1
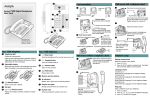
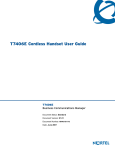
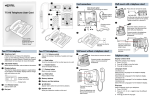
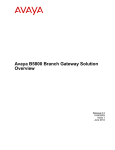
K
Avaya 7406E Digital Mobile
Handset Quick Reference Card
L
M
A
B
N
O
C
1
2 ABC
3 DEF
4 GHI
5 JKL
6 MNO
7 PQRS
8 TUV
9 WXYZ
0
#
FUNC
*
I
E
J
G
FUNC
D
F
F
1
2 ABC
3 DE
4 GHI
5 JKL
6 MN
7 PQRS
8 TUV
9W
0
Your Avaya 7406E cordless telephone
A Indicator keys
Program these keys with features for quick access to frequently
used features.
B Release key
Cancels an active call.
C Feature keys
Starts or cancels a feature.
D Volume controls
E Function button
Use to access programming mode and to mute a call.
F Headset port
G Belt clip notch
H Battery pack
I
Key pad
J Microphone
K Indicator light
Flashes to indicate that a call is on hold.
L Display
Shows call information, handset status icons (battery status), and
guides you through features and options menus.
M Softkeys
The labels for softkeys appear in the third line of the display. Softkey
functions change with each menu, option, or feature.
N Handsfree/speakerphone
O Hold
Places a call on hold.
H
#
Installing and Charging the battery pack
for the first time
Note: You must charge the battery pack fully before you use your
Avaya 7406E Digital Mobile Handset for the first time. It is
recommended that for the first two charging cycles you completely
drain the charge on the battery before you place the handset back
on the charger stand.
1. Plug the charging cradle
into the power source using
the AC power cord.
2. Use your thumb to slide
the battery compartment
cover down and off the back
of the handset.
3. Position the battery pack
in the bottom position inside
the battery compartment.
4. Firmly press the top of the
battery pack into place.
5. Replace the battery
compartment cover.
6. Place the handset in the
cradle to charge the battery.
7. Allow the battery pack to
charge for a minimum of
three hours.
FUNC
*
O
XYZ
F
1
2 ABC
3 DE
4 GHI
5 JKL
6 MNO
7 PQRS
8 TUV
9 WXY
*
0
Z
#
Telephone set up
Making and answering calls
Setting the ring type
There are many ways to place or answer a call depending on how
you program the indicator keys and the type of call you want to
make.
1. Press the Func key.
2. Scroll to the Ring Type menu.
3. Press Select.
4. Scroll to one of the eight ring types.
5. Press Select.
Using the volume control
1. Use the volume buttons located on the left-hand side of the
handset to raise or lower the hearing volume of the handset.
Indicator keys
You can program indicator keys to be line or memory keys. Indicator
keys can store internal or external numbers, or features, to give you
one-touch dialing or feature activation.
Indicator keys label
Write the indicator keys assignments on the handset card for easy
reference of programmed keys. Refer to the device configuration
guide for your system for procedures on how to use the Desktop Pro
Assistant application for creating key pad labels.
1. Remove the plastic protector and
paper card from the handset.
2. Write the key assignment beside
each key.
3. Replace the card and protector
back on the handset.
Programming indicator keys
You can program an indicator key with an internal or external
number, or a feature code.
Programming external autodial
1. Press the Feature key.
2. Enter *1 using the telephone key pad.
3. Press an indicator key.
4. Dial the external number.
5. Select OK to store the number.
Programming internal autodial
1. Press the Feature key.
2. Enter *2 using the telephone key pad.
3. Press an indicator key.
4. Dial the internal extension.
5. Select OK to store the number.
Programming a feature
1. Press the Feature key.
2. Enter *3 using the key pad.
3. Press an indicator key.
4. Select Feature.
5. Enter the feature code.
6. Select OK to store the feature code.
Erasing a programmed indicator keys
1. Press the Feature key.
2. Enter *1 using the key pad.
3. Press an indicator key.
4. Select OK to erase the indicator key.
Making a call using a line key
1. Pick up the handset.
2. Press an indicator key that is programmed as a line key.
3. Use the key pad to dial the external number or the internal
extension.
Making a call using the handsfree/speakerphone
key
1. Pick up the handset.
2. Press the Handsfree/Speakerphone key.
3. Use the key pad to dial the external number or the internal
extension.
Answering a call
1. Lift the handset.
2. Press an indicator key that is programmed as a line key or
press the Func key.
3. To end a call, press the Release key.
Answering a call using the
handsfree/speakerphone key
1. Lift the handset.
2. Press the Handsfree/Speakerphone key.
3. To end a call, press the Release key.
Putting a call on hold
1. While a call is active, press the Hold key.
2. To return to the call, press the flashing indicator key to take the
call off hold.
Making and answering calls (continued)
Using handsfree/speakerphone
1. Press a line key to make or answer a call.
2. To switch the call to handsfree during an active call, press the
Handsfree/ Speakerphone key.
3. To return the call to handset mode during a call, press the
Handsfree/Speakerphone key again.
Using a headset
1. Press a line key to make or answer a call.
2. To switch the call to the headset during a call while using the
handset, plug the headset into the headset jack.
3. To return the call to handset mode during a call, unplug the
headset.
Handset asleep mode
When the handset is idle for one minute, the Sleeping …
message appears on the LCD
Accessories
You can attach a belt clip to the handset by gently snapping the
belt clip into the notches on either side of the handset.
Refer to Avaya 7406E Digital Mobile Handset User Guide
(NN40110-110) at www.avaya.com for more detailed instructions
on how to use the handset features.
NN40110-109 02.02
N0224905
Standard
© 2010 Avaya Inc
All Rights Reserved
May 2010