1
BCM Rls 6.0
Professional Call Recording
Task Based Guide
Professional Call Recording
Copyright © 2010 Avaya Inc.
All Rights Reserved.
Notices
While reasonable efforts have been made to ensure that the information in this document is complete and accurate
at the time of printing, Avaya assumes no liability for any errors. Avaya reserves the right to make changes and
corrections to the information in this document without the obligation to notify any person or organization of such
changes.
Documentation disclaimer
Avaya shall not be responsible for any modifications, additions, or deletions to the original published version of
this documentation unless such modifications, additions, or deletions were performed by Avaya. End User agree to
indemnify and hold harmless Avaya, Avaya’s agents, servants and employees against all claims, lawsuits, demands
and judgments arising out of, or in connection with, subsequent modifications, additions or deletions to this
documentation, to the extent made by End User.
Link disclaimer
Avaya is not responsible for the contents or reliability of any linked Web sites referenced within this site or
documentation(s) provided by Avaya. Avaya is not responsible for the accuracy of any information, statement or
content provided on these sites and does not necessarily endorse the products, services, or information described or
offered within them. Avaya does not guarantee that these links will work all the time and has no control over the
availability of the linked pages.
Warranty
Avaya provides a limited warranty on this product. Refer to your sales agreement to establish the terms of the
limited warranty. In addition, Avaya’s standard warranty language, as well as information regarding support for
this product, while under warranty, is available to Avaya customers and other parties through the Avaya Support
Web site: http://www.avaya.com/support
Please note that if you acquired the product from an authorized reseller, the warranty is provided to you by said
reseller and not by Avaya.
Licenses
THE SOFTWARE LICENSE TERMS AVAILABLE ON THE AVAYA WEBSITE,
HTTP://SUPPORT.AVAYA.COM/LICENSEINFO/ ARE APPLICABLE TO ANYONE WHO DOWNLOADS,
USES AND/OR INSTALLS AVAYA SOFTWARE, PURCHASED FROM AVAYA INC., ANY AVAYA
AFFILIATE, OR AN AUTHORIZED AVAYA RESELLER (AS APPLICABLE) UNDER A COMMERCIAL
AGREEMENT WITH AVAYA OR AN AUTHORIZED AVAYA RESELLER. UNLESS OTHERWISE
AGREED TO BY AVAYA IN WRITING, AVAYA DOES NOT EXTEND THIS LICENSE IF THE
SOFTWARE WAS OBTAINED FROM ANYONE OTHER THAN AVAYA, AN AVAYA AFFILIATE OR AN
AVAYA AUTHORIZED RESELLER, AND AVAYA RESERVES THE RIGHT TO TAKE LEGAL ACTION
AGAINST YOU AND ANYONE ELSE USING OR SELLING THE SOFTWARE WITHOUT A LICENSE. BY
INSTALLING, DOWNLOADING OR USING THE SOFTWARE, OR AUTHORIZING OTHERS TO DO SO,
YOU, ON BEHALF OF YOURSELF AND THE ENTITY FOR WHOM YOU ARE INSTALLING,
DOWNLOADING OR USING THE SOFTWARE (HEREINAFTER REFERRED TO INTERCHANGEABLY
AS "YOU" AND "END USER"), AGREE TO THESE TERMS AND CONDITIONS AND CREATE A
BINDING CONTRACT BETWEEN YOU AND AVAYA INC. OR THE APPLICABLE AVAYA AFFILIATE
("AVAYA").
Copyright
Except where expressly stated otherwise, no use should be made of the Documentation(s) and Product(s) provided
by Avaya. All content in this documentation(s) and the product(s) provided by Avaya including the selection,
arrangement and design of the content is owned either by Avaya or its licensors and is protected by copyright and
other intellectual property laws including the sui generis rights relating to the protection of databases. You may not
modify, copy, reproduce, republish, upload, post, transmit or distribute in any way any content, in whole or in part,
including any code and software. Unauthorized reproduction, transmission, dissemination, storage, and or use
without the express written consent of Avaya can be a criminal, as well as a civil offense under the applicable law.
Third Party Components
Certain software programs or portions thereof included in the Product may contain software distributed under third
party agreements ("Third Party Components"), which may contain terms that expand or limit rights to use certain
portions of the Product ("Third Party Terms"). Information regarding distributed Linux OS source code (for those
Products that have distributed the Linux OS source code), and identifying the copyright holders of the Third Party
Components and the Third Party Terms that apply to them is available on the Avaya Support Web site:
http://support.avaya.com/Copyright.
Trademarks
The trademarks, logos and service marks ("Marks") displayed in this site, the documentation(s) and product(s)
provided by Avaya are the registered or unregistered Marks of Avaya, its affiliates, or other third parties. Users
are not permitted to use such Marks without prior written consent from Avaya or such third party which may own
the Mark. Nothing contained in this site, the documentation(s) and product(s) should be construed as granting, by
implication, estoppel, or otherwise, any license or right in and to the Marks without the express written permission
of Avaya or the applicable third party. Avaya is a registered trademark of Avaya Inc. All non-Avaya trademarks
are the property of their respective owners.
2
NN40011-053 Issue 1.2 BCM Rls 6.0
Professional Call Recording
Downloading documents
For the most current versions of documentation, see the Avaya Support. Web site: http://www.avaya.com/support
Contact Avaya Support
Avaya provides a telephone number for you to use to report problems or to ask questions about your product. The
support telephone number is 1-800-242-2121 in the United States. For additional support telephone numbers, see
the Avaya Web site: http://www.avaya.com/support
Copyright © 2010 ITEL, All Rights Reserved
The copyright in the material belongs to ITEL and no part of the material may
be reproduced in any form without the prior written permission of a duly
authorised representative of ITEL.
NN40011-053 Issue 1.2 BCM Rls 6.0
3
Professional Call Recording
Table of Contents
Professional Call Recording ............................................ 5
Overview .......................................................................................... 5
Requirements.....................................................................................................5
Flowchart ......................................................................................... 6
Accessing Element Manager ........................................................... 7
Accessing Professional Call Recording Configuration ..................... 7
Sending Recordings to an Email Account ...................................... 11
Sending Recordings to a Computer ............................................... 17
Setting up Manual Call Recording for a DN ................................... 20
Manual Call Recording Scenario .....................................................................20
Service Limitations ......................................................................... 24
Avaya Documentation Links .......................................... 25
4
NN40011-053 Issue 1.2 BCM Rls 6.0
Professional Call Recording
Professional Call Recording
Overview
Professional call recording offers an automated call recording solution based
upon the DN, and can include forwarded or transferred calls. The application
can capture calls to different locations such as an Email account or networked
computer. This requires a 3rd party application that is capable of capturing the
audio data and storing it. Although the 3rd party application is currently unavailable at the time of writing, a developer partner interface can be found at
www.avaya.com. Calls can be manually recorded by the use of a feature code
(F995), or set to automatically record. Professional Call Recording supports:
2-party calls – (either internal to internal, or internal to external calls).
Ad-hoc or multi party conference calls.
Meet-Me conference calls.
DISA and Auto DN calls.
Supports FAX recording.
Call tracking information is always captured during the recording process, this
information can include:
DN of the caller.
DN of the person being called.
Time of the call (with time zone information).
Length of the recording.
Line being used in the call (dependant on call type).
Number of participants (if it is a conference call).
Entry and exit times of conference participants.
Call tagging events and time.
Requirements
A minimum of one Professional Call Recording keycode must be
purchased to enable this feature.
You must have Administrator rights to configure the service through
BCM Element Manager.
Maximum Number of Concurrent Call Recordings per platform
BCM50
BCM450 (without a Capacity Expansion Card installed)
BCM450 (with a Capacity Expansion Card installed)
NN40011-053 Issue 1.2 BCM Rls 6.0
16
40
80
5
Professional Call Recording
Flowchart
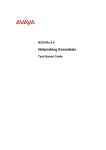
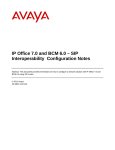
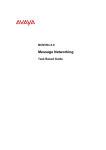
Use the following flowchart to setup and configure the Professional Call
Recording feature:
Access BCM Element Manager: Refer to the
Accessing Element Manager section of this
guide
Access the Professional Call Recording screen:
Refer to the Accessing the Professional Call
Recording Screen section of this guide
Automatically record
calls to an Email
account?: Refer to the
Sending Recordings
to an Email Account
section of this guide
6
Set
up
manual
recording for calls?:
Refer to the Setting
up Manual Call
Recording for a DN
section of this guide
Automatically stream
recorded calls to a PC
or Server?: Refer to
the
Sending
Recordings
to
a
Computer section of
this guide
NN40011-053 Issue 1.2 BCM Rls 6.0
Professional Call Recording
Accessing Element Manager
The setup and configuration of the Professional Call Recording feature is
performed through BCM Element Manager. To access this application, follow
the steps below.
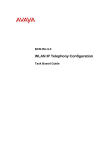
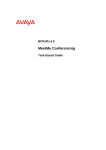
1. To access the Business Element Manager application from the Start
Menu,
navigate
to
Start,
Programs,
Avaya,
Business
Communications Manager, Business Element Manager.
2. Alternatively, double-click on the Business Element Manager desktop
icon.
NN40011-053 Issue 1.2 BCM Rls 6.0
7
Professional Call Recording
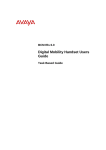
3. You will be presented with the Element Manager interface.
4. Open the Network Elements folder and select the IP Address of the
BCM.
5. Enter the User Name of the BCM in the User Name field, by default this
is nnadmin. Then enter the Password in the Password field, by default
the password is PlsChgMe!. Click the Connect button.
8
NN40011-053 Issue 1.2 BCM Rls 6.0
Professional Call Recording
6. A warning screen will appear, read the warning and click OK.
7. You will be presented with the Element Manager interface.
NN40011-053 Issue 1.2 BCM Rls 6.0
9
Professional Call Recording
Accessing Professional Call Recording Configuration
Once Element Manager is open, you can access the Professional Call
Recording screen by:
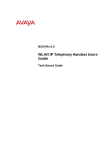
1. Clicking on the Telephony menu.
2. Then, click on Call Recording.
This page would contain any Email server details that you may wish to send
recordings to, along with the configuration settings for the service.
10
NN40011-053 Issue 1.2 BCM Rls 6.0
Professional Call Recording
Sending Recordings to an Email Account
To send any recorded calls to an Email account, you must first add the email
server details into the Email Settings page within Element Manager. To do
this, follow the steps below:
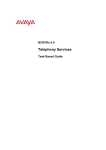
1. Click on the Administrator Access menu.
2. Next, click on the Email Settings option.
NN40011-053 Issue 1.2 BCM Rls 6.0
11
Professional Call Recording
3. Click the Add button to create a new entry.
4. Fill in the following Email server details.
Attribute
Description
SMTP Server
Enter your Email servers domain name
or IP address
(Default 25) enter the port number to use
Enter the Email address to use
Enter any CC Email address required
This is populated by default but can be
changed if required
Select this option to use Transport Layer
Security
Select if your email account/server
requires log on credentials (this will
create new fields for you to fill out with
the relevant details)
SMTP Port
To address
CC address
From address
Use encryption (TLS)
SMTP authentication
12
NN40011-053 Issue 1.2 BCM Rls 6.0
Professional Call Recording
5. Click OK to store the settings.
6. Your new entry will appear in the Alarm Email Accounts box.
7. Next, go to the Telephony menu.
NN40011-053 Issue 1.2 BCM Rls 6.0
13
Professional Call Recording
8. Click on the Call Recording option.
9. Before enabling the server entry, click on the Add button under the
Professional Call Recording Configuration box.
14
NN40011-053 Issue 1.2 BCM Rls 6.0
Professional Call Recording
10. Now add all relevant details to the new Recording Rule entry.
Note: As a minimum requirement you must enter a DN number and Email
address to send the recordings to (if selecting Email as your preferred
requirement).
Add Recording Rule options
Attribute
DN
Call option
Where to send recording
Computer (IP,port) or Email address
Don’t include key presses
Manual stop record behaviour
Follow call logic
Call tracking only
NN40011-053 Issue 1.2 BCM Rls 6.0
Description
Enter the DN of the set to be recorded, or the
Meet-Me chairperson DN
Select from:
Incoming calls – Any call received
Outgoing calls – Any calls made by the set
All calls – Any inbound or outbound calls/
conference calls
Conference calls – Any conference calls
External calls – Any external calls taken
Internal calls – Internal calls received only
Manual – Call recording is started by the user
pressing Feature 995
Select Email to send recordings to an Email
address as WAV files
Enter the full Email address
If ticked this will exclude any key press sounds
made during the call
Select from:
Disabled – Select to disable the manual stop
feature (F996)
Abort recording – Select to stop the current
recording and send the portion recorded
Stop and keep recording – Select to stop and
discard the current recording
Select from:
Disabled – Record the initial call only
Follow call forwarded only – Record the initial call
and any forwarded action
Follow call – Record the entire call even if
forwarded or transferred
Tick to only receive the call tracking information
(no audio)
15
Professional Call Recording
Attribute
Description
Enable and disable rule through F998
Tick to enable or disable the feature code used to
turn on/off automatic call recording through a set
Tick to enable the configuration settings to
immediately take effect
Tick this box to allow the system to monitor any
auto-answer lines (Note: when this feature is
enabled the specific DN is ignored)
Rule enabled
Monitor auto answer lines
11. Once your details have been entered, click on OK to save the settings.
12. Finally, Enable (tick) the entry under the Professional Call Recording
Email Servers box.
13. This rule means that any calls recorded for the DN you have entered
will be sent to your specified email address.
16
NN40011-053 Issue 1.2 BCM Rls 6.0
Professional Call Recording
Sending Recordings to a Computer
Call recordings can also be sent to a networked computer or server via RTP
(Real Time Transport) streaming protocol. This option is reliant on you having
an application running on the PC/server that can process the incoming
information.
Configuration of these applications will not be covered in this guide, and any
configuration assistance should be sought from the software vendor. This
section will cover all steps necessary to configure the Professional Call
Recording application to output any call recordings made to a specified
(networked) PC or server.
Note: As previously mentioned, this requires a 3rd party application that is
capable of capturing the audio data and storing it. Although the 3rd party
application is currently un-available at the time of writing, a developer partner
interface can be found at www.avaya.com
1. As previously covered, first click on the Telephony menu.
NN40011-053 Issue 1.2 BCM Rls 6.0
17
Professional Call Recording
2. Click on the Call Recording option.
3. Click on the Add button under the Professional Call Recording
Configuration box.
18
NN40011-053 Issue 1.2 BCM Rls 6.0
Professional Call Recording
4. Now add all relevant details to the new Recording Rule entry.
Note: As a minimum requirement you must enter a DN number, IP address,
port and change the ‘Where to send recording’ option to computer (if selecting
this as your preferred requirement).
Add Recording Rule options
Attribute
DN
Call option
Where to send recording
Computer (IP,port) or Email address
Don’t include key presses
Manual stop record behaviour
Follow call logic
NN40011-053 Issue 1.2 BCM Rls 6.0
Description
Enter the DN of the set to be recorded, or the
Meet-Me chairperson DN
Select from:
Incoming calls – Any call received
Outgoing calls – Any calls made by the set
All calls – Any inbound or outbound calls/
conference calls
Conference calls – Any conference calls
External calls – Any external calls taken
Internal calls – Internal calls received only
Manual – Call recording is started by the user
pressing Feature 995
Select Computer to send/ stream recordings to
a networked computer or server
Enter the networked computer details (IP address
and Port number) for example 200.4.4.55,16384
If ticked this will exclude any key press sounds
made during the call
Select from:
Disabled – Select to disable the manual stop
feature (F996)
Abort recording – Select to stop the current
recording and send the portion recorded
Stop and keep recording – Select to stop and
discard the current recording
Select from:
Disabled – Record the initial call only
Follow call forwarded only – Record the initial call
and any forwarded action
Follow call – Record the entire call even if
forwarded or transferred
19
Professional Call Recording
Call tracking only
Enable and disable rule through F998
Rule enabled
Monitor auto answer lines
Tick to only receive the call tracking information
(no audio)
Tick to enable or disable the feature code used to
turn on/off automatic call recording through a set
Tick to enable the configuration settings to
immediately take effect
Tick this box to allow the system to monitor any
auto-answer lines (Note: when this feature is
enabled the specific DN is ignored)
5. Once your details have been entered, click on OK to save the settings.
6. This rule enables all recorded calls to be streamed to your selected PC
or server.
Setting up Manual Call Recording for a DN
Manual call recording can also be setup should you not wish to record calls
automatically. This may be particularly useful if storage space is limited.
Manual recording is managed through the following feature codes:
Start Professional Call Recording F995.
Stop Professional Call Recording F996.
Add a time marker to the call F997.
Enable/Disable automatic call recording F998.
Manual Call Recording Scenario
Manual call recording is performed by the user on the DN set by using the
specified feature codes. A simple scenario would be:
a) A call is taken on DN 225.
b) The user wishes to record the call and presses F995 on the keypad
of the set to trigger the Professional Call Recording feature.
c) Once the call ends the user presses F996 to stop the recording.
d) Depending on the setup, an email will now be generated from the
BCM with the call attached as an audio file (WAV) and sent to the
specified address.
Or
e) The call is streamed to the relevant application running on your
specified (networked) PC or server.
20
NN40011-053 Issue 1.2 BCM Rls 6.0
Professional Call Recording
1. As previously covered, first click on the Telephony menu.
2. Click on the Call Recording option.
NN40011-053 Issue 1.2 BCM Rls 6.0
21
Professional Call Recording
3. Click on the Add button under the Professional Call Recording
Configuration box.
4. Now add all relevant details to the new Recording Rule entry.
Note: As a minimum requirement you must enter a DN number, Change the
‘Call option’ to Manual and enter a destination Email address or networked
computer IP address and port for this rule.
22
NN40011-053 Issue 1.2 BCM Rls 6.0
Professional Call Recording
Add Recording Rule options
Attribute
DN
Call option
Where to send recording
Computer (IP,port) or Email address
Don’t include key presses
Manual stop record behaviour
Follow call logic
Call tracking only
Enable and disable rule through F998
Rule enabled
Monitor auto answer lines
Description
Enter the DN of the set to be recorded, or the
Meet-Me chairperson DN
Select Manual through F995– Call recording is
controlled by the user utilising the relevant
feature codes
Select either Computer or Email
Enter the networked computer details (IP address
and Port number) for example 200.4.4.55,16384
or the relevant Email address
If ticked this will exclude any key press sounds
made during the call
Select from:
Disabled – Select to disable the manual stop
feature (F996)
Abort recording – Select to stop the current
recording and send the portion recorded
Stop and keep recording – Select to stop and
discard the current recording
Select from:
Disabled – Record the initial call only
Follow call forwarded only – Record the initial call
and any forwarded action
Follow call – Record the entire call even if
forwarded or transferred
Tick to only receive the call tracking information
(no audio)
Tick to enable or disable the feature code used to
turn on/off automatic call recording through a set
Tick to enable the configuration settings to
immediately take effect
Tick this box to allow the system to monitor any
auto-answer lines (Note: when this feature is
enabled the specific DN is ignored)
5. Once your details have been entered, click on OK to save the settings.
6. The set owner will now be able to manually record calls to your
specified location.
Note: If you have opted to send your recordings to an email address, you
must still set the Email server up in the Email Settings section of Element
Manager (see the Sending Recordings to an Email Account section of this
guide for more information).
Note: If you have opted to send your recordings to a networked PC or server,
you must have an application configured and running that can receive the
incoming information.
NN40011-053 Issue 1.2 BCM Rls 6.0
23
Professional Call Recording
Service Limitations
24
You require reliable network connectivity to the storage media.
Mail servers should be configured to handle large messages; call
recordings can use approximately 480Kb of storage space per minute
of audio recorded. Professional Call Recording will not limit the email
size or store recordings for later retrieval, in this instance the email may
be lost or not forwarded by the email server. Professional Call
Recording will also not store the recording for later recovery in case the
email is not forwarded by the email server.
The professional call recording will be terminated if the BCM no longer
has visibility of the call due to trunk optimizations.
When recording IP set to IP set, or IP set to IP trunk calls, should the
recording output be transmitted through an email (and the codec is not
G.711) - only the call details are provided in the email.
Avaya does not provide the legal notification of the recording over
DISA/ AUTO DN.
This feature does not support silence suppression.
Manual recording through feature invocation from analog sets is not
supported.
Recording of HUNT group DNs or skill set DNs are not supported.
Recording of trunk-to-trunk tandem calls that do not originally terminate
on a DN is not supported.
Professional Call Recording will not record Find Me/Follow Me calls
that have been answered on an external telephone number; unless a
recording rule is set up on the trunk line that this call is using.
Professional Call Recording will not track calls that are handed off
when using the Find Me/Follow Me feature.
NN40011-053 Issue 1.2 BCM Rls 6.0
Professional Call Recording
Avaya Documentation Links
Configuration - Telephony
NN40011-053 Issue 1.2 BCM Rls 6.0
25
Professional Call Recording
26
NN40011-053 Issue 1.2 BCM Rls 6.0