1
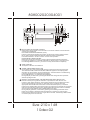
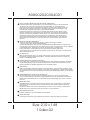
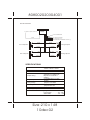
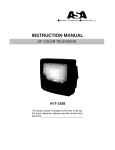
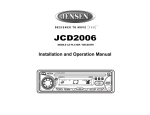
808002020304001
Electronically-Tuned
AM/FM/MPX Radio
With CD Player
Model VR202
Size:210 x 148
10dec02
808002020304001
ON-OFF SWITCH/VOLUME CONTROL
Rotate this knob clockwise to turn the radio on. Continue rotation until the desired
volume level is obtained.
LEFT/RIGHT BALANCE CONTROL (PULL)
Pull the volume knob outward until it locks into the outer position. Rotate it to the
left or right to obtain the desired balance between left and right speakers.
Push the knob back in to return it to the volume control position.
FRONT/REAR FADER CONTROL
Rotate the outer knob to the left or right to obtain the desired balance between
front and rear speakers in 4 speaker installations. When used in conjunction with
the Left/Right Balance Control, you have full 4-way stereo balance capability.
TONE CONTROL
To adjust this Knob for tone balance.
TUNER (AM/FM BAND) SELECTOR
During radio play, each time the BND button is pressed, the radio band changes.
The indications FM1, FM2 and FM3, AM1, AM2 will appear on the display panel
according to your selection. During FM operation, when the station is broadcasting
in stereo, the stereo icon appears on the display.
During AM operation, no indications are displayed.
During CD play or AUX mode, pressing this button will change to radio operation
without ejecting the disc.
MANUAL UP/DOWN TUNING, STATION SEEK AND TRACK SELECTION
Each time the Up Tuning side of the button is pressed, the radio will tune one
frequency step higher. Similarly, each press of the Down Tuning side of the button
will tune one frequency step lower. To manually tune in a station, press the
appropriate directional side of the button until the desired frequency is reached.
Pressing and holding either side of the button for longer than 2 seconds will cause the
radio to continue tuning rapidly in the selected direction until the button is released,
at which point it will seek the next available station and stop.
During CD play operation, momentarily pressing and releasing either side of the
button will increase or decrease CD track selection in sequence. Pressing and
holding either side of the button for longer than 2 seconds, will will begin fast forward
or reverse play of the current track.
Size:210 x 148
10dec02
808002020304001
AUTO-STORE TUNING (AS) PRE-SET SCAN TUNING (PS)
Press the A/PS button momentarily to scan the 6 stations in the pre-set memories of
the band in use. The unit will stop at each pre-set station for 5 seconds before
continuing to the next pre-set station (the channel number on the display panel will
flash during Pre-Set Scan operation). Press the button again momentarily to stop
Pre-Set Scan operation and remain on the selected station.
Pressing the button for longer than 2 seconds will activate the Auto-Store Tuning
feature. The radio will automatically scan the band in use and enter strong stations
into the pre-set memory positions for that band. If you have already set the pre-set
memories of that band to your favorite stations, activating the Auto-Store Tuning
feature will erase those stations and enter the new strong stations. This feature is
most useful when traveling in a new area where you are not familiar with the local
stations.
STATION PRE-SET MEMORIES
To set any of the 6 pre-set memory buttons, use the following procedure:
1.Turn the unit on and select the desired band.
2.Select the first station to be pre-set using the Manual Up/Down Seek Tuning functions.
3.Press the pre-set button to be set and continue to hold in until the pre-set number appears
in the display panel. The station is now set into the memory of that pre-set
button and can be re-called at anytime by momentarily pressing that button.
4.Repeat the above procedure for the remaining 5 pre-sets on the band in use and for the
other 4 bands of the unit.
CD DISC SLOT
With the label surface facing up, gently insert the disc into the slot until the soft-loading
mechanism engages and disc play begins. The CD IN indication and track number will
appear on the display panel.
TRACK REPEAT PLAY SELECTOR (RPT)
During disc play, press this button to repeat the play of the selected track (RPT will appear
on the display panel). Play of the track will continue to repeat until the button is pressed
again and the RPT indication disappears from the display panel.
DISC EJECT
Disc play is stopped; the disc is ejected. The unit will then change to radio operation. If the
disc is not removed from the unit within 10 seconds of being ejected, it will be automatically
re-loaded into the unit to prevent damage to the CD.(CD IN will appear steady on the display
panel).
TIME/FREQUENCY DISPLAY SELECTOR (T/F)
A momentary press of the T/F button will display the time of the incorporated quartz
clock. The time display will persist for approximately 5 seconds, after which the frequency
display will automatically return, unless the button is pressed again prior to the 5-second
time-out.
RESET BUTTON
A RESET button is located on the front of the chassis. The re-set circuitry is provided to
protect the microprocessor circuitry and should only be activated under the following
circumstance:
If there is a malfunction of and of the switches on the unit or the CD player, pressing the
RESET button may clear the system and return to normal operation.
MOD (MODE) BUTTON
Press this button to cycle from Radio-CD-Aux-Radio.
START BUTTON
Pressing this button during CD play will set the unit to play from beginning of track 1.
Size:210 x 148
10dec02
808002020304001
SCAN BUTTON
To "Intro" each song on the disc for 10 seconds, press the " INTRO" button. INT will appear
in the display area. To turn off this feature, press the " Intro" button again. The indicator in the
display will be off.
RDM BUTTON
To play the songs on the disc in a random order (other than the original recorded order), press
the " RANDOM" button. To turn off this feature, press the " RANDOM" button again. The
indicator RDM in the display will be off.
SETTING THE CLOCK
1.Switch the vehicle ignition on and turn on the radio.
2.Press and hold the T/F button.
3.Press the Down Tuning button to adjust the hours and the AM/PM indication, and the Up
Tuning button to adjust the minutes to the correct time.
4.When the correct time is shown on the display panel, release the T/F button and the time is
displayed steadily; then wait 5 seconds for the display to return to the normal indication.
Size:210 x 148
10dec02
808002020304001
WIRING DIAGRAM
VR202
To optional power Antenna
9 -PIN CONNECTOR
GREEN/WHT TO 12VDC(+) Battery
ORG/WHT
TO 12VDC(+) ACC
BLACK/WHT TO GROUND (CHASSIS OR 12 VDC(-))
PINK
WHITE
BLUE
Front Left Speaker
Front Right Speaker
VIOLET
RED
LT GREEN
YELLOW
Rear Left Speaker
Rear Right Speaker
VIOLET
LT GREEN
SPECIFICATIONS
Size:
Operating Voltage:
Output Power:
Output Wiring:
Output Impedance:
Tuning Range:
Sensitivity:
FM Stereo Separation:
Frequency Response:
7"(W) x 2" (H) x 6 1/8"(D)
178mm x 50mm x 156mm
12VDC, Negative Ground
50 Watts Max. Stereo Power
Floating Ground type
designed for 4 speaker use
May also be used with 2
speaker.
Compatible with 4 or 8 ohm
speaker.
(AM) 530-1710KHz
(FM) 87.5-107.9MHz
(AM) less than 25uV
(FM) less than 5uV
More than 23 dB
50-10000Hz
Maximum allowable Mounting angle:
Front to back . . . . . . . . -10 - +30
Side to Side . . . . . . . . -10 - +10
Size:210 x 148
10dec02
808002020304001
AM AND FM RECEPTION IN A MOBILE ENVIRONMENT
Although you may be familiar with both AM and FM reception in your home. you will experience
notable differences in reception while driving your car . This page will explain why these
variances occur and how they affect the broadcast you are listening to .
Both AM and FM provide excellent listening enjoyment and supply the diversified entertainment
necessary to relieve the boredom of hours "behind the wheel" of you car FM reception although
unique in its characteristics while driving, provides a totally new sound experience unlike AM
reception. The clarity of tone, the richness of sound and the varied program content provide
hours of uninterrupted listening enjoyment. The few reception inconveniences common to FM are
compensated by the many plus features of a sound experience rivaled only by a live sound
performance
Your new AM-FM radio or radio-tape system has been built to the strictest engineering standards
available today and through quality components and construction will provide maximum perfor.
mance under all conditions . A few minutes reading this page will enable you to obtain the most
from FM reception and provide answers to your questions about the differences between AM and
FM operation while driving in your car
Some facts about AM and FM reception:
1 RECEPTION IN TUNNELS
Although you will lose AM reception when driving through tunnels and under large bridges, it is
common to continue to receive FM reception.
2 THE NUMBER OF STATIONS IN YOUR AREA
Depending upon your location you will usually find the number of AM stations in your area
outnumber the number FM stations, although the continuing popularity of FM reception has
significantly increased the number of FM stations nationwide.
3. RECEPTION DURING STORMS
Local electrical thunderstorm activity often produces sharp static sound when listening to AM
stations although you will find that FM is unaffected
4. ELECTRICAL INTERFERENCE
When listening to AM stations, you may experience some buzzing sounds or static when
passing electrical roadside power lines. Which does not interfere with FM reception,
Conversely, FM may be affected by electrical noise from passing cars or trucks while AM
reception is not.
5. FM RECEPTION RANGE
FM reception range is usually limited to 50 miles from the broadcast station. FM signals
radiate straight out from the broadcast antenna. They do not follow the earth's curve and are
not reflected back to earth by the atmosphere resulting in limited "line of sight" reception range
6. AM RECEPTION RANGE
AM stations can be received several hundred miles from the broadcast station. AM signals
follow the earth's curve and are easily reflected back to earth by the atmosphere. Therefore ,
an AM signal is easily received far from the broadcast station antenna.
FM RECEPTION WHILE YOU ARE DRIVING
Since FM signals become weaker the further you drive away from the broadcast station you
will experience flutter, noisy reception and fading in the poor signal fringe area Through the
modern circuitry in this radio, this "Fringe Area" has been greatly reduced for greater
reception area. Even with this improved circuitry eventually the FM signal will become too
weak to provide quality reception . When this occurs it is best to change to a stronger. Local
FM station
Although FM signals are not reflected by the atmosphere they are easily reflected by solid
objects. This effect of FM signals provides two totally different reception possibilities. First an
FM signal can "bounce" between tall buildings resulting in unexpected reception in many
areas.
Size:210 x 148
10dec02
808002020304001
The same effect can result in the "loss" of an FM signal if a large obstruction is located bet.
ween you and the FM antenna. if hills or buildings between you and the antenna block the
signals.It is possible to find reception very poor even when you are not far from the FM
antenna
The Mobile Electronics Company
UDIOVOX
PECIALIZED
PPLICATIONS, L.L.C.
For a list of electronics products specifically designed for
The mobile environment, please visit us on the web
at: www.asaelectronics.com.
Made in China
Size:210 x 148
10dec02
90 DAY/12 MONTH LIMITED WARRANTY
AUDIOVOX SPECIALIZED APPLICATION, LLC (the company) warrants to the
original retail purchaser of this product that should this product or any part
thereof, under normal use and conditions , be proven defective in material or
workmanship within 90 days from the date of original purchase, such defect(s)
will be repaired or replaced (at the company's option) without charge for parts
and repair labor. After the initial 90 day period and for a period of 12 months from
the date of original purchase,the Company will supply at no charge a
replacement for any defective part(s), but will charge for the labor to repair the
product.
To obtain repair or replacement within the terms of this warranty, the product is to
be delivered with proof of warranty coverage (e.g.:dated bill of sale),
specification of defect(s), transportation prepaid, to an approved warranty
station, or the Company at the address shown below.
This warranty does not extend to the elimination of externally generated static or
noise, to the correction of antenna problems, to costs incurred for removal or
reinstallation of the product, or to damage to any tapes, speakers, accessories,
or electrical systems.
This warranty does not apply to any product or part thereof which , in the opinion
of the company , has been damaged through alteration, improper installation,
mishandling ,misuse, neglect, or accident, THE EXTENT OF THE COMPANY'S
LIABILITY UNDER THIS WARRANTY IS LIMITED TO THE REPAIR OR
REPLACEMENT PROVIDED ABOVE, AND , IN NO EVENT, SHALL THE
COMPANY'S LIABILITY EXCEED THE PURCHASE PRICE PAID BY THE
PURCHASER FOR THE PRODUCT.
This warranty is in lieu of all other express warranties or liabilities. ANY IMPLIED
WARRANTIES, INCLUDING ANY IMPLIED WARRANTY OF
MERCHANTABILITY, SHALL BE LIMITED TO THE DURATION OF THIS
WARRANTY. ANY ACTION FOR BREECH OF ANY WARRANTY HEREUNDER
INCLUDING ANY IMPLIED WARRANTY OF MERCHANTABILITY MUST BE
BROUGHT WITHIN A PERIOD OF 30 DAYS FROM THE DATE OF ORIGINAL
PURCHASE. IN NO CASE SHALL THE COMPANY BE LIABLE FOR ANY
CONSEQUENTIAL OR INCIDENTAL DAMAGES FOR BREECH OF THIS OR
ANY OTHER WARRANTY, EXPRESS OR IMPLIED, WHATSOEVER. No person
or representative is authorized to assume for the company any liability other that
expressed herein in connection with the sale of this product.