1
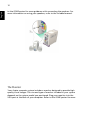
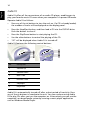
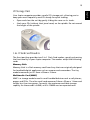
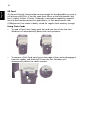
Copyright
Acer and the Acer logo are registered trademarks and Aspire is a trademark of Acer Inc. and Acer
America Corporation.
Microsoft Windows and the Windows Logo are registered trademarks of Microsoft Corporation. Intel
and Pentium are registered trademarks of Intel Corp. All other brands/product names are trademarks
or registered trademarks of their respective companies.
© 2002 by Acer Incorporated. All rights reserved.
First printing: November 2002
iii
Table
of Contents
Welcome
Major Benefits
Before You Start
Safety Instructions
Setting Up The System
Placement Tips
System Overview
Computer Front View
Computer Rear View
System Components
System Components
The Mouse
The Keyboard
The Speakers
The Monitor
Audio DJ
CD Storage Unit
3-in-1 Flash Card Readers
TV Tuner (Optional)
Upgrading Your System
Opening The Case
Installing New Components
Questions & Troubleshooting
General System Problems
Cordless Keyboard/Mouse Problems
v
v
vi
vi
vii
vii
1
1
3
5
6
6
8
11
12
14
15
15
17
19
19
21
23
23
25
iv
v
Congratulations on purchasing your new Aspire computer! You now have
the convenience and flexibility of a full-featured multimedia PC, offering
increased productivity combined with first class digital entertainment.
Incorporating the latest Microsoft® Windows® XP operating system, your
Aspire offers a host of functions designed to improve your computing
experience.
Major Benefits
Your new Aspire computer enables you to do the following:
•
Use the latest productivity software to perform a range of office tasks,
such as word processing, working with financial spreadsheets and
creating presentations.
•
Maximize your use of the Internet by downloading and playing exciting
new multimedia files.
•
Enjoy your audio CDs, even when you are not using your computer for
other tasks.
•
Delight in using a stylish new PC that offers convenient connections for
the latest peripherals.
English
Welcome
English
vi
Before You Start
To ensure that you can use your computer safely and correctly, please read
this user guide carefully before you start. For future reference, keep this user
guide handy at all times.
Safety Instructions
•
Follow all warnings and instructions marked on your computer.
•
Do not attempt to service your computer yourself. Refer servicing to
qualified personnel.
•
Unplug your computer and monitor from the wall outlet before cleaning
or before opening the case.
•
Clean your computer case and monitor with a damp cloth. Do not use
liquid or aerosol cleaners.
•
Do not use your computer near water. Never spill liquid of any kind on
your computer.
•
Do not place your computer on an unstable surface.
•
Do not expose your computer to a heat source or leave it in direct
sunlight for a prolonged period of time.
•
Do not cover or block any ventilation slots in the case. Also, ensure the
room has adequate ventilation.
•
Never push objects of any kind into your computer.
•
Do not allow anything to rest on the power cord. Do not locate your
computer where anyone will walk on the power cord.
•
Your computer should be operated from the type of power indicated on
the marking label. If you are unsure of the type of power available,
consult your dealer or local power company.
•
Your computer is designed for connection to a grounded (earthed)
outlet. Do not disable this important safety feature.
•
If a power strip is used, make sure that the total ampere rating of the
equipment does not exceed the power strip ampere rating. Use a power
strip with surge protection.
•
If your computer causes interference to radio or television reception, try
one or more of the following measures:
Reorient or relocate the radio or television antenna.
Increase the distance between your computer and the radio or
television receiver.
Connect your computer into an outlet on a circuit different from
vii
that to which the radio or television is connected.
Consult your dealer or an experienced radio/TV technician for more
help.
Setting Up The System
It only takes a few minutes to set up your new Aspire system. Start by
preparing your workspace. Make sure that the surface is stable, level and
clean.
Open the box carefully, ensuring that you do not damage the box or any of
the other packing materials. The box will be required if you ever have to
store or ship your computer. Unpack the box and set out the contents on
your work surface.
The package contains an Out Of Box Experience (OOBE) poster. Refer to the
OOBE poster for a step-by-step guide to setting up your computer system.
Placement Tips
•
For maximum viewing comfort, set up your monitor at arm’s length from
your seat, with the top third of the screen at eye level. Tilt and swivel the
display to find the optimum position.
•
Place your mouse and keyboard side by side in front of the monitor.
Check that you are able to adopt a comfortable typing position.
•
Choose a chair that can be adjusted for maximum comfort.
•
Make sure your work area is well lit.
English
-
English
viii
1
Take a few moments to study your new Aspire computer system. Learn the
locations of the buttons, ports and other hardware features.
Computer Front View
No
Description
1
CD Storage Unit
2
Audio DJ
3
Drive Door
4
CD-ROM/DVD/CD-RW Drive
5
FDD Drive
6
Front Port Bay Door
7
Front Port Bay
8
Memory Stick Reader
9
SD/MMC Reader
10
Microphone-in Port
11
Speaker/ Headphone Port
12
USB Port
13
1394 Port
14
Power Button
15
Wireless Connect Button
English
System Overview
English
2
1
2
3
8
9
4
5
7
6
14
15
10
11
12
13
3
No.
Description
1
Power Jack
2
Voltage Selector Switch
3
Fan
4
PS/2 Keyboard Port
5
PS/2 Mouse Port
6
USB Port
7
Lan Port
8
Serial Port
9
Ventilation slot
10
Parallel Port
11
VGA Port
12
Audio Ports
13
1394 Port
14
Game Port
15
PCI Card slots
English
Computer Rear View
4
English
Aspire G500
5
•
Monitor - refer to page 12
•
Keyboard - refer to page 8
•
Mouse - refer to page 6
•
Speakers - refer to page 11
English
System Components
English
6
System Components
Your Aspire computer system is made up of several components. These
include the computer itself, the monitor, keyboard, mouse and speakers. This
section provides a brief description of the main component features.
The Mouse
The pointing device included in your Aspire computer system is an optical
mouse. Unlike a traditional mouse that requires the use of a mouse pad for
its ball system to work effectively, an optical mouse can be used on almost
any surface. This allows you to operate your mouse anywhere in the vicinity
of your computer - an important advantage on a cluttered desktop.
Your optical mouse works by continuously bouncing a small beam of light off
the surface on which it is being operated. The information from the
returning light beams is read by the mouse and transmitted to the computer.
In this way, your computer is able to calculate the precise movements of the
mouse.
Although your mouse can be used effectively on most surfaces, highly
reflective materials, such as glass or metal, can distort the light signal. If you
wish to operate your mouse on a reflective surface you should first cover the
surface with a non-reflective object, such as a book or a sheet of paper.
Two types of optical mouse are available: a standard corded mouse and a
cordless mouse. The type of mouse included in your system depends on the
system model you purchased.
Your mouse features standard controls: two buttons and a scroll wheel for
convenient navigation in documents and web pages.
For more help with operating your mouse, see the mouse configuration help
on the taskbar.
left button
right button
scroll wheel
7
Corded Mouse
Cordless Mouse
A cordless mouse provides the freedom to change your work position
without having to cope with an obstructed or tangled cord.
If your Aspire computer system includes a cordless mouse, you must allow the
mouse and computer to establish radio communication.
Before using your cordless mouse for the first time, make sure that the
batteries are correctly installed. With the computer turned on and the
Windows operating system running, move the mouse within range (not more
than 2 meters/6 feet) of the computer. Windows should detect the radio
signal and begin using the mouse. If Windows fails to detect the mouse, pls
follow below steps:
English
If your Aspire computer system includes a corded mouse, you should connect
the cord to one of the computer’s USB ports. See the OOBE poster for
guidance.
English
8
step 1: Press the connect button
on the front of the computer.
step 2: Press the connect button on the mouse.
connect button
Note: When your cordless mouse is running out of batteries, a pop-up
window will remind you to recharge it.
The Keyboard
Your Aspire computer system features a multimedia keyboard, providing
one-touch control for the most important multimedia functions, as well as
instant access to your favorite websites.
Your keyboard features a standard set of keys, including 12 function keys,
four cursor direction keys and a numeric keypad.
9
1
2
3
No.
Description
1
Suspend
2
Multimedia control
3
Programmable Keys
The programmable hot keys can be set to open any website or any
application on your computer. When you purchase your Aspire, the hot keys
will have the following default settings:
Home - opens your Internet home page.
Email - launches the email application.
Go - opens an application or website of
your choice.
Search - opens the Internet search engine.
See the iTouch configuration help
on the taskbar for help with operating
your keyboard or for guidance on reprogramming the hot keys.
Two types of multimedia keyboard are available: a standard corded
keyboard and a cordless keyboard. The type of keyboard included in your
system depends on the system model you purchased.
Corded Keyboard
English
The multimedia keys provide the following functions:
English
10
If your Aspire computer system includes a corded keyboard, you should
connect the cord to the PS/2 keyboard port at the back of the computer
before starting Windows. See the OOBE poster for guidance...
Cordless Keyboard
A cordless keyboard allows greater freedom of movement. This means you
can easily reposition your keyboard to suit your changing workspace
arrangement.
If your Aspire computer system includes a cordless keyboard, you must allow
the keyboard and computer to establish radio communication.
Before using your cordless keyboard for the first time, make sure that the
batteries are correctly installed. With the computer turned on and the
Windows operating system running, move the keyboard within range (not
more than 2 meters/6 feet) of the computer. Windows should detect the
radio signal and begin using the keyboard. If Windows fails to detect the
keyboard, pls follow below steps:
11
on the front of the computer.
step 2: Press the connect button on the keyboard.
Note: When your cordless keyboard is running out of batteries, a pop-up
window will remind you to recharge it.
The Speakers
Your Aspire computer system comes with a set of speakers designed to
maximize your enjoyment of audio CDs and exciting new multimedia. Plug
your speakers into the speaker-out port at the back of your computer. Refer
English
step 1: Press the connect button
English
12
to the OOBE poster for more guidance with connecting the speakers. For
more information on using your speakers, refer to the included manual.
The Monitor
Your Aspire computer system includes a monitor designed to provide high
quality visual images. The size and type of monitor included in your system
depends on the system model you purchased. Plug your monitor into the
VGA port at the back of your computer. Refer to the OOBE poster for more
13
English
guidance with connecting the monitor. For more information on using your
monitor, refer to the included manual..
English
14
Audio DJ
Audio DJ offers all the convenience of an audio CD player, enabling you to
play your favorite music CDs even when your computer is in power-off mode.
Operate Audio DJ as follows:
•
Press any of the six buttons to turn the unit on. If a CD is already loaded,
the number of tracks will be displayed on the display panel.
•
Press the Stop/Eject button, and then load a CD into the CD/DVD drive.
Push the drawer to close it.
•
Press the Play/Pause button to start playing the CD.
•
Use the other buttons to control the playing of the CD.
•
“SP” will be displayed when Audio DJ is turned off.
Audio DJ features the following control buttons:
1
1
2
2
3
3
4
5
6
No.
Description
1
Volume Up
2
Volume Down
3
Next Track
4
Previous Track
5
Stop/Eject
6
Play/Pause
4
5
6
Audio DJ is automatically turned off after a short period of inactivity. Press
any of the six buttons to reactivate the unit. You can continue using Audio
DJ to play CDs after you turn the computer on. Alternatively you can use the
computer’s on-board audio system by running a music player application
such as Windows Media Player.
15
Your Aspire computer provides a useful CD storage unit, allowing you to
keep your most frequently used CDs handy for quick loading.
•
Open and close the unit by gently sliding the cover on its tracks.
•
Stack your CDs (without their jewel cases) on the spindle. Do not exceed
the height of the spindle.
3-in-1 Flash Card Readers
The front port bay provides two 3-in-1 Flash Card readers, greatly enhancing
the functionality of your Aspire computer. The readers accept the following
cards:
Memory Stick
Memory Stick is a flash memory card from Sony that was originally designed
for handheld digital appliances such as cameras and camcorders. The tiny
module measures just 21.5mm x 50mm x 2.8mm.
Multimedia Card (MMC)
MMC is a storage module used in small handheld devices such as cell phones,
pagers and PDAs. The ultra-small card measures 24mm x 32mm x 1.4mm and
weighs less than two grams. Currently, the maximum available storage
capacity for these cards is 64MB, with a 128MB version expected soon.
English
CD Storage Unit
16
English
SD Card
SD (Secure Digital) Card provides secure storage for handheld devices such as
cell phones and PDAs. It has the same form factor as the Multimedia Card,
but is slightly thicker (2.1mm). Although its encryption capability supports
security and content protection applications, its fast data transfer rate
(10Mbytes/sec) has made it ideally suited for regular flash memory storage.
Using Flash Cards
•
To load a Flash Card, simply push the card into one of the two slots.
Windows will automatically detect the card’s presence.
•
To remove a Flash Card, gently push the edge of the card to disengage it
from the reader, and then pull it from the slot. Windows will
automatically detect the card’s removal.
17
Some models include a TV Tuner card, located in one of the PCI card slots at
the back of the computer. The TV Tuner enables you to connect a standard
television cable to your computer, allowing you to receive a television signal.
The included PowerVCR software allows you to watch TV and record
programs, with the added benefit of time-shifting playback.
PowerVCR can accept an analogue or cable TV signal. It can also play and
record content from VCR and camcorders (Hi8 and V8), digital camcorders
(DV) and PC cameras.
Refer to the PowerVCR online help for detailed instructions on using the
application.
Watching TV
PowerVCR provides a number pad for channel selection, as well as standard
channel changing controls. In addition, Auto Scan searches for available
channels.
To help in your selection of a channel, the channel surfing feature allows you
to preview sixteen channels simultaneously. Click on Surf Channels to
display a page of preview channels arranged in a 4 x 4 grid. Next Page and
Previous Page controls allow you to display alternative pages of preview
channels, while Auto Page continuously refreshes the display with new
pages.
To select a channel, click on the preview window for that channel. The
channel will then appear in normal display mode. Alternatively, click Cancel
Surfing to exit the channel surfing feature.
Recording
Record functions include snapshot capture, instant playback with pause and
slow motion, scheduled recording, and recording reminders when the HDD is
approaching full capacity.
To capture a snapshot of the display, simply click on the snapshot button
while watching TV. The image will be stored in the folder specified under the
Snapshot tab in System Settings.
To start the instant replay feature, click on it in the master panel while
watching TV. Forward, Rewind and Pause controls enable you to navigate,
or you can drag the slider control to move between frames more quickly.
To record a program while you watch TV, simply click on Record to start, and
then click on Stop when you want to finish. Clicking on the record button
during recording displays the timer, enabling you to select a fixed time
English
TV Tuner (Optional)
English
18
period after which recording will stop automatically. After recording, the
playlist will appear, allowing you to save the file.
To schedule recording for a time when you will be away from the computer,
switch to the Recording Scheduler mode. The scheduling wizard will
appear, guiding you through the selection of settings required to set up the
scheduler.
Time-shifting Playback
The time shifting function enables you to watch an earlier segment of a live
program while PowerVCR continues to record in real-time. This means that
you can:
•
Join a program after it has begun without missing the start.
•
Pause watching a live program when you have to take a break, and then
restart your viewing in the place where you left off.
To enable time shifting, just press Instant TV Replay on the left panel of
Power VCR, then the system will start to record the program in background.
You can playback at any time by moving the slider or use the Forward,
Rewind and Pause controls.
For more information on TV function, refer to the PowerVCR on-line-help.
19
You can quickly and easily expand your Aspire computer system by adding
additional components. Alternatively, you can upgrade existing components
to provide enhanced performance.
Opening The Case
Before you open the case, turn your computer off and unplug the power
cord from the wall outlet.
•
Remove the plastic footing base.
•
Remove the retaining screws to release the cover panel.
English
Upgrading Your System
20
English
•
Slide the cover panel off.
21
Make sure you only use components that are compatible with your Aspire
computer. Consult your dealer about the suitability of new components
before you purchase them.
To ensure correct installation, refer to the documentation that comes with
your new components before you start to add or replace
components.Possible upgrade options include the following:
•
Replace the HDD with a higher capacity model, or add a second HDD.
•
Install additional memory.
•
Install a graphics card as a substitute for the embedded graphics
subsystem.
•
Replace the CD drive with a DVD or CD-RW drive.
•
Install an add-on card, such as a fax/modem card, in one of the empty PCI
slots.
English
Installing New Components
English
22
23
This section attempts to answer some frequently asked questions regarding
your Aspire computer system, as well as offering tips for troubleshooting
problems.
General System Problems
Refer to the online help file for additional information about your Aspire
computer system. Also, see the iTouch configuration
for help with setting
up and using the keyboard, and the mouse configuration
for help with
using the mouse.
Q: My monitor displays a blank screen, my corded mouse/keyboard
does not function, or my speakers do not emit sound. How can I
make them work?
A: If a system component does not perform correctly, first check that it is
plugged in and turned on (if necessary) and connected to the computer
correctly. Refer to the OOBE poster for help with checking the
connections.
For specific questions and problems relating to the monitor and speakers,
refer to the documentation provided with those components.
Q: My monitor is turned on and connected correctly but the screen is
still blank. What is the problem?
A: Check the brightness and contrast controls on the monitor. Also, move
the mouse or tap a key on the keyboard to make sure that the monitor is
not in power-saving mode.
Q: My mouse cursor movement is erratic. How can I get better control?
A: Your Aspire computer system features an optical mouse providing greater
freedom of use. However, highly reflective surfaces, such as glass or
metal, can distort the optical light signal and cause tracking problems. If
you wish to operate your mouse on a reflective surface you should first
cover the surface with a non-reflective object, such as a book or a sheet of
paper.
If you are using a cordless mouse, see the section below for help with
establishing good radio communication between the mouse and the
receiver.
English
Questions & Troubleshooting
24
English
Q: My floppy drive (FDD) is unable to read my diskette?
A: First, eject the disk, and then reinsert it before trying to read it again. If
you are still unable to read the diskette, check that it is a disk drive
problem by inserting and attempting to read other diskettes. You might
have a defective diskette, or your diskette might need formatting.
If you believe that there is a problem with the drive, take your computer
in for servicing.
Q: My system freezes. How can I restore normal operation?
A: Sometimes Windows experiences problems that cause the operating
system to “hang”. Usually these problems arise from conflicts with the
application software you are running. Press the Alt-Ctrl-Del keys
simultaneously for on-screen instructions. If Windows is unable to resolve
the problem, you should press Alt-Ctrl-Del again to reboot. In extreme
cases where the keyboard fails to respond, you might need to press and
hold the power button to perform a “hard” reboot.
If an application continually causes problems, see its online help file for
advice. You might need to uninstall and then reinstall the software using
the program’s Uninstall utility or, if it does not have one, by using the
Windows Add/Remove Programs facility. See the Windows online help
file for more information.
Q: Windows continually “hangs” or “crashes”. How can I use my
computer normally again?
A: If your operating system has become corrupted you might need to return
your computer to a previous “clean” configuration. See the Windows
online help for advice on returning your system settings to a previous
configuration.
In extreme cases, you might want to return your computer to the factory
default settings. The included recovery CD allows you to restore the
software to the state it was in when you first purchased your Aspire
computer system. However, all your additional programs, data and
settings will be lost when you use the recovery CD.
To restore the factory defaults, follow the instructions on the recovery
CD. Back up your data on another drive before you begin this procedure.
Q: I’ve tried the suggestions provided in this user guide, but I am
still unable to get my Aspire computer system to work normally.
What can I do now?
25
Cordless Keyboard/Mouse Problems
Q: What type of batteries should I use?
A: Use only alkaline batteries, regardless of brand.
Q: What kind of battery life can I expect?
A: The battery life depends on the type of device and the amount of use. For
the cordless optical mouse, you should expect to replace the batteries
about every two months. For the cordless keyboard, a set of batteries
should last about six months.
Q: I changed my batteries and now my mouse pointer doesn’t move
or my keyboard doesn’t work. What can I do?
A. First, check that you have inserted the batteries correctly. Next, establish
radio communication by first pressing the connect button on the front of
the computer, and then pressing the connect button on your mouse or
keyboard.
Q: Do my Aspire cordless mouse and keyboard use radio frequency
or infrared technology?
A: The Aspire cordless mouse and keyboard both use radio frequency to
communicate with a receiver built into the computer.
Q: What frequencies do my cordless mouse and keyboard use?
A: Channel 1 uses 26.995 MHz; Channel 2 uses 27.045 MHz
Q: How do I get the cordless mouse or keyboard to communicate
with the receiver?
A: First, press the connect button on the front of the computer, and then
press the connect button on your mouse or keyboard.
Q: How far from the computer can I use my cordless mouse or keyboard?
A: Generally, the range should be no more than 2 meters/6 feet.
Q: My cursor doesn’t move or jerks around the screen. What can I
do?
English
A: If you are unable to solve a problem after reading these troubleshooting
tips, take your computer to qualified personnel for servicing. Do not
attempt to service your computer yourself.
English
26
A: First, establish radio communication by pressing the connect button on
the front of the computer, and then pressing the connect button on your
mouse.
Next, check the quality of the batteries. With healthy batteries you should
be able to use your cordless mouse and keyboard at least 1 meter/4 feet
from the receiver. If the problem persists after replacing the batteries,
you can assume that there is an environmental problem. You can confirm
this by checking the performance of your mouse and keyboard with
another computer in a different location.
To avoid interference with the radio signal, try moving your system at
least 8 inches away from other electrical devices, or moving the mouse
and keyboard closer to the computer. If you are using a metal desk or a
desk with a metal frame, try raising the computer, mouse and keyboard
an inch or so above the surface using a thick mouse pad or a book.
Experiment with different locations and positions.
Q: Will my cordless mouse or keyboard interfere with my cordless
phone?
A: It is most unlikely. Your cordless mouse and keyboard operate at such low
frequencies that they generally do not interfere with most other cordless
devices.
Q: What can cause interference with my cordless mouse and keyboard?
A: Any electrical device, including the monitor, drives and speakers can
cause interference with your cordless mouse and keyboard. A metal desk
or a desk with a metal frame can also cause interference problems.
Q: How many cordless devices can I use in one area?
A: Cordless devices have a range of 2 meters/6 feet, although this might be
greater under certain conditions. To avoid possible interference, try to
keep systems at least 3 meters/10 feet apart.
There is no specific number of cordless devices that you can be used in an
area, as there are many environmental variables that affect performance.
Q: When I move my cordless mouse, it moves the cursor on the system next to mine. How can I stop this?
A: This is called “cross talk” and is characterized by one cordless device
controlling the cursor input of another device connected to a different
computer.
27
Finally, press and hold the connect button on the front of the computer
for ten seconds to reset the connection information. You should then
press the connect button on your mouse to re-establish radio
communication. Perform these same steps on any other cordless devices
in the area that are experiencing cross talk.
Q: When I type on my cordless keyboard, the text is displayed on
another system that is using a cordless keyboard. How can I stop
this?
A: This is another example of cross talk, and so the above solutions apply.
However, before attempting the above steps, remove the keyboard
batteries for 15 minutes. Then, re-insert the batteries and reboot the
computer. It is important that during this time, you do not press the
connect button on the receiver or keyboard of the other cordless desktop
system.
Q: When I move my cordless mouse my neighbor cannot move the
cursor on his system. How can I stop this?
A: This is called "jamming," and occurs when one cordless device stops
another cordless device from functioning until the first device stops
moving.
To avoid possible interference, try to keep systems at least 3 meters/10
feet apart. Experiment with various computer and mouse positions and
change the distance between the mouse and the computer.
Press and hold the connect button on the front of the computer for ten
seconds to reset the connection information. You should then press the
connect button on your mouse to re-establish radio communication.
Q: I loaded a CD/DVD and then pressed the Play/Pause key on my keyboard, but nothing happened. What is the problem?
A: To use the multimedia keys on your keyboard, you must first open a
movie player or music player application.
English
To avoid possible interference, try to keep systems at least 3 meters/10
feet apart. Also, try moving the mouse closer or further away from the
computer to improve the radio communication.
English
28