1
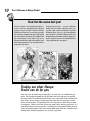
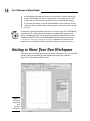
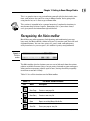
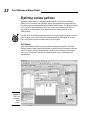
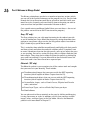
Chapter 1
AL
Getting to Know Manga Studio
Understanding what Manga Studio can and can’t do
Getting familiar with the Manga Studio workspace
RI
In This Chapter
TE
Breaking down the functions of the Main toolbar, Page toolbar, and Tools palette
MA
Explaining what the other workspace palettes do in Manga Studio
W
TE
D
hen you buy a new program, do you actually read the instruction
manual? It’s okay. You can be honest — I won’t tell anyone. The problem with skipping the instructions is that sometimes you miss out on many
interesting tidbits you didn’t know you could do with the program.
RI
GH
Well, you can think of this chapter as your Manga Studio cheat sheet — so you
don’t have to go read the instructions. This chapter is your general overview
of the program. I discuss how it differs from other drawing programs, and I do
a run-through of the Manga Studio workspace, along with all the cool toys that
you can use when producing your manga or comic.
CO
PY
And if you haven’t yet decided which version of Manga Studio to purchase, I
discuss how the Debut and EX versions differ and which may be the one that
best suits your drawing needs.
How Manga Studio Differs from
Other Drawing Programs
In many ways, Manga Studio is similar to other drawing programs available,
such as Adobe Photoshop or Corel Painter. Each of these programs is good
in its own right, but because Manga Studio is first and foremost a comic creation program, it has a few functions that set it apart from other drawing
programs — and that help make your life as a digital artist easier.
10
Part I: Welcome to Manga Studio!
Don’t let the name fool you!
The one critique I have about the program is
that its name was changed from the original
Japanese name of Comic Studio to Manga
Studio here in America. I’m not really sure why
the name was changed, aside from catching the
eye of manga fans and artists. The problem with
this name change is that when I talk to my
Western-based comic book artist buddies, they
think that the program is for the production of
manga only. Far from it.
So let me reassure you — you can use Manga
Studio to draw manga, superhero comics, or
any other style or genre of sequential art. In the
following figure, you can see three different
styles of comics, all done in Manga Studio. The
thing to keep in mind when using this program is
that it’s a tool to create art. It’s no different than
using traditional pens and pencils.
Artwork courtesy of Michael Rhodes, Teyon Alexander (characters © Merge Comics), and Jason Masters ( God Complex
© Brandon Thomas and Jason Masters).
Finding out what Manga
Studio can do for you
Over the years of producing art digitally, I’ve tried out a lot of different programs. Each program would get the job done for me in one way or another,
but many times I would find myself feeling very frustrated while working with
them. Don’t get me wrong, I think there are some flat-out awesome art programs on the market. The problem that I was having was while they’re good
art programs, I didn’t find them to be very good comic drawing programs. As I
experimented with these programs I could never find a good comfort level to
create my work digitally from start to end. More often than not, I found myself
working with multiple programs just to get a page done.
Chapter 1: Getting to Know Manga Studio
What I found when working in Manga Studio is that comfort level. It was the
first program that I felt let me take advantage of the digital medium, while
also having the “real world” feeling I normally had when working with real
pencils and inks.
So, I thought I’d list a few features of Manga Studio that I found to be the most
helpful to my work, and possibly will help you out as well.
Adding a personal touch to line work with custom rulers and guides
When using a program such as Photoshop or Painter, your ability to draw
straight lines or custom curves can be a bit limited. You can always use the
Line, Curve, or Pen tools, but because the lines all end up uniform, there’s
definitely a loss of personality. What you need are virtual rulers that can guide
you in creating and adjusting straight edges, curves, and polygons of any size
and shape. Then all you need to do is draw on them, much like their realworld counterparts, adding your own personal touches to the line work as
you go along.
Manga Studio provides such a feature with its Ruler Layers feature, which lets
you create as many rulers as you need for your page. Straight or curved, rectangular or polygonal, you can make any kind of ruler you need. In addition,
you can scale and rotate the rulers. Do you find that your curved ruler isn’t
quite how you want it? Grab an endpoint and adjust it. It’s just that simple.
To me, the best part is that when the ruler is set, you can vary your line
weight as you draw along the ruler. It probably doesn’t sound like much, but
it’s a great thing if you want to be able to add a bit of a personal flair to your
technical line work. (See Chapter 8 for the details on using the Rule Layers
feature.)
Eliminating shakiness in line work
If you’ve ever tried drawing or inking in Photoshop at anything less than
200% zoom, I’m sure you’ve noticed you need unnatural steadiness to draw
anything resembling a straight line. Even at your steadiest, you notice some
wobble to your line work. The only way to remedy that is to zoom in close to
the page, but you risk losing sight of the picture as a whole as you work.
Manga Studio provides the ability to set a variable correcting to the line work.
What this means is that as you work, the line adjusts itself to reduce or eliminate shakiness. The setting is variable, so you can make the correction as
strong or as light as you like.
If you like to work while zoomed out but have been unhappy with how your
line work has been coming out, this function may be just the remedy you
need. (I tell you how to use this feature in Bonus Chapter 1 on the CD.)
11
12
Part I: Welcome to Manga Studio!
Having thousands of screentones at your disposal
Manga Studio comes preinstalled with thousands of screentones (patterns of
dots or other shapes that are used in black and white artwork to represent
shades of gray) that you can’t get with other drawing programs. In addition,
these tones are vector based, which means that you can adjust the size of
your finished page to any size you want, and the quality of the tones remains
the same. This is something that even the Computones package for Photoshop
can’t do. (Incidentally, EX users can use Computones in addition to the program’s main tones, so there’s another advantage.)
Chapter 11 covers all you need to know about adding screentones to
your work.
Working with multiple-page story files
What if you could contain all of the pages in your story or chapter in one place,
which you could then easily preview as you go along? Manga Studio provides
that with its story files. Here, you can create as many pages as you’d like, and
they’re organized in one location. You can then rearrange the pages, add new
ones, or remove excess ones. And because all the page files are collected
within one story file, all you need to do to view your story is just open one
file, instead of several. Chapter 4 discusses how to work with these files.
Manga Studio EX users also can combine two consecutive pages into a
spread — for those large action pieces you want to draw. (Conversely,
you can split a spread into two separate pages.)
Knowing your page dimensions with print
guides (preinstalled and custom)
Manga Studio includes page templates of various shapes and sizes that are
useful if you’re planning on printing your comic. In addition, for several of
those templates, a set of print guides is included.
The print guide helps you keep track of what areas of the page are safe and
what areas are cut off by the printer when preparing it for the final book. It’s
a very useful way to make sure any important artwork or dialogue isn’t accidentally cut because you didn’t keep track of where the cut-off points were.
I go over the basics of the print guide in Chapter 4.
Creating custom word balloons (EX only)
Many programs offer the ability to add text to a page, but Manga Studio EX
provides you the option of adding word balloons as well. These vector-based
balloons can be squashed, stretched, and fitted to whatever dialogue you want
to add. EX comes with a wide variety of balloon shapes to choose from, but if
you don’t see what you’re looking for, you can always create your own! Check
out Chapter 12 for more information on how the word balloon function works.
Chapter 1: Getting to Know Manga Studio
Knowing what Manga Studio
can’t do (easily)
The one thing Manga Studio can’t do, at least as easily as other drawing
programs can, is color work. That’s not to say it’s impossible to do, it just
isn’t really as intuitive as your traditional digital coloring programs. The
reason for this is simple — at its heart, Manga Studio was designed for blackand-white use. While it can convert a layer from black and white to custom
colors, the intention is more to adjust your draft work color to differentiate
it from your finished work.
You can do simple cell-shaded-style color work, as well as some airbrushing,
to add highlights and shadows to a drawing. However, you can’t alter a layer’s
settings like you can in Photoshop. This means you can adjust only the layer’s
opacity; functions like multiply or overlay don’t exist in Manga Studio. The
other thing to keep in mind is that each color has to be on its own separate
layer. This can certainly bloat the size of your page file if you’re planning on
doing detailed color work.
In Chapter 14, I go over how you can do some simple color work in Manga
Studio. It’s a fun little trick that you can experiment with. However, if you’re
looking to do some serious color work for your comic, this is the one area
that Manga Studio lacks, compared to other programs.
Debut versus EX: Which Is Right for You?
Manga Studio comes in two flavors: Debut and EX. Choosing the right version
for you comes down to what features you’re looking for in a drawing program,
what ones you can do without, and (most importantly) how much money
you’re willing to spend:
Manga Studio Debut is the introductory-level version of the program.
There are no bells and whistles to this version of the program; it contains all the basic tools you need to create your manga from start to
finish. Debut works as a fairly accurate simulation of all the traditional
tools you would use for producing a comic, all in one convenient
package.
If you’re looking for a straight-forward drawing and screentoning art program, you may want to consider this version instead of EX. At a lower
price point than the EX version, Debut is easy on your wallet.
Manga Studio EX helps you take advantage of the fact that you are working on a computer. This version provides shortcuts and functions that
you simply can’t do with traditional tools or even Manga Studio Debut.
The EX version also allows you to work with vectors, which let you expand
13
14
Part I: Welcome to Manga Studio!
or shrink your artwork to whatever size you need, without any loss of
quality. (The Debut version, by comparison, is raster-based only. This
means that you will lose line quality if you try to enlarge the image.)
If you have the money to spend and would like a few shortcuts to help
speed up and streamline your creative process, this may be the version
for you.
If you haven’t purchased either version yet, be sure to pop the CD-ROM that
accompanies this book into your computer. e frontier, the company that
brings you Manga Studio, has generously included a 30-day demo version
of Manga Studio EX. (You can also download the demo version from www.
e-frontier.com/go/mangastudio.) It’s a good way to test-drive the
program if you’re still on the fence regarding which version to purchase.
Getting to Know Your New Workspace
Provided you’ve installed your program (and if you haven’t yet, you probably
should), you’re now staring at your brand new workspace (shown in
Figure 1-1), with no idea where to start.
Figure 1-1:
Time to get
acquainted
with
your new
workspace.
Chapter 1: Getting to Know Manga Studio
This is as good a time as any to familiarize yourself with the basic tools, functions, and palettes that you’ll be using in Manga Studio. You’re going to be
using them a lot, so it’s best to get to know them.
This section is intended to be a general overview; I explore the functions in
much more detail in later chapters. Remember, this is your cheat sheet; I
can’t give you all the information right off the bat!
Recognizing the Main toolbar
Much like many other programs (both drawing and nondrawing) you may
have used, the Main toolbar (shown in Figure 1-2) contains your basic file and
clipboard buttons. You can save, print, cut, paste, undo, and redo pretty
easily from here. As you can guess, this toolbar is pretty straightforward.
Figure 1-2:
The Main
toolbar.
The Main toolbar also has buttons you can use to hide and show the various
palettes available. Because things can get pretty cluttered on your workspace
when you have too many palettes open at once, having the ability to quickly
turn them on and off is handy.
Table 1-1 lists all the functions on the Main toolbar.
Table 1-1
Icon
The Main Toolbar Buttons
Name
Description
New Page
Creates a new page file.
New Story
Creates a new story file.
Open
Opens an existing Manga Studio file.
Save File
Saves your page or story file.
(continued)
15
16
Part I: Welcome to Manga Studio!
Table 1-1 (continued)
Icon
Name
Description
Save All
Saves all of your open Manga Studio files.
Cut
Cuts a selection from the page to the computer’s clipboard.
Copy
Copies a selection from the page to the computer’s
clipboard.
Paste
Pastes a selection from the computer’s clipboard to
the page.
Clear
Deletes a selection from the page.
Undo
Reverses the preceding action.
Redo
Replaces an Undo action.
Print
Sends the page to your printer.
Tools
palette
Opens/hides the Tools palette.
Tool Options
palette
Opens/hides the Tool Options palette.
Layers
palette
Opens/hides the Layers palette.
Navigator
palette
Opens/hides the Navigator palette.
Tones
palette
Opens/hides the Tones palette.
Properties
palette
Opens/hides the Properties palette.
History
palette
Opens/hides the History palette.
Chapter 1: Getting to Know Manga Studio
Icon
Name
Description
Gray
palette *
Opens/hides the Gray palette.
Materials
palette *
Opens/hides the Materials palette.
Custom
Tools
palette *
Opens/hides the Custom Tools palette.
Actions
palette *
Opens/hides the Actions palette.
* Available in Manga Studio EX only.
Adjusting your view with the Page toolbar
The Page toolbar, shown in Figure 1-3, contains general page-viewing and
manipulation tools. These allow you to adjust on-the-fly without the need to
constantly switch to different tools or palettes to do the same thing. Table 1-2
breaks the functions down for you.
Figure 1-3:
The Page
toolbar.
Table 1-2
Icon
The Page Toolbar
Name
Description
Zoom In
Increases the size of the page’s viewing area.
Zoom Out
Decreases the size of the viewing area.
(continued)
17
18
Part I: Welcome to Manga Studio!
Table 1-2 (continued)
Icon
Name
Description
Custom Zoom Allows you to manually enter the size of the
viewing area by percentage.
Fit to Window Resizes the viewing area to fit within
the page window.
Actual Pixels
Resizes the viewing area to its actual size in pixels.
Print Size
Resizes the viewing area to fit within the
user-defined print size.
Rotate
Rotates the viewing area 90 degrees clockwise.
Angle
Allows you to enter a manual viewing angle
for the page.
Normal View
Adjusts the viewing area to its default setting.
Flip Image
Horizontally
Horizontally inverts the viewing area.
Flip Image
Vertically
Vertically inverts the viewing area.
Show/Hide
Page Rulers
Sets the visibility of any rulers on the page.
Show/Hide
Transparent
Area
Allows you to see the transparent (non-inked)
areas of the page.
Show/Hide
Ruler
Manipulator
Used to adjust any rulers on the page.
Snap Mode
On/Off
Sets ability for a drawing tool to automatically snap
to any ruler or guide.
Snap to
Rulers
Snaps drawing tool to any rulers on the page.
Snap to
Perspective
Rulers *
Snaps drawing tool to any perspective rulers
on the page.
Chapter 1: Getting to Know Manga Studio
Icon
Name
Description
Snap to
Focus Line
Rulers *
Snaps drawing tool to any focus line rulers
on the page.
Snap to
Parallel
Lines *
Snaps drawing tool to any parallel line rulers
on the page.
Snap to
Guides
Snaps drawing tool to any guides on the page.
Snap to Grid
Snaps drawing tool to any grids on the page.
* Available in Manga Studio EX only.
Accessing your core set of tools
Out of all the various functions, actions, and palettes that come with Manga
Studio, there is one that I’m sure you’ll use more than any other — the Tools
palette, which you can see in Figure 1-4.
This is your toolbox. Or more specifically, this is your art box. This palette
contains all the drawing tools you need to rough out your page, cut out
unnecessary sections, ink it up, and erase any mistakes you made along the
way. In Table 1-3, I compile a list of the tools in the palette, along with short
descriptions of what they do. I discuss most of these tools in later chapters.
Figure 1-4:
The Tools
palette.
19
20
Part I: Welcome to Manga Studio!
You can access any of the tools from your keyboard by pressing the shortcut
key noted in Table 1-3. As you go through the table, you’ll notice that some
tools share the same shortcut. That allows you to cycle quickly through these
similar tools by pressing the shortcut key multiple times. For example, you
would press the P to select the Pen tool, press P again to select the Pencil
tool, and P once more to select the Marker tool. To go back to the Pen tool
simply press P again.
Table 1-3
Icon
The Tools Palette
Name
Shortcut
Description
Hand
H
Moves the page around the
workspace.
Zoom
/
Enlarges or reduces the
page viewing area.
Rotate
R
Rotates the page in the workspace.
Rectangle/
Ellipse Marquee
M
Creates a rectangular or circular
selection.
Lasso/Polygonal
Lasso
L
Creates a custom selection.
Wand
W
Creates a selection within an
enclosed area of a drawing.
Move Layer
K
Moves the highlighted layer
around the page.
Object Selector
O
Selects and moves an endpoint of
a ruler.
Layer Selection
D
Highlights the layer of the line
work, screentone, or any other object
on the page you selected.
Line/Curve/Polyline U
Creates a straight line, curved line,
or custom shape.
Rectangle/Ellipse/
Polygon
U
Creates a rectangular, elliptical, or
polygonal shape.
Pen
P
Used for inking/finishing a drawing.
Pencil
P
Used for roughing out a drawing.
Chapter 1: Getting to Know Manga Studio
Icon
Name
Shortcut
Description
Marker
P
Used for inking a drawing.
Eraser
E
Used to erase a drawing.
Fill
G
Fills an enclosed area of a drawing
with foreground or background color.
Airbrush
B
Used to add spattering/noise to a
drawing.
Gradation *
G
Adds a color gradient to the page.
Pattern Brush
B
Paints a design pattern onto the page.
Panel Maker
F
Creates a new panel layer on the page.
Panel Ruler Cutter
F
Divides a panel into two (used on a
Panel Ruler only).
Text
T
Adds text to a page.
Join Line
J
Joins two lines.
Eyedropper *
I
Samples a screentone for use
elsewhere.
Smooth *
;
Smooths/blurs an image.
Dust Cleaner *
;
Removes excess particles from a
scanned image.
Width Correction *
@
Adjusts the width of a vector line.
Line Lever *
@
Adjusts the position of a vector line.
Line Smoother *
:
Smoothes out a shaky vector line.
* Available in Manga Studio EX only.
21
22
Part I: Welcome to Manga Studio!
Exploring various palettes
While the Tools palette is probably the one you’ll use the most in Manga
Studio, it isn’t the only one available. When you opened the program for the
first time, you were bombarded with palettes and windows, as shown in Figure
1-5. It’s a lot to weed through at first, but as you get to understand each of
the palettes in the program, you may find them as indispensable as the
Tools palette.
If at any time you’d like to remove some of the clutter from too many palettes
open at once, press the Tab key on your keyboard to hide them all at once.
Press the Tab key again to make them all visible again.
Tool Options
Each tool in Manga Studio is customizable in one way or another. The Tool
Options palette shows you all the options available with the currently selected
tool. This allows you to tweak the tools to your heart’s content, until they’re
set in such a way that they feel as comfortable to use as their real-world
counterparts.
Figure 1-5:
That’s a lot
of palettes
on the
screen.
Chapter 1: Getting to Know Manga Studio
Layers
Looking at the Layers palette, you can see a whole slew of layer types that
you can (and probably will) use as you create your pages. The Layers palette
helps to keep all the various layer types organized. This way, you not only
know what layer you’re currently working on, but also keep track of the other
layers and layer types you create. I go over layers in much more detail in
Chapter 6.
Navigator
The Navigator palette works much like the functions available on the Page
toolbar; you can zoom in and out, as well as rotate the page (or enter manual
values for each).
You’ll also notice a miniature representation of your page, as well as a red
rectangle. This allows you to move around the page, much like using the Grab
tool from the Tools palette. All you need to do is click within the rectangle
with your mouse or stylus and drag it around the preview pane. As you can
see, manipulating the preview pane also moves the main page as well. This
is a good way to maneuver around the page without having to switch to the
Grab tool every time you need to adjust its placement.
Tones
The Tones palette is your repository for all the tones that come installed
with your program, as well as any customized tones you create. Each type of
tone available is filed into its own folder. All you need to do is dig into those
folders and find the tone you need! For more information on using tones on
your page, be sure to check out Chapter 11.
Layer Properties
Each layer type in Manga Studio has its own set of properties to go along
with it. The Layer Properties palette shows you all the options available for
that particular type. (Options you can’t adjust are grayed out.) Adjusting
the properties can range from simply renaming the layer, to setting the layerspecific ruler properties. Chapter 6 covers the various layer properties
available to you, depending on the layer type.
History
The Undo function in Manga Studio is a great way to quickly erase a mistake
you may have just made. But what happens if you need to go back several
steps? You could always undo a few extra times — or if you happen to own
Manga Studio EX, you can take advantage of the History palette.
23
24
Part I: Welcome to Manga Studio!
The History palette keeps track of a set number of previous actions (which
you can set in the System Preferences of the program) in a list. You just look
through the list to the action you’d like to go back to and click it with your
mouse or stylus. Instantly, you travel back in time to the point you want to
start over from. And you don’t even need a DeLorean to do it!
(Just a quick note to you Manga Studio Debut users out there — the rest of
the palettes are exclusive to the EX version of the program.)
Gray (EX only)
The Gray palette gives you a bit more fine-tuning for the color of your ink
as you’re working on a layer. Much like the opacity setting determines how
opaque or transparent a layer can be, the Gray palette adjusts how dark or
light a shade of gray you’d like to work in.
This is useful for those who like to work loosely and lightly with their pencils
and then go back and refine the work with a darker pencil. If you don’t want
to create a brand-new layer for the tight pencils, you can just adjust the grays
as you go along. You can try setting the gray color to a lighter shade for your
loose roughs. Then, when you’re ready to tighten the pencils up, darken the
grays and start refining! It’s a great alternative to those who feel some “life”
from their work is lost when traced on a separate layer.
Materials (EX only)
The Materials palette is your repository for all the various tools and samples
that you can use in your drawing. These include:
Two-dimensional images that you can use with the 2DLT importing
function (which I explain in Bonus Chapter 2 on the CD).
Three-dimensional objects that you can use with the 3DLT importing
function (which I explain in Bonus Chapter 2 on the CD).
Custom Ruler shapes, such as French Curves, Elliptical and Circular
rulers, and others.
Preset Layer Types, such as a Black Only Raster pen layer.
Word balloons.
You can place each of these materials on the page by clicking and dragging
it using your mouse or stylus. In addition, you can save your own custom
images, rulers, and layer types in the User folder. I discuss the Materials
palette in a bit more detail in Chapter 15.
Chapter 1: Getting to Know Manga Studio
Custom Tools (EX only)
While the Tools palette provides all your important drawing tools, EX users
can take that idea a bit further. The Custom Tools palette allows you to customize exactly which tools you want to have at the ready. Don’t want to have
to hold down the Pencil tool in order to switch them? Add all the pencils you
want right onto the palette. Want to quickly access functions without having
to go through a series of nested menus? You can add those as well. There’s
no limit to what you can add!
To help you organize things a bit further, you can switch between custom
sets. If you’d like to have a custom palette of rough work tools and one with
nothing but vector tools, it’s easy to set up and switch. This palette is yet one
more way you can streamline the way you work digitally by quickly accessing
to the tools and functions you use most frequently.
Actions (EX only)
Have you ever run into instances where you find yourself repeating the same
series of functions over and over? It can prove to be quite tedious and boring if
you have to export a series of pages one at a time, for example. If you’re an EX
user, you may find the Actions palette can help relieve you of these doldrums.
Actions (or macros, as they’re often called in other programs) are a series of
recorded commands and functions. What’s special about these actions is that
instead of repeatedly going through a series of steps manually, you can use
actions to quickly perform those steps automatically.
The preinstalled actions can range from automatically setting up the properties of an imported image to adding an outline to exporting your page for the
Internet. What’s more, you can always record your own actions to use at a
later time. When using the preinstalled actions — or creating your own —
you may find these to be another way to shave a few seconds or minutes off
of your production — time you can then use to focus on more creative things.
25
26
Part I: Welcome to Manga Studio!


![ダウンロード - Fishtail Studio[フィッシュテイル・スタジオ]](http://vs1.manualzilla.com/store/data/006652190_2-d450feb74fb712c660438a15a2d8085f-150x150.png)