1
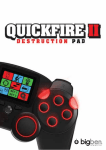
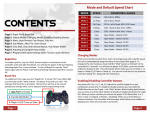
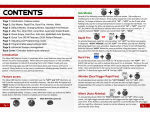
PS3™ QUICKFIRE CONTROLLER
User’s Manual
Thank you for purchasing the Quickfire controller for PS3™ from Bigben Interactive.
This product includes:
• 5 Preset quick fire modes for all your favourite games.
• Clear LCD screen.
• 8 shots per second up to 48 shots per second.
• Custom firing mode – set your own quick fire rate from 6 shots per second up to a blistering 60 shots per second.
• Program any action buttons for rapid fire.
• Tilt sensors and vibration.
• Ergonomic, non slip triggers.
• Supplied with 2 AA Alkaline batteries.
Controller Set-Up and Use
Battery Installation
1. Remove the battery compartment cover from underneath the controller
2. Insert 2 x 1.5 volt AA size batteries, observing the correct polarity
3. Refit the battery compartment cover
Using the Controller with a PS3™.
Slide the switch on the Receiver Unit to PS3™ mode.
Receiver Connection
Plug the Receiver Unit into one of the USB ports on your PS3™ console. The Red LED on the Receiver Unit will flash constantly.
Using your Controller
1. Switch on the controller by sliding the power On/Off switch, on the Controller, to on. When the controller has successfully connected with
the Receiver Unit the Red LED, on the receiver, will stop flashing and be lit continuously.
2. Press the `PS Home’ button on the centre of the controller. This is the button with the house symbol.
3. The controller will connect to your PlayStation®3 console and the numbered Red LED’s will light up showing your controller number.
4. Ensure that your contoller is assigned as controller 1.
If it is not recognised as controller 1, press and hold the home button to bring up the option menu, while you have a game loaded.
Select the controller settings and then select the ‘Reassign the Controller’ option.
Scroll down with the d-pad on the rifle until it says 1 on the TV screen.
Press X to select it and then press O twice to go back to your game.
For further information on assigning controller ports please refer to your console instruction manual.
Quick fire modes
The Quickfire controller has 6 different quick fire modes to suit all of your favourite shooting games. The controller is set to mode 1, 8 shots
per second by default.
The mode is displayed on the LCD screen as M1 08SPS. Quick fire is set to the R1 button of your controller as this is the most common
firing button for shooting games.
L
L
R
PRG
SELECT
SELECT
START
L
R
M5 48 SP S
PRG
START
SELECT
START
PS
PS
ON
R
M1
M2
M1 10 SPS
R1
M3
PRG
M4
M5
M1 08 SPS
ON
OFF
PS
OFF
ON
OFF
Changing the quick fire modes
The quick fire modes have been designed to work on all of your shooting games. To ensure full compatibility please select the correct mode
for your game.
The modes are as follow:
M1 8SPS – Call of Duty 4 Modern Warfare
M2 10SPS – Call of Duty World at War and Call of Duty: Black Ops
M3 20SPS – Call of Duty Modern Warfare 2
M4 32SPS – Call of Duty Modern Warfare 2
M5 48SPS - Call of Duty Modern Warfare 2
Please note that modes M4 and M5 may have varied results depending on which guns you are using in the game. If you experience
any problems, stick with the M3 mode. These modes will also work with other popular shooting games, like Battlefield™, Killzone™,
Resistance™ etc. Try the different modes to select which works best.
To change between modes follow these steps.
1. Press start and select simultaneously to enter the programming mode.
2. Press up or down on the D-pad to cycle through the different modes.
3. When you have found your correct mode press start and select again to confirm your selection.
4. The controller will now fire at your chosen speed when you press R1.
L
R
M1 08 SPS
PRG
SELECT
START
L
M5
M6
M1 06 SPS
M1
PRG
M2
M3
SELECT
START
PS
PS
ON
OFF
ON
OFF
R
Custom quick fire mode
The quick fire controller also includes a custom mode to ensure future compatibility with new games and so you can experiment with
different firing rates. The rates can range for 6 shots to 60 shots per second.
To set the custom firing rates follow these steps:
1. Press start and select simultaneously to enter the programming mode.
2. Press up or down on the D-pad to cycle through the different modes and choose M6.
3. Then press the select button to enter the shots mode.
4. Press up or down on the D-pad to choose the shots per second you want.
5. Press start and select again to confirm your selection.
6. The controller will now fire at your chosen rate when you are in M6 mode.
L
L
R
PRG
SELECT
SELECT
START
L
R
M6 06 SP S
PRG
START
SELECT
START
PS
PS
ON
R
M5
M6
M1 06 SPS
M1
PRG
M2
M3
M1 08 SPS
ON
OFF
L
OFF
ON
R
12
M6 14
10 SPS
R1
PRG 16
-60
SELECT
PS
L
R
M6 14 SP S
PRG
START
SELECT
START
PS
ON
OFF
PS
OFF
ON
OFF
Programming other buttons for rapid fire
By default, only the R1 button is used for quick fire, but if you are playing games that use another button for firing, you can also program
them.
To set other buttons for quick fire, follow these steps:
1. Press the select and PS Home button on the controller simultaneously to enter the button programming mode. The LCD screen will
then display PRG.
2. Press the button you wish to program as quick fire (i.e. the triangle button) A triangle symbol will then appear on the LCD screen to
indicate it has been pressed.
3. Press select and PS Home again to confirm your selection. The triangle button will now act in quick fire mode. The button will remain
as a quick fire button even when you switch off your controller
L
R
L
R
PRG
L
R
PRG
SELECT
START
PRG
SELECT
START
PS
ON
SELECT
START
PS
OFF
ON
PS
OFF
ON
OFF
To set the button back to normal, follow these steps.
1. Press the select and PS Home button on the controller simultaneously to enter the button programming mode. The LCD screen will
then display PRG.
2. Press the button you wish to clear as quick fire (i.e. the triangle button) The triangle symbol will then disappear from the LCD screen
to indicate it has been pressed.
3. Press select and PS Home again to confirm your selection. The triangle button will set back to normal.
L
R
L
R
PRG
L
R
PRG
SELECT
START
PRG
SELECT
START
PS
ON
SELECT
START
PS
OFF
ON
PS
OFF
ON
OFF
Disable Quick fire on R1 button
If you do not want rapid fire on the R1 button you can disable it in the same way as mentioned above
1. Press the select and PS Home button on the controller simultaneously to enter the button programming mode. The LCD screen will
then display PRG.
2. Press the R1 The R1 symbol will then disappear from the LCD screen to indicate it has been pressed.
3. Press select and PS Home again to confirm your selection. The R1 button will set back to normal and will no longer have quick fire.
L
R
PRG
L
L
R1
R
M1 08 SP S
R
PRG
SELECT
START
SELECT
PS
ON
SELECTS
PS
OFF
START
PS
TART
ON
OFF
Clearing all programming
If you wish to set your controller back to default, simply switch it off and switch it back on again, whilst holding the start and select buttons
simultaneously. All controls will then be set to standard factory settings.
L
R
L
R
M1
08 SP S
R1
PRG
SELECT
START
SELECT
START
PS
ON
OFF
PS
ON
OFF
Troubleshooting.
Controller is not working.
• Ensure that the power button is the ‘On’ position.
• Check that the batteries are not low. If so, replace the batteries. If power is low the Player LED will normally flash to indicate that the
batteries need replacing.
• Ensure that the receiver is connected to the console and press the home button on the controller to connect.
• Check that the switch on the receiver is set to PS3™ mode.
The guns are not working or jamming in my game
Check that you have selected the correct mode for your game. If the guns are still jamming, try a lower firing rate mode or create a
custom mode that works.
The guns are not quick firing
• Check that the game you are playing uses R1 for firing. If not program the firing button for that game (i.e. program R2 for rapid fire)
• Ensure that you have not un-programmed firing button. If so, reprogram it.
All my buttons are rapid firing
Clear all of the programming by switching off and switching on again whilst pressing and holding the start and select buttons.
Disposal of Old Electrical & Electronic Equipment
This symbol on the product or on its packaging indicates that this product shall not be treated as household waste. Instead it should be taken to an
applicable collection point for the recycling of electrical and electronic equipment.
By ensuring that this equipment is disposed of correctly you will help prevent potential negative consequences for the environment and human
health, which could otherwise be caused by inappropriate waste handling of this product.
The recycling of materials will help to conserve natural resources.
For more information please contact your local council or waste disposal service.
Important Safeguards & Precautions
1. This Unit is for indoor use only.
2. Do not expose to dust, direct sunlight, wet weather conditions, high humidity, high temperatures or mechanical shock.
3. Do not expose the unit, to splashing, dripping rain or moisture. Do not immerse in liquid.
4. Do not disassemble; there are no serviceable parts inside.
5. Do not use if the equipment is damaged.
6. Never carry the unit by its cables.
7. For external cleaning, use a soft, clean, damp cloth only.
8. Use of detergents may damage the cabinet finish.
9. Only use the cables that are supplied with this equipment.
10. The socket-outlet shall be installed near the equipment and shall be easily accessible.
11. If the power cable is damaged, it must be replaced by the manufacturer, its after-sales service or by a similarly qualified person in order to avoid any
dangers.
12. This device is not designed to be used by anyone (including children) with impaired physical, sensory or mental capacity, or by anyone without appropriate experience or knowledge unless they have received prior guidance or instructions related to the use of this device from someone who is responsible for their safety. Children should be supervised to ensure that they do not play with the device.
Battery Leakage
Important Safeguards & Precautions
1. This Unit is for indoor use only.
2. Do not expose to dust, direct sunlight, wet weather conditions, high humidity, high temperatures or mechanical shock.
3. Do not expose the unit, to splashing, dripping rain or moisture. Do not immerse in liquid.
4. Do not disassemble; there are no serviceable parts inside.
5. Do not use if the equipment is damaged.
6. Rechargeable batteries are to be removed from the equipment before being charged.
7. Rechargeable batteries are only to be charged under adult supervision.
8. Exhausted batteries are to be removed from the toy.
9. The supply terminals are not to be short-circuited.
10. Do not mix used and new batteries (replace all batteries at the same time).
11. Do not mix different brands of batteries.
12. Do not leave batteries in this product for long periods of non-use.
13. Do not put the batteries in backwards. Make sure that the positive (+) and negative (-) ends are facing in the correct directions.
Insert the negative end first. When removing batteries, remove the positive end first.
14. Do not dispose of batteries in a fire.
To avoid battery leakage
1. Non-rechargeable batteries are not to be recharged.
2. Rechargeable batteries are to be removed from the toy before being charged.
3. Rechargeable batteries are only to be charged under adult supervision.
4. Exhausted batteries are to be removed from the toy.
5. The supply terminals are not to be short-circuited.
6. Do not mix used and new batteries (replace all batteries at the same time).
7. Do not mix different brands of batteries.
8. We recommend the use of alkaline batteries.
9. Do not leave batteries in this product for long periods of non-use.
10. Please read the battery instructions very carefully if using rechargeable batteries.
11. Do not put the batteries in backwards. Make sure that the positive (+) and negative (-) ends are facing in the correct directions.
Insert the negative end first. When removing batteries, remove the positive end first.
12. Do not dispose of batteries in a fire.
Important Safety Notice
Leakage of battery acid can cause personal injury as well as damage to your product.
If leaked battery fluid comes into contact with your eyes, immediately flush your eyes thoroughly with water and see a doctor, as it may
result in blindness or other injury.
If leaked battery fluid comes into contact with your body or hands, wash thoroughly with water.
If leaked battery fluid comes into contact with the product, carefully wipe the product, avoiding direct contact with your hands.
Dispose of batteries in accordance with Local and National Disposal Regulations.
1. If at any time whilst using this product you feel pain, weakness, numbness or tingling in your hands, wrists, elbows or shoulders we recommend that you
cease using it until these symptoms subside.
2. We recommend that you take frequent breaks of fifteen minutes every hour & hold the controller with a light grip while playing a game.
TECHNICAL HELPLINE INFORMATION
The Technical Helpline is a live one-to-one service
UK: 0905 710 0015
Hours: 10:00am till 5:00pm, Monday to Friday
(All calls are charged at 30 pence per minute. All callers must be over 16 years of age. Permission must be obtained from the person paying the bill. Parental
supervision is recommended).
Eire: 154 056 3001
Hours: 10:00am till 5:00pm, Monday to Friday
(All calls are charged at 60 euro cents per minute. All callers must be over 16 years of age. Permission must be obtained from the person paying the bill.
Parental supervision is recommended).
To ensure that your call is handled quickly and effectively please ensure that you have the model number and any other relevant information regarding your
product.
Calls may be recorded for training purposes.