1
COPYRIGHT
Copyright 2010 by Tandberg Data. All rights reserved. This item and the information
contained herein are the property of Tandberg Data. No part of this document may be
reproduced, transmitted, transcribed, stored in a retrieval system, or translated into any
language or computer language in any form or by any means, electronic, mechanical,
magnetic, optical, chemical, manual, or otherwise, without the express written
permission of Tandberg Data.
DISCLAIMER
Tandberg Data makes no representation or warranties with respect to the contents of
this document and specifically disclaims any implied warranties of merchantability or
fitness for any particular purpose. Further, Tandberg Data reserves the right to revise
this publication without obligation of Tandberg Data to notify any person or organization
of such revision or changes.
TRADEMARK
NOTICES
Tandberg Data StorageLibrary, StorageLoader, SecureService, DPS1000 Series, DPS
2000, VXA, SLR, RDX QuikStor, AccuVault, and AccuGuard are trademarks of Tandberg
Data. RDX is a registered trademark of ProStor Systems. All other product names are
trademarks or registered trademarks of their respective owners.
PART NUMBER
REVISION HISTORY
1019661 Revision A
Revision Date
A
Description
September 2010 Initial release.
Note: The most current information about this product is available at Tandberg
Data’s web site (www.tandbergdata.com).
II
1019661
PRODUCT MANUAL
Preliminary
PRODUCT
WARRANTY
CAUTION
The AccuVault RDX by Tandberg Data Corporation is warranted to be free from defects
in materials, parts, and workmanship and will conform to the current product
specification upon delivery. For the specific details of your warranty, refer to your sales
contract or contact the company from which the library was purchased.
The warranty for the appliance shall not apply to failures caused by:
Physical abuse or use not consistent with the operating instructions or product
specifications.
Repair or modification by any one other than Tandberg Data’s personnel or agent
in a manner differing from the maintenance instructions provided by Tandberg
Data.
Removal of the Tandberg Data identification label(s).
Physical abuse due to improper packaging of returned unit.
Note: Refer to the end user license agreement (see Appendix C) for additional
product warranty information regarding Windows Storage Server 2008.
If problems with the AccuVault RDX occur, contact your maintenance organization; do
not void the product warranty by allowing untrained or unauthorized personnel to
attempt repairs.
Caution
CONTACTING
TANDBERG DATA
CORPORATION
Returning the AccuVault RDX in unauthorized packaging may damage the unit and void
the warranty. If you are returning the unit for repair, package it in its original packaging (or
in replacement packaging obtained from your vendor.)
Visit the Support section of the Tandberg Data web site
(http://www.tandbergdata.com) for information on contacting Technical Support.
SEPTEMBER 2010
ACCUVAULT RDX
Preliminary
III
NOTES
IV
1019661
PRODUCT MANUAL
Preliminary
Contents
AccuVault RDX Product Manual i
About This Manual . . . . . . . . . . . . . . . . . . . . . . . . . . . . . . . . . . . . . . vii
1 Product Overview . . . . . . . . . . . . . . . . . . . . . . . . . . . . . . 1
AccuVault RDX System Components . . . . . . . . . . . . . . . . . . . . . . . . . 2
AccuGuard Enterprise Software Features. . . . . . . . . . . . . . . . . . . . . . . 3
AccuGuard Enterprise User Interface Overview . . . . . . . . . . . . . . . . . 6
Best Practices . . . . . . . . . . . . . . . . . . . . . . . . . . . . . . . . . . . . . . . . . . 10
2 Installation and Setup . . . . . . . . . . . . . . . . . . . . . . . . . . 15
Software System Requirements . . . . . . . . . . . . . . . . . . . . . . . . . . . . . 16
Recommended Network Infrastructure . . . . . . . . . . . . . . . . . . . . . . . 16
Installation Overview . . . . . . . . . . . . . . . . . . . . . . . . . . . . . . . . . . . . 17
Step 1 — Unpack the AccuVault RDX . . . . . . . . . . . . . . . . . . . . . . . 17
Step 2 — Connect Network and Power Cables . . . . . . . . . . . . . . . . . 18
Step 3 — Configure AccuVault RDX LCD Panel . . . . . . . . . . . . . . . . 18
Step 4 — Connect to the AccuVault RDX via Remote Desktop . . . . . 19
Step 5 — Configure Windows Storage Server Settings . . . . . . . . . . . . 20
Step 6 — Verify System Configuration on Remote Clients . . . . . . . . . 23
Step 7 — Run the AccuGuard Enterprise software . . . . . . . . . . . . . . 25
Step 8 — Add Remote Computers . . . . . . . . . . . . . . . . . . . . . . . . . . 27
Step 9 — Create a Data Protection Plan . . . . . . . . . . . . . . . . . . . . . . 29
Step 10 — Create a Local Protection Plan (optional) . . . . . . . . . . . . . 32
Step 11 — Schedule a Store Copy . . . . . . . . . . . . . . . . . . . . . . . . . . 34
3 Remote Computers . . . . . . . . . . . . . . . . . . . . . . . . . . . . 37
Adding Remote Computers. . . . . . . . . . . . . . . . . . . . . . . . . . . . . . . . 38
4 Store Management. . . . . . . . . . . . . . . . . . . . . . . . . . . . . 39
Adding Storage . . . . . . . . . . . . . . . . . . . . . . . . . . . . . . . . . . . . . . . . . 40
Using Existing Storage . . . . . . . . . . . . . . . . . . . . . . . . . . . . . . . . . . . . 43
Removing Storage. . . . . . . . . . . . . . . . . . . . . . . . . . . . . . . . . . . . . . . 43
Creating Store Tasks . . . . . . . . . . . . . . . . . . . . . . . . . . . . . . . . . . . . . 44
Describing Store Actions . . . . . . . . . . . . . . . . . . . . . . . . . . . . . . . . . . 52
Using Store Properties . . . . . . . . . . . . . . . . . . . . . . . . . . . . . . . . . . . 53
SEPTEMBER 2010
ACCUVAULT RDX
Preliminary
v
5 Protection Plans . . . . . . . . . . . . . . . . . . . . . . . . . . . . . . . 55
Creating Protection Plans . . . . . . . . . . . . . . . . . . . . . . . . . . . . . . . . .
Scheduling Protection Plans . . . . . . . . . . . . . . . . . . . . . . . . . . . . . . .
Running, Editing, and Removing a Plan . . . . . . . . . . . . . . . . . . . . . .
Viewing Protection Plan Results . . . . . . . . . . . . . . . . . . . . . . . . . . . .
56
61
62
66
6 Archived Data. . . . . . . . . . . . . . . . . . . . . . . . . . . . . . . . . 69
Finding a Protection Plan Archive Time . . . . . . . . . . . . . . . . . . . . . .
Exploring and Restoring Folders and Files . . . . . . . . . . . . . . . . . . . . .
Restoring Exchange Storage Groups . . . . . . . . . . . . . . . . . . . . . . . . .
Restoring SQL Server Databases . . . . . . . . . . . . . . . . . . . . . . . . . . . .
70
70
74
75
A Troubleshooting . . . . . . . . . . . . . . . . . . . . . . . . . . . . . . . 77
Log Files. . . . . . . . . . . . . . . . . . . . . . . . . . . . . . . . . . . . . . . . . . . . . . 77
Remote Computer Connection Issues. . . . . . . . . . . . . . . . . . . . . . . . 79
B Specifications . . . . . . . . . . . . . . . . . . . . . . . . . . . . . . . . . 83
Physical Specifications . . . . . . . . . . . . . . . . . . . . . . . . . . . . . . . . . . .
Software Specifications . . . . . . . . . . . . . . . . . . . . . . . . . . . . . . . . . .
Power Specifications
................................
Environmental Specifications . . . . . . . . . . . . . . . . . . . . . . . . . . . . .
84
84
84
84
C Warranty and EULA Information . . . . . . . . . . . . . . . . . . 85
Product Limited Warranty . . . . . . . . . . . . . . . . . . . . . . . . . . . . . . . . 86
End User License Agreement — Basic . . . . . . . . . . . . . . . . . . . . . . . 89
Index . . . . . . . . . . . . . . . . . . . . . . . . . . . . . . . . . . . . . . . . . . 93
vi
1019661
PRODUCT MANUAL
Preliminary
ABOUT THIS MANUAL
This manual describes how to set up and operate the AccuVault RDX and how
to use AccuGuard Enterprise software to protect your data.
NOTICE–This manual may contain some preliminary information
that may change without notice.
WHERE TO LOOK FOR INFORMATION
Installation and software setup
Read Chapter 1 for an overview of the AccuVault RDX’s features and
components.
Read Chapter 2 for information on how to install and setup the AccuVault
RDX.
Using AccuGuard Enterprise software
When you are ready to back up your data:
Read Chapter 3 for information on adding remote backup clients.
Read Chapter 4 to learn about AccuGuard store management.
Read Chapter 5 for information on managing protection plans.
Read Chapter 6 for information on how to access and restore archived data.
Supplemental Information
Read Appendix A for troubleshooting information.
Read Appendix B for product specifications.
Read Appendix C for product warranty and end user license agreement
(EULA) information.
RELATED PUBLICATIONS
For additional information about theAccuVault RDX, refer to the following
publications, which are available at www.tandbergdata.com.
AccuVault RDX with AccuGuard Quick Start Guide, part number 1019089
AccuVault Knowledge Base articles available online at www.tandbergdata.com
SEPTEMBER 2010
ACCUVAULT RDX
Preliminary
VII
NOTES
VIII
1019661
PRODUCT MANUAL
Preliminary
1
PRODUCT OVERVIEW
The Tandberg Data AccuVault RDX is a centrally-managed, LAN-attached,
disk-based appliance that provides an affordable, all-in-one data protection
solution for small-to-medium businesses with limited IT resources.
The AccuVault RDX runs Windows Storage Server 2008 and comes installed
with AccuGuard Enterprise data protection software. The combination of the
AccuVault RDX with AccuGuard allows you to protect up to five remote clients
from one central data location.
This chapter provides an overview of the AccuVault RDX’s hardware and
software features and includes the following sections:
AccuVault RDX system components
AccuGuard Enterprise software features
AccuGuard Enterprise user interface overview
Best practices
SEPTEMBER 2010
ACCUVAULT RDX
Preliminary
1
CHAPTER 1—PRODUCT OVERVIEW
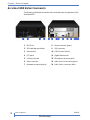
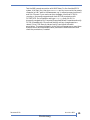
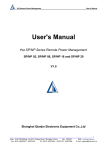
ACCUVAULT RDX SYSTEM COMPONENTS
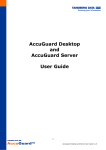
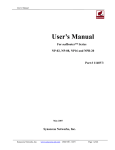
The following illustration shows the front and back panel components of the
AccuVault RDX.
2
1
RDX Dock
8
Mouse connector (green)
2
RDX cartridge eject button
9
VGA connector
3
Power button
10 USB 2.0 ports (4 each)
4
LCD panel
11 Gigabit Ethernet port
5
K-lock security slot
12 Microphone connector (pink)
6
Power connector
13 Audio Line-Out connector (green)
7
Keyboard connector (purple)
14 Audio Line-In connector (blue)
1019661
PRODUCT MANUAL
Preliminary
ACCUGUARD ENTERPRISE SOFTWARE FEATURES
AccuGuard Enterprise is designed for use with hard-disk storage. Built on
innovative deduplication technology, it virtually eliminates redundant data
because unique data is stored only once. The effective storage capacity of the
disk is significantly increased, making backup to disk fast, easy, and affordable.
Some key features of this software are:
Unique data stored only once (data deduplication)
Archived data always available on disk
Data recovery is easy and instantaneous
Fast backups
Easy to use interface
Using protection plans, you can easily select the data you wish to protect. Each
backup contains all of the files in the selected data set as they exist at the time
of the protection plan run. There are no cumbersome incremental or
differential backups to deal with.
At any time you can view all of the files you have backed up or archived.
During regular use, you will work with three main features in AccuGuard
Enterprise:
Protection Plans
Archived Data Viewing
Archived Data Restoring
SEPTEMBER 2010
ACCUVAULT RDX
Preliminary
3
CHAPTER 1—PRODUCT OVERVIEW
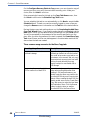
PROTECTION PLANS
A protection plan defines which data is to be archived, which store to save it
in, and when the plan runs. A protection plan keeps track of all the selected
items and, after its initial run, will store only new and changed information. At
the same time, each plan run creates a full recovery point.
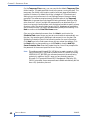
There are three types of protection plans:
Protection Plan
Type
Description
Files and Folders
The Files and Folders protection plan protects selected
files and folders.
SQL Databases
The SQL Server protection plan lets you protect Microsoft
SQL Server databases. (Only available if Microsoft SQL
Server is installed on the computer being protected)
Exchange Storage
Groups
The Exchange protection plan lets you protect Microsoft
Exchange Storage Groups. (Only available if Microsoft
Exchange is installed on the computer being protected)
EXCLUDED FILES
AccuGuard Enterprise will not archive these Windows file types:
Temporary Internet files
Temp folder
Digital Rights Management folder
Recycle Bin
Power Management files, such as files governing Hibernation
Memory Page file
System Volume Information files, System Restore files, Automated System
Restore (ASR) files
4
1019661
PRODUCT MANUAL
Preliminary
ARCHIVED DATA
With the exception of purged data, your backup storage contains all versions
of your stored files. The software detects, at a sub-file level, data that has
changed between backups and stores only the unique data necessary to
protect the versions of the files it encounters. It can reconstruct and restore all
versions of files that have been protected.
The AccuGuard user interface makes it easy to find each version of a file so
you can quickly restore the latest version of the file or a previous version of the
file. See Exploring and Restoring Folders and Files on page 70 for more
information.
RESTORE DATA
Restoring data is quick and easy.
To find and restore your data, use any of the following methods:
Use the search bar and enter whole filenames, partial filenames, or wild card
entries such as *.doc.
Explore a protection plan to view folders and files as they existed at a specific
time.
Restore the entire contents of a protection plan run.
See Exploring and Restoring Folders and Files page 70 for more information.
SEPTEMBER 2010
ACCUVAULT RDX
Preliminary
5
CHAPTER 1—PRODUCT OVERVIEW
ACCUGUARD ENTERPRISE USER INTERFACE OVERVIEW
This section provides a general overview of the AccuGuard Enterprise.
AccuGuard Enterprise interface uses a standard Microsoft Management
Console (MMC) three-pane view.
The left pane, or console tree, provides a hierarchical view of the whole system.
By selecting the Archive Manager folder at the top of the console tree, you can
manage areas that affect the overall system, such as managing license keys and
checking for product updates.
Each folder type in the console tree has specific actions defined. Actions can be
initiated from the Actions (right-hand) console pane, the Action drop-down
menu on the top menu bar, or by right-clicking the folder you wish to perform
the action on.
The center console pane is the status or results pane. This is where you see
information related to the currently selected folder in the console tree. When
actions are available for items in the center pane, they will be available in the
actions pane as a sub-group of actions.
When AccuGuard Enterprise is initially started, Archive Manager will be the
only folder shown in the console tree, and you will be prompted to activate
your software. After activation the console tree can be expanded to show
Archive Manager (top level), with Stores, Local Plans, and Remote
Computers underneath.
ARCHIVE MANAGER
The top-level category in the console tree is called Archive Manager. Actions
defined for Archive Manager affect the overall system.
Select the About action to view product version information. From here you
can also gather product logs and history information; useful when working
with product support personnel.
Select the Check for Updates action to see if any product updates are
available. If so, you will be given the opportunity to download and install
them. Prior to updating, you should close any open Archive Manager dialogs.
Select the Properties action to manage license keys, checkup reporting, and
ViewStor settings.
6
1019661
PRODUCT MANUAL
Preliminary
STORES
A store is a storage location targeted by local and remote protection plans for
keeping archived data (common content) and associated cataloging
information. After a store is created, it will appear in the Stores folder.
From the Stores folder, you can see and manage storage that has been
prepared for the software. Information such as the storage name, size of the
storage, status (Available or Offline), and the drive designation of the disk are
displayed in the status (center) pane.
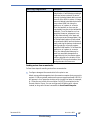
Part of creating a store is preparing the storage. As part of the store
preparation process, the software automatically creates the following folders:
Store Sub-Folders
Description
Archives
Archives contain time-stamped catalog entries (restore
points) grouped by plan name.
Quarantined Items
Stores can be verified for referential and data integrity. Any
data found to be corrupt is moved to this folder. The store
will attempt to self-heal on a subsequent plan run by
putting a good version of the quarantined item into the
store.
Recycle Bin
When an item is expired, its catalog entry is kept in this
folder until the item is purged from the system.
When a protection plan runs for the first time, an archive is created in the store
that is targeted by the plan. This archive appears in the left pane console tree
as a sub-folder of the Archives folder of the store, and it is given the same
name as the protection plan. A recovery point is also created for exploring and
restoring this point in time. Each subsequent run of the plan adds another
recovery point to the archive.
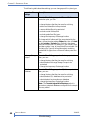
Actions available for an archive include:
Archive Action
Description
Restore
To view recovery points, select the archive and then click
its Restore action. Days containing recovery points are
highlighted in bold font in the calendar. Select the
recovery point you want to restore, and the Restore
button at the bottom right of the screen will become
active. Click Restore and a restore dialog box appears.
Refer to Chapter 6 on page 69 for more information. If the
recovery point was from a Files and Folders protection
plan, the Explore button will also become active, and you
can explore and restore files.
SEPTEMBER 2010
ACCUVAULT RDX
Preliminary
7
CHAPTER 1—PRODUCT OVERVIEW
Archive Action
Description
Search
In addition to using the Restore action to explore and
restore recovery points, you can search an archive by
clicking its Search action. Refer to Using the Search Bar on
page 70 for more information.
Properties
From the Properties action, you can define expiration
settings for the archive that override the expiration settings
of the parent store. See Store Expiration on page 50 for
information about expiring data from a store.
LOCAL PLANS
The Local Plans folder contains protection plans configured for protecting
local data (versus data on remote computers). From here you can create and
manage plans to protect local data.
Actions available for Local Plans include:
Local Plan Action
Description
Protection Plans
Select the Protection Plans action to show all local
protection plans for the AccuVault RDX. From this view,
each local plan can be manually run, reconfigured,
scheduled, and deleted.
History
You can see the history for all local plans by selecting the
History action. Each time a plan runs or is restored, an
entry is added to the history list. By selecting an entry from
the list, you can click the View Log link in the Result
Details area to view the run log.
Restore
To view local plan recovery points, select the Local Plans
folder, and click the Restore action. Days containing
recovery points are highlighted in bold font in the
calendar. Select the recovery point you want to restore,
and the Restore button at the bottom right of the screen
becomes active. Click Restore and a restore dialog box
appears. Refer to Chapter 6 on page 69 for more
information. If the recovery point was from a Files and
Folders protection plan, the Explore button will also
become active.
Search
In addition to using the Restore action to explore and
restore local plan recovery points, you can search for files
archived by local plans by clicking the Search action.
Refer to Using the Search Bar on page 70 for more
information.
Export Plan History You can export protection plan histories into an Excel
spreadsheet (.xls) format.
8
1019661
PRODUCT MANUAL
Preliminary
Local Plan Action
Description
Event Viewer /
View Log
To aid in troubleshooting, this software records its activity
in log files and writes significant events to the Windows
Application Event Log. See Log Files on page 77 for more
information. Clicking the Event Viewer action for local
plans opens the Windows Event Viewer for the AccuVault
RDX. Click the View Log action for local plans to see the
commands that have run for local plans and store tasks.
REMOTE COMPUTERS
The Remote Computers folder contains the remote computers (clients) section
of the console tree. This folder has an All Computers group underneath for
adding your remote computers to the software.
At the top level, actions for Remote Computers include:
Remote Computer Description
Action
Add Group
For organizational purposes, you can group your remote
computers together under a meaningful heading, or group
name. For instance, any remote computers you add to the
All Computers folder are listed in the All Computers
group. To streamline organization, you could create a
specific group for all computers in the sales department.
To create a new group, click Add Group and enter a
name. Any computer you add to your custom group is
automatically added to the All Computers group.
Conversely, any computer you remove from your custom
group is not automatically removed from the All
Computers group. The computer is not completely
removed until you remove it from the All Computers
group.
View Log
Click the View Log action for remote computers to see the
commands that have run for remote computer plans. See
Log Files on page 77 for more information.
Actions available for remote computers in the sub-folder Remote Computers
section include:
Remote Computer Description
Action
Protection Plans
Select the Protection Plans action to show all protection
plans for the selected remote computer. From this view,
each plan can be manually run, reconfigured, scheduled,
and deleted.
SEPTEMBER 2010
ACCUVAULT RDX
Preliminary
9
CHAPTER 1—PRODUCT OVERVIEW
Remote Computer Description
Action
History
You can see the history for all plans for a remote computer
by selecting the History action. Each time a plan runs or is
restored, an entry is added to the history list. To view the
run log for a given plan, select an entry from the history
list. Next, click the View Log link located in the Result
Details area. The run log for the selected entry appears.
See also, Viewing Protection Plan Results on page 66.
Restore
All protection plan recovery points for a remote computer
can be seen by selecting the remote computer, and then
clicking the Restore action. Days that contain recovery
points are highlighted in bold font in the calendar. To
restore a recovery point, select it from the list. Click the
Restore button in the lower-right area of the screen. A
restore dialog box appears. Refer to Chapter 6 on page 69
for more information. If the recovery point was from a
Files and Folders protection plan, you can also click the
Explore button to restore files.
Search
In addition to using Restore to find and restore archived
files, you can search for files archived by remote computer
protection plans by clicking the Search action. Refer to
Using the Search Bar on page 70 for more information.
Export Plan History You can export protection plan histories into an Excel
spreadsheet (.xls) format.
Event Viewer
To aid in troubleshooting, this software records its activity
in log files and writes significant events to the Windows
Application Event Log. Clicking the Event Viewer action
for a remote computer opens the Windows Event Viewer
for the remote computer.
BEST PRACTICES
This section provides suggestions that will help you obtain the best experience
with your AccuVault RDX system.
Getting the most from AccuGuard Enterprise
Managing User Accounts
Running a Baseline Protection Plan
Backing up and Restoring Configuration Settings
10
1019661
PRODUCT MANUAL
Preliminary
GETTING THE MOST FROM ACCUGUARD ENTERPRISE
As mentioned previously, AccuGuard Enterprise uses an advanced technology
called data deduplication or capacity optimization. This technology reduces
standard business data by as much as a twentieth of the original size of the
data during backup to disk. It achieves this level of optimization by removing
all redundant data from the files being archived and storing only the unique
data over time while allowing virtually instant point-in-time restore of the
data. Additionally, the software enhances data reduction by performing LZ
data compression.
Dynamic files and fixed files
Files on a computer may be classified generally as either fixed or dynamic.
Fixed files are files whose content is created and never, or rarely, changes. Files
such as video, music, images (pictures), and the like are examples of fixed
content files. Files such as word processing documents, spreadsheets,
presentations, projects, and the like are examples of dynamic content files
because they may be opened and edited.
As noted above, this software reduces the size of your backups dramatically.
This dramatic reduction occurs because during each plan run, the software
finds the changed bytes and metadata of each file and stores only those
changes to the disk. Therefore, by creating a protection plan that targets the
largest number of dynamic files that are most likely to change over time, you
will enable the software to achieve the greatest data reduction.
Backup scenarios
This software offers you the flexibility to create backup processes that fit your
needs.
You can choose exactly which folders to back up, and you can run protection
plans as often as needed, even more than once per day.
The software allows you to designate specific storage for specific protection
plans.
When determining how you want to store your data by using this software, it
may help to think about what files you might need to recover most often, or
which files are most important, and schedule the protection plans that protect
those files to run most often.
SEPTEMBER 2010
ACCUVAULT RDX
Preliminary
11
CHAPTER 1—PRODUCT OVERVIEW
MANAGING USER ACCOUNTS
Windows denies or grants access to its resources by means of user accounts.
When running this software in a domain, create a domain user account solely
for use by this software. Add the account to the Domain Admin Group,
thereby allowing the account access to required resources. Specify this account
from the Create Protection Plan (or store task) wizard schedule page, or in the
Run as field of the scheduled task of each protection plan.
If the AccuVault RDX or the remote computer is in a workgroup, not a domain,
then a matching user account and password must be created for the AccuVault
RDX and each remote computer. This user account must be a member of the
local Administrators group. Log on to the AccuVault RDX with this account.
When creating remote computer protection plans, specify the account for the
remote computer in the Run as field of the scheduled task. This configuration
will allow credentials to pass through to the other computer for access to
necessary resources.
Note: Do not use administrator accounts with blank passwords.
RUNNING A BASELINE PROTECTION PLAN
Follow these guidelines when you run a protection plan for the first time:
1. Add the remote backup clients in AccuGuard Enterprise (see page 27).
2. Create a protection plan for each remote computer (see page 29).
3. Schedule the initial protection plan for each remote computer to run
one-time. Run each plan at separate times, so that at any given time, you
only have one plan running.
By following these guidelines, you will have created a baseline protection plan
for each remote computer. Once the initial protection plans have completed,
you can schedule multiple protection plans to run simultaneously.
12
1019661
PRODUCT MANUAL
Preliminary
BACKING UP AND RESTORING CONFIGURATION SETTINGS
Backing Up (Export)
An off-site copy of your configuration settings should be saved to protect
against site-wide disasters. In addition to your original installation media and
your purchased license keys (if applicable), you should save the following:
Installation directory
<installation directory>\*.config
<installation directory>\SystemExcludes.xml
<installation directory>\Cache directory
<installation directory>\Configurations directory
<installation directory>\Logs directory (optional)
<installation directory>\Remote\*.config
<installation directory>\Remote\SystemExcludes.xml
<installation directory>\Remote\Configurations directory
<installation directory>\Remote\Logs directory (optional)
Storage
You should create copies of your storage locations by using store copy tasks.
See Store Copy for more information.
RESTORING (IMPORT)
To restore your configuration settings:
1. Re-install the software. Go to the Support section of the Tandberg Data web
site for software download information.
2. Replace the evaluation license keys with your saved license keys.
3. Replace the files and folders with the ones from your backup. You should
close AccuGuard prior to performing this step.
4. Reconnect using the Use Existing option on the Storage Name screen of the
Add Store Wizard.
5. If applicable, reconfigure store expiration and verification task schedules by
opening the property page of each store and selecting the appropriate tabs.
6. If applicable, reconfigure local protection plan schedules by selecting the
Edit Scheduled Task action of each plan.
7. If applicable, reconfigure the checkup report schedule by opening the
AccuGuard property page and selecting the Checkup Report tab.
8. Restart your computer for the settings to take effect.
SEPTEMBER 2010
ACCUVAULT RDX
Preliminary
13
CHAPTER 1—PRODUCT OVERVIEW
NOTES
14
1019661
PRODUCT MANUAL
Preliminary
2
INSTALLATION AND SETUP
This chapter provides information on how to install and configure the
AccuVault RDX and to create data protection plans for your network.
This chapter contains the following sections:
Software System Requirements
Recommended Network Infrastructure
Installation Overview
SEPTEMBER 2010
ACCUVAULT RDX
Preliminary
15
CHAPTER 2—INSTALLATION AND SETUP
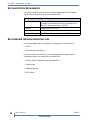
SOFTWARE SYSTEM REQUIREMENTS
The following table lists the minimum system requirements for the remote
clients that will be backed up by the AccuVault RDX:
AccuGuard Enterprise Protected Clients
Operating System
Windows XP Professional, Windows Vista, Windows 7
Professional, Windows Server 2003, Windows Server
2003 R2, and Windows Server 2008 R2
Processor
Single Core 1.0 GHz CPU
Memory
250 MB RAM
Network Interface
100 MB Network Interface Card with TCP/IP support
RECOMMENDED NETWORK INFRASTRUCTURE
It is recommended that your network is configured with the following:
DHCP
Microsoft Active Directory
If you do not plan to use DHCP, you must obtain the following network
information before you install your AccuVault RDX:
A valid, static IP address for the AccuVault RDX
Subnet mask
Gateway address
DNS Server
16
1019661
PRODUCT MANUAL
Preliminary
INSTALLATION OVERVIEW
Here is an overview of the procedures provided in this chapter. You must
complete the steps below to install and configure the AccuVault RDX and to
create data protection plans for your network.
Installation Step
go to...
1 – Unpack the AccuVault RDX
page 17
2 – Attach network and power cables
page 17
3 – Configure AccuVault RDX LCD panel (if necessary)
page 18
4 – Connect to the AccuVault RDX via remote desktop
page 19
5 – Configure Windows Storage Server settings
page 20
6 – Verify system configuration on remote computer clients
page 23
7 – Run AccuGuard Enterprise software
page 25
8 – Add remote backup clients
page 27
9 – Create one or more data protection plans
page 29
10 – Create a local protection plan (optional)
page 32
11 – Create a store copy
page 34
STEP 1 — UNPACK THE ACCUVAULT RDX
Follow these guidelines when you unpack the hardware:
1. Keep the packing materials and box in case you need to ship the unit later.
2.
Place the unit horizontally on a flat, stable work surface. Apply the bumper
guards included in the accessory kit to the bottom, if desired.
If you place the unit vertically, use the stand included in the accessory kit.
3. Verify that the following items are included in the accessory kit:
Ethernet cable (2 each)
Power cords – one each for North America and Europe
RDX 1 TB Data Cartridge
AccuGuard Enterprise license activation card
Bumper guards (to mount on bottom of the unit if it is placed
horizontally)
Hardware stand (if unit is placed vertically)
SEPTEMBER 2010
ACCUVAULT RDX
Preliminary
17
CHAPTER 2—INSTALLATION AND SETUP
STEP 2 — CONNECT NETWORK AND POWER CABLES
1. Connect the AccuVault RDX network port to an ethernet network port
(switch, hub, or router).
2. Connect the power cord that is appropriate for your region to the AccuVault
RDX.
3. Turn the power on by pushing the power button that is located on the front
of the AccuVault RDX unit.
STEP 3 — CONFIGURE ACCUVAULT RDX LCD PANEL
If the network where you are installing the AccuVault RDX does not use
DHCP, you must manually enter an IP address for the hardware via the LCD
panel.
CONFIGURE IP ADDRESS
To manually configure an IP address via the LCD panel:
1. Press [Details] on the LCD panel window.
2. Press [Modify].
3. At the next screen, press [Modify] again.
4. Using the touch keypad, enter the IP address for the AccuVault RDX. Press
[Accept] when you are finished.
5. Enter the Gateway address. Press [Accept].
6. Enter the Subnet Mask. Press [Accept].
7. Enter the DNS. Press [Accept].
8. Press [Accept] again to return to the Home screen.
SET LANGUAGE
You can also change the language that the LCD panel displays, if necessary.
The default language is English.
To change the language:
1. Press [Menu] on the LCD Panel window.
2. Press [Language].
3. Select the desired language from the menu.
4. Press [Accept].
18
1019661
PRODUCT MANUAL
Preliminary
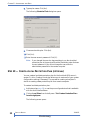
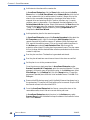
STEP 4 — CONNECT TO THE ACCUVAULT RDX VIA REMOTE DESKTOP
You can connect to the AccuVault RDX unit remotely using a computer that is
on the same network as the AccuVault RDX.
Note: As an alternate method, you can directly connect a monitor, keyboard,
and mouse to the AccuVault RDX.
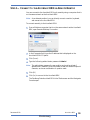
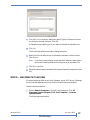
To connect remotely to the AccuVault RDX:
1. From a Windows computer that is on the same network as the AccuVault
RDX, open Remote Desktop Connection.
.
2. In the Computer field, type the IP address that is displayed on the
AccuVault RDX LCD panel.
3. Click [Connect].
4. Type the following administrator password: Admin!
Note: The administrator password is case sensitive and must be at least 6
alphanumeric characters, plus incorporate at least one additional special
character, such as an exclamation or question mark.
5. Click [OK].
6. Click [Yes] to connect to the AccuVault RDX.
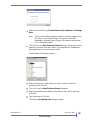
The Tandberg Data AccuVault RDX Initial Tasks screen and the Navigator
Console open.
SEPTEMBER 2010
ACCUVAULT RDX
Preliminary
19
CHAPTER 2—INSTALLATION AND SETUP
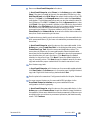
Initial Tasks screen
Navigator Console
7. For now, close the Navigator Console to proceed to the next step,
configuring initial Windows Server tasks.
STEP 5 — CONFIGURE WINDOWS STORAGE SERVER SETTINGS
Configure the following Windows Storage Server settings from the Tandberg
Data AccuVault RDX initial tasks window:
Set time zone.
Change the AccuVault RDX computer name. You must change the computer
name before creating any data protection plans. The plans use the computer
name as a link when archiving data.
Add the AccuVault RDX to the same network domain where the remote
computer clients reside. (Remote computer clients refers to the systems that
you intend to back up with the AccuGuard Enterprise software.)
Download and install any available critical Windows updates.
Set Regional and Language options from the Windows Control Panel (if
necessary).
Note: All other links listed in the initial tasks screen are provided for your
convenience. They are not required to run the AccuGuard Enterprise
software.
20
1019661
PRODUCT MANUAL
Preliminary
SETTING THE TIME ZONE
To set the time zone to your region:
1. Click Set time zone from the AccuVault RDX initial tasks window.
2. Click the appropriate buttons to reset the date and time zone for your
region. Click [OK] when you are finished.
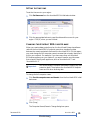
CHANGING THE ACCUVAULT RDX COMPUTER NAME
When you create a data protection plan, the AccuGuard Enterprise software
refers to the AccuVault RDX full computer name when transferring data
between the remote protected clients and the AccuVault RDX. For this reason,
you must change the full computer name to a name that uniquely identifies it
within your network. For example, if you have more than one AccuVault
RDX-series appliance on your network, you would need to provide names
that uniquely identify each appliance, such as “AccuVault unit 1” and
“AccuVault unit 2.”
!
Important
You must change the computer name before creating any data
protection plans. The plans use the AccuVault RDX computer
name as a link when archiving data.
To change the full computer name:
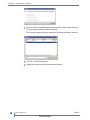
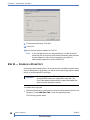
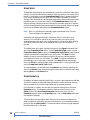
1. Click Provide computer name and domain from the AccuVault RDX initial
task screen.
2. Click [Change].
The Computer Name/Domain Change dialog box opens.
SEPTEMBER 2010
ACCUVAULT RDX
Preliminary
21
CHAPTER 2—INSTALLATION AND SETUP
3. Type a name that uniquely identifies the AccuVault RDX on your network.
Click [OK].
A dialog box opens alerting you that you must restart the server to apply
changes.
4. Click [OK] to restart the server.
Note: Do not add the domain at this time. Restart the server after adding the
computer name, then return to the dialog box to add the domain.
ADDING THE ACCUVAULT RDX TO THE DOMAIN
You must add the AccuVault RDX to the same network domain where your
remote computer clients reside. (Remote computer clients refers to the systems
that you intend to back up with the AccuGuard software.)
To add the AccuVault RDX to your network domain:
1. Click Provide computer name and domain from the AccuVault RDX initial
tasks window.
2. Click [Change].
The Computer Name/Domain Change dialog box opens.
3. Select the Domain radio button and type the network domain name.
!
Important
The remote computers that you intend to back up with the
AccuVault RDX must be members of the same domain.
A dialog box opens alerting you that you must restart the server to apply
changes.
4. Click [OK] to restart the server.
22
1019661
PRODUCT MANUAL
Preliminary
SETTING THE REGION AND LANGUAGE
To set the region and language:
1. Go to Start Control Panel Region and Languages (or may be Regional
and Language Options).
2. Make your desired changes to regional and language settings. Click [OK].
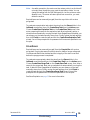
STEP 6 — VERIFY SYSTEM CONFIGURATION ON REMOTE CLIENTS
Initial Tasks screen
Navigator Console
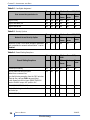
Verify that the following Windows system configurations are enabled as
described in the tables below. You must verify these system configuration
settings for every remote computer client that you intend to back up with the
AccuGuard software.
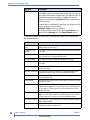
Table 2-1 Windows Services
XP
Vista 7
Windows Service
Status Set to Started/Automatic
Windows Server 2003,
2008
SQL
Server
Exchange File
Server
Server
COM+Event System
Yes
Yes
Yes
Yes
Yes
Yes
DCOM Server Process Launcher
Yes
Yes
Yes
Yes
Yes
Yes
Remote Procedure Call (RPC)
Yes
Yes
Yes
Yes
Yes
Yes
Remote Registry
Yes
Yes
Yes
Yes
Yes
Yes
SEPTEMBER 2010
ACCUVAULT RDX
Preliminary
23
CHAPTER 2—INSTALLATION AND SETUP
Table 2-2 User Rights Assignment
XP
Vista 7
User account has permission to
Windows Server 2003, 2008
SQL
Server
Exchange File
Server
Server
Log on locally
Yes
N/A
N/A
N/A
N/A
N/A
Log on as a batch job
Yes
Yes
Yes
Yes
Yes
Yes
Log on as a service
Yes
Yes
Yes
Yes
Yes
Yes
XP
Vista 7
Table 2-3 Security Options
Network Access Security Option
“Network Access: Do not allow storage of passwords Yes
and credentials for network authentication” is set to
disabled.
Yes
Yes
Windows Server 2003, 2008
SQL
Server
Exchange File
Server
Server
Yes
Yes
Yes
Table 2-4 Firewall Setting Exceptions
XP
Vista 7
Firewall Setting Exceptions
File and print sharing
Windows Server 2003,
2008
SQL
Server
Exchang
e
Server
File
Server
Yes
Yes
Yes
Yes
Yes
Yes
Remote administration exception
Yes
added from command line.
Type the following exception from the CMD window:
(Start Run type CMD press Enter)
"netsh firewall set service type=REMOTEADMIN
mode=ENABLE scope=ALL profile=ALL"
Yes
Yes
?
?
?
UDP 137,138,TCP 139, 445
Yes
Yes
Yes
N/A
N/A
N/A
Simple file sharing turned off on folders that need to
be backed up
Yes
N/A
N/A
N/A
N/A
N/A
UDP 1433, 1434
N/A
N/A
N/A
Yes
N/A
N/A
24
1019661
PRODUCT MANUAL
Preliminary
STEP 7 — RUN THE ACCUGUARD ENTERPRISE SOFTWARE
To run AccuGuard Enterprise, complete the steps in the following three
sections:
Obtain license keys
Launch software
Activate license keys
OBTAIN LICENSE KEYS
There are two license keys you must obtain and activate before you can use
the AccuGuard software:
The Enterprise key
The Enterprise Remote Computers key
To obtain the AccuGuard license keys:
1. Go to http://www.tandbergdata.com/login.
2. The Tandberg Data AccuGuard software activation screen opens.
3. Type your contact and company information.
4. At the bottom of the screen, type the promo code and activation code that
are printed on your AccuGuard license activation card. This activation card
was included in your accessory kit box that shipped with the AccuVault
RDX.
5. Click [Submit].
Your license keys will be emailed to the address you specified in the contact
information of the AccuGuard software activation screen.
SEPTEMBER 2010
ACCUVAULT RDX
Preliminary
25
CHAPTER 2—INSTALLATION AND SETUP
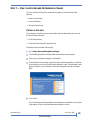
LAUNCH ACCUGUARD SOFTWARE
To launch the AccuGuard Enterprise software:
1. Click Start AccuGuard Data Protection Software located in the bottom-left
corner of the AccuVault RDX initial tasks window.
2. If software updates are available, the Enterprise Update wizard opens to
update the software. Click [Download] to start the process.
Note:
You can also verify you have the most current version of the software
by clicking Check for Updates... in the right pane of the AccuGuard
Enterprise interface.
ACTIVATE LICENSE KEYS
Once any software updates have completed, the following dialog box
opens in the AccuGuard Enterprise interface:
3. Click [Yes].
The following dialog box opens.
26
1019661
PRODUCT MANUAL
Preliminary
4. Click [Add]. The License Key dialog box opens. Type the Enterprise license
key that you received via email. Click [OK].
A dialog box opens asking you if you want to activate the software now.
5. Click [Yes].
The AccuGuard software activation dialog box opens.
6. Select the Internet radio button to activate the software via the Internet.
Click [Activate].
Note:
If you do not have Internet access, select the Telephone radio button
and contact Tandberg Data technical support for an activation PIN.
7. Click [OK] to confirm.
8. Repeat the above steps to activate the Enterprise Remote Computers license
key.
STEP 8 — ADD REMOTE COMPUTERS
A remote computer refers to any client (desktop, server, SQL Server, Exchange
Server) that has data backed up by the AccuGuard Enterprise software.
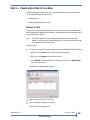
To add a remote computer:
1. Expand Remote Computers in the left-hand, tree pane. Click All
Computers from the left pane. Click “Add Computer...” from the
right-hand pane.
The following screen opens:
SEPTEMBER 2010
ACCUVAULT RDX
Preliminary
27
CHAPTER 2—INSTALLATION AND SETUP
2. Select one of the methods listed (browse network, search active directory,
or type computer name) to add a computer.
The following screen shows an example of the Browse Network method.
3. Click [OK] to add the computer.
4. Repeat the process to add more remote computers.
28
1019661
PRODUCT MANUAL
Preliminary
STEP 9 — CREATE A DATA PROTECTION PLAN
Creating a data protection plan for a remote computer is a two-part process.
This section describes the following:
Adding a store
Creating a data protection plan
ADDING A STORE
A store is a virtual storage location that contains archived, deduplicated data
and its associated cataloging information. A single store can be targeted by one
or more protection plans.
Note: AccuGuard ships with a preconfigured store that you can use to get
started. If you use the preconfigured store, you can skip this section and go
to Creating a data protection plan.
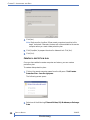
To add a store:
1.
Choose one of the following methods to open the Add Store Wizard dialog:
Right-click on Stores in the left, hierarchical-tree pane.
Right-click on Stores from the center pane.
Click Stores from either the left or center pane. Then, click Add a Store...
from the right pane.
The Add Store Wizard dialog opens.
2. Select the User (D:) disk. Click [Next].
3. Type a name for the store. Click [Next].
The Shared File dialog opens.
SEPTEMBER 2010
ACCUVAULT RDX
Preliminary
29
CHAPTER 2—INSTALLATION AND SETUP
4. Click [Next].
Note: Make sure the checkbox “Allow remote computers to archive to this
target” is selected. Otherwise, the store will not be available to the remote
computer when you create a data protection plan.
5. Click [Prepare{Now] to prepare the store for data archival. Click [Next].
6. Click [Finish].
CREATING A PROTECTION PLAN
Once you have added a remote computer and a store, you can create a
protection plan.
To create a data protection plan:
1. Click on the remote computer name from the left pane. Click Create a
Protection Plan... from the right pane.
The following screen opens:
2. Select one of the following: Files and Folders, SQL Databases, or Exchange
Data.
30
1019661
PRODUCT MANUAL
Preliminary
Note:
The AccuGuard software detects whether the remote computer runs
SQL Server or Microsoft Exchange. The options to select SQL
Databases or Exchange Data only apply if the remote computer has
SQL or Exchange installed.
3. Click [Add] from the Enter Folders to Protect dialog box. (These instructions
assume you selected Files and Folders. If you selected SQL Databases or
Exchange Data, the instructions are similar.)
The Browse for Folder dialog opens.
4. Select the folders that you want to include in the protection plan. Click [OK].
5. Click [Next] from the Enter Folders to Protect dialog box.
The following Select a Store dialog opens.
6. Select the store where the data for the protection plan will be archived.
Click [Next].
7. Select the “Override default temporary file location” checkbox and browse
for a temporary folder location. If you leave the checkbox unchecked, the
software will use the system drive as the default location. Click [Next].
SEPTEMBER 2010
ACCUVAULT RDX
Preliminary
31
CHAPTER 2—INSTALLATION AND SETUP
8. Type a plan name. Click [Next].
The following Scheduled Task dialog box opens.
9. Choose a schedule plan. Click [Next].
10. Click [Finish].
11. Enter the user account password. Click [OK].
Note:
If you changed the user who has permission to run the scheduled
protection plan in the previous Scheduled Task dialog, enter that user
account password. If you did not change the user, enter the
administrator password for the remote computer.
STEP 10 — CREATE A LOCAL PROTECTION PLAN (OPTIONAL)
You can create a local data protection plan for the AccuVault RDX server’s
system C:\ drive. Creating a local plan allows you to restore all of your system
configuration settings if necessary. The process for creating a local plan is
similar to creating a data protection plan for a remote computer.
To create a local data protection plan:
1. Add a store (see page 29), or use the pre-configured store that is available
with the AccuGuard software.
2. Click on Local Plans from the left pane. Click Create a Protection Plan...
from the right pane.
The following screen opens:
32
1019661
PRODUCT MANUAL
Preliminary
3. Select one of the following: Files and Folders, SQL Databases, or Exchange
Data.
Note:
The AccuGuard software detects whether the remote computer runs
SQL Server or Microsoft Exchange. The options to select SQL
Databases or Exchange Data only apply if the remote computer has
SQL or Exchange installed.
4. Click [Add] from the Enter Folders to Protect dialog box. (These instructions
assume you selected Files and Folders. If you selected SQL Databases or
Exchange Data, the instructions are similar.)
The Browse for Folder dialog opens.
5. Select the System (C:) folders that you want to include in the local
protection plan. Click [OK].
6. Click [Next] from the Enter Folders to Protect dialog box.
7. Select the store where the data for the protection plan will be archived.
Click [Next].
8. Type a plan name. Click [Next].
The following Scheduled Task dialog box opens.
SEPTEMBER 2010
ACCUVAULT RDX
Preliminary
33
CHAPTER 2—INSTALLATION AND SETUP
9. Choose a schedule plan. Click [Next].
10. Click [Finish].
11. Enter the user account password. Click [OK].
Note:
If you changed the user who has permission to run the scheduled
protection plan in the previous Scheduled Task dialog, enter that user
account password. If you did not change the user, enter the
administrator password for the AccuVault RDX.
STEP 11 — SCHEDULE A STORE COPY
A store copy task creates a mirror of the store’s archived data to another store
that you designate. In most cases, you would use the store copy task to create a
mirror on a removable RDX cartridge.
!
Important
Make sure you have an RDX cartridge inserted in the
AccuVault RDX before you create a store copy task. The
AccuGuard software automatically creates a removable disk
store when the cartridge is inserted.
To create a store copy task:
1. Select the store that you want to mirror from the Stores tree structure in the
left pane. Click Create Store Task... from the right-hand pane.
The following screen opens.
34
1019661
PRODUCT MANUAL
Preliminary
2. Select Create Store Copy Task.
The Create Store Copy Task Wizard opens.
3. Select the source store in the left column and select the destination store in
the right column. Click [Next].
4. Choose to either copy all the archives from the store or a select group of
archived folders. Click [Next].
5. Choose to copy all recovery points or only the most recent recovery point.
Click [Next].
6. Type a name for the store copy. Click [Next].
7. Select a schedule plan for the store copy. Click [Next].
8. Click [Finish].
9. Enter the user account password. Click [OK].
Note:
If you changed the user who has permission to run the scheduled
store copy in the previous Scheduled Task dialog, enter that user
account password. If you did not change the user, enter the
administrator password that you for the AccuVault RDX.
SEPTEMBER 2010
ACCUVAULT RDX
Preliminary
35
CHAPTER 2—INSTALLATION AND SETUP
NOTES
36
1019661
PRODUCT MANUAL
Preliminary
3
REMOTE COMPUTERS
A remote computer, in terms of this product, refers to a computer protected by
this software that is not the AccuVault RDX server.
The Remote Computers folder contains the remote computers (clients) section
of the console tree. This folder has an All Computers group underneath for
adding your remote computers to the software.
Actions for Remote Computers include:
Add Group.
For organizational purposes, you can group your remote computers
together under a meaningful heading, or group name. For instance, any
remote computers you add to the All Computers folder are listed in the All
Computers group. To streamline organization, you could create a specific
group for all computers in the sales department. To create a new group,
click Add Group and enter a name. Any computer you add to your custom
group is automatically added to the All Computers group. Conversely, any
computer you remove from your custom group is not automatically
removed from the All Computers group. The computer is not completely
removed until you remove it from the All Computers group.
View Log.
Click the View Log action for remote computers to see the commands that
have run for remote computer plans. See Log Files on page 77 for more
information.
Actions available for remote computers in the Remote Computers section
include:
Protection Plans.
Select the Protection Plans action to show all protection plans for the
selected remote computer. From this view, each plan can be manually run,
reconfigured, scheduled, and deleted.
SEPTEMBER 2010
ACCUVAULT RDX
Preliminary
37
CHAPTER 3—REMOTE COMPUTERS
History.
You can see the history for all plans for a remote computer by selecting the
History action. Each time a plan runs or is restored, an entry is added to the
history list. To view the run log for a given plan, select an entry from the
history list. Next, click the View Log link located in the Result Details area.
The run log for the selected entry appears. See also, Viewing Protection
Plan Results on page 66.
Restore.
All protection plan recovery points for a remote computer can be seen by
selecting the remote computer, and then clicking the Restore action. Days
that contain recovery points are highlighted in bold font in the calendar. To
restore a recovery point, select it from the list. Click the Restore button in
the lower-right area of the screen. A restore dialog box appears. Refer to
Restoring Your Data for more information. If the recovery point was from a
Files and Folders protection plan, you can also click the Explore button to
restore files.
Search.
In addition to using Restore to find and restore archived files, you can
search for files archived by remote computer protection plans by clicking
the Search action. Refer to Using the Search Bar on page 70 for more
information.
Export Plan History.
You can export a protection plan history to an Excel spreadsheet (.xls)
format.
Event Viewer.
To aid in troubleshooting, this software records its activity in log files and
writes significant events to the Windows Application Event Log. Clicking
the Event Viewer action for a remote computer opens the Windows Event
Viewer for the remote computer.
ADDING REMOTE COMPUTERS
Note:
For best results, you should use the same domain administrator account to
schedule plans for your remote computers as for administering your
AccuVault RDX server.
To add a remote computer, select the desired computer group for your
computer, then select its Add Computer action. This will open a screen where
you can specify the computer by either browsing the network (not supported
on Windows XP or Windows 2003), searching the Active Directory if
applicable, or typing in the computer name.
38
1019661
PRODUCT MANUAL
Preliminary
4
STORE MANAGEMENT
A store is a storage location targeted by local and remote protection plans for
keeping archived data (common content) and associated cataloging
information. After a store is created, it will appear in the Stores folder.
From the Stores folder, you can see and manage storage that has been
prepared for the software. Information such as the storage name, size of the
storage, status (Available or Offline), and the drive designation of the disk are
displayed in the status (center) pane.
Part of creating a store is preparing the storage. As part of the store
preparation process, the software automatically creates the following folders:
Archives - Archives contain time-stamped catalog entries (restore points)
grouped by plan name.
Quarantined Items - Stores can be verified for referential and data integrity.
Any data found to be corrupt is moved to this folder. The store will attempt
to self-heal on a subsequent plan run by putting a good version of the
quarantined item into the store.
Recycle Bin - When an item is expired, its catalog entry is kept in this folder
until the item is purged from the system.
The Stores folder shows the current availability of archive storage and its
physical free space.
After adding a store, the status in the center console pane of the AccuGuard
interface shows the new store and its status. To change the settings for a store,
highlight the store and click Properties.
The Status column shows the availability status of the storage media. If the
status is Available, then this media is available for use. An Offline status
means that the media is currently not available.
The Capacity column displays the native capacity of the storage.
The Free Space column displays the native free space of the storage.
SEPTEMBER 2010
ACCUVAULT RDX
Preliminary
39
CHAPTER 4—STORE MANAGEMENT
After highlighting a store in the tree pane, you can display its Details, Usage
History, Store Tasks, and Task History by clicking on the appropriate action in
the Actions pane.
This chapter contains the following sections:
Adding Storage
Using Existing Storage
Removing Storage
Creating Store Tasks
Describing Store Actions
Using Store Properties
ADDING STORAGE
A new installation of the software will not have any storage assigned to it.
Highlight the Stores folder in the console tree and click the Add a Store action
to start the Add Store Wizard.
There are four categories of storage to choose from:
Disk Drive Storage
Removable Disk Storage
File Folder Storage
DISK DRIVE STORAGE
Choose Disk Drive if you want to create a store on a locally-attached hard
disk. This option creates a store at the root of the disk that you select in the
Add Store Wizard. Choose a disk, then click the Next button.
If there are stores already at the root of this disk (perhaps from a previous
installation of this software), you can reattach by choosing the Use existing
option and selecting a store from the drop-down list. See Use Existing Store for
more information. If no stores exist at the root of the disk, this option will be
disabled.
To create a new store, choose Add new and enter a descriptive name for your
new store. After the store has been created, this name is displayed in the
left-hand tree pane under the Stores folder.
In most cases, click Next on the Shared Folder screen to accept the default
settings. If you don't want to make this store available to remote computer
protection plans, uncheck the box, then click Next.
40
1019661
PRODUCT MANUAL
Preliminary
If this is an existing store, the Prepare Store screen will have a Reconnect
button. Otherwise, it will have a Prepare now button. Preparing a store creates
the file and folder structure used by the software to store and track your
protected data.
Note: If the option is shown, the Use NTFS-only media layout (only for backward
compatibility) checkbox should normally be left unchecked. (This option is
only needed if the store will be the target of a store copy task and the
source store is a legacy store that only supported NTFS-formatted disks.)
Click the Prepare now (or Reconnect) button. When the prepare or reconnect
process is complete, the progress indicator will show Preparation Complete
and the Next button will be enabled. Click Next to continue to the Store
Added screen.
The Store Added screen shows a high-level summary of the store
configuration. Notice the Storage location value is <drive
letter>:\ObjectStore{...}. This is a hidden system folder. The name you entered
is used in the AccuGuard interface. After clicking Finish, the new store is
added to the Stores folder and can be used by protection plans.
REMOVABLE DISK STORAGE
Choose Removable Disk if you want to use a removable disk drive. This
option creates a store at the root of the drive that you select on the Add
Storage screen. Choose a removable disk drive, then click OK.
If there are stores already on this disk (perhaps from a previous installation of
this software), you can reattach by choosing the Use existing option and
selecting a storage location from the drop-down list. See Use Existing Store for
more information. If no storage locations exist on the drive, this option will be
disabled.
To create a new store, choose Add new and enter a descriptive name for your
new store. After the store has been created, this name is displayed in the
left-hand tree pane under the Stores folder.
In most cases, click Next on the Shared Folder screen to accept the default
settings. If you don't want to make this store available to remote computer
protection plans, uncheck the box, then click Next.
If this is an existing store, the Prepare Store screen will have a Reconnect
button. Otherwise, it will have a Prepare now button. Preparing a store creates
the file and folder structure used by the software to store and track your
protected data.
Note:
If the option is shown, the Use NTFS-only media layout (only for
backward compatibility) checkbox should normally be left unchecked.
(This option is only needed if this store will be the target of a store copy
task and the source store is a legacy store that only supported
NTFS-formatted disks.)
SEPTEMBER 2010
ACCUVAULT RDX
Preliminary
41
CHAPTER 4—STORE MANAGEMENT
Click the Prepare now (or Reconnect) button. When the prepare or reconnect
process is complete, the progress indicator will show Preparation Complete,
and the Next button is enabled. Click Next to continue to the Store Added
screen.
The Store Added screen shows a high-level summary of the store
configuration. Notice the Storage location value is <drive
letter>:\ObjectStore{...}. This is a hidden system folder. The name that you
entered is used in the AccuGuard interface. After clicking Finish, the new
store is added to the Stores folder and can be used by protection plans.
FILE FOLDER STORAGE
Note: This option is provided primarily for legacy purposes. In earlier
versions of the software, stores were normally created at the folder level.
Choosing this option allows you to reconnect to those stores.
Choose File Folder if you want to create or reconnect to a store in a folder on a
locally-attached disk drive. Select the folder via the link Click here to select a
folder. If this is a new store, you will be prompted to give it a name. Enter a
descriptive name for your new store. After the store has been created, this
name is displayed in the left-hand tree pane under the Stores folder. Click
Next to continue with the Add Store Wizard.
In most cases, click Next on the Shared Folder screen to accept the default
settings. If you don't want to make this store available to remote computer
protection plans, uncheck the box, then click Next.
If the folder is an existing store (perhaps from a previous installation of the
software), the Prepare Store screen will have a Reconnect button. Otherwise,
it will have a Prepare now button. Preparing a store creates the file and folder
structure used by the software to store and track your protected data.
Note:
If the option is shown, the Use NTFS-only media layout (only for
backward compatibility) checkbox should normally be left unchecked.
(This option is only needed when reconnecting to legacy stores that only
supported NTFS-formatted disks.)
Click the Prepare now (or Reconnect) button. When the prepare or reconnect
process is complete, the progress indicator will show Preparation Complete,
and the Next button is enabled. Click Next to continue to the Store Added
screen.
The Store Added screen shows a high-level summary of the store
configuration. After clicking Finish, the new store is added to the Stores folder
and can be used by protection plans.
42
1019661
PRODUCT MANUAL
Preliminary
USING EXISTING STORAGE
You can reattach a store to this software if it had been removed with the Keep
the data on the media for future use option. You can also add existing stores
from another system in the same manner.
To use an existing store, first click the Add a Store action, then choose the
physical storage containing the store you wish to use.
The software will detect that there are stores already on the physical storage
and will enable the Use existing option. Choose Use existing and select a store
from the drop-down list. If no stores exist on the storage media, this option
will be disabled.
After clicking the OK button, the store appears under the Stores folder and
archived data in this store may now be explored and restored; however, you
cannot add any new data.
REMOVING STORAGE
You can remove stores from this software. You might remove a store if you
want to set the storage aside for just restoring data. This action helps reduce
the number of stores you are viewing in the store status panel to just the
current ones being used by your protection plans. Note that removing storage
is an optional procedure. The storage can be used for restoring data, or used
by protection plans for storing data (assuming it is not full) by adding it back
to the software via the Add a Store action.
To remove a store, choose the store you wish to remove from the software,
then click its Remove Store action to open the Remove Store dialog.
Note: You cannot remove a store that is being used by protection plans or is used
by a store copy task from other stores.
You must decide whether or not to delete the data on the media used by
protection plans.
KEEP THE DATA ON THE MEDIA FOR FUTURE USE
When storage is removed from the software, the stored data is not removed or
deleted. However, you will be unable to restore or search for files in the
removed store. If you want to use the storage again to archive protection plans
or restore files, you must perform the Add a Store action. See Using Existing
Storage in the above section for more information.
When Cancel is clicked, the Remove Store dialog box closes, and the software
will take no action.
When Continue is clicked, the software removes the storage. The following
actions will take place:
SEPTEMBER 2010
ACCUVAULT RDX
Preliminary
43
CHAPTER 4—STORE MANAGEMENT
The selected store is removed from the Stores folder in the console tree.
All recovery points for protection plans associated with the storage are
removed from the Explore page.
PERMANENTLY DELETE THE DATA ON MEDIA
When storage is permanently deleted from the software, the stored data is
destroyed. You can reuse the media for new storage, but you will not be able to
access any old data.
When Cancel is clicked the Remove Store dialog will close and the software
will take no action.
When Continue is clicked, the software will ask for confirmation.
Click No to return to the Remove Store dialog without removing the storage.
Click Yes to remove the storage. The following actions will take place:
The selected store is removed from the Stores folder in the console tree.
All recovery points for protection plans associated with the storage are
removed from the Explore page.
Data is completely destroyed for the selected store.
CREATING STORE TASKS
Store tasks are tasks that operate at the store level. You can create tasks for
copying stores, verifying data in a store, expiring data in a store, and purging
expired data from a store.
Refer to the following sections for more information:
Store Copy
Store Verify
Store Expiration
Store Purge
44
1019661
PRODUCT MANUAL
Preliminary
STORE COPY
Store copy tasks allow you to copy the contents of one store to another. You
can copy stores within the same AccuVault RDX system, or you can copy
stores to or from another AccuVault RDX system.
Before you create a store copy task, both stores, source and destination, must
exist.
The store copy task is associated with the store it is created from. This store can
be the source store or the destination store. Initially it will be the source store,
but this can be changed before the task is actually created.
When copying stores to or from different AccuVault RDX systems, keep in
mind that performance is generally better when pulling data rather than
pushing it. In other words, reading across-the-wire and writing locally is
generally faster than reading locally and writing across-the-wire.
Note:
The source and target stores must be of the same type. For example, if
you want to copy an older legacy store that uses NTFS alternate data
streams, you would need a target store of the same type. In this case, the
store needs to have the Use NTFS-only media layout (only for backward
compatibility) option selected when it is created. This is not an issue if
you've only had newer (4.x) versions of this software and, consequently,
the Use NTFS-only media layout (only for backward compatibility) option
may not be available in your software.
CREATING A STORE COPY TASK
Assuming both stores exist, select the store from the AccuGuard Enterprise
console tree that you want the store copy task to be associated with and then
click the Create Store Task action. This action opens the Create Store Copy
Task wizard with the selected store shown in the Source Store window of the
Create Store Copy Task screen. Other stores configured for this AccuVault
RDX server are listed in the Destination Store window. Click the Browse
button to select a store on another AccuVault RDX.
You can reverse the source and destination lists by clicking the double-ended
arrow button. You would do this if you wanted the store listed in the Source
Store window to actually be the destination store.
Select your destination store from the Destination Store window. Contents of
the highlighted store in the Source Store window are copied to the
highlighted store in the Destination Store window. Click Next to continue.
If there is more than one archive in this store (for example, more than one
protection plan is writing to this store), you can copy all archives or a subset of
archives. Click Next to continue.
SEPTEMBER 2010
ACCUVAULT RDX
Preliminary
45
CHAPTER 4—STORE MANAGEMENT
On the Configure Recovery Points to Copy screen, you can choose to copy all
recovery points or copy only the most recent recovery point. Make your
choice, then click Next to continue.
Enter a meaningful name for this task on the Copy Task Name screen, then
click Next to continue to the Schedule Copy Task screen.
You can schedule this task to run automatically or click Next to accept the No
Schedule default. The task runs as the currently-logged-on user unless you
change the Run as account information on the Task tab of the task scheduler.
Review the store copy task settings shown on the Completing the Add Store
Copy Task Wizard screen. If you need to make changes, navigate back via the
Back button. When you are satisfied with the settings, click the Finish button.
You will be prompted for the password of the account specified to run the
plan. After you enter the password, the task is created, the Create Store Copy
Task wizard closes, and the new task appears in the store tasks results of the
store where the task was created.
Three common usage scenarios for the Store Copy task
46
Store Copy Usage Scenario
Description
Copy local drive store to store on
removable storage
A good backup plan often includes taking
the backup media to an off-site location.
You could set up a store copy task to run,
for instance, once a week, and only copy
the most recent recovery point from each
archive, thereby allowing for many
weekly backups on removable disk or
USB storage.
Copy a store from one AccuVault
RDX to another AccuVault RDX.
As mentioned above, performance is
better when pulling data rather than
pushing it. For best performance, you
should create the store copy task on the
AccuVault RDX that you are copying the
data to. When creating the task, click the
double-ended arrow on the Create Store
Copy Task screen to make the local store
the Destination Store. Click the Browse
button to select a store on another
AccuVault RDX for the Source Store
1019661
PRODUCT MANUAL
Preliminary
Store Copy Usage Scenario
Description
Seeding a store from a remote site.
This software employs source-based
deduplication, in which data processing is
distributed across a network of servers
and only the deduplicated data is moved
across a LAN or WAN to a store. If a large
amount of deduplicated data has to travel
across a slow WAN link during the
baseline run of a system in a remote
office, the baseline run time may be
unacceptably long due to the bandwidth
bottleneck. Once the baseline run has
completed, however, subsequent runs
will skip items already in the store and
only process new and changed data. Only
the deduplicated versions of active data
moves across the WAN and into the store,
greatly reducing the backup window and
making protection of remote systems
across the WAN feasible. To facilitate the
baseline run of a system in a remote
office, the deduplicated data may be
saved to a removable storage device
plugged directly into the remote system,
and then shipped to the location of the
AccuVault RDX for synchronization, thus
seeding the store for future runs.
Seeding a store from a remote site
Follow these steps for seeding a store from a remote site:
1. Configure storage at the remote site for the plan to use.
Attach a removable storage device to the remote computer that you want to
protect. If USB connected, make sure the server supports at least USB 2.0. It
will appear in the Computer window with a local drive letter, for example,
H:. Share the root of the drive and allow Full NTFS permissions to the
Domain Admin Group. You can configure a NAS device with a share
instead, so long as the share is accessible to AccuGuard Enterprise.
SEPTEMBER 2010
ACCUVAULT RDX
Preliminary
47
CHAPTER 4—STORE MANAGEMENT
2. Add a store to the share at the remote site.
In AccuGuard Enterprise, click the Stores folder and choose the Add a
Store action. In the Add Store Wizard, select Network Drive, click the link
to map a network drive (or add a network location). Map a drive to the
share on the removable storage device, choosing a drive letter for the
mapped drive and entering the UNC path to the share, e.g. \\<remote
computer name>\<share name>. Once mapped, the share appears in the
Select a Network Drive window. Select the share and click Next. Name the
store with a unique name (for example, the permanent store name plus
‘_temp’). Click Next. Prepare the store by clicking Prepare Now and
complete the Add Store Wizard.
3. Add a protection plan for the remote computer.
In AccuGuard Enterprise, expand the Remote Computers folder, select the
All Computers group, right-click and select Add Computer. Add the
remote computer by machine name or IP address. (Note: Exchange and
SQL require the machine name.) Click on the newly-added computer. In
the Actions pane, select Create Protection Plan. Step through the
protection plan wizard. Give the plan its permanent name. The plan name
will not change. Add the desired folder selections, and select to use the store
created in step two.
4. Run the plan one time. The baseline is generated and stored.
5. Run the plan at least two more times so items in the store are verified.
6. Set the plan to run to the permanent store.
Once the store copy task completes, in AccuGuard Enterprise, under
Remote Computers, All Computers, select the remote computer. The plan
appears in the center pane. Highlight the plan. In the Actions pane, select
Plan Settings. On the Settings tab, click the Change button. Choose the
permanent (seeded) store from the list of available stores. Click OK. Click
OK again.
7. Remove the USB device properly with the Safely Remove Hardware icon in
the system tray. This action will flush buffers prior to removal. Ship the USB
device and connect to the AccuVault RDX.
8. From the AccuGuard Enterprise list of stores, remove the store on the
removable media, since it has an incorrect device path now.
In AccuGuard Enterprise, select the store. In the Actions pane, select
Remove Store. Accept the default to keep the data on the media for future
use. Click Continue.
48
1019661
PRODUCT MANUAL
Preliminary
9. Reconnect AccuGuard Enterprise to the store.
In AccuGuard Enterprise, select Stores. In the Actions pane, select Add a
Store. If the store is located at the root of a removable USB device, in the
Add Store Wizard, select Disk Drive, then select the drive letter of the USB
device. Click Next. In the Storage Name window, select the Use existing
radio button. The field becomes active, and you can then select the store on
the USB device. Click OK. Click Next, then click the Reconnect button, then
click Finish. If the store is located in a folder on the USB device, do not select
Disk Drive, select File Folder and click the link to select a folder. Browse to
the folder on the USB device that contains the store, then finish
reconnecting to the store. If the store resides on a NAS share, in the Add
Store Wizard select Network Drive, browse to the folder that contains the
store, then finish reconnecting to the store.
10. Create a store copy task to synchronize the store on the removable device
with a permanent store. (If you have not created the permanent store yet,
do so now.)
In AccuGuard Enterprise, select the store on the removable media. In the
Actions pane, select Create Store Task. In the dialog box that opens, choose
Create Store Copy Task. Select the source and destination stores. The
source store is the store on the removable media. Select the destination
store from the list of available stores. The destination store is the permanent
store that the plan will use in the future. Click Next. Keep the default
selection to copy all archives. Click Next. Choose the default selection to
copy all recovery points. Click Next. Accept the default name for the store
copy task and enter proper credentials for the task to use when it runs.
11. Run the store copy task.
In AccuGuard Enterprise, with the store on the removable media selected,
click Store Tasks in the Actions pane. In the center pane, highlight the store
copy task. Right-click the store copy task and select Run.
12. Run the plan to the new store. Configure a schedule for the plan, if desired.
13. You may remove the store on the removable RDX cartridge via the
AccuGuard Enterprise interface once you are satisfied the new
configuration is working properly.
In AccuGuard Enterprise, select the store on the removable device. In the
Actions pane, select Remove Store. Accept the default to keep the data on
the media for future use or delete the contents permanently. Make sure you
are deleting the correct store or permanent protection plan data loss may
result. Click Continue.
SEPTEMBER 2010
ACCUVAULT RDX
Preliminary
49
CHAPTER 4—STORE MANAGEMENT
STORE VERIFY
To maintain store integrity, the software can verify the contents of a store and
identify corrupt files sometimes caused by disk corruptions. If a corrupt file is
found, it is moved to the store Quarantined Items folder. A quarantined item
is no longer available from the store, but if the data is available on primary
storage, it will automatically be replaced (repaired) in the store during the next
protection plan run. Each item listed in the Quarantined Items folder has
either a red flag indicating that the item has not yet been repaired, or a green
check indicating that the item has successfully been repaired. Items with green
checks can be deleted safely from the Quarantined Items folder.
Note: Note: Do not attempt to manually repair quarantined items. Contact
Technical Support for assistance.
Verification can be accomplished in two ways, with full verification or by
sampling. Full verification performs an intensive scan of the entire store,
whereas sample verification only verifies a portion of the store. With sample
verification, the entire store is verified after 256 runs of the verification
process.
To create a store verify task, highlight the store in the Stores folder and then
select the Create Store Task action. In the Create Store Task screen, choose
Create Store Verify Task to open the Create Store Verify Task wizard. Enter a
name that describes the purpose for this verify task. Click Next. Choose
whether to verify the entire store contents or to perform random sample
verification with each run of the task. Click Next. Configure a schedule for
automatically running the task, if desired. Click Next. Review the settings,
then click Finish to create the task, enter a password for running the task and
exit the Create Store Verify Task wizard.
You can manually run the task from the console at any time by selecting the
store in the Stores folder, then selecting the verify task in the center pane and
selecting Run in the Actions pane.
STORE EXPIRATION
By default, all data is retained indefinitely in a store. A store expiration task lets
you set the number of days that data is retained in a store and how often to
expire the data. Only one store expiration task is allowed per store.
Once the task is created, you can edit the retention settings from the store
Properties action. To change the retention settings, select the store in the
Stores folder of the AccuGuard Enterprise tree console, then click the
Properties action to open the Properties page. Click the Expiration tab to edit
the expiration settings.
The expiration process looks at each archive within the store to determine
what is eligible for expiration and moves those point-in-time catalogs (restore
points) to the store Recycle Bin. The expired restore points are longer exposed,
but their data is still in the store.
50
1019661
PRODUCT MANUAL
Preliminary
Note: As a safety precaution, the most recent ten restore points in an Archive will
not expire even though they may meet the expiration criteria. You can
change this setting from the Edit Settings action, but the minimum value
allowed is one. To remove all restore points from an archive, you must
delete the archive.
Expired items can be removed (purged) from the recycle bin with a store
purge task.
To create a store expiration task, select the store from the Stores folder in the
left-hand console tree, then click Create Store Task from the Actions pane.
Choose Create Store Expiration Task on the Create Store Task screen, then
enter a meaningful name for the expiration task. Next, optionally set up a
schedule for automatically running the task. Note: Regardless of schedule, you
can always run the task manually at any time. Finally, review the task settings,
then click Finish to create the task and exit the Create Store Expiration Task
wizard. You will be prompted for the password of the account specified to run
the plan.
STORE PURGE
Expired items can be removed (purged) from the Recycle Bin with a store
purge task. Purging also scans the entire store for data no longer referenced.
Unreferenced data is then deleted and the integrity of the store is verified
before the purge process is completed.
To create a store purge task, select the store from the Stores folder in the
left-hand console tree and then click Create Store Task from the Actions pane.
Choose Create Store Purge Task on the Create Store Task screen, then enter a
name for the purge task. Next, set up a schedule for automatically running the
task, if desired. Note: Regardless of schedule you can always run the task
manually at any time. Finally, review the task settings, then click Finish to
create the task and exit the Create Store Purge Task wizard. You will be
prompted for the password of the account specified to run the plan.
See Store Expiration on page 50 for more information.
SEPTEMBER 2010
ACCUVAULT RDX
Preliminary
51
CHAPTER 4—STORE MANAGEMENT
DESCRIBING STORE ACTIONS
When a store is highlighted in the Stores folder of the console tree, the actions
available include:
Details.
Choose the Details action to view details of the store, such as its physical
location, status, capacity, free space, and share name.
Usage History.
The Usage History action lists tasks that have been run against the store.
Statistics such as start and stop times and results are shown for each task.
Below the task list is a graph depicting the Free Space Trend for the store.
The graph line begins at the left by showing the space available when the
store was created. Then as the line moves to the right, it typically indicates
a drop in free space available as protection plans are run to the store.
Assuming only one large data set (one protection plan) is archived to the
store several times, the line drops for the first run of the protection plan,
indicating space used for the baseline run (typically a 2:1 data reduction).
The line then flattens out to a gradual downward slope, indicating storage
of only the changed, deduplicated data.
Store Tasks.
This view shows all Store Tasks that have been created for the store. You can
readily see last run status, schedule, and last run time for each task.
Actions for the currently-selected task in the list are shown as sub-actions in
the Actions pane. These actions allow you to edit the task settings and
schedule, run the task manually, and delete the task.
Task History.
Selecting Task History brings up a list showing each time a store task was
run. As with Usage History, start and stop times and results are shown for
each store task run. Unlike Usage History, you can select a run time from
the list and then click the View Log link at the bottom to view the run log.
Create Store Task.
See Store Tasks on page 44 for more information.
52
1019661
PRODUCT MANUAL
Preliminary
USING STORE PROPERTIES
From a store property page, you can control data retention settings, sharing,
and bandwidth throttling.
The following table describes store properties.
Store
Properties
Description
Expiration
The default setting is to retain archived data indefinitely. This
setting can be overridden from the Expiration tab of the store
property page by changing the selected radio button from Infinite
Retention to Number of days to keep recovery points. Choose
the number of days you want to retain archived data and optionally
change the Minimum number of recovery points to keep value.
The default setting is to keep ten recovery points regardless of age.
You can increase or decrease this setting, but the software will
always keep at least one recovery point.
The store expiration settings will have no effect until a Create Store
Expiration Task is created and run, at which time the software
scans the store for recovery points older than the retention days
setting. Recovery points older than the retention days setting,
excluding the minimum number to keep, are moved to the
Recycle Bin of the store. A catalog for a recovery point remains in
the recycle bin until it is either restored back to the original archive
via the Restore action or it is deleted by running the store purge
task. Note: individual archives have their own properties page
where you can override the store expiration settings.
Sharing
Protection plans for remote computers archive the files to a store
through a shared folder. You can edit the share settings and create
additional shares from the Sharing tab on the store property page.
If there is more than one share for the store, you can select which
one a remote computer protection plan uses when you are creating
the plan on the Select a Store page of the protection plan wizard.
Existing remote computer protection plans can be changed to use
a different share by clicking the Plan Settings action and then
clicking the Change button of the Settings tab.
Bandwidth
You can control bandwidth utilization from the Bandwidth tab on
the store property page. To enable and configure bandwidth
throttling for a remote computer, click Add, then enter the
computer name or IP address of the remote computer you wish to
control. In the Bandwidth Throttling window, check Enable
bandwidth throttling, then adjust the speed and date and time
settings as desired.
Click Apply to save your settings, then click Add to add another
computer, or just click OK to save your settings and close the store
property page.
SEPTEMBER 2010
ACCUVAULT RDX
Preliminary
53
CHAPTER 4—STORE MANAGEMENT
NOTES
54
1019661
PRODUCT MANUAL
Preliminary
5
PROTECTION PLANS
Protection plans specify which data to protect and where to keep the
protected data (which store to use). You can optionally set up a schedule to
automatically run the plan.
This chapter contains the following sections:
Creating Protection Plans
Scheduling Protection Plans
Running, Editing, and Removing a Plan
Viewing Protection Plan Results
SEPTEMBER 2010
ACCUVAULT RDX
Preliminary
55
CHAPTER 5—PROTECTION PLANS
CREATING PROTECTION PLANS
AccuGuard Enterprise allows you to create and save protection plans to
archive your data on storage prepared for the software. A protection plan is
made up of a plan type, selections relevant to the type, the store to use, and a
schedule specifying when the plan runs. Local plans are protection plans that
run on the local server and protect local data. Remote protection plans are
plans that run on, and protect data on, remote computers (clients), where the
protected data is deduplicated prior to being sent to the store for archiving.
Note:
Prior to creating a protection plan, you will need to create a store for
keeping your archived data. See Storage for more information.
To create a protection plan, open Archive Manager. Select either the Local
Plans folder or a remote computer, depending on where the data resides that
you want to protect. Click the Create Protection Plan action and choose a plan
type (Files and Folders, Exchange Storage Groups, or SQL Databases) to start
the protection plan wizard.
You must provide the following information to complete the protection plan
wizard:
The folders, Exchange Storage Groups, or SQL Server databases to protect.
Which store to use.
A name for the plan.
A scheduling option and the administrator account credentials needed to
run the plan.
When a protection plan is highlighted in the results (center) pane of the
interface, the Actions pane will contain actions applicable to that plan. From
the Actions pane, you can run a plan, view its results, view the history of a
plan, and modify a plan.
See Run, Edit, Remove a Plan for information about using protection plans.
See the following sections for more information about creating protection
plans:
Adding a Files and Folders Protection Plan
Adding an Exchange Protection Plan
Adding a SQL Server Protection Plan
56
1019661
PRODUCT MANUAL
Preliminary
ADDING A FILES AND FOLDERS PROTECTION PLAN
Note: Prior to creating a protection plan, you will need to create a store for
keeping your archived data. See Chapter 4 on page 39 for more
information.
To create a protection plan for files and folders, select Create Protection
Plan from either the Local Plans folder or from a remote computer
located within the Remote Computers folder. Next, choose Files and
Folders to begin the protection plan wizard for protecting files and folders.
Note: The Files and Folders plan type is not recommended to protect
Exchange and SQL. Instead, choose the Exchange Storage Groups or SQL
Databases plan types.
The first step in creating a Files and Folders protection plan is to specify the
folders that you want protected. Click the Add button on the Enter Folders to
Protect screen and then use the Windows Explorer-like controls to expand the
disks and folders that you want to protect. Click OK to protect the selected
disk/folder and sub-folders. Click Add again to add another path to be
protected by this plan. Repeat as desired.
Note: Once you've created a plan you can refine your selection down to the file
level if desired via the Plan Settings action. You can also specify exclusions
within the selected data. For instance, you might want to exclude all files
with a .exe file extension. Excluding certain file types, such as images,
audio, and video files, can significantly reduce the amount of data that is
stored on your target storage device, and speed up execution of your
protection plan. See Editing Protection Plans on page 63 for more
information.
Click Next on the Enter Folders to Protect screen to continue with the
Add Files and Folders Protection Plan wizard. This step takes you to the
Select a Store screen where you select a store; the target location for your
archived data. Highlight the desired store, then click Next to continue to
the Temporary Files screen.
On the Temporary Files screen, you can override the default temporary files
folder location. The path specified is local to the server running the plan. The
temporary files folder is the location used to build and stage objects before
transfer to the store. By default the folder is located at C:\Documents and
Settings\<current user account>\Local Settings\Temp on the server being
protected. The software requires enough free disk space in the temporary files
folder to process the single largest file being protected. The path specified is
local to the server running the plan. Specify a folder on a drive other than the
C: drive if enough disk space exists on an alternate drive. If there is not
enough free disk space, you should use the $store$ variable to specify a temp
directory within the store the plan targets. Click Next to continue to the Enter
Plan Name screen.
SEPTEMBER 2010
ACCUVAULT RDX
Preliminary
57
CHAPTER 5—PROTECTION PLANS
Give your plan a descriptive name, then click Next to continue to the
Scheduled Task screen where you can set up a schedule to automatically run
the plan. You can also specify a different user account for running the plan.
See Scheduling Protection Plans for more information. Click Next to go to the
final screen where you can review the settings. Click the Back button to
change settings, or click Finish to close the protection plan wizard and create
the plan. You will be prompted for the password of the account specified to
run the plan.
See Running, Editing, and Removing a Plan on page 62 for information about
using protection plans.
ADDING AN EXCHANGE PROTECTION PLAN
The software detects Microsoft Exchange 2003 or Exchange 2007 on the
computer you are protecting. If either product is installed, the protection plan
type, Exchange Storage Groups, is enabled.
An Exchange Storage Groups protection plan protects all of the required
Exchange Storage Group files for each storage group selected. The software
queries Exchange for their location; there is no need to specify folders for
protection. Each plan run truncates all eligible log files.
To create a protection plan for Exchange, select Create Protection Plan from
either the Local Plans folder or from a remote computer located within the
Remote Computers folder. Next, choose Exchange Storage Groups to begin the
Add Exchange Protection Plan wizard.
The first screen, Select Storage Groups, lists the available Exchange Storage
Groups. Check the box for each storage group you wish to protect, then click
Next to continue to the Select a Store screen.
Highlight the store where you want the protected data to reside. A store in this
context refers to the storage area within the AccuVault RDX, and not
Exchange. Click Next to continue to the Temporary Files screen.
On the Temporary Files screen, you can override the default Temporary Files
folder location. The path specified is local to the server running the plan. The
temporary files folder is the location used to build and stage objects before
transfer to the store. By default the folder is located at C:\Documents and
Settings\<current user account>\Local Settings\Temp on the server being
protected. The software requires enough free disk space in the Temporary
Files folder to process the single largest file being protected. Specify a drive
other than the C: drive if enough disk space exists on an alternate drive. If
there is not enough free disk space, enter the $store$ variable to specify a temp
directory within the store the plan targets. As Exchange databases can often
exceed the size of a boot volume, it is highly recommended you adjust this
setting. Click Next to continue to the Enter Plan Name screen.
58
1019661
PRODUCT MANUAL
Preliminary
Give your plan a descriptive name, then click Next to continue to the
Scheduled Task screen where you can set up a schedule to automatically run
the plan. You can also specify a different user account to run the plan. See
Scheduling Protection Plans for more information. Click Next to go to the final
screen where you can review the settings. Click the Back button to change
settings, or click Finish to close the Add Exchange Protection Plan wizard and
create the plan. You will be prompted for the password of the account
specified to run the plan.
See Running, Editing, and Removing a Plan on page 62 for information about
using protection plans
Note: This software uses Microsoft Exchange VSS Writer to create a snapshot of
Microsoft Exchange Storage Groups. Verify Microsoft Exchange VSS Writer
is present on the Microsoft Exchange Server by running VSSADMIN LIST
WRITERS at a command prompt on the server being protected.
ADDING A SQL SERVER PROTECTION PLAN
The software detects Microsoft SQL Server 2005 or Microsoft SQL Server 2008
on the computer you are protecting. If either product is installed, the
protection plan type, SQL Databases, is enabled.
A SQL Databases protection plan specifies which SQL Server databases to
protect and where to keep the protected data. At the launch of the protection
plan, the software queries SQL for the required database and log file locations;
there is no need to set up specific folders for protection. During the Add SQL
Server Protection Plan wizard, you can specify whether the transaction logs
on databases configured in the Full recovery model will be truncated at the
end of a protection plan run. The truncation of logs will not shrink the size of a
transaction log file, but instead clear space within the transaction log file for
the creation of new log records.
To create a protection plan for SQL, select Create Protection Plan from either
the Local Plans folder or from a remote computer located within the Remote
Computers folder, then choose SQL Databases to begin the Add SQL Server
Protection Plan wizard.
The wizard will display a list of all databases grouped by their instance names,
as well as each database operational state and recovery model. Place a
checkmark next to each database you wish to protect. To have the software
truncate the database transaction logs, thereby allowing SQL to continue
logging without growing the transaction log file size, place a checkmark in the
checkbox Truncate logs with full backups. Note: The Truncate logs with full
backups switch is ignored on protected databases configured for the Simple
recovery model. Click Next to continue to the Select a Store screen.
Highlight the store where you want the protected data to reside, then click
Next to continue to the Temporary Files screen.
SEPTEMBER 2010
ACCUVAULT RDX
Preliminary
59
CHAPTER 5—PROTECTION PLANS
On the Temporary Files screen, you can override the default Temporary Files
folder location. The path specified is local to the server running the plan. The
temporary files folder is the location used to build and stage objects before
transfer to the store. By default the folder is located at C:\Documents and
Settings\<current user account>\Local Settings\Temp on the server being
protected. The software requires enough free disk space in the Temporary
Files folder to process the single largest file being protected. Specify a drive
other than the C: drive if enough disk space exists on an alternate drive. If
there is not enough free disk space, enter the $store$ variable to specify a temp
directory within the store the plan targets. As SQL databases can exceed the
size of a boot volume, it is highly recommended you adjust this setting. Click
Next to continue to the Enter Plan Name screen.
Give your plan a descriptive name, then click Next to continue to the
Scheduled Task screen where you can set up a schedule to automatically run
the plan. You can also specify a different user account to run the plan. See
Scheduling Protection Plans in the following section for more information.
Click Next to go to the final screen where you can review the settings. Click
the Back button to change settings, or click Finish to close the Add SQL
Server Protection Plan wizard and create the plan. You will be prompted for
the password of the account specified to run the plan.
Note: This software uses Microsoft SQL VSS Writer to create a snapshot of SQL.
Verify Microsoft SQL VSS Writer is present on the SQL server by running
VSSADMIN LIST WRITERS at a command prompt on the server being
protected. In addition, the SQL server you are protecting requires
Microsoft CLR Types and Microsoft SQL Management Objects for SQL
2008. If not present, these components are installed automatically the first
time a SQL protection plan runs.
60
1019661
PRODUCT MANUAL
Preliminary
SCHEDULING PROTECTION PLANS
Protection plans run on the computer as Windows Scheduled Tasks. When the
Edit Schedule action for a plan is clicked, the standard Windows Task
Scheduler is opened with some pre-filled settings for the plan.
The Edit Schedule action allows you to run a protection plan as an alternate
user. That is, a user account that is different from the user which is currently
logged in to the computer where the software is installed.
The Edit Schedule action also allows you to create a schedule to automatically
run your protection plan.
Schedule Action
Settings
Description
Run As
From the Task tab of the Windows Task Scheduler, you
can change the account information required for running
the plan. By default, the Run as account is the user
account of the currently logged in user.
Enter the user account you want to be effective when the
plan runs and enter the password for that user account.
When using this option, the Run only if logged on
scheduling option is normally left unchecked.
You might change Run as account information for a task if
it needs access to network mapped drives that are
available under a different user account than the one
currently logged on. In a Windows domain, use an
account with Domain Admin Group membership.
See Managing User Accounts on page 12 for more
information.
SEPTEMBER 2010
ACCUVAULT RDX
Preliminary
61
CHAPTER 5—PROTECTION PLANS
Schedule Action
Settings
Description
Schedule
Click the New button on the Schedule tab to edit the
various scheduling fields.
Use the Show multiple schedules option to set up
multiple run times for the protection plan. You can create
a single schedule for a plan that covers multiple days,
times, and frequency of plan executions.
The field Schedule Task specifies how often the
scheduled task (your protection plan) runs. Options are:
Daily
Weekly
Monthly
Once
At System Startup
At Logon
When Idle
The field Start Time specifies the starting time of the
protection plan if the plan is scheduled for Daily, Weekly,
Monthly, or only Once.
The field Schedule Task Daily (or Weekly) specifies how
often, in days or weeks, the plan runs.
Advanced
Schedule Options
An additional set of options to create enhanced schedules
is available by clicking the Advanced button of the
Schedule tab.
The Start Date field allows you to choose the starting day
for the plan to run.
The End Date field allows you to choose the date that the
plan will stop running. This field is optional and does not
need to be set.
The Repeat task field allows you to set a plan to run
repeatedly at the interval specified in the Every fields.
RUNNING, EDITING, AND REMOVING A PLAN
This section contains the following information:
Running Protection Plans
Editing Protection Plans
Removing Protection Plans
62
1019661
PRODUCT MANUAL
Preliminary
RUNNING PROTECTION PLANS
After creating a protection plan, the plan name and scheduling behavior that
you specified is displayed in the Archive Manager.
You can configure protection plans to run either as unscheduled or scheduled. An
unscheduled plan can only be executed by clicking its Run action. A scheduled
plan can be executed by waiting for the scheduled day and time to start the
plan, or by clicking its Run action.
EDITING PROTECTION PLANS
You can edit a protection plan at any time; however, if the plan is running at
that time, your changes will not take effect until the next time the plan runs. To
edit a plan, click its Plan Settings action.
To change the store that the plan uses for archiving, click the Change button
on the Settings tab and select from the list of available stores.
The default volume for the temporary files folder is usually the system drive;
however, it is recommended you use a folder on a volume other than the
system drive for temporary file storage. You can specify a different temporary
file location from the Temporary Files tab of the protection plan Properties
page.
Click the Apply button at any time to save changes made so far. Click the OK
button to save any changes and return to the protection plan page. Click the
Cancel button to return to the protection plan page without saving any
changes.
SEPTEMBER 2010
ACCUVAULT RDX
Preliminary
63
CHAPTER 5—PROTECTION PLANS
The following table describes settings you can change specific to plan type.
Protection Plan
Settings
Description
Files and Folders
From the Plan Settings page of a Files and Folders
protection plan, you can:
change the store that the plan uses for archiving
add more folders/files to be protected
remove folders/files to be protected
exclude certain folders/files
exclude predefined file types
change the temporary file storage location
To change which folders and files are protected by the
plan, choose the plan settings Folders tab, then click Add
to add Include or Exclude rules. Exclude rules always
override include rules. For instance, if you include *.tmp
and also exclude *.tmp, all .tmp files will be excluded. See
Excluding File Types for information about excluding
predefined file types from a Files and Folders protection
plan.
64
Exchange Storage
Groups
From the Plan Settings page of an Exchange protection
plan, you can:
change the store that the plan uses for archiving
select/deselect Exchange Storage Groups to be
protected
change the temporary file storage location
SQL Server
Database
From the Plan Settings page of an SQL Server protection
plan, you can:
change the store that the plan uses for archiving
select/deselect SQL databases to be protected
select/deselect log truncation per database
change the temporary file storage location
Note: The Truncate logs with full backups switch is
ignored on protected databases configured for the simple
recovery model.
1019661
PRODUCT MANUAL
Preliminary
Excluding File Types
Your computer contains many types of files. The types of files may range from
simple text files to word processing, spreadsheet, picture, project, music,
video, and so on.
When a protection plan runs for the first time, the software performs data
compression and data deduplication on all the files specified by the protection
plan and builds an index so that the current and subsequent plan runs will
achieve the best data reduction possible.
Some file formats do not compress well. The contents of these files are static,
that is, the files themselves probably will not change. Examples of these kinds
of files are music and audio files, video files, photographs and images
(pictures, etc.), and compressed files. This software will protect all of these files
and ensure that these files are only archived once (assuming the file does not
change), but these files could take up a significant amount of space on your
storage disk. If you have collections of music, video, or photos that are
multiple gigabytes in size, you may want to protect these files by using a
second store on a second disk and use your primary storage for your
important business type data.
While editing a protection plan from its Plan Settings page, you can easily
exclude file types from your plan. In the Folders tab click the Exclude file
types button to display a list of predefined file types that can be excluded.
There are several categories of file types that you can exclude from a
protection plan. To expand these categories, click the plus sign. Select the file
types you want to exclude by checking the appropriate boxes.The Folders tab
then updates with the file types that are excluded.
Changing a Protection Plan Schedule
You can change a protection plan run schedule by clicking on its Edit
Schedule action. See Scheduling Protection Plans for information about
scheduling protection plans.
SEPTEMBER 2010
ACCUVAULT RDX
Preliminary
65
CHAPTER 5—PROTECTION PLANS
REMOVING PROTECTION PLANS
A protection plan can be removed by clicking its Delete Plan action.
After clicking Delete Plan, you will be asked to confirm the action. From the
confirmation dialog box, you can choose to delete the associated configuration
file (this is checked by default) and the associated archive (this is not checked
by default).
If you do not delete the associated archive, you can still restore data by clicking
the Restore action of the archive under its parent store in the Stores folder. If
you delete the associated archive, it will be moved to the Recycle Bin of the
store with a timestamp added to its name indicating when it was deleted. The
archive remains in the recycle bin until deleted by the Delete action or the
store purge task. While the deleted archive is in the recycle bin, you can open
it and restore individual archive point-in-time catalogs back to the archive by
clicking the Restore action. After a point-in-time catalog is restored from the
recycle bin, it can be explored and its contents restored as if it had never been
deleted.
VIEWING PROTECTION PLAN RESULTS
To quickly determine the results of a protection plan run, look at the plan
Status line when the run is complete. After a plan run, the Status line displays
one of the following states: OK, Cancelled, Error, or Warnings.
To see Result Details, click on the History action, then select the plan run
result for which you are interested in viewing. Each plan run result has a
Result, Start and Finish time to help you identify which result you may want
to view. The Result Details view displays both text and a graph which
includes:
The data reduction ratio for this run of the plan.
How many files were protected by the plan.
How many new and changed files were encountered since the last run of
the plan.
The amount of data processed by the plan.
The amount of data that was changed since the last run of the plan.
The amount of data that was stored on the backup disk.
On the first plan run, the New files count equals the Files protected count,
and the number of Changed files is zero. Also, in this case the Total changed
bytes count equals the Total processed bytes count. The green color in the
graph depicts the amount of data that is stored on the backup disk during this
plan run. The yellow color in the graph depicts the amount of data that the
software has reduced or factored during this plan run.
66
1019661
PRODUCT MANUAL
Preliminary
When the View Log link is opened, you will see a log file containing more
detail.
The log file includes statistics that require a couple of definitions:
"Data reduction" - the ratio of "New and changed" data to the "Total stored"
(total amount of data written to the disk for this run of the plan).
"CCF Ratio" - the ratio of the "Protected data" (all of the data protected by the
plan) to the "Total stored" (total amount of data written to the disk for this
run of the plan).
Looking at the Result Details for a plan that has run after some changes have
taken place in the data and the plan has been run again, you will see the
amount of Total processed data stays about the same. The software scans all of
the files selected in the plan but identifies data that is new or changed.
The graph depicts the amount of unchanged data in blue and with the label
Unchanged. The new and changed data, which the software reduced or
Factored, is shown again in yellow, and the amount of data actually Stored to
the disk is shown again in green.
SEPTEMBER 2010
ACCUVAULT RDX
Preliminary
67
CHAPTER 5—PROTECTION PLANS
NOTES
68
1019661
PRODUCT MANUAL
Preliminary
6
ARCHIVED DATA
You can restore data from an archive, Local Plans folder, or protection plans
configured for a remote computer by selecting the Restore action.
This chapter contains the following sections for help with restoring your data:
Finding a Protection Plan Archive Time
Exploring and Restoring Folders and Files
Restoring Exchange Storage Groups
Restoring SQL Server Databases
SEPTEMBER 2010
ACCUVAULT RDX
Preliminary
69
CHAPTER 6—ARCHIVED DATA
FINDING A PROTECTION PLAN ARCHIVE TIME
When you click on the protection plan (or archive) Restore action, a calendar
showing the current day of the current month opens. Dates of the month that
are in bold font are days when the protection plan has been run. Clicking on
one of those dates will show the archive times that are available for that day.
The Status column shows Available or Offline. The Status Available means
that the archive time can be viewed and explored or restored because the
storage containing that archive time is currently online and available. The
Status Offline means that the storage containing that time is not available.
EXPLORING AND RESTORING FOLDERS AND FILES
You can restore your entire protection plan or even restore single files using a
drag-and-drop (or copy-and-paste) method. With the Search action, you can
type part of the filename into the search bar, and the software will begin to list
matches for the filename. Press Enter on the keyboard or click the magnifying
glass icon to the right of the text box to see the first 1,000 matches to your
search. You can also search by wildcard entries, such as *.txt.
USING THE SEARCH BAR
The search function is a quick and easy way to find any of the files archived
with this software. You can search for a filename by typing part of the filename
in the search bar or by typing in a wildcard. The search function looks for all
files that this software has ever archived. Therefore, a disk does not need to be
present when performing a search.
Entering a filename - searching for one file
It is not necessary to remember an entire filename when you search by
filename. You can simply enter the first three characters, and the software will
display filenames that match.
For example, knowing that you might have some files beginning with the
word "microsoft", you can type in "mic", and the software will display
filenames beginning with "mic". Scroll up and down and click on a filename, or
click on the search icon at the right of the text box.
When you find the file you are looking for in the drop-down of the search,
click on the file. The filename appears in the text box. Complete your file
search by clicking the search icon at the right of the text box or by pressing
Enter on the keyboard.
Entering a filename - searching for multiple files
You can search for multiple files by typing the beginning of a filename into the
search bar. When the software begins finding matches, click the search icon at
the right of the text box, and the software will display the first 1,000 matches.
To see less than 1,000 matches, narrow the search parameters.
70
1019661
PRODUCT MANUAL
Preliminary
You can also perform a search for multiple files by entering characters along
with a wildcard parameter. For example, you can search for word processing
files by entering "*.doc" or search for spreadsheet files by entering "*.xls", and
so on. You can narrow the search, using our "microsoft" example above, by
entering "mic*.ppt", so that only filenames starting with "mic" and having the
extension ".ppt" will be searched.
INTERPRETING THE SEARCH RESULTS
When you enter a search parameter in the search bar, the software displays
the:
name of the file
containing folder of the file
number of versions of the file
When you enter a wildcard-type search, the software shows all files matching
the search criteria. For instance, entering "apps9*.doc" lists all filenames
beginning with "apps9" and ending with ".doc". The folder where each file
resided when archived is shown under From folder and the number of
versions, or copies, of the file is shown under the Versions column.
When you click the plus sign to expand a particular filename, the display
changes to show the date and time of each file and which backup disk
contains the file. If more than one version of a file exists, each version will be
listed with its date and time shown in the Versions column. You can restore
any version.
RESTORING FROM THE SEARCH RESULTS
You can restore a single file from the search results by right-clicking on the file
and choosing Save As. You will be presented with a Save As dialog and you
can then choose the folder to save your restored file.
When you choose Save As, the standard Windows Save As dialog opens. Note:
Windows Vista may display a dialog window requesting the user ID and
password that you used to log in to the computer.
Note: The software displays only the 10 most recent versions of a file. If there are
more than 10 versions available, Show All Versions will be enabled to
allow showing all versions.
You can restore your file to any folder you choose. If you attempt to restore the
file over the same file, that is, restore to the same folder where the file still
resides, you will be prompted that you are overwriting the file and asked if
you want to continue.
SEPTEMBER 2010
ACCUVAULT RDX
Preliminary
71
CHAPTER 6—ARCHIVED DATA
EXPLORE A PLAN
You can explore data from an archive, Local Plans folder, or protection plans
configured for a remote computer by selecting the Restore action, selecting an
archive time that is listed as Available in the Status column, and then clicking
Explore at the bottom of the page. A Windows Explorer view of the archive
recovery point appears.
Click on the folder in the window just like you would in any Windows
Explorer view and see your individual files.
You can open any of the files by double-clicking on the file and using the
appropriate application to view the file. When viewing a file, the file will be
opened as a read-only file. You can restore a file by using the copy-and-paste
or drag-and-drop method, or by right-clicking a file or folder and selecting
Restore from the menu.
If you select Restore, see Step 2 of Restoring Files and Folders on page 73.
DRAG AND DROP RESTORE
You can restore a single file or groups of files using the same standard
drag-and-drop or copy-and-paste methods that you use when transferring
your files within Microsoft Windows Explorer.
Restoring a file begins with finding the protection plan archive time you want
to explore. Refer to Finding a Protection Plan Archive Time.
Click on an archive time and the Explore and Restore buttons will become
active.
Click Explore and in a few moments the Windows Explorer view will open.
You can now navigate the data you archived.
You can restore by using your mouse to drag files to a folder location, or even
just to your desktop. You can also restore by right-clicking the files and
clicking Copy in the menu, then open the folder where you want to copy the
files and right-click Paste.
RESTORING FILES AND FOLDERS
1. Find the protection plan archive time.
In addition to restoring an individual file or a group of files, the software can
restore an entire archive at a given point-in-time. Generally, you only need to
restore an entire archive in the case of moving files, accidental deletion,
restoring a system after a disk change or crash, etc.
The process of restoring an entire archive begins with finding the archive time
for the plan you want to restore. Refer to Finding a Protection Plan Archive
Time.
72
1019661
PRODUCT MANUAL
Preliminary
Select the archive time you want to restore and the Explore and Restore
buttons in the lower-right portion of the screen become active. Click Restore,
and a Point in Time Restore dialog box appears.
2. Choose how to restore.
There are two basic questions to answer when restoring a Files and Folders
protection plan:
What location, or folder, should I choose to restore my files?
Should I replace existing files?
Restore Location:
Original location - Your files can be restored to their original folder from
which they were archived. This is the default operation. If the folder
which contained the files at the time the files were archived no longer
exists the software will create the folder.
Alternate location - You can restore your files to an alternate folder, that
is, a folder different from the one(s) from which you archived the files.
This option will preserve the folder structure of the archived data. That
is, all folders and subfolders that existed when the protection plan
archived the data will appear in the alternate folder you choose.
To restore to an alternate folder, click the Restore files to drop-down feature
and click Alternate Location. When this action is done, the text next to
Alternate location becomes active and is displayed as a blue link.
When the link Click here to select an alternate folder is clicked, a dialog
window opens where you can choose a folder to restore the files.
Restore Options:
There are three options to choose from when replacing the files.
Choose Missing files if you do not want the restore operation to copy over
files that are already in the restore location. This option only restores files
that are not present in the folder where you have chosen to restore the files.
You might choose this option to only copy files you believe are missing from
a folder. If you have chosen to restore the archive to an alternate folder, then
it is possible that all files will be restored since the alternate folder may not
contain any of the files in the archive.
Choose Missing files and files that are older if you want the restore
operation to restore files that no longer exist in the folder (missing) and
to replace older files in the restore location with newer files from your
archive. You might choose this option to replace a current file on your
hard disk with the most recent version of the file from your archive. If
you have chosen to restore the archive to an alternate folder, then it is
possible that all files will be restored since the alternate folder might not
contain any of the files in the archive.
SEPTEMBER 2010
ACCUVAULT RDX
Preliminary
73
CHAPTER 6—ARCHIVED DATA
Choose Missing files and files that are different if you want the restore
operation to restore files that no longer exist in the folder (missing) and
to replace files in the restore location regardless of whether the archived
files are newer or older. You might choose this option if you are
rebuilding a particular area of your hard disk.
After choosing the options, click Restore, and the software will begin to
restore the files. After the restore is complete you can view the log file for
the restore by clicking View Log. A record of the restore will also appear in
the results page under the corresponding protection plan name. You can
view the record of the restore by clicking the History action. In the Action
column, will be the word Restore and the date and time of the restore.
RESTORING EXCHANGE STORAGE GROUPS
An Exchange protection plan backs up Microsoft Exchange databases and log
files for each Microsoft Exchange Storage Group selected. After the plan runs,
eligible logs are truncated. This page discusses the process of restoring and
recovering Exchange 2003 and Exchange 2007 databases.
The software protects Microsoft Exchange using the Microsoft Exchange
Writer for VSS included with newer versions of Windows. When a Microsoft
Exchange Storage Group is backed up by the software, the VSS Writer is
invoked and the files that compose the databases, log files, and ancillary meta
files are backed up in an open state (while the mailbox stores are mounted).
Email transactions and new log files are deferred in memory while the existing
files are backed up. Because databases are protected in an open, or victimized
state, recovery steps are necessary before restored databases can be
remounted in Exchange.
When restoring one or more Microsoft Exchange Storage Groups from an
Exchange protection plan, all files composing the Microsoft Exchange Storage
Group are restored to an alternate location of your choosing. The software
never restores the database files back to their original location, due to the
potential of corrupting running mailbox databases. After restoring all files
from your protection plan, you must run an Exchange recover command
using the Microsoft utility ESEUtil.exe, included with Exchange, before the
individual databases can be used again by Exchange. You may replace an
existing damaged Exchange database, or simply recover data from a mailbox
by mounting the database in an Exchange Recovery Storage Group.
The process of restoring a protection plan begins with finding the archive time
for the plan you want to restore in AccuGuard.
Select the archive time you want to restore and the Restore button in the
lower-right portion of the screen becomes active. Click Restore and a Storage
Group Restore dialog box appears. Choose a volume or directory with enough
space to save all log files and all databases for the Microsoft Exchange Storage
Group. It is not possible to explore an archive containing protected Exchange
data.
74
1019661
PRODUCT MANUAL
Preliminary
To use the restored database files with Exchange, they must be recovered and
reattached to the Exchange Server. For information on recovering and
attaching databases to an Exchange Server, refer to the following links:
http://technet.microsoft.com/en-us/library/aa998848(EXCHG.80).aspx
http://support.microsoft.com/default.aspx/kb/824126
http://technet.microsoft.com/en-us/library/aa996168(EXCHG.65).aspx
RESTORING SQL SERVER DATABASES
A SQL Server protection plan backs up all required files for each SQL Server
database selected. This page discusses the process of restoring and recovering
SQL Server databases.
In addition to restoring an individual database or a group of databases, the
software can restore the entire protection plan. Generally, you only need to
restore an entire protection plan in the case of accidental deletion, or restoring
a system after a disk change or crash.
This software protects Microsoft SQL databases using the Microsoft SQL VSS
Writer included with newer versions of Windows. When a database is backed
up by the software, the VSS Writer is invoked and the files that compose the
database are backed up in an open state (while databases are mounted). New
transactions are deferred in memory while the existing database and
Transaction Log files are backed up. The databases are left in an open state in
the store targeted by the protection plan.
The software does not allow you to restore the database files to the original
location. You must always choose an alternate location for restoration. The
software never restores the database files back to their original location due to
the potential of corrupting running databases. After restoring, you will need to
reattach the database to the SQL Server. Whether the goal is to replace an
existing damaged database, or simply to recover data from a table or tables,
will determine if you should move the restored files to the original location of
the database files, or leave them in their restored location. Never overwrite
your original database files. Rename them and later delete them when your
recovery is complete.
The process of restoring a protection plan begins with finding the archive time
in AccuGuard for the plan you want to restore. Select the archive time you
want to restore and the Restore button in the lower-right portion of the screen
becomes active. Click Restore and a Database Restore dialog box appears. It is
not possible to explore a database archive.
After restoring, you simply need to reattach the database files to the SQL
Server instance. Refer to the following link for information on attaching
databases to SQL Server instances:
http://msdn.microsoft.com/en-us/library/ms190209.aspx
SEPTEMBER 2010
ACCUVAULT RDX
Preliminary
75
CHAPTER 6—ARCHIVED DATA
NOTES
76
1019661
PRODUCT MANUAL
Preliminary
A
TROUBLESHOOTING
To aid in troubleshooting, AccuGuard records its activity in log files and writes
significant events to the Windows Application Event Log. See the Log Files
section below for more information.
See Remote Computer Connection Issues on page 79 for help with adding
protection plans to remote computers.
LOG FILES
Two types of logs are used by AccuGuard Enterprise, internal component logs
and protection plan logs.
Note: By default only summary information is written to a protection plan log
file. You can change the configuration Log Level setting for a protection
plan to record more or less information.
Log Type
Description
Internal
component logs
These logs are specific to internal components of the software
and are located in the installation directory as <internal component name>.log.
Two of these logs, aiq.log and aiqRemote.log, can be viewed
from within AccuGuard Enterprise. The aiq log contains information pertaining to local plan execution. The aiqRemote log
contains information pertaining to remote computer plan execution. To view the aiq log, select Local Plans, then choose its
View Log action. To view the aiqRemote log, select Remote
Computers, then choose its View Log action.
SEPTEMBER 2010
ACCUVAULT RDX
Preliminary
77
APPENDIX A—TROUBLESHOOTING
Log Type
Description
Plan logs
Each time a plan is run, its results are appended to a log file:
<installation directory>\Logs\<plan name>.log. The most recent logging information can be found at the end of the file. By
default only summary information is logged, but you can
change the configuration Log Level setting to record more or
less information.
If a plan fails or completes with warnings, you should check its
log file for details. For this reason,
LogLevel=none is not recommended.
To view a protection plan log file, select the History action,
then click the View Log link in the Result Details section.
The following statistics are written to the log file for each run of a folder and
files protection plan:
Log Statistic
Description
Total transfer
time
The amount of time it took to write the updated archive
information to the store.
Directories processed
The total number of directories processed by the protection plan.
Protected items
The total number and size (in bytes) of files processed by
the current run of the protection plan.
Protected data
The total amount of data protected by the plan.
New files
The number of new files since the last run of the protection plan.
Changed files
The number of files that changed since the last run of the
protection plan.
New and changed The amount (and percentage) of protected data that
changed since the last run of the protection plan.
78
Factored
The amount of data that was reduced in size by Adaptive
Content Factoring.
Total stored
The amount of data written to the Store for this run of the
protection plan.
Data reduction
The ratio of the total amount of new and changed data
("New and changed") to the total amount of data written
to the Store ("Total stored") by the current run of the
protection plan.
CCF ratio
The ratio of all the data protected by the plan ("Protected
data") to the total amount for data written to the Store
("Total stored") for this run of the protection plan.
Common content
The amount (and percentage) of common data subject to
data deduplication.
Elapsed time
The amount of time for the entire archive operation, including the total transfer time.
1019661
PRODUCT MANUAL
Preliminary
REMOTE COMPUTER CONNECTION ISSUES
This section addresses the following scenario:
In AccuGuard Enterprise, you add a remote computer that is a member of the
domain. You are logged on to the AccuVault RDX with an account that has
permission to connect to the remote computer from the network. After the
remote computer is added, you click it and wait for communication to be
established. Eventually, a yellow triangle appears in the remote computer
icon. An error briefly appears at the bottom of the AccuGuard interface stating
that the network path is not found, or the RPC Server is unavailable. (Note: To
view the error again, right-click the computer and refresh.) You do not receive
an option in the Actions pane to create a protection plan.
Most likely causes:
Windows Remote Registry service is not running. The Remote Registry
service startup type should be set to Automatic and the service should be
started. This service is needed to remotely administer the system.
Windows firewall may be preventing communication with the AccuVault
RDX.
Other services needed for remote administration of the remote computer
may not be running or have proper permissions.
To verify that the Remote Registry service startup type is set to Automatic and
the service is running, follow these steps:
1. Click Start (or the Start icon), right-click My Computer (or Computer), and
select Manage.
2. When Computer Management opens, select and expand the Services
section.
3. Scroll to the Remote Registry service and observe its status (should be
Started) and Startup Type (should be Automatic). If necessary, double-click
the Remote Registry service and set startup type to Automatic. Click the
Start button.
4. Try to establish communication with the remote computer from AccuGuard
Enterprise again. Right-click the remote computer and select Refresh. If the
Create Protection Plan action appears in the Actions pane, start the Create
Protection Plan wizard. Otherwise, continue below.
Verify that the firewall is not preventing remote administration of the
computer by allowing exceptions.
1. On the remote computer, click Start, Control Panel.
SEPTEMBER 2010
ACCUVAULT RDX
Preliminary
79
APPENDIX A—TROUBLESHOOTING
2. Add the following exceptions to the firewall. Note: Some of these may not
be listed for your firewall because this list was compiled from several
different Windows operating systems. If the exception is listed on your
computer, then add it as an exception to the firewall. If it is not listed, just
continue to the next exception in the list below.
File and printer sharing
Remote Administration
Windows Management Instrumentation (WMI)
Core Networking
Note:
These may be set at the group policy level. For example, in Group
Policy Management, select the desired group policy, right-click
and select Edit. Navigate to Computer
Configuration\Administrative Templates\Network\Network
Connections\Windows Firewall\Domain Profile. Enable Allow
remote administration exception for localsubnet. Do the same for
Allow file and printer sharing exception. After the policy updates,
close and open AccuGuard Enterprise and attempt to connect
again. You can force group policy update with the gpupdate
command on both the domain controller and the remote
computer. You may manually set the exceptions from the remote
computer, as well. File and printer sharing is available on the
exceptions tab of the firewall settings, unless disabled in group
policy. At a command prompt on the remote computer, an
administrator may set the remote administration exception with:
Netsh firewall set service type=remoteadmin
mode=enable scope=all profile=all.
3. Try to establish communication with the remote computer from AccuGuard
Enterprise again. Right-click the remote computer and select Refresh. If the
Create Protection Plan action does not appear in the Actions pane,
continue with the next step.
4. AccuGuard uses the credentials of the currently-logged-on account to
connect to the remote computer. So, make sure you are logged on with a
domain admin account, and that the remote computer is in the domain.
5. If still having trouble, you may need to check local group policy settings on
the remote computer for log on locally, log on as batch job, and log on as a
service.
6. On the remote computer, verify the following services are started: Remote
Procedure Call, Remote registry, and COM. Click Start, Run, and type
services.msc and click OK. Search for the services and verify they are
started.
80
1019661
PRODUCT MANUAL
Preliminary
Test the WMI remote connection with WMI Tester. On the AccuVault RDX
system, click Start, Run, then type WBEMTEST and try to connect to the remote
computer by UNC path to the namespace, e.g. \\<computer name>\root\cimv2
and click Connect. If you receive an error message, check that DCOM is
running on the remote computer and check DCOM permissions with
DCOMCNFG. Go to Start/Run and type dcomcnfg and click OK. In
dcomcnfg, navigate to My Computer/Properties/Default Properties and verify
DCOM is enabled with Connect and Identify set (any changes require a
reboot). Go to COM Security tab and verify Launch and Activation
permissions. The account logged in to the Archive Manager server must have
Remote Launch and Remote Activation permissions. Add the account and
check the permissions, if needed.
SEPTEMBER 2010
ACCUVAULT RDX
Preliminary
81
APPENDIX A—TROUBLESHOOTING
NOTES
82
1019661
PRODUCT MANUAL
Preliminary
B
SPECIFICATIONS
This appendix provides the following information about the AccuVault RDX:
To view this information...
go to...
Physical specifications
page 84
Software specifications
page 84
Power specifications
page 84
Environmental specifications
page 84
SEPTEMBER 2010
ACCUVAULT RDX
Preliminary
83
APPENDIX B—SPECIFICATIONS
PHYSICAL SPECIFICATIONS
Dimensions (D x W x H)
355 mm x 265 mm x 94 mm
(14.37 x 10.43 x 3.70 inches)
Weight
6.35 kg (14 lbs.)
Processor
Intel Atom 1.66 GHz
Memory
2 GB DDRII RAM
HDD Capacity/Usable Capacity
1 TB (1x 1TB)/850 GB
HDD Configuration
Single/Internal
LAN port
1 x Gigabit RJ-45 Ethernet port
USB ports
4 x USB 2.0 (back panel)
Removable Media Drive
Integrated RDX QuikStor Dock
SOFTWARE SPECIFICATIONS
Operating System
Windows Storage Server 2008
File System
NTFS
Recommended Network
Configuration
Domain
Supported Remote Client OS
Windows XP Professional, Windows Vista,
Windows 7 Professional, Windows Server
2003, Windows Server 2003 R2, and
Windows Server 2008 R2
Remote Client
Licenses/Maximum
5/5
POWER SPECIFICATIONS
AC Input Voltage
100-240 VAC
Rated Input Current
1,0 A
Rated Input Frequency
50/60 Hz
ENVIRONMENTAL SPECIFICATIONS
84
Operating Temperature
10° to 40° C (50° to 104° F)
Non-operating Temperature
-20° to 60° C (-4° to 140° F)
Operating Humidity
20% to 80%
1019661
PRODUCT MANUAL
Preliminary
C
WARRANTY AND EULA
INFORMATION
This appendix provides the following warranty and license agreement
information about the AccuVault RDX:
Product Limited Warranty
End User License Agreement (EULA) Basic
SEPTEMBER 2010
ACCUVAULT RDX
Preliminary
85
APPENDIX C—WARRANTY AND EULA INFORMATION
PRODUCT LIMITED WARRANTY
Tandberg Data Corporation (“Tandberg Data”) warrants to the original End User
(“Purchaser”) that this computer product purchased from Tandberg Data or an
authorized Tandberg Data dealer (“Product”) is free from manufacturing defects in
material and workmanship for the applicable warranty period set forth below and as
stated in the Product Specification, from the date of shipment to Tandberg Data's
authorized dealer. In order to receive warranty services, contact the appropriate
Tandberg Data location shown at the following web address, www.tandbergdata.com.
Do not return Product to place of purchase. Product returns must reference a
Tandberg Data Return Material Authorization Number (“RMA #”) and any Product
received by Tandberg Data without an RMA# will be refused and returned to
Purchaser. Purchaser will need to provide the following information:
Date hardware was purchased
Hardware type
Serial number of hardware
Company name and address; name, email address and telephone number; name of
reseller where hardware was purchased
Description of the problem with as much detail as possible
Computer type, Operating System, Backup Application used
Purchaser may be required to perform certain diagnostic tests on Product prior to
Tandberg Data issuing an RMA #. Tandberg Data, at its discretion, may use new,
refurbished, or reconditioned replacement parts to perform any warranty repair or
replacement of Products. Tandberg Data also reserves the option to replace the entire
Product with a comparable Product or refund the then-current purchase price of the
Product. Tandberg Data Products or parts that are replaced or repaired under this
warranty are warranted for the remaining unexpired portion of the original warranty
period. This constitutes Purchaser's sole and exclusive remedy in the event of a defect.
Warranty registration must be completed and verified prior to any warranty claims.
This limited warranty covers defects encountered in the normal use of the Product
during the warranty period and does not apply under the following conditions:
Product is damaged due to physical abuse, mishandling, accident, negligence or
failure to follow operating instructions; Product is modified by Purchaser in any
manner other than that for which it was intended or otherwise approved by Tandberg
Data, including, but not limited to tempestizing, ruggedizing, and/or militarizing the
Product; damage or defects caused by the use of unauthorized parts or by
unauthorized service; the Product has been subject to unsuitable operating or physical
conditions outside those recommended in Product specifications as provided by
Tandberg Data; Product has its serial numbers altered or removed; or Product is
damaged due to improper packaging of the warranty return to the Tandberg Data
dealer or Tandberg Data.
With respect to items manufactured or supplied by a third party which are sold by
Tandberg Data, you shall be the beneficiary of the manufacturer's warranty, if any,
SUBJECT TO THE LIMITATIONS STATED THEREIN. Copies of such manufacture's
warranties will be made available upon request. TANDBERG DATA DISCLAIMS AND
EXCLUDES ALL WARRANTIES WITH RESPECT TO SUCH ITEMS.
86
1019661
PRODUCT MANUAL
Preliminary
EXCEPT FOR THE EXPRESS WARRANTY STATED ABOVE, TANDBERG DATA
MAKES NO OTHER WARRANTIES, WHETHER EXPRESS OR IMPLIED, WITH
RESPECT TO THIS TANDBERG DATA PRODUCT. ALL IMPLIED WARRANTIES,
INCLUDING THOSE OF MERCHANTABILITY AND FITNESS FOR A PARTICULAR
PURPOSE ARE EXPRESSLY DISCLAIMED.
TANDBERG DATA DOES NOT WARRANT THAT PRODUCT WILL MEET ALL OF
PURCHASER'S REQUIREMENTS OR THAT OPERATION OF PRODUCTS WILL BE
UNINTERRUPTED OR ERROR FREE.
Tandberg Data shall have no liability or responsibility to Purchaser or any other person
for any loss or damage or any special, incidental or consequential damages caused or
alleged to be caused directly or indirectly by Product or those items supplied or sold
by Tandberg Data hereunder, including, but not limited to, any interruption of service,
loss of data, loss of customer goodwill, loss of business, anticipatory profits or
consequential damages resulting from the use or operation of the Product.
In no event shall Tandberg Data be liable for loss of profits or any indirect, special,
incidental, or consequential damages arising out of any breach of this warranty or in
any manner arising out of or connected with the sale or anticipated use of the product.
In no event shall Tandberg Data be liable for any damages whatsoever in excess of the
purchase price of the Product. This warranty gives you specific legal rights, and you
may also have other rights that vary from state to state. Some states do not allow the
exclusion or limitation of incidental or consequential damages, so the above limitation
or exclusion may not apply to you. Go to www.tandbergdata.com for current limited
warranty terms and conditions.
ON SITE SERVICE (OSS)
OSS is provided for the first year at no charge in some regions. Go to the Support
section of the Tandberg Data web site (www.tandbergdata.com) for current OSS and
Technical Support terms and conditions. Technical Support is provided in an effort to
keep Product in, or return Product to, good working order. Tandberg Data shall, at its
option, repair or replace Product, including spare parts. OSS does not assure
uninterrupted operation of Customer's Product or guarantee that Product can be
returned to good working order. OSS includes the replacement of defective parts.
Unless specified otherwise, OSS shall be performed during normal business hours of
8:00 a.m. to 5:00 local time, excluding Tandberg Data holidays. OSS does not cover
accessories or consumable parts and supplies, missing parts, or those items identified
by the manufacturer as being Customer's responsibility, nor does it cover Product
installation, relocation services, systems engineering services, programming,
reinstallation of Customer's operating system or application software, firmware or
code updates, or operational procedures of any sort. Customer shall provide Tandberg
Data with full and free access to Product to allow Tandberg Data to perform OSS.
Tandberg Data requires a credit card number prior to shipping an OSS unit. You must
agree to ship the original unit back to Tandberg Data, using the OSS packaging
which includes the return ship label, within 10 calendar days from the time you
receive your replacement. If Tandberg Data does not receive your original unit within
10 days we will charge your credit card for the OSS unit at the retail purchase price.
SEPTEMBER 2010
ACCUVAULT RDX
Preliminary
87
APPENDIX C—WARRANTY AND EULA INFORMATION
ADVANCED EXCHANGE SERVICE OPTION
The ADvanced EXchange (ADEX) Service is available in many regions at no charge
during the first year of the warranty period for customers needing a replacement unit
at the time they receive a Return Material Authorization (RMA) number from
Tandberg Data Service Support. See the Support section of the Tandberg Data web site
(www.tandbergdata.com) for more details.
With the ADvanced EXchange Service option, Tandberg Data will ship a completely
reconditioned replacement unit (same configuration as customer's purchased unit) to
the customer before receiving the defective unit back from the customer. This ADEX
unit will become the customer's unit; Tandberg Data will not return the original unit to
the customer. The remaining warranty on the original unit will apply to the ADEX
unit.
The ADEX unit will usually ship within 48 hours, subject to availability. Although
Tandberg Data will ship the ADEX unit to you by best way, Tandberg Data cannot
guarantee the arrival of the ADEX unit on the following business day. Tandberg Data
can provide waybill numbers so you can work with the carrier on any delivery
problems. All deliveries shall be F.O.B. Tandberg Data's shipping point.
Tandberg Data requires a credit card number prior to shipping an ADEX unit. You
must agree to ship the original unit back to Tandberg Data, using the ADEX
packaging which includes the return ship label, within 10 calendar days from the
time you receive your replacement. If Tandberg Data does not receive your original
unit within 10 days we will charge your credit card for the ADEX unit at the retail
purchase price.
The ADEX Service Option is available in North America, Australia, and Europe and
applies to Tandberg Data-branded products purchased from authorized Tandberg
Data resellers only.
To take advantage of the ADvanced EXchange Service Option you need only ask for
the ADEX option when speaking to the Service Support representative while
processing your RMA.
For more information about Tandberg Data Service, visit the Support section of the
Tandberg Data web site (www.tandbergdata.com).
88
1019661
PRODUCT MANUAL
Preliminary
END USER LICENSE AGREEMENT — BASIC
MICROSOFT SOFTWARE LICENSE TERMS
WINDOWS STORAGE SERVER 2008 BASIC
These license terms are an agreement between you and Tandberg Data. Please read them. They apply to the software included on this
server. The software also includes any separate media on which you received the software.
The software on this device includes software licensed from Microsoft Corporation or its affiliate.
The terms also apply to any Microsoft
x
x
x
x
updates,
supplements,
Internet-based services, and
support services
for this software, unless other terms accompany those items. If so, those terms apply. If you obtain updates or supplements directly from
Microsoft, then Microsoft, and not Tandberg Data, licenses those to you.
This software does not transmit personally identifiable information from your server to Microsoft
Corporation computer systems without your consent.
By using the software, you accept these terms. If you do not accept them, do not use the software. Instead,
contact Tandberg Data to determine its return policy for a refund or credit.
As described below, using some features also operates as your consent to the transmission of certain
standard computer information for Internet-based services.
If you comply with these license terms, you have the rights below.
1.
2.
USE RIGHTS.
a.
Server Software. Server software provides functions or services on this server. You may access, boot from, display and run
the primary operating copy of the server software only on this server. You may reinstall the server software on this server. You
may not use the server software, or its components, on another server.
b.
Device Software. Device software allows a device (other than this server) to access or use the server software. You may
install and use the device software on any number of devices.
c.
Processor Rights. You may use the server software with not more than 1 processor at any one time, unless a higher number of
allowed processors is indicated on the Certificate of Authenticity for the software.
ADDITIONAL LICENSING REQUIREMENTS AND/OR USE RIGHTS.
a.
Specific Use. Tandberg Data designed this server for a specific use. You may only use the software for that use.
You may not use the software to support additional software programs or functions, other than utilities or similar software used
solely for administration, performance enhancement, preventative maintenance, or to provide complimentary data storage
functionality for this server.
b.
Software Use Limits. You are not licensed to use any of the following functions of the server software:
i.
Any use of the server software as a domain controller or any other use of DCPromo.exe.
ii.
Network Infrastructure Services. You may not use any functions of the server software necessary to support a server
network infrastructure. For example, you may not use Routing and Remote Access Service (RRAS), Domain Name
System (DNS), or Windows Internet Name Service (WINS). You may, however, use the Dynamic Host Configuration
Protocol (DHCP) server function and any network infrastructure client functions, such as DNS or DHCP clients.
iii.
Terminal Services. This function enables devices to use server software, or other software used with the server software
to provide similar services. Terminal Services may be used only to the extent required to manage the server Software in
Remote Administration Mode.
iv.
Network Load Balancing Services.
v.
Any use of the following features or functions:
x
x
x
x
x
x
x
x
x
Active Directory Lightweight Services
Active Directory Certificate Services
Active Directory Domain Services
Active Directory Federation Services
Active Directory Rights Management Services
Application Server
DNS Server
Hyper-V
Network Policy and Access Services
SEPTEMBER 2010
ACCUVAULT RDX
Preliminary
89
APPENDIX C—WARRANTY AND EULA INFORMATION
x
x
x
x
x
x
c.
UDDI Services
Windows Deployment Services
Network File System (NFS)
Distributed File System Replication (DFS-Replication)
File Server Resource Manager
iSCSI Target
Limitation on Functions Supported by the Software. Tandberg Data licenses you to use the server software to support only the
base functions as provided and installed on this server. You are not licensed to use the server to run or support
i.
enterprise database software (such as Microsoft SQL Server), except non-enterprise engines such as Microsoft SQL
Server 2005 Express Edition. The server software also may run or support enterprise database engines (including
Microsoft SQL Server) that are integrated in and used only to support the server software as part of the specific use for
which Tandberg Data designed this server,
ii.
enterprise resource planning (ERP) software,
iii.
messaging or enterprise mail,
iv.
Microsoft Exchange or Microsoft SharePoint Portal Server,
v.
team collaboration software, and/or
vi.
web-based time management applications that address appointment, meeting and other calendar items.
vii.
quota management software
viii.
file replication
ix.
more than
x
20 Server Message Block (SMB) connections
x
2 network interface cards
x
4 disk drives
x
2 concurrent printing devices
These limitations do not restrict use of the server for data management (such as providing storage and backup functions) for
the software identified above.
e.
3.
No CALs Required. Devices that access or use functions of server software licensed under these license terms do not require
a client access license (CAL). Obtaining a CAL for any Microsoft product does not grant you rights to use functions of the
server software not licensed under these license terms.
SCOPE OF LICENSE. The software is licensed, not sold. This agreement only gives you some rights to use the software. Tandberg
Data and Microsoft reserve all other rights. Unless applicable law gives you more rights despite this limitation, you may use the
software only as expressly permitted in this agreement. In doing so, you must comply with any technical limitations in the software that
allow you to use it only in certain ways. For more information, see the software documentation or contact Tandberg Data. Except and
only to the extent permitted by applicable law despite these limitations, you may not:
•
•
•
•
•
•
work around any technical limitations in the software;
reverse engineer, decompile or disassemble the software;
make more copies of the software than specified in this agreement;
publish the software for others to copy;
rent, lease or lend the software; or
use the software for commercial software hosting services.
Except as expressly provided in this agreement, rights to access the software on this server do not give you any right to implement
Microsoft patents or other Microsoft intellectual property in software or devices that access this server.
You may use remote access technologies in the software such as Remote Desktop to access the software remotely from another
device. You are responsible for obtaining any licenses required for use of these protocols to access other software.
90
4.
DATA STORAGE TECHNOLOGY. The server software includes data storage technology called Windows Internal Database.
Components of the server software use this technology to store data. You may not otherwise use or access this technology under this
agreement.
5.
INTERNET-BASED SERVICES. Microsoft provides Internet-based services with the software. Microsoft may change or cancel them
at any time.
a.
Consent for Internet-Based Services. The software features described below connect to Microsoft or service provider computer
systems over the Internet. In some cases, you will not receive a separate notice when they connect. You may switch off these
features or not use them. For more information about these features, visit http://go.microsoft.com/fwlink/?linkid=34493. By
using these features, you consent to the transmission of this information. Microsoft does not use the information to
identify or contact you.
b.
Computer Information. The following features use Internet protocols, which send to the appropriate systems computer
information, such as your Internet protocol address, the type of operating system, browser and name and version of the
1019661
PRODUCT MANUAL
Preliminary
software you are using, and the language code of the device where you installed the software. Microsoft uses this information
to make the Internet-based services available to you.
x
Windows Update Feature. You may connect new hardware to the device when you run the software. Your device may
not have the drivers needed to communicate with that hardware. If so, the update feature of the software can obtain the
correct driver from Microsoft and run it on your device. You can switch off this update feature.
x
Digital Certificates. The software uses digital certificates. These digital certificates confirm the identity of Internet users
sending X.509 standard encrypted information. The software retrieves certificates and updates certificate revocation
lists. These security features operate only when you use the Internet.
x
Auto Root Update. The Auto Root Update feature updates the list of trusted certificate authorities. You can switch off
the Auto Root Update feature.
x
Windows Media Digital Rights Management. Content owners use Windows Media digital rights management technology
(WMDRM) to protect their intellectual property, including copyrights. This software and third party software use
WMDRM to play and copy WMDRM-protected content. If the software fails to protect the content, content owners may
ask Microsoft to revoke the software’s ability to use WMDRM to play or copy protected content. Revocation does not
affect other content. When you download licenses for protected content, you agree that Microsoft may include a
revocation list with the licenses. Content owners may require you to upgrade WMDRM to access their content.
Microsoft software that includes WMDRM will ask for your consent prior to the upgrade. If you decline an upgrade, you
will not be able to access content that requires the upgrade. You may switch off WMDRM features that access the
Internet. When these features are off, you can still play content for which you have a valid license.
x
Malicious Software Removal/Clean On Upgrade. Before installation of the software, the software will check and remove
certain malicious software listed at http://www.support.microsoft.com/?kbid=890830 (“Malware”) from your device.
When the software checks your device for Malware, a report will be sent to Microsoft about any Malware detected or
errors that occurred while the software was checking for Malware. No information that can be used to identify you is
included in the report. You may disable the software’s Malware reporting functionality by following the instructions found
at http://www.support.microsoft.com/?kbid=890830.
x
Network Connectivity Status Icon. This feature determines whether a system is connected to a network by either
passive monitoring of network traffic or active DNS or HTTP queries. The query only transfers standard TCP/IP or DNS
information for routing purposes. You can switch off the active query feature through a registry setting.
x
Windows Time Service. This service synchronizes with time.windows.com once a week to provide your computer with
the correct time. You can turn this feature off or choose your preferred time source within the Date and Time Control
Panel applet. The connection uses standard NTP protocol.
c.
Use of Information. Microsoft may use the computer information, error reports, and Malware reports to improve our software
and services. We may also share it with others, such as hardware and software vendors. They may use the information to
improve how their products run with Microsoft software.
d.
Misuse of Internet-based Services. You may not use these services in any way that could harm them or impair anyone else’s
use of them. You may not use the services to try to gain unauthorized access to any service, data, account or network by any
means.
6.
BENCHMARK TESTING. The software includes one or more components of the .NET Framework (“.NET Components”). You may
conduct internal benchmark testing of those components. You may disclose the results of any benchmark test of those components,
provided that you comply with the conditions set forth at http://go.microsoft.com/fwlink/?LinkID=66406. Notwithstanding any other
agreement you may have with Microsoft, if you disclose such benchmark test results, Microsoft shall have the right to disclose the
results of benchmark tests it conducts of your products that compete with the applicable .NET Component, provided it complies with
the same conditions set forth at http://go.microsoft.com/fwlink/?LinkID=66406.
7.
ALTERNATIVE VERSIONS. The software may include more than one version, such as 32-bit and 64-bit. You may use the version
licensed under this agreement.
8.
NOTICES ABOUT THE MPEG-4 VISUAL STANDARD. The software may include MPEG-4 visual decoding technology. This
technology is a format for data compression of video information. MPEG LA, L.L.C. requires this notice:
USE OF THIS PRODUCT IN ANY MANNER THAT COMPLIES WITH THE MPEG-4 VISUAL STANDARD IS PROHIBITED, EXCEPT
FOR USE DIRECTLY RELATED TO (A) DATA OR INFORMATION (i) GENERATED BY AND OBTAINED WITHOUT CHARGE
FROM A CONSUMER NOT THEREBY ENGAGED IN A BUSINESS ENTERPRISE, AND (ii) FOR PERSONAL USE ONLY; AND (B)
OTHER USES SPECIFICALLY AND SEPARATELY LICENSED BY MPEG LA, L.L.C.
If you have questions about the MPEG-4 visual standard, please contact MPEG LA, L.L.C., 250 Steele Street, Suite 300, Denver, CO
80206; www.mpegla.com.
9.
NOTICE ABOUT THE VC-1 VISUAL STANDARD. This software may include VC-1 visual decoding technology. MPEG LA, L.L.C.
requires this notice:
THIS PRODUCT IS LICENSED UNDER THE VC-1 PATENT PORTFOLIO LICENSES FOR THE PERSONAL AND NONCOMMERCIAL USE OF A CONSUMER TO (A) ENCODE VIDEO IN COMPLIANCE WITH THE VC-1 STANDARD (“VC-1 VIDEO”)
OR (B) DECODE VC-1 VIDEO THAT WAS ENCODED BY A CONSUMER ENGAGED IN A PERSONAL AND NON-COMMERCIAL
ACTIVITY AND/OR WAS OBTAINED FROM A VIDEO PROVIDER LICENSED TO PROVIDE VC-1 VIDEO. NO LICENSE IS
GRANTED OR SHALL BE IMPLIED FOR ANY OTHER USE.
SEPTEMBER 2010
ACCUVAULT RDX
Preliminary
91
APPENDIX C—WARRANTY AND EULA INFORMATION
If you have questions about the VC-1 visual standard, please contact MPEG LA, L.L.C., 250 Steele Street, Suite 300, Denver,
Colorado 80206; http://www.mpegla.com.
10.
SECONDARY BOOT AND RECOVERY COPIES OF THE SOFTWARE.
a.
Secondary Boot Copy. If a secondary boot copy of the server software is installed on the server, you may access, boot from,
display and run it solely in the event of a failure, malfunction, or corruption of the primary operating copy of the server software,
and only until the primary operating copy has been repaired or reinstalled. You are not licensed to boot from and use both the
primary operating copy and the secondary boot copy of the server software at the same time.
b.
Recovery Copy. You may use recovery copy solely to repair or reinstall the server software on the server.
APPROVED ADDITIONAL TEXT IF EMBEDDED SYSTEM IS AUTHORIZED TO BE LEASED UNDER THE OEM LICENSE
AGREEMENT:
11.
LEASED HARDWARE. If you lease the server from Tandberg Data, the following additional terms shall apply: (i) you may not
transfer the software to another user as part of the transfer of the server, whether or not a permanent transfer of the software with
the server is otherwise allowed in these license terms; (ii) your rights to any software upgrades shall be determined by the lease you
signed for the server; and (iii) you may not use the software after your lease terminates, unless you purchase the server from
Tandberg Data.
12.
NO RENTAL. You may not rent, lease, lend, or provide commercial hosting services with the software.
13.
PRODUCT SUPPORT. Contact Tandberg Data for support options. Refer to the support number provided with the device.
14.
BACKUP COPY. You may make one backup copy of the software. You may use it only to reinstall the software on the device.
15.
PROOF OF LICENSE. If you acquired the software on the device, or on a disc or other media, a genuine Certificate of Authenticity
label with a genuine copy of the software identifies licensed software. To be valid, this label must be affixed to the device, or
included on or in Tandberg Data’s software packaging. If you receive the label separately, it is not valid. You should keep the label
on the device or packaging to prove that you are licensed to use the software. To identify genuine Microsoft software, see
http://www.howtotell.com.
16.
TRANSFER TO A THIRD PARTY. You may transfer the software only with the device, the Certificate of Authenticity label, and
these license terms directly to a third party. Before the transfer, that party must agree that these license terms apply to the transfer
and use of the software. You may not retain any copies of the software including the backup copy.
17.
NOT FAULT TOLERANT. The software is not fault tolerant. Tandberg Data installed the software on the device and is
responsible for how it operates on the device.
18.
RESTRICTED USE. The Microsoft software was designed for systems that do not require fail-safe performance. You may not use
the Microsoft software in any device or system in which a malfunction of the software would result in foreseeable risk of injury or
death to any person. This includes operation of nuclear facilities, aircraft navigation or communication systems and air traffic control.
19.
NO WARRANTIES FOR THE SOFTWARE. The software is provided “as is”. You bear all risks of using it. Microsoft gives
no express warranties, guarantees or conditions. Any warranties you receive regarding the device or the software do not
originate from, and are not binding on, Microsoft or its affiliates. When allowed by your local laws, Tandberg Data and
Microsoft exclude implied warranties of merchantability, fitness for a particular purpose and non-infringement.
20.
LIABILITY LIMITATIONS. You can recover from Microsoft and its affiliates only direct damages up to two hundred fifty U.S.
Dollars (U.S. $250.00), or equivalent in local currency. You cannot recover any other damages, including consequential,
lost profits, special, indirect or incidental damages.
This limitation applies to:
•
anything related to the software, services, content (including code) on third party internet sites, or third party
programs, and
•
claims for breach of contract, breach of warranty, guarantee or condition, strict liability, negligence, or other tort to the
extent permitted by applicable law.
It also applies even if Microsoft should have been aware of the possibility of the damages. The above limitation may not
apply to you because your country may not allow the exclusion or limitation of incidental, consequential or other damages.
21.
92
EXPORT RESTRICTIONS. The software is subject to United States export laws and regulations. You must comply with all domestic
and international export laws and regulations that apply to the software. These laws include restrictions on destinations, end users
and end use. For additional information, see www.microsoft.com/exporting.
1019661
PRODUCT MANUAL
Preliminary
INDEX
A
B
AccuGuard Enterprise
activating license keys 26
adding remote computers 27
adding stores 29
best practices 10
creating a local protection plan 32
creating a store copy 34
creating protection plans 29
excluded files 4
features 3
in a domain environment 12
in a workgroup environment 12
obtaining license keys 25
user interface 6
using search bar to locate archived files 70
AccuVault
configure Windows Storage Server 20
configuring LCD panel 18
connecting via Remote Desktop 19
installation 17 to 35
network infrastructure 16
product limited warranty 86
system components 2
adding storage 40
disk drive 40
file folder 42
removable disk 41
archives
finding a protection plan time 70
restoring files and folders 72
restoring from search results 71
restoring Microsoft Exchange storage
groups 74
restoring SQL Server databases 75
best practices
backing up and restoring configuration
files 13
backup scenarios 11
dynamic and fixed files 11
managing user accounts 12
running a baseline protection plan 12
C
copying a store 45
creating protection plans
56
D
domain environment, running AccuGuard
Enterprise 12
E
editing a protection plan 63
end user license agreement
basic agreement for Windows Storage Server
2008 89
environmental specifications 84
EULA
basic for Windows Storage Server 2008 89
Exchange
creating a protection plan 58
Exchange Storage Groups
restoring 74
excluded files 4
excluding file types 65
expiring a store 50
F
files, excluding 65
finding an archive time
SEPTEMBER 2010
70
ACCUVAULT RDX
Preliminary
93
INDEX
I
installation
connection problems 79
software system requirements 16
verifying system configuration 23
Remote Desktop Connection 19
removable disk storage 41
removing protection plans 66
removing storage 43
restoring Exchange storage groups 74
restoring protection plan files and folders
restoring SQL Server databases 75
running a protection plan 63
17 to 35
L
LCD panel 18
license keys
activating 26
obtaining 25
log files, troubleshooting
77
M
Microsoft Exchange
protection plan 58
restoring files 74
Microsoft software license terms
basic for Windows Storage Server 2008
Microsoft SQL Server
protection plan 59
restoring databases 75
P
product limited warranty 86
product warranty caution iii
protection plan 66, 70
creating 29, 56
editing 63
excluding file types 65
for files and folders 57
for Microsoft Exchange 58
for SQL Server 59
local 32
removing 66
restoring Exchange groups 74
restoring files and folders 72
restoring SQL Server databases 75
running 63
scheduling 61
purging a store 51
R
RDX cartridge
using removable disk storage 41
recommended network infrastructure
remote clients
adding to AccuGuard 27
94
16
72
S
89
scheduling protection plans 61
search bar, using 70
searching for archived plans 70
service
contacting Tandberg Data iii
product limited warranty 86
software best practices 10
software features 3
specifications
environmental 84
power 84
software 84
SQL Server
creating a protection plan 59
restoring databases 75
store
actions 52
adding to AccuGuard 29
creating a store copy 34
creating a store expiration task 50
creating a store purge task 51
creating a store verify task 50
creating store tasks 44
properties 53
removing 43
seeding a store copy from remote site
use existing 43
store tasks
copy 34, 45
expiration 50
purge 51
verify 50
system components 2
47
1019661
PRODUCT MANUAL
Preliminary
INDEX
system configuration settings for remote
clients 23
system requirements for remote clients 16
T
Tandberg Data, contacting iii
troubleshooting
log files 77
remote computer connections
79
U
user interface overview
6
V
verifying a store 50
viewing results 66
W
warranty
product limited warranty 86
product warranty caution iii
Windows Storage Server
basic end user license agreement 89
Windows Storage Server, required settings 20
workgroup environment, running AccuGuard
Enterprise 12
SEPTEMBER 2010
ACCUVAULT RDX
Preliminary
95
INDEX
Notes
96
1019661
PRODUCT MANUAL
Preliminary