1
MyXerver™MX3600
Network Storage
User’s Guide
UNIVERSAL TECH PTE. LTD.
http://www.universal-tech.biz
1
TABLE OF CONTENTS
Table of Contents ..........................................................................................................................................................2
Chapter 1 INTRODUCTION.............................................................................................................................................5
A.
Overview...........................................................................................................................................................5
B.
Features............................................................................................................................................................5
C.
Box Contents ....................................................................................................................................................5
D.
System Requirements.......................................................................................................................................5
E.
Technical Specifications....................................................................................................................................6
F.
Safe Handling Instructions................................................................................................................................6
Chapter 2 FAMILIARIZATION WITH YOUR NAS ..............................................................................................................8
A.
Front panel .......................................................................................................................................................8
B.
Rear Panel.........................................................................................................................................................8
C.
Audible Warnings .............................................................................................................................................9
Chapter 3 BASIC INSTALLATION...................................................................................................................................10
A.
Installation Steps ............................................................................................................................................10
B.
USB Devices – How to Disconnect Safely .......................................................................................................10
C.
Configuring your NAS .....................................................................................................................................11
Method 1 – Using the Setup CD (Windows only) ................................................................................................11
Method 2 – Using the Web Interface ..................................................................................................................14
Chapter 4 CLIENT PC SETUP .........................................................................................................................................17
A.
Finding MyXerver™ MX3600 on your network ..............................................................................................17
For Windows Vista™/XP/2000 or NT 4.0 Users ...................................................................................................17
For Windows 95/98/ME Users ............................................................................................................................17
B.
Using the NAS Storage....................................................................................................................................18
Method 1- Mapping a Network Drive through Windows OS ..............................................................................18
2
Method 2-Mapping a Network Drive using the Flash Map Windows utility from the Setup CD.........................18
Method 3- Accessing the NAS storage via Web Interface ...................................................................................20
C.
Changing Password.........................................................................................................................................20
Chapter 5 ADMINISTRATION SETUP ............................................................................................................................22
A.
Web Administration Setup .............................................................................................................................22
B.
Users Screen ...................................................................................................................................................22
C.
Status Screen ..................................................................................................................................................25
D.
Network Screen ..............................................................................................................................................26
E.
System Screen ................................................................................................................................................28
F.
Media Screen..................................................................................................................................................32
Chapter 6 ADVANCED ADMINISTRATION SETUP .........................................................................................................34
A.
Overview.........................................................................................................................................................34
B.
Groups Screen ................................................................................................................................................34
Groups-Access Screen..........................................................................................................................................35
Groups-Members Screen.....................................................................................................................................36
C.
Shares Screen .................................................................................................................................................37
Shares-Access Screen...........................................................................................................................................38
D.
Backup Screen ................................................................................................................................................39
Backup-Backup Job Screen ..................................................................................................................................40
Backup-Status Screen ..........................................................................................................................................41
E.
Disk Screen .....................................................................................................................................................42
F.
Upgrade Screen ..............................................................................................................................................45
Chapter 7 DOWNLOAD MANAGER ..............................................................................................................................46
A.
Overview.........................................................................................................................................................46
The Web-base Download Management Interface ..............................................................................................46
B.
Download Manager Screen ............................................................................................................................47
Download Manager – Add New Task Screen.......................................................................................................48
3
Chapter 8 ACCESSING MYXERVER™ OVER THE INTERNET...........................................................................................49
A.
Overview.........................................................................................................................................................49
B.
Making the NAS available via the Internet .....................................................................................................49
Note on changing HTTP (Web Browser) Port Number ........................................................................................50
C.
Accessing your NAS using a domain name .....................................................................................................50
Chapter 9 FREQUENTLY ASKED QUESTIONS ................................................................................................................52
A.
I cannot find MyXerver™ on the network using the NAS utility .....................................................................52
B.
The NAS has been configured, but I can't find it in Window’s Network Neighborhood. ...............................52
C.
When I click on an NAS folder icon in Network Neighborhood, I get prompted for a password. ..................53
D.
How to setup iTunes Service ..........................................................................................................................53
E.
How to setup MP3 Broadcast .........................................................................................................................54
F.
How to do a Direct USB Copy .........................................................................................................................56
Limited Warranty Statement .......................................................................................................................................58
FCC Statement .............................................................................................................................................................59
SOFTWARE LICENSE .....................................................................................................................................................60
A.
Overview.........................................................................................................................................................60
B.
BSD License.....................................................................................................................................................61
C.
GNU General Public License ...........................................................................................................................61
4
CHAPTER 1 INTRODUCTION
A.
OVERVIEW
Thank you for selecting MyXerver™ Network Storage!
MyXerver™ Network Storage is the ideal multimedia storage center for your home or small-business
network.
MyXerver™ combines the functionality of a file server, together with a host of other value added features
such as the Bit Torrent download feature which allows you do continuous download of internet content
without turning on the PC, and an embedded media server, which enables streaming of audio or video to
a compatible UPnP player. It is also an iTunes server, allowing music files on the network storage to be
played on any PC or notebook in the network with iTunes software. Connect a USB printer, and you are
able to use the print server function to share the printer anywhere within your network.
MyXerver™ Network Storage comes with the Continuous Data Protection software for real-time
automated backup of your data from your PC or notebook.
B.
FEATURES
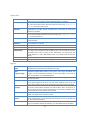
The following features are available on MyXerver™ Network Storage:
Feature
Benefit
Web management interface
Access and manage MyXerver™ anywhere via a web browser
Gigabit Ethernet
Enjoy Gigabit Ethernet speed
Bit Torrent Download
Do continuous download of internet contents even if your PC is not turned on
File Server
Share files over the network, define user or group access rights, and disk space quota
FTP Server
Setup FTP server, and access it from anywhere
USB Printer Server
Connect a USB printer and share it in your local network
iTunes Server
Stream music from your iTunes library on MyXerver™ to any notebook or PC in your local
network
UPnP Server
Stream music or video to a compatible UPnP device in your local network
MP3 Broadcast
Broadcast MP3 music in your local network
USB Direct Copy
Directly copy contents from a USB storage device to MyXerver™ at the touch of a button
C.
BOX CONTENTS
D.
MyXerver™ Network Storage enclosure with 3.5” SATA hard drive
Ethernet Cable
Power Adapter (Wall-mount type)
Rubber Feet (4x)
Quick Start Guide
Setup CD
SYSTEM REQUIREMENTS
5
E.
PC or Mac with internet browser and network access
Switch, router or cable modem with one free Ethernet port to connect to MyXerver™
Supported Operating Systems:
PC Users: Windows 2000/XP/Vista™
Mac Users: Mac OSX 10.3 or later
TECHNICAL SPECIFICATIONS
Hardware
CPU Speed
RAM
Flash Memory
HDD
LAN Interface
USB Port
LED Indicators
Power Supply
Operating Environment
Temperature
Humidity
Non-Operating Environment
Temperature
Humidity
Product Dimension (mm)
Retail Box Dimension (mm)
Software
Networking
File System
Internal HDD
External HDD
System Tools
Data Backup
Management
F.
250 MHz
32 MB DDR
8 MB
1*3.5” SATA
10/100/1000 Base-T
1*USB 2.0, to connect to USB disk or USB printer
Power, HDD Activity
External Adapter Wall-mount type
5 ~ 40°C
20 ~ 80%
-10 ~ 70°C
0 ~ 80%
171 x 135 x 58
201 x 175 x 135
TCP/IP, HTTP, FTP, NTP, CIFS/SMB, NFS, AFP,
DHCP Client
XFS
FAT32, NTFS (Read-only)
System firmware upgrade
Email alert
HDD Standby mode
Backup and restore system settings
Network recycle bin
Event log
Continuous Data Protection with NTI Shadow®
software
SAFE HANDLING INSTRUCTIONS
MyXerver™ Network Storage is designed to operate normally in the temperature range of 5˚
C to 40˚ C, and relative humidity of 20-80%.
Do not block the airflow around the drive when the drive is turned on
Do not place the product in direct sunlight
6
Incorrect handling such as dropping the drive can cause data loss and invalidates the
warranty.
Do not move or disconnect the drive while it is operating to avoid hardware damage and
potential data loss.
Do not stack anything on top of the drive; this can overheat and damage your drive.
Do not place the product near any liquid. Liquids can damage the internal electronics.
Do not attempt to open the drive’s enclosure. This action voids the warranty.
7
CHAPTER 2 FAMILIARIZATION WITH YOUR NAS
A.
FRONT PANEL
System Power
HDD Activity
System Power LED
HDD Activity LED
NAS is powered off
Off
Off
Startup Mode (1-3 mins)
Blinking
On-Off-On
Normal operation, no HDD activity
On
On
Normal operation, with HDD activity
On
Blinking
During : Disk scanning, SMART disk checking, Firmware
upgrade or HDD format
Cross-blinking
Cross-blinking
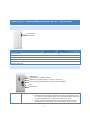
B.
REAR PANEL
System Reset
USB Eject Button / USB Copy Button
USB 2.0 port (to add storage or to connect o to printer)
Auto-sensing 10/100/1000 Base-T Ethernet port (Auto MDIX)
DC In
Power Button
System Reset
This button has 2 functions:
IP Address Reset. If the NAS’s IP address is lost, press and hold this button
for 2 seconds. The IP address will be reset to the default (DHCP client) and
the system will beep once to indicate that reset has occurred.
Password Reset. If the NAS administrator’s password is lost, press and
hold the button for 10 seconds. The password will be cleared, and the
8
NAS will beep twice.
USB Port
You can connect 2 different devices here:
USB Eject
USB hard drive or flash drive. Supported file formats are FAT32 and NTFS
(read-only).
USB Printer
This button has 2 functions:
USB Eject. Press the button. You will hear the 1st beep sound. Wait a few
seconds for the 2nd beep sound which indicates that the USB device is
ready to be disconnected.
USB Direct Copy. If you connect a USB storage device to MyXerver™, and
press the button for 5 seconds, there will be 2 beep sounds indicating that
the contents of the USB storage device will be copied onto MyXerver™.
Ethernet Port
Use this port to connect the NAS to your router/switch/hub.
Power Button
This is a spring-loaded “soft-switch”.
If the power is off, press once to turn it on.
If the power is on, press once to start the Shutdown sequence.
During Shutdown, the Power LED will blink. When Shutdown is completed, all LEDs will turn off.
C.
AUDIBLE WARNINGS
Audible warnings are given under the following conditions:
1 Beep
After connecting a USB device, a beep sound will indicate that the device is ready to use
1 Beep
Upon pressing the USB Eject button, you will hear the 1st beep sound. After a few seconds you will a 2nd
beep sound indicating that the USB device is allowed to be disconnected
1 Beep
Reset button is pressed
1 Beep
Power switch is pressed
1 Beep
System is ready to use after upgrade and NAS boots up again
2 Beeps
If you connect a USB storage device to MyXerver™, and press the USB Eject Button for 5 sec, there will be 2
beep sounds indicating that the contents of the USB storage device will be copied onto MyXerver™
3 Beeps
When hard disk usage exceeds 98%
9
CHAPTER 3 BASIC INSTALLATION
A.
1.
2.
3.
4.
5.
B.
INSTALLATION STEPS
Connect the network cable to the Ethernet port at the rear panel of MX3600. Connect the other end to your
hub or switch.
Connect the power adapter to a power outlet, and plug the power cord into MX3600’s power input at the rear
panel.
Locate the power button at the rear panel of MX3600. Press it once to power on the NAS.
MX3600 will start a bootup process, and the system power LED will blink continuously. Boot up time is
approximately 1-3 minutes.
When the system power LED stops blinking and remains on, boot up process is complete.
USB DEVICES – HOW TO DISCONNECT SAFELY
There are 2 ways of removing a USB device.
Method 1:
Press the USB eject button at the rear panel. Upon pressing the USB Eject button, you will hear the 1st beep sound.
After a few seconds you will a 2nd beep sound indicating that the USB device is allowed to be disconnected
Method 2:
You can also use the Windows utility installed from the Setup CD. After installing the utility from the CDROM, a
Flash Map icon will be displayed on the system tray.
10
1.
Right click on the Flash Map icon in the system tray.
2.
Select Safely Remove USB Device
3.
Select the desired NAS and USB device, and click Eject button.
4.
Wait for the message to appear, telling you it is safe to remove the device.
Note: If the USB device is not removed, it will not be reconnected. You must remove
and re-insert the USB device to have it re-connected.
C.
CONFIGURING YOUR NAS
Now that everything is connected and powered on, you are ready to configure your NAS so that it is accessible to
the users on your network.
This procedure only needs to be done ONCE, by the NAS Server's Administrator. Other
LAN users should follow the Client PC Setup procedure described in the following
chapter.
The initial configuration can be done either by using the Setup CD (Windows only), or by using a web browser. Use
the Setup CD method if you have more than one unit of MyXerver™ on your network.
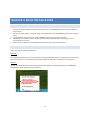
METHOD 1 – USING THE SETUP CD (WINDOWS ONLY)
1. Insert the MyXerver™ MX3600 Setup CD into your CD-ROM drive of your computer.
2. Run the program NAS_Setup.exe which is located at the root (top) folder of your CD-ROM. The Welcome
screen will be displayed.
11
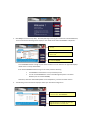
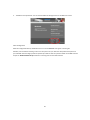
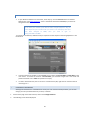
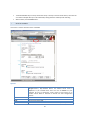
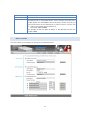
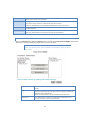
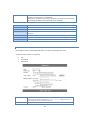
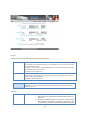
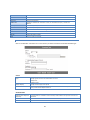
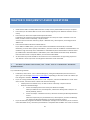
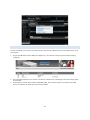
3. Click Setup to start the Setup Utility. The Utility will begin scanning your network for installed NAS drives,
and a screen like the following will be displayed. The default Server Name of MX3600 is “MyXerver”.
Detected server list. Select preferred one
to setup.
Current settings of selected server. Please
make a note.
Press “Refresh” to re-scan whole network
for available NAS/USB.
A list of MX3600 network storage on your network will show on the left side. The right side displays
details of the currently selected NAS.
If the desired MX3600 network storage is not listed, check the following:
The MX3600 has finished the start up and boot process.
Your PC and the MX3600 are on the same LAN segment (there is no Router
between your PC and the MX3600).
Otherwise, select the desired NAS (default name of MyXerver), and click the "Next" button.
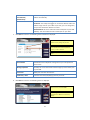
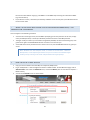
4. The following screen will then be displayed. Select your desired IP configuration.
Select this if your LAN has a DHCP Server,
otherwise select “Fixed IP Address”
Suggested values are compatible with your LAN.
Suggested IP address is currently used.
12
Obtain an IP address
automatically
(DHCP Client)
Select this only if your LAN has a DHCP Server which can allocate IP
address automatically.
Fixed IP Address
You need to enter the following data:
IP address: The utility will suggest an unused IP address within the
address range used on your LAN. If you wish, you can change this,
but you must ensure the address is unused.
Network Mask: This must match the value used by PCs on your LAN.
Gateway: This must match the value used by PCs on your LAN.
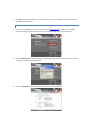
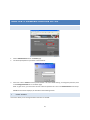
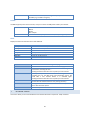
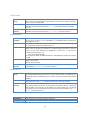
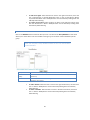
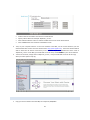
5. Click Next to continue. The following screen will then be displayed:
Each NAS comes with a unique Server
Name. You may change it if you wish.
All workgroups on the network are listed.
You may select one from the pull-down
menu, or create a new one
Set the proper Time-Zone, Date and Time
here.
Server Name
The default name is MyXerver. Change this to your own preferred
server name.
Workgroup Name
Normally this name should match the Workgroup name used by PCs
on your LAN.
Time Zone
Select your time zone from the list
Local Date / Time
Enter the local date (mm/dd/yyyy format) and time
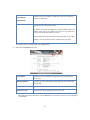
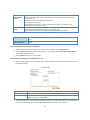
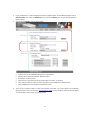
6. Click Next to continue. The following screen is displayed.
All Settings are displayed. Please confirm
they are correct, then click Save.
After saving, a final screen will be
displayed. Press Exit to close the Setup
Utility.
13
7. Click Save to save your configuration to the NAS. On the next screen, click Exit to close the Setup utility.
The NAS is now operational.
METHOD 2 – USING THE WEB INTERFACE
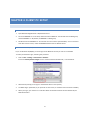
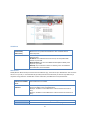
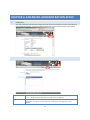
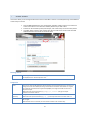
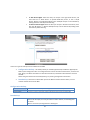
1. Open up your web browser, and type in the address bar: http://myxerver. (“myxerver” is the default
name of the NAS, if you have not changed it). The following welcome screen will be displayed.
2. Click on Administration. A window will pop up, requesting for user name and password. Enter user name
as “admin”, and leave the password blank.
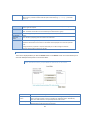
3. Click on the Network menu item. The IP configuration screen will be displayed.
14
Obtain an IP address
automatically
Select this only if your LAN has a DHCP Server which can allocate IP
address automatically.
(DHCP Client)
Fixed IP Address
You need to enter the following data:
IP address: The utility will suggest an unused IP address within the
address range used on your LAN. If you wish, you can change this,
but you must ensure the address is unused.
Network Mask: This must match the value used by PCs on your LAN.
Gateway: This must match the value used by PCs on your LAN.
After entering your IP configuration, click on Save button.
4. Next, select the System menu item.
Server Name
The default name is MyXerver. Change this to your own preferred
server name.
Workgroup Name
Normally this name should match the Workgroup name used by PCs
on your LAN.
Time Zone
Select your time zone from the list
Local Date / Time
Enter the local date (mm/dd/yyyy format) and time
After setting the above parameters, click on Save button. Please wait 1-2 mins for the configuration
to take effect.
15
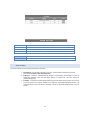
5. The NAS is now operational. You can view the Network Storage Status on the Welcome screen.
Other Configuration
After the configuration above, all Windows users can access MX3600 with "guest" access rights.
However, we recommend creating a "User" for each person on your LAN. This will provide each person on
your LAN with their own login (name and password) as well as their own personal folder on the NAS. See the
chapter on Administration Setup for details on creating users via the web interface.
16
CHAPTER 4 CLIENT PC SETUP
A.
FINDING MYXERVER™ MX3600 ON YOUR NETWORK
FOR WINDOWS VISTA™/XP/2000 OR NT 4.0 USERS
1.
Open Network Neighborhood or My Network Places.
2.
Locate the MX3600. If it is not listed, double-click Entire Network. Then double-click the Workgroup
that the MX3600 is in. By default, the MX3600 is in Workgroup.
3.
Double click on the MX3600 icon. You will then see a list of shares (shared folders). You can read and
write files to these shares, unless the MX3600 administrator has blocked access.
FOR WINDOWS 95/98/ME USERS
If you use Windows 95/98/ME, you must logon to the Network correctly in order to use the NAS.
To check your Network Logon, following this procedure:
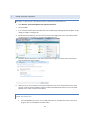
1.
Click on Start - Settings - Control Panel - Network.
Ensure the Primary Network Logon is set to "Client for Microsoft Networks", as shown below.
2.
Windows will prompt you to logon to the Network when it starts (boots).
3.
You MUST logon. (Otherwise, if you press ESC or click Cancel, no network resources will be available.)
4.
When you logon, you need to use a valid User Name and Password which has been defined by the
NAS administrator.
17
B.
USING THE NAS STORAGE
METHOD 1- MAPPING A NETWORK DRIVE THROUGH WINDOWS OS
1.
Open Network / Network Neighborhood / My Network Places.
2.
Locate the NAS.
3.
If it is not listed, double-click Entire Network. Then double-click the Workgroup that the NAS is in. (By
default, the NAS is in Workgroup.)
4.
Double click on the NAS icon, and you will see a list of shares. Right click on the shared folder which
you wish to map a drive letter to, and select Map Network Drive.
5.
Select the desired drive letter to use. Click on Reconnect at logon, in order to have the same drive
letter mapped each time you logon.
6.
When you try to access a folder you may be prompted for a user name and password. Please enter
the user name and password which has been created by the NAS administrator for you on the NAS.
(Default user is admin, and password is blank)
METHOD 2-MAPPING A NETWORK DRIVE USING THE FLASH MAP WINDOWS UTILITY
FROM THE SETUP CD
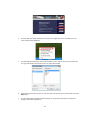
1.
Insert the CDROM into your PC, and run NAS_Setup.exe. On the Welcome screen of the setup
program, click on Flash Map to install the utility.
18
2.
The Flash Map icon will be installed on the system tray. Right click on the Flash Map icon and
select "Shared Folder Mapping".
3.
The following will be displayed. A list of all the NAS’s on your network will show on the left side.
The right side displays share folders of the currently selected NAS
4.
Select which share folder you want to map and select a drive letter for this share folder then click
Map button.
5.
This drive will now be available in Windows Explorer, and from the File-Open or File-Save As
dialog in all Windows applications.
19
METHOD 3- ACCESSING THE NAS STORAGE VIA WEB INTERFACE
1.
In your Browser's Address or Location bar, enter "http://" and the MX3600 Server’s IP Address.
Alternatively, enter http://myxerver, as this is the default hostname of MX3600, if you have not
changed the name.
If the HTTP port number of the NAS has been changed (default is 80), you
must define the port number when you connect. For example if HTTP port
has been changed to 8080, then you need to type in:
http://192.168.1.25:8080.
To connect via the Internet, additional setup is required. See the chapter on Accessing MyXerver™ over
the Internet.
C.
2.
To browse the files and folders on the MX3600, click on either the Private Data or Public Data on the
main screen. To browse the contents of Private Data, you will need to login with a user name and
password. Default user is admin and password is empty.
3.
To view or download a file, click on its name. To download any file, right-click its name and choose
"Save target as..."
CHANGING PASSWORD
Although the Administrator of the NAS must create your user name and initial password, you can then
change your own password whenever you wish, as follows:
1.
On the Home page of the web interface, click on the Change Password.
2.
The following screen will be displayed.
20
3.
Enter the required data:
User Name – your login name on the NAS, created by the NAS administrator
Existing Password – your current password
New Password – the password you now wish to change to
Confirm New Password – re-enter the new password to ensure it is correct
4.
Click Save to save the changes
5.
Click Home to return to the main screen.
21
CHAPTER 5 ADMINISTRATION SETUP
A.
WEB ADMINISTRATION SETUP
1.
2.
Click on Administration link on the Home page.
You will be prompted for a password as shown below:
3.
Enter user name as admin and leave password blank. This is the default setting. To change the password, click
on the Change Password link on the Home page.
Note: To gain access, you must enter the user name and password of a user in the Administrators User Group.
A Users screen will be displayed, as described in the following section.
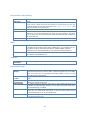
B.
USERS SCREEN
This screen allows you to manage the Users that exist on the NAS.
22
The "admin" and "guest" users are pre-defined, and cannot be deleted.
Users can be members of many user Groups.
Existing Users
User List
This list shows all existing users. As you scroll through the list of users, details of the
selected user are displayed in the "Properties" area.
Groups Button
Clicking this button will display the Groups of which the selected user is a member. You
can then add this user to other Groups, or remove existing membership
Use this to delete the selected user. When deleting a user, you have the option of
deleting the Group and Share with the same name as the user (if they exist).
Delete Button
Properties
Name
Comment
(Optional)
Password
Verify password
User Name. Note that some special characters (e.g. " / \ [ ] : ; | = . , + * ? < > ' `) and 2byte characters cannot be used in it.
Enter a comment if you wish. Note that some special characters (e.g. " \ : | , ') and 2byte characters cannot be used in it.
Enter the user's password in these fields. Note that 2-byte characters cannot be used
in it.
These fields are also used to change an existing user's password, as follows:
Select the desired user
Clear the existing values in the password fields.
Enter the desired password in both the "Password" and "Verify Password" fields. If no
password is required, leave both fields blank.
Click the "Save" button.
When creating a new user, enter the desired password in both of these fields.
23
Create
Private Folder
(Share)
Enable Disk
Quota
Clear Form Button
Save as
New User Button
If creating a new user:
Checking this option will create a Group and a Private Folder (Share) with the same
name as the user.
Read/Write access will be granted to the Share.
If changing an existing user:
The checkbox has no effect - it will neither create nor delete. This option is only
available when creating a new user.
Enable the checkbox if you want to set the disk usage for the user, then enter the
maximum amount of disk space this user is allowed to use.
Note! Unless the checkbox is checked, the Disk Quota field has no effect.
Use this button to clear the form, preparing the form for the entry of a new
user.
Use this Button to create a new user, after entering their data in the Properties
fields.
How to modify the properties of an existing user
Select the desired user from the list. Their details will be displayed in the Properties fields.
Edit the Properties fields as required. Note that you cannot change the Create Private Folder (Share)
option when modifying a user.
Click the Save button to save your changes.
How to define or modify Group membership of a user
Click on the Groups button. The following screen will be displayed. This screen also allows you to add or
revoke membership.
User name
Member of
Other Groups
The name of the user being modified is shown at the top of the screen
The Member of column on the left shows the Groups that this user belongs to
The Other Groups column on the right shows all the other Groups which may be
added to the list of membership.
To add membership of a Group, select the Group or Groups in the right-hand column, then click the "<<"
Button. Multiple Groups can be selected by holding down the CTRL Key while selecting.
24
C.
To Revoke Membership of a Group. Select the Group or Groups in the left-hand column, then click the
">>" Button. Multiple Groups can be selected by holding down the CTRL Key while selecting.
When finished, click the Close button.
STATUS SCREEN
This screen is used to check the status of the NAS.
System
Server Name
Firmware Version
IP Address
Time
Current Status
Current name of the NAS. This name will be shown in Network
Neighborhood / My Network Places. The default server name is
MyXerver. If you installed more than one unit of MX3600 on your
network, be sure to change the server name to ensure there is no
conflict. Server Name is restored to default one after configuration
restore.
Current version of the firmware in the NAS.
IP Address currently used by the NAS.
Current time of the NAS.
Indicates the current status of the NAS. This is usually in Ready mode. If
25
the Server is not available, the message will say why the NAS is not
available (e.g. Scandisk in Progress)
Printer
The NAS supports printer server function, and you can share the USB printer within your network.
Current Status
No. of Print Jobs
The different states are:
Offline
Online
Out of Paper
The total number of print jobs in the Print Queue, waiting to be printed.
Disks
Displays the status of both the Internal and USB disks.
Model
Total Space
Free Space
Partition
File System
Share
Total Size
Free Size
Model name of the disk, it's provided by the manufacturer.
Total amount of the disk space.
Amount of the disk space still available to users
Partition number of USB disk
File system used in the partition
Corresponding share of the partition
Total size of the partition.
Free size of the partition
Save Button
Cancel Button
Shutdown Now Button
Click this button to save the settings on the page.
Click this button to cancel the modifications on the page.
Shutdown the Server immediately. This will break all existing
connections, including this one.
Clicking this button does NOT save any data you have entered.
Restart (reboot) the Server. This will break all existing connections,
including this one. The NAS Server will immediately restart, but
could take a few minutes before it is available again.
Clicking this button does NOT save any data you have entered.
Clicking this button will delete the Print Job currently being
printed. Use this if the document is not printing correctly.
Clicking this button will delete all Print Jobs in the Print Queue. Use
this to clear the Print Queue.
Click this to update the data shown on screen.
Restart Now Button
Delete Current Job Button
Delete All Jobs Button
Refresh Button
D.
NETWORK SCREEN
This screen allows you to set the IP Address and related information required for TCP/IP networks
26
IP Address
Obtain IP Address
automatically
(DHCP Client)
Fixed IP Address
Do NOT select this unless you have a DHCP Server on your LAN. A
DHCP Server can provide an IP Address to PCs and other devices
when they boot.
Select this if your LAN does not have a DHCP Server, and enter the
following data.
IP Address: The IP Address must be unused, and compatible with
the PCs on your LAN.
Network Mask: Enter the same Network Mask (Subnet Mask) used
by PCs on your LAN.
Gateway: If your LAN has a Router or Gateway, enter its IP Address
here. Otherwise, leave this blank.
DNS Server
A DNS (Domain Name Server) translates Internet addresses (e.g. microsoft.com) to IP Addresses. Use the same
values as on your PC, or recommended by your ISP (Internet Service Provider). At least one (1) DNS entry is
required if using either the "E-Mail Alert" feature. Otherwise, the DNS entries may be left blank.
Obtain DNS Server
Addresses from DHCP
Server
Use Fixed DNS Server
Addresses
Select this if you want to obtain DNS Server Addresses from DHCP server
when DHCP Client is enabled.
Save Button
Cancel Button
Click this button to save the settings on the page.
Click this button to cancel the modifications on the page.
Select this if you want to specify some DNS Server Addresses.
Primary: IP Address of the first DNS Server.
Backup 1: IP Address of the DNS Server to be tried if the first server is
busy.
Backup 2: IP Address of the DNS Server to be tried if the second server is
busy.
27
E.
SYSTEM SCREEN
28
Identification
Name
Comment
Workgroup Name
Printer Name
You can change the name of the NAS here.
Enter a comment (e.g. the location of the NAS).
This should match the "Workgroup Name" on your PCs. If the Workgroup name
does not match, access to the NAS is still possible, but the NAS will not appear
when you click the "Browse Network" button (for example, when adding a
Network Printer)
Specify one name for the Printer Server. After you plug one printer into one USB
port, the Printer Name will occur in Network Neighborhood and you can click it to
install the Printer Server
Note: Some special characters (e.g. " / \ [ ] : ; | = . , + * ? < > ' ` ( ) # $ %) and 2-byte characters cannot be used in
these fields.
Date & Time
Time Zone
Change System
Date and Time as
Following
Date
Time
Select the correct time zone for your location.
Check this box to update date and time. The date and time setting will not be
sent to the server if this box is not checked.
Enter the local date. The NAS Server will set it own calendar according to the date
you provide.
Enter the local time at your location. The NAS Server will set its own clock
according to the time you provide. Remember that this is not sent to the Server
until you click "OK".
29
NTP (Network Time Protocol)
Synchronize with
Time Server
NTP Server
Status
Synchronize ...
Sync Now
If enabled, the NAS will synchronize its clock with a NTP (Network Time Protocol)
Server.
Enter the domain name or IP address of the NTP server you wish to use. The NTP
server can be a public server (on the Internet) or a local server (on your own
network). Note that some special characters (e.g. " / \ [ ] : ; | = , + * ? < > ' `) and
2-byte characters cannot be used in it.
This shows the status of the NTP update procedure.
Select how often you want the NAS to synchronize its clock with the specified
NTP server. You can also specify the time of the next synchronization. This allows
you to specify that the synchronization should be performed (for example) at
11.00 pm each day.
Use this button to synchronize with the NTP server immediately.
WINS
Enable WINS
WINS Server
Enable this if your LAN has a WINS Server.
If enabled, this device will register with the WINS Server. This will allow users on
the LAN to locate this device through a Router. (Without WINS, "Network
Neighborhood" or "My Network Places" only scans the local LAN segment.)
If WINS is enabled, enter the IP Address of your WINS Server. Normally, this will
be a Windows NT/2000/XP Server.
Language
Language
Environment
Specify the language environment for FTP clients and Download Manager.
Download Manager
Enable Download
Manager
Maximum Running
BT Tasks
Maximum Running
HTTP/FTP Tasks
Enable Schedule
Day
Time
If enabled, you can use Download Manager function on homepage to
download files with FTP and HTTP URLs. If special languages exist in the URLs,
you must make sure the Language Environment above is correct, or they
possibly fail to be downloaded.
Specify maximum number of BT tasks that can run at same time. It's up to 5
tasks.
Specify maximum number of HTTP/FTP tasks that can run at same time.
Maximum number of tasks is 10.
If enabled, Download Manager only runs on the specified time period. If
disabled, Download Manager always runs. The option only takes effect when
Download Manager is enabled.
Day of the schedule. If you want Download Manager to run in specified period
every day, you need select "Every Day", or you can select others to limit
Download Manager to run on one specified day.
Time of the schedule. If selection of Day is not "Every Day", the End Time
cannot be after Start Time.
30
E-Mail Alert
Send E-Mail...
E-Mail Address
From Address
(Optional)
Subject (Optional)
Send Test Mail
Use Specified SMTP
Mail Server
SMTP Mail Server
SMTP Port Number
Mail Server requires
Authentication
Account Name
Password
Check this to enable the sending of e-mail alerts by the NAS. Alerts will be sent
when there is some problem requiring the Administrator's attention.
Enter from 1 to 3 E-Mail Addresses. The messages generated by the NAS will
be sent to these destinations. Note that special characters (e.g. " / \ [ ] : ; | = , +
* ? < > ' `) cannot be used in them.
Specify one E-Mail Address that appear in the "From" field of e-mail alert
generated by the NAS. Usually it's helpful for e-mail alerts to avoid being
filtered as junk mails.
Enter the text you wish to appear in the "Subject" field of e-mail alert
generated by the NAS. Note that special characters (e.g. " / \ [ ] : ; | = . , + * ? <
> ' `) cannot be used in it.
Send test mail to specified e-mail address to verify whether the e-mail address
can be reached.
You can specify one SMTP (Simple Mail Transport Protocol) server to be used
to send E-Mail. It's optional.
Specify the address of the SMTP Mail Server.
Specify the port number used by SMTP server. It's 25 by default.
If the SMTP Server requires a "login" in order to send mail, check it and enter
your login name and password for the SMTP server. This is usually the same as
the POP3 server used to receive e-mail. Meanwhile, you need specify the
"From Address" as the E-Mail Address that is correlative with the Account
Name.
Specify the login name that is used to login the SMTP server.
Specify the password that is used to login the SMTP server.
Options
Enable Guest
Logins
Convert failed
logins
to "guest" logins
Enable NFS Server
Enable FTP Server
Allow anonymous
FTP login
Bandwidth Limit
Enable UPnP
Support
Enable Recycle Bin
If enabled, then the user can use "guest" as user ID to login to the NAS. If
disabled, then "guest" will not be accepted as a login.
If enabled, then all Windows users will be able to access the NAS via Network
Neighborhood/My Network Places, with "guest" access rights. By default, the
"guest" user has Read/Write permission to the "Disk" folder on the Internal
Disk, and all folders on the USB HDD/FLASH.
If enabled, then it will be possible for users to access files using a NFS (Network
File System) client .
If enabled, then it will be possible for users to upload and download files using
a FTP client program on their PC. The FTP server supports UTF-8. If the FTP
clients don't support UTF-8, please specify right Language Environment above.
The FTP server will prompt for a Username and Password when clients attempt
to connect. If this option is Enabled, users will be able to enter "anonymous" as
the Username, and any string as the Password. If this option is Disabled, users
must provide their correct Name and Password.
Limit the maximum speed of data transfer for every FTP client. Value must be
equal to or larger than 0. 0 means no limit.
If enabled, the NAS will broadcast it's availability. For LAN users with systems
which support UPnP (e.g. Windows ME, Windows XP), an icon for the NAS will
be automatically generated.
If enabled, deleted files are removed to folders 'Recycle Bin' in every share. If
you want to delete the files permanently, you need delete them from folders
31
Clear Recycle Bin
Port Number
F.
'Recycle Bin' again.
Set up a schedule to clear files that exist in the Recycle Bin on a timely basis
This port number is used for HTTP (Web Browser) connections to this Server.
The default is 80, as used by Web Servers. If this is changed, you should use a
number greater than 1024 (8080 is often used). Also, if the port is not 80, you
must specify the port in your Web browser, in order to connect. To do this, add
a ":" and the port number after the address: e.g.
HTTP://192.168.0.100:8080
This example assumes the NAS's IP Address is 192.168.0.100, and the port
number is 8080.
MEDIA SCREEN
This screen allows you to configure the settings of the multimedia server.
32
iTunes Server
Enable iTunes
Server
Server Name
Content
Directory
If enabled, then the user can listen music that stored in the NAS via iTunes client.
This iTunes Server supports files with extensions .mp3, .m4a, and .m4p. The iTunes
Server uses port number 3689.
Specify the name of the iTunes Server.
Note that some special characters (e.g. " \ : | , ') and 2-byte characters cannot be
used in it.
Specify the location in which music need be served iTunes Server.
Note that some special characters (e.g. " \ : * ? < > | ' `) cannot be used in it.
MP3 Broadcast
Enable MP3
Broadcast
Server Name
Port
Play by
Content
Directory
If enabled, then the NAS will broadcast MP3 in specified folder, and user can listen
to them by music players such as WinAMP etc. This MP3 Broadcast supports files
with extension .mp3.
Specify the name of the MP3 Broadcast. Note that some special characters (e.g. " \ :
| , ') and 2-byte characters cannot be used in it.
This port number is used for HTTP connections to MP3 Broadcast.. The default is
1234.. If this is changed, you should use a number greater than 1024. In order to
connect to the music broadcast via WinAMP etc, need add a ":" and the port
number after the address, e.g. :
HTTP://192.168.0.100:1234
This example assumes the NAS's IP Address is 192.168.0.100, and the port number
is 1234.
Specify the order that MP3 should be broadcasted.
Order - Play by order.
Shuffle - Play by shuffle.
Specify the location in which MP3 need be broadcasted. Note that some special
characters (e.g. " \ : * ? < > | ' `) cannot be used in it.
Media Server
Enable Media
Server
Server Name
Content
Directory
Browse Button
Save Button
Cancel Button
If enabled, the NAS can be located by compatible Media Adapters, using the UPnP
AV standard developed by Intel and its partners. Media content on the NAS (in the
Content Directories specified below) can then be accessed and played by the Media
Adapters.
Name of the Media Server that is displayed on client devices. Note that some
special characters (e.g. " \ : | , ') and 2-byte characters cannot be used in it.
Directories where the Media Server shall scan for media content. You can specify
four Content Directories at most. You should click the "Browse" button to select the
desired folder. Each directory can be limited to a certain media type. The default
setting will scan for all content types. Note that some special characters (e.g. " \ : *
? < > | ' `) cannot be used in it.
Click this button to select Content Directory.
Click this button to save the settings on the page.
Click this button to cancel the modifications on the page.
33
CHAPTER 6 ADVANCED ADMINISTRATION SETUP
A.
OVERVIEW
This section describes the advanced configuration that can be found under the Groups, Shares, Backup,
Disk and Upgrade screens. To view the advanced menu tabs, click on Advanced tab as shown below:
B.
GROUPS SCREEN
This screen allows you to manage the User Groups that exist on the NAS.
New Group
Use this area to create a new group. Note that some special characters (e.g. " / \ [ ] : ; | = . , +
* ? < > ' ` $ % @) and 2-byte characters cannot be used in Group Name.
Existing Groups
This shows the list of all Groups.
Two groups - "everyone" and "administrators" - always exist. These groups cannot be
deleted.
34
Create Button
Use this Button to create a new Group. Enter the desired name for the new Group in the
"Name" field, and then click this button.
Access Button
Clicking this will display the shares which members of the current Group are able to access.
You can then assign, remove or modify access rights for this Group.
Note: The "administrators" Group ALWAYS has Read/Write access to ALL Shares.
Members Button
Clicking this will display the users who are members of the selected Group. You can then add
or delete members.
Delete Button
Click this Button to Delete the selected Group.
Note: The "administrators" and "everyone" Groups cannot be deleted
GROUPS-ACCESS SCREEN
Click on the Access button within the Groups screen. You will see the Groups Access Rights screen which
allows you to view and modify the Groups that can access this Share.
Note: The administrators group ALWAYS has Read/Write (R/W) access to
ALL shares.
Group Name
The name of the Group being modified is shown above the 2 lists of
shares.
Accessible Shares
The "Accessible Shares" column on the left shows which Shares this
Group can currently access. The type of access is shown in brackets. (R =
Read Only, R/W = Read-Write).
Note: The "administrators" Group has R/W access to ALL shares.
Other Shares
The "Other Shares" column on the right shows all other Shares. The
current Group has no access to these Shares.
35
To add access rights: Select the Share or Share in the right-hand column, then click
the "<< Read Access" to provide Read-Only access, or the "<< R/W Access" Button
to provide Read-Write access. Multiple Shares can be selected by holding down the
CTRL Key while selecting.
To remove access rights: Select the Share or Shares in the left-hand column, then
click the "No Access >>" Button. Multiple Shares can be selected by holding down
the CTRL Key while selecting.
GROUPS-MEMBERS SCREEN
Click on the Members button within the Groups screen. You will see the Group Members screen which
allows you to check which users are members of the group, and to add or revoke membership of this
group.
Note: The "everyone" Group ALWAYS contains all users. You cannot add or
remove members.
Group Name
The name of the Group being modified is shown at the top of the screen.
Members
(users)
The "Members" column on the left shows the users who are currently members of
this Group.
Other Users
The "Other Users" column on the right shows users who are not currently
members of this Group.
To add a member: Select the User or Users in the right-hand column, and then click
the "<<" Button. Multiple Users can be selected by holding down the CTRL Key
while selecting.
To delete a member: Select the User or Users in the left-hand column, then click
the ">>" Button. Multiple Users can be selected by holding down the CTRL Key
while selecting.
36
C.
SHARES SCREEN
This screen allows you to manage the Shares that exist on the NAS. A "Share" is a folder (directory) on the NAS that
a User Group can access.
Only the NAS Administrators can create Shares. However, within a Share, users who have
access to that Share can create other folders (directories) as well as files.
A Share can be accessed by many User Groups, and a User Group can access many Shares.
If a folder within a Share is also a Share, then all users with access to the outer share will
ALWAYS have the same access to the inner share.
Existing Shares
Share List
All existing shares are listed. When an existing Share is selected in the list of Shares, its details
are displayed in the "Share Properties" area.
Properties
Name
The current name will be displayed. The Share Name can be changed if you wish. This does not
change the name of the folder (directory) associated with the Share. Share Name can support
up to 20 bytes. If the NAS need support Win95/98/NT, the length should be shorter than or
equal to 12 bytes.
Note that some special characters (e.g. " / \ [ ] : ; | = . , + * ? < > ' ` $ % @) and 2-byte
characters cannot be used in it.
Comment
(Optional)
Change or enter a comment if you wish.
Note that some special characters (e.g. " \ : , | ') and 2-byte characters cannot be used in it.
Location
The Location associated with the Share. Note that once a Share is created, its location cannot
be changed..
Default Folder: If this is selected, the share will be created in the root directory.
37
Specified: If this is selected, you can define the folder where you want the share. If the folder
does not exist, it will be created. Note that special characters (e.g. " \ : * ? < > | ' `) cannot be
used in it.
Access Button
Click this Button to view the Groups that have access to the selected Share, and change these
access rights as required.
Delete Button
Click this Button to Delete the selected Share. Deleting a Share does NOT delete its folder or any
data. The folder and its data is still accessible by the "administrators" group.
Save as New
Share Button
After entering the required data in the "Share Properties" area, use this Button to create a new
Share.
Clear Form
Button
Clear the form, preparing it for the creation of a new Share.
Save Button
Use this Button change the properties of a Share, as follows:
Select the desired Share in the Share list. Its details will be displayed in the "Share Properties"
area.
Change the Share properties as required. Note that you can NOT change the location.
Click the "Save" button to save your changes.
SHARES-ACCESS SCREEN
The screen is displayed when you click the Access button on the Shares screen. This screen allows you to
view and modify the Groups that can access this Share.
Note: The administrators group ALWAYS has R/W access to ALL shares.
Share Name
The name of the Share being modified is shown above the 2 lists of Groups.
Groups with
Access
The "Groups with Access" column on the left shows that group can currently access this
Share. The type of access is shown in brackets. (R = Read Only, R/W = Read-Write).
Note: The "administrators" Group has R/W access to ALL shares.
Other Groups
The "Other Groups" column on the right shows all other Groups on the current Disk Drive.
These Groups cannot access the current Share.
38
To Add Access Rights: Select the Group or Groups in the right-hand column, and
then click the "<< Read Access" to provide Read-Only access, or the "<< R/W
Access" Button to provide Read-Write access. Multiple Groups can be selected by
holding down the CTRL Key while selecting.
To Remove Access Rights Select the Group or Groups in the left-hand column, then
click the "No Access >>" Button. Multiple Groups can be selected by holding down
the CTRL Key while selecting.
D.
BACKUP SCREEN
There are 2 types of backup services available on the NAS:
1.
Configuration Backup - This facility allows you to Backup (Download) and Restore (Upload) the
NAS's system configuration file. The configuration file contains all network information, as well as the
User, Group, and Share information. It does NOT include any information about the data stored on
the NAS.
NOTE: Using this feature will overwrite (destroy) any existing configuration information.
2.
Data Backup - Data files can be backed up from the NAS to another network device, or from
another network device to the NAS
Configuration Backup
Back Up Button
Click this to download the system configuration file and save it on your PC.
Restore Button
Use this to restore a previously saved configuration file from your PC to the NAS.
Data Backup
Backup Jobs
This lists any Backup jobs you have defined. If you have not defined any jobs,
the list will be empty. For each job which has been defined, the following data
is shown:
Name - the name you assigned to this backup job.
39
Source & Destination - The name of the source and destination devices are
shown in the form Source => Destination.
Date/Time - The date and time of the last backup are shown. The name of the
Share being modified is shown above the 2 lists of Groups.
Backup Now Button
Run the selected backup job immediately.
Stop Button
Click this button to stop the selected backup job.
Status Button
This button will open a sub-window that shows the status of all Backup jobs.
Modify Button
This button will open a sub-window where you can change the settings of the selected
backup job.
Delete Button
Delete the selected backup job.
Add New Job Button
This button will open a sub-window where you can define a new backup job.
View Log Button
View the log of completed backup jobs in a sub-window.
BACKUP-BACKUP JOB SCREEN
On the Backup screen, click Add New Job button. You will see the Backup Job screen.
3 types of backup options are supported:
Full
Incremental
Synchronize
Name
Enter a suitable name for this job.
Note that some special characters (e.g. " / \ [ ]: ; = , + * ? ` ~ ! @ # $ % ^ & ( ) { } ' <
>) and 2-byte characters cannot be used in it.
Backup Type
Select the desired backup type:
40
Direction
Select the desired option:
Local Location
Full - All files will be backed up.
Incremental - Only changed files will be backed up.
Synchronize - All files are backed up, and any files
on the destination that do not exist on the source
are deleted.
From this NAS to another device
From another device to this NAS
Select the desired folder in this NAS:
If backing up from this NAS, select the folder you
wish to backup.
If backing up from another device to this NAS,
select the folder where you want the backed-up
data to be stored.
Note that some special characters (e.g. " / \ : * ? < > | ' `) cannot be used in it.
Remote Location
Enter the details of the remote device:
Schedule
Name - Enter the name of the other device, as seen
on the network.
Shared Folder - Enter the name of the shared
folder. Depending on the direction of the backup,
this is either the share to be backed up, or the
destination for the backed-up data. Note that some
special characters (e.g. " / \ : * ? < > | ' `) cannot be
used in it.
The Server Requires Authentication - If the share is
password-protected, enable this checkbox and
enter the User Name and Password required to
gain access to the share.
Select the desired option from the list:
Never - This will disable this backup job.
Every Day - Select this to have the backup job
performed each day, at the specified time.
Every Monday, Every Tuesday, ... Select this to
have the backup performed once per week, on the
specified day.
Use the time fields (hour, minute, am/pm) to specify when the backup job should
be performed.
Browse button
Click it to select one folder in this NAS.
Save button
Click it to apply modifications to the settings
Close button
Close the window
BACKUP-STATUS SCREEN
On the Backup screen, click Status button. You will see the Job Status screen.
41
E.
Job Name
Displays the name of jobs.
Schedule
Shows if there is a schedule for the job.
Status
The status can be "Running", "Waiting" or "Idle".
Admin
Click this to "Stop" or "Start" the job.
Refresh Button
Refresh the status window
Close Button
Close the window
DISK SCREEN
This screen allows you to do disk maintenance on the NAS.
Format Disk - use this after installing a new disk. The disk will be partitioned and quickformatted. Any data on the disk will be lost!
S.M.A.R.T. - S.M.A.R.T. (Self-Monitoring, Analysis, and Reporting Technology) can warn of
impending problems with the Hard Disk, before it actually fails. This test should be
performed regularly.
Scandisk - running the Scandisk (Disk Check) program will check the file system, and correct
any errors found. This program should be run regularly. The Scandisk program will also run
automatically if an error condition is detected, such as an abnormal shutdown due to loss of
power.
42
Format
This allows you to format both the internal disk and the USB disk.
Internal Disk
Not Installed - No disk is inserted, or connection or disk has failed.
Not Formatted - Disk has been detected, but it is not ready for use. Use the "Format" button
to prepare the disk for use.
Formatting - This message will only be displayed after you have clicked the "Format" button.
(See below for details of this button.)
Formatted - Disk is ready for use.
USB Disks
No Installed - No disk is inserted into this USB port.
Not Formatted - This USB disk hasn't been formatted into FAT or NTFS file system. You can
click "Format" button to format it.
Formatted – Disk is ready for use.
Format Button
Use this button to format the disk. This will partition and quick-format the new disk.
WARNING! This will destroy any data on the disk. Once started, this process can NOT be
halted or reversed
Scandisk
Status
N/A - No disk is available.
Not Scanned - No Scandisk has been performed recently on
this drive.
Scanning - Scandisk operation is in progress. The disk cannot
be used while a Scandisk is in progress. If required, use the
"Stop" button to terminate the Scandisk operation and gain
43
Schedule
access to data on the disk. (To see the results of the
Scandisk operation, use the "View Disk Log" button.)
Completed - The last Scandisk operation has been
completed. You can use the "View Disk Log" button to view
the results.
Terminated - The last Scandisk operation was cancelled by
the Administrator before it was completed.
Never - Scandisk will not be scheduled to run.
Every Day - select this to have scandisk run each day, at the
specified time.
Every Monday, Every Tuesday, ... - Select this to have the
scandisk run once per week, on the specified day.
Use the time fields (hour, minute, am/pm) to specify when
the scandisk operation should be performed.
Start Button
Click the button to start the Scandisk. The Scandisk could take long time, and the disk is
unavailable to users while the Scandisk is in progress.
Stop Button
If a Scandisk is in progress, and you wish to stop it, click the Stop button.
S.M.A.R.T
Status
Schedule
Check Button
Not Installed - No disk is available.
Not Checked - No S.M.A.R.T. check has been performed on
this drive since system boots up.
OK - No errors were found in the last test.
Going to fail - The S.M.A.R.T. check found errors on the drive
and the disk is going to fail.
Never - S.M.A.R.T. check will not be scheduled to run.
Every Day - Select this to have S.M.A.R.T. check to run each
day, at the specified time.
Every Monday, Every Tuesday, ... - Select this to have the
scandisk run once per week, on the specified day.
Use the time fields (hour, minute, am/pm ) to specify when
the S.M.A.R.T. check should be performed.
Check - Click this button to run the S.M.A.R.T. check immediately.
Standby
Set Hard Disk to
Standby Mode
after
Idle 10 minutes – Set HDD to standby mode, if idle for 10 minutes
Idle 30 minutes – Set HDD to standby mode, if idle for 30 minutes
Other Buttons
Save Button
Click it to save the modifications in this window
Cancel Button
Restore the settings on the screen to their values after the last "Save" operation. Clicking
"Cancel" has NO EFFECT on any operations in progress.
View Log Button
View the log messages of disk maintenance
44
F.
UPGRADE SCREEN
The Upgrade facility allows you to upgrade the NAS's firmware. Note that the NAS is unavailable during the
upgrade process, and all connections will be lost.. The NAS will reboot once the upgrade installation is completed.
The procedure may take from 5 to 10 minutes.
Current Firmware
This displays the version number of the NAS's current firmware.
Upgrade
You will need to locate the Firmware file.
Browse Button
Click this button to browse the folders on your PC and select the Firmware
file (e.g. C:\downloads\NS65L_V36R01.bin).
Note: Implementation of this feature is Browser-dependent
Other Buttons
Start Upgrade
Button
Click this button to start the firmware upgrade.
45
CHAPTER 7 DOWNLOAD MANAGER
A.
OVERVIEW
Download manager allows you to download files via FTP, HTTP or Bit Torrent without the need to turn on the PC
continuously. Once the download configuration is defined on the NAS, the files will be downloaded automatically.
THE WEB-BASE DOWNLOAD MANAGEMENT INTERFACE
To access the Download Manager interface, click the "Download Manager" link on the home page.
You will then be prompted for a password, as shown below.
Default administrator user name is “admin”, and password is blank.
46
B.
DOWNLOAD MANAGER SCREEN
This screen allows you to manage your download tasks.
Manager Status
The status can either be 'Enabled' or 'Disabled'.
Owner
Name of the user that logins the Download Manager.
File Name
Name of the saved file in the NAS for the task.
File Size
Total size of the downloaded file for the task.
Speed
Speed of the task. HTTP/FTP task only has download speed. BT task has download speed and
upload speed, and its format is such as "Download Speed, Upload Speed".
Percent
Completed percentage of the downloaded file from the URL.
Status
The status can show "Waiting", "Connecting", "Failed", "Paused", "Hashing”, “Transferring" or
"Done".
Admin
Select the tasks to be executed here
47
Task Details
View the detailed information of the task.
Run Task
Start to run the selected task.
Stop Task
Stop the selected task.
Delete Task
Delete the selected task. If the task is done, its saved files are kept, or all files are
deleted.
Move Up
Increase the priority of the task.
Move Down
Decrease the priority of the task.
Logout
Leave the screen of Download Manager.
Add New Task
Open the window to add new task.
Refresh
Refresh the status of tasks.
Help
Click it to view on-line help.
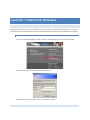
DOWNLOAD MANAGER – ADD NEW TASK SCREEN
Click on the Add New Task Button This screen allows you define download task of Download Manager.
Source
Type
Specify type of the file to be downloaded. It can be
HTTP/FTP or
BT (Bit Torrent).
URL(HTTP/FTP)
Specify the URL if type is HTTP/FTP.
Torrent File
Specify the torrent file with which you need download files. You can upload it from local
PC or provide one HTTP/FTP URL for it.
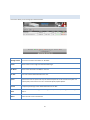
Authentication
Authentication Required
(Optional)
If authentication is needed to access the URL, need enable it and input the account and
password.
Account
Account name that is used to access the URL if necessary.
Password
Password that is used to access the URL if necessary.
48
Destination
Share Folder
Select name of the share where downloaded file will be saved.
Subdirectory
Select the subdirectory under the selected share where downloaded file will be saved.
Save Button
Save the new task.
Cancel Button
Cancel the modifications on the web page.
Close Button
Close the window.
CHAPTER 8 ACCESSING MYXERVER™ OVER THE
INTERNET
A.
OVERVIEW
If your LAN is connected to the Internet, typically by a Broadband Gateway/Router and Broadband modem, you
can make the NAS available via the Internet. Features available to Internet users include:
B.
Using a Web browser to view and download files.
Remote management
MAKING THE NAS AVAILABLE VIA THE INTERNET
If your LAN is connected to the Internet via a Router or Gateway, you can make the NAS available from the
Internet.
No changes to the NAS configuration are required, unless you wish to use a port number other than the default
value of 80 for Web connections.
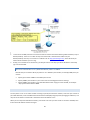
1
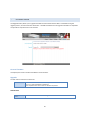
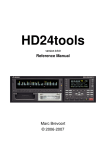
Your Router or Gateway must be configured to pass incoming HTTP connections to the NAS. This feature is
normally called Port Forwarding or Virtual Servers, and is illustrated below. Please refer to your Router
manual on how to configure Port Forwarding / Virtual Servers.
49
2
3
To connect to the NAS, Internet users need to know and use the Internet IP address (public IP address) of your
Router/Gateway. There are a number of ways to find out what is the Internet IP address of your
Router/Gateway. One way is to connect to a website such as http://whatismyip.com/, and it will show you
what internet IP address you are using.
Finally, from a remote PC on the internet, you will just have to enter http://<internet IP address> from Step
(2), to access the NAS.
NOTE ON CHANGING HTTP (WEB BROWSER) PORT NUMBER
Default HTTP port number is 80. If you prefer to use a different port number, for example, 8080, then you
need to
C.
Specify port number “8080” on the NAS System screen
Specify “8080” port number on your router’s Port Forwarding/Virtual Server settings.
Specify “8080” port number in your web URL address when trying to access the NAS, for example
“http://<internet IP address>:8080.
ACCESSING YOUR NAS USING A DOMAIN NAME
You may want to use a host name instead of having to specify the internet IP address, each time you connect to
your NAS. Moreover, most broadband Internet Service Providers (ISP) assign dynamic (changing) IP addresses, so it
may not be convenient to track what is the latest internet IP address to use.
When you use a Dynamic DNS Server Provider, your friends can enter your host name to connect to the NAS, even
if the internet IP address has been changed.
50
Note: Your Router/Gateway must be able to support Dynamic DNS feature. Please
check the router manual for more information.
The following section gives a general description on how to configure and use Dynamic DNS feature.
1
2
3
First of all you need to find a Dynamic DNS provider to register and get your domain name. Some popular
Dynamic DNS providers are DynDNS and TZO. You may need to purchase the domain name.
Enable Dynamic DNS feature in your Router/Gateway. In a typical router you will need to setup the following:
Enable the DDNS feature
Specify the DDNS service provider name
Enter the host name which you have registered with the dynamic DNS service provider (example:
http://myhost.mydomain.net)
Enter username and password provided by the DDNS service provider
If you wish to access the NAS remotely from the internet, you can now type for example
http://myhost.mydomain.net.
51
CHAPTER 9 FREQUENTLY ASKED QUESTIONS
A.
I CANNOT FIND MYXERVER™ ON THE NETWORK USING THE NAS UTILITY
Check that the NAS is installed, LAN connections are OK, and it is powered ON and startup is complete.
Ensure that your PC and the NAS are on the same network segment (not on different networks across a
router)
Ensure that your PC has the TCP/IP network protocol loaded.
In Windows, this is done by using Control Panel-Network. If an entry for TCP/IP -> Network card is not
listed, use Add - Protocol - Microsoft - TCP/IP to add it.
You then need to select the new entry (TCP/IP -> Network card), click Properties, and configure the IP
Address tab.
Ensure that the NAS is allocated a valid IP address.
If your LAN has a DHCP Server, you can select "Obtain an IP Address automatically" on the NAS.
Otherwise, you must select "Specify an IP Address", and enter values for IP Address and Subnet Mask. The
IP Address range commonly used is 192.168.0.1 to 192.168.0.254, with a Subnet Mask of 255.255.255.0.
(The NAS Server's default IP Address is 192.168.0.2, with a Subnet Mask of 255.255.255.0). Remember
that each device needs a unique IP Address, and the same Subnet Mask.
An alternative way to find the NAS on the network is to use a web browser and type “http//myxerver”.
This method is works if you have not changed the default host name of the NAS.
B.
THE NAS HAS BEEN CONFIGURED, BUT I CAN'T FIND IT IN WINDOW’S NETWORK
NEIGHBORHOOD.
Try out the following methods:
In Windows, click on Start – Run. A window will pop up, asking which file/folder/internet resource to
open. Type in for example \\myxerver or \\192.168.0.2, depending on what host name or IP address you
have assigned to the NAS.
If you are running Windows 98, click on Start - Find - Computer, and enter the NAS Server's name. If this
does not work, use Control Panel - Network to check the following:
o TCP/IP protocol is installed. If not, use Add - Protocol - Microsoft - TCP/IP to install it.
o Check the network Bindings:
Ensure the TCP/IP protocol is bound to your Network card (NIC).
Select your Network card, click Properties, and then the Bindings tab. If TCP/IP is not
bound (checked), check it.
Ensure the TCP/IP -> Network card entry is bound to the Client for Microsoft Networks
service.
Select the TCP/IP entry for your Network Card, click Properties, and then the Bindings
tab. If Client for Microsoft Networks is not bound (checked), check it.
If you had manually assigned an IP address to the NAS (for example, in the case where you do not have a
router with DHCP server), check that your IP Address is compatible with the NAS's. This means it needs to
52
be from the same address range (e.g. 192.168.0.1 to 192.168.0.254) and using the same Subnet Mask
(e.g. 255.255.255.0).
If you DO have a router, check that your Gateway IP Address is set correctly. Ask your LAN administrator
for the correct value.
C.
WHEN I CLICK ON AN NAS FOLDER ICON IN NETWORK NEIGHBORHOOD, I GET
PROMPTED FOR A PASSWORD.
This can happen in the following situations:
You have the correct logon name, and the NAS is prompting you for the password. In this case, simply
enter your NAS password, or make your Windows password the same as the NAS password.
The logon name you used on your PC is NOT recognized by the NAS, and was converted to guest, with
guest access rights. Ask the NAS Administrator to create a user name for you.
You do NOT have access permission for this share. In this case, ask the NAS Administrator to grant you
access.
Note: Windows uses the Computer name, as shown on Control Panel - Network Identification, as the default Logon Name. But you can create a new Windows logon
name by merely entering a new name and password at the Logon prompt.
D.
HOW TO SETUP ITUNES SERVICE
1.
2.
3.
Copy your music collection onto the NAS, for example at /DISK/iTunes.
Log on to MyXerver™’s web management interface as Administrator. On the NAS home page, click on
Administration. Then select the Advanced menu, and click on Media. (You can also refer to Chapter 5 –
Media section.)
You will see the Media screen as shown below.
53
4.
5.
E.
Check on the box to enable iTunes Server as shown above.
Specify a Server Name for example “MyXerver_iTunes”.
Click on Browse button to find or create the folder where iTunes music will be stored.
Click on Save button at the bottom of the Media screen.
Then, on your computer which is on the same network as the NAS, run the iTunes software. (You can
download the latest version of iTunes software from http://www.apple.com.) The iTunes software will be
able to detect the all shared iTunes library on the network. If you had specified the server name as
“MyXerver_iTunes” on the NAS, you will be able to see this entry under SHARED in your iTunes interface.
To listen to the music, simply click on “MyXerver_iTunes”, and you will be able to see the list of songs
which you have copied in step (1).
HOW TO SETUP MP3 BROADCAST
1.
Copy your music collection onto the NAS, for example at /DISK/MP3.
54
2.
3.
Log on to MyXerver™’s web management interface as Administrator. On the NAS home page, click on
Administration. Then select the Advanced menu, and click on Media. (You can also refer to Chapter 5 –
Media section.)
You will see the Media screen as shown below.
4.
Check on the box to enable MP3 Broadcast as shown above.
Specify a Server Name for example “MyXerver_MP3”.
Default port number is 1234.
Select how you want the music to be played: either by “Order” or “Shuffle”.
Click on Browse button to find or create the folder where the MP3 music will be stored.
Click on Save button at the bottom of the Media screen.
Then, on your computer which is on the same network as the NAS, run a music player such as WinAmp.
Specify the URL to open, for example: http://myxerver:1234. See the WinAmp sample screenshot below.
You will be able to listen to the music being played.
55
F.
HOW TO DO A DIRECT USB COPY
Scenario: Sometimes you may want to quickly transfer contents from a USB flash drive to your NAS without using
the computer.
1.
Plug in the USB device into the USB port of MyXerver™. You will hear a beep sound as the device is being
recognized.
2.
Press the USB Eject button for 5 seconds. You will hear 2 beep sounds, indicating that the data is being copied
onto the NAS.
On the NAS, you will see that a folder at /DISK/USB_COPY_SEC has been created. The contents of the USB
device are copied to this folder. See the screen shot below.
3.
56
4.
After the data is being copied, be sure to disconnect the USB device safely. You may refer to Chapter 3: Basic
Installation, Section B: USB Devices – How to disconnect safely.
57
LIMITED WARRANTY STATEMENT
MyXerver™ MX3600 Network Storage
Warranty Duration
Hardware: 3 years Limited Warranty
Hardware Limited Warranty
Universal Tech Pte Ltd warrants that the product that you have purchased from Universal Tech is free from defects
in materials or workmanship under normal use during the Limited Warranty Period. The Limited Warranty Period
starts on the date of purchase. Your dated sales or delivery receipt showing the date of purchase is your proof of
purchase date.
Limitation of Liability
If your Universal Tech hardware product fails to work as warranted above, Universal Tech’s maximum liability
under this limited warranty is expressly limited to the lesser of the price you have paid for the product or the cost
of repair or replacement of any hardware components that malfunction in conditions of normal use.
Exclusions
Universal Tech does not warrant that the operation of the product will be uninterrupted or error-free. Universal
Tech is not responsible for damage that occurs as a result of your failure to follow the instructions intended for the
product. This Limited Warranty does not apply to product under the following circumstances:
serial number has been removed
product enclosure has been opened
product has been damaged or defective due to a) transportation, b) accident, misuse, abuse, water, fire,
lightning or other acts of nature, c) improper or inadequate site maintenance, d) normal wear and tear,
(e) software not supplied by Universal Tech.
ENSURE THAT YOUR DATA IS BACKED UP PERIODICALLY. UNIVERSAL TECH IS NOT RESPONSIBLE FOR DAMAGE OR
LOSS OF DATA, AND IS NOT RESPONSIBLE FOR RECOVERY OF PROGRAMS OR DATA OTHER THAN THE SOFTWARE
SUPPLIED BY UNIVERSAL TECH WHEN THE PRODUCT IS MANUFACTURED.
FOR MORE INFORMATION, VISIT HTTP://WWW.UNIVERSAL-TECH.BIZ
58
FCC STATEMENT
Federal Communications Commission Notice
This equipment has been tested and found to comply with the limits for a Class B digital device, pursuant to Part
15 of the FCC Rules. These limits are designed to provide reasonable protection against harmful interference in a
residential installation.
This equipment generates, uses, and can radiate radio frequency energy. If this equipment does cause harmful
interference to radio or television reception, which can be determined by turning the equipment off and on, the
user is encouraged to try and correct the interference by one or more of the following measures:
• Reorient or relocate the receiving antenna.
• Increase the distance between the equipment and the receiver.
• Connect the equipment to an outlet on a circuit different from that to which the receiver is connected.
• Consult the dealer or an experienced radio/TV technician for help.
59
SOFTWARE LICENSE
A.
OVERVIEW
Many software components are covered by the GNU GPL (General Public License). Some are covered by the BSD
License.
The following table provides details of the various components.
The text of both Licenses is below.
Package Name
bash
bftpd
BusyBox
CUPS
e2fsprogs
gawk
gdbm
glibc
hdparm
Kernel
libtermcap
Lilo
LPRng
mod-utils
net-tools
openssl
pam
quota
Samba server
sh-util
smtpclient
sysVinit
telnet-server
textutils
thttpd
Tinylogin
Ucsc-smartsuite
udhcp
upnpsdk
util-linux
vixie-cron
XFS patch
xfsdump
License
GPL
GPL
GPL
GPL
GPL
GPL
GPL
LGPL
BSD
GPL
LGPL
BSD
GPL
GPL
GPL
BSD
BSD or GPL
BSD
GPL
GPL
GPL
GPL
BSD
GPL
BSD
GPL
GPL
GPL
BSD
GPL
Distributable
GPL
GPL
60
xfsprogs
xinetd
B.
GPL
Distributable
BSD LICENSE
BSD License Information
Copyright (c) 2002. All rights reserved.
Redistribution and use in source and binary forms, with or without modification, are permitted provided that the
following conditions are met:
Redistributions of source code must retain the above copyright notice, this list of conditions and the following
disclaimer.
Redistributions in binary form must reproduce the above copyright notice, this list of conditions and the following
disclaimer in the documentation and/or other materials provided with the distribution.
Neither the name of the BSD organization nor the names of its contributors may be used to endorse or promote
products derived from this software without specific prior written permission.
THIS SOFTWARE IS PROVIDED BY THE COPYRIGHT HOLDERS AND CONTRIBUTORS "AS IS" AND ANY EXPRESS OR
IMPLIED WARRANTIES, INCLUDING, BUT NOT LIMITED TO, THE IMPLIED WARRANTIES OF MERCHANTABILITY AND
FITNESS FOR A PARTICULAR PURPOSE ARE DISCLAIMED. IN NO EVENT SHALL THE COPYRIGHT OWNER OR
CONTRIBUTORS BE LIABLE FOR ANY DIRECT, INDIRECT, INCIDENTAL, SPECIAL, EXEMPLARY, OR CONSEQUENTIAL
DAMAGES (INCLUDING, BUT NOT LIMITED TO, PROCUREMENT OF SUBSTITUTE GOODS OR SERVICES; LOSS OF USE,
DATA, OR PROFITS; OR BUSINESS INTERRUPTION) HOWEVER CAUSED AND ON ANY THEORY OF LIABILITY,
WHETHER IN CONTRACT, STRICT LIABILITY, OR TORT (INCLUDING NEGLIGENCE OR OTHERWISE) ARISING IN ANY
WAY OUT OF THE USE OF THIS SOFTWARE, EVEN IF ADVISED OF THE POSSIBILITY OF SUCH DAMAGE.
C.
GNU GENERAL PUBLIC LICENSE
GNU GENERAL PUBLIC LICENSE
Version 2, June 1991
Copyright (C) 1989, 1991 Free Software Foundation, Inc.
59 Temple Place, Suite 330, Boston, MA 02111-1307 USA
Everyone is permitted to copy and distribute verbatim copies of this license document, but changing it is not
allowed.
PREAMBLE
The licenses for most software are designed to take away your freedom to share and change it. By contrast, the
GNU General Public License is intended to guarantee your freedom to share and change free software--to make
sure the software is free for all its users. This General Public License applies to most of the Free Software
Foundation's software and to any other program whose authors commit to using it. (Some other Free Software
Foundation software is covered by the GNU Library General Public License instead.) You can apply it to your
programs, too.
61
When we speak of free software, we are referring to freedom, not price. Our General Public Licenses are designed
to make sure that you have the freedom to distribute copies of free software (and charge for this service if you
wish), that you receive source code or can get it if you want it, that you can change the software or use pieces of it
in new free programs; and that you know you can do these things.
To protect your rights, we need to make restrictions that forbid anyone to deny you these rights or to ask you to
surrender the rights. These restrictions translate to certain responsibilities for you if you distribute copies of the
software, or if you modify it.
For example, if you distribute copies of such a program, whether gratis or for a fee, you must give the recipients all
the rights that you have. You must make sure that they, too, receive or can get the source code. And you must
show them these terms so they know their rights.
We protect your rights with two steps: (1) copyright the software, and (2) offer you this license which gives you
legal permission to copy, distribute and/or modify the software.
Also, for each author's protection and ours, we want to make certain that everyone understands that there is no
warranty for this free software. If the software is modified by someone else and passed on, we want its recipients
to know that what they have is not the original, so that any problems introduced by others will not reflect on the
original authors' reputations.
Finally, any free program is threatened constantly by software patents. We wish to avoid the danger that
redistributors of a free program will individually obtain patent licenses, in effect making the program proprietary.
To prevent this, we have made it clear that any patent must be licensed for everyone's free use or not licensed at
all. The precise terms and conditions for copying, distribution and modification follow.
GNU GENERAL PUBLIC LICENSE
Terms And Conditions For Copying, Distribution And Modification
0. This License applies to any program or other work which contains a notice placed by the copyright holder saying
it may be distributed under the terms of this General Public License. The "Program", below, refers to any such
program or work, and a "work based on the Program" means either the Program or any derivative work under
copyright law: that is to say, a work containing the Program or a portion of it, either verbatim or with modifications
and/or translated into another language. (Hereinafter, translation is included without limitation in the term
"modification".) Each licensee is addressed as "you".
Activities other than copying, distribution and modification are not covered by this License; they are outside its
scope. The act of running the Program is not restricted, and the output from the Program is covered only if its
contents constitute a work based on the Program (independent of having been made by running the Program).
Whether that is true depends on what the Program does.
1. You may copy and distribute verbatim copies of the Program's source code as you receive it, in any medium,
provided that you conspicuously and appropriately publish on each copy an appropriate copyright notice and
disclaimer of warranty; keep intact all the notices that refer to this License and to the absence of any warranty;
and give any other recipients of the Program a copy of this License along with the Program.
You may charge a fee for the physical act of transferring a copy, and you may at your option offer warranty
protection in exchange for a fee.
62
2. You may modify your copy or copies of the Program or any portion of it, thus forming a work based on the
Program, and copy and distribute such modifications or work under the terms of Section 1 above, provided that
you also meet all of these conditions:
a) You must cause the modified files to carry prominent notices stating that you changed the files and the date of
any change.
b) You must cause any work that you distribute or publish, that in whole or in part contains or is derived from the
Program or any part thereof, to be licensed as a whole at no charge to all third parties under the terms of this
License.
c) If the modified program normally reads commands interactively when run, you must cause it, when started
running for such interactive use in the most ordinary way, to print or display an announcement including an
appropriate copyright notice and a notice that there is no warranty (or else, saying that you provide a warranty)
and that users may redistribute the program under these conditions, and telling the user how to view a copy of
this License. (Exception: if the Program itself is interactive but does not normally print such an announcement,
your work based on the Program is not required to print an announcement.)
These requirements apply to the modified work as a whole. If identifiable sections of that work are not derived
from the Program, and can be reasonably considered independent and separate works in themselves, then this
License, and its terms, do not apply to those sections when you distribute them as separate works. But when you
distribute the same sections as part of a whole which is a work based on the Program, the distribution of the whole
must be on the terms of this License, whose permissions for other licensees extend to the entire whole, and thus
to each and every part regardless of who wrote it. Thus, it is not the intent of this section to claim rights or contest
your rights to work written entirely by you; rather, the intent is to exercise the right to control the distribution of
derivative or collective works based on the Program.
In addition, mere aggregation of another work not based on the Program with the Program (or with a work based
on the Program) on a volume of a storage or distribution medium does not bring the other work under the scope
of this License.
3. You may copy and distribute the Program (or a work based on it, under Section 2) in object code or executable
form under the terms of Sections 1 and 2 above provided that you also do one of the following:
a) Accompany it with the complete corresponding machine-readable source code, which must be distributed under
the terms of Sections 1 and 2 above on a medium customarily used for software interchange; or,
b) Accompany it with a written offer, valid for at least three years, to give any third party, for a charge no more
than your cost of physically performing source distribution, a complete machine-readable copy of the
corresponding source code, to be distributed under the terms of Sections 1 and 2 above on a medium customarily
used for software interchange; or,
c) Accompany it with the information you received as to the offer to distribute corresponding source code. (This
alternative is allowed only for noncommercial distribution and only if you received the program in object code or
executable form with such an offer, in accord with Subsection b above.)
63
The source code for a work means the preferred form of the work for making modifications to it. For an
executable work, complete source code means all the source code for all modules it contains, plus any associated
interface definition files, plus the scripts used to control compilation and installation of the executable. However,
as a special exception, the source code distributed need not include anything that is normally distributed (in either
source or binary form) with the major components (compiler, kernel, and so on) of the operating system on which
the executable runs, unless that component itself accompanies the executable.
If distribution of executable or object code is made by offering access to copy from a designated place, then
offering equivalent access to copy the source code from the same place counts as distribution of the source code,
even though third parties are not compelled to copy the source along with the object code.
4. You may not copy, modify, sublicense, or distribute the Program except as expressly provided under this License.
Any attempt otherwise to copy, modify, sublicense or distribute the Program is void, and will automatically
terminate your rights under this License. However, parties who have received copies, or rights, from you under this
License will not have their licenses terminated so long as such parties remain in full compliance.
5. You are not required to accept this License, since you have not signed it. However, nothing else grants you
permission to modify or distribute the Program or its derivative works. These actions are prohibited by law if you
do not accept this License. Therefore, by modifying or distributing the Program (or any work based on the
Program), you indicate your acceptance of this License to do so, and all its terms and conditions for copying,
distributing or modifying the Program or works based on it.
6. Each time you redistribute the Program (or any work based on the Program), the recipient automatically
receives a license from the original licensor to copy, distribute or modify the Program subject to these terms and
conditions. You may not impose any further restrictions on the recipients' exercise of the rights granted herein.
You are not responsible for enforcing compliance by third parties to this License.
7. If, as a consequence of a court judgment or allegation of patent infringement or for any other reason (not
limited to patent issues), conditions are imposed on you (whether by court order, agreement or otherwise) that
contradict the conditions of this License, they do not excuse you from the conditions of this License. If you cannot
distribute so as to satisfy simultaneously your obligations under this License and any other pertinent obligations,
then as a consequence you may not distribute the Program at all. For example, if a patent license would not
permit royalty-free redistribution of the Program by all those who receive copies directly or indirectly through you,
then the only way you could satisfy both it and this License would be to refrain entirely from distribution of the
Program.
If any portion of this section is held invalid or unenforceable under any particular circumstance, the balance of the
section is intended to apply and the section as a whole is intended to apply in other circumstances.
64
It is not the purpose of this section to induce you to infringe any patents or other property right claims or to
contest validity of any such claims; this section has the sole purpose of protecting the integrity of the free software
distribution system, which is implemented by public license practices. Many people have made generous
contributions to the wide range of software distributed through that system in reliance on consistent application
of that system; it is up to the author/donor to decide if he or she is willing to distribute software through any other
system and a licensee cannot impose that choice.
This section is intended to make thoroughly clear what is believed to be a consequence of the rest of this License.
8. If the distribution and/or use of the Program is restricted in certain countries either by patents or by
copyrighted interfaces, the original copyright holder who places the Program under this License may add an
explicit geographical distribution limitation excluding those countries, so that distribution is permitted only in or
among countries not thus excluded. In such case, this License incorporates the limitation as if written in the body
of this License.
9. The Free Software Foundation may publish revised and/or new versions of the General Public License from time
to time. Such new versions will be similar in spirit to the present version, but may differ in detail to address new
problems or concerns.
Each version is given a distinguishing version number. If the Program specifies a version number of this License
which applies to it and "any later version", you have the option of following the terms and conditions either of that
version or of any later version published by the Free Software Foundation. If the Program does not specify a
version number of this License, you may choose any version ever published by the Free Software Foundation.
10. If you wish to incorporate parts of the Program into other free programs whose distribution conditions are
different, write to the author to ask for permission. For software which is copyrighted by the Free Software
Foundation, write to the Free Software Foundation; we sometimes make exceptions for this. Our decision will be
guided by the two goals of preserving the free status of all derivatives of our free software and of promoting the
sharing and reuse of software generally.
NO WARRANTY
11. BECAUSE THE PROGRAM IS LICENSED FREE OF CHARGE, THERE IS NO WARRANTY FOR THE PROGRAM, TO THE
EXTENT PERMITTED BY APPLICABLE LAW. EXCEPT WHEN OTHERWISE STATED IN WRITING THE COPYRIGHT
HOLDERS AND/OR OTHER PARTIES PROVIDE THE PROGRAM "AS IS" WITHOUT WARRANTY OF ANY KIND, EITHER
EXPRESSED OR IMPLIED, INCLUDING, BUT NOT LIMITED TO, THE IMPLIED WARRANTIES OF MERCHANTABILITY AND
FITNESS FOR A PARTICULAR PURPOSE. THE ENTIRE RISK AS TO THE QUALITY AND PERFORMANCE OF THE
PROGRAM IS WITH YOU. SHOULD THE PROGRAM PROVE DEFECTIVE, YOU ASSUME THE COST OF ALL NECESSARY
SERVICING, REPAIR OR CORRECTION.
65
12. IN NO EVENT UNLESS REQUIRED BY APPLICABLE LAW OR AGREED TO IN WRITING WILL ANY COPYRIGHT
HOLDER, OR ANY OTHER PARTY WHO MAY MODIFY AND/OR REDISTRIBUTE THE PROGRAM AS PERMITTED ABOVE,
BE LIABLE TO YOU FOR DAMAGES, INCLUDING ANY GENERAL, SPECIAL, INCIDENTAL OR CONSEQUENTIAL
DAMAGES ARISING OUT OF THE USE OR INABILITY TO USE THE PROGRAM (INCLUDING BUT NOT LIMITED TO LOSS
OF DATA OR DATA BEING RENDERED INACCURATE OR LOSSES SUSTAINED BY YOU OR THIRD PARTIES OR A FAILURE
OF THE PROGRAM TO OPERATE WITH ANY OTHER PROGRAMS), EVEN IF SUCH HOLDER OR OTHER PARTY HAS
BEEN ADVISED OF THE POSSIBILITY OF SUCH DAMAGES.
END OF TERMS AND CONDITIONS
66