1
SONY.
4.o81.14_
KP-43HT20
KP-53HS20
KP-53HS30
KP-61HS20
KP-61HS30
Hi.Scan
WARNING
To prevent fire or shock hazard, do not
expose the projection TV to rain or
moisture.
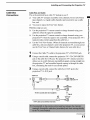
Note on convergence
adjustment
Before you use your pro3ectmn TV. make sure to adJUSt
convergence. For details, see"Adlustmg the Convergence
Automatically - FLASH FOCUS TM -" on page 33,
Note
system
to CATV
installer
This reminder is provided to call the CKFV system
installer's attention to Article 820-40 of the NEC that
provides
guidelines
for proper
particular,
specifies
connected
to the grounding
grounding
and. m
that the cable ground
system
shall be
of the building,
as
close to the point of cable entry as practical.
PRECAUCION
Use of this television
receiver
viewing
broadcast
of programs
transmitted
by cable
the general
public
for other than private
on UHK VHE
compahies
or satellite
may require
broadcaster/cable
company
for the use of
authorization
and/or
from the
progxam
owner.
NOTIFICATION
This equipment
the limits
has been tested and found to comply
for a Class B digital
of the FCC Rules.
Ax
l'his symbol
presence
within
of uninsulated
the product's
sufficient
electric
¢/_k
is intended
reasonable
protecuon
"dangerous
residential
installation,
enclosure
magnitude
voltage"
that may be of
to constitute
a risk of
shock to persons.
This symbol
is intended
to alert the user to the
presence of important
operating and
maintenance
¢servmmg) mstrucuons
in the
[iterature
accompanying
electric
shock, do not use this polarized
unless the blades
cord. receptacle
can be fully inserted
AC
or other outlet
to prevent
in a
generates,
uses.
This equipment
with radio
commumcatmns.
interference
El
blade
interference
However.
there is no guarantee
will not occur in a particular
this eqmpment
does cause harmful
recephon,
that
installation,
interference
offand
if
to radio
which can be determined
the eqmpment
following
plug with an extension
to provide
interference
may cause harmful
to try to correct
CAUTION
harmful
energy and. if not
with the instractiorLs.
or television
the apphance_
limits are designed
against
with
to Part 15
and can radiate radio frequency
installed and used in accordance
turning
qb prevent
These
to alert the user to the
device pursuant
by
on. the user is encouraged
the interference
by one or more of the
measures:
Reorient
or relocate
Increase
receiver.
the separation
the receiving
Connect
different
the equipment into an outlet on a circuit
from that to which the receiver is
between
antennas,
the equipment
and
exposure_
CAUTION
When using TV games, computers, and similar products
with your protection TV. or viewing a TV station whose
connected.
El
logo always stays on the screen, keep the brightness and
contrast functions at low settings, Ifa fixed non-moving)
pattern
such as a station
logo is left on the screen
periods
of time. especially
setting,
the _mage can be permanently
screen.
These types
at a high brightness
of imprints
_mprinted
are not covered
modifications
or contrast
this manual
onto the
operate
by your
Note on Caption Vision
Thls televismn recelver provides display of television
closed capnomng in accordance with _ 15.119 of the FCC
2
You are cautioned
for long
warrallry
rules.
Consult the dealer or an experienced
technician for help,
This document
MODELS:
61HS20.
Please
radio/T'_
that any changes
not expressly
or
approved
m
could void your authority
to
this eqmpmem,
is for the remote
KP-43HT20.
control
KP-53HS20.
RM-Y908,
KP-53HS36.
KP-61HS30
keep this notice with the instruction
manual.
KP-
Safety
d
Operate the projection TV only on 120 V AC.
-3 The plug is designed, for safety purposes, to fit into
the wall outlet only one way. If you are unable to
insert the plug full 3 into the outlet, contacl your
dealer.
-I
_3
If any hquid or solid object should fall inside the
cabinet, unplug the projection TV immediate1) and
have it checked by qualified service pm_onnel
before operating it further.
If you will not be using the projection TV for several
days. disconnect the power by pulling the plug itself.
Never pull on the cord.
For details
concerning
"Important
Safeguards"
safety
precauuons,
see
wUlIonlD
symbol are registered trademarks
of SRS Labs. inc. in the United States and salecte(
foreign countries.
lb prevent
internal
openmgs_
heat buildup,
numerous
_3
Avoid operating the projection
below 5°C ¢41_F .
d
If the projection
do not block the
location,
suddenly,
dust ol
recordings
BBE and BBE Symbol
Inc. and are licensed
Patent No. 4.638.258
directly
from a
temperature
may be blurred
or
wait a few hours
to let the moisture
turning
before
projection
TV.
To obtain
the besl picture, do not expose
to direct illumination
recommended
the screen
or direct sunhght,
to use spot lighting
from the ceiling
foreign
patents.
the right to sell
technology=
of BBE
Sound.
Inc. under
U.S.
les chocs
41ectriques,
avec un prolongatem;
ou une autre
sortie de courant,
tre inser4es/_
fond sans en laisser
ne pas utiliser
cette
une prise de courant
sauf si les lames peuvenr
aucune
partie
vert.
drapery,
Record
on the
are located
at the rear of
the proJection TV below the Sony logo. on the sticker.
and also on the TV box, white label]. Record these
numbe_
m the spaces provided
whenever
you call upon
below. Refer
to them
your Sony dealer regarding
this
product.
Model No
Serial No.
the screen
it is
directed
or to cover the windows
with opaque
are trademarks
b_*BBE Sound.
and 4.482.866.
The model and serial numbers
show poor color. In this case, please
evaporate
and pending
does not convey
made with the TruSurrouod
Owner's
TV at temperature
or if the room
the picture
are incorporated
TV in a hot or humid
TV _s transported
cold to a warm
issued
of this product
Pour pr4venir
place, or m a place subJect to excesswe
mechanical
vibration.
changes
additional
Pro'chase
deco_o
Do not install the projection
SRS and TruSurround
under license from SRS Labs. thc. and is protected under
United States Patent Nos. 4.748.669 and 4. 841 572 with
fiche polaris&
ventilation
TruSurround
is a trademark of
SRS Labs. inc. SRS and the SRS
_.
_.WJ
ATTENTION
on page 4
Installing
_3
]/ll-qllnund"
H==v'_t-=_,.=
down
that face
it is desirable
to
install the projection
TV in a room where the floo_
and walls are not of a reflective material.
As an ENERGY STAR ®
/D_=_,
'-,_
*'_'1._4
Partner, Sony Corporation has
determined that this product
meets the ENERGY STAR ®
guidelines for energy efficiency,
ENERGY
STAR
r
is a U.S. registered
mark.
3
Important
Safeguards
For your protection,
completely,
Carefully
observe
and instructions
operaung
Overloading
please read these instructions
and keep this manual
and comply
placed
lnstraclAons
for future reference.
with all warnings,
on the set or described
or
servme
caunons
in the
manual.
Do not overload
To guard against injury, the following basic safety
precauuons should be observed in the installation, use
and servicing of the set,
Use
exrensmn
receptacles
beyond their capacity, since this can
result in fire or electric shock.
Always
WARNING
wall outlets,
cords or convenience
turn the set offwben
it is not
being used. When the set is left
unattended
periods
and unused
for long
of time. unplug
wall outlet
it from the
as a precautmn
possibility of an internal
fire hazard.
against
the
malfunction
that could create
a
Power Sources
This set should
be operated
only from
the type of power source indicated on
the serial/model
plate_ if you are nol sure
of the type of electrical
to your home.
consult
local power
company.
from battery
power
Grounding
three-wire
.J
your dealer or
For those sets designed
refer to tile operating
to operate
mstructmns.
one blade wider
Follow
AC power
cord plug
than the other_, or with a
type plug (a plug having a third pin
the instructions
For the set with a polarized
plug
below:
AC power cord
This plug will fit into the power outlet
only one way, This is a safer? feature, if _F_-2
you are unable to insert the plug fully
_
into the outlet, try reversing the plug. If
the plug still fails to fit. contact your electrician to have a
suitable outlet installed. Do not defeat the safet': purpose
of the polarized plug by forcing _tm.
Alternate Warning for the set with a threewwe grounding type AC plug
This plug will only fit into a grounding_-_(q--..
type power outlet. Tffts is a safety
feature, if you are unable to insert the
plug into the outlet, contact your
electrician to have a suitable outlet
installed. Do not defeat the safety purpose
grounding plug.
your dealer or service technician. It is
normal for some TV sets to make
occasmnal
snapping
particularly
or popping
when being turned
of the
Never push objects
set through
sounds.
on or ot'l_
of any kind into the
the cabinet
slots as they may
touch dangerous voltage points or short
out parts that could result in a fire or
electric shock. Never
kind on the set.
spill liquid
_ll_z_
)f
"
of any
N
r\ ]:_]
I _-:--_
;]
i
k_l
_
B
ljJ
Attachments
Do not use attachments not
recommended b3 the mamtfacturer, as
they may cause hazards.
Cleaning
Clean the cabinet
of the proJection
T\
with a dr5 sofi cloth, ]b remove dust
from the screen, wipe it gently with a soft
cloth. Stubborn
stains
with a cloth slightly
solution
solvents
may be removed
dampened
becomes
for a long period
dark after using the proJection
of time. it may be necessary
inside of the proJection
personnel.
with
of mild soap and warm water, Never use strong
such as thinner or benzine for cleanin_
If the picture
4
_._._(.
_,_ _o_ _.:
''-
Object and Liquid Entry
with a polarized
grounding
for grounffmg).
supplied
(?_
_'_ _-_-
or Polarization
This set is eq0ipped
(a plug having
power
_
Ifa snapping or poppmg sound from _ TV
set is continuous
or frequent while the TV
_s operating, unplug the TV and consult
TV. Consult
qualified
TV
to clean the
service
Installation
Power-Cord
Water and Moisture
set where the power
wear or abuse.
r
_2_j
the set on an unstable
,..],,_-)_
cart, stand, table or shelf. The set
may fall, causing serious injury to a
'_t \L,/I,/-)_"
\ _'_
damage
_'_R
_
to the set. Use only a cart or stand
recommended
by the mam/facturer
for the specific model ofprojecuon
TV. An appliance and cart
combination
should be moved with
care. Quick stops, excessive
and uneven
combination
surfaces
force.
and cart
Ventilation
are provided
reliable
operation
in the cabinet
for necessary
and in the back or
venhlahon,
of the set. and to protect
overheating,
these slots and opemngs
blocked or covered.
d
rib ensure
it from
must never
WHEN INSTALLING AN OUTDOOR ANTENNA
SYSTEM. EXTREME CARE SHOULD BE TAKEN TO
KEEP FROM CONTACTING SUCH POWER LINES
OR CIRCUITS AS CONTACT WITH THEM IS
ALMOST INVARIABLY FATAL.
Canada pro_i_des information with respect to proper
grounding of the mast and supporting structure.
grounding of the lead-in wire to an antenna discharge
tram size of grounding conductors, location of antenna
discharge umt, connecnon to gnsundmg electrodes, and
requirements for the grounding electrode.
be
Antenna Grounding According to the NEC
Refer to section
Never cover the slots and opemngs
with a cloth or other materials.
Never
Outdoor Antenna
Grounding
If an outdoor anterma is installed, follow the precautions
below. An outdoor antenna system should not be locatec
m the vicinity of overhead power lines or other electric
light or power circmts, or where it can come m contact
with such power lines or circmts.
Section 810 of the National Electt-ical Code (NEC} in
USA and Section 54 of the Canadian Electrical Code in
to overturn.
bottom
Antenna
block the slots and openings
_-
or built-in
ventilation
Ground cla
is
z_.....
Do noI place
radmtor
exposed
Code
for
mp_
_._4._ Antenna lead-in wire
_
-- ....
the set near or over a
or heat reglsmr, or where it is
to direct sunlight.
_IE
_
"-" [
"ag_._,[g_)_1_
z_
._Anennalead-inwire
_-r-serVlCme
ent
_:/ Electri_fl I--....
_Power
d
Electrical
/-
the set in a confined
cabinet, unless proper
provided.
of Canadian
__---_
J
space, such as a bookcase
54-300
Grounding.
by
placing the set on a bed. sofa. rug o_
other similar surface
Never place
ro
Be sure the antenna system _s grounded so as to prowde
some promctmn against voltage surges and built-up stauc
charges,
may cause the appliance
The slots and opemngs
cord is subject
Antennas
Accessories
child or an adult and serious
to rest on or roll
over the power cord. and do not place the
Do not use power-line operated sets
near water -- for example, near a
bathtub, washbowl, kitchen sink. or
laundry tub. in a wet basement, or
near a swimming pool. etc.
Do no1 place
Protection
Do not allow anything
_IEC:National
---ectrical Code
_
_
Grounding conductors
, _I(NECNEC section
Sect °n810-21_
810-201
Groundclamps
service grounding
eIectrode system tNEC Art
250 Part H
5
Lightning
For added protection for this television receiver during a
lightning storm, or when it is left unattended and unused
for long periods of time. unplug it from the wall outlet
and disconnect the antenna. This will prevent damage to
the receiver due to hghtning and power-line surges.
Service
Damage Requiring Service
Unplug
the set from the wall outlet
qualified service
conditions:
personnel
.A
plug is damaged or frayed
If liquid has been spilled into
_1
the set.
If the set has been exposed
d
to ram or water.
If the set has been subject
excessive
shock by bemg
dropped,
or the cabinet
_@
¢ _
,_A,_
Ut?L
_,_
,,=_2=_,
U_
ro
has
normally
when following
operating
mstrucnons.
ff-_),)
1_,_'_
_ ,_*-_
(/
_:/.
the
require
adjustment
--(o-,.-_ I
of
ma_ result
extensive
Watch your footmg
to restore
servmmg
it indicates
to service
TV
If you carry the projectmn
TV m a manner
the set to normal
change
TV.
in the
manner
number
and
of persons,
may drop and a serious injury may be
caused. Be sure to follow the instructions
below.
LI
VA
m
a need for service.
voltage
may expose
or other hazards.
to qualified
service
Parts
parts are required,
technician
in writing
certifies
you to
Refer all
personnel.
When replacement
parts specified
the same characteristics
Unauthorized
substitutions
shock or other hazards.
6
the specified
of persons,
the set yourself
the cabinet
Replacement
replacement
mg the proJection
Carry the projection
specified manner
Carry the projection
Servicing
dangerous
c__
whale lnsta
it
mentioned
TV with the specified
number
tsee page i 0/
Do not carry the projectmn
TV holding
the speaker
grilk
performance,
since opemng
_"'//
_alel_y
on your foot or fingers,
m
When the set exffthits a distinct
Do not attempt
5_
,_.1[/_
_ _'_
When you place the projection
TV
in position, be careful not to drop it
operation.
d
that the
Be careful when moving
the projection TV
work by a
techrdcian
(as specified
in a picture tube implosion. Ask a qualified
service technician to dispose of the set.
and will often
qualified
checks
to determine
set is in safe operating condmon,
and to so
certify. When the set reaches the end of its
useful life, improper disposal could result
without
that are specified in the
operating instructions.
damage
safety
other than the specified
only those controls
other controls
routine
by the manufacturer,
'Sg
been damaged.
If the set does not operate
Improper
perform
For
When the power cord or
Adjust
to
Upon completion
of any service or rep;J n-s
to the set. ask the service technician to
under the following
-I
...I
and refer servicing
Safety Check
be sure the service
that he has used
by the manufacturer
as the original
that have
parrs
may result in fire. electric
Hold the projectmn
TV tightly when carrying
it.
Contents
Important
Safeguards
...............................................
4
Using the Features
Using the Remote
Introducing
Presemmg
the Sony Projection
the Sony Projection
Using tl_ts manual
TV
TV ..........................
....................................................
Installing and Connecting
Projection TV
Inserting
Batteries
Carrying
Your ProJection
Installing
to the Remote
the Projection
Connector
ProJection
37
Watching
the Digital TV .......................................
39
o
Using Favorite
Control
............. 10
TV ................................
Types ....................................................
and Connectors
................
Basic Connections
(Connecting
Cable TV or
Antenna _.........................................................
10
Function
.....................................
Index .............................................
41
44
45
50
l3
52
Using
the Parent
Menu .........................................
54
16
Using the Timer Menu ..........................................
62
Using the Setup
63
Connecting
a Satellite
Receiver
.............................
Connecting
a Satellite
Receiver
with a VCR ......... 24
Connecting
an Audio
Receiver
22
23
25
Connecting
a DVD Player with Component
Video Connecto_
..........................................
26
Connecting
a DVD Player with
A/V Connectors
.............................................
27
Connecting
a Digital
28
Connecting
a Camcorder
Connecting
an AV Receiver
.......................................
..................................
............................
TV Automaticall'y
Menu ..........................................
Other Information
Programming
Operating
the Remote
Other
ProJection
Troubleshoonng
.........................
47
Menu ......................................
20
..............................
................................................................
the Channel
Two VCRs for Tape Editing
..............
Ovelwlew
Using
a VCR and Cable
Box ........................
Using the Menus
12
Connecung
Up the Proiection
Using the Freeze
40
48
Connecting
TV Receiver
...............................................
Usm_ the Audio Metal ..........................................
19
Setting
TM
11
a VCR and Cable ................................
S Feature
Usmg Twin View
........................................
Using the Video Menu ..........................................
Connecting
Using the CONTROL
Channels
10
TV ...................................
TV Controls
34
8
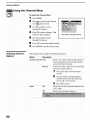
Using Channel
.................................................................
.....................................
the TV ....................................................
the
Contents
Control
Watching
Specifications
Control .........................
Components
TV Remote
65
with Your
Control
......................
68
.....................................................
70
.........................................................
73
29
30
31
......... 32
Adjushng the Convergence
Automatically
- FLASH FOCUS TM -, ..................................
33
7
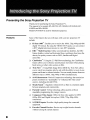
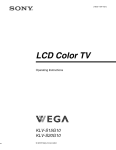
Presenting
the Sony Projection
TV
Thank you for purchasing the Sony Projection TV.
This manual is for models KP-43HT20,
KP-53HS20,
61HS20 and KP-61HS30.
Model
Features
KP-53HS30
is used for illustration
Some of the features
include:
KP-
KP-53HS30
purposes.
that you will enjoy with your new projection
TV
TM
O
Hi Scan 1080
: Enables you to receive the 1080i, 720p, 480p and 480i
digital TV formats. By using the VIDEO 5/6 IN jacks, you can connect
a DTV (digital television) receiver to view DTV programs.
O
DRC
TM
Multi-Function:
Unlike
conventional
line doublers,
the DRC
feature doubles vertical and horizontal lines, resulting in four times the
density for quality sources such as DVD, Satellite and Digital
camcorder.
TM
CineMotion
: Using the 2-3 Pull-Down technology, the CineMotion
feature allows you to obtain a smooth picture movement when playing
back movies or other video sources on film.
•
*
_M
,
,
Twin View
: Using MultMmage Driver (MID-X), Twin View allows
you to watch two programs side by side with the ability to zoom in one
picture and listen to selected window. You can watch pictures from two
different sources (1080i, 720p, 480p or 480i) simultaneously.
16:9 Enhancement:
Vertical Compression
technology that maximizes
ricture resolution on anamorphic' or enhanced for wide screen
sources, including selected DVDs.
Steady Sound_M: Equalizes
between progranas
volume
levels so there is consistent
output
and commercials.
Parental Control: V-Chip technology allows parents to block
unsuitable programming for younger viewers.
Component
Video Inputs: Offers the best video quality for DVD
(480p, 480i) and Digital Set-top box (1080i, 720p, 480p, 480i)
connections.
8
O
S-VIDEO
equipment.
Inputs:
Provides
a high-quality
O
Favorite Channel Preview: Preview
without leaving the current channel.
image for connected
up to eight favorite
channels
Introducing
V_l Channel
Index:
the Sony Projection TV
Allows you to view and choose from twelve programs.
T_
LI
Flash
Focus
: Allows
you to adjust convergence
5"
automatically.
¢1
Using this manual
We recommund that you carefully review the contents of the following
sections in the order provided to ensure that you fully understand the
operation
1
of your new projection
installing
and Connecting
four
TV.
r0
o
._
the Projection
TV
_'r0
€3
o
This section guides you through your initial setup. It shows you how tc
install your projection TV. to connect your new components and to connect
the antenna and cable.
2
Using the Features
This section shows you how to begin using your new projection
shows you how to use your remote control functions.
3
TV. It
Using the menus
This section teaches you how to access on-screen
projection TV settings.
Instructions
controls
in this manual
are written
may be found on the projecuon
menus and adjust your
for the remote control.
Similar
TV console.
9
Contents
Your box contains
your new projection
TV, a remote control
and two AA
batteries. No peripheral cables are included. If you intend to add additional
equipment to your projection TV, please check the hookup instructions for
your desired setup before you begin. You may need to purchase cables and/
or splitters to complete the hookup properly.
Inserting
Batteries
to the Remote Control
Insert two size AA (R6) batteries (supplied) by matching
batteries to the diagram inside the battery compartment.
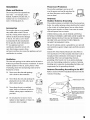
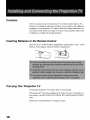
Carrying
Your Projection
Carrying
the + and - on the
TV
the projection
TV requires
three or more people.
The projection TV has been equipped with casters for easy movement on a
hard surface. (for KP-53HS20,
KP-53HS30,
KP-61HS20 and KP-61HS30
only)
Please move your projection
10
TV using the casters.
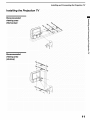
Installing and Connecting
Installing
the Projection
the Projection TV
TV
Recommended
viewing area
(Horizontal)
_n
Q.
o
[
0
Recommended
viewing area
(Vertical)
11
Installing and Connecting the Projection TV
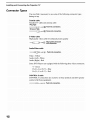
Connector
Types
You may find it necessary
during set up.
Coaxial
to use some of the following
connector
types
cable
Standard
TV cable
and antenna
cable
Plug Type
_(_
Push into connection.
Screw-on Type
_
_
Screw into connection.
S Video cable
High quality
video cable for enhanced
__
picture qualit3
Align guidesand push
into connection.
Audio/Video
cable
_
_
Pushinto connection.
Video - Yellow
_udio (Left_ - White
Audio
(Right) - Red
Some DVD Players
arc eqmppcd
with the following
three video connectors.
Y - Green
PB, CB. Cb or BY_ - Blue
PR tCR. Cr or RY _ - Red
CONTROL S cable
CONTROL
control
__zz_
12
S connections
are exclusive
to Sony products
of all Sony eqmpmenr.
_
_
Pushinto connection.
and allow greater
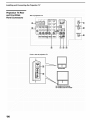
Installing and Connecting
Projection
the Projection TV
TV Controls and Connectors
Front Panel Menu
Controls
The front panel menu controls allow access to the on-screen menus without
the use of a remote control. Pressing MENU brings up the on-screen menus.
The arrow buttons move the on-screen cursor in the menus and the Select
button (-t-) selects the menu item.
POWER
o
TIMBA/ST_D BY
_EF_O
VOLUME
T_AqDEO
N_J
oZo
+
I
I
i,,_1_FOC,m
13
Installing and Connecting the Projection TV
Projection TV Rear
and FrontlSide
Panel Connectors
Rear of projection TV
@
AUX
DONVE_IIE_
@
VHF/UHF
_DE0 VIDE0
!
IN
KP*53HS20, KP-53HS30,
KP-61HS20and
KP-61HS30
14
Installing and Connecting
[]
Connection
Description
AUX
Allows
the Projection TV
you to view local and cable channels
provider
does not feature
local channels.
if your cable
You can switch
between local and cable channels easily by pressing ANT
on the remote control. Devices connected to the AUX
input cannot
[]
TO CONVERTER
be viewed
TNs is a VHF/UHF
projection
in Twin View.
OUT jack that lets you set up your
TV to switch
between
o,
o
quality when switching
between
unscrambled
cable channels.
scrambled
@
g}
VHF/UHF
Cormects
to your VHF/UHF
[]
S VIDEO
Connects
to the S VIDEO
(Rear
S VlDEO*eqmpped
side)
channels
cable channels (CXFV).
to get better picture
[]
and front/
scrambled
(through a cable box_ and normal
Use this-ack instead ofa sphtter
pmture
quahty
antenna
and
or cable
OUT jack of your VCR or other
video component.
than the VHF/UHF
Provides
jacks
better
or the Video IN
lack.
[]
VIDEO
Connects
(L/R)/AU
(Rear
DID
and front
sider
to the audio and video OUT jacks on your VCR
or other video
21 is located
component.
front panel (for KP-53HS20.
and KP-61HS30)
[]
Y/PB/PR
Connects
{L/R)/AU
[]
DIO
TV OUT
component
Cormects
of the projection
video
AUDIO
OUT
{VAR/FIX)
Connects
TV.
or Digital
Set-top
box's
for greater
control
of all audio
€see page 30] For detailed
about connecuolL
supplied
Jor the
KP-61HS20
_Y. PB. PR) and audio _L/R)jacks.
to an AV receiver
information
manual
for KP-43HT20
KP-53HS30.
to your DVD player's
and video eqmpment.
[]
A fourth video inpm _VIDEO
on the side panel,
refer to the operating
with the AV receiver.
to the left and right audio inputs of your audio or
video component.
L (MONO)/R
[]
CONTROL S
IN/OUT
"Io control other Sony eqmpment with the projection TV's
remote control, connect the CONTROL
S IN jack of the
eqmpment
to the CONTROL
projection
TV with the CONTROL
S OUT jack on the
S cable.
"Ib control the projechon
TV with a remote control for
another Sony product, connect the CONTROL
S OUT
lack of the eqmpmem
prolection
m the CONTROL
TV with the CONTROL
S IN jack on the
S cable.
15
r}
o_
Installing and Connecting the Projection TV
Basic Connections
Connecting
Directly
to Cable or an
Antenna
(Connecting
Cable TV or Antenna)
The connection you choose depends on the cable found in your home. Newer
homes are eqmpped with standard coaxial cable (sec In); oldcr homes
probably have 300-ohm twin lead cablc (sce r_); other homes may contain
both (see r_l),
[]
VHF Only or VHF/UHF or Cable
VHF!UHF
75-ohm coaxial
cabte
[]
__
Rear of projection TV
VHF Only or UHF Only or VHFIUHF
300-ohm twin lead cable
VHF/UHF
___
Rear of projection
Antenna
[]
VHFand
TV
connector
UHF
75-ohm coaxial cab)e
_=_(_
Rear of projection TV
U/V Splitter
_Jn/Vt
SPutl_t;ied)
300-ohmtwinread
Cable and Antenna
ca_
If your cable provider
up convenient.
does not feature local channels,
CATV cable
you may find this set
AUX
TO
(No connection to
TO CONVERTERI
Antenna
cable
Select CABLE
control.
16
or antenna
Rear of projection TV
VHF/UHF
(ANT)
mode by pressing
ANT on the remote
Installing and Connecting
Cable Box
Connections
the Projection TV
Cable Box and Cable
This is the preferred
basic cable TV hookup
to use if:
_1 Your cable TV company scrambles some channels, but not all of them
tpay channels
box. and
vs. regular
cable channels)
and you need to use a cable
_"
You want to enjoy the Twin View feature.
With this setup you can:
Use the projection TV remote control to change channels
cable box when the signal is scrambled.
using your
o
Ll
Use the projection TV remote control to change channels using your
projection TV when the signal is not scrambled
(Your projection TV's
tuner provides a better signal than the cable box.
¢_
o
5'
_l
Use the Twin View feature, tWhnn all channels are routed through your
cable box. only one channel is sent to the projection TV. so you can nor
¢D
use the Twin View or Channel
¢_'
¢)
1
2
Connect
Index features
for your cable box.
the Cable TV cable to the projection
Using a coaxial
cable, connect
TV's VHF/UHF
the projection
jack.
TV's TO CONVERTER
jack to the cable box's IN jack. The projection TV's internal converter
allows you to switch between unscrambled
signals cnn£mg straight into
the projection TV and scrambled signals coming in through the cable
box. eliminating the need for an external splitter,
3
Using a coaxial
projection
cable, connect
the cable box's
OUT jack to the
TV's AUX jack.
Cable box
IN
3
Aux
Rear of
projection
__
OUT
2
75-ohm coaxial cable (not supplied)
TV
CONVERTER
ro
A
_ Signal
VHF/UHF
CATV cable (unscrambled
channels)
(Continued)
17
Installing and Connecting the Projection TV
Cable Box Only
Use this hookup if:
LI
You subscribe to a cable TV system that uses scrambled
signals requiring a cable box to view all channels, and
or encoded
J
You do not intend to hook up any other audio or video equipment
your projection TV.
to
When all channels are routed through your cable box. only one unscrambled
channel is sent to the projection TV so you cannot use the Twin View
feature. If some channels are scrambled, but others are not. consider using
the hookup on page 17 instead.
1
Connect
the coaxial
connector
from your cable service to the cable
box's IN jack,
2
Usingacoaxialcable,
VHF/UHF
connectthecablebox'sOUTjacktotheTV's
jack.
Cable
VHFIUHF
,_
N
__
_
RearofprojectionTV
OUT
Cable box
Also. set Cable to ON in the Channel
_J_ Setting the Channel
Fix feature in the Channel
menu (see "Using the
Channel Menu" on page
52/ensures that you do
not accidentally switch
the channels using your
projection TV,
18
menu. (see page 52)
Installing and Connecting
Connecting
the Projection TV
a VCR and Cable
Use this hookup
if:
7..I You have cable TV that does not require
a cable box.
Disconnect all power sources before making any connections.
1
Connect
2
Using a coaxial
cable, connect
TV's VHF/UHF
jack.
the cable TV cable to the VCR's
the VCR's
IN jack.
OUT jack to the projecuon
Q.
o
3
Using AUDIO
and S VIDEO
cables,
Video OUT jacks to the projection
jacks.
connect
the VCR's
TV's AUDIO
Audio and
and S VIDEO
0
IN
Rear of Projection TV
[_xia I cable
2
VCR
S 1
• Jn4O
n xtmloL vmEo s _DEO
UNE
OUt"r_
N
_
VMC-810S/820S
(not supplied)
YC-15V/30V
(not supplied)
19
Installing and Connecting the Projection TV
Connecting
a VCR and Cable Box
Use this hookup
if:
Your cable TV company scrambles some channels, but not all of them
(pay channels vs. regular cable channels) and you need to use a cable
box_ and
LI
You want to enjoy the Twin View feature.
With this setup you can:
_1
Use the projection TV remote control to change channels
cable box when the signal is scrambled.
using your
_1
Use the projection TV remote control to change channels using your
projection TV when the signal is not scrambled. Your projection TV's
tuner provides a beirut signal than the cable box.
Use the Twin View feature., When all channels are routed through your
cable box. only one signal is sent to the projection TV. so you cannm
use the Twin View feature,
Disconnect all power sources before making any connections.
1
2
3
4
5
Connect
the Cable TV cable to the projection
Using a coaxial cable, connect the TV's TO CONVERTER
cable box's 1N jack. The projection TV's internal converter
to switch between unscranabled signals coming straight into
projection TV and scrambled signals coming in through the
eliminating the need for an external splitter.
Using a coaxial
IN jack.
cable, connect
the cable box's
jack.
jack to the
allows you
the
cable box.
OUT jack to the VCR's
Using AUDIO and S VIDEO cables, connect the VCR's AUDIO and S
VIDEO OUT jacks to the projection TV's AUDIO and S V1DEO IN
jacks.
Using a coaxial
TV's AUX jack.
2O
TV's VHF/UHF
cable, connect
the VCR's
0UTjack
to the projection
Installing and Connecting
the Projection TV
VCR
YC-t5V/30V
(not supplied)
_n
13
Coaxial
cable
S VIDEO
I
,'_--
VIDEO (yeltow)
_--
AUDIO-L
VMC-810S/820S
(not supplied)
(white)
/1DE04VID£*05 VIDE06
IN
t
Rear of projection TV
21
Q.
('_
0
Installing and Connecting the Projection TV
Connecting
Two VCRs for Tape Editing
Connecting two VCRs together, then into the prqiection TV, allows you re
switch between the two to be sure that what you are playing on one is
recording on the other.
Disconnect all power sources before making any connections.
1
Using AUDIO
and VIDEO
cables_ connect
and Video OUT jacks to the recoMing
jacks.
2
Using AUDIO
and VIDEO
cables,
the playback
VCR's Audio
connect
the recording
AUDIO and Video OUT jacks to the projection
VIDEO 1N jacks.
VCR's
VCR's
TV's AUD10
and
Rear of projection TV
VCR (playback)
D®],u.,
AUDIO R AU_OL
_IDEO
UNE
OUT
OUT
IN
AUDIOR ALIDIO
L "dIDEO
VMC-810SI820S
22
(not supplied)
Audio
and Video IN
Installing and Connecting
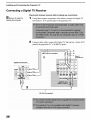
Connecting
the Projection TV
a Satellite Receiver
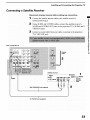
Disconnect all power sources before making any connections.
1
Connect
the satellite
SATELLITE
2
antenna
Using AUDIO
Connect
receiver's
IN jack.
and S VIDEO
AUDIO and S VIDEO
VIDEO 1N jacks.
3
cable to the satellite
cables,
OUT/acks
connect
thc satellite
to the projection
and S
Q.
a coaxial cable from your cable or antenna
TV's VHF/UHF
receiver's
TV's AUDIO
to the projection
o
=
jack.
7,
Rear of projection
TV
°i¸
3
Satellite receiver
iN
o°ton°a
UMOUT
Satellite
_
-
_
cable
I
r
YC-t 5V/30V Inot supplied)
23
Installing and Connecting the Projection TV
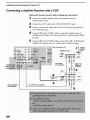
Connecting
a Satellite Receiver with a VCR
Disconnect all power sources before making any connections.
1
Connect
the satellite
SATELLITE
antenna
cable to the satellite
IN jack.
2
Connect
3
Using a coaxial
cable, connect
TV's VHF/UHF
jack.
4
the CATV cable to the VCR's
Using AUDIO
and S VIDE0
AUDIO and S VIDEO
IN jacks,
5
Using AUDIO
VIDEO
receiver's
VHF/UHF
the VCR's
cables,
0UTjack
connect
and S VIDEO
cables,
connect
AUDIO
the VCR's
and S VIDEO
Rear of projection TV
Satellite receivel
VMC*810S/820S.-(not supplied)
24
to the projection
thc satcllite
OUT jacks to the VCR's
OUT jacks to the TV's AUDIO
IN jack.
receiver's
and S VIDEO
AUDIO
and S
]N jacks.
t
_1 Satellite
_
t]enna
Installing and Connecting
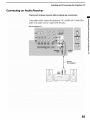
Connecting
the Projection TV
an Audio Receiver
Disconnect all power sources before making any connections.
Usmg audio cables
connect
jacks to the audio receiver's
the projection
TV s AUDIO
OUT _VAR/FIX
audio LINE IN jacks.
Rear of projection TV
Q.
o
7,
(white)
RK-74A
{nOt supplied)
iLipet
_
_
25
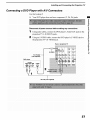
Installing and Connecting the Projection TV
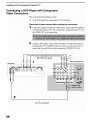
Connecting a DVD Player with Component
Video Connectors
This is the preferred
LI
hookup
to use if.'
Your DVD player has component
(Y, PB, PR) jacks.
Disconnect all power sources before making any connections.
1
Using three separate
component
video cables,
connect
the DVD player's
Y. PB and PRjacks to the Y. PB and PR jacks on the projection
the VIDEO IN 5 or 6 connections
2
Using an audio cable, connect
the DVD player's
Audio
TV. Use
OUT lacks to
the projection TV's AUDIO 1N jacks. Be sure to use the same row of
inputs that you used for the video connection (VIDEO IN 5 or 6 _.
PB
PR
f
f
t
VMC-10HG
(not supplied)
DVD player
2
RK-74A (not supplied)
26
YRear
of projection
TV
Installing and Connecting
Connecting
the Projection TV
a DVD Player with AIV Connectors
Use this hookup
if:
Your DVD player does not have Component
(Y, PB, PR) jacks.
Disconnect all power sources before making any connections.
1
Using audio cables,
projection
2
connect
TV's AUDIO
the DVD player's
IN jacks.
Using an S V1DEO cable, connect
the projection
Q.
Audio OUT jacks to the
TV's S VIDEO
the DVD playur's
S VIDEO jack to
jack.
Rear o_ projection TV
y
S VIDEO
YC_I 5V/30V
(not supplied)
_---
DVD player
N
\
1
[
RK-74A {not supplied)
27
o
Installing and Connecting the Projection TV
Disconnect
Be sure to read the
Set-top box manual.
1
Set-top
Using
all power sources before making any connections.
three Separate component
Connect the Digital TV
box's 5(, PB and PR jacks to the projection
2
Using an audio cable, connect
jacks to the projection
VMC-t0HG
(not supplied)
Digital TV Set-top box
2
RK*74A (not supplied)
TV.
the Digital TV Set-top box's Audio
TV's AUDIO
t
28
video cables,
OUT
IN jacks.
B
Rear of
projection
TV
Installing and Connecting
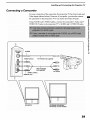
Connecting
the Projection TV
a Camcorder
For eas,: connection of the camcorder, the projection TV has front Audio and
Video inputs €shown below*. However. if you prefer, you can also connect
the camcordcr to the projection TV's rear Audio and Video 1N jacks.
Using AUDIO and S VIDEO cables, connect the camcorder's
Audio and S
VIDEO OUT jacks to the projection TV's AUDIO and S VIDEO IN jacks.
o
[
S VIDEO
DEO 2 INPUT
8VIDEO
((_
J
VIDEO (yellow)
YC-15V/30V
(not supplied)
_.
p/
e_
VMC_t0s/820s _
(not supplied)
--_
_
AUDIO-L
A/V output
(white)
AUDI(3_R (red)
\
\
KP-53HS20.
KP_IHS20,
KP-53HS30=
and KP-61HS30
29
Installing and Connecting the Projection TV
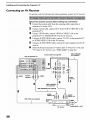
Connecting
an AV Receiver
For greater control of all audio and video equipment,
connect
an AV receiver.
Disconnect an power sources before making any connections.
antenna
to 1N on the VCR.
Using a coaxial
cable, connect
OUT on the VCR to VHF/UHF
on the
projection TV.
Using a VIDEO cable, connect VIDEO of VIDEO 1 1N onthe
proj ection TV to MONITOR OUT on the AV receiver.
Using an AUDIO/VIDEO
cable, connect TV OUT on the projection
to AUDIO/VIDEO
2 1N on the AV receiver.
Using an AUDIO/VIDEO
receiver.
6
cable, cormect the Video equipment
Select the Setup menu and set "Video
TV!s input to AV receiver.
Label,
(see "Video
to "Receiver"
Label'!
-VIDEO
AUDIO-R
AUDIO-L
VIDEO
to fix your
VMC-8t0S/820S
(n0t SUppl!ed)
\
_
to the AV
on page 64)
Coaxia! cable (not SUPp!ied)
Antenna
ICable
/
_
t
4
(not supplied)
VMC-8t0S/820S
(not supplied)
3
VMC-10HG (not supplied)
MONITOR
-
, .......
,-
AV receiver
3O
-
TV
.
AUDIO/VIDEO
1 OUT
Installing and Connecting
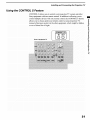
Using the CONTROL
the Projection TV
S Feature
CONTROL S allows you to control your projection TV system and other
Sony eqmpment with one remote control. In addition to allowing you to
control multiple devices with one remote control, the CONTROL
S feature
allows you to always point your remote control at your projection TV
instead of having to point it at the other eqmpmem, which might be hidden
or out of direct line of sight.
o
IN
OUT
©0
0
Rear of projection TV
31
Installing and Connecting the Projection TV
Setting Up the Projection
TV Automatically
Afler you finish connecting your projection TV, you can rtm Auto Setup to
set up your channels. The Auto Setup screen appears when you turn your
projection TV on for the first time after installing it. If you do not want to set
up the channels at this time, you can do it later by using the Auto Program
feature in the Channel menu. (see page 53)
Using Auto Setup
1
2
3
Press POWER on the front panel of your projection TV or on the remote
control to turn on the projection TV.
Press the TV/FUNCTIONI
briefly appear.
button on your remote control.
Press CH+ on your projection TV to run Auto Setup, or press CH- to
exit. If you use the channel buttons on your remote control, be sure to
use the main set of buttons
Projection
(HI "
TV front panel
-1
"ilMEP.IS't_/DBY
-3
9OA_IE
WNIDEO
MENU
OSQ
+
32
Red light will
.
Installing and Connecting
Adjusting
the Convergence
Automatically
the Projection TV
- FLASH FOCUST M-
The projection tube image appears on the screen in three layers (red, green
blue), if they do not converge, the color is poor and the picture blurs.
and
Before y0u use your projection TV, be sure to adjust the convergence.
The
automatically.
FLASH FOCUS feature allows youto adjust the convergence
¢3
o
_0
Projection TV
front panel
7,
OZO
-t-
1
2
Receive
a TV or cable TV program.
Press FLASH FOCUS.
The cross pattern appears and FLASH FOCUS begins to work. The
adjustment is completed when the cross pattern becomes white and will
come back to the program you are watching.
To obtain
an
optimum
convergence
for
Digital TV programs
The opnmum convergence alignment varies with digital TV formats.
Whenever you find that the picture blurs, press FLASH FOCUS.
33
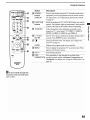
Using the Remote Control
The following table describes
more advanced functions.
Button
Descriptions
ffF--
the buttons
on the remote control
that are for
Outside Panel
Button
Description
[]
MUTING
Press to mute the sound. Press again or press VOL + to
restore the sound.
[]
SLEEP
Press repeatedly until the projection TV displays the time
in minutes (15, 30, 45, 60, or 90) that you want the
projection TV to remain on before shutting off
automatically. Cancel by pressing until SLEEP OFF
appears. While Sleep feature is set, press once to view
remaining time.
[]
ANT
Changes between the VHF/UHF input to the AUX input.
[]
DISPLAY
Press once to display the current time and channel label (if
set) and channel number. Press again to turn Display off.
See page 62 for details on setting the time.
[]
JUMP
Press to jump back and forth between two channels. The
projection TV alternates between the current channel and
the last channel that was selected.
[]
FREEZE
Freezes the window picture. Press again to restore the
picture.
[]
I_) INDEX
Pressto enter the Channellndex
6
cH
mode. You can view and
select from twelve channels without leaving the current
one.
SON=Y
iiii
34
[]
/_,_
Joystick allows for movement of the on*screen cursor.
Pressing down on the center of the joystick selects the item.
[]
VOL +1-
Adjusts the volume.
[]
PIG MODE
Press repeatedly to step through the available video picture
modes: Vivid, Standard, Movie and Pro. Also available in
the Video menu. For details, see "Selecting Video Options"
on page 48.
[]
FAVORITES
Displays the Favorite Channels list. For details, see "Using
Favorite Channels" on page 40.
[]
RESET
Press when in a menu to reset the settings to the factory
defaults.
Using the Features
[]
Button
Description
POWER
buttons
equipment
(GREEN)
For instructions,
Turn on and offthe
projection
TV and other audio/videc
you have programmed
into the remote
see "'Programming
the Remote
control.
Control"
on page 65.
[]
FUNCTION
buttons
Select the eqmpment
operate,
ITV. SA_IV(_ABLE/that
The indicator
to show which device
[]
TV/VIDEO
Cycles through
lights
you want to
up momentarily
the remote
control
the video equlpment
when pushed
is opel_atmg,
connected
to your
projection
TV's video inputs: TV. VIDEO 1. VIDEO
VIDEO 3. VIDEO 4. VIDEO 5 and VIDEO 6.
f
[] 0 -
FRI_
[]
9 and
Press 0 - 9 to select a channel,
ENTER
seconds.
Press
ENTER
[_
l'urns on/offTwin
the channel
to select
View,
changes
2.
after 2
immediately,
For details,
see _'Using Twin
View 'rM" on page 41.
GUIDE
--_
[]
MENU
Displays
the program
Press to display
guide of your
the projection
satellite
TV on-screen
menu,
Press
again to exit from the menus.
--N
[]
CH +/-
Scan through
[]
DRC/
Press repeatedly
CINEMOTION
resolution
CineMotion.
channels.
picture
to step through
modes:
For details,
the available
Interlaced.
see "Using
high-
Progressive
the Video
and
Menu"
on
page 48.
]To
scan rapidly through the
channels press and hold down
CH+ or CH-.
35
Using the Features
Inside Panel
Button
[]
SYSTEM
[]
_
Description
OFF
Press to turn of Fthe projection
connected
with S-Link.
TV and all equipmem
Play
Rewind
Record
%m
Stop
[]
DVD MENU
Displays
[]
MTS/SAP
Press to scroll through
the Multi-channel
options:
SAP
[]
CODE SET
POWER
Stereo
For details,
Control"
I_b
into the remote
the Remote
SOI_TY
36
player
control.
nonthe
you have
For instructions,
Control"
for connected
one video source
see
on page 65,
details,
65.
see "Programming
Press agmn to resume
video eqmpment,
for each switch posltlon,
the Remote
[]
|1
Pause
[]
DVD TITLE
Displays the DVD title.
[]
_, _, _1i_,_li..
and ENTER
Use to opel_ate the DVD menu.
[]@
to operate
see "Programming
Fast-forward
Use to switch control
m
control
on page 65.
Press to turn on the DVD/VCR
can program
_wo_
TV Sound (MTS)
and Mono.
the remote
'Programming
[]
Auto
Sony wdeo equipment.
programmed
VOL
menu,
Used for programming
Remote
[]
the DVD
normal
Control"
You
For
on page
playback)
Press to select an audio option: Steady Sound ON or
OFF.
Using the Features
Watching the TV
Many TV features can be accessed
following will explain the function
control.
Buttons
for
Projection
Operations
[_ "IV (FUNCTION)
Activates the remote
TV
control
[_ ANT-- [AUX input)
Press to change between
directly through
of some buttons
the remote control. The
found on your remote
for use with the projection
the VHF/UHF
T\.
input and the AUX input. (for
detailed connection information,
see "Cable
"Cable Box Connections"
on page 17_
and Antenna"
on page 16 or
_] TV (POWER)
Turns the projection TV on and off. Ifa video input indication tc.g., VIDEO
1. VIDEO 2 _appears on the screen, press TV/VIDEO or GH +1- until a
channel number appears.
F)-wN
0-9 and ENTER
_[]- --
Use for direct channel selection. Press 0-9 to select a channel (for example.
to select channel 10, press 1 and 0 b.The channel will change after 2 seconds.
or you can press ENTER for immediate selection.
=_----._
CH +Jit
N-
i
Press to scan through
\_
j,%_- ,)
the channels
!± up or
down J.
-N
VOL +/Press to adjust the volunac E÷ up or
down
.
JUMP
Press to alternate or jump back and forth between two channels. The
projection TV will jump between the current channel and the last channel
selected.
D
SONY
"_"
]
MUTING
Press to mute the sound. "MUTING"
will appear on the screen and will dim
three seconds later. To restore sound, press again or press VOL +.
[_ FREEZE -- (yellow labeled button)
This is useful when you need to copy down information that appears
TV's screen. (see '_Using the Freeze Function" on page 44)
on the
(Continued)
37
Using the Features
[_ SLEEP
Press repeatedly until the projection TV displays the approximate
time in
mmmes, 15.30. 45.60. or 90) that you want the projection TV to remain on
before shutting off automatically.
Cancel by pressing
÷::
.>-
SLEEP
until "SLEEP
OFF" appears.
DISPLAY
Press to display the channel
number,
current time and channel
label (if setJ.
To turn the display oft. press DISPLAY again.
W/VIDEO
Press repeatedly to scroll through available video inputs: TV. VIDEO
VIDEO 2. VIDEO 3. VIDEO 4. VIDEO 5 and VIDEO 6.
1.
If you select Skip as a Video Label in the Setup menu, your projection T'_
will skip the video input you selected., see "Video Label" on page 64)
MTS/SAP
Press to scroll through
"'MTS" on page 50)
the Multi-channel
TV Sound (MTS) options.
(see
PIC MODE
Press PIC MODE repeatedly to directly choose one of five different
modes that best suits the program you are watching.
Vivid: Select for enhanced
Standard:
Select
picture contrast
to display
a standard
video
and sharpness.
picture
for normal
viewing
envlronmems.
Movie: Select to display
_ro (Professional
a finely detailed
picture for low light environments.
Select to display a pmture with minimum
enhancements.
When you select each mode, you can also adjust the picture quality (such as
Brightness. Color. etc.) to suit your taste. For details, see "Mode" on page
48.
38
Using the Features
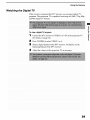
Watching
the Digital TV
programs. This projection TV is capable
and 480i digital TV formats.
of receiving
the 1080i, 720p, 480p
To view a digital TV program
Connect the DTV receiver
(for details, See page 28)
Press TVNIDEO
3
4
to select VIDEO
Select a digital channel
(Operating Manual
Adjust
to VIDEO
5 0r 6 iN 0n the projection
TV_
5 or 6.
on the DTV receiver.
For details,
see the
of the DTV receiver.
the vo!ume on this projection
TV as necessary.
39
Using the Features
The
Favorite
channels
Channel
feature lets YOUselect programs
from a list of favorite
that you preset.
To display a list of your favorite channels:
1
Press FAVORITES.
The Favorite
Channel
options
appear.
Previewwindow
2
Move the joystick
watch. The program
Press
4O
@
to select.
up or down to highlight
on that channel
the channel
you want ro
appears in the preview
window.
Using the Features
Using Twin View
TM
Twin View enables you to watch two programs at the same time. You can
also change the size of both the left and right pmmres.
Displaying
Pictures
Twin
To display
I
twin pictures
Make sure your projection
tuned to a working
2
Press
[_.
To cancel twin pictures
U
Press _
agamtorpress
Activating
Picture
the
Although
two pictures
TV is
channel.
@ _.
appear on the screen at the same time, only one
picture is active. Change
picture, you can:
the picture
_1
Change
LI
Adjust the vohLme.
Cl
Switch the input sources
size by using the joystick.
For an active
channels.
from VHF/UHF
to cable by pressing
ANT or
TV/VIDEO to switch the video input.
LI
Change the picture
size by pressing
the joystick
up or down.
To activate the right picture
Move the joystick to the right.
To activate the left picture
LJ Move the joystick to the left.
(Continued)
41
Using the Features
42
Using the Features
Changing the
Picture Size
The zoom feature lets you change the size of the left and right pictures.
To enlarge the left
picture (reduce the
right_
To enlarge the right
picture (reduce the
left}
1
1
Move the joystick
left to activate the
right to activate
left picture (if not
already activated J.
2
Move thcjoystick
up to enlarge the
picture and move
the joystick down
to reduce thc
Movc the joystick
9
the
right picture dfnot
alrcad,- activated,.
_,
Movc the joystick
¢_
2_
_lg
up to cnlargc the
picture and move
the joystick down to
reduce the picture.
picture.
43
Using the Features
Using the Freeze Function
The FREEZE button allows you to temporarily capture a program!s picture.
You can use this feature to write down information
such as phone numbers,
To use the Freeze function
When the Program
information
YOUwant to capture
is displayed,
press
FREEZE,
2
"frozen,
left.
The projection
TV Switches to Twin View mode and displays
picture on the right, _hi!e the current program
the
continues
on the
. Frozen_ tu
3
44
TO cancel and return to norma! viewing,
press FREEZE,
Using the Features
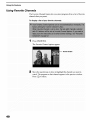
Channel
Index allows you to display multiple
channels
and select one
directly.
The
TWs
53)
channels used for Chamae! Inde x will come directly from the projection
list of receivable channels (those set during !'Auto Program'! on page
5'
To use the Channel Index function
1
pross _.
The current channel will be reduced in size and displayed in the center
of the screen in normal motion picture fomlat. The first twelve
receivable channels will appear one after another, clockwise, around the
center picture. These small pictures are updated in intervals of one
second. The channel number and channel caption (if set on the second
and later appearances will dim.
A cyan-colored
2
frame will appear to indicate
Move the joystick
channel
in an'. direction
channel
of that channel
selection
to move the c) an frame to the
that you wish to view. and press
The selected
current channel
0"
will zoom in and move to the center, and the sound
will be heard.
(Continued)
45
Using the Features
For the center picture
CI
you can!
Change the channe! by pressing
Switch the input sources
or to the video input by pressing
surrounding channe!s,
3
If you wish to view another
0-9 and ENTER.
from VHF/UHF
channel,
to cable by pressing
TV/V!DEO! without
repeat
proceed
Press @.
The cemur picture will be enlarged for normal viewing.
To cancel Channel Index
LI Press O again to resume nomlal
46
viewing.
the
step 2.
To view another twelve channels, press CH+.
To view the previous twelve, press CH-.
To view the nnmlal picture of the selected channel,
4
changing
ANT
to step 4.
Overview
Opening
®
a menu:
1 ProssMENUtodispl ythemenuscreon.
:_
u [; [
and choosing
_
2
Movethejoysticktothedesiredmenuiconandpress
I
Use
The
mSeethespeeificmenupagef°rinstructi°ns°nm°vingthr°ughthe
menu gives you access to the following
features:
Menu
the joystiek
Icon
to scroll
through
@toselectit.
the features.
Description
Allows
Page
you to make adjustments
to your picture
settings.
48
It also
the
typeallows
of program
you to you
customize
are viewing_
the Picture Mode based on
Offers
enhanced
audio programming
the sound
audio options
(SAP),
on your projection
such as listening
or customizing
to second
50
the Effect of
TV.
To end a menu session:
Allows
Press MENU again,
]
To end one menu
session
and move
list, run the Auto
52
of programs
based on their
54
Lets you set the clock on your projection
TV and allows
62
Program
you to set up a Favorite
function,
Lets you control
to
Channel
and more.
the viewing
another:
ratings.
Press the joystick * to
return to the menu icons,
Move the joystick to
choose the next menu icon
and press
J-_ to select
it.
|IN,T1
[_]
you tothe
using
program
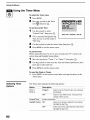
Timers.your projection TV for scheduled viewing
Provides
_]
several
options
for setting
up your channels,
63
the
on-screen
menus.inputs, and selecting the language of
labeling
your Video
47
Using the Menus
Using the Video Menu
To select the Video Menu
1
Press MENU.
9
Move the joystick
icon []
3
Use the joystick
through
4
Press
3.
to scroll
the features.
_'_ to select a feature. That
feature's
5
to the Video
and press
adjustment
Use the joystick
appears.
to make the
desired adjustmems.
6
Press
-_ to select/set.
'7
Press MENU to exit the menu
screen.
To restore the factory default settings for Picture. Brightness, Color,
Hue, Sharpness and Color Temp
LI Press RESET on the remote control when in the Video menu.
Selecting
Video
The Video
menu includes
Options
Option
Description
[]To
Mode
Vivid
quickly and easily
the following
options.
Select for erLhanced picture
contrast
and
viewing
conditions.
sharpness.
change from one Video
Mode to another, use the
Customized
plc[ure
Standard
Recommended
PIC MODE on the remote
control.
viewing
Movie
Select for soft. film like. plcture,
Pro
Select for professional
Picture
48
contrast
monitor
and deepen
like appearance.
Adjust
m increase
picture
contrast
Brightness
Adjust
to brighten
Color
AdJuSt to increase
or decrease
color intensity.
Hue
Adjust to increase
or decrease
the _een
Sharpness
Adjust
or soften the p_cture.
Color Temp
Choose
H bite
intensity
adjusrmem
Cool
Select to give the white
colors a blue tint.
Neutral
Select to g_ve the white
colors a neutral
Warm
Select to g_ve the white
Standard,,
colors a red tint _NTSC-
to sharpen
picture
for Normal
the color or decrease
and soften the color.
or darken
the picture.
tones.
from three color temperatures:
tint.
Using the Menus
Option
Description
DRC Mode
Creates
a high-resolution
Digt_al
sources
_Le.. DVD player.
Reality
Select from
Creation
Interlaced
Recommended
for moving
Progressive
Recongnended
for still images
CineMotion
Recommended
for 24 frame-per-second
interlaced
picture
with 4x density,
Satellite
receiver
Progressive
for high qualit_
J.
and CineMotion,
pictures,
and text.
films.
49
Using the Menus
Using the Audio Menu
To select
the Audio Menu
1
Press MENU.
2
Move the joystick
icon []
3
to the Audio
and press
Use the joystick
@,
to scroll through
the options.
4
Press
-_ to select an option
That option's
5
settings appear,
Use the joystick
MOve:
4o._ _,-
8ele)_t:Q
End:_
to scroll through
the seltings.
6
Press
-_ to select the desired setting.
7
Press MENU to exit the menu
screen.
To restore the factory default settings for Treble, Bass and Balance
_1 Press RESET on the remote control when in the Audio menu.
Selecting Audio
Options
The Audio
menu
includes
the following
Option
Description
Treble
Adjust
to increase
or decrease
higher-pitched
3ass
Adjust
to increase
or decrease
lower-pitched
3alance
Adjust
to emphasize
Steady
Sound
ON
Select to stabilize
OFF
gelect to turn off Steady
TruSurround
Select for surround
only).
Simulated
Adds a surround-like
OFF
Normal
k4TS
Stereo
Enjoy stereo.
bilingualand
Select for stereo reception
_roadcast m stereo.
Auto-SAP
Select to automatically
switch the projection
second
when a mgnal is received
Effect
programs
left or right speaker
audio
Sound
sound
effect
programs
weak stereo
sounds.
the volume.
(for stereo
programs
to mono
programs.
reception.
when viewing
zs present,
mode.
_elect for mono receptton,
during
sounds.
balance
stereo or mono
, ffno SAP signal
remains in Stereo
k4ono
5O
options:
the projecnon
tUse
broadcasts.,
to reduce
a program
TV to
TV
noise
Using the Menus
Option
Description
Speaker
ON
Select to turn on the projection TV speakers
OFF
Select to turn offthe projection TV speakers and
listen to the projection TV's sound only through
your external audio system speaker.
Audio Out
Variable
Eu 0 c*ontrol
or volume
adtustmem,_
:ixed
The projection TV's speakers are turned off. but
the volume output from your audio system can still
3e controlled by the projection TV's remote
control.
The projection TV's speakers are turned offand the
volume, bass and treble output of the projecnon TV
is fixed. Use your audio receiver's volume control
to adjust the volume through your audio system.
51
.v-
Using the Menus
Using the Channel Menu
To select the Channel Menu
1
Press MENU.
2
Move the jo_ stick to the Channel
icon
3
andpress
Use the joystick
through
4
Press
_
Options
Channel
to select a feature. That
options
appear.
Use the joystick
through
Selecting
to scroll
the features.
feature's
5
@,
to scroll
the options.
6
Press
_
1
Press MENU to exit the menu
The Channel
Option
to select the desired option,
menu includes
screen.
the following
options:
Description
Favorite Channel Auto
Manual
Select if you want Favorite Channel options to
be set automatically to the last eight channels
selected with the 0-9 buttons.
Select if you want to input your own selections
as Favorite Channel opuons.
1
Press _ to select a favorite channel
number.
Use the joystick
channels
to scroll through
tmtfl you lind the channel
the
you
want to add to your favorites.
Press
Sable
S2
_
to select
it.
ON
Select if you are recelvmg
CATV cable.
OFF
Select if you are using an antenna.
cable channels
with a
Using the Menus
Option
Description
Channel
Fix
2-6
_'F_x" your projection
TV's channel
setting
to 3
UseJul when you
_ave a cable box
or 4 and use the cable box. VCR or satellite
receiver to change channels. Select one of these
or satellite
settings
receiver
VHF/UHI _ jack.
connected
AUX 2-6
if you have connected
Same as 2-6. except
settings
AUX jack.
VIDEO
1
video
connected
Program
Channel
Automatically
channels.
Removes
Skip/Add
'!
(see page
Use when connecting
external
Auto
you select
if you have connected
programs
15 /
channels
to scroll through
find the channel
you want to skip/add,
Press @
3
Press the joystick
to select
be
TV for all receivable
Use the loystick
2
to control
TV outpt/t should
the AV receiver.
the projection
and adds viewable
one of these
the device to the
an AV recmver
sources.
through
the device to the
the channels
until you
it.
uF or down to toggle
between
"Add" and
"'Skip.
4
Channel
Label
Press
_
to select
Label up to 20 channels
with their station
call letters.
53
Using the Menus
Using the Parent Menu
The Parent menu allows you to set up the TV to block progran_s
their content and rating levels.
according
to
These ratings are assigned by a federal rating board. Not all programs are
rated. Using the Parental Lock blocks programs with a specific rating, but it
does not block an entire channel.
Using the Parent
Menu
To select the rating
First. set a password, then select the country
Canada_ and your desired rating.
you reside m _U.S.A. or
Press MENU.
Move the joystick
3
4
Use the 0-9 buttons
password.
to the Parent icon g
on the remote control
-_.
to enter yore four-dig_t
Confirm your password by entering it again. Your password
and the Parent menu opuons appear.
Make sure that "Country"
is selected,
lga_tlil
h=ngl
54
and press
L_k_GpF
pa==wo_d
and press
_.
is stored
Using the Menus
6
Move the joystick
the country
7
up or down to select U.S.A.
you reside in. and press
Move the joystick
or Canada
according
to
_._.
down to select "Parental
Lock".
and press @.
ID
8
Move the joystick
up or down to select a desired rating,
lfyou select Child. Youth. Young Adult or Custom.
is activated automatically.
If you want to select the ratings
Ranng Options" on page 57.
0
Press MENU to exit the mcnu
from Custom.
and press @.
the Parental
Control
see _'Using Custom
screen.
(Continued)
55
Using the Menus
The Parent
H If you are not familiar
with the Parental
Guideline rating system.
you should select Child
Youth. or Young Adult to
help simplify the rating
selection, To set more
menu includes
Option
Parental
the following
Description
Lock
Turn ratings
OFF
Parental lock is off. No programs are blocked
on
oJJ'and select a
rating system
restrictive ratings, select
Custom.
from viewing,
Child
Maxlmum ratings permltted are:
.3
US: TV-Y. TV-G. G
_1 Canada: TV-Y. C. G
Youth
Maximum ratings permitted are:
_1 US: TV-PG. PG
_1 Canada: TV-PG. PC. 8 arts
Young
Adult
Maximum ratings perrmtted
J
US: TV-14. PC-13
J
H
For descriptions
of
Child. Youth. and Young
Adult ratings, see
pages 60 and 61.
opnons.
Custom
Change
Canada:
TV-14.14+.
Select to set ratings
For changing
are:
13 arts
manually,
_1
US: See page 60 for details.
_1
Canada:
See page 61 for details.
your password.
(see below_
Password
To deactivate the Parental Control feature
U
Set Parental Lock to OFF when in thc Parcnt menu.
To change the password
1
Select Change Password option when in the Parent menu using the
joystick,
Viewing Blocked
Programs
and press
@.
2
Enter a new four-digit
passwoM
3
Confirm
4
Press MENU to exit the menu
the new password
You can view a blocked program
'!
by entering
it again.
screen.
by entering
Press ENTER when tuned to a blocked
Enter your password
the password.
program.
using the 0-9 buttons.
Parental Control will be canceled
projection TV off.
56
using the 0-9 buttons.
temporarily
until you turn your
Using the Menus
Using Custom
Rating Options
If you warn to select the ratings
procedure below.
1
Perform
4
follow the
on page 54 to display
Lock options.
Move the joystick
up or down to select "Custom."
M_vllz_
3
from Custom.
the steps 1 to 7 in "To select the rating"
the Parental
2
to be blocked
Make sure that "'Movie Ratings"
Move the joystick
press _..
I_ _1ii_t;0_
and press
9.
End:
is selected,
and press 6-
up or down to select the rating to be blocked,
and
The _ indicator automatically
appears beside the selected rating and all
"higher" ratings, indicating that the programs that match the ratings will
be blocked.
To unblock a rating, select it by moving the joystick up or down. then
press O. The indicator _ changes into "-" and all "lower" ratings are
unblocked.
(Continued)
57
Using the Menus
5
Move the joystick
left. then down. to select "TV Rating"
or _Program.
''
and press _..
6
The '_TV Rating"
setting menu appears.
7
Move the joystick
up or down to select the rating to be blocked,
and
press @.
The _ indicator
automatically
"higher" ratings,
be blocked.
indicating
appears beside the selected
that the programs
rating and all
that match the ratings
will
To unblock a rating, select it by moving the joystick up or down. then
press _i The indicator _ changes into "-" and all "lower" ratings are
tmbloekcd.
Some TV ratings have additional
content ratings
called "cxtenders."
The
extcnders are defined as follows: D (sexually suggestive Dialog), F'_
(Fantasy Violencel. L (coarse Language), S _Sexual situations _and "_
(Violence). By settin_ the extenders, you can define additional viewin_
limits. All of the extenders included in the selected ratings will be
blocked, lfyou wish to allow any of them to be viewed_ go to step b.
58
Using the Menus
8
Move the joystick
left or rigm [o select the extender
to be viewed,
and
press@
"" appears
prograthat
_nSn_atch
the
beside
extender
the selected
can be viewed.
extemtcr, indicating ttat the
lfscn[ress
_ again, r_ is displayed to show that the programs that
match the cxtcndcr will be blocked again.
9
Rcpeat step 8 for othcr extenders.
All programs tl_at match the ratings you selcct amt highcr, exccpt for the
_
that_ere _
will be _
1 OPrcss MENU to exit the menu screen.
59
Using the Menus
US custom rating options
If you selected U.S.A. as the country of residence on page 54. the Custom
Rating Menu includes the following options. (If you selected Canada. see
page 61.)
H
To ensure maximum
blocking capability, the
age-based ratings should
be blocked.
b._ If you choose to block
unrated TV programs.
please be aware that the
following programs may
be blocked: emergency
broadcasts, political
programs, sports, news
public service
announcements, religious
programs and weather.
Option
Description
Movie Rating
G
All children and General Audience.
PG
PG-13
Parental Guidance suggested.
Parental Guidance for children under 13.
R
Restricted viewing, parental guidance is suggested
for children under 17.
NC-17
and X
No one 17 and under allowed.
TV Rating
Age-Based
Blockprograms
TV-Y
All children.
by their rating,
content or both
TV-Y7
D_rected to older children.
TV-G
General Audience.
TV-PG
Parental Guidance suggested.
TV-14
Parents Strongl:, cautioned.
TV-MA
Mature Audience only.
Options
Content-Based
FV
Fantasl,
D
Suggestive
Violence.
Dialogue.
L
Strong
S
Sexual situations.
Language.
V
Violence.
Unrated
Block
Blocks all programs and movies that are broadcast
Blockprograms
or movies that
Allow
withou_ a ranng.
Allows programs and movies that are broadcast
are broadcast
without
6O
Options
a rating
without a rating,
Using the Menus
Canadian custom rating options
If you selected Canada as the country of residence on page 54, the Custom
Rating Menu includes the following options. (lfyou selected U.S.A.. see
page 60./
Option
English Rating
French Rating
USA Rating
Description
C
All children
C8+
Children 8 years and older,
G
PG
General programming.
Parental Guidance
14+
Viewers 14 and older.
18+
Adult programming,
G
General programming.
8 ans+
Not recommended for young children.
13 ans+
Not recommended
for ages under
13.
16 ans+
Not recommended
for ages under
16.
18 ans+
Programming
See "TV Rating"
restricted
¢0
to adults
on page 60 for details.
61
Using the Menus
Using the Timer Menu
To select the Timer menu
1
Press MENU.
2
Move the joystick
icon []
to the Timer
andpress
_,_.
To set the Current Time
1
Use the joystick
to select
"Current
then press @.
Time",
If it is currently Daylight Saving
Time. be sure to set the mode to
"ON" first.
3
Use the joystick
to enter the correct time. then press @.
4
Press MENU to exit the menu
screen.
To set the Timer
Before setting the timer, be sure to set your projection
current time and Daylight Saving Mode.
Movethejoystickto"Timer
Use the joystick
press
TV's clock to the
l" or "_Timer 2", then press
to enter your day, time and channel
C,_.
preferences,
then
_._ to select each one
Press MENU to exit the menu
screen.
To reset the Clock or Timers
Cl
Selecting Timer
Options
62
Press RESET on the remote control
Timer menu.
The Timer menu includes
the following
after selecting
that option in the
options:
Option
Description
Timer 1
Timer 2
Program
Select to set the Timer by day, time, duration.
and channel.
OFF
Select to turn off the Timer_ (Your previous
settings will be saved.
Current Time
Set the current time.
Daylight Saving
ON
Select in the spring to adiust the time during
Daylight Saving Time.
OFF
Select in the fall to adjust the time at the end of
Daylight Saving Time.
Using the Menus
Using the Setup Menu
To select the Setup Menu
1
Press MENU.
2
Move the joystick to the Setup
icon []
and press
3
Use the joystick
the features.
4
Press
_
feature's
5
_,_.
to scroll through
to select a feature.
options
Use the joystick
Thai
appear.
to scroll througn
the options.
Selecting
Setup Options
6
Press
_
to select the desired option.
1
Press MENU to exit the menu
The Setup menu includes
the following
Option
Description
Caption Vision
Allows
you to select
programs
opnons:
from three closed
that are broadcast
OFF
CC1
CC3
screen.
caption
with closed
Turns off Caption
CC2.
CC4
modes,
for
captionk
Vlslon.
Displays a printed version of the
dialog or sound effects of a program.
Should be set to CC1 for most
programs.
TEXT1.
TEXT2.
Displays
TEXT3.
TEXT4
presented using either half or the
whole screen ifavailable,
Forclosed
captioning,
XDS
"Extended
S,_rvice
Displays
Data
network/station
information
set to CCl.
a network
name,
name, program length,
show if the broadcaster
program
and time of the
offers this
service
(Continued)
63
Using the Menus
Option
Description
Video Label
Allows
you to label the audio/video
to the projectton
VIDEO.
components
TV so you can identify
When in the Setup menu's
the joystick
to highlight
Video
to select the component
to scroll through
yell connected
jacks on the back of your projection
not have a component
Label feature,
an input to label, then
select it. Use the joystick
connected
you connected
them when using TV
press
use
_
to
the labels, Press
@
to each of the input
TV, Select "Skip"
to a particular
if you do
set of input
jacks.
VIDEO
1/213/4
VIDEO
5/6
if you select
when
Language
[_To
use this feature
with widescreen DVDs
set your DVD player to
16:9 aspect ratio
16:9 Enhanced
"Skip",
VHS.
8mm. Beta. LD, Game,
DVD.
Web. Receiver.
DVD.
DTV. HD. Skip
your projection
TV skips this connection
Select to displa3
all on-screen
EspafioL
Provides
enhanced
picture
menus
in your language
resolution
for widescreen
such as selected DVD titles (onl 3 available
TV is m VIDEO mode,
Press TMNIDEO
of the following
of
Fran_ais.
sources
when the projection
and select from one
options:
To activate
automatically
signal is recmved.
64
SAT,
Skip
you press TV/V[DEO.
chome: English.
AUTO
DTV.
ON
To activate
OFF
To deactivate
manually.
manually.
when a 16:9
Programming
the Remote Control
The remote control
is preset to operate
Sony
Equipment
Switch Position
on Remote Control
Programmable
Code Number
Beta, ED Beta VCRs
AVI
303
8 mm VCR
AV2
302
VHS VCR
AV3
301
DVD Player
DVD
751
If you have video equipment
with the projection
program
other than Sony brand that you want to control
TV's remote control,
one code number
procedures
to
listed on page 67, select the three-digit
code for your component. If more than
is listed, start with the number
number to complete
the following
listed first. Use the code
procedure.
To program a cable box or a satellite receiver
I
I
use the following
the remote control.
From the "Manufacturer's
Codes"
code number for the manufacturer's
'2
Sony brand video equipment.
÷I
1
®"
control.
Press CODE SET inside the panel.
'_" _ _'_
i/,u
Open the panel of the remote
3
Close the panel and press SAT/CABLE (FUNCTON).
4
Enter the three-digit
5
Press ENTER.
6
To check if the code number
manuPacturer's
code number
using the 0-9 buttons.
"hi
3
works,
aim the projection
TV's remote
control at the component and press the green POWER button that
corresponds with that component.
If it responds, the programming
is
completed. If not, try using the other codes listed for that manufacturer.
(Continued)
65
Other Information
To program video equipment
-3
Open the panel of the remote control.
_}
Move the slide switch to the desired componcnt
3
Press CODE SET inside the panel
4
Close the pancl and enter the thrce-digit
rypc.
-2
I
I
1
m.== (÷_ =,_=
manufacturer's
code number
using the 0-9 buttons.
5
Press ENTER.
6
To check if the code number
works,
aim the projection
TV's remote
control at the component, open the panel, and press the green POWER
button, tfit responds, the programn_mg is completed. If not. try using
the other codes listed for that manufacturer.
®®®1
o
-4
-5
m
Tips
_t If more than one code number is listed, try entering them one bv one
until you come ro the correct code for your componem
66
[..I
tf you enter a new code number,
entered at that setting is erased.
the code number
yon previously
J
In some rare cases, you may not be able to operate your component with
the Sony remote control. In this case. use the component's
own remote
control unit.
Other Information
Manufacturer's
Codes
VC Rs
Manufacturer
Code
Sony
301
Admiral
327
M. Ward_
Manufacturer
Code
Manufacturer
Code
Mmolta
305. 304
Wards
Mltsubishi
MGA
323. 324. 325.
326
327. 328. 335.
331 332
Yamaha
314. 330. 336.
Multltech
325. 338. 321
337
NEC
314. 336. 337
Zenith
331
Alwa
338. 344
Olympic
309. 308
DVD Players
Audio Dynamic
314. 337
Opumus
Pan_somc
327
308. 309. 306.
307
Manufacturer
Code
Sony
751
Panasomc
753
Pemax
305. 304
Noneer
752
Philco
30_. 309
RCA
755
roshiba
75_
Broksomc
319.317
Canon
309. 308
Citizen
332
Uralg
302. 332
Criterion
315
Curtis Mathes
304. 338. 309
Daewoo
341. 312. 309
308. 309. 310
Pioneer
308
Quasar
308. 309. 306
RCA
PROSCAN
304. 305. 308.
Cable
O
Boxes
Manufacturer
Code
HamhrL_Regal
222. 223. 224.
225.226
/e_old/G.L
201.202.
203.
309.330.328.
204.205
206.
335.324.338
207. 208. 218
DBX
3N.
Dlmensla
304
Emerson
319. 320. 316.
317. 318. 341
Reahstm
Fisher
330.335
Sansm
314
Oak
227.228.
Funal
338
Samsun_
322.313.321
Panasomc
_oneer
219.220.221
214. 215
Scientific
209. 210.211
General
ElecWic
336, 337
Phihps
309.311.312.
313.310
329
329.304.
309
Sanyo
330.335
Go Video
Goldstar
322.339.
332
340
Scott
HitacN
30_.304.
305.338
312.313.321.
335.323.324.
32'.326
Sharp
327. 328
309.308
Shintom
315
Satellite
Code
801
802
Instant Replay
JC Penney
JVC
Kenwood
LXI
Sears/
Atlanta
lbcom
216.217
Zenith
212. 213
Receivers
309. 305.304.
33C.314.336.
Signature 2000
(M. Ward}
338. 327
Manufacturer
337
SV2000
338
Sony
General
314.336.337.
345.346.347
Sylvama
308.309
310
338.
Elecmc
Hitachi
805
Hughes
804
Panasomc
803
RCA
802. 808
314. 336. 332.
Symphonic
33_
337
Fashtro
332
332.305.330.
335.338
Fatung
314.336337
PROSCAN
l_ac
314.336.338.
337
ibshiba
Magnavox
308. 309. 310
Marantz
314. 336. 337
l_chnics
309. 308
Marta
332
Toshiba
312. 311
Memorex
309. 335
229
806. 807
67
o
Other
Information
Operating
Control
Operating
Other Components
a VCR
with Your Projection
TV Remote
Opcn thc pancl and movc the slidc switch to thc AV input you codcd for this
device.
To Do
This
Press
...
Turn on/off
green POWER button (inside the panel)
Change
OH +l-
channels
Record
and REC simultaneously,
Play
Stop
Fast forward
Rewind
Operating
Player
a DVD
the tape
Pause
II (press again to resume normal playbackl
Search the picture
forward or backward
or _
during playback
, release to resume normal playback)
Change
Slide switch
input mode
Open the panel and move the slide switch to the DVD input you coded for
this device.
To Do This _.
Press
1"urn on/off
green POWER
button
(inside
the panell
Play
Stop
•
Pause
l!
Step through different
an audio disc
tracks
Step through different
of a video disc
chapters
Display
the DVD menu
Select tracks
68
directly
of
I_
press agam to resume
to step forward
OH+ to step forward
or OH-
0-9 buttons
the menu/Setup)
MENU
Display
the DVD
DVD TITLE
Operate
the DVD menu
title
or _
DVD MENU
Display
t
normal
'1', _"', ""_', ENTER
playback)
to step backward
to step backward
Other Information
Operating
Box
a Cable
To Do
This
Turn on/off
SAT/CABLE (POWER'J
Select Cable Box
SAT/CABLE IFUNCTION
Select a channel
0-9 buttons. ENTER
Change
CH +/-
channels
Back to previous
Operating
Receiver
Press
_.
channel
JUMP
a Satellite
To Do This _.
Press
Fum on/off
SAT/CABLE (POWER_
Select Satellite
Receiver
SAT/CABLE (FUNCTION }
Select a channel
0-9 buttons ENTER
Change
CH +I-
channels
O
Back to previous
channel
JUMP
Display
channel
number
DISPLAY
Display
DBS guide
GUIDE
Display
DBS menu
MENU
Move highlight/cm_or/
Joystick
Select item
@
or arrows
69
Other Information
Troubleshooting
If, after reading
these
Sony television,
residents
only)
operating
please
or (416)
499-SONY
Problem
not
lit L
nO sound
you have additional
Information
(7669)
Possible
NO plcture
screen
instructions,
call our Customer
(Canadian
..I
Make sure the projectmn
Push the power
Check
button
picture
(screen
Try another
LJ
Fhe Parental
547
3
lfyour
good sound
setting
connected
channel.
Control
projection
is correct:
eqmpmem,
It could
be station
feature
is activated.
(7669)
(U.S.
Batteries
could be weak. Replace
3
Press TV IFUNCTION)
_1
LJ
Locate the projection
Check the orientation
U
Adjust
the Picture
TV's
€see "Using
tile Parent
Menu"
on page
your
Center.
the batteries.
power
your projection
cord is connected
TV.
securely
from fluorescent
to the wall outlet,
lights
in the Video menu. (see page 48)
again using
Automaticall
or6.
flashing,
Call your local Sony Servlce
Adjust the Brightness
setting in the Video menu.
Check antenna/cable
connections,
the convergence
TV, set to TV.
1.2.3.4.5
trouble,
TV at least 3-4 feet awa)
of the batteries.
setting
to the wall outlet,
when watching
set to VIDEO
when opermmg
sure the projection
AdJust
securely
TV.
TV does not turn on. and a red light keeps
.21
Convergence
I
FLASH
FLASH
(see page 48)
FOCUS.
FOCUS
TM
(see "'Adjusting
the
-" on page 331
L.21 Press MUTING so that "MUTING" disappears from the screen, i see page 34)
U
Make sure Speaker is set to ON in the Audio menu. Isee page 51 /
J
Check the MTS setting in the Audio menu _see "MTS" on page 50)
Cannot receive &gltal
when a DTV receiver
connec_eo
power cord is connected
TV ma_, need service.
LI
J
Good picture.
no sound
TV's
projection
htk
to the use of your
only).
on the front of the projection
to see if the TV/VIDEO
J
L£1 Make
Dark, poor or no
related
at 1-800-222-SONY
Remedies
and when watching
Remote control
does not operate
questions
Center
residents
LI
3
Services
channels
is
_
LI
Check
28.
the connections
between
_1
Check
your local listings
the DTV
receiver
and the projection
to find out if you can receive
digital
TV. Isee page
broadcasts
in your
_rea.
Cannot receive
UHF, when
upper channels
L_I
.1
Cable to OFF, <see page 52
Change
Use Auto Program
presently
usmg an antenna
in the Channel
m TV memory,
No color
L.21 Adjust
the Color
Only snow and noise
LA
_1
Check
Check
the Cable setting
the antenn',gcable
-I
Make sure the channel
.3
Press ANT to change
_1
Adjust
appear
Dotted
or stripes
on the screen
lines
[.21 Move
dryers.
7O
settings
menu to add receivable
channels
that are not
tsee page 53 )
in the Video menu.
in the Channel
connections.
is broadcasting
the input mode.
see page 48)
menu.
see "Cable"
on page 521
programs.
(see page 37t
the anterma.
the projectmn
TV away from noise
sources
such as cars. neon signs, or hair-
Other Information
Problem
Possible
Projection TV is fixed to one
channel
.1
LI
Double
images
.1
or ghosts
Remedies
Use Auto
Program
presently
m TV memory.
Check
your Channel
Use a highly
reflections
Cannot operate merit.
Cannot receive an3 channels
when using cable "IV
directional
volume
item you want to choose
the proJection
t.l
Use Auto
Program
presently
m TV memory.
Unable
channels
to select
Increase
a channel
.I
Cannot change channels
the remote control
with
_1
appears
Use Auto
the projection
the other
connected
..1
menu to add receivable
channels
that are not
and adjust
in the Channel
Program
see page 52/
the projection
screen
fhe master
password
temporarily
unblock
TV's
menu.
remote
control,
Then
O
volume.
see "Cable"
menu to add receivable
on page 52)
TV channels
that are
TV channels
that are
tsee page 53/
in the Channel
in TV memory.
In the password
menu.
menu to add receivable
(see page 53)
_see page 54/. enter the follouilng
clears your previous
password:
master
it cannot
password:
4357.
be used to
channels.
Be sure you have not inadvertently
switched
are using another
device
device to control
has been pressed,
Be sure the Video
Label
feature
You have selected
a text option
your projection
to change
channels,
or the slide switch
channels,
TV from channel
3 or
channels.
be sure the "function"
is set correct b
button
For example,
if
be sure to press SAT/CABLE.
has not been set to Skip.
tsee page 64
TV
U
page 63 to reset Setup selections]
screen
Gaption
Vision option.
instead of Text I-4
There
it.
to
There is a black box on the
is no twin
J [k_[ StatiC
select
of the cable box using the cable box's
you are using your cable to control
cycle through
by
(see page 53)
m TV memory,
for that device
vMeo eqmpment
is caused
on again
is set to ON in the Channel
Program
Use Auto
lfyou
(when the problem
m gray, you cannot
power offand
4 setting if you are using another
.I
Cannot
or a cable
or tall buildings).
in the Channel
the volume
not presently
Lost password
anterma
Make sure Cable is set to ON in the Channel
t_l
that are not
your cable settings.
not presently
receive
TV's
press TV (FUNCTION)
t_l
channels
(see page 53/
mountains
rum
.1
Channel Index does not display
all available charmels
Cannot
outdoor
from nearby
Make sure Cable
gain enough
Fix settings.
lithe
when using a cable box
menu to add receivable
(see page 53)
.1
U
Check
Cannot
in the Channel
picture
or it is
in the Setup menu and no text is available.,
To turn this feature
If you were trying
to get closed
_1
Be sure your twin picture
[..1
You may be tuned to a vMeo input with nothing
through
£wm
off. select
OFF
captioning,
is set to a video source/channel
connected
see
in the
select
CG1
that has a program
alring.
to it. Try cycling
your vtdeo inputs using W/VIDEO.
View is not set to receive
a signal
from the AUX input, if you have
connected
a VCR. DVD player or satellite
projection
TV. it will not show in the second picture,
receiver
to the AUX input on the
(Continued)
71
Other Information
Problem
Possible
I get the same program
window
picture
in the
J
as in the main
picture
Remedies
Both may be set to the same channel.
picture
J
or the window
You may be running
_nl'y unscramble
possible,
all your charmels
get maything
channels
in my second
Favorite
display
Chaanel
but TV
run a direct
does nor
sources
Be sure the video
menu
.1
yotu- choices
Some video
Veri_
do not
LI
Ensure
channels
in either
the main
a cable
cable to your projection
provides
box. The cable box will
use the Twin View feature,
TV's VHF/UHF
an unscrambled
input. (This will
signal.)
labe! has not ueen set to skip your video inputs
See the Setup
on page 63.
that Favorite
"'Favorite
appear when you press TV
VIDEO
72
.1
picture
through
one mgnal at a time. so you cannot
_nly work if your cable system
I cannot
Tiy changing
picture.
Channel"
Channel
is set to Manual
in the Channel
menu.
_see
on page 52)
that Video Label is not set to SKIP
_see "Video
Label"
on page 64)
if
Other Information
Specifications
Projection system
Picture ]_be
3 picture
ProJection
High performance,
large
diameter h) 9rid lens F1.1
lenses
Antenna
_i_levision System
Screen size measured diagonally)
Channel
VHF
75 ohm external
NTSC.
horizontal
American
in-line
system
tubes,
6.3 raster
size), with optical
terminal for VHFfUHF
TV Standar(
43 inches
_KP-43HT2a_
53 inches
IKP-53HS20.
KP-53HS30_
61 inches
,KP-61HS20.
KP-6IHS30_
Coverage
2-13
UHF
14-69
CAT_
1-125
Power
tubes. 3 lenses
7-inch high-brightness
monochrome
coupling and liquid cooling system
Reqmrements
O
121}v. 60 Hz
Number
of inputs/Outputs
Video
IN/
1 Vp-p, 75 ohms unbalanced,
S Video ONt
3
sync negahve
Y: 1 Vp-p, 75 ohms unbalanced,
sync
rlegat!ve
Audio
C: 0.286 Vp-p (Burst signal). 75 ohrm
500 mVrms, 100% modulation
(IN',
Impedance:
AUDIO
tVAR/FIX'
OUT
TV Out
i
500 mVrms,
a70 ohms
47 kiloohms
100 % modulation),
1
[ Vp-p, 75 ohms unbalanced,
CONTROL
S/IN/OUT)
1
mmijacks
Component
Video input
2 (Y, PI3, P10
Y: 1.0 Vp-p,
negahve
PB: 0.7 Vp-p,
impedance:
sync negahve
75 ohms unbalanced,
sync
75 ohms
PR: 0.7 Vp-p, 75 ohms
RF Inputs
_onvel'ter
(Continued)
73
Other Information
Supplied Accessories
Remote Control
AA R6_ Batteries
Optional Accessories
AV Cable
Audio Cable
Control S Cable
RM-Y908
2 supplied for remote control
VMC-810/820/830
HG
RKC-515HG
RK-G69HG
Component Video Cable
AV recmver
TV Stand
VMC-10/30
Speaker Outpul
20 W × 2 (KP-43HT20.
KP-53HS30.
18 W x 2 (KP-53HS20.
KP-61HS2C,
Dimensions
,W
× H x D/
HG
STR-V555ES
SU-43HT4/43HT5
38 x 42 % x 224/3 inches
46 % × 55 7/_ × 25 inches,
KP-61HS3C,
(965 × 1.069
1.i 80
x 577 mm, ,KP-43HT2C
1.417 x 632 nmlI (KP-53HS20.
KP-
53HS30_
54 × 61 _/2 x 26 % inches
(i.370
x 1.560 x 666 mm,
,KP-61HS20.
61HS30,
Mass
119 Ib 8 oz (54.2 kg,
152 lb 9 oz (69.2 kg,
KP-43HT20
KP-53HS20.
157 ib (71.2 kg) tKP-53HS30,
203 lb 11 o2 (92A kg/(KP-61HS2(n
210 Ib 5 oz (95.4 kg,
Power
KP-61HS30,
Consumpnon
In Use
230 W
In Standby
Under
1W
Design and specifications are subject to change without notice.
74
KP-
Index
16:9 _widescreen)
8. 64
CineMotion.
DRC 35. 49
Closed caption modes 63
A
CODE
Activating a Twin View screen 41
Adding channels to the channel list 53
Adjusting audio. Steady Sound 50
ANT button 34
Color temperature,
B
Balance. adjusting 50
Bass. adjusting 50
Batteries. inserting in rcmmc 10
Bilingual audio 50
Blocking programs. See Ratings.
Brightness, adjusting 48
C
Cable
senmg ON/OFF 52
with VCR. connecting 19
Cable box
connecting with VCR 20
using with TV remote control 69
Camcorder. connecting 29
Caption Vision 63
CATV. See cable.
Channel Index
described 9
using 45
Channel list. adding channels 53
Channel menu 47. 52
Channel Skip/Add
Charmels
53
Auto Program 53
creaung labels 53
setting u,_ 32
adjusting 48
Audio receiver 25
AV receiver 30
Cable box "17. 18. 20
Cable or antenna 16
Camcorder 29
25
Auto Program tchannel setup) 32, 53
Auto Setup 32, 53
AV receiver, cormecting to TV OUT 15
36
Color. adjusting 48
Connecting
Antenna. connecting
Aspect ratio, 16:9 in Twin View 42
Audio menu 47. 50
Audio receiver, connecnng
Audio/Video
cable 12
SET button
Digital TV Receiver 28
DVD player 26, 27
Satellite receiver 23. 24
VCR 20--22. 24
Connector Types 12
Contents of box 10
CONTROL
S 31
Convergence,
adjusting
autonYatically
33
D
Daylight saving 62
Digital Reality Creation 49
DigttaI TV
connecting 28
watching 39
Digital TV program 39
Digital TV receiver, comlecnng
DISPLAY button 34
28
Display, turning off 34
DRC (Digital Reality Creation) Mode. described
DRCA31NEMOTION
button 35
DVD MENU button 36
8
DVD player
using with TV remote control 68
wlrh A/V connectors, cormecung 27
with component video connectors, connecting 26
DVD TITLE button 36
Enhanced
Enlarging
Extended
picture resolution.
16:9 64
pictures, in Twin View 43
Data Service 63
(Contmuedi
75
F
MTS/SAP
Favorite Channel
auto 52
described 8
manual 52
setting up 52
using 40
FAVORITES
button
Features 8
Flash Focus
described 9
performing 33
FREEZE button 34
MTS/SAP. using 38
Muting, using 37
P
Parent menu 47. 54
Parental control_ described
34
Freeze. using 37, 44
Front Panel Controls 13
FUNCTION buttons tWHITD
Picture
contrast,
adjustmg
48
Picture size. adjusting in Twin View 43
POWER button 36
POWER buttons (GREEN) 35
35
Presetting
Problems.
channels 32
troubleshooting
70
R
Hookups 16
Hue. adjusting
48
I
Inputs. labelin_ 64
Installation of the prol ection TV 16-31
J
34
Jump, using 37
L
Label
channels 53
video inputs 64
Locking programs 54
M
MENU button 35
Menus
Audio 47. 50
Channel 47. 52
Parem 47
Setup 47. 63
Timer 47. 62
Video 47. 48
MODE
Movie 38
Pro 38
Standard 38
Vivid 38
76
8
Password. changing 56
PIC MODE button 34
H
JUMP button
button 36
Ranngs
setting 54--56
viewing blocked programs 56
Rear panel controls and connections
Remote control
14. 15
buttons inside panel 36
t-'unction of buttons 37
msemng batteries 10
programming 65--67
Remote control, operating other eontponents
Cable box 69
DVD player 68
Satellite receiver 69
VCR 68
Removing channels
RESET button 34
from the channel
Resetting
Audio optmns 50
Timer options 62
VMeo options 48
S
S Video cable 12
SAT/CABLE
function
SAT/CABLE
power
Satellite receiver
button
35
button 35
cormectmg 23
using with TV remote control 69
Setting up channels 32
Setup menu 47. 63
Sharpness, adjusting 48
SLEEP button 34
list 53
with
Sleep, using 38
Specifications
73-74
Steady Sound
adjusting 50
described 8
Surround sound 50
SYSTEM OFF button
36
T
Tape-to-tape
editing 22
Time
set current 62
set daylight saving 62
Timer menu 47. 62
Timer setting 62
Treble. adjusting 50
Troubleshooting
70
TV function button 35
TV power buiton 35
TV/V1DEO button 35
Twin View TM
activating a picture 41
described 8
using 41
V
VCR
connecting two, for tape editing 22
using with TV remote control 68
with cable box. connecting 20
with cable, connecting 1,9
with satellite receiver, connecting 24
Video inputs, labeling 64
Video menu 47. 48
Video Modes. selecting 48
Viewing area. recommended
VOL +/button
34
VOL +/buttons
37
11
W
Widescreen
Widescreen.
64
described
8
Z
Zoom feature, with Twin View 43
77
If. after reading this instruction manual, you
have additional questions related to the use of
your Sony projection TV. please call one of the
following numbers €English only),
Customers in the continental United
States contact the Direct Response
Center at:
http:/hvww.world.sony.com/
Printed in U.S.A.
1-800-222-SONY {7669)
Customers in Canada contact the
Customer Relations Center at:
(4161 499.SONY (7669)