1
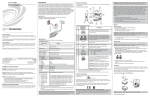
Crestron Isys® TPS-4L
3.6-Inch Wall Mount Touchpanel
7.
Tighten the mounting screws evenly and only enough to compress the
mounting clips and secure the TPS-4L squarely in the mounting surface. Do
not over tighten the screws.
NOTE: If it becomes necessary to remove the touchpanel from the mounting
surface, the original mounting clips cannot be reused to remount the touchpanel.
Additional mounting clips are available in the Mounting Kit WMKB-4L identified in
“Mounting Options” on page 11.
Installing the Bezel
Use the Crestron Engraver software package to obtain a custom-engraved bezel for
the TPS-4L. Install the bezel as follows.
1.
Carefully position the bezel over the face of the touchpanel.
2.
Ensure that the bezel is oriented properly and press against the TPS-4L until
the bezel snaps into place.
Touchpanel Removal
If it is necessary to remove the touchpanel after it has been installed into a mounting
surface, complete the following steps in the order provided to remove the
touchpanel. The only tool required is a #2 Phillips tip screwdriver.
1.
Lift one edge of the bezel to free it from the touchpanel, and lift it off. Do
not apply excessive pressure to the touchscreen.
2.
Loosen and remove the screws that secure touchpanel to the mounting
option in use.
3.
Using equal pressure, carefully remove the touchpanel from the opening.
If necessary, secure and label the attached cables before disconnecting them from the
back of the touchpanel.
Hardware Hookup
NOTE: To prevent overheating, do not operate this product in an area that exceeds
the environmental temperature range listed in the specifications table. Consideration
must be given if installed in a closed or multi-unit rack assembly, inside a closed
desk, or in a closed podium since the operating ambient temperature of these
environments may be greater than the room ambient. Contact with thermal insulating
materials should be avoided on all sides of the unit.
Connect the Device
Make the necessary connections as called out in the illustration on the next page.
Refer to “Network Wiring” on page 7 before attaching the 4-position terminal block
connector. Apply power after all connections have been made.
When making connections to theTPS-4L use Crestron power supplies for Crestron
equipment.
Operations & Installation Guide – DOC. 6449A
3.6-Inch Wall Mount Touchpanel: TPS-4L • 15