1
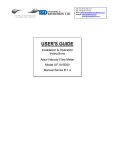
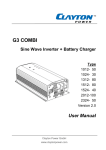
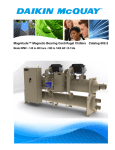
EN Installation manual (Boilers with printed circuit board type 585) 40C Gas boiler for Heating E40C 2011 585 E Coopra Advanced Heating Technologies Installation manual E40C CHAPTER 4. COMMISSIONING …………...…….. 20 4.1. Supply connection 4.2. Mains switch 4.3. Burner situation 4.3.1. Burner is on 4.3.2. Burner is off 4.4. Water pressure 4.5. Gas / Air Ratio 4.6.1. Full load 4.6.2. Low load 4.7. Changing over to LPG (G30/G31) 4.7.1. Full load on LPG (G30) 4.7.2. Low load on LPG (G30) 4.7.3. Labelling CONTENTS CHAPTER 1. GENERAL ……………….………….. 3 Use of application General safety regulations Environmental conditions Water quality Standards / Guidelines Conditions of delivery 1.1. Display …………………………………….…….. 4 1.2. PCB configuration 1.3. Operation indications 1.3.1. Normal state 1.3.2. Blocking state 1.3.3. Lock-out state 1.4. Menu Structure 1.4.1. View mode 1.5. Dimensional sketch 1.5.1. Technical data 1.5.2. Boiler components 1.6. Connection diagram 1.7. Operation 1.8. Boiler types 1.8.1. Coopra 40C 1.8.2. Technical characteristic 1.9. Electricity connection 1.10. Configuration of flue tube and air supply 1.10.1. Permitted flue resistance Type 40 1.11. Circulation pumps 1.11.1. Boiler pump 1.11.2. Secondary system pump CHAPTER 5. BURNER DEMAND and MONITORING ……………………………………………………….... 23 5.1. Standby 5.2. Pre purge 5.3. Ignition 5.4. In operation 5.5. Post-purge 5.6. Pump after run 5.7. Lock-out 5.8. Frost protection 5.9. System pressure monitoring 5.10. Flue temperature sensor 5.11. Limiter 5.12. Glow plug protection CHAPTER 6. PERIODICAL MAINTENANCE …….. 25 6.1. Check the CO2 percentage on full load 6.2. Check the heat input 6.3. Clean the condensation water drain 6.4. Check the ionisation current 6.5. Water pressure 6.6. Service mode CHAPTER 2. INSTALLATION …………………….. 15 2.1. Mounting the assembly bracket 2.2. Water and gas connections 2.2.1. Gas connection 2.2.2. Water connections 2.2.3. Safety valve and Draconin connection 2.3. Expansion vessel 2.4. Filling and draining device 2.5. Dirt filter 2.6. Differential bypass valve 2.7. Unpacking the boiler 2.8. Fitting the flue tube and air supply 2.8.1. Connecting flue and air (2-pipe system) 2.8.2. Connecting flue/air adapter (80/125 mm) 2.8.3. Connecting flue/air adapter (60/100 mm) 2.9. Suspension 2.10. Green connector block CHAPTER 7. MALFUNCTIONS …..………...…….. 26 7.1. Serial connection 7.2. No signal on the display 7.3. Boiler does not respond to heat demand 7.4. Fitting instructions for the pressure sensor 7.5. Fitting instructions for the safety valve 7.6. Malfunction code 'F' (flashing) 7.6.1. Gas control will not open (no voltage) 7.6.2. Gas control will not open (gas inlet pressure high) 7.6.3. Gas control will not open (coils defective) 7.6.4. Check function of gas control 7.6.5. Check glow plug (no ignition) 7.6.6. Check the fan impedance 7.6.7. Gas/air mixture is not correctly adjusted 7.6.8. Inspection ionisation probe 7.6.9. Temperature sensors CHAPTER 3. REGULATIONS ……………..…….. 18 3.1. Central heating regulations 3.1.1. Modulation on flow sensor 3.1.2. Modulation on return sensor 3.1.3. Modulation on system sensor 3.2. Thermotats 3.2.1. On/off room thermostat 3.2.2. OpenTherm control 3.2.3. 0÷10V control 3.2.4. Outdoor sensor CE-Certificate ………………..……………………… 28 2 Coopra Advanced Heating Technologies Installation manual E40C CHAPTER 1. GENERAL Use of application The appliance is not intended for use by persons (including children) with reduced physical, sensory or mental capabilities, or lack of experience and knowledge, unless they have been given supervision or instruction concerning use of the appliance by a person responsible for their safety. Children should be supervised to ensure that they do not play with the appliance. General safety regulations The installation may only be performed by a recognised installer. Take note that internal parts of the boiler can carry a dangerous electrical voltage (230 Volt). Take note that the boiler, the various pipes and the flue gas exhausted by the boiler can reach high temperatures (up to 90°C). Before carrying out maintenance activities in or on the boiler, you must close the gas tap, switch off the electricity supply and pull the mains plug out of the socket Environmental conditions The area in which the boiler is installed must satisfy the applicable regulations. The wall must be able to bear the weight of the boiler (loaded weight approx. 40 kg). If you use a different assembly surface than a bricky wall of sufficient thickness, you must select suitable fixtures yourself and properly install the boiler. The boiler may not be fitted in a chemically aggressive environment. The boiler with air feed and flue gas exhaust satisfies the requirements of protection class IP44 and may therefore be installed in a wet area. Although the boiler is fitted with an internal frost protection, it may not be exposed to extremely low ambient temperatures (lower than -10°C). Water quality Fill the system with tap water. The composition and quality of the system water has a direct effect on the performance of the total system and the life of the boiler. At own risk is the addition and use of chemicals, water softeners, oxygen binders, de-aerators, aerators and water filters as they increase the chance of malfunctions. Generally, the build-up of undesired deposits can lead to leakages with fatal damage. No warranty when corrosive elements of certain additives have attacked the boiler. Regulations applicable to hot water Ask for the locally applicable regulations at the local water company as they are different in some areas. Standards / Guidelines With the installation of the boiler, all local regulations must be followed, where applicable, including the provisions of the following standards and guidelines: • Building Regulations • Regulations for natural gas installations • Regulations for LPG (if applicable) • Guidelines for existing gas installations • Safety requirements for heating installations • Safety provisions for low voltage installations • General regulations for drinking water installations • Water authority regulations • Ventilation in dwellings • Supply of combustion air and exhaust • House sewerage in homes and dwellings • Fire Brigade regulations • Factory Act regulations Conditions of delivery Coopra Advanced Heating Technologies b.v. supplies its products according to the general conditions of delivery for the metal and electro technical industry. Registered with the Clerk of the District Court at Den Haag on 19 October 1998 under no. 119/1998. 3 Coopra Advanced Heating Technologies Installation manual E40C 1.3. Operation indications To protect the system from the result of failures and/or excessive conditions, several protection functions are implemented. 1.1. Display Open the door of the casing for display operation. On the Status display is the status indication shown. On the 3 right segments, the Reading display, values of the temperature, pressure, etc are shown. Status 1.3.1. Normal state The boiler is stand-by or heating. During heating the burner may be switched off temporarily when the regulated water temperature is above setpoint. Reading 1.3.2. Blocking state Blocking protection is used when a certain condition must block the system during this condition, but when this condition is not valid anymore, the system automatically may run normal again. A blocking state is indicated by a fixed letter or number on the Status display. Depending on the blocking state the Reading display is used normal or can have extra information regarding the blocking state. The blocking state cannot be reset by the user. The control automatically goes to normal state when the conditions are normal again. (-) button (+) button Set/Reset Push-buttons from left to right: MIN, PLUS and Set/Reset Left of the Status display is a LED informing the situation of the boiler. LED is ON = burner is ON LED is OFF = burner is OFF LED is FLASHING = boiler is in LOCK-OUT 1.3.3. Lock-out state Lock-out protection is used when a certain condition must lock the system until the user resets the system. These conditions are often more safety related then blocking conditions. A lockout state is indicated by a blinking letter or number on the left display character position. Depending on the lockout state, the right characters of the display are empty or have extra information regarding the lockout state. Right of the Reading display is a LED, active for TWIN boilers only. 1.2. PCB configuration Parameter A=2 is for single boilers 15B; 15C; 37K; 37B; 37C and also 40C Parameter A=1 is for TWIN boiler 80C; set as SLAVE Parameter A=0 is for TWIN boiler 80C; set as MASTER The Alarm output is active, and the running LED on the display left hand side blinks. To reset the system after a lock-out, press and hold the Set/Reset button for more than 1 second. Some lock-out situations can only be removed by power restoration. Parameter H is to set for correct type of application. Note: With repeating failures in short period of time always let your installer or maintenance man check and repair unconditionally. 4 Coopra Advanced Heating Technologies Status Reading Installation manual E40C 1.3.1. Normal state (continuous code) P With initialisation and after restoration of supply power de-aeration programme runs for 2 minutes. The boiler pump and 3-way valve (if applicable) switch several times, with the purpose to move eventual air out of the boiler; burner off 0 Stand-by (no heat demand) C Heating heat demand, temperature above setpoint, burner off C. Heating heat demand, temperature below setpoint, burner on J Heating heat demand, 3 minutes anti-cycling time, burner off c Pump after run heating mode, burner off d DHW heat demand, temperature return sensor of Combi-boiler above setpoint, burner off d. DHW heat demand, temperature return sensor of Combi-boiler below setpoint, burner on b HWS heat demand, temperature external cylinder above setpoint, burner off b. HWS heat demand, temperature external cylinder below setpoint, burner on o Frost protection 8°C; burner off, pump on o. Frost protection 3°C; burner on, pump on C Chimney sweeper function (ionisation current on the right hand segments) flashing Status Reading 1.3.2. Blocking state (continuous code) 2 Return sensor temperature 5°C above flow sensor temperature, pump on, burner off 6 Combi boiler internal tank sensor not connected or open (parameter H=01) 6. Combi boiler internal tank sensor shortcut fault (parameter H=01) 9 Flow or return sensor temperature > 95°C A Flue gas sensor temperature > 100°C b/r Hot water on right unit of TWIN boiler E No SLAVE connected / PCB is set as MASTER, (parameter A=0) SLA/01 No MASTER connected / PCB is set as SLAVE, (parameter A=1) P Water pressure low or high, display shows ‘P’+ pressure t Outdoor sensor summer switch on, burner off, (parameter O/t) Status Reading 1 1.3.3. Lock-out state (flashing code) 1 Max delta temperature, differential temperature between flow and return sensor limits 50°C Boiler does not pass temperature test. After burner start the flow sensor must rise 3°C more in temperature than return sensor within 20 seconds (after 3 start attempts follows lock-out) 2 Flame signal lost 3 times during operation 5 Fan speed error (fan speed deviates > 30% from the speed setpoint) 8 Flame signal detected with closed gas valve 9 Eeprom programmed (to reset press the Set/Reset button) A Flue gas temperature > 100°C for more then 3 times within 30 minutes E Internal regulation fault / A/D conversion fault (depending type of error display shows ‘E’ or “EEE”) E t1 Flow sensor open or shortcut fault E t2 Return sensor open or shortcut fault E t3 Flue gas sensor open or shortcut fault F Too many (4 times) consecutive start attempts H Flow or return sensor temperature > 105°C O Safety limiter contact is open (no limiter on this boiler, contacts bridged) 5 Coopra Advanced Heating Technologies Installation manual E40C 1.4. Menu structure To enter the menu structure press and hold the Set/Reset button for longer than 10 seconds. The menu mode opens with the password mode h=10. To unlock menu structure make h=18, use the (+) and (-) buttons. To go to the first parameter press the Set/Reset button. To change the parameter value, use the (+) and (-) buttons. To go to the next parameter press the Set/Reset button. To save altered parameter settings, walk through the complete menu with the Set/Reset button until normal status indication appears. Timeout: When inside the menu structure the keys are untouched for 3 minutes, the system will switch back to the normal status indication. Settings are not saved. Menu structure Status Description parameter h Password protected To unlock menu structure make h=18 C Heating max. flow temperature C/r Modulation option O P Heating pump after run Heating max input A Boiler application H Type of application Range 10 - 99 h=10 25 - 90°C 0 = Regulation on flow sensor (default) 1 = Regulation on return sensor or regulation on system sensor 1 - 25 min; CO=24uur 45 - 100 % (fan 1800 – 5400 rpm) 82°C d t b (1) (1) (2) Setpoint temperature (Combi boiler) Hold temperature internal tank Setpoint temperature storage cylinder 2=Standalone (for single boiler) 1=Slave (for TWIN right hand PCB) 0=Master (for TWIN left hand PCB) 00 = Adjustment for heating only 01 = Combi-boiler (with internal DHW tank) 02 = HWS storage cylinder 12kOhm (use for large volume cylinders) 03 = HWS storage cylinder 10kOhm (use for large volume cylinders) 04 = HWS storage cylinder 12kOhm (use for small volume cylinders) 40°C - 65°C 40°C - 65°C 25°C - 70°C O/b O/S O/d O/t (3) (3) (3) (3) Basic temperature Slope Day reference temperature Outdoor summer switch temperature 10 - 90°C 01 - 99 10 - 90°C 1 - 50°C Return to “Factory setting” Press (+) button for at least 5 seconds Note: some settings do not return r u Configuration 0÷10V input Factory setting 0 5 min 100 % 2 01 60°C 40°C 60°C 40°C 20 40°C 40°C = factory setting = customised setting 0 = Regulation on temperature 1 = Regulation on boiler output 01 = power mode (input 14,6 kW – 74,0 kW) 00 = comfort mode (input 7,3 kW – 74,0 kW) o (4) Configuration of TWIN F (2) Storage cylinder max flow temperature 65 - 90°C 0 01 85°C 00 = automatic S Configuration pump (2-stage pump regulation) = pump always high = pump always low Notes: (1) Active when H=1; (2) Active when H=2 or H=3 or H=4; (3) Active with outdoor sensor; (4) TWIN only 6 00 Coopra Advanced Heating Technologies Installation manual E40C 1.4.1. View mode At the end of the menu structure, the view mode is shown. The view mode is a reading only entry; no parameters can be changed in here. The view mode is to enter directly. Press the (+) button for at least 10 seconds. First upcoming is the water pressure P / u; in the Reading display on the right hand segments is the actual water pressure in bar. Press the Set/Reset button to next parameter. To switch out of the view mode press the (-) button shortly or after timeout. When the keys are untouched for 3 minutes, the system will switch out of the view mode automatically. View mode Single boiler Status P/u ﬤ/u 1/u 2/u 3/u 4/u 5/u 6/u 7/u 9/u A/u d/u Description Actual water pressure left hand unit (in bar) Setpoint temperature on flow sensor (in °C) (parameter C/r = 0) Setpoint temperature on return or system sensor (in °C) (parameter C/r = 1) Actual flow sensor temperature (in °C) Actual return sensor temperature (in °C) 0÷10V control (in Volt) Outdoor sensor temperature (in °C) Combi-boiler internal tank or external storage cylinder temperature (in °C) Flue gas sensor temperature (in °C) Flame signal (in µA DC) Last lock-out Last blocking Actual system sensor temperature (in °C) (parameter C/r=1) 7 Coopra Advanced Heating Technologies Installation manual E40C 1.5. Dimensional sketch Dimensions in mm Free Space There must be sufficient space at the top and bottom to be able to suspend the unit and to be able to connect all feed and drain pipes. Normally, roughly 300 mm is required. It is recommended to leave a free space of 150 mm on the left (for servicing reasons) and 50 mm on the right of the unit. The front of the unit must be easily accessible for servicing at all times. 8 Coopra Advanced Heating Technologies Installation manual E40C 1.5.1. Technical data Boiler type 40C natural gas G20 Gas type Electrical data Dimensions and weight Gas technical data Mains voltage / Frequency 230 V / 50 Hz Power consumption (max.) 144 W Automatic recognition of thermostat connection (potential free contact) Height 700 mm Width 360 mm Depth 300 mm Weight 35 kg Heat input CH (gross) 8.1 – 41.1 kW Heat input CH (net) 7.3 – 37.0 kW Nominal output CH at 80/60ºC 7.2 – 36.0 kW Nominal output CH at 50/30ºC 7.9 – 37.9 kW Efficiency at 80/60ºC (net) Low load = 98.7 %; High load = 97.2 % Efficiency at 50/30ºC (net) Low load = 108.4 %; High load = 104.2 % 8.2% - 8.8% Emission value CO (0% 02) on low-high fire Connections 8.2% - 8.8% 10 – 30 ppm at 80/60ºC < 70ºC at 50/30ºC < 35ºC Air feed and flue tube together 85 Pa Gas Ø 15 mm CH (flow and return) Ø 20 mm Overflow Ø 15 mm Air feed and flue tube system 2-pipe system Boiler primary heat exchanger Water contents 0,8 L Max. temperature 90°C Max. Water pressure 3 bar Sound level Certification Ø 60 – Ø 60 mm or Ø 80 – Ø 80 mm Concentric system Ø 60 / 100 mm or Ø 80 / 125 mm Pump high 40 dB(A) Pump low 30 dB(A) CE Identification number CE0063-AT3070 35C power reduced boiler to meet Italian market Boiler type Gas type natural gas G20 natural gas G25 LPG G30/G31 20 mbar 25 mbar 37/50 mbar Nominal gas pressure Gas technical data 9.2% - 9.8% 12 – 100 ppm NOX (0% O2) on low-high fire Maximum chimney resistance LPG G30/G31 on/off thermostat or OpenTherm control CO2 on low-high fire Flue gastemperature natural gas G25 Heat input CH (gross) 8.1 – 38.5 kW Heat input CH (net) 7.3 – 34.7 kW Nominal output CH at 80/60ºC 7.2 – 33.7 kW Nominal output CH at 50/30ºC 7.9 – 36.1 kW Efficiency at 80/60ºC (net) Low load = 98.7 %; High load = 97.2 % Efficiency at 50/30ºC (net) Low load = 108.3 %; High load = 104.1 % 9 Coopra Advanced Heating Technologies Installation manual E40C 1.5.2. Boiler components No 1 3 6 7 8 9 10 11 12 13 14 15 16 18 20 21 22 23 24 Description Primary heat exchanger Pump Glow plug Ionisation probe Burner type 30/40 Vapour tray Gas valve Fan Venturi type 40 Water pressure sensor Return sensor Flow sensor Safety device Flue gas sensor Type plate Condensation water overflow Gas connection Central heating return connection Central heating flow connection 10 Coopra Advanced Heating Technologies Installation manual E40C 1.6. Connection diagram (general) SITGroup CONNECTION DIAGRAM S.I.T. Controls B.V. Type :BIC-0.585.303 -T CN11-2 Outside temp (S4) CN7 CN11--9 -T Inlet temp (S2) CN12-4 CN12-10 MMI 0.585.503 -T Outlet temp (S1) *CN3-6 CN12-9 L', high *CN3-5 CN11-5 CN11-12 Optional (S7) L' CN1-5 CN12-3 Pump H/L *CN3-3 L', low *CN3-4 Tank temp (S6) Flue temp (S5) CN11-1 CN11-8 CN1-4 N CN4-6 PE PWM CN10-9 CN10-18 -T CN12-6 Pump PWM GND CN12-12 24 V CN12-5 DHW temp (S3) CN12-11 24 V in Water pressure sensor GND + 0÷10 V input GND BIC 0.585.303 CN14-3 -T Indication Alarm CN14-1 CN14-2 Running CN12-2 CN12-1 CN12-7 CN1-2 L' CN1-1 N CN1-3 CN4-3 L'' L' CN5-10 CN11-3 CN11-10 Gas valve N' CN5-9 PE CN4-4 Safety limit thermostat (S7) Three way valve PE CN10-1 CN10-10 PC connection L' CN1-7 CN15 Pump 2 GND A RS 485 Twin / Zone B GND L N CN4-5 PE CN2-5 L1 V+ CN2-3 CN2-1 CN2-2 CN11-6 OpenTherm CN1-6 CN11-13 V- CN2-4 L2 CN11-7 CN11-14 CN4-2 PE CN11-12 CN8 CN5-2 N CN5-1 PE CN4-1 Fan Hall CN5-5 CN5-6 HSI IO BURNER *) simultaneous activation of both relays must be avoided 100507 C Optional sensor (S7) added 100115 091110 B Water pressure switch replaced by sensor A New Revision board 303 11 D ATE : 07-05-10 D R AW N : EV EV SC A LE : 1:1 U N IT : n.a. EV FILE : PAG E 058 5303 _A S E .mkd EV CO PY RIG HT ACCO RDI NG TO LAW : Coopra Advanced Heating Technologies Installation manual E40C 1.7. Operation 1.8.2. Technical characteristic Boiler type 40 burner Burner ports 130 mm Sset02, Burner type30/40 venturi A fan sucks the air required for the combustion through the air feed canal (A). Because the combustion air in the venturi sucks an under pressure, the correct amount of gas (G) is automatically added to the combustion air. The flammable gas/air mixture thus obtained is fed to the burner, via a mixing chamber, to be ignited at the surface of the burner by a ceramic glow plug. The hot combustion gases are efficiently fed through the heat exchanger, where they give their heat to the water. The flue gases are fed outside, through the flue tube (F), into a flue tube exhaust canal. The condensation water (H2O) thus obtained is discharged into the sewer. Diameter inlet 25 mm Sset51, Venturi type 40 1.8. Boiler types The Coopra boiler is a heating unit with compact dimensions and a very high efficiency, with versions for domestic use for heating or in combination with domestic hot water. The type plate, which specifies the type of gas etc. to be used, for which the boiler is set, is on the left side of the boiler. The boiler is fixed to the wall with the aid of a separately delivered assembly bracket or rear cabinet. 1.8.1. Coopra 40C High efficiency boiler for heating only 12 Coopra Advanced Heating Technologies Installation manual E40C 1.9. Electricity connection There must be an electrical outlet with Earth connection available at a maximum distance of 1 m from the boiler. The electricity connection (230 VAC) must consist of Line, Neutral and Earth A good Earth connection is a requirement for good operation of the boiler. 1.10. Configuration of flue tube and air supply The boilers are approved for appliance types: B23, C13(x), C33(x), C43(x), C53, C63(x), C83(x). Preferably use flue tube materials, roof ducts and exterior wall ducts with a quality mark. The material of the flue gas exhaust pipe must be of stainless steel or plastic, suited for exhaust gases with a maximum temperature of 120°C. 1.10.1. Permitted flue resistance Type 40 The total resistance of the flue tube and air supply together may not be greater than 85 Pa. Indication for the resistance values given in table below apply to 3 - Flue exhaust flow rate of 61 m /hour (at 70°C) 3 - Supply air flow rate of 48 m /hour (at 20°C) Ø 100 mm Ø 80 mm Type 40 (35) Tube per metre 2,5 Pa 5.0 Pa Bend 90°, R = 1.5 D 3.0 Pa 6.0 Pa Bend 90°, R = 0.5 D 5.0 Pa 10.0 Pa Bend 45°, R = 1.5 D 2.0 Pa 4.0 Pa Bend 45°, R = 0.5 D 3.5 Pa 7.0 Pa 20.0 Pa 30.0 Pa Roof duct 13 Coopra Advanced Heating Technologies Installation manual E40C 1.11. Circulation pumps 1.11.2. Secondary system pump 1.11.1. Boiler pump If the capacity of the unit pumps is insufficient, an extra external system pump can be installed with the appliance. If set in the menu on automatic function (parametermenu setting) the electronics switches the speed of the pump to “high” or “low”, depending on the temperature demand: • Dt > 30 °C : the pump runs „high speed“. • Dt < 10 °C : the pump runs „low speed“. Dt = Setpoint temperature deducted with the actual Flow temperature. Earth N L 1 3 2 You must connect the secondary system pump to ports 1, 2, and 3 of the connector block, mounted on the electronics casing. 0,8 The absorbed current consumption of the secondary system pump may be maximum 275 W (1,2 Amp). Pump state high 0,7 Pressure [bar] 0,6 0,5 Pump state low 0,4 0,3 Boiler resistance 0,2 0,1 0 0 0,2 0,4 0,6 0,8 1,0 1,2 1,4 1,6 1,8 2,0 2,2 2,4 2,6 2,8 3,0 Flow [m³/h)] Characteristic and the resistance graph of boiler pump. On command of the printed circuit board, an external second system-pump will switch with the internal boilerpump simultaneously. Note the internal pump will switch high/low/off (2-stage) while the external pump will switch on/off (1-stage). 14 Coopra Advanced Heating Technologies Installation manual E40C 2.2. Water and gas connections CHAPTER 2. INSTALLATION 2.1. Mounting the assembly bracket 1 75 40 4 3 2 2 1 1 = Heating return 2 = Heating flow 3 = Gas connection 4 = Draconin connection To mount the assembly bracket on a brick wall of sufficient thickness, use the screw plugs that are supplied. When you have determined the place of assembly, proceed as follows: 2.2.1. Gas connection - Connect the gas pipe to connection (7) - Install the gas pipe stress free. - Include an approved stopcock in the pipe. - Carefully blow the gas pipe clean. - Draw the position of the hole (1) in the strap of the assembly bracket. - Use a masonry drill of 8 mm diameter to drill a hole with a sufficient depth in the wall. - Keep the hole (1) in the assembly bracket in front of the hole in the wall and fit one of the screws supplied through the assembly bracket in the hole. - Align the assembly bracket with the aid of a spirit level. - Use a masonry drill of 8 mm diameter to drill holes with a sufficient depth in the wall through the two bottom holes (2) in the assembly bracket. - Fit two of the screws supplied in the bottom holes. - Fix the assembly bracket firmly by tightening all screws. 2.2.2. Heating water connections - Connect the heating return pipe to connection (1) - Connect the heating flow pipe to connection (2) - Install a filling and draining device in the heating system. - Stopcocks must be fitted in the heating return pipe (1) and the heating flow pipe (2). - The heating return pipe (1) must be fitted with a suitable expansion vessel. - If it may be expected that the heating water will be severely contaminated by under floor heating, fitting is a 2 kg dirt filter in the return pipe is recommended. Coopra cannot give a guarantee for damage to the unit that is caused by dirt in the system. - A differential bypass valve must be installed on plants where it may happen that various radiators are simultaneously excluded from the circuit because of closure of control or zone valves. - Before connecting the unit, rinse the system completely to remove all contamination. 15 Coopra Advanced Heating Technologies Installation manual E40C 2.4. Filling and draining device 2.2.3. Safety valve and Draconian connection The boiler has been provided with electronics that block the burner at a water pressure of 3.5 bar. When the water pressure rises further the safety valve will open at a water pressure of 3.7 bar. The discharge (4) under the boiler should determinate facing downwards exterior to the building in a position where discharging water will not create danger or nuisance but remains in a visible position. Install a filling and draining device in the heating system. There must be a connection for the removal of the condensation water to the drain. This connection must be fitted with a trap to prevent smell problems. A tundish connection must be made because of possible overpressure or under pressure in the drain. Fit the condensation drain pipe (8) (inner diameter 40 mm minimum) several centimeters left of the gas pipe. 2.5. Dirt filter If it may be expected that the heating water will be severely contaminated by under floor heating, fitting a 2 kg dirt fine filter in the return pipe is recommended. With this, possible contamination of the heating water is prevented from ending up in one of the units. Coopra cannot give any guarantee for damage to the unit that is caused by dirt in the system. Example of PermaTrade “dirt filter” type PT-FM-25W 2.3. Expansion vessel In the heating return pipe, as near as to the boiler, an expansion vessel must be fitted. The size of the expansion vessel must be determined on the basis of the heating water temperature and the total water content the installation contains. 2.6. Differential bypass valve A differential bypass valve must be installed on plants where it may happen that various heating units (radiators) are simultaneously excluded from the circuit because of the closure of control or zone valves. It ensures a recirculation proportional to the number of shut off valves, thus avoiding noise and keeping the pump pressure steady. Example of Emmeti “Expansion vessel” The pre-pressure depends on the installation height above the mounted expansion vessel. 5 meters - 0,5 bar 10 meters - 1,0 bar 15 meters - 1,5 bar Example of Caleffi “Bypass valve” type 519500 (¾”) Mounting: The differential by-pass valve must be mounted in the installation between the flow and the return piping. It may be mounted both horizontally and vertically, provided that flow direction indicated by arrow is respected. Adjustment: Rotate knob on the desired value of the graduated scale. The values correspond to the meters of pump head (m H2O). The advised knob setting is 2.53.0. Lock the screw on the groove knob. 16 Coopra Advanced Heating Technologies Installation manual E40C 2.9. Suspension Place an O-ring in the middle of each of the connections present. Remove the sealing caps from the pipes of the boiler. Keep the boiler straight against the wall at about 5 cm above the site of the mounted assembly bracket or the assembly cabinet. Press the boiler into the guide and let it drop carefully, so that the hook on the suspension bracket falls into the opening at the rear of the boiler and the pins at the bottom of the boiler fall in the corresponding openings in the suspension bracket. Here, the connection pipes of the boiler fall over the connection points of the suspension bracket. Firmly tighten the union nuts of each of the connections present with the aid of a spanner SLW 30, starting from the right hand side. 2.7. Unpacking the boiler Before unpacking the boiler, check whether the type of gas to be used corresponds with the specification on the packing. If you have any questions, contact your supplier. To prevent back injury, take account of the fact that the weight of the boiler is roughly 35 kg. 2.8. Fitting the flue tube and air supply 2.10. Green connector block The connections of the green connection block (righthand side, down under the boiler) are all volt-free contacts. Therefore, do not connect voltage onto them ! 2.8.1. Connecting flue and air 2-pipe system When the flue tube and air supply are connected eccentrically, proceed as follows: Fit the flue adapter in the boiler flue gas pipe and check weather the flue adapter seals in the sealing ring of the boiler flue gas outlet. Connect the flue channel to the flue adapter. Fit the air supply pipe in the rubber bellows and seal with the hose clip. 2.8.2. Connecting flue and air Concentric adapter 80/125 mm When the flue tube and air supply are connected concentrically, proceed as follows: Fit the 80/125 mm adapter onto the boiler before you place the boiler. After you have placed the boiler, fit the concentric flue/air pipes onto the 80/125 mm adapter. 2.8.3. Connecting flue and air Concentric adapter (60 / 100 mm) When the flue tube and air supply are connected concentrically, proceed as follows: Fit the 60/100 mm adapter onto the boiler before you place the boiler. After you have placed the boiler, fit the concentric pipes onto the 60/100 mm adapter. 17 orange Ports (1) - (2) Connection for On/off (room)thermostat or OpenTherm control (automatic recognition) yellow Ports (3) - (4) Connection for outdoor sensor of 12 kOhm green Ports (5) - (6) Connection for storage cylinder with sensor of 10 kOhm or sensor 12kOhm or on/off cylinder thermostat Coopra Advanced Heating Technologies Installation manual E40C 3.1.3. Modulation on system sensor CHAPTER 3. REGULATIONS 3.1. Central heating regulations 3.1.1. Modulation on flow sensor System sensor Parameter C/r=0 (default) 4 The regulation on flow sensor is between 25“C and the value of parameter C. In the menu structure you can set the maximum permitted boiler flow temperature with parameter C (default 82“C). 5 You must connect the system sensor, NTC of 12kOhm @ 25°C, to ports 4 and 5 of the connector block, mounted on the electronics casing. Set in the menu structure parameter C/r=1 The regulation on system sensor is between 24“C and the value of parameter C. In the menu structure you can set the maximum permitted system temperature with parameter C (default 82“C). The burner blocks when the maximum permitted boiler flow temperature (parameter C) is reached. 3.1.2. Modulation on return sensor - The burner blocks when the maximum permitted system temperature (parameter C – parameter C/r) is reached. - The burner blocks also when the boiler flow sensor or boiler return sensor reaches a temperature of 90°C, whatever parameter C has been set to. 3.2. Thermostats 3.2.1. On/off room thermostat You must connect the on/off thermostat to the green connector block ports (1) (2) The setpoint is made by the ’on-time’ and the ‘off-time’ of the room thermostat. Set in the menu structure parameter C/r=1 The regulation on return sensor is between 24“C and the value of parameter C. In the menu structure you can set the maximum permitted boiler return temperature with parameter C (default 82“C). Increasing setpoint With heat demand the thermostat is closed and the setpoint (desired boiler temperature) rises at a rate of 6°C per minute from 25’C until the maximum permitted temperature is reached (parameter C). - The burner blocks when the maximum permitted boiler return temperature (parameter C – parameter C/r) is reached. - The burner blocks also when the boiler flow sensor reaches a temperature of 90°C, whatever parameter C has been set to. Falling setpoint With end of heat demand is the thermostat open and the setpoint falls at a rate of 3°C per minute to the minimum heating temperature of 25°C. 18 Coopra Advanced Heating Technologies Installation manual E40C 3.2.4. Outdoor sensor When using the outdoor sensor the option of OpenTherm control expires. When using the outdoor sensor the option of 0÷10V control expires. 3.2.2. OpenTherm control You must connect the OpenTherm control to the green connector block ports (1) - (2) Connect the outdoor sensor (NTC of 12kOhm @ 25°C) to the green connector block ports (3) - (4) The setpoint is calculated by the actual ambient temperature and the temperature set. The OpenTherm control sends the setpoint value to the boiler. Take in account by placing the sensor that sunshine can influence the reading temperature of the outdoor sensor significantly. The setpoint is calculated by the actual outdoor temperature and in the menu structure adjustable parameters. The outdoor sensor sends the setpoint value to the boiler. OpenTherm control with outdoor sensor. The value of the outdoor sensor (connected to the green connector block ports 3-4) is sent to the PCB. The PCB passes on the outdoor sensor value to the OpenTherm control, which calculates the setpoint with the value of the outdoor sensor and sends the setpoint to the boiler. 3.2.3. 0÷10V control Ports (1) - (2) of the green connector block must be open. 0÷10V control 6 You must connect the 0÷10V control to of the connector block, mounted on the electronics casing ports 6 and 7 Parameter C: Maximal flow temperature (default 82°C). Parameter O/b: Minimal flow temperature (default 40°C). Parameter O/S: Slope, the change of flow temperature depending on the outside temperature (default 20 = 2:1). Parameter O/d: This parameter sets specific point; the flow temperature at outdoor temperature of 20°C (default 40°C). Parameter O/t: Summer/winter switch blocks the burner on ports (1) – (2) of the green connector block when the outdoor temperature is above the O/t-value (default 40°C). The burner is off. After the after run time also the pump is off. On the status display is a permanent t 7 In the menu structure you can set the configuration either on temperature or on heating power (parameter u). The 0÷10V control sends the setpoint value to the boiler. 19 Coopra Advanced Heating Technologies Installation manual E40C 4.4. Water pressure Check the water pressure; top up and de-aerate as necessary. CHAPTER 4. COMMISSIONING 4.1. supply connection If the boiler is provided with a supply cord and a plug the appliance must be positioned so that the plug is accessible. If the boiler is not provided with a supply cord without a plug the supply must have a contact separation of at least 3 mm in all poles. If the supply cord is damaged, it must be replaced by the service agent or similarly person in order to avoid a hazard. If the water pressure in the installation falls below 0,5 bar the Status display shows a continuous P and the right hand display shows the actual water pressure in bar. Solution: Fill the system with domestic water. The working range of the boiler is between 0,5 and 3,5 bar. With lower and higher water pressures the burner is off. The boiler is blocked and gives no heat. Reading water pressure To read the actual water pressure press the (+) button for at least 10 seconds. De electrical connection (230 VAC) must have a good Phase, Zero and Earth. The Earth is absolutely necessary for the function of the appliance. If you do not have the required supply connection, in that case it must be made. Press the (-) button briefly to return to normal mode. Time-out: Automatic return to normal operation after 3 minutes. 4.2. Mains switch To power up the appliance the mains switch, positioned down under the boiler, must be switched on and light up. Filling - Fill the system with domestic drinking water. - Fully open all radiator taps. - Connect the water supply tube to the filling and draining device in the central heating system. - Fill the water supply tube with water. - Let the air in the water supply tube escape; because you want to fill the system with water instead air. - Connect the fully filled water supply tube to the water tap. - Open both water taps with caution and fill the system. - Advised is a fill pressure between 1,5-2,0 bar. - Close, after filling, the filling tap and remove the water supply tube. - After filling, the installation must be vented. De-aeration program After restoration of supply power, both the boiler pump and 3-way valve are switched several times with the purpose to move eventual air out of the boiler. The de-aeration program lasts for 2 minutes. During de-aeration time the burner is off. To read the water pressure press the (+) button for at least 10 seconds Venting Follow instructions of your installer of how to vent the system elements of the installation. - Take care all pumps are off. Running water can move the air through the system constantly. - During the venting process you also may put the appliance mains switch in the supply cable off. - Open the air bleed cocks of the radiators one at a time. Use an air bleed key for this. As soon as water comes out of the air bleed cock, shut the cock off again. - Air in the boiler can cause a malfunction of the boiler. Vent the boiler, the HWS hot water cylinder or internal tank of Combi-boiler. - After venting of the system, the appliance and pumps must be connected to the mains and be switched on. 4.3. Burner situation 4.3.1. Burner is on - When the thermostat is closed (heat demand) - and when the actual flow temperature is 5°C below the setpoint - and with no maximum temperature blocking - and after 3 minutes anti-reciprocal time, if applicable. 4.3.2. Burner is off - When the thermostat is open (end of heat demand) - or when the actual flow temperature is 3°C above the setpoint (C on status display) - or with maximum temperature blocking. The actual temperature is 3°C above the maximum permissible flowor return temperature. 20 Coopra Advanced Heating Technologies Installation manual E40C 4.6.1. Full load 4.5. Gas / Air Ratio Activate the chimney sweeper function on full load Read the CO2 value on the analyser. If the value does not correspond with the value in the "CO2 setting" table, carefully adjust the venturi screw (1). ATTENTION VENTURI ADJUSTMENT SCREW ! • Turning the venturi screw clockwise to decrease the CO2 value (less gas) • Turning the venturi screw anti-clockwise to increase the CO2 value (more gas) (1). Venturi screw – Full load adjustment Turn the venturi screw anti-clockwise to increase the CO2 value, clockwise to decrease it. (2). Gas control screw – Low load adjustment Turn the screw anti-clockwise to decrease the CO2 value on low load, clockwise to increase it. (3). Cover screw CHECK THE ADJUSTMENT: Distance between Venturi-screw and the Top of the venturi-stud is an indication: 12.5 mm for natural gas G25 14.0 mm for natural gas G20 16,5 mm for LPG gas G30/G31 IMPORTANT ! The exact adjustment has always to be made using the CO2 analysing method as described 4.6.2. Low load below. Activate the chimney sweeper function on low load 4.6. Flue gas analysis (CO2 adjustment) The gas control is set in the factory to the type of gas to be used. This type of gas is stated on the packing and on the identification plate. To check the setting, you have to make a flue gas analysis. Read the CO2 value on the analyser. If the value does not correspond with the value in the "CO2 setting" table, carefully adjust the gas control adjusting screw (2). To do this, temporarily remove the cap (3) with the Proceed as follows Remove the measuring cap from the flue tube. Fit the measurement probe of a flue gas analyser (CO2 analyser) in the measurement opening of the flue tube canal. Make sure there is sufficient heat dissipation through the aid of a Torx screwdriver. ATTENTION GAS CONTROL ADJUSTING SCREW ! • Turning the venturi screw clockwise to increase the CO2 value (more gas) • Turning the venturi screw anti-clockwise to decrease the CO2 value (less gas) heating. CO2 setting At full load At low load Natural gas (G20, G25) between 8,8-9.4 % CO2 between 8,2-8,6 % CO2 Butane (G30) 9,8 % CO2 9,2 % CO2 The adjustment with the gas control adjusting screw is very sensitive. Hardly any turn makes a large change in the CO2 value. 21 Coopra Advanced Heating Technologies Installation manual E40C 4.7. Changing over to LPG (G30/G31) 4.7.2. Low load on LPG (G30) Activate the chimney sweeper function on low load FIRST: Turn the venturi adjusting screw fully clockwise until it blocks. On LPG the adjustment must start from the situation „No-Gas“. Check the CO2-value at low load on Butane G30 (9,2% CO2). If the gas control is already properly adjusted for natural gas, then the low load will not need to be adjusted. Be aware that a boiler set on natural gas will give with LPG an explosion in the burner, damaging the mixing plates. Proceed as follows: When needed: Re-adjust the gas control screw until the correct value is reached. Please note the adjustment with the gas control adjusting screw is very sensitive. Hardly any turn makes a large change in the CO2 value. Fit a flue gas analyser (CO2 analyser) in the measurement opening of the flue tube. ATTENTION CO2 setting At full load At low load Butane (G30) 9,8 % CO2 9,2 % CO2 GAS CONTROL ADJUSTING SCREW ! • Turning the venturi screw clockwise to increase the CO2 value (more gas) • Turning the venturi screw anti-clockwise to decrease the CO2 value (less gas) 4.7.1. Full load on LPG (G30) Activate the chimney sweeper function on full load In first instance the burner does not start, because the gas supply is blocked by the venture screw turned fully clockwise on its seat. When the venturi adjusting screw (1) blocks on its seat, gas flow is blocked. 4.7.3. Labelling After changing over to LPG gas, label the boiler corresponding the new setting. ATTENTION VENTURI ADJUSTMENT SCREW! • Turning the venturi screw clockwise to decrease the CO2 value (less gas) • Turning the venturi screw anti-clockwise to increase the CO2 value (more gas) - Unscrew the venturi adjusting screw half a turn anticlockwise. Try to start the appliance using chimney sweeper function. - Unscrew the venturi adjusting screw another half a full turn anti-clockwise. Try to start the appliance. - Repeat till the boiler starts. IMPORTANT! A guide for the dimension from the top of the screw to the top of the support is 16,5 mm for LPG (G30/G31) Read the CO2 value on the flue gas analyser. If the value does not correspond with the value for Butane G30 (9, 8 % CO2), carefully adjust the venturi screw until the correct value is obtained. 22 Coopra Advanced Heating Technologies Installation manual E40C CHAPTER 5. BURNER DEMAND and MONITORING 5.1 Standby 2.2 Pre purge 5.3 Ignition 5.4 In operation 5.5 Post purge 5.6 Pump after run 5.1 Standby heat demand fan gas valve glow plug ionisation pump t=0sec t=3sec t=7sec t<12sec 5.1. Standby Fan off - Gas valve on - Glow plug off - Ionisation off Gas valve: The gas valve is still closed during pre-purge time During the standby, a check is made to see if there is burner demand. If so the boiler will go over to pre rise. If the glow plug counter is too high (the boiler made too many starts repeatedly) the regulation blocks the burner demand. Once per hour, if there is no heat demand, the difference between flow and return temperatures must be less than ± 5°C. If this is not the case, the pump will be switched on and a check will be made for a maximum of 10 minutes to see whether the temperature difference goes to within ± 5°C. Glow plug: The glow plug is switched on for the last part of the pre-purge time. Pump: The pump is running, controlled by the heat demand of the firmware. 5.3. Ignition Fan on - Gas valve on - Glow plug on/off - Ionisation off/on Fan: The fan is running at the ignition speed (2900 rpm). If a false flame signal is detected during standby for more than 5 seconds, the regulation runs into lock-out, flashing indication ‘8’: Gas valve: The gas valve is on and allows gas to flow. Glow plug: The glow plug is on, till an ionisation signal is measured. If there is no ionisation at the end of the safety time, a new attempt at ignition will be made if this was not the last permitted (third) attempt at starting. The safetytime is defined as the time that the gas valve is allowed to be opened without the flame necessarily being present. 5.2. Pre purge Fan on - Gas valve on - Glow plug on - Ionisation off The pre-purge time is defined as the time that it takes for the fan to be in the range of the setpoint value for a fixed amount of time. The ramp-up of the fan speed is not part of the pre-purge time. 5.4. In operation Fan on - Gas valve on - Glow plug off - Ionisation on To ensure the water flow through the heat exchanger a 20 second temperature test is activated. After each burner start the flow temperature must rise 3°C more than the return temperature within the first 20 seconds. If the temperature rise is less than 3°C, the burner is started again after 10 seconds. If this occurs more than three times within a heat demand, the regulation runs into lock-out, flashing indication ‘1’. The difference between flow and return temperatures must be less than 20°C before each burner start. Fan: The fan is switched on at purging speed (1800 rpm). After a few seconds, the fan goes from purging speed to the faster ignition speed (2900 rpm). When the measured fan speed deviates from the desired speed the regulation blocks. When this situation lasts for more than 60 seconds, the regulation runs into lock-out, flashing indication ‘5’. If the return temperature becomes 5°C above the flow temperature, the regulation blocks. The burner remains blocked until the temperature difference becomes correct. 23 Coopra Advanced Heating Technologies Installation manual E40C This block is automatically removed when the water pressure goes above 0,6 bar. Fan: For the first 10 seconds of this state the fan is running at the ignition speed (2900 rpm). After that time the heat demand program defines the fan speed. If the water pressure is greater than 3.5 bar, the regulation blocks with a ‘P’ and actual water pressure on the display. The status shows alternately the ‘P’ and the normal status on the display. This block is automatically removed when the water pressure goes below 3.4 bar. Ionisation: If the ionisation fails, a restart is made, providing this is not the third time within the burner demand. If this is the third time, the regulation runs into lock-out, flashing indication ‘2’. Fan: At end of heat demand (burner stop) the regulation runs into post-purge. The fan runs at the last demanded speed. 5.10. Flue temperature sensor If the flue gas temperature sensor becomes above 100°C, the burner is blocked (off). The display status is continuous ‘A’. When the flue gas temperature goes below 80°C, the blocking action will be removed automatically. Pump: The pump is controlled by the heat demand of the firmware. If the flue gas temperature goes above 105°C, the regulation runs into lock-out, flashing indication ‘A’ 5.6. Pump after run Fan off - Gas valve off - Glow plug off - Ionisation off If the flue temperature sensor measures a temperature below –25°C, the regulation runs into lock-out, flashing indication ‘4’ 5.5. Post-purge Fan on - Gas valve off - Glow plug off - Ionisation off Pump: The pump remains running, mixing the system water for a certain period of time. 5.11. Limiter If the flow temperature goes above 105°C, when the burner is off, the regulation will lock with a continuous ‘H’. Burner action is restored automatically when the actual flow temperature is 5°C below the setpoint (default 82°C). 5.7. Lock-out Fan on/off - Gas valve off - Glow plug off - Ionisation off - Alarm contact on A “lock-out” situation can be reset by pressing the Set/Reset button on the display for more then 1 second. If the flow temperature goes above 105°C, when the burner is on, the regulation will lock-out with a flashing ‘H’. Fan: At the beginning of being in this state the fan is running (2700 rpm), only if the reason was a temperature problem. After a fixed time of 1 minute, the fan switches off. 5.12. Glow plug protection The glow plug protection counter is incremented at each ignition. This counter is decremented per minute. If this counter is too high burner start is delayed to protect the glow plug for overheating by to many start attempts repeatedly. Pump: The pump is running over the central heating circuit at high speed. The 3-way valve (if applicable) was directed in position of central heating circuit. Alarm: The alarm on the display is on (flashing LED). 5.8. Frost protection If the flow sensor temperature becomes below 8°C (and if there is no heat demand) the pump is on and runs over the heating circuit. The display shows continuous ‘o’. If the flow temperature goes below 3°C, the burner is on in low load. When the return sensor temperature is above 10°C, the frost protection is finished. When an outdoor temperature sensor is connected to the boiler and the outside temperature becomes below –4°C, the pump is on and runs over the heating circuit. This situation is removed at an outside temperature of –2°C. 5.9. System pressure monitoring The boiler is in working mode when the system water pressure is between 0,5 and 3.5 bar. If the water pressure is less than 0,5 bar (low level), the regulation blocks with a ‘P’ and actual water pressure on the display. The status shows alternately the ‘P’ and the normal status on the display. 24 Coopra Advanced Heating Technologies Installation manual E40C 6.4. Check the ionisation current The ionisation current (in µA DC) can be read on the display directly with the chimney sweeper function. CHAPTER 6. PERIODICAL MAINTENANCE High voltage !!! Full load: Correct ionisation current 3 µA DC to 8 µA DC Low load: Correct ionisation current 1,5 µA DC to 8 µA DC The wiring of the pump, the three-way valve, fan and wiring of the gas control can be under high voltage of 230 Volt. With insufficient ionisation current check the ionisation probe. When the ionisation rod is filthy or has an insulating layer, simply clean the probe with fine sandpaper. After the first year, have a recognised installer or maintenance man to inspect the boiler. He should be ascertaining the maintenance deadline on the basis of the inspection and circumstances. The condensation water drain must be cleaned each second year 6.5. Water pressure Check the water pressure by pressing the plus (+) button more than 10 seconds. On the display comes up the actual water pressure in bar. 6.1. Check the CO2 percentage on full load The nominal value for natural gas at full load is 8.8% CO2 (chimney sweeper function). The boiler does not need to be cleaned if the measured CO2 percentage at full load is within 8.8% CO2 and 9.4% CO2. The working range is between 0,5 and 3,5 bar. If needed top up with domestic water, fill and vent. Advised fill pressure is between 1,5-2,0 bar. 6.6. Service mode This function, for service purposes only, has priority over both the central heating and hot water regulations. Maximum flow temperature with this mode is 85°C Maximum service time is 10 minutes. 6.2. Check the heat input A load drop can be the consequence of a clogged boiler, flue gas channel, heat exchanger, or air intake channel. Check whether this is the case by measuring the heat input on high load (chimney The chimney sweeper function is activated by simultaneously pressing the plus (+) and the min (-) buttons of the display for more than 10 seconds. The actual ionisation current can be seen on the right hand Segments of the display. sweeper function). If the gas consumption equals (-10%) the nominal heat input, then the boiler works normally. There is no clogging. Press the (-) button briefly to go to low load 6.3. Clean the condensation water drain Press the (+) button briefly to go to high load Always clean the trap (siphon). Clean the drain each second year. There is an opening for this purpose on the top of the vapour tray. First remove the rubber sealing plug; rinse the vapour tray and drain with clean tap water. When no more impurities are removed, the vapour tray is clean. 25 Coopra Advanced Heating Technologies Installation manual E40C 7.4. Fitting instructions for the pressure sensor The seal is made with a “0”-ring. The pressure sensor must only be tightened slightly more than hand tight. CHAPTER 7. MALFUNCTIONS 7.5. Fitting instructions for the safety valve The safety valve must be tightened with a torque of 10 Nm. High voltage !!! 230 Volt The wiring of the pump, the three-way valve, fan and wiring of the gas block can be under high voltage. 7.6. Malfunction code 'F' (flashing) After three failed attempts in a row, the boiler will lock (flashing 'F'). 7.1. Serial connection A PC or Laptop can be connected for an extensive diagnosis and display of the functionality. This can have very different causes: • no gas • no ignition • bad flame formation • bad ionisation current 7.6.1. Gas control will not open (no voltage) BE CAREFUL !!! 210 VDC The necessary cable, with an opto-isolator (opt coupler), and the software kit can be ordered at Coopra separately. If the gas control is not connected, the Manager will see this at the beginning of the heat demand as a malfunction and therefore lock. To measure the voltage on the gas control, the gas control must remain connected. During the starting period, the gas control is connected to a voltage of 210 VDC. 7.2. No signal on the display When there is no signal on the display, power fails. Check the mains voltage of 230 VAC and check whether the on/off switch on the bottom of the boiler is switched on. Check the glass fuse(s) of the printed circuit board. 7.6.2. Gas control will not open (gas inlet pressure too high) The gas pressure in the gas pipe before the gas control is too high. The safety valves of the gas control cannot open with gas pressures of >60 mbar. 7.3. Boiler does not respond to central heating heat demand Is the parameter for the type of boiler correctly set in the menu structure? Parameter H=0 H=1 H=2 H=3 H=4 Application Central heating 15C/37C/40C (not for hot water) Combi-boiler 37K (not for TWIN, standalone only) Boiler 15/37B for external HWS cylinder sensor 12kOhm (large volume cylinders) Boiler 15/37B for external HWS cylinder sensor 10kOhm (large volume cylinders) Boiler 15/37B for external HWS cylinder sensor 12kOhm (small volume cylinders) • • • 7.6.3. Gas control will not open (coils defective) The electrical coils of the gas control are burnt out and the safety valves of the gas control will therefore not open. (not for TWIN, stand-alone only) H=5 open the inlet pressure nipple of the gas control connect the pressure meter measure the gas pressure (10 - 50 mbar) Not active (not for central heating and not hot water) The two outermost contacts on the gas valve should be measured for resistance. The value of the multimeter should be at ambient temperature of 20’C about 4.1 kOhm. 26 Coopra Advanced Heating Technologies Installation manual E40C 7.6.7. Gas/air mixture is not correctly adjusted See the chapter concerning the adjustment full load and low load. 7.6.4. Check function of gas control 7.6.8. Inspection ionisation probe/cleaning - open the outlet pressure nipple of the gas valve - connect the pressure gauge to the outlet pressure nipple - measure the outlet pressure (zero) - start heat demand (chimney sweeper function) - first, the fan will pre-purge at 1800 rpm - next, the fan runs at the ignition speed of 2900 rpm. - now, the pressure gauge will indicate an under pressure of approximately 3 mbar - the same moment the gas valve opens, the zero governor makes zero gas pressure. - if not, then the gas control is not functioning. Unplug the plug of the ionisation probe (low voltage). Remove the two screws from the ionisation clamp. Remove the ionisation probe from the lid of the heating unit. Check the ionisation probe. The ionisation probe must be straight and clean (a slight deposit is normal). Clean or replace the ionisation probe. 7.6.5. Check glow plug (no ignition) 7.6.9. Temperature sensors The temperature sensors are NTC thermistors of 12kOhm (@ ambient of 25‘C). BE CAREFUL !!! 230 VAC The 230 volt glow plug is in order if the measured resistance at room temperature is about 1.0 - 1.4 kOhm. Replacing the glow plug The glow plug is a resistance through which current is fed. As a result of the high temperature of the glow plug, the burner can be ignited. This makes the glow plug a part that wears. The average life of the glow plug is estimated at 8 years, depending on the number of starts and on the variation of the mains voltage. • remove plug from glow plug (230 V high voltage) • remove glow plug from cover of heating unit • replace glow plug 7.6.6. Check the fan impedance Check the resistance of the coil, the two outermost contacts on the fan motor. The value that the multimeter shows must be between 115 and 120 Ohms at room temperature. 27 Coopra Advanced Heating Technologies Installation manual E40C 28 Coopra Advanced Heating Technologies Installation manual E40C 29 Coopra Advanced Heating Technologies Installation manual E40C 30 Coopra Advanced Heating Technologies Installation manual E40C 31 Coopra Advanced Heating Technologies Installation manual E40C 2011 Coopra Advanced Heating Technologies b.v. All rights reserved. Nothing from this document may be duplicated and/or made public by means of printing, photocopy, microfilm or in any other way without prior written permission from the manufacturer. This also applies to the appropriate drawings and/or diagrams. The information supplied in this document is based on general data with regard to constructions, material characteristics and working methods known at the time of going to print. Therefore, we reserve the right to make changes without notification. For this reason, the instructions given serve only as a guideline for the installation, use and maintenance of the boiler shown on the cover of this document. This document is valid for the boiler in its standard version. Therefore, the manufacturer cannot be held liable for any damage arising from specifications that deviate from the standard version of the boiler delivered to you. This document has been compiled with all possible care. However, the manufacturer cannot be held liable for any mistakes in this document or for any consequences. Take the time to read this document carefully before installing or using the boiler. Always keep this document near the boiler. COOPRA Advanced Heating Technologies b.v. Vierlinghstraat 14 3316 EL Dordrecht Tel: +31 78 6530835 Fax: +31 78 6530833 Email: [email protected] Internet: www.coopra-aht.nl 32