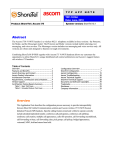
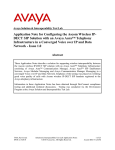
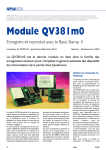
1
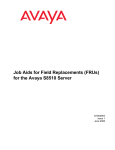
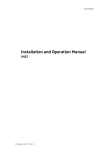
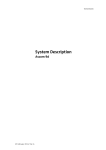
Avaya Solution & Interoperability Test Lab
Application Note for Configuring the Ascom Wireless IPDECT SIP Solution with Avaya Communication Manager,
Avaya SIP Enablement Services, Avaya IA 770 INTUITY
AUDIX and Avaya Modular Messaging - Issue 1.0
Abstract
These Application Notes describe a solution for supporting wireless interoperability between
the Ascom wireless IP-DECT SIP solution and Avaya Communication Manager, Avaya SIP
Enablement Services, Avaya IA 770 INTUITY AUDIX and Avaya Modular Messaging.
Emphasis of the testing was placed on verifying good voice quality on calls from and to
Ascom wireless IP-DECT SIP handsets registered to the Avaya telephony infrastructure.
Information in these Application Notes has been obtained through compliance testing and
additional technical discussions. Testing was conducted via the DeveloperConnection Program
at the Avaya Solution and Interoperability Test Lab.
TMA; Reviewed:
SPOC 6/19/2008
Solution & Interoperability Test Lab Application Notes
©2008 Avaya Inc. All Rights Reserved.
1 of 23
IP-DECT-APP-50
1. Introduction
These Application Notes detail the steps for creating a SIP VoIP-enabled wireless network using
Digital Enhanced Cordless Telecommunications (DECT) with connectivity that enables
interoperability between the Ascom wireless IP-DECT SIP solution and Avaya Communication
Manager, Avaya SIP Enablement Services, Avaya IA 770 INTUITY AUDIX and Avaya
Modular Messaging. The specific calling features that were verified to operate correctly include
transfer (attended and unattended), hold/return from hold, multiple call appearances, caller ID
operation, call forwarding (unconditional, on busy/no answer and clear), pickup groups, call
pickup, bridged appearance alerting, and voicemail Message Waiting Indicator (MWI).
1.1. Ascom IP DECT Base Station
The Ascom IP-DECT system is a modular solution for large and small deployments with full
handover capabilities with one PBX. The Ascom IP-DECT Base Station works as a conduit
between the Avaya SIP Enablement Services and the Ascom IP-DECT wireless handsets.
After the Ascom IP-DECT wireless handsets register with the Ascom IP-DECT Base Station, the
Base Station registers the handsets to Avaya SIP Enablement Services.
1.2. Network Diagram
The network diagram shown in Figure 1 illustrates the testing environment used for compliance
testing. The network consists of Avaya Communication Manager running on an Avaya S8300
Server with an Avaya G700 Media Gateway, Avaya SIP Enablement Services Server, Avaya
Modular Messaging Application Server, Avaya Modular Messaging Storage Server, one Avaya
9630 IP Telephone running Avaya one-X Deskphone SIP, one Avaya 9620 IP Telephone (SIP),
one Avaya 2420 Digital Telephone, one Ascom wireless IP-DECT Base Station, one Ascom
wireless 9d24 DECT handset, one Ascom wireless OfficeT DECT Handset and one OfficeM
DECT Handset. One computer is present in the network providing network services such as
DHCP, TFTP, HTTP and RADIUS.
TMA; Reviewed:
SPOC 6/19/2008
Solution & Interoperability Test Lab Application Notes
©2008 Avaya Inc. All Rights Reserved.
2 of 23
IP-DECT-APP-50
Figure 1: Sample Network Diagram
TMA; Reviewed:
SPOC 6/19/2008
Solution & Interoperability Test Lab Application Notes
©2008 Avaya Inc. All Rights Reserved.
3 of 23
IP-DECT-APP-50
2. Equipment and Software Validated
The following equipment and software were used for the sample configuration provided:
Equipment
Avaya S8300 Server
• Avaya G700 Media Gateway
• (MM712 DCP Media Module 8)
Avaya SIP Enablement Services
Avaya Modular Messaging - Messaging
Application Server (MAS)
Avaya Modular Messaging - Message Storage
Server (MSS)
Avaya IA 770 INTUITY AUDIX
Avaya 2420 Digital Telephone
Avaya 9600 Series IP Telephones
Ascom wireless IP-DECT Base Station
Ascom wireless 9d24 DECT Handset
Ascom wireless OfficeT DECT Handset
Ascom wireless OfficeM DECT Handset
Software
Avaya Communication Manager 5.0 R015x.00.0.825.4
26.31.0
HW05 / FW08
5.0 - SES-5.0.0.0-825.31
3.1
3.1
5.0
5.0
Avaya one-X Deskphone SIP
2.0.3 (SIP)
2.1.5 (SIP)
3.26
1.08
1.08
3. Configure Avaya Communication Manager, Avaya SIP
Enablement Services, Avaya IA 770 INTUITY AUDIX and
Avaya Modular Massaging
All of the telephones configured in the sample network in Figure 1 were administered as stations
in Avaya Communication Manager. SIP stations were administered as Off-PBX stations in
Avaya Communication Manager. For information on how to administer these types of stations
refer to Section 9 [1] and [2].
SIP stations were administered as users on the Avaya SIP Enablement Services. Media server
extensions were associated with these SIP users to link the SIP users to the Avaya
Communication Manager stations. For information on how to administer SIP stations on Avaya
SIP Enablement Services refer to Section 9 [3].
Voicemail services were provided by Avaya Modular Messaging and Avaya IA 770 INTUITY
AUDIX. For information on how to administer Avaya Modular Messaging and Avaya IA 770
INTUITY AUDIX, refer to Section 9 [4] and [5].
Certain Avaya Communication Manager features were tested with the Ascom wireless DECT
Handsets. The configuration related to these specific features tested is included in this section.
TMA; Reviewed:
SPOC 6/19/2008
Solution & Interoperability Test Lab Application Notes
©2008 Avaya Inc. All Rights Reserved.
4 of 23
IP-DECT-APP-50
Step Description
1.
To enable the features used for testing (Call Park, Call Answer Back, Call Forwarding and Call
Pickup), administer the Feature Access Codes (FAC) and Feature Name Extensions (FNE) on
Avaya Communication Manager. In order for the FACs and FNEs to be routed through the
system properly the digits used for Auto Route Selection (ARS), Auto Alternate Routing
(AAR) and FACs need to be administered in the dial plan. From the System Administration
Terminal (SAT) interface on Avaya Communication Manager, use the “change dialplan
analysis” command to configure the values displayed in bold below and submit the change.
The values specified for the “Dialed String” field must match the ones configured in Step 2 for
Auto Alternate Routing (AAR) Access Code and Auto Route Selection (ARS) - Access
Code.
change dialplan analysis
Page
1 of
12
DIAL PLAN ANALYSIS TABLE
Percent Full:
Dialed
Total Call
String
Length Type
1
3
dac
5
5
aar
7
5
ext
75000
5
ext
8
1
fac
9
1
fac
*
3
fac
60
2
fac
61
2
fac
#
3
fac
TMA; Reviewed:
SPOC 6/19/2008
Dialed
String
Total Call
Length Type
Solution & Interoperability Test Lab Application Notes
©2008 Avaya Inc. All Rights Reserved.
Dialed
String
3
Total Call
Length Type
5 of 23
IP-DECT-APP-50
Step Description
2.
Feature Access Codes (FACs) must be configured for the FNEs that will be accessed from the
SIP stations. From the SAT interface on Avaya Communication Manager, use the “change
feature-access-codes” command to configure the following values and submit the changes.
Change feature-access-codes
Page
1 of
7
FEATURE ACCESS CODE (FAC)
Abbreviated Dialing List1 Access Code:
Abbreviated Dialing List2 Access Code:
Abbreviated Dialing List3 Access Code:
Abbreviated Dial - Prgm Group List Access Code:
Announcement Access Code:
Attendant Access Code:
Answer Back Access Code: #11
Auto Alternate Routing (AAR) Access Code: 60
Auto Route Selection (ARS) - Access Code: 61
Call Forwarding Activation Busy/DA: #15
All: #16
Deactivation: #17
Automatic Callback Activation:
Deactivation:
Call Forwarding Enhanced Status:
Act:
Deactivation:
Call Park Access Code: #10
Call Pickup Access Code: #12
CAS Remote Hold/Answer Hold-Unhold Access Code:
CDR Account Code Access Code:
Change COR Access Code:
Change Coverage Access Code:
Contact Closure
Open Code:
Close Code:
TMA; Reviewed:
SPOC 6/19/2008
Solution & Interoperability Test Lab Application Notes
©2008 Avaya Inc. All Rights Reserved.
6 of 23
IP-DECT-APP-50
Step Description
3.
From the SAT interface, use the “change off-pbx-stations feature-name extensions”
command to configure the following values and submit the changes. Note that the extensions
used for FNEs match those used for FACs by pre-pending the FAC code with “710”. Having
this uniformity between FACs and FNEs is recommended but not required.
change off-pbx-telephone feature-name-extensions
Page
1 of
EXTENSIONS TO CALL WHICH ACTIVATE FEATURES BY NAME
Active Appearance Select:
Automatic Call Back:
Automatic Call-Back Cancel:
Call Forward All:
Call Forward Busy/No Answer:
Call Forward Cancel:
Call Park:
Call Park Answer Back:
Call Pick-Up:
Calling Number Block:
Calling Number Unblock:
Conference on Answer:
Directed Call Pick-Up:
Drop Last Added Party:
Exclusion (Toggle On/Off):
Extended Group Call Pickup:
Held Appearance Select:
TMA; Reviewed:
SPOC 6/19/2008
71016
71015
71017
71010
71011
71012
Solution & Interoperability Test Lab Application Notes
©2008 Avaya Inc. All Rights Reserved.
7 of 23
IP-DECT-APP-50
2
4. Configure Ascom wireless IP-DECT SIP Solution
The following steps detail the initial configuration for the Ascom wireless IP-DECT SIP
Solution. In the sample network, the DHCP server was configured to register DHCP client
information to a DNS server. This allows the Ascom wireless IP-DECT Base Station to be
reachable via a DNS name using the following format: http://IPBS-XX-XX-XX, where XX-XXXX are the last 3 bytes of the MAC address of the Ascom wireless IP-DECT Base Station. For
example, an Ascom wireless IP-DECT Base Station with a MAC address of 00-01-3E-00-CBDB could be accessed using http://IPBS-00-CB-DB or via the IP address assigned by DHCP.
4.1. Configure IP-DECT Base Station
The Ascom wireless IP-DECT Base Stations can be configured in a Master/Standby Master
scenario to provide redundancy or to extend the radius of coverage. The following configuration
steps detail the configuration process used to configure an Ascom wireless IP-DECT Base
Station in Master mode only.
Step Description
1.
Launch a web browser and place either the IP address or the DNS name of the Ascom wireless
IP-DECT Base Station into the URL. The user will be presented with a login screen. Refer to
Section 9 [7] for appropriate credentials needed to access the Ascom wireless IP-DECT Base
Station. Enter the appropriate login information and then click OK.
TMA; Reviewed:
SPOC 6/19/2008
Solution & Interoperability Test Lab Application Notes
©2008 Avaya Inc. All Rights Reserved.
8 of 23
IP-DECT-APP-50
Step Description
2.
The user is presented with the General Info frame where the system information for the Ascom
wireless IP-DECT Base Station is displayed.
TMA; Reviewed:
SPOC 6/19/2008
Solution & Interoperability Test Lab Application Notes
©2008 Avaya Inc. All Rights Reserved.
9 of 23
IP-DECT-APP-50
Step Description
3.
The web interface on the Ascom wireless IP-DECT Base Station consists of a series of frames
selected by a two-click process, where a category and then an option are clicked. Categories are
found below Configuration, which is displayed in the top left portion of the frame, and options
are found to the right.
Navigate to the General Admin frame by clicking General and then clicking Admin. Configure
the fields displayed below and then click OK. The Device Name can be any descriptive name
that identifies this Ascom wireless IP-DECT Base Station. In the sample network the name
“Avaya-Master” was chosen. The User Name and Password fields were populated using the
default credentials. The box below Password is to confirm the password and the value entered
for the Password field must be entered here. Click OK to continue.
TMA; Reviewed:
SPOC 6/19/2008
Solution & Interoperability Test Lab Application Notes
©2008 Avaya Inc. All Rights Reserved.
10 of 23
IP-DECT-APP-50
Step Description
4.
Navigate to the LAN DHCP frame by first clicking LAN and then clicking DHCP. Using the
drop-down list, set Mode to “Off” and then click OK. This will present the user with the
clickable red text which reads “reset required”. Click IP tab to continue to the LAN IP frame.
5.
Set the static IP Address, Network Mask, Default Gateway, and DNS Server, and Click OK.
Click reset required to continue.
TMA; Reviewed:
SPOC 6/19/2008
Solution & Interoperability Test Lab Application Notes
©2008 Avaya Inc. All Rights Reserved.
11 of 23
IP-DECT-APP-50
Step Description
6.
Click OK to initiate the system reset. Many of the other changes made to the system during the
configuration process require a reboot. Repeat this process whenever a reset is required.
7.
After the Ascom wireless IP-DECT Base Station (Avaya-Master) has rebooted, navigate to the
LDAP Server frame by clicking LDAP and then clicking Server. The “ldap-guest” account is a
default system account. Configure User using the Device Name used in Step 3. Configure the
Password field with the Password used in Step 3. Check the Write Access check box for the
"Avaya-Master” user account and then click OK to continue.
TMA; Reviewed:
SPOC 6/19/2008
Solution & Interoperability Test Lab Application Notes
©2008 Avaya Inc. All Rights Reserved.
12 of 23
IP-DECT-APP-50
Step Description
8.
Navigate to the DECT Master frame by clicking DECT and then clicking Master.
Configure the fields displayed below and then click OK. Use the drop-down list for Mode and
select “Active”. Gatekeeper IP Address was set to the IP address of the Avaya SES (see Figure
1). Use the drop-down list for Protocol, select “SIP”, and select the Register with number box.
In the sample network, five digit extensions were used and Max. internal number length was
set to “5”. Click OK. Click reset required to continue
TMA; Reviewed:
SPOC 6/19/2008
Solution & Interoperability Test Lab Application Notes
©2008 Avaya Inc. All Rights Reserved.
13 of 23
IP-DECT-APP-50
Step Description
9.
Navigate to the DECT System frame by clicking DECT and then clicking System. Configure
the fields displayed below and then click OK. System Name is the Device Name used in Step 3.
Password is the “Password” used in Step 3. The box below Password is to confirm the
password and the value configured for Password field must be entered here. The
Authentication Code is a numerical code that every DECT handset will need to use to subscribe
to this system. Using the drop-down list, Subscriptions can be set to “With User AC”, “With
System AC”, or “Disable”. In the sample configuration “With System AC” was used. This
enables the system to use the Authentication Code when challenging DECT handsets during
registration. Use the drop-down list for Tones and select “US”. Use the drop-down list for
Default Language and select “English”. Use the drop-down list for Frequency and select
“North America”. Check the 0,1,2,3 and 4 check boxes. The Enabled Carriers check boxes
enable the DECT handsets to use different channels or frequencies when transmitting. Check the
DTMF through RTP channel check box. Use the drop-down list for Coder and select
“G711u”. Ensure that the codec chosen matches whatever is used on the Avaya Communication
Manager.
Note: The G.729A codecs are set the same way.
TMA; Reviewed:
SPOC 6/19/2008
Solution & Interoperability Test Lab Application Notes
©2008 Avaya Inc. All Rights Reserved.
14 of 23
IP-DECT-APP-50
Step Description
10.
Navigate to the DECT Suppl. Serv. frame by clicking DECT and then clicking Suppl. Serv..
Check the Enable Supplementary Services check box. Enter the extension used for Avaya
Modular Messaging in the Message Center No. field. Click OK.
11.
Navigate to the DECT PARI frame by clicking DECT and then clicking PARI. PARI is a userdefined system value and must range from 1-35. Enter any number from 1-35. Click OK to
continue.
TMA; Reviewed:
SPOC 6/19/2008
Solution & Interoperability Test Lab Application Notes
©2008 Avaya Inc. All Rights Reserved.
15 of 23
IP-DECT-APP-50
Step Description
12.
Navigate to the DECT SARI frame by clicking DECT and then clicking SARI. SARI is an
Ascom wireless provided activation code which is needed for the system to function. Contact
Ascom wireless to obtain a SARI. Enter the SARI value. Click OK to continue.
13.
Navigate to the DECT Air Sync frame by clicking DECT and then clicking Air Sync. Use the
drop-down list for Sync Mode and select “Master”. Check the LED Indication check box. Click
OK to continue.
TMA; Reviewed:
SPOC 6/19/2008
Solution & Interoperability Test Lab Application Notes
©2008 Avaya Inc. All Rights Reserved.
16 of 23
IP-DECT-APP-50
Step Description
14.
Navigate to the General Info frame by clicking General and then clicking Info. The PARIPARK is displayed. This value is needed when programming Ascom wireless DECT handsets.
The PARI-PARK is similar to an SSID in an 802.11 wireless environment.
15.
Navigate to the Users Users frame by clicking Users and then clicking Users. Click new to
provision a new user account.
TMA; Reviewed:
SPOC 6/19/2008
Solution & Interoperability Test Lab Application Notes
©2008 Avaya Inc. All Rights Reserved.
17 of 23
IP-DECT-APP-50
Step Description
16.
The user is presented with the Edit User web page. Long Name and Name can be any
descriptive name that identifies this user. The Number field is the extension assigned to this
user. The Password field is the password used to register with the Avaya SIP Enablement
Services. The box below Password is to confirm the password and the value entered for the
Password field must be entered here. Display Text is the text string that will be displayed on the
LCD screen of the Ascom wireless DECT Handset. Auth. Code is used only if Subscriptions in
Step 8 is set to “With User AC”. Once all the user information has been configured, click OK.
Repeat this process for each user being added to the system.
4.2. Configure Ascom wireless DECT Handset
Refer to Section 9 [7], [8], [9] and [10] to obtain information on the procedures for subscribing
and registering the Ascom wireless DECT Handsets to the Ascom wireless IP-DECT Base
Station.
5. Interoperability Compliance Testing
The compliance testing focused on verifying interoperability of the Ascom wireless IP-DECT
SIP solution (comprised of the Ascom wireless IP-DECT Base Station and Ascom wireless
DECT Handsets) with Avaya Communication Manager, Avaya SIP Enablement Services, Avaya
TMA; Reviewed:
SPOC 6/19/2008
Solution & Interoperability Test Lab Application Notes
©2008 Avaya Inc. All Rights Reserved.
18 of 23
IP-DECT-APP-50
IA 770 INTUITY AUDIX and Avaya Modular Messaging. Additional testing verified proper
operation with the Avaya 9630 IP Telephone, Avaya 9620 IP Telephone and the Avaya 2420
Digital Telephone. Voicemail and MWI using Avaya Modular Messaging and Avaya IA 770
INTUITY AUDIX was tested and verified to operate correctly.
Avaya’s formal testing and Declaration of Conformity is provided only on the headsets/handsets
that carry the Avaya brand or logo. Avaya may conduct testing of non-Avaya headsets/handsets
to determine interoperability with Avaya telephones. However, Avaya does not conduct the
testing of non-Avaya headsets/handsets for: Acoustic Pressure, Safety, Hearing Aid Compliance,
EMC regulations, or any other tests to ensure conformity with safety, audio quality, long-term
reliability or any regulation requirements. As a result, Avaya makes no representations whether
a particular non-Avaya headset will work with Avaya’s telephones or with a different generation
of the same Avaya telephone.
Since there is no industry standard for handset interfaces, different manufacturers utilize
different handset/headset interfaces with their telephones. Therefore, any claim made by a
headset vendor that its product is compatible with Avaya telephones does not equate to a
guarantee that the headset will provide adequate safety protection or audio quality.
5.1. General Test Approach
The general test approach was to register the Ascom wireless DECT Handsets with Avaya SIP
Enablement Services through the Ascom wireless IP-DECT wireless network and that voice mail
left on Avaya Modular Messaging was able to be retrieved and that MWI worked. Calls were
made between both wired and wireless telephones and specific calling features were exercised.
5.2. Test Results
The Ascom wireless DECT Handsets passed all test cases. Ascom wireless DECT Handsets were
verified to successfully register with Avaya SIP Enablement Services. Two codecs were used for
testing: G.711MU and G.729AB. Telephone calls were verified to operate correctly with the
media path direct between the telephones (shuffling enabled) and with the media path centralized
through Avaya Communication Manager (shuffling disabled). Calls were maintained for
durations over one minute without degradation to voice quality. The telephony features verified
to operate correctly included transfer (attended and unattended), hold/return from hold, multiple
call appearances, caller ID operation, call forwarding (unconditional, on busy/no answer and
clear), pickup groups, call pickup, bridged appearance alerting, and Avaya Modular Messaging
voicemail and MWI.
6. Verification Steps
6.1. Ascom wireless DECT Handset Registration Verification
The following steps can be used to ascertain the registration state of the Ascom wireless DECT
Handsets that the Ascom wireless IP-DECT Base Station is configured to support.
From a web browser open up a connection to the Ascom wireless IP-DECT Master Base Station,
refer to 4.1 Step 1. Navigate to the Users Users frame by clicking Users, then clicking Users,
TMA; Reviewed:
SPOC 6/19/2008
Solution & Interoperability Test Lab Application Notes
©2008 Avaya Inc. All Rights Reserved.
19 of 23
IP-DECT-APP-50
and then clicking show. A Registration state of “Pending” indicates an Ascom wireless DECT
Handset has not registered to the Ascom wireless IP-DECT Base Station. A Registration state
of “Subscribed” indicates that an Ascom wireless DECT Handset has connected to the Ascom
wireless IP-DECT Base Station and requested the use of that particular extension. A
Registration state that displays the IP Address of the Avaya SIP Enablement Services indicates
the extension has successfully registered to both the Ascom wireless IP-DECT Base Station and
Avaya SIP Enablement Services.
TMA; Reviewed:
SPOC 6/19/2008
Solution & Interoperability Test Lab Application Notes
©2008 Avaya Inc. All Rights Reserved.
20 of 23
IP-DECT-APP-50
6.2. Ascom wireless DECT Handset Function Verification
The following steps can be used to verify proper operation of the Ascom wireless DECT
Handsets.
•
•
•
•
Place calls from the Ascom wireless DECT Handsets and verify two-way audio.
Place a call to the Ascom wireless DECT Handsets, allow the call to be directed to
voicemail, leave a voicemail message and verify the MWI message is received.
Using each Ascom wireless DECT Handset that received a voicemail, connect to the
voicemail system to retrieve the voicemail and verify the MWI clears.
Place calls to the Ascom wireless DECT Handsets and exercise calling features such as
transfer and hold.
7. Support
Technical support for the Ascom wireless IP-DECT Base Station and Handsets can be obtained
through the following:
• Phone: 1-877-71ASCOM or 1-877-712-7266
• Email: [email protected]
8. Conclusion
These Application Notes demonstrate how to build a sample SIP VoIP-enabled wireless network
using the Ascom wireless IP-DECT Base Station with the Ascom wireless DECT Handsets.
These Application Notes also demonstrate how to provide interoperability between Avaya
Communication Manager, Avaya SIP Enablement Services, Avaya IA 770 INTUITY AUDIX
and Avaya Modular Messaging with the Ascom wireless IP-DECT Base station and Handsets.
TMA; Reviewed:
SPOC 6/19/2008
Solution & Interoperability Test Lab Application Notes
©2008 Avaya Inc. All Rights Reserved.
21 of 23
IP-DECT-APP-50
9. Additional References
The following Avaya product documentation can be found at http://support.avaya.com.
[1] “Administrator Guide for Avaya Communication Manager, February 2007, Issue 3.1,
Document Number 03-300509
[2] SIP Support in Release 3.1 of Avaya Communication Manager Running on Avaya S83xx
Servers, Issue 8, Doc ID 555-245-206, January, 2008
[3] Installing and Administering SIP Enablement Services, March 2007, Issue 2.1, Document
Number 03-600768
[4] Avaya IA 770 INTUITY AUDIX Messaging Application Release 5.0Administering
Communication Manager Servers to Work with IA 770 November 2007
[5] Messaging Application Server (MAS) Administration Guide Release 3.1 with the Avaya,
February 2007
[6] Avaya one-X Deskphone Edition for 9600 Series IP Telephones Administrator Guide
The following Ascom product documentation can be found at http://www.Ascomwireless.com.
[7] Installation and Operation Manual IP-DECT Base Station, January 2007 Ver. C, Document
Number TD 92372GB
[8] User Manual 9d24 MkII Cordless Handset USA, February 2007 Ver. C, Document Number
TD 92411GB
[9] User Manual OfficeM Cordless Telephone, May 2006 Ver. C, Document Number TD
92288GB
[10] User Manual Cordless Telephone OfficeT, May 2006 Ver. C, Document Number TD
92282GB
TMA; Reviewed:
SPOC 6/19/2008
Solution & Interoperability Test Lab Application Notes
©2008 Avaya Inc. All Rights Reserved.
22 of 23
IP-DECT-APP-50
©2008 Avaya Inc. All Rights Reserved.
Avaya and the Avaya Logo are trademarks of Avaya Inc. All trademarks identified by ® and
™ are registered trademarks or trademarks, respectively, of Avaya Inc. All other trademarks
are the property of their respective owners. The information provided in these Application
Notes is subject to change without notice. The configurations, technical data, and
recommendations provided in these Application Notes are believed to be accurate and
dependable, but are presented without express or implied warranty. Users are responsible for
their application of any products specified in these Application Notes.
Please e-mail any questions or comments pertaining to these Application Notes along with the
full title name and filename, located in the lower right corner, directly to the Avaya
DevConnect Program at [email protected].
TMA; Reviewed:
SPOC 6/19/2008
Solution & Interoperability Test Lab Application Notes
©2008 Avaya Inc. All Rights Reserved.
23 of 23
IP-DECT-APP-50