1
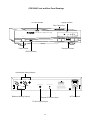
O
W
N
E
R
'
S
M
A
N
C/DP-2000 Ultra Belt Drive CD Player
C/DP-2000 Ultra Compact Disc Player
TRACK
Track Skip
Power
-1-
Search
SEC
MIN
Stop
Play/Pause
U
A
L
Table of Contents
Important Safety Instructions .........................................................................................3
C/DP-2000 Ultra Front and Rear Panel Drawings ..........................................................4
Introduction ......................................................................................................................5
Unpacking and Installation..............................................................................................5
Condensation and Dew....................................................................................................5
Making Connections to your C/DP-2000 Ultra ...............................................................6
Operating Your C/DP-2000 Ultra ......................................................................................7
Remote Control Handset and Display ............................................................................8
Maintaining Your C/DP-2000 Ultra ...................................................................................9
In Case of Difficulty ..........................................................................................................8
Parasound C/DP-2000 Ultra Specifications ...................................................................10
Special Features
Unique Belt Drive Design Built for Parasound by CEC
Patented Transport Mechanism, Massive 3/4 lb Disc Clamp
High Mass Heavily Damped Chassis
DAC Circuits Designed and Built by UltraAnalog
Two Power Transformers for Mechanism Control and Audio Circuits
Premium Burr Brown PCM-1702 20 Bit DACs
Pacific Microsonics HDCD Digital Filter
Balanced and Unbalanced Analog Outputs
Coaxial Digital Output
Fully Programmable, Fully Remote Controlled, External IR Repeater Input
Final Assembly in the USA
-2-
IMPORTANT SAFETY INSTRUCTIONS
The lightning flash with the arrowhead symbol within an equilateral triangle is intended to alert the user to
the presence of “dangerous voltage” inside the product that may constitute a risk of electric shock.
The exclamation point within an equilateral triangle is intended to alert the user to the presence of important
operating and maintenance instructions in the literature accompanying the product.
TO REDUCE THE RISK OF ELECTRIC SHOCK, DO NOT REMOVE COVER. NO USER-SERVICEABLE
PARTS INSIDE. REFER SERVICING TO QUALIFIED SERVICE PERSONNEL
1.
2.
3.
4.
5.
6.
7.
8.
9.
10.
11.
12.
13.
14.
15.
16.
17.
19.
20.
21.
Read Instructions — Read all the safety and operating instructions before operating this product.
Retain Instructions — Retain safety and operating instructions for future reference.
Heed Warnings — Adhere to all warnings on the product and in the operating instructions.
Follow Instructions — Follow all operating and use instructions.
Cleaning — Unplug this product from the wall outlet before cleaning. Use a damp cloth for cleaning. Clean the
outside of the product only.
Attachments — Do not use attachments that are not recommended by the product manufacturer; they may be
hazardous.
Water and Moisture — Do not use this product near water.
Accessories — Do not place this product on an unstable cart or stand. The product may fall causing bodily injury
and damage to the product. A product and cart combination should be moved with care. Quick stops, excessive
force, and uneven surfaces may cause the product and cart to overturn.
Ventilation — Slots and openings in the cabinet are provided for ventilation to ensure reliable operation of the
product and to protect it from overheating. These openings must not be blocked or covered. This product should not
be placed in a built-in installation such as a bookcase or rack unless proper ventilation is provided.
Power Sources — Operate this product only from the type of power source indicated on the label. If you
are not sure of the type of power supply to your home, consult your dealer or local power company. This product is
equipped with a three-prong grounding plug. This plug will only fit into a grounding power outlet. If you
are unable to insert the plug into the outlet, contact your electrician to replace your obsolete outlet. Do not defeat the
safety purpose of the grounding plug.
Power Cord Protection — Power supply cords should be routed so that they are not likely to be walked on or
pinched by items placed upon or against them.
Lightning— Unplug the unit from the wall outlet for added protection during a lightning storm and when it is left
unattended and unused for long periods of time. This will prevent damage to the product due to lightning and power
line surges.
Overloading — Do not overload wall outlets or extension cords. This can result in a fire or electric shock.
Inserting Objects into Unit - Never push objects of any kind into this product through any openings; they may
touch dangerous voltage points or short out parts that could result in fire or electric shock.
Servicing — Do not attempt to repair or service this product yourself. Opening or removing covers may expose you
to dangerous voltage and other hazards. Refer all servicing to qualified service personnel.
Damage Requiring Service — Unplug this product from the wall outlet and refer servicing to qualified service
personnel under the following conditions: a) If the power-supply cord or plug is damaged. b) If liquid has been
spilled into the product. c) If the product has been exposed to rain or water. d) If the product does not operate
normally by following the operating instructions. e) If the product has been dropped or damaged in
any way. f) If the product exhibits a distinct change in performance.
Replacement Parts — When replacement parts are required, be sure the service technician has used replacement
parts specified by the manufacturer. Unauthorized substitutions may result in fire, electric shock, and other hazards.
Safety Check — Upon completion of any service or repairs to this product, ask the service technician to perform
safety checks to determine that the product is in proper operating condition.
Wall or Ceiling Mounting — Mount the product to a wall or ceiling only as recommended.
Heat — The product should be situated away from heat sources such as radiators, heat registers, stoves, and other
products (including amplifiers) that produce heat.
-3-
C/DP-2000 Front and Rear Panel Drawings
Display Window
CD Door Handle
Disc Clamp Pad
C/DP-2000 Ultra Compact Disc Player
TRACK
Track Skip
Search
SEC
MIN
Play/Pause
Stop
Power
Power Switch
Transport Buttons
HDCD Indicator
Unbalanced Analog Outputs
CAUTION
Balanced
Unbalanced
Balanced
RISK OF ELECTRIC SHOCK
DO NOT OPEN
Unbalanced
AVIS: RISQUE DE CHOC
ELECTRIQUE-NE PAS OUVRIR
C/DP-2000
75 Ohm Digital Output
Right Channel
External Remote Input
Ultra Compact Disc Player
Parasound Products, Inc
San Francisco, CA USA
Left Channel
This device complies with part 15 of the FCC rules.
Operation is subject to the following two conditions:
1. This device may not cause harmful interference.
2. This device may accept any interference received,
including interference that may cause undesired operation
Analog Outputs
Complies with FDA radiation performance standards 21
CFR subchapter J
Made in Japan and the USA
Balanced Analog Outputs
External IR Remote Input
75 Ohm Digital Output
-4-
AC 120V 50/60Hz
Power Consumption 15 W
WARNING
TO PREVENT ELECTRIC SHOCK,
DO NOT REMOVE THE COVER.
NO USER SERVICABLE PARTS INSIDE.
REFER SERVICING TO QUALIFIED
SERVICE PERSONNEL.
AC Receptacle
Introduction
Congratulations on your purchase of this precision audio component and thank you for your selection of
Parasound. The C/DP-2000 Ultra's unique patented CD Belt Drive design delivers analog-like musicality
unavailable in other compact disc players. Your C/DP-2000 Ultra features custom 20 bit digital to analog
circuitry manufactured by UltraAnalog, Inc. yeilding higher resolution than some "24/96" players.
The C/DP-2000 Ultra also incorporates the PMD-100 High Definition Compatible Digital process decoder
developed by Pacific Microsonics. This decoder performs precise decoding of HDCD encoded recordings
and is also a superior digital filter that enhances the sonic quality of non-HDCD encoded recordings.
Please take a few moments to read these instructions so you may fully understand how to maximize the
performance capabilities of your belt drive CD player.
Unpacking
Carefully unpack your CD player and remove all the enclosed accessories: CD clamper, remote control, AC
cord. Be sure to inspect the unit for any possible shipping damage. If you see any, contact your Parasound
Dealer immediately. Save all the packing material in case you need to ship the unit for repair. Before you
proceed, find the serial number located on the rear panel of your amplifier and record it here for reference:
Serial #____________________
Date of Purchase____________________
Installation
Your C/DP-2000 Ultra should be placed on a level and sturdy surface, out of direct sunlight. It should be
in a well-ventilated area, away from heating ducts or radiators. The area must be free of dust or excessive
humidity.
Located your CD player away from your speakers to minimize vibrations that could interfere with the optical
laser. This could cause the error correction circuits to operate excessively for other than defects in the CDs
themselves. The unit should not be placed near any component that generates heat or a strong magnetic field,
such as a power amplifier.
Do not place your C/DP-2000 Ultra near your radio or TV tuner since digital circuitry uses very high
frequency signals that could cause interference with clear broadcast reception. Additionally, RF radiation
from radio or TV tuners could interfere with the clarity of CD reproduction.
A Note on Condensation and Dew
If your C/DP-2000 Ultra is brought directly from a cold location to a warm room or if it is placed in a very
damp room, moisture may condense on the laser lens within the unit and the player may not operate. If this
occurs, remove the disc and leave the player in a warm, dry place for about an hour so the moisture can
evaporate.
-5-
Making Connections to your C/DP-2000 Ultra
Before making any connections, turn off the power to your preamplifier and power amplifier. Once the inputs
have been connected, plug the AC cord into any convenient outlet.
Analog Output Connections
There are two analog output connections on the rear panel of your C/DP-2000 Ultra: RCA connectors for
unbalanced line outputs and XLR connectors for balanced line outputs. You may use the RCA and XLR
connectors simultaneously if you wish.
RCA Jacks
Connect the left and right RCA output jacks to any line level RCA input on your preamplifier with a pair of
high-quality audio interconnect cables.
XLR Jacks
Connect the left and right XLR output jacks to the XLR input on your preamplifier if it is so equipped. The
industry standard pin assignment for the XLR connectors are: Pin 1 Ground, Pin 2 + signal, and Pin 3 - signal.
AC Power Connection
Your C/DP-2000 Ultra has an audiophile quality IEC standard detachable power cord. Try to connect this
cord directly to a nearby AC wall outlet and avoid extension cords or connection to accessory outlets on your
preamp.
Digital Output Connection
75 Ω Coaxial Digital Connection
Your C/DP-2000 Ultra is equipped with an RCA jack for 75 Ω coaxial digital connection to an external
D-A converter. Use a 75 Ω digital cable designed for data transmission; a standard audio interconnect cable
will degrade data transmission and sonic quality.
External Remote Control Connection
Your C/DP-2000 Ultra has a rear mounted remote control connection that accepts the input of any popular
infrared repeater system to facilitate remote control operation from another room or when your player is
installed within a closed cabinet. This connector is a popular 1/8" (3.5 mm) mini jack and its center conductor
is +, the outer is - . For further details about IR control systems, contact your Parasound dealer or custom
installer.
-6-
Operating Your C/DP-2000 Ultra
Loading Discs
To load a disc, gently slide the plexiglas door open. Remove the disc clamp and place it on the convenient
clamp pad on the top of the chassis. Next, load the disc onto the spindle, label side up, and gently place the
disc clamp on top of the disc. You'll need to slide the door to its fully closed position to enable the unit to
operate. The C/DP-2000 Ultra will read the disc and momentarily display the total time and number of tracks
on the disc. Once the player has read the disc’s table of contents, it is ready to play. Press PLAY and the disc
will start playing the first track on the disc.
Selecting Specific Tracks
To select a specific track on the disc, press TRACK NUMBER on the remote or TRACK SKIP on the front
panel to select the track you want to play. Start play by pressing the PLAY/PAUSE button on the remote or
front panel. Skipping ahead several tracks may require a few seconds due to the nature of the belt drive
mechanism and the weight of the clamper.
Front Panel Functions
Power Switch
Use this switch to turn your C/DP-2000 Ultra on and off. The power switch is not duplicated on the remote
control handset.
Play/Pause
Press PLAY/PAUSE to start disc playback. Once the disc is playing, you can press this button again to
temporarily pause the disc. The display will then indicate that the unit is paused. To resume play, press the
PLAY/PAUSE button again.
Track Skip
These buttons skip tracks forward and backward each time they are pressed. Pressing the previous track
button once initiates playing the current track over again.
Search
This is an audible fast review or fast forward cue to assist you in finding a specific segment within a given
track.
Stop
This button stops the disc and disengages the laser operation. If you have pressed STOP, pressing PLAY
starts playback from the beginning of the disc.
-7-
Remote Control Handset
The Remote Control Handset duplicates all front panel functions except power on/off. It also contains several
additional functions. The remote uses 2 AA batteries; be sure to observe correct polarity.
Number Keys
You can select the specific track you want to listen to by selecting the corresponding number on the remote
control. Press the desired track number and then press PLAY. For example to listen to track number 23 on
a CD, press 2, 3, and then play. Track number 23 will appear in the display and that track will begin playing.
Repeat
If you press this button, the disc will play continuously until you press the STOP or REPEAT button again.
The
symbol appears in the display indicating that the C/DP-2000 Ultra is in the repeat mode.
Time Display
Press this button once to change from normal mode to time remaining on disc, press twice for time
elapsed on disc, press three times to return to the normal mode.
2
02 :31
TRACK
MIN
-15:45
SEC
Normal mode
MIN
28:19
SEC
First Press: Time remaining on disc
Program
MIN
SEC
Second Press: Time elapsed on
disc.
Programming allows you to select specific tracks or rearrange the entire play sequence. Programming must
be performed in the STOP mode. To store tracks on a disk, first select the track number with the number or
SKIP buttons on the remote handset. Next, press the PROGRAM button on the remote to store the selected
track. The display will indicate a non flashing 01 for the first programmed track. The display will then flash
02 until you select the next track and press PROGRAM. Repeat this procedure for each of the tracks you want
to store. A maximum of 20 tracks may be programmed. When you press the PLAY/PAUSE button, the tracks
will play in programmed order.
PRGM
4
01
TRACK
Select track number directly or with
the SKIP button. Press PROGRAM
to store
PRGM
3
02
TRACK
Press SKIP or track number for
next track to program. Press PROGRAM again to store
PRGM
5
20
TRACK
When programming is finished,
press PLAY to start programmed
play.
Checking, Changing, and Clearing Program
Each time you press the PROGRAM button, the track number and its program position will appear in the
display. You can add tracks to the program by pressing PROGRAM for the track you want to add. Tracks
can be cleared in descending order by pressing the CLEAR button. Pressing the stop button twice or turning
the unit off will clear the entire program.
Other Display Functions
When you first play your C/DP-2000 Ultra, its display panel will show you if the unit has recognized a
playable CD in its disc compartment. You will hear the machine spin for a moment while it reads the data
on the disc. If there is no disc loaded, the display will indicate four zeros. Once there is a disc loaded, will
briefly show you how many tracks and the total playing time on the disc and then will stop at track 1 and wait
for you to press the PLAY button. At the end of the disc, the display will read 0:00 after the unit has stopped.
-8-
HDCD Indicator
If the loaded disc is encoded in High Definition Compatible Digital (HDCD) the green LED on the front panel
will illuminate once the C/DP-2000 recognizes the HDCD bitstream. The HDCD LED remains off while
listening to normal CDs.
Maintaining Your C/DP-2000 Ultra
Your C/DP-2000 Ultra requires no periodic maintenance and has no user serviceable parts inside. To avoid
risk of electric shock, do not remove the top cover. To keep it clean use only a soft cloth and never use any
solvents or abrasives. Since dust and dirt can cause problems, keep the plexiglas door closed when you are
not using the C/DP-2000 Ultra. Fingerprints may be removed with a soft cloth moistened only with a few
drops of clear water. The remote control handset batteries should be removed whenever it will be unused for
an extended period. Remove the battery cover annually to inspect and remove leaking batteries.
In Case of Difficulty
If you believe your unit is malfunctioning, please review these instructions, and then refer to the following
troubleshooting chart that covers many common problems:
Problem
Disc is inserted, but display does not show number
of tracks and playing time:
Possible Solutions
Disc was inserted upside down-reinstall disc
Plexiglas door is not fully closed-close door
Disc is dirty - clean it carefully
Disc is scratched or defective - try another disc
Condensation on laser - allow to warm up and dry
Problem
Sound skips or mistracks often
Possible Solutions
Player is exposed to excessive vibration - relocate
Disc is dirty or damaged
Many discs recorded by a CDR player cannot
successfully play on another player.
Problem
Program function will not operate:
Possible Solution
Programming was erased - reprogram the memory
Problem
One channel not operative
Possible Solution
Check cable connections-try another source to confirm
problem is with your CD player
Problem
Remote control does not work
Possible Solutions
Batteries in remote control are weak or batteries are
installed improperly
There is an obstruction between the remote and player
Too great an angle to player for remote signal to reach
There is no disc loaded in the player
Player is exposed to fluorescent or neon lights that
interfere with IR transmission
-9-
C/DP-2000 Ultra Specifications
Frequency Response
3 Hz-20 kHz, ±0.2 dB
Signal to Noise Ratio
> 110 dB, IHF A
Dynamic Range
> 102 dB
Channel Separation
> 115 dB, 1 kHz
Low Level Linearity
± 1.5 dB down to -96 dB
Analog Line Output Level
2 V RMS, ± 0.1 V Suitable load ⊕ 10 k Ω
Coaxial Digital Output
75 Ω RCA, 0.5 V peak-to-peak
Total Harmonic Distortion at Full Scale
< 0.002%
Wow and Flutter
Unmeasurable; crystal accuracy
Interchannel Phase Shift
< 0.6ϒ at 20 kHz
Disc Defect Tracking
up to 2000 µM
Converter Type
One 24 bit Burr-Brown PCM 1702 Per Channel
Sampling Rate
352.8 kHz, 8 x 44.1 kHz
Error Correction Method
CIRC double error correction
Dimensions
17 1/8" wide x 3 1/2" high x 10" deep
Power Requirements
120 V - 120 Vac 15 watts
-10-
Parasound Products, Inc. 950 Battery Street, San Francisco, CA 94111
415-397-7100 / FAX 415-397-0144 www.parasound.com
© 1999 Parasound Products, Inc.
-11-