1
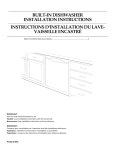
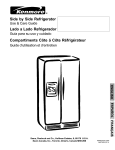
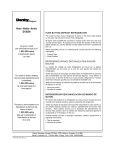
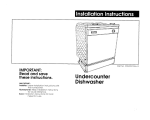
Undercounter Dishwasher
What do I need to have to
install the dishwasher?
Tools, parts & materials
Requirements
Dishwasher dimensions
Customize dishwasher
1-2
3-6
Back cover
Back cover
Whatdo I needto do before
I installthe dishwasher?
• Prepare cabinet
• Prepare dishwasher
7-12
13-16
Howdo I install the
dishwasher?
• Connect dishwasher
• Secure dishwasher
• Check operation
17-20
21
22
Doing so will:
• make installation easier.
• help you in the future if you have questions.
• help if you have an electrical inspection.
Call your Sears store or service center when you
have questions or need service. When you call, you
will need the dishwasher model and serial numbers.
Part No. 9744231
Your safety and the safety of
others is very important.
O
We have provided many important
safety messages in this manual and
on your appliance, Always read and
obey all safety messages,
O
!_
O
This is the safety alert
symbol. This symbol alerts
you to hazards that can kill
or hurt you and others. All safety
messages will be preceded by the
safety alert symbol and the word
"DANGER" or "WARNING". These
words mean:
You wnl be killed or seriously
injured if you don't follow
instructions.
You can be killed or seriously
injured if you don't follow
instructions.
All safety messages will identify the
hazard, tell you how to reduce the
chance of injury, and tell you what
can happen if the instructions are
not followed.
v' carefully open dishwasher door
while someone grasps the rear of
the dishwasher. Remove shipping
materials, drain hose and lower rack.
Close dishwasher door. Latch the
dishwasher door shut.
v' observe all governing codes and
ordinances.
install this dishwasher as specified in
these instructions.
v' have everything you need to properly
install dishwasher.
v' contact a qualified installer to insure
that dishwasher is installed to meet
all electrical and plumbing national
and local codes and ordinances.
Tools and
materials needed
A. pliers
K, safetyglasses
O. Phillipsscrewdriver L. 90° elbowwith3/8"
C. 5/16"and1/4"nut
N.P.T.external
drivers or hex
threadsonone
sockets
end.(Theotherend
D. measuringtapeor
mustfit yourwater
ruler
supplyline.
E, 16"adjustuMn
M.flashi_hf
wrenchthatopensto N. Teflon
TM tapeor
1-1/8"(29cm)
pipeJoJnl
F. flat-blade
compound
screwdriver
O.shallowpan
G, gloves
H. utilityknife
I. 2 twist-onwire
connectors
which
are theprepersize
toconnectyour
household
wiringto
16-gau6ewiringin
dishwasher
J. smalllevel
@
0
P. electricdrill with
Q, 1[2%3/4" and
1-1/2"holesaw bits
R. smalltubingcutter
S. wire stripper
T. 1-1/2"-2"screw-type
clampif connecting
towaste-fen
U. coppertubing(3/8"
recommended}
p. clampconnector
or
_onduitconnector
to
fit a 7/8"_2.2r.m)
diameter hole
Parts supplied
_Q
'mzz_zq_
_)
!
_
'
<)
_'_
A. 2 drainhoseclamps
Phillips-head
screws
B.
No.16 x1/2"
C. 2
drainhose
Makesureall thesepartsare included.
Seepartslistforaccessories
availableforyour
dishwasher.
2
t/)
Cabinet opening
E
i,_
iim
Electrical Shock Hazard
0"
Enclose dishwasher completely
on the top, sides, and rear.
Failure to do so can result in
death or electrical shock.
Do not run water or drain lines or
electrical wiring where they can cross
in front of or contact dishwashermotor
or legs.
The Iocalion must provide 1/4" (.64cm)
minimum clearance between motor and
flooringto prevent motor overheating.
Do not install dishwasherover carpeted
flooring.
Protect dishwasherand water lines
leading to dishwasheragainst freezing.
Damage from freezing is not covered by
the warranty.
A side panel kit is available from your
Sears store or service center for
installing your dishwasherat end nt
cabinet.
Check location where dishwasher
will be installed. The location must
provide:
easy access to water, electricity and
drain.
v' convenient loading. Corner locations
require a 2' (5.1cm) minimum
clearance between the side of the
dishwasher door and wall or cabinet.
square opening for properoperation
and appearance.
3
v' cabinetfrontperpendicularto floor.
v' levelfloor.(If floorat frontof opening
is notlevelwithfloorat rear of
opening,shimsmaybe neededto
leveldishwasher.)
If dishwasher
willbeleft unusedfora
periodof timeor in a locationwhereit
may besublectto freezing,follow
"Winter,zing"instructions _nUseand
CareGuide.
Make sure pipes, w_resand drain hose
are within the shaded area. See Page 7
for dtmenslons.
HELPFUL TIP:
if the floor in the dishwasher
opening Is tmeven (example:
tile flooring only part way into
opening) you will need to take
special care in measuring
dimens/ons and In leveling
dishwasher.
continuedon page5
4
continued
frompage4
Electrical
It is the customer's responsibility:
To contact a qualified electrician.
To assure that the electrical
installation is adequate and in
conformance with all national and
local codes and ordinances.
You must
have:
I/120-volt, 60-Hz, AC-only, 15- or
20-amp., fused electrical supply.
i/COPPER WIRE ONLY.
We recommend:
v' a time-delay fuse or circuit breaker.
a separate circuit.
iv' use flexible, armored or non-metallic
sheathed, copper wire with
grounding wire that meets the wiring
requirements for your home and
local codes and ordinances.
use strain relief method provided
with house wiring junction box or
install a U.L.-listed/CSA-oertified
clamp connector to the house wiring
junction box. If using conduit, use a
U.L-listed/CSA-certified conduit
connector.
v' use Power Supply Cord Kit (Part No.
4317824) available from your Sears
store or service center. Follow the kit
instructions for installing the power
supply cord.
If kit is unavailable, use a U.L.-listed,
16-gauge, three-conductor power
supply cord that meets all local
codes and ordinances. Maximum
length of the power supply cord is
6 feet (1.8m).
a clamp connector to fit a 7/8"
(2.2cm) diameter hole is required to
securepowersupplycouutu
dishwasher
terminalbox.
®
q/power supply cord must plug into a
mating three-prong, grounded outlet,
located in the cabinet next to the
dishwasher opening. Outlet must
meet all local codes and ordinances.
Water
You must
have:
v' a hot water line with 20-125 psi
(138-862 kPa) water pressure.
v' 120°F (49°C) water at dishwasher.
o/3/8" O.D. copper tubing with
compression fitting (1/2" minimum
plastic tubing is optional but not
recommended).
v' a 90° elbow with 3/8" N.P.T.external
pipe threads on one end.
Do not solder within 6" (15.2cm) from
water inlet valve.
Drain
You must:
v' usea new 12feet (3.7m) maximum
drain hose that meets all current
AHAM/IAPMO test standards and is
resistant to heat and detergent.
v' have a high drain loop 20 inches
(50.8cm) above the subfloor or floor.
V' connect drain hose to waste tee or
disposer inlet above drain trap in
house plumbing and 20 inches
(50.8cm) minimum above the floor.
v' use an air gap if the drain hose is
connectedto house plumbing lower
than 20 inches (5O.8cm) above
subfloor or floor.
v' use 1/2" minimum I.D. drain line
fittings.
6
CUtopenings In shaded ares of Cabinetwalls
or floor as specified in chart:
OPENINGFOR:
0
aii
4K
24"(61cm)**
i
i
24"(6_
34"(86.4cm)min.*
6"(5.2cm)
6"(1! .2am)
4"(lO.2cm)
4 II
(lO.2cm)
2-1/2"
(5.1cm)
5"(12.7cm)
5"(12.7um)
* Measured from the lowest point on the undersideof uountertop.
** Minimum, measured from narrowest point of opening.
Electrical Shock Hazard
Disconnect electrical power at
the fuse box or circuit breaker
box before installing dishwasher.
Failure to do so can result in
death or electrical shock,
(5.1cm)
r
DIAMETER:
water line
1/2"
drain line
1-1/2" (3,3 cm)
(1.3 sin)
direct wire
3/4"
power supply cord
1-1/2" (3.8 am)
(1.9 cm)
A.
Disconnect the power supply. Turn
water off.
1
Put on gloves and safety glasses
11
v' check that the water hne 0 reaches
to the front left of opening where the
water connection w_ll be made
,/
v' check that the direct wire Q reaches
to the front right of opening where
the electrical connection w_ll be
made
If the water line and the d_rect wire
reach into the opening far enough, go to
step 10, page 11.
Electrical
Follow all national and local codes and
ordinances for completing electrical
supply to cabinet.
if youare:
usesteps:
directwiring
3, 4 and5
usinga powersupplycord
3a and4a
HELPFUL TIP:
Wiring the dishwasher will he
easier if you route wire into the
cabinet opentng from the right
side.
continued on page 9
8
continuedfrompage8
1
Cut a 3/4" (1.9cm) hole (_ in right-hand
cabinet side, rear or floor. Optional
locations are shown.
Wood cabinet: Sand hole until smooth.
Metal cabinet: Cover hole with
Grommet (Part No. 302797) available
from your Sears store or service center.
Run wire into house wiring junction
box. Use strain relief method provided
with junction box. If no strain relief is
provided, install a U.L.-listed/CSAcertified clamp connector for flexibletype wire. If installingconduit, attach a
U.L.-listed/CSA-certified conduit
connector to junction box.
4.
Run other end of wire through cabinet
hole. Cable must extend to the right
front of cabinet opening. Go to step 6.
m
6"(15,2cm)
Cut a 1-1/2" (3.8cm) hole _) in righthand cabinet rear or side. Optional
locations are shown.
Wood cabinet: Sand hole until smooth.
Metal cabinet: Cover hole with
Grommet (Part No. 302797) available
from your Sears store or service center.
4a,
Install a mating, three-prong,
grounding-type wall receptacle _ in the
cabinet next to the dishwasher opening.
Go to step 6.
9
Water line
HELPFUL TIP:
Routing the water line throu_
the left side of cabfnet opening
will make water connection
easier.
Cut a 1/2" (1.3cm) minimum hole 0 in
left-hand cabinet s=de,rear or floor
Optional locationsare shown.
/
Measure overall length of copper tubing
_) required. Attach copper tubing to
water hne w_thmanual shutoff valve
Carefully feed copper tubing through
hole in cabinet (copper tubing w_ll bend
and kink easdy) until _t_sfar enough
into the cabinet opening to connect _tto
dishwasherinlet on the front left of
dishwasher.
m
a
Turn shutoff valve _) to "ON" position.
Flush water into a bucket to get rid of
particles that may clog the inletvalve
Turn shutoff valve to "OFF" position.
conhnuedon page 11
10
continued
frompage 10
Drain hose
10.
Cut a 1-1/2" (3.8cm) diameter hole in
cabinet wall or floor on the side of the
opening closest to the sink.
Connect drain hose to waste tee or
waste disposer following one method.
11.
If youhave:
and:
an air gap
gotostep:
11a.
no air gap*
11c.
anair gap
11b.
a wastedisposer
nowastedisposel
noair gap*
*an air gapis recommended
11a.
11b.
11d.
1. Remove the disposer knockout plug.
Cut end of drain hose O if needed
(do not cut ribbed section).
2. Attach drain hose to air gap • with
spring-type clamp O.
3. Use a rubber hose connector* •
with spring or screw-type clamps*
_) to connect air gap to disposer
inlet O.
This connection O MUST be before
drain trap _) and at least 20" (50.8cm)
above the floor where dishwasher will
be installed. Go to step 12.
1. Cut end of drain hose O if needed
(do not cut ribbed section).
2. Attach drain hose to air gap O with
1-!/2"-2" (3.8-5cm) screw clamp.
3. Use a rubber hose connector* •
with spring or screw-type clamps*
_) to connect air gap to waste tee _).
This connection _ MUST be before
drain trap (D and at least 20" (50.8cm)
above the floor where dishwasher will
be installed. Go to step 12.
11
1. Remove the disposer knockout plug.
Do not cut end of drain hose
2. Attach drain hose 0 to disposer inlet
0 with spring-type clamp O.
This connection O MUST be before
drain trap _) and at least 20" (50 8cm)
above the floor where dishwasher will
be installed. Go to step 12
11c.
11d.
1 Cut end of drain hose 0 (do not cut
ribbed section)
2 Attach dram hose to waste tee
with 1-1/2-2" (3.8-5cm) screw
clamp* _).
Th_s connectmn Q MUST be before
drain trap _) and at least 20" (50 8cm)
above the floor where dishwasher will
be installed Go to step 12.
* Parts avatlabie from local plumbing
supply stores.
HELPFUL TIP:
To reduce the vibration of the
hose, insert a cloth, putty or
caulking compound in hole
around drain hose.
12.
l
Insert drain hose 0 into hole cut in
cabinet to the front center of opening
where drain connection will be made.
12
all
Tip Over Hazard
Do not use dishwasher until
completely installed.
Do not push down on open door.
Doing so can result in serious
injury or cuts.
Excessive Weight Hazard
Use two people to move and
install dishwasher.
Failure to do so may result in
back or other injury.
Put dtshwasher corner posts 0 behind
dtshwasher. Grasp sides of dtshwasher
door frame and put dtshwasher on Ets
back.
11
Remove two top screws Q and two
bottom screws @ attaching access
panel _ and lower panel _ to
dishwasher using a 1/4" hex socket, nut
driver or Philhps screwdriver Remove
panels and set panels aside on a
protecttve surface. Check that
grounding chp 0 stays attached to
access panel
HELPFUL TIP:
0
Hold water valve mounting
bracket _) with pliers while
attaching elbow to water inlet
valve.
13
Apply Teflon tape or ptpe jo=nt
compound • to 90 ° elbow httmg 0
and connect fitttng to water =nletvalve
0. Hold bracket (_ with phers Ttghten
elbow unttl snug, and be sure that tt
faces to the rear.
Remove terminal box cover _ Pull
apphance wtres@ through hole m
termmal box
If you are direct wiring: install a U L.hsted/CSA-certd_edclamp connector @
to the terminal box If using condu_t,
use a U L -listed/CSA-certtfied conduit
connector.
If you are installing a power supply
cord kit, do so now and follow kit
instructions.
HELPFUL TIP:
Put cardboard under dishwasher
until it is installed in cabinet
opening. The cardboard will help
protect floor covering during
Installation.
_f
L:
1
t
t:
.f;
]
Measure hetght of cabinet opening from
underside of countertop to floor where
dishwasher will be installed 0 (you
need the lowest point) Check chart for
that hetght openmg Put wheels (D in
the requtred posttion.
MIn.
c.tou! height
34- (86.4cm)
34-1/8"(86.7cm)
34-511S"
(87 2cm)
34-1/2"(87.6cm)
continuedon page15
Wheel position
(see illustration)
1
2
3
4
14
continued
frompage14
6.
Stand dishwasher upright.
7.
Grasp the dishwasher door frame _).
Tilt dishwasher backwards on wheels
_). Move dishwasher close to cabinet
opening. Do not push on dishwasher
panels or console---they may dent.
?
\
1
1
10.
If dishwasher has a power supply cord,
insert power supply cord into hole cut
into cabinet,
Check that water line is on the left side
of openingand drain hose is near the
center of opening. If using direct wire,
check that it is on the right side of
opening.
Carefully move dishwasher completely
into cabinet opening. Do not kink or
pinch copper tubing, drain hose,
power supply cord or direct wire
between dishwasher and cabinet,
Center dishwasher in opening.
15
11.
Remove cardboard from under
dishwasher
HELPFUL TIP:
it Is okay if dishwasher fits
tightly into cabinet opening. Do
not remove insulation blanket-it acts as a sound barrier.
12.
side view
rue lat_rale
vista lateral
Align front of dishwasher console Q
with countertop edge 0. You may need
to adJust alignment to look good with
your cabinets.
HELPFUL TIP:
Prop up one side of frame to
hold dishwasher up off floor
when adjusting front legs.
13.
Check that leveling legs 0 are firmly
against the floor. Place level on the rack
guide • on one side of the d_shwasher
tub. Check that dishwasher is level from
front to back. AdJust leveling leg or add
shims under rear wheel until
d_shwasher is level. Repeat for other
s_deof dishwasher.
Place level against top front opening of
tub O. Check that d_shwasher is level
from side to side If dishwasher is not
level, adjust front legs up or down until
d_shwasher is level.
16
C.
Electrical
Connection
water
agua
eae
_l-electrical
el6ctrico
_lectrlque
desagde
d6charge
Check electrical requirements
(see pages 4-6). You need to.
I/have the correct electrical suppty and
recommended groundtng method
i/check that power supply _s
dtsconnected
If you are
directwiring
[ usinga powersupplycord
usesteps
1-4
1
Rotatedirect wireso that it does not
touch dishwashermotor or lower part
of dishwashertub Pull direct wire 0
through hole m terminal box
HELPFUL TIP:
• Select the proper size _ist-on
connectors to connect your
household wiring to 16-gauge
dishwasher wiring.
• Insert wire ends into twist.on
connector. Do not pre-twlst
bare wire.
• Twist connector.
• Gently tug on wires to be sure
both are secured.
Electrical Shock Hazard
Electricelly ground dishwasher•
Connect ground wire to green
ground connector in terminal box.
Do not use an extension cord.
Failure to do so can result in
death, fire, or electrical shock.
Connect the wires 0 as follows using
twist-on connectors _ sized to connect
direct wire to 16-gauge dishwasher
wire:
Form bare, ground wire _ into a
U-shaped hook. Wrap ground wire hook
clockwisearound ground connector0
and under the washer _1. Securely
tighten ground connector O.
Powersupplywire:
Terminalboxwire:
white-,_-_,-white
black_<-_,_black
groundingwire-.<-_ground connector
Tightenclampconnectororconduit
connectorscrews_).
Reinstall terminal box cover • with
wires inside terminal box. Go to step 5.
11
Electrical Shock Hazard
Plug into a grounded 3 prong
outlet.
Do not remove ground prong.
Do not use an adapter.
Do not use an extension cord.
Failure to follow these
instructions can result in death,
fire, or electrical shock.
Check that power supply cord does not
touch dishwasher motor or lower part
of dishwasher tub. Go to step 5.
continuedonpage 19
18
cont_nuedfrompage18
Water Connection
HELPFUL TIP:
Compressio.
m_s:
@
3. Slide nut O onto €opper tubing
• about I inch (2.5cm).
2. Slide lermle (_) onto the tubing,
Do net poaltion lermle on the
end of the tubing,
3. Pet the tubing into the elbow 0
as far as it will go.
4. Slide the nut and ferrule forward
and start the net onto the elbow
threads0. b carefalwhen
handbaga.d posmonb_the
coppertubing.R _nds and
kinks easily,
HELPFUL TIP:
Hold water valve mounting
bracket with pliers while
attaching copper tubing.
To preventvibrationduring operation,
route the watersupply hne so that it
does not touch the dishwasherbase,
frame or motor
With copper tubing _ pushed _nto
compression fitting as far as it will go,
use an adjustable wrench and tighten
compression fitting nut 0 to elbow O
on water inlet valve
19
6.
Place paper towel under elbow. Turn on
water supply and checkfor leaks.
Drain Connection
m
Route drain hose to avoid contact with
motor, door springs, water line, cabinet
or flooring. Insert a cloth, putty or
caulking compound in hole around drain
hose where hose passes through
cabinet to help minimize vibration noise.
Place a shallow pan 0 (pie or cake
pan) under drain connector _). Remove
drain hose connector cap O. Put the
drain hose clamp 0 onto the
connector.
No Io quite.
m
Push drainhose@ ontoconnector(D
upto the stops • on connector.
Usepliers to openclamp0 and
slide clamp overdrain hose O and
connector_). Releaseclamp and check
that the drain hose is held securelyon
connector.
2O
DII
Tip Over Hazard
Do not use dishwasher until
completely installed.
Do not push down on open door.
Doing so can result in serious
injury or cuts,
Open dishwasherdoor and place towel
0 over pump assembly and spray arm
of dishwasher. This will prevent screws
from falling into pump area when
securing dishwasher to countertop.
Check that dishwasher is still level.
11
Secure dishwasher to countertop with
two, No. 10 x 1/2" Phillips-head screws
0. The dishwasher MUST be secured
to keep it from tipping when door is
opened. Do Not drop screws into
bottom of dishwasher.
Open door about 3 inches (7.6cm) and
check that space between inner door
and tub is equal on both sides. If
spacing is not equal, loosen bracket
screws and shift tub. Tighten bracket
screws. Remove paper or towel from
dishwasher.
21
1
back
parletrasem
arri_re
front
pmledelantera
avant
upen ano ClOSe[fie ooor several [lllle_.
The door should open and close easily.
If the door closes too quickly, decrease
the spring _ tension by moving the
spring end _ toward the front of the
dishwasher.If the door falls open,
increase the spring tension by moving
the spring end toward the back of the
dishwasher. Springs should be in the
same notches on left and right sides.
Read the Owner's Manual that came
with your dishwasher.
Check that all parts have been installed
and no steps were skipped. Check that
you have all the tools you used.
1
At fuse box or circuit breaker, turn on
electrical power supply to dishwasher.
Start dishwasher and allow it to
complete the "Water Miser" cycle.
Check that dishwasher is working
properly and that there are no water
I_k_
Check that grounding clip O is attached
to the access panel. Put lower panel in
place and start screws through lower pane
holes and into dishwasher frame. Do not
tighten. Slide access panel over and down
onto screws. Reinstall screws through
holes in top of access panel. Check that
bottom edge of lower panel contacts the
floor. Tighten lower access panel screws.
If dishwasher
does not operate:
Has the circuit breaker tripped or the
house fuse blown?
Is the door closed tightly and
latched?
v' Has the cycle been set correctly to
start the dishwasher?
_' Is the water turned on?
22
To customizeyourdishwasher:
0
mm
Order the color accessory
you need.
CalI(U.S. only*)
Change door and access panel color
White - 675773
Almond - 675774
1-800-665-9978
Black-9743678
1-800-366-7278
White-9743679
1-800-366-7278
Almond- 9743680
1-800-366-7278
Install customwood panels, you
need a trim accessory that matches
the dishwasher color
33-7/8"
(86cm)mln.
* to front of doorframe
* al frente del marco
de la puerta
E
If you want to:
1-800-665-9978
If you have installation questions:
1-800-473-7247
*In Canada,call toll-free 1-800-665-4455 to order accessories or ask installationquestions.
I
• jusqu'audevantdu
cadrede a porte ]
mm
24"(61om)
Part No 9744231
Pieza No. 9744231
N° de piece 9744231
Sears, Roebuck and Co., 3333 Beverly Rd Hoffman Estates, IL 60179
Printed in U.SA.
Impreso en los EE;UU.
lmprim_ aux E-U