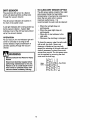
1
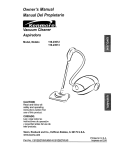
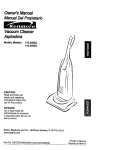
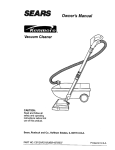
Owner'sManual
ManualDel Propietario
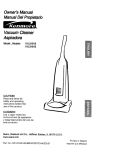
VacuumCleaner
Aspiradora
Model,
Modelo
116.34924
116.34925
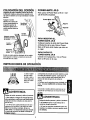
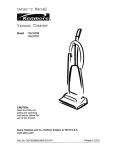
CAUTION:
Read and follow all
safety and operating
instructionsbefore first
use of this product.
CUIDADO:
Lea y sigue todas las
instrucciones de operaci6n
y seguridad antes del uso de
este producto.
Sears, Roebuck and Co., Hoffman Estates, IL 60179 U.S.A.
www.sears.com
Part No. CGI1ZCJN3_UO(3-KCO1ZCJNZGIUO
Printed in Mexico
Impreso en Mexico
AttachmentUse Chart ...............
Before UsingYour New
Vacuum Cleaner ....................
2
Kenmore Vacuum Cleaner Warranty
... 2
Important Safety Instructions .........
Upright Vacuum Cleaner Parts and
Features ...........................
3
Assembly
Instructions
4
.............
5-6
Operating Instructions ...............
Cord Release .......................
Releaseingthe Handle ................
TouchControl ......................
6
7
7
7
Pile Height Selection and Setting ........
8
Attachments .....................
8-10
Please read this guide. It will help you assemble
cleaner in the safest and most effective way.
VacuumingTips ....................
Performance/SafetyFeatures .......
11
11
12-13
Vacuum Cleaner Care ...............
Vacuum Cleaner Storage .............
Cleaning Exterior and Attachments .....
Dust Bag Replacement ..............
Filter Replacement ..................
Light Bulb Replacement ..............
AgitatorCleaning ...................
Clog Removal .....................
Troubleshooting
....................
14
14
14
15
16
17
17
18
19
Requesting Assistance Or Sendce back page
and operate your new Kenmore vacuum
For more information about vacuum cleaner care and operation, call your nearest Sears store.
You will need the complete model and serial numbers when requesting information. Your vacuum cleaner's model and serial number are located on the Model and Serial Number Plate.
Use the space below to record the model number and serial number of your new Kenmore
vacuum cleaner.
Model No.
Serial No.
Date of Purchase
Keep this book and your sales check (receipt) in a safe place for future reference.
LIMITED ONEYEAR
WARRANTY
ON KENMOREVACUUM
CLEANER
This warranty is for one year from the date of purchase, and includes only private household
vacuum cleaner use. During the warranty year, when this vacuum cleaner is operated and
maintained according to the owner's manual instructions, Sears will repair any defects in
material or workmanship free of charge.
This warranty excludes vacuum cleaner bags, belts, light bulbs, and filters, which are
expendable parts and become worn during normal use.
For warranty service, return this vacuum cleaner to the nearest Sears Service Center in
the United States.
This warranty applies only while this product is in use in the United States. This warranty gives
you specific legal rights, and you may also have other rights which vary from state to state.
Sears, Roebuck and Co., D/817 WA, Hoffman Estates, IL 60179
rvl
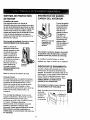
WARNING:
,1
Your safety is important to us.To reduce the risk
of fire, electrical shock, injury to persons or
damage when using your vacuum cleaner, follow
basic safety precautions
including the following:
Read all instructionsin this manual before
assemblingor usingyour vacuum cleaner.
Do not rest vacuum cleaner on steps.
Do not put on chairs,tables, etc. Keep on
floor.
Use your vacuum cleaner only as
described in this manual. Use only with
Sears recommendedattachments.
Do not use vacuum cleaner to pick
flammable or combustible liquids
line, cleaning fluid, perfumes, etc.),
in areas where they may be present. The
fumes from these substances can create a
fire hazard or explosion.
Disconnect electrical supply before perf._orming maintenance to the brusn area:
t-allure to do so could result in electrical
shock or the brush suddenly starting.
Do not leave vacuum cleaner when
pluggedin. Unplugfrom outletwhen not in
use and before preformingmaintenance.
Do not pick up anything that is
smoking, such as cigarettes, matches, el
hot ashes.
To reduce the risk of electrical shock - Do
not use outdoors or on wet surfaces.
Do not use vacuum cleaner without dust
bag and/or filters in place.
Do not allow to be used as a toy. Close
attention is necessary when used by or
near children.
Always change the dust bag after vacuuming carpet cleaners or freshener, powders, and fine dust. These products clog
the bag, reduce airflow and can cause the
bag to burst. Failure to change the bag
promptly could cause permanent damage
to the cleaner.
Do not use with a damaged cord or plug.
If vacuum cleaner is not working as tt
should, has been dropped, damaged, left
outdoors or dropped in water, return it to a
Sears Serv ce Center.
Do not use the vacuum cleaner to pick up
sharp hard objects, small toys, pins, paper
clips, etc. They may damage the cleaner or
dust bag.
Do not pull or carry by cord, use cord as
a handle, close a door on cord, or pull core
around sharp edges or corners. Do not run
vacuum cleaner over cord.
Keep cord
away from heated surfaces.
Do not unplug by pulling on cord.
unplug, grasp the plug, not the cord.
Do not operate vacuum cleaner without the
belt access door properly installed (if applicable).
To
The hose contains electrical wires. Do not
use when damaged, cut, or punctured. Do
Not pick up sharp objects.
Do not handle plug or vacuum cleaner with
wet hands.
Do not put any objects into openings.
Do not use with any opening blocked;
keep free of dust, lint, hair, and anything
that may reduce air flow.
Always turn off and unplug the vacuum
cleaner before connectinq or disconnecting either hose, Handi-ma-te Jr. (if applicable) or Power-mate Jr. nozzle.
Keep hair, loose clothing, fingers, and all
parts of body away from openings and
moving parts.
You are responsible for making sure that
your vacuum cleaner is not used by anyone unable to operate it properly.
Turn off all controls before unplugging.
SAVE THESE INSTRUCTIONS
Proper assembly and safe use of your vacuum cleaner are your responsibilities.
Your
vacuum cleaner is intended for Household
use. Read this Owner's Manual carefully for
important use and safety information. This guide contains safety statements under warning and caution symbols.
3
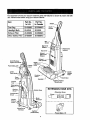
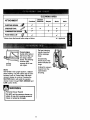
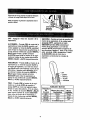
It is important to know your vacuum cleaner's parts and features to assure its proper and safe
use. Review these before using your vacuum cleaner.
Item
Part No.
In U.S.
Part No.
In Canada
Dust Bag
20-50690
20-50690C
Headlight Bulb
20-5248
20-5248
Exhaust Filter
20-86889
20-86889C
Motor Safety Filter
20-86884
20-86884C
Handle
Control
Sensor
Beg Cover
Release
indicator
Bag Cover
Exhaust
Rher Cover
Release
Exhaust
Quick Release
Height
Power-Mate
Jr.®
Lever
Cord
Lower
Cord Hooks
Release
Pedal
Carry
Guard
-Nozzle Base
Agitator Overload
Reset Button
Crevice
Tool
Telescoping
Wand
Dusting
IIit
Stretch
Combination
Brush
Hose
EXTENSION HOSE KITS
Extension Hose
Motor
Protector
Handle
Release
Model/Serial
Numbers
Agitator
(Underneath)
Power-Mate
4
Jr.®
_
Igiven. WARNING statements alert you to such dangers as fire, electricshock, burnsI
IPlease
pay special
attentionto
hazard alert
alert you
boxes,
follow
any instructions]
I_d
personal
injury.
CAUTIONthese
statements
to and
such
dangerous
personall
Ilnjuryand/or property damage.
/
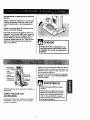
Electrical Shock Hazard
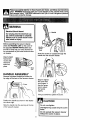
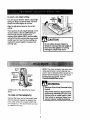
Do not plug into the electrical supply until the assembly is complete.
Failure to do so could result in electrical shock or injury.
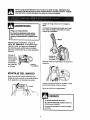
H_no_lldlWee_Handle
Before assembling the vacuum cleaner,
check the PACKING LIST on the cover of
the separate REPAIR PARTS LIST. Use
this list to verify that you have received all
the components of your new Kenmore vacuum cleaner.
Insert the screw so it passes through the
handle into the vacuum cleaner.
Attach stretch
hose end to
nozzle until
hose end
locks into
place.
Hose
End
HANDLE ASSEMBLY
Remove the screw located just below the
top edge of the back of the vacuum cleaner.
Screw
Begin to tighten
the screw with
your fingers. It
may be necessary to adjust
the handle
slightly.
Using a screwdriver, tighten the screw.
Position the handle as shown in the illustration above right.
Slide the handle into the opening at the top
of the vacuum cleaner.
l
CAUTION
Do not overtighten.
Overtightening
holes.
could strip the screw
Do not operate the vacuum cleaner
without the screw In place.
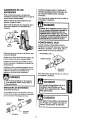
CORD ASSEMBLY
POWER-MATE JR.®
Make sure the quick release upper cord
hook is in the uprightposition.Remove the
wiretie from the power cord.
For operation of Power-Mate
separate Owner's Manual.
Lock the power cord
into the locking notch
base by pressing it
into the quick release
upper cord hook as
shown. This helps
keep the power cord
out from under the
vacuum cleaner agitator.
Jr.® see
Lockln_
Notch
Latch
- Caddy
Tab
Power
TO INSERT
POWER-MATE
JR"
Place the rear of the Power-Mate
Upper Cord
Hook
the caddy. Rotate the Power-Mate
back until it snaps into place.
Power
Cord
Jr.® into
Jr. ®
TO REMOVE POWER-MATE
JR. e
Lift up on the latch and rotate Power-Mate
Jr.° out of the caddy.
Lower
Cord
Wrap the power cord around the upper and
lower cord hooks and lock the power cord
plug onto the power cord.
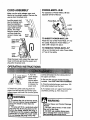
OPERATING INSTRUCTIONS
1. Turn the
quick release
upper cord
hook to either
side and down
to release the
cord is still locked into the locking notch of
the upper cord hook.
3. Be sure the vacuum cleaner has bag
installed. See DUST BAG REPLACEMENT.
4. Plug the polarized power cord into a 120
Volt outlet located near the floor.
power cord.
2. Detach the power cord plug from the
power cord and pull the cord oft the quick
release upper cord hook. Be sure the power
!
5. To replace cord, turn upper hook counterclockwise pointing up, then wrap cord.
WARNING
• To reduce the risk of electric shock,
this vacuum cleaner has a polarized
plug (one blade is wider than the
other).
• The plug will fit in a polarized outlet
only one way. If the plug does not fit
fully in the outlet, reverse the plug. If
it still does not fit, contact a qualified
technician to install the proper outlet.
Do not change the plug in any way.
Personal Injury and Product Damage
Hazard
• DO NOT place hands or feet under
the unit at any time.
• DO NOT use outlets above counters. Damage from cord to items in
surrounding area could occur.
6
Releasethe handleby pressingdownon
the handlereleasepedalwithyourfootand
pulling back and down on the handle with
your hand.
Note: The agitator does not rotate when the
vacuum cleaner is in the upright position.
Handle
Release
Pedal
OFF - Turns OFF the vacuum cleaner
(suction) motor.
CARPET - Turns ON the vacuum cleaner
motor to HIGH suction level and the agitator motor to HIGH speed level for cleaning
of most carpets and rugs. In order to get
MEDIUM and LOW suction levels for
cleaning, press the SUCTION button to
cycle the vacuum cleaner motor through
MEDIUM, LOW, and HIGH suction levels
respectively.
GENTLE
I
FLOOR -Turns ON the vacuum cleaner
motor to HIGH suction level and turns OFF
the agitator motor for cleaning of bare
floor. In order to get MEDIUM and LOW
suction levels for cleaning, press the SUCTION button to cycle the vacuum cleaner
motor through MEDIUM, LOW, and HIGH
suction levels respectively.
SUCTION - Changes the suction level of
the vacuum cleaner motor. If the unit is
OFF, pressing the SUCTION button turns
ON only the vacuum cleaner motor to
HIGH suction level for cleaning of most
carpets, rugs, and fabrics. If the unit is
ON, pressing the SUCTION button cycles
the vacuum cleaner motor through suction
levels.
_/OFF
1_
- Turns ON the vacuum cleaner
motor to HIGH suction level and the agitator motor to LOW speed level for gentle
cleaning of most delicate carpets and rugs.
In order to get MEDIUM and LOW suction
levels for cleaning, press the SUCTION
button to cycle the vacuum cleaner motor
through MEDIUM, LOW, and HIGH suction
levels respectively.
_I
MOTOR
Touch
Control
Button
OFF
CARPET
GENTLE
FLOOR
SUCTION
SUCTION
FUNCTION
Vacuum Cleaner
(Suction) Motor
OFF
HIGH
HIGH
HIGH
HIGH/MEDIUM/LOW
Agitator
Motor
OFF
HIGH
LOW
OFF
To select a pile height setting:
Height
Adjustment
Lever
\
Turn off vacuum cleaner. Select a pile height
setting by tilting the cleaner back until front
wheels are lifted slightly off the floor.
Slide the adjustment lever to the correct
setting.
There are four (4) pile height settings on the
vacuum cleaner. Use the LOW setting for
most low-pile carpets and bare floor
cleaning (with agitator OFF), and the HIGH
setting for high-pile carpets like shag carpet,
scatter rugs, etc. Use the other settings as
needed for carpet heights in-between low
and high pile.
CAUTION
Do not allow vacuum cleaner to
remain in one spot for any length of
time when the agitator is turning.
Damage to carpet may occur.
Crevice
NOTE: The motor protector may open when
using attachments or when cleaning new
carpet, due to reduced airflow caused by the
attachments themselves or by new carpet
lint filling the bag quickly. See the
TROUBLESHOOTING
section.
Tool _
Telescoping
Wan_
Dusting
-Stretch
Hose
Combination
Hose
Collar
Identify each of the attachments
above.
!
TV.. WARNING
Electrical Shock And Personal Injury
Hazard
shown
Disconnect electrical supply before
performing maintenance to the uniL
Failure to do so could result in electrical shock or personal injury from
vacuum cleaner suddenly starting.
TO USE ATTACHMENTS
Remove the lower end of the stretch hose
from the vacuum cleaner by grasping the
hose collar, press the release button and
pull straight out. The attachments can now
be added to the hose.
8
TELESCOPIC WAND WITH
SUCTION CONTROL SLIDE
To achieve maximum reach
with the attachments, add the
crevice tool to the end of the
wand by inserting and
twisting slightly.
1. Remove the
hose from the
Hose
c_
hose clip by
pulling straight
out.
sucaon m' I IU_II II
controlN J-I I Ill II
2. Remove the telescopic wand from its
storage position.
Telesc°pic///
3. Remove
the crevice
tool from its
Crevice//
--Crevice
Tool
storage position in the
wand. Turn
H
_
_x
_ /_Raised
Tool //
_
y
Telescopic
Wand
/ff
_
Tab/
The dusting brush or the combination
brush may be attached directly to the
wand or placed on the end of the crevice
tool.
the locking
ring to the
UNLOCK
position.
4. Extend the wand to its full length. Turn
the locking ring to the LOCK position.
Attach the extension wand onto the open
end of the hose.
Lower_
Wand ---'_'_f_
Dusting
Brush
Wand
(Some Models)
Combination
Brush
=
_,mJ
(Some
Models)
I_
\
\
L.J
I
Brush
TO OPERATE SUCTION
CONTROL SLIDE
Suction
Control Slide
Telescopic Wand
I
\
"_.,,__
Wand
_<_,_.Lock/ngRing
Unlock
_,_-
When using attachments for cleaning
draperies, small rugs with low pile and other
delicate items, twist the suction control slide
to the open position. This slide is located on
the telescopic wand, close to the hose.
! _'_¢t..J
|_
Upper
Wand
Align the tabs on the extension wand with
the "J" slots in the hose (as illustrated above
right). Push the wand into the hose and
twist to the right to lock.
This will reduce suction for ease of cleaning.
Note: Return
suction control
slide to the closed
position for
normal cleaning.
!
Suction
Control
Sfide
CAUTION
When using attachments, be careful
not to overextend the stretch hose
when reaching.Trying to reach
beyond the hose stretch capability
could cause the vacuum cleaner to
tip over.
9
TO STORE ATTACHMENTS
Connect extensionhose to stretchhose by
pressingtogether,Make sure electrical
connectionsare pressed firmly together.
Remove dusting brush or combination
brush, Snap into appropriate storage location.
To disconnect press release button on
hose and pull apart.
Remove crevice tool from the wand by twisting. Lay aside.
Remove the extension wand from the hose.
Twist the wand to the left and pull from the
hose end.
Unlock the wand by turning the wand locking ring to the UNLOCK position.
/
Lower
F.T ,f
//
When using the stretch hose or with
the extension hose attached, the
vacuum cleaner should be on a solid
surface on the same level or below
the level of the user's feel DO NOT
use the hoses when the vacuum
cleaner is above the level of the
user's feel
wan"
I IUnl°ck
I
POWER-MATE JR.®
Upper
Wand
When attaching Power-Mate Jr.® to
extension hose align electrical connections and press together. Power-Mate
Jr.® cannot be used with extension wand.
Slide the lower wand into the upper wand.
Turn the wand locking ring to the LOCK
position.
Power-Mate Jr.®
Place the crevice tool down into the compressed wand. Snap into the appropriate
storage location.
Reinsert the hose fully into the opening on
the nozzle body from which it was removed.
Press firmly to assure connection.
_
Electrical
Connectors
CAUTION
To disconnect press release
hose and pull apart.
button on
CAUTION
EXTENSION
DO NOT connect Power-Mate Jr._ to
electrified hose with power to
vacuum cleaner ON. ALWAYS unplug
before connecting powered
attachments.
HOSE
Some models include an extra hose which
connects to the stretch hose on the vacuum
cleaner for a longer cleaning reach.
Extension
Release
Button
CAUTION
DO NOT leave the Power-Mate
Jr.®
running in one spot for any length of
time. Damage to carpet may occur.
="
\
Connection
_-
Stretch Hose
10
CLEANING
A'I-rACHMENT
Furniture*
DUSTING BRUSH
it
CREVICE TOOL
tt
COMBINATION BRUSH
Between
Cushions*
Stairs
v'
v'
i/
i/
= Applicable
,,t%
Pivoting
0,/
v'
*Alwaysclean attachments beforeusing on fabrics.
Brushes
Walls
it
i/
Power-Mate Jr._
AREA
For
ceanin
Carpet edges
Guide either side or
the front of the noz-
results, keep the
airflow passage
clear.
zle along a baseboard. The pivoting
brushes help
remove dirt at carpet edges.
Occasionally,
check each of the
areas indicated for
clogs.
Unplug the vacuum
cleaner from the
outlet before
Stairs
Set handle in full upright position. Agitator
stops rotating. Use the crevice tool or combination brush or Power-Mate Jr.® when
checking.
vacuum cleaner is running. Pressing the
SUCTION button will cycle the vacuum
cleaner motor through HIGH, MEDIUM and
LOW suction levels.
WARNING
Personal Injury Hazard
DO NOT set the vacuum cleaner on
stairs. It may fall, causing personal
injury or property damage.
11
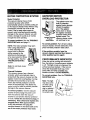
MOTOR PROTECTION SYSTEM
AGITATOR MOTOR
OVERLOAD PROTECTOR
Motor Protector
This vacuum cleaner has a motor
The agitator motor has
built-in protection
against motor damage
should the agitator
jam. If the agitator
slows down or stops,
the agitator overload
protector shuts off the
agitator motor. The
Agitator Overload
vacuum cleaner motor
Protector
will continue to run.
Reset Button
protector by-pass valve which
automatically opens to provide cooling air
to the vacuum cleaner motor when a clog
prevents the normal flow of air to the
motor. If the by-pass valve opens to
prevent motor overheating and possible
damage to the vacuum cleaner, you will
notice a change of sound as air rushes
through the valve opening.
To correct problem: See the TROUBLESHOOTING table and page 11.
NOTE: The motor protector
when using attachments
or when cleaning new
carpet, due to reduced
airflow caused by the
attachments themselves
or by new carpet lint filling
the bag quickly. See the
TROUBLESHOOTING
section.
To correct problem: Turn off and unplug
vacuum cleaner, remove obstruction, then
press overload protector reset button.
may open
If the problem persists, have the
vacuum cleaner serviced by a Sears or
other qualified service agent,
PERFORMANCE
Motor
Protector
Note: Do not block motor
protector.
Thermal Protector
This vacuum cleaner has a thermal
protector, which automatically trips to
protect both the vacuum cleaner and the
agitator motor from overheating. If a clog
prevents the normal flow of air to the
motor, the thermal protector turns the
motor off automatically. This allows the
motor to cool in order to prevent possible
damage to the vacuum cleaner.
To correct problem:
SHOOTING table.
To correct
airflow through
the attachment.
problem:
See the TROUBLE-
Note: The light
may also come
on when using
attachments,
due to reduced
Turn the vacuum
cleaner off and unplug the power cord
from the outlet to allow the vacuum
cleaner to cool and the thermal protector
to reset. Check for and remove clogs, if
necessary.
Also check and replace any
clogged filters. Wait approximately
thirty (30) minutes and plug the
vacuum cleaner in and turn back on to
see if the motor protector
INDICATOR
When the unit is running with normal air
flow, the light on the performance indicator
is off. The light comes on whenever the
airflow becomes blocked. If that occurs,
check the disposable dust bag, motor
safety filter and other possible clog
locations shown in CLOG REMOVAL.
has reset.
12
Indicator
DIRT SENSOR
TO CLEAN
The electronic dirt sensor is a feature
The dirt sensor optics consist of two optic
cells located inside the bag holder.
Occasionally, it may become necessary to
clean the two optic cells to assure
maximum performance. It is
recommended the optic cells be cleaned:
which will detect particles as they pass
through the vacuum cleaner.
The dirt sensor indicators is located on
the front of the switch cover.
SENSOR
OPTICS
• When the red light stays on
continuously.
A red light indicates dirt is being picked up
by the vacuum cleaner. A green light
indicates most of the dirt has been picked
• When the green light stays on
continuously.
• When dirt or dust adheres to the
up by the vacuum cleaner.
optic ceils.
• Whenever the dust bag is changed.
OPERATION
As you vacuum, the red indicator light will
come on and stay on as long as the
To clean the sensor, wipe the optic cells
with a soft, dry cloth. Never use
cleaners or liquids as they can help
speed the recoating of the optic cells and
make it necessary to clean them much
sooner than normal. The dirt sensor area
sensor detects a high concentration of
particles passing through the vacuum
cleaner.
!
DIRT
WARNING
can be reached by removing the dust
cover and the dust bag.
Electrical Shock And Personal Injury
Hazard
Disconnect electrical supply before
performing maintenance to the unit.
Failure to do so could result in electrical shock or personal injury from
vacuum cleaner suddenly starting.
Optic
Cells
13
s Bag Holder
VACUUM CLEANER CARE
Alwaysfollow all safety precautionswhen
performingmaintenanceto the vacuum
cleaner.
Electrical Shock And Personal Injury
Hazard
Disconnect electrical supply before
performing maintenance
to the unit.
Failure to do so could result in electricel shock or personal injury from
vacuum cleaner suddenly starting.
Gather the cord and wrap it loosely around
the upper and lower cord hooks.
Store the vacuum
Electrical Shock And Personal Injury
Hazard
cleaner in a dry,
indoor area, on
the floor with the
handle locked in
the upright
position.
Wrapping the cord too tightly puts
stress on the cord and can cause
cord damage. A damaged cord is an
electrical shock hazard and could
cause personal
Injury or damage.
Unplug cord from wall outlet. DO NOT drip
water on vacuum cleaner.
Clean exterior using a clean, soft cloth that
has been dipped in a solution of mild liquid
detergent and water, then wrung dry. Wipe
dry after cleaning.
Do not use attachments
if they are
wet. Attachments
used in dirty
areas, such as under a refrigerator,
should not be used on other
surfaces until they are washed.
They could leave marks.
To reduce static electricity and dust buildup, wipe outer surface of vacuum cleaner
and attachments.
Wash attachments in warm soapy water,
rinse and air dry. DO NOT clean in dishwasher.
14
TO REMOVE DUST BAG
TO REPLACE DUST BAG
!
1. Unfold the
new dust bag.
Fold the safety
seal tab on the
WARNING
Always unplug power cord from
electrical outlet before performing
any maintenance on the vacuum
cleaner.
new dust bag
away from the
opening that
fits on the bag
holder.
1. Pull out on the
bag cover release
located near the
top of the bag
cover.
Dust
Bag
Seal Tab
/,
//
/
NOTE: See PARTS AND FEATURES for
bag number.
Bag
//_'_
2. Insert the dust
bag onto the bag
holder completely
by holding the bag
collar.
2. Pull the bag
cover forward
and lift up.
Remove and lay
aside.
Bag
4.Throw away the
used dust bag.
corner flaps shown
here. Be sure the
bottom and sides
of the dust bag are
completely within
bag cavity prior to
replacing the bag
cover.
,,Dust
Bag
Do not reuse dust bag.
- Beg Holder
Safety
Filter
O
3. Place the dust bag
collar into position.
4. Tuck the bag
behind each of the
four bag retention
3. Grasp the dust bag
collar and pull gently,
carefully removing
the dust bag.
B
Check the bag
holder and the
Bag
Retention
Comer
Flaps
5. Position the bag
cover so its positioning tabs fit into
the body positioning tab slots.
Slots
motor safety filter. If either is
blocked, check
TROUBLESHOOTING.
6. Close the bag
cover.
CAUTION
You will hear a
NEVER REUSE A DUST BAG.Very
fine materials, such as carpet freshener, face powder, fine dust, plaster,
soot, etc. can clog the bag and
cause it to burst before it is full.
distinct snap
when cover is
Bag
securely closed.
Check to see that the dust bag is fully
enclosed in the bag cover.
Change bag more often when vacuuming these materials.
15
EXHAUST FILTER
Check motor safety filter frequently and
change when dirty.
!
(HEPA)
I.,3w,=,o
WARNING
Electrical Shock Hazard
Do not operate without exhaust
Unplug power cord from electrical
outlet. Do not operate the vacuum
cleaner without the motor safety filter. Be sure the filter is dry and
properly installed to prevent motor
failure and/or electrical shock.
filter, Failure to due so may damage
the vacuum cleaner
The exhaust filter cartridge must be
replaced when dirty. It should be replaced
regularly depending on use conditions. The
filter CANNOT be washed as it will lose
its dust trapping ability.
Remove the dust bag as outlined in the
DUST BAG REPLACEMENT section.
Note: See PARTS AND FEATURES for the
exhaust filter number.
MOTOR SAFETY FILTER
(ELECTROSTATIC)
1. The filter must be
replaced when dirty.
It should be replaced
regularly depending
on use conditions.
The filter CANNOT
be washed as it will
lose its dust
1. Slide the
exhaust filter
cover release
down.
Motor
Safety
Filte
Bag
cover
Exhaust Filter
2. Pull out on
exhaust filter
cover to remove
from bag cover.
Fil_
Bag
trapping ability.
3. Removethe
exhaustfilter
Note: See PARTS
AND FEATURES for
motor safety filter number.
Exhaust
cartridge from the
bag cove_
2. If the filter, located in the bottom of
Motor
Safety
3. Replace the
filter, smooth
(white) side up,
by sliding it back
into place under
the ribs in the bag
cavity.
4. Replace the
exhaust filter
the bag cavity, is
dirty, remove it by
pulling forward and
out from under the
ribs.
Cover---=
cartridge, carefully
positioning it so that it
fits into the bag cover.
The black edge of
the filter should be
Exhaust
Filter --
eag
1
facing away from
the operator. Push
only on filter cartridge
frame, not on filter itself.
Motor
);rN
ExhaustFilter
Replace the bag as outlined in the DUST
BAG REPLACEMENT
section.
16
_1/
5. Replace the
exhaust filter
cover and secure
the latch by
pushing it upward.
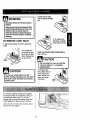
3. Remove the light
bulb by pulling straight
out.
To Release
Electrical Shock Or Personal Injury
Hazard
Disconnect electrical supply before
performing maintenance to the unit.
Failure to do so could result in
electrical shock or personal injury
from the vacuum cleaner suddenly
starting.
To Replace
TO REMOVE LIGHT BULB
1. Disconnect power cord from electrical
outlet.
\
2. Pry light lens
out at slot in rear
as shown on both
sides. Rotate lens
4. To replace the
light bulb, carefully
insert fully into slot.
Note: See PARTS AND FEATURES for
bulb number.
up and lift off.
CAUTION
Slots
Do not use a bulb rated over 9W
To replace light
lens, place tabs at
front of lens into
slots. Rotate lens
(13V). During extended use, heat from
the bulb could overheat surrounding
down and snap
into place.
CAUTION
To maintain efficient cleaning, the agitator
must be kept free of carpet fiber, string, or
hair build-up. After every 7 to 10 uses,
unplug and turn vacuum cleaner over and
check agitator for fiber and hair build-up.
Use scissors to remove any build-up entangled around the agitator.
17
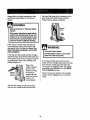
Alwaysfollow all safety precautionswhen
performingmaintenanceto the vacuum
cleaner.
Re-insert the hose into the opening on the
lower body from which it was removed.
Press firmly to assure connection.
Stretch
Hose
Electrical Shock Or Personal Injury
Hazard
Hose
Collar
Disconnect electrical supply before
performing maintenance to the unit.
Failure to do so could result in electrical shock or personal injury from
vacuum cleaner suddenly starting.
If the vacuum cleaner does not seem to
have adequate suction, first check if the
dust bag is full or if a filter is clogged. See
DUST BAG REPLACEMENT
and FILTER
REPLACEMENT.
WARNING
If the bag and filter areas are free of clogs,
check the hose area. Remove the lower end
of the stretch hose from the vacuum cleaner
by grasping the hose collar, twisting, and
pulling straight out.
Stretch
Hose In
and Out
If the bag and filter areas and the hose
areas are free of clogs, disconnect the hose
from the floor nozzle pipe and check the
nozzle pipe for clogging. Clean the agitator
according to the instructions in the AGITATOR CLEANING section.
Plug in the
vacuum cleaner
and turn it on.
Stretch the hose
to maximum
length and then
allow the hose to
return to its
Return the vacuum cleaner to the upright
position before plugging into an electrical
outlet.
natural length.
Turn off and unplug the vacuum cleaner.
Remove any visible clogs from the hose.
18
Review this table to find do-it-yourselfsolutionsfor minor performanceproblems.Any other
service needed, should be performedby a Sears or other qualifiedservice agent.
Vacuum
cleaner
won't rgn,
1.
Unpluggedat wall outlet.
2. Trippedcircuitbreaker/blownfuse
at householdservicepanel.
3. Thermal protectortripped.
Poor Jobof dirt
pick-up.
1. Fullor cloggedd_t bag.
2. Wrong pile heightsetting.
3. Worn agitator.
4. Cloggednozzleor bag holder.
5. Cloggedhose.
6. Hole in hose.
7. Hose notinsertedfully.
i 9"
. Motorpmtactlensystemactivated.
Dirtyfilters.
Plug in firmly,select the desiredsetringon the touchcontrol.
Reset circuitbreakeror replace fuse.
Unplugvacuumcleaner allowto cool
and thermalpmtactorwill reset itself.
1. Change bag.
2. Adjustsetting.
3. Taketo yournearestSears
Service Center.
4. Check CLOG REMOVAL.
5. Check for clogs.
6. Taketo your nearestSears
ServiceCenter.
7. Insert hosefufiy.
8. Check for clogs.
9. Change motorsafety filter and
exhaustfilter.
Vacuum Cleaner picks up
moveable rugs or
pushes too hard.
1. Wrong pileheight setting.
1. Adjust setting.
Light won't work.
1. Burnedout lightbulb.
1. Changelightbulb.
Agitator does not turn.
1. Handlein full uprightposition.
1. Move handlefrom uprightposition.
2. AgitatorOverleadtripped.
3. Thermal protectortripped.
2. Reset AgitatorOverload.
3. Unplugvacuumcleaner allowto cool
andthermal protectorwill reset itself.
1. Full or cleggeddust beg.
2. Dirtyfilters.
1. Changebag.
2. Changemotorsafety filter and
exhaustfilter.
3. Clear clogfrom airflow passage.
4. This is normal.Lightshouldgo off
when tool is removed.
Performance indicator,
some models, is red.
3. Cleggedairflowpassage.
4. Certain attachmenttools.
Air flow restricted
with attachment use.
1. Attachmentuse restrictsair flow.
1. CheckATTACHMENTS.
Sound changes.
2. New carpet fuzz cloggedair path.
2. Check CLOG REMOVAL and clean
hose.
Dirt Sensor, some
models, will not work.
1. Dirtyopticcells.
1. Clean opticcells.
Difficulty adjusting pile
height eattlng
1. Vacuum cleanernot in upright
position,
1. Tilt vacuumcleaner to upright
position.
19
20
Antes de usar su asplradora nueva .....
I
6
6
Sugerenciaspare aspirar ...............
10
Carecterfisticas
de
rendimiento/seguridad
...............
11-12
Culdado de la aspiradora ..............
13
Almacenamientode la aspiradora ........
13
Limpieza del exteriory de los accesorios... 13
Camblode la bolsapare polvo...........
14
Cambiode filtros .....................
15
Cambiode la bombilla .................
16
Umpieza del ag_der ..................
16
C6mo eliminarlos residuosde basura
en los conductos.....................
17
7
7-9
10
Reconocimiento de problemas .........
18
Informaci6n de assistancia
o eervlclo ......................
backpage
Garantia de la aspiradom de Kenmore ... I
Inetrucclonesimportantes de
segurldad ............................
2
Piezas y caractedeticae
de aspiradora
verticar...............................
Instruccionee do ensamblamiento
.....
Instrucciones de operaci6n ............
Liberaci6ndel cord6nel_ctrico............
Despmndimiento
del Mango ..............
Pulsadorde Control ....................
Ajustey selecci6nde nivelde pelode la
alfombra ............................
Accesorios.........................
Cuadrode uso de los accesorios.........
3
4-5
5
5
Porfavorlea esta guiaque le ayudaraa assomblary operarsu aspiradoranuevade Kenmoreen una manera
mas seguray efectiva.
Paramas informaci6nacercadel cuidadoy operaci6nde esta aspimdor,Ilame a su tiendaSearsmas cercana.
Cuandopreguntepor informaci6nustednecisitardel n,',memcompletode serie y modelode la aspiradoraque
estanen la placa de los nfmerosde modeloy serie.
Use et espaciode abajopara registrarel n_merode modeloy serie de su nuevaaspiradorade Kenmore.
N_mero de Modelo
NL_merode Serie
Fecha de Compra
Matengaeste iibro y su reciboen un lugarseguropara referenciasfutures.
GARANTiALIMITADA DE UN AI_ODE LA ASPIRADORAKENMORE
Esta garantiaes porun aSo desdela fecha de compra,e inctuyesolamenteel usode la aspiradora en
hogaresprivados.Durante el aSo de garantia, cuando la aspiradoraes operada y mantenida de acuerdo al
manualde instruccionesdel due5o, Sears reparar_,cualquierdefecto en materialeso fabricaci6n libre de cargo.
Esta garantia excluyelas bolsas de colecci6n, correas, lamparillas,y filtros,las cuales son partes gastablesque
se deteriorancon el uso normal.
Para el servicio de garant|a, retorne esta aspiradora al Centre de Servicio Sears rods cercano en los
Estados Unidos.
Esta garantia se aplica solamentemientras este producto est,, en usoen losEstadosUnidos.Esta garantia le
da a usted derechos legalesespecificos, y usted puede tener tambi_n otros derechos los cuales varian de
estado a estado.
Sears, Roebuckand Co., £)/817WA, Hoffman Estates, IL 60179
Susegurldad
esmuyImpodante
paraneaotms.
Para
mmmmm
poral0 dan_- al _bar su aspb-adora,
acb_ede acuen:lo
con precauclonesb_sloasde segurldad,entreeUas:
Lea este manualantesde armar o utilizarsu
aspiradora.
Use su aspiradora_nicamente en la forma
descdtaen este manual.Use Qnicamentecon
accesoriosracornendadospor Sears.
Para raducirel riesgode choqueel6ctdco,no use
su aspiradoraal aira fibreni sabre superficies
mojadas.
Desconectela provisi6nde electdcidadantesde
efectuar el mantenimientodel drea del cepillo.
De lo contrarlo podrfacausar unchoqueel6ctrico
o lesi6ncorporal.
Siempredebe apagarsu aspiradoraantesde
desconectarla.
No descansela aspiradorasobreescalones.
La manguera contiene cablesel_ctricos.No los
use cuandoest6ndafiadoso pinchados.Evite
levantarobjetosafilados.
Slempre apag6 la aspiradoraantesde conectar
o de desconectarla manguerao la boquillaelectrica.
No use la aspiradorasin tenerinstaladala boise
para polvoy/o los filtros.
Cambie siempm la bolsaparapolvodespu6sde
aspirarlimpiadoresde alfombraso desodorantes,
talcosy polvosfinos.Estosproductosatascanla
bolsa,reducenel flujode aira y puedencausar
qua 6stase rompa.Si no cambiala boisepodria
No desconectela aspiradoratirandodel cord6n
eldctrico.Paradesconectarla,jale el enchufe,no
el cord6n.
No use laaspiradorasi el cord6no el enchufe
es_ dafiado.Si la aspiradorano est_
funcionandoadecuadamenteo si se ha dejado
caer,est,. daSada,se ha dejadoexpuestaa la
intemperie o se ha dejadocaer en agua, devu_lvalaa un Centrede serviciode Sears.
ocasionardafiopermanentea la aspiradora.
No usela aspiradorapara levantarobjetosagudos,juguetespeque_s, alflleres,sujetapapeles,
etc.PodriandaSarla aspiradorao la bolsapara
polvo.
No jale ni transportela aspiradoraporel cord6n;
no use et cord6ncomomango;no cierrepuertas
sobreel cord6n;no jale ei cord6nsobm rebordes
agudosni esquinas.No pase laaspiradorasobre
el cord6n.Mantengael cord6n alejadode superficiescalientes.
No levanteningunacosaque se est6 quemando
o emitiendohumo,comocigarrillos,cerilloso
cenizascalientes.
No abandonela aspiradoracuandoestdconectada. Descondctela
cuandono la est6 usandoy
antesde dade servicio.
No usela aspiradorapara aspirarliquidos
inflamableso combustibles(gasolina,liquidos
para limpieza,perfumes,etc.) ni la use en
lugaresdonde6stospodn'anestarpresentes.Los
vaporesde estassustanoiaspuedenerear un
No permitaqua sea utilizadacomojuguete.Se
requieratener mayorcuidadocuandosea
utilizadaen la pmximidadde niF}os
o pot nifios.
No toquela aspiradorani el enchufecon las
manos mojadas.
No coloqueobjetosen lasaberturas.
No utilicela aspiradorasi algunaaberturaesta
bloqueada;mant_ngalafibrede polvo,pelusa,
cabellosy cualquieracosaque poddadisminuir
el flujo de aire.
peligmde incendioo explosi6n.
Tengacuidado especial al utilizar la aspiradora
en escalones.No la coloquesobresillas,mesas,
etc.Mantdngalaen el piso.
Usted es responsablede asegurar qua su aspiradora no sea utilizadapor ninguna persona que no
puedamanejarlacorrectamente.
Mantengael cabello,ropasuelta,dedosy todas
laspartesdel cuerpoalejadosde tas aberturasy
piezasmecdnicas.
GUARDE ESTAS INSTRUCCIONES
El armado y usoseguro de su aspiradora son su responsabilidad.Esta aspiradora ha sido diseSada
exclusivamentepara use dom_stico.La aspiradora deber_,almacenarseen un lugar seco yen el interior.
Lea este Manualdel propietario detenidamente, pues contiene informacibn importantesobre seguridady
uso. Esta guia contiene informaci6nsobre seguridad debajo de simbolos de advertienciao cuidado.
2
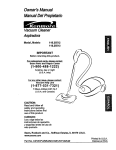
Es importante concerlaspiezasy caractedsticas de su aspiradorapara asegurarsu uso adecuadoy seguro,
Examfnelasantesde usar su aspiradora.
Objeto
Pieza N2
Pieza N9
en EUA
en Canadd
Bolsapara polvo
20-50690
20-50690C
Bombilla de farol
20-5248
20-5248
Filtro de escape
20-88889
20-86889C
Filtrode seguridad
del motor
20-86884
20-86884C
de Control
Indicador de
polvo
Seguro de la
cublerfe de
Cuble_a
de
rendimiento
Flltto de
Sujetador superior
de liberaci6n r_pida
del cord6n
(dentro)
Power-Mate Jr.®
Sujeladors
del cord6n
inferior
Mango
fiberaci6n
delmango
pare
Farol
He_am_n_s
pare
hen_duras
Bot6n para reajustar la
sobrecarga de agitador
Manguera
giratoria list
user
Tubo
Cepillo
para
expansible
Cepillo pare
combinacidn
JUEGOS DE MANGUERA
boquflla
DE EXTENSION
Manguera
de extension
.Protector
de motor
Pedal de
liberaci_n
del mango
N_meros de
series y modelo
Agitador _
(abajo)
Power-Mate
3
Jr.®
U
informack_n
le alertarddel peligrode fuego,choqueselectricos,quemadasy ]esiones.Culdado:
Estefavor
informacidn
alertarade
peligros
comolesionesy
Pot
ponga
eIs
special
atenci6n
a 6stosrecuadros
condaSosde
alerta de propiedad.
riesgo.Adverteucla:Este
Coloqueel mangocomose ve en el diagrama
abajo.
ADVERTENCIA
AI mantenerla manguera de manemque no interfsra, muevael mangoa la aberturaen la parte
superiorde la aspiradora.
Pellgro de cheque eldctrlco
No conecte le asplradora hast= que termine de armada. De Io contrario podrfa
causar un choque eldctrlco o lesldn corporal.
Antes de armar la aspiradora, cheques La
USTA DE EMBALAJE en la cubierta separada de la Lista de Partes para Reparacibn.
Use esta lista para verificar que ha recibido
todas las componontes de su nueva aspiradora
Kenrnore.
Conecte el
extremode la
manga eldstica
ala boquilla
cerciordndose
que quede fija
en su lugar.
Orirmlo del
tornillo en
el mango
Inserte el tornillo para que pase por el mango de la
aspiradora.
Cabo de
la manguera
MONTAJE DEL MANGO
Quite el tornillo del mango Iocalizado justo
debajo del horde superior de la parle posterior
de la aspiradora, vet ilustracibnde arriba.
Empiecea apretarel torni]locon los dedos. Quizd
sea necesarioajustarun pocoel mango.
Aprieteel tornillocon un destornillador.
No apriete demasiado el tornillo.
Si lo apriet= demasiado podria arruinar los
orificios para el tornUlo.
No opere Is aspiradora sin tener instalado
el tornillo.
4
COLOCACI( N DEL CORDON
POWER-MATE JR.@
Assgt_rese
de que el sujetadorsuperiordel corddn
de libemci6nrdpidase encuentreen posick_n
vertical Quiteel alambreconel que est_atado el cord6n
eldctrico.
Para operar el Power-Mate
ual dee dueSo separado.
Asegureel cord6n
el6ctricoen la ranurade
la basepresion.-_ndoio
en
el ganchosuperiorde
libsraci6nrdpidapara el
cord6nel6ctricocomose
muestra
de liberaci6n
del cord6n_
Jr.® ver man-
Seguro
de f_
Leng_eta
r_pida
PARA INSERTAR EL
POWER-MATE
JR.®
Coloque la parts de atrds del Power-Mate
Jr.® adentro de la caja Rote el PowerMate Jr.® hacia atrds hasta que calce en
su lugar.
el_ctrico
Sujetadors
inferior del
cord6n
PARA SACAR EL
POWER-MATE
JR.®
Levante en el picaporte y rote el PowerMate Jr.® fuera de la caja.
Enrolleel cord6nel6ctricoalrededorde lossujetadorassuperiore inferiory presionela ranuradel
enchufesobreel cord6n.
INSTRUCClONES DE OPERA( :ION
1, Gire el sujetadordel cord6n
de lado a lade y
haciaabajopara
liberar el cordon
eldctrico.
2. Desprendael enchufedel cord6nel6ctricoy quite
el cord6n del sujetadorsuperior.Est6 seguro de
que el cablede poderest_ todaviafijado en la
rnuescade trabadel ganchode arriba del
cord6n.
3. Verifiqueque la aspiradoratengainstaladauna
bolsa. ConsultsCAMBIO DE LA BOLSA PARA
POLVO.
4. Conecte el cord6n eldctricopolarizadoen un
enchufede 120 voltios que se encuentrecerca
del piso.
ADVERTENCIA
ro de lesi6n personal y da_o al producto
a reducir el riesgo de choque eldctrico,
esta aspiradora cuenta con una clavija polarizade (uno de los contactos es m&sancho
que el otro).
ADVERTENCIA
Peligrode lesibn personaly daSo al producto
NO PONGA manos ni pies debajo de la
unidaden ningdnmomento.
• La clavija solo puede introducirse de una
manera en el enchufe. Si la ctavija no cabe
bien en el enchufe, invi_rtala. Si adn no
cabs, gamea un electricista para que instale
un enchufe correoto. No alters la clavija de
nin_una manera.
• NO use los enchufesIocalizadossobre los
muebles.Los objetos cercanospodfianresultar da_ados.
5
Q
Desprenda el mango pisando el pedal de liberaci6n
y tirandadel mangohaciaabajocon la mano.
Nota: El agitador no girar_si la aspirador_est,. en
posici6nvertical.
liberacl6n
del mango
SUCCI6N
OFF - Apaga el motor de succi6n de la
aspiradora.
ALFOMBRA
- Prende (ON) el motor de la
aspiradora al nivel de ALTA succl6n y el
motor agitador al nivel de ALTA velocidad
para limpiar la mayorfa de las alfombras. A
fin de obtener niveles de succi6n MEDIO y
BAJO para limpiar, apriete el bot6n
SUCCION para ciclar el motor de la aspiradora a trav6s de los nivetes de succi6n
MEDIO,
- Cambia el nivel de succi6n del
motor de la aspiradora. Si la unidad estd
apagad.a (OFF), apretando el bot6n
SUCClON prende (ON) solamente el
motor de la aspiradora a un nivel de
succi6n ALTO para limpiar la mayorfa de
las alfombras, tapetes y telas. Si la unidad
est,. prendida (ON), apretando el botbn
de SUCClON cicla el motor de la
aspiradora a trav6s de los niveles de
succi6n.
BAJO, y ALTO respectivamente.
MODERADO
- Prende (ON) el motor de la
aspiradora a un nivel de succi6n ALTO y
el motor del agitador a un nivel de velocidad BAJO para una limpieza suave de las
alfombras y tapetes mds delicados. A fin
de obtener niveles de succidn MEOIO y
BAJO para limpiar, apriete el bot6n
SUCCION para ciclar la aspiradora a
trav6s de los nivetes de succi6n MED|O,
BAJO, y ALTO respectivamente.
__OFF
CARPET
FL
OO"
=oT,o.
PISO - Prende (ON) el motor de la aspiradora a un nivel ALTO de succibn y
apaga (OFF) el motor del agitador para
limpiar el piso descubierto. A fin de obtener los niveles de succi6n MEDIO y BAJO
para limpiar, apriete el bot6n SUCClON
para ciclar el motor de la aspiradora a
tray,s de los niveles de succi6n MEDIO,
BAJO, y ALTO respectivamente.
FUNCION
Pulsador
de
Control
OFF
CARPET
GENTLE
FLOOR
SUCTION
6
MOTOR
Motor (Succi6n)
Aspiradora
APAGA
ALTO
ALTO
ALTO
ALTO/MEDIO/BAJO
Motor
A_litador
APAGA
ALTO
BAJO
OFF
Paraseleccionar
unaJuste
denlveldepelodela
alfombra:
Apague
laaspiradora.
Seleccione
unniveldeajuste
inclinando
laaspiradora
haciaatrdshastaque las
Height
Adjustment
Lever
ruedasdelanterasest6nun pocodespegadasdel
piso.
Deslicela palancade ajustede nivelde pelode la
alfombraa la posici6ndeseada.
Hay cuatro(4) posicionesde ajustedo alturaen la
aspiradora.Use la posicibnLOW para la mayoriade
alfombrasy sueloslisos(conel agitadorOFF), y la
posici6nHIGH para alfombrasde fibraslargaso
abundosas,tapetespequeSos,etc. Utilicelosotros
ajustescomosea necesariopara lasdiferentes
alturasde la alfombra.
Herramlenta
Tubo
telesc
Cepillo
para sacudir
_
Manguera
expansible
Cepillo para
combinaci6n
_
Collar de
manguera
CUIDADO
Nota: La valvulade desviacibnpuede estarabierta
mientrasse usan los accesorios o para limpiar una
alfombra nueva a causade un flujo reducidode aire
por los accesorios mismos o
por la pelusa de la alfombra que Ilene la bolsa rapidamente. Consulte el cuadro RECONOCIMIENTO
DE PROBLEMAS.
ro de choque el_ctrico o lesi6n
Identifiquecada uno de losaccesoriosmostrados a
continuacibn.
COMO UTILIZAR LOS
ACCESORIOS
Saca la parte inferior de la manguera expansible de
la aspiradoray tirandopot atr&s.Ahora se puede
conectar la manguera.
oral
onecte la unidad antes antes de
tuar el mantenimlentoa su aspira. De Io contrario podr/a producirse un choque eldctricoo causar
lesi6n corporal si la aspiradora arranca
de manera imprevista.
ADVERTENCIA
I
Lamanguera
incorporada
gira
parafacilitar
la
Ilmpieza
oncual-
Paraobtenerla m_ima
Iongitudcon los
Manguera,
accesorios,instale la
herremientapara
hendidurasen
Desllzador
de control de
el extremedel
tubo.Pare
hacerlo,
introd_zcala
en el tubo
Tubo
y girela
un poco.
Giratorlaquierdirecci6n.
Paraquitarla
manguera,tirede Manguera
la mangueradel
del collar collar.
BorOn
deslacado
TUBO TELESCOPICO CON
CONTROL DE ASPIRACION
Herramlenta
para
hendiduras
para hendiduras
Cuando use el cepillopara sacudiro el cepillopara
combinaci6n,puedeinstalarlos
directamente
enel
tuboo en extremode la harramienta
parehendiduras.
Saque el tubo
telesc6pico de
SU lugar de
almacenamiento.
PARA OPERAR EL
DESUZADQR DE CONTROL DE
ASPIRACION
_ll_pico
Hert_mlenta
Retirela herramientapara hendidurasde su lugarde
almacenamientodentrodel tubo.Gireel are de bloqueo hastala posici6nUNLOCK.
Cepillo
//_-
III E
hendlduras
para sacudir
gunos
Despliegueel tubocompletamente.Gireel aro de
bloqueodel tubobasrala posici6nLOCK.
Instaleel tubode extensi6nen el extremoabiertode
para
Tubo
modelos)
C_plllo
_,o _.,_
Comblnacl_n
\
(Algunos
L-J
modelos)
\
I
"-F
Ceplllo
la manguera.
Tubo telesc6pico
Tubo
_
inferior-----_
Deslizador
de control
>2
Cuando useaccesoriospara limpiarcortinas,
tapetespequefiosde pelo cortoy otrosarticulos
delicados,gireel deslizadorde controlde aspiraci6n
a la posici6nabierta. Este selectorse encuentraen
el tubotelesc6pico,cerca de la manguere.
Esto reducira la
Tub°
superior
potencia de
aspiraci6n pare
facilitar la
limpieza.
Alineelas pestafias del tubo de extensi6n conlas
ranurasen forma de "J" de la manguera (Como se
muestra arfiba a la derecha). Empujeel tubo dentro
de la manguera y gire hacia la derecha para bloquearlo.
Deslizador
de control
de aspiraci6n
Nota: Coloque
el desfizadorde
control de aspiraci6n a la posicion cerradapara la
limpieza normal.
CUIDADO
Cuando use los acceaorios, tenga cuidado
de no estirar demasiado la manguera expansible para tratar de alcanzar maa lejos. Si
trata de estirar la manguera rods de Io
debido, podria cauaar que la aapiradorase
venga abajo.
8
ALMACENAJE DE LOS
ACCESORIOS
Conectela manguera extraala manguera de
extensl6napretdndolasjuntas. Est6 segum qua
las conexionesaldctdcasest=tn apretadas
firmemente.
Retireel cepillopara sacudiro el cepillopara
combinaci6n.
Col6quelosflrmemente en sulugarde
almacenamiento
correspondiente.
Para desconectar apriete el bot6n de soltar en
la manguera y sepdrelos.
Retire_sherramlentapare hendidurasdel tubo
girdndola.P6ngalaa un lado.
Retireel tubode extensi6nde la manguera.Gire el
tubohaciala izquierday tire del extremode la
manguera.
Cuando use la manguem en forma normal o
con la manguera de extensi6n instalada,la
asp|radora debe mantenersesobre una
superflcleflrme al mlsmo nlvel o a un nlvel
inferior que los pies del usuario. NO use las
mangueras cuando la asp|redora est6 a un
nivel m_isalto que los pies del usuarlo.
Tubo
Abr_
Cerrsr
bloqueo
deltubo
_,.
POWER-MATE JR.®
Tubo
superior
Cuando conecte el Power-Mate Jr.® ala
manguera de extensi6n alines tas consxiones
eldctricas y aprietelas. Power-Mate Jr.® no
puede usarse con la vara de extensi6n,
Desbloqueeel tubo girando el am de bloqueo hasta
la posici6nUNLOCK.
Power-Mate Jr,®-_
_._.._
jj
Deslice el tubo inferiordentro del tubo superior.Gire
el aro de bloqueodel tuboala posici6nLOCK.
Introduzca la herramientapare hendidurasdentin
del tube comprimido.
Instale bien en suposici6n de
almacenamiento.
Aseg_resede que launidadest_ apagada.Inserte
nuevamentela manguera completamentedentrode
la aberturaubicadaen la parteinferiorde la
aspiradora, de dondela sac6 inicialmente.
"_
Conexi6n
eldctrica
Para desconectar apriete el botbn de soltar en
la manguera y sepdrelos.
CUIDADO
CUIDADO
NO tire de la aspiradora pot la manguera
en la habiteci6n. PodHanocurrir da_os a
sue pertenencias.
NO conecte Power-Mate Jr.® a la
manguera electrificada
la aspiradora
desenchufe
MANGUERA DE EXTENSI(3N
ALGUNOS MODELOS
con el
ON. SIEM-
Unos modelos incluyen una manguera auxiliar qua
conecta con la manguerade estirar en la aspiradora
para una extensionmas larga para limpiar.
CUIDADO
Suelte el
._
"_
extr_
NO deje el Power-Mate Jr.® andando
en un lugar por ningt_n intervalo de
tiempo. Puede dafiar la alfombra.
_\1
el_crrlca
_--Manguera
9
I
AREA A LIMPIAR
ACCESORIO
Muebles*
Entre
cojlnes*
Escalones
Paredes
CEPILLO
SACUDIRPARA
HERRAMIENTA PARA
HENDIDURAS
CEPILLO PARA
COMBINACION
Power-Mate
t/
i/
<_
v'
v'
Jr.®
• Siemprelimpielosaccesorios
antesde usarsobmtelas.
.....
_
Cepillos
pivotes
v' = Apiicable
_] .......
-
ff
i/
i<_ll,,,iF
r
--!;lilili
Paraobtenerlos
mejores resultados
de limpieza,mantengadesbloqueadoslos conductos
de flujode aire.
Guie unode loscostados
o la parte anteriorde ia
rillas de Io
alfombras
boquillaa
largodel
bordede la pared.Los
cepillospivotesayudana
limpiarel polvode los
bordesde las alfombras.
Examinede vez en
cuandocada una
de laszonasque
se indicapodrfan
causarbloqueo.
Escalones
Dosconectela
aspiradoradel enchufe antesde examinarla.
Coloqueel mangoen la posici6nvertical. El agitadorpara de girar. Use la herramienta para
grietas o cepillo combinaci6n o PowerMate Jr.® cuando la aspiradora estd
andando. Apretando el bot6n SUCCION
ciclar_ el motor de la aspiradora a travds
de los niveles de succi6n ALTO, MEDIO
y BAJO.
ADVERTENClA
Peligrode lesl6n personal
NO COLOQUE la aspiradora en la
escalera.Si se cae, podrfa oausar leai6n
personal o dafio a la propiedad.
10
......,;,:_
SISTEMA DE PROTECTION
DE MOTOR
Protector
PROTECTOR DE SOBRECARGA DEL AGITADOR
de motor
Esta aspiradora tiene una vdlvula de
desviaci6n que sirve como protector de motor y
se abre automaticamente para proveer un flujo
de aire al motor cuando un bloqueo impida que
cimule el aire al motor. Si se abre la vdlvula
bypass para impedir que se recaliente el motor
y que so daSe la aspiradora, se notara un
cambio de sonido miantras el aire pasa por la
abertura de la vdlvula.
Botdn para reajustar
el protector se
sobrecarga
del
agitador.
Para corregir el problema: Consulte el cuadro
RECONOCIMIENTO DE PROBLEMAS.
Nota: La v_.lvulade
desviaci6n puede estar
abierta mientras se usan
los accesorios o para
limpiar una alfombra
nueva a causa de un
flujo mducido de airo por
los accesorios mismos o
por la pelusa de la
alfombra que Ilena la
bolsa rapidamente.
Consulte el cuadro
RECONOClMIENTO DE
PROBLEMAS.
El motordelagitador
tieneuna proteccibn
incorporadacontra
da_odel motoren
casodeque el
agitadorse tranque.
Si el agitadorse
ponelentoo se
detiene,el protector
de sobrecargadel
agitadorapaga el
motordel agitador.El
motorde succi6n
continuard
funcionando.
Para corregir el problema:Apagudy desconectd
la aspiradora, limpie la obstrucci6n,y despuds
presloneel bot6n del protectorde sobrecarga.
Si el problema persiste,busque un tdcnico
calificadoque haga el servicio de la aspiredora.
INDICADOR DE RENDIMIENTO
Cuandola unidadestdfuncionandoconel flujo
normalde aire, el indicadorde mndimiento estd
apagado.Se enciendela luzcuandoel flujo deaire
est_ obstrufdo.Si estosucede,revisela bolsapara
polvo,el filtrode la seguridaddel motory otros
lugaresposiblespor residuosde basura.Vedse
COMO ELIMINAR LOSRESIDUOS DE
BASURA EN LOS CONDUCTOS.
Nota: No obstruye el protector de motor.
Protector Termal
Esta aspiradora tiene un protector termal que
se ajusta automdticamente para proteger a la
aspiradora del sobrecalentamiento. Si una
obstrucci6n impide el flujo normal de aim al
motor, el protector termal apaga el motor
automdticamente para permitir que el motor so
enfrie a fin de evitar posibles daSos a la
aspiradora.
Para corregir el problema:Ve_iseel diagrama
RECONOCIMIENTODE PROBLEMAS.
Nota: Es posible que la luzencienda al usar los
accesorios
/ i
i
porque el flujo
de aire es
reducido por
los accesorios.
Para corregir el problema: Si esto ocurre,
apague la aspiradora y desenchufe el cordbn
del tomaeorriente para permitirque la
aspiradora se enfrie y que el protector termal
se reajuste. Busque y saque las
obstrucciones, si es necesario. Examine
tambidn y reemplace cualquier filtro
obstruido. Espere aproxirnadamente treinta
(30) minutos y enchufe la aspiradora y
volt6ela para vor sl el protector del motor se
ha reajustado.
11
INDICADOR DE POLVO
PARA LIMPIAR I.AS CELDAS OPTICAS
El indicadorde polvoy el indicadorde sensibilidad
estdnIocalizadosen la partedelanterade la cubierta del indicador.
Los 6pticosdel indicadorde polvoconsistsde dos
celdas6pticasIocalizadasdentrodel compartimiento para Is bolsa. De vez en cuandoes necesario
limpiarlasdos celdas6pticasparaque funcionen a
su capacidadrndxima.Se recorniendalimpiarlas
celdas6pticas:
El indicadoreldctricode polvoes unacaracterfstica
que detectael polvornientras que pasapot la aspiradora.
La luz rojaindicaque la aspiradoraaspirael polvo.
La luz verde indicaque la mayorfadel polvoya fue
aspiradopor la aspiradora.
• Cuandose enciendecontinuarnente
la luz
roja.
• Cuandose enciendecontinuamentela luz
verde.
• Cuandoss adhierenla tierrao el polvoen las
celdas6pticas.
• Cuandose carnbiala bolsaparapolvo.
OPERACION
AI pasarla aspiradora,la luz rojadel indicadorde
polvoenciendey sigueencendidamientrasque el
indicadordetectauna concentmci6naltade polvo
pasandopor la aspiradora.
!
Para limpiarel indicador,Iirnpielocon un trapo
suavey seco. Nuncause detergenteso liquidos
porqueellospuedenensuciarlorodsrdpidolas celdas 6pticasy serd necesariolirnpiarlasmdsseguido
de Io normal. Se alcanzael cornpartimiento
para el
indicadorde polvocuandoquitala cubiertade polvo
y la bolsaparapolvo.
ADVERTENCIA
Peligrode choque el6ctrico o lesi6n corporal
Desconecte la unidad antes de limpiarla o
darle serviclo. De Io contrario podHa produclrse un choque el_ctrico o causar
leei6n corporal si la aepiradora arranca de
manera irnprevista.
12
E'.f ADVERTENCIA
Siga siempretodaslas instrucciones
de seguridad
antesde efectuarel mantenimientoa su aspiradora.
Peligm de choque el(ctrico o lesi6n corporal
Desconecte la unidad antes de efectuar el
mantenlmlentoa su asplradora. De Io contrario podrfa producirss un choque el(c.
trlco o causar lesldn corporal el la aspiradora arranca de manera imprevista.
Recojael cord6ny enrrblleloen lossujetadoressuperiore inferior,sin que quede muy apretado.
Peligrode choque el(ctrlco o lesi6n corporal
Guardela aspiradora
bajotechoen un lugar
seco,con el mangoen
posici6nvertical.
Si enrolla el cord6n muy apretado puede
tensarlo mucho y oausarle dafios. De daSarse, el cord6n podrfa causar descargasel(ctricas y lesiones o
dafios pemonales.
Desconecteel cord6neldctricode la clavijade la
pared.NO rocie agua sobre la aspiradora.
CUIDADO
Limpieel exterior con un trapo suavey limpio,que
ha sido exprimido despu6s de remojar en una soluci6n de agua y detergente liquido ligero. Seque el
exterior con un trapo seco despuSsde limpiar.
No use los accesorios si estan mojados.
Los accesorios que se utilicenen _reas
sucias, debaJodel refrigerador,no deben
usarse en otras superficiessin antes ser
lavados. Podr|an dejar marcas.
Limpiela superficie exterior del receptdculoy de los
accesorios para reducir la electricidad est_tica y la
acumulaci6n de polvo.
Lavelos accesoriosen agua tibiajabonosa,
enjuaguey deje secaral airs.No los lave en lavadora de platos.
13
1SARAQUITAR LA BOLSA PARA
POLVO
PARA CAMBIAR LA BOLSA
Desdoblela bolsa
para polvonueva.
Doble la lengBeta
de seguridadde la
nuevabolsapara
polvoen direcci6n
contradaa la abertura que va en el
sujetadorde la
bolsa.
ADVERTENClA
Tire haciaadelantede la liberaci6nsituada
cercade la parte
superiorde la
cubiertade bolsa.
Liberaci6nde_
Cubierta
de I/_'_
-Cavidadpara
la bolsa
- Filtro de
seguridad
del motor
/
Coloqueel collarde la bolsa
en posici6n.
Aseg0reseque la
Leng_etas
bolease queda
deretenci6n
detrasde las
de labolsa,
leng5etasde
retenci6nde cada
ladodemostradas
aqui, Aseg_resede
que la parts inferior
de la bolsapara
polvoest6
completamente
dentin de la cavidadparala bolsaantesde instalar
la cubiertade la bolsa.
Tomeel collarde la
bolsa para polvo y tire
con cuidadopara retirar
la bolsapara polvo.
Sujotadorde
la botsa
/
Insertsla bolsaparapolvo
completamente
sobreel sujetadorde la bolsasujetandola
bolsaporel collar.
Tirede lacubierta
de la bolsahacia
el frente.Refirela
y d6jelaa un lado.
Tire la bolsausadaa la
basura.NO la vuelva a
usar.
LengiJeta de
seguridad
Nota: ConsultePI_-AS Y CARACTERJSTICAS
para determinarel Ng.de la bolsapara polvo.
laboisa-_
Cubierta
de la
Bolsapara
.Bolsa
para
polvo
Revise el sujetador
de la bolsa y el filtro
de seguridad del
motor.
Coloquela cubierta de la bolsa
de maneraque
lasleng_etasentren en las ranura
de posici6ndel
cuerpo.
Ranuras
Si estuvieran
bloqueados,
consults la tabla de
diagn6stico de
pmblemas.
Cierre la cubierta de
la bolsa.
,_"-
AI escucharun
chasquido
caracteristico ser_ in- CUbidelae
NUNCA REUTIMCE UNA BOLSA PARA
POLVO.Los materialesmuy finos, tales
como desodorantes para alfombras,talco
facial, polvo fino, yeso, holffn,pelusa de
alfombras nuevas,etc., pueden atascar la
bolsa y causar que se rompa antes de que
este Ilena. Cambie la bolsa rodsseguido
cuando aspire eels tipo de materlales.
dicaci6nde
que la cubiertaha cerrado
bien.
bolsa-_l_
I
tl
Asegdrese de que la bolsa para polvoeetd
instalada per complete en la cubierta de bolsa.
14
Examine
elfiltmdeseguridad
delmotor
devezen
cuando
ycambielo
cuando
est6 sucio.
FILTRO DE ESCAPE
HEPA
CUIDADO
Pellgrode choquo eldctrico
Daaenchuta el cord6n de la cordente e|6ctrica. No opere la asplradora sin el filtro de
aegurldad del motor. Aseg_urese de que
el firm eat6 aeco • [nstalado adecuadao
manta para impedir qua el motor falle y/o
qua sa produzca un choque e]6ctrico,
No opera la aspiradora sin el filtro de
escape.
Este cartuchodel filtroescapese tieneque cambiar
cuandoestdsucio.Debe cambiarseped6dicamente
segdnlascondicionesde uso. El flltro no ee
puede lavar pues prderi_ su capacidad para atrapar altrapar polvo.
Paraquitarla bolsa,siga las instrucciones
en CAMBIO DE LA BOLSA PARA POLVO.
Nota: Consulte PIEZASY CARACTER|STICAS
para determinarel N°. del filtro de escape.
FILTRO DE SEGURIDAD DEL
MOTOR
ELECTROSTATICO
1. Ests filtrose tiene
que cambiarcuando
est_ sueio. Debe
cambiarssperi_dicamerits seg_n las
condiciones
de uso.
El filtro no se pueda
lavar puea prder|a su
capacidad para atrapar polvo.
Mueva hacia abajo
la liberaci6n de la
cubiertade filtro de
escape, Tire hacia
adelantede la
cubiertadel filtrode
escapepara quitar
la cubiertade la
bolsa.
Filtrode
seguridad
del motor
"
_"_
de
del
fittro de escape
Cub iertadel
_
II
_
_1
I J
--_._
_
filtro de escape _
_
1
Quite el cartuchodel
filtro escape de la
cubierta de bolsa.
Reemplaceel cartucho
del filtro escape,colocdn- Cubierta
dela
dolo concuidadopara
que quepaen la cubierta
de la bo]sa.El filo negro
del filtro debe estar
Filtro de
opuesto del operario.
Empuje_nicamenteel
cartuchode filtro, no el
filtromismo.
_"
sucio,s_que_otirando
de el hacia adelante
dad para ta bolsa,estd
pordebajode las estrias.
3. Reemplaceel
filtro,con el lado
suave (blanco)
haciaarriba,
desliz_ndolo en su
lugarbajo las
estfiasen la cavidad de bolsa.
de
Filtro de
2. al
do
Si fondo
el flltro,Iocalizade la cavi-
seguridad _
Liberaci6n
la cubierta
Cublerta
dela
Nora: Consulte PIEZAS¥ CARACTERISTICAS
para determinar el N°. del fiJtm de seguridad del
motor.
Filtro de
Cublerta
la bolsa -._
Filtrode
la cubierta de/
Liberaci6n
de
filrro
de escape
seguridad
de
Cublerta
filtro
Vease CAMBIO DE LA BOLSA PARA POLVOpara
cambiarla bolsa.
15
del
I
cubierta del filtro
de escape y
ernpuje
hacia
Reemplazcael
arriba la libe_aci6npara asegurarlo.
Remueva la bombilla
tirando derecho hacia
afuera.
|/"_1
//,:r
Para reUrar
Pellgmdechoque
el6ctricoo lesi6ncorporal
Desconecte
launidadantesdeefectuar
el
mantenlmlento
asuaeplradora.
DeIocontrariopodr|aproducirse
unchoque
el6ctrlcoo causarlesl6ncorporal
sl laasplradoraarranca
demanera
Imprevlsta.
Para reemplazar la bombiUa cuidadosamente
PARAQUITAR LA BOMBILLA
Para remplacar
\
Ranuras
Abracon una palanca cuidadosamente
el lentede luz por ta
ranurade la parte
posteriorcomose
muestraen ambos
lados.Gire el lente
haciaarriba y tewintelo.
ins6rtela en el porta
bombilla.
Nota: Mire PIEZASY CARACTERISTICASpara el
numerode la bombilla.
cUIDADO
onecte o enciende la aspiradora antes
CUIDADO
rmarla completamente.
No use una bombilla de mdsde 9 vatios
(13 volts). Cuandose use la aspiradora
por un largo periodo de tiempo, el calor de
la bombilla puede calentar las partes de
plastico cerca.
Para reemplazarel
lentede luz coloque
las presillasal frente
del lente en las
ranuras.Gire el lente
haciaabajo y encdjeIo en el sitio.
Lente
de Luz "
Para un aspiradoeficiente, el agitadordeber set
mantenido libre de fibrasde alfombra, hilos, o acumulaci6nde pero.Luegode 7 a 10 uses,desenchufey d_ vueltaa la aspiradoray reviseel agitador para vet si tieneacumulaci6nde hilos,fibras o
pelo.
Use tijeraspara sacarcualquieracumulaci6natorada alrededordel agitador.
16
Proceda
siempre
conprecauciones
deseguridad
antes
deefectuar
elmantenimiento
a suaspiradora.
Insertanuevamentela manguera an la aberturade
la parteinferiorde dondela retir6.Empujeconfirmezapara asegurarsede que quedebienconectada.
Pellgm de choque el6ctrico o lasl6n corporal
- Manguera
expansible
Deaconectela unldad antes de efectuar el
mantenlmiento a su aspiradora. De Io contrarlo podrfa produclrse un choque el6ctrico o causar fesi6n corporal si la aspiradora arranca de manera Imprevlsta.
Collar de la
manguera
Siconsideraque la aspiradora noaspirabien
aseg_mseprimerode que la bolsano est6 Ilenay
de que el filtro no est6 atascado.Consultalas instruccionessobreCAMBIO DE LA BOLSA PARA
POLVOy LIMPIEZA DE FILTROS.
I
Si laszonas del filtro y la bolsa no estan atascadas,
examinela zonade la manguera.Retireel extremo
inferiorde la mangueraexpansiblede la aspiradora
lom_ndolapar el collary tirandode haciaarriba.
Extienda y
afloje la
manguera
ADVERTENCIA
Peligrode lesi6n personal
NO coloque nunca laa manoa ni los pies
debajo de la unidad.
Enchufela aspiradoray encidndala.
Estiraal m_lximola
manguera y luego
permitaque se
encojahastasu
tama5onormalde
almacenamiento.
Si las_.reasde la bolsay del filtroy las_.reasde la
mangueraestdnlibresde obstrucciones,
desconectela manguera del tubode la boquiila y
revisesi hayresiduosde polvoen el tubode la
boquina.V_ase LIMPIEZA DEL AGITADORpara
coma limpiarel agitador.
Coloquela aspiradoraen la posici6nverticalantes
de conectarlaen el enchufe.
17
Revise
esterecuadro
paraencontmr
soluciones
a problemas
que puedecorregirustedmismo.Cualquierotro
serviciodebe ser realizadoper SEARS u otroagentede serviciocalificado.
La asplradora no encbnde
1. Esld desconectada.
2. Cortacircuitos
botedoo fusible
quemadoen el tablerode servk;io
de la residencia.
3. Protectortermalactlvade.
1. Conectebien,seleccionela fusion deseada
en el controlmanual.
2. Restablezcael €ortacircuitos
o
cambieel fusible.
3.
Desconecte k, asplmdera y permite que se
enfri_, el protector tGrmfcose activara por si solo
No aspira
safisfaotorlamente.
1. DelsaparepolvoIlenao atascade.
2. Ajustelocorrectode nivelde peb de
la alfordom.
1. Carnbie la bolsa.
3. Agitaderdesgastade.
3. Acude el Centre de Servk:io de Sears
riVas¢elGano.
4.
4.
Dequilta, o sujeteder de la bolsa, afascade.
2. Ajuste el nivel.
Rwise COM_ ELIMINAR LOS RESIDUES
DE BASURA EN LOS CONDUCTOS.
5. Mangueraatascade.
6. Manguerarota
5. Lknpie la manguera de obstrucciones.
6. Acuda el Centre de Servicio de Sears
7. La rnangueranoest_ bieninsertade.
8. Activack_n
del sistemade protsctidn
del motor.
7.
9. Filtrosde seguridad.
9. Carnbie el filtro de protecci_n al motor y el filtro
del escape
La aspiradora levanta
tepetes o es dificil empujar,
1. Ajuste incorrecto de nivel de pelo
de la alfombra.
1. Ajuste el nivel.
La luz no lunciona.
1. Bombil_afundida.
1. Camb_e la bombilla.
Elensamblodelagitador
no funciona
1. Elmangoestecompletementeen
pos[cidn vertical
1. Mueva el mango desde =apos+ci_nvertical.
2, Sobreca_ga del agltador actlvade,
2. Reajuste la sobrecarga del agitador,
3. Protector t_rmico desactivade,
3, Desconecte la aspitadora y permite que se
enfrid, el protector t6rmico se activara per si solo
1. Bolsaparapolvollenaoatascade.
2. Filttos de segoridad atascado.
1, Cambielabolsa.
2. Cambie el finro de protecck_nal motor y el filtro
del escape
3. Conducto de flujo de aire atescade.
3. Retire el materiat bloqueante del
conducto de aim.
4. Clerlos accesorios.
4. Esto es normal. La luz debe apagarse al
quiter ta herramienta.
Restrlccl6n del fluJo
de el use de los accesodos,
1. El use de los accesorlos limita el
ftujode aire.
1. Revise use DE LOS
ACCESORIOS
Camblodesonido.
2. Lapelosadeunaalbmbranueva
obstruye el paso de airs.
2. ReviseC(3MOELIMINARLOSRESIDUOS DE BASURA EN LOS CON-
Indicadordepolvo,
a)gunos
modelos, no funciona.
1. Celdas_pt_casest_nsL_ias
1. LirnpielasceldasSpticas,
rndscemano.
Elindicadordemndimiento,
algunos modelos, est_ roJo.
Inserte bien la manguera
8. Determine si existen bloqueos.
DUCTOS y limpie la mar_uera
18
19
Your Home
For repair - in your home - of all major brand appliances,
lawn and garden equipment, or heating and cooling systems,
no matter who made it, no matter who sold it!
i iii _ _ii
For the replacement parts, accessones and
owner's manuals that you need _o do-it-yourself.
ilii _
For Sears professional installation of home appliances
and items like garage door openers and water heaters.
1-800-4-MY-HOME
®
(1-800-469-4663)
Anytime,day or nJgtlt
{U.S.A.andCanada]
www.sears.com
www,sears.ca
Our Home
For repair of carry-in Products like vacuums, lawn equipment,
and electronics, call or go on-line for the nearest
Sears Parts and Repair Center.
1-800-488-1222
Anytime, day or night (U.S.A. only)
www, sears.com
To purchase a protection agreement (U.S.A.)
or maintenance agreement (Canada) on a 0roduct serviced by Sears:
1-800-827-8655 (US.A.
Para pedir ser_cio de reparac_6n
a domicilio, y para oroenar p_ezas:
1-888-SU-HOGAR s_
1-800-361-6665 (Canada)
AU Canada =}ourserwce en franc,ais:
1-800-LE.FOYER _c
(1-888-784-6427)
1-800-533-69371
www.sears.ca
=4RS
© Seats, Roebuck and Co.
® Registered Trademark / TMTrademark / SMService Mark of Sears, Roebuck and Co.
® Marca Registrada / TM Marca de F_bdca / s_ Marca de Servicio de Sears, Roebuck and Co,
Mc Marque de commerce / MOMarque d6pos_e de Sears, Roebuck and CO.