1
J
]
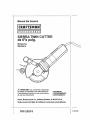
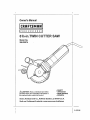
Owner's Manual
61/8=in.TWIN CUTTER SAW
Model No.
286.25574
_CAUTION:
Read, understand and follow
all Safety Rules and Operating Instructions in
lhis manual before using this product,
Sears, Roebuck
and Co., Hoffman
Visit our Craftsman®
I
1
!
I
website:
Estates,
• SAFETY
• OPERATION
° MAINTENANCE
• ESPAF4OL
IL 60179
U.S.A.
www.sears.com/craftsman
l
5-25-06
Warranty, ...............................................................................
Page
Safety Instructions
Pages
3-8
Safety Symbols ...........................................................
Page
8
Description
Page
9
Pages
10-19
Pages
17-19
....... Pages
19-20
Operation
........................................................................
.........................................................................
Removing
Maintenance
and Installing
Blades ........................................
..............................................................
Troubleshooting
Accessories
..........................................................
2
..............................................................
...................................................................
Repair Parts ....................................................................
Service Numbers .............................................................
ONE FULLYEAR
PROFESSIONAL
WARRANTY
TOOL
ON CRAFTSMAN
Page
21
Page
21
Pages 22-23
Back Cover
®
tf this Crafl[smanProfessionaltool fails to give complete satisfaction within
90 days from the date of purchase, return it to any Sears Store or other
Craftsman Outlet In the United States for free replacemenL
After 90 days and through one year from the date of purchase, if this
Craftsman Professionaltool fails to give complete satisfaction,return it to
any Sears store or Parts & Repair Center or other Craftsman Outlet for
free repair (or replacement if repair provesimpossible.)
This warranty gives you specific legal rights, and you may also have other
rights,which vary, from state to state,.
Sears, Roebuck and Co., HotTmanEstates, tL 60179
SAVE THESE INSTRUCTIONS!
READ ALL INSTRUCTIONS!
!
|
I
i Z_ WARNING:
I
I
I
BE SURE to read and understand all instructions. Failure to
follow all instructions listed betow may result in electric shock, fire and/or
I serious personal injury.
WORK AREA SAFETY
t. ALWAYS keep your work area clean and well lit. Cluttered benches and dark
areas invite accidents.
2. DO NOT operate power tools in explosive atmospheres, such as in the
presence of flammable liquids, gases, or dust. Power tools create sparks which
may ignite the dust or fumes
3. ALWAYS keep bystanders, children, and visitors away while operating a
power tool Distractions can cause you to lose control
ELECTRICAL
SAFETY
1oDouble insulated tools are equipped with a polarized plug (one blade is
wider than the other'.)This plug will fit in a polarized outlet only one way.
If the plug does not fit fully In the outlet, reverse the plug. If it still does not
fit, contact a qualified electrician to Install a polarized ouUeL Do not change
the plug in any way.
2. Double insulation [_eliminates the need for the three-wire grounded power cord
and grounded power supply system. Applicable only to Class !1(double insulated)
tools°
3, Before plugging in the tool, BE SURE that the outlet voftage supplied is within the
voltage marked on the tool's data platenDO NOT use "AC only" rated tools with a
DC power supply.
4oALWAYS avoid body contact with grounded surfaces, such as pipes,
radiators, ranges and refrigerators_ There is an Increased risk of electric shock
if your body is grounded°
5. If operating the power tool in damp locations is unavoidable, ALWAYS use a
Ground Fault Circuit Interrupter to supply power to your tool, ALWAYS wear
electrician's rubber gloves and footwear in damp conditions.
6. DO NOT expose power tools to rain or wet conditions. Water entedng a power
tool wiltincrease the risk of electdc shock.
7. DO NOT abuse the cord. NEVER use the cord to carry the tools or pull the
plug from the outlet. Keep cord away from heat, o!1,sharp edges or moving
parts. Replace damaged cords immediately. Damaged cords increase the risk
ofelectric shock.,
8. When operating a power tool outside, ALWAYS use an outdoor extension cord
marked"W-A" or "W". These cords are rated for outdoor use and reduce the risk
of electric shock.
NOTE: The extension cord must have adequate wire size AWG (American Wire
Gauge) for safe, efficient use_Smaller gauge wires, have greater capacity (16 gauge
wire has more capacity than 18 gauge wire).
3
5-25-06
PERSONAL SAFETY
1. ALWAYS stay alert, watch what you are doing and use common sense when
operating a power toot. DO NOT use tool while tired or under the influence of
drugs, alcohol, or medication. A moment of inattention while operating power
tools may result in serious personal injury,
2. ALWAYS dress properly° DO NOT wear loose clothing or jewelry° Pull hack
long hair. Keep your hair, clothing, and gloves away from moving parts.
Loose clothes, jewelry, or long hair can be caught in moving parts,
3. At.WAYS avoid accidental starting. BE SURE switch is in the "Off" position
hefore plugging In. DO NOT carry tools with your finger on the switch_Carrying
tools with your finger on the switch or plugging in tools that have the switch in the
"On" position invites accidents°
4. ALWAYS remove adjusting keys or wrenches before tumlng the tool "On".
A wrench or a key that is left attached to a rotating part of the tool may result in
personal injury°
5. DO NOT overreach, ALWAYS keep proper footing and balance at all times,
Proper footing and balance enables better control of the tool in unexpected
situattonso
6. ALWAYS use safety equipment. Always wear eye protection_ Dust mask,
non-skid safety shoes, hardhat, or hearing protection must be used for appropriate
conditions.
TOOL USE AND CARE SAFETY
1. ALWAYS use clamps or other practical ways to secure and support the
workplece to a stable platform. Holding the work by hand or against your body
is unstable and may lead to toss of control
2, DO NOT force the tool, Use the correct tool for your application. The correct
tool wilt do the job better and safer at the rate for which it is designed,
3. DO NOT use the tool if the switch does not turn it"On" or "Off". Any tool that
cannot be controlled wilh the switch is dangerous and must be repaired.
4. ALWAYS disconnect the plug from the power source before making any
adjustments, changing accessories or storing the tool. Such preventive safety
measures reduce the risk of starting the toot accidentally.
5, ALWAYS store idle tools out of the reach of children and other untrained
persons. Tools are dangerous {n the hands of untrained users_
6. ALWAYS matntaln tools with care. Keep cutting tools sharp and clean.
Properly maintained tools with sharp cutting edges are less likely to bind and are
easier to control.
7. ALWAYS check for mlsallgnment or binding of moving parts, breakage of
parts, and any other condition that may affect the tool's operation. If
damaged_ have the tool serviced before using. Many accidents are caused by
poorly maintained tools.
t Z_
OFMAY
ACCESSORIES
ARE NOTCONDITION
RECOMMENDED
FORWARNING;
USE WlmH THISUSE
TOOL
CREATE A THAT
HAZARDOUS
8. ALWAYS use only accessoriesthat are recommended for this tool.
Accessories that may be suitablefor one toolcan becomehazardouswhenused
on anothertool,
4
!I
SERVICE SAFETY
t. If any part of thts saw Is missing or should break, bend, or fall in any way; or
should any electrical component fail to perform properly: ALWAYS shut off the
power swttchand remove the saw plug from the power source and have the missing,
damaged or failed parts replaced BEFORE resuming operation.
2. Tool service must be performed only at a Sears Parts and Repalr Center.
Service or maintenance performed by unqualified personnel could result in a risk of
injury..
SAFETY RULES FOR SAWS
1. ALWAYS keep your body positioned to either side of the saw blades, but not
In Linewith the saw blades.
2, DO NOT reach underneath the work, The guard cannot protect you from the
blades beneath the work.
3_ ALWAYS check guard for proper closing BEFORE each use. DO NOT operate
the saw if the guard does not move freely and close instantly, Never clamp or
tie the blade guard in the open position, it the saw Is accidentally dropped, the
guard may be bent, Raise the guard and make sure that it moves freely and does
not touch the blades or any other parL
4. ALWAYS check the operation and condition of the guard spring° If the guard
and the spring are not operating properly, they MUST be serviced before use°
The blade guard may operate sluggishly,due to damaged parts, gummy deposits,
or a butldup of debris.
5_ The guard should be retracted manually ONLY for making special cuts, such
as pocket or compound cuts° ALWAYS raise the guard by retracting the
handle. As soon as the blade enters the material, the guard MUST be
released. For all other sawing, the guard should operate automatically°
6. ALWAYS make sure that the guard is covering the blades BEFORE placing the
saw down on a work bench or floor, An unprotected moving blades will cause the
saw to walk backwards, cuttingwhatever is in its path. Make note ofthe time it takes
for the blades to stop spinning after the switch is released.
7. NEVER hold the piece being cut in your hands or across your legs. It is
Important to support the work properly _norder to minimize body exposure, blade
binding, or loss of control,
8. ALWAYS hold tool by insulated gripping surfaces when performing an
operation where the cutting tool may contact hidden wiring or its own cord.
Contact with a 'live" wire wilt make the exposed metal parts of the tool "live" and
shock the operator.
9. DO NOT leave the saw running when carrying it In your hand.The lower blade
guard may be opened by contact with your clothing. AccidentaF contact with the
spinning saw blades could result in serious personal injury
10. DO NOT use the tool if the switch does not turn "On" or"Off". Any tool that
cannot be controlled with the switch is dangerous and must be repaired°
1
1
I
t
5-25-06
SAFETY RULES FOR SAW cont.
11. When removing the blades from the tool, ALWAYS wear protective gloves when
grasping the blades or accessory. Accessories may be hot after prolonged use°
KICKBACK..WHAT CAUSES IT AND WAYS TO PREVENT IT
The Causes of Kickback
t. Kickback is a sudden reaction to a pinched, bound or misaIfgned saw blades,
which cause the uncontroIfed saw to lift up and out of the workpiece and towards
the operator.
2, When the blades are pinched or bound tightly by the kerr closing down, the blades
stall and the motor reaction drives the unit rapidly back towards the operator.
3. if the blades become twisted or misaligned in the cut, the teeth at the back edges
of the blades can dig into the top surface of the wood° This causes the blades to
climb out of the kerf and jump back towards the operator.
4. Kickback is a result of tool misuse and!or incorrect operating procedures or
conditions, it can be avoided by taking the proper precautions, as listed below°
Ways to Prevent Kickback
1. ALWAYS maintain a firm grip with both hands on the saw and position your
body and arms to allow you to resist KICKBACK forces, KICKBACK forces can
be controlled by the operator, if the proper precautions are taken.
2. If the blades are binding, or when you are interrupting a cut for any reason,
ALWAYS turn off the saw and hold the saw motionless in the material until
the blades come to a complete stop. NEVER attempt to remove the saw from
the work or pull the saw backward while the blades are in motion or
KICKBACK may occur. ALWAYS check and be ready to take corrective action to
eliminate the cause of blade binding_
3. When restarting the saw in the workpiece, ALWAYS center the blades in the
kerr and check to be sure that the saw teeth are not engaged into the
material. If the saw blades are binding, they may walk up or KICKBACK from the
workpiece when the saw is restarted
4. ALWAYS support large panels to minimize the risk of blades pinching and
KICKBACK. Large panels tend to sag under their own weight. Supports MUST be
placed under the panel on both sides, near the line of cut and near the edge of the
panel.
5, DO NOT use a dull or damaged blades, Unsharpened or Improperly set blades
produce narrow kerf which causes excessive friction, blade binding and
KICKBACK
6, ALWAYS use extra caution when making a "Pocket Cut" into existing walls or
other blind areas. The protruding blades may cut objects that can cause
KICKBACK.
7. ALWAYS have the saw blades at full speed before contacting workpiece
8. ALWAYS keep your body positioned to either side of the saw btades, but not in line
with the saw blades_KICKBACK could cause the saw to jump backwards towards
the operator, KICKBACK forces can be controlled by the operator, If proper
precautions are taken,
ALWAYS hold tool by insulated gripping surfaces when performing an
operation where the cuffing tool may contact hidden wiring or its own cord.
Contact with a "live" wire will make the exposed metal parts of the tool "live" and
shock the operator.
6
ADDITIONAL
RULES
FORSAFEOPERATION
all instructionsBESUREtoread
listed be{ow may result
in electric shock,
fire and/orFa'lui'e
serious
I_followWARNING:
an----_
u"nderstand
al,tns_ctlonsl
to 'tI
personal injury............
I.
I
Know your power tooloRead operator's manual carefully. Learn the
applications and limitations, as well as the specific potential hazards related
to this tool. Following this rule will reduce the risk of electric shock, fire or serious
injury,
2. ALWAYS wear safety glasses or eye shields when using this saw. Everyday
eyeglasses have only impact.resistant lenses; they are NOT safety glasses°
Following this rule will reduce the risk of serious personal injury°
3o ALWAYS protect your lungs.Wear a face mask or dust mask if the operation
is dusty. Following this rule will reduce the risk of serious personal injury.
4. ALWAYS protect your hearingoWear hearing protection during extended
periods of operation. Fo!lowing this rule will reduce the risk of serious personal
injury,
5, ALWAYS inspect the tool cords periodically and If damaged have them
repaired at your nearest Sears Service Center or other Authorized Service
FacUlty. ALWAYS be aware of the cord location. Following this rule will reduce
the risk of electric shock or fire.
6. ALWAYS check for damaged parts. Before further use of the tool, a guard or
other part that is damaged should be carefully checked to determine if it will
operate properly and perform its Intended function. Check for mlsallgnment
or binding of moving parts, breakage of parts, and any other condition that
may affect the tool's operation. A guard or other part that is damaged, should
be properly repaired or replaced at a Sears Service Center. Following this rule
will reduce the risk of electric shock, fire or serious injury.
7. DO NOT abuse the cord. NEVER use the cord to carry the tool or pull the
plug from the outlet. Keep cord away from heat, oil, sharp edges or moving
parts. Replace damaged cords immediately. Damaged cords increase the risk
of electric shock. Following this rule will reduce the risk of electrlc shock or fire.
8_ ALWAYS make sure that your extension cord is in good condition.When
using an extension cord be sure to use one that is heavy enough to carry the
current that your toot will draw. A wire gauge size (A.W.G,) of at least t6 is
recommended for an extension 100 feet or less in length. Using an extension
cord that is over 100 feet lntength is not recommended. If in doubt, use the
next heavier gauge. Smaller gauge wires, have greater capacity (16 gauge
wire has more capacity than 18 gauge wire). An undersized cord will cause a
drop in line voltage, resulting in loss of power and overheating.
9. DO NOT use the tool while tired or under the Influence of drugs_ alcohol or
any medication. Followingthis rule will reduce the dsk of electric shock, fire or
serious personal injury..
10. SAVE THESE INSTRUCTIONS. Refer to them frequently and use them to
instruct others who may use this tool. if someone borrows this toot, make
sure they have these instructions also.
!
!
I
5-25-06
ADDITIONAL
RULES FOR SAFE OPERATION cont.
WARNING: Some dust particles created by power sanding, sawing,
grinding, drilling and other construction jobs contains chemicals known
to cause cancer, birth defects or other reproductive
harm, Some examples
of these chemicals are:
. Lead from lead-based paints.
- Crystalline silica from bricks and cement and other masonry products_
, Arsenic and chromium from chamically-treated lumber,
"Tour risk from these exposures varies, depending upon how often you do this
type of work. To reduce your exposure to these chemicals:
. Work in a well-ventilated area,
• Work with approved safety equipment, such as those dust masks that are
specially designed to filter out microscopic particles.
Z_ WARNING:
The operation of any saw can result in
foreign objecls being throwninto your eyes, which can resutt in
severe eye damage. Before beginning power tool operation,
ALWAYS wear safety goggles or safety glasses with side shield
and a full face shield when needed. We recommend A Wide
Vision Safety Mask for use over eyeglasses or standard safety
glasses with side shield, available at Sears Retail Stores.
.............................................................................................
HZ
The label on your tool may include the following symbols,
V...............................................................................
Volts
A .........................................................................................
Amperes
Hertz
Wo................................................................................................
Watts
mtn ........................................................................
Minutes
•_.....................................
i..................................................
Alternating current '
_-=.==__
.....................................................................................
Direct current
n o ..................................................................................
No-toad speed
[] ...................................................................................
Class II construction
....lmin ...................................................................................
Revolutionsor St_kes per minute
Z_. ...................................................................................
Indicates danger, warning or caution.
It means attention! Your safety is involved.
IMPORTANT! READ ALL INSTRUCTIONS
I
I
t
1
Before attempting to use any tool, be sure to familiarize with ail the operating
features and safety instructions.
I
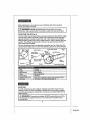
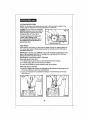
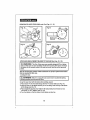
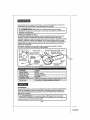
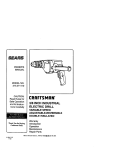
KNOWYOURSAW (SEE Fig. 1)
YourTwinCuttersaw has many built-inconveniencefeaturesfor fast, efficientcutting.
These featuresincludea innovative2-bladesystemwithspecialbladesthat spinfn
oppositedirectionstoprovidesmooth,cleancuts,It also includesa pro-installed
bladelubricatingsystemfor use when cuttingaluminum,copper,stainlesssteeland
cast iron,The auxiliaryhandlemountson thetop of the saw toprovidemaximum
support=and ease ofhandling,,
Foryourconvenience,there is no assemblyrequired foryourTwinCutterSaw,The
special2-bladecuttingsystem and the wax lubricating systemare alreadyinstalled
Lower Blade
GuardHandle
OnlOff Switch
Wa×
_ckN_ut
I
Assist Handle
St_ck
_
Wax Lubricating
Wrench .__System
""ill
"
_
.......
!nPut.......
Output
........
BladeDiameter
Rating
No-IoadSpeed
MaximumDepthofCut
DutyCycle
Upper Blade Guard
Fig. 1
Knob
Blades
-
-
"
.......
--
7.8 A,,nps
1,25-PeakHP
................................
6% in, (i55mm)
_ i20 volls160Hz AC
4600 RPM
wo'od"(I!!2in_)'_'_!'(w!th awall or sh_eet
thicknessof 118in_)
30 minuteson 10 minutesoff(see page12)
UNPACKING
Your Twin Cutter Saw has been shipped completely assembled. Inspect the saw
carefully to make sure that no breakage or damage has occurred during shipping.
If any parts are damaged or missing return the saw to your nearest Sears Store to
have it replaced_
parts are replaced,.
Failure
do so could
result
in possible
serious
i missing
_ WARNING:
If any parts
are to
missing,
DO NOT
operate
this saw
until the
personal injury
I
I
I
i
5-26-06
SAW BLADES
Even the best saw blades will not cut efficiently if they are not kept clean and sharp
Using dull blades wit! ptace a heavy toad on your saw and increase the danger of
kickback.,Keep extra blades on hand, so sharp blades are always available,
Gum and wood pttch hardened on your blades will slow your saw down. Use gum
and pitch remover, hot water or kerosene to remove these accumufations,
DO NOT use gasoline.
and no other types or sizes of blades should ever be used Other types and sizes of
................................
WARNING: This.'PwinCutter
saw uses specially designed 6Vs-In. blades
blades will not operate safely in this saw and could result,in serious personal injury_
._
i
To order extra blades or to replace the blades that came with the saw, see page 21
of this manual for ordering instructions. To instal! new blades onto to your saw see
the special instructions on pages 17 to 19 of this manual for proper removal and
Installation of blades.
BLADE GUARD SYSTEM
The lower blade guard, attached to your saw, Is there for your protection and
safety. It should NEVER be altered for any reason, if it becomes damaged or
begins to return slowly or sluggishly, DO NOT operate your saw until the
problem has been corrected or the damaged part has been replaced. ALWAYS
leave the guard in its correct operating position when using the saw.
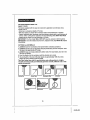
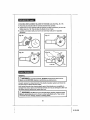
DANGER: When sawing througha
workpiece, the lower blade guard does not
cover the blade on the underside of the
workpieceoSince the blade is exposed on the
underside of the workpiece, ALWAYS keep
your hands and fingers away from the cutting
area (see Fig,,2).,Any part of your body
coming in contact with the moving blade wilt
result in serious injury°
\ Fig. 2
Lower Blade Guard is in UP position when
making a cuL Blades are exposed on underside
of workpiece,,
Z_ WARNING:
NEVER use the saw when the guard Is not operating properly.
The guard should be checked for correct operation before each use,,If you drop your
saw, check the lower blade guard for damage before using.
NOTE: The guard is operating properly when it moves freely and then readily
returns to the closed position,,If, for any reason,,your lower blade guard does not
close free_y,take it to your nearest Sears Repair Center for senlice before using it.
iii
I0
I
I
KICKBACK
Kickback occurs when the blades stall rapidly and the saw is driven back towards
you. Blade statling _s caused by any action which pinches the blade in the material
being cut.
IMPORTANT: The best guard against kickback is to avoid dangerous practices.
Z_ DANGER:
ALWAYS turn OFF power to saw immediately if the blades bind
or the saw stalls,,Kickback could cause you to lose control of the saw. Loss of
control can lead to serious injury,
ALWAYS provide proper support
both hands
Kickback is caused By:
for the workpiece and hold the saw with
\ Fig, 3
1. Twisting the blades while making a cut.
2. Making a cut with a dull, gummed up, or
improperly set blades..
3. Not providing proper support for work'piece.
ALWAYS provide proper support as shown
In Fig,,3,,
4. Forcing a cut.
5. Cutting warped or wet lumber.,
6 Tool misuse or Incorrect operating procedures°
7. Contacting the workpiece with blades at less
than full speed.
To Lessen the Chance of Kickback
1. ALWAYS approach the workpiece with
the saw at an angle of approximately
30 ° to the workptece_ (see Fig. 4°)
2. ALWAYS make straight cuts.
This will help prevent twisting the
blade in the cut,
3. ALWAYS use clean, sharp and
properly set blades° NEVER make
cuts with dull blades,,
4, ALWAYS propedy support the
workplece before beginning a cut.This will help you avoid pinching the blades
(see Fig, 3).
5. ALWAYS use steady, even pressure when making a cuL NEVER force the cut,
6. DO NOT cut wet or warped lumber.
7. ALWAYS hold the saw firmly with both hands and keep your body in a balanced
position. ALWAYS keep your body positioned to either side of the saw blades, but
not in line with the saw blades._Thlswilt help you resist the forces of kickback,
should it occur,,
IMPORTANT: When using your saw, ALWAYS stay alert and exercise control,
DO NOT remove your saw from the workplece, while the blade is moving,
11
I
I
I
5-25-O6
STARTING A CUT
IMPORTANT:
BEFORE using the Twin Cutter Saw for the first time, ALWAYS familiarize yourself
with the saw by making practice cuts in scrap materials,
The weight of this saw helps to make the cuts smoother_ Learn how to safely handle
and control the weight of the sawn
ALWAYS be sure that you position the blades perpendicular to the plane of the
workpiece. Make the cut at an approximate 30 ° angle to the workpiece surface,
(See Fig_5),,
Practice the proper feed speed rate for the materials being cut.
Engage f.he onloff switch to start the saw, ALWAYS let the blades reach full speed
before you begfn the cut into the workpiece,
IMPORTANT:When using your saw, ALWAYS stay alert and exercise control.
DO NOT remove your saw from the workpiece, while the blade is moving.
Blades perpendicular
Approximately 30 °
Z_ WARNING:
to workplace
ALWAYS
maintain proper control of the saw
to make sawing safer and easier_
Loss of control of the saw could
cause an acctdent resulting in
possible serious Injury,
Fig, 6
Correct
Wrong
NEVER hold the saw with just
one hand (see Hg_ 6).,
ALWAYS hold saw by motor body and
assist handle (see Fig° 7),
DUTY CYCLE
30 minutes on 10 minutesoff dutycyclerefersto short-time operation°Short
timeoperationdenotesoperationundernormalloadfor a specifiedperiodand
material,startingcoid,the intervalbetweeneach periodof operation beingsufficient
toallowthe too!to cooldownapproximatelyto room temperature_
12
TOHELPMAINTAIN CONTROL
1.ALWAYSsupport theworkpiecenear the cut,
2. ALWAYSsupporttheworkpieceso the cutwiltbe on yourright,
3. ALWAYSclamptheworkpieceso it will notmoveduringthe cut.
Placethe workpIecewiththe good side down. NOTE: The good side isthe side
whereappearanceisimportanL
Beforestarting a cut,draw a guideline alongthedesired line of cut.Thenplace the
front edge ofthe saw blades on the part of theworkpiecethatis so[idlysupported,
4. ALWAYSkeep the cordawayfrom the cuttingarea. ALWAYSplacethe cordso it
does not hangup on the workpiecewhen makinga cuL
DANGER: If the cord hangs up on the workpiece during a cut, release the
on/off switch immediately°Unplug the saw and move the cord to prevent it from
hanging up agatn_
-Z_ DANGLER: Using the saw with a damaged cord could result In serious
injury or deatk If the cord has been damaged, have it replaced before using the
saw again.
Z_ WARNING:
If the blades come in contact with the workpiece before they
reach full speed, it could cause the saw to kickback towards you, resulting in
serious injury.
ii ===
/
i
i
ii
l
l=l
i
i
ii
i i
ll.,
.i.lll.i
H H...=
When making a cut, ALWAYS use steady, even pressure. Forcing the saw causes
rough cuts and could shorten the life of the saw or cause kickback_
Z_ DANGER:
When sawing through the workplece, the lower
does not cover the blades.The blades are exposed on the under
workpiece. ALWAYS keep your hands and fingers away from the
Any part of your body coming in contact with the moving blades
,n serious m)ury.
blade guard
side of the
cutting area°
will result
After completing your cut, release the on/off switch and allow the blades to come to a
complete stop° DO NOT remove the saw from the workptece while the blades
are moving.
CAUTION: Whenever you lift your saw from the workpiece, the blades are
exposed on the under side of the saw untttthe lower blade guard closes. ALWAYS
MAKE SURE that the lower blade guard is closed before setting the saw down on
work surface°
13
I
I
I
I
5-26-06
CUTTING INSTRUCTIONS
NOTE: The {ire span of the blades on your Twin Cutter saw and the quality of the
cutting edges Is dependent on keeping vibrations to a minimum_
ALWAYS securely clamp the workpiece
BEFORE beginning a cu! Then feed the
blade through the material at an angle
of approximately 30 ° (see Fig. 8).
This saw produces hot chips, not
sparks, when cutting metal,
tt is recommended that you wear a
face shield over safety glasses to
protect your faces
FEED SPEED
Feed speed is how quickly you push the saw blades through the matedal being cut.
The correct feed speed is totally determined by the hardness and the thickness of
the material being cut..
IMPORTANT: Feeding must ALWAYS be done with the blades perpendicular to the
plane of the workpiece (See Fig_A)o Feeding at an angle can burn the blade and
damage the blade teeth (See Fig° B)_
Selecting the correct feed speed is important,
If the feed speed is too slow:
1_The blades will onty press down on the matedal rather than cutting ito
2, The blade edges glide and wear down the material,
3. A poor'cut wilt result and cause excessive wear on the blades
If the feed speed is too fast:
1_There is a definite risk that the cut might spilt and the splintered opening of the cut
wilt not be sufficient to divert the wood shavings,
2, A poor cut wilt result with a significant discharge of wood shavings on the lower
side of the cut,
Fig:B.
J
_,_
/rig
Correct
14
I
1
CUTTING INSTRUCTIONS
WHAT IT CUTS
cont,
The blades supplied with the saw are universal in application and will give clean,
smooth cuts in:
- Wood up to a maximum depth of 11/2inch.
. Mild steel tubing or sheets with a maximum wal! or sheet thickness of 1t8 inch.
. Copper, stainless steel, aluminum, cast iron tubing or sheets with a wall thickness of
1/8 inch. When cutting these materials, the wax lubricating sticks MUST BE USED.
- Plastic pipe or sheets of a wall thickness of 1/8 inch,
IMPORTANT: The Twin Cutter WILL NOT CUT masonry, cement or brick material.
IMPORTANT: Once the blades become worn, chipped or dull, they MUST BE replace
immediately
CUTTING ALL MATERIALS
1, ALWAYS have the saw blades at full speed before contact!ng workpiece.
2oALWAYS hold the saw so the blades feed perpendicularly Into the workpiece, Hold
the saw at an approximate 30 ° angle.
3. ALWAYS keep your body positioned to either side of the saw blades, but not fn tine
with the saw blades°
4. Feed the blades into the workplece until the desired cut is made,
5oThe kerf (width of the cut) of the twin blades ts approximately 1,/8th of an inch.
Always be sure to allow for this kerfwidtho
This Twin Cutter Saw with it's special blades and cutting action is a highly
versatile tool that quickly and efficiently provides smooth, efficient cuts a wide
variety of materials:
Flat Iron Bar
Thin Plato
Shaped Plate
15
I
I
i
I
5-25-06
CUTTING ALL MATERIALS cent.
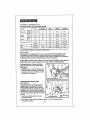
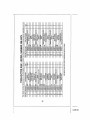
MAXIMUM STOCK SIZE AND FEED RATES
MAX. s_ZE
CISTYPE
MATERIAL_
DROSS
AVERAG_
BLADE
LIFE
AVERAGE
TIME OR FF_J_
t,'O..in.
285coLa
20 Se_
tlS_ln.
iDScuL_
30 Sac
l_Mn,
I]84 n,
4000cuts
5 Soc
tY_n
t/8-1n
ESoJts
30 Sea
't/B-In.
EO feet
4,3 ]nch/mln
SEP't30
N
MAX
I"H|CKN ESS
HellQw P[po
Square
_
Channel
_
MS
1'/fin,
Nu_num
-
Chmnnol
Sheet MoL_!
IF
_
__,,
MS
M,S.
-
..........j
,,,
'*J,
O4n.
Aluminum
....
Stud
Wood (PJne)
2 x 4Jn.
....=:,
Pipe
PI.sU¢ (PVC)
t_lrt.
lY_n.
, ,,,, ,,,,, ,,,.....
3It6_1n.
,, _, , ,,,..........
05 f_et
,
,,,,,,, ,,
4500
t02 tnchffnln
,,,,_
11 Sac
cuts
6 5ec
60QO cuts
P_, Average b|_da |ire tndlcales resull_ _! po rleKn_nca test _ part_cul_r type of t_s! rno[edal es per O_a _tb_'va teb_e. H swayer the,
cesutis may vary ifthe tJarnebl_ds ls used an a c_mbtnof_on otlLsled maU_d_,b-
DUTY CYCLE
30 minutes on 10 minutes off duty cycle refers to short-time operatiom Short
time operation denotes operation under normal load for a specified period and
material, starting cold, the Interval between each pedod of operation being sufficient
to aElowthe tool to coo] down approximately to room temperature°
Cutting other materials may require even more special handling, These include
cutting aluminum, copper, stainless steel and cast Iron or shaped plates
Cutting Aluminum, Copper, Stainless
Steel and Cast Iron up to 1/8-in. thick,
(See Fig, 9).
1, ALWAYS use the wax lubricating deViCe
(included) when cutting these materials
because they have a tendency to soften
and adhere to the blades.
Wax Lubricating
Stick
LUBRICATING INSTRUCTIONS
(See Figure C)
The bladesof yourTwinCutter saw are
equippedwith"drycut teeththat under
normalcuttingconditionsdo notneed to
be lubricated_
However,in extremecutting
conditions,suchas whenyouare sawing
intoaluminum,copper,staintesssteel and
cast iron,thewax lubricating deviceshould
be used°
1. Insert wax lubricating stickintowax
Lubricating Device
Slick
lubricatingdevice.
2. Turn feeder wheel to applylubricant to blade.A I/4 turn should provide
adequate lubrication°
16
t
CUTTING iNSTRUCTIONS conL
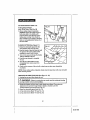
Cutting Shaped Plates
up to 1t84n. thick' (See Fig. 10)
1. When cutting shaped metal plate
ALWAYS support the plate evenly on
both sides and in the middle with
support blocks. This witl keep it from
flexing when cutting This should be
done, whether you're using a clamping
table, or using adjustable clamps on a
fiat work table°
Fig, 10
PLUNGE CUTTING (See Figure 11)
1, Raise the retractable guard into the
open position with your left hand.
2, Use the thumb of your left hand to hold
the guard in the open position while
gripping the saw's assist handle.
3. Turn on the saw and plunge the blades
into the material to be cut
\!
Fig. 1 I
4. Push the saw forward to complete
the cut
5. Turn off saw, allow blades to stop
completely, then remove saw from
workpiece.
6. Clean out the comers of the cut with a hand saw or sabre saw, depending
on projecL
NOTE: When cutting roofing materials, blades must be kept clean with a tar and pitch
blade cleaning solvent
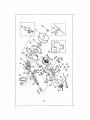
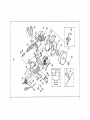
REMOVING BLADES FROM SAW (See Figs. 12 - 15)
1, Unplug the saw and allow blades to cool
WARNING:
I
Failure to unplug the saw coutd result in accidental starting
...........
causing possible serious personal injury.
2_ Rotate the blades until the holes in both blades are aligned. Then place pin
attached to the wrench through holes in bladeso Unscrew Lock Nut
counterclockwise and remove (see Fig° 12).
3. Open the retractable guard (see Fig_ 13).
4oLift up and remove Blade "B" (see Fig. 14).
5_ Lift up and remove Blade "A"(see Fig. 15).
17
I
I
I
I
!
REMOVING BLADES FROM SAW cont, (See Figs, 12- 15)
Fig. 13
!
Fig, 14
Fig. 15
ATTACHING REPLACEMENT
i
1_
ii
i
BLADES TO THE SAW (See Figs. 16 - 19)
i
WARNING:
This Twin Cutter saw uses specially designed 61/a-in. blades
and no other types or sizes of blades shouldever be used, Other types and sizes
i of blades wlll not operate safely in this saw and could result in serious personal
I iojury.
See the accessories section of this manual for the proper replacement blades
that are needed for this saw.
1. Unplug the sawn
2. Lay the saw down with the blade arbor pointing upward.
3o Place blade "A" onto the blade flange with the "A" clearly visible (see Fig. 16).
4. Align the holes on the blade with the pins on the flange and securely fit the blade
on the flange (see Fig. 17)o
5. Place blade "B" onto the arbor with the "B" easily visible, then thread lock nut
onto shaft, DO NOT tighten, (see Fig° 18)o
6. Turn the blades so that the holes in both blades are lined up.
18
|
!
ATTACHING REPLACEMENT BLADESTOTHE
SAW cont, (See Figs. 16 - 19)
7oPlace the pin (included with the wrench) into the lined up holes_
8. Tighten the lock nut clockwise with the wrench and then remove the pin from the
blades (see Fig/19)_ This will allow the blades to turn freely,
9. Carefully turn blades with your hand to be sure they easily turn in opposite
directions,,
Fig. 16
Fig. 17
Flange
Fig, 18
GENERAL
I _WARNING:
I ppwer sour_
To avoid accidents, ALWAYS disconnect the tooi from the
BEFORE cleaning or performing any maintenance.
I
All parts represent an important part of the double insulation system and should be
serviced only at a Sears Service Center
Avoid using solventswhen deantng plastic parts_ Most plastics are susceptible to
damage from various types of commercial solvents and may be damaged by their use,
Use clean cloths to remove dirt. carbon dust, etc.
A wAR'i.
G:oo.o_o,oo_,,m"e
,o,
_.o.o,...
0o.o,,oo,
_o_o,oon_o.o.
pwoducts, penetrating oils, etcoto come in contact with plastic parts,,They contain
chemicals that can damage, weaken or destroy plastic,
19
I
I
I
I
5-25-06
GENERAL cent,
It is a known fact that electric tools are subject to accelerated wear and possible
premature failure when they are used to work on fiber glass boats and sports cars,
wallboard, spackling compounds or plaster. The chips and grlndings from these
materials are highly abrasive to etectrica! tool parts, such as bearings, brushes,
commutators, etc_ Consequently, it is not recommended that this tool be used for
extended work on any fiber glass material, wallboard, spackling compound, or plaster,.
During any use on these materials, it is extremely important that the tool is cleaned
frequently by blowingwith an air jeL
or face shield when blowing dust from tool when cleaning iL If operation is dusty, also
/_ WARNING:
wear
a dust mask. ALWAYS wear safety goggles or safety glasses with side shields
LUBRICATION
Al! of the beadngs in this tool are lubricated with a sufficient amount of high-grade
lubricant for the life of the tool under normal operating conditions,.Therefore, no
further lubrication is required..
DOUBLE INSULATION
Double insulation is a concept in safety in electric power tools, which eliminates the
need for the standard 3-wire grounded power cord.All exposed metal parts are
isolated from the internal motor components with protectve insulation. Double
insulated tools do not need to be grounded_
IMPORTANT
The servicing of a tool with double insulation requires extreme care and knowledge
of the system and should be performed only by a qualified service technician. For
service, we recommend that you return the tool to your nearest Sears Service Center
for repair. ALWAYS use original factory replacement parts when servicing..
EXTENSION CORDS
The use of any extension cord will cause some loss of power.To keep the loss at a
minimum and to prevent overheating, use an extension cord that is heavy enough to
carry the current that the tool will draw,
A wire gauge (AWG) of at least t6 is recommended for an extension cord t00 feet or
_ess in length. When working outdoors ALWAYS use an extension cord that is
suitable for outdoor use, The cord's jacket will be marked WA.
E
m
! _
CAUTION:
Keep extension cords away from the cutting area, and position I
I the cord so it will not get caught on lumber, tools, etco during the cutting operation
I
i iiil_U,,ll
it immediately NEVER use a tool with a damaged cord because touching the
_
DANGER:
Check
extension
before
each in
use,
If damaged,
damaged
area could
cause
electricalcords
shock,
resulting
serious
injury. replace
Extension cords that are suitable for use with your saw are available at your nearest
Sears Store.
20
I
!
PROBLEM
CAUSE
SOLUTION
An unusually
large amount
of sparks
1,Damagedteeth
2. Feedspeedistoosiow
3. Bluntlee[h
1.,Replace btades
2o Increase feed speed
3. Replace blades
A lot of wear
in sections
1. Feedspeed is toofast
2, Damaged teeth
3. Blunt teeth
4. Notcuttingperpendicular
to worksurface
1 Reduce feed speed
2. Replace blades
3oReplace blades
4oHold saw perpendicular
to work surface
Blades are
breaking
1_Damaged teeth
2. Feed speed is too fast
3., Blunt teeth
4. B_ades have buckled
5. Blades have burned out
1oReplace blades
2. Reduce feed speed
3. Replace blades
4o Replace blades
5. Replace blades
Posslbta causes
of broken teeth
t. Feed speed is too fast
2. The surface being
cut is too hard
3, The teeth have been
damaged by impact
4. Blades were not
installed properly
5, Blades are burned out
6. Not cutting perpendicular
to wod_surface
1. Reduce feed speed
2, Replace b_ades
3, Replace blades
4. Replace blades and follow
the proper blade tnstalEation
instructions
Z_WARNING:
This Twin Cutter saw uses specially
5, Replace blades
6, Replace blades and always
hold saw perpendicular to
work surface when cutting
designed
61fs-in, blades
and no other types of blades should ever be used, Other blades
safely in this saw and could result in serious personal injury
will not operate
The following accessories for your Twin Cutter saw are available at your local
Sears store,.
9-61t31 M A packaged set of 2 UniversalTwin Cutter Saw Blades
9 26678 _ 6 PackagedWa× Lubricating Sticks
I Z_ WARNING:
The use of attachments
! recommend
edmight
bedangerous
21
I
1
|
t
or accessories
that are not
!
I
I
I
1
I
1
I
J
%
®
\
\
\
/
/
\
/
/
v'
22
1
!
0
_o
o
O N
o
x
x
x
o
O
z_
>09
_ _0"
_
_o
m
i0 ii- !
_.- [€1
Ul
I
I
r,,,
tu_0
2_
o
a_
-€.- _
O
W
u'll.I.-I1_
_
1=
x
2
O
_,_o_
t-
L_
_o_
i
::::)ZO,
_bZ
to
o
0
t_
IZI
I'I
o
n_m
8
fit
€-
0
2.
!
E
O
Z
o
|
Q
o
!
o
o
o
o
z
O
n
1:1. Q.
n0..
n
n
8,8.
nln
6
Z
E
cO 0'_
_m
b-
23
I
I
I
I
e,l t'N _
o
n
n
_ o"_:_
-'1
I!1
o
o_
o
1
t,o ho
o
NN
o
o
n
n
ILl
lU
ffl
NOTES
24
t
Manual del Usuario
IcRnf!°.,
......................
1
SIERRA TWIN CUTTER
de 61/s pulg.
Modelo No.
286.25574
©
Z_ ATENCION:
Lea, comprenda y siga todas
las Reglas de Seguridad y las instrucciones de
Funcionamiento incluidas en este manual antes
de usar esta herramienta_
• SEGURIDAD
° FUNCIONAMIENTO
° MANTENIMIENTO
Sears, Roebuck and Co., Hoffman Estates, IL 60179 U.S.A.
Visite nuestro sitlo Web de Craftsman: www.sears.com/craftsman
E
I
0M-25574
I
5-25-06
Garantfa........................................................................
P&gina 26
instruccionesde Seguridad..........................................
P_ginas27-32
Sfmbolosde Seguridad...................................................
P&gina 32
Descripci6n..................................................................
P_gina 33
Funcionamiento.........................................................
P_ginas 34-43
Desmontaje
e instalaci6n
Mantenimiento
Localizaci6n
Accesorios
de las Hojas .......................
.................................................................
y Soluci6n
de Aver[as .............................
....................................................................
P&ginas 41-43
P&ginas
43-44
P&gina
45
P&gina
45
Repuestos ...................................................................
P&ginas 46-47
N_meros
Contraportada
de Servicio ...................................................
UN AKIO DE GARANTiA COMPLETA DE ESTA
HERRAMIENTA PROFESIONAL CRAFTSMAN '_
Siesta herramienta Profesional Craftsman falla dO la satisfacci6n completa
en el plazo de 90 dias a partir de la fecha de la compra, vu61vala a
cualesquiera chamusca el almac_n o el otro enchufe del artesano en los
Estados Unidos para el reemplazo Ifbre.
Despu_s de 90 dias y con un afio a partir de la fecha de la compra, siesta
herramienta Profesional Craftsman faUa d_ la satisfacci6n completa,
vu_lvala a cualquler tienda de Sears o Centro de Repuestos y Reparaci6n o
cualquler otro punto de venta de Craftsman en los Estados Unidos para su
reparaci6n sin costo (o el reemplazo si la reparaci6n prueba imposible)
Esta garantla le otorga derechos legales especlficos y adem_s podr& tener
otros derechos, los cuales rattan de un estado al otto.
Sears, Roebuck and Co., Hoffman Estates, IL 60179
IGUARDE ESTAS INSTRUCCIONES!
ILEA TODAS LAS INSTRUCCIONES!
26
ADVERTENCIA: ASEGURESE de leery comprender todas las
instrucciones,El incumplimiento de todas las instruccionestndicadas a continuact6n
puede ocasionar un c,hoqueelbclrico, incendio y/o tes|6n personal grave,.
SEGURIDAD EN EL LUGAR DE TRABAJO
1, SIEMPRE mantenga el lugar de trabajo limpio y blen Iiuminado, Los bancos de
trabejo desordenados y real iluminados favorecen los accidentes,
2. NO utlllce las herramientas el6ctrlcas en una atm(_sfera explosive, tal come en
presencta de liquidos Inflamables, gases o polvo. Las herramientas elbcldcas
crean chispas que pueden lnflamar el polvoo ?osvapores_
3. SIEMPRE mantenga a los espectadores, ni_os y visitantes a una distancta
prudente cuando est_ utilizando una herramienta el_ctrica. Las dtstracciones
pueden hacede perder el control.
SEGURIDAD ELECTRtCA
1. Las herramientas con aislamiento doble est_n equipadas con un enchufe
polartzedo (una hoja de contacto es m_s ancha qua la otra.) Este enchufe
puede colocarse en un tomacorrlente po?arizado en una sole direcci6n. Si el
enchufe no calza bien en el tomacorr|ente, invierta el enchufe. Si todavia no
calza, p6ngase en contacto con un elecbicfsta calificado para que instale un
tomacorriente polartzadoo NO modifique el enchufe de nlnguna manera.
2. EIQde aislamiento doble elimina la necesidad del cord6n el_ctrico tri[iiar puesto a
tierra y det sistema de aiimentaci6n de energfa puesto a tierTa. Aplicabie soiamente
alas herramtentas de la Clase tl (con aislamiento doble)._
3oAntes de enchufar la herramienta, ASEGURESE de qua el volLajedet tomacorriente
est_ dentro del volLajemarcado en la placa de dates de la herramienta. NO use
herramlentas clasificadas '*CA solamente=con una fuente de energfa CC_
4_SIEMPRE evite contacto del cuerpo con las superficies puestas a tlenra tales
come tuberias, radiadores, estufas y refdgeradoreso Existe mayor riesgo de
sufdr cheque e!_ctrico si su cuerpo estd a tierra.
5. Si es inevitable el use de la herramienta en lugares hQmedos, SIEMPRE use
un interrupter de p_rdlda a tierra que le sumlnlstre energia a su herramienta,
SIEMPRE use guantes y calzado de gema de electrictsta cuando trabaje en
ambientes h[imedos,
6. No exponga las herramtentas el_ctflcas a la Iluvla ni a amblentes h_medos.
Cuando entra agua a una herramienta el_cLrica, se aumenta e! desgo de sufrirun
choque el_ctrico,,
7, NO abuse del cord6n el_ctrico. NUNCA use el cord6n para transportar las
herramtentas ni tire de! cord6n para desenchufadas. Mantenga el cord6n
alejado del calor, det aceite, berries afltados o plezas m6viles. Reemplace
inmediatamente los cordones qua est_n decades. Los cordones dafiados
aumentan el riesgo de sufrirun cheque el_ctricor
8. Cuando utilice una herramienta el_ctrica al aim fibre,SIEMPRE use un cord6n de
extens[6n marcado "W-A" o "W"_Estos cordones est_n aprobados para use ai aire
libra y reducen el riesgo de cheque el_ctrico.
NOTA: El cord6n de extensi6n debe set de calibre adecuado (AWG -American Wire
Gauge) para use eficiente y seguro. Los alambres de calibre mds pequefio tienen
mayor capacldad (afambre de calibre 16 tiene rods capacidad que el a?ambrede 18).
27
I
I
I
1
I
5-25-06
SEGURIDAD PERSONAL
1. SIEMPRE mant_ngase a?erta, observe Io qua est& haciendo y use sentido com_in
cuando est6 usando una herram|enta. NO use la herramtenta cuando est_
cansado o bajo la influencia de drogas, alcohol o medicamentos. Un momento de
distracci6ncuando esLdtrabajando con tas hsr_mientas el_ctricas, puede ocastonar
una lesf6n personal grave°
2. SIEMPRE vistase adecuadamente. NO use ropes sueltas o joyas. Atese el cabello
largo. Mantenga su cabello, ropas y guantes alejados de las plazas m6.¢iles. Las
ropes sueitas, las joyas o el cabellolargo pusdonquedar atrapadosen las piezas
m6viles,
3. SIEMPRE evils la puesta en marcha accidental, ASEGURESE de que el fnterruptor
est_ en la posicibn "Off" (apagado) antes de enchufar ia herramienta. NO
transportslas herramientasconsu dedo en el interrupter. Se puede productrun
acoidentesl transporla la herramientaconsu dedo en el interruptero st enchufata
herramientacuando el interrupterestb en la posicl6n"On" (encendido),
4. SIEMPRE saquelas Haves de aJusteo Ilaves inglesas antes de poner en marcha
la herramienta. Si se deja una flare inglesa o una llave de ajuste en una pieza m6vil
de la herram]enta,se puede produciruna tesi6n personal.,
5. NO use la herramlenta a una dlstancla demastado alejada. Mantenga SIEMPRE
un buen equilibdo y una poslci6n firms. El buen equilibriay la poslcibnfirme
permiten un major controlde la herramientaen sttuacionestmprevEsias,
6. SIEMPRE use equipo de sogurtdad. Use slempre lentes protectores. Se debe user
mEscarascontrael polvo,zapatos de seguridadantJrresbaladizos,casco de seguridad
o proteccibnaudttivade acuerdo con las clrcunstancias,
USOY CUIDADO DE LAS HERRAMIENTAS DE SEGURIDAD
1. SIEMPRE use mordazas u otto m(_todopractice para asegurar y apoyar la plaza
de trabajo en una ptataforma as|able,, St suJetaet trabaJocon la mane o centre su
cuerpo queda loestabley pueda conductr ala p_rd_dade control
2. NO fuerce la herramlentao Use ta herramlenta aproplada para el trabajo. Le
herramientacorrectshar_ el trabajo majory de manera m_s segura, a Eavelocidad
pare la cuat rue disefiada.
3. NO use la herramienta si el interrupter no funciona debidamente. Es petigrososi la
herramientano puede set controlada conel interruptery per lo lento debeser reparada,
4. SIEMPRE desenchufe ta herramienta antes de hacer alg,_n ajuste, cambtar
accesorios o guardarla° Estas reed|despreventtvasde seguridad reducenel riesgo
de qua ta herramientase ponga en marcha accidantalmente_
5oSIEMPRE guards las herramlontas lejos det alcance de los nlfios y de otras
personas Inexpertas,, Las herramfentasson petigrosasen manes de personas
inexpertas,
6. SIEMPRE mantanga bien culdadas las herramientas° Las herramlentas cortantes
deben mantenerse afiladas y limpias. Las herramlentasqua se mantienen blen
cutdadasy bten aflladas l]enen menos probabllldadde atascarse y se pueden controlar
m_s f,'_cilmenteo
7. SIEMPRE verifique si hay plezas desalineadas o atascadas, sl hay plazas
quebradas o st exists cualquler otra situaci6n qua pueda afectar el
functonamiento de la herramlenta. SI la herramienta est_ daSada, debe repararse
antes de usarla. Muchosacctdentessoncausados dab|doal real eslado de las
herramienlas,
,
,
,
,
,
,,,
!/_USADOSCON
ADVERTENCIA:
EL USO DEACCESORIOS
NO
RECOMENDADOSPAPASER
ESTA HERRAMIENTAPUEDEN
CREAR
UNA
SITUACION PELIGROSA
I
8oSIEMPRE use solamente los accesodos recomendados per el fabdcante para esta
herramlenta. Losaccesoriosadecuados pare una herramlenta, puedenset peftgrosos
si se ulilizan en otra herramienta
28
|
|
SEGURIDAD SOBRE LAS REPARACIONES
1, SI falta cualquier plaza de esta sierra o se romps, dobla o falla de cualquler
manors; o sl alguno de los componentes eldctdcos no funciona en forms debida,
SIEMPRE apague'el interrupterde puesta en marcha, desenchufsIs sierra y reemplace
las plazas daSadas, faltantes o failadas ANTES de vofvera ponerfaen funcionars_ento.
2. La reparact6n de ias herramlentas debe set efectuada solamente en un Centre de
Repuestos y Reparaci6n Sears. La reparaci6n o mantentmlento efectuadoper
personal no especiallzado puede causar una lesl6n_
REGLAS DE SEGURIDAD PARA LAS SIERRAS
Z_ PELIGRO!
Mantenga tas manes alejadas del _rea de corte y de las hojas.
Mantenga la otra mane en la manija auxitiar
o en la caja del motor, SI sujeta la
.........................
sierra con ambas manes, evitar_ el peligrode qua la sierra se las lesione.
1oSIEMPRE mantenga st=cuerpo colocado a cualquler lade de las hojas de la
sierra, pore no en lines con ias hojas de la sierra.
2. NO Irate de alcanzar nada per debaJo del trabaJo. Ei protectorno pueda protegerlo
contracontactocon ias hojas per el tado inferiordet trabajo_
3. SIEMPRE verffique sl el protector est& blen cerrado ANTES de cads use. NO use
Jiasierra si el protector no se mueve iibremerde y se clerra Instantz_neamente.
Nunca sujete con mordazas ni ate el protector de la hoja en posici6n abierta, Si la
sferrase deja caer acctdentalmente, el protectorpuede doblarse,Levanteel protectory
aseg_rese de que se mueve ltbrementey que no toca las hojas nt ninguna otra plaza,
4. SIEMPRE verifique et funcionarsiento y el estado del resorts del protector. Si el
protector y el resorts no est_n funcfonando de manera aproptada, DEBE hacertos
reparar antes dei use. El protectorde la hoja puede funcionaren [ormalenta debido a
p_ezasdecades, dep6sitosgomososo acumulac|6n de sucledad_
5. El protector de la hoJadebe maniputarse manualmente SOLAMENTE cuando se
hacen cortes espectales, tel come cortes de cavidades o codes compuestos.
SIEMPRE levante el protector medtante la manlja.Tan pronto come la hoja penetra
el material, se DEBE soltar e! protector. Pare lodes los otros cortes,ei protector
funclonar_ autombticamente
6, StEMPRE aseg_rese de qua el protector est,, cubrlendo las hoJas ANTES de
depositer la sierra en un banco de trabaJo o en el plso, Sl las hojas en movimlento
no est_n protegidasla sierra se mover& hacia atr_s, cortando1oqua encuentrea su
paso Observe cuantodemoran las hajas en dejar de girar despu#.sde que se suelta el
interruptoro
7. NUNCA suJetela plaza que est_ siendo cortada en sus manes o a trav6s de sus
piernas. Es importante apoyarla pieza de trabajo en forma debida°parareducir a un
minimo ta exposicf6ndel cuerpo, atascamiento de ]as hojas o la p_rdidade control
8_SIEMPRE sostenga la herramienta per las superficies de suJecl6n alsladas
cuando reallce operaclones en que la sierra puede tocar alambrado ocutto o su
propio cord6n el6ctrico, SI se produce contactocon un alambre "baJo tenst6n=fas
piezas de metal expuestas de la herramfenta quedardnbajo tensi6n y el operador
puede reclbirun cheque el_ctrico.
9. NO deje ta sierra funcionande cuando la transports en la mane, El protector de
la hoJaInferior puede abrirse at tocar su rope. El contacto accidental con las hojas
rotatorfasde la s_errapuede causer una lest6n personalgrava_
10.NO use la herramienta st el interrupter no funclona debtdarsente_ Cualquisr
herramientaqua no puede ser contreladacon el interrupteres peligrosay debeser
reparada
29
,
i
REGLAS DE SEGURIDAD PAPA LAS SIERRAS cont.
11. Cuando retire las hojasde la herramienta,SIEMPRE use guantesprotecterespare
sujetar tas hoJaso accesodos..Losaccesortospusden estar cafientesdespu6s de use
protongado,.
RETROCESO.-SUS
CAUSASY
COMO SE PUEDE EVtTAR
Causes de! Retroceso
1. El retroceso es una reacci6n repentina qua se produce cuando las hojas de las sierras
se aprietan, atascan o desa!inean, causando que ta sierra sin control se levante y se
salga de ta pteza de trabajo retrocediendo hac[a el operador,,
2. Cuando la entalla aprieta o atasca firmaments las hoJas, betas se detienen y el motor
reacciona impuisando rdpidamente la sierra hacia atr_s, hacta el operadoro
3. Si las hojas se tuercen o desalinean en el corte, los dientes en los bordss traseros de
las hojes pueden enterrarse en la super_cte superior de la madam, Esto cause que las
hojas se salgan de la entalla y sa?ten hacia atr_s, hacia el operador.
4. E! retroceso se produce a causa del mal uso y!o procedimtantos o condtclones de
operacibn Incorrectas. Puede evitarse tornando tas precauctones apropladas, como se
tndica a conttnuact6n,
Come Evttar el Retroceso
1oSIEMPRE sujete ta sierra firmaments con ambas manes y coloque su cuerpo y
brazes de manera que puedan resistir |as fuer'zas de! retroceso. El operador
puede controlarlas fuerzas del retrocesosi se roman las precaucionesapmpfadas,
2°SI las hoJasse est_n atascando o st per cualquler raz6n usted Interrumpe un
carte, SIEMPRE apague la sierra y mant_ngala inm6vil en el material haste qua
tas hojas se detengan completamente. NUNCA intenta sacar la sierra del trabajo
o tirar de la sierra hacla atr_s cuando las hojas estSn an movimlento puss puede
ocurrlr RETROCESO, StEMPRE verffiquey eat6 preparado pare tamer medidas
correctivesqua etiminenla causa de! atascamianto de las hojas.
3oCuando ponga en marcha nuevamente la sierra en ia pteza de Lrabajo,SIEMPRE
centre las hojas en |a entalla y compruebe qua los dientes de ta sierra no est6n
enganchados en el mater|eL Si }as hojas de la sierra se atascan, pueden safirse
hacia arriba o RETROCEDER de ta pieza de trabajocuando la sierra es puesta en
marcha nuevamente..
4. SIEMPRE apoye los pansies grandes a fin de reducir el riesgo de qua las hojas
se aprleten y retrocedan. Los panelesgrandes tienden a combarsebajo se propfo
peso..Losapoyos DEBEN colocarseen ambos lades, carte de ta tinea de carte y cerca
del borde del panel,
5, NO use hojas desafiladas o daSadas. Las hoJasdesafitadas o incorrectamente
triscadas producen una ental]a angosta qua cause demastada frlccl&n, atascamiento
de la hoja y RETROCESO,,
6. SIEMPRE range sumo culdado cuando haga "Cortes de Cav]dades" en parades
extstentes u arras &reas ciegas. Lea hojassaltentes puedencarter objetosqua
causen RETROCESO.
7. SIEMPRE espere haste qua las hojas hayanalcanzado ta ve[octdadplena antes de
qua toquen la plaza de trabajo.
8. SIEMPRE mantenga su cuarpo en cuaiqulerlade de las hojasde la sierra, pare no en
linea con las hojas El RETROCESO puede lanzar la sierra hacia atr_s hac[a e|
operador.Las fuerzas de! RETROCESO puedenser controladas per e?operador,si se
roman las debidas precauciones_
SIEMPRE sostenga la herramlenta per las superficies de suJect6na]sladas cuando
reallce operaclones en que la sierra puede tocar alambrado oculto o su propto
eord6n el6ctdcc,. Si sa produce contacto conun alambra "bajo tensibn"las plazas da
metal expuestas de la herramientaquedar_n bajo tensi6n y el operadorpuede recibirun
cheque eI6ctdco_
30
t
I
REGLAS ADICIONALES PAPA FUNCIONAMIENTO SEGURO
I Z_ ADVERTENCIA:
ASEGURESEde leer y comprender todas las
J lnstrucciones.El tn'cumplimientede todas las instrucciones tndtcadasa contlnuaclbn
J,,,,,,,,puede
rasultar en un cheque el6ctrice, incendie y/o tesldn personal grave.
1_Conozca su herramlenta el6ctricao Lea culdadosamente el manual del usuarlo.
Apranda sus apltcaciones y ltmitaciones asi come tambl_n los rlesgos
potenclales especificos relactonados con esta herramienta. Si se cumple esta
regta se raductrdet riesgo de un cheque el_ctrtco0Incendloo laslbn graver
2. Cuando use esta sierra SIEMPRE use lentes protectores o gafas de seguridad.
Los anteojos regulates tienen sotamanta !antes reststentes al impacto; ellos NO
son lentes protectores. Si se cumple esta regla se reducirdel riasge de sufriruna
lesi6n personalgrave_
3. SIEMPRE proteja sus putmonesoUse una m_scara centre el polvo st la operaci6n
va a despedlr touche polvo,. Si se cumple esta regia se reducir,5el riesgo de sufrir
una lesi6n personalgrave_
4oSIEMPRE protaja su audici6n, Use protecci6n pare los ofdos duranta periodos
prolongados de funclenamiento. Si se cumpteasia regfase reduclr&eLriesgo de
sufrir una lesl6n personalgrave.
5, SIEMPRE lnspacclone peri6dlcamente los cordones el_ctrleos de ia herramlenta
y st est_n da_ados h&galos reparar an su Centre de Servtclo Sears m_s cercano
o en otro Centre de Servlclo Autorizado. SIEMPRE est6 atento de la ubicacidn del
cord6n. Si se cumpla esta ragla sa reducir_el desgo de un cheque eldct,dcoo incendlo,,
6. SIEMPRE verifique st hay plezas daSadas. Antes de seguir utilizando la
herramienta, inspecclone para datarmlnar sl algdn protector o cuatqutar plaza
qua est6 da_ada funclonar_ debtdamante. Vartfique el ailneamlento de las plazas
m6viles, sl ast_n atascadas o st hay plazas rotas y cuaiquier otro estado qua
pueda afactar el funcionamiento de la herramienta. St se da_a un protector o
cualquler otra plaza debe ser reparada o reamplazada per un Centre de Servicio
Autorizado. Si se cumple esta regla sa reductr_ el rlesgo de un cheque eldctrico,
tncendtoe lesi6n grave.
7. NO abuse del cord6n el6ctdco. NUNCA transporte la herramienta per el cord6n nt
tire del cord6n pare desenchufarla. Mantenga el cord6n alejado det calor, del
acette, bordas afitados o plezas m6viles. Reemplace Inmediatamente los
cordones el6ctricos qua est6n daSados. Los cordonesdaSadosaumentan el desgo
de sufrirun cheque el_ctrico.,Si se cumple esta regla se reducird el riesgo de un
cheque el_ctricoo tncendio
8. SIEMPRE asegtirese de qua su cord6n de extensl6n est6 en buen estado.
Cuando use un cord6n de extensl6n, asegtirese de qua sea de calibre suflclente
para portar la corriente que necesita su herramienta. Se recomlenda un cord6n
de per Io manes calibre 16 {A.W.G.) pare un cord6n de extensi6n de 180 pies o
menos de largo. No se recomtenda el use de un cord6n de extensi6n de m_s de
100 pies de largo. SI flene dude, usa el calibre slguiente de mayor capacidad. Los
alambres de calibre m_s pequeiio tienen mayor capacidad (el alambre de calibre
16 tlene m_s capacldad qua el alambre da calibre 18). Un cord6n de calibrefnfedor
causard una p_rdlda en e! voltaicde linea resu_tandoen pSrdtdade potenciay
sobrecalentamlento,
9. SIEMPRE Inspeccione y saque redes los clavos de la madera antes de cortarla.
St se curnple esta ragla se reduclr_ el desgo de sufdr una lest6npersonal grave,
10.NO haga functonar esta harramienta cuando est_ cansado o baJo la lnfluencla de
drogas, alcohol o haya tornado alguna medicina. Si se cumple esta regta Be
raducir_ et riesgo de un cheque el6ctdco= tncendio o lasl6n grave.
31
I
i
i
I
5-25-06
REGLAS ADICIONALES
PARA FUNCIONAMIENTO
SEGURO cant°
,
Z_ ADVERTENCIA:
Algunas particulas de potvo creadas par el lijado
mec_nico, aserrado, rectificado, taladrado y arras trabajos de consf_-uccibn
contienen productos quimlcos qua se sabe causan c_ncer, defectos cong_nItos
u otros dafios al slstema reproductoroAlgunos de estos productos qutmicos son:
• Plomo proveniente de pinturas a base de plomo
•Stllce crtstaltzadade tadrillosy cementoy aires produclosde albafitleda.
. Arsbnico y creme de madera tratadaquimtcamente,.
Su desgo de exposici6na estos productos vada dependlendode cuan a menudo
ustedhace este ripede trabajo.Para reducir su exposicibna estos productosqulmicos;
• Trabajeen tugares bien ventilados
, Utiliceequipo de seguridadaprobado, tal coma mbscarasconLrael palvo
especlalmente dlseffadaspara filtrar partlculasmtcroscbpfcas.
ADVERTENCIA:
La uttlizacl6nde cualquier cepIltadora
puede causar la proyecci6nde objetos extrafios a sus ojos, Io cual
puede ocaslonar dafios oculares severos.Antes de comenzar a
usar la herramlenta mecbnlca, SIEMPRE use sus lentes
protectoreso gafas de seguridad con protecci6nIateraJ y una
mdscara completa cuando sea necesarfo.Recomendamos una
M_scara de Vtsi6n Amplia para usar sabre sus lentes protectores
o sus lentes de seguridad est&ndar, con proteccibn lateral,
disponible en los Almac_nes Sears.
11
m.
REGLAS ADICIONALES PARA FUNCIONAMIENTO SEGURO cont.
_ped_
...........................................................................................
La etlqueta de su herramlenta pueda Inclulr los slgulentes simbolos,
V..............................................................................
Voltios
A
H_.........................................................................
Hertz
W ........................................................................
Watts
min.................................................................
Minutas
......................................................................................
Corriente Alterna
===.=__
..................................................................
Cements Continua
no ..............................................................
Veloddad stn Carga
[] ..............................................................
Construccibn Class 1!
....tmin ......................................................................
Revoluciones o Carreras per minute
Z_. ...........................................................................................
Indica peHgro,advertencia o atencibn.,
tSigniIica atenci6n! Exists riesgo para su seguddad
ilMPORTANTEI
LEATODAS LAS INSTRUCCIONES
32
Antes de intenlar usar cualquierherramienta, es necesario famltiarizarse con fades las
caracter[slicasde funcionamiento y las tnstruccionesde seguddad.
descuidado,
Recuerde queun
una
fraccibn decon
segundoes
sufic_ente
J Z_
ADVERTENCIA,
NO descuidode
perm,|a qua su
famil,addad
la sierra Io
haga _ pare j
......
0Caslonaruna lesf6ngrave.
...
CONOZCA SU SIERRA (vet Fig. 1)
La sierra 3V,,inCutter tiene Incorporadastouches caractedsticaspractices para cortes
eficientes y r_pidos.Entre elias cabe mencionar un slstema innovador de 2 hojas
especiales que gkan en dtrecci6n epuesta pare !ograr certes suaves y exactos con menos
vibraci6n y retroceso,Tambi_n est_ equipada con un sistema de lubdcaci6n de la hoja
preinstaladopare usar cuando corte aluminto,cobra, acero lnoxfdable y hlerroforjado..La
manija auxiliar se Instala en la parte superior de ia sierra ofrecJendoapoyo adtcienaly
faciltdad de manipulaci6n.
Pare mayor conveniencla,la sierra TwinCutter no necesita set armada,.Las hojas
especialesy el sistema de tubricaci6nya est_ tnstalado..
ProtectorSu _eriorde la Hoja Fig. t
nterruptor "On/Off"
'EncendtdofApagado)
Manija Auxtltar
Manfja del Pmlector
Inferior de la Hoja
Lubricaci6n.,"
alaCe,a
Uave
/
Peri_ladel "
Sistemade
Lubricaci6n
/
L_
a la Cera Hojas 'j
ProtectorInferior
de la Hoja
Alimentaci6n
7,8 Amps.
PotenctaM_xima
1,25HP
Df_metrode'I'a"H'oja"
6% pulg.(156mm)
......
CarrientaNominal
_ 120re[ties,60 Hz CA
....
Veloctdadsfn Carga
4600 RPM
Pmfundldadm_ximade corte madera (1_/2")metal(con ungrosordeparedo I&minade1t8")
lb..
'C[€i0 de eber
30 minutes en10 minutesapagado(vet p_gina12)
DESEMPAQUE
Su sierra Twin Cutter rueembarcada completamente armada, lnspeccione atentamente la
sierra pare asegurarse de qua no ocurn6 daSo nt quebradura duranteel embarque, SI
alguna pieza es_ dar_adao fatta, devuetvala sierra a su Aimacf_n Sears m_s cercano
pare que se ta cambien.
i
haste qua se reemplacen las plazas faltantes. El incumplimientode esta advertencta
_
ADVERTENCIA:
St hay piezas fattantes, NO haga fi.mcionar esta sierra
J
pue.deocaslonar .una....!.esi6n
personal grave.
...............
33
i
I
I
5-26-06
J
!
HOJAS DE LA SIERRA
A!3n las mejores hojas de sierras no cortar_tn de manera eficiente si no se mantienen
limpias, afiladas y debtdamente colocadas. Las hoJas desafiladas ejercen mayor
esfuerzo en la sierras y aumentan el peligro de retroceso. Mantenga hojas
adicionales de mode que siempre tenga hojas afiiadas disponibles,
La goma y resina de la madera que se endurece en las hojas reducir_n la velocidad
de la sierra. Use un disolvente de goma y resina, ague salients o keros_n para quitar
estas acumulaciones_ NO use gasoIina,
diseSadas de 6 1t8 pulg,, y nunca se debe user ningOn otro tipo nt tamaSo de
Las hojas de otro ripe
y tamatSo
no funcionar_n
en forma
segura en esta
I hojas.,
_ ADVERTENCIA:
Esta
sierra Twin
Cutter usa hoJas
especialmente
sierra y pueden provocar una lesi6n personal grave.,
Para hacer pedidos de hojas adicionales o pare reemplazar las hoJas que venlan
con ta sierra, yea en la p_gina 45 de este manual las instrucctones para hacer
pedtdos. Pare instalar las hojas nuevas en ta sierra, yea las instrucciones especiates
en las p_ginas 41 a 43 de este manual pare el desmontaje e instataci6n apropiada
de las hojas_
SISTEMA DE PROTECCION DE LAS HOJAS
El protector inferior de la hoja, instalado en su sierra, liens per objeto velar per
su protecci6n y seguridad. NUNCA debe ser modificado, per ning_n motive. Si
se da_a o comienza a funcionar m,'_s ientamente, NO haga funcionar su sierra
haste que el problema no haya s|do corregido o ss haya reemplazado la pleza
da_ada. SIEMPRE mantenga el protector en su postcidn correcta de
funclonamiento
cuando use la sierra.
Z_ PELIGRO:
Cuando corta a trav_s de
una pleza de trabaJo, el protector infedor de la
hoja no cubre ta hoja per el lade inferior de la
pieza de trabajo. Debido a que la hoja est_
expuesla per el lade inferior del trabajo,
SIEMPRE mantenga las manes y los dedos
aiejados det Area de corte (ver Fig. 2).,
Cualquier parle de su cuerpo que toque la
hoja en movimiento puede sufdr una lesi6n
personal grave.
\
Fig, 2
El protector infedor de la hoja est_ en posici6n
HACIA ARRIBA cuando se hace un sorts.
Las hojas est._n expues_s per el lade inferior de la pieza de trabajo
Z_ ADVERTENCIA:
NUNCAusela sierra si elprotectorno estAfuncionando
enforma debida.Se debs verificarel funcionamiento
correstodel protectorantesde
cadause,,Si la sierrase deja caer,antesde usadaverifiquestse ha dafiadoet
protectorinferiorde la heja_NOTA:El protectorest_ funcionandoen forma debida
cuandose muevelibrementey retornaoportunamentea la posici6ncerrada.SI per
cualquiermotiveel protectorinferiorde la hojano se cierralibremente,antes de usar
lasierraII_vetaa su Centre de Reparaci6nSearsrodscercanoparasu reparacidn.
34
I
i
RETROCESO
El retroceso ocurre cuando tas hojas se detienen r_pidamente y la sierra es lanzada
hacia atr_s, hacia usted+ Las hojas pueden detenerse slla hoja queda apretada en el
material que est_ stendo cortado.
IMPORTANTE: La meier protecci6n centre el retroceso es evitar las pr_cticas
pellgrosas.
Z_ PELIGRO:
SIEMPRE apague inmediatamente la sierra si las hojas se
atascan o la sierra se detfene., El retroceso le puede hacer perder el control de ]a
sierra. La p_rdida de control puede ocasionar una lesion grave.
SIEMPRE apoye en forma aproplada la pleza de trabaJo y suJetela sierra con
ambas manos
Causas que provocan el retroceso:
1. Torcedura de las l_ojascuandoest,_haciendo
un corte+
2. Hacer un corte con hojas desafi+adas,
engomadas o tncorrectamente triscadas+,
3, Sin apoyo apropfado para la pleza de trabaJo,.
SIEMPRE pmperctoneapoyo aproptado come
se muestra en la Fig 3.
4+ Forzar un corte,.
5. Cotter readers combada o h_meda.,
6. Mal use de ta herramlenta o procedimlsntos de
funclonamiento incorrectos+
7. Cotocarlas hoJasen la pleza de trabajo antes de que atcancen la velocldad plena.
1. S|EMPRE dir[jase haciala pieza de
trabajo con la siena en un tmgulo de
Fig.4
aproximadamente 30 ° en relaci_ncon
ta pleza de trabajo_ (ver Fig.4).
2. SIEMPRE haga cortes derechos As,
evttar_ que la hojase tuerza en el certe,
!
-4 _
3_SIEMPRE use hojas ,impias, afi,adasy
__,:_
__._
_,_:_ I_
-.
j ._.._
_+ •
..-
,
"
deb,damente
tdscadas.
NUNCA haga
I
_
_"_'_"_
_-_='
cortes con hojas
desafiladas°
I
I
!
4. SIEMPRE apeye en forms apropiada ta
pleza de trabajo antes de comenzar un corte+Esto le ayudar& a evItar que ]as
hojas queden apretadas en el corte (vet Fig 3).
5. SIEMPRE use una presi6n uniformsy constantscuando hags un corte.,NUNCA
fuerce el carte.
6. NO corte readers combada o hOmeda.
7. SIEMPRE sostenga ra sierra firmemente con ambas manes y mantengasu cuerpo en
equ+tlbdo+
SIEMPRE cot6queseen cualquterlade de las hojas de la sierra, peru no en
lines con las hojas+Esto le ayudard a resistirfas fuer-zas del reLroceso,s[ es que se
produjerao
IMPORTANTE: Cuando use su sierra, SIEMPRE mant_ngase alerts y en control..
NO levante la sierra de la p|eza de trabaJo cuando las hoJas estdn en movimlento,
35
I
I
I
I
5-25-O6
COMIENZO DE UN CORTE
IMPORTANTE:
ANTES de usar la sierra Twin Cutter per primera vez, SIEMPRE familiaricese con la
sierra hactendo cortes de pr,_clicaon materiales sobrantes.
El peso de esta sierra ayuda a que los cortes seen m_s suavos, Aprenda a manipular
y controlar en forma segura el peso de la sierra.
SIEMPRE aseg_rese de colocar las hojas perpendiculares al piano de la pieza de
trabajo.. Haga el code a un &ngulo apro×imado de 30 ° en relacfSn con la superScie de
la pieza de trabajo. (Vet Fig. 5)°
Practique la vetocidad de avance apropiada pare el material que estd stendo cortado.,
s hojas gtran a una velocidad constante de 4600 RPM (velocidad sin carga).
Optima el interrupter'on/off' pare poner on marcha la sierra° SIEMPRE espere haste
qLie las hojas atcancen ta velocidad piena antes de comenzar a cortar la pieza de
trabajo_
IMPORTANTE: Cuando use la sierra, SIEMPRE manl_ngase alerta yen control.
NO tevante la sierra de la pieza de trabaJo cuando las hojas est_n en movimiento.
Hojas perpendiculares ala pieza de
trabaJo Aproxtmadamente 30=
/_
ADVERTENCIA:
SIEMPRE mantenga buen control
de la sierra para facititar y hacer m,_s
seguro su usooLa p_rdida de control
puede causar un acc_dente que
ocastone una poslble lest6n grave,
Fig, 6
NUNCA sostenga la sierra con una
mano solamente (ver Fig° 6),
SIEMPRE sujele la sierra tom&ndola
del cuerpo dol motor y de la manija
auxilfar (vet Fig_7)_
CICLO DE DEBER
30 minutes enciclo fuera de servicio de t0 minutes refleren a laoperacidn a
corto ptazo. La operacl6n corta del tiempo denote la operacl6n bajo carga normal
pare un perlodo y un material especificados, comenzando el frfo, el Intervalo entre
cada periodo de ia operaci6n que es suficiento permitir que la herramienta se
refresque abajo aproximadamente a la temperatura ambiente.
36
PARA AYUDAR A MANTENER EL CONTROL
1. SIEMPRE apoye la pieza de trabajo cerca del corte.,
2. SIEMPRE apoye _a pieza de trabajo de merle que el corte quede a su derecha,
3. SIEMPRE sujete la pieza de trabajo con mordazas a fin de que no se mueva
durante el corte,_Coloque la pieza de trabajo con e! lade bueno hacia abajo.
Coloque la pieza de trabajo con el lade bueno hacia abajo, NOTA: El lade bueno es
aquel cuya apariencia es Importante,
Antes de comenzar un corte, trace una Ilnea a to largo de la lfnea de corte deseadao
Luego coloque el borde delantero de las hojas de la sierra en esa parte de la pieza
de trabajo que est_ifirmemente apoyada,,
4. NUNCA co{oque ta sierra en Ia parte de la pteza de trabajo que se desprenderd
despuds de hecho el corte,
5. SIEMPRE mantenga el cord6n eldctrico alejado del &tea de corteoSIEMPRE
coloque el cord6n de mode que no cuelgue de la pieza de trabajo cuando se hace
el corte,
PELIGRO: Si el corddn cuefga de la pieza de trabajo durante un code,
sueite inmediatamente el Interrupter 'onloff', Desenchufe ta sierra y mueva
el cord6n a fin de evltar que cuelgue del trabajo nuevamente
provocar una lest6n grave o mortal., Si el cerd6n se ha dar_ado,hagalo reemplazar
antes de user la sierra nuevamente_
•
ill
/i
i
i
llll.
i
.J....I,,.....,HH,.,.I
Z_ ADVERTENCIA:
St las hojas tocan Ia pieza de trabajo antes de
alcanzar la velocidad plena, la sierra puede retroceder hacia usted causando un
a lesibn grave,
Cuando haga un code, SIEMPRE aplique una presi6n firme y uniformeo Si fuerza la
sierra se producirAn cortes _speros y puede acortar ia vida utit de la sierra o causer
retroceso.
Z_ PELIGRO:
Cuando est_ cottando a travds de la pleza de trabajo, el
protector Inferior de la hoja no cubre las hojas. Las hojas quedan expuestas
porel lade inferior de la pieza de trabajo. SIEMPRE mantenga sus manes y
dedos aleJados del _rea de corte, Cualquier parte de su cuerpo que toque
las hojas en movlmiento puede sufrir una fesi6n grave.
Despuds de cempletar el corte, suelte el interrupter 'on/off y espere haste que las
hojas se detengan completamente_ NO retire la sierra de la pieza de trabajo
cuando tas hojas est_n en movimientor
/_ ATENCION: Siempre que levanta ta sierra de la pieza de trabajo, las hojas
estdn expuestas per el lade inferior de la sierra hasta queet protector inferior de
las hojas se cierra. SIEMPRE ASEGURESE de que el protector interior de tas
hoJasse haya cerrado bien antes de depos{tar la sierra en la superftcie de trabajo,,
37
I
i
I
t
5-26_06
INSTRUCCIONES
PARA LOS CORTES
NOTA: La vida _ti_de las hojas de su sierra Twin Cutter y la catidad de tos bordes
cortantes depende de que las vibractones sean reducidas a un mlnimo,
SIEMPRE sujete firmemente la pieza de
trabajo ANTES de comenzar un corte,
Despu&s avance fa hoja a travL,s de!
material en un _ngu!o de
aproximadamente 30 =(ver Fig, 8),,
Esta sierra produce astillas calientes,
no chtspas, cuando terra metal. Se
recomienda que use una mbscara
facial sobre las galas de seguridad
para proteger su tara.
VELOCIDAD
DE AVANCE
La velocidad de avance es la rapidez con que se empujan las hojas de la sierra a
travbs de material que est,_ siendo corlado. La velocidad de avance correcta es
determinada totalmente per ta dureza y grosor del material que est_ siendo cortado,
tMPORTANTE: El avance debe SIEMPRE ser hecho con las hojas perpendicutares
al plane de ta pieza de trabajo (Ver Fig A)_ Si avanza las hojas en _ngulo puede
quamar la hoja y daSar los dientes de la hoja (Vet Fig° B),
Es importante selecclonar la velocidad de avance correctao
Si la velocidad de avarice es demasiado ienta:
1. Las hojas sotamente aplastar_n el material en vez de cortado,
2. Los bordes de las hojas se deslizan y desgastan el material
3. El corte serb deficiente y causar& desgaste excesivo de las hojas,
Si la velocidad de avarice es demastado _pida:
t_ Existe un desgo definido que el corte puede dividirse y que la abertura astillada
del corte no ser_ suftciente pare desviar las virutas de maderao
2. El corte ser& detictente con una descarga signiftcativa de v|rutas de madera per el
lade inferior del corte.
.......
Fig,
f
Ii_
Correcto
38
cto
INSTRUCCIONES PARA LOS CORTES cont.
APL|CACIONES
Las hojas proporcionadas con la sierra son de aplicacidn universal y realizan cortes
limpios y tisos an:
- Madera hasta un m_ximo de 11/2pulg.de profundidad_
• Tuberias o I&minas de acero suave con un grosor m_ximo de pared o de I;_mina de
I/8 pulg.
- Tubertas o Idmtnas de cobre, acero inox[dable, aluminio o hterro fundido con un
grosor m&xtmo de pared o de l_mina de 1/8 pulg,. Cuando corte estos matefiales,
DEBE USAR las vadllas de lubricacibn de cera.
- _Jber{as o l_minas de ptastico con un grosor maximo de pared de 1/8 pulg.
IMPORTANTE: La sierra de hoja doble NO CORTAR,&.concrete, cemento o ladri{Io.
1MPORTANTE: Una vez se hayan desgastado, parttdo o desafitado las holas, las
mtsmas DEBEN SER reempiazadas inmediatamenteo
CORTE DETODOTIPO
DE MATERIALES
t. SIEMPRE espere qua las hojas de la sierra alcancen la velocidad plena antes de
que toquen ta pieza de trabajo,
2. SIEMPRE sostenga la sierra de mode que tas hojas avancen perpendicularmente
hacia la pieza de trabajo, Sujete la sierra en un &nguio de aproximadamente 30 °.
3. SIEMPRE col6quese a cualquier lade de )as hojas de ta sierra, pete no en l[nea
con las hoJas de la s[errao
4, Avarice las hojas hacia la pieza de trabajo hasta hacer el corte deseadoo
5, La entalla (ancho del corte) de las hojas gemelas mide aproxlmadamente 1/8 de
pulgada.,Siempre tome en cuenta el ancho de la entalla al hacer un corte,
Esta slerra "Pw|nCutter con sus hoJas y accl6n de torte especial es una
herramienta muy vers_ttl que realtza cortes r&pidos y eficacos en una variedad
39
i
I
i
I
I
5-25-06
CORTE DE TODO TIPS DE MATERIALES
M_IMO
DE MEDIDAS LIBRES Y VELOCIDADES
_Po_eco_E
TRAN:_ERSAL
Tubo
hueco
€,.ued_do
C,enztl
Cartel
F
Pi=nch=
do m_t_l I-'-'--'3
MATEFL1AL_
TA,MA_OM#t._(.
{¢ORTE
TRAHSVF.,RSAL)
DE ALIMENTACI6N
_ ESPESOR
_,
MAX.
V]DA_I'nLPROMEDIO
DELLA HOJA
AUMEI_ITACI_NO
TIEMPO
PROME_IO
I_=rm
galvantzodo
t_-_pulg,
Acorn du_Ca
l_pulg.
Numlnlo
l_pulg.
"]/_pufg..
lY=-pu!_o
1R@utg
95 codes
AcornduI_
ls'B-pulg,
60 ples
4,3 pulgJmin
AJum_nl_
_/B-pu!g_
E5 p!es,
I_2 pu!lzJmln
ty_pulg,
4500 COdas
11 =ogundo:_
Armro dulme
Pores Pd.stonom
Mode_
(Pins)
Pip=
Pl_|1co iPVC)
2 x 4-pul0,
t/8-putg,
z
118-pu_9.
285 cortem
t
20 segundos
105 cort_
4000 cortes
30 r_Dundos
.
5 v,,og_,'_o_ ......
30 sel]undos
IYrI=ulg,
CICLO DE DEBER
30 minutos en clclo fuera de servicle de 10 minutos refierena faoperacibn a
torts plazo,La operacl6ncorta del tiempodenotala operacibn bajo carga normal
pars un periodsy un material especificados,comenzandoel frlo, el inter€sisentre
cads periodsde ia operaciOnque es suficientepermitirque ia herramientase
refresque abajoaproximadamentea la temper°tuFaambienteo
Para cortar otros materiales puede ser necesarla manlpufacl6n a0n m_s
especial. Por ejemp|o para cortar
aluminio, cobre, acero inoxidable y
hi°fro forjado o placas con forma
Code de aluminio, cobre, acero
inoxidable y hierro forjado de hast°
1/8 pulg. de grosor (Ver Fig° 9).
1. SIEMPRE use ei disposit_volubricador
(se incluye) cuando corte estos
materiales puss tienen tendencia a
ablandarse y adhefirse alas hojas
Lubricaci6n a
la Gem
INSTRUCCIONES DE LUBRICACION
(Ver Figura C)
Las hejas de la sierra Twin Cutter °stUn
equipadas con dientes de %orte en seco"
que bajo condiciones normales no
necesitan set tubdcadosoSin embargo,
bajo condIciones extremas, tal corns
cuando corta aiuminto, cobre, acero
inoxidable y hierro forjado se debe usar el
dispositivo de fubricaci_n a la cera.
1. Inserts la vadlla lubdcadora en el
dispositivode lubricaci0n a la cora_
2. Gire la rueda distribuidera para aplicar lubricante a la hojao Un cuarto (t14) de
vuelta debe proporcionar lubricactSn adecuada,
,i0
INSTRUCCIONES
PARA LOS CORTES cont.
Corte de placas con forma
(no rectangulares)de
hasta 1/8 pulg.
de grosor (Vet Fig. 10).
1. Cuando corte planchas de metal con
forma, SIEMPRE apoye la placa de
manera igual en ambos lades yen el
medio con bloques de soporte. Esto
fmpedir& que la plancha se doble cuando
se hace el code. Esto se recomienda ya
sea cuando est_ usando una mesa de
fijaciSn o mordazas ajustabies en una
mesa de trabajo plana,
CORTES POR PENETRACION
(Ver Figura 11)
Fig, 11
1. Levante et protector retr&ctil con su
mane fzquierda hasta la pesici_n abierta,
2. Use el pulgar de su mane izquierda para
sujetar el protector en posici6n abierta a
la vez que sujeta ta manija auxiliar,
3. Ponga en marcha la sierra y haga
penetrar las hojas en el material que va
a cortar_
4_ Empuje la sierra hacia ade[ante para
completar e! coffee
5. Apague la sierra, espere a que las hojas
se detengan completamente, luego ievante ta sierra de la pieza de trabajo,
6. Limpie las esquinas del corte con una sierra de mane o con una sierra de sable,
depend{endo det preyecto,
NOTA: Cuando corte materiales de techo, mantenga las hojas limpias con un
solvente de limpieza de alquitr,_n y brea.,
DESMONTAJE DE LAS HOJAS DE LA SIERRA (Ver Figs. 12 - 15)
1. Desenchufela siena y deje que se enfrfenlas'hojas.
I
2, Glre las hojas hasta que los agujeros en ambas hojas est_n altneados, Luego
coloque el pasador que es_ adjunto a la Itave a tray,s de tos agujeros de las hoJaso
Destornilte la contratuerca girandola a la izquierda y retfrela, (ver Fig 12)..
3, Abra el protector retr,_ctil (ver Fig_ 13),
4, Levante y retire la hoja "B" (ver Fig. 14).,
5. Levante y retire la hoja "A" (ver Fig,, 15)o
41
I
I
I
I
I
5-25-06
DESMONTAJE
DE LAS HOJAS DE LA SIERRA cont. (Ver Figs. 12 - 15)
Conlratuerca ,Pasadot
Relraldo
i
Fig. 14
INSTALACION
i
i
i i
ill,
i,
ii
llll
ll,, ii ii i,l,
,H,
Fig. 15
DE LAS HOJAS DE REPUESTO EN LA SIERRA (Ver Figs, 16 - 19)
ADVERTENCIA: Esta sierra Twin Cutter usa hojas especialmente
diseSadas de 6 1f8 pulg, y nunca se debe usar ning_n otto ttpo o tamaSo de
hoJas. Las hojas de otro tipo y tamaSo no funcionar&n en forma segura en esta
sierra y pueden provocar una lesi6n personal grave,
Vea la secci6n Accesorios de este manual para las hoJas de repuesto
apropiadas necesarias para esta sierra.
t. Desenchufe la sierra,
I Z_ ADVERTENCIA:
Si no se desenchufa la sierra se puede producir la
[ puesta en marcha accidental causando una postble fesl6n personal grave,
2. Deposite la sierra con el eje de la hoja dirigido hacia ardba.
3, Coloque la hoja "A" en la brida de la hoja dejando ta letra "A" ctaramente visible
(ver Fig, 16),
4, At]nee lot agujeros de la hoJacon los pasadores de la brfda y coloque firmemente
la hoja en la bdda (vet Fig, 17),,
5oColoque la hoja "B" en el eje dejando la "B" ctaramente visible, luego
atornille la contratuerca en el eje, NO la apriete, (vet Fig,. 18),,
6. Gire las hojas para alinear los agujeros de ambas hojas_
42
INSTALACION DE LAS HOJAS DE REPUESTO EN LA SIERRA cont.
(Ver Figs. 16 - 19)
7. Coloque el pasador (se Incluye con la liave) en los agujeros ya alineados.
8, Apriete la contraluerca ala derecha y luego retire el pasador de las hojas
(vet Fig, 20). Esto permttird qua las hojas giren libramente.
9. Gire cuidadosamente las hojas con la mane pare asegurarse de que giran
con faciUdad en direccl6n opuesta.
Fig. 17
Flange
Contratuerca
Pasador
GENER.ALtDADES
I
herramienta de la fuente de alimentaci6n ANTES de la limpieza o de realizer
A fin de evttar acc|dentes, SIEMPRE desenchufe la
!
cualquier labor de mantenimiento..
........
I Z_ ADVERTENCIA:
Todas las piezas representan una parte Importante de[ sistema de aislamiento doble
y deben ser reparadas solamente en un Centre de Servlcio Seam.
Evite st use de soEventescuando limpie las plazas de pldstlco..La mayorla de los
pl_sticos son susceptibres a diverses tipos de solventes comercfales y pueden
daftarse con su use, Use patios limpios para sacar la suciedad, polvo de carb6n, etc,
Z_ ADVERTENCIA:
Evite en rode memento qua los t[quidos de frenos,
gasoline, productos a base de petrSieo,aceites penelrantes, etc, entren en contacto
con las piezas de pl_sficooEllos contienen productos qu[mtcos qua pueden da_ar,
debilitar o destruirel pl_stico.
!
43
I
I
I
I
5-25-06
GENERALIDADES cont.
Se ha comprobado qua las herramtentas ei_ctdcas se someten a desgaste acelerado
y posible falla premature cuando se ut_lizanen betas de fibre de viddo, autom6viIes
deportivos, madera lamlnada, compuestos obturadores o yeso, Las astiltas y el polvo de
la fibra de vidrio son altamente abrasives pare los cojinetes, escobillas, conmutadores,
etcoPer io tanto no se recomienda qua esta herramtenta se use para trabajo prolongado
en cualquier matedal de tibia de vidrio, madera laminada, compuestes obturadores o
yeso, Durante cualquier use de estos maler_ates, es extremadamente importante qua la
herramienta se limpie con frecuencia, sopt_ndota con un chorro de aire,,
I
LLIBRICACION
Todos los cojinetes en asia herramienfa han side lubricados con suficiente cantidad de
lubdcante de alta catidad pare durar toda la vfda 0til de taherramienta, bajo condiciones
normales de funcionamientoo For 1otanto, no se requiere lubricacibn adicionaL
AISLAMtENTO DOBLE
El aislamiento doble es un concepto relacionado con la seguridad de las herramientas
el_ctricas, qua etimina la necesidad del cerd6n et6ctdco trifilar puesto a tierra y del
sistema de altmentaci6n de energla puesto a tierraoTodas las plazas met_ttcas
expuestas est&n aisladas de los componentes internes del motor con aislamiento
protector.Las herramientas con aistamiento dobte no necesitan ser puestas a tierra
IMPORTANTE
La reparaciSn de una herramienta con alslamiento doble exlge extreme cuidado y
conocimlento del sistema per Io tanto debe set realizada sotamente per un tbcnlco
de serviclo calfficado. En case de nacesitar servicio, recomendamos qua devuelva
la herramienta a su Centre de Servicto Sears m(_s cercano pare su reparacl6n,,
SIEMPRE use repuestos de fabrtca originales cuando repare ta herramlenta,,
CORDONES DE EXTENSION
El use de un cord6n de extBnsibncausar_ una clerta p_rdida de potencia. Para
mantener la p_rdtda a un mlnimo y evitar el sobrecatentarniento de la herramienta,
use un cord6n de extensi6n qua sea 1osuflctentemente grueso come pare
transportar la cordente qua necesitar& su herramienta_
Para un cord6n de extensi6n de 100 pies o menos de largo se recomfenda per 1o
menos el caltbre 16 (A_W,G,,)oCuando trabaje al airs libra, SIEMPRE use un cord6n
de extensi6n adecuado pare use al aire libra,, La envoltura det cord6n estar_
marcada con las letras WA,,
ATENCION:
Mantenga los cordones de extensibn alejados de ta zone
| del corte y cotoque el cord6n de tel manera qua no se enredarb en la madera,
! herramientas, etc,.,cuando est6 cortando
Z_ PELIGRO:
Revise los cordones de extensibn antes de cada use.,SI est&n
dafiados reempl&celos inmediatamente. NUNCA use una herramienta con un
cord6n dafiado pues al tocar el tugar dafiado puede causar un cheque el_etrico
qua resulte en una test6n grave°
Los cordones de extensibn qua son adecuados para user con su sierra estbn
disponible en su Atmac._n Sears m_s cercanoo
44
!
1
PROBLEMA
CAUSA
SOLUCION
Se produce una
cantldad
oxcopcionalmente
granda de chispas
I_ Dtentes dar3ados
2_Velocidad de avance
demaslado lenta
3. Dfsntes despunlados
1. Reemptace las hojas
2, Aumente la vetocldad
d8 ava tic8
Mucho desgaste
en algunas
sacclonos
t. Velacldad de avance
demasiado _plda
2, Dtenles dailados
1, Redttzc.a la velocidad
de aval3 ¢,e
3. Reemp_aca las hojas
3,,Dtenle.s despuntados
4, No se est_ cortando an forma
perpendic.ular a ta supe_de de trabajo
Las hoJas
so rompen
causas posibles
de dlenles rotos
1oDlenles da_ados
2. Veloddad de avance
demaslado _plda
3. Dlentes despuntados
4. Las hojas se han torcfdo
5, Las hoj_s se hart fundtdo
t. Velocldad de avanca
demastado r_ptda
2, Reemplaca lasho_as
3. Reemplaca las hojas
4._Soslenga la sierra perpendicular
a la superfide de babajo
1oReemplace las hojas
2. Reduzca la velocldad
de avance
3,,Reemptaca las hojas
4° Reernptace las hojas
5. Reemplace las hoJas
I.Reduzca la velocldadde avsnce
2,, La superfirJe que est,_ sl,,ndo
cortada es demasfado dura
3. Los dtentes se datlamn a
causa de un impacto
4o Las hojas no est&n
debidamente [nstaladas
5. Las hojas es_n fundidas
6, No se est_ cortando en trorma
perpendfcuB_ra ta supertlcte de L_bajo
2. Reempface las hojas
3. Reemplace las hojas
4. Reamplace las hojas y stga !as
tnstrucdones apropiadas para la
tnslalacidn de tas hoJas
S. Reempl_ce l_shoJas
6. Reemplace l_s hoJas y cuando
est_ cortandosostenga siempre
la sierra perpendicular a la
super_cie de trabajo
/KADVERTENCIA:
Esta sierra Twin Cutter usa hojas especialmente
diseSadas de 6 1/8 puig. y nunca se debe usar nIngt3notro tipo o tamaSo de hojaso
Las hojas de otro tipo y tamaSo no funcionardn en forma segura en esta sierra y
pu_den provocar una lesiSn personal grave, •
Los accesorios para su sierra Twin Cutter que se indican a continuadbn est_n
disponibles en su Almacdn Sears local,.
9-61131 - Un conjunto de 2 Hojas Universales para Sierra Twin Cutter empacadas
9 26678 - 6Vari!!as Lubricadoras a la Cera empacadas
Z_ ADVERTENCIA:
E1uso de accesorios o dispositivos no recomendados
!
i
puede ser peltgroso,
45
I
I
I
I
5-25-06
1
J
1
i
1
\
\
\
\
\
\
]
\
%
€_
f
1
1
I
I
I
1
I
I
I
I
i
SIERRA TWIN-CUTTER- NUMERO DE MODELO 286.25574
FJn0mero de modelo se encuen_ en la piece de fabricante. SIEMPRE menc{one el nt_merode modelo en toda la correspondencia referente a su herramienta.
Cantidad
i Set
PW002
PW003
PWO04
PW005
PWO06
PWO07
Protector de ]a ,H.oJa
Protector RetractiL
Arendeia del Protector
Torniflo M4 x 14
Pasador de Goma
To rniUo SA M4 x 12
1
1
1
1
1
1
8
10
PWOOB
Protector
PW010 Tornil]oAutorroscante ST 4.2 x 35
11
12
13
14
PW011
PW012
PW013
PWO14
Caja de Engranales SA
Manija Letral
Cubierta
Pt_6n
15
16
18
t9
20
21
22
23
24
25
26
27
PWO15
PW016
PW018
PW019
PW02O
PWO21
PWO22
PW023
PW024
PWO25
PW026
PW027
Cojinete 6000
Jnducido
Are de (Soma
Cojinete
CD
1
4
!
1
1
1
1
i
1
607
Etiquela
Btlnd_ie
det Cord6n
P!atina del Cordon
Torni[loAutorroscante ST 4.2 x 12
Etfque{a tV
Resorte
Arandeia Elastica
Pafanca del Interrupter
VEA LAS INSTRUCCIONES
3
=
No,
[No.depleza
Desclipci6n
Cantidad
i.iiiiiiii128.1111.ii
L,
Pwo26
iTomiiiQ
A,to ,=n e 201
T,.2
......
30
31
33
34
35
36
.
I PW030
PW03i
t PW033
BO_N de[ _nterruptor
Cubierta
Resorte
Etique_ Pequesa
i
]
]
II_IPw034 !U!tJm_P_gina
PW035
TomifloAuton'osc_nte ST 4.2 x 16
PW036
Place de Fabncante
38
40
41
42
PW038
PW040
_ PW041
- PW042
43
44
PWQ43
PW044
45
47
48
PW045
PW047
PW048
.
i
I
1
i
2
1
Inte_uptor
Caia
Estator
-Tornllle Auterroscante ST 4.2 x 65
1
1
1
2
COrd6n y Enchufe
Arande|a
!
1
Conductor I
_
Conduc[or Ill
i
Torni!lo Autortoscante ST 2,2 x 8.51
1
1
1
1
2
1
49
PW049
50
] PWO_O[
51
53
54
PW051
PW053
PW054
_s
1
1
56
57
PW056
PW057
PARA HACER PEDID08
1
Descripcidn
HoIB
,,....
PW029
2
3
4
5
6
7
,,,,
29
No.dop|eza
PWOOl
............
No.
1
1
1
4
Arandela
4.
Esco6iiia
...
_
Portaescobi]la
Hoja Con_tuerca
Llave
2
1
1
PW05_ f
Tub0deCera
1
j
DIspositiivo Lubricador
j TomiIlo Aul:{}rroscanle ST 4.8 x t 0
DE REPUESTOS EN LA ULTIMA PAGINA,
I
1
Your Home
For repair-in your home-of all major brand appliances,
lawn and garden equipment, or heating and cooling system,
no matter who made it, no matter who sold itl
©Sea_ Brands, LLC
® Registered Trademark/_M Trademark f sM Service Mark of Sears Brands, LLC
® Mama RagfsS"ada/1_ M_rca de F brica / sM Marca de Servfclo de Sear_ Brands, LLC
Mc Marque de commerce / _o Marque d_pas_e de Sears Brands, LLC
I
!