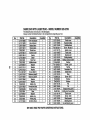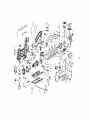
1
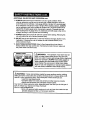
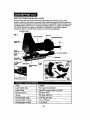
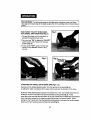
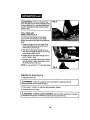
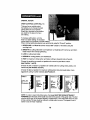
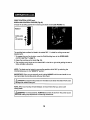
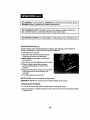
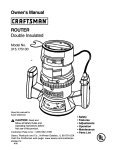
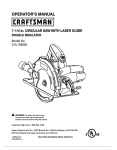
Owner's Manual
P
R
O
F E S
S
I
0
N A
L
I
2-.in-1 Handle Scrolling Sabre Saw
w,th Laser Trac ®
Model No.
320.27245
CAUTION: Read, understand and
follow all Safety Rules and Operating
instructions in this manual before
using this product.
• SAFETY
• OPERATION
• MAINTENANCE
• ESPANOL
Sears, Roebuck and Co., Hoffmen Estates, IL 60179 U.S.A.
Warranty ......................................................
Safety Instructions ..........................................
Safety Symbols ..............................................
Assembly .....................................................
Description ...................................................
Operation .....................................................
Maintenance .................................................
Troubleshooting ............................................
Accessories ..................................................
Service Numbers ...........................................
Page 2
Page 3 - 9
Page 5
Page 9
Page 9-10
Page 11-21
Page 22
Page 23
Page 24
Back Cover
ONE FULL YEAR WARRANTY ON CRAFTSMAN
PROFESSIONAL TOOL
If this Craftsman Professional Tool fails due to a defective in material
or workmanship within one years from the date of purchase,
RETURN IT TO THE NEAREST SEARS PARTS AND REPAIR
CENTRE IN THE UNITED STATES and Sears will replace it, free
of charge.
This warranty gives you specific legal rights, and you may also have
other rights which vary from state to state.
Sears, Roebuck
and Co., Dept. 817 WA, Hoffman
SAVE THESE INSTRUCTIONSE
READ ALL INSTRUCTIONS!
2
Estates,
IL 60179
L_WARNING:
BE SURE to read and understand all instructionsin this manual
before using the sabre saw. Failure to follow all instructions may result in hazardous
red at on exposure, electric shock, fire and/or serious personal injury.
SAFETY PRECAUTIONS FOR LASER
This CRAFTSMAN PROFESSIONAL Sabre Saw has a built-in laser light. The lasar is a
Class Ilia and emits output power of a maximum 2.5roW and 650nm wavelengths. These
lasers do not normally present an optical hazard. However, DO NOT stare at the beam
because it can cause flash blindness.
on.our, ,
where the laser light is emitted by the saw. ALWAYS BE
AWARE of its location when using the sabre saw. ALWAYS
MAKE SURE that any bystanders in the vicinity of use are
_
==,
made aware of the dangers of looking directly into the laser.
Iz,
i Z]__WARNING!
LASER LIGHT. LASER RADIATION. Avoid Direct Eye Exposure.
! DO NOT stare into beam. Only turn laser beam on when the sabre saw is on the
work piece. Class Ilia laser.
L_WARNING:
Use of controls, adjustments or performance of procedures other
than those specified in this manual may result in hazardous radiation exposure.
/_WARNING:
The use of optical instrumentswith this productwill increaseeye hazard.
1. The tinted glasses that were included will enhance the laser light in bright light
conditions,DO NOT wear these glasses if they interfere with the safe operationof this saw.
2. NEVER aim the beam at any person or object other than the workpieos.
3. The laser beam can be harmful to the eyes. ALWAYS avoid direct eye exposure.
DO NOT look directly into the laser beam output aperture during operation,
4, The laser on the sabre saw is not a toy. ALWAYS keep out of the reach of children. The
laser light emitted from this device SHOULD NEVER be directed towards any person
for any reason.
5. ALWAYS be sure the laser beam is aimed at a sturdy workpiece (such as wood or
rough coated surfaces) that does not have a reflective surface,
6. DO NOT use on surfaces such as sheet steel that have a shiny, reflective surface.The
shiny surface could reflect the beam back at the operator.
7. ALWAYS be aware that laser light reflected off of a mirroror any other reflective
surfaces can also be dangerous.
/_CAUTION:
ALWAYS follow only the instructions contained in this manual when
using this laser. Use of this feature in any manner other than what appears in this manual
may result in a hazardous radiation exposure.
3
I
I
8. DO NOT attempt to modify the performance of this laser device in any way. This may
result in a dangerous exposure to laser radiation.
9. For further information regarding lasers, refer to ANSI - Z136.1 The STANDARD FOR
THE SAFE USE OF LASERS, available from the Laser Institute of Amedca
(407) 380-1553.
Z_WARNING:
BE SURE to read and understand all instructionsin this manual
before using the sabre saw. Failure to follow all instructions may result in hazardous
radiation exposure, electric shock, fire and/or serous personal injury.
I
I
SAVE THESE INSTRUCTIONSI
READ ALL INSTRUCTIONSI
WORK AREA SAFETY
1. ALWAYS keep your work area clean and well lit. Cluttered benches and dark areas
invite accidents.
2. DO NOT operate power tools in explosive atmospheres, such as in the presence of
flammable liquids, gases, or dust. Power tools create sparks which may ignite the
dust or fumes.
3. ALWAYS keep bystanders, children and visitors away while operating a power tool.
Distra_ons can cause you to lose control.
ELECTRICAL SAFETY
I. Double insulated tools are equipped with a polarized plug (one blade is wider than
the other.) This plug will fit in a poladzed outlet only one way. If the plug does not fit
fully in the outlet, reveres the plug. If it still does not fit, contact a qualified electdolan
to install a polarized outlet. Do not change the plug in any way.
2. Double insulation[] eliminates the need for the three-wire grounded power cord and
grounded power supply system. Applicable only to Class II (double insulated) tools.
3. Before plugging in the tool, BE SURE that the outlet voltage supplied is within the
voltage marked on the tool's data plate. DO NOT usa "AC only" rated tools with a DC
power supply.
4. ALWAYS avoid body contact with grounded surfaces, such as pipes, radiators, ranges
and refrigerators, There is an increased dsk of electdc shock if your body is grounded.
5. If operating the power tool in damp locations is unavoidable, ALWAYS use a Ground
Fault Circuit Interrupter to supply power to your tool. ALWAYS wear electrician's rubber
gloves and footwear in damp conditions.
6. DO NOT expose power tools to rain or wet conditions.Water entedng a power tool will
increase the dsk of electric shock.
7. DO NOT abuse the cord. NEVER use the cord to carry the tools or pull the plug from
the outlet. Keep cord away from heat, oil, sharp edges or moving parts, Replace
damaged cords immediately. Damaged cords increase the dsk of electdc shock.
8. When operating a power tool outside, ALWAYS use an outdoor extension cord marked
"W-A"or "W". These cords are rated for outdoor use and reduce the risk of electricshock.
NOTE: The extension cord must have adequate wire size AWG (American Wire Gauge)
for safe, efficient use. Smaller gauge wires have greater capacity (16 gauge wire has
more capacity than 18 gauge wire).
4
SAFETY SYMBOLS
The purpose of safety symbolsis to attractyour attention to possibledangers.The safety
symbols,and the explanationswith them, deserveyour carefulattentionand understanding.
The safetywarningsDO NOT by themselveseliminateany danger.The instructionsand
warningstheygive are no substitutesfor properaccidentpreventionmeasures.
SYMBOL MEANING
//_
SAFETY
ALERT
SYMBOL:with
Indicatesdanger,warningor
caution.
May be used
in conjunction
othersymbolsor pictographs.
Li_
DANGER:
Failureto
obeya safetywarningwillresultin
seriousinjury
to yourselfor
to others.Alwaysfollow
the safety precautions
to reduce
the riskof fire, electricshockand personalinjury.
Z_
WARNING: Failureto obey a safetywarningcan resultin serious
injuryto yourselfor to others.Alwaysfollow thesafety precautionsto
reducethe risk of fire, electricshockand personalinjury.
CAUTION: Failureto obey a safetywarningmay resultin property
damage or personalinjuryto yourselfor to others. Alwaysfollow the
safetyprecautionsto reducethe risk of fire, electricshockand
personalinjury.
NOTE: Advisesyou of ioformation or instructions vitalto the
operationor maintenanceof the equipment.
PERSONAL SAFETY
1. ALWAYS stayalert, watchwhat you are doingand use commonsensewhen operatinga power
tool. DO NOT use toolwhiletired or underthe influenceof drugs,alcohol or medication.A
momentof inattentionwhile operatingpowertoolsmay resultin seriouspersonalinjury.
2. ALWAYS dressproperly.DO NOT wear looseclothingor jewelry.Pullback long hair. Keep your
hair, clothingand glovesaway from movingparts.Looseclothes,jewelryor long haircan be
caughtin movingparts.
3. ALWAYS avoidaccidentalstarting.BE SURE switchis in the "Off"positionbeforepluggingin.
DO NOT carry toolswith yourfinger on the switch. Carryingtoolswith yourfinger on the switch
or pluggingin toolsthat have the switchin the "On' positioninvitesaccidents,
4. ALWAYS removeadjustingkeys or wrenchesbefore turningthe tool'On'. A wrenchor a key
that is leftattachedto a rotatingpart of the toolmay resultin personalinjury.
5. DO NOT overreach.ALWAYS keepproperfootingand balanceat all times. Properfooting and
balanceenables bettercontrolof the tool in unexpectedsituations.
6. ALWAYS usesafety equipment.Alwayswear eye protection.
TOOL USE AND CARE SAFETY
1. ALWAYS useclamps or other practicalways to secure and supportthe workpieceto a stable
platform.Holding the work by hand or agai_t yourbody is unstableand may Leadto Lossof
control.
2. DO NOT force tool. Use the correcttool and blade for yourapplication.The correcttool and
blade will do the job better and safer at the rate for which it is designed.
S
SAFETY RULES FOR SABRE SAWS cent.
5. ALWAYS hold tool by insulated gripping surfaceswhen performing an eperation
where the cuttingtool may contacthiddenwiringor its own cord.Contact with a
'live" wire wilt make the exposedmetal parts of the tool "live" and shockthe operator.
6. ALWAYS use blades that have the correctsize and shape, Bladesthat do not match
the mountinghardware of the saw willrun erraticallyand willcause lossof control.
7. ALWAYS BE SURE thatall adjustingscrewsand the blade holderare fastened
tightlyBEFORE makinga cut. Looseadjusting screwscan causethe toolto slip
and loss of controlmay result.
ADDITIONAL RULES FOR SAFE OPERATION
z_WARNING:
BE SURE to read and understand all instructionsin this manual before
using the sabre saw. Failure to follow all instructionsmay result in hazardous radiation
exposure,e ectrc shock,f re and/or seriouspersonalinjury.
1. Know your power tool. Read operater's manual carefully,Learn the applications and
limitations, as well as the specific potential hazards related to this tool, Following this
rule will reduce the risk of electric shock, fire or serious injury.
2. ALWAYS wear safety glasses or eye shields when using this saw. Everyday eyeglasses
have only impact-resistant lenses; they are NOT safety glasses. Following this rule will
reduce the risk of serious personal injury.
3. ALWAYS protect your lungs. Wear a face mask or dust mask if the operation is dusty.
Following this rule will reduce the risk of serious personal injury.
4. ALWAYS protect your hearing. Wear hearing protection during extended periods of
operation. Following this rule will reduce the risk of serious personal injury.
5. ALWAYS inspect the tool cords periodically and if damaged have them repaired at your
nearest Sears Service Center or other Authorized Service Facility. ALWAYS be aware
of the cord location. Following this rule will reduce the risk of electric shock or fire.
6. ALWAYS check for damaged parts. Before further use ef the tool, a guard or other part
that is damaged should be carefully checked to determine if it will operate properly and
perform its intended function. Check for misalignment or binding of moving parts,
breakage of parts and any other condition that may affect the tool's operation. A guard or
other part that is damaged should be properly repaired or replaced at a Sears Service
Center. Following this rule will reduce the risk of electric shock, fire or serious injury.
7. DO NOT abuse the cord. NEVER use the cord to carry the tool or pull the plug
from the outlet. Keep cord away from heat, oil, sharp edges or moving parts.
Replace damaged cords immediately. Damaged cords increase the risk of
electric shock. Following this rule will reduce the risk of electric shock er fire.
7
ADDITIONAL RULES FOR SAFE OPERATION cent,
8. ALWAYS make sure that your extension cord is in good condition. When
using an extension cord be sure to use one that is heavy enough to carry the
currentthat yourtoolwill draw.A wire gauge(AWG) of at least 14 is recommended
for an extension cord 25 feet or less in length.When workingoutdoors,ALWAYS
use an extension cord that is suitable for outdoor use. The cord's jacket will be
marked WA. Smaller gauge wires, have greater capacity (16 gauge wire has
more capacity than 18 gauge wire). An undersizedcord will cause a drop in line
voltage, resulting in loss of power and overheating.
9. ALWAYS Inspect and remove all nails from lumber beforesawing. Followingthis
rule will reduce the risk of serious personal injury.
10. DO NOT use the tool while tired or under the influence of drugs, alcohol or any
medication. Following this rule will reduce the risk of electric shock, fire or
serious personal injury.
11. SAVE THESE INSTRUCTIONS. Refer to them frequently and use them to
instructothers who may use this tool. If someone borrows this tool, make sure
they have these instructionsalso.
./_WARNING:
The operation of any sabre saw can
result in foreign objects being thrown into your eyes,
which can result in severe eye damage. Before beginning
power tooloperation, ALWAYS wear safety goggles or
safety glasses with side shield and a full face shield
when needed. We recommend A Wide Vision Safety
Mask for use over eyeglasses or standard safety glasses
wRh side shield, available at Sears Retail Stores.
Z_WARNING:
Some dust particles created by power sanding, sawing, grinding,
drilling and other constructionjobs contains chemicals known to cause cancer, birth
defects or other reproductiveharm. Some examples of these chemicals are:
• Lead from lead-based paints,
• Crystalline silica from bricks and cement and other masonry products.
• Arsenic and chromium from chemically-treated lumber.
Your risk from these exposures varies, depending upon how often you do this type of
work. To reduce your exposure to these chemicals:
Work in a wen-ventilated area.
• Work with approved safety equipment, such as those dust masks that are
specially designed to filter out microscopic particles.
8
The label on your tool may include the following symbols.
V..................................................... Volts
A .................................................... Amperes
Hz .................................................. Hertz
W................................................... Watts
min ................................................ Minutes
_, .................................................. Alternating current
no ................................................. No-load speed
[] ................................................... Class II construction
RPM .............................................. Revolutions or Strokes per minute
/'lk ..........................................
Indicates danger, warning or caution.
It means attention! Your safety is involved.
IMPORTANT! READ ALL INSTRUCTIONS
UNPACKING
Your sabre saw has been shipped completely assembled as a barrel sabre saw, except for
the saw blade and top handle which are packed unassembled. Inspect the tool carefully to
make sure that no breakage or damage has occurred during shipping. If any parts are
damaged or missing, return the sabre saw to your nearest Sears Service Center to have
it replaced.
Z_ WARNING:
If any parts are missing, DO NOT operate this tool until the missing
parts are replaced. Failure to do so cou d resu t in possibleserious personal injury.
Z_WARNING:
Yoursabre saw should NEVER be connected to a power source when
you are assembling parts, making adjustments, installingor removing blades, cleaning or
when it is not in use. Disconnectingthe tool will prevent accidental starting that could
cause serious personal injury.
Before attempting to use any tool, be sure to familiarize yourself with all the operating
features and safety instructions.
9
KNOWYOUR SABRE SAW (See Fig.1 & Fig.2)
Yoursabre saw has many built-inconveniencefeatures for fast, efficientcutting,These
features includethe laser beam that projectsa line of light along the cuttingline for accurate
cutting.It has scrollingfeature that allows the blade to be rotated 360 °, ideal for cuttingcurves
and detailed work.The saw's 2-in-1 soft-griptop handles allow you to guide the saw with the
"top handle"attached or to guide the saw with the "barrelgrip"for low center of gravity
precision,givingyou a choiceof grip locationsto matchthe job application.
ScrollingControl
Flg. 1
Decorlid
Push-onswitch
Vadablespeeddial
Laser/LED
aperture
Blade
guard
- Base plate
bladechange
Locking
r eoge
guide
Blade!
Angle
_.,ale
Orlblt/Scrolling
lever
Vaouum _owerknob
Input
Laser Diode Type
Laser Class
5 Amps
Red Laser Diode 650rim
No load Speed
Class Ilia, power output <2,5 mW
800-3000 RPM
Rating
120 volts, 60Hz AC
Cutting angle range
0-45° left and right
Cutting depth in wood
3 3/sin. (85mm)
Cutting depth in steel
1/4 in.(6mm)
10
/'1",CAUTION! The blade guide supports the blade when cutting and must at all times
I
rest against the back edge of the blade except when in the scrollingmode. It should rotate
free y.
I
TURN POWER "ON-OFF" WHEN USING
AS A BARREL GRIP SABRE SAW (Fig. 3)
1. Connect the power cord of your saw to a
standard householdpower outlet.
2, Turn your saw 'ON' bysliding the "ON-OFF"
switchforward until it 'clicks' into the start
position (Fig. 3).
3.To turn power "OFF", press in on the rear
section of the "ON-OFF" switch to stop
the tool.
Fig. 4
Fig. S
Metal
top
ATTACHING TOP HANDLE ONTO SABRE SAW (Figs. 4, 5)
Remove the "tophandle attaching plate"from the rear top of the barrel (Fig. 4)
by sliding the "plate" completely off the saw's motor housing in the directionof the arrow.
Guide the metal attaching plate located in the inside front of the "top" handle toward the slot
located in the front of the sabre saw just beneath the scrolling knob (Fig. 5). At the
same time, align and slide the rear bottom of the "top" handle into the attaching compartment
which had been covered by the attaching plate (Fig. 4) that you removed earlier. When
sliding the "top" handle onto the attaching plate compartment, hold down the handle-release
buttons until "top" handle snaps and locks into place (Fig. 5),
11
TURN POWER ON-OFFWHEN USING AS ATOP HANDLE GRIP SABRE SAW (Fig. 6)
1. Connect the power cord of your saw
to a standard householdpower outlet.
2. Start the tool by squeezingthe "ON-OFF"
triggerswitch (C) (Fig. 6).
Fig, 6
3. Release the trigger switchto stop the tool.
4. If you press in on either side of the lock-on
button(locatedon both sides of the top
handle (D) while the triggerswitch is
depressed, the trigger switchremains in
the "locked-on"operatingposition. This
feature is convenientfor continuous
sawing applications.
5. The lock-onbuttonallowsthe operatorto
keepthe sabre saw motor runningwithout
continuouslyholdingthe trigger switch.
6. To release the lock-onbutton,press and release the triggerswitch.
I
I
I careless
Z_ CAUTION:
DO aNOT
let familiarity
with your
saw
makeinjury.
you careless. Remember that a I
fractionof
secondis
sufficientto
cause
severe
Z_WARNING: If the .....
LOCK-ON button s cont nuously being depressed, the tngger
cannot be released.
NOTE: Determine the optimumspeed for cuttingyourworkplace by making a trial cut in a
scrap piece of material.Your experience willdetermine the best resultsfor a particular
application. However, as a general rule, use slower speed for harder, denser materials
and faster speed for soft materials.
ADJUSTING THE CUTTING SPEED WITH THE VARIABLE SPEED DIAL (Fig. 7)
The variable speed feature of this sabre saw
enhances the cuttingperformanceof your saw
and saves the blade from undue wear.
Fig. 7
1. The variable speed dial is used to adjust
the speed of the blade.
2. Turnthe dial to increaseor decrease the
speed of the blade (Fig. 7).
3. Position'1' selects the slowest blade speed,
position'6' selects the fastest blade speed.
Adjustblade speed for optimumperformance.
NOTE: Determine the optimumspeed for
cuttingyourworkpiece by makinga trial cut
in a scrap piece of the material.
12
Z_WARNING!
Failureto unplug the saw
from the power source when assembling parts, I
makingadjustments
or changingblades could
I FIg. 8
resultin accidental starting causing possible
seriousinjury.
TOOL-LESS BLADE
INSTALLATION (Fig. 6, 0)
The tool-less blade change controlallows
you to remove and replace the saw blade
quickly and easily withoutthe use of additional
tools.
1. Place your fingeron the lower edge of the
see-throughblade guard and pull forward
until it locks in place (Fig. 8).
2. Slide the tool-less blade-change cover up,
then insert the blade into the slot of tool-less
blade change holder (Fig. g).
3. Release the tool-less blade-change cover to
lock the blade in place.
4. Pull down on the blade to be sure the blade is
securely locked in place. Blade teeth should
be pointing forward and down.
NOTE: For use with both 'T' & 'U' shanked blades.
Fig. 9
REMOVING THE BLADE (Fig. 8, 9)
1. Unplug the sabre saw.
z_WARNING:
Failure to unplug the saw could result in accidental starting
causing possible serious personal injury.
2. Followsteps 1 through3 on tool-less blade installation(above).
3. Carefullyremovethe blade.
•/_ WARNING:
ALWAYS CLAMP WORKPIECE. Failureto clamp workpiececould result
in workpiece beingthrown or kickedback causing seriouspersonalinjury.
13
I
TURNTHE
LASER LIGHT "ON/OFF' (Fig. 10)
Your sabre saw has a built-in laser light.
To activate laser light, plug in your sabre saw.
SAFETY PRECAUTIONS FOR LASER
This saw has a built-in laser light. The laser is a
Class Ilia and emits output power of a maximum
2.5roW and 650nm wavelengths. These lasers do not
normally present an optical hazard. However,
DO NOT stare at the beam because it can cause
flash blindness.
IMPORTANT: The following label is on your saw.
It indicates where the laser light is emitted by the saw. ALWAYS BE AWARE of its location
when using the saw, ALWAYS MAKE SURE that any bystanders in the vicinity of use are
made aware of the dangers of looking directly into the laser.
Z_WARNING[ LASER LIGHT. LASER RADIATION. Avoid Direct Eye Exposure.
Do Not Stare into beam. Only turn laser beam on when toolis on the workplace.Class ilia.
Z_CAUTION:
The tinted glasses that were includedwill enhance the laser light in bright
light conditions.DO NOT wear these glasses ifthey interfere with the safe operation of
th s saw.
1. Move the LASER/LED switch to the "LASER LINE" position.The laser light will be
projected out from the laser aperture (See Fig. 10). Use the laser line as cutting line
guide by focusing it on a fixed "target" and following its path.
2. To turn off the laser light, move the LASER / LED switch to the "OFF" position.
TURN THE LED WORK LIGHT "ON/OFF" (Fig. 10)
Your sabre saw has a built-in LED work light (See Fig. 10) for illuminatingthe cutting area.
To activate the LED work light, plug in your sabre saw.
1. Move the LASER/LED switch to the "LED" position.The LED lamp will come on.
2. To turn off the LED work light, move the LASER / LED switch to the "OFF" position.
14
ORBITAL ACTION
ORBIT CONTROL LEVER (Fig. 11)
This saw has an orbital control
that allows you to choose the best
cutting action for your material.
Simply turn the lever to the position
you need for the type of cut you
are making.
To increase orbit action, turn the
lever to a higher setting. To decrease
orbital action turn the lever to a lower setting.
When minimal splintering desired, we recommend using the "Smooth" position.
1. SCROLLING in all Materials allows manual 360 ° rotation of the blade using the
scrollingknob.
2. SMOOTH for cutting mild steel / soft materials / all materials with normal up and down
blade motion with minimal splintering.
3. LOW for cutting most metal.
4. MEDIUM for cutting plastics, and hardwoods.
5. FAST for maximum orbital action and faster cutting in plywood and soft woods.
Choose the scrolling or smooth cut positions for normal up and down motion
(see Position 1 and 2).
Choose the low or medium cut positions for orbital action for cutting metal, plastic, and
hardwoods (see Position 3 and 4).
Choose the fast cut position for maximum orbital action that will provide faster, more
aggressive cutting in softer materials (see Position 5.
PositionI
Position2
Positions3,4
Position5
SCROLLING
In
all materials
Smooth
for
reduced
splintering
In all
materials
Low
for metal
Fast for
maximum
Medium
_)r
)lastlcs,
_ardwoods
and soft
woods
NOTE: In order to reach full orbital action, the blade MUST BE FACING STRAIGHT
FORWARD and the back of the blade must rest in the groove of the guide roller.The foot
must be all the way in the forward position.Orbital action is not observable when the saw
is free-running. The saw must be cutting for orbital action to occur. The speed of cut is
easier to see in thicker materials.
15
ORBIT CONTROL LEVER cont.
SCROLLING CONTROL FEATURE (Fig.12)
Choose the scrolling position for normal up and down motion (see Position 1),
Position1
SCROLLING
in
all rnaterlals
The scrollingfeature allows the blade to be rotated 360 °. It is ideal for cutting curves and
detailed work.
1. To engage the scrolling function, move the Orbit/Scrolling lever to the SCROLLING
position,see Fig. 11, page 15.
2. Grasp the scrolling control knob (Fig. 12).
3. The scrolling control knob can be rotated 360 =to the left or right while guiding the saw to
follow intricate cutting lines.
NOTE: The blade can be locked in any scrolling position within 360 ° by switchingthe
Orbit/Scrolling lever to the "SMOOTH" position.
IMPORTANT: When you are manually scroll cutting ALWAYS hold the saw handle in one
hand and rotate the scrolling knob with your other hand.
I damage
/KCAUTION:
the material
Excessive
beingside
cut.pressure to the blade could break the blade which could
NOTE: When scroll cutting intricate designs, we recommend that you use a scroll
cutting blade.
Z_.WARNING: To avoid accidents, ALWAYS disconnect the tool from the power source
BEFORE making any adjustments or attaching accessories.
16
I
I
WARNING: The use of attachments or accessories that are not recommended
might be dangerous.
2-WAY SAWDUST REMOVAL
Your sabre saw is equipped with a 2-way (vacuum and blower) sawdust removal system.
Use the detachable vacuum adapter (dust port) shown in (Fig. 13) for removing dust and
chips from the immediate work space to help keep the cutting line clear.
1. Switch the Vacuum/Blower knob (Fig. 14) to the "VACUUM" position and connect the
sabre saw through the adapter to a standard shop vacuum (sold separately) for
vacuuming sawdust, metal and plastic chips.
2. Switch the Vacuum/Blower knob to the "BLOWER" position to blow sawdust, metal
and plastic chips away from the cutting area.
Fig.13
GENERAL CUTTING TIPS
1. Place the best side of the material face down and secure it in a bench vise or clamp it
down.
2. Draw your cutting lines or designs on the side facing you.
3. Place front edge of saw foot on the material to be cut and line up the blade with your
cutting line.
4. Hold saw firmly and turn it on.
5. Press down (to keep saw foot flat against the workpiece) as you slowlypush the saw in
the direction of the cut.
6. Gradually buildup the blade speed, cutting as close to the line as possible (unless you
want to leave enough room for finished sanding).
7. As you cut, you may need to reposition the vise or clamps to keep the workpieoe stable.
8. DO NOT force the saw because the blade teeth may rub and wear without cutting
which may result in breaking the blade.
9. ALWAYS let the saw do most of the work.
10. ALWAYS cut slowlywhen following curves, so the b_adecan cut through cross grain.
This will provide an accurate cut and will prevent the blade from wandering.
17
CUTTING METAL
When cutting metal ALWAYS clamp down the metal workpiece. Be extremely careful to
move the saw very slowly as you cut. Use slower speeds (Position 1,2 or 3 on the Variable
Speed Dial). DO NOT twist, bend or force the blade. If the saw jumps or bounces as you cut,
change to a blade with finer teeth. If the blade begins to clog when cutting soft metal, change
to a blade with coarser teeth.
For easier cutting, lubricate the blade with a stick of cutting wax (if available) or cutting oil
when cutting steel. Thin metal should be sandwiched between two pieces of wood or
tightly clamped on a single piece of wood (wood on top of the metal). Draw the cut lines or
design on the top piece of wood.
When cutting aluminum extrusion or angle iron, clamp the work in a bench vise and saw
close to the vise jaws.
When sawing tubing with a diameter larger than the blade is deep, cut through the wall of
the tubing and then insert the blade into the cut, rotating the tube as you saw.
1. When cutting metals, a suitable cooling / cutting oil must be used.
2. Spread the oil onto the blade or workpiece at regular intervals during cutting in order to
reduce wear or overheating the blade.
Z_ WARNING: To avoid accidents, ALWAYS disconnect the tool from the power source
BEFORE making any adjustments or attaching accessories.
,/K WARNING:
The use of attachments or accessories that are not recommended
might
be dangerous.
CUTTING WITH A STRAIGHTEDGE (Fig. 15)
1. ALWAYS use a rough-cut blade whenever
possible.
2. Mark the line-of-cut, then position the
straightedge parallel to cut line and at the
same distance as between the blade and
the side edge of the saw foot.
OR
3. Mark the side edge of the saw foot and then
clamp the straightedge on the mark and
parallel to the cut.
4. As you cut, keep the saw foot edge flush
against the straightedge and flat on the
workpiece.
18
I
I Z_
BEFORE
WARNING:
making
Toany
avoid
adjustments
accidents,orALWAYS
attaching
disconnectthe
accessories. tool from the power source
Z_ WARNING; DO NOT let familiarity with your saw make you careless, Remember
that a careless fraction of a second is sufficientto cause severe injury.
Z_ WARNING! ALWAYS wear safety goggles or safety glasses when operating this tool.
PLUNGE CUTTING (Fig. 16)
Plunge cutting is useful and time-saving for making roughopenings in soft materials. It
makes it unnecessary to drilla hole for an inside or pocket cut.
1. Draw lines for the opening.
2. Hold saw firmly and tilt it forward so the toe
of the saw foot rests on the workpiece.
3. MAKE SURE that the blade is well clear of
the workpiece.
4. Start the saw and then gradually lowerthe blade.
5. When the blade touches the workpiece,
continue pressing down on the toe of the
saw foot.
6. Slowly pivot the saw like a hinge until the blade
cuts through and the foot rests flat on the
workpiece.
7. Then begin sawing on the cut line.
NOTE" DO NOT use a scroll blade for plunger cutting.
IMPORTANT: DO NOT try to plunge cut into hard materials, such as steel.
TO MAKE SHARP CORNERS
1. Cut up to the corner, then back up slightlybefore rounding the corner.
2. After the opening is complete, go back to each corner and cut it from the oppositedirection
to square it off.
19
TO ADJUST BASE PLATE FOR BEVEL CUTTING (Figs. 17, 18)
mechanism MUST BE locked in place with the cutting edge of the blade facing the front
I of_ the
CAUTION:
To prevent damage to the tool when angle or bevel cutting, the scroll
tool.
1. To adjust the cutting angle, first turn the tool upside down and loosen the hex screw that
secures the blade guide assembly located on the underside of the tool using the hex key
provided (Fig. 17).
2. Loosen the hex screw securing the base plate. Move the base plate slightlyforward and
tilt it to the required angle between 0 ° and 45 ° using the scale marked on the base
bracket.The base plate has indents at 0 °, =L-45
° for easy angle setting.
3. Slide the blade guide assembly until the blade guide rests against the back edge of the blade.
4. Re-tighten the hex screws. For accurate work, it is necessary to make a trial cut, measure
the work and reset the angle until the correct setting is achieved.
Fig.17
Z_ WARNING: To avoidaccidents,ALWAYS disconnect the tool from the power source
BEFORE making any adjustmentsor attaching accessories.
I careless
Z_ WARNING:
DOa NOT
let familiaritywith
yoursaw
make
you careless.Rememberthat a
fractionof
secondis
sufficientto cause
severe
injury.
be
,/_ dangerous.
WARNING: The useof attachments or accessoriesthatare not recommendedcould
20
I
I
THE EDGE GUIDE (Fig. 19)
This accessory (included) is
used for straightcutting:
1. Insert the bar of the edge guide through
the slots in the base of the sabre
saw (See Fig.19) It can be insertedfrom
either side of the base withthe edge guide
facing down.
2. Screw the edge guide locking knob
intothe threaded hole in the base to
tighten the edge guide bar in place.
3. Once the edge guide is attached, measurethe distancefrom the edge of the workpieceto the
line-of-cut.
4. Set the edge guide to the same distance and then securelytighten the edge guide in place
with the locking nut tightened down (see Fig. 19),
CIRCLE CUTTING (Fig. 20)
This requires using the Circle Cutting/ StraightEdge Guide (9-27959) sold separatelyat your
local Sears Store.
1. BEFORE attachingthe edge guide,
draw a cimle and drilla hole in the center
of the circle(see Fig. 20).
Fig. 20
2. Drillor plungecut near the edge of the circle.
3.Turn off saw and disconnectplug from
powersource.
4. Attach the edge to saw (the same way
you attached the includededge guide)
with the edge guide facing up
5. Place the metal center point on the
edge into the hole in the center of the circle.
In order for the edge guide to cut a circle,
the metal center point MUST BE in
alignment with the saw blade (see Fig. 20).
6. Measure the distance from the selectedhote to theblade;this distanceis equal to the circle radius.
7. Insert saw plug into power source.
8. Hold saw firmly, squeeze the trigger switch and slowlypush the saw forward.
NOTE: To make a hole, cutfrom inside the circle;to make wheels or discs,cut from the outside.
21
SERVICE
Z_WARNING:
Preventivemaintenance performedby unauthorizedpersonnelmay
resultin misplacing of internalwires and components, whichcould cause a serious hazard.
1. When servicing a tool, use only identical replacement parts. Follow instructionsin the
maintenance section of this manual. Use of unauthorized parts or failure to follow
maintenance instructions may create a risk of electrical shock or serious personal injury.
2. All service that requires opening the sabre saw MUST only be performed by a Sears
Service Center. All motor parts represent an important part of the double insulation
system and MUST only be serviced by a Sears Service Center. Service performed by
unqualified personnel could result in a risk of injury.
3. Avoid using solvents when cleaning plastic parts. Most plastics are susceptible to
damage from various types of commercial solvents and may be damaged by their use.
Use clean cloths to remove dirt, carbon dust, etc.
GENERAL
z_WARNING!
To avoid accidents, ALWAYS disconnect the tool from the power
source BEFORE cleaning or performing any maintenance.
I
./_WARNING!
I
DO NOT at any time let brake fluids, gasoline, petroleum-based
products, penetrating oils, etc. to come in contact with plastic parts. They contain
chem ca s that can damage, weaken or destroy plastic.
I
I
4, It is a known fact that electric tools are subject to accelerated wear and possible
premature failure when they are used to work on fiber glass boats and sports cars,
wallboard, spackling compounds or plaster. The chips and grindings from these materials
are highly abrasive to electdcal tool parts, such as bearing, brushes, commutators, etc.
Consequently, it is not recommended that this tool be used for extended work on any
fiber glass material, wallboard, spackling compound, or plaster. During any use on
these materials, it is extremely important that the tool is cleaned frequently by blowing
with an air jet.
LUBRICATION
All of the beadngs in this tool are lubricated with a sufficient amount of high-grads
lubricant for the life of the tool under normal operating conditions. Therefore, no further
lubrication is required.
Z_WARNINGI
ALWAYS wear safety goggles or safety glasses with side shields
when using this tool or blowing dust. If operation is dusty,also wear a dust mask.
DOUBLE INSULATION
Double insulation is a concept in safety in electdc power tools which eliminates the need
for the standard 3-wira grounded power cord, All exposed metal parts are isolated from
the internal motor components with protecting insulation. Double insulated tools do not
need to be grounded.
22
PROBLEM
Laser line is
not projected
USE
SOLL ITION
Laser/LED switch
is not in "LASER LINE"
Make sure to plug
in tool and
position or the tool
isn't plugged in.
Laser/LED
switch
is in "LASER
LINE"
position.
Laser line is
hard to see
Working condition
is too bright
Use laser enhancing
glasses
LED lamp does
not light
Laser/LED switch is
Make sure that plug
in tool and Laser/LED
switch is in "LED"
The scrolling
control cannot
be turned,
not in "LED" position
or the tool isn't plugged
in.
The OrbitJScrolling
lever is not in position
'Scrolling'.
23
position.
Put the lever into
position 'Scrolling'
The following recommended accessories are currently available at your local Sears Store.
!_WARNING:
The use of attachments or accessories that are not recommended
might be dangerous and could result in serious injury.
I
I
EXTENSION CORDS
Sears offers a Large selection of extension cords that help extend your working range.
The use of any extension cord will cause some loss of power. To keep the loss at a
minimum and to prevent overheating, use an extension cord that is heavy enough to
carry the current that the tool will drew.
A wire gauge (AWG) of at least 14 is recommended for an extension cord 25 feet or
less in length. When working outdoors ALWAYS use an extension cord that is suitable
for outdoor use. The cord's jacket will be marked WA.
Z_CAUTION!
Keep extension cords sway from the cutting area and position the
cord so it will not get caught on lumber, tools, etc. during the cutting operation..
I
immediately. NEVER use a tool with a damaged extension cord because touching
I Z_WARNINGI
Check extension cords before each use. If damaged, replace it
the damaged ares could cause electrical shock resulting in serious injury.
BLADES
Sears has a large selection of sabre saw blades for fast, efficient cutting in a variety of
materials and applications.
6-in. long, 7 teeth per in.
Fast-cutting wood Blade
3 '/e-in. long, 10 teeth per in.
Fine scrolling in wood
2 s/4-in, long, 20 teeth per in.
Super-fine wood scrolling
3 %-in. long, 10 teeth per in.
Super-fine wood scrolling
3 '/_-in. long, 8 teeth per in.
Wallboard, plaster
2 s/4-in, long, 20 teeth per in.
General metal cutting
3 %-in. long, 10 teeth per in.
Bi-metal; general wood
3 %-in. long, 6 teeth per in.
Bi-metal; fast-cut wood
2 s/4-in, long, 12 teeth per in.
Bi-metal; general metal
3-in. long
"Knife-edge'-linoleum, rubber, leather
Sears also offers Combination Squares, Framing Squares and various length Edge
Guides to help you with all your cutting needs.
24
I
I
SABRE SAW WITH LASER TRAC - MODEL NUMBER 320-27245
The Model Number will be found on the Nameplate.
Always mention the Model Number in all correspondence
ol
No.
1
2
3
4
5
6
7
8
9
10
11
12
13
14
15
16
17
18
19
20
21
22
23
24
25
26
Part No.
L01311903B
L01311902B
L00311906A
L00311907A
DSJS1901
L07311901A
L09311901A
L07311903A
DSJS1902
DSJS1903
L04310904A
L04311911A
L04311912A
T.02.3.301021
L04311910A
L04311909A
L04311306A
L04310102A
T04061303
L05311902A
T09208599M
DSJS1904
L04310903A
T04081303
DSJS1905
L01311908A
Description
Down enclosure
Up enclosure
Internal wire
Internal wire
Brush box
Carbon brush
Spdnq
Stator
Rotor Set
Middle holder
Washer
Washer
Washer
Screw M3xl0
Balance plate-B
Balance plate-A
Washer
Washer
Safety dng
Pendulum block
Roller bearing
Gear
Washer
Safety dng
Rolling dng
Scrolling Knob
Quantity
1
1
1
2
1
2
2
1
1
1
1
1
1
2
1
2
1
3
2
1
1
1
1
1
1
1
No.
27
28
29
30
31
32
33
34
35
36
37
38
39
40
41
42
43
44
45
46
47
48
49
50
51
52
53
regarding your tool.
Part No.
L01311910A
L01311909A
L05311304A
T0113512211
L01311917A
L03311902B
L04311301B
L05311901A
L03311906A
T040403021
T0113508212
L09320904A
L06311905A
L01311926A
L01311301A
T020301231
T04030903
T04030302
L06311313A
L06311302A
L01311907A
DSJS1906
L01311911A
T011 402056
L09311303A
L01311923A
L03311903A
i Quantity
1
1
Beadng holder
1
Guilding block
2
Screw M3,5x12
1
Switch cover
Front cover
1
1
Bearing slot
1
Sliding bearing
1
Sliding beadng holder
1
Washer
1
Screw 3.5x8
1
Spdng
Pendulum Pin
1
Guide Block
1
1
Ring
Screw 3x12
2
Washer
2
2
Washer
1
Pin
Pin
2
1
Transparence guard
1
Sliding shaft assemble
1
Back cover
17
Screw 4x20
1
Steel bracket
1
Blowing knob
1
Up aluminium guard
SEE BACK PAGE FOR PARTS ORDERING INSTRUCTIONS.
Description
Knob cover
SABRE SAW WITH LASER TRAC - MODEL NUMBER 320-27245
The Model Number will be found on the Nameplate.
Always mention the Model Number in all correspondence regarding your tool.
Io
No.
54
55
56
57
58
59
6O
61
62
63
54
65
66
67
68
69
70
71
72
73
74
75
76
77
78
79
80
Part No.
L06311305A
L06311312A
L09311904B
L06311304A
L06310106A
L04311303A
T040317031
L01312006A
T013300835
L04311906B
T020402534
L04310902A
L03312002A
L99312001A
DSJS1907B
L07310405A
L07311904B
T12433201G
L01140103A
T011351621
L06310101A
L04310502A
L09311903A
L01311916A
L01311922.A
L09311902.A
L01311914A
Description
Pin
Pin
Quantity
1
1
No.
81
82
Part No.
T04041703
L01311920A
Spring
Guide wheel
Pin
Guide wheel holder
1
1
1
1
83
84
85
86
L01311921A
T07000004
L09310902A
L01030118B
Safety ring
Base plate cover
Screw 3x8
Bracket
Screw 4x25
Washer
2
1
12
1
1
1
87
88
89
90
91
92
LO0311904A
L06311301A
LO4310911A
DSJS1908
L03311904A
L01311915A
Base plate
Adapter for dust collector
Transformer
1
1
1
93
94
95
L02310101A
T146D96051
L99310102A
Junction port
Speed adjuster
Switch
1
1
2
96
97
98
L01311905B
L01311904B
L01311912A
Anchorage
Screw 3.5x16
Pin
Nut
1
2
1
1
99
100
101
102
Spring
Switch pole
Active button
1
1
1
Spring
Lock of switch
1
!
Description
Safety ring
Fixing board
Orientation button
Steel ball
Quantity
1
1
1
1
Spring
Cap of spring
Pendulum knob
Woollen
2
1
1
1
Cap of spring
Linker assemble
1
1
Down aluminium guard
Switch button
1
1
Cable guard
Cord and plug
Hexagon wrench
Down handle
1
1
1
1
Up handle
Switch button
1
1
L03311905A
L09321201A
L04311905A
L01311918A
Switch pole
Spring
Connecting piece
Up handle locking button
1
2
1
1
103
104
105
L01311919A
L01311404A
L09311401A
;)own handle Iockin_lbuttor
1
106
107
L99310901A
L99311705C
Limiting piece
Spring
edge guide
Locking knob on guide
2
1
1
1
SEE BACK PAGE FOR PARTS ORDERING INSTRUCTIONS.
105
161
©
Your Home
For repair In your home of all major brand appliances,
lawn and garden equipment, or heating and cooling system,
no matter who made it, no matter who sold Itl
For the replacement parts, accessories and
owner's manuals that you need to do-it-youmelf.
For Sears professional installation of home appliances
and the items like garage door openers and water heaters.
1-800-4-MY-HOME ®
(I-800-469-4663)
www.sears.com
Anytime,day or nlght
(U.S.A. and Canada)
www.sears.¢om
Our Home
For repair of carry-in products like vacuums, lawn equipment,
and electronic, call or go on-line for the nearest
Sears Parts and Repalr Center.
1-800-488-1222
Anytime,dayornight(U.S.A.)
www.sears.com
To purchase a protectionagreement (U.S.A.) or maintenance
agreement (Canada) on a productserviced by Seam:
1-800-827-6655
iii!i_
11171111111
i!i!iii!iiiii!ii!
!i!IiiiiiiIiI_
.(U.S.A.)
1-800-361-6665
(Canada)
Parapedirsen/iciode reparaci_
a domicilio,
y paraordenarpiezas:
1-888-SU-HOGAR
s.
(l-sSS-TS4-6427)
® RegisteredTrademark/ TMTrademark/ SMServiceMark ofSeam, Roebuckand Co.
® Mares Registrada/ TMMamade F.brlca/ SMMarca de Serv)elode Sears, Roebuckand Co.
MeMarquede commerce/ MDMarqued_pos_,edeSears, Roebuokand Co.