1
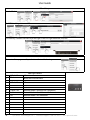
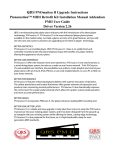
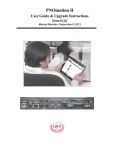
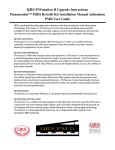
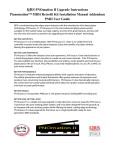
PNOmation II Upgrade Instructions User Guide Driver Version 3.3x QRS is revolutionizing the player-piano industry with the introduction of its latest player technology, PNOmation II . PNOmation II is the most advanced player-piano system available on the market today. Just take a glance at some of its great features, and you will see why new and current customers are upgrading to the latest in player technology. BETTER AESTHETICS PNOmation II is an invisible player. With PNOmation II , there is no visible front-end controller mounted under the piano keyboard. Enjoy the benefits of a player without altering the appearance of your piano. BETTER USER EXPERIENCE PNOmation II offers the industry’s best user experience. PNOmation II not only functions as a standalong player system, but also as a node on your home network. With PNOmation II’s web-enabled user interface, the possibilities are endless: create playlists and control your player piano with an iTouch, iPod, Android, or any web-enabled phone; or use a PC or MAC on your home network. BETTER PERFORMANCE PNOmation II features enhanced playback abilities with superior execution of dynamics. The softest pianissimos and loudest fortissimos offer greater extremes of expression and produce more convincing musical performances. PNOmation II also dramatically improves the control over the sustain pedal solenoid which allows for quieter sustain pedal operation and more accurate performance. BETTER DESIGN PNOmation II incorporates PNOscan II , the player industry’s leading MIDI recording tool. BETTER NOW, BETTER LATER PNOmation II is a simple and easy upgrade. It only takes four screws to swap the PNOmation II processor into your existing player system, and it has been designed from the ground up to integrate with your existing system while offering the latest, cutting-edge technology. PNOmation II is also prepared for the future, as it is high-bandwidth ready for next-generation MIDI standards. User Guide Table of Contents PMII Upgrade Kit Installation Instructions Package Contents 81525 PMII Upgrade Kit 3 81529 PMII MIDI Kit PMII MIDI Kit Installation Instructions [81529] PMII Upgrade Kit Installation Instructions [81525] 1] Remove the Existing Pianomation Processor 4 5 2] Mount and Connect the new PMII Processor 6 3] Mount and Connect the Wi-Fi Adapter and Speaker 7 4] Mount and Connect the Pin-Light Extension [PLx] 8 5] Verify Operation Connect to Power and Turn ON to Standby Mode 9 Establish Wireless Connection and Power ON Performance Setup Key Adjust [Sets the minimum key force for soft playback] Pedal Adjust [Sets-up sustain pedal for proper operation] Test Files 10 11 PNOscan Adjust [Sets-up the QRS PNOscan record system] 12 MIDI Out Key Adjust [For MIDI Kit #81529] 13 Power ON to the PNOmation II User Interface Play Piano Button Descriptions Songs / Albums / Artists / Genres / Playlists Recordings / USB Drive / External Inputs Sample Library / Song Search / Scroll Bar Playback Settings Volume / Soft Play / Full Expression / Mute / EQ Playback Options: Repeat & Transpose / Prompts Trial Activation Playlists Create a Playlist Play songs from a Playlist Add songs to an existing playlist USB Drive External Inputs AUX Line In [AMI] / QRS Controller MIDI IN 5-Pin / MIDI IN USB Client Record a Song Record Settings System Information Update the Operating System [OS Update] Standby Shutdown Options Standby / Reboot / Shutdown Purchase Music From The Sample Library Unlock Content Information User Guides / Warranty Contact Info / My Account 14 15 16 17 18 19 20 21 22 23 24 Playback Parameters 25 Network Settings 26 Record Defaults 27 Curves Other Setups 28 PLx Features 29 QRS Remote Control Features 30 How To Setup: TRENDnet Wireless - Stand Alone 31 How To Setup:ASUS 330N3G Wireless - Stand Alone 32 How To Setup: ASUS 330N3G Wireless - Network 33 How To Setup: ASUS 330gE Wireless - Stand Alone 34 How To Setup: ASUS 330gE Wireless - Network 35 Complimentary Song List [319 Total] 36-37 Warranty 38-39 PMII Upgrade Kit Installation Instructions - 81525 81525 PMII Upgrade Kit Package Contents 80108 PNOmation II Processor Assembly 80108A 1 PMII Processor Only 990026 1 Cable: Speaker [1/8” stereo plug to two RCA] 70213 1 Cable [6” - RCA M Plug - 2 RCA F Jacks] 80109 2 Mounting brackets [New - Metal] 37322 4 Screws: Mounting 79226 SD Card with the QRS Music Library 80124 PLx - Pin-Light Port Extender Package 8012406 1 PLx Unit: Lights, IR Sensor; Stereo & USB Ports; Microphone; Button 50126 2 Cable: USB A Male to USB 5-Pin Mini B [1 for computer connection to PMII] 50128 2 Cable: Audio [1/8” Male to 1/8” Male] 6.5’ 50141 1 Cable: USB Male A to USB Male B 790185B 1 Cable: 72” Six-Pin Ribbon [Black] 35271 4 Screw 79227 Portable Wireless Assembly - TRENDnet [79227A] DISCONTINUED Universal power adapter (+5V/1.2A, 100V~120V) Center + Cable: USB A to Trendnet’s power jack Cable: RJ45 Ethernet 50074 Velcro Strip [Use to attach WiFi to beam or back post] DISC ONT INU ED OR 79224 81529 Portable Wireless Assembly - ASUS [79224A] 330gE - Universal power adapter (5V/1A, 100V~240V) 330N3G - Cable: USB A to Asus’ power jack Cable: RJ45 Ethernet 50074 Velcro Strip [Use to attach WiFi to beam or back post] WL-330gE DIS CO N 70204 5 Cable Ties 30403 1 Screw Driver [Right-Angled Phillips #2 to remove old processor] 70208 3 Clamp [Wave Shaped Ribbon] 70585 3 Screws for Clamp [6x1/2”] 30409 1 Screw Driver [Snub-Nosed Phillips] TIN UE D 70152 1 Cable: 10’ MIDI 7921706 1 Cable: 10-Pin [Use with 10-Pin Coupler to extend PNOscan cable to PMII] 8152503 1 Coupler: 10-Pin 81525i 1 PMII Upgrade Instructions PMII MIDI Upgrade Kit Package Contents 81525 PMII Upgrade Kit - See above 8152905 PMII Upgrade Kit to PMII MIDI Upgrade Kit Conversion 70166 WL-330N3G 2 Adapter: MIDI Barrel Connector 990026 Cable: Speaker [1/8” stereo plug to two RCA] 8152501 Power Adapter [Power supply for PMII] 2007116 2 Cable: 6’ MIDI 73398 70388 PMII Big Button Remote 4 AAA Batteries QRS Music Technologies, Inc. / Technical Support - 800-247-6557 / www.qrsmusic.com 3 PMII MIDI Kit Installation Instructions - 81529 The PNOmation II Controller can be used as a MIDI file player to control other player piano products. Other than the addition of a power adapter, remote and MIDI connectors, the 81529 PMII MIDI kit connects the same as the 81525 PMII Upgrade kit. Note: The QRS PMII unit will NOT adjust the minimum key force levels of the piano. 1 Verify that the player piano operates properly before connecting the 81529 PMII MIDI Kit. 2 Mount the Pin-Light Extension [PLx] box as shown on page 8. 3 Mount the PNOmation II Controller to the piano within cable length of the PLx box. 4 Connect the PMII Controller to the PLx box using the cables provided. See page 8 for details. 5 Mount and connect the Wi-Fi device. Ethernet cable and the power adapter. 6 Connect the MIDI cable, provided, from the PMII MIDI OUT socket to the MIDI IN socket of your player. 7 If the piano has a key scan unit, for recording the piano, connect it to the PMII Controller. QRS PNOscan units connect via a flat ribbon cable, as shown below, or a standard 5-pin MIDI cable. Use the MIDI OUT socket to connect other MIDI record units to PMII. 8 Connect a powered speaker to Audio port #3. 9 Connect the power adapter to the PMII Controller and then to an AC outlet. The PMII will power up as soon as it’s connected to power. The PLx lights will begin scanning and the power on process will take several minutes. 10 Continue with the User Guide on page 13. Note: You may have to adjust the MIDI OUT Curves within the PMII interface. Wi-Fi Power to USB PLx MIDI IN on the player piano. PLx Front PLx Rear QRS Controller Front Power Adapter or Other record systems. Amplified Speaker QRS PNOscan Record Note: Use the “MIDI Out Key Adjust” to calibrate the key force. 4 QRS Music Technologies, Inc. / Technical Support - 800-247-6557 / www.qrsmusic.com Back PMII Upgrade Kit Installation Instructions - 81525 1 Remove the Existing Pianomation Processor Turn OFF the player system and unplug the AC power cord from the wall outlet. Locate the Pianomation processor. It’s within a foot of the power supply. The power supply is a black box the size of a loaf of bread. - On a GRAND piano the processor is mounted to a beam under the soundboard area. - On an UPRIGHT piano remove the lower panel to gain access to the power supply. Flip the ON/OFF switch on the power supply to the OFF position. Disconnect all of the cables from the old Pianomation processor. Older processors, part # 70100 - circa 1992-1997, use a different type of “To Driver Boards” connector needed to connect the new processor to the driver boards located at the solenoid rail. If you have the type of processor shown above you will need to replace the “Note Driver Signal Cable”. Order part # 811433 - TO SOLENOID RAIL [To Driver Boards] This ribbon cable may be held in by two small screws. - TO POWER SUPPLY - TO CD/USER INTERFACE [To User Box] Remove the old Pianomation processor and brackets from the piano by removing the 4 screws. Type A Type B Lower The Power Supply [Type A or B above] and the Processor are located in these areas. QRS Music Technologies, Inc. / Technical Support - 800-247-6557 / www.qrsmusic.com 5 PMII Upgrade Kit Installation Instructions - 81525 2 Mount and Connect the New PMII Processor Mounting the new PNOmation II processor to the piano. When upgrading a current system, place the new processor in the same location as the original. On a new system installation with record, place the processor in a location where all of the cables will reach: Driver Port B - To Driver Boards Power Supply Keyscan Primary - To the record system’s Soft-Shift circuit board. Position it so that the connectors are easily accessible. The mounting brackets are attached to the processor when shipped. Secure the new PMII processor to the piano with the screws provided. Mounting Brackets - Three different style brackets used. Connect these cables to the new PNOmation II processor. - “DRIVER Port B” This is the 1-1/2” flat gray cable going to the driver boards - “POWER SUPPLY” This is the 3/4” flat gray cable going to the power supply - “KEYSCAN PRIMARY” - QRS PNOscan Record Systems Only White flat cable coming from the record system’s Soft-Shift circuit board and it may be connected into the PNOscan II interface under the piano keybed. If so, disconnect it from the PNOscan interface. Front and rear views of this PNOscan II unit is shown at the bottom of this page. - “QRS CONTROLLER” located on the side of the PMII chassis. It is not necessary to reconnect your original QRS controller for proper operation of PMII. Driver Port B QRS Controller QRS Controller Power Supply The TUSB control box for the PNOscan II record system, shown here, is not needed with the new PNOmation II system. If you’re upgrading an existing QRS Pianomation system with PNOscan II record, disconnect the flat white cable (black on newer units) from the Primary Port and plug it into the Pianomation II Controller’s Keyscan Primary port. The silver “contact” side of the cable faces away from the word “Primary”. 6 PNOscan II Record [TUSB] QRS Music Technologies, Inc. / Technical Support - 800-247-6557 / www.qrsmusic.com Front Back PMII Upgrade Kit Installation Instructions - 81525 Mount and Connect the Wi-Fi Adapter and Speaker 3 Connect the Ethernet cable from the wireless to the Ethernet port on the PMII processor. Power the ASUS using the USB cable. Mini end to ASUS and the large-wire USB end to the USB HOST port. Do not connect the second USB connector from the ASUS power. Using the Velcro strip supplied, attach the wireless unit to the piano . Connect your powered speaker to Audio #3 jack. Use the 1/8” stereo-to-RCA cable provided. Large USB Wire Do not connect 2nd USB Amplified Speaker Wi-Fi Device QRS Music Technologies, Inc. / Technical Support - 800-247-6557 / www.qrsmusic.com 7 PMII Upgrade Kit Installation Instructions - 81525 4 Mount and Connect the Pin-Light Extension - PLx The Pin-Light Extension serves several functions: Six lights will display valuable information about your system. The built-in IR Sensor will allow you to use your existing QRS Remote to control PMII. USB A- USB Mini B & 1/8” stereo jacks extend the ports from PMII to an accessible position on the piano. The button is for Play / Stop / Standby and Reset. Mount the PLx unit to the piano. We suggest mounting the PLx unit under the keybed at the treble side of the piano. IR Sensor for QRS remote control access Connect one end of the 6-pin flat ribbon cable to the PMII’s “ALT” port. The black side of the cable faces the word “ALT” Connect the other end of the 6-pin flat ribbon cable to the PLx connector. Connect so the black side faces the ceiling. Connect the USB A Male cable to one of the USB Host sockets on the PMII. Connect the other end of the cable, USB 5-Pin Mini B, to back of the PLx. Used for updates and music access. Connect the USB B Male cable to the “USB Client” port o the PMII. Connect the other end of this cable, USB A Male, to the back of the PLx. This is used to record to a computer. Connect one end of a 1/8” audio cable to the PMII’s Audio #1 socket. Connect the other end to the last 1/8” socket of the PLx. This is the PMII External Source’s Line Input [AUX] port. Connect one end of a 1/8” audio cable to the PMII’s Audio #4 socket. Connect the other end to the remaining 1/8” socket of the PLx. This will be used for Headphones. AUX In [Connect to external CD or MP3 player] PLx Rear ON/Standby Light Play/Pause/Reset Button 8 PLx Front An additional USB A to USB Mini B cable is provided for user to connect to computer for recording purposes. A record system is required. Lights: Power/System/Network/Mode/MIDI/AMI QRS Music Technologies, Inc. / Technical Support - 800-247-6557 / www.qrsmusic.com PMII Upgrade Kit Installation Instructions - 81525 5 Verify Operation Connect to Power and Turn ON to Standby Mode Plug the AC power cord into a wall outlet. Flip the power supply switch to the “ON” position. PNOmation II will take several minutes power on. During this power-on/boot sequence PMII is loading the operating system and indexing the music on the SD card. You may remove the SD card for faster boot time during initial setup and service. Note: Once removed, the SD card must be re-inserted before flipping ON the power supply switch. The system has booted and is in standby when PLx lights stop scanning and the Power light is yellow. Establish a Wireless Connection and Power ON Wirelessly connect your iTouch, iPad, Wireless Computer or Android device to the piano’s Wi-Fi Adapter. [Settings / Wi-Fi / click on the QRSPNO ### device] Open your Safari, Google Chrome or Android internet browser. In the address box type: 192.168.1.1/qrs and refresh your browser. Press the Power ON button 192.168.1.1/qrs/index.html The “Power”, “System” and “Network” lights should be green. Power System Network Mode MIDI AMI QRS Music Technologies, Inc. / Technical Support - 800-247-6557 / www.qrsmusic.com 9 Performance Setup Key Adjust If this is a MIDI Upgrade Kit go to the “MIDI Out Key Adjust” page. The “MIDI” kits (81529) do not have a cable connected to the PMII “DRIVER PORT B” socket. The key adjustment sets the minimum force for each key. There is no “save” button. Your changes are automatically saved to memory. Press “System Setup”, Performance Setup” and then “Key Adjust” Piano key #5 should begin to repeat. [Key #1 for 88 note systems] You must adjust the Legato AND Staccato Force levels for each key. Set the Legato adjustment first. Previous Key / Key Number / Next Key Key “Force”: Legato & Staccato. Adjust so key plays as softly as possible. “Extend”: Sets the Force value “displayed” to all notes upscale. Global Clicking “More” or “Less” increases or decreases the force for ALL Keys. Entering a number in the force box sets the Key Force value entered to ALL Keys. Chromatic Scale: Down/Up. Use as a final test. Please press the EXIT button when finished. Otherwise the note will continue to play. 10 QRS Music Technologies, Inc. / Technical Support - 800-247-6557 / www.qrsmusic.com Performance Setup Pedal Adjust This procedure is not necessary on systems that do not have a sustain pedal solenoid, usually on uprights . Press “System Setup”, Performance, “Pedal Adjust” and slide the “Start/Stop Test” button to the right. The sustain pedal solenoid and the sustain dampers should start to cycle ON and OFF. Turn OFF the “Thump Reduction” by sliding the button to the left. Press the “-” buttons to set the “Initial Drive” and “Hold” values to zero. Watch the sustain dampers and press the Initial Drive’s “+” button until the dampers move off the strings. Then, press the Hold “+” button until the dampers lift up and hold off of the strings. Turn ON the “Thump Reduction” to pulse the solenoid as it’s release to break it’s fall and reduce noise. Adjust the release up and down until the solenoid drops quietly. Stop the adjustment by sliding the “Start/Stop Test” button to the left. Test Files Press “System Setup”, Performance Setup, “Test Files” Select “PedalKeySync.MID to test your pedal adjustment. Check out other test files. QRS Music Technologies, Inc. / Technical Support - 800-247-6557 / www.qrsmusic.com 11 Performance Setup PNOscan Adjust When PNOmation II is connected to the QRS PNOscan II record system the PNOscan Adjust option will appear on the System Setup/Record Setup page. The following adjustments are necessary after initial installation or when the system isn’t recording properly. Select the PNOscan Adjust option from the System Setup / Record Setup page. Press the Calibrate button. The “PNOscan Adjustment Started” box will appear. At this point the previous calibration has been cleared. To calibrate the PNOscan key sensors you’re going to play each key, in sequence, starting at the bass end of the keyboard. Watch the MIDI light on the PLx box and press the first bass-end key. The light will flicker red indicating that the key is set. Release the key and proceed up the keyboard. Move to the next key when the PLx light flashes. MIDI Press OK when finished. Adjust the Sustain Pedal. Click the arrow to the right of the Trigger button. Verify that the Sustain Mode is Basic. Wait for changes in the Rest, Down and Trigger values as you make adjustments. Press the Rest button. Depress the sustain pedal and press the Down button. Release the pedal and depress until the strings sustain. Hold the pedal and press the Trigger button. Pedals Soft Sostenuto Sustain Adjust the Soft Pedal. Follow the same procedures above with the soft pedal. No adjustments are necessary for the Sostenuto pedal. The PNOscan adjustments are complete. Continue to the User Guide on the next page. Always put the system in Standby Mode when you are finished for the day. 12 QRS Music Technologies, Inc. / Technical Support - 800-247-6557 / www.qrsmusic.com Performance Setup MIDI Out Key Adjust This procedure is used when the PMII MIDI Kit #81529 is connected to a piano with a non-QRS engine. In these installations the only connection from the PMII processor to the piano is via the 5-Pin MIDI Out socket. PMII MIDI Out to the MIDI In of the piano. You MUST call QRS Technical Support for the release key to turn on the 5-Pin MIDI Output! The non-QRS player system attached to the piano must be in good working order and the key force settings adjusted. The following PMII key adjustments cannot soften the volume of the keys softer than the piano’s key force settings. The key adjustment sets the minimum force for each key. There is no “save” button. Your changes are automatically saved to memory. Press “System Setup”, Performance Setup” and then “Key Adjust” Piano key #5 should begin to repeat. You must adjust the Legato AND Staccato Force levels for each key. Set the Legato adjustment first. Previous Key / Key Number / Next Key MIDI Out Min Vel: Adjust so key plays as softly as possible. “Extend”: Sets the Force value “displayed” to all notes upscale. Global Clicking “More” or “Less” increases or decreases the force for ALL Keys. Entering a number in the force box sets the Key Force value entered to ALL Keys. Chromatic Scale: Down/Up. Use as a final test. Please press the EXIT button when finished. Otherwise the note will continue to play. QRS Music Technologies, Inc. / Technical Support - 800-247-6557 / www.qrsmusic.com 13 User Guide Power ON to the PNOmation II User Interface Determine the status of the system by looking at the lights on the PLx box. If all of the PLx box lights are off, the power may be disconnected: Plug the AC power cord into a wall outlet. Flip the system’s power supply switch to the “ON” position. If the first two or more lights are yellow, the system has shut down: Unplug the AC power cord from the wall outlet... Wait two minutes and then reconnect. PMII will take several minutes to power on. During this power-on sequence the PLx lights will scan until PMII has loaded the operating system and indexed the music on the SD card. Note: The SD card MUST be inserted BEFORE powering on the system. If the first light is yellow and the second is green... The system is in Standby mode: Continue below to power on... If the third light is yellow, the system is in Network Mode... You won’t be able to connect using the IP address listed below. Call the QRS Technical Support department for help. Wirelessly connect your iTouch, iPad, Wireless Computer or Android to the piano’s Wi-Fi Adapter. [Settings / Wi-Fi / click on the QRSPNO ### device] Open your Safari, Google Chrome or Android internet browser. In the IP address box type: 192.168.1.1/qrs and refresh your browser. Note the Driver number, circled in red below. 192.168.1.1/qrs/index.html Press the Power ON button To check on the latest Driver update, connect to your home network go to: http://www.qrsmusic.com/support_pmii.asp The system is powered on and ready to play. 14 QRS Music Technologies, Inc. / Technical Support - 800-247-6557 / www.qrsmusic.com User Guide Play Piano Home Page Button Descriptions Stop Play Pause Playback Settings Go back to Home Page Standby Music Groups QRS Music on SD Card Song Title Color Music from your Playlists Music that you’ve recorded Music from your USB drive Music from external sources Purchase Music from QRS Unlock Feature or Music Red Solo Blue Concert Black SyncAlong Scroll Bar By Song Title Create or Add to Playlist Use PC Mouse Click & Hold left button then drag mouse up/down. Song Search Music Groups Playback Settings To adjust volume levels, press the “Speaker” icon to open the “Playback Settings” page. Mute the Audio Only Mute the Piano and Audio Mute the Piano Only to play along with the Audio Sets the Master Volume to Level 75 Sets the Master Volume to Level 1 EQ Audio: Treble / Bass / Mid Prompts Voice Prompt - Volume and EQ Playback Options Repeat Modes: Off / 1 Song / All Songs Tempo and Transpose Adjusts the Audio Volume Only Adjusts Piano & Audio Volume Levels QRS Music Technologies, Inc. / Technical Support - 800-247-6557 / www.qrsmusic.com 15 User Guide Trial Activation Complete the Trial Activation form and click the “Register & Activate” button to view the sample library 16 QRS Music Technologies, Inc. / Technical Support - 800-247-6557 / www.qrsmusic.com User Guide Playlists Create a Playlist To create a playlist just touch the black box next to the song title. A check-mark will be added. You may continue to select songs for the playlist or... 1 Press “Quick Save” to save you current selections with the default name (Playlist_#.Pls). 2 Press “Save As...” to save your playlist with the name you choose. 3 Press “Save To...” to save the song to an existing playlist. 4 Press the “Clear” button, before saving, to uncheck all of your current selections. Play songs from a Playlist Press “Playlist” in the left or at the bottom of the page. Open a playlist by touching the playlist name. Your playlist will open where you can... Play a song from the list. Add more songs to your playlist by clicking the “Add More Music” button. QRS Music Technologies, Inc. / Technical Support - 800-247-6557 / www.qrsmusic.com 17 User Guide USB Drive Play MIDI or MP3 files from a USB Drive. When a USB drive, with MIDI or MP3, is plugged into the USB port the source will change to USB Drive. External Inputs Press External Input to play from one of the four external source options. AUX Line In: Connect your MP3 or CD player to the Audio jack #1. QRS Controller: Connect your Ancho or Petine to the “QRS Controller” socket on the PMII chassis. MIDI In 5-Pin: Connect your MIDI device to the MIDI In port of PMII. MIDI In USB Client: Connect your Computer with MIDI software to the USB Client port of PMII. QRS Controllers: Petine Ancho Chili Serenade Pro QRS Controller MIDI In 5-Pin [Connect to MIDI device] AUX In [Connect to external CD or MP3 player] MIDI In USB Client [Connect to computer] 18 QRS Music Technologies, Inc. / Technical Support - 800-247-6557 / www.qrsmusic.com User Guide Record a Song Press the Record option. Press the red Record button. Begin playing the piano when the “Recording” box appears. Press the “Stop” button when you are finished recording. A new song will appear in the Record window. Press the newly created file to play. Record Settings Stop Play Record Master volume sets to 50 (75%) when the Record button is pressed. Delete Recording Opens up the recording in certain music software programs, if PMII is connected to a computer via the USB Client port. With the “Event Trigger” ON, recording begins when the first key is pressed. Record Source - Select which port you are recording from: PNOscan The QRS PNOscan sensor strip under the piano keys. MIDI Port A MIDI device connected to the 5-Pin MIDI IN port. USB MIDI A computer w/software connected to the USB Client port. Turn OFF to keep PNOscan key information from exiting the 5-Pin MIDI OUT socket. Eliminates “Looping”. QRS Music Technologies, Inc. / Technical Support - 800-247-6557 / www.qrsmusic.com 19 User Guide System Information PMII Serial Number Driver (Operating System) Version 10 pin PNOscan: Numbers above zero indicate the record sensor strip is attached IP Address Last Key Adjust (Align) Date Last Patch: Date that the system Driver was updated. Update the Operating System Go to Information / System for the current “Driver” version. See above. To update your PMII Operating System (Driver): Go to the QRS website to find latest version. http://www.qrsmusic.com/support_pmii.asp Download the latest “system_patch_2011-xx-xx.zip from the QRS website. Copy the zipped folder “system_patch_2011-xx-xx.zip” to a USB memory stick. Plug the USB memory stick in the USB port on the PLx box. Go to the OS Update page to view the progress. The update procedure is automatic. Old Patch File Found Copy Patch File from USB Drive Unzip Execute Your system will reboot when the update is complete. 20 QRS Music Technologies, Inc. / Technical Support - 800-247-6557 / www.qrsmusic.com User Guide Standby When you’re finished playing the piano press the QRS PWR icon in the upper right corner. Then, when the Power Options window appears press the “Standby Mode” button. Standby mode shuts off power to the key solenoids but keeps the processor running. Note the Trial Music Time Remaining Shutdown Options You can also enter standby mode by pressing the “Shutdown Options” button. There are two other options from this window: “Standby” - Shuts off power to the key solenoids but keeps the processor running. “Reboot” - Restarts the system in case the unit does not respond to commands. “Shutdown” - Shuts OFF the system for a move or when the unit won’t be used for a while. To restart from this mode the unit must be disconnected and then reconnected the AC power. QRS Music Technologies, Inc. / Technical Support - 800-247-6557 / www.qrsmusic.com 21 User Guide Purchase Music From The Sample Library When your 90-Day Trial period has expired go to the Sample Library section to purchase more music: Click on the box next to the song title that you want to purchase to add it to the cart. Cart Go to the Cart and click on “Purchase Now” to view the QRS Item numbers. Write down the Serial and Catalog-Track Numbers and call QRS Music to place your order. After your purchase enter the Release Key here. 22 QRS Music Technologies, Inc. / Technical Support - 800-247-6557 / www.qrsmusic.com User Guide Unlock Content Unlocks QRS Music Packages and Special Features. QRS Music Technologies, Inc. / Technical Support - 800-247-6557 / www.qrsmusic.com 23 User Guide Information User Guides Warranty Contact Info My Account 24 QRS Music Technologies, Inc. / Technical Support - 800-247-6557 / www.qrsmusic.com User Guide Playback Parameters Invert Keyboard: Shown “ON” Reverses the direction of play, usually on, as shown, for upright pianos. Magic Pedal: Shown “OFF” System automatically detects the presence of the Sustain Pedal Solenoid. Lowest Key: Set to 5 for 80 note systems and 1 for 88 note installations. Lowest Note: Refers to MIDI. Set to 25 for 80 note installations. Transpose: Set to 0. MIDI Out Delay: Sets the piano delay of the 5-Pin MIDI Out socket. Default = 500. Solenoid Delay (Ms): Sets the piano delay to the driver boards. Default = 500. All other settings are reserved for QRS system setup and should not be changed by user. QRS Music Technologies, Inc. / Technical Support - 800-247-6557 / www.qrsmusic.com 25 User Guide Network Settings PNOmation II systems are shipped from the factory in “Stand-Alone” mode with the IP address set to 192.168.1.1 and a host name of QRSPNO. The Wi-Fi device supplied by QRS and connected to PMII is set as an access point. See “How to...Setup the ASUS Wireless for PMII in Stand-Alone Mode”. You may want to connect PMII to your local network. This will allow you to control PMII from any PC on your network using Google Chrome. You can either connect a cable from PMII to your network or use the Wi-Fi device supplied with your player system for a wireless connection to your network. To use PMII with your local area network you must: 1 Set-up PMII in Network mode by sliding the “DHCP Server Enabled (Standalone)” button to the left, as shown below. You can also use a QRS remote to make this change. Connect an Ethernet cable from PMII to you network. 2 Or...Reset the Wi-Fi device to communicate with your wireless network. See “How to...Setup the ASUS Wireless for PMII in Network Mode”. Once in Network Mode you can set a static IP address by sliding the “DHCP Enabled” button to the left and manually entering the static IP Address. QRSPNO 26 QRS Music Technologies, Inc. / Technical Support - 800-247-6557 / www.qrsmusic.com User Guide Record Defaults Autosave: Default Record Artist: Hide Record Window Source/PNOscan: Source/MIDI Port(5-Pin): Source/USB MIDI: Tempo Transpose Routing/PNOscan to 5-Pin MIDI: Routing/PNOscan to USB MIDI: Tempo/Beats Per Minute: Lead-In Measures: Event Trigger Metronome Enable Click Volume Curves QRS Music Technologies, Inc. / Technical Support - 800-247-6557 / www.qrsmusic.com 27 User Guide Other Setups Set the Clock On/Off Scheduling LED Intensity: Controls the intensity of the lights in the Pin-Light Extension (PLx) box. Service Data The service Data pages used by technicians for troubleshooting. PMII Light Patterns 1 1 1 Blink / 10 sec Blinks Idle Blinks with PNOscan data 2 1 Blink / 10 sec Idle 3 3 3 1 Blink / sec Solid Off Network Mode = Network with Connection Network Mode = Stand Alone with Connection Network Mode = No Connection 28 QRS Music Technologies, Inc. / Technical Support - 800-247-6557 / www.qrsmusic.com User Guide Pin-Light Extension [PLx] Light Patterns Steady: HI power LED is ON Green Winking: Data to Driver Boards - Piano should be playing Yellow STANDBY: CPU=ON, Hi Voltage=OFF waiting for ON command Red Steady: Key or Pedal Solenoid over-current. Hi Volt shut down Green Steady: LO power LED is ON, PLx has been initialized. Yellow Blinks with Remote Control Activity Steady: Stand-Alone Mode for Access Point connection Green With flashing Red: Stand-Alone link is down Yellow Steady: Network Mode Red Changing Music Sources Power HI power LED System LO power LED Network Mode (Music Source) SD Card Library USB Drive Record Demo External: Auxiliary Line In External: QRS Controller External: MIDI IN 5-Pin External: MIDI IN USB Client MIDI MIDI Traffic to Solenoids AMI IN Green Yellow Green Red Green Yellow Power Play / Pause Standby Reboot Steady Steady 2 Blinks Blinking 1 Blink Steady 3 Blinks 2 Blinks Steady: 10-pin PNOscan Winking: MIDI traffic from record system Winking: 5-pin MIDI traffic Steady: Decoding MIDI Data Steady Carrier Present Winking: Audio pass-thru [Including Voice Prompts] System Network Mode MIDI AMI Pin-Light Extension [PLx] Button Functions Press to play selected song. Press again to stop playback. Press and Hold for 8 seconds and then release. Press and hold for 15 seconds. Front Button: Play/Pause/Standby/Reset QRS Music Technologies, Inc. / Technical Support - 800-247-6557 / www.qrsmusic.com 29 User Guide QRS Remote Control Features SD Music Source Demo Future Option PWR Power ON/OFF USB Music Source MIDI IN Music Source P LIST Future Option AUD UP / DN Audio Volume - Offset MSTR UP / DN Master Volume - Adjusts Piano and Audio Levels PNO UP / DN Piano Volume - Offset Numbers 0-9 ENTER Future Option Play Music Next Song Stop Music II Pause Music REC Record a Song SHIFT Press “SHIFT” and a button below. RADIO Future Option TEST Test Music Files D OFF Future Option SPDIF Future Option AUX Play Music from an External Source Connected to Audio Port #1 ALIGN Key Calibration SET Future Option A Future Option DYN Future Option MUTE AUD B MUTE PNO 30 Previous Song Mute Audio Future Option Mute Piano ADD Future Option COPY Future Option INFO Current IP Address STAT Future Option PSET Future Option RESET Future Option FUNC Use with SHIFT and Number Buttons to access Special Features PGM Future Option RAND Future Option VOICE Future Option PRAC Future Option QRS Music Technologies, Inc. / Technical Support - 800-247-6557 / www.qrsmusic.com How To... Setup TRENDnet Wireless for PMII in Stand Alone Mode The TRENDnet does NOT support Network Mode If you wish to set up PMII in Network Mode please call the number at the bottom of the page and we will replace the TRENDnet with an ASUS wireless unit. Flip the switch on the back of the TRENDnet to AP Log In to the TRENDnet TEW-654TR Wireless Router 192.168.10.1 User Name = admin Password = admin Verify that the Firmware Version is 1.10.12 If the version is not 1.10.12 or higher call QRS Technical Support Select: Setup / Wireless Change the Wireless Network Name to QRSPNO # This is the name that will appear when you view the available wireless networks. It can be any name that you wish. Click the “Apply” button and wait... Click the “Back” button when the data is successfully saved.. Select: Setup / WPS “Wi-Fi Protection Settings” Click to uncheck “Enable to disable the protection Click the “Apply” button and wait... Click the “Back” button to save settings. Select: Setup / LAN Select “Static IP” in the “My LAN Connection is: drop-down box. Change the Device Name to QRSPNOAP Change the IP Address to 192.168.1.220 Change the Gateway to 192.168.1.1 Change the Primary DNS to 192.168.1.1 Click the “Apply” button and wait... Click the “Back” button to save settings. This will disconnect you from the Wi-Fi device. Use 192.168.1.220 if you need to log in to the TRENDnet setup again. Reconnect the TrendNet to PMII You can now log on to PMII 192.168.1.1 QRS Music Technologies, Inc. / Technical Support - 800-247-6557 / www.qrsmusic.com 31 How To... Setup the ASUS WL 330N3G Wireless for PMII in Stand-Alone Mode PNOmation II Wireless Computer or Android Device or Apple iPad/iTouch Default Configuration Set by QRS Power Cable No access from home Network IP Address 192.168.1.1is assigned by PMII ASUS 330N3G Wireless set as an Access Point (AP) All systems are shipped in Stand-Alone mode: [1] The PLx Network light is green and [2] you should see “QRSPNO ####” when viewing your local Wi-Fi devices . These instructions are used to reset the PMII and the ASUS wireless to the default configuration. If the PLx “Power” light is green and the speakers are on, you should hear voice prompts when remote control commands are received. If the “Power” light is yellow, tap the PLx button once so that the light turns green. Point the remote at the button on the PLx box. The “System” light will flash, w/ voice prompts, when remote commands are received. Using a QRS Remote: Press FUNC then PGM then 9 9 0. FUNC 990 on PMII Versions 3.00 and higher. If you have one of the smaller QRS remotes: press F1Source then Program then 990. PLx The PLx Network light should now be green. Power System Network Confirm that the ASUS’ “power” light is ON. Press and Hold the “Restore’ button, on the back of the ASUS, until the “power” light flashes at least 3 times. DISCONNECT the Ethernet cable from you PC or Laptop computer. View the available wireless devices using your iPad, iTouch, Android device or Wireless Computer. If the ASUS was “restored” correctly you should see “ASUS” in your available Wi-Fi devices list. Select “ASUS” from the list and wait until a connection is established. Apple devices may automatically open the Authentication screen when connection. Enter admin in the User Name and Password fields. If you are using an Android or a Computer and Google Chrome: In your web browser, enter 192.168.1.1 in the URL address window. Enter admin in the User Name and Password fields. Click the Log In button. Apple Google Chrome Android The ASUS programming window opens. Select Access Point. Enter the SSID name that you want to see when you view connections. Our example uses QRSPNO Test Click the APPLY button. The ASUS will apply, save and restart with the new settings. Close the browser window when 100% complete. Wait for the voice prompt to report: “Standby”...“Connected”...”IP Address is...192.168.1.1”. [FUNC INFO to hear voice prompts] You can now wirelessly connect to PNOmation II via the ASUS wireless access point.. Enter [192.168.1.1/qrs] in your Internet web browser. 32 QRS Music Technologies, Inc. / Technical Support - 800-247-6557 / www.qrsmusic.com How To... Setup ASUS WL 330N3G Wireless for PMII in Network Mode PNOmation II Power Cable Your wireless network router Wireless or Cable connection to your Home Network Computer or Android Device or Apple iPad/iTouch Internet Modem PMII gets its IP address from your home network ASUS 330N3G set as an Ethernet Adapter If the PLx “Power” light is green and the speakers are on, you should hear voice prompts when remote control commands are received. If the “Power” light is yellow, tap the PLx button once so that the light turns green. Point the remote at the button on the PLx box. The “System” light will flash, w/ voice prompts, when remote commands are received. Using a QRS Remote: Press FUNC then PGM then 9 9 1. (FUNC 991 on PMII Versions 3.00 and higher) [If you have one of the smaller QRS remotes: press F1Source then Program then 991] PLx The PLx Network light should now be yellow. Power System Network Confirm that the ASUS’ “power” light is ON. Press and Hold the “Restore’ button, on the back of the ASUS, until the “power” light flashes at least 3 times. DISCONNECT the Ethernet cable from you PC or Laptop computer. View the available wireless devices using your iPad, iTouch, Android device or Wireless Computer. Select “ASUS” from the list and wait until a connection is established. Apple devices may automatically open the Authentication screen when connection. Enter admin in the User Name and Password fields. If you are using an Android or a Computer and Google Chrome: In your web browser, enter 192.168.1.1 in the URL address window. Enter admin in the User Name and Password fields. Click Log In (Apple) or click the OK (Android/Chrome) button. Apple Google Chrome Android The ASUS programming window opens. Select Network Adapter. Select your local wireless Network device from the Site Survey list. Close the Help screen if it appears over the Site Survey list. Click the Connect button. The ASUS will connect, save and restart with the new settings. Close the browser window when 100% complete. Wait for the voice prompt to report: “Network”...“Connected”...”IP Address is...192.168.1.xxx”. [FUNC INFO to hear voice prompts] You can now connect to PNOmation II through your home Network. Enter [192.168.1.xxx] in your Internet web browser. QRS Music Technologies, Inc. / Technical Support - 800-247-6557 / www.qrsmusic.com 33 How To... Setup the ASUS WL 330gE Wireless for PMII in Stand-Alone Mode PNOmation II Reset Wireless Computer or Android Device or Apple iPad/iTouch Default Configuration Set by QRS ASUS 330gE Wireless set as Access Point (AP) No access from home Network IP Address 192.168.1.1is assigned by PMII All systems are shipped in Stand-Alone mode: [1] The PLx Network light is green and [2] you should see “QRSPNO ####” when viewing your local Wi-Fi devices . These instructions are used to reset the PMII and the ASUS wireless to the default configuration. If the PLx “Power” light is green and the speakers are on, you should hear voice prompts when remote control commands are received. If the “Power” light is yellow, tap the PLx button once so that the light turns green. Point the remote at the button on the PLx box. The “System” light will flash, w/ voice prompts, when remote commands are received. Using a QRS Remote: Press FUNC then PGM then 9 9 0. (FUNC 990 on PMII Versions 3.00 and higher) [If you have one of the smaller QRS remotes: press F1Source then Program then 990] PLx The PLx Network light should now be green. Power System Network DISCONNECT the Ethernet cable from you PC or Laptop computer. View the available wireless devices using your iPad, iTouch, Android device or Wireless Computer. If the ASUS was “reset” correctly you should see “ASUS” in your available Wi-Fi devices list. Select “ASUS” from the list and wait until a connection is established. Open Apple Safari, Android Web Browser or Google Chrome on a Computer: In your web browser, enter 192.168.1.220 in the URL address window. The “Authentication Required” dialog box will appear. Enter admin in the User Name and Password fields. Click Log In. Apple Google Chrome Android The ASUS programming window opens. Select the AP Tab Enter the SSID name that you want to see when you view your wireless devices. Our example uses ASUSQRS AP Click the FINISHED button. This yellow message box will appear. Click OK The ASUS will save and restart with the new settings Wait for the progress to complete, 100%. At this point you will loose connection to the ASUS... Close the browser window when the progress is 100% complete. Wait for the voice prompt to report: “Standby”...“Connected”...”IP Address is 192.168.1.1”. [FUNC INFO to hear voice prompts] You can now wirelessly connect to PNOmation II via the ASUS wireless access point.. Enter QRSPNO [192.168.1.1/qrs] in your Internet web browser. 34 QRS Music Technologies, Inc. / Technical Support - 800-247-6557 / www.qrsmusic.com How To... Setup ASUS WL 330gE Wireless for PMII in Network Mode PNOmation II Your wireless network router Wireless or Cable connection to your Home Network Computer or Android Device or Apple iPad/iTouch Internet Modem PMII gets its IP address from your home network Reset ASUS 330gE set as an Ethernet Adapter If the PLx “Power” light is green and the speakers are on, you should hear voice prompts when remote control commands are received. If the “Power” light is yellow, tap the PLx button once so that the light turns green. Point the remote at the button on the PLx box. The “System” light will flash, w/ voice prompts, when remote commands are received. Using a QRS Remote: Press FUNC then PGM then 9 9 1. (FUNC 991 on PMII Versions 3.00 and higher) [If you have one of the smaller QRS remotes: press F1Source then Program then 991] PLx The PLx Network light should now be yellow. Power System Network DISCONNECT the Ethernet cable from you PC or Laptop computer. View the available wireless devices using your iPad, iTouch, Android device or Wireless Computer. Select “ASUS” from the list and wait until a connection is established. Open Apple Safari, Android Web Browser or Google Chrome on a Computer: In your web browser, enter 192.168.1.220 in the URL address window. The “Authentication Required” dialog box will appear. Enter admin in the User Name and Password fields. Click Log In. Apple Google Chrome Android The ASUS programming window opens. Click on the Adapter tab. In the Available Network List , click on the radio button for your local network. Our example shows ASUS QRS AP. Click the Connect button. You may need to provide a password to your network. Use the “Add” button if your local network is hidden. This yellow message box will appear. Click OK The ASUS will save and restart with the new settings Wait for the Progress to complete. At this point you will loose connection to the ASUS... Close the browser window when the progress is 100% complete. Wait for the voice prompt to report the new IP Address from your network: “Network”...“Connected”...”IP Address 192.168.1.xxx”. [FUNC INFO to hear voice prompts] You can now connect to PNOmation II through your home Network. Enter [192.168.1.xxx] in your Internet web browser. QRS Music Technologies, Inc. / Technical Support - 800-247-6557 / www.qrsmusic.com 35 User Guide Complimentary Song List [319 Total] A Beautiful Friendship Chances Are Good King Wenceslas A Christmas Love Song Change The World Good-bye Yellow Brick Road A Curious Story (Kinderscenen, Op 15) Chanukah O Chanukah Gypsy, part 1 A Holly Jolly Christmas Chemin de Fer (rag) Gypsy, part 2 A Last Dance Chopsticks Hard-Hearted Hannah A Night At The Opera About Strange Lands And People (Kinderscenen, Op 15) Clair de Lune, Op 46 No 2 (Faure) Hark! The Herald Angels Sing Contretanze He Hideth My Soul Adagio, from Sonata in C, Op 3 No 3 (Beethoven) Could I Have This Dance High Noon Addams Family Theme Crazy Holberg Suite: Preludium Adoro Dancing In The Dark Holberg Suite: Sarabande Afternoon Delight Danny Boy Honeysuckle Rose Against All Odds Danse (Debussy) Honky Cat Ain’t Misbehavin’ Days of Wine and Roses How About You All I Do Is Dream Of You Deed I Do Hungarian Rhapsody No 2 (Liszt) Allegretto, from Haydn Sonata in E Allegro con brio, from Sonata in C, Op 3 No 3 (Beethoven) Deep In The Heart Of Texas Hungarian Rhapsody No. 12 (Liszt) Do That To Me One More Time I Don’t Need You Allegro giusto (from Italian Concerto, BWV 971) Don’t It Make My Brown Eyes Blue I Don’t Stand A Ghost Of A Chance Allegro, from Sonata in C, K545 (Mozart) Don’t Take Your Love From Me I Don’t Want To Walk Without You Allegro, from Sonata in G, K283 Down By The Riverside I Just Called To Say I Love You Always (Atlantic Star) Down Yonder I Love My Wife Always On My Mind Dream I Love Paris Amazing Grace Dreamsville I Married An Angel Andante, from Sonata in C, K545 (Mozart) Duelling Banjos I Only Have Eyes For You Andante, from Sonata in G, K283 Eighteenth Street Strut I Saw Three Ships Angie El Dia Que Me Quieras I Want To Be Happy Animaniacs Theme El Pelele (Goyescas) (Granados) I’ll Be Around Annes de Pelerinage – Tarantella (Liszt) Enticellas I’ll Close My Eyes/Close Your Eyes Annie Get Your Gun, part 1 Etude in C-sharp minor, Op 10 (Chopin) I’m Old-Fashioned Annie Get Your Gun, part 2 Etude in E, Op 10 No 3 I’m Through With Love Arabesque No 1 (Debussy) Etude in G-flat, Op 10 No 5 I’ve Got A Crush On You/I’ve Got It Bad As Long As He Needs Me Etude in G-sharp Minor, Op 25 No 6 If Ever I Would Leave You At A Georgia Camp-Meeting Etude, Op 2 No 1 (Scriabin) If I Could Be With You Autumn In New York Etude, Op 3 No 5 (Scriabin) If You Believe Ave Maria (Schubert/Liszt) Everything I Have Is Yours Impromptu in G-flat, Op 90 No 3 (Schubert) Baby Medley Exactly Like You In Dulci Jubilo Bacharach Medley Exodus In The Mood Bad Bad Leroy Brown Fantasie in B minor, Op 28 (Scriabin) Intermezzo in A, Op 118 No 2 Ballade in D Minor, Op 10 No 1 Fine And Dandy Irlandaise Basin Street Blues Finian’s Rainbow Irving Berlin Medley Battle Hymn/How Great Thou Art First Kiss Isn’t It Romantic Beautiful Dreamer Five Foot Two, Eyes Of Blue It Came Upon A Midnight Clear Benny Goodman Medley For The Good Times It Might As Well Be Spring Blessed Assurance Forty-Second Street It Was A Very Good Year Blue Skies Forty-Second Street, part 1 It’s A Grand Night For Singing Blues For Big Scotia Forty-Second Street, part 4 It’s De-lovely Border Song Frosty the Snowman It’s Impossible Bringing In The Sheaves Georgia On My Mind It’s Not For Me To Say Brother Can You Spare A Dime Get Happy It's Too Late Burton Lane Medley Ghostbusters Theme Ivor Novello Medley Candle Blessings Glenn Miller Medley Jeepers Creepers Captain Jack God Bless America/America The Beautiful Jesus, Jesus Rest Your Head Carolina In The Morning God Rest Ye Merry Gentlemen Jesus, The Very Thought Of You Carousel Gone With The Wind Jolly Old St. Nicholas 36 QRS Music Technologies, Inc. / Technical Support - 800-247-6557 / www.qrsmusic.com User Guide Complimentary Song List Killing Me Softly With His Song Paganini Etude No. 3 (La Campanella) Thanks For The Memory Killing Me Softly With His Song Paper Moon Thanksgiving La Cage Aux Folles Penny Lane That Old Black Magic Lazy Bones That Old Feeling Le Chemin de Fer (Alkan) Phantom Fantasy Pizzicato Polka Leola Please Be Kind The Entertainer Les Miserables Polka Medley The Fantasticks Liebesleid (Kreisler/Rachmaninov) Polonaise in A-flat, Op 53 (Chopin) The Folks Who Live On The Hill Liebestraum No. 3 (Liszt) Polonaise, Op 26 No 1 The Gift Linus & Lucy Prelude No 1 in C (WTC I) The Good Life Lookin’ For Love The Hut Sut Song Love And Marriage Prelude No 10 in E Minor (Bach/Siloti) Presto, Concert Piece No. 2 in D Minor (Mendelssohn) Love Letters Reverie, Op 3 (Joel) The Nearness of You Love Makes The World Go Round Romanze from Concerto No 1 Love Walked In Rose of Washington Square The Nearness of You/One Morning In May The One I Love (Belongs To Somebody Else) MacNamara’s Band Rosenkavalier Waltzes (R. Strauss) The Phantom of the Opera Manhattan Ruby The Rose Masquerade Rudolpho’s Narrative (La Boheme)(Puccini) The Sheik of Araby Mazurka, Op 6 No 3 Sad Songs The Sound of Music II Medley No. 1 The Stranger Memories Of You Santa Claus Is Coming To Town Satin Doll/They Can’t Take That Away From Me Memories of You/As Time Goes By Sea Songs Medley The Tribute Minuet (Boccherini) Semper Fedelis The Trolley Song Minuet in G, Op 17 No 2 (Moszkowski) Send In The Clowns The Twist Moderato, from Haydn Sonata in E Moondance Shadow Waltz The Very Thought Of You Shall We Gather At The River The Way It Is Moonglow Since I Fell For You The Way You Look Tonight Moonlight and Roses Six Variations on Nel Cor Piu Moonlight Cocktail Smells Like Teen Spirit The Wizard of Oz Third Movement - Piano Concerto in E-flat, K 482 (Mozart) Moonlight In Vermont Smoke Smoke Smoke Through The Eyes Of Love (Ice Castles) Moonlight Serenade So Am I To Beat The Band Moonlight Sonata, 1st Mvt. (Beethoven) Some Other Time Tommy Dorsey Medley More Something Morning Has Broken Somewhere Out There True Love Unforgettable Morning Sun Sonata No 4 in F-sharp, Op 30 (Scriabin) Up On The Housetop Mr. Jelly Lord Sophisticated Ladies, part 1 Valentine Muppet Show Theme Sophisticated Ladies, part 2 Valse Impromptu in A-flat (Liszt) Music, Music, Music Southern Nights Volare My Christmas Song for You Souvenirs D’Andalousie (Gottschalk) Walkin' After Midnight My Foolish Heart Spancil Hill Waltz in A-flat, Op 39 No 15 (Brahms) My Heart Stood Still Speak Softly Love Waltz No 1 (Joel) New Hampshire Hornpipe Spinner’s Song , Op 67 No 4 (Mendelssohn) We Three Kings Niteflite Stars Fell On Alabama What Child Is This (Greensleeves) No No Nanette What The World Needs Now Nocturne in F (Chopin) Straight Ahead Stumbling O Christmas Tree Suite, Op 14 No 1 (Bartok) When My Baby Smiles At Me Where Everybody Knows Your Name (Cheers) Oh Happy Day Suite, Op 14 No 2 (Bartok) White Christmas Medley On Golden Pond Suite, Op 14 No 3 (Bartok) Who Is It? On The Street Where You Live Sweet And Low Down Who Wants To Live Forever On The Sunny Side of the Street Sweet Rosie O’Grady Wonderful Words Of Life Only Trust Your Heart Taking A Chance On Love You Light Up My Life Ooh! Look-a There, Ain’t She Pretty Tango (Albeniz) Young At Heart Oops! I Did It Again Thank You Zing Went The Strings Of My Heart The Birth Of The Blues The Moth Waltz (Straus/Tausig) The Talk Of The Town QRS Music Technologies, Inc. / Technical Support - 800-247-6557 / www.qrsmusic.com 37 Link to PMII upgrade instructions Get the free mobile app at: http://gettag.mobi QRSPNO [http://192.168.1.1/qrs] Stand Alone Mode