1
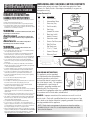
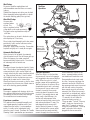
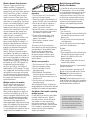
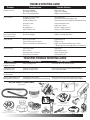
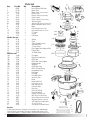
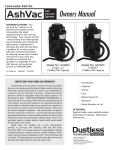
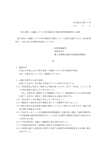
DUSTLESSTM WET/DRY VACUUM
HEPA VACUUM, AND TOOLSYNCTM
TOOL ACTIVATED VACUUM
OWNER’S MANUAL
CONGRATULATIONS: You are now the owner of a DustlessTM
Wet/Dry Vacuum which incorporates the latest advancements
in wet/dry dust removal technology. This vacuum is engineered
to eliminate the dust that has been a problem for so many
years with wet/dry vacuums almost from their inception. This
vacuum is different from anything in its category.
Once again CONGRATULATIONS
Model’s 16003, 16006,
16009, 16010, & 16011
16 Gallon
This cleaner was inspected and
packaged carefully before being
shipped from the factory.
If you should happen to need
assistance during assembly or
operation, call 1-800-568-3949
for our customer service department.
Serial Number __________________________
Model Number _________________________
Model and serial numbers are found on the
side of the motor cover. You should record both
model and serial numbers in a safe place for
future use.
FULL ONE-YEAR WARRANTY
ON DUSTLESSTM WET/DRY VACUUMS
If within one year from the date of purchase, this DustlessTM Wet/Dry
Vacuum fails due to a defect in material or workmanship, Dustless
Technologies will repair or replace it, free of charge. Please note that
this warranty is limited to and applies only to the original purchaser “For
Household Use Only,” “POUR USAGE ME’ NAGER TYPE MENAGER”, so
long as that use is in accordance with instructions and limitations set out
in this manual.
If this DustlessTM Wet/Dry Vacuum is used for commercial or rental
purposes, this warranty coverage applies for 90 days from date
of purchase.
Warranty registration - Please fill out and return the warranty
registration card accompanying your cleaner. Proof of purchase date
will be needed for warranty work.
Obtaining Warranty Service - Warranty Service is available by simply
contacting the factory at 1-800-568-3949.
800.568.3949
1285 East 650 South
Price, Utah 84501
dustlesstechnologies.com
This warranty gives you specific legal rights, and you may also have
other rights which vary from state to state. There are no warranties,
express or implied, written or verbal, which extend beyond the
description in this manual.
NOTE: This equipment has been tested and found to comply with the limits for a Class B digital
device, pursuant to Part 15 of the FCC Rules. These limits are designed to provide reasonable
protection against harmful interference in a residential installation. This equipment generates,
uses and can radiate radio frequency energy and, if not installed and used in accordance with
the instruction. Many cause harmful interference to radio communications. However, there is no
guarantee that interference will not occur in a particular installation.
If this equipment does cause harmful interference to radio or television reception, which can be
determined by turning the equipment off and on, the user is encouraged to try to correct the
interference by one or more of the following measures:
• Reorient or relocate the receiving antenna.
• Increase the separation between the equipment and receiver.
• Connect the equipment into an outlet on a circuit different from that to which
the receiver is connected.
• Consult the dealer or an experienced radio/TV technician for help.
CAUTION: Any changes or modification not express approved by Dustless Technologies, Inc. could void the user authorization to operate this equipment.
UNPACKING AND CHECKING CARTON CONTENTS
IMPORTANT SAFETY INSTRUCTIONS
Remove entire contents of carton. Check each item against the Carton
IMPORTANTES MESURES DE SECURITE Contents
List. Notify Dustless Technologies immediately if any parts are
IMPORTANTE PARA SU SEGURIDAD
damaged or missing.
SAVE THESE INSTRUCTIONS
Carton Contents List
CONSERVER CES INSTRUCTIONS
Key Qty Description
A
GUARDAR
ESTA
INSTRUCTIONES
A
1
Lid Assembly
• Read the Owner’s Manual completely before attempting to operate
this unit.
• Always check the filters before each use.
• Connect to a properly grounded outlet. See grounding instructions.
• Don’t change filters, clean the unit, or empty the canister until the
plug has been disconnected from the electrical outlet. Always unplug
unit when not in use and before servicing.
WARNING
Avertissement
– Pour reduire les risques de choc
electrique, ne pas utiliser a l’exterieur et ne pas aspirer de matieres
– To avoid risk of electrical shock, do not
use out doors or on wet surfaces.
humides.
Advertencia
– Para reducir el riesgo de un
electrochoque, no usarlo afuerra o mojado.
WARNING – To reduce the risk of burns, fire,
electric shock, or personal injury:
• Do not allow this unit to be used as a toy or to run unattended at any
time. Keep children away from this unit.
• Do not use accessories except those recommended and provided by
Dustless Technologies. Use this unit only for its intended use as
described in this manual. Use of accessories not recommended by the
manufacturer may cause fire, electric shock, or injury. (See parts list)
• Do not operate this unit in an enclosed space where flammable,
explosive or toxic vapors are given off by oil-base paint, paint thinner,
gasoline, etc.
• Do not vacuum toxic, carcinogenic, combustible, or other hazardous
materials such as asbestos, arsenic, barium, beryllium, lead, pesticides,
or other health endangering materials.
• To avoid the igniting of vapors or dust due to the arcing of the motor
brushes, do not pick up flammable or readily combustible material.
• Do not expose your Vacuum to excessive heat as damage to your
vacuum may occur and the 1 year warranty will be null and void.
• Do not pick up anything that is burning or smoking, such as cigarettes,
matches, or hot ashes.
• Do not use without dust bag and/or filters in place.
• Do not pull unit by the suction hose.
• Do not abuse cord. Never carry your Vacuum by the cord or pull cord to
disconnect it from the outlet. Grasp the plug, not the cord.
• Do not leave the cord lying on the floor once you have finished the
cleaning job. It can become a tripping hazard.
• Never handle plug, cord, or cleaner with wet hands.
• Never drop or insert any objects into any openings. Do not use with any
opening blocked; keep free of dust, lint, hair, and anything that may
reduce air flow.
• Keep cord away from heat, oil and sharp edges. Do not close doors on the
cord or snag it under furniture or pull around corners with sharp edges.
• The operation of a Wet/Dry Vacuum can result in foreign objects being
blown into your eyes, which can result in eye damage. Always wear
safety goggles when operating vacuum.
• Use special care when emptying heavily loaded canisters.
• Do not use outdoors or on wet surfaces. Do not leave appliance when
plugged in. Unplug from outlet when not in use and before servicing. Do not
use with damaged cord or plug if appliance is not working as it should, has
been dropped, damaged, left outdoors, or dropped into water.
• Wear eye and hearing protection. Always use safety glasses. Everyday
eyeglasses are NOT safety glasses. USE CERTIFIED SAFETY EQUIPMENT.
Eye protection equipment should comply with ANSI Z87.1 standards.
Hearing equipment should comply with ANSI S3.19 standards.
2
B
C
D
E
1
1
1
2
F
2
G
H
I
2
1
1
J
1
1
1
Intermediate Cover
Accessory Tray
Tank Assembly
Front Legs
(smooth) & screws
Back Legs (with/
hooks) & screws
Extension wands
Crevice Tool Accessory
Wet/Dry Floor
Tool Accessory
12' x 11/2” Hose
Owner’s Manual
Warranty Card
B
C
D
F
E
G
J
H
J
I
GROUNDING INSTRUCTIONS:
This appliance must be grounded.
If it should malfunction or breakdown,
grounding provides a path of least
resistance for electric current to reduce
the risk of electric shock. This appliance
is equipped with a cord having an
Grounded
equipment - grounding conductor and
Plug
grounding plug. The plug must be
inserted into an appropriate outlet that is properly installed and grounded
in accordance with all local codes and ordinances.
DANGER - Improper connection of the conductor can result in a risk of
electric shock. Check with a qualified electrician or service person if you
are in doubt as to whether the outlet is properly grounded. Do not modify
the plug provided with the appliance.
NOTE: Static shocks are common in dry areas or when the relative
humidity of the air is low. This is only temporary and does not affect
the use of the Vacuum.
ASSEMBLY
To install the legs and accessory tray, undo the clips holding the intermediate cover in place and set the cover and lid assembly
aside. Turn tank upside down. Front legs are on either side of the drain port opening. These front legs do not have the small hooks
on either side. The back legs do have the hooks. These hooks are for the hose to rest on when in storage.
Align legs with openings provided on bottom of the canister and slide into place. The holes will only align in proper position
for front and back legs. Insert black support screw into hole and tighten screw with a Phillips screwdriver.
Turn cleaner tank right side up.
Attach Accessory Tray
Align the three slots on the edge of the accessory tray with the three guides on the rear side of
the tank and press the accessory tray toward the tank as you push the tray down. The two locking tabs will slide under the rim of the tank and catch. By pushing the tray down and toward
the tank it will lock into place.
Place intermediate cover and lid assembly right side up and set on top of the tank.
Attach the yellow clips from the tank onto the intermediate cover.
The Lid Assembly with the vacuum controls, motor, and filters are all preassembled at the
factory for your convenience. Maintenance and replacement of filters is described later in
this manual.
Attach hose, wands and cleaning accessories
Hose and accessories are stored on the unit. The hose will loop through the two outside holes of the
accessory tray and rest on the hooks of the back legs as shown below. For convenience, additional
accessories can be stored on tray when not in use.
To Use Accessories
Push hose into tank port; twist hose to tighten or loosen connection. The wands and cleaning accessories attach to hose in the same manner.
GENERAL INFORMATION
Dustless Technologies Model 16003 Wet/Dry Vacuum delivers 99% filtration at .5 micron which is great for fine particle pick-up, like
drywall, concrete, or surface dust. All units come with a powerful 11 amp motor, dual filtration system, corrosion resistant tank, large
wheels and an integrated accessory holder. Model 16010 comes with a built-in ToolSync outlet for use with power tools providing an
automatic vacuum start-up when the tool is turned on and about a 6 second shut-off delay to clear the hose when the vacuum is
turned off. Model 16006 Wet/Dry Vacuum has HEPA certified filters installed and provides filtration rated at D.O.P Eff. Mil. Std. 282:
99.97% min. at .3 micron. The Model 16011 HEPA Wet/Dry Vacuum comes with ToolSync.
The ToolSync model vacuums (16009, 16010, 16011) are intended for use with small hand held power tools with current rating 8
amperes or less. Accessories are available to allow larger tools to operate with the vacuum. See the ToolSync Operation section below
for more information.
Automatic Suction Shut-Off
NOTE: The unit must be used in the upright position at all times, otherwise the automatic suction
shut-off will activate. The automatic suction shut-off functions when the tank fills with liquid. As
the tank fills, the ball float ( inside the cage ) rises until it seats itself against the bottom of the
intermediate cover. This shuts off the suction of the vacuum cleaner when the tank is full.
ToolSync Vacuum Controls (Models 16009, 16010 and 16011)
I – Continuous run mode.
No power to outlet
Wireless remote
start plug
0 – Off
Vacuum ToolSync outlet
Note: Model 16009 comes without the
Vacuum ToolSync outlet and Wireless
remote start plug
Power cord
II – Automatic or ToolSync
mode. Power is supplied to
outlet, vacuum will start
when tool activates.
3
HOW TO USE
Extension cord instructions:
Use an outdoor, grounding type SJT
extension cord of 16 gauge (up to 35
feet ) or 14 gauge ( any length ). The
extension cord must employ a 3-prong
grounding type plug and a 3-pole receptacle that accepts the machine plug.
Filters
Do not operate cleaner without filters
in place. To assure that your cleaner
operates at peak performance, it is
imperative that you use only genuine
Dustless Technologies filters.
Regular Wet/Dry Vacuum Filters:
Primary and secondary filters should be
held in place by their respective band
clamps. There should not be any puckers
or wrinkles that will allow dust to travel
through or suction will be reduced.
Micro Prefilter - Part #13141 is provided
with each vacuum. Packages of 2 are
available to purchase.
HEPA Filters:
It is recommended to use part #13141 micro prefilter with your vacuum. Micro
Prefilters #13141 are available. They are
recommended to be used on any fine
dust application such as sanding drywall.
This is a disposable bag and should be
thrown away when full.
How to Clean Filters:
Special note for HEPA filters: All HEPA
filters should be discarded after use, no
attempt to clean filters should be made.
Turn the unit off then remove the brass
agitator rod cover from the top of the
cleaner lid. The agitator rod will be
exposed. Lift the agitator rod about 1/2
inch and rock from side to side. The lid
acts as a pivot point for the filter support
basket, located underneath the lid. The
rocking motion of the basket agitates the
primary filter to knock off the layer of
dust that has accumulated. This will
make the suction resume. After a period
of time, when suction is reduced and
cleaning the filters with the agitator rod
is not sufficient, the filters may be
replaced or laundered and reused.
Micro Prefilters are disposable and will
hold 20-30 lbs. of dust.
4
How to Replace Filters:
Regular Wet/Dry Vacuum Filter
assembly:
Turn vacuum lid upside down on a flat
surface. Place the small, white
secondary filter over the
spring mounted cage on
the underneath side of
the lid. Gently push the
filter all the way on and
compress the springs,
then let off all pressure
allowing the cage to push
the filter back out into a
relaxed position. Secure
filter firmly with the 7’’
band clamp to the lid so
particles are not allowed
to go through to the
motor. Use a flat blade
screwdriver for this clamp.
Take the filter support basket with
agitator rod and turn it upside down.
Put the agitator rod through the hole in
the lid. The filter support basket rests
on top of the secondary filter with the
agitator rod through the lid hole.
Place the primary filter over the filter
support basket and secondary filter.
The side seam of the larger primary filter
should line up with the filter support
basket agitator rod and the filter is then
put around the large lip on the underneath side of the lid and secured into
place smoothly with the 10’’ band clamp.
There should not be any wrinkles in the
fabric as they will affect the functioning
of the filters. The filter support basket is
suspended between the two filters and
the agitator rod extends through the top
of the lid. Use a flat blade screwdriver
for this clamp.
Turn right side up and screw the brass
agitator rod cover into the top of the
lid - only finger tight!! Do not
over tighten.
HEPA Wet/Dry Vacuum
Filter assembly:
The HEPA Filter is placed
over the crosspiece stud.
The threads will protrude
through the hole in the
middle of the HEPA filter.
Slide the provided rubber
washer (part #91522) over
the threads of the stud
with the rubber side
against the HEPA Filter.
Screw down the wing nut
(part #91523) and slightly
compress the rubber washer. It will
compress about 1/2 of its original
thickness. Next place the HEPA Filter
Cover Support on top of the HEPA filter
and finally place the HEPA Filter Cover
over the filter and cover. Attach the filter
cover with the 10” band clamp using a
flat blade screwdriver.
Turn right side up and screw the brass
agitator rod cover into the top of the
lid - only finger tight!! Do not over
tighten. This part must be in place to
maintain suction.
Dry Pickup:
Wet waste should be emptied from tank
but filters can remain in place.
Connect suction hose and appropriate
attachments for use. As suction is
reduced from fine material coating the
filters, shut off the unit to clean filters.
Remove the brass agitator rod cover and
rock the agitator rod from side to side to
clean filters and resume suction.
After Dry Pickup:
Disconnect cleaner from electrical outlet.
Release lid latches and remove cleaner
lid assembly as well as intermediate
cover from tank. Empty dry material from
the tank and intermediate cover.
To avoid back strain, do not lift a full
tank. First, scoop out enough debris to
make tank easier to lift.
Empty contents into a suitable receptacle.
Wet Pickup:
Dry waste should be emptied from tank
and intermediate cover but filters can remain
in place.
ToolSync
Operation
Should filters become wet, during use, dry both
filters thoroughly before continued use, consult
the trouble shooting guide (Filters get wet).
After Wet Pickup:
Unscrew drain
cap from bottom
of tank. This
drain is regulated so that
a floor drain can be used conveniently.
The liquid can be regulated from a drip to
a full flow.
The suction hose can be put in the drain cap to
drain liquid up to 12 feet away.
Rinse inside of tank thoroughly with clean water
particularly if spills or other substances other
than water have been
picked up. Wipe inside of tank dry. Screw drain
cap back on tightly so it is ready for use again.
Automatic Wet Shut-off:
When the tank is full of liquid, the automatic
shut-off mechanism will shut off cleaner pick-up.
When this happens, the motor sound will
become noticeably higher in pitch. Turn cleaner
off and empty tank to continue use.
Storage:
Disconnect cleaner from electrical outlet. Empty
tank. Rinse inside of tank thoroughly with clean
water particularly if spills or other liquid substances other than plain water have been picked
up. Wipe inside of tank dry. If tank is stored
with liquid left inside, the moisture may cause
damage to the motor and its internal parts.
Wireless ToolSync
Operation
Do not plug
Electric Tool
Start Module
into the vacuum.
ToolSync Operation:
When the switch is in the I position,
the vacuum will turn on but no power
will be applied to the vacuum ToolSync
outlet. When the switch is in the II
Wands and cleaning accessories as well as hose position, power will be applied to the
store right on the accessory tray. Wands store on ToolSync outlet on the vacuum. When
each of the back leg grooves provided.
the portable electric tool is activated,
the
vacuum will turn on and run until
Lubrication:
the
tool
is turned off, then remain
The motor is equipped with bearings which conrunning
for
about 6 seconds to clear
tain sufficient lubrication for the life of the motor.
the hose. If the portable electric tool
The addition of lubricant could cause damage.
being
used is rated 6-8 amps, the
Do not add lubricant to motor bearings.
vacuum will reduce power to the
If you have a problem:
vacuum to keep the total current to the
This appliance was inspected thoroughly and
tool and vacuum below 12 amps. The
was in good operating condition when it was
tool plugged into the vacuum will
shipped from the factory. If a minor problem
always receive full power. If a large
occurs, it usually can be solved quite easily
tool is attached to the vacuum outlet,
when the cause is found. Therefore, this Trouble there may not be enough available
Shooting Guide is provided for you convenience. current to supply the vacuum and the
vacuum motor will shut off. If this
occurs, a remote/wireless electric
start module will need to be used.
Some portable electric tools rated
less than 1 amp may not trigger the
automatic mechanism. When these
low amperage tools come into contact
with the work surface, they often
draw enough current to activate the
automatic start. When the vacuum is
started with an attached tool, and the
tool is turned immediately off (within
1-2 seconds), this will allow the
vacuum to remain running in a
“Clean-up mode”. To clear “Clean-up
mode”, simply turn the tool on for
more than 1-2 seconds, or turn the
vacuum to the off position. “Clean-up
mode” only works with a device
plugged into the vacuum outlet.
5
Wireless Remote Start Operation:
There are 2 types of wireless start
modules available. The pneumatic
wireless start module (ToolSync A) is
plugged inline with the air hose supplying
air to a tool. When air flows, a wireless
signal is transmitted to the vacuum to
signal it to turn on. When the air flow
stops, the vacuum is signaled to turn off
after about a 6 second delay. The Electric
wireless start module (ToolSync E) works
in the same way as the ToolSync A
module except it plugs into a power outlet
and measures current flow to signal the
vacuum to operate. Both remote start
modules have a red blinking light that
signals the unit is transmitting
Note for ToolSync E electric wireless start
modules: When using large amperage
devices and the ToolSync E modules, it is
important to plug the tool into a different
circuit than that of the vacuum to avoid
tripping a circuit breaker. Never plug the
ToolSync E into the vacuum outlet.
Note for ToolSync A Pneumatic wireless
start modules: The ToolSync A module can
send false signals if excessively jarred. It is
best to mount the module on a wall or onto
the hard lines. All ToolSync A modules are
shipped without air fittings. The fittings on
the module are a 3/8” FNPT tapered. Any
fitting desired can be attached with
pressures up to 150 psi. The ToolSync A
module requires 2 AAA batteries. The module is shipped with these batteries installed
and should last many months with normal
use. When the transmit light stops blinking
when air is flowing, remove the 4 screws on
the module case to open the unit and
replace the batteries.
Multiple wireless start modules:
The first time the vacuum receives a
wireless signal, it will automatically
recognize that and only that device that
send the signal. Each vacuum has the
ability to learn to operate on a specific set
of wireless start modules (up to 16). For a
vacuum to recognize multiple wireless start
modules, the following training procedure
must be followed. The training/reset plug
shown below will be required for the
following procedures. Note that the training
plug is not included with the vacuum and is
available through Dustless Technologies.
It is only required when multiple vacuums or
multiple remote start modules are used.
6
Wireless training
procedure:
1.Turn the vacuum off. (O on the switch)
2.Insert the training/reset plug.
3.Switch the vacuum to the automatic or II
position. (Do NOT push in the red button)
4.The vacuum will now be waiting for a
remote start and will learn the next
wireless signal that it receives.
5.Activate the wireless start module. Once
the vacuum has turned on, that wireless
start module has been learned.
6.As long as the training plug is in the
vacuum, it will learn or recognize all
wireless start modules.
7.When training is complete, remove
the training plug.
The vacuum can also be reset back to
factory defaults by executing the following
reset procedure. In factory default mode,
the vacuum does not recognize any
wireless start modules. The first time
the vacuum receives a wireless signal,
it will automatically recognize that and
only that device.
Wireless reset procedure:
1.Turn the vacuum off. (0 on the switch)
2.Insert the training/reset plug.
3.Press the red button in on the
training/reset plug.
4.While holding in the red button,
switch the vacuum to the automatic or
II position. When the vacuum turns on, it
has been reset.
5.Turn the vacuum off, and remove the
training/reset plug.
After resetting the vacuum, all previously
recognized devices will need to be retrained
according to the above training procedure.
One Wireless Start module controlling
multiple vacuums:
It is possible for one wireless start module
to control multiple vacuums. To do this,
reset both vacuums, activate the remote
start module so it starts transmitting,
then turn the vacuums on. They will be
trained to the first wireless signal received.
If this condition is not desired, reset both
vacuums and train them to individual
wireless start modules.
Multiple Vacuum and Multiple
Wireless Start Modules:
It is possible for each vacuum to recognize
16 unique modules. This can be achieved
by systematically training one vacuum with
associated wireless start modules, then
moving on to the next vacuum. Care must
be taken when training multiple vacuums
to ensure that only one vacuum is being
trained at a time along with only one
wireless start module being activated
at a time.
Model 16009 training/reset procedure:
To reset:
1.Turn the unit off.
2.Place a paperclip into the small hole on the
left side of the vacuum top until a small
detent is felt.
3.Turn on the unit with the reset/training
switch depressed.
The unit will now be in the factory shipped
state with no trained devices.
To train:
1.Turn the unit on.
2.Place a paperclip into the small hole on the
left side of the vacuum top until a small
detent is felt. Hold the switch in the
depressed position.
3.Send a wireless signal to the unit from a
remote ToolSync device.
Once the vacuum turns on, it is permanently
trained to that device.
As long as the button is pressed, up to 16
devices can be associated with the vacuum.
Warning: Don't push too hard or the
reset/training switch can be damaged.
Warning: The reset/training switch is just
inside the plastic wall, don't push a paperclip
too far into the unit or damage to the unit or
possible electrocution could result.
This device complies with Part 15 of the
FCC Rules. Operation is subject to the
following two conditions: (1) this device
may not cause harmful interference, and
(2) this device must accept any interference received, including interference that
my cause undesired operation.
TROUBLE SHOOTING GUIDE
Problem
Possible Cause
Possible Solution
Cleaner won’t run
Not firmly plugged in
No voltage in wall plug
Blown fuse/tripped breaker
Plug in unit firmly
Check fuse or breaker
Replace fuse/reset breaker
Loss of suction
Obstruction in hose in place
Coated primary filter
Coated secondary filter
Clean obstruction
Clean Filter with cleaning agitator rod
Remove primary filter and replace/launder both filters
Hole/split in hose
Tank is full
Unit tipped over
Micro Prefilter is full
Inspect and replace hose
Empty tank of waste
Put unit in upright position
Dispose of filter and debris.
Using Agitator Rod
does not clean filters
(Non-HEPA vacuum)
Too much debris around the primary filter
Both filters plugged
Empty debris from intermediate cover and tank
Replace or launder both filters.
Filters get wet
Drain cap not sealed
O-ring on drain cap not in place
Debris not emptied from tank before use
Tighten drain cap
Replace o-ring
Empty tank and intermediate cover of waste
**Always dry filters thoroughly before continued use
Unit blows dust
Filters not in place
Hole in filter/s
Secondary filter not in place
Primary filter not in place
Check filters
Check/replace filters
Check secondary filter
Check primary filter
TOOLSYNC TROUBLE SHOOTING GUIDE
Problem
Possible Cause
Possible Solution
Tool will not start when
plugged into vacuum
Switch in wrong position
Switch must be in II or auto-start position
Vacuum will not start
when the tool starts
Tool draws too little current
Tool draws too much current
Make contract with work surface to draw more current
Use a remote start module
Wireless module will
not start vacuum
Module has not been trained for this vacuum
Go through training procedure
Wireless module lights are not
blinking when tool activates
Tool drawing too little current
Drawing plenty of current but still not transmitting
Make contract with work surface to draw more current
Try another tool, if unsuccessful contact customer support
ACCESSORIES AVAILABLE
Micro
Prefilter Bag
#13141
Set of 2
(not to scale)
Turbo Carpet
Head #13241
25'Hose & 2 Cuffs
Set #14291
HEPA Filter
#13201 for #16006 and
16011 Vacuums HEPA
Vacuum only
Cu t A
lon
Round Wire Brush
Tool #14113
gA
2 Cuff Adaptor
Package #14191
Pole Sander
#50001
ppro
p
ria
i
te C
rcle
www.dustlesstechnologies.com
OUT
Filter Package
#13001
BitBuddie
Numerous item #’s available,
see our web page at
www.dustlesstechnologies.com
FCC ID: WP7DUSTWDV1
This device complies with part 15 of the FCC rules.
Operation is subject to the following 2 conditions:
(1) This device may not cause harmful interference. and
(2) This device must accept any interference received,
including interference that may cause undesired operation
Dustie
Numerous item #’s available,
see our web page at
www.dustlesstechnologies.com
Wire Brush Tool
#14112
ToolSync Reset/Training
plug #D5260
Wireless Tool Start Air Adapter
Model D5255
Made in USA
Model D5250
Made in USA
IN
Wireless Tool Start Adapter
www.dustlesstechnologies.com
DustBuddie
Numerous item #’s available,
ChipBuddie
see our web page at
#61001
www.dustlesstechnologies.com
ToolSync Electric Adapter ToolSync Air Adapter
#D5255
#D5250
7
Parts List
Key
Part No.
04503
1
2
01154
2a
01153
3
11431
3a
11432
4
91421
4a
91424
5a
91445
6a
44035
7
91181
8
11301
9
91321
10
91511
11
91574
12
11121
13
11221
Wet/Dry Vacuum
14
91161
15
11151
16
91173
17
13111
18
93131
19
13501
20
13101
21
93121
HEPA Vacuum
14H
13200
15H
91523
16H
13201
17H
13301
18H
13301
19H
91522
20H
94521
21H
93141
22
15101
13
11221
23
15121
24
15111
25
12501
26
12101
27
12111
28
12301
29
12311
30
12321
31
12121
32
12131
34
14131
35
14121
36
14110
37
18501
38
18511
39
91523
40
14251
41
91533
Qty.
11
Description
1
1
1
1
1
1
1
1
1
1
1
1
2
4
1
3
Brass Agitator Rod Cover
Motor Cover
Motor Cover (ToolSync Model)
Electric Cord
Electric Cord (ToolSync Model)
On/Off switch
On/Off switch (ToolSync Model)
ToolSync Outlet
ToolSync PCB (with connecting wires)
Motor hold down tab (Not shown)
Motor
Pink Connector (Not shown)
Hex Head Screws (Not shown)
2” Screws
Vac Lid
Lid Clamps
4
1
4
1
1
1
1
1
Springs
Cage
Silver Shoulder Screws
Secondary Filter
7" Hose Clamp
Filter Support with Agitator Rod
Primary Filter
10" Band Clamp
1
8
1
1
1
1
1
1
1
4
1
1
1
1
1
2
2
4
1
1
2
1
1
1
1
1
1
3
Crosspiece
Black Pan Head Screws
HEPA Filter
HEPA Filter Cover Support
Rubber Washer
Wing Nut
HEPA Filter Cover
HEPA 10" Band Clamp
Intermediate Cover
Lid Clamps
Float Ball
Float Ball Basket
Accessory Tray
Barrel
Barrel Intake Port
Front Legs (smooth)
Back Legs (w/hooks)
Casters & Stem
Drain Cap
Drain Cap O-Ring
Extension Wands
Crevice Tool Accessory
W/D Floor Tool Accessory
Owner’s Manual (not illustrated)
Warranty Card (not illustrated)
3/8” Black Pan Head Screws
12’ x 11/2” Hose
9/16”Black Pan Head Screws
2a
3
1
2
5a
4
4a
8
12
13
14H
14
15H
15
16
16H
17
18
17H
19
18H
19H
20H
20
21
22
13
23
41
25
24
26
27
28
29
32
8
31
39
30
40
36
35
Service
To obtain approved Dustless Technologies service and parts, call: 1-800-568-3949.
Please reference: Part Number, Description, Model Number, Name of Unit.
Phone (435) 637-5885 • Fax (435) 637-5895 • www.dustlesstechnologies.com
6a
39
34
DUSTLESSTM WET/DRY VACUUM
HEPA VACUUM, AND TOOLSYNCTM
TOOL ACTIVATED VACUUM
OWNER’S MANUAL
CONGRATULATIONS: You are now the owner of a DustlessTM
Wet/Dry Vacuum which incorporates the latest advancements
in wet/dry dust removal technology. This vacuum is engineered
to eliminate the dust that has been a problem for so many
years with wet/dry vacuums almost from their inception. This
vacuum is different from anything in its category.
Once again CONGRATULATIONS
Model’s 16003, 16006,
16010, & 16011
16 Gallon
This cleaner was inspected and
packaged carefully before being
shipped from the factory.
If you should happen to need
assistance during assembly or
operation, call 1-800-568-3949
for our customer service department.
Serial Number __________________________
Model Number _________________________
Model and serial numbers are found on the
side of the motor cover. You should record both
model and serial numbers in a safe place for
future use.
FULL ONE-YEAR WARRANTY
ON DUSTLESSTM WET/DRY VACUUMS
If within one year from the date of purchase, this DustlessTM Wet/Dry
Vacuum fails due to a defect in material or workmanship, Dustless
Technologies will repair or replace it, free of charge. Please note that
this warranty is limited to and applies only to the original purchaser “For
Household Use Only,” “POUR USAGE ME’ NAGER TYPE MENAGER”, so
long as that use is in accordance with instructions and limitations set out
in this manual.
If this DustlessTM Wet/Dry Vacuum is used for commercial or rental
purposes, this warranty coverage applies for 90 days from date
of purchase.
Warranty registration - Please fill out and return the warranty
registration card accompanying your cleaner. Proof of purchase date
will be needed for warranty work.
Obtaining Warranty Service - Warranty Service is available by simply
contacting the factory at 1-800-568-3949.
800.568.3949
1285 East 650 South
Price, Utah 84501
dustlesstechnologies.com
This warranty gives you specific legal rights, and you may also have
other rights which vary from state to state. There are no warranties,
express or implied, written or verbal, which extend beyond the
description in this manual.
NOTE: This equipment has been tested and found to comply with the limits for a Class B digital
device, pursuant to Part 15 of the FCC Rules. These limits are designed to provide reasonable
protection against harmful interference in a residential installation. This equipment generates,
uses and can radiate radio frequency energy and, if not installed and used in accordance with
the instruction. Many cause harmful interference to radio communications. However, there is no
guarantee that interference will not occur in a particular installation.
If this equipment does cause harmful interference to radio or television reception, which can be
determined by turning the equipment off and on, the user is encouraged to try to correct the
interference by one or more of the following measures:
• Reorient or relocate the receiving antenna.
• Increase the separation between the equipment and receiver.
• Connect the equipment into an outlet on a circuit different from that to which
the receiver is connected.
• Consult the dealer or an experienced radio/TV technician for help.
CAUTION: Any changes or modification not express approved by Dustless Technologies, Inc. could void the user authorization to operate this equipment.