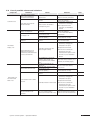
1
UPONOR
U N D E R F LO O R H E AT I N G
UPONOR CONTROL SYSTEM
RADIO
9416-054-10 / IOM- V_07-02
Uponor Control System
Radio
Installation Manual
Controller and Thermostats, UK, IRL
In keeping with our policy of continuous improvement and development,
Uponor reserves the right to change specifications without prior notice.
U p onor Hou si ng Solu t ions Lt d.
S n a peth or pe Hous e
R u g by Road
L u t ter w or th
Le i ces ter s hi re
L E 17 4 HN
T
F
W
E
U p onor Centra l Eu ro pe
P O B ox 1 6 4 1 (In dus trie st ra sse 56)
D - 9 7 4 3 3 Has s fu r t
T +49 ( 0) 9 5 2 1 6 9 0 0
F +49 ( 0) 9 5 2 1 6 9 0 1 5 0
W w w w.up o no r.d e
U p onor N ordi c
P O B ox 1 0 1
S E - 7 3 0 6 1 Vi r s bo
T
F
H S South, West
A re a m anag em ent
Upo nor Hi s pan i a S . A.U.
Calle C, n° 24
Po l í gono Indus tr i al n °1
E - 28 9 3 8 Mó s tol es (M a drid)
T +34 91 6 8 5 3 6 0 0
F +34 91 6 4 7 3 2 4 5
W w w w.up o no r.e s
U p onor Cor pora ti on
Ro ber t Huber i n ti e 3 b
P. O. Box 3 7
F I - 01 5 1 1 VAN TAA
T
F
+44 ( 0) 1 4 5 5 5 5 0 3 5 5
+44 ( 0) 1 4 5 5 5 5 0 3 6 6
w w w.up o no rho us in g s o lutio ns .co .uk
hse nqu irie s @ u p o no r.co .uk
+46 22 3 3 8 0 0 0
+46 22 3 3 8 1 0 1
+358 ( 0)2 0 1 2 9 2 1 1
+358 ( 0)2 0 1 2 9 2 8 4 1
Table of contents
1. General recommendations and explanations .................................................................................................... 4
2. The Uponor Control System .............................................................................................................................. 5
2.1 Example of a system...................................................................................................................................... 5
2.2 Uponor Control System components................................................................................................................. 5
3. Installation ....................................................................................................................................................... 6
3.1 Preparation before installation ......................................................................................................................... 6
3.2 Installation of the components ........................................................................................................................ 6
3.2.1 Mounting the antenna............................................................................................................................ 6
3.2.2 Mounting the controller.......................................................................................................................... 7
3.3 Connections.................................................................................................................................................. 8
3.3.1 Controller description ............................................................................................................................ 8
3.3.2 Connecting the antenna to the controller.................................................................................................. 8
3.3.3 Connecting the actuators to the controller ................................................................................................ 8
3.3.4 Installation of the options ...................................................................................................................... 8
3.3.5 Connecting the controller to the mains................................................................................................... 10
3.4 Room thermostats ....................................................................................................................................... 10
3.4.1 Mark room thermostats ....................................................................................................................... 11
3.4.2 Insert batteries................................................................................................................................... 11
3.4.3 Register room thermostats ................................................................................................................... 11
3.4.4 Mount the room thermostats ................................................................................................................ 12
3.4.5 Thermostat setup................................................................................................................................ 14
3.4.6 Mark the external sensor thermostats .................................................................................................... 14
3.4.7 Insert batteries................................................................................................................................... 14
3.4.8 Connect the sensor and put switch on right position ................................................................................ 14
3.4.9 Register external sensor thermostats..................................................................................................... 14
3.4.10 Cancelling the registration of a channel ................................................................................................ 14
3.4.11 Mount external sensor thermostats...................................................................................................... 14
3.4.12 Set min and max temperature for floor sensor ...................................................................................... 14
3.4.13 Close the thermostats........................................................................................................................ 14
3.4.14 Carry out communication test ............................................................................................................. 14
3.5 External sensor thermostats ......................................................................................................................... 14
3.5.1 Introduction ....................................................................................................................................... 14
3.5.2 Registration and marking ..................................................................................................................... 14
3.5.3 Wiring ............................................................................................................................................... 15
3.5.4 Floor sensor setting............................................................................................................................. 15
3.5.5 Finishing the registration of the thermostats ........................................................................................... 15
3.6 Testing the communication between the thermostats and the controller .............................................................. 16
3.6.1 Testing the communication between the room thermostats and the controller ............................................. 16
3.6.2 Testing the communication between the external sensor thermostats and the controller ............................... 16
3.7 Finishing the installation ............................................................................................................................... 16
3.8 Actuators test ............................................................................................................................................. 16
3.9 Resetting.................................................................................................................................................... 17
3.9.1 Cancelling the registration of a channel.................................................................................................. 17
3.9.2 Resetting the system........................................................................................................................... 17
4.
5.
6.
7.
Troubleshooting ............................................................................................................................................. 18
Installation report ...................................................................................................................................fold-out
Technical data .........................................................................................................................................fold-out
Wiring diagram / Controller description ..................................................................................................fold-out
Uponor Control System - Installation Manual
3
1. General recommendations and explanations
Safety measures
• Read and follow the instructions.
Power supply
WARNING
• Installation must be performed by a qualified person
according to local regulations.
• The Uponor Control System uses a 230VAC
50Hz power supply.
• It is prohibited to make changes or modifications not
specified in this manual.
• In case of emergency, immediately disconnect
the plug from the 230V mains.
• Power must be switched off when carrying out the wiring.
• Do not use water to clean the Uponor Control
System.
• We decline any responsibility concerning damages and
breakdowns that may result from the non-observance of
these instructions!
• Do not expose the Uponor Control System to
flammable vapors or gases.
Symbols used in this manual
Limitations for radio waves
WARNING
Risk of bodily injuries or squeezing.
Non observance may harm health or cause damage
to product components.
STOP
CAUTION
Important note on functionality. Non observance of
this note may cause malfunctions.
Information.
Important operating advice and information.
See another document.
99
See another page in the manual.
The Uponor Control System uses radio waves. The
frequency used is reserved for similar applications
and the chances of interference from other radio
sources is very low. However, in some rare special
cases, it may not be possible to establish a perfect
communication. The transmission range is sufficient
for most applications, but each building has
different obstacles affecting communication and
maximum transmission distance. If communication
trouble exists, Uponor can support the system with
accessories, such as repeaters, for solving the
exceptional problems.
Technical constraints
Extended function with the interface.
• Keep installation/data cables away from power
cables > 50V to avoid interference.
➜
Result of an action.
>
Press button.
• The electrical circuits of the boiler and the
pump must be protected by a maximum
6A circuit-breaker.
LED off.
LED on.
LED blinks.
LED flickers.
4
Underfloor Heating
2. The Uponor Control System
The Uponor Control System is a complete management for
underfloor heating systems. Comfort, user-friendliness and
temperature control for each room can be combined through
the different components. The controller Installation and
Operation Manual allow an optimum installation and setting.
An ergonomic interface can be added in order to facilitate the
setting and optimize the management. If your system is
equipped with an interface, see interface Installation and
Operation Manual.
2.1
2.2
Uponor Control System components
Example of a system
Uponor Control System
designation
Uponor
Thermostat Display T-75
Item
Uponor
Thermostat Mounting
Kit for T-75
Description
Mark
1
Thermostat Display T-75
2
Thermostat T-55
3
Thermostat Public T-53: This thermostats can be
used as a room thermostat or for a floor sensor.
4
Thermostat Public T-53 with floor sensor
5
Controller C-55
6
Antenna for Controller C-55
The floor sensor can be used for maximum or
minimum limitation of the floor temperature,
regardless of the room temperature.
Uponor
Thermostat T-55
1
Thermostat Display T-75
2
Fastening screws
3
Batteries
4
Table stand
5
Wall bracket
2
Fastening screws
6
Adhesive strip
7
Thermostat T-55
2
Uponor
Thermostat Public T-53
6
Batteries
8
Thermostat Public T-53
6
Batteries
9
Controller C-55
Bag with fastening screws and
6 adhesive strip
10
Antenna
11
Connection cable for antenna,
length 0.3 m
Connection cable for antenna,
length 3 m
Installation and Operation
Manual
12
13
14
15
Uponor Control System - Installation Manual
Bag with fastening screws and
adhesive strip
3
2
Uponor
Floor sensor
Bag with fastening screws and
adhesive strip
3
2
Uponor
Controller C-55
Description
Floor sensor
Instruction (for floor sensor)
5
3. Installation
Installation steps
3.2
Uponor recommends that you follow the steps described
below to guarantee the best possible installation:
3.2.1
Description
3.1
Preparation before installation
3.2
Installation of controller and antenna
3.3
Connection of components to controller
(Actuators, pump, H/C relay)
3.4
Registrations and mounting of room thermostats
3.5
Registrations and mounting of external sensor
thermostats
3.6
Testing the communication between the
thermostats and the controller
3.7
Finishing the installation
3.1
Installation of the components
Mounting the antenna
Decide if the antenna are to be mounted on the back of the
controller or on the wall.
Preparation before installation
Before beginning the installation:
Metal cabinet
• Verify the contents of the package with the list shown in
Section 2 to make sure you have all the necessary
components;
• Check whether a floor sensor has been mounted;
STOP
If the controller is installed inside a metal cabinet,
the end of the antenna or the whole antenna must
be outside the cabinet.
• Study the wiring diagram in the fold-out or inside the
controller cover.
Clip the antenna at the back of a controller
Study the drawings of the underfloor heating system. If the
locations of the controllers and thermostats are not specified,
determine the best positions:
• A controller with antenna should be installed close to
each manifold;
• A power outlet is required for the connection of the
controller to the mains;
6
1
Use 0.3 m antenna cable
• The mounting locations for the Uponor Control System
must be protected from running and dripping water;
2
Connect the RJ 9 connector into the antenna
• Use one thermostat for every room with underfloor
heating.
3
Clip the antenna into the controller
4
Run the cable of the antenna into the hole of the
controller
➜
Connect to terminals 9 and 10
Underfloor Heating
Screwing the antenna onto a wall
3.2.2
Mounting the controller
• Position the controller just above the manifold. Check
position of 230V socket.
• Check that the cover of the controller can easily be
removed.
• Check that the connectors and switches are easily
accessible.
STOP
1
Connect the RJ 9 connector into the antenna
2
Drill the wall (Ø6 mm)
3
Fix anchor and screw on the wall
Let the screw protrude from the wall (3 mm)
4
Hang the antenna on the screw
The controller has to be mounted horizontally.
There is a risk for overheating if the controller is
mounted vertically or on a horizontal surface.
Sticking the antenna onto a wall
1
Drill the wall (Ø6 mm)
2
Press the anchor into the hole
3
Attach the controller to the wall with screws
Use the double sided adhesive strip to fix the
antenna on a smooth wall such as glazed ceramic
tiles.
1
Connect the RJ 9 connector into the antenna
2
Stick the antenna on the wall
Uponor Control System - Installation Manual
7
3.3
Connections
99
3.3.1
Correct installation:
See wiring diagram in the fold-out.
Controller description
Description
Mark
1
Terminal block for connection of antenna and
options
2
Interface RJ 9 connector
3
Push-button and LED from 01 to 12 for channel
registration
4
Test push-button and LED
5
Quick connectors for the actuators
6
Socket for the connection of the data stick
7
Power LED
8
230VAC 50Hz compartment
3.3.2
Thermostat Display #01 controls channels 01a,01b
and 02a,02b,
External sensor thermostat #01 communicates the floor
temperature to the controller,
Thermostat Display #03 controls channels 03 and 04.
...
Connecting the antenna to the controller
(Only if the antenna is mounted on the wall)
Remove plastic part at the cable entrance on the side of the
controller. Pull cable under the strain release and connect to
terminals 09 and 10 (symbol
3.3.3
STOP
Connecting the actuators to the controller
Identify what room each loop on the manifold is
supplying and decide which channel it should be
connected to.
Example installation:
Each thermostat can control any desired channel,
one or several. It simplifies installation and
maintenance if actuators controlled by the same
thermostat are wired to channels in sequence.
8
: Radio / Program connection
: Cable connection
, non polarized).
3.3.4
Installation of the options
Systems with interface, please see the interface
Manual.
WARNING
Mains supply 230VAC 50Hz
Disconnect the 230V mains before installing or
changing the device wiring.
Using an interface with this system allows increased
management possibilities.
Underfloor Heating
Controller heating / cooling input
WARNING
Do not apply voltage to the controller heating /
cooling input. Damage to the Uponor Control
System will occur.
Circulation pump relay
The Uponor Control System can operate a circulation pump
on heating/cooling demand. The controlled use of a
circulation pump improves the efficiency and responsiveness
of the underfloor heating.
Example of an installation:
Should your system include a cooling unit, it is possible to
manage the Uponor Control System with the help of a
heating / cooling switch input.
The contact may be operated in different ways: timer,
ancillary control system, 2 position switch.
The heating / cooling input operates with the connection of a
dry contact.
• When the contact of the relay is open, the system is in
heating mode.
• When the contact of the relay is closed, the system is in
cooling mode.
WARNING
See the circulation pump supplier documentation
before performing the connection.
The controller controls the circulation pump via connection on
terminal block (dry contact).
1
Heating / cooling relay
2
Heating / cooling contact
3
Controller heating / cooling input (potential free dry
contact)
4
Example of different type of heating / cooling relay
input
See the heating / cooling relay documentation.
1
Ensure the power is disconnected
2
Open 230V compartment and fix cover to hanger
3
Connect "L" wire from/to pump via relay
4
Close 230V compartment
The electrical circuits of the pump must be
protected by a maximum 6A circuit-breaker.
Uponor Control System - Installation Manual
9
3.3.5
Connecting the controller to the mains
3.4
Room thermostats
The Uponor Control System may be controlled with the help
of three types of thermostats. These may be used separately
or together:
Thermostat Display T-75:
1
Check that the wiring is complete (Actuators,
Antenna)
2
Check that the 230V compartment is closed
3
Connect the plug to the mains
Thermostat T-55:
Thermostat Public T-53:
10
Underfloor Heating
3.4.1
Mark room thermostats
• Type of batteries for the thermostats:
2x Alkaline AAA 1.5V. Respect the polarity.
• Mark the thermostats with the channel numbers
they are to control e.g. 02, 03. For a system
with an interface and several controllers the ID
of the controller has to be added e.g. 1.02,
1.03, 2.02, 2.03.
4
Using a point, press the registration button of the
thermostat for at least 5 seconds.
For Thermostat Display T-75:
• The temperature is replaced by 2 lines
• When the temperature appears again the button
can be released
For Thermostat T-55 and Thermostat Public T-53:
• The LED of thermostat blinks one time only
If registration is successful the LEDs of channels 02
➜
and 03 switches on after 10 s
.
If channel registration fails (the channel LEDs
continues to flash or switch off), follow steps 2 to 4
once more.
5
Register all room thermostats
6
Press Test push-button to end the registration process
➜
The Test LED switch off.
LED
LED status
LED on
LED flash
LED off
3.4.2
To cancel registration of a channel and to reset the
controller: see: "3.9 Resetting", page: 17.
Wrong registration of the channels will cause bad
temperature control.
Insert batteries
See: controller Operation Manual
3.4.3
Register room thermostats
Example of registration: thermostat placed in a room, with
3 loops connected to channels 02 and 03.
1
Press the Test push-button
➜
The Test LED lights up
2
➜
3
.
Press the push-buttons of channels 02 and 03
The LED of channels 02 and 03 flash
.
Uponor Control System - Installation Manual
11
Room with floor sensor
The floor sensor has to be connected to a
Thermostat Public T-53. This thermostat has to be
registered to the same channel as the room
thermostat, but can be mounted elsewhere.
The room thermostat must be registered to the
controller before the sensor thermostat. See: "3.5
External sensor thermostats"
Example of installation:
Thermostat Display #01 controls channels 01a,01b
and 02a,02b,
External sensor thermostat #01 communicates the floor
temperature to the controller,
Thermostat Display #03 controls channels 03 and 04.
...
3.4.4
Mount the room thermostats
If no external sensors are used, go to "3.4.13 Close
the thermostats".
3.4.4.1 Location of a thermostat
(For all thermostats)
• On an indoor wall.
• 1.5 m to 1.8 m from the floor.
• Away from any source of humidity.
• Away from any source of heat (television, electronic
equipment, fireplace...).
• Away from direct solar sunshine.
• Away from direct water splashes.
Uponor Wall frame can be used to hide marks on the
wall or the box if needed.
3.4.4.2 Thermostat fixation
There are various solutions to fix the thermostat :
• Fixing on the wall using a screw;
The Thermostat Display T-75 #01 controls the room
temperature.
The Thermostat Public T-53 #01 has been added in order to
provide the room with a floor sensor.
• Fixing on the wall using the bracket (option);
• Using the thermostat table stand (option).
It is possible to display the measured floor
temperature if your system is fitted with an
interface.
12
Underfloor Heating
Thermostat Display T-75
Let the screws protrude 3 mm from the wall.
or
Fix the bracket on the wall (option).
Hang the thermostat on the screw or on the bracket.
Installation using the thermostat table stand (option):
Insert the metal stand in the appropriate holes at the back of
the thermostat.
Fix the bracket on the thermostat to lock in place the table
stand.
Thermostat T-55 and Thermostat Public T-53
Removing the Thermostat Display T-75 from the optional
bracket.
Screw the thermostat on the wall or/and on the box.
Sticking onto a smooth wall:
Use the double sided adhesive strip to fix the thermostat on a
smooth wall such as glazed ceramic tiles. Use optional
bracket for Thermostat display T-75.
Uponor Control System - Installation Manual
Sticking onto a smooth wall:
Use the double sided adhesive strip to fix the thermostat on a
smooth wall such as glazed ceramic tiles.
13
3.4.5
99
Thermostat setup
3.5
External sensor thermostats
See Operation Manual for thermostat min/max and
room temperature settings.
3.5.1
For more information on external sensor settings:
See: "3.5 External sensor thermostats", page: 14.
The Thermostat Public T-53 allows a floor or outdoor sensor
to be fitted to the system.
Introduction
Configuration switches
3.4.6
99
3.4.7
Mark the external sensor thermostats
See: "3.4.1 Mark room thermostats", page: 11.
The Thermostat Public T-53 has a terminal to permit the
connection of different type of sensors.
The switches has to be set according to the type of sensor
used.
Insert batteries
See: controller Operation Manual.
3.4.8
99
3.4.9
99
Connect the sensor and put switch on right
position
See: "3.5 External sensor thermostats", page: 14.
Register external sensor thermostats
See: "3.4.3 Register room thermostats", page: 11.
3.4.10 Cancelling the registration of a channel
99
1
Floor sensor
2
Outdoor sensor
3
(No used)
4
(No used)
See: "3.9 Resetting", page: 17.
Only one of the four switches must be on. When the
thermostat is used as a room thermostat all
switches should be off. If more than one switch is
on: the LED flickers. It stops flashing when only one
switch is on, or none at all.
3.4.11 Mount external sensor thermostats
99
See: "3.5 External sensor thermostats", page: 14.
3.5.2
3.4.12 Set min and max temperature for floor sensor
See: "3.5.4 Floor sensor setting", page: 15.
3.4.13 Close the thermostats
See: controller Operation Manual, page: 10.
99
Registration and marking
The registration procedure for a Thermostat
Public T-53 fitted with a floor or outdoor sensor is
similar as that followed for room thermostats. See:
"3.4.3 Register room thermostats", page: 11.
Marking the Thermostat Public T-53 is carried out in
the same way as with the room thermostat, but
add information floor or outdoor.
See: "3.4.6 Mark the external sensor thermostats",
page 14.
3.4.14 Carry out communication test
99
14
See: "3.6 Testing the communication between the
thermostats and the controller", page: 16.
Underfloor Heating
3.5.3
Wiring
It is possible to display the measured floor
temperature if your system is fitted with an
interface.
3.5.5
99
1
3.5.4
Finishing the registration of the thermostats
The procedure for completing the registration of a
Thermostat Public T-53 fitted with a floor or outdoor
sensor is the same as that followed for room
thermostats. See: "3.4.3 Register room
thermostats", page 11.
Connect cable from the floor or outdoor sensor (nonpolarized)
Floor sensor setting
Floor sensor
The limitation of the floor temperature is adjusted with a
potentiometer.
The temperature is set on the minimum or the maximum
range of the potentiometer. So the Thermostat Public T-53
allows to have a minimum or a maximum floor limitation.
The Thermostat Public T-53 sends the external sensor values
to the controller:
• The floor temperature.
• The minimum or the maximum limitation temperature.
1
Select the required temperature with the
potentiometer
Uponor Control System - Installation Manual
15
3.6 Testing the communication between
the thermostats and the controller
3.6.1
Testing the communication between the room
thermostats and the controller
3.6.2
Testing the communication between the
external sensor thermostats and the controller
The procedure for testing a Thermostat Public T-53 fitted with
an outdoor sensor is the same as that described under "3.6.1
Testing the communication between the room thermostats
and the controller".
Where two thermostats are connected to the same
channel, the procedure described under "3.6.1
Testing the communication between the room
thermostats and the controller" must be carried out
fully and separately for each thermostat.
3.7
1
➜
Press the Test push-button
The Test and channel LEDs with registered
thermostats light up
2
➜
Finishing the installation
Using a point, briefly press the registration button of
the thermostat
• Communication OK -> LED for the channels
registered to the thermostat switch off
• NO Communication -> LED for the channels
registered to the thermostat stay on
Make a complete check up of the installation :
1
• Verify that the antenna is correctly mounted
• Check if the thermostats are powered
2
Close the cover of the controller
Close the thermostat covers where necessary
3
Fill in the "Installation report" on the centre
pages of booklet
4
Give the manual and all information about the system
to the end user
See: "4. Troubleshooting", page: 18
3
To exit the Test mode, press the Test push-button
3.8
Alternative: Thermostat Display T-75:
Use the +/- keys of the thermostat to switch
between high and low temperatures and make sure
that the LED of the channel continues changing.
Alternative: Thermostat T-55:
Use the control dial of the thermostat to switch
between high and low temperatures and make sure
that the LED of the channel continues changing.
16
1
Actuators test
Press the button of the selected channel
• The LED lights up: the actuator is powered
(time for actuator opening is ~ 5 min).
➜
• The LED does not light up.
See: "4. Troubleshooting", page: 18.
2
Press the Test button twice to end the actuator test (or
wait 10 min)
Underfloor Heating
3.9
3.9.1
1
➜
Resetting
3.9.2
2
➜
If there are problems with thermostat linking, thermostats
mixed up, bad channel registration, etc, the system can be
reset.
Cancelling the registration of a channel
• For the controller, press the Test button for 10 s. The
Test LED flashes for at least 2 s, then all LED go off
(except the POWER LED). All parameters are erased.
New installation / registration after reset is necessary.
Press the Test push-button
The Test and channel LEDs with registered
thermostats light up
.
Press the push-button of the channel that is to be
cancelled for 10 s
The LED of the channel cancelled flashes
then switches off
for 2 s
.
3
Press the Test push-button to leave registration mode
➜
The Test LED switches off
STOP
Resetting the system
.
In order to register a different thermostat to a
channel, you first have to cancel the existing, not
desired registration of this thermostat.
• Pressing briefly the reset buttons is sufficient for the
thermostats. New installation / registration after reset is
not necessary.
Uponor Control System - Installation Manual
17
4. Troubleshooting
Normal system operating conditions:
The Power LED of the controller is lit up. All the channel LEDs are off if there is no demand for heating or cooling. The LEDs
light up when the corresponding actuators are activated. While on stand-by, waiting for the actuators to be activated, the LEDs
flash.
LED of Thermostat T-55 and Thermostat Public T-53:
- LED blinks one time only with each transmission.
- LED blinks twice for low batteries.
- Only for Thermostat Public T-53: LED flickers if several switches are in ON position.
Failure
the system does not
start
bad radio reception
Causes
Solution
power LED off in controller check that the controller is
connected to the mains and that
the wiring in the 230V
compartment is OK
cable breakdown
230V in socket but not in
230V compartment
replace cable and plug
repeated radio alarms
change the location of the
antenna (if the problem still is
remaining, contact your installer
for help checking the radio
transmission and test with
repeater for radio signals)
antenna mounted inside
metal cabinet or too close
to other shielding objects
■ building structure
unfavorable for radio
transmission
■
18
Indication
no voltage
See
Underfloor Heating
Use of quick connectors:
0682
Declaration of conformity:
We hereby declare under our own
responsibility that products dealt with by
these instructions satisfy all essential
demands linked to the R&TTE 1999/5/CE
Directive dated March 1999.
Usable in all Europe
Press, without turning, with a thin screwdriver on
the white button of the terminal to insert or
remove a wire
Insert a wire in the quick connector
Remove the screwdriver from the white button
Run the cable in the cable guides to block it in
secure
Screw clamp to secure the cable of antenna or/and
extension
1
2
3
4
5
Controller
■ CE marking:
- Low Voltage Tests: EN 60730-1* and EN 60730-2-1**
- EMC Tests: EN 60730-1 and EN 301-489-3
- ERM Tests: EN 300 220-3
■ Power supply: 230VAC +10/-15% 50Hz
■ Operating temperature: 0°C to +55°C
■ Storage temperature: -20°C to +70°C
■ Consumption: 70 W in full charge max
■ Pump relay output: 230VAC +10%/-15%, 250VAC μ 2A max
■ Heating/cooling input: Only Dry contact
■ Valve outputs: 24VDC ±10%, 436 mA max per output 1 and 2
24VDC ±10%, 218 mA max per output 3 to 12
■ Supply connection: EU - Plug 1 m cable, pre-mounted
■ Pump connection: wires 1.5mm² max
■ Heating / cooling connection: wires 1.5mm² max
* EN 60730-1 "Automatic electrical control to domestic use"
** EN 60730-2-1 "Particular Requirements for Electrical Controls for Electrical Household Appliances"
***EN 60730-2-9 "Specific rules for devices of thermo sensitive control"
Antenna
■ Power supply: 11VDC ±10% from Controller
■ Consumption: << 1W
■ Radio Frequency: 868.3 MHz
■ Transmitter Duty Cycle: 1%
■ Receiver Class: 2
Interface
■ CE marking:
- Low Voltage Tests: EN 60730-1 and EN 60730-2-1
- EMC Tests: EN 60730-1
■ Power supply: 11VDC ±10% from Controller
■ Operating temperature: 0°C to +55°C
■ Storage temperature: -20°C to +70°C
■ Consumption: 1W max
Thermostat
■ CE marking:
- Low Voltage Tests: EN 60730-1* and EN 60730-2-9***
- EMC (Electromagnetic compatibility requirements) Tests: EN 60730-1 and EN 301-489-3
- ERM (Electromagnetic compatibility and radio spectrum Matters) Tests: EN 300 220-3
■ Approval and certification:
- KNX: Konnex approval and certification
■ Power supply: 2x Alkaline AAA 1.5V
■ Voltage:2.2 V to 3.6 V
■ Operating temperature: 0°C to +45°C
■ Storage temperature: -10°C to +65°C
■ Radio Frequency: 868.3 MHz
■ Transmitter Duty Cycle: 1%
General
■ IP: IP30 (IP: degree of non-accessibility to the active parts of the product and degree of non-accessibility of water)
■ Max ambient RH (relative humidity): 95% max at 20°C.
Technical data
Description
Interface RJ 9 connector
Push-button and LED from 01 to 12 for channel
registration
Test push-button and LED
Quick connectors for the actuators
Socket for the connection of the data stick
Power LED
230VAC 50Hz compartment - Pump
3
4
5
6
7
8
Terminal block for connection of antenna and
extensions
2
1
Mark
Uponor Control System
2
Pump
Relay
Floor sensor
#1
controller number
No
Yes
No
Yes
230V
24V
Installation report
Channels
Rooms
#3
Pump
Floor sensor
Pump
Floor sensor
#2
controller number
option:
No
Yes
No
Yes
Channels
Underfloor Heating
Rooms
UPONOR
U N D E R F LO O R H E AT I N G
UPONOR CONTROL SYSTEM
RADIO
9416-054-10 / IOM- V_07-02
Uponor Control System
Radio
Operation Manual
Controller and Thermostats, UK, IRL
In keeping with our policy of continuous improvement and development,
Uponor reserves the right to change specifications without prior notice.
U p onor Hou si ng Solu t ions Lt d.
S n a peth or pe Hous e
R u g by Road
L u t ter w or th
Le i ces ter s hi re
L E 17 4 HN
T
F
W
E
U p onor Centra l Eu ro pe
P O B ox 1 6 4 1 (In dus trie st ra sse 56)
D - 9 7 4 3 3 Has s fu r t
T +49 ( 0) 9 5 2 1 6 9 0 0
F +49 ( 0) 9 5 2 1 6 9 0 1 5 0
W w w w.up o no r.d e
U p onor N ordi c
P O B ox 1 0 1
S E - 7 3 0 6 1 Vi r s bo
T
F
H S South, West
A re a m anag em ent
Upo nor Hi s pan i a S . A.U.
Calle C, n° 24
Po l í gono Indus tr i al n °1
E - 28 9 3 8 Mó s tol es (M a drid)
T +34 91 6 8 5 3 6 0 0
F +34 91 6 4 7 3 2 4 5
W w w w.up o no r.e s
U p onor Cor pora ti on
Ro ber t Huber i n ti e 3 b
P. O. Box 3 7
F I - 01 5 1 1 VAN TAA
T
F
+44 ( 0) 1 4 5 5 5 5 0 3 5 5
+44 ( 0) 1 4 5 5 5 5 0 3 6 6
w w w.up o no rho us in g s o lutio ns .co .uk
hse nqu irie s @ u p o no r.co .uk
+46 22 3 3 8 0 0 0
+46 22 3 3 8 1 0 1
+358 ( 0)2 0 1 2 9 2 1 1
+358 ( 0)2 0 1 2 9 2 8 4 1
Table of contents
1. General recommendations ................................................................................................................................ 4
2. The Uponor Control System .............................................................................................................................. 5
2.1 Overview of the system .................................................................................................................................. 5
2.2 Operating your installation.............................................................................................................................. 6
3. Thermostats ..................................................................................................................................................... 6
3.1 Changing the temperature format .................................................................................................................... 8
3.2 Changing the temperature setpoint .................................................................................................................. 8
3.3 Setting the min and max temperatures............................................................................................................. 9
3.4 Floor sensor settings ...................................................................................................................................... 9
3.5 Thermostat battery replacement.................................................................................................................... 10
4. System maintenance ...................................................................................................................................... 11
5. Diagnosis and resolution of alarms and faults ................................................................................................ 11
5.1 Normal system operating conditions: ............................................................................................................. 11
5.1.1 Controller .......................................................................................................................................... 11
5.1.2 Thermostat Display T-75...................................................................................................................... 11
5.1.3 Thermostat T-55 and Thermostat Public T-53 ......................................................................................... 11
5.2 Alarms ....................................................................................................................................................... 11
5.2.1 Controller .......................................................................................................................................... 12
5.2.2 Thermostat Display T-75...................................................................................................................... 12
5.2.3 Thermostat T-55 and Thermostat Public T-53 ......................................................................................... 12
5.3 Erasing the alarms....................................................................................................................................... 12
5.4 List of possible alarms and solutions .............................................................................................................. 13
5.5 List of possible failures and solutions.............................................................................................................. 14
6. Disposal of the product................................................................................................................................... 14
33 Uponor Control System - Operation Manual
3
1. General recommendations
Safety measures
• Read and follow the instructions.
Power supply
WARNING
• Installation must be performed by a qualified person
according to local regulations.
• The Uponor Control System uses a 230VAC
50Hz power supply.
• Don't make changes in hardware or software, send
damaged control devices to Uponor if they need to be
repaired.
• In case of emergency, immediately disconnect
the plug from the 230V mains.
• It is prohibited to make changes or modifications not
specified in this manual.
• Power must be switched off when carrying out the wiring.
• We decline any responsibility concerning damages and
breakdowns that may result from the non-observance of
these instructions!
Symbols used in this manual
WARNING
Risk of bodily injuries or pinching.
Non observance may harm health or cause damage
to product components.
STOP
CAUTION
Important note on functionality. Non observance of
this note may cause malfunctions.
Information.
Important operating advice and information.
99
• Do not use water to clean the Uponor Control
System.
• Do not expose the Uponor Control System to
flammable vapors or gases.
Limitations for radio waves
The Uponor Control System uses radio waves. The
frequency used is reserved for similar applications
and the chances of interference from other radio
sources is very low. However, in some rare special
cases, it may not be possible to establish a perfect
communication. The transmission range is sufficient
for most applications, but each building has
different obstacles affecting communication and
maximum transmission distance. If communication
trouble exists, Uponor can support the system with
accessories, such as repeaters, for solving the
exceptional problems.
Technical constraints
Reference to another document.
• Keep installation/data cables away from power
cables > 50V to avoid interference.
Reference to another page in the manual.
• The electrical circuits of the boiler and the
pump must be protected by a maximum
6A circuit-breaker.
Extended function with the interface
4
➜
Result of an action.
>
Press button.
Underfloor Heating
2. The Uponor Control System
The Uponor Control System is a complete management for
underfloor heating systems. Comfort, user-friendliness and
temperature control for each room can be combined through
the different components. The controller Installation and
Operation Manual allow an optimum installation and setting.
An ergonomic interface can be added in order to facilitate the
setting and optimize the management. If your system is
equipped with an interface, see interface Installation and
Operation Manual.
2.1
2
The thermostat is easy to use.
The temperature settings can be adjusted with
the help of a simple dial. The cover may be
removed to allow min/max temperatures to be
set.
The 21°C position is marked.
Overview of the system
The controller manages the operation of the actuators, when
required by the thermostats following a demand for heating
or cooling. It is possible to add an interface to centralize and
optimize the management of the system.
Thermostat T-55
3
Thermostat Public T-53
The thermostat is designed for public location.
An alarm is triggered as soon as the cover is
opened.
The button, switches and potentiometers are
all hidden by a cover. The cover may be
removed to allow min/max temperatures to be
set.
An external sensor can be connected.
4
The Uponor Control System may be controlled with the help
of three types of thermostats. Designed for maximum
comfort, the thermostats communicate with the controller
through radio waves. They may be used individually or in
combination with each other. They are fitted with the same
battery type for power supply.
The controller drives the actuators according to the setting
in the interface and the temperature information received
from the thermostats.
The controller is typically located near the hydraulic system
manifolds.
5
1
Thermostat Display T-75
The thermostat shows the ambient or set
temperature on its screen.
The thermostat is designed for operative
measurement, it is affected by temperature of
surrounding surfaces as well as the ambient air
temperature.
55 Uponor Control System - Operation Manual
Controller with antenna and actuators
Interface I-75
(possible option)
The interface gives you the opportunity to
centralize and optimize the management of the
system. The interface allows you to display and
update easier and faster the operating
parameters of the system.
The interface also displays the causes of any
alarms. It is simple and easy to use.
5
2.2
Operating your installation
The Uponor Control System controls your heating installation
according to your needs. You simply have to set the
temperatures you wish on the thermostats located in each
room.
3. Thermostats
Thermostat Display T-75
LCD display
Principle of operation:
The temperature setpoint is setting with the thermostats. The
order to change the temperature setpoint is controlled by the
controller. Is there a temperature deviation the actuator
opens or closes the valve, which varies the heat supply.
Default display
(Indication of room
temperature)
For more information on your system, please see to
the Installation Report in the fold-out.
Normal operation
When the system is running in normal mode:
• The Power LED is on (visible on the upper right side of
the controller cover),
1
LCD display
Display of temperatures and menus
Display of the temperature with a precision of 0.1°
• In Heating mode, in case of room temperatures lower
than the temperatures set on the thermostat, the
actuators are open.
Displayed when setting the temperature set point
• In Cooling mode, in case of room temperatures higher
than the temperature set on the thermostat, the
actuators are open.
Displayed during radio transmission
This can be seen in the small windows of the actuators.
Temperature format for the display
Low battery indication
6
2
Temperature sensor for optimum measurement of
ambient temperature
3
+ and - keys to set the thermostat parameters
4
Thermostat resetting push button
Underfloor Heating
Thermostat T-55
1
Room temperature setpoint dial control
2
Configuration button
3
Batteries
4
Radio transmission LED
5
Blue cam to set minimum temperature
6
Red cam to set maximum temperature
Thermostat Public T-53
1
Screw to open the thermostat
2
Terminal for external sensor (non-polarized)
3
Batteries
4
Set point temperature potentiometer
5
Configuration switches
6
Floor sensor potentiometer
7
Configuration button
8
Radio transmission LED
STOP
77 Uponor Control System - Operation Manual
CAUTION
Your thermostats are allocated by your installer to
precise rooms and locations. Any change of the
location may cause abnormal temperature control.
7
3.1
Changing the temperature format
Thermostat T-55
Thermostat Display T-75
1 Simultaneously press the + and - keys for 10 s
➜
The SEL menu is displayed.
2
Press + or - to change the temperature format (°C or
°F)
3 Wait for 5 s
➜
3.2
The thermostat returns to the default
display.
Changing the temperature setpoint
1 Rotate the dial to get a higher temperature set point
2
Thermostat Display T-75
You can avail of an energy-saving mode (ECO Mode)
if your system is fitted with a Thermostat
Display T-75 and an Interface I-75. This ECO Mode
may be activated from the interface menu and will
allow you to achieve significant energy savings.
Rotate the dial counter-clockwise to get a lower
temperature set point
Thermostat Public T-53
1 Press the + or - key
➜
The set point setting icon and the set point
value are displayed.
Press + or - to change the set point value
2 For °C, setting by 0.5°C steps
For °F, setting by 1°F steps
3 Wait for 5 s
➜
The radio transmission icon is displayed,
confirming that the set point has been
recorded and sent, and returns to default
display.
In order to set the temperature set point to its
default value of 22.0°C (72.0°F), briefly press the +
and - keys simultaneously.
8
1
Open the cover. See: "3.5 Thermostat battery
replacement"
2
Select the required temperature using the
potentiometer
Underfloor Heating
3.3
Setting the min and max temperatures
Thermostat Display T-75
The minimum and maximum temperatures (5° C
and 35° C) of the Thermostat Display T-75 are
pre-set. It is however possible to tailor these
temperatures to your system if it is equipped with
an interface.
Thermostat T-55
3.4
Floor sensor settings
If your system includes a floor sensor, a potentiometer fitted
behind the cover of the Thermostat Public T-53 allows you to
adjust the minimum or maximum temperature settings for
the floor.
The floor sensor can be used for maximum or minimum
limitation of the floor temperature, regardless of the room
temperature.
The maximum limitation can be used, for example, to prevent
a sensitive floor covering from exposure to a too high
temperature where there is a high heat demand. The
minimum limitation can be used, for example, to keep a tile
floor warm even when there is no general demand for heat
supply to the room.
1 Remove the dial with a screwdriver
Set the desired minimum temperature of the room with
the blue cam
2
Set the maximum temperature with the red
3 cam
The blue and red cam allow the minimum and
maximum set point to be set as a deviation from the
usual setpoint.
Example:
• The usual set point is 21°C
1
Select the required temperature using the
potentiometer
See controller Installation Manual for more
information.
• The setting of the blue cam is -10°C
➜
• The setting of the red cam is +5°C
The temperature range for this room is 11°C
to 26°C.
Thermostat Public T-53
It is not possible to set min/max temperatures using
the Thermostat Public T-53.
99 Uponor Control System - Operation Manual
9
3.5
Thermostat battery replacement
Installing the batteries
Type of batteries for the thermostats: 2x Alkaline
AAA 1.5V. Respect the polarity.
Opening the battery compartment or the cover
Closing the thermostat
10
Underfloor Heating
4. System maintenance
Regular checks on your system components are
recommended in order to optimize performance. This system
requires no maintenance, but every few years the batteries
5. Diagnosis and resolution
of alarms and faults
5.1
Normal system operating conditions:
are to be changed.
You have the possibility of centralizing and
optimizing the management of the system by
connecting an interface to the controller. The
interface allows you to display and update easier
and faster the operating parameters of the system.
The interface also displays the causes of alarms and
facilitates diagnosis.
5.1.1
The Power LED of the controller is lit up. All the channel LEDs
are off if there is no demand for heating or cooling. The LEDs
light up when the corresponding actuators are activated.
While on stand-by, waiting for the actuators to be activated,
the LEDs flash.
5.1.2
Thermostat batteries:
The thermostats are powered by batteries. Discharged
batteries must be replaced. See: "5.2 Alarms", page: 11.
Controller:
The Power LED of the controller is always lit up. When it
blinks, this means that an alarm has been triggered.
Open the controller cover. The LED of the channel from which
the alarm originated is blinking rapidly. See: "5.2 Alarms",
page: 11.
Automatic exercise function:
The system is fitted with an automatic exercise function. Set
every 6 days +/- 24 hours, this function consists of a test-run
designed to prevent the pump and actuators from seizing up,
when they have not been activated since the last test.
Controller
Thermostat Display T-75
The thermostat displays the room temperature.
5.1.3
Thermostat T-55 and Thermostat Public T-53
LED blinks one time only with each transmission.
5.2
Alarms
WARNING
Note that some actions, e.g. actions involving 230V,
wiring, etc., are to be performed by a qualified
person.
The errors are indicated on the controller when the power
LED blinks. The errors could be:
If your system is fitted with an interface, the
exercise function may be activated at any time.
• Loss of radio transmission from a thermostat for more
than 3 hours.
• Low batteries on a thermostat.
STOP
Use a dry soft cloth to clean the Control System
and all it's components. Do not use any detergent.
• Short circuited actuator.
• Cover Alarm.
To contact your installer:
See installation report in the fold-out to find the contact
information of the installer.
Please prepare the following information before contacting an
installer:
• Installation report.
• Drawings of the underfloor heating system (if available).
If an interface is fitted to the system, alarms can be
readily displayed without the need to take the
controller apart. The interface displays clearly and
accurately the causes of the various alarms.
1111Uponor Control System - Operation Manual
11
5.2.1
Controller
A blinking mains indicator indicates an alarm/an
error message.
The power LED of the controller always remains lit up. If it
blinks, this means a problem has occurred. Please consult
your Installation Report, which can be found in the
Installation Manual.
Open the controller cover and identify the LED(s) that are
flickering in order to assess from which thermostat the alarm
is originating.
5.2.2
Thermostat Display T-75
Battery Alarm:
Replace the batteries of the Thermostat when the
symbol
5.2.3
appears.
Thermostat T-55 and Thermostat Public T-53
Battery Alarm:
Replace the batteries of the thermostat when the red LED
inside the thermostat blinks twice. (During a heat or cool
demand)
Cover Alarm:
The Thermostat Public T-53 includes a switch to warn in case
of opening the cover. The status of the switch is transmitted
by radio waves. Power LED and concerned channel LED blink.
5.3
Erasing the alarms
Each LED switches off as the corresponding problem is
solved, and the Power LED goes back to its normal state (i.e.
always on).
12
Underfloor Heating
5.4
List of possible alarms and solutions
Component
Indication
power LED and thermostat
LED's in the controller for
connected channels flash
Causes
Solutions
antenna out of position or wire
mount antenna in correct position
disconnected
with wire correctly connected
short-circuit on a connected
check the wiring of the actuators,
replace the actuator
■ use another channel (if an
actuator
Controller C-55
power LED and concerned
channel LED flash
Note
unused one is remaining)
short-circuit on the actuator
terminal/wiring error
■
for replacement of the
controller, see Installation
manual
battery icon displayed
the display is off
the thermostat batteries are
discharged
batteries totally dead or wrong
type of battery used
batteries mounted upside down
no radio transmission icon
(reversed polarity)
thermostat is out of the correct
displayed
position
replace the batteries
see "3.5 Thermostat battery
replacement"
mount batteries correctly
move the thermostat
■
force the thermostat to
transmit by changing the
temperature set point
Thermostat
Display T-75
transmitter working but with
radio transmission icon is
displayed but signals are
received only if the thermostat
is close to the antenna
reduced signal intensity
■
replace the thermostat
■
for info how to delete the
assignment of the old
thermostat and replace it with
the new one, see Installation
Manual
new installations in the house,
shielding radio signals (e.g.
drying cupboard, safe, metallic
LED blinks twice
LED no blinks one time only
door)
the thermostat batteries are
discharged
batteries totally dead or wrong
type of battery used
batteries mounted upside down
(reversed polarity)
thermostat is out of the correct
position
try to find a new position for
thermostat and/or antenna (or, if
possible, the shielding object)
replace the batteries
see "3.5 Thermostat battery
replacement"
mount batteries correctly
move the thermostat
■
transmit by changing the
Thermostat T-55
temperature set point
and Thermostat
Public T-53
force the thermostat to
in transmission LED no blinks
one time
transmitter broken in thermostat
■
replace the thermostat
■
for info how to delete the
assignment of the old
thermostat and replace it with
the new one, see Installation
Manual
power LED and concerned
channel LED flash in the
controller
1313Uponor Control System - Operation Manual
the cover of thermostat is
check the settings and put back in
opened (Thermostat Public T-53)
place the cover of the thermostat
13
5.5
List of possible failures and solutions
Failure
Indication
■
Causes
Solutions
Note
press + or – key to display the
use max and min
temperature set point on the
■
limitation to protect
thermostat
thermostat setting
the temperature set point is also
too low
change temperature set point
consequences of
unreasonable
displayed in the room information
temperature settings
menu
temperature displayed on the
thermostat e.g.
room too cold (or
thermostat drops after a while when
influenced by a heat
too warm in
the thermostat is moved
■ see installation report and the
source
Cooling mode) 1
system from
change the location of the
thermostat
controller/channel numbering
under thermostat batteries cover
■
force thermostat to transmit and
the thermostat of
place the thermostat in the
single rooms were
room supplied by the loops
mixed up
controlled by the thermostat
check so if the corresponding
LED's are flashing
the white indication can not be seen
in the indicator window of the
actuator
room too warm (or
the corresponding loop is warm
too cold in cooling
even after a long period without
mode)
1
heat call
■
actuator does not
open
replace the actuator
■
actuator does not
check that the actuator is
correctly mounted
close
■
replace the actuator
no heat demand (from underfloor
heating system)
the floor is cold 2
room temperature
OK, but the floor is
■
the room is heated by another
cold
heat source
1
: To find out if a problem is caused by the supply system or the control system: loosen the actuators from the manifold, wait
some minutes and check if the flow pipe of the floor heating loop warms up. After some more minutes, the return pipe also
should warm up. If the pipes do not warm up, the trouble lies in the warm water supply, if the loops warm up, the cause
could be the room control system.
2:
Supply system defect: no warm water in manifold. Check boiler and circulation pump.
6. Disposal of the product
The Uponor Control System is made up of various recyclable components. Uponor would be grateful if you could sort out these
components (batteries, plastics, electric or electronic parts) and dispose of them at a suitable recycling centre.
14
Underfloor Heating