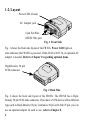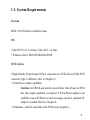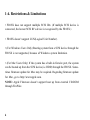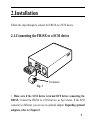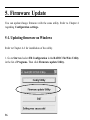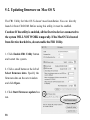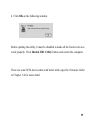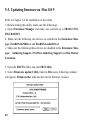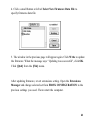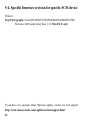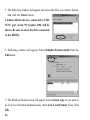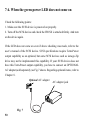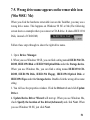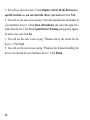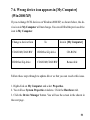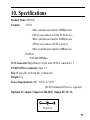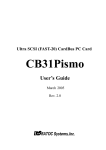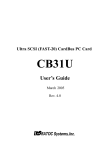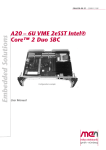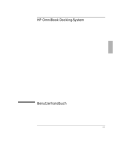
1
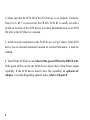
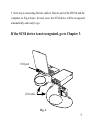
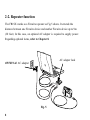
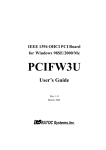
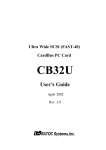
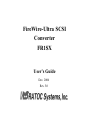
FireWire-Ultra SCSI
Converter
FR1SX
User’s Guide
Dec. 2006
Rev. 5.0
FR1SX
1.Introduction ....................................................1
1-1.
1-2.
1-3.
1-4.
Package Contents ......................................................... 1
Layout ............................................................................. 2
System Requirements .................................................. 3
Restrictions & limitations ........................................... 4
2. Installation .....................................................5
2-1.Connecting the FR1SX to a SCSI device ................... 5
2-2. Repeater function ......................................................... 8
3. How to check if device is working .............9
3-1. Windows System ......................................................... 10
3-1-1. Mass Storage Device ......................................... 11
3-1-2. Scanner device, Tape drive, CD/DVD burner, etc. ......... 12
3-2. Mac OS X ..................................................................... 17
3-2-1. Mass Storage Device ......................................... 17
3-2-2. Scanner device, Tape drive, CD/DVD burner, etc. ......... 18
3-3. Mac OS 9 ..................................................................... 19
3-2-1. Mass Storage Device ......................................... 19
3-2-2. B’s Crew SIM Driver ......................................... 20
4. Configuration Utility ................................. 23
4-1.
4-2.
4-3.
4-4.
4-5.
You can change following settings ............................ 23
Installing Utilities on Windows ................................. 25
FR1 Utility (Mac OS X) ............................................. 30
Installing the FRUty (Mac OS 9) ............................. 32
Examples of configuration settings .......................... 35
5. Firmware Update....................................... 36
5-1.
5-2.
5-3.
5-4.
Updating firmware on Windows ................................ 36
Updating firmware on Mac OS X .............................. 38
Updating firmware on Mac OS 9 .............................. 40
Specific firmware revision for specific SCSI device .................. 42
6. Format Utility(Windows Only) ................ 43
6-1. How to use FRFMTW9X on Windows Me/98SE ................... 43
6-2. How to use FRFMTW2K on Windows XP/2000 ................... 46
7. Troubleshooting ......................................... 47
7-1. General Hardware Troubleshooting ........................ 47
7-2. When copying files is failed ....................................... 48
7-3. When a new drive letter is not assigned ................. 49
7-4. When the green power LED does not come on ...................... 50
7-5. Wrong drive name appears on the removable icon .................... 51
7-6. Wrong device icon appears in My Computer ........ 53
7-7. When Version Conflict message appears ............... 55
7-8. Write error happens woth an old Castlewood ORB .............. 56
7-9. Castlewood ORB can not be recognized when you start your
computer with ORB connected...... ....................................... .56
7-10. CD-R/RW writing software can not recognize the CD-R/ RW
drive connected to the FR1SX, even though the MacOS recognizes
the CD-R/RW ........................................................................... 56
8. Optional items ............................................ 57
9. Registration and Tech-Support ............... 58
10. Specifications ........................................... 59
Appendix .......................................................... 60
1.Introduction
The FR1SX is a Firewire to Ultra SCSI Converter for use in Firewire port
enabled system. This User’s Guide describes how to install and use the FR1SX.
README file in the CD-ROM may include the newer information. For the
latest information, go to http://www.ratocsystems.com/English/.
1-1.Package Contents
FR1SX FireWire-Ultra SCSI Converter
FR1SX CD-ROM
IEEE1394 6pin- 6pin cable
Quick installation guide
Software License Agreement
NOTE
If any of these items are missing, contact the supplier immediately.
1
1-2. Layout
Power LED (Green)
AC Adapter jack
6 pin FireWire
(IEEE1394) port
Fig. 1 Front Side
Fig. 1 shows the front side layout of the FR1SX. Power LED light-on
state indicates the FR1SX is powered. If this LED is NOT lit, an optional AC
adapter is needed. Refer to Chapter 8 regarding optional items.
High-Density 50 pin
SCSI connector
Fig. 2 Back Side
Fig. 2 shows the back side layout of the FR1SX. The FR1SX has a HighDensity 50 pin SCSI male connector. If you have a SCSI device with a different
type such as High-Density 68 pin, Centronics 50 pin or D-Sub 25 pin, you can
use an optional adapter. In such a case, refer to Chapter 8.
2
1-3. System Requirements
System
IEEE 1394 (Firewire) enabled system
OS
• Mac OS X 10.1.x or later / Mac OS 9.1 or later
• Windows Server 2003/XP/2000/Me/98SE
SCSI device
• High-Density 50 pin female SCSI-2 connector on a SCSI device (If the SCSI
connector type is different, refer to Chapter 8)
• Term-Power output capability
Caution: As FR1SX gets electric power from Term-Power on SCSI
bus, this output capability is required. If Term-Power output is not
available at your SCSI device such as iomega zip drive, optional AC
adapter is needed. Refer to Chapter 8.
• Terminator ( must be attached to the SCSI device properly )
3
1-4. Restrictions & Limitations
• FR1SX does not support multiple SCSI IDs. (If multiple SCSI device is
connected, the lowest SCSI ID’s device is recognized by the FR1SX.)
• FR1SX doesn’t support LUN(Logical Unit Number).
• (For Windows Users Only) Booting system from a SCSI device through the
FR1SX is not supported, because of Windows system limitation.
• (For Mac Users Only) If the system has a built-in firewire port, the system
can be booted up from the SCSI device( ie. HDD) through the FR1SX. Sometimes firmware update for Mac may be required. Regarding firmware update
for Mac, go to http://www.apple.com.
NOTE: Apple Firmware doesn’t support boot up from external CD-ROM
through FireWire.
4
2.Installation
Follow the steps through to connect the FR1SX to a SCSI device
2-1.Connecting the FR1SX to a SCSI device
Terminator
Fig. 3
1. Make sure if the SCSI device is turned OFF before connecting the
FR1SX. Connect the FR1SX to a SCSI device, as Fig.3 shows. If the SCSI
connector is different, you can use an optional adapter. Regarding optional
adapters, refer to Chapter 8.
5
2. Make sure that the SCSI ID of the SCSI device is set properly. It must be
from 0 to 6. ID 7 is reserved for the FR1SX. SCSI ID is usually set with a
switch on the back of the SCSI device. For more information how to set SCSI
ID, refer to the SCSI device’s manual.
3. Attach an active terminator to the SCSI device, as Fig.3 shows. If the SCSI
device has an internal terminator instead of external terminator, it must be
enabled.
4. Turn ON the SCSI device and check if the green LED on the FR1SX is lit.
If the green LED is not lit, the SCSI device doesn’t have Term-Power output
capability. If the SCSI device doesn’t have this capability, an optional AC
Adapter is needed. Regarding optional items, refer to Chapter 8.
6
5. Next step is connecting firewire cable to firewire port of the FR1SX and the
computer, as Fig.4 shows. In most cases, the SCSI device will be recognized
automatically and ready to go.
If the SCSI device is not recognized, go to Chapter 3.
1394 port
1394 cable
Fig. 4
7
2-2. Repeater function
The FR1SX works as a Firewire repeater as Fig.5 shows. It extends the
distance between one Firewire device and another Firewire device up to 9m
(30 feet). In this case, an optional AC adapter is required to supply power.
Regarding optional items, refer to Chapter 8.
AC adapter Jack
OPTIONAL AC adapter
Fig. 5
8
3. How to check if device is working
If the SCSI device is not recognized:
Double check followings.
1. Is green LED on the FR1SX lit? If not, refer to Chapter 8.
2. Is terminator attached to the SCSI device properly?
3. Is SCSI ID of the SCSI device set properly? ( Must be 0 - 6 )
Try following sequence, too.
1. Unplug the firewire cable from the FR1SX or the computer.
2. Turn off the SCSI device.
3. If an optional AC adapter is used, unplug the AC adapter from the FR1SX.
4. Turn on the SCSI device and plug the AC adapter at the same time as possible
as you can. If it is difficult, turn on the SCSI device first.
5. After self initialization of the SCSI device, plug the firewire cable to the
FR1SX or the computer.
6. Wait about 5 seconds for recognition by the system and see if the SCSI device
is recognized.
9
If the SCSI device is still not recognized:
If you are using Windows system, go to Chapter 3-1
If you are using Mac OS X system, go to Chapter 3-2
If you are using Mac OS 9 system, go to Chapter 3-3
3-1. Windows system
If the SCSI device is a mass storage device like a hard drive or a removable
drive, go to Chapter 3-1-1.
If the SCSI device is not a mass storage device like a scanner device or a tape
drive, go to Chapter 3-1-2.
10
3-1-1. Mass Storage Device ( ie. hard drive, removable
drive )
Mass storage device with the FR1SX should be recognized by the system
automatically. On the device manager, the hard drive with the FR1SX is recognized as follows.
If the hard drive or the media in the removable drive is formatted properly, it
will be mounted. It can be seen in “MY Computer”.
If the hard drive is still not recognized by the system, refer to Chapter 4.
11
3-1-2. Scanner device, Tape drive, CD/DVD burner, etc.
If the device driver of the SCSI device(ie. scanner, tape drive etc.) is not included in Windows or sometimes even if the driver is included, the New
Hardware Wizard requires the device driver for “RATOC System_Inc.
IEEE1394-SCSI-3 IEEE1394 SBP2 Device”.
12
If the New Hardware Wizard doesn’t appear, but there is a yellow ‘!’ point on
“RATOC System_Inc. IEEE1394-SCSI-3 IEEE1394 SBP2 Device” on the
Device Manager, the driver of the SCSI device needs to be installed.
(To open the device manager: Go to “Start” - Right click on “My Computer” Properties - Hardware - Device Manager button.)
13
Following is an example of Windows2000/Xp how to find and install the driver
of the SCSI device.
If the New Hardware Wizard requires the driver, Start from [B].
If there is a yellow ‘!’ point on the "RATOC System_Inc. IEEE1394-SCSI-3
IEEE1394 SBP2 Device" on the device manager, Start from [A].
[A] On the device manager:
1. Double click on "RATOC System_Inc. IEEE1394-SCSI-3 IEEE1394 SBP2
Device" to open "Properties".
2. Click on "Update Driver..." button on the Driver tab. New Hardware Wizard
will appear.
[B] On the New Hardware Wizard:
3. Select "Install from a list or specific location" and click Next button.
4. Select "Don't search I will choose the driver to install" and click Next.
5. If the device is a scanner device, select "imaging device" and click Next. If the
device is a tape drive, select "Tape drives" and click Next.
14
6. If the driver is included, the manufacturer and the model number of the SCSI
device should be listed. Select proper device and click Next. If there is no driver
on the list, specify the location of the driver with using Have disk button.
If the SCSI device is still not recognized by the system, refer to Chapter 4.
15
Windows 98SE(Second Edition) Storage Supplement Update
If you use Windows 98 SE, we highly recommend to install Storage Supplement Update from Microsoft web site. This component improves 1394 storage performance and also installs a Safely Removal Utility on the task bar.
To find the update:
1. Click Start menu on the TaskBar.
2. Select Windows Update.
http://v4.windowsupdate.microsoft.com/en/default.asp
3. Click Scan for updates and find Storage Supplement Update for
Windows 98 Second Edition.
16
3-2. Mac OS X
If the SCSI device is a mass storage device like a hard drive or a removable
drive, go to Chapter 3-2-1.
If the SCSI device is not a mass storage device like a scanner device or a tape
drive, go to Chapter 3-2-2.
3-2-1. Mass Storage Device ( ie. hard drive, removable
drive )
Mass storage device with the FR1SX should be recognized by the system
automatically. If the device is a fixed hard drive and it is formatted properly, it
will be mounted on the desktop. If the device is a removable disk and the media
is formatted properly, the media will be mounted on the desktop.
Fixed drive
Removable media
If the SCSI device is still not recognized by the system, refer to Chapter 4.
17
3-2-2. Scanner device, Tape drive, CD/DVD burner, etc.
The other SCSI devices besides mass storage device should be recognized by
the system automatically, but they will not be mounted on the desktop. If the
SCSI device is a scanner, it will be recognized by scanning software. If the
device is a tape drive, it will be recognized by backup software. If the device is
a CD burner, it will be recognized by burner software.
(Note: Even if the device is recognized by the system, if the software doesn’t
support firewire interface or doesn’t support the device itself, the device will
not work.)
On Mac OS X, we currently recommend following softwares
For Scanner: VueScan (Hamrick Software)
For Tape drive: Retrospect 5 or above(EMC Dantz), BRU(TOLIS Group)
For CD burner: Toast 5 or above(Roxio)
If the software which comes with the SCSI device doesn’t work, try other
software, too. Because the software which comes with the SCSI device may
support only SCSI interface.
If the SCSI device is not recognized by the software, refer to Chapter 4.
18
3-3. Mac OS 9
If the SCSI device is a mass storage device like a hard drive or a removable
drive, go to Chapter 3-3-1.
To use following device or software, go to Chapter 3-2-2.
1. If TWAIN driver for scanner has only SCSI API.
2. The Disk Utility software which comes with a removable drive that has only
SCSI API.(ie. ORB drive)
3. If the writing software for CD burner doesn’t support Firewire.
4. The device driver for the SCSI device supports only SCSI interface.
3-3-1. Mass Storage Device ( ie. hard drive, removable
drive )
Mass storage device with the FR1SX should be recognized by the system
automatically. If the device is a fixed hard drive and it is formatted properly, it
will be mounted on the desktop. If the device is a removable disk and the media
is formatted properly, the media will be mounted on the desktop.
If the SCSI device is still not recognized by the system, refer to Chapter 4.
19
3-3-2. B’sCrew SIM driver
If the driver of the SCSI device or the software which comes with the SCSI
device supports only SCSI API / SCSI interface, you can use B’sCrew SIM
driver.
B’sCrew SIM driver works as shown above.
Note that the B’sCrew SIM driver runs on MacOS 9 only. It doesn’t work on
MacOS X.
20
The B’sCrew SIM driver has following restrictions:
1. The SIM Driver mode must be set enable(Default setting is enable). You can
set or reset this mode with the SCSI Configuration utility. Regarding the Utility, refer to Chapter X.
3. As the SIM driver hooks the standard SCSI APIs and substitute for Firewire
API, some SCSI applications or drivers which don’t use standard SCSI APIs
may not work properly.
4. The SIM driver doesn’t support system boot from a SCSI device connected
to the FR1SX.
21
Macintosh
2. The SIM driver doesn’t support Firewire Plug and Play, Hot Swapping
because the original SCSI API doesn’t include these features.
Follow the instructions to install the B’sCrew SIM driver.
1. To get the SIM driver, you have to download it from our Registered User
page. Before downloading, you have to register the FR1SX. Go to the User
Registration https://regist.ratocsystems.com/english/, and click "Web for User"
and select B's Crew SIM driver.
2. After downloading, double-click it and follow the instructions.
3. When message screen says “install was successful”, click [Restart].
4. B’sCrew SIM FireREX1 is copied in the [Extensions] folder. If the B’sCrew
SIM FireREX1 is not needed, you can disable it from the Extensions Manager.
If the SCSI device is not recognized by the software, refer to Chapter 4.
22
4. Configuration Utility
4-1. You can change following settings.
SIM Driver mode
Default is enabled. It is only for MacOS 9.
Transfer Mode/Speed (SCSI)
Default value is 20MB/s. You can select 20, 10, 5MB/s and Async.
Delay time between power on and SCSI bus reset (sec.)
You can set the delay time for some SCSI devices which hang up if SCSI bus
reset is issued right after the FR1SX gets powered.
Delay time between SCSI bus reset and SCSI command (sec.)
You can set the delay time for some SCSI devices which hang up if SCSI
command is issued right after SCSI bus reset.
23
Macintosh
You can change configuration settings on the FR1SX for the SCSI device
with using the utility. You can update/change firmware with the same utility,
but refer to Chapter 5 regarding Firmware Update.
Delay time until 1394 transaction start (sec.)
Default value is 4. If START UNIT command is disabled(Default), it
indicates the delay time to start 1394(firewire) transaction. If START UNIT
command is enabled, it indicates the delay time for the next command after
being issued Start/Stop Unit command. Some SCSI devices cannot take any
SCSI command right after Start/Stop Unit command is issued.
Enable SCSI bus reset
Default is enabled. If it is enabled, SCSI bus reset is issued. If disabled, SCSI
bus reset is not issued.
Enable START UNIT command (Start/Stop UNIT command)
Default is disabled. Some SCSI devices don’t spin up if Start/Stop unit
command is not issued.
Enable parity check
Default is enabled. If the SCSI device doesn’t have parity check function, it
should be disabled.
Target SCSI ID.
Default value is AUTO. You can specify the target SCSI ID.
Max Payload Size (IEEE1394)
Default value is 1024. You can set Max byte size in transferring IEEE1394
data block. Max size is 2048 Bytes. You should set this value to 1024 for
Blue&White PowerMac G3.
24
If you are using Windows system, go to Chapter 4-2
If you are using Mac OS X system, go to Chapter 4-3
If you are using Mac OS 9 system, go to Chapter 4-4
Macintosh
4-2. Installing Utilities on Windows
1. Before installing the utility, remove the SCSI device with the FR1SX from
the system and unplug the firewire cable from the FR1SX or the computer.
2. Put the CD-ROM in the CD drive.
3. Installer should be launched automatically. If not, double click Setup.exe
and follow the instructions.
4. After the installation, FR Configuration and FR Format utility will appear in the RATOC Firewire Utility in the list of Programs. Refer to Chapter 6 for the FR Format utility.
25
You can change configuration settings on the FR1SX for the SCSI device.
1. From the Start button, select Programs, RATOC FireWire Utility, and
then FR Configuration.
2. If the message box says “reconnect the 1394 cable”, unplug the firewire cable
from the FR1SX or the computer and wait a few seconds. If the FR1SX is not
connected, the message says “Can't find FireREX1/FR1SX. connect FireRex1/
FR1SX now”. Then connect the firewire cable to the FR1SX or the computer
and click OK.
26
3. If the FR Configuration is launched for the first time on Windows XP/
2000, the New Hardware Wizard may appear. Just click Next and then click
Finish at the last dialog. Click Yes, when the message says "Do you want to
restart your computer now?". Restart your the computer. After the computer
being restarted, launch the FR Configuration again.
Macintosh
4. Make sure Setting was successful is shown as follows.
5. Click Config Utility.
To quit FR configuration Utility, click EXIT.
27
Advanced: The advanced window in the next page will appear.
Default: Default settings will be loaded.
Write: Click Write button to write settings. You can go back to the previous
Window by clicking Back button.
6. After changing the configuration settings, restart the computer to take effect
the change.
28
You can go back to the previous Window by clicking Back button.
Macintosh
There are some examples of configuration settings. Refer to Chapter 4-5.
29
4-3. FR1 Utility ( Mac OS X )
The FR1 Utility for Mac OS X doesn’t need installation. You can directly
launch it from CD-ROM. Before using this utility, it must be enabled.
Caution: If the utility is enabled, all the firewire devices connected to
the system WILL NOT WORK temporally. If the MacOS X is booted
from firewire hard drive, do not enable the FR1 Utility.
30
Click Enable FR1 Utility button and restart the system.
Macintosh
After the system being restarted, all
the values are read from the FR1SX.
Default button loads default
settings.
To write the settings, click Start
Configuration setting button.
Before quitting the utility, it must be
disabled to make all the firewire
devices work properly. Click
Disable FR1 Utility button.
There are some examples of configuration settings. Refer to Chapter 4-5.
31
4-4. Installing the FRUty ( Mac OS 9 )
Before install the FRUty on Mac OS 9, we recommend to make a copy of
Mac OS Base setting from the Extensions Manager.
1. Open the Extensions Manager and select Mac OS Base from selected
set and click Duplicate Set.
2. Name the setting like FR1SX CONFIGURATION and click OK. Then,
disable following drivers.
Authoring Support
FireWire Authoring Support
Disc Banner Extension
3. Put the CD-ROM in the CD drive.
4. Launch FR1 Installer-E in the FRUTY folder in the FR1SX for OS 9.
Follow the instruction and restart the computer.
32
5. FRUTY folder is created in the location that you have specified. Open the
folder and start FR1 Utility. Following window will appear. Click [OK].
Macintosh
6. Select Config Utility from File menu. The window below appears.
Advanced: The advanced window in the next page will appear.
Default: Default settings will be loaded.
Write: Click Write button to write settings. To quit the utility, select Quit
from File menu. Exit button just close this window.
33
To go back to the previous window, click Back. For more information about
each configuration setting, refer to Chapter 4-1
After changing configuration settings, revert extensions setting. Open the
Extensions Manager and change selected set from FR1SX CONFIGURATION to the previous settings you used. Then restart the computer.
There are some examples of configuration settings. Refer to Chapter 4-5.
34
4-5. Examples of Configuration setting
Scanners:
CanonScan FB620S, Sharp JX-270/JX-370
Set 2 at Delay time between power on and SCSI bus reset
Macintosh
Agfa Duoscan T1200
Set 12 at Delay time between power on and SCSI bus reset
HP ScanJet4c
Set 15 at Delay time between power on and SCSI bus reset
Microtek Artiscan100, Polaroid SprintScan 4000
Set 40 at Delay time between power on and SCSI bus reset
MO drive:
FUJITSU MO M2512A, M2513A
Set 10MB/sec at Transfer Mode/Speed
If the SCSI device is still not recognized, contact our tech support. http://
www.ratocsystems.com/english/contact/support.html
35
5. Firmware Update
You can update/change firmware with the same utility. Refer to Chapter 4
regarding Configuration settings.
5-1. Updating firmware on Windows
Refer to Chapter 4-2 for installation of the utility.
1. Go to Start and select FR Configuration in the RATOC FireWire Utility
in the list of Programs. Then click Firmware update Utility.
36
2. Following window will appear.The top row indicates the firmware data you
are about to write. The bottom row indicates current firmware version on the
FR1SX.
4. After selecting the firmware, click Write.
5. When the update is completed successfully, the message box will appears.
Click OK, click Back to go back to the main menu and click EXIT.
6. Restart the computer to take effect.
37
Macintosh
3. Click Browse to specify firmware data. The CD-ROM includes a firmware
data. The latest version may have been released on our web site.
http://www.ratocsystems.com/english
5-2. Updating firmware on Mac OS X
The FR1 Utility for Mac OS X doesn’t need installation. You can directly
launch it from CD-ROM. Before using this utility, it must be enabled.
Caution: If the utility is enabled, all the firewire devices connected to
the system WILL NOT WORK temporally. If the MacOS X is booted
from firewire hard drive, do not enable the FR1 Utility.
1. Click Enable FR1 Utility button
and restart the system.
2. Click a small button at the left of
Select firmware data. Specify the
firmware data on the next window
and click Open.
3. Click Start Firmware update button.
38
4. Click OK on the following window.
There are some SCSI devices that work better with a specific firmware. Refer
to Chapter 5-4 for more detail.
39
Macintosh
Before quitting the utility, it must be disabled to make all the firewire devices
work properly. Click Disable FR1 Utility button and restart the computer.
5-3. Updating firmware on Mac OS 9
Refer to Chapter 5-4 for installation of the utility.
1. Before starting this utility, make sure the followings:
a. Open Extensions Manager and make sure selected set is FR1SX CONFIGURATION.
b. Make sure the following two drivers are enabled in the Extensions Manager. FireREX1APIDriver and FireREXLoaderDriver
c. Make sure the following three drivers are disabled in the Extensions Manager. Authoring Support, FireWire Authoring Support and Disc Burner
Extension
2. Open the FRUTY folder and start FR1 Utility.
3. Select Firmware update Utility from the File menu. Following window
will appear. Firmware Rev indicates the current firmware revision.
40
4. Click a small button at left of Select New Firmware Data File to
specify firmware data file.
Macintosh
5. The window in the previous page will appear again. Click Write to update
the firmware. When the message says “Updating was successful”, click OK.
Click [Quit] from the [File] menu.
After updating firmware, revert extensions setting. Open the Extensions
Manager and change selected set from FR1SX CONFIGURATION to the
previous settings you used. Then restart the computer.
41
5-4. Specific firmware revision for specific SCSI device
Printers:
Fuji Pictrography Series(PG3000,PG3500,PG4000,PG4000II,PG4500)
Firmware 1.23 works better than 1.33 (MacOS X only)
If you have any question about firmware update, contact our tech support.
http://www.ratocsystems.com/english/contact/support.html
42
6. Format Utility (Windows Only)
You can format a HDD, Jaz, MO, Zip drive, etc.,with this utility.
Caution: You can not format a CD-R, CD-RW or DVD-RAM.
Refer to Chapter 4-2 for installation of the utility.
If you use Windows Me, 98SE, go to Chapter 5-1.
If you use Windows XP, 2000, go to Chapter 5-2.
6-1. How to use FRFMTW9X on Windows Me/98SE
Follow the steps through to format the SCSI drive:
1. Make sure the SCSI device is connected and turned on.
2. If the device is a removable disk and its media is not inserted, insert a media.
3. From the Start menu, select Programs, RATOC FireWire Utility and
then FR Format utility.
43
5. The following window will appear and select the drive you want to format.
And click the Select button.
Caution:All the devices, connected to USB,
SCSI port on the PC besides 1394, will be
shown. Be sure to select the drive connected
to the FR1SX.
6. Following window will appear. Select Initialize/Format media from the
Edit menu.
7. The Initialize/Format screen will appear. Select format type. If you want to
do Low Level Format simultaneously, check Low Level Format. Then, click
OK.
44
8. If you selected IBM-PC/AT FDISK format at step 7, the message box
saying You should create partition next will appear. Then, click OK. You
will see the screen shown at the step 6 and select Create Partition from the
Edit menu. And then, you will see the screen below. Select File System from
the list box and set Partition size, using the slider bar. Then, click OK to create
partition. If you selected Super FD format at step 7, you will see a screen
similar to the following. Select [File System] from the list box.
Slider Bar
9. You must restart your computer for your information to take effect. If you
are using a removable media, the media will be ejected to take effect. So, you
don’t need to restart your computer.
45
6-2. How to use FRFMTW2K on Windows XP/2000
If you format a HDD, removable disk on Windows XP/2000, you usually
use Disk Management in the Computer Management in Windows XP/
2000. But, when you failed to format the HDD or a new drive letter will not
be assigned after you have done Disk Management, you should do Low
Level Format, using this format utility FRFMTW2K.EXE.
Follow the steps through to do Low Level Format.
1. Make sure the SCSI device is connected and powered on.
2. If the device is a removable disk and its media is not inserted, insert a media.
3. From the Start menu, select Programs, then RATOC FireWire Utility,
and then FR Format utility.
4. The message box appears. Click [OK].
5. The following window will appear. Select the drive and click [Start].
6. After finishing, you have to write signature
on the disk and format the disk, using Disk
Management in Windows XP/2000. For more
information, refer to a Windows XP/2000 help
file.
46
7. Troubleshooting
7-1.General Hardware Troubleshooting
T Make sure the FR1SX’s power LED comes on. If the LED does not come on,
your SCSI device may not provide SCSI bus termination power. If the
SCSI device can not provide it, an OPTIONAL AC adapter is required.
For purchasing information, refer to Chapter 8.
T Make sure the FR1SX is firmly connected to your SCSI device.
T Make sure the 1394 cable is firmly connected to the FR1SX and a 1394 port
on your PC or Mac.
T Make sure you are using the 1394 cable bundled in this package.
T Make sure the SCSI device has a proper SCSI ID. (Must be 0-6)
T Make sure the SCSI device is powered.
T Make sure a terminator is attached to the SCSI device.
47
7-2. When copying files is failed
When you come across an error message during copying files or the system
locks up, try to reduce transfer speed with the SCSI configuration utility.
If you use the older MO models made by FUJITSU such as M2512A, M2513A,
the system sometimes locks up. If you use the older FUJITSU MO(M2512A,
M2513A), remove the FR1SX from the SCSI device and attached the FR1SX
to other SCSI device to set transfer rate to 10MB/sec with the SCSI configuration utility. Please note that you can not execute the SCSI configuration utility
with the older FUJITSU MO models attached to the FR1SX. You have to
attach the FR1SX to other SCSI device.
Refer to Chapter 4, regarding to change configuration settings.
48
7-3. When a new drive letter is not assigned(Windows)
When you connect a HDD which is not formatted or does not have partition, a
new drive letter will not be assigned in [My Computer]. You need to format or
create partition on the HDD.
1. When you use Windows Me/98SE, you can format your HDD and create
partition, using the format utility, FRFMTW9X.EXE.
2. When you use Windows XP/2000, you can format your HDD and create
partition, using Disk Management in Windows XP/2000. For more
information, refer to a Windows XP/2000 help file. If a new drive letter will
not be assigned yet or you fail to format the HDD after you have done Disk
Management, you should do Low Level Format, using the format utility,
FRFMTW2K.EXE.
Regarding format utility, refer to Chapter 6.
49
7-4. When the green power LED does not come on
Check the following points:
1. Make sure the SCSI device is powered on properly.
2. Turn off the SCSI device and check the FR1SX is attached firmly. And turn
on the device again.
If the LED does not come on even if above checking was made, refer to the
user’s manual of the SCSI device. SCSI specifications require Term-Power
output capability as an optional, but some SCSI devices such as iomega Zip
drive may not be implemented this capability. If your SCSI device does not
have this Term-Power output capability, you have to connect an OPTIONAL
AC adapter(sold separately) as Fig.7 shows. Regarding optional items, refer to
Chapter 8.
Optional AC adapter
Fig. 7
50
AC adapter jack
7-5. Wrong drive name appears on the removable icon
(Win 98SE / Me)
When you click the hardware removable icon on the Task Bar, you may see a
wrong drive name. This happens on Windows 98 SE or Me.(The following
screen shows a example when you connect a CD-R drive. It shows IEEE 1394
Disk, instead of CD-ROM.)
Follow these steps through to show the right drive name.
1. Open Device Manager.
2. When you use Windows 98 SE, you can find a string named IEEE1394 CDROM, IEEE1394 Disk or IEEE1394 Optical Disk under the Storage device.
When you use Windows Me, you can find a string named IEEE1394 CDROM, IEEE1394 Disk, IEEE1394 Floppy, IEEE1394 Optical Disk or
IEEE1394 Tape under the Storage device. Double click the wrong drive name
string.
3. You will see the properties window. Click the Driver tab and click Update
Driver.
4. Update Device Driver Wizard will start up. When you use Windows Me,
check Specify the location of the driver(Advanced) and click Next. When
you use Windows 98 SE, just click Next.
51
5. You will see the next screen. Check Display a list of all the drivers in a
specific location, so you can select the driver you want and click Next.
6. You will see the next screen saying “select the manufacturer and model of
your hardware device”. Check Show all hardware and select the right drive
name from the list. Click Next. Update Driver Warning message may appear.
In such a case, just click Yes.
7. You will see the next screen saying “Windows driver file search for the
device”. Click Next.
8. You will see the next screen saying “Windows has finished installing the
driver you selected for your hardware device.” Click Finish.
52
7-6. Wrong device icon appears in [My Computer]
(Win 2000/XP)
If you exchange SCSI devices on Windows2000/XP, as shown below, the device icon in My Computer will not change. You can still find the previous drive
icon in My Computer.
Change a device from
To
Icon in [My Computer]
CD-ROM,CD-R/RW
HDD/Jaz/Zip drive
CD-ROM
HDD/Jaz/Zip drive
CD-ROM,CD-R/RW
Removable
Follow these steps through to update driver so that you can resolve this issue.
1. Right-click on My Computer and select Properties.
2. You will see System Properties windows. Click the Hardware tab.
3. Click the Device Manager button. You will see the screen in the shown in
the next page.
53
4. If you have changed from a CD-ROM or CD-R/RW to a Removable disk or
HDD, you can find a RATOC Systems_Inc. IEEE1394-SCSI-3 IEEE1394
SBP2 Device string under the DVD/CD-ROM drives. If you have changed
from a Removable disk or HDD to a CD-ROM or CD-R/RW, you can find a
RATOC Systems_Inc. IEEE1394-SCSI-3 IEEE1394 SBP2 Device string
under the Disk drives. Double click on the RATOC Systems_Inc. IEEE1394SCSI-3 IEEE1394 SBP2 Device string to show its property.
54
5. Select Driver tab on the screen and click the Update Driver button.
6. Update Device Driver Wizard will start up. Click Next.
7. Install Hardware Device Drivers window will appear. Check Search for
a suitable driver for my device(recommended) and click Next.
8. Locate Driver Files window will appear. Uncheck all the options at
Optional Search locations:. Click Next.
9. Driver Files Search Results window will appear. Click Next.
10. Completing the Upgrade Device Driver Wizard window will appear.
Click Finish.
Open My Computer to see if the right icon appears in My Computer.
7-7. When Version Conflict message appears(Win98SE)
When you use Windows 98 SE, you may see a screen similar to the following.
Click [Yes] all the time for the question “Do you want to keep this file?”
55
7-8. Write error happens with an old Castlewood ORB
The AC adapter the Castlewood ORB uses may not be able to provide enough
termination power for the FR1SX to work. You should purchase an Optional
AC adapter. Refer to Chapter 8.
7-9.Castlewood ORB can not be recognized, when you
start your computer with an old ORB
Set 2 seconds at [Delay time between power on and SCSI bus reset] with
the SCSI configuration utility. For more information, refer to Chapter 4.
7-10. CD-R/RW writing software can not recognize the
CD-R/RW drive with the FR1SX, even though the Mac
OS recognizes the CD-R/RW drive.
The software you are using may not be able to support Firewire interface.
56
8. Optional items
Optional AC adapter and optional SCSI adapters are available on our
direct online shop. http://www.firewireshop.com
FR-AC05 (AC Adapter for the FR1SX)
Refer to Chapter 10 for the specification. According to our test, at least
1.2A(Output) is required to make the FR1SX work properly.
The FR1SX has a high density 50 pin connector. If the connector type of
the SCSI device is different, you can use adapter between the FR1SX and the
SCSI device.
RCL-3005 (HD50F - CN50M adapter)
For the device with Centronics 50 pin female connector
RCL-3068 (HD50F - HD68M adapter)
For the device with High density 68 pin female connector
RCL-3025 (HD50F - DB25M adapter)
For the device with DSub 25 pin female connector
If you have any questions about these optional items, feel free to ask us.
E-mail: http://www.ratocsystems.com/english/contact/sales.html
57
9. Registration and Tech-Support
9-1. How to Register
We highly recommend to register yourself as our customer through our
on-line registration. (http://www.ratocsystems.com/english/)
9-2. Software Update and Support
-Utility UpdateThe latest utility is subject to change for improvement or bug fix. You can
download the latest version from our web site.
-Technical SupportIf you have any question, please feel free to contact to our tech-support:
Open 9:30AM-5:00PM(PST) Mon-Fri(except holidays)
RATOC Systems International, Inc. Tech support
Address: 2000 Wyatt drive
Suite 9
Santa Clara, CA 95054
TEL: 408-986-9040 FAX: 408-986-9042
E-mail: http://www.ratocsystems.com/english/contact/support.html
Home Page: http://www.ratocsystems.com/english/
Please include following information:
• Our product name, serial number, and product description
• Host Computer Name, OS version, CD-ROM version
58
10. Specifications
Product Name :FR1SX
Transfer
:SCSI
•Max synchronous transfer 20MBytes/sec
(When you connect an Ultra SCSI device)
•Max synchronous transfer 10MBytes/sec
(When you connect a SCSI-2 device)
•Max asynchronous transfer 6MBytes/sec
FireWire
•100/200/400Mbps
SCSI connector:High-Density 50 pin male SCSI-2 connector x 1
1394(FireWire) connector: 6pin x 2
Size:58 mm (W) x 66 mm (D) x 22mm (H)
Weight:70 g
Power Requirements :DC +4.25V to 5.25V
(SCSI Termination Power is required)
Optional AC Adapter :Input AC100-240V, Output DC 5V, 2A
Polarity
59
Appendix
Trademarks
-Windows is a registered trademark of Microsoft Corporation.
-MacOS, PowerMacintosh, PowerBook and Mac logo are registered trademarks of
Apple Computer,Inc.
-Other brand and product names may be registered trademarks or trademarks of
their
respective holders.
Regulatory Agency Notice
FCC Compliance Statement
This equipment has been tested and found to comply with the limits for a Class B digital device, pursuant to Part 15
of the FCC Rules. These limits are designed to provide reasonable protection against harmful interference in a
residential installation. This equipment generates, uses and can radiate radio frequency energy and, if not installed
and used in accordance with the instructions, may cause harmful interference to radio communications.
However, there is no guarantee that interference will not occur in a particular installation. If this equipment does
cause harmful interference to radio or television reception, which can be determined by turning the equipment off
and on, the user is encouraged to try to correct the interference by one or more of the following measures:
(1) Reorient or relocate the receiving antenna.
(2) Increase the separation between the equipment and receiver.
(3) Connect the equipment into an outlet on a circuit different from that to which the receiver is connected.
(4) Consult the dealer or an experienced radio/TV technician for help.
Changes or modifications not expressly approved by the party responsible for compliance may result in this unit
not
complying with FCC Rules Part 15.
To meet EN55022(Class B) and EN55024 requirements, you have to use a IEEE1394(FireWire) cable less than 3
m.
60