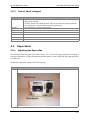
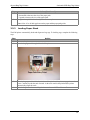
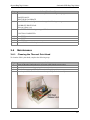
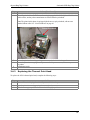
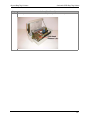
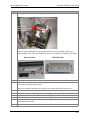
1
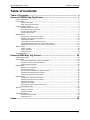
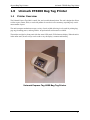
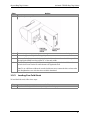
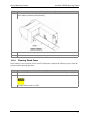
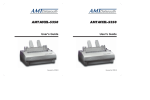
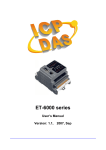
Airport Bag Tag Printers
Level 1 Repair Program
Unimark ET6000
Unimark 8500
Version:
Date:
Owner:
Author:
2.2
February 15, 2005
Business Support
Jack Michko
Airport Bag Tag Printers
Table of Contents
Table of Contents
Table of Contents............................................................................. ii
Unimark ET6000 Bag Tag Printer ..................................................... 1
Printer Overview ............................................................................................. 1
Front Panel .................................................................................................... 2
Adjustments Menu ............................................................................................ 3
Basic Operator-Level Menu ................................................................................ 4
Loading Paper Stock........................................................................................ 5
Adjusting Input Path Size .................................................................................. 5
Locking Down the Input Path ............................................................................. 5
Loading Fan-Fold Stock ..................................................................................... 6
Clearing Stock Jams .......................................................................................... 7
Maintenance ................................................................................................ 10
Cleaning the Thermal Print Head ....................................................................... 10
Replacing the Thermal Print Head ..................................................................... 12
Cleaning the Platen ......................................................................................... 14
Cleaning/Clearing the Present Sensor ................................................................ 17
Cleaning/Clearing Left Top of Form (TOF) Sensor ................................................ 19
Cleaning/Clearing Center Top of Form (TOF) Sensor ............................................ 21
Stock Cutter................................................................................................. 24
Cutter Location .............................................................................................. 24
Cutter Operation ............................................................................................ 24
Clearing a Jam ............................................................................................... 25
Troubleshooting............................................................................................ 27
Unimark 8500 Bag Tag Printer....................................................... 29
Printer Overview ........................................................................................... 29
Front Panel .................................................................................................. 30
Front Panel Operations: Online and Offline ......................................................... 30
Operator’s Control Panel Operations .................................................................. 30
Control Panel’s Keypad .................................................................................... 31
Paper Stock ................................................................................................. 31
Adjusting the Paper Size .................................................................................. 31
Loading Paper Stock ....................................................................................... 32
Initial Set Up and Adjusting Name Location ........................................................ 33
Resetting the 8500’s Stock Counter .................................................................. 35
Calibrating the 8500’s Print Head ...................................................................... 36
Maintenance ................................................................................................ 37
Cleaning the Thermal Print Head ....................................................................... 37
Replacing the Thermal Print Head ..................................................................... 38
Cleaning the Platen ......................................................................................... 41
Replacing the Platen ....................................................................................... 41
Cleaning the Paper Stock Guide Rails ................................................................ 47
Cleaning the Filter .......................................................................................... 51
Alarms ........................................................................................................ 52
Clearing an Alarm ........................................................................................... 52
Operator Alarms ............................................................................................. 53
Troubleshooting............................................................................................ 54
Troubleshooting Guide .................................................................................... 54
Diagnostic List ............................................................................................... 55
Index............................................................................................. 56
ii
Airport Bag Tag Printers
1.0
1.1
Unimark ET6000 Bag Tag Printer
Unimark ET6000 Bag Tag Printer
Printer Overview
The Unimark Express Tag 6000 is a small, fast, and versatile thermal printer. The unit is designed to fit into
a ticket or gate counter, kiosk, or curb-side podium. It can also sit on a countertop, requiring only a minimum amount of space.
The unit’s transport mechanism accepts a variety of stock widths, allowing it to be used for printing baggage tags, boarding passes, and cargo labels. An optional roll stock mount is available.
The unit has an eight-key front panel with four status LEDs and a 2X20-character display. When the unit is
in the online state, the arrow keys can be used to vary the display’s contrast and intensity.
Unimark Express Tag 6000 Bag Tag Printer
1
Airport Bag Tag Printers
1.2
Unimark ET6000 Bag Tag Printer
Front Panel
2
Airport Bag Tag Printers
1.2.1
Unimark ET6000 Bag Tag Printer
Adjustments Menu
3
Airport Bag Tag Printers
1.2.2
Unimark ET6000 Bag Tag Printer
Basic Operator-Level Menu
4
Airport Bag Tag Printers
1.3
1.3.1
Unimark ET6000 Bag Tag Printer
Loading Paper Stock
Adjusting Input Path Size
The ET6000 printer is equipped with a simple input path adjustment method. To adjust the input path, follow these steps:
Step
Action
1
Grip the adjustment paddle.
2
3
4
While holding the left guide straight, move it right or left to widen or narrow the input path.
Insert stock approximately 1” into the guide posts.
Make any final adjustments to the input path so that it is as close to the stock width as possible.
The input path should be no larger than .01” of the stock width.
The input path adjustment is self-centering; no other positioning adjustments are required.
5
1.3.2
Locking Down the Input Path
The ET6000 printer is equipped with a lock-down thumbscrew to secure the path guides. To secure the
guides, follow these steps:
5
Airport Bag Tag Printers
Step
Unimark ET6000 Bag Tag Printer
Action
1
Grip the adjustment paddle.
2
3
4
While holding the left guide straight, move it right or left to widen or narrow the input path.
Insert stock approximately 1” into the guide posts.
Make any final adjustments to the input path so that it is as close to the stock width as possible.
The input path should be no larger than .01” of the stock width.
While holding the adjustment paddle and ensuring guides are against the installed stock, turn
the lock-down screw clockwise until it bottoms out against the wall.
5
Note: To use a different width stock, turn the lock-down screw counterclockwise to loosen the
rails. Retighten the screw after the correct width is determined.
1.3.3
Loading Fan-Fold Stock
To load fan-fold stock, follow these steps:
Step
1
Action
Grip the stock firmly with the thermal printing surface facing up.
6
Airport Bag Tag Printers
Step
Unimark ET6000 Bag Tag Printer
Action (Continued)
2
Insert the stock between the right and left guides until it is detected by the Top of Form (TOF)
sensor and the print motor starts advancing.
3
4
The stock will automatically be pulled in by the platen and detected by the Present Senor (PS).
The stock is now loaded and ready for printing.
1.3.4
Clearing Stock Jams
In the unlikely event a stock jam occurs in the ET6000 printer, complete the following steps to clear the
jam and continue printing operations:
Step
1
2
Action
Press the RESET button on the front panel. If the jam does not clear by itself, go to step 2.
Power off the unit.
The print head is sensitive to ESD.
7
Airport Bag Tag Printers
Step
3
Unimark ET6000 Bag Tag Printer
Action (Continued)
Press the front panel release button. Lift the front panel up and out of the way.
Front Panel
Release Button
4
Pull the print head release lever forward and lift the print head up and away from the platen.
Print Head
Release Lever
5
Grip the stock firmly from the rear of the unit and remove it.
8
Airport Bag Tag Printers
Step
6
Unimark ET6000 Bag Tag Printer
Action (Continued)
Check the print head and platen for adhered label stock.
Raised
Print Head
7
8
9
10
11
12
13
If there is label stock on the print head, use isopropyl alcohol to clean the heater element
surface. Verify that all label stock, media residue, and any other contaminants are clear from
the print head.
If label stock is wrapped around the platen, rotate the platen and find a loose end of the stock.
Grip the stock firmly and pull it free from the platen.
DO NOT USE a sharp blade to cut stock from the platen.
If label stock still remains on the platen, clean the platen surface using Bloch Buster, window
cleaner, a damp cloth/paper towel, or Fedron. Verify that all label stock, media residue, and any
other contaminants are clear from the platen.
Although the stock guides are very short, check both right and left sides for any label stock that
may have adhered to them. Use isopropyl alcohol to clean these areas.
Verify that stock-related contaminants are not blocking the Top of Form (TOF) sensor in the
left stock guide. Use canned air to clear sensor if necessary.
Verify that stock-related contaminants are not blocking the Present Sensor (PS) at the exit point
of the unit. Use canned air to clear sensor if necessary.
Check the ESD static brush for any label stock and related contaminants. Carefully remove
these contaminants.
Note: DO NOT USE alcohol or other chemicals to clean ESD static brush. If the brush is
damaged, replace the brush and/or unit immediately. Operating the unit without an ESD static
brush, or with a damaged brush, may result in reduced print head life.
9
Airport Bag Tag Printers
1.4
Unimark ET6000 Bag Tag Printer
Maintenance
1.4.1
Cleaning the Thermal Print Head
Step
Action
1
Power off the ET6000 printer.
2
The print head is sensitive to ESD.
Press the front panel release button. Lift the front panel up and out of the way.
Front Panel
Release Button
10
Airport Bag Tag Printers
Step
3
Unimark ET6000 Bag Tag Printer
Action (Continued)
Pull the print head release lever forward and lift the print head up and away from the platen.
Print Head
Release Lever
Raised
Print Head
4
5
Grip the stock firmly from the rear of the unit and remove it.
Clean the print head heater element surface using isopropyl alcohol. Verify that all label stock,
media residue, and any other contaminants are cleared from the print head.
Note: Unimark recommends cleaning the print head every fifth box of stock or 100,.000 inches
of printing.
11
Airport Bag Tag Printers
1.4.2
Unimark ET6000 Bag Tag Printer
Replacing the Thermal Print Head
Step
Action
1
Power off the ET6000 printer. Unplug the AC power cable for the unit.
2
The print head is sensitive to ESD.
Press the front panel release button. Lift the front panel up and out of the way.
Front Panel
Release Button
3
Pull the print head release lever forward and lift the print head up and away from the platen.
Print Head
Release Lever
4
Grip the stock firmly from the rear of the unit and remove it.
12
Airport Bag Tag Printers
Step
Unimark ET6000 Bag Tag Printer
Action (Continued)
5
6
Place a coin into the tool slot in the thumbscrew.
Turn the thumbscrew counterclockwise to loosen.
7
After both thumbscrews have been loosened, pull the print head away from the mounting plate.
Remove the power and interface cables from the print head assembly.
13
Airport Bag Tag Printers
Step
8
9
10
11
12
13
14
1.4.3
Unimark ET6000 Bag Tag Printer
Action (Continued)
Locate a new print head assembly. Install the power and interface cables into the print head
assembly.
IMPORTANT!
The Unimark ET6000 printer uses the same newer version thermal print head now installed in
most of our Unimark 8500 bag tag printers. See “Replacing the Thermal Print Head” on
page 38 for more information on the new print head installed in Unimark 8500 printers.
Using the two alignment pins to position the print head assembly, place the assembly into the
mounting position.
Hand-tighten the two thumbscrews (turn clockwise to secure).
Power on the unit. Take the unit offline by pressing the ONLINE key.
Press Enter and then either the UP or DOWN arrow until SERVICE MENU appears. Press
Enter. Enter the service password (UP/DOWN arrows change the individual character value
and RIGHT/LEFT arrows move cursor side to side). Press Enter.
Press the UP or DOWN arrow key until the MAINTENANCE menu appears. Press Enter.
Press the UP or DOWN arrow key until the NEW PRINT HEAD option appears. Press Enter.
The unit will read the baseline resistance of the print head you just installed. After the baseline
resistance has been read, press ONLINE to put the unit back into service.
Cleaning the Platen
To clean the platen, follow these steps:
Step
1
Action
Power off the ET6000 printer.
The print head is sensitive to ESD.
14
Airport Bag Tag Printers
Step
2
Unimark ET6000 Bag Tag Printer
Action (Continued)
Press the front panel release button. Lift the front panel up and out of the way.
Front Panel
Release Button
15
Airport Bag Tag Printers
Step
3
Unimark ET6000 Bag Tag Printer
Action (Continued)
Pull the print head release lever forward and lift the print head up and away from the platen.
Print Head
Release Lever
4
5
Grip the stock firmly from the rear of the unit and remove it.
Clean the platen surface using Bloch Buster, window cleaner, a damp cloth/paper towel, or
Fedron. Verify that all label stock, media residue, and any other contaminants are cleared from
the platen.
Note: Unimark recommends cleaning the platen every fifth box of stock or 100,000 inches of
printing.
16
Airport Bag Tag Printers
1.4.4
Unimark ET6000 Bag Tag Printer
Cleaning/Clearing the Present Sensor
To clean/clear the Present Sensor (PS), follow these steps:
Step
Action
1
Power off the ET6000 printer.
2
The print head is sensitive to ESD.
Press the front panel release button. Lift the front panel up and out of the way.
Front Panel
Release Button
17
Airport Bag Tag Printers
Step
3
Unimark ET6000 Bag Tag Printer
Action (Continued)
Pull the print head release lever forward and lift the print head up and away from the platen.
Print Head
Release Lever
4
5
Grip the stock firmly from the rear of the unit and remove it.
Clean the Present Sensor window and the sensor reflector plate using a dry cloth. Verify they
are clear of particles, paper stock, and dust. Used canned air to clear the sensor.
DO NOT USE alcohol except to clean off adhered labels or adhesives.
18
Airport Bag Tag Printers
1.4.5
Unimark ET6000 Bag Tag Printer
Cleaning/Clearing Left Top of Form (TOF) Sensor
To clean/clear the left Top of Form sensor, follow these steps:
Step
Action
1
Power off the ET6000 printer.
2
The print head is sensitive to ESD.
Press the front panel release button. Lift the front panel up and out of the way.
Front Panel
Release Button
19
Airport Bag Tag Printers
Step
3
Unimark ET6000 Bag Tag Printer
Action (Continued)
Pull the print head release lever forward and lift the print head up and away from the platen.
Print Head
Release Lever
4
5
Grip the stock firmly from the rear of the unit and remove it.
Clean the Top of Form transmitter and receiver using a dry cloth. Verify they are clear of
particles, paper stock, and dust. Use canned air to clear the sensor.
DO NOT USE alcohol except to clean off adhered labels or adhesives.
20
Airport Bag Tag Printers
1.4.6
Unimark ET6000 Bag Tag Printer
Cleaning/Clearing Center Top of Form (TOF) Sensor
To clean/clear the center Top of Form sensor, follow these steps:
Step
Action
1
Power off the ET6000 printer.
2
The print head is sensitive to ESD.
Press the front panel release button. Lift the front panel up and out of the way.
Front Panel
Release Button
21
Airport Bag Tag Printers
Step
3
Unimark ET6000 Bag Tag Printer
Action (Continued)
Pull the print head release lever forward and lift the print head up and away from the platen.
Print Head
Release Lever
4
5
Grip the stock firmly from the rear of the unit and remove it.
Clean the Top of Form transmitter and receiver using a dry cloth. Verify they are clear of
particles, paper stock, and dust. Use canned air to clear the sensor.
DO NOT USE alcohol except to clean off adhered labels or adhesives.
Note: See additional diagram on the next page.
22
Airport Bag Tag Printers
Step
Unimark ET6000 Bag Tag Printer
Action (Continued)
23
Airport Bag Tag Printers
1.5
1.5.1
Unimark ET6000 Bag Tag Printer
Stock Cutter
Cutter Location
The ET6000 printer’s stock cutter is in the front of the unit. It is designed to cut between each stock piece
at approximately the perforation point.
1.5.2
Cutter Operation
The cutter is designed to:
• Cut between each stock piece at approximately the perforation point.
• Monitor the cutter and automatically detect when the cut is made.
• Release stock at the time of the cut.
• Reset stock position for the next print and cut cycle.
• Be set up through the front panel, and the exact operation will depend on customer requirements.
24
Airport Bag Tag Printers
1.5.3
Unimark ET6000 Bag Tag Printer
Clearing a Jam
In the unlikely event a stock jam occurs, use the following procedure to clear the jam:
Step
Action
1
Power off the ET6000 printer.
2
The print head is sensitive to ESD.
Press the front panel release button. Lift the front panel up and out of the way.
Front Panel
Release Button
25
Airport Bag Tag Printers
Step
3
Unimark ET6000 Bag Tag Printer
Action (Continued)
Pull the print head release lever forward and lift the print head up and away from the platen.
Print Head
Release Lever
4
5
6
Grip the stock firmly from the front of the unit and remove it from the cutter.
Grip the stock firmly from the rear of the unit and remove it.
Locate the blade location adjustment screw. Use a flat-blade screwdriver and turn the
adjustment clockwise. Verify that the blade moves up and down freely.
26
Airport Bag Tag Printers
Step
Unimark ET6000 Bag Tag Printer
Action (Continued)
7
If there is label stock on the blade, use isopropyl alcohol to clean it. Verify that all label stock,
media residue, and any other contaminants are clear from the cutter mechanism.
The cutter blade is very sharp.
1.6
Troubleshooting
Problem
No Power
Possible Cause
Unit will not power up.
a) Verify AC plug is installed in the rear of the unit.
No Communications
b) Check the AC line level. The unit is designed to operate at voltages as low as
90 VAC.
Unit will not communicate with the host system.
a) Verify the communication cable is plugged into the appropriate connector on
the rear of the unit.
Stock Alarm
b) Verify the communication parameters of the host system match the unit’s
parameters.
Unit failed to detect the Top of Form (TOF) mark/edge/hole.
a) Verify the TOF parameter in the menu and verify it is set up for the stock
being used.
b) Verify the correct stock length has been entered per the stock being used.
c) Verify the front or rear of the unit is not exposed to direct sunlight.
d) Verify the stock guides are adjusted correctly so that the TOF mark runs
under the TOF sensor.
Out of Stock
e) Verify the stock has been inserted properly, with the thermal printing side up.
Check that the stock has been inserted in the correct direction.
Unit is detecting an out-of-stock condition when stock is present.
a) Verify that the sensors are clear. Clean as needed.
b) Verify TOF and PS sensor voltage levels are set per the stock being used.
Adjust levels in maintenance menu if necessary.
Off Center Print
c) Verify the front or rear of the unit is not exposed to direct sunlight.
Print image off to the side of the stock instead of the center.
a) Verify input path is adjusted to the stock being used.
b) If the input path is adjusted correctly, change the left margin offset to center
the print.
27
Airport Bag Tag Printers
Problem
Early or Late Print
Unimark ET6000 Bag Tag Printer
Possible Cause (Continued)
Print image starting position is in an incorrect location.
a) Verify that the sensors are clear. Clean as required.
Stock Tear Off
Difficult
Message: Head Up
No Display
b) Change the TOF/PS position steps so that the starting position for both
sensors are the same.
Stock perforation point does not locate for tear off.
a) Verify that the sensors are clear. Clean as required.
b) Change the perforation tear point so that the perforation stop position
provides the best tear point. This is typically at the edge of the print head.
Print image starting position is in an incorrect location. Verify that the Head Up
detect switch is not stuck or broken/damaged.
Display characters difficult or impossible to see.
a) Verify that the display interface cable has not pulled out from the front bezel.
If it has, power off the unit and reinstall the cable.
b) Verify that the unit’s online LED is lit and use the Up and Down arrow keys
to adjust the display contrast.
28
Airport Bag Tag Printers
2.0
2.1
Unimark 8500 Bag Tag Printer
Unimark 8500 Bag Tag Printer
Printer Overview
The Unimark 8500 printer employs a high-speed, direct-thermal, intelligent print head. The printer uses the
Intel i960 32-bit RISC microprocessor as its main firmware engine. The printer is designed specifically for
the airline bag tag market, which requires high-quality printing and bar codes. The unit prints on longer
and narrower paper stock, prints at the fastest print speed possible, and also allows for easy paper access.
Front View
Print Head Raised
29
Airport Bag Tag Printers
2.2
Unimark 8500 Bag Tag Printer
Front Panel
2.2.1
Front Panel Operations: Online and Offline
The Unimark 8500 printer has two modes of operation: Online and Offline. When online, the printer prints
bag tags as requested by the host system. The offline mode allows an operator to query the printer’s status,
modify operational parameters, and test and maintain the printer.
The online button transitions the printer between online and offline modes. The printer will not operate in
the online mode if an alarm condition exists.
Mode
Comments
Online •
•
•
Offline •
The printer illuminates an Online LED while in the online mode and with the host system.
The printer accepts data from the host system and prints all requests.
If an alarm condition occurs, the printer suspends printing until the printer clears the alarm.
The mode provides a service technician with the information and procedures needed to
maintain the printer.
• The Offline functions are available via the keyboard.
• Access to the service functions require a password.
2.2.2
Operator’s Control Panel Operations
The operator’s control panel is the interface between the printer and the operator. The panel is used to
select the printer’s online and offline operations, print configuration coupons, select printer functions, and
display messages and status. The panel is divided into three sections:
• Message Display Area
• Indicator Lights (LED)
• Control Keypad
30
Airport Bag Tag Printers
2.2.3
Unimark 8500 Bag Tag Printer
Control Panel’s Keypad
Key
RESET
ONLINE
MENU
TEST
ENTER
EXIT
ARROW KEYS
2.3
2.3.1
Action
• If offline and no alarms exist, performs a form feed. If an alarm exists, performs an
alarm clear sequence.
• If online, printer will realign the stock. This can be used if the operator pulls the
next tag past the exit sensor while removing a printed tag.
Toggles the printer’s offline or online mode.
Enters into the Printer Function menu.
Executes selected diagnostic test.
Enters a menu level.
Exits a menu level.
Select menu entries or parameters.
Paper Stock
Adjusting the Paper Size
The Unimark 8500 accepts paper stock widths from 1.75 to 3.5 inches. The paper path guide rails adjust to
meet these dimensions. A paper path adjustment thumb spindle is used to adjust the paper path guide rails
to fit the stock.
To adjust the paper path, complete the following steps:
Step
1
Action
Loosen the spindle lock to allow adjustment of the thumb spindle.
31
Airport Bag Tag Printers
Step
2
3
Unimark 8500 Bag Tag Printer
Action (Continued)
Rotate the spindle:
• Downward to decrease the size of the paper path.
• Upward to increase the size of the paper path.
Re-tighten the spindle lock when adjustments are complete.
Note: Allow .03 to .06 inch gap between the paper and the paper path guides.
2.3.2
Loading Paper Stock
The 8500 printer automatically loads and aligns new bag tags. To load bag tags, complete the following
steps:
Step
Action
1
2
Power on the printer.
Insert the bag tag stock through the back of the printer.
3
When the bag tag stock is within three inches of the print head, the printer engages its stock
motor. Continue to push the stock forward. As the stock reaches the print head, the printer
automatically aligns the stock.
After loading the stock successfully, the alarm and/or stock LEDs will turn off.
4
32
Airport Bag Tag Printers
2.3.3
Unimark 8500 Bag Tag Printer
Initial Set Up and Adjusting Name Location
Connect the 8500 printer to the AC outlet and power on. Before adding paper, complete the following procedure:
Step
Action
1
The following message should be displayed:
2
OUT OF STOCK
REPLENISH-RESET
Press MENU. The following message is displayed:
3
PRINTER FUNCTIONS
DISPLAY STATUS
Using the arrow keys, scroll down until the following message is displayed:
4
PRINTER FUNCTIONS
SERVICE FUNCTIONS
Press ENTER. The following message is displayed:
SERVICE FUNCTIONS
PASSWORD
5
6
7
8
9
Note: In the next series of steps, you will be entering the password 0123.
Press ENTER. You will see four (4) zeros displayed, the first of which is flashing.
Press ENTER. The second 0 (zero) begins flashing. Press the Up Arrow key one time and the
second 0 (zero) now becomes a 1 (one).
Press ENTER. The third 0 (zero) begins flashing. Press the Up Arrow key two times and the
third 0 (zero) now becomes a 2 (two).
Press ENTER. The fourth 0 (zero) begins flashing. Press the Up Arrow key three times and the
fourth 0 (zero) now becomes a 3 (three).
Press EXIT. The message PASSWORD ACCEPTED will display momentarily and then the
following message is displayed.
10
SERVICE FUNCTIONS
PASSWORD
Press the Down Arrow key until the following message is displayed:
11
SERVICE FUNCTIONS
DIAGNOSTICS
Press ENTER. Press the Down Arrow key until the following message is displayed:
DIAGNOSTICS
MAINTENANCE
33
Airport Bag Tag Printers
Step
Unimark 8500 Bag Tag Printer
Action (Continued)
12
Press ENTER and the following message is displayed:
13
MAINTENANCE
PRINTER ADJUST PROC.
Press ENTER and the following message is displayed:
14
15
16
STOCK OUT CALIBRATE
REMOVE STOCK-RESET
If paper stock is in the printer, remove it.
Press RESET.
Press ENTER. The following message is displayed.
17
18
19
20
21
22
23
TEST TOP OF FORM
RESET-TOP OF FORM
Load stock into the printer.
Press RESET and the paper will advance to the next Top of Form (TOF). The following
message is displayed:
POSITION TOF/HEAD
UP-BACKWARDS STEP
Open the cover and view the front of the print head.
Position the stock by pressing the Up Arrow or Down Arrow key until the printable area is
barely visible.
Press RESET and the stock will advance to the next TOF. If the stock is not in the desired
position, repeat the stock-positioning procedure.
Press ENTER and the following message is displayed:
REMOVE TAGS
EXIT - ABORTS
Tear off the paper stock. Stock will advance to the Exit sensor and back, the printer will display
the following message:
24
ADJUSTMENT COMPLETE
After several seconds, this message will appear:
25
MAINTENANCE
PRINTER ADJUST PROC.
Press EXIT until the following message is displayed:
26
27
MAKE CHANGES DEFAULT
(Exit=no) (Enter=yes)
Press ENTER.
Press EXIT until the following message is displayed:
28
ONLINE!
Your setup is complete.
34
Airport Bag Tag Printers
2.3.4
Unimark 8500 Bag Tag Printer
Resetting the 8500’s Stock Counter
To reset the printer’s stock counter to 0 (zero), complete the following steps:
Step
Action
1
2
3
Press ONLINE to switch the printer offline.
Press MENU.
Press the Down Arrow key until the following is displayed:
4
PRINTER FUNCTIONS
SERVICE FUNCTIONS
Press ENTER. The following message is displayed:
SERVICE FUNCTIONS
PASSWORD
5
6
7
8
9
Note: In the next series of steps, you will be entering the password 0123.
Press ENTER. You will see four (4) zeros displayed, the first of which is flashing.
Press ENTER. The second 0 (zero) begins flashing. Press the Up Arrow key one time and the
second 0 (zero) now becomes a 1 (one).
Press ENTER. The third 0 (zero) begins flashing. Press the Up Arrow key two times and the
third 0 (zero) now becomes a 2 (two).
Press ENTER. The fourth 0 (zero) begins flashing. Press the Up Arrow key three times and the
fourth 0 (zero) now becomes a 3 (three).
Press EXIT. The message PASSWORD ACCEPTED will display momentarily and then the
following message is displayed.
10
SERVICE FUNCTIONS
PASSWORD
Press the Down Arrow key until the following message is displayed:
11
SERVICE FUNCTIONS
DIAGNOSTICS
Press ENTER. Press the Down Arrow key until the following message is displayed:
12
DIAGNOSTICS
MAINTENANCE
Press ENTER. Press the Down Arrow key until the following message is displayed:
13
MAINTENANCE
RESET STOCK COUNTER
Press ENTER. The following message is displayed:
RESET STOCK COUNTER
(Exit=no) (Enter=yes)
35
Airport Bag Tag Printers
Step
Unimark 8500 Bag Tag Printer
Action (Continued)
14
Press ENTER. The following message will flash:
15
16
17
18
FUNCTION COMPLETED
Press EXIT three times.
Press ENTER.
Press EXIT.
Press ONLINE to switch the printer online.
2.3.5
Calibrating the 8500’s Print Head
To calibrate the 8500’s print head, complete the following steps:
Step
Action
1
2
3
Press ONLINE to switch the printer offline.
Press MENU.
Press the Down Arrow key until the following is displayed:
4
PRINTER FUNCTIONS
SERVICE FUNCTIONS
Press ENTER. The following message is displayed:
SERVICE FUNCTIONS
PASSWORD
5
6
7
8
9
Note: In the next series of steps, you will be entering the password 0123.
Press ENTER. You will see four (4) zeros displayed, the first of which is flashing.
Press ENTER. The second 0 (zero) begins flashing. Press the Up Arrow key one time and the
second 0 (zero) now becomes a 1 (one).
Press ENTER. The third 0 (zero) begins flashing. Press the Up Arrow key two times and the
third 0 (zero) now becomes a 2 (two).
Press ENTER. The fourth 0 (zero) begins flashing. Press the Up Arrow key three times and the
fourth 0 (zero) now becomes a 3 (three).
Press EXIT. The message PASSWORD ACCEPTED will display momentarily and then the
following message is displayed.
10
SERVICE FUNCTIONS
PASSWORD
Press the Down Arrow key until the following message is displayed:
11
SERVICE FUNCTIONS
DIAGNOSTICS
Press ENTER. Press the Down Arrow key until the following message is displayed:
DIAGNOSTICS
MAINTENANCE
36
Airport Bag Tag Printers
Step
Unimark 8500 Bag Tag Printer
Action (Continued)
12
Press ENTER. Press the Down Arrow key until the following message appears:
13
MAINTENANCE
PRINT HEAD CALIBRATE
Press ENTER. Press the Up Arrow twice to get the following message:
14
CALIBRATE PRINT HEAD
(Exit=no) (Enter=yes)
Press ENTER. The following message will flash:
15
16
17
18
FUNCTION COMPLETED
Press EXIT three times.
Press ENTER.
Press EXIT.
Press ONLINE to switch the printer online.
2.4
2.4.1
Maintenance
Cleaning the Thermal Print Head
To clean the 8500’s print head, complete the following steps:
Step
1
2
3
4
Action
Power off the unit. Unplug the unit’s AC power cable from the power source.
Open the printer’s cover by pressing the cover release button.
After the cover pops open, lift the cover to the full upright position.
Press the print head release latch downward to open the print head assembly.
37
Airport Bag Tag Printers
Unimark 8500 Bag Tag Printer
Step
Action (Continued)
5
6
Lift the print head to the upright position.
Clean the print head heater element surface using isopropyl alcohol. Verify that all label stock,
media residue, and any other contaminants are cleared from the print head.
Note: The printer in this photo is equipped with the newer style print head, with an extra
attached ribbon cable. See “New Print Head” on page 40.
Raised Print Head
7
8
9
2.4.2
Lower the print head assembly, making sure to securely latch it back into position.
Lower the printer’s cover, plug the AC power cord into a power source, and turn on power to
the printer.
Reload paper stock.
Replacing the Thermal Print Head
To replace the 8500’s thermal print head, complete the following steps:
Step
1
2
3
Action
Power off the unit. Unplug the unit’s AC power cable from the power source.
Open the printer’s cover by pressing the cover release button.
After the cover pops open, lift the cover to the full upright position.
38
Airport Bag Tag Printers
Step
4
Unimark 8500 Bag Tag Printer
Action (Continued)
Press the print head release latch downward to open the print head assembly.
39
Airport Bag Tag Printers
Step
5
Unimark 8500 Bag Tag Printer
Action (Continued)
Lift the print head assembly to the upright position.
Raised Print Head
Print Head
Mounting Screws
(Allen Wrench)
Note: The printer in this photo is equipped with the newer style print head, with an extra
attached ribbon cable. This same print head is also used in Unimark’s ET6000 Bag Tag Printer.
New Print Head
6
7
8
9
10
11
12
13
Old Print Head
Grip the stock firmly from the rear of the unit and remove it.
Remove the two Allen-wrench screws holding the brass mounting plate (with attached print
head) to the raised print head assembly.
Note: Newer model 8500 printers have thumb screws rather than Allen-wrench screws.
Remove the power and interface cables from the print head.
Remove the two screws holding the brass mounting plate to the back of the thermal print head.
Locate new print head. Re-install the brass mounting plate to the back of the new print head.
Re-install the power and interface cables to the new print head.
Using the Allen wrench, re-install the brass mounting plate (with attached print head) to the
raised print head assembly.
Lower the print head assembly, making sure to securely latch it back into position.
40
Airport Bag Tag Printers
Step
14
15
Unimark 8500 Bag Tag Printer
Action (Continued)
Lower the printer’s cover, plug the AC power cord into a power source, and turn on power to
the printer.
Reload paper stock.
Note: It is recommended that the new print head be calibrated at this point. See “Calibrating the
8500’s Print Head” on page 36.
2.4.3
Cleaning the Platen
To clean the 8500’s platen, complete the following steps:
Step
1
2
3
4
5
6
7
8
9
2.4.4
Action
Power off the unit. Unplug the unit’s AC power cable from the power source.
Open the printer’s cover by pressing the cover release button.
After the cover pops open, lift the cover to the full upright position.
Press the print head release latch downward to open the print head assembly.
Clean the platen surface using Bloch Buster, window cleaner, a damp cloth/paper towel, or
Fedron.
If the platen appears to be defective, replace the platen.
Lower the print head assembly, making sure to securely latch it back into position.
Lower the printer’s cover, plug the AC power cord into a power source, and turn on the power
to the printer.
Reload the paper stock.
Replacing the Platen
To replace the 8500’s platen, complete the following steps:
Step
1
2
3
Action
Power off the unit. Unplug the unit’s AC power cable from the power source.
Open the printer’s cover by pressing the cover release button.
After the cover pops open, lift the cover to the full upright position.
41
Airport Bag Tag Printers
Step
4
Unimark 8500 Bag Tag Printer
Action (Continued)
Remove the two screws holding the metal cover over wiring and circuitry for the print head.
Screws securing metal cover
5
Remove the screw securing the ground wire between the print head/paper stock guide rail
assembly and the power supply unit.
Screw securing
ground wire
42
Airport Bag Tag Printers
Step
6
Unimark 8500 Bag Tag Printer
Action (Continued)
Remove the two screws securing the plastic cover over the daughter board and remove the
cover.
Screws securing
plastic cover over
daughter board
7
8
Disconnect all cables attached to the daughter board.
Loosen (do not remove) the two screws securing the daughter board and pull up on the board to
remove it.
Screws securing
daughter board
IMPORTANT!
The above photo shows the daughter board with the print head/paper stock guide rail assembly
already removed. It is for illustration purposes only. However, even with that assembly still in
place, you have clear access to the screw securing the right side of the board. Because the
assembly partially hides the screw securing the left side of the daughter board, use a small thin
screwdriver.
43
Airport Bag Tag Printers
Step
9
Unimark 8500 Bag Tag Printer
Action (Continued)
Loosen (do not remove) the two nuts on the bolts securing the left side of the print head/paper
stock guide rail assembly.
Nuts on bolts
10
To free up the Thumb Spindle on the back panel of the printer, loosen the screw securing the
Spindle Lock. Rotate the Spindle Lock to an up position and retighten the screws.
11
Remove the print head/paper stock guide rail assembly by sliding it toward the back of the unit
and lift it up and out.
44
Airport Bag Tag Printers
Unimark 8500 Bag Tag Printer
Step
Action (Continued)
12
After removing the print head/paper stock guide rail assembly, loosen the three screws near the
gear and belt that secure the motor. Slide the motor forward (toward the gear) to decrease
tension on the belt. Remove the belt.
Pinch here
to determine
tension on
the belt
Screws securing motor
When reinstalling the belt after the platen has been replaced, make sure the tension on the belt is
not excessive. Pinch the belt with your fingers to ensure there is sufficient “play” in the belt.
45
Airport Bag Tag Printers
Step
13
Unimark 8500 Bag Tag Printer
Action (Continued)
Loosen both set screws securing the gear to the platen.
Set screw securing gear
14
When reinstalling the gear after the platen has been replaced, make sure each of the two set
screws is tightened against a “flat” side of the end of the platen.
Remove the horseshoe clip that secures the other end of the platen.
Horseshoe clip
securing platen
15
Replace the platen and reinstall all components in reverse order.
46
Airport Bag Tag Printers
Step
16
17
18
2.4.5
Unimark 8500 Bag Tag Printer
Action (Continued)
Lower the print head assembly, making sure to securely latch it back into position.
Lower the printer’s cover, plug the AC power cord into a power source, and turn on power to
the printer.
Reload paper stock.
Cleaning the Paper Stock Guide Rails
Occasionally, the 8500’s paper stock guide rails need to be cleared of jammed paper stock or paper residue.
The following steps involve first removing the entire print head/paper stock guide rail assembly to avoid
spilling the cleaning fluid Fedron on, and thus damaging, the daughter board or power supply. To clean the
rails, complete the following steps:
Step
1
2
3
4
Action
Power off the unit. Unplug the unit’s AC power cable from the power source.
Open the printer’s cover by pressing the cover release button.
After the cover pops open, lift the cover to the full upright position.
Remove the two screws holding the metal cover over wiring and circuitry for the print head.
Screws securing metal cover
47
Airport Bag Tag Printers
Step
5
Unimark 8500 Bag Tag Printer
Action (Continued)
Remove the screw securing the ground wire between the print head/paper stock guide rail
assembly and the power supply unit.
Screw securing
ground wire
6
Remove the two screws securing the plastic cover over the daughter board and remove the
cover.
Screws securing
plastic cover over
daughter board
7
Disconnect all cables attached to the daughter board.
48
Airport Bag Tag Printers
Unimark 8500 Bag Tag Printer
Step
Action (Continued)
8
Loosen (do not remove) the two screws securing the daughter board and pull up on the board to
remove it.
Screws securing
daughter board
9
IMPORTANT!
The above photo shows the daughter board with the print head/paper stock guide rail assembly
already removed. It is for illustration purposes only. However, even with that assembly still in
place, you have clear access to the screw securing the right side of the board. Because the
assembly partially hides the screw securing the left side of the daughter board, use a small thin
screwdriver.
Loosen (do not remove) the two nuts on the bolts securing the left side of the print head/paper
stock guide rail assembly.
Nuts on bolts
49
Airport Bag Tag Printers
Step
Unimark 8500 Bag Tag Printer
Action (Continued)
10
To free up the Thumb Spindle on the back panel of the printer, loosen the screw securing the
Spindle Lock. Rotate the Spindle Lock to an up position and retighten the screws.
11
Remove the print head/paper stock guide rail assembly by sliding it toward the back of the unit
and lift it up and out.
Press the print head release latch downward to open the print head assembly.
12
50
Airport Bag Tag Printers
Step
13
Action (Continued)
Stand the print head/paper stock guide rail assembly in a vertical position on its back end and
pour Fedron into the front-end openings of the stock guide rails just behind the platen. Let the
Fedron run down and soak in for a few minutes. Then carefully clean out any jammed paper
stock or remaining paper residue.
Platen
14
15
16
2.4.6
Unimark 8500 Bag Tag Printer
Front-end of
stock rails
After the paper stock rails have been cleaned, reinstall all components in the reverse order.
Lower the printer’s cover, plug the AC power cord into a power source, and turn on power to
the printer.
Reload paper stock.
Cleaning the Filter
The 8500’s air filter should be cleaned at least once a month to ensure proper printer operation. To clean
the filter, complete the following steps:
Step
1
Action
Power off the unit. Unplug the unit’s AC power cable from the power source.
51
Airport Bag Tag Printers
Step
Unimark 8500 Bag Tag Printer
Action (Continued)
2
Lift out the filter guard located at the back of the printer.
3
4
5
6
Remove the filter.
Clean the filter using a vacuum cleaner or canned air.
Replace the filter and filter guard.
Turn on the power to the printer.
2.5
Alarms
The 8500 printer’s alarms are displayed in two formats: Operator and Maintenance.
• Operator alarms are automatically displayed
• Maintenance alarms must be queried by a technician
When an alarm occurs, the printer automatically goes offline and illuminates an alarm LED. The control
panel message displays the activated alarm and a brief corrective action message.
2.5.1
Clearing an Alarm
The 8500 printer has two alarm-clearing mechanisms. The stock-load procedure performs an alarm clear
sequence, and the RESET button clears alarms. When clearing a stock jam, complete the following steps:
Step
1
2
3
4
Action
Open the printer’s cover.
Examine the paper path and remove any jammed stock. Open and inspect the print head.
Close the print head (if opened) and the printer’s cover.
Press RESET.
52
Airport Bag Tag Printers
2.5.2
Unimark 8500 Bag Tag Printer
Operator Alarms
Alarm
Description
Corrective Action
Electronic Alarm
Press RESET
A malfunction has been detected within Perform an alarm clear
the printer’s electronic components.
sequence. If the alarm persists,
call for assistance.
Print Head Error
Press RESET
The print head electronics detected a
fault.
Tag Alarm
Check-Press RESET
The printer detected an error during
Check the paper path for any
print. An obstruction in the paper path is obstructions and perform an
the usual cause. Another possibility is
alarm clear sequence.
improper paper loading.
Alarm Clear Required
Press RESET
This LCD screen displays this error after Perform an alarm clear
a Head Up alarm occurs. This error
sequence.
occurs if the head mechanism has been
latched down, but the alarm clear
sequence has not been performed.
Out of Stock
Replenish-Press RESET
This printer is out of stock.
Replenish the stock.
Head Up
Lower-Press RESET
The printer’s head mechanism is not
latched in its print position.
Ensure the head mechanism is
latched down. Perform an alarm
clear sequence.
Please Remove Tags
The exit sensor is blocked and the host
has requested another set of tags.
Remove previous batch of tags.
If already removed and sensor is
still blocked, press RESET key.
Perform an alarm clear
sequence. If the alarm persists,
call for assistance.
53
Airport Bag Tag Printers
2.6
Unimark 8500 Bag Tag Printer
Troubleshooting
2.6.1
Troubleshooting Guide
The following is a list of things to look for if the Operator Alarms list (above) does not help solve a printer
problem.
Alarm
Description
Corrective Action
TAG ALARM
Printer has failed to detect the
Top of Form mark.
1. Check for correct PAPER PARAMETER/TOP
OF FORM parameter.
2. Check for correct PAPER PARAMETER/
LENGTH parameter.
3. Check paper rails adjustment.
OUT OF STOCK
Printer is detecting an out-ofstock condition when stock is
present.
1. Run the DIAGNOSTIC/MAINTENANCE/
PRINTER ADJUST PROC. The first step
STOCK OUT CALIBRATION should correct
this problem.
2. Check the DIAGNOSTICS/MAINTENANCE/
SENSOR READINGS. The translucency of the
stock may be too great for the PRINTER
ADJUST PROC. Lower the SPECIAL
PARAMETERS/OOS value manually. Note
that this value is activated during an alarm
clear/init procedure.
OFF CENTER
PRINT
Use the PRINTER PARAMETERS/
HORIZONTAL parameters to adjust to the right or
left.
EARLY OR
LATE PRINT
1. Run the DIAGNOSTICS/MAINTENANCE/
PRINTER ADJUST PROC.
2. Use PRINTER PARAMETERS/VERTICAL
parameter to adjust the print to start later.
3. If the print is starting too early, the PRINTER
ADJUST PROC must be readjusted so that less
of the tag is present.
54
Airport Bag Tag Printers
2.6.2
Unimark 8500 Bag Tag Printer
Diagnostic List
DISPLAY STATUS displays all the alarms that are currently active. The alarm message that is displayed is
more specific to the alarm than an unsolicited alarm message. The following list of alarms will assist the
technician or maintenance personnel in troubleshooting the printer’s electrical or mechanical subsystems.
Alarm
Description
Corrective Action
MECHANISM
TIMEOUT
Formatter processor has timed out
waiting for the transport processor.
• Faulty electronics
• Defective print head
MECHANISM
FIRMWARE
Operation failed but no direct cause was
found.
• Electronic alarms
• Supply alarms
• Mechanism alarms
TRP ROM FAULT
Transport processor (80188) is reporting • Defective transport ROM
a ROM fault.
• Defective PCB
TRP RAM FAULT
Transport processor (80188) is reporting • Defective transport RAM
a RAM fault.
HEAD ERROR
Transport processor has detected
problems communicating with print
head.
• Defective print head cabling
• Defective print head
MECHANISM TABLE Print command was issued before the
Defective PCB electronics
formatter (i960) processor has initialized
the transport processor (80188).
TOF POSITIONING
Paper was being advanced, either
printing a tag, seeking Top of Form, or
loading stock and it failed to find TOF.
While loading stock, the TOF
sensor is blocked but the stock is
not pushed under the print head.
• Printer has an incorrect TOF
parameter programmed
• Paper path is obstructed
• Defective TOF sensor, motor,
or electronics
HEAD UP DURING
PRINT
During a print operation, firmware
• Print head raised during print
detected the print head in the up position. • Defective Head Up sensor or
assembly
RESET REQUIRED
A FAULT condition was active and
clear. This fault is requesting the
operator to press RESET.
Print head was re-latched back
down. Press RESET.
OUT OF STOCK
Printer detected an Out of Stock
condition.
• No stock present under TOF
sensor
• Defective TOF sensor
• PRINTER ADJUST
PROCedure was not executed
correctly
HEAD UP
Print head is in the up position.
• Print head is lifted
• Defective Head Up sensor or
assembly
55
Airport Bag Tag Printers
Index
A
adjustment paddle 5
alarms
clearing 52
Early or Late Print 54
Off Center Print 54
Operator and Maintenance 52
operator on Unimark 8500 53
Out of Stock 54
Tag Alarm 54
Unimark 8500 52
alignment pins 14
Allen wrench 40
B
Index
E
Early or Late Print alarm 54
ESD 7
static brush 9
F
fan-fold stock 6
Fedron 9, 16, 41, 47, 51
filter
cleaning on Unimark 8500 51
guard 52
front panel release button 10, 15
H
Head Up message 28
horseshoe clip 46
host system 27, 30
bag tags 1
bar code 29
belt 45
Bloch Buster 9, 16, 41
boarding passes 1
I
C
K
canned air 9, 52
cargo labels 1
Control Panel
Unimark 8500 30
counter
gate 1
ticket 1
curb-side 1
cutter blade 27
keyboard 30
kiosk 1
D
daughter board 43, 47
diagnostic 31, 33
Unimark 8500 55
Intel i960 RISC microprocessor 29
interface cables 13, 14
isopropyl alcohol 9, 11, 27, 38
L
LED 1, 30, 32, 52
M
Maintenance 33
Message Display Area 30
modes of operation
offline 30
online 30
56
Airport Bag Tag Printers
Index
N
rolled paper stock 1
Name Location
adjusting on Unimark 8500 33
S
O
Off Center Print alarm 54
offline 30
online 30
Out of Stock 27, 33
alarm 54
screwdriver 26, 43
Service Functions 33
spindle lock 31, 44, 50
stock counter
resetting on Unimark 8500 35
stock cutter 24
stock jam 7
T
P
paper stock 1, 5, 38
adjusting paper size 31
cleaning guide rails 47
guide rail 42, 44, 45
jam 25
loading 32
Out of Stock 27
paper towel 9, 16, 41
password 30, 33
perforation 24
platen 8, 9, 11, 18
cleaning 14
cleaning on Unimark 8500 41
Present Sensor (PS) 7, 9
cleaning 17
print head 9, 29
assembly 13, 38
calibrating on Unimark 8500 36
cleaning on Unimark 8500 37
cleaning on Unimark ET6000 10
new 40
old 40
release lever 8, 11, 16, 18, 39
replacing on Unimark ET6000 12
Printer Adjust Proc. 34
Printer Functions 33
R
Remove Stock-Reset 34
ribbon cable 38
Tag alarm 54
thermal printer 1
thumb spindle 31, 44, 50
thumbscrew 5, 13
ticket counter 1
Top of Form (TOF) 7, 9, 27
Top of Form (TOF) Sensor
center 21
left 19
Troubleshooting
Unimark 8500 54
Unimark ET6000 27
U
Unimark 8500 29
adjusting name location 33
alarms 52
calibrating print head 36
cleaning paper stock guide rails 47
cleaning print head 37
cleaning the filter 51
cleaning the platen 41
diagnostic list 55
initial set up 33
operator alarms 53
resetting stock counter 35
Troubleshooting 54
Unimark ET6000 1
adjusting input paper path size 5
adjustments menu 3
cleaning the platen 14
57
Airport Bag Tag Printers
Index
cleaning the Present Sensor 17
cleaning the print head 10
cleaning Top of Form sensor (center)
21
cleaning Top of Form sensor (left) 19
clearing a stock jam 7, 25
front panel 2
loading fan-fold stock 6
loading paper stock 5
operator-level menu 4
replacing the print head 12
stock cutter 24
Troubleshooting 27
V
vacuum 52
W
window cleaner 9, 16, 41
58