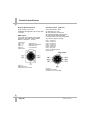
1
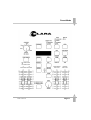
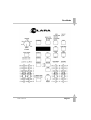
USER MANUAL
USER MANUAL
WARNING
If a portable or temporary three phase mains supply
is used to power this desk:
We recommend the Power Supply is unplugged from the mains supply
before connecting or disconnecting the mains supply.
SERIOUS DAMAGE will occur if the Power Supply
is connected across two phases.
This equipment is designed for use as a
lighting control desk only, and is
unsuitable for any other purpose. It should
only be used by, or under the supervision
of, an appropriately qualified or trained
person.
Zero 88 Lighting Ltd.
Zero 88 Lighting Ltd. reserves the right to
make changes to the equipment
described in this manual without prior
notice. E & OE.
United Kingdom
Issue 1 September 1998
Manual Stock No. 73 - 710 - 00
Software Version 1.0
© Zero 88 Lighting Ltd. 1998
Usk House
Llantarnam Park
Cwmbran
Gwent NP44 3HD
Tel:
+44 (0)1633 838088 ✱
Fax:
+44 (0)1633 867880
✱ = 24 hour Answer Phone
e-mail:
[email protected]
web site: www.zero88.com
Contents
Program Mode
Introduction
Memories and Sequences
19
Programming Memories and Sequences
19
Programming Controls and Displays
20
Setting up the Desk for Programming
22
Selecting a Scene Memory
22
Programming a Scene Memory
22
Editing a Scene Memory
23
Clearing/Deleting a Scene Memory
23
10
Selecting a Sequence
24
Two Preset Operation
12
Programming a Sequence
24
Setting up for Two Preset Operation
12
Inserting a Step into a Sequence
24
To Output a Scene from Preset A
12
Editing a Step in a Sequence
25
To Output a Scene from Preset B
12
Deleting a Step from a Sequence
25
Clearing/Deleting a Sequence
26
Reviewing a Sequence
26
This Manual
5
The Elara Lighting Desk
5
Master Controls and Displays
6
Turning on the Desk
6
Default State
6
Preset Mode
Preset Controls and Displays
Manual Fading between Scenes
12
Timed Crossfades between Scenes
13
Flashing Channels
13
Wide Operation
14
Setting up for Wide Operation
14
Storing and Cross Fading Scenes
in WIDE
15
Manual and Timed Crossfades
16
Flashing Channels in WIDE
16
Page 2
ELARA 7371000 25.9.98
Contents
Run Mode
Super User Mode
Run Mode Controls and Displays
30
Entering Super User Mode
37
Entering Run Mode
32
Exiting Super User Mode
37
Outputting Scene Memories
32
Setting Recovery Mode
38
Clear All Memories
38
Accessing Scene Memories on
Different Pages (Page Overlay)
33
Saving Memory Data
38
Flashing Memories
34
Loading Memory Data
38
Outputting a Sequence
34
Memory Module Error Codes
38
Moving between Sequence Steps
35
Manually Stepping through a Sequence
35
Automatically Stepping through
a Sequence
35
Using Sound Input to Step through
a Sequence
35
Snap or Crossfade Between
Sequence Steps
36
Controlling the Direction of a Sequence
36
ELARA 7371000 25.9.98
Technical Specification
Power Supply:
39
Audio Input:
39
Remote STEP +
39
Memory Module:
40
DMX Output:
40
Analogue Output: (Optional)
40
Page 3
Page 4
ELARA 7371000 25.9.98
This Manual
This manual describes the operation and
programming of the Elara lighting desk. It
begins with a general description of the
desk, the master controls, turning on the
desk and the default state. The manual
then covers the different operating modes
of the desk, namely PRESET, PROGRAM
and RUN. Each of these sections contains
a basic description of the relevant front
panel controls and displays, and a step by
step guide to the various functions
available. The SUPER USER functions
and technical specification sections follow.
Throughout this manual, references to
controls, buttons and lights on the front
panel appear in capital letters (eg GRAND
MASTER, PRESET CONTROL).
The Elara Lighting Desk
Is a compact user-friendly memory desk
which records channel levels.
Up to 48 Memories can be saved. The
memories are accessed as two pages of
24 memories, using the PRESET faders
as submasters. The programmed
memories can also be used to program
three sequences (chases) each of which
can contain up to 99 steps. Crossfade
times and chase speed/direction can be
adjusted by the user.
The desk has 12 control channels (24 with
WIDE active). The standard output from
the desk is DMX 512. The control channel
data is output on DMX channels 1 -24
(control ch 1 = DMX ch 1, control ch 2 =
DMX ch 2 etc.)
Options Available:
Analogue output kit Stock No 00-118-00
Memory Module
Stock No 00-115.00.
ELARA 7371000 25.9.98
Page 5
Introduction
Master Controls and Displays
These controls set the general operating
conditions for the desk.
l MODE
The MODE button is used to select the
operational mode of the desk. The red
lights above the button show the current
operating mode (SUPER USER,
PRESET, PROGRAM, RUN).
l GRAND MASTER
The GRAND MASTER fader is used for
overall control of the maximum output
levels from all channels of the desk.
l DBO
The DBO button makes all the desk
outputs zero and operates in all modes
except SUPER USER. Pressing the DBO
button switches between DBO active
(Dead Black Out - all channels at zero)
and DBO not active (normal desk
outputs). The red light in the DBO button
indicates the current state (Flashing =
DBO active, Off = DBO not active).
l DMX OUT OK
This light is illuminated when the desk is
transmitting digital data.
l WIDE
The WIDE button is used to
select/deselect WIDE operation. When in
WIDE, the desk is a single preset 24
channel desk, rather than a two preset 12
channel desk. With WIDE selected it is
still possible to crossfade between two
scenes (see section on Preset Mode for
details). When WIDE is selected the red
light in the button is illuminated.
Page 6
l FLASH ON/OFF
The FLASH ON/OFF button is used to
enable/disable the CHANNEL FLASH
buttons. When the FLASH FUNCTION is
active, the red light in the button is
illuminated and the CHANNEL FLASH
buttons are enabled.
Turning on the Desk
1.
Connect the DMX cable.
2.
Connect the power supply to the desk
and switch on at the mains.
3.
Ensure that DBO is not active (the red
light in the DBO button is off).
Set the GRAND MASTER fader to
full.
Set the A MASTER and B MASTER
faders to zero.
Set the CROSSFADE control to
manual.
4.
5.
6.
Default State
When the desk is first switched on, or is
subsequently switched on and Recovery
Mode is off, the following default state is
entered:
MODE
DBO
DISPLAY
WIDE MODE
FLASH ON/OFF
SOUND
All other lights
PRESET
Not active
Not active
Not active
Active
Not active
Off
ELARA 7371000 25.9.98
Introduction
ELARA 7371000 25.9.98
Page 7
Page 8
ELARA 7371000 25.9.98
When the desk is in PRESET Mode all the
memory functions are disabled, offering
the user a completely manual system.
The desk can be operated by either two
12 channel presets controlling 12
channels, or a single WIDE preset
controlling 24 channels.
In Two Preset operation, separate scenes
are set up on PRESET A and PRESET B
using the individual channel faders. The A
MASTER and B MASTER faders are used
to crossfade between the two scenes.
With WIDE selected it is still possible to
crossfade between two scenes. The first
scene is set up on the PRESET A and
PRESET B faders and is stored
temporarily using the PRESET CONTROL
button. Once stored, another scene can
be set up on the PRESET A and PRESET
B faders. The A MASTER and B MASTER
faders are used to crossfade between the
stored scene and the scene on the
PRESET faders.
Crossfades can be manual or timed.
Overall output is under the control of the
GRAND MASTER.
ELARA 7371000 25.9.98
Page 9
Preset Mode
Preset Controls and Displays
l PRESETS A AND B
l CROSSFADE
There are 12 PRESET A faders which
control individual channels 1 -12.
The CROSSFADE control is used to
determine the fade time when crossfading
between scenes. The control can be set
to Manual or to a time between 1 second
and 5 minutes.
There are 12 PRESET B faders which
control individual channels 1 -12 or
channels 13 - 24 if WIDE is active.
l CHANNEL FLASH BUTTONS
There are 24 CHANNEL FLASH buttons
corresponding to the 12 PRESET A and
12 PRESET B faders. These are used to
flash individual channels. These buttons
can be disabled using the FLASH
ON/OFF button.
l A MASTER AND B MASTER
In two preset operation, the A MASTER is
used to control the maximum output level
from the PRESET A faders. The B
MASTER is used to control the maximum
output level from the PRESET B faders.
l FADING LIGHT
The red FADING light below the
CROSSFADE control flashes when a
timed crossfade is taking place.
l PRESET CONTROL
The PRESET CONTROL button is only
applicable when WIDE is active. This
button is used to control which master
(A MASTER or B MASTER) has control of
the PRESET faders, and which master
has control of the stored scene. The
accompanying lights on the front panel
indicate the current state (A FADERS,
B STORED or B FADERS, A STORED).
In WIDE operation, the A MASTER and
B MASTER faders are used to control the
maximum output level from both the
PRESET A and PRESET B faders, and
the stored scene.
The B MASTER fader is reversed (100%
at the bottom of its travel) to facilitate
manual crossfades when moving the A
MASTER and B MASTER in tandem.
Page 10
ELARA 7371000 25.9.98
Preset Mode
ELARA 7371000 25.9.98
Page 11
Preset Mode
Two Preset Operation
The PRESET A and PRESET B faders,
the A MASTER and B MASTER and the
GRAND MASTER are used to control the
output levels from the desk. The
CROSSFADE control is used to
determine the crossfade time between the
preset masters.
Setting up for Two Preset Operation
1. If the desk is not already in PRESET
Mode, press and hold the MODE
button for 1 second. The PRESET
light above the MODE button will
come on.
2. Ensure WIDE is not active and the
CROSSFADE control is set to
Manual.
To Output a Scene from Preset A
1. Set the required levels for each
channel on the PRESET A faders.
2. Set the A MASTER to full and the
B MASTER to zero. The scene set up
on PRESET A is output live.
To Output a Scene from Preset B
1. Set the required levels for each
channel on the PRESET B faders.
2.
Set the A MASTER to zero and the B
MASTER to full. The scene set up on
PRESET B is output live.
Page 12
Manual Fading between Scenes
1. Ensure that the CROSSFADE control
is set to Manual.
2. Set up a scene using the PRESET A
faders.
3. Set up a different scene on the
PRESET B faders.
4.
5.
6.
7.
8.
Set the A MASTER to full, and the
B MASTER to zero. The scene set on
the PRESET A faders will be output.
To crossfade to the scene set up on
PRESET B, simultaneously move the
A MASTER to zero and the B
MASTER to full. The operator has
direct control over the speed of the
scene change. As the master faders
are moved in tandem the scene set
up on PRESET B will fade in and the
scene set on PRESET A will fade out.
The crossfade is dipless
A new scene can then be set up on
PRESET A without affecting the
outputs.
To crossfade to the new scene on
PRESET A, simultaneously move the
A MASTER to full and the B MASTER
to zero.
As the master faders are moved in
tandem the scene set up on PRESET
B will fade out and the scene set on
PRESET A will fade in. The crossfade
is dipless.
ELARA 7371000 25.9.98
Preset Mode
Timed Crossfades between Scenes
1. Set the A MASTER and B MASTER
to zero.
2. Set up a scene using the PRESET A
faders.
3. Set up a different scene on the
PRESET B faders.
4.
Set the CROSSFADE control to the
time required to fade scene A in.
5.
Quickly move the A MASTER to full.
The scene on the PRESET A faders
will fade in and be output live. (The
time taken for the fade to complete is
determined by the value set on the
CROSSFADE control). The red
FADING light will flash while the
dipless crossfade is taking place, and
go out when the crossfade is
complete
To crossfade to the scene on
PRESET B, quickly move the
A MASTER to zero and the
B MASTER to full. The scene on
PRESET B will fade in and the scene
on PRESET A will fade out in the
selected time. The red FADING light
will flash while ss crossfade is taking
place.
A new scene can then be set up on
PRESET A without affecting the
outputs.
To crossfade to the scene on
PRESET A, quickly move the
A MASTER to full and the B MASTER
to zero. The scene on PRESET A will
fade in and the scene on PRESET B
will fade out in the selected time. The
red FADING light will flash while the
dipless crossfade is taking place, and
go out when the crossfade is
complete.
6.
7.
8.
ELARA 7371000 25.9.98
Flashing Channels
1. Ensure that the FLASH FUNCTION is
active.
2. Press and hold an individual
CHANNEL FLASH button. (Those
below the PRESET A faders or
PRESET B faders can be used). The
channel is then added to the scene at
the level set on the GRAND
MASTER.
3. Release the CHANNEL FLASH
button. The channel returns to its
previous level.
Page 13
Preset Mode
Wide Operation
In WIDE the user is able to crossfade
between, or combine two scenes which
are 24 channels wide.
A scene is set up using the PRESET A
and PRESET B faders (PRESET A faders
control channels 1 -12, PRESET B faders
control channels 13 - 24). This scene is
then stored temporarily by pressing the
PRESET CONTROL button. A second
scene can then be set up on the PRESET
A and PRESET B faders. The A MASTER
and B MASTER faders can then be used
to crossfade between the two scenes.
The PRESET CONTROL button is used
to control which master has control of the
PRESET channel faders and the stored
scene. The GRAND MASTER is used to
control the final output levels from the
desk. The CROSSFADE control is used
to determine the crossfade time between
the two scenes.
Page 14
Setting up for Wide Operation
1. If the desk is not already in PRESET
Mode, press and hold the MODE
button for 1 second. The PRESET
light above the MODE button will
come on.
2.
Ensure WIDE is active. On first
invoking WIDE or re-entering WIDE,
the PRESET faders will be assigned
to the A MASTER, and the stored
scene assigned to the B MASTER.
The lights next to the PRESET
CONTROL button will indicate this
(A FADERS, B STORED). The
temporarily stored scene will be
cleared.
ELARA 7371000 25.9.98
Preset Mode
Storing and Cross Fading Scenes in
WIDE
1. Set the A MASTER and Grand
MASTER to full and the B MASTER
to zero. Set the CROSSFADE control
to manual.
2. Ensure that the lights next to the
PRESET CONTROL button indicate
A FADERS, B STORED
3. Set up a scene using the PRESET A
and PRESET B faders. This scene
will be output.
4.
5.
6.
To store the scene press the
PRESET CONTROL button. The
output levels are temporarily stored
and the lights next to the PRESET
CONTROL button change to indicate
B FADERS, A STORED.
The A MASTER is now assigned to
the stored scene and the B MASTER
assigned to the PRESET faders, so
the outputs remain the same.
Set up the next scene using the
PRESET A and PRESET B faders.
(The outputs are not affected since
the B MASTER is currently at zero).
To crossfade between the stored
scene and the scene on the PRESET
faders, simultaneously move the
A MASTER to zero and the B
MASTER to full. A dipless crossfade
will occur.
ELARA 7371000 25.9.98
7.
8.
If the PRESET CONTROL button is
pressed again, the output levels are
saved into the temporary store
(overwriting the previous values) and
the lights next to the PRESET
CONTROL button change to indicate
A FADERS, B STORED. The B
MASTER is now assigned to the
stored scene and the A MASTER
assigned to the PRESET faders, so
the outputs remain the same.
The operations described in
steps 5 - 8 can then be repeated to
set up a new scene on the faders,
crossfade to the new scene, and save
it to a temporary store etc.
Page 15
Preset Mode
Manual and Timed Crossfades
Crossfading between the scene set up on
the PRESETS and the stored scene is
achieved by moving the A MASTER and
B MASTER faders in tandem.
If the CROSSFADE control is set to
Manual, the crossfade time is determined
by the speed at which the A MASTER and
B MASTER faders are moved. The
operator has direct control over the speed
of the scene change.
If the CROSSFADE control is not set to
manual, the crossfade time will be the
time indicated on the CROSSFADE dial
(between 1 second and 5 minutes).
Flashing Channels in WIDE
1. Ensure that the FLASH FUNCTION is
active.
2. Press and hold an individual
CHANNEL FLASH button. (Those
below the PRESET A faders control
channels 1 - 12, those below the
PRESET B faders control channels
13 - 24). The corresponding channel
is then added to the scene at the
level set on the GRAND MASTER.
3.
Release the CHANNEL FLASH
button. The channel returns to its
previous level.
NOTES
Stored Scene
Any stored scene being output in PRESET
Mode will be removed from the outputs if the
desk is changed to PROGRAM, RUN or
SUPER USER Modes.
Page 16
ELARA 7371000 25.9.98
ELARA 7371000 25.9.98
Page 17
Page 18
ELARA 7371000 25.9.98
Memories and Sequences
Both SCENE memories and
SEQUENCES can be programmed on the
Elara desk.
A SCENE memory consists of a single
static state, recording the output level of
each channel.
A SEQUENCE consists of a number of
steps (max 99). Each step is a previously
programmed scene memory. The same
scene memory may be used in more than
one step of a sequence and more than
one sequence.
Programming Memories and
Sequences
The desk provides 48 programmable
memories, which are accessed as two
pages of 24 memories. The MEMORY
PAGE button is used to select the
required page. The CHANNEL FLASH
buttons are used to select the memory.
The yellow lights in the CHANNEL FLASH
buttons are use to indicate which
memories have been programmed. The
PRESET faders are used to set the output
levels and the PROGRAM button used to
save the levels to memory.
The desk also provides 3 programmable
sequences. The SEQUENCE buttons are
used to select the sequence, and the
MEMORY PAGE and CHANNEL FLASH
buttons used to program the required
memories into each step.
ELARA 7371000 25.9.98
Page 19
Program Mode
Programming Controls and
Displays
The following controls and displays are
used in PROGRAM Mode.
l PRESET A AND PRESET B
There are 12 PRESET A faders which
control individual channels 1 - 12.
There are 12 PRESET B faders which
control individual channels 1 - 12, or
channels 13 - 24 if WIDE is active.
l CHANNEL FLASH BUTTONS
The 24 CHANNEL FLASH buttons located
below the 12 PRESET A and 12
PRESET B faders are used as memory
selection buttons in PROGRAM Mode.
l A MASTER
The A MASTER fader is used to control
the maximum output level from the
PRESET A faders. If WIDE is active, the
A MASTER is used to control the
maximum output level from both the
PRESET A and PRESET B faders.
l B MASTER
The B MASTER fader is used to control
the maximum output level from the
PRESET B faders. If WIDE is active, the
B MASTER has no effect.
l PREVIEW/EDIT
When EDIT is active, the user can edit
individual channels of a previously
programmed SCENE memory, or the
memory numbers in a SEQUENCE. The
light in the button is illuminated when
EDIT is active.
Page 20
l MEMORY TYPE
This button is used to select whether a
SCENE memory or SEQUENCE is being
programmed. The red lights above the
button indicate which is currently selected.
l DISPLAY
The DISPLAY indicates the current step
number when a sequence is being
programmed or edited.
l SEQUENCE 1, SEQUENCE 2,
SEQUENCE 3 BUTTONS
These buttons are used to select a
sequence to program/edit. Only one
sequence can be selected/active at a
time. The red light in the button is
illuminated when the sequence is
selected/active.
l CLEAR
The CLEAR button is used to clear a
scene memory or sequence (ie remove
the programmed data and return to an
unprogrammed state).It is also used to
delete a step from a sequence.
l STEP + and STEP These buttons are used to select the
required step when inserting, deleting or
editing steps in a sequence.
l PROGRAM
The PROGRAM button is used to save
the output levels into the current scene
memory.
ELARA 7371000 25.9.98
Program Mode
l MEMORY PAGE
NOTES
This button is used to toggle between the
two pages of memories. The red lights
above the button indicate which page is
currently selected.
Preset Faders
In two preset operation, either the PRESET A
or PRESET B faders can be used to set the
levels for channels 1 - 12. Channels 13 -24 will
be recorded at zero. In WIDE operation, the
PRESET A faders are used to set channels 1 12 and the PRESET B faders to set channels
13 - 14.
Recording Output Values
It is recommended that the A MASTER, B
MASTER and GRAND MASTER are set to full
(100%) when programming memories.
Otherwise the output values may not be as
expected when the memories are output in
RUN Mode. As current output values are
recorded (not channel fader positions).
DMX Channels
The desk outputs and records all 24 DMX
channels , even if NOT in WIDE.
In NOT in WIDE then channel s 13-24 are
output at zero.
ELARA 7371000 25.9.98
Page 21
Program Mode
Setting up the Desk for
Programming
1.
2.
3.
4.
5.
If the desk is in PRESET Mode or
SUPER USER Mode, press and hold
the MODE button for 1 second to
enter PROGRAM Mode. If the desk is
in RUN Mode, simply press the
MODE button to enter PROGRAM
Mode. The red lights above the
MODE button indicate the current
operating mode.
Ensure that DBO is not active
(the light in the DBO button is off)
Select WIDE, if required.
Set all the PRESET faders to zero.
Set the A MASTER, B MASTER and
GRAND MASTER to full.
Programming a Scene Memory
1.
Select a scene memory to be
programmed as described above.
2.
Use the PRESET A and/or the
PRESET B faders to set the required
output levels. The outputs appear
live.
Press the PROGRAM button. The
output levels are stored in the
selected memory. The yellow light in
the CHANNEL FLASH button
changes from flashing to on, to show
that the memory is now programmed.
The lights in the other CHANNEL
FLASH buttons come back on if the
corresponding memories are
programmed.
3.
Selecting a Scene Memory
1. If not already selected, press the
MEMORY TYPE button to select
SCENE.
2. Use the MEMORY PAGE button to
select the required page. The
CHANNEL FLASH buttons below the
PRESET A faders now represent
memories 1 -12; the CHANNEL
FLASH buttons below the PRESET B
faders represent memories 13 - 24.
The yellow lights are illuminated in
the CHANNEL FLASH buttons if the
corresponding memory is
programmed.
3. Press a CHANNEL FLASH button to
select the corresponding memory.
The light in the button flashes to
indicate that the memory has been
selected. The lights in all the other
CHANNEL FLASH buttons go out.
The output levels are determined by
the current positions of the PRESET
faders.
Page 22
ELARA 7371000 25.9.98
Program Mode
Editing a Scene Memory
Clearing/Deleting a Scene Memory
Individual channels of a programmed
scene memory can be edited without
affecting the other levels in that memory.
1.
1.
2.
3.
4.
5.
6.
7.
If not already selected, press the
MEMORY TYPE button to select
SCENE.
Press the PREVIEW/EDIT button to
activate the EDIT function. The red
light in the button comes on.
Select the required page using the
MEMORY PAGE button.
Press a CHANNEL FLASH button to
select the memory to be edited. The
light in the button flashes, and the
contents of the selected memory
ONLY are output. (The PRESET
faders are NOT mixed into the
output).
The level of an individual channel can
now be adjusted using the
corresponding PRESET fader. First it
is necessary to pick up the existing
level by bringing the fader through
that level. Once the level has been
picked up, the output level for that
channel can be set using the fader.
Adjust other channel levels as
required.
Press the PREVIEW/EDIT button.
This saves the new level(s) into the
memory and exits the EDIT function.
The light in the CHANNEL FLASH
button stops flashing, and the desk
outputs revert back to the levels set
on the PRESET faders.
ELARA 7371000 25.9.98
2.
Select a scene memory as described
above.
Press and hold the CLEAR button for
1 second. All the channel values in
the memory are set to zero, and the
light in the CHANNEL FLASH button
goes out indicating that the memory is
now unprogrammed.
NOTES
Preset Faders
If WIDE is not active, either PRESET A or
PRESET B faders can be used to set the
required output levels for channels 1 - 12.
Channels 13 -24 will be recorded at zero. If
WIDE is active, the PRESET A faders control
the levels for channels 1 - 12, and the PRESET
B faders control the levels for channels 13 - 24.
Overwriting Memories
If a programmed memory is selected and the
PROGRAM button pressed, the original
contents of the memory will be
OVERWRITTEN with the current output levels.
No warning is given.
Abandoning Edits
To abandon any edits which have been made
on a memory, press the CHANNEL FLASH
button for the selected memory (to deselect the
memory), or press a different CHANNEL
FLASH button (to select a different memory).
This must be done BEFORE pressing the
PREVIEW/EDIT button to exit the EDIT
function.
Deleting Memories
If a scene memory is deleted which was
referenced by any of the three programmable
sequences, the relevant step(s) in those
sequences will be AUTOMATICALLY
DELETED. For example, if a sequence was
programmed with scene memories
1,2,3,4,1,5,6,7,8 and memory number 1 was
deleted, the sequence would automatically
become 2,3,4,5,6,7,8.
Page 23
Program Mode
Selecting a Sequence
To select a sequence press the
SEQUENCE 1, SEQUENCE 2 or
SEQUENCE 3 button as required. The
red light in the button comes on to show
that the sequence has been selected. The
lights above the MEMORY TYPE button
indicate SEQUENCE.
If the selected sequence is already
programmed the DISPLAY will show the
last step number in the sequence. The
contents of the last step will be output
live. (The PRESET faders are NOT mixed
into the outputs)
If the selected sequence is
unprogrammed the DISPLAY will show
“00”, and the output will be zero.
Programming a Sequence
The CHANNEL FLASH buttons are used
to add a new step and enter the selected
memory number into the step in a single
action.
1.
2.
3.
Select an unprogrammed sequence
as described above. The DISPLAY
shows “00”. The outputs are all zero,
the positions of the PRESET faders
are ignored.
To add and program a step, press the
CHANNEL FLASH button
corresponding to the scene memory
required. The yellow light in the
CHANNEL FLASH button comes on,
the contents of the scene memory are
output live, and the number in the
DISPLAY increments by one to show
the current step number.
Repeat step 2 until all the required
steps have been programmed.
Page 24
Inserting a Step into a Sequence
1. Select a programmed sequence as
described above.
2. Use the STEP + and STEP - buttons
to select the step BEFORE where you
wish to insert the new step.
(For example, to insert a step
between steps 4 and 5, select step
4). The scene memory in the current
step will be output, and the light in the
CHANNEL FLASH button for the
corresponding memory comes on.
3. To insert and program a step, select
the required page using the
MEMORY PAGE button, then press
the CHANNEL FLASH button
corresponding to the scene memory
required. The yellow light in the
CHANNEL FLASH button comes on,
the contents of the scene memory are
output live, and the number in the
DISPLAY increments by one.
NOTES
Selecting Unprogrammed Memories
If an unprogrammed memory is selected the
DISPLAY flashes briefly. The sequence and
outputs are unaffected.
Maximum Steps Programmed
If an attempt is made to insert a step into the
sequence when the maximum 99 steps have
been programmed, the DISPLAY flashes “99”
for a second, and then returns to the previously
displayed step number. The sequence and
outputs are unaffected.
Renumbering Steps
Any original steps in the sequence after the
inserted step are renumbered accordingly. For
example, if you started with a 10 step
sequence and inserted a step between steps 4
and 5, the new step becomes step 5 and the
original steps 5 to 10 become steps 6 to 11.
ELARA 7371000 25.9.98
Program Mode
Editing a Step in a Sequence
Deleting a Step from a Sequence
Individual steps of a programmed
sequence can be edited (ie the memory
number changed) without affecting the
other steps in that sequence.
At any time while a sequence step is
selected in PROGRAM Mode, it is
possible to remove that step from the
sequence.
1.
1.
2.
3.
4.
5.
Select a programmed sequence as
described above.
Press the PREVIEW/EDIT button to
activate the EDIT function. The light
in the button comes on.
Use the STEP + and STEP - buttons
to move to the step to be edited. The
DISPLAY indicates the current step
number. The lights next to the
MEMORY PAGE button show the
page number, and a light in one of
the CHANNEL FLASH buttons is
illuminated to indicate the memory
programmed into the current step.
The memory is output.
To edit the step, use the MEMORY
PAGE button to change page if
required, then select the required
memory by pressing the
corresponding CHANNEL FLASH
button. The previously output memory
goes off, the light in the selected
CHANNEL FLASH button comes on
and the new memory is output.
Press the PREVIEW/EDIT button.
This saves the edits and exits the
EDIT function.
2.
3.
Select a programmed sequence as
described above.
Use the STEP + and STEP - buttons
to select the step to be deleted. The
DISPLAY shows the current step
number.
Press the CLEAR button. The
selected step is removed from the
sequence. The DISPLAY shows the
previous step number, except in the
case where step 1 is deleted, when it
flashes briefly and shows “1”.
NOTES
Single Step
If there is only one step in the sequence and it
is deleted, the DISPLAY shows “00” indicating
that the sequence is now unprogrammed.
Renumbering Steps
Any steps in a sequence after the deleted step
are renumbered accordingly. For example, in a
10 step sequence where step 5 is deleted, the
original steps 6 to 10 become steps 5 to 9.
Abandoning Edits
To abandon edits made to a sequence, press
the MEMORY TYPE button, MODE button, or a
SEQUENCE button. The desk will exit the EDIT
function.
ELARA 7371000 25.9.98
Page 25
Program Mode
Clearing/Deleting a Sequence
It is possible to clear a sequence
completely in one operation.
1.
Select a programmed sequence as
described above.
2.
Press and hold the CLEAR button for
1 second. All the programmed steps
will be cleared and the DISPLAY
shows “00” indicating an
unprogrammed sequence.
Reviewing a Sequence
The user can review the contents of a
sequence while in PROGRAM Mode.
1.
Select a programmed sequence as
described above.
2.
Use the STEP + and STEP - buttons
to move through the steps in the
sequence. The lights next to the
MEMORY PAGE button show the
page number, and a light in one of
the CHANNEL FLASH buttons is
illuminated to indicate the memory
programmed into the current step.
The contents of the memory are
output live.
Page 26
ELARA 7371000 25.9.98
ELARA 7371000 25.9.98
Page 27
Page 28
ELARA 7371000 25.9.98
In RUN Mode the user can output a single
programmed memory or a combination of
memories. The memories are accessed
using the MEMORY PAGE button, and
the 24 PRESET Faders which are used
as submasters. The current memory page
is indicated by the lights next to the
MEMORY PAGE button. The PRESET A
faders control memories 1 -12, and the
PRESET B faders control memories 13
-24. The lights in the CHANNEL FLASH
buttons are illuminated if the
corresponding memory is programmed.
Any programmed sequences can also be
output, using the SEQUENCE buttons.
Only one sequence can be active at a
time. The output levels, crossfade time,
sequence speed and attack can be
adjusted using the various front panel
controls.
The final output levels of a scene memory
are determined by the programmed levels
in the memory, the appropriate PRESET
fader (submaster) and the GRAND
MASTER.
The final output levels of a sequence are
determined by the programmed levels in
the memory referenced by the current
step, the SEQUENCE MASTER and the
GRAND MASTER.
The desk outputs 24 channels of DMX all
the time. If WIDE is not active, channels
13 - 24 are output at zero.
ELARA 7371000 25.9.98
Page 29
Run Mode
Run Mode Controls and Displays
l PRESET A AND PRESET B
The 12 PRESET A faders are used as
submasters to control the output levels of
memories 1 - 12 from the selected
memory page.
The 12 PRESET B faders are used as
submasters to control the output levels of
memories 13 - 24 from the selected
memory page.
l CHANNEL FLASH BUTTONS
The CHANNEL FLASH buttons are used
to flash the associated memories. These
buttons can be disabled using the FLASH
ON/OFF button.
l SEQUENCE MASTER
The SEQUENCE MASTER fader is used
to control the maximum output level of the
selected sequence.
l SPEED CONTROL
The SPEED control is used to regulate
the speed of a sequence being output
The control has a switch position at the
minimum end of its rotation which stops
automatic stepping through a sequence
and gives full manual control.
l CROSSFADE
The CROSSFADE control is used to
determine the fading between steps of a
sequence.
Page 30
l DISPLAY
When a sequence is active the display will
show the current step being output. If no
sequence is active the display will be
blank.
l SEQUENCE 1, SEQUENCE 2,
SEQUENCE 3 BUTTONS
These buttons are used to select/deselect
a sequence to output. The red light in the
button is illuminated when the sequence
is selected. Only one sequence can be
selected at a time.
l STEP + and STEP If a sequence is currently being output,
these buttons are used to move through
the steps of the sequence.
l DIRECTION
This button is used to select the direction
that a sequence will run when it is output.
The accompanying lights indicate which
direction has been selected.
l SOUND
This button is used to activate the audio
input into the desk. The audio input is
used to advance sequences. When the
SOUND function is active the light in the
button is illuminated.
l MEMORY PAGE
This button is used to select the current
memory page. The lights above the
button indicate the selected page.
ELARA 7371000 25.9.98
Run Mode
ELARA 7371000 25.9.98
Page 31
Run Mode
Entering Run Mode
Outputting Scene Memories
1.
The programmed scene memories can be
output using the corresponding PRESET
faders.
2.
If the desk is in PRESET Mode or
SUPER USER Mode, press and hold
the MODE button for 1 second to
enter PROGRAM Mode. When the
desk is in PROGRAM Mode, press
the MODE button to enter RUN
Mode.
Ensure that DBO is not active.
3.
4.
5.
Select WIDE, if required.
Set all the PRESET faders to zero.
Set the SEQUENCE MASTER and
GRAND MASTER to full.
6.
Set the CROSSFADE control to
Manual.
Page 32
1.
2.
Select the required memory page
using the MEMORY PAGE button.
Move the appropriate PRESET fader
to the level required. The
corresponding scene memory is
output.
ELARA 7371000 25.9.98
Run Mode
Accessing Scene Memories on
Different Pages (Page Overlay)
It is possible to output several memories
from pages 1 and 2 simultaneously,
provided that they are NOT controlled by
the same PRESET fader.(eg, you can
output page 1 memory 1 and page 2
memory 2 at the same time but not page
1 memory 1 and page 2 memory 1).
If the memory page is changed, while any
of the PRESET faders are above zero,
the PRESET remains on the original
page, and the outputs for the previous
memory are held. When the PRESET
fader is returned to zero, the PRESET
moves to the current page. This is known
as Page Overlay.
Page Overlay also applies if the memory
page is changed, while any of the
CHANNEL FLASH buttons are held down.
When the CHANNEL FLASH button is
released, the button moves to the current
page.
While the memory being output is NOT
from the current page, the light in the
corresponding CHANNEL FLASH button
flashes. The light in the CHANNEL
FLASH button stops flashing when the
correct page is returned to by pressing the
MEMORY PAGE button.
The following example demonstrates how
Page Overlay works:
1.
2.
3.
Ensure that memories 1 and 6 on
both pages 1 and 2 are programmed.
Ensure that all the PRESET faders
are at zero and the GRAND MASTER
is at full.
Use the MEMORY PAGE button to
select page 1.
ELARA 7371000 25.9.98
4.
Move the PRESET fader
corresponding to memory 1 to full
(page 1 memory 1 is output live)
5.
Press the MEMORY PAGE button to
change to page 2. The light in the
CHANNEL FLASH button
corresponding to memory 1 flashes.
The outputs remain unaltered.
6.
Move the PRESET fader
corresponding to memory 6 to full
(page 2 memory 6 is added to the
output)
Move the preset fader corresponding
to memory 1 back to zero (page 1
memory 1 is removed from the
output). The light in the CHANNEL
FLASH button stops flashing. The
PRESET fader is now controlling
page 2 memory 1.
Move the PRESET fader
corresponding to memory 1 to full
(page 2 memory 1 is added to the
output live).
Press the MEMORY PAGE button to
change back to page 1. The lights in
the CHANNEL FLASH buttons
corresponding to memory 1 and
memory 6 will now flash.
7.
8.
9.
10. Move the PRESET fader
corresponding to memory 1 back to
zero. The light in the CHANNEL
FLASH button stops flashing (page 2
memory 1 is removed from the
output). The PRESET fader is now
controlling page 1 memory 1.
11. Move the PRESET fader
corresponding to memory 6 back to
zero. The light in the CHANNEL
FLASH button stops flashing (page 2
memory 6 is removed from the
output) The PRESET fader is now
controlling page 1 memory 6.
Page 33
Run Mode
Flashing Memories
Outputting a Sequence
Any of the programmed scene memories
can be flashed to the level of the GRAND
MASTER.
Any one of the three sequences can be
output (assuming it has been
programmed). The output from the
sequence is added to that from any scene
memories currently being output.
1.
2.
3.
Select the required memory page
using the MEMORY PAGE button
Press and hold down the CHANNEL
FLASH button corresponding to the
memory to be flashed. The
corresponding memory will be output.
Release the CHANNEL FLASH
button. The corresponding memory
output will return to the level set by
the PRESET fader.
Page 34
1.
Press one of the SEQUENCE buttons
to transfer it to the outputs. The light
in the button comes on indicating the
sequence is active. The DISPLAY
shows the current step number being
output. The sequence starts at step 1.
2.
Use the SEQUENCE MASTER to
control the output level of the
sequence. The speed, direction, and
transition between steps can be
adjusted as required (see the
following sections for details).
3.
Press the SEQUENCE button again
to remove the sequence from the
outputs. The light in the button goes
out indicating the sequence is not
active. The DISPLAY goes blank.
ELARA 7371000 25.9.98
Run Mode
Moving between Sequence Steps
Manually Stepping through a Sequence
1. Ensure that the SPEED control is set
to Manual and the SOUND function is
not active.
2. Press the STEP + button to move to
the next step.
3. Press the STEP - button to return to
the previous step.
Automatically Stepping through a
Sequence
1. Ensure that the SPEED control is not
set to Manual and the SOUND
function is not active.
2. Use the SPEED control to adjust the
rate at which the sequence is
advanced (the sequence speed).
ELARA 7371000 25.9.98
Using Sound Input to Step through a
Sequence
The sequence can be advanced in time
with the bass beat of a suitable music
source, or the basic speed of the
sequence can be set and the bass beat
from the music source used to increment
extra steps.
1.
2.
3.
4.
Connect a suitable music source to
the audio input on the desk.
Ensure that the SOUND function is
active.
To use only the sound to trigger the
sequence, set the SPEED control to
Manual.
To use a combination of sound and
automatic, set the basic speed with
the SPEED control.
Page 35
Run Mode
Snap or Crossfade Between
Sequence Steps
To snap from one sequence step to the
next set the CROSSFADE Control to
manual.
To crossfade from one step to the next
move the CROSSFADE control to any
timed setting.
If stepping is manual (via the STEP + and
STEP - buttons) the crossfade time is set
on the CROSSFADE control.
If stepping is automatic or sound
controlled, the sequence crossfades at a
rate set by the SPEED control.
Controlling the Direction of a
Sequence
The direction of a sequence is controlled
by the DIRECTION button. Press the
DIRECTION button to select the direction
required - Forwards (>), Backwards (<) or
Auto-Reverse (< >).
NOTES
Changing Sequences
To change from outputting one sequence to
another, simply press the required SEQUENCE
button. It is not necessary to turn the first
sequence off first. For example, if sequence 1
is running and the sequence 2 button is
pressed, sequence 1 will be removed from the
output and sequence 2 will be output.
Step Buttons
The STEP + and STEP - buttons are active at
all times while a sequence is running. They can
be used to advance or reverse the sequence
by one step. If either of these buttons are held
down for more than two seconds, the sequence
will advance for as long as the button is held
down.
Remote Step
Pressing a switch connected to the Remote
input socket on the back panel, will have the
same effect as pressing the STEP + button,
and can be used for advancing sequences.
Sound Input
If an external sound source attached to the
desk is used to advance a sequence, the
SOUND function must be activated using the
SOUND button.
Removing Sound Input
If the external sound source is removed, the
sequence will advance at the rate set on the
SPEED control. If the SPEED control is set to
Manual, the sequence will stop.
Page 36
ELARA 7371000 25.9.98
In SUPER USER Mode the presets and
memory functions are disabled. The user
has the options of setting recovery to on
or off, clearing all the programmed
memories, and saving or loading memory
data.
WARNING
Only a Zero 88 memory module
should be connected to the 9 pin D
type connector on the rear panel of the
desk. It is advisable to switch the desk
off before connecting or disconnecting
the memory module.
Entering Super User Mode
Press and hold down the STEP + and
STEP - buttons together, and then press
and hold the MODE button for 1 second.
The SUPERUSER light above the MODE
button comes on. The DISPLAY shows
the software version.
Exiting Super User Mode
To exit SUPER USER mode press and
hold the MODE button for 1 second. The
desk will return to PROGRAM mode.
ELARA 7371000 25.9.98
Page 37
Super User Mode
Setting Recovery Mode
Saving Memory Data
Recovery mode determines the state that
the desk starts in when it is switched on.
1.
If Recovery Mode is On - the desk will
start in the mode that it was in when it
was switched off, except if it was in
SUPER USER Mode, in which case it will
start in PROGRAM mode.
2.
If Recovery Mode is Off - the desk will
start in the Default State.
Press the WIDE button to toggle the
Recovery state. The light in the WIDE
button indicates the recovery state
(on = Recovery On, off = Recovery Off).
Loading Memory Data
1.
Clear All Memories
Press and hold the CLEAR button for 1
second to clear all the programmed
memories. When the memories have
been cleared, the DISPLAY goes blank,
and then returns to displaying the
software version.
Ensure a memory module is
connected to the D type socket on the
rear panel of the desk.
Press the PROGRAM (SAVE) button.
The programmed memory data is
saved onto the memory
device.OVERWRITING ANY
EXISTING DATA. If the operation is
successful, the DISPLAY flashes
“00”, if not the DISPLAY flashes an
error code. The display then returns
to showing the software version.
2.
Ensure a memory module is
connected to the D type socket on the
rear panel of the desk.
Press the FLASH ON/OFF (LOAD)
button. The memory data in the
memory device is loaded into the
desk. OVERWRITING ANY
EXISTING DATA If the operation is
successful, the DISPLAY flashes
“00”, if not the DISPLAY flashes an
error code. The display then returns
to showing the software version.
Memory Module Error Codes
Code
Error
Errors Saving
01
No module connected
02
Faulty module
Error Loading
03
No module connected
04
Faulty module
05
Wrong desk type
06
Incompatible version
Page 38
ELARA 7371000 25.9.98
Power Supply:
Separate plug mounted mains transformer
supplying low voltage via a 4 pin locking
DIN connector
Mains voltage
230V -18% to +10% (190V - 253V)
DC Connection
PIN 1 =
9V @ 400mA
PIN 2 =
OV Signal ground
PIN 3 =
20 V @ 200mA
(Only required for Analogue)
PIN 4 =
Not used
Figure A.
Power Supply connector
Viewed from the rear of the desk.
Audio Input:
Stereo Input >10 k , minimum 100mV to
maximum 10V
Connections
Tip =
Ring =
Sleeve =
Left channel
Right channel
0V Signal ground
Remote STEP +
0.25” stereo jack socket.
Connect Sleeve to Tip to simulate a STEP +
button push
Figure B. Stereo Jack Plug
ELARA 7371000 25.9.98
Page 39
Technical Specification
Memory Module (Optional)
Analogue Output: (Optional)
Stock number 00-115-00
EEPROM cartridge with 9 pin D type male
connector.
Stock number 00-118-00
24 channels 0 to +10V
all channels Short circuit proof
all channels capable of driving 5mA
all channels are diode protected
connectors 4xX 8 pin ring locking DINs
Any dimmer supply not used.
DMX Output:
5 pin XLR, Not isolated, with voltage
protection, with data output indicator.
Data on channels 1 - 24 only.
Connections
PIN 1 = 0V
PIN 2 = 1PIN 3 = 1+
PIN 4 & 5
See Figure C.
Signal ground
DMX drive compliment
DMX drive true
not connected.
Figure C.
DMX Connector
Viewed from rear of desk.
Page 40
PIN 1 = Channel 1
PIN 2 = Channel 2
PIN 3 = Channel 3
PIN 4 = Channel 4
PIN 5 = Channel 5
PIN 6 = Channel 6
PIN 7 = Not used
PIN 8 = 0V Signal Ground
See Figure D
Figure D.
Analogue Connector.
Viewed from rear of the desk.
ELARA 7371000 25.9.98
Zero 88 Lighting Ltd.
Usk House, Llantarnam Park
Cwmbran, Gwent NP44 3HD
United Kingdom
Tel: +44 (0)1633 838088 ✱
Fax: +44 (0) 1633 867880
✱ = 24 hour Answer Phone
e-mail [email protected] web site: www.zero88.com