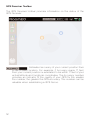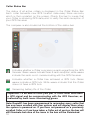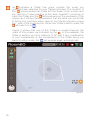
1
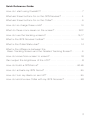
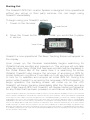
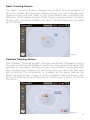
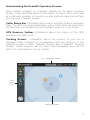
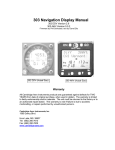
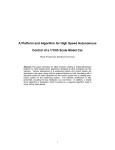
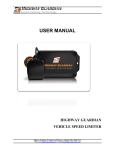
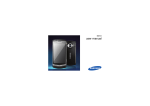
GPS Pet Location System Welcome Congratulations on your purchase of the RoamEO GPS Pet Location system. Your system should include the following components: RoamEO GPS Receiver RoamEO Collar Power Adapter for Receiver Power Adapter for Collar Owners Manual Quick Reference Guide: How do I start using RoamEO? . . . . . . . . . . . . . . . . . . . . . . . . . . . . . . . . . . . .7 What are these buttons for on the GPS Receiver? . . . . . . . . . . . . . . . . . .4 What are these buttons for on the Collar? . . . . . . . . . . . . . . . . . . . . . . . . . .5 How do I re-charge these units? . . . . . . . . . . . . . . . . . . . . . . . . . . . . . . . . . .19 What do these icons mean on the screen? . . . . . . . . . . . . . . . . . . . . .12-13 How do I use the tracking screens? . . . . . . . . . . . . . . . . . . . . . . . . . . . .15, 17 What is the GPS Receiver toolbar? . . . . . . . . . . . . . . . . . . . . . . . . . . . . . . . .12 What is the Collar Status bar? . . . . . . . . . . . . . . . . . . . . . . . . . . . . . . . . . . . . .14 What is the difference between the Basic Tracking Screen and the Detailed Tracking Screen? . . . . . . . . .9 How do I move from screen to screen? . . . . . . . . . . . . . . . . . . . . . . . . . . . .18 Can I adjust the brightness of the LCD? . . . . . . . . . . . . . . . . . . . . . . . . . . . .8 How do I build a GPS Fence? . . . . . . . . . . . . . . . . . . . . . . . . . . . . . . . . . .20-25 How do I activate my GPS Fence? . . . . . . . . . . . . . . . . . . . . . . . . . . . . . . . .26 How do I turn my Alarm on and off? . . . . . . . . . . . . . . . . . . . . . . . . . . . . . .26 How do I enroll a new Collar with my GPS Receiver? . . . . . . . . . . . . . . .28 3 Introduction to your RoamEO GPS Pet Location System The RoamEO GPS Pet Location System is made up of two components: a handheld GPS Receiver and a special GPS-enabled collar for your pet. Both components are required for a functional system. RoamEO GPS Receiver The RoamEO GPS Receiver is designed to display the location and movements of your pet within a one mile radius. It does not require any set up to operate, nor does it need a third party service to function. RoamEO GPS Receiver 1 RF Antenna: RoamEO will operate effectively with the antenna in the down position. However, if moved into an upright position, the range of the radio may be improved. Zoom Button: Use this button to change the scale of the tracking screen. By pressing the + side, the screen will zoom in. By pressing the – side, the screen will zoom out. 2 LCD 3 Power Switch: This button powers the GPS Receiver on and off. 4 LED Indicator Lights: Indicate charge status when the system is plugged into the Power Adapter. The Red LED will be illuminated when the Power Adapter is plugged in and the system is charging. The Green LED will be illuminated when the system is fully charged. The LEDs are only used during the charging cycle and will not be on at any other time. Fence Button: Used to program a GPS Fence. When a GPS Fence has been stored in memory, this button allows you to turn the GPS Fence on or off. 5 11 4 6 10 Enrollment: Used for enrolling Collars with the GPS Receiver. 9 Alarm Button: Turns the audible alarm on or off. 8 Screen Button: Used to change between the different screen views that are available for use. 7 Charging Port: Insert Power Adapter plug here to charge the GPS Receiver. Option Button: This button is used in combination with other buttons to allow you to perform an operation or move between the different tracking screens. RoamEO Collar The RoamEO Collar uses GPS technology and a miniature radio that sends GPS coordinates to the Receiver where they are displayed on the LCD screen. Each collar has a unique address that is only recognized by your Receiver. We have programmed your collar(s) for you, so it is not necessary to re-program them before you use the RoamEO system. Please refer to “Enrollment” for instructions on how to enroll a new collar, or to re-enroll an existing collar. 4 3 1 2 À Electronics Box: The radio circuit, GPS module and battery are contained in this box. There are no serviceable parts in the electronics box. Á Charging Port: Insert the Power Adapter plug here to charge the lithium-ion battery in the electronics box. The plug is keyed and can only be inserted one way. Â Paw Button: used for enrolling a new Collar or re-enrolling an existing Collar. Refer to the “Enrolling Collars” section for instructions. Ã Power Button: Press to turn on the Collar. The LED will begin blinking every three seconds to indicate the collar is operational. To turn off the collar, press and hold the power button for five seconds. Important: Your Collar should be orientated on your pet so that the box is at the bottom of the neck. This results in the GPS antenna to be properly positioned for maximum satellite reception. 5 GPS Basics The Global Positioning System (GPS) was launched in 1995 by the United States Defense Department. Twenty-four satellites orbit at 10,900 nautical miles above the Earth, passing overhead twice daily. At least four of these satellites are in view nearly anywhere on the Earth at all times. GPS requires signal reception from three satellites in order to determine a latitude and longitude position, known as a 2D fix. Four satellites are needed to determine position and elevation. This is a 3D fix. In 2003, in order to provide an additional degree of accuracy to GPS, the Federal Aviation Administration developed a program called Wide Area Augmentation System (WAAS) that complements GPS. WAAS is not always available to GPS users because of the position of the satellites. RoamEO will automatically receive WAAS signals, if available. Please remember: for GPS to work effectively, it must have a clear view of the satellites in the sky in order to receive their signals. Unlike television or radio signals, GPS works at very high frequencies. As a result, GPS reception can be easily effected by tree foliage, buildings, your body, and any other cover that blocks the sky. To help achieve the maximum performance from RoamEO, we recommend: 1. If possible, power up RoamEO outdoors. 2. If powering up RoamEO outdoors, maintain some distance from buildings and stay out from under foliage if possible. After gaining an initial GPS lock, RoamEO will probably maintain a lock even if operating under these conditions. 3. If indoors, it may require a few minutes to acquire a GPS lock. To improve your ability to gain a GPS fix, stand as close to a window as possible so that RoamEO has at least a partial view of the sky. It is unlikely that you will be able to achieve a GPS fix from an interior room in the house or the basement. You can check the status of the GPS reception on the GPS Receiver Toolbar. For more detailed information on the GPS status, refer to the GPS Status Screen. 6 Starting Out The RoamEO GPS Pet Location System is designed to be operational without any set-up or third party services. You can begin using RoamEO immediately. To begin using your RoamEO system: 1. Power on the Receiver. Power Button 2. Press the Power button on each Collar you would like to place in service. Power Button RoamEO is now operational. The Basic Tracking Screen will appear on the display. Upon power up, the Receiver immediately begins searching for Collar(s) that are enrolled and powered on. This process will only take a few seconds. Every Collar that has been enrolled will be displayed in the Collar Status Bar. At the same time it is searching for active Collar(s), RoamEO also begins the process of acquiring a GPS fix. Under optimum conditions, it can take up to 45 seconds for RoamEO to lock on to satellites and acquire an initial GPS fix*. During this period while RoamEO is acquiring the necessary GPS information to begin operation, the tracking screen will come up on the LCD. RoamEO will begin tracking immediately after the Receiver and any one Collar have a GPS lock. RoamEO will display tracking information for any Collar that has been powered on and has an active GPS lock. * Note: To obtain a GPS lock, the Receiver needs to know its current position and date so that it can calculate which satellites should be in view and then searches for only those satellites. When your Receiver is powered on for the first time, it does not know your position so it immediately begins to search for satellites using data acquired the last time it was turned on (which was most likely at our factory). Because there is a high degree of probability you are not at our factory, the Receiver is looking for the wrong satellites. After a short period of time of not being able to find these satellites, the Receiver then switches automatically to an auto search mode, causing it to search for any satellite in the sky. Due to advances in GPS technology, this process has become much quicker now. Once the Receiver locks onto these new satellites, it should become much quicker to display your position next time you use RoamEO provided you have not moved more than 100 miles from the last location it was used. 7 Screen Views RoamEO is designed with three operational screens to provide information about the location of your pet and the status of the GPS: Basic Tracking Screen RoamEO defaults to the Basic Tracking Screen when powered up. Detailed Tracking Screen Similar to the Basic Tracking Screen, but provides detailed distance and velocity information for each active collar. GPS Status Screen Displays the raw GPS data for the GPS Receiver. 8 Basic Tracking Screen The Basic Tracking Screen displays the location and movements of all active Collars. By using the distance rings, you can estimate your distance from your pet. Refer to the Collar Status Bar to monitor the GPS and Radio status of each Collar. Figure 1 shows a Basic Tracking Screen with two active Collars, one about 100 feet from you, the other about 150 feet. Figure 1 Detailed Tracking Screen The Detailed Tracking Screen provides additional information about the status of the active Collars. In addition to the same information that appears on the Basic Tracking Screen, the Detailed Tracking Screen also displays your distance (in feet) from your pet and how fast your pet is moving. This information is updated at the same rate as the Basic Tracking Screen. Figure 2 show a Detailed Tracking Screen with an active GPS Fence and three active Collars, one of which is outside the fence. Figure 2 9 GPS Status Screen The GPS Status Screen displays the status of the GPS satellites, as well as other critical data associated with their performance. This screen can be helpful to assess the number of satellites your Receiver is using to gain its GPS data and the signal strength of each of these satellites. Sky View of Available Satellites Satellite Status Bar The Satellite Status Bar at the bottom of this screen displays the strength of each satellite. A green bar indicates that your Receiver has a lock on this satellite. A gray bar indicates your Receiver is not locked on to this satellite. The satellites are numbered across the bottom, and correspond to their position in the sky as shown in the Sky View. The height of the bar indicates the relative strength of that satellite signal. A stronger signal from multiple satellites will result in better accuracy. 10 Understanding the RoamEO Operation Screens When initially powered on, RoamEO defaults to the Basic Tracking Screen. There are three areas of information on this screen which are all continually updated to provide you with real time data that will help you use your RoamEO system. Collar Status Bar: Information about each enrolled Collar is displayed here. The GPS Receiver remembers every Collar that has ever been enrolled with your system and will display it even if it is not active. GPS Receiver Toolbar: Information about the status of the GPS Receiver is located here. Tracking Screen: Information about the location of your pet is displayed here. RoamEO is programmed with two versions of the tracking screen: a Basic Tracking Screen and a Detailed Tracking Screen. These screens can be used interchangeably and will not affect the performance of your system. GPS Receiver Toolbar Collar Status Bar Tracking Screen 11 GPS Receiver Toolbar The GPS Receiver toolbar provides information on the status of the GPS Receiver. Estimated accuracy of your current position from a benchmark location. For example, if Accuracy reads 17 feet, then your current position is estimated to be within 17 feet of your actual latitude and longitude coordinates. The Accuracy number provides an indicator of the quality of your GPS fix: the smaller the number, the greater the GPS accuracy. This number can be valuable when establishing a GPS Fence. 12 GPS Status Green waves indicate a GPS lock. White waves indicate the Receiver is unable to achieve a GPS fix in this location. Remaining battery life of the GPS Receiver. GPS Fence Status Gray indicates the GPS Fence is turned off. White indicates the GPS Fence is on and all active Collars are currently contained within the fence. Red indicates the GPS Fence is on and at least one Collar is currently outside the fence perimeter. The GPS Fence icon will not appear on the toolbar if there is not a GPS Fence stored in memory. Alarm Status Gray indicates the Alarm or the GPS Fence is turned off. The alarm will not sound if your pet exits the fence. White indicates the GPS Fence is on and the alarm will sound if a Collar moves outside the fence. Red indicates the GPS Fence is on and at least one Collar is outside the fence. The Alarm icon will not appear on the toolbar if there is not a GPS Fence stored in memory. 13 Collar Status Bar The status of all active collars is displayed in the Collar Status Bar. Each collar transmits new GPS location data every three seconds, which is then updated on the screen. Check this bar to insure that your Collar is receiving GPS data, and to verify the radio reception of your GPS Receiver. The compass is also located at the bottom of the status bar. Indicates whether a Collar is receiving a radio signal from the GPS Receiver. Green waves indicate there is radio reception; white waves indicate the radio is not communicating with the GPS Receiver. Indicates whether a Collar has achieved a GPS lock. Green waves indicate a GPS lock. White waves indicate that the Collar does not have a GPS lock. Remaining battery life of the Collar Important: To be able to track your pet, a Collar must have both a GPS signal and be communicating with the GPS Receiver, as indicated by both icons illuminating green. Note: RoamEO has been programmed to remember every collar that has ever been enrolled with your system and will display them when the system is powered on. If you have not powered on a previously enrolled Collar, or if you have taken a Collar out of service, the box will still illuminate but none of the icons in the box will be illuminated. 14 Tracking Screen Your pet’s location and movements are displayed on the Tracking Screen and are continually updated. Each is color coded to match its corresponding color on the Collar Status Bar. RoamEO can track up to three Collars at one time. Only Collars that have been powered on will be displayed on the Tracking Screen. The is you. You will always remain at the center of the screen and your pets will move around you. The Distance Circles are helpful to provide information regarding your pet’s distance from you. You can change this scale by using the Zoom Button. Press the + side, and the Distance Circles will become smaller. Press the - side, and the Distance Circles will become larger. The smallest Distance Circle is 50 feet, the largest is 7250 feet. 15 An indicates a Collar has gone outside the scale you currently have selected for your Tracking Screen. The location of the shows where the Collar left the scale of the screen and the direction it was heading at the time. RoamEO continues to track the Collar and the will move around the perimeter of the screen as it follows the movements. If at any time you would like to bring your pet back within view on the Tracking Screen, press the - side of the zoom button. When the Collar is within scale, the will switch to a . Figure 3 shows that one of the Collars is located beyond the scale of this screen, as indicated by the . In this example, the Collar is behind you at a distance of 191 feet. If any combination of your movements or the movements of the Collar bring you back to within scale, the will appear again automatically. Figure 3 16 How to use the Tracking Screens The Tracking Screens are designed to display the movements of your pet in relation to your position. When using the Tracking Screens, here are some things to remember: 1. Your location is always in the center of the screen designated by the . Your location in the center of the screen will never change. 2. The Tracking Screens are orientated based on the top of the screen. In other words, if your pet appears on the right side of the screen, your pet is located to your right. If your pet appears underneath the , then your pet is behind you. See figure 4. Figure 4 3. As you turn to face your pet, the screen will automatically orientate to show your pet at the top of the screen. This is your indication that you are moving in the direction toward your pet. 4. As you move toward your pet, the distance on the screen between the and the will adjust based on your movements and your pet’s movements. Remember: the distance shown on the screen between you and your pet is based on the combination of the activity of both of you. If you are moving toward your pet but notice that you do not appear to be getting any closer, it is because your pet is moving also. If in doubt, stand still for a few moments and watch the activity of your pet on the screen. 17 LCD Screen Options Power Saving Mode RoamEO is designed with a Power Saving Mode to improve the battery life of the Receiver. When RoamEO enters the Power Saving Mode, the brightness of the display is lowered to help save power. To restore the screen to its original brightness, press any button and the LCD will return to its original setting. RoamEO will display the message Power Saving Mode on the LCD to notify you that when the system is in this state. RoamEO will not initiate the Power Saving Mode for approximately 45 minutes from start-up if the battery is in a fully charged state. RoamEO will not go into the Power Saving Mode if it is being used while powered from the Power Adapter. Changing Screen Views Changing from screen to screen can be done at any time while the GPS Receiver is on. To change back and forth from the Basic Tracking Screen to the Detailed Tracking Screen, press . No data is lost during this transition. To view the GPS Status screen, press the Option and simultaneously. RoamEO will continue to track your pets while this simultaneously screen is visible on the LCD. Press Option and again to return to a tracking screen. Adjusting the brightness on your LCD Screen To increase or decrease the brightness of the LCD screen, press and hold the Option and then use the Zoom button located on the side of the Receiver to adjust the screen to the desired brightness. 18 Charging your GPS Receiver and Collar For all the benefits of GPS, unfortunately it requires a fair amount of power to operate. To maintain communication with the GPS satellite system, the GPS receiver must stay on at all times. As a result, all GPSbased products, including RoamEO, require recharging or replacing batteries more frequently than other electronic products you may own. Both the RoamEO GPS Receiver and Collar were designed with rechargeable lithium ion batteries. Your system includes one power adapter for the GPS Receiver and one power adapter for the Collar. To check the status of the battery in the GPS Receiver, refer to the battery icon in the GPs Receiver Toolbar. To check the status of the battery in the Collar, refer to the battery icon in the Collar Status Bar. Battery Icon Fully Charged 75% 50% 25% GPS Receiver The RoamEO GPS Receiver can operate between 7 – 10 hours on a fully charged battery. To charge the Receiver, plug the Receiver Power Adapter in the charging port. The red LED indicator will stay illuminated while the Receiver is charging. When the battery is fully charged, the green LED will illuminate. Approximate charging time is three hours. Collar The RoamEO Collar can operate between 8 – 10 hours on a fully charged battery. To charge the Collar, plug the Collar Power Adapter in the charging port. Please note the plug on the Collar Power Adapter is keyed, so it must be inserted correctly to fit into the charging port. The LED will be red while the Collar is charging. When the battery is fully charged, the LED will turn green. 19 Setting up a GPS Fence The GPS Fence can be a valuable feature to assist you in protecting your pet. However, it is not meant to be substitute for human initiative and we do not recommend this as a pet containment system. The GPS Fence feature allows you to establish a perimeter that when combined with the Alarm will give an audible warning if your pet exits your defined boundary. Before setting up a GPS Fence, a few moments of forethought are in order. Please read the following carefully: 1. All GPS systems can be affected by dense cover, whether foliage, heavy cloud cover, or buildings. To improve the accuracy of your GPS Fence, it is recommended that you set up your fence on a clear day. Be aware of your surroundings as you establish your fence posts. You may want to move your fence post slightly if you encounter a problem with a particular location due to weak GPS reception. 2. Take note of the relative amount of precision of GPS as you establish your fence. It is recommended that you set your fence at least 10-15 feet away from areas of concerns (i.e, roads) to account for GPS precision. You can refer to the Accuracy reading on the Toolbar to understand the relative accuracy of GPS at a particular position. If you stand still in a single spot for an extended period of time, GPS accuracy will usually improve. 3. You may want to have a good idea of the basic outline of your fence before you begin to set fence posts. You will need to establish a minimum of three fence posts. There is no need to return to your first post: the GPS Receiver will automatically draw a line to that position. 4. Try to allow for a minimum of at least 15 feet between any two fence posts. There is no maximum distance between any two fence posts; you can place fence posts as far apart as you desire. RoamEO will allow you to set up to 100 fence posts, but we recommend using the minimum amount that are needed to define the particular shape of your desired fence. 20 5. Remember that both the Alarm and the GPS Fence must be activated in order to receive an audible warning if your pet exits your perimeter. You can use your GPS Fence without the Alarm if desired. Example: if you have drawn a perimeter around a known area such as your property line, the GPS Fence can help give you a better perspective of your pet’s location in these immediate surroundings. 6. It is not necessary for the GPS Receiver to be within the fence perimeter for the GPS Fence to work. As long as the GPS Receiver is capable of radio reception with the Collar, the GPS Fence will operate effectively. You can be standing outside of your GPS Fence and the fence will still be operational. 7. The GPS Receiver will always default to the last condition when powered up. If your GPS Fence and Alarm were activated when you shut down your GPS Receiver, they will be activated when you power up your GPS Receiver the next time. Always check the GPS Receiver Toolbar for the status of the GPS Fence and Alarm. 21 Building your GPS Fence To build your GPS Fence, you will need to set GPS fence posts that will be used to outline the perimeter of you desired boundary. After establishing these fence posts, RoamEO will automatically ‘draw’ in the fence and store it in memory for future use. 1. Only one GPS Fence can be stored in memory at a time. 2. Each time a new GPS Fence is established, the current fence that was stored in memory is deleted and replaced with your new fence coordinates. 3. There is no method of correcting mistakes once RoamEO is placed in the Fence Building mode. Should you discover that you have misplaced a fence post, or do not like the shape of your fence, there is no way to correct this data while in the Fence Building mode; it will be necessary to start over. You will need to turn off your system and power back up, and then begin the fence building process again. Remember: turning off your system while in the Fence Building mode will erase any fence posts you had placed for your new fence, but it will not erase the last GPS Fence that was previously stored in memory. 22 Step 1 Press the Option and the Fence buttons on the GPS Receiver simultaneously. This will set the GPS Receiver into the Fence Building mode and the Fence Building screen will be displayed. You are now ready to begin establishing the fence posts. See figure 5. Figure 5 Fence Building Screen Step 2 Establish a Perspective Point. The Perspective Point is a temporary location only used during the fence building process to help assist you. In most cases, you will probably want to build a fence around some type of landmark, such as your home or a camp site. By using a landmark as your Perspective Point, it is easier to see how your fence is being constructed on the LCD screen. A Perspective Point must be established even if you do not need one; if you have no need for one, place it at any location within your desired fence perimeter. Stand at the location of your Perspective Point and press the Fence button. Your Perspective Point will be indicated by the and remain in the center of the screen while you finish constructing your fence. See figure 6. Figure 6 Establishing a Perspective Point 23 Step 3 Walk to your first fence post. Your movements will be displayed on the screen with the . You can also gain an appreciation of your distances from the distance rings shown on your screen. When you reach the desired location for your first fence post, and are satisfied with the accuracy of the GPS at that point, press the Fence button. If you wish to improve the GPS accuracy at a given fence post, remain still in that location and monitor the Accuracy reading found in the GPS Receiver Toolbar until you are satisfied before pressing the Fence button. See figure 7. Figure 7 Establishing a fence post. Confirmation of each fence post will be designated by the . Each time a fence post is committed to memory, its location is shown on the screen as . Do not move from any fence post location until you are certain the system has accepted that location. Repeat this step as required to complete additional fence posts. Do not return to your first fence post: RoamEO will complete the fence on its own. See figure 8. Figure 8 24 Multiple fence posts have been established. Your current position is noted by . Step 4 After establishing the last fence post, press Option and Fence . Your fence will now be saved to memory. The green will indicate that your fence has been successfully completed and placed into memory. See figure 9. To activate your fence, press Fence at any time. The system will now automatically revert back to the last tracking screen it was in. Figure 9 Fence being saved to memory. 25 Using your GPS Fence Once you have built your GPS Fence, you may use it at any time. To turn on your GPS Fence, press Fence . Your fence will be activated, and the in the GPS Receiver Toolbar will now be illuminated. See figure 10. Figure 10 Ô Fence Status of GPS Fence is displayed on GPS Receiver toolbar. A white fence indicates your GPS Fence is active and all Collars are contained within the fence perimeter. A red fence indicates your GPS Fence is active and at least one Collar is outside the fence perimeter. To turn off the GPS Fence, press Fence again. The in the GPS Receiver Toolbar will now turn gray, indicating there is a fence stored in memory but it is not activated. Turning on the Alarm The Alarm feature can be used to receive an audible warning should your pet exit the GPS Fence perimeter you have established. To use the Alarm feature, your GPS Fence must be on. Press to activate the alarm. If your pet exits the GPS Fence perimeter, the alarm will sound an audible alert. To turn off the audible alert, press . To turn off the Alarm feature, press the GPS Fence will remain active. . The Alarm will be disabled but The status of the Alarm is displayed on the GPS Receiver toolbar. See figure 11. Status of Alarm is displayed on GPS Receiver toolbar. 26 Ô Figure 11 Using the GPS Fence from inside your home You can use the GPS Fence feature from indoors, as long as the GPS Receiver is making radio contact with a Collar. To use the GPS Fence from indoors, it is recommended placing the GPS Receiver near a window on the side of the house closest to where you expect the Collars to be. This will improve the quality of the radio reception. Power on the GPS Receiver and Collars, and make sure the fence is activated. Some experimentation may be needed to understand which rooms in your home offer the best reception. It is not necessary for the GPS Receiver itself to have a GPS lock to use the fence feature. The GPS Receiver remembers the coordinates of the fence you have established (it does not require a GPS lock to do this), and displays that fence information along with the location of the Collars on the tracking screen. As long as the Collars have a GPS lock and can communicate with the GPS Receiver, their location and movements will be visible on the tracking screen. See figure 12. Figure 12 Tracking screen with GPS Fence, but GPS Receiver does not have a GPS lock. 27 Enrolling Collars to your GPS Receiver In order for RoamEO to operate, the Collar must be set up to be able to ‘talk’ to a Receiver. Each RoamEO Collar contains a unique ID which is used so that it only communicates with the Receiver which has been programmed to recognize that ID. The process of ‘bonding’ a specific collar (i.e., its unique ID) with a Receiver is called Enrollment. Your collar(s) were enrolled at the factory and no further action is needed to use RoamEO. However, if you purchase an additional Collar, or replace an existing one, or would just like to change the color choice assigned by the factory, you must use the Enrollment process. There are four steps to the Enrollment process. You must have both your Receiver and the Collar you wish to enroll to successfully complete this process. Place the Collar within five feet of the Receiver. Step 1 Press the Option and buttons on the GPS Receiver at the same time. This will set the GPS Receiver into the Enrollment mode and cause the Enrollment screen to be displayed See figure 13. Figure 13 Collar Enrollment Screen RoamEO can track three Collars, each of which is designated by a different color. Collars which are currently enrolled will be illuminated by one of the three colors. Collars available for enrollment are shown in gray—these Collars have not been previously enrolled. RoamEO will automatically select the first collar that has not been previously enrolled. 28 Step 2 Using the Zoom button to scroll up or down, select the Collar you wish to enroll. If you wish to enroll the Collar that has been automatically selected, proceed to Step 3. Step 3 Press the button on the GPS Receiver. This will select the Collar you have chosen and place it in memory. See figure 14. Figure 14 Blue Collar selected for enrollment process. Step 4 Press and hold the button on the Collar for five seconds. This will cause the Collar to send it’s unique address to the GPS Receiver, completing the enrollment process. See figure 15. Figure 15 If enrollment was successful, the Collar you selected will now be illuminated on the Collar Status Bar for about two seconds. The RoamEO will then move to the last selected tracking screen. You can also check the Collar Status Bar at this time to see if the Collar you enrolled is now illuminated. Press to complete the enrollment process. 29 FCC Compliance This device complies with Part 15 of the U.S. Federal Communications Commission (FCC) Rules. Operation is subject to the following conditions: 1. This device may not cause harmful interference. 2. This device must accept any interference that may cause undesired operation. Changes or modifications not expressly approved by the manufacturer could void the user’s authority to operate the equipment. This equipment has been tested and found to comply with the limits for a Class B digital device, pursuant to Part 15 of he FCC rules. These limits are designed to provide reasonable protection against harmful interference in a residential installation. This equipment generates, uses and can radiate radio frequency energy and, if not installed and used in accordance with the instructions, may cause harmful interference to radio communications. There is no guarantee that interference will not occur in a particular installation. If this equipment does cause harmful interference to radio or television reception, which can be determined by turning the equipment off and on, the user is encouraged to try to correct the interference by one or more of the following means: 1. Rotate or relocate the receiving antenna 2. Increase the separation between the equipment and receiver. 3. Connect the equipment into an outlet on a circuit different from that which the receiver is connected. 4. Consult the manufacturer customer service department for help. Under normal operating conditions, the antenna is designed to maintain a separation distance of 20cm from all persons. The EUT is mobile and fixed. 30 White Bear Technologies Software License Agreement The software contained in this product is licensed, not sold to you. We grant you the non-exclusive, non-assignable right to use this software for location purposes, but only as long as you comply with the terms and conditions of this License agreement. We reserve the right to terminate this license if you violate any aspect of this agreement. The software contained in this product are protected by copyright owned by White Bear Technologies. You may not modify, adapt, translate, reverse engineer, de-compile, disassemble, rent, lease or resell any software or create derivative works based upon any software or its contents. Any unauthorized reproduction, use, transfer of this software may be a crime and may be subject you to damages. We will prosecute violations of this software agreement. 31 Warranty White Bear Technologies warranties the RoamEO GPS Pet Location System against defects and malfunctions in materials and workmanship, and against failure to conform to the product’s written specifications for one (1) year from the date of original purchase. We make no other express warranty or representation of any kind whatsoever concerning this product. Any such defect, malfunction, or non-conformity which occurs within one year from the data of your original purchase will either be repaired without charge or replaced with a new product identical or reasonably equivalent to this product, or your purchase refunded, at our option, within a reasonable amount of time after our receipt of the defective product. This repair, or product replacement, or refund is the exclusive remedy to you against us for any defect, malfunction, or nonconformity concerning our product or any loss or damage from any other cause whatsoever. This warranty does not apply in the following circumstances: (1) if said defect is a result of negligence, accident, misuse, or carelessness; (2) if the product has been connected, installed, combined, altered, adjusted, or handled in any manner other than according to the instructions furnished with this product; or (3) if the product has been serviced or repaired by anyone other than us. 32 How To Obtain Service For all technical, return or repair questions, please contact the Factory by either email or phone. If using email, please provide a detailed description of the problem or question you have. Email: [email protected] Phone: 651-636-5695 M-F, 9am-4pm, Central Standard Time Before any product can be returned, you must call customer service to determine if a return is necessary. In most cases, customer service can resolve your problem over the phone, making a return unnecessary. If it becomes necessary to send a product in for repair or replacement, you must first receive a return authorization number from the Factory. Products returned without this authorization number will not be accepted. Shipping instructions for returning product will be given when the return authorization number is given. Please note that White Bear Technologies does not assume responsibility for goods lost or damaged in transit. 33 WWW. RoamEOforPets .COM WHITE BEAR TECHNOLOGIES, 900 LONG LAKE ROAD, SUITE 110, MINNEAPOLIS, MN 55112 © 2007 WHITE BEAR TECHNOLOGIES OWNERS MANUAL VERSION 1.1 1OWN-01000-11