1
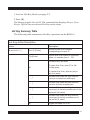
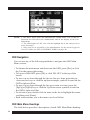
1
2
FCC Information
This equipment has been tested and found to comply with the limits for a Class A
digital device pursuant to Subpart J of Part 15 of the FCC Rules. These limits are
designed to provide reasonable protection against harmful interference in a residential
installation. This equipment generates, uses and can radiate radio frequency energy
and, if not installed and used in accordance with the instructions, may cause harmful
interference to radio communications. However, there is no guarantee that interference
will not occur in a particular installation. If this equipment does cause harmful
interference to radio or television reception, which can be determined by turning the
equipment off and on, the user is encouraged to try to correct the interference by one
or more of the following measures:
• Reorient or relocate the receiving antenna.
• Increase the separation between the equipment and receiver.
• Connect the equipment into an outlet on a circuit different from that which the
receiver is connected.
• Consult the dealer or an experienced radio/television technician for help.
© Copyright 2002 ALTUSEN® PKG-M0046
All brand names and trademarks are the registered property of their respective owners.
3
4
Table of Contents
Table of Contents ...................................................................05
About this Manual ..................................................................08
How this manual is organized ..................................................................... 08
Document conventions ............................................................................... 09
Special message conventions ..................................................................... 09
Additional help ............................................................................................. 10
ALTUSEN website ........................................................................................ 10
ALTUSEN authorized reseller ..................................................................... 10
Chapter 1
Introduction ........................................................................ 13
Benefits ........................................................................................................... 14
Features .......................................................................................................... 14
Package contents .......................................................................................... 15
Hardware requirements ................................................................................ 15
Console ....................................................................................................... 16
Computers ................................................................................................... 16
Cables .......................................................................................................... 16
KH0116 Front Panel ...................................................................................... 17
KH0116 Rear Panel ........................................................................................ 18
Chapter 2
Installation ........................................................................... 21
Single station installation ............................................................................ 21
Daisy chaining ............................................................................................... 22
Hot plugging .................................................................................................. 24
Switching station positions ..................................................................... 24
Hot plugging CPU ports ........................................................................... 24
Hot plugging console ports ..................................................................... 24
Powering off and restarting ......................................................................... 25
Port ID numbering ......................................................................................... 25
Port Selection ................................................................................................. 25
5
Chapter 3
Hot Key Operation ............................................................. 27
Hot Key port control .................................................................................... 27
Activate Hot Key mode ..............................................................................27
Selecting the active port ........................................................................... 28
Auto scanning ........................................................................................... 28
Setting the scan interval ...................................................................... 29
Activating auto scan ............................................................................ 29
Skip mode .................................................................................................... 30
Hot Key beeper control ..............................................................................30
Hot Key summary table ..............................................................................31
Chapter 4
OSD Operation ................................................................... 33
OSD overview ................................................................................................ 33
OSD navigation .......................................................................................... 34
OSD main menu headings ........................................................................ 34
OSD functions ............................................................................................ 35
F1 GOTO ................................................................................................... 36
F2 LIST ...................................................................................................... 36
F3 SET ....................................................................................................... 37
F4 ADM ..................................................................................................... 39
F5 SKP ....................................................................................................... 43
F6 BRC ....................................................................................................... 43
F7 SCAN ................................................................................................... 44
F8 LOUT ................................................................................................... 45
Chapter 5
The firmware upgrade utility ........................................... 47
Before you begin ........................................................................................... 47
Starting the upgrade ..................................................................................... 48
Upgrade succeeded ................................................................................ 50
Upgrade failed ......................................................................................... 51
Chapter 6
Control KH0116 Remotely ............................................... 53
6
Control KH0116 from up to 500 feet (150 meters) away .......................... 53
Control KH0116 over IP ............................................................................... 54
Appendix ............................................................................. 55
KH0116 connection table ............................................................................ 55
OSD factory default settings ...................................................................... 56
Specifications ............................................................................................... 57
Rack mounting .............................................................................................. 58
Troubleshooting ........................................................................................... 59
Limited warranty ........................................................................................... 60
Index ..................................................................................... 61
7
About this Manual
Welcome to the HIGH DENSITY KVM SWITCH (KH0116) User Manual,
which provides information for understanding and using ALTUSEN’s KH0116
KVM control unit.
How This Manual is Organized
The overall organization of this manual is described in the following table:
8
Chapter 1
Int roduct ion provides an overview of the K H0116 control unit's
features and functionality.
Chapter 2
Inst allat ion details installation procedures, from basic single stage
hookup through a complete three- stage operation..
Chapter 3
Hot Key Operat ion describes the concepts and procedures for
port control using Hot K eys.
Chapter 4
OSD Operat ion provides detailed information about how to
navigate and use both the administrator and user O n- Screen
Display (O SD) features.
Chapter 5
The Firm ware U pgrade U t ilit y provides required information to
upgrade the K H0116's firmware with the latest available version.
Chapter 6
Cont rol KH0116 Rem ot ely provides required information to
remotely manage the K H0116
Appendix
Specif icat ions provide technical and operational information about
the use of K H0116.
Document Conventions
This manual uses a variety of formats to identify different types of information,
courier
Indicates typed information such as syntax statements, on- screen computer
text, path, file and drive directory.
>
Indicates separation between a menu and an option.
Start > Run: select the Start menu, then select Run in the Start menu.
ALL CAPS
Indicates acronyms and abbreviations.
it alics
Indicates document or chapter titles, special words or phrases used for the first
time and emphasized words.
[ ]
Indicates a key to press on your keyboard.
[Alt]: press the Alt key.
[Alt + Ctrl]: press the Alt and Control keys at the same time.
[Alt + Ctrl], [Del]: press the Alt and Control keys at the same
time and then press the Delete key.
Type text [ ]
Indicates information you must type and then press a [key] on your keyboard.
Install [Enter]: type install and then press the Enter key.
•
Bullet lists indicate an informational list.
1.
Numbered lists indicate procedure steps.
Special Message Conventions
This manual uses the following message conventions:
NOTE: Indicates information of special interest or importance.
Indicates information that helps prevent system failure or data loss.
9
Additional Help
ALTUSEN provides the following support options for additional help, advice
and information:
ALTUSEN Te chnical Support
North America Technical
Phone Support
As a registered ALTUSEN product owner, you are entitled to
free telephone technical support. To contact the ALTUSEN
Technical Support Center, call: 1- 949- 453- 8885
International Technical
Phone Support
Contact your local dealer or the ALTUSEN Technical
Support Center: 1- 949- 453- 8885.
E- mail
Email your questions and concerns to: [email protected].
Online Documentation
The User Manual is available electronically. To access online
documentation, visit the ALTUSEN support website:
http://www.altusen.com/support.
Troubleshooting
Online troubleshooting describes some of the most commonly
encountered problems and provides possible solutions. Visit
the ALTUSEN support website:
http://www.altusen.com/support.
Software Updates
To download the latest computer drivers and firmware
upgrades, visit the ALTUSEN support website:
http://www.altusen.com/support.
ALTUSEN We bs ite
Product Information
Need more information about how ALTUSEN products can
help you connect without limits? Visit ALTUSEN on the web:
http://www.altusen.com
ALTUSEN Authorize d Re s e lle r
Find An Authorized
Reseller In Your Area
10
ALTUSEN provides three easy methods to find an authorized
reseller:
- United States, Canada and South America contact :
866- ALTUSEN
- International contact : 886- 2- 8692- 6959
- Visit the ALTUSEN website for locations and telephone
numbers
Please have the following information ready before contacting ALTUSEN
technical support:
• Product model number, serial number and date of purchase.
• Your current computer configuration, including operating system, revision
level, add-on boards and software.
• Error messages displayed at the time the error occurred.
• The sequence of computer operations that cause the error.
• Any other helpful information.
11
12
Chapter 1
Introduction
The new Altusen™ 16-port high density KVM switch offers a highly
efficient network management solution. Specially designed high-density
CPU connectors allow a 16-port KVM switch to use only a 1U high rack
space, and control up to 512 computers through daisy chaining.
This switch offers many advanced features such as an intuitive On-Screen
Display (OSD), Hot Keys, excellent video resolutions, two level password
security for users with different security clearance, flash ROM for firmware
upgrade, remote console and more.
A custom ASIC (patent pending) provides an auto-sensing function that
recognizes the position of each station on the chain, eliminating the need
to manually set the position with DIP switches. A seven-segment front
panel LED displays each station’s position for easy identification.
For further convenience, the KH0116 features high-density 15 pin
connectors instead of the usual 25 pin connectors. This space saving
innovation allows installation of a full, 16-port switch in a 1U space on a
system rack.
An included Firmware Upgrade Utility protects your KH0116 investment.
You can stay current with the latest functionality improvements by
downloading firmware update files from the ALTUSEN website as they
become available, and using the utility to quickly and conveniently perform
the upgrade.
Setting up the KH0116 is fast and easy, consisting of plugging cables into
their appropriate ports. Because the KH0116 intercepts keyboard input
directly, there is no software to configure and therefore no complex
installation routines or incompatibility problems.
Once installed, you can easily access any computer using two methods:
enter Hot Key combinations from the keyboard or use the powerful, menu
driven On-Screen Display (OSD) system. A convenient Auto Scan feature
also permits automatic scanning and one-by-one monitoring of the
activities of selected computers on the installation.
13
Benefits
The KH0116 KVM switch saves time and money by allowing a
single console to manage each connected computer. Installing the
KH0116 provides the following benefits:
• Eliminates the cost of a keyboard, monitor and mouse for
individual computer.
• Eliminates the need for additional space of extra components.
• Saves on energy costs.
• Eliminates the time and effort required to move from one
physical computer to another
Features
The main features of the KH0116 unit are as follows:
• Control 16 computers directly, or up to 512 computers through
daisy chaining, with only one keyboard, monitor and mouse.
• High-density 16-port KVM switch is rack mountable and only
1U high.
• Neatly designed, high-quality, custom cable for the high-density
server rack.
• Color-coded connectors for easy installation.
• Dedicated chain ports allow daisy chaining up to 31 additional
units – control up to 512 computers from a single console.
• “Hot-pluggable” feature allows adding or removing switches or
computers without having to power down the switch.
• “Keep-Alive” feature assures all the keyboard and mouse
connections work properly if the KVM switch loses power
supply temporarily.
• Auto sensing of KVM station positions for daisy chained
installations – no need for manual DIP switch setting – front
panel LED indicates station position.
• Port names automatically reconfigured when station sequence is
changed.
• Two level password security – an administrator and up to four
users, separate files for each, only authorized users viewing and
14
controlling the computers.
• Two level logout—manual and timed.
• No software required, convenient computer selection via intuitive OnScreen Display (OSD) menu or Hot Key combination.
• AutoScan offers easy monitoring of connected computers.
• PS/2 keyboard & mouse emulation for smooth switching and
simultaneously booting multiple computers.
• Remote console allows control of KVM from up to 500 feet away.
• Supports PS/2 compatible mice, Microsoft Intellimouse explorer,
Logitech FirstMouse+.
• Superior video quality – supports resolutions of up to 1920 x 1440.
• 19” Rack mountable.
• Firmware upgradeable through flash ROM.
• 110-220V auto-sensing power supply.
Package Contents
The complete KH0116 package includes the following items:
• 1 KH0116 KVM Switch
• 2 Custom KVM Cable Set (KC5202P)
• 1 Firmware Upgrade Cable
• 1 Power Cord
• 1 Rack Mounting Kit
• 1 User Manual
• 1 Quick Start Guide
Check to make sure that each item in the above list is included in your
package. If an item is missing or damaged in shipment, please contact your
dealer.
Read this manual thoroughly. Follow the installation and operation
procedures carefully to prevent damage to the KH0116 unit and any
connected devices.
Hardware Requirements
This section details the required hardware components for successful
15
installation and use of the KH0116.
Console
• A VGA, SVGA or Multisync monitor capable of the highest resolution that
you plan to use on any computer in the installation.
• A PS/2 style mouse
• A PS/2 style keyboard
Computers
To use and access the KH0116 successfully, your computer requires the
following:
• A VGA, SVGA or Multisync card.
• A 6-pin mini-DIN (PS/2 style) mouse port.*
• Either a 6-pin mini-DIN (PS/2 Style) keyboard port with +5V DC on pin 4
and Ground on pin 3, or a 5-pin DIN (AT Style) keyboard port with +5V
DC on pin 5 and ground on pin 4.*
* See the note under Cables in the next section.
Cables
Substandard cables may damage the connected devices or degrade overall
performance. For optimum signal integrity and to simplify the layout,
ALTUSEN strongly recommends using the high quality Altusen Custom
Cable sets described below:
Function
CS Part Numbe r
KVM Switch to KVM Switch (Daisy
Chaining)
KC1700 - 0.6m (2 feet)
KC1701 - 1.8m (6 feet)
KVM Switch to Computer
KC5202P - 1.8m (6 feet)
KC5203P - 3.0m (10 feet)
KC1700, KC1701
KC5102P, KC5203P
NOTE:
1. The KH0116 does not support serial mice. You cannot use Serial-to-PS/2 adapters
with the cables.
2. If your computer uses an AT style keyboard socket you must purchase a PS/2-toAT keyboard adpater in order to plug the cable into the computer’s keyboard port.
16
Front Panel
The front panel of the KH0116 includes six features as shown in the figure below.
Each number in the figure corresponds to a numbered step that follows.
1
2
3
4
5
6
1. Port LEDs
Each Port LED provides status information about corresponding CPU Ports. Each
Port consists of a left and right LED pair: On Line LED (left port) and Selected
Port LED (right port). The following describes the LED light indicators:
• An GREEN On Line LED indicates the corresponding attached computer
port is up and running.
• A ORANGE Selected LED indicates the corresponding attached computer has
the KVM focus. Under normal conditions, the LED is steady. When accessing
its port under Auto Scan Mode (see page 29) the LED flashes.
• Each time the KH0116 powers on, the Switch performs a self-test. The On line
and Selected LEDs blink once in succession during the self-test.
2. Reset Switch
Press the recessed Reset switch with a thin object (the end of a paper clip or
ballpoint pen) to perform a system reset.
3. Remote Console Area
• If you choose to use a remote console, its cable plugs into this RJ-45
connector. When a Local and Remote Console are present, both can access the
switch (not simultaneously).
• Push the Select button to toggle between the remote and the local console.
17
When the remote console is in control, you can only view through the local
console. When the local console is in control, you can only view through the
remote console.
• The LED indicates which console is currently in use, remote or local.
NOTE: For more information on using KH0116 with a remote console, see Chapter 6.
4. Firmware Upgrade Section
The Firmware Upgrade section includes two components (as described below):
Firmware Upgrade Port and Firmware Upgrade Reset Switch.
• The Firmware Upgrade Cable plugs into the Firmware Upgrade Port’s RJ11 connector and transfers firmware upgrade data from the administrator’s
computer to the KH0116 (see page 47).
• The Firmware Upgrade Reset Switch is in NORMAL position during normal
operation or while performing a firmware upgrade. If the firmware upgrade
operation does not successfully complete, slide the switch to the RECOVER
position; power Off and restart the switch; slide the switch bakc to the
NORMAL position; power Off and start the switch.
5. Power LED
The Power LED lights when the KH0116 powers up and is ready to operate.
6. Station ID LED
The Station ID LED displays a KH0116’s Station ID and indicates the position of
the particular KVM on the chain when it is part of the daisy chain operation. For a
Single Station or First Station on a Daisy Chain installation the KH0116 Station ID
is 01. On a Daisy Chained installation, the KH0116 auto-senses its position and
displays the Station ID that corresponds to its position in the chain (see Port ID
Numbering, page 25 for details).
Rear Panel
The rear panel of the KH0116 includes five features as shown in the figure below.
Each number in the figure corresponds to a numbered step that follows.
18
1
2
3
4
5
1. Power Socket
Plug the AC power cord into the power socket.
2. Power Switch
Turn on the KH0116 with the standard rocker power switch.
3. Local Console Port Section
For a Single Station or First Station unit of a daisy chain installation, the local
administrator’s keyboard, monitor, and mouse plug into the local console port. An
appropriate icon indicates each port.
4. Daisy Chain Ports
For Daisy Chain installations, plug daisy chain cables into the Daisy Chain ports.
The upper port is Chain In and the lower port is Chain Out. Do not use the Chain
In port on the Master First Stage unit.
5. CPU Port Section
The cables that link to the computers plug in here. Only cables specifically
designed to work with this switch can plug into the CPU port section.
NOTE: For detailed information on cables, see page 16.
19
20
Chapter 2
Installation
Before you begin, turn off power to all devices with which you plan to
connect. To prevent damage to your equipment due to static electric
discharge, properly ground all devices on the installation. Consult your
dealer for technical details if necessary.
Single Station Installation
In a Single Stage installation, no additional KH0116s are daisy chained
down from the first unit. To set up a single stage installation, do
the following:
1. Plug your keyboard, mouse, and monitor into the unit’s Console Ports.
21
2. Use custom cable sets (as described in the Cables section on page 16),
to connect any available CPU Port to the Keyboard, Video and Mouse
ports of the computer you are installing.
NOTE: Disregard the Daisy Chain ports at this time. Use Daisy Chain ports for daisy
chaining additional KH0116. See the next section in this chapter for more
information on daisy chaining.
3. Plug the power adapter cable into the KH0116’s Power Jack, and
then plug the power adapter into an AC power source.
4.Turn on the power to the computers.
Daisy Chaining
To control even more computers, up to 31 additional KH0116 units can be
Daisy Chained down from the first KVM station (KVM switch). In a
complete installation, you can control up to 512 computers from a single
console.
NOTE: For more information on the relationship between the number of both
computers and KH0116 units needed to control each computer, see page 55 in the
Appendix.
22
To set up a daisy chained installation, do the following:
1.Turn off power to all devices with which you plan to connect.
2. Use a Daisy Chain cable set (described in the Cables section, page 16),
to connect the Chain Out port of the parent KH0116 unit to the Chain In
port of the child KH0116 unit (First Station Out to Second Station In,
Second Station Out to Third Station In, etc.).
NOTE: Do not use the Chain In port of the First Station. The Chain In port is
the highest-level parent in the chain.
3. Use custom cable sets (described in the Cables section, page 16), to
connect any available CPU port on the KH0116 installation to the
Keyboard, Video and Mouse ports of the computers you are installing.
4. To power up the installation, do the following:
a. Plug in the power cable for the first KVM station (KVM switch). Wait for
the unit to ascertain and display its Station ID on the Station ID LED. (The
Station ID for the First Stage unit is 01, the ID for the Second Stage unit is
02, the ID for the Third Stage unit is 03, and so on.)
b. Plug in the power cables for each KVM station on the installation in
order of Second Station, Third Station and so on. In each case, wait for the
Station ID to be ascertained and displayed on the current KVM station
before plugging in the next one.
23
c.After all the KVM stations are up, power on the computers.
Hot Plugging
The KH0116 supports hot plugging: you can remove or add components to
the installation by unplugging or plugging their cables from the ports
without shutting down the unit. In order for hot plugging to work properly,
follow these steps:
Switching Station Positions
You can switch KVM station positions by simply unplugging from the old
parent and plugging into a new one. After you do, in order for the OSD
menus to correspond to the change, you must reset the OSD. See RESET
STATION IDS, page 42, for details.
Hot Plugging CPU Ports
In order for the OSD menus to correspond to the change, you must
manually reconfigure the OSD information for the new port information.
See the F3 SET (page 37) and F4 ADM (page 39), functions for details.
NOTE: This feature may not work properly if your computer operating system does
not support hot plugging.
Hot Plugging Console Ports
You can hot plug the keyboard, monitor, and mouse. When hot plugging
the mouse, follow these steps:
1.Unplug the mouse and plug in again (to reset the mouse, for example),
only if you use the same mouse.
2.If you use a different mouse, all KVM stations and computers on the
installation must be shut down for ten seconds, and then restarted
following the Power Up sequence described in Step 4 on page 23).
NOTE: If there is not response to keyboard or mouse input, perform a keyboard and
mouse reset by pressing the Reset Switch in (see page 17).
24
Powering Off and Restarting
You may need to power off a KH0116 unit occasionally. Do the following
before powering the KH0116 unit on again:
1.Turn off power to all connected computers.
NOTE: Unplug the power cord of any computer with the Keyboard Power On
function; otherwise, the KVM station continues to receive power from the computers.
2.Wait 10 seconds, and then plug-in the KH0116.
3.Power on the computers only after the KH0116 station is running.
NOTE: If you shut down more then one KVM station, power up the highest station
first, and work your way down to the lowest station.
Port ID Numbering
Each CPU port on a KH0116 installation has a unique assigned Port ID.
The Port ID includes two parts: a Station Number and a Port Number as
described below:
• The Station Number - A two-digit number indicating the KH0116’s
position in the daisy chain sequence. The Station number corresponds
to the number displayed on the front panel Station ID LED.
• The Port Number - A two-digit number indicating the corresponding
connection port on the KH0116 station.
• The Station Number precedes the Port Number.
• Station and Port numbers 1 - 9 include a preceding zero and display as 01
- 09. For example, a computer attached to Port 6 of Station 12 has a Port
ID of 12-06.
Port Selection
You can select ports using the following two methods: entering Hotkey
combinations from the keyboard or using the On-Screen Display (OSD).
NOTE: For more information on Hotkey Port Selection, see Chapter 3 on page 27.
For more information on OSD Operation, see page 33.
25
26
Chapter 3
Hot Key Operation
Hot Keys allow you to use keyboard sequences that perform a variety of actions
for KH0116 operations. This chapter provides information about each Hot Key
operation and instructions for using the Hot Key port controls.
Hot Key Port Control
Hot Key Port Control allows you to provide KVM focus to a particular computer
directly from the keyboard. The KH0116 includes the following Hot Key Port
Control features:
• Selecting the Active Port
• Auto Scanning
• Skip Mode
Activating Hot Key Mode
All Hot Key operations begin by activating Hot Key Mode.
To activate Hot Key mode, follow these steps:
1.Hold down the Num Lock key.
2.At the same time, press and release the minus key.
3.Release the Num Lock key.
[Num Lock] + [-]
NOTE: Release the minus key within ½ section or Hot Key activation stops and has
no effect.
When Hot Key Mode is active, the following changes occur:
• Caps Lock and Scroll Lock LEDs flash in succession. These stop flashing
and revert to normal status after exiting Hot Key Mode.
27
• The screen displays a command line prompt with the word Hot Keys in
yellow text on a blue background as well as all subsequent keyed in
Hot Key information.
• Ordinary keyboard and mouse function have no effect. You may only
input Hot Key compliant keystrokes and mouse clicks (as described in
the following sections).
• Press [Esc] to exit Hot Key Mode.
Selecting the Active Port
Each CPU port is assigned a Port ID, you can directly access any computer
on the installation with a Hot Key combination that specifies the Port ID of
the connected CPU Port.
To select the active port, follow these steps:
1.Activate Hot Key Mode (see page 27).
2.Key in the Port ID
The Port ID numbers display on the Command Line as you type each
number. For example, enter “0305” to switch to port 5 of the 3rd KVM on the
chain. If you make a mistake, use [Backspace] to erase the wrong number.
3. Press [Enter]
The KVM focus switches to designated computer and automatically exists
Hot Key Mode.
Auto Scanning
Auto Scan automatically switches among all the active CPU Ports that are
accessible to the currently logged on User at regular intervals in order to
28
automatically monitor their activity. (See Scan/Skip Mode of the OSD F3
SET function).
Setting the Scan Interval
Set the amount of time Auto Scan waits on each port with the Scan
Duration setting of the OSD F3 SET function (see page 37). You can also
change the scan interval before activating Hot Key Auto Scanning with the
following Hot Key combination:
1.Activate Hot Key Mode (see page 27).
2.Key in [T] [n]
[T] is the letter T, and [n] is a number from 1-255 that represents the number
of seconds for the wait time. The letter T and the numbers display on the
command line as you key them in. If you make a mistake, use [Backspace]
to erase the wrong number.
3.Press [Enter]
You automatically exit Hot Key Mode and are ready to activate Auto
Scanning.
Activating Auto Scan:
To activate Auto Scanning, enter the following Hot Key combination:
1.Activate Hot Key mode (see page 27).
2.Press [A].
Hot Key mode stops automatically. Auto Scan mode and Auto Scanning
begins.
• While in Auto Scan mode, pause scanning to keep the focus on a
particular computer using either of these methods: press P or left-click
the mouse. While Auto Scanning is paused, the command line displays:
Auto Scan: Paused.
Use Pausing when you want to keep the focus on a particular computer
29
rather than Exit Auto Scan mode. With this method, you start from where
you left off once scanning resumes. On the other hand, scanning begins
from the first computer on the installation if you exit and restart. To
resume Auto Scanning, press any key or left-click the mouse. Scanning
continues from where it left off.
• While Auto Scan mode is in effect, ordinary keyboard and mouse
functions are suspended - only Auto Scan mode compliant keystrokes
and mouse clicks may be input. You must exit Auto Scan mode in order
to regain normal control of the console.
3.To exit Auto Scan mode press [Esc] or [Spacebar]. Auto Scanning stops
once you exit Auto Scan mode.
Skip Mode
Skip mode allows you to switch between computers in order to monitor
them manually. You can wait on a particular port for as long as you like—
unlike Auto Scanning, which automatically switches after a fixed interval.
To activate Skip mode, key in the following Hot Key combination:
1.Activate Hot Key mode (see page 27).
2.Press [Arrow]
[Arrow] refers to one of the Arrow keys. After pressing [Arrow], Hot Key
Mode automatically exits, and Skip Mode activates. Once Skip Mode
activates, you can switch ports as follows:
Once in Skip mode, continue skipping by pressing the arrow keys. You
don’t have to use the [NumLock] + [-] combination again.
While Skip mode is in effect, ordinary keyboard and mouse functions are
suspended - only Skip mode compliant keystrokes can be input. Exit Skip
mode in order to regain normal control of the console.
3.To exit Skip mode, press [Esc] or [Spacebar].
Hot Key Beeper Control
You can use Hot Keys to toggle the Beeper On and Off.
To toggle the Beeper, enter the following Hot Key combination:
30
1.Activate Hot Key Mode (see page 27).
2.Press [B]
The Beeper toggles On or Off. The command line displays Beeper On or
Beeper Off for one second and Hot Key mode stops.
Hot Key Summary Table
The following table summarizes Hot Key operations on the KH0116:
Hot Ke y Action De s cription
Action
[Num Lock] + [- ]
De s cription
[Port ID] [Enter]
switches access to the computer
corresponding to the port ID.
[T][n][Enter]
Sets the Auto Scan interval to n seconds,
where n is a number from 1 - 255.
Activate Auto Scan mode.
To pause Auto Scan, press [P] or leftclicking mouse.
[A]
To resume Auto Scan, press any key or
left- click mouse.
[
]
Activates Skip mode and skips from the
current to a previous accessible port
[
]
Activates Skip mode and skips from the
current to the next accessible port.
[
]
Activates Skip mode and skips from the
current port to the last accessible port of the
previous KVM switch.
[
]
Activates Skip mode and skips from the
current port to the first accessible port of
the next KVM station.
[B]
Toggles the beeper on or off.
31
32
Chapter 4
OSD Operation
The KH0116 On-Screen Display (OSD) provides a visual interface that controls
computer and switching operations from your desktop. This chapter provides
detailed information about how to navigate and use both the administrator and
user OSD features.
OSD Overview
The On-Screen Display (OSD) uses a menu driven interface. Each menu option
activates a function used to configure and control various operations from editing
port names to performing operations on multiple computers.
The OSD also provides security over the KVM. For example, the administrator can
assign access privileges to users, such as the right to access or view certain
computers connected to the KVM.
The OSD Main Menu displays a list of function key controls, connected
computers and symbols that indicate a computer’s status. The OSD includes a two
level password system: Administrator and User.
To activate the OSD Main Menu follow these steps:
1.Press the pre-assigned hotkey, [Scroll Lock] two times. The login window
appears.
NOTE: Optionally, you can assign the Control key as the Main Menu hotkey. For
additional information, see OSD Hotkey on page 38.
2.Do either of the following:
- Enter a valid password in the password field and then press [Enter].
- For a first time OSD activation or if the password has not been set, leave
the password field blank and then press [Enter].
The OSD Main Menu appears in Administrator mode. Administrator mode
provides access to both Administrator and User functions. You can also
set-up operations (including future password authorization) as desired.
33
NOTE: 1. The above figure shows the Administrator’s Main Menu. The F4 and F6
functions are reserved for the Administrator and do not display on the User
Main Menu.
2. The OSD begins in LIST view with the highlight bar in the same position
as the last usage.
3. Only ports set as accessible by the Administrator for the current logged in
User are visible (see SET ACCESSIBLE PORTS on page 42).
OSD Navigation
You can use any of the following methods to navigate the OSD Main
Menu screen:
• To dismiss the main menu and deactivate the OSD, press [Esc] or click
the X at the upper right corner.
• To logout of the OSD, press [F8] or click F8 LOUT at the top of the
screen.
• To move up or down through the list one line at a time, press the up/
down arrows keys or click the up/down triangle symbols located on the
OSD’s right scroll bar.
• To move up or down through the list one screen at a time, press the
[PgUp] or [PgDn] key or click the Up/Down arrow symbols located on
the OSD’s right scroll bar.
• To activate a port, double-click its name in the list or highlight the name
and then press [Enter].
• Each action returns you to the menu, one level below.
OSD Main Menu Headings
The table below provides a description of each OSD Main Menu heading:
34
M ain M e nu He ading
De s cription
SN - PN
List the Port ID numbers (Station Number Port Number) for all CPU ports on the
installation. To access a computer, move the
highlight bar over a computer in the list and
then press [Enter].
QV
An arrowhead appears in this column to
indicate ports selected for Quick View (see
Set Quick View Ports on page 41).
A sun symbols appears in this column to
indicate powered on computers currently
online.
NAME
You can provide a unique port name that
appears in this column (see Edit Port
Names on page 41).
OSD Functions
The OSD provides a series of function keys used to configure and control
various computer operations. For example, you can rapidly switch to any
port, scan selected ports and limit the list of ports you want to view,
manage port names or make OSD setting adjustments.
This section describes the meaning and use of the following OSD
functions: F1 GOTO, F2 LIST, F3 SET, F4 ADM, F5 SKP, F6 BRC, F7 SCAN
and F8 LOUT.
To access any OSD function, follow these steps:
1.Do either of the following:
- Press the desired function key on your keyboard.
- Click a function key menu option located at the top of the Main Menu
screen.
A submenu appears that corresponds to your selected function key.
2.Press [Esc] to return to the previous menu level.
35
F1 GOTO:
To activate the GOTO function, press [F1] or click the F1 menu option
located at the top of the Main Menu screen.
GOTO allows you to switch directly to a port by typing the port’s Name or
Port ID. The last line on the OSD screen prompts you to select by Name or
Port ID.
• To use the Name method: type1 and the port Name, then press [Enter].
• To use the Port ID method: type 2 and the Port ID, then press [Enter].
NOTE: You can enter a partial Name or Port ID. In this case, the screen displays
computers for which the current User has view privileges (see Set Accessible Ports on
page 42) and that match the Name or Port ID pattern regardless of the current List
setting (see F2 LIST in next section.)
• To return to the OSD Main Menu screen without selecting, press [Esc].
F2 LIST:
To activate the LIST function, press [F2] or click the F2 menu option
located at the top of the Main Menu screen.
36
LIST allows you to broaden or narrow the scope of ports listed on the
OSD.
To activate a submenu option, move the highlight bar to the desired option
and then press [Enter]. An icon, indicating your selection, appears to the
left of the menu option.
The following table provides a description of each F2 LIST submenu
option:
M ain Option
De s cription
ALL
Lists all the ports on the installation.
POWERED ON
Lists only those ports with attached
computers powered on.
QVIEW
Lists only the ports selected as Quick View
Ports (see SET QUICK VIEW PORT on
page 41).
QVIEW + POWERED ON
Lists only those ports selected as Quick
View Ports with their attached computers
powered on.
F3 SET:
To activate the SET function, press [F3] or click the F3 menu option located
at the top of the Main Menu screen.
37
SET allows an Administrator or User to set up a unique working
environment profile. The stored profile activates each time a corresponding
user logs into the system.
To activate a submenu option, move the highlight bar to the desired
option, and then press [Enter]. An icon, indicating your selection, appears
to the left of the menu option.
The following table provides a description of each F3 SET submenu
option:
M ain Option
De s cription
OSD HOTKEY
Selects which hotkey combination activates the OSD:
[Scroll Lock][Scroll Lock] or [Ctrl][Ctrl]
The default hotkey combination is Scroll Lock. The
Ctrl hotkey combination may conflict with other
programs running on computers.
PORT ID DISPLAY POSITION
Allows you to position the Port ID display on your
monitor. The upper left corner is the default postion.
To position the Port ID display anywhere on- screen,
use the mouse or arrow keys. You can also use the
arrow keys on the numeric keypad (with NumLk off).
To lock the position and return to the Set menu, press
[Enter] or double- click the mourse.
PORT ID DISPLAY DURATION
Determines the number of seconds a Port ID appears
on- screen after a port change has occurred. You can
select from:
User Defined: Type the number of seconds (from 1 255) and then press [Enter]. The default is 3 seconds.
A value of 0 (zero) disables this function.
Always On: displays the Port ID at all times.
PORT ID DISPLAY MODE
Determines how a Port ID displays on- screen:
PORT NUMBER: displays the port number.
PORT NAME: displays the port name.
PORT NUMBER + PORT NAME (default): displays
the port number and name.
( continued)
38
( continued from previous page )
M ain Option
De s cription
SCAN DURATION
Sets the amount of time a port displays on- screen each
time you activate SCAN (see F7 SCAN on page 44).
Type a value from 1 - 255 seconds and then press
[Enter].
The default is 5 seconds. A value of 0 (zero) disables
this function.
SCAN/SKIP MODE
Select the computers accessed in Skip (see F5 SKP on
page 43) and Auto Scan (see F7 SCAN on page 44)
mode. The default is ALL.
You can select from:
ALL: all ports set as accessible (see SET
ACCESSIBLE PORTS on page 42) by a user.
POWERED ON: all ports set as accessible by a user
and powered on.
QUICK VIEW: all ports set as accessible by a user
and selected as a Quick View port (see SET QUICK
VIEW PORTS on page 41).
QUICK VIEW + POWERED ON: all ports set as
accessible by a user and selected as Quick View and
are powered on.
SCREEN BLANKER
The screen blanks when there is no console input for
the number of minutes specified. Type value from 1 30 minutes and then press [Enter].
A value of 0 (zero) disables this function. The default is
0 (disabled).
HOTKEY COMMAND MODE
If a software conflicts occurs, you can enable or
disable the Hotkey function.
F4 ADM:
To activate the ADM function, press [F4] or click the F4 menu option
located at the top of the Main Menu screen.
ADM is an Administrator function that allows the Administrator to
configure and control the overall operation of the OSD.
To activate a submenu option, move the highlight bar to the desired option
and then press [Enter] or double-click the option. An icon, indicating your
selection, appears to the left of the menu option.
39
The following tables provides a description of each F4 ADM submenu option:
M ain Option
De s cription
SET USERNAME AND PASSWORD
Sets username and passwords for (1) administrator and
(4) users as described below:
1. After selecting either the administrator or user fields,
a password screen appears. Enter a username. Supply
a unique password consisting of up to 15 characters
with any combination of letter and numbers.
2. Re- enter the password in the Confirm field and then
press [Enter]. Press [Esc] to return to the previous
menu.
• To modify or delete an existing username and/or
password, press [Backspace] to erase letters or
numbers.
• To ensure that the security feature is effective the
administrator must enter user name and passwords for
all four users even if there are less than four users (any
unassigned user can login without entering user name
and password).
SET LOGOUT TIME
Automatically logs out a user when there is no console
input for the number of minutes specified.
Other users may access computers when the primary
user has not logged out but is no longer accessing
computers.
To set a timeout value, type a value from 1 - 180
minutes and then press [Enter]. A value of 0 (zero)
disables this function. The default is 0 (disabled).
40
M ain Option
De s cription
EDIT PORT NAMES
You can assign a unique name to each port to easily
recognize a port's corresponding computer. The
administrator can create, modify or delete port names.
To edit a port name, do the following:
1. Click the desired port or highlight a port using the
navigation keys, and then press [Enter].
2. Type in a new port name or modify/delete an existing
name. The maximum number of characters allowed is
12. Valid characters include:
Alphabetic: a- z, A- Z
Numeric: 0- 9
+- /: . and [Space]
Port names are not case sensitive and appear as all
capital letters regardless of how they were input.
3. When you have finished, press [Enter] to save your
changes. Press [Esc] to cancel.
RESTORE DEFAULT VALUES
Returns current settings to the original factory default
settings (see FACTORY DEFAULT SETTINGS on
page 56.)
CLEAR THE NAME LIST
Returns the current settings to original factory default
settings and clears assigned port names.
ACTIVATE BEEPER
Activates a beeper sound each time the Auto Scan
function (see F7 SCAN on page 44) accesses a port
or an invalid entry is made on an OSD menu.
Select Y (Yes) to activate the beeper (default).
Select N (No) to deactivate the beeper.
SET QUICK VIEW PORTS
Quick View ports allow users to scan and view
selected ports, saving time for a large installation base.
For instance, if an installation includes 500 computers
and you want to view 10 of these quickly, you can
select these as Quick View and then select Quick View
as the criteria for the computers listed in the OSD
window.
The administrator can select which ports are included as
Quick View ports as described below:
• To select/deselect a port, double- click or move the
highlight bar to the desire port and then press [Enter].
• An arrowhead appears in the QV column on the
Main Menu List, indicating ports selected as Quick
View.
• If you select either the QVIEW or QVIEW +
POWER ON options for F2 LIST (see page 36), only
those ports selected as Quick View appear in the Main
Menu list.
41
M ain Option
De s cription
SET QUICK VIEW PORTS
• If you select either the QVIEW or QVIEW +
POWER ON options for SCAN/SKIP MODE (see F3
SET on page 37), only those ports selected as Quick
View are auto scanned.
SET ACCESSIBLE PORTS
An administrator can determine user access to
computers on the installation on a port- by- port basis as
described below:
• F (full access) default
• V (view only)
• Blank (no access): port does not display on user's
Main Menu LIST.
To set user access, select the target port and then press
[Spacebar] to cycle through each selection (F, V,
blank). Repeat for all user access rights and press
{Enter} when finished.
RESET STATION IDS
If you change a KVM station position in the daisy
chain, OSD settings no longer correspond with the new
position. Use this function to rescan KVM station
positions and update the OSD.
NOTE: Only KVM station numbers update. You must
redo all administrator settings (such as Set Accessible
Ports and Set Quick View Ports) for all KVM stations
affected by the change. Port names are not affected.
FIRMWARE UPGRADE
You must activate Firmware Upgrade mode to upgrade
the KH0116's firmware (see Chapter 5).
In the case that administrator forget the correct combination of the user name and
password, do the following to restore the default user name and password:
1.Turn off the power of KH0116;
2.Open the cover of KH0116, and short the jumper marked “Restore Default
Password”;
3.Turn the power of KH0116 while this jumper is shorted, you can see the
LEDs start blinking. Wait until LEDs stop blinking and then turn off the
power;
4.Resume the jumper to open position and put the cover on;
5.Turn the power back on for KH0116. The assigned user names and
passwords should all be cleared. You will be able to start the OSD with the
default user name and password.
42
Please make sure this documentation and the KVM switches are placed
separately and all in secured locations to avoid security breaches.
F5 SKP:
To activate the SKP function, press [F5] or click the F5 menu option
located at the top of the Main Menu screen.
SKP enables you to easily skip forward or backward, switching the console
focus from the current active computer port to the next or previous
available computer port.
The following lists additional SKP function features:
• The F3 SET function (see page 37) determines which computers are
available for Skip Mode switch selection.
• To navigate in Skip Mode, do any of the following:
• Press [ ] to switch to the previous computer in the list.
• Press [ ] to switch to the next computer in the list.
• Press [ ] to switch to the last computer on the previous KVM station in
the list.
• Press [ ] to switch to the first computer on the next KVM station in the
list.
NOTE
When you Skip, you only Skip to the previous or next available computer
that is in the Scan/Skip Mode selection.
• When you select a port for Scan/Skip Mode, a left/right triangle symbol
appears to the left of the Port ID.
• The console does not function normally while in Skip mode. You must
exit Skip mode to regain console control.
• To exit Skip mode press [Spacebar] or [Esc].
F6 BRC:
To activate the BRC function, press [F6] or click the F6 menu option
located at the top of the Main Menu screen.
BRC is an Administrator function that enables Broadcast mode (BRC). In
Broadcast mode, commands sent from the console broadcast to all
available computers on the installation.
43
The BRC function is especially useful for performing operations on
multiple computers, such as a system-wide shutdown or upgrading
software. For instance, if you turn Broadcast on and press [Ctrl+Alt+Del],
all computers listed on the OSD reboot.
F6 BRC works in conjunction with the F2 LIST function. LIST broadens or
narrows the focus of ports that appear in the OSD Main Menu list. When
you broadcast a command, only those ports that appear in the OSD Main
Menu list receive the command.
The following list describes additional BRC features:
• While BRC mode is in effect, a speaker symbol appears before the Port ID
Display of the port with the current console focus.
• While BRC mode is in effect, the mouse does not function normally. You
must exit BRC mode to regain mouse control.
• To exit BRC mode, activate the OSD (use the OSD hotkey), and then
press [F6] or click the F6 menu option.
F7 SCAN:
To activate the SCAN function, press [F7] or click the F7 menu option
located at the top of the Main Menu screen.
SCAN allows you to automatically switch among available computers at
regular user-defined intervals.
The following list describes SCAN features:
• Use the F3 SET Scan/Skip Mode (see page 39) setting to select the
computers you want included each time you activate SCAN.
• Use F3 SET Scan Duration (see page 39) to set the amount of time each
port displays on-screen each time you activate SCAN. Press [Spacebar]
to stop at a particular port and exit Auto Scan Mode.
• If scanning encounters an empty port or one with a powered down
corresponding computer, the monitor screen appears blank and mouse or
keyboard input have no effect. Scanning moves to the next port after the
44
assigned scan duration time.
• The letter S appears in to the left of the Port ID display, indicating that it
is being accessed under Auto Scan Mode.
• The console does not function normally while in Auto Scan mode. Exit
Auto Scan Mode to regain console control.
• Press P or left-click the mouse to pause scanning in order to keep focus
on a particular computer.
• To exit Auto Scan Mode, press [Spacebar] or [Esc].
F8 LOUT:
To activate the LOUT function, press [F8] or click the F8 menu option
located at the top of the Main Menu screen.
LOUT logs out and exits the OSD. To regain access to the OSD, you must
activate and then login to the OSD. LOUT is different then pressing [Esc].
[Esc] temporarily deactivates the OSD, allowing you to regain access by
pressing the OSD Hotkey without a login sequence.
NOTE: 1. After re-entry to the OSD, the OSD Main Menu appears and the screen
stays blank. You must input your password to continue.
2. After re-entry, if you immediately press [Esc] without having first selected a
port from the OSD menu, a Null Port message appears on-screen. Press the
OSD hotkey to display the OSD Main Menu screen.
45
46
Chapter 5
The Firmware Upgrade Utility
The Windows Firmware Upgrade Utility provides an automated method to easily
upgrade the KH0116 firmware. This software is included as part of a firmware
upgrade package, specific for each device.
NOTE Check for the latest information and download new versions of the firmware
upgrade package at: http://www.altusen.com/support
This chapter provides information on retrieving the firmware upgrade software
and systematic instructions to complete the upgrade process.
Before You Begin
To prepare for the firmware upgrade, follow these steps:
1.Use a computer that is not part of your KVM installation and visit:
http://www.altusen.com/support. Select your device model name to view a
list of available firmware upgrade packages.
2.Select the firmware upgrade package you want to install (usually the
most recent), and then download it to your computer.
3. Connect a COM port on your computer to the Firmware Upgrade Port
on your KVM unit with the Firmware Upgrade Cable (provided with the
KVM unit).
47
NOTE: For a daisy-chain installation, connect the cable to the first KVM station.
The subsequent KVM stations in the chain receive the upgrade via the daisy
chain cable.
4.Turn off all computers on your KVM installation. Do not turn off the
KVM station.
5.From your KVM station console, activate the OSD (see page 33) and
then select the F4 ADM function.
6.Scroll down to FIRMWARE UPGRADE and then Press [Enter]. Press [Y]
to activate the Firmware Upgrade mode.
Starting the Upgrade
To upgrade your firmware, follow these steps:
1.Start the firmware upgrade program that you previously downloaded by
doing either of the following:
- Double-click the file icon.
- Click Start and then Run. Type the path to the file you want to open.
The Firmware Upgrade Utility Welcome screen appears.
2.Read the License Agreement. Select the I Agree radio button and click
Next. The Firmware Upgrade Utility main screen appears.
The Utility inspects your installation. The Device List pane displays all
upgrade capable devices.
48
3.If the utility detects more than one Master Device (the First Stage KVM
unit on a daisy chained installation) on the installation, an alert message
appears requiring you to select the Master Device (and the KVM devices
chained down from it) that will receive the upgrade.
4.Select the KVM device and then click OK.
5.As you select KVM devices, a detailed description of each appears in the
Device Description pane.
6.After you have made your selection(s), click Next to perform the upgrade.
Status message appears in the Status Messages pane as the upgrade
proceeds. The Progress bar graphically displays how much of the
installation has completed
49
• If you enabled Check Firmware Version, the Utility compares the
KVM device’s firmware version with that of the upgrade files. If the
device firmware version is higher, an alert message appears. Click Yes
to continue or No to cancel the upgrade.
• If you didn’t enable Check Firmware Version, the Utility installs the
upgrade files without comparing the device version with that of the
upgrade files.
7.To abort the upgrade procedure before completion, click Cancel. An alert
message appears warning you that quitting at this point may cause the
device’s firmware to be lost. You have the option to proceed with the
cancel operation or abort the cancel operation.
NOTE: To recover from a “lost firmware” situation, see the Firmware Upgrade Reset
Switch information on page 18.
Upgrade Succeeded
After the upgrade has completed, a screen appears to inform you that the
procedure was successful:
50
Click Finish to close the Firmware Upgrade Utility
Upgrade Failed
If the upgrade failed to complete successfully an alert message appears
providing you with the option to retry. Click Yes to retry. If you click No,
the Upgrade Failed screen appears:
Click Cancel to close the Firmware Upgrade Utility.
51
52
Chapter 6
Control KH0116 Remotely
The Altusen High Density KVM Switch can be control remotely in two ways:
1.Using the Remote console port and the Remote Console Station
(Altusen Part No. KA9250) to control KH0116 from up to 500 feet (150
meters) away;
2.Using KVM on the Net (Altusen Part No. KN9000) to control KH0116
over LAN/WAN, or Internet.
Control KH0116 from up to 500’ (150 meters) away
The Remote Console port on KH0116 allows you to use Category 5E cabling and
the Remote Console Station KA9250 to control the KVM from up to 500’ (150m)
away. To set up the remote console, do the following:
Before you start, please make sure KA9250 is not powered on,
KH0116 is either powered off or on Local Console (the Local
Console LED of Remote Console on KH0116 is on).
1. Plug one end of the Category 5E cabling into the RJ-45 port in the
Remote Console Area of KH0116, and plug the other end of Category 5E
cabling into the RJ-45 port on the Remote Console Station KA9250 (refer
to the KA9250 drawing for detail).
NOTE: In order to assure the optimum video quality, make sure you use Category 5E
(also called Enhanced Category 5) or Category 6 cabling with solid conductor.
Stranded patch cables are only used for short distance patching, not for distance as far
as 500’. For details regarding cabling standards, contact your cable manufacturers.
2.Plug the keyboard, monitor and mouse into the corresponding ports on
the Remote Console Station (refer to the next drawing for detail).
3.Plug the power adapter (supplied with KA9250) into the power jack of
KA9250 and the AC outlet.
53
4.Push the Select button in Remote Console Area of the KH0116 to turn the
control over to the remote console. After you push the button, the LED of
the Remote Console will be on.
Once the Remote Console Installation is done, you can toggle between
local and remote console by pushing the Select button. When remote
console is in control, you can still view through local monitor, vice versa.
Control KH0116 over IP
To remotely control the Altusen High Density KVM Switch over the IP, do the
following:
Before you start, please make sure KN9000 is powered off.
1.Plug the KVM cable (supplied with KN9000) to connect the console port
of KH0116 to the KVM port of KN9000.
2.Plug keyboard, monitor, and mouse to the console port of KN9000.
3.Turn on the power of KN9000.
4.Follow the procedure of KN9000 to set up the control over IP.
54
Appendix
This appendix provides specifications and other technical information regarding
the KH0116.
KH0116 Connection Table
The following table indicates the relationship between the number of KH0116
units and the number of computers that they control:
Units
Compute rs
Units
Compute rs
Units
Compute rs
Units
Compute rs
1
1- 16
9
129 - 144
17
257 - 272
25
385 - 40 0
2
17 - 32
10
145 - 160
18
273 - 288
26
401 - 416
3
33 - 48
11
161 - 176
19
289 - 304
27
417 - 432
4
49 - 64
12
177 - 192
20
305 - 320
28
433 - 448
5
65 - 80
13
193 - 208
21
321 - 33 6
29
449 - 464
6
8 1 - 96
14
209 - 22 4
22
337 - 35 2
30
464 - 480
7
97 - 112
15
2 2 5 - 2 40
23
353 - 36 8
31
481 - 496
8
113 - 128
16
241 - 256
24
369 - 38 4
32
4 9 7 - 5 12
55
OSD Factory Default Settings
The factory default settings are as follows:
Se tting
De fault
OSD Hotkey
[Scroll Lock] [Scroll Lock]
Port ID Display Position
Upper left corner
Port ID Display Duration
3 seconds
Port ID Display Mode
Port Number + Port Name
Scan Duration
5 seconds
Scan/Skip Mode
All
Screen Blanker
0 (disabled)
Logout Timeout
0 (disabled)
Beeper
Y (activated)
Accessible Ports
F (full) for all users on all ports
56
Specifications
Function
Spe cification
Power Supply
AC- 110- 240V, 50/60 Hz
Computer Connections
Connectors
Direct
16
Max
512 (via daisy chain)
Console VGA
1 x HDB - 15 F
Console K/M
2 x 6 pin mini DIN F (Keyboard:
purple, Mouse: green)
CPU Ports
16 x SPDB - 15 F
Daisy Chain
1 x DB - 25 F, 1 x DB - 25 M
Remote Control
1 x RJ - 45
FW Upgrade
1 x RJ - 11
Power
3 pin AC power jack
Port Selection
Switches
LEDs
Emulation
OSD / Hotkey
Power
1 x Rocker switch
FW Recover
1 x Slide switch
Reset
1 x Semi- recessed pushbutton
Remote Control
1 x Locking pushbutton
On- line
16 (Green)
Selected
16 (Orange)
Power
1 (Blue)
Station ID
2 x 7 Segments
Keyboard
PS/2
Mouse
PS/2
57
Function
Spe cification
Scan Interval
User specified: 1 - 255 seconds
Video
1920 x 1440, DDC2B
Power Consumption
DC 9V, 8W (max)
Operating Temperature
0 - 50° C (32° F - 122° F)
Storage Temperature
- 20 - 60° C (- 4° F - 140° F)
Humidity
0 - 80% RH
Housing
Metal
Weight
7.9 lbs (3.56 kg)
Dimensions (LxWxH)
17" x 8.25" x 1.75"
(43.2cm x 21cm x 4.5cm)
Rack Mounting
You can mount the KH0116 in a 1U system rack. For convenience and flexibility,
the mounting brackets can screw into either the front or the back of the unit so
that it can attach to the front or the back of the rack. To rack mount the unit do
the following:
1. Screw the mounting brackets into the sides of the unit at the front or the rear, as
shown in the diagrams below.
2. Slide the unit into the rack and secure it to the rack.
58
Troubleshooting
Sympton
Mouse and/or keyboard do
not respond.
All Station ID display as 01.
Pos s ible Caus e
Action
Mouse and/or keyboard reset
improperly.
Unplug the cable(s) from the
console ports(s), and then
plug the cable(s) back in.
Station 1 has suddenly lost power.
Wait a few seconds for the
system to reinitialize the
station sequence and display
the correct IDs.
59
Limited Warranty
Altusen warrants this product against defect in material or workmanship for a period of
three (3) years from the date of purchase. If this product proves to be defective, contact
Altusen's support department for repair or replacement of your unit. Altusen will not
issue a refund. Return requests can not be processed without the original proof of purchase.
When returning the product, you must ship the product in its original packaging or
packaging that gives an equal degree of protection. Include your proof of purchase in the
packaging and the RMA number clearly marked on the outside of the package.
This warranty becomes invalid if the factory-supplied serial number has been removed or
altered on the product.
This Warranty does not cover cosmetic damage or damage due to acts of God, accident,
misuse, abuse, negligence or modification of any part of the product. This warranty does
not cover damage due to improper operation or maintenance, connection to improper
equipment, or attempted repair by anyone other than Altusen. This warranty does not
cover products sold AS IS or WITH FAULTS.
IN NO EVENT SHALLALTUSEN'S LIABILITY EXCEED THE PRICE PAID FOR THE PRODUCT.
FURTHER, ALTUSEN SHALL NOT BE RESPONSIBLE FOR DIRECT, INDIRECT, SPECIAL,
INCIDENTAL, OR CONSEQUENTIAL DAMAGES RESULTING FROM THE USE OF THE
PRODUCT, IT'S ACCOMPANYING SOFTWARE, OR IT'S DOCUMENTATION. ALTUSEN
SHALL NOT IN ANY WAY BE RESPONSIBLE FOR, WITHOUT LIMITATION, LOSS OF
DATA, LOSS OF PROFITS, DOWNTIME, GOODWILL, DAMAGE OR REPLACEMENT OF
EQUIPMENT OR PROPERTY, AND ANY EXPENSES FROM RECOVERY, PROGRAMMING
AND REPRODUCTION OF ANY PROGRAM OR DATA. Altusen makes no warranty or
representation, expressed, implied, or statutory, with respect to its products, contents or
use of this documentation and all accompanying software, and specifically disclaims its
quality, performance, merchantability, or fitness for any particular purpose. Altusen
reserves the right to revise or update its product, software or documentation without
obligation to notify any individual or entity.
For details about extended warranties, please contact one of our dedicated value added
resellers.
Service & Support: [email protected]
Address: 23 Hubble Irvine, CA 92618
Web: www.altusen.com
Phone: 949-453-8885
Fax: 949-453-8887
60
Index
A
Activate Beeper . . . . . . . . . . . . . . . . . . . . . . . . . . . . . . . . . . . . . . . . . . . . . . . . . . 30
Administrator functions . . . . . . . . . . . . . . . . . . . . . . . . . . . . . . . . . . . . . . . . . . . 39
Advanced Firmware Upgrade .... . . . . . . . . . . . . . . . . . . . . . . . . . . . . . . . . . . . . 47
Auto Scanning . . . . . . . . . . . . . . . . . . . . . . . . . . . . . . . . . . . . . . . . . . . . . . . . 28, 44
Activating Auto Scan …………………. . . . . . . . . . . . . . . . . . . . . . . . . . . . . 29
Pausing Auto Scan . . . . . . . . . . . . . . . . . . . . . . . . . . . . . . . . . . . . . . . . . . . . . 29
Scan Duration . . . . . . . . . . . . . . . . . . . . . . . . . . . . . . . . . . . . . . . . . . . . . . . . . 39
Setting the Scan Interval ……………. . . . . . . . . . . . . . . . . . . . . . . . . . . . . . 39
Exiting Auto Scanning . . . . . . . . . . . . . . . . . . . . . . . . . . . . . . . . . . . . . . . . . . 30
B
Beeper
Activate . . . . . . . . . . . . . . . . . . . . . . . . . . . . . . . . . . . . . . . . . . . . . . . . . . . . . . . 30
Hot Key Control . . . . . . . . . . . . . . . . . . . . . . . . . . . . . . . . . . . . . . . . . . . . . . . . 30
BRC . . . . . . . . . . . . . . . . . . . . . . . . . . . . . . . . . . . . . . . . . . . . . . . . . . . . . . . . . . . . 43
Broadcast Mode. . . . . . . . . . . . . . . . . . . . . . . . . . . . . . . . . . . . . . . . . . . . . . . . . . 43
C
Front view . . . . . . . . . . . . . . . . . . . . . . . . . . . . . . . . . . . . . . . . . . . . . . . . . . . . . . . 17
Clear the Name List . . . . . . . . . . . . . . . . . . . . . . . . . . . . . . . . . . . . . . . . . . . . . . . 41
Computer Connection Tables . . . . . . . . . . . . . . . . . . . . . . . . . . . . . . . . . . . . . . 55
D
Daisy Chaining . . . . . . . . . . . . . . . . . . . . . . . . . . . . . . . . . . . . . . . . . . . . . . . . . . 22
E
Edit Port Names . . . . . . . . . . . . . . . . . . . . . . . . . . . . . . . . . . . . . . . . . . . . . . . . . . 41
F
F1 GOTO . . . . . . . . . . . . . . . . . . . . . . . . . . . . . . . . . . . . . . . . . . . . . . . . . . . . . . . . 36
F2 LIST . . . . . . . . . . . . . . . . . . . . . . . . . . . . . . . . . . . . . . . . . . . . . . . . . . . . . . . . . 36
F3 SET . . . . . . . . . . . . . . . . . . . . . . . . . . . . . . . . . . . . . . . . . . . . . . . . . . . . . . . . . . 37
F4 ADM . . . . . . . . . . . . . . . . . . . . . . . . . . . . . . . . . . . . . . . . . . . . . . . . . . . . . . . . .39
F5 SKP . . . . . . . . . . . . . . . . . . . . . . . . . . . . . . . . . . . . . . . . . . . . . . . . . . . . . . . . . . 43
F6 BRC . . . . . . . . . . . . . . . . . . . . . . . . . . . . . . . . . . . . . . . . . . . . . . . . . . . . . . . . . .43
F7 SCAN . . . . . . . . . . . . . . . . . . . . . . . . . . . . . . . . . . . . . . . . . . . . . . . . . . . . . . . . 44
61
F8 LOUT . . . . . . . . . . . . . . . . . . . . . . . . . . . . . . . . . . . . . . . . . . . . . . . . . . . . . . . . 45
Factory Default Settings . . . . . . . . . . . . . . . . . . . . . . . . . . . . . . . . . . . . . . . 42, 56
Firmware upgrade . . . . . . . . . . . . . . . . . . . . . . . . . . . . . . . . . . . . . . . . . . . . . . . . 47
cable . . . . . . . . . . . . . . . . . . . . . . . . . . . . . . . . . . . . . . . . . . . . . . . . . . . . . . 15, 47
port . . . . . . . . . . . . . . . . . . . . . . . . . . . . . . . . . . . . . . . . . . . . . . . . . . . . . . . 17, 47
G
GOTO . . . . . . . . . . . . . . . . . . . . . . . . . . . . . . . . . . . . . . . . . . . . . . . . . . . . . . . . . . 36
H
Hardware Requirements
Cables . . . . . . . . . . . . . . . . . . . . . . . . . . . . . . . . . . . . . . . . . . . . . . . . . . . . . . . . 16
Computer . . . . . . . . . . . . . . . . . . . . . . . . . . . . . . . . . . . . . . . . . . . . . . . . . . . . . . 16
Console . . . . . . . . . . . . . . . . . . . . . . . . . . . . . . . . . . . . . . . . . . . . . . . . . . . . . . . 16
Hot Plugging . . . . . . . . . . . . . . . . . . . . . . . . . . . . . . . . . . . . . . . . . . . . . . . . . . . . 24
Console Ports . . . . . . . . . . . . . . . . . . . . . . . . . . . . . . . . . . . . . . . . . . . . . . . . . . 24
CPU Ports . . . . . . . . . . . . . . . . . . . . . . . . . . . . . . . . . . . . . . . . . . . . . . . . . . . . . 24
switching stations. . . . . . . . . . . . . . . . . . . . . . . . . . . . . . . . . . . . . . . . . . . . . . 24
Hotkey
Beeper Control. . . . . . . . . . . . . . . . . . . . . . . . . . . . . . . . . . . . . . . . . . . . . . . . . 30
Command Mode . . . . . . . . . . . . . . . . . . . . . . . . . . . . . . . . . . . . . . . . . . . . . . . . 27
OSD. . . . . . . . . . . . . . . . . . . . . . . . . . . . . . . . . . . . . . . . . . . . . . . . . . . . . . . . 27, 38
Port Control . . . . . . . . . . . . . . . . . . . . . . . . . . . . . . . . . . . . . . . . . . . . . . . . . . . . 28
Selecting the Active Port . . . . . . . . . . . . . . . . . . . . . . . . . . . . . . . . . . . . . . . . 28
Summary Table . . . . . . . . . . . . . . . . . . . . . . . . . . . . . . . . . . . . . . . . . . . . . . . . . 31
Hotkey Mode
auto scanning . . . . . . . . . . . . . . . . . . . . . . . . . . . . . . . . . . . . . . . . . . . . . . . . . . 28
exiting . . . . . . . . . . . . . . . . . . . . . . . . . . . . . . . . . . . . . . . . . . . . . . . . . . . . . . . . . 29
invoking . . . . . . . . . . . . . . . . . . . . . . . . . . . . . . . . . . . . . . . . . . . . . . . . . . . . . . 28
I
Installation
Daisy Chaining . . . . . . . . . . . . . . . . . . . . . . . . . . . . . . . . . . . . . . . . . . . . . . . . . 22
Single Stage . . . . . . . . . . . . . . . . . . . … . . . . . . . . . . . . . . . . . . . . . . . . . . . . . . 21
Invoking Hotkey Mode . . . . . . . . . . . . . . . . . . . . . . . . . . . . . . . . . . . . . . . . . . . 29
K
KH0116
Front View . . . . . . . . . . . . . . . . . . . . . . . . . . . . . . . . . . . . . . . . . . . . . . . . . . . . . 17
Rear View . . . . . . . . . . . . . . . . . . . . . . . . . . . . . . . . . . . . . . . . . . . . . . . . . . . . . . 18
62
L
LEDs
Local Console . . . . . . . . . . . . . . . . . . . . . . . . . . . . . . . . . . . . . . . . . . . . . . . . . . 17
Port . . . . . . . . . . . . . . . . . . . . . . . . . . . . . . . . . . . . . . . . . . . . . . . . . . . . . . . . . . . 17
Remote Console . . . . . . . . . . . . . . . . . . . . . . . . . . . . . . . . . . . . . . . . . . . . . . . . 17
Station ID . . . . . . . . . . . . . . . . . . . . . . . . . . . . . . . . . . . . . . . . . . . . .. . . . . . . . . 17
LIST . . . . . . . . . . . . . . . . . . . . . . . . . . . . . . . . . . . . . . . . . . . . . . . . . . . . . . . . . . . . 36
Local Console
LEDs . . . . . . . . . . . . . . . . . . . . . . . . . . . . . . . . . . . . . . . . . . . . . . . . . . . . . . . . . . 17
Logout . . . . . . . . . . . . . . . . . . . . . . . . . . . . . . . . . . . . . . . . . . . . . . . . . . . . . . . . . . 40
Logout Timeout . . . . . . . . . . . . . . . . . . . . . . . . . . . . . . . . . . . . . . . . . . . . . . . . . . 40
LOUT . . . . . . . . . . . . . . . . . . . . . . . . . . . . . . . . . . . . . . . . . . . . . . . . . . . . . . . . . . . 40
O
OSD
Factory Default Settings . . . . . . . . . . . . . . . . . . . . . . . . . . . . . . . . . . . . . . . . . 56
Functions . . . . . . . . . . . . . . . . . . . . . . . . . . . . . . . . . . . . . . . . . . . . . . . . . . . . . . 35
Hotkey . . . . . . . . . . . . . . . . . . . . . . . . . . . . . . . . . . . . . . . . . . . . . . . . . . . . . . . . 38
Logout . . . . . . . . . . . . . . . . . . . . . . . . . . . . . . . . . . . . . . . . . . . . . . . . . . . . . 40, 45
Main Screen . . . . . . . . . . . . . . . . . . . . . . . . . . . . . . . . . . . . . . . . . . . . . . . . . . . 34
Main Screen Headings . . . . . . . . . . . . . . . . . . . . . . . . . . . . . . . . . . . . . . . . . . 34
Navigation . . . . . . . . . . . . . . . . . . . . . . . . . . . . . . . . . . . . . . . . . . . . . . . . . . . . 34
Overview . . . . . . . . . . . . . . . . . . . . . . . . . . . . . . . . . . . . . . . . . . . . . . . . . . . . . 33
Password . . . . . . . . . . . . . . . . . . . . . . . . . . . . . . . . . . . . . . . . . . . . . . . . . . . . . . . 40
P
Password . . . . . . . . . . . . . . . . . . . . . . . . . . . . . . . . . . . . . . . . . . . . . . . . . . . . . . . 40
Pause . . . . . . . . . . . . . . . . . . . . . . . . . . . . . . . . . . . . . . . . . . . . . . . . . . . . . . . . . . 29
Port ID
Display Duration . . . . . . . . . . . . . . . . . . . . . . . . . . . . . . . . . . . . . . . . . . . . . . . 38
Display Mode . . . . . . . . . . . . . . . . . . . . . . . . . . . . . . . . . . . . . . . . . . . . . . . . . . 38
Display Position . . . . . . . . . . . . . . .. . . . . . . . . . . . . . . . . . . . . . . . . . . . . . . . . . 17
Numbering . . . . . . . . . . . . . . . . . . . . . . . . . . . . . . . . . . . . . . . . . . . . . . . . . . . . . 25
Port LEDs . . . . . . . . . . . . . . . . . . . . . . . . . . . . . . . . . . . . . . . . . . . . . . . . . . . . . . . 17
Port Names . . . . . . . . . . . . . . . . . . . . . . . . . . . . . . . . . . . . . . . . . . . . . . . . . . . . . . 41
Port Selection . . . . . . . . . . . . . . . . . . . . . . . . . . . . . . . . . . . . . . . . . . . . . . 25, 28, 36
Power up . . . . . . . . . . . . . . . . . . . . . . . . . . . . . . . . . . . . . . . . . . . . . . . . . . . . . . . 24
Powering Off and Restarting . . . . . . . . . . . . . . . . . . . . . . . . . . . . . . . . . . . . . . 25
Q
63
Quick View Ports . . . . . . . . . . . . . . . . . . . . . . . . . . . . . . . . . . . . . . . . . . . . . . . . . 41
R
Rack Mounting . . . . . . . . . . . . . . . . . . . . . . . . . . . . . . . . . . . . . . . . . . . . . . . . . . 58
Remote Console
Installation . . . . . . . . . . . . . . . . . . . . . . . . . . . . . . . . . . . . . . . . . . . . . . . . . . . . 53
LEDs . . . . . . . . . . . . . . . . . . . . . . . . . . . . . . . . . . . . . . . . . . . . . . . . . . . . . . . . . 18
Reset Station IDs . . . . . . . . . . . … . . . . . . . . . . . . . . . . . . . . . . . . . . . . . . . . . . 42
Restore Default Values . . . . . . . . . . . . . . . . . . . . . . . . . . . . . . . . . . . . . . . . . 41, 56
S
SCAN . . . . . . . . . . . . . . . . . . . . . . . . . . . . . . . . . . . . . . . . . . . . . . . . . . . . . 28,44,39
Scan Duration . . . . . . . . . . . . . . . . . . . . . . . . . . . . . . . . . . . . . . . . . . . . . . . . . 39,44
SCAN/SKIPMODE . . . . . . . . . . . . . . . . . . . . . . . . . . . . . . . . . . . . . . . . . 39,30,44
Screen Blanker . . . . . . . . . . . . . . . . . . . . . . . . . . . . . . . . . . . . . . . . . . . . . . . . . . . 39
Selecting the Active Port . . . . . . . . . . . . . . . . . . . . . . . . . . . . . . . . . . . . . . . 28,36
SET . . . . . . . . . . . . . . . . . . . . . . . . . . . . . . . . . . . . . . . . . . . . . . . . . . . . . . . . . . . . 37
Accessible Ports . . . . . . . . . . . . . . . . . . . . . . . . . . . . . . . . . . . . . . . . . . . . . . . 42
Logout Timeout . . . . . . . . . . . . . . . . . . . . . . . . . . . . . . . . . . . . . . . . . . . . . . . . 40
Password . . . . . . . . . . . . . . . . . . . . . . . . . . . . . . . . . . . . . . . . . . . . . . . . . . . . . . 40
Quick View Ports . . . . . . . . . . . . . . . . . . . . . . . . . . . . . . . . . . . . . . . . . . . . . . . 41
USERNAME . . . . . . . . . . . . . . . . . . . . . . . . . . . . . . . . . . . . . . . . . . . . . . . . . . . 40
Setting the Auto Scan Interval . . . . . . . . . . . . . . . . . . . . . . . . . . . . . . . . . . . . . 29
Skip Mode . . . . . . . . . . . . . . . . . . . . . . . . . . . . . . . . . . . . . . . . . . . . . . . . 30, 39, 43
SKP . . . . . . . . . . . . . . . . . . . . . . . . . . . . . . . . . . . . . . . . . . . . . . . . . . . . . . . . . . . . 43
Specifications . . . . . . . . . . . . . . . . . . . . . . . . . . . . . . . . . . . . . . . . . . . . . . . . . . . 57
Station IDs . . . . . . . . . . . . . . . . . . . . . . . . . . . . . . . . . . . . . . . . . . . . . . . . . . 23, 18
Reset . . . . . . . . . . . . . . . . . . . . . . . . . . . . . . . . . . . . . . . . . . . . . . . . . . . . . . . . . 42
Station Positions
Switching . . . . . . . . . . . . . . . . . . . . . . . . . . . . . . . . . . . . . . . . . . . . . . . . . . . . . 24
Switching Station Positions . . . . . . . . . . . . . . . . . . . . . . . . . . . . . . . . . . . . . . . 24
T
Timeout . . . . . . . . . . . . . . . . . . . . . . . . . . . . . . . . . . . . . . . . . . . . . . . . . . . . . . . . . 40
Troubleshooting . . . . . . . . . . . . . . . . . . . . . . . . . . . . . . . . . . . . . . . . . . . . . . . . . 59
U
Upgrading the firmware . . . . . . . . . . . . . . . . . . . . . . . . . . . . . . . . . . . . . . . . . . . 47
Username . . . . . . . . . . . . . . . . . . . . . . . . . . . . . . . . . . . . . . . . . . . . . . . . . . . . . . . 39
64