1
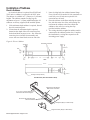
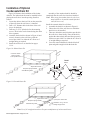
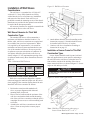
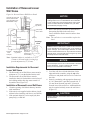
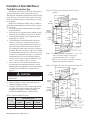
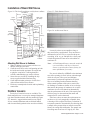
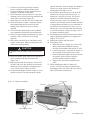
Installation of Basic Wall Sleeve 5. Recess the wall sleeve so that the louver is flush with the exterior of the building. 6. Level wall sleeve in both directions and secure by anchoring with appropriate fasteners or drill additional holes as required to secure firmly. Refer to Anchoring The Wall Sleeve instructions on page 13. 3. Secure the two sections by installing the clip screws supplied with the hardware bag. 4. Caulk indoor/outdoor perimeter of wall sleeve with resilient caulk such as silicone. 5. Finish any uncompleted electrical and/or plumbing connections. Figure 20. Panel wall construction with cord connection CAUTION DO NOT drill holes in the bottom of the wall sleeve as it will cause leaks. 7. Where a subbase is used, secure wall sleeve to subbase with clips provided. 8. Caulk the wall sleeve to the wall opening on both the inside and outside perimeter. Be careful not to plug the weep holes. Caulking should be resilient, nonhardening type such as silicone. Louver Frame (see page 11 for details) 17" (432mm) Outside Louver 133/4" (349mm) 81/4" (209mm) 16" (406mm) Figure 19. Panel wall construction with standard electrical subbase Louver Frame (see page 11 for details) Wall Sleeve Room Cabinet 3"Min. (76mm) Caulk Perimeter both Indoors & Outdoors Floor Wall Sleeve 17" (432mm) 81/4" (209mm) Room Cabinet 133/4" (349mm) Conduit Electrical Subbase See Note Minimum 2 Supports (field supplied) Receptacle (by others) 16" (406mm) Gasket & Caulk Perimeter Outside Louver Figure 21. Panel wall installation with hydronic subbase Louver Frame (see page 11 for details) Outside Louver Floor 81/4" (209mm) Power Supply Connect (Alternate Entry) Subbase Side Channel 17" (432mm) Hydronic Heating Coil Note: Standard subbase is available in 3" or 4" (76 mm or 102 mm) height. Leveling legs provide adjustment of 1" (25 mm). Attaching Wall Sleeve to Subbase 1. Where a subbase is used, secure wall sleeve to subbase with clips provided. 2. Caulk the wall sleeve to the wall opening on both the inside and outside perimeter. Be careful not to plug the weep holes. Caulking should be resilient, nonhardening type such as silicone. Room Cabinet 81/4" (209mm) 133/4" (349mm) 16" (406mm) Wall Sleeve Subbase Side Channel Caulk Perimeter both Indoors & Outdoors Power Supply Connect (Alternate Entry) Leveling Legs with 1" Adjustment IM 934 Applied PTAC / Page 15 of 44