1
23PF5320
User's
Thank you for choosing Philips_
Need help fast?
Read your user Manual and/or
Quick-Use Guide T]rst for quick tips
that make using your Phitips product
more e_oyable.
If you have read your instructions
and still need assistance,
you may access our online help at
wwwousasupport.philips.com
or
call 1_888_PHlUPS
(744°5477)
while with your product
(and Model
/ Serial number)
Downloaded From TV-Manual.com Manuals
3138 15524071
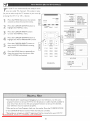
Registering
your model
with PHILIPS makes you eligible for all of the valuable benefits listed
below, so don't miss out. Complete and return your Product Registration Card at once to ensure:
Know
Dear PHILIP$
product
owner:
Thank you for your confidence in PHILIPS.You've
one of'the
best-built,
best-backed
products
setected
these safety
A
his "bolt of lightning" indicates
uninsulated
materia{ within your
available today.
"We'll do everything in our power to keep you happy with
your purchase for many years to come.
As a member of the PHILIPS"famity,"
you're entitled to
pro£ection by one of £he most comprehensive
warranties
may cause an elecufical
safety of everyone
not remove
Host
importantly,
from
you can count
our convenient
household,
unit
For the
please do
point"
for which
the enclosed
calls attention
you should
literature
closely
read
to
home
prevent
on our
uncompromising
commitment
to your total satisfaction.
Att of this is our way of saying welcome - and thanks for
investing
shock.
covering.
to features
and special offers for which you qualify, plus
easy access to accessories
shopping network.
in your
product
The "exclamation
and outstanding service networks in the industry What's
more, your purchase guarantees you'll receive all the
information
symbols
operating
WARNING:
electric
shock,
exposed
and maintenance
To reduce
problems.
the risk of fire or
this apparatus
to rain or moisture
should
not be
and obiects
filled
in a PHILIPS product.
with
liquids,
such as vases, should
not be placed
on this apparatus.
CAUTION:
To prevent
electric
shock,
wide blade of plug to wide s{ot, fully
ATTENTION:
Pour
electriques,
introduire
_viter
la lame la plus large de la
correspondante
et pousser
fond.
For
Customer
Enter below
information
Hodei
No.
Serial No
de la prise
Use
the Serial No. which
on the rear of the cabinet.
Downloaded From TV-Manual.com Manuals
les choc
fiche dons ta borne
jusqu'au
match
insert.
for future
is tocated
Retain "this
reference.
IMPORTANT
READ
SAFETY mNSTRUCTiONS
BEFORE OPERATING
EQUIPMENT
I.
Read these
instructions,
exhibits
2.
Keep
instructions.
E. The appliance
3.
4.
Heed a[J warnings.
Follow
all instructions.
5.
Do
6.
CJean only with
7,
Do not block any of the ventilation
openings.
JnstaJl in accordance
with the manufacturers
8,
these
not use this
Do
heat
9,
Do
17. THt/gtability
apparatus
near water.
stoves,
that
and
the
sources
or other
produce
not defeat
apparatus
safety
purpose
one wider
than
the other
blades
and third
groundin
prong
are provided
for
10, Plotect
the
where
they
plug has two
A grounding
your
safety.
being
Use
only
table
apparatus.
moving
injury
from
unused
for
long
is required
has
such
been
materials
please
or pinched
tripod,
bracket,
is used,
or
No.
with
Requiring
by quBified
B. Obiects
the
2f.
cord
or plug
is damaged,
have fallen
to
contain
lead
of the
rain
local
into
in any
does
and mercury.
due
22.
the
not
of
or the
Electronic
Servlce
- The
service
supply
cord
have fallen,
appliance
personnel
should
an antenna
system
against
Code,
voltage
to proper
structure,
grounding
unit,
size
of
of antenna-discharge
See
unit,
and requirements
Figure
for
below.
- Cale
should
are not
be taken
spilled
so
into
- To prevent
CAUTION
in bodily
to
all batteries
on the unit,
injury,
property
battery
leakage
damage,
or
unit
correctly,
batteries
with
(old and
+ and
new
aligned
or carbon
as
and
etc.).
batteries
when
the unit
is not
used
for
a long
be
when:
or the plug has been damaged;
or liquid
has been spilled
into the
appliance;
C. The appliance
has been exposed
D, The
does
Note
820-40
appliance
to the
of the
connected
CATV
NEC
not
system
that
appear
installer:
provides
to the D*ounding
to rain
to operate
system
This
guidelines
of the
normally
reminder
for proper
building,
or
is provided
grounding
as close
to carl the
CATV
and, in particular,
to the point
Example of Antenna Grounding as
per NEC - National Electric Cod
of cable
systern
installer's
specifies
that the
entry
as practical,
_
_.................................
Downloaded From TV-Manual.com Manuals
3
the
openings.
• Install
marked
• Remove
time,
is
is
ANSI/NFPA
respect
discharge
e_ectrode.
Entry
antenna
antenna
with
electrodes,
damage
mix
be located
sorne protection
grounding
Usage
alkaline,
be
by the
tf an outside
location
Liquld
the
should
should
be sure the
do not fall and liquids
rnay result
• Do not
information,
to
through
Battery
that
to environmental
or recyding
authorities
Disposal
and
ob}ects
and
iniury.
and supporting
connectors,
enclosure
liquid
apparatus,
or moisture,
antenna
information
mast
wire
grounding
Object
that
dropped.
be regulated
disposal
Servicing
damaged
personal
Such
of the set
only as recommended
receiver,
provides
to
cabinet.
- The appliance
so as to provide
grounding
by placing
of the
the top
Groundlng
to the
lead-in
cabinet
lines.
Antenna
70-1984,
of the
or when
has been
and/or
- An outdoor
tilt
by applying
of the
or children,
the top
fall from
or ceiling
power
grounding
www.eiae.org
serviced
Lines
for
design.
the product.
on
Mounting
with
standards
standards
yourself,
damage
Ceiling
comply
or top,
surges and built up static charges,
Section 8[ 0 of the National
Electric
caution
personnel
endanger
unsuspecting[y
connected
to avoid
storms
service
been
),our
16, Damage
or
20. Outdoor
of time.
exposed
Alliance:
A. The power
lighming
or has
For
contact
Industries
product
grounded
by the
combination
during
may
considerations.
cause
19. Power
and the
use
or obiects
may
could
connection
has been
product
these
on
specified
a cart
to qualified
normally,
enclosure
safety
design
overturn
equipment/toys
away from
When
as power-supply
apparatus
15, This
provided
or sold
the apparatus
spilled
operate
the
these
mounted
to a wall
manufacturer.
an electrician
by the manufacturer,
periods
when
do not
must
global
to the front,
ultimately
items
18. Wall
or third
tip-over.
all servicing
way,
plug has two
blade
walked
stand,
the cart/apparatus
this apparatus
14, Refer
with
the apparatus,
a cart,
specified
the
when
13, Unplug
with
or
blades
receptacles,
I I, Only use attachments/accessories
manufacturer.
12
could
• Also,
outlet.
from
from
When
consult
convenience
exit
type
The wide
outlet,
obsolete
cord
at plugs,
(induding
of the polarized
S prong.
),our
of the
power
particularly
point
for
fit into
replacement
orthe
of its cabinet
pLl[I force
electronic
plug. A polarized
not
which
properties
compromise
excessive
such as radiators,
international
stability
• Do not
instructions.
heat.
grounding-type
plu S does
in performance;
- All televisions
recommended
cloth.
near any heat
resisters,
amplifiers)
change
has been dropped,
damaged.
a dry
not install
a marked
attention
cable
to Article
D*ound
shall be
ADDITIONAL SAFETYPRECAUTIONS
• ENSURE that LCD TV stand is tightened
properly
screw of the stand to the set. Improper
If LCD TV is installed
tightening
on the wall. installation
installation
may render
Disconnect
mains plug when :
cleaning
--
there
--
the set is left unattended
the surface
will cause damage
for a prolonged
DO NOTUSE
Improperor
incorrect
agents.
period
of time,
on.
of the LCD screen with any sharp or hard objects,
acetone, toluene
or alcohol to clean the surface
cotton
cloth or other soft
of the screen.
These chemicals
when temperature
parts. After
information
These liquids can cause deformation
and color fading
of the LCD
for some time.
of condensation
CAUTION
cleaning
when it is powered
off water, or saliva as soon as possible,
and electrically
servicemen.
to the surface.
screen when left exposed
Be careful
out by qualified
of the LCD screen becomes dusty, wipe it gently with an absorbent
like chamois.
of the
storm.
Do not touch, push or rub the surface
Wipe
should be carried
the TV screen, never use abrasive
is a lightning
Do not shift or move the LCD TV around
When
(See Quick Guide on the right way of tightening
of screw may render the set unsafe.
the set unsafe.
--
material
to the set
condensation
is located
changes occur.
Condensation
fades, spots or blemishes
can cause damage
will be present
on the inside of the VESA cover/see
diagram
to the LCD screen
on the LCD screen.
below).
To read information,
open
the VESA cover.
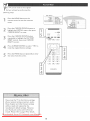
POSITIONING
THE LCD TELEVISON
Place the LCD TV on a solid, sturdy
base or stand. Be sure the stand is strong
enough to handle the weight of the
LCD TV_
* Try to leave
at least
6 of space
, Do not place
the LCD TV near
, Do not place
the LCD TV where
RECYCLING PROCEDURE/END
To minimize
cadmium.
If possible,
for companies
your dealer
• Please dispose of the carton
sources
to allow for proper
ventilation_
of heat.
to rain or excessive
the batteries
of batteries,
that can be recycled.
will recover
for TV recycling
side of the LCD TV cabinet
or other
moisture_
OF LIFE DISPOSAL
when disposing
that
each
it can be exposed
harm to the environment,
• The LCD TV uses materials
area
around
a radiator
used
supplied
use recycling
To minimize
televisions
with the LCD TV do not contain
means available
the amount
for dismantling
and
mercury
of waste in the environment,
collection
or nickel
in your area,
of reusable
materials,
check your
or contact
tips.
and packing
material
through
Downloaded From TV-Manual.com Manuals
the proper
waste
disposal management
in your area.
++++++++,
,,,,
Introduction
"VVelcome/Registration
of Your TV ...........
IMPORTANT
SAFETY INSTRUCTIONS
......
2
3
PRECAUTIONS
4
Table of Contents
5
[_
Installation
Language Settings
Tuner Mode Control ........................
Auto Program
Channel
(Setting
Up Channels)
Edit Control
...............
(To Add or Delete
channels)
Factory Reset
Presentation
of the LCD TV
Installing
Timer
Operations
Menu Controls
Sound
Menu
TV
Sound
Menu Controls
to your LCD TV.
8
Closed
9
program
Channel
Captioning:
On-screen
Helpful
as on-screen
text.
rnessages (in English, Spanish,
French or Portuguese) For setting TV controls
[{emote
IS
of time you specify (15-240 minutes frorn the current
Sleep
Control:
Timer:
...........
!7
AutoLock:
Works
your LCD TV features.
Turns off the LCD TV within
an arnount
Lets you block viewing of certain TV
channels if you do not want your children
19
........................
18
Standard
channel
broadcast
18
Stereo
twin-speaker
Auto Lock Program
21
broadcast
Auto Loci< - Movie Ratings
22
Treble,
Auto Lock - TV Ratings
23
sound.
Using The Picture
SURF Control
24
25
Format
Captions
viewing
material
(VHF/UHF)
or Cable
TV
capability.
20
capability:
Includes a built-in
system, allowing
reception
amplifier
and
of TV programs
in stereo
Bass, and Balance:
Enhance the LCD TV's
26
PC Mode
PC Picture Controls
Controts
Program):
A+tows the viewer to read TV
Menus:
Auto Lock Access Code
PC Audio
(Auto
dialog or voice conversations
Auto Sound Control
Closed
Programming
other
13
!4
16
Features
Menu
Auto Lock
Control
Use to quickly connect
Quick and easy setup of available channels.
inappropriate
Auto Picture
of your new LCD
time).
Picture Menu
TV Picture Menu Controls
[]
In Jacks:
equipment
Automatic
12
......
special features
Audio/Video
6
7
l0
!I
LCD TV on the wall .......................
Basic TV and Remote Control
Remote Control
Here are a few of'the
TV
..............
27
..............................
28
Using PC PIP (Picture In Picture)
Setting Up The PC Mode
Feature .......
General
Information
Trouble Shooting Tips ......................
29
30
31
Care And Cleaning
Index
32
33
Regulatory
34
Limited
35
Warranty
"Your new LCD TV and its packaging contain
rnaterials
that can be recycled and reused Specialized companies
can recycle your product to increase the amount of
reusable materials and minimize the amounts that need
to be properly
"Your product
disposed.
also uses batteries
that should not be
thrown away when depleted, but should be handed in
and disposed off as small chemical waste.
When you replace your existing equipment, please find
out about the tocal reguta'dons regarding disposal of your
old television,
Downloaded From TV-Manual.com Manuals
batteries,
and packing materials
_hoen
operate INSTALL
r your personal code
function, the access code window
setting to enter this menu,
will appear
on the screen. Press default
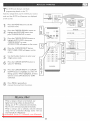
or English, French, Spanish or Portuguese speaking TV owners, an onscreen LANGUAGE
option
is present.
The LANGUAGE
control
enables
you to set the TV's onscreen menu to be shown in
either English, French, Spanish
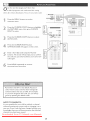
Press the MENU
rernote
control
button
or Portuguese,
on the
to open the onscreen
menu
Press the CURSOR DO\_/N button to highlight
the INSTALL menu
Press the CURSOR RIGHT button to Highlight
LANGUAGE
4
Press the CURSOR
LANGUAGE.
to select ENGLISH,
PORTUGUES,
to conf]rrn
RIGHT
to enter
DOWN
FRAN_AIS,
button
ESPANOL
then press the CURSOR
Press the MENU button
menu from the screen.
Remember,
button
Press CURSOR
the LANGUAGE
repeatedly
control
_
E3_B EE_Z
or
EE!B E3[B
E_Z
RIGHT
EZ!B E_B
[Z_Z
to clear the
makes
only the TV's onscreen MENU items
appear in English, French, Spanish or Portuguese
text. It does not change the other onscreen text
[eatures, such as Closed Captioning (CC), with
TV shows.
Downloaded From TV-Manual.com Manuals
code (0711)
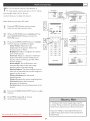
he Tuner Mode allows you to change
TV's signal input to Cable or Air
(antenna).
if you want
signal
It's
important
to receive
far the
or an antenna
channels
1'
TV to know
a cable
TV
signal.
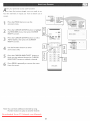
Press the Menu button
2
LCD
from
the LCD
to see the onscreen
Press the CURSOR DOWN
the INSTALL menu
button
button
menu.
to highlight
Press the CURSOR
INSTALL menu
RIGHT
Press the CURSOR
DOWN
the
TUNER
MODE
RIGHT
to confirm.
menu, then press CURSOR
button
to enter the
2
to highlight
_
_
ress theANTENNA,
CURSOR DOWN
buttons
se{ect
CABLE,
or AUTO,
then to
press
CURSOR RIGHT to confirm
_
Press from
the MENU
button
menu
the screen.
When
* When
CABLE
repeatedly
to clear the
is selected, channeJs 2-125 are available.
ANTENNA
is selected, channeJs 2-69 are available.
When AUTO is selected, yout LCD TV will search automatically
or cable channels.
* Immediately
PROG
RAM
E3_Z EE_
_
E3_Z E_B
EZ_Z _
E3[B
after unpacking and plugging in your new television,
function
to set up the TV for the broadcast
available in your area. If you do not run the auto program
channels, your television rnay not operate properly.
Downloaded From TV-Manual.com Manuals
for antenna
run the AUTO
or cable channels
function
to set up the
&f_ur
LCD TV can automatically
rea (or cable TV) channels.
set itself for local
This makes it easy
for you to selec_ only the TV stations
pressin_
in your area by
the CH (+) or CH (-) buttom
POWER
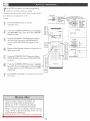
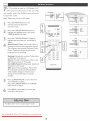
Press the MENU
control
button
on the remote
to show the onscreen
Press the CURSOR
DOWN
highlight the INSTALL
Sn_TU._
EXiT
menu.
button
CC
r
to
C4_j
menu
Press the CURSOR RIGHT button
to enter the INSTALL menu
,
Press the the
CURSOR
highlight
AUTO
DOWN
button
to
PROGRAM
control
Press the CURSOR RIGHT button to
start the AUTO PROGRAM scanning
of channels
Press tbe
the menu
MENUfrom
button
repeatedly
clear
the screen,
afterto
AUTO STORE has finished.
l
h-nmediately
program
after
function
your
area.
if you
your
television
" After
you've
or the
CURSOR
Remember,
run
unpacking
to
set
and
up
do
not
run
may
not
operate
Auto
an antenna
TV
the
Program,
UP button
plugging
the
auto
in your
new
_he broadcast
program
]
television,
or
function
cable
{JRF
run
the
channels
to
set
up
the
Press
the
CURSOR
auto
available
channels,
properly.
check
and see
or cable
for
AV )a
TV
out
which
signal
the
results.
channeJs
must
first
you
can
be connected
Downloaded From TV-Manual.com Manuals
DOWN
select.
to
your
LCD
TV
in
hannel
listing.
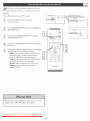
Edit control lets you edit the channel
You can add or remove _ channel in the
LCD TV's memory.
,sI_
'
Press
the
onscreen
Menu
menu,
button
Press the CURSOR
highlight
_l'
the
INSTALL
RIGHT
Press
the
CURSOR
enter
the
CHANNEL
press
CURSOR
DOWN
you wish
Press
dear
button
to
then
press
button
menu,
to
then
enter
button
menu
to
press CURSOR
LEFT to setect the
to add or rernove
press CURSOR
LEFT to select
(to add) or SKIPPED
the channel
_;_
to
DO\_/N
EDIT
colurnn,
In SKIPPED column,
RIGHT or CURSOR
ACTIVE
EDIT
RIGHT
or CURSOR
channel
menu,
the
to enter.
Press the CURSOR
enter the CHANNEL
RIGHT
open
DOWN
CURSOR
In CHANNEL
to
(to detete)
you selected.
the MENU button
the menu from the
repeatedly
screen
to
Repeat steps 5 -6 to add or delete
additional
channels
to or from the
LCD TV% memory,
Downloaded From TV-Manual.com Manuals
ur TV
c{ory
foflowing
con be
settings
reset
to the original
by performing
the
steps.
Press the MENU
remote
control
button
on the
to see the onscreen
menu
Press the CURSOR
DOWN
button
to
highlight "the INSTALL menu, then press
CURSOR RIGHT to enter
Press the CURSOR
repeatedly
DOWN
button
to highlight the FACTORY
RESET control, then press CURSOR
RIGHT to enter.
41 _
Press
CURSOR
reset the
originat DOWN
factory
to
select"YES"
settings
Press the MENU button repeatedly
the menu frorn the screen.
to
to dear
EZ_B _
If you reset the TV to the factory settings,
all your present setting on picture, audio,
Close Caption and other feature settings
will be erased and replaced by the
manufacture's default settings. However%
your AutoLock access code will not be
erased. Please refer to page 19 [or detaits
Downloaded From TV-Manual.com Manuals
_0
E3_B
ositioning
the LCD TV.
. Place the LCD TV on a solid, stable surface.
Be sure the
, Do not place the LCD TV near a radiator
surface
of the LCD
source of.
is strong
enough to handle the weight
or other
heat.
TV.
. Do not place the LCD TV where it can be exposed to
. Try to leave at least 6" of space around
LCD TV cabinet
to allow for proper
each side of the
rain or excessive moisture.
ventilation.
AUUl0
IN
VlUEC
m
®
®
©
I}®
®
0
AUDIO
VHFIUHF
Connect
Video output
to your VHF/UHF
antenna
through
AV OUT jacks is available
only when your LCD TV is displaying
or cable.
CVBS or RF
signals.
AV/S-Vldeo
Connects
other
to the output jacks
ofyour
VCR or
AC _N
Connects
video equipment.
the supplied
AC power cord.
DV_ _N (HDCP)
_
Component
SD/AV
Connect
• Y, Pb, Pr Inputjacks
Connects
to the component
video connectors
your DVD player or other video equipments
SD (Standard
• Connects
Definition)
to the output
of.
to your DVD player
ment with DVI/HDCP
output
or other video equipconnectors.
with
video format.
jacks of your VCR or
PC _N
Connect
to your PC with VGA type video output.
other video equipment,
Component
AV OUT
Connects
audio
to the input jacks
Connect
of your video and
equipment.
Downloaded From TV-Manual.com Manuals
video equipments
Definition)
HD/SD
to the Digital
Satellite
Receiver or other
that supports
YPbPr HD (High
video format.
The stand of your LCD TV complies
consutt a professional
The manufacture
with VESA standard, if you intend to install the LCD TV on the wall, please
technician for proper
insulting.
accepts no liability [or installations
The manufacturer accepts no liability for improper
with dlese instructions
not performed
by professional
installations or installations
Downloaded From TV-Manual.com Manuals
_2
technician.
not performed
in accordance
Plug
thepowercable
intoACinleton
LCDTVset.Plug
thepowercordintoan
outletandswitch
TVseton.
Press POWER
to turn on the LCD TV
Press VOLUME
+ to increase the sound level, or
press VOLUME-
4
to decrease
the sound level,
Press CH+ or CH- to select channels
Point
the
remote
the
LCD
the
remote
controt
TV when
toward
operating
the
on the
LCD
front
TV
of
with
control
En:n _
6
7
Remove
button
the
of the
Place tithium
battery
remote
compartment
cell in the remote
controk
the (+) and (-) ends of the batteries
marked inside the battery
compartment.
8
lid on
Reattach
the
battery
the
control.
Be sure
line up as
(CR2025)
compartment
lid.
Downloaded From TV-Manual.com Manuals
_
Status!Exit
Press
Button-
to
see the
number
press
the
on
to clear
control
Power
current
TV
the
channel
screen.
TV
button
Press to turn
the LCD
TV on or off
Also
menu
button
after
Press
adiustrnents.
the CC button
to select
CC on
or CC off
SAP
button
POWER
Press to select
available
with
a sound mode if
Mono_ Stereo,
Incredible
CC
the TV prograrnrning:
or SAY
button
to set the
off within
Surround
LCD TV to turn
a certain
itself
time
PIP button
Adds greater depth and dimension
to TV sound.
Select from
Sleep
Press
Incredible
Press repeatedly to change the size of
PIP window in PC mode,
Surround
or OFF.
AICN
Button
Press
to go to previously
selected
channel
Press the FORMAT
button
button
repeatedly to toggle among the six
screen format sizes;
Press
WlDESCREEN,
to
ZOOM
4:3, ZOOM
16:9, SUBTITLE
14:9,
Right,
Press these
Up,
Down)-
buttons
Press the number
or decrease
onscreen
button
Press
to adiust
Mute
button
Auto
Sound
Press
repeatedly
4 settings;
Theatre
the channel
up or down.
or restore
the LCD
buttons
channel,
button
to select
Personal,
Voice,
among
Music,
the
or
for
enter
Auto
Picture
button
Press repeatedly
to setect either
Personal, Rich, Natural, Soft, or
the first
the next 2 digits.
Multimedia
AV+
the
the
access to the TV channels.
digit fallowed
exit
to
back
onscreen
TV sound. Mute wilt appear on the
screen when the sound is muted.
buttons
For a 3-digit
the
Press to eliminate
sound level.
direct
menu,
inside
to highlight_
button
Press "co increase
Number
or press
Channel
select_ and adiust items on the TV's
on screen menu
Volume
onscreen
tevet
menu
Buttons
(Left,
previous
menu,
ZOOM
or SUPERWlDE.
Cursor
to activate
picture
setting.
button
Press to select the video
source:
Surf
input
Cornponent,
S-Video,
Button
Press to select
PC, DVI, TV, AVI, AV2,
HD
channels
in memory.
the select
m4
viewed
You can place up to 8
the SURF button
Downloaded From TV-Manual.com Manuals
previously
channels.
Then by pressing
you can quickly
channels
view
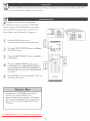
ur LCD TV comes with an onscreen clock. The
V can also be set to turn on or off at a specific
time and tune to a specific
itself
channel
when it powers
on.
SLEEP
oFF
'?_,
Press
the the
SLEEP
but'tonmenu
on the rernote
to show
onscreen
Press the SLEEP button
requiring sleep timing.
repeatedly
control
to select your
IMPORTANT
For the Timer to function, the set rnust not be
turned off. Once the set is turned off, the Timer
is disabled.
Downloaded From TV-Manual.com Manuals
SLEEP
_5M_"I
5LEEi24o
Mii,
T_
djust your LCD TV picture, select
channel and follow these steps_
Press the MENU
onscreen
button
to see the
nT8PIZT
P_F
]
menu
{OltT_ST •
VVhen PICTURE menu is highlighted,
SOFT
/
T_T•I
press the CURSOR RIGHT button to
enter the PICTURE menu
Press the CURSOR
DOWN
the item you want
to adjust:
Auto
Picture_ Brightness_
Color,
Contrast,
Sharpness
"cochoose
or Tint.
Auto
Picture:
PIZTUI_E
Please refer to page
_
18, for details
on Auto
Picture
Settings
Brightness:
Adjust
doris parts
appears
Color:
to brighten
of the picture.
to add white
Adjust
1
TIT •
°°;,°,5?4:
the
This
E!B
_
E2_B
s nP,
p_g{{:
TIT ; I
to the color.
to add or reduce
color,
Contrast:
Picture
Adjust
quality.
the picture
to "sharpen"
the
The black pordons
become
and the white
richer
become
Sharpness:
Adjust
Tint:
to obtain
of
in darkness
_T0
brighter.
"to improve
detail
£]{TUR[ ,
(01/I_I_ST !
PI(T_RE
Adiust
natural
skin
%iiiiiiiiiiiiiiiiiiiiii_!@iiiiii{
tones
,
Press the CURSOR
RIGHT or CURSOR
LEFT button to adiust the itern.
Press the CURSOR
select
and adiust
DOWN
other
button
picture
to
controts
Press
MENU
the menu
frornrepeatedly
the screen.to rernove
Any adjustment
Contrast
of Brightness,
or Sharpness
PERSONAL
at Auto
Color,
wiJl be stored
Picture
into
section
Downloaded From TV-Manual.com Manuals
_6
¸
/
o adjust your LCD TV Sound, se/ect a channel and
follow these steps_
Press"the
MENU
button
to see the menu.
Press the CURSOR DOWN button to
highlight the AUDIO menu.
_"_
Press "the CURSOR
the AUDIO
_l _
RIGHT
Press "the CURSOR
DOWN
the item you want to adiust:
Settings,
Auto
Stereo,
Sound:
details
Stereo:
Surround,
Adiust
Mcredibte
you to adiust Treble,
to setect between
Surround:
Bass,
Stereo,
(Auto
Adds
sudden
Surround
or OFF
Volume
Leveler):
depth
When
occur
breaks or channel
Press "the CURSOR
Om AVL
being heard when
changes in volume
commercial
greater
to TV sound. Select from
wilt levet out the sound
RIGHT
during
changes
or CURSOR
LEFT
to adiust the item
ress the CURSOR
DOWN
button
and adiust other sound controls.
'
AVL.
to page 18 for
of the sound.
and dimension
button
button to choose
Auto Sound,
or SAR
Incredible
AVL
to enter
Sound Settings.
Altows
and Balance
Mono,
incredible
Piease refer
on Auto
Settings:
_
button
menu.
to select
Press
MENU
the menu
frornrepeatedly
the screento rernove
.Any adiustment
of Treble and Bass
will be stored into PERSONAL at
Auto
sound
.If Stereo is not presented
on a
selected show and the TV is placed in
Stereo mode, the sound coming from
TV will remain
in Mono mode, Manuals
Downloaded
From TV-Manual.com
ether you're watehin_ a movie or a video
ame, your LCD TV has video control preset
that wilf match with your current
program source or
content. Auto Picture quickly resets your TV's video
controls for a number of'different
types of #roErams
and viewin_ conditions that you may have in your
home, The Personal, Rich, Natural,
Soft, Multimedia,
and Auto Picture controls have been preset at the
factory to easily adjust the TV's brightness, color,
#icture,
sharpness, tint, and color temperature
levels,
In the Personal auto picture mode you can
create your own preferred
video settings.
Press the AUTO PICTURE button on the remote
control The current Auto Picture setting wi[[ appear
on the screen
Press the AUTO PLCTUREbutton repeatedly to
select either Personal, Rich, Natural, Sof[,
or Multimedia.
Note:The
settings
of the Personal
auto
mode
picture
can be adjusted in picture options within the onscreen
menu. The Personal mode is the only mode which
can be adjusted by the user via the onscreen picture
menu.
control
uto Sound atlows you to select from three user
presets and a #ersonal mode that you set
accordin_ to your own preferences
through
the
onsereen Sound menu. The four user #resets
(Personal, Voice, Music, and Theatre)
enable you to
tailor the TV sound so as to enhance the particular
program
you are watching. Followin_ these steps to
select any of the options,
Press the AUTO
SOUND
control The current
on the screen
Press the AUTO
Auto
SOUND
button
on the ,'emote
_Ez3
Sound se_ting will appears
button
toggle arnong the four setting:
or Theatre.
repeatedly
to
Personal, Voice, Music,
Note: The settingsof the Personalauto sound mode can
be adjusted in sound controI within the onscreen
menu. The Personal mode is the only mode which
can be adjusted
controJ menu.
by the user via the onscreen
sound
Downloaded From TV-Manual.com Manuals
_8
TU 8ATIItG
he AUTO Lock feature is an
ntegratedcircuit
that receives and
processes data sent by broadcasters,
other program
program
providers,
content
programmed
AUTO
FI_I ,
by the viewer, a TV with
to the content
and block program
content
G:
(such
situations, etc).
This is a great
GeneraU
parents
would
for
may watch_
offers
from
Code
- An Access
Code
from
or censored
must
be
unblocking
programming
set
Enable
been programrned,
programming
and user
Movie
Ratings
which
on ratings
has
on the
ParentaU
programming
that
parents
- Certain
block
children.
of the
language,
blocking
programming
by the Hotion
options
based
Pictures
like the
can be blocked
TV ratings
Movie
from
Ratings,
viewing
using
set by TV broadcasters.
or no
Suggested
contains
It may contain
or some
sexual
StrongUy
contains
or no
of the
-This programming
under
the
view this
adults.
age of 17 should
programming
or adult
guardian.
of the
intense
coarse
with
an
sexual
no strong
sexual
Parental
Guldance
children
under
only.
indecent
be viewed
It contains
by
graphic
Adults
the
following:
very
graphic
OnUy
TV-14
Parents
one or more
intense
following:
sexual
graphic
and explicit
acts, and very
Downloaded From TV-Manual.com intensely
Manuals
suggestive
m9
violence,
or indecent
coarse
language
and
diMog
violence
of
(V),
(S), strong
(D).
Audience
designed
Only
-
to be viewed
and may be unsuitable
under
programming
sexual
17. This type
contains
of the following:
indecent
of
or more
(L), or intensely
MatlJre
children
explicit
one
situations
language
-
for
age 14. This type
the
for
Cautloned
R/at many
find unsuitable
contains
by adults
of
(L), or
(D).
Strongly
under
intense
situations
language
material
programming
coarse
Moderate
sexual
dialog
would
may
children.
contains one
foUowing:
some
TV-MA
- This type of
very
suggestive
Contains
parents
coarse
some
Specifically
contains
that
for younger
(V), some
suggestive
sex, or crude,
language.
programming
sexual
age
- This type
should
explicit
the
material
(S), infrequent
parents
little
-
violence
children
and
or situations.
of :he
or intensely
dialog.
No
violence,
intense
of
or no
litt{e
language,
dialog
or more
situations,
[7 wHU be admltted.
adults
X:
It contains
foUowing:
language,
of programming
the default code.
contains
]-histype of programming
of
inputting
all ages. This type
R: Restricted
NCotT:
for example) or you have forgotten
the code, you can always get in by
for
- Host
programming
find unsuitaMe
suggestive
than you (a child,
suitable
Audience
find this
Contains
only
mild fantasy
(FV or fantasy
coarse language, or suggestive dialog.
Anyone
between
This
following: violence, sexual situations,
for
for
may include
would
Suggested
strong
other
appropriate
GeneraU
violence,
may find
designed
-
age 7 and above.
and reality.
parents
TVoPG
is specifically
children.
ChiMren
can distinguish
programming
parents
ages 2-6,
younger
violence
young
is not
to Older
children
programming
unsuitable for children under the age
vio}ence,
someone
for
who
of [3. [tcontains one or more
parent
default AutoLock code. If your
access code has been changed by
to frighten
It may be more
TV-G
dialog.
-
that
children
Directed
for
a very
violence).
coarse
suggestive
Parents
Cautloned
of programming
and comic
some
infrequent
including
type
make-believe
one
for
]-his
children
for
Appropriate
Designed
audience,
TV-Y7
-
material
foUowing:
violence,
one or more
that 071 ! is the
children
Designed
accompanying
Remember
At[
expected
and little
may find unsuitable
or more
rnateria[
of America.
-just
Guidance
younger
moderate
little
of
or situations.
This programming
received
setting.
will
Ratlngs
standard
code
you can block
patterned
Association
programs
an access
depending
rating
PG:
PG-13:
- After
TV-Y
program
tanguage,
dialog
This
situations,
parents,
Block
TV
BLOCKING
to choose:
children
questionable
exist
varlous
which
set to prevent
by their
contains
no strong
or no sexual
Lock
Access
violence,
find this
all ages. This type
programming
to censor the type of viewing children
- All ages
all children.
suitable
feature
Audlence
admitted.
Host
as offensive language, violence, sexual
controls
OH
that contain
that may be found objectionable
AUTO
,
G_
advisories,When
Lock can respond
advisories
77
or
graphic
situations
language
(L)
of
one or more
violence
(V),
(S), or crude,
ver the next few pages you'll learn how
to block programs and understand the rating
terms
for certain
broadcasts.
First, set an access code_
'sI_
,
Press
the MENU
onscreen
menu
_
Press
the CURSOR
button
to hight!ght
the FEATURES
menu,DOWN
then press
CURSOR
RIGHT to enter.
_
Press the
CURSOR DOWN button to select
AUTO
LOC!<
4_
Press the CURSOR
CHANGE
CODE w!llRIGHT
appearbutton
on the screen
Enter a four-digit
buttons.
button
c
code using the Number
The screen w!H prompt
the code you iust entered.
code again.
_
to see the
you to confirm
_EBEBE_ZZ
Enter your same new
[Z_1D_B_
Press MENU repeatedly to rernove
the menu from the screen
Remember
that 0711 is the default AutoLock
code. If your access code has been changed by
someone other than you (a chiN, for example)
or you have forgotten the code, you can always
get in by inputting the default code.
NOTE
TO
PARENTS:
1_is not possible for your child to unbiock
a channel
without knowing your access code or changing it to a
new one. If your code has been changed without your
knowledge,
then you will become aware that blocked
channels may have been viewed.
Downloaded From TV-Manual.com Manuals
20
fter your personal access code has been
set (see the previous page), you are ready to select the channels
or inputs
you want to block out or
censor.
Press the MENU
onscreen
button
to see the
menu.
Press the CURSOR
DOWN
button
to highlight
the FEATURES menu, then press CURSOR
RIGHT to enter.
Press the CURSOR
DOWN
button
to select
AUTO LOCI(, then press the CURSOR
RIGHT to enter.
1'
Use the Number buttons
your access code
to enter
Press the CURSOR RIGHT/LEFT
button to
block current seJected channd or CURSOR
RIGHT/LEFT
button
to unbtock a channel.
Press "the
MENU
repeatedly
from
screen.
Note:You
can block additional
Nurnber
buttons
_
E3E1 _
_
E3EZ E_Z
EZ_1
E_1
E3_B
EZB
E3_Z
_
to rernove the menu
_>
channels by using
to jurnp to another
channel
Downloaded From TV-Manual.com Manuals
2m
L_55
he AUTO Lock feature
can block programming
based on the Movie Industry ratings_
Once you've entered
Lock features
your access code and the AUTO
are displayed
on the
screen:
#l
Press
the PIENU
button to see the
Ot*}SC ree_-}
menu
_
ress
the CURSOR
button
highlight
the
FEATURES
menu,DOWN
then press
the toCURSOR
RIGHT to enter.
!_
Press the
CURSOR
DOWNCRUSOR
button to
select
AUTO
LOCK,
then press
RIGHT
to enter. ACCESS CODE wilt appear on the
screen.
,
Pleaseaccess
use thecode.
Number buttons to enter your 4
digits
Press the CURSOR
MOVIE RATING,
to enter.
_
DOWN
button
to select
then press CURSOR
RIGHT
Press the CURSOR DOWN button to highlight
any of the Movie Rating options. When highlighted,
all these options can be (ON) blocked or (OFF)
unblocked
Press
MENU
the
screen
repeatedly
to remove the menu from
i iiiiiiiiiiiiiiiiiiiiiiiiiiiiiiiiiiiiiiiiiiiiiiiiiiiiiiiii: i i :i i
When a rating is chosen to be blocl<ed, any
higher level rating will also be blocked from
viewing. (i.e.: If "R" is selected to be btocked,
NC-17 and X will automatically be blocked.)
When a rating is set to unb{ock, only the selected
rating will be unbtocked (Ratings lower will not
autornaticatly be unbtocked )
Downloaded From TV-Manual.com Manuals
22
ii i i i i i i i i i i i i i i i
he AUTO Lock feature can block
programming based on the TV
Industry
ratings.Once
code and the AUTO
on
the
you've entered
Lock features
your access
are displayed
screen_
Press the MENU
onscreen
button
to see the
OLCPTE
10_E _T_
menu
Press the CURSOR
DOVv'N
button
A_TOLI]CR
to
highlight the FEATURES menu, then
press CURSOR
RIGHT to enter
Press the CURSOR
DOWN
button
to
highlight AUTO LOCK, then press
CURSOR RIGHT to enten
ACCESS CODE
UT LO[H
will appear on the screen.
[[[[[[[[[[[[[[[[[[[[[[[[[[[_1_
}_LIH O_T]
_J_/i_ _
4_
Press theUSER
CURSOR
button,
INPUT
CODE RIGHT
will appear
on the
[ _/_i!
[
tIDI[
R_TI]IG •
_>GIcQ
l&
screen,
N
oll
Y7 _
Use the Number
buttons
OH
to enter your
4 digits access code
_
7
Press the CURSOR
select TV RATING.
DOWN
Press the CURSOR
RIGHT
DOWN
button
button
to
or CURSOR
to highlight any of'the TV
Rating options. When highlighted, alt these
options can be (ON) blocked or (OFF)
unblocl<ed.
Press
repeatedly
to screen.
rernoveMENU
the menu
from the
i iiiiiiiiiiiiiiiiiiiiiiiiiiiiiiiiiiiiiiiiiiiiiiiiiiiiiiiii: i i :i i
When a rating is chosen to be biocl<ed, any
higher level rating will also be blocked from
viewing. (i.e.: If "R" is selected to be btocked,
NC-17 and X will automatically
be blocked.)
When
a rating is se_ to unblock,
rating will be unbiocked
autoraaticatIy be unbiocked
(Ratings
)
only the selected
lower
will
not
Downloaded From TV-Manual.com Manuals
23
ii i i i i i i i i i i i i i i i
y_h
u can change the picture format size to match
e type ofprogrom
you are watching. Select tt_e
normal
4:3, WIDESCREEN,
16:9, SUBTITLE
Picture
ZOOM
ZOOM
14:9, ZOOM
or SUPERWIDE
aspect
ratios.
Format
_ID[S{RfER
_:]
SUBIiT[[ lOOB
SU_[R _l_f
Note:
h You can dh*ecdy change the picture
format by pressing the FORMAT
WIDESCREEN
i
button on your FemoEe control
2. The Picture Format Function is not
accessible in PC MODE.
3. In HD and DVI MODE,
Format Function
the Picture
is only accessible
4:3
when input video signal is SD (e.g.
480i/480p). If input video signal is HD
(e.g. 720p/1080i), the Picture Format
Function will not be accessible
ZOOM 16:9 _L'}<
>L.J
SUBT'TLEZ
I
G .................
SUPERWlDE
Downloaded From TV-Manual.com Manuals
24
._..___l
A
ist or series of previously viewed channels can be
selected with the SURF button on your remote
control.
between
With
this feature,
different
you can easily switch
TV channels that currently
_UBFEDff
interest
i
you. The SURF control
22
allows you to set up to 8
channels in its quick viewing tis_.
SBBFEDIT
1
Press the CH+ or CH- button ( or the numbered
buttons) to seteet a channel to add to the SURF
list.
Press the SURF button
on "the remote
control.
The onscreen display may read, SURF LIST
EMPTY. The number of the current channel wilt
be shown with ADD
3
While
_ to the right.
the SURF list message or the SURF channel
list appears on the screen, press the CURSOR
RIGHT button to add the present channel to the
SURF list
4
If you want to delete the present channe{ from
the SURF list, press the CURSOR
again.
Repeat steps ! throught
RIGHT
button
3 to add more channels
(up to 8) to the SURF tist
Along with regularly programmed channels, the
external video source connections can be added
to the SURF list. This means that the external
A/V Jacks and their channels can be added to
your SURF Hst. Use the AV+ button "cotune their
channel and use the sarae steps described on "this
page to add those channels to "the Surf )ist
Downloaded From TV-Manual.com Manuals
2S
22
Delete?
losed Captioning (CC) _llows you to
read the voice content of television
programs
on the TV screen. Designed
ing impaired,
this feature
show dialogue
to help the hear-
uses onscreen
and conversations
"text
boxes" to
while the TV program
is in progress,
Press
the
MENU
button
to
see the
onscreen
menu,
Press the CURSOR
DOVVN
button
to highlight
the FEATURES menu, then press CURSOR
RIGHT to enter.
Press the CURSOR
DOWN
CLOSE CAPTION,
then press CURSOR
to
,
button
to select
RIGHT
enter,
Press the CURSOR RIGHT button to select the
closed caption you want: CC MUTE, CC!, CC2_
CC3, CC4, Txtl, Txt2, Txt3 o1"Txt4.
Press MENU
the screen.
Note:Closed
repeatedly
Caption
CC button
to remove the menu from
can also be activated
on your remote
by pressing
controt
Not all TV programs and product
commercials are broadcast with Closed
Captioning
Captioning
(CC). Nor are all Closed
MODES (CAPTION
!-4 or TEXT
necessarily
being used by broadcast
I-4)
stations during the transmission
of a prograra
offering Closed Captioning. Refer to your area's TV
program listings for the stations and times of shows
being broadcast with Closed Captioning.
Downloaded From TV-Manual.com Manuals
26
his TV can also be used as a PC Monitor. A
PC video signal must be present or the TV will go
into standby
controls
Note:
mode_ The PC Picture
allow you to adjust the picture.
Make sure you are in PC mode.
........
__
'sI_
,
Press
on the
remote
control theto MENU
see the button
onscreen
menu
EZ3
_2
EZ3
When the PICTURE menu is highlighted, Press
the CURSOR RIGHT button to enter the
PICTURE rnenu
3
_I[TU_f
Press the CURSOR DOWN
button to highlight
the item that you would like to adiust
Color
Ternp:
Adiust the cotor
temperature
of the picture
Select
Normal
Cool or Warm.
Brightness:
Adjust
parts of the picture.
to brighten
PI[THE
from
[O[ORI[NP_
EZEE3EEEE3EEl3
EEl3 CEDE3C3E3
the darkest
EEl3 E3E3 _
Contrast:
Adiust to "sharpen"
the Picture
quality. The black portions
of the picture
become
richer in darkness
and the white
become
Auto
_ES,
EE2E3EEEE3EE_Z3
brighter.
Adiust:
The LCD Monitor
will
automatically
adiust to the best image
position,
phase, and ctock setting.
Manual
Adiust:
The Manual Adiust
control
allow you to manually fine tune the image as it
appears on the screen.
Phase-eliminates
the horizontal
interfering
lines.
Clock-eliminates
Horizontal-adjust
placement
[;
lines.
of the picture.
VertieaJ-adiust
picture
,
the vertical interfering
the horizontal
ress the CURSOR
the item
the verticat
placement
RIGHT/LEFT
button
of the
to adiust
Press
MENU
the menu
frornrepeatedly
the screen to rernove
h To adiust
2. Color
Auto
other
Temp
Picture
items
repeat
steps
can also be activated
button
on your
Rernote
If you are willing to reset adiustment
3 and 4.
by pressing
Control.
back to
original value, please enter to Factory Reset in
Install menu
Downloaded From TV-Manual.com Manuals
27
is TV can also be used as a PC Monitor_ A PC
idea signal must be present or the TV will go
into standby made.
The AUDIO
controls
allow you
to adjust the sound.
Note:
Make sure you are in PC mode,
$TEREa
NU]_(
Press the MENU button on the
remote control to show the
onscreen
menu,
Press the CURSOR
DOWN
button
to
5TE_E_
_L_N[E
highlight the AUDIO menu, then press
CURSOR RIGHT to enter
Press the CURSOR
DOWN
button
highlight the item that you would
4
adiust:
Auto Sound:
to
like to
5TE_Eg
Allows
you to select from
3
factory-set controls and a personaI control
The 4 factory-set controls (Personal, Voice,
Music, Theatre)
program
enhance the particular
you are watching.
ET B
Settings:
Allows you to adjust Treble,
and Balance of the Sound
Stereo:
To setect from Stereo,
Bass,
P1ono, and
SAR (OnJy function in TV mode)
incredible
Sound: Adds greater depth and
dimension to PC sound.
AVL (Auto Volume LeveJer)-When
ON,
AVL will level out the sound being heard
when sudden changes in voiume occur
during commercial
breaks or channel
changes
Press CURSOR
RIGHT
to enter the item
you would like to adjust.
Press the CURSOR RIGHT
LEFT button
_;
or CURSOR
to adiusL
Press MENU
menu
from therepeatedly
screen.
to remove the
Downloaded From TV-Manual.com Manuals
28
_
_B
iP (Picture-in-Picture)
up d subscreen
when
feature
you are
allows
you to call
usin_ your rv as a
monitor.
Note:
_l
Make
sure
you
are in PC
Press
the MENU
or_screen
menu
button
mode.
to see the
Press CURSOR DOWN button to highlight the
FEATURESmenu
Press the CURSOR
RIGHT
button
to enter
button
to enter the
the FEATURES menu.
4
5
Press the CURSOR
PIP menu
RIGHT
Press the CURSOR
DOWN
buttons to highlight
the item that you would like to adjust
SIZE: Turn offand setthe
size of PIP. You
can choose your preferred
size of small,
large, or PBP (Picture
Beside Picture).
Video: Select video source of PIP frorn TV,
EZZ:3 _
EZ3Z3 E:3C3
_
AVI, AV2, S-Video or Component.
Audio:
Select audio source of PiP or PC
_
_
Display:
position
Select
of PIE
which
corner
EZ3B
of the
PIP windows with component
video source
support up to 480i/576i
(SD) video signal
can only
Downloaded From TV-Manual.com Manuals
29
EZi3
EZ3E3 _
ERE3
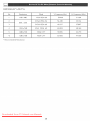
23PF5320
(23"
No
LCD
TV)
Resolution
640 x 480
2
Mode
V Frequency
(Hz)
H Frequency
VGA
VESA 60
59940
31469
SVGA
VESA 56
56.250
35156
SVGA
VESA 60
60.3!7
37897
60004
48.363
800 x 600
3
4
1024 x 768
5
1280 x 720
VESA CVT
59.855
44772
*6
1280 x 768
VESA CVT
60000
47.700
Recommended
XGA
VESA
60
Resolution
Downloaded From TV-Manual.com Manuals
3O
(kHz)
No
Power
SoVHS
" Check the TV power cord.
Unplug'[he
TV, wait
seconds, then reinsert the plug into the outlet
push the POWER
button again.
, Check that the outlet is not on a walt switch.
l0
and
, Be sure the fuse is not btown on the AC power
TV
strip, if one is being used
No
Faint
Becomes
Onmy
Produces
MONO
Sound
. Ifusinga cablebox with RF only type connections,
the signal corning from the cable box will be
produced in MONO
only.
Picture
Check antenna/cable connections.
Are they properly
secured to the TV's ANT75Q plug_
, Check the TUNER
NODE
control for the correct
Check Sound control
Stereo.
Remote
tuner setting.
, Try running the Auto Prograrn feature to find all
_vaitable channels.
, Press the AV button on the remote to make
sure the correct
Check
remote.
, If in PC PIode, a video signal MUST
the TV wilt turn off
. Check
BE present or
the MUTE
Be sure
Work
Ptace lithium
on the rernote
ceil in the
the (+) and (-) ends of the batteries
the TV power
cord.
Unplug
the fuse [s not btown
the TV, wait
l0
and
on the AC power
strip, if one is being used.
Check to be sure the TV outlet
buttons.
button
Not
the batteries.
seconds,then
reinsert
the plug into the outlet
push the POWER
button again.
Be sure
No Sound
. Check the VOLUME
Does
setting. Change setting to
line up as marked
inside the battery
compartment.
Ctean the remote
control
and the rernote
contro!
sensor window on the TV.
signal source is selected,
, If using an accessory device, be sure that it is
functioning properly.
. Check
Color
Unplug socket for S-Video connection.
Reconnect
the S-Video socket of the TV carefully to the VCR
socket.
is not on a wall
switch.
control.
. If you're attempting
to hook up auxiliary
equipment,
check the audio jack connections.
Be sure that the remote
mode.
No AV Signal
, Check whether
Be sure the remote is pointed at the Remote
Sensor Window on the TV. See page 2. of the Quick
Use OuideFor details.
simultaneously.
AV and S-Video sockets
If they are, disconnect
connected
is in the correct
operating
the S-Video
TV Displays
Above
13
socket. AV signal automatically overrides the S-Video
signal if both sockets are connected simultaneously.
. Repeat
Wrong
channel
Channel
or No Channels
selection.
. Add the desired channel numbers
(using the
CHANNEL
EDIT control)
into the TV's memory.
. Check to be sure the TUNER
MODES
are set to
the CABLE
option and run the Auto
feature to find all available channels
Downloaded From TV-Manual.com Manuals
31
Program
WARN]N(}
concerning
stationary
images on the TV
Screen: Do not leave fixed images on the screen for extended periods of'time. This can cause uneven aging of the LCD
panel. Normal use of the TV should involve viewing of programs that have constantly moving or changing images. Do
not leave st+tl images on screen for extended
periods
of'time.
Do not disp{ay "the same images too frequently;
if you do,
subtle "ghost +'images can be left on "the LCD screen. Sources of stationary images may be Laser discs, video games,
Compact Discs Interactive (CD-i)+ or paused Digital Video Discs (DVDs) or video tapes
Here are some common examples
+ DVD menus tist DVD content.
of stationary
images:
+ Letterbox black bars appear at the top and bottom of the TV screen when a wide screen (16:9) movie is viewed
TV with standard (4:3) aspect ratio This is avai+abte with sorne DVDs.
+Video game images and scoreboards
+Television station Iogos cause a problem +f'they are bright and stationary. Hoving or tow-contrast
graphics are
less likely to damage the p+cture "tube
+ Stock market tickers may appear at the bottom of the TV screen if the TV programming
covers this news.
+ Shopping channe+ Iogos+ pricing displays may be br+ght and may appear constantly
during "the show
These are usually in the same Iocat+on on the TV screen.
TV
Location
+To avoid cabinet warping,
cabinet color changes, and an increased chance of TV failure+ do not p+ace the TV
where temperatures
can become excessively
+Allow a free flow of air around the TV
hot (for example+ in d+rect sunlight or near a heating appJ+ance)
Cleaning
+To avoid possible shock hazard, remove the TV's power
+Regular[y dust the TV with a dry, non-scratching
duster.
cord From "the electrJca+ outlet
before cleaning.
+When cleaning "the TV, take care not to scratch or damage the screen surface. Avoid wearing jeweh+y or using
anything abrasive. Do not use household cleaners. Wipe "the screen with a clean cloth dampened with water
Use even, easy, vertical strokes when cleaning.
+ Occasionally vacuum the vents on the rear of the TV.
+ Never use thinners,
insecticide
sprays, or other
chernica+s on or near the cabinet
permanently
Downloaded From TV-Manual.com Manuals
32
They may blemish the cabinet
on a
A
Auto Program
..............................
7,8,31
B
Balance
.....................................
Bass .....................................
Batteries
..................................
Blocking
......................................
Brightness
I_ 28
!6, 17+28
3, !3, 3!
!9
................................
!6, 18,26
C
Care and Cleaning ...............................
Channe+ Edit ..................................
Ctosed Captions .............................
Color .........................
32
9, 3J
IO, 26
4, 16, J8, 26, 27, 3!, 32
F
Factory
Reset .................................
I I, 27
J
Index
........................................
5,33
L
Language ..................................
Limited Warranty
.............................
6,18, 19
5, 36
M
Mono
.................................
!4, I_ 28, 31
R
Regulatory
.....................................
34
S
Sound .............................
Sound Mode .................................
Stereo
................................
TabJe of Contents
14+ 17+ !8+ 28+ 3!
14+18
14,17, 28,3!
................................
Tint .........................................
TrebJe .......................................
Troubleshooting
.................................
TV Operat+on (Basic) ............................
5
16, 18
17, 28
3I
13
VV
"Warranty
\_/elcome
..................................
........................................
2+ 5, 34
5
Downloaded From TV-Manual.com Manuals
33
FEDERAL
COMMUNICATIONS
This equipment
COMMISSION
(FCC)
NOTICE
(U.S,
ONLY)
has been tested and found to comply with the limits for a Class B digital
device, pursuant to Part !5 of the FCC Ruies. These limits are designed to provide
protection
against harrnful interference
in a residential installation. This equipment
uses and can radiate radio fl'equency
reasonable
generates,
energy and, if not installed and used in accordance
the instructions, may cause hnrmful interference
to radio communications.
is no guarantee that interference
will not occur in a particular installation.
with
However, there
If this equipment
does cause harrnfu[ interference
to radio or te{evision reception, which can be determined
turning the equipment off and on, the user is encouraged to try to correct the inter[erence
one or more of the [ollowing
Reorient
or
Increase
the
Connect
Consult
the
the
relocate
the
separation
equipment
deater
Use only RF shielded
into
antenna.
the
an outlet
or an experienced
Changes
could
receiving
betweeE
void
or
modifications
"the user's
cable with ferrite
measures:
equipment
arid
on a circuit
radio/TV
not
authority
receiver.
different
technician
expressly
approved
to operate
core when connecting
Downloaded From TV-Manual.com Manuals
34
[rom
for
the
"that to which
the
receiver
by the
party
responsible
equipment
"this monitor
is connected.
help.
to a computer
device
[or
compliance
by
by
One
PHILIPS
warrants
material
(m) Year
this product
or workmanship,
Labor
& One(m)
against defect
subject
Year
in
Parts
& One
receipt
to any conditions
set forth
as follows:
used for commercial
not limited
_Products
PROOF
OF
of purchase
or other
PURCHASE:
to receive
document
you purchased
included,
You must
repair
on the product.
showing
the product
the product
is considered
have proof
t{s well
A sa_es receipt
LABOR:
as the _uthorized
retailer
option,
Philips
repair
at rio charge,
authorized
service
or replace
After
the period
be responsible
PARTS: For a period
at no charge,
parts in exchange
for defective
will provide
parts.
removal
year,
OBTAin
WARRANTY
(French
For a period
Phi]ips will
incurred
the date of purchase,
and installation
active display
device
Phihps authorlzed
insta}lation
hi exch_nge
service
FROH
PHIUPS
OR CONSEQUENTIAL
OF ANY
Your' wa_-r anty does not
charges
display.
removal
and
labor warranty.
COVERAGE
or setup
adjustment
of customer
installation
or repah" of anterlna
controls
NOT
EXPRESS OR IMPLIED
PRODUCT
EXCEPT
TO
LAMA/, ANY
MERCHANTABILITY
Sorne
or
ON
THE
BE LIABLE
FOR ANY
DAMAGES
EXTENT
IMPLIED
FOR BREACH
ON
THiS
PROHIBITED
WARRANTY
OR FITNESS
THIS
FOR THE
VVARRANTY
THIS PRODUCT
BY
OF
FOR A PARTICULAR
IS LiMiTED
in
DURATION
TO
OF THIS VVARRANTY.
states
do
not
consequential
implied
f_ot
to
lasts,
you.
with
of
of saJe,
d_te
does
not
the
so
or
the
In addition_
agreement
the
allow
damages_
warranty
apply
lasts
cover:
for installation
SHALL
UNDER
REMEDY
the date of
win provide
WARRANTY
CANADA..,
or Spanish Speaking)
AS PROVIDED
INCIDENTAL
APPLICABLE
a new or rebuilt
the specified
IN
- (English
CONSUMER.
of the
for d'le defective
centers
of the pa_ts under
EXCLUDED
• Labor
at no charge,
U.S,A.,
at:
SERVICE
IS THE EXCLUSIVE
_ep]acement
Philips ;{uthorized
of one (I) year from
THE
Speaking)
REPAIR OR REPLACEMENT
PURPOSE
supply,
IN
ISLANDS...
Center
(I-888W44-5477)
THE DURATION
purchase,
Care
WARRANTY
parts for one (I) year.
DISPLAY:
VIRGin
(I-888W44-5477)
1-888-PHIDPS
to any Phihps
new or rebuilt
purposes(including
at its
of one ([)
for charges
of one (I) year from
Phihps will supply,
centers
product
SERVICE
OR U,S.
Phllips Customer
1-800-66!-6162
the date of
the
or institutional
purposes).
WARRANTY
RICO,
Contact
to be defective)
or pay the labor charges
center.
will no longer
service
OBTAIN
1-888-PHILIPS
of one (I) year from
Phflips will
to rental
sold AS IS or RENEWED.
PUERTO
TO
For a period
purchase,
TO
and the date that
such proof,
is determined
Repair
of the date
COVERAGE:
(if this product
Display
can be provided.
*A product
but
(|) Year
the
allow
or
on
on
limitations
enter
partnership
limitation
limitation
limitations
above
if you
PHILIPS
the
exclusions
into
or
long
long
an
extensions
a se_'v_ce
within
how
of incidental
how
ninety
rlla_
contracl:
(90)
an implied
days
w_rranty
apply
of the product,
on the product,
systems
and
outside
of the
product.
• Product
repair
improper
instaliatlon,
supply,
and/or
abuse, neglect,
or other
[hat requires
enable it to operate
country
for which
authorized,
because
to improper
misuse, accident,
cause not within
•A product
and/or
part replacement
corlrlections
the control
modification
in arly country
it was designed,
o_ repalr
of
voltage
unauthorized
i-eprdl-
of PhWips.
or adaptation
other
to
than the
manufactured,
of products
approved
damaged
by these
modifications.
• Damage
improper'iy
• Product
occurring
packaged
to product
or costs
lost in sMpment
This warranty
during
shipping
associated
with
and no signawre
g;ives you speci[ic
when
packaging.
verification
legal rights.
of
You may have other
rights
_,hich
vary from
statelprovince
to state/province.
Downloaded From TV-Manual.com Manuals
[_
(Warranty:
4835
710
28375)