1
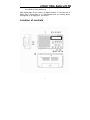
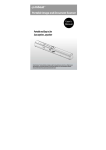
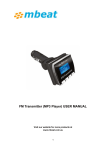
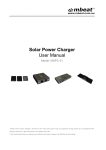
USER MANUAL
Version 2.0
Please read manual before you operate the product!!!
Disclaimer: Product specification, color and other features may slightly change to
reflect the latest product update from manufacturer without prior notice to user. All
rights reserved.
Important to know about the digital radio
coverage
Please note that digital radio is currently only available in
Australian metropolitan cities. It is not available in remote area
yet. You can visit www.digitalradioplus.com.au to discover the
coverage of the available digital radio broadcasting around
Australia by typing your living area postcode.
Please make sure that your area has digital radio signal available
to use the DAB+ mode. We do not accept warranty returns due to
no reception outside the coverage area.
Digital radio is a new, exciting and involving way for listeners to tune
into their favorite radio stations.
Offering an exceptionally high sound and signal quality, digital radio
offers a range of exciting features to enhance your listening
experience.
•
Clearer sound and improved reception
•
Extra features such as extra channels pause and rewind radio,
downloadable music, more details about the advertised product,
slideshows, scrolling text, Electronic Program Guides, updated
news, sports and racing information. Just to name a few
•
Extra channels potentially doubles the number of commercial
stations
•
Tuning by station name, not frequency, making it easy to find
favorite stations
1
•
A wider choice of shows and program highlights better meets
the needs of niche audiences
With digital radio all you need is a digital receiver or a device with a
DAB+ chip in it and that’s it – no subscription fees, no messing about
with signing up or logging on, just tune in.
Location of controls
2
1
2
3
4
5
6
7
8
9
Speaker
LCD Display
ON/ OFF Key
Display Key
Scan Key
Preset Key
Menu Key
Volume Down Key
Volume Up Key
10. DAB+/ FM Mode Key
11.Previous Key
12. Select Key
13. Next Key
14. 3.5mm Earphone Socket
15. DC Power Socket
16. Aerial Input
1. DAB+ radio functions
1.1 How to power the device
1.1.1 Main Adaptor (supplied with the package).
Connect the mains adaptor to the DC power socket of the radio to the
wall socket.
1.1.2 Battery (not supplied).
Open the battery door and insert 4 "AA” size alkaline batteries. Remark:
Insert batteries correctly. Pay attention to the positive and negative +/Pole. Please note that the DAB+ radio technology consumes more
power than normal FM radio and it consumes approx 800mA per hour ,
the normal battery could last about 4-6 hours depending how good the
battery it can be. This is the normal and should not be considered as
the faulty.
1.1.3 Telescopic aerial
Extend the telescopic aerial as far as it can go to ensure a good
reception.
1.1.4 Power on
Press the Power button to turn on the radio. The LCD backlight will light
up during the operation of the radio. The radio will automatically show
message:
3
The radio will auto enter” SYNC TIME” to sync the CLOCK time with
DAB+ radio station and then enter into Standby mode.
If it is the first time to use the digital radio, after “SYNC TIME”, press
the power button to activate the radio tuning function if it enters
standby mode without doing anything.
The LED backlit will turn off and enter power save mode after a while.
Press any key to turn on the backlit.
1.1.5 Radio LED display panel information
1.1.6 Stored stations
Your Radio will return to the mode that it was last used in (DAB+/FM).
If you listened to a DAB+ station before then this station will
automatically selected.
Note: Always make sure that the aerial is extended to ensure the
maximum signal strength and the best possible sound quality,
especially in the first time to use.
4
1.2 How to adjust the volume
Press the "Vol+" up to increase the volume and the "Vol-" down to
decrease the volume. Press and hold the "Vol+” or "Vol-" to
progressively increase or decrease the volume.
1.3 How to change the radio stations
1.3.1 If you are not already in DAB+ mode, Press the "DAB+/FM"
button to go to DAB+ mode. Then you can press "DAB+/FM" button
again to go to FM mode.
1.3.2 Press the "◄◄" or "►►" button, to scroll through the stations.
By default, the stations are listed in numerical and then alphabetical
order. Just in few seconds, the DAB+ radio will tune to the station.
1.3.3 In FM mode, Press the "◄◄" or "►►" button to change the FM
frequency
1.4 How to scan the stations
With DAB+ radio, additional stations and services regularly become
available so it's a good idea to carry out a manual scan every now and
then to make sure that you have the most up to date station listing
stored within the memory of your radio. If you have moved your radio
to another location, eg: if you go on holiday, then it" s also a good idea
to carry out a manual scan.
Note: before start, please pull out the telescopic aerial or walk outdoor
to get max reception of the digital radio signal during initially scans.
1.4.1 If you are not already in DAB+ mode, Press the "DAB+/FM"
button to go to DAB+ mode first.
1.4.2 Press the "Scan" button to begin a local search for stations. The
display will change to "FULL SCAN" and the number of stations found
5
during the scan will be displayed .A local scan takes approximately
20-30 seconds to finish.
1.4.3 If you are using your DAB+ radio outside of the UK, then Press
and hold the "Scan" button for 2 seconds to begin a wider, national
and full scan. A national and full scan takes approximately 30 seconds
but can take up to 3 minutes depending on the area and signal
strength.
1.5 Storing a preset station
Your digital radio can store up to 10 DAB+ stations and 10 FM stations
in its preset memories for instant access to your favorite stations.
1.5.1 Tune your radio to the station that you wish to preset (see
changing stations, 1.3).
1.5.2 Press and Hold the "Preset" button for seconds and the display
message on LCD will change to “EMPTY P1 “where "1" is the number
of stations available to preset (1-10, stores 10 stations).
6
1.5.3 Using the "◄◄" or "►►" button, select the preset number that
you would like to store the station to Press the "
station.
" button to store the
For example: I am listening “3AW” in DAB+ mode, I want to preset it
into my favorite stations. First to press and hold “Preset” button for
seconds, the LCD shows message like ”EMPTY P1”, then I press
“Select” key , so the LCD shows “3AW P 1” , if I want to store this
station in 2-10 , I can press the "►►" button to choose from 1-10 as I
like.
Note:
If there is already an existing DAB+ or FM station stored under a
preset, it will be overwritten when you store the new station
When you store DAB+ radio station presets, these do not overwrite
your FM station presets.
1.6 Tune to a preset station
1.6.1 Briefly Press the "Preset" button.
1.6.2 Use the "◄◄" or “►►" buttons to scroll through the station
presets. Press " " when you see the station that you would like to
listen to the radio will instantly tune to that station and begin to play.
Note: If no station has been stored under the preset, the display will
change to "EMPTY P1" and then revert to the previously selected
station after a few seconds.
1.7 Display information
Press the “Display” button to show the extra information of the station
while you are listening.
TIME: Sync time with the station
7
CHANNEL FREQUENCY: Display channel frequency
STATION LOCALITY: Display DAB+ radio broadcast place
VERSION: Display DAB+ radio station version information
2. Using the menu key under DAB+ mode
The "MENU" button enables you to change some of the default
settings of your Radio, so that it works just the way you want it to. Use
" " to confirm your choose, use "◄◄"or "►►" to scroll through the
menu list.
2.1 For DAB+ mode, the main menus are as below
2.1.1 MANUAL
With DAB+ radio, additional stations and services regularly become
available so it's a good idea to carry out a manual scan every now and
then to make sure that you have the most up to date station listing
stored within the memory of your radio. If you have moved your radio
to another location, eg: if you go on holiday, then it" s also a good idea
to carry out a manual scan.
As well as an auto tune function, you can manually tune the receiver.
This can help you when aligning your aerial or when adding stations
that were missed while auto tuning.
” and use
Press “Menu” key enter “Manual” mode and press “
"◄◄"or "►►” to move through the DAB+ CHANNELS, which are
numbered from 5A-13F.
2.1.2 LOC SCAN
Local Scan searches the all the local stations in your area. Sometime a
National or Full scan required if your living area does not provide local
stations.
2.1.3 FULL SCAN
Full scan is an auto scan by searching all available stations around
your area.
2.1.4 CLOCK
8
Display sync time of the DAB radio station. Under CLOCK information,
press” t” and use "◄◄"or "►►" to scroll between AUTO COLOCK
or MANU CLOCK to adjust CLOCK time
2.1.5 12/24 H
Choose to display time under 12/24 hours mode.
3. System reset
Press and hold the “DAB+/FM” button for 3 seconds. The LED display
will show” RESET”. Press “ ” button to confirm after that the radio is
back to original factory settings and all previous settings in the radio
are eliminate.
It is often use when your DAB+ radio is crushed or change to another
DAB+ Country or other DAB+ locations rather than your previous
settings.
4. FM radio functions
4.1 Switching between FM/DAB+
Just press the “DAB+/FM” button to switch between FM or DAB+ radio
as you like
4.2 Display mode
Press the “Display” button to show the FM radio “CH FREQ” and
“VERSION”
4.3 Scan mode
Press the “SCAN” button, the FM radio will automatically increase the
frequency. Once a station is found, the radio will stop automatically.
To scan up frequency, you need to press “
down frequency, you need to press “
9
” button +"►►". To scan
” button +"◄◄"
4.4 Signal Not Available
When there is no signal received after the FULLSCAN has been done,
the display will show “OFF AIR”. It may due to weak station signal.
Please check if Antenna has been pulled out and try to do the scan
again.
5. Product Q&A
If you are experiencing problems with your DAB+ radio there are some
quick and easy checks that you can do, which may help to solve the
problem.
Radio reception is poor
-Please check that the aerial is extended for the maximum signal
strength and improved reception.
-Use the manual tune (see 2.2), to adjust your aerial for the best
reception.
-Try moving your radio to an alternative location to see if the
reception improves Please remember to scan for DAB+ stations
again once you have moved your radio See 2.2
-Check that you do not have other electrical equipment too close to
your radio, causing interference.
-Visit www.digitalradioplus.com.au for information about DAB+
reception in your area.
No sound or No power
-Adjust the volume using the "Vol+” button
-Please check that the mains power lead is connected at the back of
the radio and the mains power wall socket is switched on
-If you use the battery, make sure the batteries get enough power to
drive the device
Visit www.mbeat.com.au for more products information
10
6. Warranty registration
To receive the full support of your product, please register your product
and your details with our distributor in your country, for Australian user,
go to www.ultra-imagiantion.com , click product registration page to fill
out the details.
Join us at facebook™, by searching “ultraimaginationtechnology” for
our distributor information or “mbeat” for mbeat® information. Keep
updating with product information and you have the chance to win the
monthly prize or free gift from us.
11