1
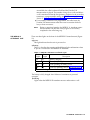
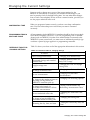
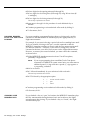
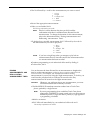
AT&T
®
MERLIN II
COMMUNICATIONS SYSTEM
MERLIN II Attendant
User’s Guide
©1990 AT&T
All Rights Reserved
Printed in USA
Issue 4
January, 1990
N O T I C E
The information in this document is subject to change without notice. AT&T assumes no responsibility
for any errors that may appear in this document.
MERLIN is a registered trademark of AT&T.
To order copies of this document, call the AT&T Customer Information Center, 1-800-432-6600 and
include the document number 999-504-140 with your order.
Contents
MERLIN II Attendant User’s Guide
FCC Notification Information
Section 1: Overwiew
Introduction
The MERLIN II Attendant
1-1
1-2
Section 2: Changing the Current Settings
Changing the Current Settings
2-1
Section 3: Troubleshooting
Troubleshooting
Index
3-1
FCC Notification Information
INTERFERENCE
INFORMATION
Federal Communications Commission (FCC) Rules require that you be
notified of the following:
●
This equipment generates, uses, and can radiate radio frequency energy
and, if not installed and used in accordance with the instructions in this
manual, may cause interference to radio communications.
●
This equipment has been tested and found to comply with the limits for a
Class A computing device pursuant to Subpart J of Part 15 of FCC rules,
which are designed to provide reasonable protection against such
interference when operated in a commercial environment.
●
Operating this equipment in a residential area is likely to cause
interference with radio communications, in which case the user, at his or
her own expense, will be required to do whatever is necessary to correct
the interference.
●
The MERLIN 11 Attendant is designed to be connected to a Basic (012)
Telephone Module of the MERLIN II system control unit. It is not
intended to be connected directly to the network.
●
The MERLIN II Attendant is a separately registered device.
FCC registration number: GRM3U8-19187-CIE
PROBLEMS AND REPAIRS
If you have a problem with the MERLIN II Attendant, or if you need repair
information that is not provided in the w Troubleshooting Section w of this
guide, please call the AT&T National Service Assistance Center at 1-800-6282888.
FCC Notification Information 1
Introduction
This User’s Guide explains how the MERLIN II Attendant works and how to
change initial settings. To use the MERLIN II Attendant:
❑
Complete the MERLIN II Attendant planning forms.
● Planning
Form A—Business Days
● Planning
Form B—Business Hours
● Planning
Form C—Announcement Time Reallocation
● Planning
Form D—Announcement Recordings
● Planning
Form E—Routing Plan
● Planning
Form F—Supervised Transfer Operations
● Planning
Form G—Blind Transfers
● Planning
Form H—Call Processing Options
● Planning
Form I—Individual Changes
NOTE:
❑
If you need planning forms, order them from the AT&T
Customer Information Center, 1-800-432-6600. The document
order number is 999-504-139.
Have the MERLIN II Attendant installed by an authorized AT&T
technician who has completed the following procedures:
● Administered
a port on a Basic Telephone (012) Module for each
MERLIN II Attendant
● Programmed
● Recorded
❑
your business schedule and route plans
your announcements
Be sure you know your authorized caller code. See “Changing the
Authorized Caller Code” in Section 2, “Changing the Current
Settings” for more information about this code.
Introduction 1-1
The MERLIN II Attendant
The MERLIN 11 Attendant answers incoming calls on designated lines with a
prerecorded message and directs the calls to the appropriate extension in your
MERLIN II Communications System Release 3. The MERLIN II Attendant can
help your business by answering calls immediately or after a delay to assist a
busy receptionist. It can also answer calls when your company is closed for
holidays and weekends, and after normal business hours.
NOTE:
To avoid confusion between a human attendant and the MERLIN II
Attendant, this document refers to the human attendant as the
receptionist.
A prerecorded announcement can provide callers with “Announcements”
information on how to reach certain departments or people within your
company. Generally, a list of one digit numbers, known as routes, is
provided so that callers can dial the department they need with the touch of a
button. If appropriate, the announcement can also give callers the option to
enter two to four digit extension numbers to reach employees directly.
For example, during normal business hours a car dealership directs customer
calls to the MERLIN II Attendant so that callers hear the Day announcement
which offers the following options:
“Thank you for calling ABC Motors...
For Sales, dial 1...
For Service, dial 2...
For Parts, dial 3...
For the receptionist, dial O...
For a specific employee, dial the extension
or hold for operator assistance. ”
NOTE:
In the above example, the numbers 1, 2, 3, and O are routes.
After the car dealership closes, calls are answered immediately by the
MERLIN II Attendant and the Night announcement is played:
“Thank you for calling ABC Motors.
Our sales hours are 10:00 a.m. to 6:00 p.m. Monday through Saturday.
If you are calling our Service Department, dial 1 now.
If you know the extension number of the person you are calling, dial
that number now. ”
If a caller does not enter a route or extension because he or she is calling from
a rotary phone or does not know the extension, the call is automatically
directed to the receptionist after a specified number of seconds (2 to 5). You
can select the number of seconds by using the “Call Processing Options”
described in Section 2, “Changing the Current Settings”.
Callers using Touch-Tone phones can also bypass the announcement by
diaIing the route or extension they want at any time during the message.
Their calls are transferred immediately to the route or extension number they
have selected.
DAY AND NIGHT
ANNOUNCEMENTS
1-2 The MERLIN II Attendant
You can choose from two different announcements (Day or Night) to play to
callers when the MERLIN II Attendant answers incoming calls. Both the Day
announcement and Night announcement can direct calls to up to nine
different routes (1 through 9, 0 is reserved for the receptionist). Additionally,
these announcements can offer callers the option to dial individual extension
numbers, which can be from two to four digits.
Depending on your business hours, you can allow callers to dial a route or an
extension number when your business is open (Day announcement), then
provide information such as business hours when your business is closed
(Night announcement). If your business operates 24-hours a day, you can use
just the Day announcement. Here are two examples:
Use of both Day and Night Announcement
ABC Company office hours are 8:30 a.m. to 5:00 p.m. Monday through
Friday. Callers who dial the business’ toll free number hear the Day
announcement when the MERLIN II Attendant answers. The Day
announcement instructs callers to enter a route number (1 through 9) to reach
a specific department or an extension number to contact a particular
individual. Callers who call after 5:00 p.m. or on the weekends hear the
Night announcement when the MERLIN 11 Attendant answers. The Night
announcement provides the regular office hours and allows callers to dial
extension numbers to connect with employees who are working after-hours.
Use of the Day Announcement Only
XYZ Company has 24-hour sales and customer service departments. Callers
on lines answered by the MERLIN II Attendant hear the Day announcement
no matter what time they call. The Day announcement offers callers a choice
between entering the route number for sales (1) or for customer service (2).
CALL HANDLING
There are three types of call handling available with the MERLIN II
Attendant:
●
Immediate Call Handling
Immediate call handling can be set up so that the MERLIN II Attendant
answers these kinds of calls:
• All incoming calls on all lines. The receptionist is only required to
help callers who have a rotary telephone or who need additional
assistance.
• All incoming calls on specified lines.
●
Backup Call Handling
Calls are answered by the MERLIN II Attendant only when the
receptionist is unable to answer within a specified number of rings (2 to
6). To set the number of rings, see “Call Processing Options” in Section
2, “Changing the Current Settings”.
●
Night Service
Using the MERLIN II system feature, Night Service with Time Set, you
can synchronize the clocks on the control unit and the MERLIN II
Attendant so that the Night announcement plays whenever you indicate
that your business is closed. After-hours callers can be given the option to
dial a route number, an extension number, or leave a message on an
answering machine. Or the Night announcement can simply provide the
normal business hours and disconnect without giving callers the option to
dial an entry.
The MERLIN II Attendant 1-3
ALL TRANSFER
There are two ways to transfer calls with the MERLIN II Attendant:
●
Blind Transfer
The MERLIN II system control unit monitors the call after the MERLIN II
Attendant transfers the caller to the route or extension number dialed. If
the number is busy or the route or extension number is invalid, the call is
transferred to the receptionist. Likewise, if the call is unanswered after a
specified number of rings, the call rings at both the receptionist position
and at the original number until it is answered or the caller hangs up.
The blind transfer method should be used unless there is another route or
extension number that callers can logically choose if the first number they
select is unavailable. For example, a caller to a car dealership who needs
to make an appointment to have a car serviced would not want to talk to
the sales department if the service department is busy.
●
Supervised Transfer
During a supervised transfer, calls are monitored by the MERLIN II
Attendant until the call is completed or the caller hangs up. When a caller
enters a route or extension number, the Hold announcement plays
informing the caller to hold while the transfer is being completed. If the
route or extension number dialed is available, the Connect announcement
informs the person at the extension dialed that a call is being transferred.
If the route or extension is unavailable, the Transfer Fail announcement
plays to inform the caller that the call could not be completed. Sample
messages are shown below:
Hold announcement
This announcement informs callers to hold until the transfer is
completed.
Example: "Please hold while your call is being transferred.”
Transfer Fail announcement
This announcement informs the caller when a call cannot be
completed.
Example: *The extension you requested is busy. Please hold or dial another
extension. ”
Connect announcement
This announcement informs the person at the extension dialed that a
call is being transferred.
Example: “A call is being transferred to you. ”
NOTE:
You can also record an announcement that provides business
hours or related information then disconnects without giving
callers the option to enter a route or extension.
When a call is not answered or the extension is busy, the MERLIN 11
Attendant retrieves the call and handles it one of two ways:
If another extension is programmed, supervised transfer should be
used so that the MERLIN II Attendant can transfer the call to a
secondary extension when the first (primary) extension is unavailable.
When callers enter a route or extension number, the Hold
announcement plays, and their calls are transferred to the first
(primary) extension. If the first (primary) extension is busy or does
not answer, the MERLIN II Attendant dials the secondary extension
while the caller remains on hold. If the secondary extension is also
1-4 The MERLIN II Attendant
unavailable, the caller is taken off hold and the Transfer Fail
announcement is played. The number of rings (2 to 6) allowed before
a call is transferred from the first (primary) extension to the secondary
extension is a programmable setting, see “Call Processing Options” in
Section 2, ‘Changing the Current Setting”.
●
If a secondary extension is not programmed, the caller hears the
Transfer Fail announcement when the route or extension dialed is
busy or does not answer.
NOTE:
THE MERLIN II
ATTENDANT UNIT
During a supervised transfer, the MERLIN 11 Attendant cannot
answer another call until the call in progress is successfully
completed or the caller hangs up.
There are three lights on the front of the MERLIN II Attendant unit (Figure
l-l):
●
power
This light indicates that the unit is powered on.
●
battery
Table 1-1 describes the meaning of the different light combinations when
ac power is connected to the MERLIN II Attendant:
TABLE 1-1 MERLIN II Attendant Front Panel Lights.
Power
Light
On
On
Battery
Light
Off
On
Description
Battery charging
Battery fully charged
Off
On
Unit operating on battery power
Off
Off
Unit not operating; refer to “Troubleshooting”
On
I Blinking I Out of Service code; refer to “Troubleshooting.”
The battery is fully charged after 18 hours of continuous ac powered
operation.
●
talking
Lights when the MERLIN II Attendant answers and monitors a call.
The MERLIN II Attendant 1-5
MERLIN® II
Lights when ac
power is on ,
o
.
0
Blinking Iight indicates
a probl em. See
“Troubleshooting’*
Attendant
o
Lights when
MERLIN II
Attendant
answers and
monitors calls
Steady light indicates
battery is fully charged
(when power light is on)
Light off when battery
is not fully charged
FIGURE 1-1 Front view of the MERLIN II Attendant.
FIGURE 1-2 Back view of the MERLIN II Attendant.
Refer to Figure 1-2 for a diagram of the back of the MERLIN II Attendant unit
and to the following paragraphs for its description.
reset
This recessed button resets the MERLIN II Attendant. See
“Troubleshooting” for details.
setup switches
There are four setup switches. Switches 1, 2, and 3 control the MERLIN 11
Attendant’s response to a power outage; switch 4 is not used.
1-6 The MERLIN II Attendant
TABLE 1-2 Setup Switches
Switch
On (Down)
Off (up)
1
Recorded announcements
are retained up to three
hours during a power
outage
Recorded announcements
are erased when a power
outage occurs
2
Routes and other
programming parameters
are retained during a
power outage -
Routes and other
programming parameters
are reset to defaults when
a power outage occurs
3
The MERLIN II Attendant
continues to answer calls
during a power outage
The MERLIN II Attendant
does not answer calls
during a power outage
4
Not Used
Not Used
CAUTION:
Before disconnecting ac power from the MERLIN II Attendant,
be sure that switches 1 and 2 are on (down). With this setting,
the MERLIN II Attendant is placed on battery power so that your
recorded announcements are saved up to three hours during a
power outage (assuming the battery is fully charged) and routing
plans and programming parameters are retained up to eight
weeks.
●
10 VAC
This is the power connector.
●
serial i/o
This is for diagnostic tests by an authorized AT&T technician.
●
audio out
Not used
●
reserved
Not used
●
to line
This connects the MERLIN II Attendant with the Basic Telephone (012)
Module on the MERLIN II system control unit.
.
The MERLIN II Attendant 1-7
Changing the Current Settings
You may need to change one or more of the current settings for the
MERLIN 11 Attendant if, for example, your business hours change or you
need to reset the clock for daylight saving time. You can make these changes
from a Touch-Tone telephone on-site or from a remote location, provided you
use the proper authorized caller code.
CONFIRMATION TONE
When you program a feature correctly, you hear a two-beep confirmation
tone. You hear a three-beep error tone when you enter a command
incorrectly.
PROGRAMMING FROM A
MULTILINE PHONE
All programming for the MERLIN 11 Attendant should be done from a singleline Touch-Tone phone. However, if you are programming from a multiline
phone (such as a MERLIN 11 system voice terminal) that is connected to the
MERLIN II system control unit, you must enter an additional pound (#) sign
each time a pound (#) sign appears in a programming command.
REFERENCE TABLE FOR
CHANGING SETTINGS
Table 2-1 shows you where to find the appropriate information in this section.
TABLE 2-1 Reference Table for Changing Settings
Refer to
In case of
Office closings and holidays
“Changing Your Business Days”
Unexpected closings and extended
business hours
“Changing Business Hours for
Early/Late Closings”
daylight savings time
“Changing the Clock for Daylight
Saving Time”
I
A change in business hours
“Changing Your Business Hours”
A new announcement
“Changing Your Recorded
Announcements”
A change in the number of times an
incoming call rings before the
MERLIN II Attendant picks up
“Changing Call Processing Options”
A change in the length of a
recorded announcement or all new
recorded announcements
“Erasing Announcements and
Reallocating Announcement Times
A new authorized caller code
“Changing the Authorized Caller
Code”
A change in how the MERLIN II
Attendant handles incoming calls
“Changing the Routing Plan”
Resetting the day, date, and time
“Setting the Current Day, Date, and
Time”
n
.
Changing the Current Settings 2-1
CHANGING THE
AUTHORIZED CALLER
CODE
To prevent unauthorized changes to recorded announcements or programmed
settings, an authorized caller code must be entered before any changes can be
made to the programming of the MERLIN II Attendant. The default code
number is 789 but it can be changed to any sequence of numbers from one to
20 digits in length. Follow the procedure below to change the code:
1 Dial
the MERLIN II Attendant extension number from a Touch-Tone
phone, preferably a single-line set.
NOTE:
If you are programming from a multiline Touch-Tone phone
connected to the MERLIN II system control unit, you must enter
an additional pound ( # ) sign each time a pound ( # ) sign appears
in a programming command.
2 Wait
for an answer.
3 Dial
*6 followed by the current authorized caller code and #.
The two-beep confirmation tone sounds.
4 Dial
*6 followed by the new authorized caller code you have chosen.
5 Dial
#.
The two-beep confirmation tone sounds.
6 Enter
7 Dial
the new authorized caller code again.
# to confirm the new authorized caller code.
The two-beep confirmation tone sounds.
8 Continue
9 To
SETTING THE CURRENT
DAY, DATE, AND TIME
programming or exit authorized caller mode by dialing *#.
disconnect, dial #.
Refer to the following instructions to set the current day, date, and time for
the MERLIN II Attendant clock.
NOTE:
If you have never set the MERLIN 11 Attendant clock or if you have
lost your programming due to a power failure, the date is set to
01/01/80, the time is set to zero, and the MERLIN 11 Attendant will be
in Day mode (Day announcement with Day routing plan) until the
clock is reset.
1 Dial
the MERLIN II Attendant extension number from a Touch-Tone
phone, preferably a single-line set.
NOTE: If you
are programming from a multiline Touch-Tone phone
connected to a MERLIN II system control unit, you must enter an
additional pound ( # ) sign each time a pound ( # ) sign appears in
a programming command.
2 Wait
3 Dial
for an answer.
* followed immediately with your authorized caller code and #.
The two-beep confirmation tone sounds.
4 Dial
*71 followed by a code for the current day of the week.
1
2
3
4
5
6
7
2-2 Changing the Current Settings
= Sunday
= Monday
= Tuesday
= Wednesday
= Thursday
= Friday
= Saturday
5 Dial
two digits for the month (0l through 12).
6 Dial
two digits for the day (01 through 31).
7 Dial
two digits for the year (00 through 99).
8 Dial
two digits for the hour (00 through 23) using 24-hour time (00 is
midnight).
9 Dial
two digits for the minute (00 through 59).
10 Dial
two digits for the seconds (00 through 59).
11 Dial
# to set the clock with the current day, date and time.
The two-beep. confirmationn tone sounds.
12 Continue
13
CHANGING YOUR
BUSINESS HOURS
programming or exit authorized caller mode by dialing * #.
To disconnect, dial #.
The MERLIN II Attendant maintains an opening and closing time for each
day of the week, even if your business is closed one or more days of the
week. See “Changing Your Business Days” for information about holidays.
Business hours are entered in 24-hour format (hours and minutes) and are
preset to be open 8:30 a.m. to 5:00 p.m. Monday through Friday. Whenever
you indicate that your business is open, the MERLIN II Attendant answers
with the Day announcement. Likewise, whenever you indicate that your
business is closed, the MERLIN II Attendant answers with the Night
announcement.
NOTE:
If your business is normally open on Saturday and Sunday, be sure
to indicate those days as “open” as described under n Changing Your
Business Days.”
To change the business hours, follow the instructions below:
1 Dial
the MERLIN II Attendant extension number from a Touch-Tone
phone, preferably a single-line set.
NOTE:
2
If you are programming from a multiline Touch-Tone phone
connected to a MERLIN II system control unit, you must enter an
additional pound ( # ) sign each time a pound ( # ) sign appears in
a programing command.
Wait for an answer.
3 Dial
* followed immediately by your authorized caller code and #.
The two-beep confirmation tone sounds.
4 Dial
* 73 followed by a code for the day of the week.
1 = Sunday
2
3
4
5
6
7
9
=
=
=
=
=
=
=
Monday
Tuesday
Wednesday
Thursday
Friday
Saturday
entire week
.
5 Dial
two digits for the opening hour (00 through 23) using 24-hour time
(00 is midnight).
Changing the Current Settings 2-3
6 Dial two digits for the opening minute (00 through 59).
7 Dial
two digits for the closing hour (00 through 23) using 24-hour time (00
is midnight),
8 Dial
two digits for the closing minute (00 through 59).
The two-beep confirmation tone sounds.
9 Repeat
steps 4 through 8 of this procedure for each additional day as
needed.
10 Continue programming or exit authorized caller mode by dialing *#.
11 To
CHANGING BUSINESS
HOURS FOR EARLY/LATE
CLOSINGS
disconnect, dial #.
If you are extending your normal business hours or closing early, use this
command so that the MERLIN II Attendant plays the appropriate Day or
Night announcement.
For example, if your store is having a special sale and is extending hours until
11:00 p.m. instead of closing at 9:30 p.m., use this command so that the
MERLIN II Attendant continues to answer with the Day announcement until
you indicate otherwise. Likewise, if your office is closing early, use this
command at the time your office closes to turn on the Night announcement.
However, to resume your normal schedule, you must cancel this command,
as shown below:
1 Dial the MERLIN II Attendant extension from a Touch-Tone phone,
preferably a single-line set.
NOTE:
2 Wait
3 Dial
If you are programming from a multiline Touch-Tone phone
connected to a MERLIN II system control unit, you must enter an
additional pound ( # ) sign each time a pound ( # ) sign appears in
a programing command.
for an answer.
* followed immediately by your authorized caller code and #.
The two-beep connation tone sounds.
4 Dial
*75 followed by the appropriate option:
1
=
=
2
=
o
5 Continue
6 To
CHANGING YOUR
BUSINESS DAYS
2-4 Changing the Current Settings
resume normal schedule
open
closed
programming or exit authorized caller mode by dialing *#.
disconnect, dial #.
If you schedule a day as “open” for business, the MERLIN II Attendant plays
the Day announcement during business hours and switches to the Night
announcement after closing. If you schedule a day as “closed,” the Night
announcement plays.
To schedule for a holiday or business closing on a day that your business is
usually open, use this command to enter the day as “closed” up to six days
before the closing. If you choose the holiday closing, the MERLIN 11 Attendant
automatically resumes your normal schedule at midnight without additional
programming.
1 Dial
the MERLIN 11 Attendant extension number from a Touch-Tone
phone, preferably a single-line set.
NOTE:
2 Wait
If you are programming from a multiline Touch-Tone phone
connected to a MERLIN II system control unit, you must enter an
additional pound ( # ) sign each time a pound ( # ) sign appears in
a programming command.
for an answer.
Dial * followed immediately by your authorized caller code and #.
3
The two-beep confirmaion tone sounds.
Dial *74 followed by a code for the day of the week.
1 = Sunday
4
2
3
4
5
6
7
9
=
=
=
=
=
=
=
Monday
Tuesday
Wednesday
Thursday
Friday
Saturday
entire week
Dial one digit to indicate whether the business is open or closed for the
day entered or if it is closed for a holiday.
5
1 = Open
2 = Closed
3 = Holiday
The two-beep confirmation tone sounds.
CHANGING THE CLOCK
FOR DAYLIGHT SAVING
TIME
6
Repeat steps 4 and 5 of this procedure for each day of the week, as
needed.
7
Continue programming or exit authorized caller mode by dialing * #.
8
To disconnect, dial #.
To adjust the MERLIN II Attendant’s clock by one hour (for Daylight-Savings
Time), use the following instructions.
1 Dial the MERLIN II Attendant extension number from a Touch-Tone
phone, preferably a single-line set.
NOTE: If you are progr amming from a multiline Touch-Tone phone
connected to a MERLIN II system control unit, you must enter an
additional pound ( # ) sign each time a pound ( # ) sign appears in
a programming command.
2 Wait
for an answer.
3 Dial
* followed immediately by your authorized caller code and #.
The two-beep connation tone sounds.
Changing the Current Settings 2-5
4 Dial
*72.
5 Perform
the appropriate procedure:
Dial l to add one hour to the current time (normally used in the spring
to begin Daylight-Savings Time).
Dial 2 to subtract one hour from the current time (normally used in the
fall to cancel Daylight-Savings Time).
The two-beep confirmation tone sounds.
6 Continue
7 To
CHANGING YOUR
RECORDED
ANNOUNCEMENTS
programming or exit authorized caller mode by dialing *#.
disconnect, dial #.
There are five types of recorded announcements available with the MERLIN II
Attendant: Day, Night, Transfer Fail, Hold, and Connect.
The total duration for all recorded announcements for the MERLIN II
Attendant cannot exceed 64 seconds. Each recorded announcement has a default
duration in seconds as follows:
TABLE 2-2 Default Time Allocations for Recorded Announcements
Duration
(Seconds)
Announcement
Day
20
Night
20
Transfer Fail
I
14
Hold
I
5
I
I
Connect
I
5
I
Total
64
When recording announcements be sure to speak clearly, using a normal tone
of voice. When providing route numbers, pause between each one so that
when the message is played the caller has an opportunity to hear the number
he or she needs to enter. If you are transferring your announcements from a
tape recorder, make sure the volume is not set too high.
NOTE:
1
If you exceed the allocated time when recording your announcement,
an error tone is sounded. Always play back your announcements as
indicated in step 7 to be sure they are recorded properly.
Dial the MERLIN II Attendant extension number from a Touch-Tone
phone, preferably a single-line set.
NOTE: If
you are programming from a multiline Touch-Tone phone
connected to a MERLIN II system control unit, you must enter an
additional pound ( # ) sign each time a pound ( # ) sign appears in
a programming command.
2
Wait for an answer.
3
Dial * followed immediately by the authorized caller code and #.
The two-beep confirmation tone sounds.
2-6 Changing the Current Settings
4 Dial *4 followed by a code for the announcement you want to record.
1
2
3
4
5
5 Record
6 When
= Day
= Night
= Transfer Fail
= Hold
= Connect
the appropriate announcement.
you are finished, dial #.
The two-beep confirmation tone sounds.
NOTE:
If there is a delay between the time you dial # and the
confirmation tone there is additional time allocated for this
announcement. To change the duration for this announcement,
refer to the information under “Erasing Announcements and
Reallocating Announcement Times”.
7 To
playback any recorded announcement, dial *5 followed by the code for
the announcement you want to play back.
1
2
3
4
5
NOTE:
8 Continue
9 To
ERASING
ANNOUNCEMENTS AND
REALLOCATING
ANNOUNCEMENT TIMES
= Day
= Night
= Transfer Fail
= Hold
= Connect
If you hear a single beep when you attempt to play back an
announcement, there is time allocated for the announcement but
no announcement has been recorded.
programming or exit authorized caller mode by dialing *#.
disconnect, dial #.
You can decrease the time allocated for an announcement to lengthen the
time for another announcement provided you do not exceed 64 seconds total for all
the announcements. For example, you can add 20 seconds to the Day
announcement if you are not using the Night announcement. To do this, you
would use the procedure below to allocate 40 seconds to the Day
announcement and 00 seconds to the Night announcement.
CAUTION:
Whenever you reallocate time to any announcement, you erase
all announcements that are already recorded.
1 Dial
the MERLIN II Attendant extension number from a Touch-Tone
phone, preferably a single-line set.
NOTE:
If you are programming from a multiline Touch-Tone phone
connected to a MERLIN II system control unit, you must enter an
additional pound ( # ) sign each time a pound ( # ) sign appears in
a programming command.
2 Wait for an answer.
3 Dial
* followed immediately by your authorized caller code and #.
The two-beep confirmation tone sounds.
Chanqing the Current Settings 2-7
4 Dial
* 49.
NOTE:
If you want to erase the announcements without reallocating
time, skip to step 6.
5 Perform
all the steps below even if you are not using all the
announcements. For example, if you do not use the Night announcement,
enter 00. Be sure the total time allocated for all announcements does not
exceed 64 seconds.
a
Dial two digits representing the maximum length in seconds for the
Day announcement.
b
Dial two digits representing the maximum length in seconds for the
Night announcement.
c
Dial two digits representing the maximum length in seconds for the
Transfer Fail announcement.
d
Dial two digits representing the maximum length in seconds for the
Hold announcement.
e
Dial two digits representing the maximum length in seconds for the
Connect announcement.
6 Dial
#.
The two-beep connation tone sounds.
7 Continue
programming or exit authorized caller mode by dialing *#.
8 To disconnect, dial #.
CHANGING THE ROUTING
PLAN
The routing plan determines how your MERLIN II Attendant handles
incoming calls, including where and when calls are transferred. You need to
establish separate routing plans for both your Day announcement and Night
announcement, if applicable.
To change the routing plan you need to identify the business function of each
route number (such as sales, customer service, accounting) and the route (O
through 9) the caller dials to reach an extension.
Once you have established the route numbers and functions, you need to
identify how the MERLIN II Attendant processes calls. Your choices are the
following:
●
Blind Transfer
Calls that are answered by the MERLIN II Attendant are transferred to the
route or extension number dialed by the caller. If the number is busy or
dialed incorrectly, the call is transferred to the receptionist.
●
Supervised Transfer
Calls that are answered by the MERLIN 11 Attendant are transferred to the
route or extension number dialed by the caller. If the number is busy or
dialed incorrectly, the call is transferred to a secondary extension, if
programmed, or Transfer Fail announcement plays.
If you want calls transferred to an secondary extension when the first
(primary) extension is unavailable, program a Day Secondary Extension
number for the route in your Day routing plan and a Night Secondary
Extension number for the route in your Night routing plan.
2-8 Changing the Current Settings
NOTE:
●
During a supervised transfer, the MERLIN II Attendant is
unavailable to answer another call until the call in progress is
successfully connected or the caller hangs up.
Disconnect
Generally used with the Night announcement when a business is closed,
callers on lines answered by the MERLIN 11 Attendant hear the Night
announcement but are not allowed to enter a route or extension number
This transfer code should be programmed for route O, so that after the
announcement plays calls are disconnected automatically without
requiring an entry from the caller.
For example, callers who call the ABC Company after business hours hear
this Night announcement:
Thank you for calling ABC Company.
Our office hours are 9:00 a.m. to 4:00 p.m. Monday through Saturday.
Please call back during those hours.
Refer to your MERLIN II Attendant Planning Form E to plan your routes.
Then use the follow the instructions below for the type of transfer you are
programming.
Changing an Existing Route
To make changes to an existing route (blind or supervised transfer), refer to
Planning Form I and follow the steps below:
1 Dial the MERLIN II Attendant extension number from a Touch-Tone
phone, preferably a single-line set.
NOTE:
If you are programming from a multiline Touch-Tone phone
connected to a MERLIN II system control unit, you must enter an
additional pound ( # ) sign each time a pound ( # ) sign appears in
a programming command.
2 Wait for an answer.
3 Dial * followed immediately by your authorized caller code and #.
The two-beep confirmation tone sounds.
4 Dial *8.
5 Dial the route number (O through 9).
6 Dial the extension code.
NOTE:
Day Secondary Extensions and Night Secondary Extensions are
available only with supervised transfers.
11
12
21
22
=
=
=
=
Day Primay Extension
Day Secondary Extension
Night Primary Extension
Night Secondary Extension
7 Dial the transfer code.
1
2
5
=
=
=
Supervised Transfer
Blind Transfer
Disconnect
Changing the Current Settings 2-9
8 Dial
the extension number where the caller will be connected.
9 Dial ##.
The two-beep confirmation tone sounds.
10 Continue
11 To
programming or exit authorized caller mode by dialing *#.
disconnect, dial #.
Erasing an Existing Route
If you need to eliminate a route you previously programmed, follow the
procedure below:
1
Dial the MERLIN II Attendant extension number from a Touch-Tone
phone, preferably a single-line set.
NOTE:
If you are programming from a multiline Touch-Tone phone
connected to a MERLIN II system control unit, you must enter an
additional pound ( # ) sign each time a pound ( # ) sign appears in
a programming command,
2
Wait for an answer.
3
Dial * followed immediately by your authorized caller code and #.
The two-beep confirmation tone sounds.
4
Dial *8.
5
Dial the route number (0 through 9) you want to erase.
6
Dial the extension code of the route you want to erase.
11
12
21
22
=
=
=
=
Day Primary Extension
Day Secondary Extension
Night Primary Extension
Night Secondary Extension
7
Dial 0, the transfer code for “No Operation. ”
8
Dial ##.
The two-beep confirmation tone sounds.
9
Continue programming or exit authorized caller mode by dialing * #.
10
To disconnect, dial #.
Programming a New Route for Blind Transfer
To program a blind transfer, refer to Planning Form G and follow the steps
below:
1 Dial
the MERLIN II Attendant extension number from a Touch-Tone
phone, preferably a single-line set.
NOTE: If
you are programming from a multiline Touch-Tone phone
connected to a MERLIN II system control unit, you must enter an
additional pound ( # ) sign each time a pound ( # ) sign appears in
a programming command.
2 Wait for an answer.
3 Dial
* followed immediately by your authorized caller code and #.
The two-beep confirmation tone sounds.
2-10 Changing the Current Settings
4 Dial
5
* 8 followed immediately by the route number (O through 9).
Dial the extension code:
11
21
6
=
=
Dial the transfer code:
2
5
7 Dial
=
=
Blind Transfer
Disconnect
the extension number where the caller will be connected.
The extension number for route O should be 720 or an extension
number that is not in your dial plan. This allows calls transferred
to the receptionist to appear on a line button and not on the
receptionist’s intercom button.
NOTE:
8
Day Primary Extension
Night Primary Extension
Dial ##.
The two-beep confirmation tone sounds.
9 Continue
10
programming or exit authorized caller mode by dialing *#.
To disconnect, dial #.
Programming a New Route for Supervised Transfer
To program a supervised transfer, refer to Planning Form F and follow the
steps below:
1 Dial the MERLIN II Attendant extension number from a Touch-Tone
phone, preferably a single-line set.
NOTE:
2
If you are programming from a multiline Touch-Tone phone
connected to a MERLIN 11 system control unit, you must enter an
additional pound ( # ) sign each time a pound ( # ) sign appears in
a programming command.
Wait for an answer.
3 Dial
* followed immediately by your authorized caller code and #.
The two-beep confirmation tone sounds.
4 Dial * 3 followed by a route number (O through 9 ) and the Day Primary
Extension number.
NOTE: The
extension number for route O should be 720 or an extension
number that is not in your dial plan. This allows calls transferred
to the receptionist to appear on a line button and not on the
receptionist’s intercom button.
5
Dial #.
6 Dial
7
the Day Secondary Extension number.
Dial #.
8 Dial
the Night Secondary Extension number.
9 Dial #.
.
The two-beep confirmation tone sounds.
Changing the Current Settings 2-11
10 Continue
programming or exit authorized caller mode by dialing *#.
11 To disconnect, dial #.
CHANGING CALL
PROCESSING OPTIONS
This section contains a list of ringing options and time delays that you can
adjust for your business’ needs. It also lists several options to improve call
processing of extension numbers.
If you offer callers the option to enter individual extension numbers so that
they can be connected to employees’ telephones directly without being
transferred by the receptionist, these commands can improve the processing
of those calls. Call transfers to extensions can be expedited when the
MERLIN II Attendant knows which extensions are valid in your MERLIN II
system and what the number of digits are in an extension (two to four). For
example, if you indicate that only 2-digit extension numbers ranging from 10
to 55 are available in your system, once a caller enters two numbers, the
MERLIN 11 Attendant quickly determines if the extension number is valid and
immediately transfers the call without -waiting for further input from the
caller.
NOTE:
Occasionally a MERLIN II system may have extension numbers
composed of various numbers of digits. For example, a system may
include extension numbers 29 (a two-digit extension) and 2489 (a
four-digit extension). In systems for which the number of digits is
mixed, you must set the “Extension Digits” Call Processing Option to
19. “Lowest Extension” and “Highest Extension” Call Processing
Options cannot be used when “Extension Digits” is set to 19.
Table 2-3 gives a description of the call processing options, the default setting
for each one, and the possible settings you can use. The last column can be
used to record the current setting. Refer to Planning Form H and the
programming instructions following the table to change any of the values
listed.
2-12 Changing the Current Settings
TABLE 2-3 Call Processing Options
2901
Day Answer Delay
In Day mode, number of rings before the
MERLIN II Attendant answers an incoming call.
2902
Night Answer Delay
In Night mode, number of rings before the
MERLIN 11 Attendant answers an incoming call.
If not using Night mode, set to 15.
2903
Dialing Delay
2904
Extension Delay
2916
Number of seconds after an announcement that
a caller has to dial a route or extension before
the call is transferred to the receptionist.
Number of rings allowed for an extension to
answer before the call is transferred to the
‘receptionist.
The number of digits in an extension. If all
phones in your system have 2-digit extensions,
set to 2. If all phones in your system have 3digit extensions, set to 3, etc. For systems with
various numbers of digits in their extension
numbers (e. g., 2- and 3-digit extension
numbers), YOU must set to 19
Extension Transfer
9709
Lowest Extension
Indicates how extension number calls are
transferred. If blind transfer (2) is selected,
when an extension dialed is busy or does not
answer, the call is transferred to the
receptionist. If supervised transfer (1) is
selected, when an extension dialed is busy or
does not answer, the caller hears the Transfer
Fail announcement.
Identifies the lowest valid extension number in
the range available in your system. (Do not set
for systems with mixed numbers of extension
digits. See “Extension Digits. ” )
9710
1
1–15
2
2–5
4
2–6
I
Extension Digits
2918
1
Possible
Settings
1 –5
Default
Setting
Option/
Description
Program
Code
Highest Extension
.
I
2
2–4
or
19
1
1–2
—
—
_
_
Identifies the highest valid extension number in
the range available in your system. (Do not set
for systems with mixed numbers of extension
digits. See “Extension Digits. ” )
Changing the Current Settings 2-13
To change any of these Call Processing Options:
1
Dial the MERLIN II Attendant extension number from a Touch-Tone
phone, preferably a single-line set.
NOTE:
If you
are programming from a multiline Touch-Tone phone
connected to a MERLIN II system control unit, you must enter an
additional pound ( # ) sign each time a pound ( # ) sign appears in
a programming command.
2
Wait for an answer.
3
Dial * followed immediately by your authorized caller number and #.
The two-beep combination tone sounds.
4
Dial * followed by “Program Code” shown on Table 2-3.
2901
2902
2903
2904
2916
2918
9709
9710
=
=
=
=
=
=
=
=
Day Answer Delay
Night Answer Delay
Dialing Delay
Extension Delay
Extension Digits
Extension Transfer
Lowest Extension
Highest Extension
5
Dial the number you have entered under “Current Setting”.
6
Dial #.
The two-beep confirmation tone sounds.
NOTE:
Commands 9709 and 9710 require an additional # to enter.
7
Continue programming or exit authorized caller mode by dialing * #.
8
To disconnect, dial #.
2-14 Changing the Current Settings
Troubleshooting
OUT-OF-SERVICE CODES
When the MERLIN II Attendant detects a problem, the unit enters an out-ofservice state and will not answer calls. The light labeled “Battery” on the front
of the unit blinks up to ten times, pauses, then repeats the pattern.
NOTE:
A single blink indicates that time is allocated for announcements but
no announcements have been recorded or they have been erased.
To restore normal operation, use a straightened paper clip to press the
recessed RESET button on the back panel of the MERLIN II Attendant. This
procedure does not result in any loss of programmed options or recorded
announcements. If the problem reoccurs, count the number of times the
Battery light blinks (one to ten) then call your authorized AT&T technician.
POWER FAILURES
When setup switches 1 and 2 on the back of your MERLIN II Attendant are
set to on (down), the MERLIN II Attendant can maintain all of its
programming information up to eight weeks after interruption of power.
However, recorded announcements remain only up to three hours during a
power failure (provided the battery is fully charged at the time of the power
outage).
If power is interrupted for more than three hours, you must rerecord all of
your announcements once power is restored. Refer to MERLIN II Attendant
Planning Form D for the information and programming instructions.
If you are using the MERLIN II Attendant for backup call handling and power
is interrupted to the MERLIN II system control unit, you should reactivate the
privacy feature to prevent call contention between the MERLIN 11 Attendant
and the receptionist.
To activate the privacy feature:
LOST AUTHORIZED
CALLER CODE
1
Be sure switches 1 and 2 on the back of the MERLIN 11 Attendant are on
(down).
2
Unplug the MERLIN II Attendant from the power source.
3
At the MERLIN II system control unit, disconnect the first MERLIN II
Attendant from the Basic Telephone (012) Module.
4
Plug a basic Touch-Tone telephone into that same port.
5
Lift the handset.
6
Dial #31 to activate the privacy feature.
7
Hang up the handset.
8
Reconnect the MERLIN II Attendant to its port on the Basic Telephone
(012) Module.
9
Plug the MERLIN 11 Attendant into the ac power outlet.
10
Repeat these steps for each MERLIN II Attendant.
If the default authorized caller code (789) is changed and the new code is lost
or forgotten, the default code can be restored. However this procedure also
restores all the MERLIN 11 default settings so that any programmed setting
you changed must be reentered and all announcements must be rerecorded.
Troubleshooting 3-1
To restore the default code:
3-2 Troubleshooting
1
On the back of the MERLIN II Attendant, set switches 1 and 2 to off (up).
2
Unplug the MERLIN 11 Attendant from ac power.
3
Wait 30 seconds.
4
With switches 1 and 2 still off (up), plug the MERLIN II Attendant back
into its power source.
5
Reset switches 1 and 2 to on (down).
6
Use the appropriate MERLIN II Attendant Planning Forms to reprogram
your settings and rerecord your announcements.
Index
A
ac power, 1-7
Announcements, 3-1
changing, 2-6 – 2-7
Day, 2-3
duration, 2-6
erasing, 2-7 – 2-8
Night, 2-3
playing back, 2-6, 2-7
reallocating allotted time, 2-7 – 2-8
Audio out, 1-7
B
Backup call handling, 1-3
Basic Telephone (012) Module, 1-7
Battery light, 1-5, 3-1
Blind transfer, 1-4, 2-8, 2-10 – 2-11
Business days, changing, 2-4- 2-5
Business hours, changing, 2-3 – 2-4
Button, reset, 3-1
C
Call handling, 1-3- 1-5
Call processing options, 1-2, 1-3, 1-5
changing, 2-12 – 2-14
Call transfer, 1-4
Caller code, 3-1- 3-2
changing, 2-2
Changing
announcements, 2-6- 2-7
business days, 2-4 – 2-5
business hours, 2-3-24
call processing options, 2-12 – 2-14
settings (reference table), 2-1
Clocks, 1-3
changing for Daylight-Savings Time, 2-5 – 2-6
setting, 2-2 – 2-3
Confirmation tone, 2-1
Connect announcement, 1-4
Connectors, 1-7
D
Day announcement, 1-2 – 1-3, 2-3
for late closing, 2-4
Day answer delay, 2-13
Day mode, 2-2
Day Secondary Extension number, 2-8, 2-9
Daylight-Savings Time, 2-5 – 2-6
Dialing delay, 2-13
Disconnect, 2-9
E
Erasing an existing route, 2-10
Erasing announcements, 2-7- 2-8
Error tone, 2-1
Extension numbers, 1-2
F
I
Immediate call handling, 1-3
Invalid, route or extension number, 1-4
L
Lights
battery, 1-5, 3-1
meaning of, 1-5
power, 1-5
talking, 1-5
N
Night announcement, 1-2 – 1-3, 2-3
for early closing, 2-4
Night answer delay, 2-13
Night Secondary Extension number, 2-8, 2-9
Night Service, 1-3
0
Out-of-service codes, 1-5, 3-1
P
Planning forms, 1-1
Playing back announcements, 2-6, 2-7
Power
connector, 1-7
disconnecting, 1-7
failure, 2-2, 3-1
light, 1-5
Primary extension, 1-4
Privacy feature, 3-1
R
Reserved, 1-7
Reset button, 1-6, 3-1
Ringing options, changing, 2-12 – 2-14
Rotary phone, 1-2, 1-3
Routes, 1-2
Routing plan
changing an existing route, 2-9 - 2-10
erasing an existing route, 2-10
programming for blind transfer, 2-10 – 2-11
programming for supervised transfer, 2-11 – 2-12
S
Secondary extension, 1-4, 1-5
Serial i/o ; 1-7
Settings, changing (reference table), 2-1
Setup switches, 3-1
Supervised transfer, 1-4, 2-8 - 2-9, 2-11 - 2-12
T
Talking light, 1-5
To line, 1-7
Touch-Tone phones, 1-2
Transfer Fail announcement, 1-4, 1-5
FCC Notification Information, 1
Front panel, 1-5
H
Hold announcement, 1-4
Index l - 1
999-504-140