1
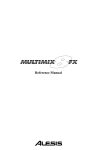
REFERENCE MANUAL
Alesis airSynth Reference Manual
© Copyright 2001, Alesis Studio Electronics, Inc. All rights reserved.
Reproduction in whole or in part is prohibited. “airSynth” and “Axyz”
are trademarks of Alesis Studio Electronics, Inc. “Axyz” technology is
patent pending.
ALESIS CONTACT INFORMATION
Alesis Studio Electronics, Inc.
1633 26th Street
Santa Monica, CA 90404
USA
Do not use this address for repair service.
Telephone:
E-Mail:
Website:
2
800-5-ALESIS (800-525-3747)
[email protected]
www.alesis.com
AIRSYNTH REFERENCE MANUAL
CONTENTS
Important Safety Instructions...................................................... 5
Safety symbols used in this product .........................................................................5
Please follow these precautions when using this product:..........................................5
Instructions de Sécurité Importantes (French) ...........................................................7
Symboles utilisés dans ce produit ............................................................................7
Veuillez suivre ces précautions lors de l’utilisation de l’appareil: ...............................7
Beim Benutzen dieses Produktes beachten Sie bitte die folgenden
Sicherheitshinweise: (German).................................................................................9
CE Declaration of Conformity..................................................................................10
INSTRUCTIONS TO THE USER (FCC compliance)...................................................11
Quick Start Guide ......................................................................... 13
Step 1: Hook it up ...................................................................................................13
Step 2: Select a Program ..........................................................................................13
Step 3: Have fun .....................................................................................................13
Connections................................................................................... 15
Unpacking and Inspection.......................................................................................15
Basic Connections...................................................................................................15
Connecting to a Stereo Receiver ...................................................................16
Connecting between a CD Player and a Stereo Receiver ................................16
Connecting to a Studio Mixer ......................................................................17
Connecting into a DJ System........................................................................18
Mounting on a Microphone Stand................................................................19
Mono Operation .........................................................................................19
Performance ................................................................................. 21
Selecting a Program ................................................................................................21
Using the Axyz™ Controller ...................................................................................22
Effect Hold.............................................................................................................23
Effect Bypass ..........................................................................................................24
Special Programs ....................................................................................................27
Sequencers .................................................................................................27
Pads...........................................................................................................28
Auto-Melody Generators ............................................................................31
The Global Tempo Program ........................................................................31
Troubleshooting ........................................................................... 33
Troubleshooting Index ............................................................................................33
Care and Maintenance ............................................................................................34
Cleaning ....................................................................................................34
Obtaining Repair Service.............................................................................34
Program Chart........................................................................................................36
Specifications................................................................................ 37
Alesis Limited Warranty............................................................... 38
AIRSYNTH REFERENCE MANUAL
3
Introduction
Thank you for purchasing this Alesis airSynth. To take full advantage
of this synthesizer’s functions, and to enjoy long and trouble-free use,
please read this user’s manual carefully.
How to Use This Manual
This manual is divided into the following sections describing the
various functions and applications for the airSynth. Though we
recommend you take time to read through the entire manual once
carefully, those having general knowledge about synthesizers should
use the table of contents to look up specific functions.
Chapter 1: Quick Start. If you want to start using the airSynth right
away, here’s a one-page guide to hooking it up and trying it out.
Chapter 2: Connections. This chapter gives detailed instructions for
connecting the airSynth to a variety of typical sound systems.
Chapter 3: Performance. This section explains how to select programs,
use the Axyz™ Controller, and use the Hold and Bypass functions. It
also explains how to use some of the special programs in the unit.
Chapter 4: Troubleshooting. This chapter contains troubleshooting
tips and service information should problems occur.
✪
4
When something important appears in the manual, an icon (like
the one on the left) will appear in the left margin. This symbol
indicates that this information is vital when operating the
airSynth.
AIRSYNTH REFERENCE MANUAL
IMPORTANT SAFETY
INSTRUCTIONS
Safety symbols used in this product
This symbol alerts the user that there are important operating and
maintenance instructions in the literature accompanying this unit.
This symbol warns the user of uninsulated voltage within the
unit that can cause dangerous electric shocks.
This symbol warns the user that output connectors contain
voltages that can cause dangerous electrical shock.
Please follow these precautions when
using this product:
1. Read these instructions.
2. Keep these instructions.
3. Heed all warnings.
4. Follow all instructions.
5. Do not use this apparatus near water.
6. Clean only with a damp cloth. Do not spray any liquid cleaner onto the
faceplate, as this may damage the front panel controls or cause a
dangerous condition.
7. Install in accordance with the manufacturer's instructions.
8. Do not install near any heat sources such as radiators, heat registers,
stoves, or other apparatus (including amplifiers) that produce heat.
AIRSYNTH REFERENCE MANUAL
5
9. Do not defeat the safety purpose of the polarized or groundingtype plug. A polarized plug has two blades with one wider than the other. A
grounding-type plug has two blades and a third grounding prong. The wide
blade or the third prong are provided for your safety. When the provided
plug does not fit into your outlet, consult an electrician for replacement of the
obsolete outlet.
10. Protect the power cord from being walked on or pinched, particularly at
plugs, convenience receptacles, and the point where they exit from the
apparatus.
11. Use only attachments or accessories specified by the manufacturer.
12. Use only with a cart, stand, bracket, or table designed for use with
professional audio or music equipment. In any installation, make sure
that injury or damage will not result from cables pulling on the apparatus
and its mounting. If a cart is used, use caution when moving the
cart/apparatus combination to avoid injury from tip-over.
13. Unplug this apparatus during lightning storms or when unused for long
periods of time.
14. Refer all servicing to qualified service personnel. Servicing is required
when the apparatus has been damaged in any way, such as when the
power-supply cord or plug is damaged, liquid has been spilled or objects
have fallen into the apparatus, the apparatus has been exposed to rain or
moisture, does not operate normally, or has been dropped.
15. This unit produces heat when operated normally. Operate in a wellventilated area with at least six inches of clearance from peripheral
equipment.
16. This product, in combination with an amplifier and headphones or
speakers, may be capable of producing sound levels that could cause
permanent hearing loss. Do not operate for a long period of time at a
high volume level or at a level that is uncomfortable. If you experience
any hearing loss or ringing in the ears, you should consult an audiologist.
6
AIRSYNTH REFERENCE MANUAL
Instructions de Sécurité Importantes
(French)
Symboles utilisés dans ce produit
Ce symbole alèrte l’utilisateur qu’il existe des instructions de
fonctionnement et de maintenance dans la documentation jointe
avec ce produit.
Ce symbole avertit l’utilisateur de la présence d’une tension non
isolée à l’intérieur de l’appareil pouvant engendrer des chocs
électriques.
Ce symbole prévient l'utilisateur de la présence de tensions sur
les raccordements de sorties, représentant un risque
d'électrocution.
Veuillez suivre ces précautions lors de
l’utilisation de l’appareil:
1. Lisez ces instructions.
2. Gardez ces instructions.
3. Tenez compte de tous les avertissements.
4. Suivez toutes les instructions.
5. N’utilisez pas cet allareil à proximité de l’eau.
6. Ne nettoyez qu’avec un chiffon humide. Il est potentiellement dangereux
d'utiliser des pulvérisateurs ou nettoyants liquides sur cet appareil.
7. Installez selon les recommandations du constructeur.
8. Ne pas installer à proximilé de sources de chaleur comme radiateurs,
cuisinière ou autre appareils (don’t les amplificateurs) produisant de la
chaleur.
AIRSYNTH REFERENCE MANUAL
7
9. Ne pas enlever la prise de terre du cordon secteur. Une prise murale avec
terre deux broches et une troisièrme reliée à la terre. Cette dernière est
présente pour votre sécurité. Si le cordon secteur ne rentre pas dans la
prise de courant, demandez à un électricien qualifié de remplacer la prise.
10. Evitez de marcher sur le cordon secteur ou de le pincer, en particulier au
niveau de la prise, et aux endroits où il sor de l’appareil.
11. N’utilisez que des accessoires spécifiés par le constructeur.
12. N’utilisez qu’avec un stand, ou table conçus pour l’utilisation d’audio
professionnel ou instruments de musique. Dans toute installation, veillez
de ne rien endommager à cause de câbles qui tirent sur des appareils et
leur support.
13. Débranchez l’appareil lors d’un orage ou lorsqu’il n’est pas utilisé
pendant longtemps.
14. Faites réparer par un personnel qualifié. Une réparation est nécessaire
lorsque l’appareil a été endommagé de quelque sorte que ce soit, par
exemple losrque le cordon secteur ou la prise sont endommagés, si du
liquide a coulé ou des objets se sont introduits dans l’appareil, si celui-ci a
été exposé à la pluie ou à l’humidité, ne fonctionne pas normalement ou
est tombé.
15. Puisque son fonctionement normale génère de la chaleur, placez cet
appareil au moins 15cm. des équipments péripheriques et assurez que
l’emplacement permet la circulation de l’air.
16. Ce produit, utilisé avec un amplificateur et un casque ou des enceintes,
est capable de produite des niveaux sonores pouvant engendrer une perte
permanente de l’ouïe. Ne l’utilisez pas pendant longtemps à un niveau
sonore élevé ou à un niveau non confortable. Si vous remarquez une
perte de l’ouïe ou un bourdonnement dans les oreilles, consultez un
spécialiste.
8
AIRSYNTH REFERENCE MANUAL
Beim Benutzen dieses Produktes beachten
Sie bitte die folgenden
Sicherheitshinweise: (German)
1. Lesen Sie die Hinweise.
2.
3.
4.
5.
6.
7.
8.
9.
10.
11.
12.
13.
14.
15.
Halten Sie sich an die Anleitung.
Beachten Sie alle Warnungen.
Beachten Sie alle Hinweise.
Bringen Sie das Gerät nie mit Wasser in Berührung.
Verwenden Sie zur Reinigung nur ein weiches Tuch. Verwenden Sie
keine flüssigen Reinigungsmittel. Dies kann gefährliche Folgen haben.
Halten Sie sich beim Aufbau des Gerätes an die Angaben des Herstellers.
Stellen Sie das Gerät nich in der Nähe von Heizkörpern,
Heizungsklappen oder anderen Wärmequellen (einschließlich
Verstärkern) auf.
Verlegen Sie das Netzkabel des Gerätes niemals so, daß man darüber
stolpern kann oder daß es gequetscht wird.
Benutzen Sie nur das vom Hersteller empfohlene Zubehör.
Verwenden Sie ausschließlich Wagen, Ständer, oder Tische, die speziell
für professionelle Audio- und Musikinstrumente geeignet sind. Achten
Sie immer darauf, daß die jeweiligen Geräte sicher installiert sind, um
Schäden und Verletzungen zu vermeiden. Wenn Sie einen Rollwagen
benutzen, achten Sie darauf, das dieser nicht umkippt, um Verletzungen
auszuschließen.
Ziehen Sie während eines Gewitters oder wenn Sie das Gerät über einen
längeren Zeitraum nicht benutzen den Netzstecher aus der Steckdose.
Die Wartung sollte nur durch qualifiziertes Fachpersonal erfolgen. Die
Wartung wird notwendig, wenn das Gerät beschädigt wurde oder aber
das Stromkabel oder der Stecker, Gegenstände oder Flüssigkeit in das
Gerät gelangt sind, das Gerät dem Regen oder Feuchtigkeit ausgesetzt
war und deshalb nicht mehr normal arbeitet oder heruntergefallen ist.
Dieses Gerät produziert auch im normalen Betrieb Wärme. Achten Sie
deshalb auf ausreichende Lüftung mit mindestens 15 cm Abstand von
anderen Geräten.
Dieses Produkt kann in Verbindung mit einem Verstärker und
Kopfhörern oder Lautsprechern Lautstärkepegel erzeugen, die
anhaltende Gehörschäden verursachen. Betreiben Sie es nicht über
längere Zeit mit hoher Lautstärke oder einem Pegel, der Ihnen
unangenehm is. Wenn Sie ein Nachlassen des Gehörs oder ein Klingeln
in den Ohren feststellen, sollten Sie einen Ohrenarzt aufsuchen.
AIRSYNTH REFERENCE MANUAL
9
CE Declaration of Conformity
Manufacturer’s Name:
Alesis Corporation
Manufacturer’s Address: 1633 26th Street
Santa Monica, CA 90404
USA
declares, that the product:
Product Name:
airSynth
Model Type:
Signal Processor
conforms to the Standards listed for this product on the web site
www.alesis.com
European Contact:
Sound Technology
17 Letchworth Point, Lechworth,
Hertfordshire, SG6 1ND, England.
Phone: +44.1462.480000
Fax: +44.1462.480800
March 2001
10
AIRSYNTH REFERENCE MANUAL
INSTRUCTIONS TO THE USER
(FCC compliance)
This equipment has been tested and found to comply with the limits
for a class B digital device, pursuant to Part 15 of the FCC Rules. These
limits are designed to provide reasonable protection against harmful
interference in a residential installation. This equipment generates,
uses and can radiate radio frequency energy and, if not installed and
used in accordance with the instructions, may cause harmful
interference to radio communications. However, there is no guarantee
that interference will not occur in a particular installation. If this
equipment does cause harmful interference to radio or television
reception, which can be determined by turning the equipment off and
on, the user is encouraged to try to correct the interference by one or
more of the following measures:
1. Reorient or relocate the receiving antenna.
2. Increase the separation between the equipment and receiver.
3. Connect the equipment into an outlet on a circuit different from
that to which the receiver is connected.
4. Consult the dealer or an experienced radio/TV technician for
help.
This equipment has been verified to comply with the limits for a class
B computing device, pursuant to FCC Rules. In order to maintain
compliance with FCC regulations, shielded cables should be used with
this equipment. Operation with non-approved equipment or
unshielded cables is likely to result in interference to radio and TV
reception. The user is cautioned that changes and modifications made
to the equipment without the approval of the manufacturer could void
the user’s authority to operate this equipment.
AIRSYNTH REFERENCE MANUAL
11
FRONT PANEL
AXYZ™ Controller
Program Knob
LED Display
REAR PANEL
RCA Outputs
12
RCA Inputs
Power Jack
AIRSYNTH REFERENCE MANUAL
Chapter 1: Quick Start Guide
CHAPTER 1
QUICK START GUIDE
This page gives you brief instructions so that you can start using the
airSynth right away. If you have questions about any of the steps,
don’t worry – the following chapters will expand on these instructions
in mind-numbing detail.
Step 1: Hook it up
Pull the airSynth out of the package, and plug it into the wall with the
supplied Power Supply. Connect the Left and Right outputs of the
airSynth into the Left and Right CD Inputs of a stereo receiver or
mixer.
Receiver
airSynth
Receiver CD In
airSynth Line Out
NOTE: If your system looks different from this one, skip ahead to
Chapter 2, Connections.
Step 2: Select a Program
Turn the Program Select knob and select a Program between 00 and 49.
When you’ve found one you like, press the knob down to select it.
There is a list of program names printed on the bottom of the unit.
Step 3: Have fun
AIRSYNTH REFERENCE MANUAL
13
Quick Start Guide: Chapter 1
Move your hand over the black Axyz™ dome on the unit. Try moving
from side to side, front to back, as well as up and down. Get down!
14
AIRSYNTH REFERENCE MANUAL
Chapter 2: Connections
CHAPTER 2
CONNECTIONS
Unpacking and Inspection
Your Alesis airSynth was carefully packed at the factory, and the
shipping carton was designed to protect the unit during shipping.
Please retain this container in the highly unlikely event that you need
to return your processor for servicing.
The shipping carton should contain the following items:
•
•
•
•
•
•
✪
airSynth Processor
This instruction manual
Program Chart
Power Supply, Alesis model P3
Alesis Warranty card
2 3’ RCA stereo cables
It is important to register your purchase; if you have not already
filled out your warranty card and mailed it back to Alesis, please
take the time to do so now.
Basic Connections
The airSynth is designed to function with a wide range of equipment,
from CD players to musical instruments. The only requirement is that
the input and output signals be line level (for the technically minded,
unbalanced -10 dBu).
This means that you never want to plug the powered output of
an amplifier or receiver into the airSynth. These speaker-level
voltages will fry the electronics inside of the airSynth.
The systems on the next few pages will give you some examples of
typical systems where the airSynth is used. If you can’t apply one of
AIRSYNTH REFERENCE MANUAL
15
Connections: Chapter 2
these systems to your own setup, contact Alesis or your dealer for
assistance.
Connecting to a Stereo Receiver
Receiver
airSynth
Receiver CD In
airSynth Line Out
The simplest method for listening to the airSynth is to connect the Left
and Right Outputs to the Left and Right Inputs of a stereo receiver.
The CD or Tape inputs of your receiver are best for this purpose – if
you use Phono inputs the airSynth will sound very noisy.
Connecting between a CD Player and a Stereo
Receiver
Receiver
airSynth
CD Player
Receiver CD In
airSynth Line Out
airSynth Line In
CD Line Out
The above system allows you to hear the airSynth with a CD player
through your home stereo system. Although the airSynth does not
change the sound of the CD, this method allows you to hear both
sources at once. Using a stereo RCA (phono) cable, plug the Left and
Right outputs of your CD player into the Left and Right Inputs of the
airSynth. Usually, the white connector is connected to the Left side and
the red connector is connected to the Right side.
16
AIRSYNTH REFERENCE MANUAL
Chapter 2: Connections
Next, using another stereo RCA cable, plug the Left and Right outputs
of the airSynth into the Left and Right CD inputs of your receiver.
(Actually, any unused inputs on the receiver should work except for
“Phono” or “Record Player”.)
If the unit doesn't have RCA outputs:
The instructions above are fine for home or professional CD Players.
However, most portable CD players don’t have a pair of RCA outputs
like component CD players do. Instead, they have a 1/8” Mini jack.
This is usually labeled “Line Out”. If your CD Player doesn’t have a
Line Out, then use the Headphone output and set the Volume to about
80% to avoid distorting the airSynth.
Many portable CD players include a cable with a 1/8” mini jack on one
side and a pair of RCA connectors on the other. You will need to locate
or purchase this cable to use a portable CD player with the airSynth.
Plug the RCA connectors on this cable into the Left and Right Inputs of
the airSynth. You should be able to use these instructions to connect a
game console, DVD player or video camera through the airSynth.
✪
Although the speaker outputs of many compact stereo systems
use an RCA connector between the main outputs and the
speakers, speaker level voltages like these will distort and
possibly damage the airSynth.
Connecting to a Studio Mixer
The best method of connecting the airSynth to a mixing console is to
use a pair of channel line inputs. You’ll need a cable with two 1/4”
connectors on one side and two RCA connectors on the other. Connect
the RCA jacks to the airSynth’s line outputs, then connect the 1/4”
jacks to a pair of line inputs on the mixer. If no channel line inputs are
available, tape returns or effects returns may be used instead.
AIRSYNTH REFERENCE MANUAL
17
Connections: Chapter 2
Powered Monitor
Powered Monitor
Monitor Line In
Monitor Line In
Mixer Channel Inputs
Mixer Monitor Outs
airSynth
airSynth Line Out
Mixer
Connecting into a DJ System
Turntable Out
Turntable Out
Mixer
Phono In 1
Phono In 2
CD/Aux Input
Line Out
airSynth Line Out
Amp Line Inputs
airSynth
Amp Speaker Outputs
Amplifier
Speakers
This section explains how to connect the airSynth into a DJ system. The
first point to mention is that the output of a turntable is not at line
level. Therefore, unlike a CD player, you can’t just connect the output
of the turntable through the airSynth. You would need to connect the
turntable to a preamp, then connect this output to the airSynth.
A much better method is to use a DJ mixer. This allows you to control
the volume of both turntables (or CD players) and the airSynth
18
AIRSYNTH REFERENCE MANUAL
Chapter 2: Connections
separately. In the system above, we first connect the two turntables
into two inputs of the mixer. We then plug the Left and Right outputs
of the airSynth into another mixer input. Next, plug the Left and Right
outputs of the mixer into the Left and Right inputs of your power
amplifier.
✪
If your amplifier is built into the mixer, make sure you don’t plug
those speaker-level outputs into the inputs of the airSynth. The
voltage levels needed to drive large DJ speakers will distort and
possibly damage the airSynth.
Mounting on a Microphone Stand
The bottom of the airSynth features a threaded socket for a standard
microphone stand. This allows the unit to be mounted away from the
area where the other equipment is, so that unintended movements
won't be picked up by the Axyz controller.
When mounting on a stand, avoid tipover by:
• Using a stand with a heavy base
• Tying the input, output and power cables to the stand in several
places, especially near the base (so if someone pulls on the cord,
it pulls on the base)
• Using cords that are long enough
Mono Operation
The airSynth does not have a mono output. If your sound system is
mono, you should use a “Y-cable” to sum the outputs of the airSynth.
Connect the two connectors of the Y-cable to a single RCA cable, then
connect this cable to your mono destination.
You can also simply connect one of the outputs to a mono input.
However, the panning effects will cause many programs to jump up
and down in volume.
AIRSYNTH REFERENCE MANUAL
19
Chapter 3: Performance
CHAPTER 3
PERFORMANCE
Selecting a Program
The Alesis airSynth contains 50 programs, each one creating a different
effect. There is a list of program names printed on the bottom of the
unit, and you should have received a program chart with the unit that
describes each program.
Selecting a new program is simple:
1. Turn the program knob on the bottom left side of the airSynth to
select a program number. The new program will not load right
away, allowing you to keep using one program while you find
another.
12.
Notice that there is a decimal point after the program number to indicate
that it hasn’t been loaded yet.
2. Press the Program knob to load this new program.
12
The decimal point goes away, showing that the program has been loaded.
AIRSYNTH REFERENCE MANUAL
21
Performance: Chapter 3
Using the Axyz™ Controller
The airSynth is the second in a line of Alesis products to use the
groundbreaking Axyz controller. This controller allows you to use
your hand to control the sound of your music in a way never before
possible.
The Axyz Controller works by sending a beam of invisible infrared
light out of the top of the unit. There are sensors all around the dome
which see the light when it is reflected back. By moving your hand
around the dome, you reflect the light to different sensors, and this
changes the sound of the effect.
There are three sets of sensors in the Axyz controller, they are known
as the X-axis, Y-axis, and Z-axis.
The X-axis sensor reads your hand position from left to right.
The Y-axis sensor reads your hand position from the front to the back
of the unit.
The Z-axis sensor reads how close your hand is to the sensor (up and
down).
Tip: When playing the airSynth, make sure to move your hand in
all three directions. Some of the programs don’t use the Y-axis,
but most use all three.
You should hear an effect when your hand gets within 6” (15 cm) of
the Axyz controller. For a list of what each axis does to the sound, see
the Program Chart which came with your unit.
Note that ambient light can affect the sensitivity of the Axyz controller.
Make sure that you don’t sit the airSynth right next to a light source or
in the sun, or you may notice that you need to move your hand closer
to hear an effect. You may also notice this if a large light is pointed
directly at the airSynth when you are on stage.
22
AIRSYNTH REFERENCE MANUAL
Chapter 3: Performance
Effect Hold
The airSynth has a function that allows you to freeze the current effect
from the airSynth without needing to hold your hand in place. This
function is called Hold.
To use the Hold function:
1. Recall a program as described in the previous section. There should
be no decimal points showing in the display.
12
Note that there are no decimal points in the display, showing that the
effect is loaded and operational.
2. Move your hand around the Axyz controller, stopping your hand
position when you find an effect that you want to freeze.
3. Press and hold the Program knob for one second. A decimal point
should appear in the display between the first and second number
of the program.
1.2
A decimal point has appeared between the first and second digits of the
program number, showing that the Hold function is set.
4. Move your hand away from the Axyz controller. Notice that the
effect continues as if your hand was still there.
5. To turn off the hold function and resume normal operation, press
the Program knob one more time. The decimal point should go
away and you can use the Axyz controller again to modify the
sound.
On Program 2 and Programs 42-49, the Hold function puts the unit in a
different mode. These programs will be discussed later in this chapter.
AIRSYNTH REFERENCE MANUAL
23
Performance: Chapter 3
Effect Bypass
The effect Hold function can also be used as a Bypass. This function
turns off the Axyz controller so that the effect is not accidentally
triggered.
To use the Bypass function:
1. Recall a program as described in the previous section. There
should be no decimal points showing in the display.
12
Note that there are no decimal points in the display, showing that the
effect is loaded and operational.
2. Move your hand away from the Axyz controller, making sure
that the airSynth isn’t affecting the sound.
3. Press and hold the Program knob for one second. A decimal
point should appear in the display between the first and second
number of the program.
1.2
A decimal point has appeared between the first and second digits of the
program number, showing that the Bypass/Hold function is set.
4. The Axyz controller should now have no effect, so moving your
hand towards the Axyz dome should not change the sound.
5. To turn off the hold function and resume normal operation,
press the Program knob one more time. The decimal point
should go away and you can use the Axyz controller again to
modify the sound.
24
AIRSYNTH REFERENCE MANUAL
Chapter 3: Performance
Special Programs
The airSynth has a few Programs that act differently than the others.
This section describes their special operation.
Sequencers
Programs 2, 42, 43, 44, 45
The Programs listed above are Sequencer programs. A sequencer is a
device that records in a loop, remembering which notes you play. You
can keep adding notes each time the sequencer loops around. When
you’re finished recording, the airSynth allows you to filter or adjust the
loop.
When you recall one of these programs, the first thing you will hear is
a metronome click. As you move your hand towards the sensor from
different sides, you will trigger one of several pitches or drum sounds.
After one measure has passed (8 clicks) you will hear this tone played
again. The airSynth corrects the timing so that it plays back in the
nearest 1/16th note. It’s easier to think about your timing falling on a
grid:
Click
Open HH
Closed HH
Snare
Kick
The grid above shows the 16 different timing locations where a drum
hit or pitch can fall. If you play a note a little bit early or late, the
airSynth will move it so that it falls right on a beat.
The airSynth will continue looping as you add notes. When you think
you’ve finished creating your loop, turn on the Hold function by
pressing the Program knob for one second. You will notice that the
click goes away and that a decimal point appears between the first and
second digits of the Program number in the display.
0.2
AIRSYNTH REFERENCE MANUAL
27
Performance: Chapter 3
A decimal point has appeared between the first and second digits of the
program number, showing that the Hold function is set.
When you’ve entered Hold mode, you can move your hand around the sensor to
modulate the loop. On some programs, your hand controls the balance between
the instruments. On others, your hand changes the octave of the bass line or
filters the loop.
Pressing the Program knob again exits the Hold function and allows
you to create a new loop.
In summary, to make a new sequence:
1. (Optional:) Select the “--“ program to set the tempo of the loop.
See “The Tempo Program” section later in this chapter. (If the
tempo is not set, the unit will operate at 120bpm upon powerup.)
2. Select the Program you want to sequence, number 2 or 42-45.
3. Play the drum sounds or pitches by approaching the sensor
from different sides.
4. When you’re finished adding notes, press and hold the Program
knob to enter Hold mode.
5. Move your hand around the sensors to modulate the loop
you’ve created.
6. To start over, press the Program knob again to turn off the Hold
function.
Pads
Programs 1, 5, 6, 7
These programs allow you to select a pitch, then move around the
sensors to change the timbre. The trick is to approach the sensor from a
different direction when you want a new pitch.
To use these programs:
1. Approach the sensor from one of its sides. For example, approach
from the left.
2. Twist your hand around the sensors to filter and modulate the
sound.
28
AIRSYNTH REFERENCE MANUAL
Chapter 3: Performance
3. Move your hand away from the sensors to stop playing the note.
4. Now, approach the sensors from another direction. The airSynth
should play a different pitch.
AIRSYNTH REFERENCE MANUAL
29
Chapter 3: Performance
Auto-Melody Generators
Programs 46, 47, 48, 49
These programs automatically generate a melody. When you hear
something you like, you can freeze it using the Hold function and then
modulate the performance.
To use these programs:
1. (Optional:) Select the “--“ program to set the tempo of the loop. See
“The Tempo Program” section later in this chapter. (If the tempo is
not set, the unit will operate at 120bpm upon power-up.)
2. Hold your hand over the sensors. The airSynth will start playing
notes at random.
3. When the airSynth plays something you like, press and hold the
Program knob to engage the Hold function. While the airSynth is in
Hold mode, it will keep repeating the last melody it generated.
4. Move your hands around the sensors to modulate the looping
melody.
5. Press the Program knob again to exit Hold mode. The looping
melody will stop and the unit is ready to generate a new melody.
The airSynth may take an entire measure before the first note
sounds. If the Global tempo is slow, you may need to leave your
hand in the field for a bit of time. Be patient, it’s worth it!
The Global Tempo Program
Program -Located between Program 49 and Program 00, this Program controls
the tempo of every loop in the airSynth. To change the tempo, select
this program and tap over the sensor at least three times. As you tap
1/4 notes in rhythm, you will hear the unit play back 1/8 notes to
indicate the tempo. When you have finished, select a new program to
continue using the airSynth at this new tempo.
AIRSYNTH REFERENCE MANUAL
31
Chapter 4: Troubleshooting
CHAPTER 4
TROUBLESHOOTING
Troubleshooting Index
If you experience problems while operating your airSynth, please use
the following table to locate possible causes and solutions before
contacting Alesis Product Support for assistance.
Symptom
No audio from
outputs
Buzz from outputs
AIRSYNTH REFERENCE MANUAL
Cause
You’re not close
enough to the
sensors
Solution
Try selecting Program
“02“ and listen for the
click. If you hear one,
try moving closer to
the sensors or try
another program.
Bad cables
Replace the cables.
Destination is turned Check the connections
down
and the level of the
mixer or amp that the
airSynth is connected
to.
Power is not
Time for a coffee
connected
break.
Cables are crossing a Make sure that the
power cable
airSynth and its audio
cables are kept away
from power cables,
other power
transformers and wall
warts.
Bad cables
Replace the cable with
a new, high-quality
cable.
Problem with the
Try disconnecting the
input signal
inputs to the airSynth
and see if the problem
remains.
33
Troubleshooting
Symptom
Axyz controller is not
as sensitive as it
should be
Cause
Too much ambient
light
Too much
interference from
smoke
Can’t change
programs
No effect
Software problem
Hold feature is
turned on
Not close enough to
the Axyz sensor,
effect too subtle
Solution
Move airSynth away
from bright lights or
sunlight.
If a fog machine or
cigarette smoke is
nearby, try moving the
airSynth.
Unplug the airSynth
and plug it back in
If there is a decimal
point between the
numbers, press the
Program knob quickly
so that it goes away.
Try moving your hand
closer to the sensor or
switching to a
different program.
Care and Maintenance
Cleaning
Disconnect the AC cord, then use a damp cloth to clean the airSynth’s
metal and plastic surfaces. For heavy dirt, use a non-abrasive
household cleaner such as Formula 409 or Fantastik. DO NOT SPRAY
THE CLEANER DIRECTLY ONTO THE FRONT OF THE UNIT AS IT
MAY DESTROY THE LUBRICANTS USED IN THE SWITCHES AND
CONTROLS! Spray onto a cloth, then use cloth to clean the unit.
Refer All Servicing to Alesis
We believe that the airSynth is one of the best processors that can be
made using current technology, and should provide years of troublefree use. However, should problems occur, DO NOT attempt to service
the unit yourself. Service on this product should be performed only by
qualified technicians. NO USER-SERVICEABLE PARTS INSIDE.
Obtaining Repair Service
Before contacting Alesis, check over all your connections, and make
sure you’ve read the manual.
Customers in the USA and Canada: If the problem persists, call Alesis
USA at 1-800-5-ALESIS and request the Product Support department.
34
AIRSYNTH REFERENCE MANUAL
Chapter 4: Troubleshooting
Make sure you have the unit’s serial number with you. Talk the
problem over with one of our technicians; if necessary, you will be
given a return order (RO) number and instructions on how to return
the unit. All units must be shipped prepaid and COD shipments will
not be accepted.
For prompt service, indicate the RO number on the shipping label.
Units without an RO will not be accepted. If you do not have the
original packing, ship the unit in a sturdy carton, with shock-absorbing
materials such as Styrofoam pellets (the kind without CFCs, please) or
“bubble-pack” surrounding the unit. Shipping damage caused by
inadequate packing is not covered by the Alesis warranty.
Tape a note to the top of the unit describing the problem, include your
name and a phone number where Alesis can contact you if necessary,
as well as instructions on where you want the product returned. Alesis
will pay for standard one-way shipping back to you on any repair
covered under the terms of this warranty. Next day service is available
for a surcharge. Field repairs are not authorized during the warranty
period, and repair attempts by unqualified personnel may invalidate
the warranty.
Service address for customers in the USA:
Alesis Service Department
12520 Wilkie Avenue
Hawthorne, CA 90250
Customers outside the USA and Canada:
Contact your local Alesis distributor for any warranty assistance. The
Alesis Limited Warranty applies only to products sold to users in the
USA and Canada. Customers outside of the USA and Canada are not
covered by this Limited Warranty and may or may not be covered by
an independent distributor warranty in the country of sale. Do not
return products to the factory unless you have been given specific
instructions to do so.
Internet Address: Important information and advice is available on
our web site:
http://www.alesis.com
Email may be addressed to:
AIRSYNTH REFERENCE MANUAL
35
Troubleshooting
[email protected]
Program Chart
Top Five:
# Program Name Description
0
1
2
3
4
Chopper
Use your hand to control the
helicopter as it flies around
you
Android
The direction that your hand
Choir
approaches chooses the
pitch, then twist it around to
adjust the tone
Beat Machine Slap all around the sensor to
add to the drum loop. Next,
hold the Program knob
down to stop the metronome
and adjust the mix
FM
Moving your hand around
the sensor triggers a biting,
sweeping tone
Didgiri-Don't A groaning synthesized
digeridoo, try moving from
front to back to change the
pitch
Tone:
5 Oberon Swell For the next three programs,
approach the sensor from
different directions for
different pitches, then move
your hand around to change
the sound
6 Demon Pad A darker tone, move your
hand farther back for some
twisted feedback
7
Star Chime After a bell tone attack,
moving your hand around
the sensors adds filtering
and panning effects
36
X Axis
Y Axis
Z Axis
Left/Right Forward/
Pan
Back Pan
Proximity
Pitch/
Formant
Pitch/
Formant
Volume
Each
quadrant
adds a
different
drum
FM Osc. 1
Freq.
Each
quadrant
adds a
different
drum
FM Osc. 2
Freq.
–
Filters
Pitch
Volume
Pitch/
shaping
Pitch/
shaping
Volume
Pitch/
shaping
Pitch/
shaping/
feedback
Filter
Volume
Pitch
Volume
Volume
AIRSYNTH REFERENCE MANUAL
Program Chart
8
C-Saw
9
Air-amin
Move left to right to play a Quantized Pitch bend Volume
pentatonic scale, then back Pitch
to front to bend the pitch
A Theremin-like sound
Pitch
Octaves
Volume
whose pitch rises as you
hand moves back and to the
right
AIRSYNTH REFERENCE MANUAL
37
Program Chart
Tone:
# Program Name Description
10
Radio Bass
11
Free Bass
12
Distorted
Annoyance
13
Chewie
14
LFO Abuse
15
Pet Sounds
16 Square-amin
17
Ther-FM-in
18
Supergrowl
19
Robo-Vox
38
X Axis
Y Axis
A bass rumble with radio
Osc.
Modulation
interference tones makes this Frequency amount
the perfect excuse to end cell
phone calls
Approach from the sides to Pitch
Filter
create a bass line that sweeps
up and down an octave
The name says it all, your
Pitch/
Shaping
neighbors should start
shaping
banging on the door in
minutes
Make vocal-like sounds
Pitch
Filter
understandable only to other
airSynths
Sounds like a broken UFO, Pitch and Filter
move from left to right to
LFO
change the speed and pitch frequency
Theremin-like sound with
Pitch
Brightness
almost two octaves of range
for spooky sci-fi music
Another theremin, this one Pitch/
Duty
has a square-wave timbre
Filter
cycle/Filter
This theremin uses an FM
Pitch
FM
sound generator, try moving
your hand forward to back
to change the tone
Did you like to break your Wild interelation of
toys when you were a kid? FM Osc.
Then this program is for
you.
Strange vocal-sounding
Pitch
Filter
theremin, rotate your hand
forward and back to change
the Filter
Z Axis
Volume
Volume
Volume
Volume
Volume
Volume
Volume
Volume
Volume
Volume
AIRSYNTH REFERENCE MANUAL
Program Chart
Percussion:
# Program Name Description
20
21
22
23
24
25
26
27
X Axis
Water Drum Move from left to right as
Pitch
you airdrum to change the
pitch
Clockwork Makes a bell tone, try
Pitch
Bell
different sides of the sensor
for variations on the tone
Ring Wood “Strike” high in the field for Pitch
higher notes, nearer to the
dome for lower notes
Plink
Sounds like a steel drum,
Pitch
add an island beat to your
mix
Broken Chime If you move your hand
Clank
towards the back, it adds a
bouncing sound
Yo-Yo Drum Hold your hand over the
Pitch
sensor after triggering the
drum for more zaniness.
Triggering close to the dome
will start a sound with
infinite decay. Retrigger high
in the field to stop. In the
meantime, play.
Boom-Boom Kick drum on the right,
Boom/
Chik
snare on the left, try not to chick
breakdance when playing
this one
One Hand Clap the night away, moving Pitch
Clapping further back adds Decay to
the sound
SFX:
28
Time Bells
Y Axis
Z Axis
Pitch
Volume
Pitch
Volume
Pitch
Pitch
Pitch
–
Bounce
Volume
Burrble
Decay
Drum tone Volume
Decay
Floating hammered bells
Moving your hand
change pitch and tone as you makes pretty bell
wave you hand around
sounds
29 Cyber Chant Chanting robotic voices, try Pitch
going to Program "--" to
change the tempo
AIRSYNTH REFERENCE MANUAL
Morphing
–
Volume
Volume
39
Program Chart
SFX:
# Program Name Description
30
31
32
33
34
35
36
37
38
39
40
41
40
X Axis
Y Axis
Off The Dial "We interrupt this
Shaping
Shaping
broadcast…", try using this
radio interference program
to disrupt the signal coming
into the inputs
Soul Craft Cool transport effect which LFO Freq/ Filter
adds a stereo panning effect Tone Freq.
when you move your hand
away
Water Torture Sounds like water dripping Sample
Pitch
in a pan, move from side to and Hold
side to change the pitch
value
Ishara
Like the pounding surf with Filter
Filter
sweeping filter effects, a
coefficients coefficients
great ambience bed
Vega
Great sci-fi transmission
Modula- Pitch
Transmission sound, move from side to
tion
side for some interesting
amounts
stereo panning
Whispering Spooky talking wind effect, Formant –
Wind
let the airSynth tell you
change
ghost stories
frequency
Phoneme- Quite possibly the most
Formant/ Formant/
anon
annoying sound ever
consonant consonant
Idle Growl Great engine effect - move RPM's
Amount of
your hand to the left to step
muffler
on the gas
Gunplay
Stage your own battle, or a Resonance Ferocity of
Chinese New Year if you're a of Filter
battle
pacifist
Processing… The sound that computers
FM Osc. 1 FM Osc. 2
make on game shows and
frequency frequency
cartoons
Soap Dish Fun bubbly effect, stereo
Panning
Pitch
panning from left to right
sounds great in headphones
Sabre Tooth A squeaky alien roar, try
FM
Roar!
very slow movements
amount
around the sensors
Z Axis
Volume
Volume
Volume
Volume
Volume
Volume
Volume
Volume
Volume
Sample
and hold
level
Volume
Volume
AIRSYNTH REFERENCE MANUAL
Program Chart
Rhythm:
# Program Name Description
42
43
44
45
46
47
48
49
--
X Axis
Bongo Beat Slap all around the sensor to Filter LPF
add to the drum loop. Next,
hold the Program knob
down to stop the metronome
and Filter the loop
Caloopso This program allows you to Hold to
program your own steel
change key
drum melody. Hold the
sequence to change the key.
Walking Bass Another sequencer program, Hold to
this one lets you program a change key
bass line. Try changing the
key after you press hold.
Jungle Boogie This drum sequencer uses
Filter LPF
deep bass notes and synth
sounds to create hypnotic
dance loops. Use the Hold
function to Filter the loop.
Auto-Bass Hold your hand over the
LP Filter
sensor to create a random
bass line. Next, hold the
PROGRAM knob to freeze
the melody so you can Filter
it.
Auto-Melody Like the last program, only Octave
this one creates a random
jump
Use the Hold function to
control Portamento amount.
Auto-Techno Another random melody
LP Filter
generator, this one uses a
techno lead tone for dance.
Use the Hold function to add
Filtering.
Auto-Pop This random melody
LP Filter
generator has a mellower
tone for pop songs and
robotic soap opera themes
Global Tempo Tap your hand over the
–
sensor to the beat to set the
tempo for every rhythm
program in the airSynth
AIRSYNTH REFERENCE MANUAL
Y Axis
Z Axis
Filter Q
–
–
–
–
–
Filter Q
–
Portamento –
Portamento –
Portamento –
Portamento –
–
–
41
Specifications
SPECIFICATIONS
I/O:
Nominal Input Voltage:
Max Input Voltage:
Stereo RCA in and out
-10dBu
11.96dBu (4.34Vpp)
Dynamic Range:
Signal to Noise Ratio:
THD+N:
Frequency Response:
102.8 dB (A-weighted)
-102.4dB (A-weighted)
0.0065%
20-20000Hz
Sampling Frequency:
Converter Resolution:
Processor Resolution:
44.1KHz
24bit (ADC and DAC)
28bit
All measurements done over a 20Hz-22,000Hz range with 1KHz sine
wave at Full Scale, except for the dynamic range which was done with
a -60dBFS 1KHz sine wave.
AIRSYNTH REFERENCE MANUAL
43