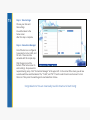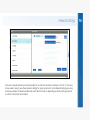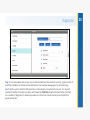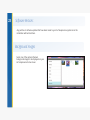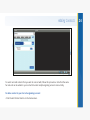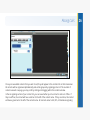
1
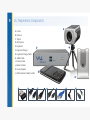
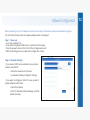
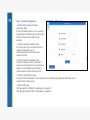
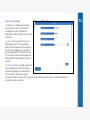
USER MANUAL
Table of Contents
Network Configuration
3
Preparing Your Room for Telepresence
5
Components
9
Component Installation
10
Component Installation Diagram
11
Software Configuration
12
Network Settings
16
User Settings
18
Diagnostics
20
Time Settings
22
Archives
22
Software Versions
23
Background Images
23
Adding Contacts
24
Placing Calls
26
Tech Support
28
3
Network Configuration
Before you begin setup and installation of your Vu Telepresence unit, please ensure that the following ports
are open on your network.
If these ports are open, your Vu Telepresence system will operate right out of the box with a working
internet connection.
For the best performance of the Vu system and for interoperability capability, the system must be setup on
a public IP. Special port forwarding rules can be applied when necessary for the Vu system to operate
properly.
Port Access
The following port access is required for both inbound and outbound call flow:
• TCP 5222 XMPP: For XMPP registration and authentication. XMPP is the primary signaling protocol for
Vu Telepresence to establish a call.
• TCP 2202 SSH: Required by Vu support teams. For security purposes, the SSH connection may only
be initialized by Vu support teams. SSH is used as a reverse SSH for support when initiated by the
client.
• TCP 1720 - For H.323-Based Signaling Mode.
• TCP 8080 HTTP - Used for Standalone Mode.
• TCP 7011 - For H.323-Based Signaling Mode.
• TCP 9091 - Used for registering.
• TCP/UDP 5060 SIP - UDP and TCP are required when using the Vu unit for point-to-point
interoperability between manufacturers using SIP.
• TCP/UDP 7009 - For relay server.
• UDP 7000 to 7010 - UDP is required for the upload and download of audio and video.
For further assistance, contact our support team at [email protected], or call 1-855-393-9782.
Trusted Sites
If your organization is conducting web content filtering, the following websites must be added to your
network’s list of trusted sites. Please also add the following sites to the trusted site list of your web browser
or personal firewall on your PC in order to utilize the PC video client:
• vuusa172.opencloudapi.com - Required for patch servers and remote support capability
• vuusa26.opencloudapi.com - Required for patch servers and remote support capability
• talk.vutelepresence.com - Required for web conferencing
• screenshare.vutelepresencego.com - Required to enable screen sharing
4
5
Preparing Your Room for Telepresence
A great video meeting is more than a camera, microphone, and agenda. On this page we provide our
recommendations for setting up your meeting room.
Camera/Display Placement
For the most natural communication experience, place the base of your TV display and the center of your Vu
Telepresence camera at 4 to 4.5 feet above ground level. When seated, this eye-level setup enhances the
face-to-face experience.
Proper Telepresence Lighting
Lighting can make or break your video
conferencing session. Follow this list of do’s and
don’ts for the best image possible.
Do: Position soft and bright lights in front of the
user on camera. For best results, elevate these
lights to a 45 degree angle above the line of sight.
Don’t: Position lights directly above the presenter.
Ceiling lights create harsh shadows in the eyes.
Don’t position the user between Vu Telepresence
and windows. This strong lighting from behind will
cause the user on camera to appear as a
silhouette.
Flourecent lights may cause an unwanted green tint and
flicker to your video. For best results, use tungsten or LED lights.
Do: Use constant burning bulbs such as tungsten or LED lighting.
Don’t: Use alternating current bulbs such as flourescent lighting (for best results).
Optimizing Telepresence Audio
Empty rooms with hard/flat walls and surfaces can create
unwanted reverb or echo during your video call. To
reduce these audio disturbances modify your room with
any of the following choices:
• Furniture (especially upholstered)
• Curtains
• Venetian blinds
• Plants in the corner spaces
• Baffles for rooms with high ceilings
• Sound dampening panels
These tools help to break up the sound waves that
contribute to echo and reverb. The more disturbances
that you can reduce organically, the better Vu
Telepresence will process and reproduce your natural
voice.
Sound dampening panels like these help to reduce echo
and reverb in your room.
6
7
Colors and Patterns
Vu Telepresence is designed to
automatically focus on the user and
calibrate the image to produce the
best image results in any
environment. However, there are
some steps you can take to ensure
the best color reproduction. See
this list of dos and don’ts.
Do: Position a light blue
background behind the user. Light
blues and light greens enhance the
natural skin tones of the user which
draws in the attention of other
meeting attendees.
Avoid red backgrounds. Blue/green tones will enhance the skin tones of the user.
Don’t: Include too much bright red in the frame. Bright reds will take away from the presentation of the
user, and may affect the natural representation of skin tones.
Do: Include a range of colorful objects in view. Dynamic colors contribute to an impressive image for your
meeting attendees to see.
Don’t: Position patterned objects or clothing directly in the center of the camera frame. These patterns can
confuse the camera’s auto-adjustment sensors and make the video fluxuate in and out of focus.
8
9
Vu Telepresence Components
B
A. Codec
B. Camera
C. Tripod
D. Micropone
E. Keyboard
C
A
F. Keyboard Dongle
G. Keyboard Charge Cable
H. HDMI Cable
I. Camera Cable
J. Network Cable
K. Power Adapter
E
L. USB Extender Cable (For Mic)
D
F
G
H
I
J
K
L
Component Installation
[Do not power on Vu Telepresence until all components are connected and all necessary ports are open.]
Step 1 - Plug camera [B] into back USB port on codec [A] using camera cable [I].
Step 2 - Affix camera [B] onto tripod [C].
Step 3 - Plug microphone [D] into back USB port on codec [A]. You may use the optional
USB extender [L] between the microphone and codec for extra length.
Step 4 - Plug keyboard dongle [F] into bottom front USB port on codec [A].
Step 5 - Turn on the keyboard using the switch on the side. You may need to charge the
keyboard using camera charge cable [G].
Step 6 - Plug network cable [J] into codec [A] and the desired network port.
Step 7 - Plug HDMI cable [H] into codec [A] and your desired display monitor (not
included).
Step 8 - Plug power adapter [K] into codec [A].
Step 9 - Press the power button on the front of codec [A] to begin software setup.
10
11
Component Installation Diagram
Microphone
D to USB
J Network Cable
to Network
HDMI to
Display
B
H
Adapter
K Power
to Outlet
Camera
I to USB
A: BACK
to
C Tripod
Camera
A: FRONT
Dongle
F Keyboard
to USB
Software Configuration
Before powering on your Vu Telepresence unit ensure all ports have been opened as explained on page 2.
For instructional setup videos visit www.vutelepresence.com/support.
Step 1 - Power up:
• Turn on the display first.
• Ensure that the proper HDMI source is selected on the display.
• Press the power button on the front of the Vu Telepresence unit.
• After the booting process you will enter configuration screen.
Step 2 - Network Settings:
• If you have a DHCP service enabled on your private
network select DHCP:
- Name this network and click next.
- Vu will automatically configure IP settings.
• If you want to configure a Static IP in case a public or
private network select Static:
- Name this network.
- Enter IP, Netmask, Default Gateway, and DNS
details manually.
12
13
Step 3 - Network Diagnostics:
• Confirm that the network cable is
connected - Blue
If red, the network cable is not successfully
inserted into the network port on the codec.
Check to make sure the cable is fully
inserted.
• Confirm network is available - Blue
If red, the codec is not connected to a live
network. Check with your IT
administrator/ISP to ensure that your
network is active.
• Confirm Internet is Available - Blue
If red, the network you are connected to
cannot access the internet. If you choose to
operate Vu in StandAlone mode within a
closed network, this box should be red.
• Confirm Is UDP Allowed - Blue
If red and “UDP Not Allowed,” the Vu Telepresence is inhibited by a firewall. Check with your IT
administrator to allow access.
• Confirm NAT Type
NAT Type will be red “Relay” if operating on a private IP.
NAT Type will be blue “Public” if operating on a public IP.
Step 4 - User Settings:
• Create your Vu Telepresence identity.
Ensure that port 9091 is open before
completing this step. Otherwise Vu
Telepresence will not register your chosen
credentials.
Vu Name: Choose a name for your Vu
Telepresence unit. This name will be
public and searchable in the Vu directory.
It is how you will appear in a contact list.
Create a name with 15 characters or less.
If your desired name is already taken you
will be notified and prompted to choose
another.
Vu Number: Choose a 10 digit number for
your Vu Telepresence unit. This unique
number will be public and searchable in
the Vu directory. Others will use this
number to search for your contact. If your desired number is already taken you will be notified and
prompted to choose another.
14
15
Step 5 - Time Settings:
Choose your date and
time settings.
You will be taken to the
home screen
after this step is complete.
Step 6 - Connection Manager:
Out of the box Vu is configured
to execute Vu-to-Vu, H.323, and
SIP calls. These must be
activated with this simple step.
Click the gear icon at the
bottom of the home screen to
enter settings. No password is
required during setup. Click “Connection Manager” at the upper left. In the center ofthe screen you will see
a window with blue switches labeled “Vu,” “H.323,” and “SIP.” Press the switch next to each account to turn
them red. Then press the switch again to reactivate them to blue.
Congratulations! You are now ready to add contacts and start Vuing!
Network Settings
Some users may be interested in transporting their Vu unit from location to location or IP to IP. In this case,
Vu has made it easy to save these network settings for quick access later. Under Network Settings you may
create any number of network profiles and switch them off and on depending on which profile you wish to
use at the current time and location.
16
17
To set up a new network:
• Click Add.
• Select the network Type: DHCP or Static.
- If you are operating on a DHCP service enabled private network, DHCP will automatically configure
your settings. Name this network and click Apply.
- If you desire to provide a fixed Public or Private IP choose Static, you will need to fill in the proper IP
address, Subnet Mask and Default gateways for your static IP. (For these details please contact you
network admin or ISP.) Name this network and click Apply.
Saving additional network configurations
• To set up a new network profile first click Add.
• Confirm that the Vu unit has access to the new network.
• Select the network Type: DHCP or Static.
- If you are operating on a DHCP service enabled private network, DHCP will automatically configure
your settings. Name this network and click Apply.
- If you desire to provide a fixed Public or Private IP choose Static, you will need to fill in the proper IP
address, Subnet Mask and Default gateways for your static IP. Name this network and click Apply.
When you move your Vu system to a new network you may switch back and forth between your
configured network profiles by pressing the switches on the left side of this screen.
User Settings
Vu Name: Choose any alpha-numeric name. This name is public facing and searchable. Name should be 15
characters or less. (If your desired name is already chosen by another Vu user you will be prompted to
choose another name.)
Vu Number: Choose any 10 digit number. This number is public facing and searchable. (If your desired
number is already chosen by another Vu user you will be prompted to choose another number.)
18
19
Vu Password: Vu to Vu calls are governed by 128 bit encryption. Enter your desired encryption password
here.
Max Allowed Bandwidth: This number determines the amount of incoming and outgoing bandwidth
usage your Vu unit will operate within. Choose any bandwidth allocation from 300kbps to 3000kbps. Vu
recommends 1000kbps minimum for 1080p video. A higher number will result in a better image quality,
but may result in instability depending on the strength of your network.
Admin Password: Choose a password to lock and unlock the Settings menu.
Auto Accept Call: Enable or Disable. Choose disable to hear a ring-tone during an incoming call and
manually answer. Choose enable to allow your Vu unit to automatically answer incoming calls.
Sounds: Enable or disable all the ringtones, busy signals, etc.
Automatic Gain Control (ACG): When ACG is activated, Vu causes the microphone to become extra
sensitive in order to boost your microphone volume level. When ACG is activated the general quality of
voice may decrease due to necessary compression.
Echo Level: Depending on the size or density of your room, you may experience an echo during calls. This
echo can be fixed by adjusting Echo Level. There are ten levels. A higher number provides more echo
cancellation.
Reset Factory: When you choose Reset Factory, Vu will erase all of your settings, contacts, call logs,
accounts and recordings. Your Vu name and Vu number will be wiped from the database. The Vu unit will
shut down and restart. At that time you will be required to run through the initial configuration settings
again. Your deleted Vu name and Vu number may be re-entered again at this time.
Caution: Do not use Reset Factory unless you are certain that you require a fresh installation.
Diagnostics
Ping: To test and evaluate the success of your inbound/outbound data transfers use Ping. Type the name of
a working IP Address or Domain into the address bar. For example: www.google.com and press ping.
Iperf: Iperf is used to check for UDP packet loss on the network connected to the Vu unit. To run Iperf,
input the IP address of another Vu online unit followed by: 7010:1m and press the Iperf button. Iperf will
run a number of diagnostics to determine packet loss. Packet loss should read zero percent (0%) for a
proper connection.
20
21
Analyze Network: You may click “Analyze Network” to check your network connections.
• Confirm that the network cable is connected - Blue
If red, the network cable is not successfully inserted into the network port on the codec. Check to
make sure the cable is fully inserted.
• Confirm network is available - Blue
If red, the codec is not connected to a live network. Check with your IT administrator/ISP to ensure
that your network is active.
• Confirm Internet is Available - Blue
If red, the network you are connected to cannot access the internet.
If you choose to operate Vu in StandAlone mode within a closed network, this box should be red.
• Confirm Is UDP Allowed - Blue
If red and “UDP Not Allowed,” the Vu Telepresence is inhibited by a firewall. Check with your IT
administrator to allow access.
• Confirm NAT Type
NAT Type will be red “Relay” if operating on a private IP.
NAT Type will be blue “Public” if operating on a public IP.
Time Settings
In Time Settings, you may change the Date,
Time, or Time Zone of your Vu Telepresence
unit.
Archives
If you have created any recordings from previous Vu
Telepresence meetings, those recordings will appear
here. Select a video to play. This video will play back
in full-screen for you to review.
22
23
Software Versions
Any patches or software updates that have been made to your Vu Telepresence system since the
installation will be listed here.
Background Images
Select one of the optional themed
background images to be displayed on your
Vu Telepresence home screen.
Adding Contacts
To search and add contacts that you wish to connect with, follow this procedure. Note that the same
far-side unit can be added to your contact list under multiple signaling accounts concurrently.
To add a contact to your Vu to Vu signaling account:
• Click the Add Contact button on the homescreen.
24
25
• Select the name of your Vu account under Account Name.
• Click the “Search/Call Contact...” bar.
• Type the Vu name or Vu number of the Vu unit you wish to add to your contact list, and click the search
icon.
• Find the desired user from the list below.
• Click “Add.”
• This user will receive a notification at the bottom of their homescreen which they must accept before calls
can be placed to that user.
To add a contact to your H.323, SIP, or Standalone signaling account:
• Select H.323, SIP, or Standalone under Account Name.
• Enter a display name. This is how the contact will appear in your contact list.
• Contact Address: Enter the IP address of the unit you wish to connect with.
• Switch Favorite to yes (blue) or no (red). If yes, this contact will appear in your favorites list.
You may now place calls to these units whenver they are online.
Placing Calls
Once you have added contacts that you wish to call, they will appear in the contacts list on the homescreen.
All contacts will be organizaed alphabetically and will be grouped by signaling protocol. If the number of
contacts exceeds one page, you may scroll by clicking and dragging within the contacts window.
In the Vu signaling section of your contact list, you can see whether your Vu contact is online or offline. If
they are offline, the contact will have a red bar to the left of the contact name. If they are online, the contact
will have a green bar to the left of the contact name. All contacts under H.323, SIP, or Standalone signaling
26
27
protocols will show a blue bar to the left of their contact name. These types of connections do not support
online/offline verification.
To place a call:
• Find the name/number of the contact that you would like to dial.
• Click the green telephone symbol to place a call.
• You will hear a ringtone.
• If the user is in another call, you will see a “User Busy” notification in the upper-right corner.
Tech Support
In the event that you require technical support use one of the following methods to reach our team. We’re
happy to help you resolve any issue you may experience.
U.S. Technical Support
[email protected]
1-855-393-9782
Global Technical Support
[email protected]
+91-22-28305929
28
29
Notes
Notes
30