1
INSTALLATION INSTRUCTIONS: Viewline 85 mm
Speedometer
TU00-0752-7407102
02/11
GB
1-11
2
Procedures for installing VDO Viewline instruments
1
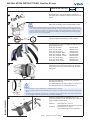
Before beginning, turn off the ignition and remove
the ignition key. If necessary, remove the main circuit
switch.
2
Disconnect the negative terminal on the battery.
Make sure the battery cannot unintentionally restart.
• Before taking any action, disconnect the negative terminal on the battery, otherwise you risk a short
circuit. If the vehicle is supplied by auxiliary batteries, you must also disconnect the negative terminals
on these batteries! Short circuits can cause fires, battery explosions and damages to other electronic
systems. Please note that when you disconnect the battery, all volatile electronic memories lose their
input values and must be reprogrammed.
If installing the instrument near a magnetic compass,
note the magnetic safe distance to the compass.
3
0.3 m
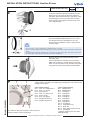
The following rings may be installed as alternatives to
the supplied front ring:
4
Front
Front
Front
Front
Front
Front
Front
Front
Front
ring,
ring,
ring,
ring,
ring,
ring,
ring,
ring,
ring,
flat; black
flat; white
flat; chrome
triangular; black
triangular; white
triangular; chrome
round; black
round; white
round; chrome
A2C53192911
A2C53192912
A2C53192910
A2C53192917
A2C53192920
A2C53192918
A2C53192913
A2C53192916
A2C53192914
Place the new front ring on the instrument, rotate it
until the ring’s lip locks into the slots in the housing
and press the front ring until it is flush with the instrument glass.
5
2
1
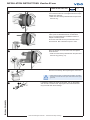
Conventional assembly. (Instrument is put into the
drill hole from the front).
The panel width may be within a range of 2 to 20 mm.
The drill hole must have a diameter of 86 mm.
Ø 86 mm
6
• Do not drill holes or ports in load-bearing or stabilizing stays or tie bars!
• Note the necessary clearance behind the drill hole or port at the installation location. Required mounting depth:
65 mm.
• Drill small ports; enlarge and complete them, if necessary using taper milling tools, saber saw, keyhole saw or
2 ... 20 mm
file. Debur edges. Follow the safety instructions of the tool manufacturer.
7
TU00-0752-7407102
B
A
or
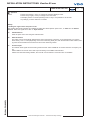
For 85 mm instruments, the fastening nut can be
mounted at position A or B. This allows you to fixe the
gauge in different panel bores.
Version A
Version B
Panel bore 80.5 - 81 mm
Circumferential lip away from instrument
Panel bore 85.5 - 86 mm
Circumferential lip next to instrument
Technische Änderungen vorbehalten - Technical details subject to change