1
The Operation
Handbook
for the
SMARTCASTER
Digital
Audio Automation
System
Operations Handbook for the
SMARTCASTER Digital Audio
Automation System
Overview:........................................................................................................................... 6
Don't Panic! ....................................................................................................................... 6
WHAT IS CLOCK AND HOW DOES IT WORK? ..................................................... 6
How CLOCK relates to Live Assist...
8
Using CLOCK some of the time...
8
Sequential (or Non-CLOCK Satellite) Programming....
9
Continuous (Music on Hard Drive)............................................................................... 10
Jock-In-the-Box (CD System) ........................................................................................ 10
Getting started................................................................................................................. 11
The Main Screen... .......................................................................................................... 13
Editing
16
Pausing............................................................................................................................. 16
Live Assist... ..................................................................................................................... 17
The Audio Section........................................................................................................... 19
The Record Screen.......................................................................................................... 19
! RECORD AUDIO
20
@ EDIT CUT DATA
22
# AUDITION CUT
22
$ DELETE A CUT
22
Operations-2
% TIMED STOP ON
22
^ RECORD TIME/TEMP
23
& AUTO START ON/OFF
24
* NET TRANSFER
24
( BACKUP ON/OFF
25
) CHANGE PATH
25
a+R RENAME CUT
26
Cut Manager ................................................................................................................... 27
Verification Logs............................................................................................................. 30
1.) TRANSFER LOGS
31
2.) PRINT LOGS.
31
3.) VIEW LOGS
32
4.) DELETE LOGS
33
The Programming Section ............................................................................................. 33
Breaks .............................................................................................................................. 33
What is a 99999? ........................................................................................................................36
What happens if a 99999 is programmed in a Manditory Break?..............................................36
CLOCK Users:
35
Commands:.................................................................................................................................37
Operations: .................................................................................................................................38
Continuous Users:
37
Functions.......................................................................................................................... 42
The Functions Screen...
43
Operations-3
Announcers...................................................................................................................... 46
Timed Events................................................................................................................... 47
Adding a Timed Event.................................................................................................... 50
Types of TIMED EVENTS...
52
Why rejoin 50 seconds early?
54
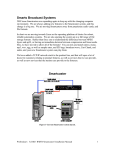
Diagram of RIDZ 8x2 Switcher with example inputs.
58
Deleting a Timed Event
61
Adding a Subroutine
62
Deleting a Subroutine
64
Editing a Subroutine
64
Renaming Networks on the RIDZ 8x2 Switcher
64
Mini-Switcher
65
Input Mapping for the RIDZ Switcher...
65
Diagram of RIDZ 8x2 Switcher with example inputs.
67
Global Inputs
70
Backing up the Timed Events List:
71
Unattended Record ......................................................................................................... 72
Start on a timed basis, end on a timed basis.
74
Starting on a relay and ending on a time basis...
76
Using multiple records within a Record Window...
78
Start on a time basis and end on a relay...
79
Starting on a Relay and Ending on a Relay...
80
Doing a Multi-Segment Record...
81
Remotes............................................................................................................................ 84
Remote Screen Example:
85
The Remote Screen Options.......................................................................................................86
Doing Remotes from the keyboard... .........................................................................................87
Doing Remotes with a SmartTouch...
........................................................................................87
Operations-4
For CLOCK Users:.....................................................................................................................88
Tones on the air... .......................................................................................................................89
Using the SmartTouch...
89
Fill Rotation..................................................................................................................... 89
The Live Show Screen .................................................................................................... 91
Assign Satellite Clocks.................................................................................................... 97
The Maintenance Section ............................................................................................... 98
Change Break
98
Change Day
99
Import Traffic Log
99
Change Time
99
Change Date
99
The Quit Section............................................................................................................ 100
Clock - The Clock Setup Screen .................................................................................. 101
Operations-5
Overview:
The SMARTCASTER is one of the most sophisticated automation systems ever developed. It is versatile
and powerful. This handbook is designed to help the user unlock the potential of the SMARTCASTER.
There are two main modes that the SMARTCASTER operates in: Satellite, and Music on Hard Drive.
This manual discusses SMARTCASTER operations in terms of these modes.
CLOCK refers to Clock satellite operation. Where needed there are additional notes for Non-Clock
operation.
Continuous refers to the Music on Hard Drive.
Generation 2000 refers to the Generation 2000 system.
The SMARTCASTER is capable of using several audio devices to digitize and store audio. The two main
categories for audio devices are called "Antex" and "Ace." Only Generation 2000 systems use the Ace
cards. Differences between these categories (if any) are noted in the descriptions.
For the beginning user...
Don't Panic!
The SMARTCASTER is set up in the factory before it is shipped. It has most of the Setup Options
activated for the type of operation specified on your contract. The system can be customized to the user's
preference as he/she reads along in this section. It is recommended that one start slowly and understand the
basics for the type of system that was purchased.
Support...
This automation system has the capacity to run a radio station. At the very least it alters nearly every
operation of the station. This handbook goes a long way toward helping everyone to adjust, but, of course,
more may be needed. See the introduction section of the manual about Support hours and policy.
WHAT IS CLOCK AND HOW DOES IT WORK?
Warning...
Even though the software package referred to as "CLOCK" is used on nearly all types of
SMARTCASTERS, the CLOCK mode is used only on Satellite systems. Continuous (Music on Hard
Drive) customers should have the Clock Option disabled (Option 5 in OPTION SETUP). CLOCK mode
should never be on at the same time as Continuous Play mode (Option 7 in USER SETUP).
Description...
CLOCK is the name of a special mode that the SMARTCASTER can enter. In this mode, the
SMARTCASTER uses the time of day to determine when to load and play breaks. Prior to the
development of CLOCK, SMARTCASTERS ran in a sequential mode (i.e. when one break played, it
simply went on to the next break and waited for a closure). Sequential operation works well until a break is
missed, or two break closures are accidentally fired. When this happens, the SMARTCASTER is off a
break until the top of the hour when the system updates its breaks.
Operations-6
CLOCK changed all that. Now the user has a CLOCK SETUP Screen that allows him/her to define when
the breaks are, how long they are, and whether they are mandatory or not (Mandatory means that the break
contains closed circuit feeds or is silent and MUST be filled to insure that inappropriate audio or silence not
get on the air).
This information gives the SMARTCASTER a lot more power. Since it knows when a break is supposed
to fire, it knows when a break closure is missed and automatically updates to the next break. Also, since it
knows how long the break is, if a break is accidentally under-programmed, it pulls material (Public Service
Announcements, promos, or any other audio cuts the station chooses) and fills the break to the proper
length. All SMARTCASTERS running in CLOCK mode fill to within a few seconds of the proper length
of the break. However, if the SMARTCASTER is equipped with an SX-8, SX-12, SX-20, SX-7 or SX-22
audio card the SMARTCASTER varies the speed of the audio just a little to make sure that it fits as close
as possible to the break length! This is the Shrink-and-Expand feature.
Of course, if so desired, one or all of these features may be disabled. See the SETUP SCREEN
APPENDIX. Especially USER SETUP Options 17 and 18 for details on how to set up the
SMARTCASTER for CLOCK operation.
TRICKS...
Though the number of SMARTCASTER Setup Screens is daunting, they allow a user to configure the
SMARTCASTER to fit a station like a glove fits a hand. As users become familiar with their unit's
capabilities, they love to "tweak" the system to fit their operation.
For Satellite users, the CLOCK Options are a Program Director's playground. A little originality produces
fantastic results using these features.
For instance, users who cannot use the Shrink-and-Expand feature (ACE, SX-3,SX-6, SX-15, SX-34, SX36, and AudioPort) could make use of the Unmute On Time (Option 16 in USER SETUP). When this
feature is activated, the SMARTCASTER unmutes satellite audio at the end of the break time instead of
when the SMARTCASTER audio is done playing. If the SMARTCASTER is setup to fill the breaks, the
breaks are slightly over-programmed. This causes an overlap of break audio and satellite audio when the
SMARTCASTER rejoins the music network. Creative operators can create a "seamless" flow that helps to
get rid of the "cookie cutter" satellite sound.
Operations-7
How CLOCK relates to Live Assist...
When the user enters Live Assist, all of the CLOCK features disappear since they would only get in the
way of a live operation.
Change Break goes back to asking for a break number and the SMARTCASTER does not automatically
update from break to break.
One problem that users may have is that during Live Assist, a station may have a variable number of breaks
from day to day. Often, the rigid CLOCK structure is too restrictive for live operators.
To get around this problem, the user must build a "dummy" Clock in the Clock Setup Screen and define 12
breaks (the system maximum) on it. Then, by scheduling this Clock (using Set Active) during their live
hours, they ensure that no matter how many breaks come over from traffic for that hour, there will be
enough break slots to cover it. ESETUP contains a place to input this Clock.
If an hour is half live, half satellite, a special "transition" Clock may be built that has enough breaks to
cover the live half then start into the normal satellite format.
Using CLOCK some of the time...
In systems that are both Satellite and Continuous (Music on Hard Drive), the user has the option of turning
the CLOCK off and on as needed. Timed Events has the capability of turning on and off CLOCK, or
Continuous Play. Using these items in combination is a very powerful programming tool that creative
operators can use to their advantage.
Continuous Play is incompatible with CLOCK. In order to turn Continuous Play on, CLOCK must be
turned off first and visa-versa. When the CLOCK is on during the Satellite times, all the differences
mentioned previously take effect. The Breaks Screen shrinks down to the number of breaks defined in the
CLOCK SETUP Screen.
It is very important to generate a "dummy" Clock containing 12 breaks, and
assign it (using Set Active) to the non-satellite hours, just as would happen
during Live Assist (described above). That way, when the SMARTCASTER
enters CLOCK mode, it doesn't effect the programming information for Music
on Hard Drive.
Operations-8
Sequential (or Non-CLOCK Satellite) Programming....
CLOCK is not for everyone.
Some people prefer the simplicity of the sequentially based
SMARTCASTER. It also may occasionally be necessary to run without CLOCK in order to diagnose a
problem.
A non-CLOCK satellite operation waits for a local break closure from the satellite receiver. When it gets
one, it plays the current break, rejoins satellite, then loads the next break and waits again. A safety feature
can be activated that at a specific time in the hour causes the SMARTCASTER to jump to the first, second,
third, etc. break in the hour (The break number is user definable in options 4 and 12 in USER SETUP).
Note: When the CLOCK Option is disabled, the SMARTCASTER no longer has the ability to Shrink-andExpand, Fill, or automatically update from break to break.
Operations-9
Continuous (Music on Hard Drive)
The Music on Hard Drive systems use the SMARTCASTER in a different way. The Breaks Screen becomes a
sequential list of "sets." These are sets of audio cuts, usually spots or sets of music. As the last item in a set plays,
the next set loads and readies itself for playback. When the previous set finally concludes, the new set begins its
playback. This cycle continues through the log for the day.
This is one of the simplest systems to run. No external music network wiring is necessary, though a news network
may be desired. The newer hard drives are big enough to hold hundreds of songs. The system can be fitted to have
enough drive space to comfortably hold an entire music library and the news network would be used for news and a
time update closure.
Music is added to the traffic log through a separate program called Log Manager. See the appendix on the
SMARTS Digital Program Director for details about this procedure. Jock-In-the-Box (CD System)
(NOTE: AS OF JULY 1998 – JIB SYSTEMS ARE NO LONGER SOLD)
The Jock-In-the-Box system runs in similar fashion to the Music on Hard Drive. JIB systems use a playlist
generated on a separate machine. The playlist is loaded on to the SMARTCASTER via floppy. Generation 2000
systems can load the playlist across the network from another machine.
Operations-10
Getting started...
To begin SMARTCASTER operation, the user chooses option 1 from the "SMARTCASTER Digital Audio" main
menu. This begins the SMARTCASTER initialization process. The screen indicates progress by displaying a
percentage in the center of the screen. Each number shown indicates an operation. If the SMARTCASTER stops at
a certain percentage and jumps back to the main menu an error has occurred. The following table indicates (in
detail) what the SMARTCASTER is doing at the different percentages. The description may be too technical for
beginning users. Feel free to skip this section and come back to it later.
Operations-11
SMARTCASTER Loading Guide
% Operation
What to do if an error occurs:
0%
Loading Paths
Check PSETUP
1%
Logging Start
Rename Log.{day of week}*
2%
Check Drives
Check system Hardware*
3%
Loading Addresses
Check ASETUP
4%
Loading Audio Info
Check RSETUP
5%
Loading Backup Drives
Check BACKUPDR.FIL*
6%
Loading Sample Rates
Check USETUP
7%
Loading Options
Check OSETUP
8%
Loading Comports
Check com connections or turn off coms*
9%
Loading Old Net
Set Option 3 in OSETUP to N
10%
Init Vars, Recvol.Fil
Check Recvol.fil*
11%
Load Switcher
Check Switcher.fil*
12%
Load AMX info
Check AMX files, Tone File*
13%
Init audio cards
Check sample rate, mono/stereo etc.
14%
Load Parameters
Check Param.fil*
15%
Load Fill Info
Check Frotat.fil*
16%
Get Fill
Check Fill information*
17%
Load CLOCK Info
Check CLOCK Option on main menu
18%
Load CLOCK Info (more)
Check Set Active Option on main menu
19%
Turn off Muting
Call SMARTS*
19%
Load Music Position
Call SMARTS*
19%
Load Wait
Call SMARTS*
19%
Load Mute
Call SMARTS*
19%
Load Hold
Call SMARTS*
20%
Get live info
Check Live.fil*
21%
Init Breaklogs
Put traffic log on another disk, try again
23%
Create Directories
Let set for a while. If there are errors, call*
25%
Init CD's
Check Option 3 in USETUP
27%
Init CD's
Check PlayLists
30%
Init SmartTouch
Check ASETUP*
33%
Init Function Rotation
Check Offset.fil*
34%
Init Menus
Check Menu.fil's*
35%
Init Announcers
Check Announcer files*
40%
Init Announcers
Check Announcer files*
45%
Init Unattended Record
Check UnRecord.fil*
48%
Init Timed Based Events
Check Satswich.fil*
49%
Init Drive Sizes
Check Hidesize.fil*
50%
Init Functions
Check Function Files*
100% Get next Break
Check Breaklog's*
*Call SMARTCASTER Support Staff for instructions
Operations-12
The Main Screen...
The blue screen is the first screen to show when the SMARTCASTER program loads. One "set" or "break"
is displayed at a time. Within a break are up to 10 audio cuts that are recorded on the hard drive. To the
right of the items in the break, the length is displayed. The length counts back from the total to 0 when the
item plays. Down below, the current log day, date, time, break number, announcer, duration, break
countdown, version number, and RIDZ network selections are displayed. In the far right column is the
indicator for status of Clock, Digital Inputs, or Continuous Play.
All system capabilities can take place while at this screen. Unattended Records, Network Switching, and
On Air playback may all take place.
There are three menu options at the bottom of the screen: v, ( and ). v ‐ Brings up the menu bar along the top of the screen. To use the menu bar, press the arrow keys
to move the highlighted bar from selection to selection, then press e. This reveals a vertical sub
menu that contains more options.
( ‐ Allows the user to edit the events displayed in the break without taking the SMARTCASTER
off-line. In other words, the SMARTCASTER is still looking for closures, will continue to play,
etc. (See Editing Keys below.)
) ‐ Puts the SMARTCASTER in Live Assist mode. The user may edit items just as using the ( option allows, but the SMARTCASTER will not respond to any closures or roll from break to
break (if it is in Continuous Play).
Operations-13
Live Assist was the predecessor to the Live Show and was used extensively in the early days of the
SMARTCASTER. There are a few stations that still use Live Assist. Live Show is a more streamlined and
beefed up tool for the live announcer. Live Show is discussed in depth later in the handbook.
After five minutes of inactivity by a user, the SMARTCASTER Screen changes to the Screen Saver. This
prevents excessive wear on the system monitor. The SMARTCASTER, however, still runs even though
the Screen Saver is on. Pressing any key on the keyboard will bring the working screen back to view. The
Screen Saver does not come on in Live Assist or in the Edit mode. Changing the time for the Screen Saver
If the duration of 5 minutes is not desirable, it is possible to reset it. Doing so involves taking the
SMARTCASTER off the air and exiting to the C:\> prompt. If you do not feel confident about the
following steps, please feel free to call SMARTCASTER Technical Support.
•
•
•
•
•
•
•
Press v and arrow over to QUIT.
Select YES and press e (Doing so takes the system off the air).
From the Main Menu press v.
At the C:\> prompt, type SETSAVER and press e.
Enter the minutes for the system to wait before the Screen Saver activates. When finished, press e.
Type GO and press e.
Select SMARTCASTER and press e.
The Screen Saver will now activate after the specified period of time.
Setting the Screen Saver to 0 (zero) disables the device.
Operations-14
▄▄▄▄ ▄▄▄▄▄ ▄▄▄▄ ▄▄▄▄ ▄▄▄▄▄ ▄▄▄▄ ▄▄▄▄ ▄▄▄▄ ▄▄▄▄▄ ▄▄▄▄ ▄▄▄▄
┌────── █▄▄▄ █ █ █ █▄▄█ █▄▄█ ▀ █ ▀ █ ▀ █▄▄█ █▄▄▄ ▀ █ ▀ █▄▄ █▄▄█ ────┐
│
▄▄▄█ █
█ █ █ █ █▄
█
█▄▄█ █ █ ▄▄▄█
█
█▄▄▄ █ █▄
│
│
Sat ellite Mode
│
│
1. 00131 Bubba's BBQ
:30
│
│
2. 00231 Joe's Cars
:60
│
│
3. 00331 McNally's Bake Shop
:60
│
│
4.
│
│
5.
│
│
6.
│
│
7.
│
│
8.
│
│
9.
│
│ 10.
│
├───────────────┬──────────────┬───────────────────────┬──────────────┤
│ Time:08:25:40 │ Break : 109 │ Duration :
│ Announcer: A │
│ Date:12/08/94 │ Log Day: Thu │ Countdown: 2:30
│
│
├───────────────┴──────────────┴───────────────────────┴──────────────┤
│
│
└─────────────────────────────────────────────────────────────────────┘
Esc
Menu
F9 Edit
Operations-15
F10 Live Assist
Editing
The Edit Screen allows the user to make quick changes to the current break. This allows the program to
remain in automated mode where the SMARTCASTER can react to possible closures from a satellite
source.
Pressing ( switches the system to Edit. The information in the gray bar at the bottom of the screen will
change to show that the system is in Edit Mode. The y and z arrow keys then allow the cursor to be placed
in the proper position for making the change.
Several options appear at the bottom of the screen.
(- Quit. Pressing this button exits the Edit Mode.
_ - Abort Spot. Stops the spot that is playing on the air and continues with the next item in the break.
= - Abort Break. Stops and resets the break. For CLOCK users, this also un-mutes the satellite feed.
Editing Keys...
In Edit Mode, the user has the ability to insert, change, and delete spots or music even while that very
break is playing.
To insert a spot into a break in Edit mode, use the y and z arrow keys, to move the highlight bar to the
desired position. Then, press the i button. Items after the insertion point all move down a line leaving a
gap where the user may enter a script number.
Note: If there are ten items in the break, it is full. The SMARTCASTER does not allow a spot to be
inserted at this point. Also, if the break is playing, the SMARTCASTER does not allow inserts or deletions
of spots that have already played. Only events that the SMARTCASTER hasn't yet played are valid to edit,
insert, or delete.
To delete a spot from the break, use the y and z arrow keys to move the highlight bar to the spot desired.
Then press the k key. The SMARTCASTER deletes the spot and moves the remaining spots up by one.
To edit (replace) an audio cut in a break, use the y and z arrow keys, to move the highlight bar to the event
desired and begin typing the new script number. Once entered the new spot name replaces the old one.
Pausing...
There are two ways to pause the SMARTCASTER in Live Assist or Edit. One way is to press P to insert a
pause. The other way is to use the t or { key to toggle Pause Between Spots on. The first way pauses until
the user presses !. The second pauses between every item and waits for an ! keypress.
Operations-16
The advantage to the first method is that pauses can be pre-programmed on the log. However, if the user is
doing a Live Show with sound bites, sound effects, etc., the second way is much faster to use.
Live Assist...
The Live Assist Screen allows the user to play breaks, jingles, liners, etc. manually. A live operator may
insert or delete spots from the break linup and play the break by pushing a button.
The SMARTCASTERS’ Live Assist Screen looks almost identical to the Automated Screen. The Live
Assist Screen changes colors to alert the user that the system is no longer automated. At this time, it will no
longer take closures from the network or automatically play spot breaks.
Live Assist was the predecessor to the Live Show and was used extensively in the early days of the
SMARTCASTER. There are a few stations that still use Live Assist. Live Show is a more streamlined and
beefed up tool for the live announcer. Live Show is discussed in depth later in the handbook.
Several options appear at the bottom of the Live Assist Screen.
! ‐ Play Break. This button starts the SMARTCASTER running the break.
@-* - Play Functions 0 through 6. These buttons play the Functions entered in the Function Rotation
Screen. Functions play in the order they are scheduled and start over from the beginning when they are
done. Between Live Assist sessions the next Function to fire does not remain the same. There are several
conditions that can cause the software to shift down the list for the next Function to play.
) ‐ Quit. Pressing this button exits Live Assist. If the current break is started in Live Assist but is not done,
it continues to the end. In CLOCK the break stops playing at the end and returns to satellite. In
Continuous modes, the system continues from break to break.
_ - Abort Spot. Stops the spot that is playing on the air and continues with the next item in the break.
Generation 2000 users may want to use option 5 in MISCELLANEOUS SETUP to change this key to an S.
See SETUP APPENDIX.
= - Abort Break. Stops and resets the break. For CLOCK users, this also un-mutes the satellite feed.
Generation 2000 users may want to use option 5 in MISCELLANEOUS SETUP to change this key to a B. See the SETUP APPENDIX.
Editing Keys...
In Live Assist or Edit mode, the user has the ability to insert, change, and delete audio cuts even while that
very break is playing.
To insert an event into a break in Live Assist or Edit mode, use the y and z arrow keys to move the
highlight bar to the position desired. Then, press the i button. Items after the insertion point all move down
a line leaving a gap where the user may enter a script number.
Note: If there are ten items in the break, it is full. The SMARTCASTER does not allow an event to be
inserted at this point. Also, if the break is playing, the SMARTCASTER does not allow inserts or deletions
of cuts that have already played. Only events that the SMARTCASTER hasn't yet played are valid events
to edit, insert, or delete.
Operations-17
To delete a cut from the break, use the arrow keys to move the highlight bar to the spot desired. Then press
the k key. The SMARTCASTER deletes the cut and moves the remaining cuts up by one.
To edit (replace) a cut in a break, use the arrow keys to move the highlight bar to the spot desired and begin
typing the new script number. Once entered the new event name replaces the old one.
▄▄▄▄ ▄▄▄▄▄ ▄▄▄▄ ▄▄▄▄ ▄▄▄▄▄ ▄▄▄▄ ▄▄▄▄ ▄▄▄▄ ▄▄▄▄▄ ▄▄▄▄ ▄▄▄▄
┌────── █▄▄▄ █ █ █ █▄▄█ █▄▄█ ▀ █ ▀ █ ▀ █▄▄█ █▄▄▄ ▀ █ ▀ █▄▄ █▄▄█ ────┐
│
▄▄▄█ █
█ █ █ █ █▄
█
█▄▄█ █ █ ▄▄▄█
█
█▄▄▄ █ █▄
│
│
Live Assist
│
│
1. 00131 McNally's Bake Shop
:00
│
│
2.
│
│
3.
│
│
4.
│
│
5.
│
│
6.
│
│
7.
│
│
8.
│
│
9.
│
│ 10.
│
├───────────────┬──────────────┬───────────────────────┬──────────────┤
│ Time:08:26:06 │ Break : 109 │ Duration :
│ Announcer: A │
│ Date:12/08/94 │ Log Day: Thu │ Countdown: 0:00
│
│
├───────────────┴──────────────┴───────────────────────┴──────────────┤
│
│
└────────────────────────────────────────────────────────────────
─────┘
Esc Menu
F1 Play Break
Pause Between events off
TAB Pause ON
F2-F8 Play Fctn 0-6 F10 quit F11 Abort Spot F12 Abort Break
Operations-18
The Audio Section
The Record Screen
The Record Screen is where the user manually records audio into the SMARTCASTER. Almost all audio,
including liners, music, and spots, is recorded here. Automatic or "Unattended" Records (of news feeds,
etc.) are not done on this screen. They are programmed into the Unattended Record section that is
described later.
Note: While in the Record Screen the SMARTCASTER cannot do Unattended Record, Remote Records,
Hot Key Playback or SmartTouch operations (including record and playback).
┌────────────────────┬────────┬──────────────────────────────────┬─────────┐
│SCRIPT:
│DRIVE: │ACCNT:
│Time Left│
├────────────────────┼────────┴────────────┬─────────────────────┤ C: 3:02 │
│START: MM/DD/YY
│STOP: MM/DD/YY
│PRODUC T CODE:
│
│
├────────────────────┼─────────────────────┼─────────────────────┤
│
│ DIGITAL INPUT GAIN │
RECORDING LEVEL
│
OVERLOAD STATUS
│
│
│
│
│
│
│
├──────────────────┬─┴─────────────────────┴─────────────────────┤
│
│ FIDELITY: 16S
│ ELAPSED TIME (MMM:SS.HH) ═══>
│
│
│
│ EOM TIME
(MMM:SS.HH) ═══>
│
│
├──────────────────┴─────────────────────────────────────────────┤
│
│
│
│
│
│
│
├────────────────────────────────────────────────────────────────┤
│
│
│
│
├────────────────────┬─────────────────────┬─────────────────────┤
│
│[F1] RECORD A SPOT │[F5] TIMED STOP ON
│[F9] BACKUP ON
│
│
│[F2] EDIT SPOT DATA │[F6] RECORD TIMES
│[F10] Change Path
│
│
│[F3] AUDITION SPOT │[F7] AUTO START OFF │
│
│
│[F4] DELETE A SPOT │[F8] NET TRANSFER
│[ESC] EXIT
│
│
Operations-19
└────────────────────┴─────────────────────┴─────────────────────┴─────────┘
The SMARTCASTER Record Screen displays only those options that the system is configured to use. For
instance, if no backup path is specified in PATH SETUP option 2, then the option ( Backup ON does not
appear on the Record Screen.
The time left on each drive is displayed in the column on the right hand side of the Record Screen. It is
shown in hours and minutes. In systems with many hard drives, pressing T will show any drives not seen at
first glance.
Key terms:
EOM - Refers to the End of Message signal. SMARTCASTERS equipped for overlap of audio will
advance to the next cut and overlap the tail end of the current cut. This acts the same as the
tertiary tone on older cart-based automation systems.
FUNCTION - is a liner, jingle, magic call, I.D., etc.
FIDELITY - The quality of the audio recorded. See ‘Fidelity’ or ‘Sample Rate’ in the SETUP section of
this handbook for details on this setting.
! RECORD AUDIO
STEP 1.
The user is prompted for a Script number. This number is five digits long. Continuous Play
(Music on Hard Drive) users should start the Script Number with an M if the file recorded is a
song.
Functions are recorded starting with an F. The five digit number has special meanings for
Functions. For example, F001A means Function zero, Cut 01, announcer A. Continuous Play
users have the option to either record their Functions with an F or an M. Many Music on Hard
Drive customers use this trick to allow their music scheduling program to schedule their Functions
as well as the songs. However, for the Function to operate in the Function Rotation Screen, an F
is required. See Function Rotation for a description of a Function.
After entering a valid spot number press e. If the spot entered already exists, the user is prompted
with a message asking permission to delete the old audio cut.
STEP 2
The user is prompted for a drive letter.
Note: Functions starting with an F automatically know where they are recorded. The drive letter
step is skipped in this case. Function location is designated in PATH SETUP, option 4.
Valid drive letters are displayed to the right under Time Left. Drives that are highlighted are
locked and cannot be recorded to (see BACKUP SETUP).
STEP 3
The user is prompted for an Account Name. Enter the name of the sponsor, song, or Function.
STEP 4
Operations-20
The user is prompted for a Start and Stop Date. This is the time period that this audio cut runs.
The SMARTCASTER can be configured to not allow outdated material to play on the air (See
USER SETUP, option 14). They default to today for the Start Date and to12/30/99 for the End
Date.
STEP 5
The SMARTCASTER prompts the user for a Product Code. This is used in conjunction with the
SMARTS Traffic System. It helps to prevent two similar sponsors from playing back to back. In
the Breaks Screen and in Live Assist the user is warned about a Product Code conflict when
entering a script number. Leave this blank if no Product Codes are used.
STEP 6
If option % Timed Stop is ON, the user is prompted for the length of the cut. This feature
automatically shuts off the recording after the amount of time entered has elapsed. This feature is
rarely used, but could be handy for recording long shows that are pre-timed. If the timing is
accurate, the user need not sit through the entire recording session. The user can start the recording
and then leave to handle other duties.
STEP 7
If the SMARTCASTER is equipped for overlapping audio, the user is given the opportunity to
enter an "End of Message" (EOM) time before recording the commercial. This is not a
requirement. The user may stamp the EOM time by pressing the } bar while listening to the audio
during the record or the audition of the audio cut.
STEP 8
The Record Screen prompts the user for permission to continue. If the user answers Y, the
SMARTCASTER is "cued" and ready to go by pressing a key or by Autostart which is explained
below.
This is the only time a user is allowed to alter the Digital Input Gain. The Digital Input Gain is the
volume control for recording to the SMARTCASTER. Use h, g, p and q to alter the Digital Input
Gain. Note: This should not be done often. It is far better to raise the levels to the highest point
seen on the screen. It is recommended to set this once and then lock it to prevent accidental
changes. Digital Input Gain is locked out in MISCELLANEOUS SETUP, option 3. Once locked,
the operator cannot change the level while in the Record Screen.
At this time, SMARTCASTERS that can show levels and Overload Status will do so. Adjust the
levels (preferably on the source, not the Digitial Input Gain) so that the Overload message blinks
very rarely. On systems equipped with Antex audio cards, this indicates clipping. On a
Generation 2000, the Overload status is like “dipping into the red” on a VU meter. You don’t want
to do it all the time, but it is not clipping the audio.
SMARTCASTERS capable of Overlap insist that the user press e to stop the record or } bar to set
the EOM tone. If the SMARTCASTER is not capable of Overlap, any key starts the recording
and any key stops the recording.
Once finished, the Record Screen prompts the user to press R to re-record the same audio cut or (if
the system is capable of overlap) E to edit EOM tone. Pressing R sets the Record Screen back to
the point just before the recording started. Nothing needs to be re-entered. Pressing E allows
Overlap users to change the EOM time down to the hundredth second. Any other key clears the
Record Screen.
Operations-21
@ EDIT CUT DATA
Pressing this button allows the user to change all but one of the fields assigned to the Script
number. Drive, Name, Start Date, Stop Date, Product Code and EOM time are all changeable.
The Script number is not changeble here. Use ALT+R to change the Script number. When
Editing, @ prompts the user to enter the five digit Script number.
Moving an audio cut from one drive to another:
Changing the drive letter causes the audio to be copied from its present location to the new one
specified. This can take some time depending on the length of the audio cut. This only applies to
systems with more than one drive. Functions starting with an F cannot be moved in the Record
Screen.
# AUDITION CUT
This prompts the user to enter the five digit Script number. If the audio cut exists, the cut appears
and the user is asked to "Press a key to begin Audition." If the audio cut does not exist, the
Record Screen clears.
If the SMARTCASTER is capable of Overlap, the user may, at any time, set the EOM by pressing
the } bar. If the user changes his/her mind, pressing the } bar again resets the EOM time. While
only one EOM time is allowed per audio cut, the placement of that tone may be done over and
over without re-recording the file. An EOM time of 000:00:00 means the audio cut will play to the
very end.
Once finished, the Record Screen prompts the user to press A to re-audition or any other key to
quit. Pressing A sets the Record Screen back in the audition process to where a keypress will once
again begin the audition. Press an A key. This takes you back where you can begin the audition
again.
$ DELETE A CUT
This prompts the user for the five digit Script Number. The operator must know the number of the
desired audio cut. If the audio cut exists the Record Screen displays the cut and asks permission to
delete the audio cut. If the cut does not exist, the system returns to the main Record Screen.
% TIMED STOP ON
As mentioned above in the Record Audio steps, Timed Stop allows the user to enter the length of
the audio cut before it is recorded. This is great for recording program length audio that is pretimed. The Record Screen automatically stops recording when the time runs out, allowing the
announcer doing the recording to be somewhere else discharging other duties. The system will
automatically read the fourth digit in the script number and set the time to match. A “1” will be 10
seconds, a “3” will be thirty seconds, a “6” will be sixty, and a “9” will be ninty seconds. This also
applies for the other numbers not mentioned. Once the cursor rests on the Elapsed Time the
system-picked time will show. At this time the operator may change the Elapsed Time to whatever
they desire that may be different from the number picked by the system. Timed Stop will continue
to work for every audio cut until de-activated by pressing the % key again.
Operations-22
^ RECORD TIME/TEMP
This option allows the user to enter Time and Temp Checks into the system. For Time Checks, at
12:47 PM, if the SMARTCASTER gets a Time Check signal, it plays, "It's twelve forty-seven"
just as it would a Function. The Record Times Option on the Record Screen is used by the
announcer to record these Time Checks into the SMARTCASTER.
When the user selects this option, the Record Screen asks for a Start Time. This is done in hours
and minutes. The first two characters are the hours, the second two are the minutes. For example,
if the start time is 12:47, the user enters 1247.
After the start time is determined, the Record Screen asks for an Announcer letter. Refer to the
ANNOUNCERS Screen to see who is on at the time the Time Check takes place.
The SMARTCASTER checks the system time to determine which cuts to play.
When the first recording is completed, the system automatically sets up the Record Screen again,
only this time it is set for the following minute…in this case, 12:48. It is recommended that the
recording session start with 1:00 and work its way through the hours to 12:59.
Note: In most places on the SMARTCASTER time is entered in military format. Here is the
exception. Times entered in the Record Times are in non-military format, or Civilian time. This
is done because the SMARTCASTER uses only one announcement for the AM and PM Time
Checks. For instance, if a station had only one Announcer Code entered, the 12:47 AM and the
12:47 PM Time Check would actually be the same audio cut.
CLOCK users should check USER SETUP, option 20 for information on using a Function Relay
for a Time Check. Continuous users should look at the Time Checks information in the Breaks
section of the Handbook for details on programming Time Checks into the log.
For Temp Checks, if the SMARTCASTER gets a Temp Check signal, it plays, "It's seventy-five
degrees" just as it would a Function. The Record Temp Option on the Record Screen is used by
the announcer to record these Temp Checks into the SMARTCASTER.
When the user selects this option, the Record Screen asks for the first Temp. Recording Time and
Temp Checks are usually done in sessions; beginning with one number and continueing through a
series of numbers. When the first recording is completed, the system automatically sets up the
Record Screen again, only this time it is set for the following temperature…in this case, the next
warmest temperature. It is recommended that the recording session start with a reasonable low
temperature for the region and work its way through to the highest possible temperature.
The system uses three digits. For below zero, the minus sign (-) is entered first, and then the two
digit temperature. By necessity, no temperature below - 99 can be entered. After the first
temperature is determined, the Record Screen asks for an Announcer letter. Refer to the
ANNOUNCERS Screen to see the choices for Announcer letters. The SMARTCASTER checks
the system time and current temperature to determine which cuts to play.
Known Bugs and Limitations:
While the Time Check already works in the system because it refers to the time in the SMARTCASTER,
the Temp Check requires a Temperature Probe in order to function. In older versions of software, if the
operatore rolls above 59 degrees while recording Temp Checks, the number jumps to 100 degrees. Stop the
recording process and start it again at 60 degrees to get around this problem. Newer versions automatically
increment to the next highest temperature. Currently, the Temp Check can not play instead of a function
Operations-23
like it can with a Time Check. Neither Temperature nor Time Checks contribute to the total length on a
break when played back. This can cause timing problems when using automatic fill in satellite mode.
& AUTO START ON/OFF
Most SMARTCASTER systems (SX-12 or later) show audio levels before and during the
recording of audio. These systems are capable of Autostart. When Autostart is on, the Record
Screen adds one step to the record process.
After the user presses a key to begin recording, the Record Screen tells the user that it is
"Listening." This means that it is waiting to hear audio. Once audio is heard, the recording begins
automatically. This feature is used when timing at the beginning of an audio cut is a problem or if
the operator can’t reach the keyboard and the start button of the audio source at the same time. An
example would be when the SMARTCASTER is in one room and the reel-to-reel tape machine is
in another.
If the recording begins before the audio feed with Autostart On, there is enough line noise
coming into the SMARTCASTER to trigger the record. Have an engineer check the board
and eliminate the hum, static, etc.
Note: Users who have SX-8 audio cards or AudioPorts cannot use this feature.
* NET TRANSFER
Most SMARTCASTERS that use a LAN (Local Area Network) are Generation 2000 systems.
However, some Antex systems are equipped with a network. These systems handle recording in a
different way. Recording is done locally instead of across the network. Then the audio is
transferred across the network to the waiting SMARTCASTER unit.
Having this option activated adds an additional step to the recording procedure. When finished
with the recording the user is asked whether or not to add this audio cut to the Transfer List. If the
user responds with a Y, the Record Screen requests the Destination Drive for the newly recorded
audio cut. This is the destination hard drive on the SMARTCASTER that the audio is being sent
to.
Once the information is entered, the Record Screen asks the user if the information is correct. If
the user responds with an N, the questions start over. If the user responds with a Y, the item is
added to the Transfer List.
NOTE: Only 20 items are allowed in the Transfer List at one time. Net Transfer is activated in
PATH SETUP by changing selection 14 from ‘N’ to ‘Y’. This should only be done while a
technician from SMARTS Broadcast Systems is assisting.
╔═══════════════════════════════Transfer Spots════════════════════════════════╗
║
# item
Account
Src. Drive
Dest. Drive
║
║
1 00131 BUBBA'S BBQ
C
G
║
║
2 00331 McNally's Bake Shop
C
G
║
║
3 00531 Joe's Cars
D
G
║
║
║
║
║
Operations-24
║
║
║
║
║
║
║
║
║
║
║
║
║
║
║
║
║
║
║
║
║
║
║
║
║
║
║
║
║
║
║ * indicates repeats
║
║ F1 Add F2 Delete F3 Start Transfer F4 Edit F5 Insert F6 Move Esc Exit ║
╚═════════════════════════════════════════════════════════════════════════════╝ When the user selects this option, a new screen appears. This screen contains a list of audio cuts
and their destinations. At the bottom of the screen, a new list of options appears.
! Add
-Manually adds an item to the end of the list. @ Delete
-Manually deletes an item from the list.
# Start Transfer -Starts the transfer process.
$ Edit
-Allows the user to edit (change) an audio cut destination.
% Insert
-Lets the user add a cut in the middle instead of the end.
^ Move
-Lets the user change the list position of a cut.
v Exit
-Exits back to the Record Screen.
Should the user accidentally repeat an audio cut in the list, a "*" appears next to both as a warning
of the duplication.
Note: Due to technological advances, this feature is now obsolete and should not be used.
( BACKUP ON/OFF
Not all SMARTCASTERS can backup effectively. Even though SMARTCASTERS can be
configured to backup to floppy, it is not recommended.
The only effective ways to backup the audio information is either on another hard drive, or to a
tape backup unit. This option deals with backing up to another hard drive in the system.
This option does not appear on the screen unless it is activated in the Setup Screens. Please refer
to PATH SETUP, option 2 and the entire BACKUP SETUP Screen information in the Setup
manual for details on backing up the system.
If this option is on, an additional step is added to the recording steps. When the recording finishes,
the Record Screen asks the user if the audio cut just recorded should be backed up. Should the
user answer Y, the audio cut is copied to the designated backup drive. If the user responds with an
N, the Record Screen clears.
) CHANGE PATH
This is used exclusively by Generation 2000 users who operate more than one radio station and
share their commercials. While it is desirable to share commercials, Functions cannot be shared.
Operations-25
This option exists to allow users the ability to record Functions specific to each station from one
site. Only Functions beginning with an F can use this feature.
When the user selects this option, a new screen appears. The user can choose a destination
SMARTCASTER from this list. Currently, only a few stations use this feature.
Please refer to FUNCTION SETUP in the Setup Manual for additional explanations of this
feature. Due to the complexity of this procedure, it is usually done by the Installation Engineer
sent by SMARTS. Basically, the operator needs to know where the Functions will be stored on
each station. That information is stored in the FUNCTION SETUP and accessed by using the )
key in the Record Screen.
To make a selection, enter the station number (1-10) and press e. For stations with this feature, the
proper destination should be chosen before each recording session where Functions are recorded
into the unit to ensure that they are stored in the proper place. The originating stations’ path should
be selected at the end of the recording session to eliminate problems.
Note: This is specifically designed to be used in a production room where Functions are recorded
to more than one studio. There are drawbacks to using this feature from one on-air studio to
another. While Studio One is recording Studio Two’s Functions, any closures received on Studio
One will cause Studio Two Functions to play on Studio One. In other words, the wrong jingles,
liners, and I.D.s will play on the air of the station doing the recording. This may be circumvented
by placing the SMARTCASTER in Live Assist before going into the Record Screen.
a+R RENAME CUT
The Rename Cut feature was designed to cover a common mistake. Whether a clerical error, a
transposition, or some other form of mistake, audio cuts can sometimes be given a wrong number. In early
versions, this meant that the cut needed to be re-recorded. The a+R feature allows the user to change a
script number from one number to another. This allows the announcer to quickly change the number on a
cut rather than re-record the material. It also allows the cut to be duplicated without spending the time to rerecord it. If the new cut number already exists, a prompt will appear asking if the cut should be overwritten.
v EXITS THE RECORD SCREEN
Operations-26
Cut Manager
Cut Manager is the method used to inspect and manipulate the stations’ audio inventory, be it commercials,
music, jingles, time announcements, or temperature announcements. Cut Manager displays the Cut
Number, Cut Name, Start Date, Stop Date, Product Code, Length, End Of Message, and Drive Letter. It
may be used to list, sort, find, audition, or delete any of the inventory. Cut Manager can also be used to
record a new cut, and check the hard drives.
Cut Manager can be accessed from the Main SMARTCASTER Screen by pressing the v key to get the
menu bar across the top of the screen, then using the z key to highlight Cut Manager. Press e to activate the
program. Once in Cut Manager, the choices are Spots, Music, Functions, Times, or Temps. Each of the
highlighted keys will enter that part of Cut Manager. The program will begin loading the respective
information once a button has been pressed. Once loaded, the information will be displayed on the screen.
The total number of cuts will be displayed in the upper right-hand corner of the screen.
To get around in this screen, use the wxyz arrow keys, Page Up or Page Down pq, and Home or End hg.
The wx keys will go from column to column. The yz keys will scroll up and down by increments of one.
The pq keys will change pages on the screen, moving in increments of 16 at one time. The hg keys will
jump to the top or the bottom of the list, respectively. The cursor is the purple line and is moved by use of
the yz keys. To select a particular item move the cursor to cover that item and press the } bar. The text of
the item will turn yellow when selected and the cursor will move down to the next item in the list. When
selecting the last item in the list the cursor remains on that item. When de-selecting an item, place the
cursor over the yellow text of that item and press the } bar. To de-select all of the items that have already be
selected, merely press the a+C keys. Pressing the a+H keys will display the Help Screen. Using the yz keys
will allow viewing of the Help Screen.
Other options available once the screen has loaded include Sort, Output, New Cut, Drives, and Find. To
access any particular option press the key highlighted in red, S, O, N, D, or F. Pressing e on an item will
bring up a prompt before going to the Record Screen. The prompt allows the user to Record, Edit Data, or
Audition. The cursor automatically comes up on Audition. Pressing R for Record will bring up that item in
the Record Screen and ask if it should be recorded over. The recording is normal from that point on.
Pressing E for Edit Data will bring up that item in the Record Screen and allow it to be edited. The editing
is normal from that point on. Pressing A for Audition will bring up that item in the Record Screen and
allow it to be auditioned. The auditioning is normal from that point on. When done, pressing the v key once
will return the Cut Manager Screen.
Operations-27
SORT
Any particular column can be selected by using the arrow keys wx to highlight the column of
choice. The text in each column brightens as it is selected. Once selected, that column may be sorted by
pressing the S key for Sort. Items in that column are sorted in ascending order. Only one column may be
sorted at a time.
FIND
This is a shortcut when looking for a specific name or number in a large list. This feature is
limited to the Cut Number or Cut Name.
Operations-28
Either name or number may find an audio cut. Use the wx arrow keys to select which field to use and then
press F to Find. When prompted, enter the item to find. For example, for finding cut 00131, select the
number field using the wx arrows, then press F and type in 00131 and press e. If a matching cut is found, it
appears at the top of the list already highlighted and is in yellow to show that it is selected. Finding a cut by
name works the same way.
All or part of an item may be found. For instance, when searching the list of audio cuts to find all entries
that contain the word “Test”, simply arrow wx over to the Cut Name field, press F, and type
in “test” (not case sensitive), then press e. All cuts with names containing “test” anywhere in them appear
at the top of the list and are selected (yellow).
A general search can also be done. If all of the audio cuts for account 777 need to be found, merely type in
777 and press e. All audio cuts that contain 777 somewhere in the title will be selected and presented at the
top of the screen. Unfortunately, this will pull up not only cuts 77731 and 77732, but will also pull up cuts
07771 and 03777. When looking for a specific account, it may be easier to use the Cut Name field and use
just a few letters from the name of the account. For exhibition purposes, quick use of the space bar can deselect the audio cuts that do not apply, leaving just the desired cuts highlighted on the screen. So, whether
showing the boss all of the outdated audio cuts, or showing a salesman all of the audio cuts for a specific
account, this is a quick and efficient tool.
DELETE
This feature is used to remove unneeded audio from the hard drive. By using the yz keys and the } bar, as
many audio cuts as desired may be selected. Once the cuts have been selected, pressing the d key will warn
that there are cuts to be deleted and ask for permission to continue. The choices are ‘Yes’, ‘No’, or
‘Escape’. ‘No’ or ‘Escape’ will terminate the process. ‘Yes’ will continue the deletion process. A second
prompt appears providing one more chance to terminate the process without losing audio. Once this prompt
is answered in the affirmative, the process will continue until the selected audio is deleted. The selected
audio cut remains on the screen once it has been deleted. The fact that it changes color and has a red “x” to
the right of the number indicates that it is no longer available.
Using the Sort feature may enhance Delete. Sorting by End Date will group all of the audio cuts by date,
allowing the user to select the dates that are outdated and need to be deleted.
NEW CUT
This feature is used to access the Record Screen while in Cut Manager. Pressing the N key brings up the
prompt asking for the script number of the intended cut. Typing in the number and pressing e will bring up
the Record Screen with the number and drive selection already entered. The cursor rests on the drive
selection so that it may be changed if necessary. The rest of the recording process is like the standard
procedure. When the recording is completed, pressing the u key will return the operator to the Cut Manager
Screen. The newly recorded cut will appear on the screen.
OUTPUT
This feature allows the Cut Manager list to be transported elsewhere. Sometimes it is good to have a
hardcopy (paper) list of the commercials or music in the library. The Sales Force likes to look over the
current inventory; announcers need to know information about a song. A printout makes the information
available.
Pressing the O key brings up a prompt asking for a choice of printer or disk. It is recommended that the
SMARTCASTER NEVER be hooked to a printer. The information should be downloaded to a disk and
Operations-29
that disk taken to another computer which has a printer. Selecting “disk”, the prompt shows the path, i.e.
the floppy drive and the name of the file that will hold the information. The operator may change the path
and file name. Pressing e will download the information to the disk inserted into the floppy port. The disk
can then be taken to another computer and the file printed out.
Output works best when tied in with the Sort feature. Output sends the file to disk the way it was last
Sorted. Sorting the Music by Cut Name allows it to be printed out in alphabetical order for use as a
reference library for announcers. Sorting the commercials by End Date allows the Sales Force to see what
spots are outdated. Sorting the spots by Cut Name allows the Sales Force to look for their accounts
alphabetically.
DRIVES
This feature is an unfinished mapping tool. It uses two columns to show the drives that are available and
the types of information stored on them. The S, M, F, and R stand for Spots, Music, Functions, and
Removable, respectively. An “x” may be placed between the parenthesis in each column for each drive to
indicate the type of audio that may be stored there. Removable indicates that particular drive is portable,
such as a tape drive, Zip drive, or Jaz drive. Use the arrow keys wxyz to get around the screen. Pressing the
S, M, F, or R keys activates or de-activates that form of audio for storage on that drive. This screen also
reads the Backup Setup and displays the drives involved in the backup. Again, this is an unfinished tool.
Watch the newsletter for further information.
a+V
This key combination is used to verify EOMS and duration before export to the Digital Program Director.
The confirmed information will be displayed in Cut Manager.
ESCAPE
Pressing the v key exits the Cut Manager Screen.
Note on Floppy disks.
If any errors occur during this process, be sure that the floppy disk is formatted. Refer to the
Formatting A Floppy Appendix.
The Term "Floppy" disk applies to both this and this type of disk.
Verification Logs
This screen deals with the Verification Logs on the SMARTCASTER. It is a paper trail used to see what
the SMARTCASTER has done throughout the day and may be used for affidavits. Using this, operators
may also diagnose problems or get answers to questions.
For example, if the Program Director hears a Mandatory Break going over the air, he/she could easily
check the Verification Log to see what the system was doing at the time the break came down. The
Verification Log could clearly show that the closure was missed, that the board operator left the
SMARTCASTER in Live Assist, or that the wrong information had been programmed into the
SMARTCASTER by Traffic.
The SMARTCASTER writes nearly all of its operations to the Verification Log. Each day has its own log.
This shows what has actually played on the SMARTCASTER.
Operations-30
This screen does not deal with the breaklog. To transfer a breaklog into the SMARTCASTER, select
Import Traffic Log under the MAINTENANCE heading on the On-Air Screen. To view the breaklog,
select the Breaks Option under the PROGRAMMING header on the On-Air Screen.
There are four options on the Verification Log Screen.
┌───────────────────┐
│ 1) Transfer logs. │
│ 2) Print logs.
│
│ 3) View logs.
│
│ 4) Delete logs.
│
│
│
│ Which
(1 -4)? │
└───────────────────┘ 1.) TRANSFER LOGS
Using this option, the user has the ability to transfer any day's Verification Log to a floppy disk for
storage or to be printed out later.
Note: Only one week's Verification Logs may be stored on one floppy.
Here is a series of steps to follow when the user wishes to print out Monday's Verification Log on
another computer.
1. Select LOGS from the On-Air Screen.
2. Select option number 1, Transfer Logs.
3. Select Monday.
4. Insert a formatted floppy disk and press e. 5. Take the floppy disk to another computer.
6. Get to the C:\> prompt.
7. Make sure that the printer is on and that the "ON-LINE" light is on.
8. Type
COPY A:LOG.MON PRN
then press e. To do other days, substitute TUE, WED, THU,etc. for MON.
2.) PRINT LOGS.
The user need only select which day to print. It is not recommended that a printer be connected to
the SMARTCASTER. Printing should be done from other computers.
Operations-31
3.) VIEW LOGS
To view a log, the user selects which day of the week to view. Then use the arrow keys yz, h, g, p and q to
scroll through the day. Press v to exit.
This option requires elaboration. Viewing the log can help to determine many things. Did the commercials
play when scheduled? Does the system update its time regularly? Are missing spots being replaced by the
Fill Rotation? What liner played after the 3:20 p.m. break?
In time, an operator can learn to read much more than the obvious from the Verification Log. The obvious
is easily discerned on the screen. The spot is shown to have started at a certain time and was in a certain
break. The system was in Live Assist for a certain length of time. The SMARTCASTER left the program
during the afternoon air-shift. And the operator corrected the time.
The less obvious is the failure of certain spots to contain audio. A scheduled spot was replaced because it
was outdated. And an Unattended Record went longer than was expected.
The subtle is the power outage that occurred at 2:15 a.m. The system didn’t react to the satellite closure at
1:15 p.m. And why the system didn’t air the network news at the top of the hour.
One part of the LOG needs clarification. Just to the left of the time column on the far right is the Status
Column. This column shows what mode the SMARTCASTER was in at that time. “M” is Continuous
Mode, “C” is Clock Mode, “A-Z” is the particular Clock that is being used in Clock Mode, and “J” is
Jock-In-The-Box Mode. This is used as a quick indicator of the SMARTCASTERS’ status at any given
time.
The log is a text file that may be saved to disk or e-mailed as an attachment to SMARTS for further
research.
Operations-32
4.) DELETE LOGS
This operation is rarely necessary since the SMARTCASTER automatically deletes the old
Verification Log for a specific day when that day rolls around again and the new log starts.
Completion of any task will bring this menu back up. Pressing u will end this session.
The Programming Section
Breaks
The breaklog is the heart of the SMARTCASTER system. It is the log from which the SMARTCASTER is
programmed. The breaklog is a sequential list of events that the SMARTCASTER can execute various
ways. CLOCK users trigger breaks with a closure coming down from a satellite receiver. Continuous
systems read the events one after the other.
The breaklog contains 2880 positions per day. Each of these positions can hold spots, music, Functions,
and several special commands. Since the two main categories of SMARTCASTER (CLOCK and
Continuous) use this log differently, each category is discussed separately. Those who use their
SMARTCASTER in more than one mode should read the sections relevant to their operation. The
following is a concise table that sums up the capabilities of the Breaks Screen and whether or not the
feature is available for CLOCK or Continuous.
When the user enters the Breaks Screen, the screen asks if it should calculate the break lengths. If the user
enters a Y, the Breaks Screen takes the time to calculate the length of every break-set for the day. Once in
the Breaks Screen, it displays that information to the right under LEN.
The screen will show the date and time across the top along with several titles. Down the left side are the
hours and break numbers. Down the right side are the listings of time allotted for the break and the total of
the accumulated audio cuts. Near the bottom is the information related to the audio cut highlighted by the
cursor. At the very bottom of the screen is the keyboard key for the Help Screen and accessing other days
of the week. The total accumulation of time for the hour is also shown here. The screen has many colors.
The cursor is gray, audio cut (commercial) numbers are in green, music cuts are red, 99999’s are yellow,
SKIP’s are blue, Functions are lavender, and Time, Temp, Wait, and Relays are White.
The y, z, w, x, p, and q keys may be used to get around the screen. There are ten positions per line and 12
lines per hour. The cursor may be moved to the position where new audio is to be scheduled. The system
will point out if the audio isn’t available.
Keys:
[CTL]+[F1] - Change color.
[CTL]+[J] - Jump to Break (The system will prompt you for a number).
[CTL]+[C] - Enters a CD.
[CTL]+[S] - Enters a Source (The system will prompt you for a number).
[ALT]+[S] - Enters a SKIP in a non-clock configuration.
[ALT]+[D] - Clears all breaks for the entire day, careful!
[ALT]+[C] - Clears all breaks for the hour.
[ALT]+[N] - Continue to next break line in non-clock configuration.
[ALT]+[T] - Enters a Stop into the breaklog. This is usually used in a
continuous play mode or a CD system. It will bring the
Operations-33
system to a halt until it receives either a local break
closure or an [F1] keypress.
[ALT]+[R] - Enters a relay into the breaklog (the SMARTCASTER prompts
for a number).
[ALT]+[P] - Stands for Pause. This acts as Stop above.
[ALT]+[I] - Enters a time check into the breaklog.
[ALT]+[E] - Enters a temperature check into the breaklog.
[ALT]+[H] - Brings up the Help Screen.
[ALT]+[B] - This toggles the display of break times or break numbers.
Depending on the logging technique, the user can use whichever
is convenient.
[ALT]+[W] - Enters a Wt (Wait) event onto the log. This event allows the
system to wait for a specified amount of time. The time
is entered following the Wt as WtMSS (Wait Min. Seconds).
For Example:
Wt100 = Wait for 1 min.
Wt330 = Wait for 3 min. 30 seconds.
Waits add to the total length of a break and count backwards
just like a silent cut, but with one critical difference...
Waits do not mute the network. In a satellite system the
Waits unmute the satellite network, so be sure to have the
correct satellite source routed to air *before* the Wait
occurs.
[F1]-[F7] - Represent Sunday through Saturday. Just press the key, and
change the day.
NOTE: When using the [ALT]+[C] feature to clear the hour, the cursor must be in one of the first 11 breaks
of that hour. Placing it in the twelfth break will clear the next hour instead.
Operations-34
CLOCK Users:
Break Screen run in CLOCK mode: (Newer versions do not display zeros)
╔═══════════════════════════════════Breaks═════════════════════════════════════╗
║HR MIN
Fri 12/ 9/94
LEN
PGM ║
╟──────┬───────────────────────────────────────────────────────────┬───────────╢
║12a:10│99999 00000 00000 00000 00000 00000 00000 00000 00000 00000│ 0:00 2:25║
║
:40│00131 00231 00331 00431 00531 00631 00731 00000 00000 00000│ 3:27 3:30║
Operations-35
║
:55│88964 52541 66635 01254 81873 00000 00000 00000 00000 00000│ 3:20 3:30║
║1a :10│99999 00000 00000 00000 00000 00000 00000 00000 00000 00000│ 0:00 2:25║
║
:40│99999 00000 00000 00000 00000 00000 00000 00000 00000 00000│ 0:00 3:30║
║
:55│00131 00231 00331 00431 00531 00631 00731 00000 00000 00000│ 3:27 3:30║
║2a :10│99999 00000 00000 00000 00000 0 0000 00000 00000 00000 00000│ 0:00 2:25║
║
:40│99999 00000 00000 00000 00000 00000 00000 00000 00000 00000│ 0:00 3:30║
║
:55│00131 00231 00331 00431 00531 00631 00731 00000 00000 00000│ 3:27 3:30║
║3a :10│99999 00000 00000 00000 00000 00000 00000 00 000 00000 00000│ 0:00 2:25║
║
:40│99999 00000 00000 00000 00000 00000 00000 00000 00000 00000│ 0:00 3:30║
║
:55│00131 00231 00331 00431 00531 00631 00731 00000 00000 00000│ 3:27 3:30║
║4a :10│99999 00000 00000 00000 00000 00000 00000 00000 00000 000 00│ 0:00 2:25║
║
:40│99999 00000 00000 00000 00000 00000 00000 00000 00000 00000│ 0:00 3:30║
║
:55│00131 00231 00331 00431 00531 00631 00731 00000 00000 00000│ 3:27 3:30║
║5a :10│99999 00000 00000 00000 00000 00000 00000 00000 00000 00000│ 0:00 2:2 5║
║
:40│99999 00000 00000 00000 00000 00000 00000 00000 00000 00000│ 0:00 3:30║
╟──────┴───────────────────────────────────────────────────────────┴───────────╢
║ DR Spot Account
Start
Stop
PC
Length
║
║ McNally's Bake Shop
10/19/94 10/19/95 B
00:00:30
║
╚══════════════════════════════════════════════════════════════════════════════╝
Alt-H Help F1-F7 Change Day (Sun-Sat) Alt-B Toggle Break Number/Time
When the CLOCK is turned on, the Breaks Screen shows only the breaks defined in the CLOCK
Setup Screen. Break times are in a column on the left hand side of the screen. Highlighted times
designate a Mandatory Break. Pressing a+B toggles the break times with the break numbers.
Satellite systems not using CLOCK only have break numbers (12 per hour) and cannot show break
times.
Each break is read left to right. Each of the 10 slots in the break contains a cut number, command
or 00000. The user may view cut information by highlighting the cut--the information is
displayed at the bottom of the screen. Newer versions of the software blank the zeros.
If CLOCK is turned on and the user calculated the break lengths when entering the Breaks Screen
there is a column of lengths displayed on the right hand side of the screen (under LEN). Further
right is a column showing how long each break is supposed to be. Traffic people can tell at a
glance what breaks are underfilled, overfilled, etc.
What is a 99999?
99999 is a not an audio cut. When it is in the first position of a break, the SMARTCASTER
ignores the break and stays with the satellite feed. It is intended for use with an optional satellite
break that the user does not want to take. This number should never be used for recording.
What happens if a 99999 is programmed in a Manditory Break?
All breaks accept a 99999 in the Breaks Screen. However, when it comes time for a Manditory
Break to air, SMARTCASTERS with CLOCK turned on automatically replace the 99999 with
PSA's from the Fill Rotation Screen. Satellite users who do not use CLOCK have no safeguard
against this.
Operations-36
Continuous Users:
╔═══════════════════════════════════Breaks═════════════════════════════════════╗
║HR BRK
Fri 12/ 9/94
BRK LEN ║
╟──────┬───────────────────────────────────────────────────────────┬───────────╢
║12a 1│SKIP 00000 00000 00000 00000 00000 00000 0000 0 00000 00000│ 0:00
║
║
2│M0102 M0342 M0654 M0004 00000 00000 00000 00000 00000 00000│ 0:00
║
║
3│00131 00231 00331 00000 00000 00000 00000 00000 00000 00000│ 0:00
║
║
4│M0005 M0006 M0007 M0008 00000 00000 00000 00000 00000 00000 │ 0:00
║
║
5│SKIP 00000 00000 00000 00000 00000 00000 00000 00000 00000│ 0:00
║
║
6│M0009 M0010 Fun01 M0020 00000 00000 00000 00000 00000 00000│ 0:00
║
║
7│00431 00531 00000 00000 00000 00000 00000 00000 00000 00000│ 0:00
║
║
8│SKIP 00000 00000 00000 00000 00000 00000 00000 00000 00000│ 0:00
║
║
9│M0031 M0032 M0033 M0034 M0035 M0036 M0037 00000 00000 00000│ 0:00
║
║
10│SKIP 00000 00000 00000 00000 00000 00000 00000 00000 00000│ 0:00
║
║
11│SKIP 00000 00000 00000 00000 00000 00000 00000 00000 00000│ 0:00
║
║
12│SKIP 00000 00000 00000 00000 00000 00000 00000 00000 00000│ 0:00
║
║1a 13│SKIP 00000 00000 00000 00000 00000 00000 00000 00000 00000│ 0:00
║
║
14│SKIP 00000 00000 00000 00000 00000 00000 00000 00000 00000│ 0:00
║
║
15│SKIP 00000 00000 00000 00000 00000 00000 00000 00000 00000│ 0:00
║
║
16│SKIP 00000 00000 00000 00000 00000 00000 00000 00000 00000│ 0:00
║
║
17│SKIP 00000 00000 00000 00000 00000 00000 00000 00000 00000│ 0:00
║
╟──────┴───────────────────────────────────────────────────────────┴───────────╢
║ DR Spot Account
Start
Stop
PC
Length
║
║
║
╚══════════════════════════════════════════════════════════════════════════════╝
Alt‐H Help F1‐F7 Change Day (Sun‐Sat) Continuous Music on Hard Drive systems are the most flexible for programming. The breaklog is
a sequential list of events that includes music, spots, Functions and nearly any command. Since
the music audio is recorded directly into the SMARTCASTER, the system has complete control
over it, and knows everything about it. The user sees exactly what songs are where, and how the
hour goes together.
Commands:
In addition to spots, music, liners, etc., the breaklog can contain several special commands.
commands are listed in the table below.
These
The user is allowed to enter any command into the breaklog regardless of mode (CLOCK or Continuous).
Occasionally users find innovative ways to use these features in ways other than they were intended. It is
wise to check with the SMARTCASTER Support Department when you want to try something new. The
only option used in normal CLOCK operation is the Relay command.
Operations-37
Keys: a+D a+C a+H a+B a+S Operations:
Clears entire day's breaklog * Clears breaklog for an hour * Brings up Help Screen Break Number/Time toggle Enter SKIP c+J c+C c+S a+N a+T a+P a+R a+I a+E a+F c+N Commands: Jump to Break xxx Enter CD Enter Source Continues to next line ** Enters Stop in breaklog *** Enter Pause into breaklog *** Enter Relay into breaklog Put Time Check in breaklog Put Temp Check in breaklog Put Function in breaklog Enter NET into breaklog Operation/Command: Clock JIB Continuous
* ‐ Command or Operation is not available in this configuration. ‐ Command or Operation is availabe in the configuration. *In CLOCK this clears the break and places a 99999 in the first position. **This option is used only in non‐CLOCK satellite. ***This can be used during Live Assist times. Operations:
Clear Day - The Break Screen asks the user for permission to delete all entries for the day shown at the top
of the screen. Answering Y clears all items out of the log.
CLOCK users see all breaks turn into 99999's. This means that even a completely empty breaklog
still runs the station. All optional breaks are ignored (system stays with satellite) and all
Manditory Breaks automatically fill with PSA's from the Fill Rotation Screen.
Clear Hour - Clears all entries for an hour.
Help Screen - Shows a summary of operation and command keys.
Operations-38
Break Number/Time - in CLOCK mode only, this option changes the break times shown on the left side of
the screen to the break numbers. Repeating toggles back and forth.
Enter SKIP - Places the word SKIP in the first position of the break causing the break to disappear.
CLOCK users see a 99999 instead of SKIP since the number of breaks in the hour is governed by
the CLOCK Setup Screen.
Jump to Break - is used rarely in the breaklog. When the user presses c+J, the Break Screen asks for a
break number. This is the break number that the SMARTCASTER jumps to when it sees this
command in the breaklog. This is an easy and quick way to make the SMARTCASTER do the
same thing over and over again.
Example:
This is useful for stations who have a silence sense hooked to some kind of alarm system. If that
station signs off and the SMARTCASTER stops playing, this command is used to keep the silence
sense from triggering. Be sure to not have any JUMP commands programmed into Timed Events.
Also, turn off Update Breaks (USER SETUP, option 4) in order to keep the SMARTCASTER in
the closed loop.
Enter CD - Adds a CD "place-holder" into the log.
Enter Source - is used for reel-to-reel or some other external based automation. When the user selects this
option, they are prompted for a source number. This is actually a Relay number that the
SMARTCASTER pulses when the SRC command is seen in the breaklog. Once issued, the
SMARTCASTER waits for a local break closure before resuming. Thus reel-to-reel systems
could play music until a sub-audible tone (recorded on the tape) triggers a relay. That relay acts as
a local break to the SMARTCASTER causing it to advance to the next item in the break or the
next break. The next item could be another source, spot, Function, Time Check, etc. This option
makes it possible for the SMARTCASTER to be the "brain" of an older analog automation
system.
Continue on next line - is an obsolete option that is not used since the invention of Continuous Play. It can
have some benefit to Satellite stations who do not use CLOCK. When the SMARTCASTER sees
this command in the breaklog, it jumps down to the next break line and plays it as though it were
an extention of the first break.
Enter Stop or Pause in breaklog - causes the Continuous system to wait until a local break closure or an !
keypress. The Pause command may be inserted from the Live Assist Screen by pressing P,
although new and better options for pausing now exist (see Live Assist). There are no other
differences between Stop and Pause.
Entering Relays into breaklog - is a powerful way to be innovative. Stations have done three minute
remotes using this feature. When the SMARTCASTER sees a Rel in the breaklog, it pulses that
relay and moves on to the next event. When the user selects this option they are prompted for the
relay to pulse.
For Example:
One of the most innovative ideas that came from a customer was to use these relays to do short
remotes during satellite breaks. The same philosophy can be used in Continuous Systems.
Operations-39
As an example, the system is using CLOCK and has a 03:00 minute break at 10:00 after the hour.
The break looks like this in the Breaks Screen:
REL05 M0001 REL06 00000 00000 00000 00000 00000 00000 00000
M0001 is a 03:00 pre-recorded music bed. The middle of the recording has its audio level down
compaired to the beginning and end. At the end of the bed, some kind of obvious finale was
recorded (applause, crescendo, etc.).
Relay 5 turns on a channel (phone, Marti, etc.)
Relay 6 turns that channel off again.
Now, the announcer is at the location with a mike and air cue. The Satellite takes its normal
break. The SMARTCASTER mutes satellite audio as it usually does during a satellite break.
The SMARTCASTER then performs the first item in the break (Relay 5) which puts the
announcer on the air.
Next, the SMARTCASTER executes the second item in the break which is the three minute bed.
The announcer hears the bed begin in their headset and knows to begin talking when the music
pots down.
The announcer keeps talking until they hear the signal of the end (applause, crescendo, etc.) and
knows to wrap it up quick.
Lastly, the SMARTCASTER executes the last item in the break (Relay 6) which takes the
announcer off the air. The SMARTCASTER then un-mutes the satellite for a seamless, and
totally unattended rejoin.
Any station engineer should be able to use this feature for remotes, making coffee, letting the cat
out, whatever a relay can be made to do!
Note: Many newer systems do not use a relay card. These systems should use the NET command
in place of the Rel command to perform these tricks. Information on NET can be found later in
this section.
Entering a Time Check - is a good way to sound local. See the Record Screen for details on how to record
Time Checks.
Continuous users enter the command into the Break Screen between events. When the
SMARTCASTER sees a Time Check in the breaklog, it checks its own time and Announcer
Schedule to determine which audio cut is to play and airs it. Unfortunately, overlapping audio
does not work with a Time Check.
CLOCK users may try to use this in the breaklog, but the length of the Time Check cannot be
figured into the break for the Shrink-and-Expand feature, making the break run long. It is a better
idea to designate a Function Input as a Time Check Input so that whenever a specific closure
comes down from the satellte, a Time Check is played (see USER SETUP, option 20).
Entering a Function - like a Time Check, is a good way to sound local. This option is also meant mainly
for Continuous systems.
Operations-40
When the user enters this option, they are prompted for which Function number to enter. When
the SMARTCASTER sees a FUN command in the breaklog, it checks the Function Rotation to
see what the next cut is to air and plays it.
This feature is compatible with the Shrink-and-Expand feature, so CLOCK users may use this.
However most satellite systems only play Functions that are triggered by a closure sent by the
satellite.
Entering a NET - When the user selects this option, they are prompted to enter the network number. See
the Relay command example above for details on the use of this feature.
Operations-41
Functions
A Function is a liner, jingle, ID, sweeper, etc. Functions make a station sound local and live. On the
SMARTCASTER system, up to seven different Function types are allowed. Within those types, 99 cuts are
available for each Function. The SMARTCASTER also holds up to 26 different Announcers. In the end
the SMARTCASTER has the potential for 7x99x26 or 18,018 Function cuts.
The Functions Screen is where the user enters the order of rotation for the Function cuts.
CLOCK users usually have Functions fired by a relay closure from their satellite network. Continuous
users generally fire Functions from the breaklog (See Breaks Screen).
The Function number...
The conventional Function number has five digits starting with an F.
For example:
Say the engineer has the SMARTCASTER hooked up so that Function 0 is the Legal ID. Now
someone wants to record Legal ID's for Announcer A. They start with Cut 01.
Summary: Function 0, Cut 01, Announcer A or F001A.
The Function number for cut 02 would be F002A.
Later, someone wants to record a Legal ID (cut 05) for Announcer X. The number is F005X or
Function 0, cut 05, Announcer X.
Sometimes a Function is not specific to an announcer. For instance, if the station has a jingle package for
their sweepers, there is no specific announcer. In those cases, use a % sign instead of an announcer letter.
This means that this cut is to play regardless of which announcer is on the air. This means that the % has
precedence and will play first before any announcer letter.
Note: Be very carefull to use zero’s rather than o’s. The computer sees them as two distinctly different
entities and will do strange things if o’s are used accidentally.
Operations-42
The Functions Screen... ╔═════════════════════════════════════════════════════════════════════╗
║
Function 0 Mute is OFF
║
║
║
║
SUN
MON
TUE
WED
THU
FRI
SAT
║
╠═════════╦═════════╦═════════╦═════════╦═════════╦═════════╦═════════╣
║ 1
01 ║ 1
04 ║ 1
06 ║ 1
01 ║ 1
06 ║ 1
03 ║ 1
06 ║
║ 2
04 ║ 2
05 ║ 2
04 ║ 2
02 ║ 2
05 ║ 2
04 ║ 2
01 ║
║ 3
02 ║ 3
02 ║ 3
05 ║ 3
03 ║ 3
04 ║ 3
05 ║ 3
05 ║
║ 4
03 ║ 4
03 ║ 4
03 ║ 4
04 ║ 4
03 ║ 4
01 ║ 4
02 ║
║ 5
06 ║ 5
01 ║ 5
01 ║ 5
05 ║ 5
02 ║ 5
02 ║ 5
04 ║
║ 6
05 ║ 6
06 ║ 6
02 ║ 6
06 ║ 6
01 ║ 6
06 ║ 6
03 ║
║ 7 STOP ║ 7 STOP ║ 7 STOP ║ 7 STOP ║ 7 STOP ║ 7 STOP ║ 7 STOP ║
║ 8
08 ║ 8
08 ║ 8
08 ║ 8
08 ║ 8
08 ║ 8
08 ║ 8
08 ║
║ 9
09 ║ 9
09 ║ 9
09 ║ 9
09 ║ 9
09 ║ 9
09 ║ 9
09 ║
║ 10
10 ║ 10
10 ║ 10
10 ║ 10
10 ║ 10
10 ║ 10
10 ║ 10
10 ║
║ 11
01 ║ 11
01 ║ 11
01 ║ 11
01 ║ 11
01 ║ 11
01 ║ 11
01 ║
║ 12
02 ║ 12
02 ║ 12
02 ║ 12
02 ║ 12
02 ║ 12
02 ║ 12
02 ║
║ 13
01 ║ 13
01 ║ 13
01 ║ 13
01 ║ 13
01 ║ 13
01 ║ 13
01 ║
║ 14
04 ║ 14
04 ║ 14
04 ║ 14
04 ║ 14
04 ║ 14
04 ║ 14
04 ║
║ 15
05 ║ 15
05 ║ 15
05 ║ 15
05 ║ 15
05 ║ 15
05 ║ 15
05 ║
║ 16 STOP ║ 16 STOP ║ 16 STOP ║ 16 STOP ║ 16 STOP ║ 16 STOP ║ 16 STOP ║
╚═════════╩═════════╩═════════╩═════════╩═════════╩═════════╩═════════╝
[Alt-H] HELP [F1] - [F6] and [F10] Change Functions [F7] Toggle Mute
The screen first appears displaying the Function 0’s, with the cursor highlighting the first position of the
Sunday column. The cursor may be moved by using the y, z, w, x, p, and q keys to get around the screen.
To enter a Function cut into the rotation, the user selects the position on the screen where the cut is to be
placed, then types in the Function cut number. The new cut number replaces the old one. Cuts are not
deleted, they are replaced. Each position must have something in it; meaning a valid number must replace
the number that is no longer needed in the rotation.
The numbers entered on the Functions Screen are the cut numbers for the Functions. At the top of the
screen the Function number is displayed. The Functions Screen allows the user to rotate cuts differently
each day. The cuts rotate in sequence. Multiple Stops mean nothing. As soon as the SMARTCASTER
Operations-43
sees the first Stop it goes back to the top of the list. Any additional STOPS or cut numbers are meaningless
and are completely ignored by the SMARTCASTER. To enter a Stop into the list press a+S.
For example,
A CLOCK user's satellite service sends down a Legal ID closure at 10:59:54 on Sunday.
The station engineer has wired the SMARTCASTER so that Function 0 is the Legal ID.
At 10:59:54, the SMARTCASTER receives the relay closure.
The SMARTCASTER checks its own date and realizes that it is Sunday.
Then, it checks its own time and the Announcer schedule to realize that Announcer B is on the air.
And last, it looks at the list of cut numbers in the Function Screen for Sunday and plays the next
one in line. If the next cut in the rotation is 06, the SMARTCASTER plays F006B on the air.
If the SMARTCASTER sees a Stop, it starts over from the top of the list.
Continuous systems may also take advantage of the Function Rotation. The only difference between this
system and the CLOCK system is that it may use FUN (Function) commands in the breaklog instead of a
relay closure.
For example,
If this is programmed into the breaklog on a Continuous Play system:
00131 M0123 Fun01 M0122 M0111 00000 00000 00000 00000 00000
Then the SMARTCASTER, when it sees the Fun01 command, checks the date to determine what
day of the week it is, and checks the time to see what announcer is on and plays the appropriate
cut.
Note on Continuous Play systems: Many Music on Hard Drive stations opt to record their Functions as
music rather than a true "Function" so that their music scheduling program handles the rotation of the
Function. Essentially, the Functions are nothing more than very short songs. The advantage to this idea is
that there is far less work for the user since the music scheduler usually can automatically insert music into
the breaklog. Otherwise the FUN commands must be programmed by hand. The only drawback is that
since the Functions are recorded with M numbers (Script Numbers starting with an M), the
SMARTCASTER treats them as music in the Cut Manager Screen. It is wise to assign a number range to
the Functions that is different than the music.
! - ^ ‐ The screen can be changed to a different Function by pressing the corresponding key along the top of
the keyboard. ! is Function 01, @ is Function 02, etc. Pressing ) will return the system to the Function 0
Screen.
& - Mute on/off - gives the Function the ability to mute satellite audio. This is a feature used only by
CLOCK satellite users. Under rare circumstances, the user may wish to mute the satellite audio during a
Legal ID, or liner. Turning this option on causes that Function number to mute satellite whenever it is
Operations-44
fired. In other words, if Function 4 has mute turned on, whenever the satellite service triggers the Function
4, satellite audio is muted while the SMARTCASTER plays back the Function.
Operations-45
Announcers
╔══════════╦══════════╦═══════╡Announcer Schedule╞═════╦══════════╦══════════╗
║
SUN
║
MON
║
TUE
║
WED
║
THU
║
FRI
║
SAT
║
║A 00:00:00║E 00:00:00║E 00:00:00║E 00:00:00║E 00:00:00║E 00:00:00║A 00:00:00║
║B 06:00:00║F 06:00 :00║F 06:00:00║F 06:00:00║F 06:00:00║F 06:00:00║B 06:00:00║
║C 12:00:00║G 12:00:00║G 12:00:00║G 12:00:00║G 12:00:00║G 12:00:00║C 12:00:00║
║D 20:00:00║H 20:00:00║H 20:00:00║H 20:00:00║H 20:00:00║H 20:00:00║D 20:00:00║
║
║
║
║
║
║
║
║
║
║
║
║
║
║
║
║
║
║
║
║
║
║
║
║
║
║
║
║
║
║
║
║
║
║
║
║
║
║
║
║
║
║
║
║
║
║
║
║
║
║
║
║
║
║
║
║
║
║
║
║
║
║
║
║
║
║
║
║
║
║
║
║
║
║
║
║
║
║
║
║
║
║
║
║
║
║
║
║
║
║
║
║
║
║
║
║
║
║
║
║
║
║
║
║
║
║
║
║
║
║
║
║
║
║
║
║
║
║
║
║
║
║
║
║
║
║
║
║
╚══════════╩══════════╩══════════╩══════════╩══════════╩══════════╩══════════╝
C:Copy
Ins: Insert
Del: Delete
Esc: Exit
In CLOCK systems, Announcer Codes are used to match Functions (jingles, liners, etc.) with the announcer
that is on the satellite network. This is a powerful tool in making a station sound local.
The Announcers Screen is the list of the announcer shifts for each day. Each announcer is assigned a letter.
Then, each announcer is scheduled into the Announcers Screen as shown above. The cursor may be moved
around the screen by using the y, z, w, and x keys. The C, i, d, and u keys are used to make selections.
To add an entry:
Operations-46
•
•
•
•
Press the i key.
Enter the announcer letter.
Enter the time of day (in military format), in hours, minutes, and seconds.
When the SMARTCASTER asks " Do you wish to add this entry?" press Y or N accordingly.
To Copy an announcer to other days:
• Select C. • Press any key to clear the message screen.
• Highlight the entry that is to be copied.
• Press e. • Move the hightlight bar to the first destination slot and press i. • Repeat for any other slots.
• Press u to exit the Announcer Screen.
To Delete an announcer entry:
• Using the arrow keys the user selects the entry he/she wishes to delete.
• Press the d key.
• When asked to "Delete Y/N?" the user selects Y or N accordingly.
To Exit the Announcer Screen.
Press the u key.
When asked to "Exit and Save, Y/N?" the user selects Y or N accordingly.
Note: The Announcer schedule starts at Midnight. If an announcer's air shift does not start at Midnight,
two entries must be made. For example, if the announcer works from 22:00 on Monday to 03:00 Tuesday
morning, an entry must be made for Monday at 22:00 and another for Tuesday at Midnight.
Due to the importance of the program, we will discuss Timed Events before Unattended Record, even
though it isn’t listed that way on the menu window.
Timed Events
Timed Events allows the broadcaster to program the SMARTCASTER to execute a number of commands
on a timed basis. Common uses are to join a network, fire a commercial break at a specific time, re-sync a
music playlist at the top of the hour, etc.. In addition, the RIDZ 8x2 Audio Switcher is set up through the
Timed Events Screen for all network switching and closures.
This section of the handbook is lengthy because there are MANY commands the SMARTCASTER can
execute on a timed basis. Most likely, each station will use only a few of the commands - depending on
items purchased and the format. It is recommended that the user scan through this document, and highlight
sections that pertain to his/her specific situation. Examples are given throughout.
This portion of the SMARTCASTER documentation, when read in its entirety, can be very confusing.
Most stations do not use all of the features available in Timed Events. The user is advised to focus on the
features that are needed by the station with the understanding that others could be used for future
expansion.
To access the Timed Events Screen, press v at the main On Air (Break lineup) Screen. A menu bar
appears at the top of the screen. Using the arrow keys, select 'Timed Events' under 'PROGRAMMING,'
and press e. The following screen appears: Operations-47
Time Based Events
╔══════════════════════════╦═══════════════════════════════════════════════════╗
║ F1 Add
║
Days
Time
Num Event
║
║ F2 Delete
║
_MTWTF_ 01:00:00
04
Fire Relay 4
║
║ F3 Add Subroutine
║
║
║ F4 Delete Subroutine
║
║
║ F5 Edit Subroutine
║
║
║ F6 Edit AMX Names
║
║
║ F7 Edit Mini Names
║
║
║ F8 Edit AMX Inputs
║
║
║
PgUp PgDn to move
║
║
║ ESC Exit
║
║
╠══════════════════════════╣
║
║
║
║
║
║
║
║
║
║
║
║
║
║
║
║
║
║
║
║
║
║
║
║
║
║
║
║
║
║
║
╚══════════════════════════╩═══════════════════════════════════════════════════╝
The window on the right side of the screen contains a list of all the events the SMARTCASTER is
scheduled to execute and the specific time during the week it is scheduled to play. For example, in the
screen above, the SMARTCASTER is instructed to fire Relay 4 at 01:00:00 in the morning, on Monday Friday. At 01:05:00 in the morning, it is to fire a local break, (commercial spot set), and at 01:05:10 in the
morning, it is to fire Relay 5. The user may scroll through the Timed Events list using the q,p,y, and z
keys. The window in the top-left portion of the screen contains a list of options for Timed Events. The
SMARTCASTER will use the bottom-left corner to ask questions when making changes to the Timed
Events list..
Operations-48
It is not possible to edit an entry once it is made. When an entry needs changing, the user must delete that
entry and re-make it from the beginning. It is suggested that the new entry be made first with its changes
and then delete the old entry.
Operations-49
Adding a Timed Event...
To add a Timed Event press !. The following appears in the lower-left hand corner of the screen:
Please toggle which days
switching is to occur.
(Hit Spacebar to toggle
and Enter to continue.)
The SMARTCASTER asks for the days the Timed Event should be scheduled. The first letter showing is
'S' for Sunday. If the event is not to occur on Sunday, press the } bar. This toggles Sunday from 'S' to '_' turning this day off. Pressing the } bar again brings back 'S' for Sunday. Once the user decides whether or
not to keep Sunday, pressing e locks in the choice and moves to the next day. 'M' for Monday now
appears. The user need only continue selecting each day using the } bar to toggle the day on and off, and
the e key to select the next day. Changing ones’ mind means only using the b key to go back to the place
where the change needs to be made. Once all the days have been chosen, the selection appears in the topleft screen. In the example below, the SMARTCASTER is programmed to fire the Timed Event on
Monday, Wednesday, and Friday only:
Days: _M_W_F_
Next, the SMARTCASTER asks for the time that the Timed Event is to occur. The SMARTCASTER uses
military time. (For example, if the event is to occur at 2 PM, type 14:00:00.)
Military Time Chart
12a - 00:00
12p - 12:00
1a - 01:00
1p - 13:00
2a - 02:00
2p - 14:00
3a - 03:00
3p - 15:00
4a - 04:00
4p - 16:00
5a - 05:00
5p - 17:00
6a - 06:00
6p - 18:00
7a - 07:00
7p - 19:00
8a - 08:00
8p - 20:00
9a - 09:00
9p - 21:00
10a - 10:00
10p - 22:00
11a - 11:00
11p - 23:00
Note: If the Timed Event occurs exactly at the top of the hour, type in the numbers for the hour and press e.
The SMARTCASTER automatically fills in the rest of the field with zeroes. For example: If the Timed
Event is to occur at 2 PM, type 14 and press e. The resulting time is 14:00:00.
Operations-50
After typing in the days and time the event is to occur, the user must select the "type" of event. The
SMARTCASTER displays the following sub-menu:
1.
2.
3.
4.
5.
6.
7.
8.
Relays
Local event
Other
Smart (RIDZ) Switcher
5 x 1 Switcher
Latch relay
Unlatch relay
Subroutine
Selection ________
Each of these selections group the type of Timed Events into different categories. Option 1, Relays, allows
the SMARTCASTER to fire relays located on the 37-pin connector at specific times. (Often used for
simple network switching.) Option 2, Local Event, allows the SMARTCASTER to fire commercial spot
sets, liners, jingles, ID’s, etc. at specific times. Option 3, Other, allows the user to program jumps in the
log, turn Continuous Play on and off, and other types of events. Option 4, SMART (RIDZ) Switcher,
allows the user to switch inputs on the RIDZ 8x2 Switcher to two different outputs. Option 5, 5x1
Switcher, allows the SMARTCASTER to control the 5x1 Network Switcher. Option 6, Latch Relay, allows
the user to latch a relay. Option 7, Unlatch Relay, allows the user to unlatch a relay. Option 8, Subroutines,
allows the user to enter a Subroutine full of common Timed Events. A better description of each category
follows in the next section. However, as an example, choose Option 1, Relays, in order to learn how to add
a typical Timed Event.
After selecting Option 1, there are choices for pulsing Relays 0 through 31. Again, for example's sake,
choose number 5, 'Pulse Relay 4'. Now, the screen will revert to the typical Timed Events Screen. In the
lower-left corner shows the selection chosen. In the example's case:
Days: _M_W_F_
Time: 14:00:00
Event: 4 4 Pulse Relay 4
Is this correct?
(Yes or No)
If the user wishes to include this selection in the Timed Event's list, hit Y for “Yes”. If there is a mistake,
then type N for “No”. (There is no editing, then the user must go through the process all over again.)
When the entry is completed, the SMARTCASTER returns to the Timed Events Main Screen. The cursor
will be at the top of the right window resting on the event just added.
If the Timed Event entries seem to disappear...
Use the arrow keys to scroll up. Previous entries are listed "above" the current entry. The system puts the
cursor on the new item and places it at the top of the screen.
Operations-51
Types of TIMED EVENTS...
About halfway through the process of adding a Timed Event, the screen looks like the following:
1.
2.
3.
4.
5.
6.
7.
8.
Relays
Local event
Other
Smart (RIDZ) Switcher
5 x 1 Switcher
Latch relay
Unlatch relay
Subroutine
Enter Selection ________
Each type of Timed Event is categorized into several categories. In the following pages, each category is
described with more detail. Again, some categories are not used by some stations. For example, the
SMART (RIDZ) Switcher category is only used by stations who have purchased the RIDZ 8x2 Audio
Switcher.
1. Relays
By accessing Option 1, the SMARTCASTER can be programmed to pulse relays located on the 37-pin
connector of the PCL-725 relay card. (This pulse lasts for one second.) Common uses for pulsing relays
include: controlling simple 2x1 Network Switchers, turning on external equipment such as reel-to-reels or
cart machines, turning tower lights on or off, etc. (Some have been known to turn the coffee pot on in the
morning!)
A typical example is to use two relays to control a network switcher. In our example, KXYZ wishes to
switch at the top of the hour from the Satellite Music Network, (SMN), to CBS News. Five minutes later,
after the newscast, it wishes to switch back to SMN. The engineer has wired Relay 4 to switch the network
switcher from SMN to CBS. Relay 5 has been wired to switch from CBS back to SMN. This occurs only
during the weekdays. This example will take place at 5 AM. To program the SMARTCASTER to perform
this operation, the following would be needed in the Timed Events List:
Days
_MTWTF_
_MTWTF_
Time
05:00:00
05:05:00
Num
4
5
Event
Pulse Relay 4
Pulse Relay 5
Both of these commands are entered via the 'Relays' category located in the 'Type of Event" sub-menu.
Operations-52
2. Local Event
The Local Event category is chosen when the SMARTCASTER needs to fire commercial spot sets or
Functions at a specific time. (Remember, Functions are rotations of jingles, ID's, magic calls, etc.) The
screen is shown below:
Select event to play
1. Local Break
2. Function 0
3. Function 1
4. Function 2
5. Function 3
6. Function 4
7. Function 5
8. Function 6
Enter Selection ________
To fire a commercial spot set at a specific time, select Option 1, Local Break. The SMARTCASTER will
fire the current break loaded into the break lineup at this time.
NOTE: If a timed local break is used in addition to satellite automation, please make sure you have added
an extra local break to the log. Please notify any traffic personnel about adding a spot set!
For an example, (using the above entry):
Station KXYZ wants to switch from SMN to CBS at the top of the hour. But, in this case, CBS will finish
the newscast four minutes later. At four minutes after the top of the hour, SMN will still be in the middle
of a song - they will not be ready until 5 minutes after the top of the hour. So, the station must cover this
one minute discrepancy with :60 seconds of local audio, i.e. paid (hopefully) sponsorship! Since there will
be no tone from either CBS or SMN at 4 minutes after the top of the hour, the SMARTCASTER must be
programmed to fire a 60 second break at this time. To achieve this, the following must be programmed into
Timed Events:
Days
_MTWTF_
_MTWTF_
_MTWTF_
Time
05:00:00
05:04:00
05:04:10
Num
4
5
Event
Pulse Relay 4
Fire a Break
Pulse Relay 5
At 05:00:00, the SMARTCASTER fires Relay 4 - switching the network from SMN to CBS. Four minutes
later, a local break will be fired. The amount of audio that will play is determined by how much audio is
programmed into the current break lineup. In other words, Traffic must make sure that 60 seconds worth of
spots are programmed into the first break of the five o'clock hour. Ten seconds later, while the audio is
playing, the switcher will go back to SMN.
Operations-53
Why rejoin 50 seconds early?
The SMARTCASTER mutes any network while spots play. So, when the 60 seconds of commercials are
finished, and the SMARTCASTER un-mutes the network, SMN is ready to go!
Functions can also be fired on a timed basis from the Local Events category. For example, if the Legal ID
is recorded using Function 1, you can schedule a Function 1 to fire at 04:59:50. However, unless setup
otherwise, when Functions fire, they play over the top of any satellite audio and do not mute. Under
strange circumstances stations may wish the Function to mute. (See FUNCTIONS)
3. Other
This category is a general, "miscellaneous" category. Many of the features in this category are used for
Music on Hard Drive automation, or systems that use BOTH Satellite and Music on Hard Drive
automation. The options in this category are:
1. Jump to Break
2. Jump and Fire
3. Fade Spot
4. Clock On
5. Clock Off
6. Continuous On
7. Continuous Off
8. JIB On
9. JIB Off
10. Random On
11. Random Off
12. Inputs On
13. Inputs Off
14. Stop
Operations-54
Each of these options is explained separately. Most likely, only some of these will be used by each station.
Jump to Break
This command is used to move the SMARTCASTER from the current break number to another
break number in the log. This option is used most often with Music on Hard Drive automation. In
these systems, each hour is over-programmed with music. Each hour, (usually near the top), the
system must re-sync itself to the next hour's programming. In other words, it must jump to the
next hour. Jump to Break can be used to accomplish this.
For example, KXYZ wishes to re-sync the log at 30 seconds before the top of the hour every day
of the week at 2 PM. The SMARTCASTER is programmed in this manner:
Days
SMTWTFS
Time
13:59:30
Num
169
Event
Jump to Break
At 2 PM, on Music on Hard Drive Automation systems, the current song or spot playing continues
playing, but the next item to play is the first item programmed in break 169 on the log. (Break
169 is the first break number in the 2 PM hour. For a list of break numbers and corresponding log
hours, refer to the insert in the front of the manual.)
CLOCK users should not use Jump To Break. Doing so may cause the SMARTCASTER some
confusion as to which break to play (i.e., Timed Events telling it one thing, and CLOCK telling it
another).
Jump and Fire
This command is very similar to the previous Jump to Break option. This is usually used only
with Continuous automation systems. This command jumps to a specific break number as above,
but at the time the command is issued, the SMARTCASTER immediately fires the break
interrupting the previous audio. This is used if a Continuous Play automation system, (i.e. , Music
on Hard Drive) must join a network feed at a specific time.
If KXYZ must air CBS news at the top of the hour at 2PM, the system still needs to re-sync the
programming in order to jump past the over-programmed material.
Fade Spot
This feature allows the SMARTCASTER to fade hard drive audio in four seconds and advance to
the next event. With a Music on Hard Drive system, this is used to fade the current song on the
air, and then go into a live news feed. No other TIMED EVENT is possible during a fade. Using
the same situation as above, but with KXYZ having a Music on Hard Drive automation system,
the Timed Events list looks like this:
Days
_MTWTF_
_MTWTF_
_MTWTF_
_MTWTF_
_MTWTF_
Time
04:59:46
04:59:50
05:00:00
05:05:00
05:05:01
61
4
5
Num
Event
Fade Spot
Jump and Fire
Pulse Relay 4
Pulse Relay 5
Fire a Break
As before, the ID and a Stop must be programmed in break 61. The SMARTCASTER fades the
current song on the air at 04:59:46. After the Fade is complete, the SMARTCASTER Jumps to
Break 61, and starts playing the Legal ID. After the ID is finished, the SMARTCASTER will
STOP its Continuous Play mode. Relay 4 fires at the top of the hour to bring alive CBS News.
Operations-55
Relay 5 fires at the end of the newscast, to turn off CBS News, and the SMARTCASTER
continues playing where it left off with the Fire a Break command at 05:05:01.
Note: The Fade command works only for audio that is recorded on the hard drive of the
SMARTCASTER.
CLOCK On and CLOCK Off
For satellite automation, the SMARTCASTER has a CLOCK mode than can be turned on and off.
When the SMARTCASTER is in CLOCK mode, it determines what break should be ready to
play, based on the current time of day (see the CLOCK appendix). To run in CLOCK mode, the
SMARTCASTER must have Flex Clocks, showing what time local breaks are to occur, based on
the time in the hour. These Flex Clocks should correspond to the Flex Clocks sent by the satellite
service. (See the CLOCK section of the SETUP appendix).
Sometimes, it is necessary to turn the CLOCK mode on or off. If a station is running with
Satellite Automation during the weekdays, but sometime during the weekends it needs to run in
Continuous mode, the Clock must be turned off before the system can be instructed to begin a
Continuous playback. An example is shown in the description of Continuous On and Continuous
Off.
Continuous On and Continuous Off
This option, when on, allows the SMARTCASTER to fire breaks, one after another, continuously,
until either the operator enters Live Assist, or Continuous is turned off. As discussed above,
sometimes a SMARTCASTER running on satellite automation, must cut away to a multi-cut
program pre-recorded on the hard drive. Examples of such programs are Country CountdownTM,
Casey CasemTM, etc. In this example, KXYZ is stopping Satellite Automation on Sunday at 10
AM, and playing a one hour show from the hard drive. Then, at 11 AM, it goes back to normal
Satellite Automation. The following is needed in the Timed Events programming:
Days
Time
S______ 09:59:58
S______ 09:59:59
S______ 10:00:00
S______ 10:59:58
S______ 10:59:59
Num
Event
Clock off
Continuous On
Fire a Break
Continuous Off
Clock on
In this situation, the SMARTCASTER turns off the Clock mode at 2 seconds before the show
starts. One second later, Continuous Play is turned on. Exactly at the top of the hour, a Fire A
Break command is issued. This kicks the long program into play. For the next hour, when the
SMARTCASTER finishes a break, it immediately starts playing the next break. Two seconds
before the program is to end, the SMARTCASTER turns off Continuous Play. One second later,
Clock mode is turned back on. From this point on, the SMARTCASTER is ready to accept and
respond to satellite closures.
It's common for stations that normally run with Music on the Hard Drive most of the day to also
run a Satellite Automated program for a few hours. For example, if KXYZ was running music
most of the day, but at 9 AM, needed to air Rush LimbaughTM, they would do the following
commands:
Days
Time
Num
Event
_MTWTF_
08:59:53
Fade Spot
_MTWTF_
08:59:57
Continuous Off
_MTWTF_
08:59:58
Clock on
_MTWTF_
09:00:00
4
Pulse Relay 4
Operations-56
_MTWTF_
_MTWTF_
_MTWTF_
_MTWTF_
11:59:58
11:59:59
12:00:00
12:00:01
5
Clock off
Continuous On
Fire a Break
Pulse Relay 5
In this situation, the SMARTCASTER fades the current song on the air at seven seconds before
the top of the hour. Four seconds later, the Continuous Play mode is turned off. CLOCK turns on
one second later. Relay 4 pulses at the top of the hour to route Rush Limbaugh audio to air. The
SMARTCASTER then continues with the satellite automation of Rush for three more hours. Two
seconds before noon, the SMARTCASTER turns off the Clock mode. One second later, the
Continuous Play mode turns on. Exactly at noon, the SMARTCASTER kicks off with the noon
hour's music. One second later, Rush Limbaugh audio is routed away from the air channel.
JIB On and JIB Off
JIB stands for Jock-In-the-Box - the trade name for SMARTCASTER CD automation systems.
The introduction of bigger and faster hard drives gave an excuse to eliminate JIB. The JIB systems
involved CD decks, which added one more item in the audio chain that could break down. Many
of the CD players we were using have since been discontinued by their manufacturer. These
systems have been replaced by Music on Hard Drive (Continuous) systems.
Random On and Random Off
This option is rarely used in SMARTCASTER automation.
The Random mode is intended to maintain compatibility with the older and less expensive Night
WatchmanTM system developed by SMARTS Broadcast Systems prior to the Jock-In-the-Box.
This system is very rarely used anymore.
Inputs On and Inputs Off
When the inputs are turned off, the SMARTCASTER ignores ANY relay closures from satellite
receivers to fire local breaks and Functions. For example, if there is a time period when relay
closures from a satellite receiver need to be ignored, the Inputs Off command should be used. At
the time where closures must be seen again, inputs should be turned back on.
Note: Even when inputs are turned off the SMARTCASTER still updates the system clock from
the Time Update Relay, though the Function (ID) does not fire. The SMARTCASTER also
continues to pay attention to the Start Relay for an Unattended Record. Local breaks triggered
from the Timed Events list are also allowed. All other digital inputs are ignored.
CLOCK users should note that local breaks scheduled in Timed Events pay attention to the
CLOCK Setup, just as though they were closures from a satellite receiver. The only difference
between them is that timed local breaks from Timed Events occur even with inputs turned off.
Stop
The Stop command halts any system operating in a Continuous mode, (i.e., Music on Hard Drive
at a specific time. Most often, this command is actually issued in the breaklog. (As seen in
previous examples.) However, sometimes there is a need to stop the SMARTCASTER at a
specific time.
Operations-57
4. SMART (RIDZ) SWITCHER
This category is used to route audio with the SMART (RIDZ) SWITCHER 8x2 Audio Switcher. This
rack-mount device allows eight different stereo inputs to be routed to two different audio outputs. In most
stations, the first RIDZ output is for switching network feeds to the air. The second audio output is used to
switch network feeds or a production source to the record inputs of the SMARTCASTER. A diagram of a
sample RIDZ Switcher Setup is shown below:
Diagram of RIDZ 8x2 Switcher with example inputs.
In this example, four different network sources, (SMN, ABC News, Mutual, and Rush), are hooked into
four of the RIDZ 8x2's inputs. The production source, (Audition channel of the control board, or the
production board), is connected to Input 7. The SMARTCASTER audio output, (i.e. audio recorded on the
hard drive), is connected to Input 8. With the 8x2 Switcher, any of the inputs can be routed to either of the
two outputs. When an input is routed to Output #1, it goes over the air. When routed to Output #2, it can
be recorded by the SMARTCASTER.
Operations-58
The screen for the RIDZ category is shown below. To route an input to an output on the 8x2
Audio Switcher, simply select the corresponding selection.
Select Channel
1. Network 1 On Air
2. Network 2 On Air
3. Network 3 On Air
4. Network 4 On Air
5. Network 5 On Air
6. Network 6 On Air
7. Network 7 On Air
8. Network 8 On Air
9. Network 1 Record
10. Network 2 Record
11. Network 3 Record
12. Network 4 Record
13. Network 5 Record
14. Network 6 Record
15. Network 7 Record
16. Network 8 Record
17. Network 1 on Bank 3
18. Network 2 on Bank 3
19. Network 3 on Bank 3
20. Network 4 on Bank 3
21. Network 5 on Bank 3
22. Network 6 on Bank 3
23. Network 7 on Bank 3
24. Network 8 on Bank 3
25. Network 1 on Bank 4
26. Network 2 on Bank 4
27. Network 3 on Bank 4
28. Network 4 on Bank 4
29. Network 5 on Bank 4
30. Network 6 on Bank 4
31. Network 7 on Bank 4
32. Network 8 on Bank 4
33. Clear Bank 1
34. Clear Bank 2
35. Clear Bank 3
36. Clear Bank 4
37. Clear All Banks
Enter Selection _____
For the KXYZ example, let's switch to ABC News at 9 AM, and to Rush Limbaugh at 09:04, (after the
newscast). To do so, the following commands are entered into the Timed Events list:
Days
Time
Num
Event
_MTWTF_
09:00:00
2
Network 2 On Air
_MTWTF_
09:04:00
4
Network 4 On Air
It is important to note that if an input is switched to a specific bank, all other inputs on that bank are turned
off. In this case, when it switches to Rush at 09:04:00, ABC News is turned off.
Sometimes, it is necessary to do an Unattended Recording of a satellite feed for delayed playback. To
program the SMARTCASTER to perform an Unattended Record, you must use the Unattended Record
option under PROGRAMMING located in the Break Lineup (On Air) Screen. However, the
SMARTCASTER only records the audio that is routed to its record inputs. By using output #2 on the 8x2,
it can route different feeds to be recorded. For example, if KXYZ needs to record SMN's mandatory breaks
while Rush is on the air, it needs to route SMN audio to the record inputs of the SMARTCASTER. So
sometime prior to the mandatory break, the following must be programmed:
Days
Time
Num
Event
_MTWTF_
09:25:00 9
Network 1 Record
SMN's Pure Gold format has a mandatory break at 09:30:00. Five minutes before the break occurs, the
SMARTCASTER routes SMN audio to the record inputs of the SMARTCASTER. Now, when the
appropriate commands for recording SMN fire from the Unattended Record Screen, the SMARTCASTER
"hears" SMN audio.
CHANGE THIS STUFF Done-4/8/99 Several other options in the RIDZ category need explanation. The
'Clear Air' command removes all inputs from the air output at the designated time. The ‘Clear Record’
Operations-59
command removes all inputs from the record output. The 'Clear Both' command removes all inputs from all
outputs at the appropriate time.
SMARTCASTER audio usually routes through Input 8 to air (See OSETUP, Option 16). For example, if
Input 1, (SMN) routes to air, Input 8 also routes to air. The SMARTCASTER plays audio only when
needed. At all other times, this channel is silent.
Note: The operator can change channels on the RIDZ in an emergency by pressing the a and ! keys at the
same time. The channel switching screen will appear. The operator then picks the channel needed and hits
e. The system switches to that channel and returns to the On-Air Screen. This can also be done on the
front of the RIDZ Switcher by turning the channel knob to the desired channel and depressing the program
or record button.
5. 5x1 Switcher
The 5x1 Switcher, or mini-switcher, was our way of expanding beyond the original 2x1 switcher. This
allowed as many as five networks to be selected at one time or another. Time and technology have replaced
this early model with the SMART (RIDZ) Switcher, a sleek and powerful workhorse that is currently being
used.
6. Latch relay
The Latch Relay feature allows the station to use relays to activate various pieces of equipment. The feature
discussed in 1. Relays above merely pulses the relay. This feature latches the relay and holds it until it
receives a command to unlatch. This feature might be used to turn on the tower lights, switch off a +50 db
audio source, or turn on the coffee pot. Latch Relay does require an internal relay card or a device we call
the Robbie Relay Kit.
7. Unlatch relay
The Unlatch Relay feature is the release mechanism for Latch Relay. Unlatch Relay will release the
previous latching command. It also works with the internal relay card or the Robbie Relay Kit.
8. Subroutines
Operations-60
It is obvious that the Timed Events list can grow to be a long and confusing list. Using subroutines can
alleviate some of the perplexity! For example, a station may be switching to ABC News at the top of every
hour five days a week. Here is an example for one such hour:
Days
Time
Num
Event
_MTWTF_
05:00:00
4
Pulse Relay 4
_MTWTF_
05:04:00
Fire a Break
_MTWTF_
05:04:10
5
Pulse Relay 5
To program this for every hour of the day, it takes 72 lines of programming! (3 lines per hour multiplied
by 24 hours.) This is where subroutines come into play and make life much easier.
One may think of a subroutine as a subset of Timed Events. For those familiar with computers, a
subroutine is best described as an event Macro.
For example, a subroutine titled, "ABC News" can be created that contains the three Timed Events shown
below:
Days
Time
Num
Event
_MTWTF_
00:00:00
4
Pulse Relay 4
_MTWTF_
00:04:00
Fire a Break
_MTWTF_
00:04:10
5
Pulse Relay 5
This subroutine is then programmed to occur every hour at the top of the hour. For example, if ABC News
airs at five, six, seven, and eight AM, one programs the following:
Days
Time
Num
Event
_MTWTF_
05:00:00
ABC News
_MTWTF_
06:00:00
ABC News
_MTWTF_
07:00:00
ABC News
_MTWTF_
08:00:00
ABC News
When the SMARTCASTER hits 5 AM, it reads the subroutine, "ABC News" and fires the appropriate
events based on the offset in time.
For example, the "Fire a Break" command has a 00:04:00, (4 minute), offset from which the subroutine
starts. Therefore, if the subroutine starts at 5 AM, the Fire a Break command occurs at 05:04:00. If the
ABC News subroutine starts at 05:30:00 AM, then the Fire a Break command occurs at 05:34:00 in the
morning.
Creating subroutines eases the task of data entry in the Timed Events list. An explanation of how to create
subroutines is described later in the Timed Events documentation under “Adding a Subroutine. However, to
add an already existing subroutine to the Timed Events list, (Ex: ABC News at 5 AM), use the Subroutine
category to get a list of all existing subroutines. Then choose the correct routine for the application.
Deleting a Timed Event
To delete one or more events from the TIMED EVENTS list, press the @ key at the main Timed Events
menu. The following message appears in the lower left corner of the screen:
Press d to tag file for
deletion or yz to scroll.
When finished, press h
to delete all tagged files.
Operations-61
The system now prompts the user to select events for deletion. The user places the cursor on an event
he/she wishes to delete, then presses d to mark the entry for deletion. The letters, 'DEL' appear to the right
of the event. The event is now 'Tagged' for deletion. Deleting more events entails highlighting each one,
and pressing d. Pressing d a second time clears the tag.
Once finished tagging all of the events for deletion, pressing the h key begins the deletion process. The
system warns the user that the deletion is ready. This is the last chance to abort the deletion. This prompt is
displayed:
Do you wish to delete all
tagged switching times?
(Yes or No)
Pressing Y deletes all tagged items.
normal Timed Events Screen.
If N is pressed, nothing is deleted, and the screen reverts back to a
Subroutines
As described above, subroutines are short lists of repetitive Timed Events that occur frequently throughout
the day or week. The section above explains how to add an existing subroutine to the Timed Events list. It
should be noted that there is a downside to using subroutines. In normal circumstances, the
SMARTCASTER checks Timed Events when loading and sets up the system using the last command that
has been activated. The system DOES NOT check Subroutines! When reloading in the middle of a
subroutine, the system will not follow the subroutines’ commands.
This section covers instruction on how to create a subroutine. The example subroutine used is based on the
following routine event at KXYZ:
Days
Time
Num
Event
_MTWTF_
05:00:00
4
Pulse Relay 4
_MTWTF_
05:04:00
Fire a Break
_MTWTF_
05:04:10
5
Pulse Relay 5
Monday through Friday, KXYZ switches to CBS at the top of the hour with Relay 4. Four minutes later, it
fires a timed local break. While the break is playing, Relay 5 pulses to bring SMN back on-line. (This
SMN audio is muted by the SMARTCASTER while the spot break is playing.)
Adding a Subroutine
Obviously, instead of entering the above three lines for every hour of the day, the station personnel at
KXYZ prefer creating a subroutine! In order to create a subroutine, press # from the main Timed Events
Screen. In the lower left corner, the following command appears:
Enter name of Subroutine:
It is wise to pick names that make sense to someone else who would look at the Timed Events Screen. For
the example above, the name of the subroutine could be "CBS News". Picking obscure names for
subroutines will only serve to confuse, and most likely, cause mistakes in the future.
Operations-62
After typing in a name, "CBS News" appears at the top of the Subroutine Screen:
CBS News
╔══════════════════════════╦═══════════════════════════════════════════════════╗
║
Options:
║
Time
Num Event
║
║
║
║
║ F1 Add
║
║
║ F2 Delete
║
║
║ F3 End Subroutine
║
║
║ F6 Edit AMX Names
║
║
║ F7 Edit Mini Names
║
║
║ F8 Edit AMX Inputs
║
║
║
PgUp PgDn to move
║
║
║ ESC Exit
║
║
╠══════════════════════════╣
║
║
║
║
║
║
║
║
║
║
║
║
║
║
║
║
║
║
║
║
║
║
║
║
║
║
║
║
║
║
║
╚══════════════════════════╩═══════════════════════════════════════════════════╝
Next, the user needs to add the three events needed to air CBS into the subroutine. Pressing the ! key to
add an item displays the following message in the lower left corner:
Please enter time to
switch.
At this point, the user needs to type in the offset from the time the subroutine fires. For example, if the
subroutine fires at 12:30:00, and an event in the subroutine fires at 12:35:00, then the offset is 00:05:00.
(The SMARTCASTER automatically inserts the first two zeros). In the example above, the first event
occurs exactly at the top of the hour. To achieve the same result, the user must schedule the subroutine to
fire also at the top of the hour. So, the offset is 00:00:00. Next, the SMARTCASTER displays the "Type
of Event Screen":
Select type of event
1.
2.
3.
4.
5.
6.
7.
8.
Relays
Local event
Other
Smart (RIDZ) Switcher
5 x 1 Switcher
Latch relay
Unlatch relay
Subroutine
Enter Selection:____
Since the first event is to Pulse Relay 4, select Option 1, "Relays". Next from the "Select Relay" Screen,
choose Option 5, "Pulse Relay 4". The SMARTCASTER asks if this is correct. Press Y if there are no
typo's. On the right side of the screen, in the Subroutine List, there is the following message:
Time
Num
Event
00:00:00
4
Pulse Relay 4
Operations-63
After the user enters the next two events to fire a break at 00:04:00, and pulse Relay 5 at 00:04:10, the user
must press # to quit entering the "CBS News" subroutine. The system returns to the main Timed Events
Screen.
Deleting a Subroutine
If there are some subroutines that are no longer needed, press $ from the main Timed Events Screen.
Choose from the list of subroutines and press e. The subroutine is then deleted. A marker is left in its spot
denoting it as an empty subroutine. If this screen is accidentally entered, pressing u returns to the main
Timed Events Screen.
Editing a Subroutine
To Add, Delete, or Change some events within a subroutine, press % from the Main Menu. Next, select
the subroutine that needs editing. In the lower left-hand window, the name of the subroutine appears. To
change the name of the subroutine the user types over the present one. If the original name does not
require change, press e. The system now displays a list of the events in the subroutine on the screen. The
user may delete or add any event from this point. Press # or u to finish.
Renaming Networks on the RIDZ 8x2 Switcher
Sometimes, it is confusing to remember that SMN is Network 1, CBS is Network 2, Rush Limbaugh is
Network 4, etc... However, in the case of the RIDZ Switcher, it is possible to rename these to more
descriptive names.
Users with a RIDZ 8x2 Switcher...
cA or ^ puts the following text on the TIMED EVENTS Screen:
Select Channel
1. Network 1 On Air
2. Network 2 On Air
3. Network 3 On Air
4. Network 4 On Air
5. Network 5 On Air
6. Network 6 On Air
7. Network 7 On Air
8. Network 8 On Air
9. Network 1 Record
10. Network 2 Record
11. Network 3 Record
12. Network 4 Record
13. Network 5 Record
14. Network 6 Record
15. Network 7 Record
18. Network 2 on Bank 3
19. Network 3 on Bank 3
20. Network 4 on Bank 3
21. Network 5 on Bank 3
22. Network 6 on Bank 3
23. Network 7 on Bank 3
24. Network 8 on Bank 3
25. Network 1 on Bank 4
26. Network 2 on Bank 4
27. Network 3 on Bank 4
28. Network 4 on Bank 4
29. Network 5 on Bank 4
30. Network 6 on Bank 4
31. Network 7 on Bank 4
32. Network 8 on Bank 4
Operations-64
35. Clear Bank 3
36. Clear Bank 4
37. Clear All Banks
16. Network 8 Record
17. Network 1 on Bank 3
33. Clear Bank 1
34. Clear Bank 2
Enter Selection _____
To rename any of these, the user must type the corresponding number, and press e. In the lower left-hand
portion of the screen the user is prompted for a new name for this entry:
Enter name of Network:
The user may now type in an appropriate name. For example, KXYZ might select Option 1, "Network 1
On Air". It could then be renamed to "SMN On-Air".
Mini-Switcher
To rename the networks on the 5x1 Mini-Switcher in the Timed Events Screen, press cB or &. This brings
up the following on the screen:
Select Channel
1. Network 1
2. Network 2
3. Network 3
4. Network 4
5. Network 5
6. Network 6
7. Network 7
8. Network 8
9. Clear all Networks
Enter Selection ______
The user may choose the corresponding number for the network you wish to rename, and in the bottom lefthand corner of the screen, the user is prompted:
Enter name of Network:
Again, as with the RIDZ Switcher, the user simply types in the correct name of the network.
Input Mapping for the RIDZ Switcher...
A SMARTCASTER with an RIDZ Switcher addresses satellite closures, (to fire spot breaks, IDs, jingles,
etc.), a bit differently than a typical SMARTCASTER. With the RIDZ Switcher, there are 32 inputs for
Operations-65
different closures. Each of these inputs can be "mapped" to fire spot breaks, or Functions. In addition, the
SMARTCASTER can be programmed to accept these inputs at all times, or only when a specific network
is on the air. (Obviously, during the ABC newscast, it is not desirable for the SMARTCASTER to play
SMN's jingle.)
In the example, KXYZ station has an 8x2 Audio Switcher hooked up with the networks shown below:
Operations-66
Diagram of RIDZ 8x2 Switcher with example inputs.
When the engineer hooked up the networks to the RIDZ Switcher, they also had to connect the relay
closures from the network to the 32 digital inputs for the SMARTCASTER. KXYZ has the following
closures hooked up:
SMN Magic Call
SMN Return Liner
SMN Sweep Liner
SMN Legal ID
SMN Local Break
Mutual Local Break
Mutual Legal ID
Mutual Return Liner
Rush Limbaugh Break
Rush Limbaugh Liner
Input 1
Input 2
Input 3
Input 4
Input 5
Input 6
Input 7
Input 8
Input 9
Input 10
Operations-67
To map the SMARTCASTER inputs to the different networks, press *. A list of the eight inputs for the
RIDZ Switcher plus a Global Inputs selection appears (more on Global Inputs later). Should the user
choose the first selection for Network #1, (SMN) they see the following:
Edit Inputs for Network: Network 1 On Air
Inputs
Network 1 On Air
1 2 3 4 5 6 7 8 9 10 11 12 13 14 15 16
N N N N N N N N N N N N N N N N
Inputs
Network 1 On Air
17 18 19 20 21 22 23 24 25 26 27 28 29 30 31 32
N N N N N N N N N N N N N N N N
N
0
1
2
3
4
5
6
7
X
Not used
Local Break
Function 0
Function 1
Function 2
Function 3
Function 4
Function 5
Function 6
Cancel Global Input
Operations-68
u to Exit yzxw to move.
Right now, none of the 32 inputs are mapped. They all have 'N' under them. Looking at the list, the
engineer hooks SMN's magic call to Input 1. If, for example, magic calls for SMN are recorded using
Function 0, then the user needs to map Input 1 to Function 0. Place the cursor underneath the '1', and press
1. Now a '1' appears underneath Input 1. To map SMN's local break closure, the user needs to place a 0
under Input 5. Please note that "O" (the letter) and "0" (zero, the number) are not the same thing to a
computer. The following examples use zeros (i.e. Function 0 or Digital Input 0). After all of the SMN
closures are mapped, the screen should look like this:
Inputs
Network 1 On Air
1 2 3 4 5 6 7 8 9 10 11 12 13 14 15 16
1 2 3 4 0 N N N N N N N N N N N
Inputs
Network 1 On Air
17 18 19 20 21 22 23 24 25 26 27 28 29 30 31 32
N N N N N N N N N N N N N N N N
Note that none of the other networks have been mapped. This is to prevent one network from firing events
while another is on the air. For example, if a 0 was placed under Input 6, this would allow Mutual's local
break closure to fire breaks while SMN was on the air. To keep the SMARTCASTER from seeing any
closures from the other networks while SMN is on the air, an 'N' is placed under their inputs.
Below are the inputs mapped for the other networks on the 8x2 Audio Switcher:
Inputs
Network 2 On Air
ABC:
1 2 3 4 5 6 7 8 9 10 11 12 13 14 15 16
N N N N N N N N N N N N N N N N
Inputs
Network 2 On Air
17 18 19 20 21 22 23 24 25 26 27 28 29 30 31 32
N N N N N N N N N N N N N N N N
Inputs
Network 3 On Air
Mutual:
1 2 3 4 5 6 7 8 9 10 11 12 13 14 15 16
N N N N N 0 5 6 N N N N N N N N
Inputs
Network 3 On Air
17 18 19 20 21 22 23 24 25 26 27 28 29 30 31 32
N N N N N N N N N N N N N N N N
Inputs
Network 4 On Air
Rush Limbaugh:
1 2 3 4 5 6 7 8 9 10 11 12 13 14 15 16
N N N N N N N N 0 7 N N N N N N
Inputs
Network 4 On Air
17 18 19 20 21 22 23 24 25 26 27 28 29 30 31 32
N N N N N N N N N N N N N N N N
The user should note that ABC does not have any inputs mapped. Typically, newscasts do not have any
automation closures. Thus, no inputs are mapped. In addition, at KXYZ, Input 7 is the production source,
and Input 8 is the SMARTCASTER digital audio. Neither of these has closures. Therefore, no inputs need
to be mapped.
Operations-69
Global Inputs
Global Inputs are inputs that should be seen by the SMARTCASTER no matter what network is on the air.
There are several examples where such inputs are needed: closure for updating time, closure to start
Unattended Recording, closure to stop Unattended Recording. When selecting Global Inputs, the following
screen appears:
Edit Inputs for Global Inputs
Inputs
Global Inputs
1 2 3 4 5 6 7 8 9 10 11 12 13 14 15 16
N N N N N N N N N N N N N N N N
Inputs
Global Inputs
17 18 19 20 21 22 23 24 25 26 27 28 29 30 31 32
N N N N N N N N N N N N N N N N
N
0
1
2
3
4
5
6
7
T
Not used
Local Break
Function 0
Function 1
Function 2
Function 3
Function 4
Function 5
Function 6
Time Update
v to Exit yzxw to Move.
As before, the user simply arrows over to the input that needs to be mapped, and selects the corresponding
number for the event to trigger. For example, if Input 14 should fire a local break, regardless of which
network is on the air, place a 0 underneath Input 3.
A 'T' can be placed under an input to signify a Time Update closure. For example, if station KXYZ has a
closure from CBS that always fires at the top of the hour, they could hook it to Input 15. By placing a 'T'
under Input 15, the SMARTCASTER knows to use this input to update the clock. (See USER SETUP,
options 5 and 6).
When a Global Input is entered, a change occurs with the input settings for specific networks. Using the
KXYZ example, if the user views the SMN Input settings, they see the following:
Inputs
Network 1 On Air
SMN - Pure Gold
1 2 3 4 5 6 7 8 9 10 11 12 13 14 15 16
1 2 3 4 0 N N N N N N N N 0* T* N
Inputs
Network 1 On Air
17 18 19 20 21 22 23 24 25 26 27 28 29 30 31 32
N N N N N N N N N N N N N N N N
The '*' means that these inputs are set as a Global Input. The "0*" and "T*" now appear on every network
mapping screen.
There may be cases where Global Inputs should not be seen when on a specific network. In this case, it is
possible to "cancel" a Global Input. For example, if KXYZ does not want Input 14 to trigger a local break
while on Rush, they can cancel the Global Input from the Rush Limbaugh Input Screen:
Inputs
Rush Limbaugh:
1 2 3 4 5 6 7 8 9 10 11 12 13 14 15 16
Operations-70
Network 4 On Air
N N N N N N N N 0 7 N N N X T* N
Inputs
Network 4 On Air
17 18 19 20 21 22 23 24 25 26 27 28 29 30 31 32
N N N N N N N N N N N N N N N N
The "X" under 14 signifies that when Rush Limbaugh is on the air, Input 14 will be ignored as a Global
Input.
Final Notes...
If a station has a very "busy" Timed Events schedule, it is wise to write down the schedule on paper before
entering it into the computer. By planning ahead, fewer mistakes are made.
Take care to not program too many events to occur simultaneously. Events that take time (Fades, Jumping
to a different Break, etc.) should be given enough time to complete before being asked to handle another
event. The SMARTCASTER is a fast computer, but the user should refrain from pushing it too hard.
Besides Timed Events, the SMARTCASTER has to handle simultaneous playback and record of audio,
overlap, announcer schedules, Function rotations, verification logs, Unattended Records, and many other
features too numerous to list. If two events are scheduled in the same second, it is possible to miss an
event. Any simultaneous operations should be observed once or twice to ensure no trouble occurs.
Note: Build slowly! Try each event out once before entering all of them. For example, try switching to
news at the top of the hour at 1 PM before entering the other 23 hours. The user may find that the news
feed comes down 1 second earlier or later than expected. Once the correct timing is discovered, then the
user should add the events for the other hours.
Backing up the Timed Events List:
At the SMARTCASTER Main Menu, the user should select the option to Backup Data. The user then
inserts a blank, formatted floppy disk into the drive and presses a key. The SMARTCASTER then copies
all customizing information for your system onto the floppy. This backup does not include any hard drive
audio; only programming data is copied by this option. This disk should be stored in a cool, dry place
where it is easily accessible. A bank vault or the trunk of the boss’ car are not places that can be accessed in
the middle of the night or on the weekend, when they might be needed.
Operations-71
Unattended Record
┌───────────────────────────────UNATTENDED RECORD──────────────────────────────┐
│ OPEN WINDOW
CLOSE WINDOW S Relay Duration
End Time
E Relay Spot │
│
│
│
│
│
│
│
│
│
│
│
│
│
│
│
│
│
│
│
│
│
│
│
│
│
│
│
│
│
│
│
│
│
│
│
│
│
│
│
│
└──────────────────────────────────────────────────────────────────────────────┘
F1 Add
F2 Delete
F3 Edit
Esc Exit
One of the most powerful features of most SMARTCASTER systems is the ability to record and playback
at the same time on the same system. The Unattended Record feature is especially powerful because it is
automated. No one needs to be present to perform the recording operation.
The Unattended Record Screen is used to automatically record audio into the SMARTCASTER. The time
and method of recording, as well as the script number are programmed into the SMARTCASTER ahead of
time.
Operations-72
Generation 2000 Systems usually delegate recording to a production machine. Unattended Records must
take place on a machine with record capability.
On the bottom of the Unattended Record Screen are the main options:
! - Add an Unattended Record to the list
@ - Delete one or a series of Unattended Records
# - Edit an existing Unattended Record entry
v - Exit the Unattended Record Screen
What everything means...
OPEN WINDOW is the time the SMARTCASTER begins the Unattended Records or begins looking for
the relay to begin the Unattended Record.
CLOSE WINDOW is the time that the SMARTCASTER stops looking for a relay closure to begin the
Unattended Record.
S Relay is the start relay that begins the Unattended Record (if there is one).
Duration is the length of the Unattended Record (if known).
End Time is the time that the SMARTCASTER stops recording. It is wise to use this time even if the
recording is to end on a relay closure. This ensures that even if the closure is somehow missed,
the recording does not run away and fill the hard drive.
Spot is the script ID number (or Spot number) used to do the recording.
Operations-73
How does the SMARTCASTER know what network to record?
The SMARTCASTER has one set of Record Inputs. So, whenever a network is recorded the
SMARTCASTER Inputs must listen to the network that is routed to the Record Inputs. Users with RIDZ
8x2 Switchers need only issue an RIDZ switch in the Timed Events Screen to route any network to the
Record Inputs.
Note: The Unattended Record must be finished recording before the break is loaded that contains that script
number.
Note: Users with 5x1 Switchers do not have the ability to switch inputs through the 5x1 Switcher itself.
Other arrangements must be made to switch the Record Inputs to a different source. Refer to Engineering
- Satellite Automation for information on routing an Unattended Record source to the SMARTCASTER.
The concept...
There are four ways to perform an Unattended Record.
• Start on a timed basis, end on timed basis.
• Start on relay, end on timed basis.
• Start on timed basis, end on relay.
• Start on relay, end on relay.
Start on a timed basis, end on a timed basis.
Ending on a timed basis is done by providing either a Duration or an End Time. The Duration is the length
of the recording. The End Time is the time of day to stop recording.
This is a very common method. Network news feeds that come down at a specific time and last for a
specific duration are easily handled by instructing the SMARTCASTER to begin recording at a specific
time for a specific duration.
For example, KXYZ records ABC Direction News at the 50:00 mark of every hour and replays it at the top
of the hour, Monday through Friday. To program this recording, the user must follow these steps:
• Press ! to Add.
• Enter the days of the week that this event takes place.
Please toggle any days you wish to
enter. Press 'N' to select not
applicable. (Spacebar to toggle &
Enter to move to next day.)
_MTWTF_
Please enter in time:
09:50:00
To toggle a day on or off, press }. To advance to the next day of the week, press e. By pressing,
b, the cursor can be decremented back to the previous day of week. Once the last day of the week
is decided, (Saturday), pressing e advances to the next step.
•
Enter the time of day for the recording to take place. The SMARTCASTER now asks for the time of
the Open Window. All references to time should be 24 hour military time. In the example above, the
Open Window is set for 09:50 Monday through Friday. If the event occurs every hour the user must
program 24 individual entries. The Open Window equals the Start Time whenever the recording
begins on a timed basis. When this happens, the SMARTCASTER sets the Start Relay to N/A (not
Operations-74
applicable).
Operations-75
•
The SMARTCASTER prompts the user to enter the days for the Close Window. When starting a
recording on time, the user should set this option to "N". (See the following sections on Starting On
Relays for more information about what this question means.) Next, the SMARTCASTER asks for a
Duration. Here, the user enters the length of the recording. If no Duration is entered, the
SMARTCASTER prompts the user for an End Time later.
Note: The user should take care to remember that the Duration question is asking for hours,
minutes and seconds. This means that 12:00:00 is not 12 minutes, but 12 hours! 12 minutes looks
like this: 00:12:00. The SMARTCASTER does not restrict the user from entering an incorrect
time. If the user mistakenly asks the SMARTCASTER to record for 12 hours, it attempts to do so
whether or not the system has that much time available. If this situation occurs, the user must exit
the SMARTCASTER program to stop a runaway recording.
•
•
•
After the Duration comes the End Relay. However, since this recording automatically ends at the end
of the Duration, the user should press e to leave this field blank.
If the user omited the Duration field, the SMARTCASTER now prompts the user for an End Time.
This is the time of day that the audio cut stops recording.
Finally, the SMARTCASTER asks the user for a Script Number. If the spot is already recorded, the
SMARTCASTER asks the user if he/she really wants to record over that audio cut. If the spot does not
exist, the user is prompted for Spot Name, Start Date, Stop Date, Product Code and Drive Letter. Most
SMARTCASTERS have a D drive. This is the default setting for the Unattended Record. Should the
SMARTCASTER have only a C drive, the user should be certain to enter a 'C' instead of a 'D.'
Once finished, the user has a new entry on the screen that appears as it does below. The SMARTCASTER
(Monday through Friday) begins recording 88888 at 09:50 and continues to do so for four minutes, then
stops.
┌───────────────────────────────UNATTENDED RECORD──────────────────────────────┐
│ OPEN WINDOW
CLOSE WINDOW S Relay Duration
End Time
E Relay Spot │
│
│
│_MTWTF_ 09:50:00 N/A
N/A 00:04:00 N/A
N/A 88888 │
│
│
│
│
│
│
│
│
│
│
│
│
│
│
│
│
│
│
│
│
│
│
│
│
│
│
│
│
│
│
│
│
│
│
│
│
└──────────────────────────────────────────────────────────────────────────────┘
F1 Add
F2 Delete
F3 Edit
Esc Exit
Starting on a relay and ending on a time basis...
Operations-76
Ending on a timed basis is done by providing either a Duration or an End Time. The Duration is the length
of the recording. The End Time is the time of day to stop recording.
This method is equally common. It is used frequently by stations that have news networks which fire a
closure signaling the beginning of the recording. If the news feed is always the same length, the recording
is easily stopped at the end of the Duration.
For example, if KXYZ had a news feed at the 50:00 mark of each hour that begins with a digital input 05,
the user should follow these steps to program the SMARTCASTER:
•
•
Press ! to Add.
Enter the days of the week that this event takes place.
Please toggle any days you wish to
enter. Press 'N' to select not
applicable. (Spacebar to toggle &
Enter to move to next day.)
_MTWTF_
Please enter in time:
09:48:00
To toggle a day on or off, press }. To advance to the next day of the week, press e. By pressing,
b, the cursor can be decremented back to the previous day of week. Once the last day of the week
is decided, (Saturday), pressing e advances to the next step.
•
•
•
Enter the time of day for the SMARTCASTER to begin looking for the Start Relay. This time is
known as the Open Window. All references to time should be 24 hour military time. In the program
example above, the Open Window is set for 09:48 on Monday through Friday. If the event occurs
every hour the user must program 24 individual entries.
The SMARTCASTER prompts the user to enter the days for the Close Window. Select the days in the
same manner as the Open Window.
Enter the time of day to stop looking for the Start Relay.
Note: The period of time between the Open Window and the Close Window is the period of time
the SMARTCASTER looks for the Start Relay. Theoretically, this period may be minutes or days
in length. See the note on Multiple Records below. The Window is created as a safety measure
against stray records. Using the Record Window prevents stray closures from starting a recording.
•
Now the SMARTCASTER asks for the new relay or Start Relay. This is the SMARTCASTER'S
digital input used to trigger the start of the Unattended Record.
•
Now the SMARTCASTER asks the user, "Does the Start Relay trigger multiple records within the
Record Window?" If the user answers ‘Yes’ to this question, the SMARTCASTER records the audio
cut specified every time the relay triggers. Should the window be very wide (hours), then the same
recording can be easily repeated over and over. If the user answers ‘No’ to this question, the
SMARTCASTER pays attention to the relay closure only once.
Now the SMARTCASTER asks for the Delay. For this example, the Delay is not used. The user
should press e to leave it blank. The Delay is used with the Multi-Segmented Record feature explained
below.
Next, the SMARTCASTER asks for a Duration. Here, the user enters the length of the recording. If
the user omits the Duration of the recording, the SMARTCASTER prompts the user for an End Time
later.
•
•
Operations-77
Note: The user should remember that the Duration question is asking for hours, minutes and
seconds. This means that 12:00:00 is not 12 minutes, but 12 hours! 12 minutes looks like this:
00:12:00. The SMARTCASTER does not limit the user in how much time to record. If the user
mistakenly asks the SMARTCASTER to record for 12 hours, it attempts to do so whether or not
the system has that much time available.
If this situation occurs, the user must exit the
SMARTCASTER program to stop a runaway recording.
•
•
•
After the Duration comes the End Relay. However, since this recording automatically ends at the end
of the Duration, the user should press e to leave this field blank.
If the user omited the Duration above, the SMARTCASTER now prompts for an End Time. This is
the time of day that the recording stops.
Finally, the SMARTCASTER asks the user for a Script Number. If the spot is already recorded, the
SMARTCASTER asks the user if he/she really wants to record over that audio cut. If the spot does not
exist, the user is prompted for Spot Name, Start Date, Stop Date, Product Code and Drive Letter. Most
SMARTCASTERS have a D drive. This is the default setting for the Unattended Record. Should the
SMARTCASTER have only a C drive, the user should be certain to enter a 'C' instead of a 'D.'
When finished, the user's screen should have the entry shown below. At 9:48 Monday through Friday, the
SMARTCASTER begins looking for a relay 05. It does so until the relay is fired or until 9:52 when the
window closes. As soon as the SMARTCASTER detects digital input 05 it records 88888 for four minutes
and stops.
┌───────────────────────────────UNATTENDED RECORD──────────────────────────────┐
│ OPEN WINDOW
CLOSE WINDOW S Relay Duration
End Time
E Relay Spot │
│
│
│_MTWTF_ 09:48:00 _MTWTF_ 09:52:00 05
00:04:00
N/A
N/A 88888 │
│
│
│
│
│
│
│
│
│
│
│
│
│
│
│
│
│
│
│
│
│
│
│
│
│
│
└──────────────────────────────────────────────────────────────────────────────┘
F1 Add
F2 Delete
F3 Edit
Esc Exit
Using multiple records within a Record Window...
This is done in cases where an audio feed fires a unique closure and the user wishes to re-record an audio
cut every time this closure is fired. Thus, one window covers many identical recordings.
For example, KXYZ has a weather forecast that they air every hour that is fed from a service and recorded
prior to airing. If the service does not reliably call in at the same time every hour, a time basis won't work
because there is no way of knowing when the feed starts.
If the feed triggers a discreet relay closure to signal the start of the recording, then the feed could easily and
accurately be recorded once. What happens, however, if the service has trouble and must re-do the audio
feed? The answer is to use multiple recordings within a window. If the window is open wide (for example,
Operations-78
an hour), then every time the start relay fires, the system records for the amount of time specified in the
Duration field. It is also possible (and more likely in this example) to stop the recording on a relay closure.
(See Start on a Relay and End on a Relay heading below for details on the setup of that kind of recording).
Start on a time basis and end on a relay...
This method is used primarily by those who do Multi-Segmented Records (where the SMARTCASTER
records individual segments of a program from satellite for later broadcast). Otherwise it is used whenever
the start time of a program is known, the duration is not known and the network feeding the audio fires a
relay at the end of the feed. The user must follow these steps to perform this type of recording:
•
•
Press ! to Add.
Enter the days of the week that this event takes place.
Please toggle any days you wish to
enter. Press 'N' to select not
applicable. (Spacebar to toggle &
Enter to move to next day.)
_MTWTF_
Please enter in time:
09:50:00
To toggle a day on or off, press }. To advance to the next day of the week, press e. By pressing,
b, the cursor can be decremented back to the previous day of week. Once the last day of the week
is decided, (Saturday), pressing e advances to the next step.
•
•
•
•
•
•
Enter the time of day for the recording to take place. The SMARTCASTER now asks for the time of
the Open Window. All references to time should be 24 hour military time. In the example above, the
Open Window is set for 09:50 on Monday through Friday. If the event occurs every hour the user
must program 24 individual entries.
The SMARTCASTER prompts the user to enter the days for the Close Window. When starting a
recording on time, this option is set to ‘No’. The user, therefore, should enter an ‘No.’ (See the
sections on Starting On Relays for more information on what this question means).
Next, the SMARTCASTER asks for a Duration. Since the duration is not known, the user should press
'No' here.
After the Duration comes the End Relay. Here the user enters the digital input number that ends the
record session (for example, 06).
Next comes End Time. It is wise to set this to a time beyond when the End Relay should fire. This is a
good way to keep the SMARTCASTER from doing a runaway Unattended Record, should it miss the
End Relay for any reason. The SMARTCASTER continues to record until the End Relay or the End
Time.
Finally, the SMARTCASTER asks the user for a Script Number. If the spot is already recorded, the
SMARTCASTER asks the user if he/she really wants to record over that audio cut. If the spot does not
exist, the user is prompted for Spot Name, Start Date, Stop Date, Product Code and Drive Letter. Most
SMARTCASTERS have a D drive. This is the default setting for the Unattended Record. Should the
SMARTCASTER have only a C drive, the user should be certain to enter a 'C' instead of a 'D.'
See the "Doing a Multi-Segment Record" heading below for good uses of this Unattended Recording
method.
Operations-79
Starting on a Relay and Ending on a Relay...
This is the "cleanest" method of Unattended Record. It virtually ensures no gaps before or after a network
feed. A Start Relay is used to trigger the start of the recording. The recording continues until the Stop
Relay occurs. This method is also used for the Multi-Segment Records described below. To program this
type of Unattended Record into the SMARTCASTER, the user must follow these steps:
If KXYZ had a news feed at the 50:00 mark of each hour that begins with a closure 05 and ends four
minutes later with a closure 06, the user should follow these steps to program the SMARTCASTER:
•
•
Press ! to Add.
Enter the days of the week that this event takes place.
Please toggle any days you wish to
enter. Press 'N' to select not
applicable. (Spacebar to toggle &
Enter to move to next day.)
_MTWTF_
Please enter in time:
09:48:00
To toggle a day on or off, press }. To advance to the next day of the week, press e. By pressing,
b, the cursor can be decremented back to the previous day of week. Once the last day of the week
is decided, (Saturday), pressing e advances to the next step.
•
•
•
Enter the time of day for the SMARTCASTER to begin looking for the Start Relay. This time is
known as the Open Window. All references to time should be 24 hour military time. In the program
example above, the Open Window is set for 09:48 on Monday through Friday. If the event occurs
every hour the user must program 24 individual entries.
The SMARTCASTER prompts the user to enter the days for the Close Window. Select the days in the
same manner as the Open Window.
Enter the time of day to stop looking for the Start Relay.
Note: The period of time between the Open Window and the Close Window is the period of time
the SMARTCASTER looks for the Start Relay. Theoretically, this period may be minutes or days
in length. See the note on Multiple Records beneath. The window is created as a safety measure
against stray recordings. Using the Record Window prevents stray closures from starting
recordings.
•
Now the SMARTCASTER asks for the new relay or Start Relay. This is the digital input used to
trigger the start of the Unattended Record.
•
Now the SMARTCASTER asks the user, "Does the Start Relay trigger multiple records within the
Record Window?" If the user answers ‘Yes’ to this question, the SMARTCASTER records the audio
cut specified every time the relay triggers. Should the window be very wide (hours), then the same
record can be easily repeated over and over. If the user answers ‘No’ to this question, the
SMARTCASTER pays attention to the relay closure only once.
Now the SMARTCASTER asks for the Delay. For this example, the Delay is not used. The user
should press e to leave it blank. The Delay is used with the Multi-Segmented Record feature explained
below.
Next, the SMARTCASTER asks for a Duration. Since the Duration is not known, the user should
press N here.
•
•
Operations-80
•
•
•
After the Duration comes the End Relay. Here the user enters the relay number that ends the recording
session (for example, 06).
If the user omited the Duration, the SMARTCASTER asks for an End Time. This is the time of day at
which the SMARTCASTER stops the recording.
Finally, the SMARTCASTER asks the user for a Script Number. If the spot is already recorded, the
SMARTCASTER asks the user if he/she really wants to record over that audio cut. If the spot does not
exist, the user is prompted for Spot Name, Start Date, Stop Date, Product Code and Drive Letter. Most
SMARTCASTERS have a D drive. This is the default setting for the Unattended Record. Should the
SMARTCASTER have only a C drive, the user should be certain to enter a 'C' instead of a 'D.'
┌───────────────────────────────UNATTENDED RECORD──────────────────────────────┐
│ OPEN WINDOW
CLOSE WINDOW S Relay DURATION
End Time
E Relay Spot │
│
│
│_MTWTF_ 09:48:00 _MTWTF_ 09:51:00 05
N/A
09:53:50
06 88888│
│
│
│
│
│
│
│
│
│
│
│
│
│
│
│
│
│
│
│
│
│
│
│
│
│
│
│
│
│
│
│
│
│
│
│
│
└──────────────────────────────────────────────────────────────────────────────┘
F1 Add
F2 Delete
F3 Edit
Esc Exit
Doing a Multi-Segment Record...
It is possible to record program length audio into the SMARTCASTER. Stations can record and play back
programs that are hours long (assuming enough room is available on the hard drive(s)). The only trouble is
that if the station records this program in one long audio cut, how do they insert locally sold ads?
Multi-Segmented Records allow the SMARTCASTER to record each segment of a program as a separate
audio cut. Local commercials are programmed in-between the segments. The Segmented Record usually
uses a combination of the methods mentioned above.
For example, Sam's Talk Show is a three hour program that runs Monday through Friday,. It takes four
local breaks (on Relay 06) per hour. The first break is 02:30 in length, the second is 03:00 in length, the
third is 03:00 in length, and the fourth is 02:25 in length. In true talk show fashion, there is only the
faintest clue as to when the host decides to take a break.
Because talk shows hosts cannot hit breaks on time (ever it seems), it is possible to "overlap" start relay
windows. When this is done, the SMARTCASTER takes the start relays sequentially, recording the first
cut, followed by the second, etc..
Operations-81
Since the show starts on time at 3 PM, the first segment uses the start on a time basis and end on a relay
method. The user programs the following:
Days: _MTWTF_
Open Window:15:00:00 (This acts as a start time if no Close Window is specified).
Close Window N/A
Duration: N/A
End Time: N/A
End Relay: 06
Script Number: 88881 (This number is just a sample five digit audio cut number).
In this example, the first segment, 88881, starts recording at 15:00:00. It ends when the talk show host
fires a tone for a local break. (The relay for this tone has been wired into digital input 06 of the
SMARTCASTER.) The tone for the local break signifies that the talk show host has quit talking. The
goal is to record the program segments, not the local breaks.
Now, all of the rest of the segments use the Start on a Relay, End on a Relay method. They begin on a
relay 06--the same relay closure that stopped the first record. In other words, when the network fires a
relay 06, the first cut stops, and the second one starts.
Now the problem is if the second segment starts at the same time the first stops, then the SMARTCASTER
records all the network fill material, during the local break, at the beginning of the second cut. To keep this
from happening, the user must enter a delay.
Whenever the user sets up a recording to begin on a relay, the SMARTCASTER prompts the user for a
delay. Normally, this delay is left blank. However, in a Multi-Segmented Record, a delay is entered that is
the length of the local break.
In the Sam's Talk Show example above, the first break is 02:30 in length. Therefore the second segment
has a delay of two minutes and thirty seconds before it begins recording. As soon as it begins, it records
until another closure 06 occurs. When that happens the second segment stops recording and the third
segment begins its delay.
This is an example of what the second segment could look like:
Days: _MTWTF_
Open Window:15:05:00
Close Window:15:22:00
Start Relay: 06
Delay: 02:30
Duration: N/A
End Time: N/A
End Relay: 06
Script Number: 88882
This process continues to the last segment. Depending on the network feed that is used, the last segment
may end on a relay or on a time.
If the SMARTCASTER user has an AMX 8x4 Switcher Do we change this to RIDZ?
The relay and closure numbers referred to in this section are replaced with a digital input number. These
numbers correspond to the "AMX Inputs" defined in the Timed Events section.
Operations-82
The only "trick" to using the AMX digital inputs for Unattended Record is that in the Edit AMX Inputs
section in Timed Events, the input wanted for the Unattended Record must not be an 'N'. Instead, the user
must enter an unused Function number. (For example, if the station does not use a Function 6, Function 6
may be used for this purpose). If the Input has an 'N' underneath the digital input, the SMARTCASTER
completely ignores the closure. If an unused Function is programmed there, the SMARTCASTER does
nothing to effect on-air-playback, but responds to the closure for the purpose of Unattended Records. The
user should note, when selecting a Function to cover Start/Stop Relays in the Network Mapping Screen,
that the Function used must be the relay number minus one. In other words Function 0 is Relay 1,
Function 1 is Relay 2, etc.
Operations-83
Remotes
The Remotes Screen is designed to work with the SmartTouch DTMF telephone interface made by
SMARTS Broadcast Systems. However, this screen may be used as a modified Live Assist Screen if the
station does not own a SmartTouch. In this version of Live Assist, a user may run a conventional remote
by using four buttons, button one to play the intro, button two to start spots, button three to stop the spots,
and button four to play the close. The spots continue in an endless loop that the user has programmed
ahead of time.
The SMARTCASTER can hold up to 1000 different Remote templates (as long as the system memory is
not too tight).
What is a Remote Template?
Each remote is assigned its own template. A template includes a distinct intro, close, and spot rotation.
For example:
The station runs a promotion called, "The Sports Club." This promotion runs for the entire
football season and has five sponsors participating.
To set up a template for The Sports Club follow these steps:
•
•
•
•
•
•
•
•
•
•
•
Select Remotes
Select @ to Add
Enter 001. This brings up a new screen
Enter the Remote name
Enter the date of the event (This is used only for sorting the events on the previous screen.
No matter what the date, the Remote may still be used. To enter the date 10/10/99, type
101099 and press e. The Remote Screen takes care of the /'s.
Enter the Remote time. As with the date, enter the numbers without any colons (:). Also, as
with the date, the time is used only to sort the Remotes on the previous screen. The user is in
no way denied access to a Remote because of date or time.
Enter the Script Number of the intro.
Enter the Script Number of the close.
Enter a 1. This is the next spot in the rotation to play. Since this is a new Remote, it defaults
to 1. As the Remote is used, the Remotes Screen keeps track of where in the rotation it left
off so that next time it starts with the next spot in the rotation. This way the customers are
ensured a very even rotation.
Then begin entering Spot Script Numbers. When finished, press v. Press v again to exit the screen. Operations-84
Remote Screen Example:
╔══════════════════════════════════════════════════════════════════════════════╗
║
SMART -TOUCH UNATTENDED REMOTE AUTOMATION
║
╟───────────────────┬───────────────────────────┬───────────────┬──────────────╢
║REMOTE NUMBER: 1
│NAME: Sports Club
│DATE: 10/10/95 │TIME: 07:00
║
╟───────────────────┴───────────┬───────────────┴──────────────┬┴──────────────╢
║INTRO AUDIO CUT-DTMF 1: 88831 │CLOSE AUDIO CUT -DTMF 4: 88832 │NEXT SPOT: 1
║
╟───────────────────────────────┴──────────────────────────────┴───────────────╢
║
SPOT ROTATION
START=DTMF 2
STOP=DTMF 3
║
║
║
║ 00131 McNally's Bake Shop
║
║ 00231 Joes Garage
║
║ 00331 Randy's Repair
║
║ 00431 Sam's Sportswear
║
║ 00531 Joyce's Foodland
║
║
║
║
║
║
║
║
║
║
║
║
║
║
║
╟──────────────────────────────────────────────────────────────────────────────╢
║
AIR CUE=DTMF 8
NETWORK CUE=DTMF 9
║
╚══════════════════════════════════════════════════════════════════════════════╝
This completes the creation of Template 001 Sports Club.
╔═════════════════════════════╡ Enter Remotes ╞═══════════════════════════════╗
║
║
║ ### │ Remote Name
│ Next Spot │ Intro │ Close │ Date
│ Time
║
║
║
║
║
║
1
Sports Club
1
88831
88832 10/10/95
07:00
║
║
║
║
║
║
║
Operations-85
║
║
║
║
║
║
║
║
║
║
║
║
║
║
║
║
║
║
║
║
║
║
║
║
║
║
║
║
║ F1 Help
F2 Add/Edit
F3 Delete F4 Do R emote
ESC Exit
║
╚═════════════════════════════════════════════════════════════════════════════╝
The Remote Screen Options...
! Help
@ Add/Edit
# Delete
$ Do Remote
v Exit
- Brings up a summary screen of SmartTouch options
- Creates a new template or edits an existing template - Deletes an entire template
- Brings up the SmartTouch Screen in a Live Assist mode.
- Exits the Remote Screen
Operations-86
Doing Remotes from the keyboard...
The user may wish to manually run a Remote by selecting option $. When the user selects this option, the
Remotes Screen prompts him/her for a Remote number.
Once entered, a new screen appears that is identical to the screen used to define a Remote template. Now,
however, no editing keys function. The user has full control over the system by using four Function keys.
! - Plays the Remote intro and stops. This must be played to begin the session.
@ - Starts the spot rotation, when the system is done with the last spot, it starts over.
# - Stops the spot rotation from playing back at the end of the current spot.
$ - Plays the outro for the Remote.
Pressing v exits this screen.
Should the user wish to add or edit the spot list, or change the next item on the air, he/she must exit this
screen and select @ from the first Remotes Screen.
Note: Whether or not an intro or outro has been recorded, an ! must be pressed to begin using the template.
An $ must be pressed in order to finish the broadcast.
Doing Remotes with a SmartTouch...
The Remote user has several more functions available to him/her. It is literally possible to do a Remote
with nothing more than a cellular phone! The following commands are explained from the perspective of
a remote operator using a telephone. These same commands can be simulated by using the function keys
along the top of your keyboard (!-)). The “*” and the “#” key functions are not applicable to what a live
operator needs and are therefore unavailable via keyboard. To exit the Remote using the keyboard, press v.
1 Play Intro-
Takes Satellite or Music On Hard Drive off the air and plays the intro. When the intro is
done, the Remote announcer is on the air. This must be played to begin the session.
2 Start Spots
Starts the spot rotation for this Remote. Spots continue to play
until told to stop (by a 3).
3 Stop Spots
Stops the commercial rotation after the current spot ends.
After the spot stops, the announcer is back on the air.
4 Play Close-
Plays the close for the Remotes and takes the Remote announcer
off the air. When the close finishes, the SMARTCASTER
resumes normal programming.
CLOCK systems simply check the time of day and go to the right break
number. Be careful not to rejoin during a Mandatory Break! Use the
8 and 9 key commands to check what is on the air and what is on the
network prior to a network re-join.
Operations-87
Continuous systems "guess" at their location. Under normal
circumstances, by the top of the hour, a jump takes place that gets
the system back on track.
5 Direct On-
Puts the announcer directly on the air without playing the intro.
6 Direct Off-
Takes the announcer directly off without playing the close. The
SMARTCASTER follows the same rules after a Direct Off
as it does for a normal close.
7 Cancel-
A panic button that stops the intro, close, or spot immediately. If the
announcer was on the air prior to the audio playback, the announcer
returns to the air. If the announcer was not yet on the air, pressing a
7 sends the SMARTCASTER back to previous programming (Music
or Satellite).
* Star-
When pressed three times, this hangs up SmartTouch.
Warning: Do not leave the SmartTouch in a live mode, or rotating
spots when hanging up. Doing so strands the SMARTCASTER in
a mode from which it cannot return without manual help or a
call back.
# Pound-
This is a "last resort" panic button, but it has other uses. Whenever
this key is pressed, the SmartTouch puts the SMARTCASTER back
to normal programming, takes the announcer off the air, and clears
any numbers in memory (kind of like the C button on a calculator).
It is extremely useful if the user accidently types too many digits
when entering a Remote number. Pressing this key lets the user
"start over" with the entry sequence.
For CLOCK Users:
8 Air CueWhen an intro, close, or spot is playing, the user may listen to either Net cue or Air cue.
This is only useful for CLOCK users or satellite users who do not use CLOCK.
Continuous users do not need this feature.
9 Net Cue-
Allows the Remote user to hear the network cue over the phone.
Note: When the user starts over by using the # key, he/she
need not re-enter the password. The password is done in
the hardware of the SmartTouch itself and is not controlled
by software. Start by re-entering the Remote number and
continue from there.
Operations-88
Using the SmartTouch...
When the Remote user calls the station he/she hears a tone for about a second. When the tone stops, the
user should enter a pre-determined four digit code number.
Once the number is correctly entered, the user hears air cue for about 5 seconds. When the air cue stops,
the user is free to enter the Remote number.
Once the Remote number is entered, air cue resumes down the phone line. However, the air cue has "pops"
in it. These pops are actually short gaps in the cue audio. These are here so that DTMF tones, sent by the
user, do not compete with the cue audio to get across the phone line.
Note: The gaps are not "targets." The user need not try to hit the gaps, just hold down the telephone button
until one of the gaps occurs. It is important to have the type of telephone that produces a DTMF tone as
long as the button is held down. Some modern phones and cellular phones produce only a very short burst
of DTMF. These phones do not work well with SmartTouch.
Tones on the air...
Some users worry about DTMF tones that go over the air. Remember, however, that the Start Spots, Close,
and Direct Off tones are the only ones that listeners can hear. Also, the SmartTouch mutes DTMF audio as
soon as it is detected (usually about ½ of a second).
Fill Rotation
Operations-89
╔═════════════════════════════════════════════════════════════════════╗
║
║
║
║
║ 5 sec
10 sec
20 sec
30 sec
40 sec
50 sec
60 sec ║
╠═════════╦═════════╦═════════╦═════════╦═════════╦═════════╦═════════╣
║ 1 99878║ 1 99818║ 1 99828║ 1 99838║ 1 99848║ 1 99858║ 1 99868║
║ 2 STOP ║ 2 STOP ║ 2 STOP ║ 2 STOP ║ 2 STOP ║ 2 STOP ║ 2 STOP ║
║ 3 99878║ 3 99818║ 3 99828║ 3 99838║ 3 99848║ 3 99858║ 3 99868║
║ 4 99878║ 4 99818║ 4 99828║ 4 99838║ 4 99848║ 4 99858║ 4 99868║
║ 5 99878║ 5 99818║ 5 99828║ 5 99838║ 5 99848║ 5 99858║ 5 99868║
║ 6 99878║ 6 99818║ 6 99828║ 6 99838║ 6 998 48║ 6 99858║ 6 99868║
║ 7 99878║ 7 99818║ 7 99828║ 7 99838║ 7 99848║ 7 99858║ 7 99868║
║ 8 99878║ 8 99818║ 8 99828║ 8 99838║ 8 99848║ 8 99858║ 8 99868║
║ 9 99878║ 9 99818║ 9 99828║ 9 99838║ 9 99848║ 9 99858║ 9 99868║
║ 10 99878║ 10 99818║ 10 99828║ 10 99838║ 10 99848║ 10 99858║ 10 99868║
║ 11 99878║ 11 99818║ 11 99828║ 11 99838║ 11 99848║ 11 99858║ 11 99868║
║ 12 99878║ 12 99818║ 12 99828║ 12 99838║ 12 99848║ 12 99858║ 12 99868║
║ 13 99878║ 13 99818║ 13 99828║ 13 99838║ 13 99848║ 13 9 9858║ 13 99868║
║ 14 99878║ 14 99818║ 14 99828║ 14 99838║ 14 99848║ 14 99858║ 14 99868║
║ 15 99878║ 15 99818║ 15 99828║ 15 99838║ 15 99848║ 15 99858║ 15 99868║
║ 16 99878║ 16 99818║ 16 99828║ 16 99838║ 16 99848║ 16 99858║ 16 99868║
╚═════════╩═════════╩═════════╩═════════╩═════════╩═════════╩═════════╝
[Alt-H] HELP
The Fill Rotation Screen shows seven lists of audio cuts of various lengths. These cuts are used to replace
missing or (in some cases) outdated spots. CLOCK systems also use this screen to fill an underfilled
break. A three minute break with only 2:30 worth of audio in it will have a :30 P.S.A. added to the break so
that the system does not join the network prematurely and drop into the middle of a song or other audio.
The operator uses this screen to create lists of fill material that the system may use to replace missing
audio, replace outdated audio (if activated), and fill breaks to their proper length.
This screen is designed as a stop-gap measure to cover mistakes made by the user. This screen is not
intended to be used to rotate paid advertising. No Product Code checking is done when audio from this
screen is selected to play. In other words, if the user schedules a car dealership in this screen, the
SMARTCASTER may use that audio cut when it needs to, even if the cut follows a competing auto
dealership. This screen is intended to hold PSA's and short filler material.
TIP: CLOCK users may want to avoid using liners (I.D.’s , jingles, magic calls) in the 5 and 10 second fill
categories because the SMARTCASTER schedules the fill material at the end of the break, with the
shortest cuts last. That means that if the last thing in the break was a fill liner, it is quite possible that the
satellite service, during the rejoin, will trigger another liner to fire. For 5 and 10 second filler material, harp
sweeps, stabs, or some other short audio should be used that is compatible with the upcoming liner from the
satellite service.
Below each time is a list of audio cuts. When the SMARTCASTER sees a STOP it starts over from the top
of the list. The Fill Rotation Screen may use up to 100 audio cuts per category. The SMARTCASTER
comes with the generic number already inserted as a placemarker. No audio is recorded to this number. The
numbers your station uses for P.S.A.’s should be inserted in the respective columns to replace the generic
number.
To enter a STOP into the list press a+S. To enter an audio cut number, the user selects the position in the list by using the wxyz arrow keys and
then typing in the five digit script number. Operations-90
The Live Show Screen
What it’s for:
The Live Show Screen is designed for the “mostly” attended operation of an air shift. It is specifically
geared toward Music On Hard Drive systems, though it can be useful for Satellite operations as well.
SETUP:
An operator needs to set up a shift or template before the Live Show can be loaded or run. The following
instructions will walk through the process:
Press v from the Main “On Air” Screen and arrow over to PROGRAMMING. Now, using the down arrow,
select Live Shows and press e.
The following screen appears:
Operations-91
F1-Help F2-Add/Edit F3-Delete F4-Start Show
ESC-Exit
To setup a new show, press @.
You will be prompted to Enter Show Number. You need only type in a three-digit number from 001 to
999. For our example, choose 001 and press e.
A new screen appears asking for the Name of the Live Show. The name normally defaults to the show
number. If you wish a more descriptive name, simply backspace the show number out of the field and type
your new description. For this example, let’s type, Test Show and press e.
Press e again to open a box that asks which days the show will air. For our example, let’s assume that the
show runs all seven days of the week. There should already be an “X” under each of the days (Sunday
through Saturday). To keep these settings, press e.
Now enter the time (in military time) for the show to air. For our example, please enter 07:00:00 (you do
not have to type the “:”).
For now, let’s leave Intro and Close blank. These are reserved for later use.
The item labeled Next should default to 1. This should be left at 1. This is also reserved for future
development.
Next is the Start Break. Please enter the break number that corresponds with the start of the shift. Use the
following chart as a guide. If the numbers don’t match your breaks exactly, don’t worry. Just get it close,
and the computer will handle the rest.
12 AM
1 AM
2 AM
3 AM
4 AM
5 AM
6 AM
7 AM
8 AM
9 AM
10 AM
11 AM
Break 1
Break 13
Break 25
Break 37
Break 49
Break 61
Break 73
Break 85
Break 97
Break 109
Break 121
Break 133
12 PM
1 PM
2 PM
3 PM
4 PM
5 PM
6 PM
7 PM
8 PM
9 PM
10 PM
11 PM
Break 145
Break 157
Break 169
Break 181
Break 193
Break 205
Break 217
Break 229
Break 241
Break 253
Break 265
Break 277
Lastly, we have the End Break. Use the same guide to indicate when your shift ends.
Note: It is possible to enter the entire day as one long shift. However, it will significantly increase the
amount of time it takes to load.
Once these items have been entered, a small red box appears on the left side of the large blue box on the
screen. This is the “cursor”. This allows you to type in spot, function, or music numbers if you so desire.
Operations-92
At this point you may completely hand enter an entire show. However, it is much easier to just press the !
key and load all the log information from the Start Break to the End Break. For our example, please press !
now. You will see a small “spinner” in the lower left-hand corner of the screen indicating that action is
taking place. Please wait until information appears on the screen. (This may take a bit.)
Once on the screen, you may add, change, or delete any or all of the items in this list. This can also be done
inside the Live Show and may prove to be easier there.
For now, press the v key to return to the previous screen. You will now see that your show is listed. As
you add shows, the list will grow on this screen.
Operations-93
You have now completed the steps necessary to setup a show. To run it, you may either press $ or just
highlight the one you want and press e.
The system will take a moment to “pull” the items for the show. You will see an indicator on the screen
showing that the show is loading.
Once in the live screen, pressing a+H will bring up the Help! Screen. These keystrokes will become
familiar with time.
} – Starts playing the first cut of audio. The system will automatically advance to the next audio cut in the
list when the first one is done. Pressing the } again will start a second cut, either clipping the first cut or
overlapping it, depending on your system. This feature is dangerous, but can be used judiciously with good
effect.
t – Will pause the system at the end of the current audio cut. This starts the yellow Pause light to blink in
the lower right-hand corner of the red cart.
P – Inserts a pause into the event list. If you know that you want to read the weather after the third cut, you
can put a pause in the event list at that point. When the system sees a pause, it will wait until the } key is
pressed to resume. Placing the cursor on the fourth item, and pressing the P key will push the rest of the
list down and place a pause in the new space.
F – Fades out of the current spot and automatically begins the next item in the event list.
j – Inserts a blank line and prompts you for the five-digit script number. When you type in the cart number
and press e, the new item should be inserted into the list. While you are inserting, there are a couple of
commands that may be entered here instead of script numbers. These include a +N (Change network) and
a +R (Pulse relay). In both cases you will be prompted for a number (either a network number or a relay
number to change to.)
Operations-94
k – Deletes the highlighted (purple) event.
e – Makes the highlighted (purple) event next to play. If this is further down the list from the currently
playing event, the system will jump over the items in between.
p – Goes up one page.
q – Goes down one screen.
h – Goes to the top of the list.
g – Goes to the end of the list.
a + C – Cuts an event out of the list. This one event is held in memory and can be pasted elsewhere in the
log. Doing this a second time replaces the memory of the first event you picked.
a + V – Pastes a cut event onto the log. You may press this over and over again, pasting that event multiple
times.
a + X – Immediately stops all audio and waits for the } to resume. Pressing the } will begin the next event,
not the one that was interrupted.
a + R – Revives a cut. This is designed to “unplay” a cut that has been played already and allows the
system to play it again.
a + L – Shows the list of recent SMARTCASTER events that have occurred while you were in Live Show.
Pressing u exits this screen.
a + I – Shows information about the highlighted (purple) event. Pressing v exits this box.
a + T – Toggles Time of day or Duration on the right hand side of the screen. When Duration is active, you
will see the length of each of the events. When Time of day is active, you will see the estimated starting
time for each event. If the system is stopped, the estimated Time of day changes for every event.
a + P – Inserts a Backtime Post. This prompts you to enter a time to backtime to (in military time). You
will now see if you are under or over-programmed.
a + J – Rejoins with the automation system automatically. If you know that you want to rejoin the
automation system after a specific event, you may just enter this command and specify the break number to
return to.
a + W – Stops the system for a specified period of time. During this time, satellite audio is unmuted. Once
you have pressed a + W you will be prompted for the length of the wait. This may be used in conjunction
with an a + N to switch networks to a news channel for the top of the hour news report.
a + N – Allows you to switch to a different network. This must be used in conjunction with an i. The
prompt requires a two-digit number.
a + R – Allows you to fire a relay. This must be used in conjunction with an i. The prompt requires a twodigit number.
a + F – Allows you to find a song in the database. You must have the database activated to use this feature.
Operations-95
a + D – Known as the “cute” feature. Toggling back and forth will switch the VU meter from squares to
musical notes and dollar signs.
a + Z – The shortcut to the Record Screen. Allows the operator to record or audition without leaving Live
Show.
a + O – Will change the green box to blue and show the audio output and which device is playing it.
On the Live Screen:
The Purple Bar is your “cursor.” Using the arrow keys you may select different positions in the list.
The Red Bar is what is currently playing. Most of the information in this bar is repeated inside the Red
Cart in the upper right-hand corner of the screen.
The Green Bar indicates what is next to play. It automatically stays one ahead of the Red Bar unless
directed to do otherwise. If you want to skip an event, simply position the Purple Bar on the item you want
to skip to, and press e. The Green Bar will move to that new position. When the event that is playing is
finished, the system will move on to the Green Bar skipping any items in between.
Let’s not forget the two boxes at the top of the screen. The green box is a display of the event that is next
to air. In the upper right-hand corner is the time it will take for this event to play. The red box is the event
that is currently playing. The upper right-hand corner displays a countdown showing the amount of time
left for this event. The slowly diminishing gray bar at the bottom of the box also displays the amount of
time left for this event. The small yellow square in this box will flash when a pause has been designated.
The small green square and the squares in the green box are reserved for future development.
The flashing exclamation marks (!!!) are indicators that the audio cuts have not been recorded or are out of
date.
Operations-96
To exit the Live Show smoothly, schedule a Join (described next to a +J). If no audio is playing, however,
you may simply press v and press S to stop the audio and return to the automation. This returns the system
to normal automated SMARTCASTER operation.
Assign Satellite Clocks
This screen may be found in two places. It is located at the bottom of the PROGRAMMING
window and also in the Super Menu on the very first screen of the system. This feature is used in tandem
with Clock systems and nowhere else. Any letter entered into the grid MUST have a corresponding flex
clock built in CLOCK at the Super Menu. As a matter of fact, a Clock letter cannot be entered into the grid
if the Clock is not already built. In the reverse, the system will allow a Clock to be deleted even though it
is scheduled in Set Active. This is not recommended because the system will begin to behave strangely.
The grid covers EVERY hour of the week. Looking at the grid, Sunday through Saturday are
listed along the left-hand margin. The hours 0 through 23 are listed along the top of the grid.
The cursor is the red rectangle in the Sunday 0 hour. The w, x, y, and z arrow keys can be used to
get around in this screen. Once over the desired hour in the proper day, the user merely has to type in the
letter of the new Clock. The new letter will appear in a darker color and the cursor will move one space to
the right.
Pressing the u key will save the changes and exit from the screen.
Operations-97
The Maintenance Section
The MAINTENANCE section contains options to Change Time, Date, Break number, etc. on the
SMARTCASTER. The section for CLOCK users is different from Continuous Play Systems.
The MAINTENANCE section for CLOCK:
Audio Files
Programming
Maintenance
quit
┌────── █▄▄▄ █ █ █ █▄▄█ █▄▄█ ▀ █ ▀ █ ▀╔═════════════════╗▄ █▄▄█ ────┐
│
▄▄▄█ █
█ █ █ █ █▄
█
█▄▄█║ Change Time
║▄▄ █ █▄
│
│
Satellite M║ Change Date
║
│
│
1. 99999
║ Change Rotation ║
│
│
2.
║ Transfer SMARTS ║
│
│
3.
║ Transfer Music ║
│
│
4.
║ Change So ng
║
│
│
5.
║ Change Break
║
│
│
6.
╚═════════════════╝
│
│
7.
│
│
8.
│
│
9.
│
│ 10.
│
├───────────────┬──────────────┬───────────────────────┬──────────────┤
│ Time:15:15:03 │ Break : 181 │ Duration :
│ Announcer: G │
│ Date:12/16/94 │ Log Day: Fri │ Countdown: 0:00
│
│
├───────────────┴──────────────┴───────────────────────┴──────────────┤
│
│
└─────────────────────────────────────────────────────────────────────┘
The MAINTENANCE section for Continuous or Satellite without CLOCK:
Audio Files
Programming
Maintenance
quit
┌────── █▄▄▄ █ █ █ █▄▄█ █▄▄█ ▀ █ ▀ █ ▀╔═════════════════╗▄ █▄▄█ ────┐
│
▄▄▄█ █
█ █ █ █ █▄
█
█▄▄█║ Change Break
║▄▄ █ █▄
│
│
Satellite M║ Change Day
║
│
│
1. 99999
║ Change Rotation ║
│
│
2.
║ Transfer SMARTS ║
│
│
3.
║ Transfer Music ║
│
│
4.
║ Change Song
║
│
│
5.
║ Change Time
║
│
│
6.
║ Change Date
║
│
│
7.
╚═════════════════╝
│
│
8.
│
│
9.
│
│ 10.
│
├───────────────┬──────────────┬───────────────────────┬──────────────┤
│ Time:15:13:51 │ Break :
3 │ Duration :
│ Announcer: C │
│ Date:12/16/94 │ Log Day: Sat │ Countdown: 0:00
│
│
├───────────────┴──────────────┴───────────────────────┴──────────────┤
│
│
└─────────────────────────────────────────────────────────────────────┘
Esc Menu
F9 Edit
F10 Live Assist
Change Break
On Continuous or Non-CLOCK Satellite, this option allows the currently loaded break to be
changed. This operation should be done before the break is played. There are 288 possible breaks,
so the operator should be familiar with the intended target break.
CLOCK systems have their own Change Break option.
Operations-98
When the user selects Change Break on a CLOCK system., the SMARTCASTER shows a list of
the breaks for the current hour. The user is asked to choose which of the x number of breaks is
correct.
This option is used only when the SMARTCASTER could become confused as to which break it
should be on. If CLOCK windows overlap the system could land on the wrong break (See
Appendix, "What is CLOCK and How does it Work?"). This is also possible when the user exits
Live Assist.
It should be noted that the system will skip ahead to a break that has audio in it. Example, if there
are no audio cuts scheduled in Breaks 210 through 222, the system will skip those breaks. So, if
the user changes breaks to Break 215, the system will update to Break 223 where it finds the next
audio cuts.
Change Day
On Continuous or Non-CLOCK Satellite, this option allows the user to change the current running
log day (not the system date). On these types of systems, the running log and the system date can
be different. Since CLOCK systems determine the current day from the system date, this option is
not needed on a CLOCK system.
Import Traffic Log
If the station uses floppy disks to transfer their breaklog for each day, the SMARTCASTER
prompts the user to insert a floppy disk and select the day to be used.
Generation 2000 systems may have a traffic computer on the network. Although Generation 2000
systems still need to use this option, no floppy disk is required.
Note: This is a “computer-intensive procedure”. Depending on the capability of your computer,
the tranfer will slow down the system for a few minutes. During that time, audio going to the air
could be affected. It is suggested that someone air a CD or some other form of audio while the
transfer is taking place.
Note II: Only SMARTS compatible logs are able to be loaded with this option. If the station does
not have the SMARTS traffic system a conversion program must be used to make it compatible.
Contact the SMARTS Sales Department for details on a conversion interface.
Change Time
This feature is used to correct the time on the system without exiting the program. It sets the
system time in military format. When making a correction it is wise to use an accurate nearby timepiece.
Check the time. Set the SMARTCASTER about ten seconds ahead. Press enter to activate the new time as
the real time catches up with the time that was entered. Always be careful to use military time or to
designate AM or PM. Failure to do so will throw the system off by twelve hours.
Change Date
Operations-99
This allows the system date to be changed without exiting the program. There are occassions
where the date might be off. This way it can be changed with a minimum of fuss.
The Quit Section
The QUIT Section contains the options to say ‘Yes’ or ‘No’ to quitting, or to go to the About Screen. The
‘Yes’ or ‘No’ options are quite simple. You either want to quit or you don’t. ‘Yes’ will take the system to
the main menu, commonly known as the Super Menu, due to the name in the lower left-hand corner. The
system terminates any audio that originates from the hard drive while doing this and all Timed Events and
Unattended Records. ‘No’ will cause the system to stay in the program and turn off the menu bar. The
About Screen is an information and access screen. The first screen shows pertinent information regarding
the system. It will show the software version number, the type of audio card, memory size, version of DOS,
and directory pathing. Screens below that show the people who work at SMARTS Broadcast Systems and
other information about the unit. One may get around in these screens by using the y and z arrow keys.
The About Screen also allows access to several diagnostic screens. The user will need to depress the a key
with the left hand and enter the number necessary on the keypad on the right side of the keyboard.
Releasing the a key activates the feature. The numbers along the top of the keyboard will not work. a + 123
will turn on the Input Diagnostic Log. a + 124 will turn it off. Be sure to copy it to disk before turning it
off. a + 251 will activate the Comm Port Diagnostics, and a + 226 will activate the Use Diagnostics Mode
(UD Mode). Using a + 226 again will turn UD Mode off.
a + 123 turns on the Input Diagnostic Log. This log will record all closures taken by the SMARTCASTER.
Since a great number of closures are taken in any given hour, this log can take up a lot of space in a hurry.
The log file (TTLINPUT.LOG) needs to be copied to a floppy before using the a + 124 command to turn
the feature off. a + 251 activates the Comm Port Diagnostics Screen for use with the Remote Record unit. a
+ 226 activates the Use Diagnostics Mode (UD Mode). This is used to determine what the program was
doing at a particular time. The information is displayed on the SMARTCASTER screen. Using a + 226
again will turn UD Mode off.
Operations-100
Clock - The Clock Setup Screen
The Clock Setup Screen is used to create respective hour formats for the various network services that a
station may enlist. Formats vary. One service uses only one clock, while another service uses two for the
weekdays and two more for the weekend. A station with a talk format will change the clock with each
program.
Inside the Clock program, the operator can indicate the number of breaks needed in the hour, how long
each break needs to be, where in the hour they should fall, and whether or not the station needs to provide
audio to cover a feed from the network during the commercial break.
! adds a function to a Clock. This produces a highlight bar in the upper right-hand section of the screen.
The first bar is labeled A. As more are added, the letters increment. 26 Clocks are possible.
The first item, "EVENT," is a comment field. This can be anything. It is used to describe the type of break
that is in use.
The second item is the four-digit length of the break in MMSS (Minutes & Seconds) format.
The third item for now is always a ‘Y’. In the future this field may have other uses, and is therefore
reserved until then.
The fourth is the four-digit time in the hour that the break is supposed to fall. Again it is done in minutes
and seconds. Break times are approximate, of course, since few satellite services hit break times dead on.
The last item lets the system know whether the break is mandatory or optional. Mandatory means that the
station must fill that break with local audio; otherwise a closed circuit feed or silence will get on the air.
Optional means that the station doesn’t necessarily need to play commercials here. The network may
provide P.S.A.’s or music for the length of the break.
When e is pressed after the last entry, the highlight bar will cover two lines. Additional times when a
certain length break occurs can now be entered. When the entry is finished, the operator may press e once
to go down a line, then again on the empty line to signal that the entry is complete. The system should then
graphically display the logged items in the pie chart.
This process may be repeated to add additional breaks to the screen. A checkerboard pattern indicates a
break is optional. A solid entry means it is mandatory.
@ is used to change an already existing item. Once chosen, use the e key to move from field to field until
the item desired has the cursor underneath it. Then using the b key, remove the entry and then replace it
with the new information. Then, continue pressing e until the changes have been logged on the screen.+
# is used to delete the highlighted material. This will remove the entire line, not just one entry, so be
careful.
( is used to go back one Clock, (i.e. from C to B).
) is used to advance one Clock (i.e. from B to C).
Pressing v will exit the screen.
Operations-101
Note: These Clocks are scheduled in Set Active in the Super Menu or in Assign Satellite Clocks under
PROGRAMMING on the Main Screen. It is possible to delete all of the entries in a Clock while it is
scheduled in Set Active or Assign Satellite Clocks. The user is warned not to do this, as the system will
begin to act irratically because it can no longer access the deleted Clock.
Operations-102
8
8x2, 66
8x2 Audio Switcher, 64, 66, 74, 77
A
a + 123, 112
a + 124, 112
a + 226, 112
a + 251, 112
a +C, 105
a +D, 106
a +F, 106
a +I, 105
a +J, 105
a +L, 105
a +N, 106
a +P, 105
a +R, 105, 106
a +T, 105
a +V, 105
a +W, 105
a +X, 105
a+H, 104
a+R, 30
About Screen, 111
Ace, 8
Adding a Subroutine (in TIMED EVENTS), 70
Adding a Timed Event, 55
Announcers, 51
Antex, 8, 28
Assign Satellite Clocks, 107
Audio Section, 22
AUDITION CUT, 25
AUTO START, 27
B
B Key, 20
Backing up the Timed Events List:, 79
Backup, 23, 79
BACKUP, 29
Breaks (Breaks Editing Screen), 37
C
CD, 12, 44, 63
Change Break, 109
Change Date, 111
Change Day, 110
CHANGE PATH, 29
Change Time, 110
Clock, 112
CLOCK, 8, 9, 10, 11, 19, 20, 26, 37, 40, 41, 42, 43,
44, 45, 46, 47, 49, 50, 51, 61, 62, 63, 64, 96, 97, 99,
100, 109, 110
CLOCK ON/OFF (in TIMED EVENTS), 62
Clock Setup Screen, 112
CLOSE WINDOW, 81
Continuous ON/OFF (in TIMED EVENTS), 62
Continuous Play Mode, 8, 10, 12, 15, 20, 23, 26, 37,
42, 44, 45, 46, 47, 49, 56, 60, 61, 62, 63, 64, 97,
109, 110
Copy an Announcer, 52
Cut Manager, 31
Cut Name, 31
Cut Number, 31
D
Delete (Cut Manager), 33
DELETE A CUT, 25
DELETE A CUT (from the Record Screen), 25
DELETE LOGS, 37
Deleting a Subroutine (in TIMED EVENTS), 72
Deleting a Timed Event, 69
Digital Input Gain, 24
Don't Panic!, 8
Drive (time left on each in the Record Screen), 24
Drive Letter, 31
Drives (Cut Manager), 34
Duration, 81
E
EDIT CUT DATA, 25
Editing, 15, 19, 20, 72
Editing a Subroutine (in TIMED EVENTS), 72
End Break, 102
End Of Message, 31
End Relay, 84, 86, 88, 90, 91
End Time, 81
EOM, 23, 24, 25
Escape (Cut Manager), 34
F
Fade Spot, 61
Fill Rotation, 98
Find (Cut Manager), 32
Floppy disks, 34
Functions, 47
Functions Screen, 48
G
Generation 2000, 8, 20
Getting started, 13
Operations-103
Global Inputs, 78
Green Bar, 106
green box, 106
Output (Cut Manager), 33
Overload Status, 24
Overview, 8
I
P
Import Traffic Log, 110
Inputs ON/OFF (in TIMED EVENTS), 63
Pausing, 19
Play Break (from Live Assist), 20
PRINT LOGS, 35
Product Code, 31
PRODUCT CODE, 24
Programming Section, 37
Purple Bar, 106
J
JIB, 12, 60, 63
JIB ON/OFF (in TIMED EVENTS), 63
Jock-in-the-Box, 12, 63
Jump and Fire, 61
Jump to Break, 61
Q
Quit Section, 111
L
R
Latch relay, 67
Length, 31
Live Assist, 10, 16, 20, 21, 43, 44, 62, 93, 95, 110
Live Show, 101
Loading Guide, 14
Local break, 11, 44, 54, 58, 69, 77, 78, 79, 91
Local Event, 58
Logs, 34
M
Main Screen, 15
Maintenance Section, 109
Mandatory Breaks, 9, 34, 40, 66, 97
Military Time Chart, 55
Moving an audio cut from one drive to another:, 25
Multiple records within a record window, 87
Multi-Segment Record, 90
Music on Hard Drive, 8, 10, 12, 23, 42, 49, 60, 61, 63,
64
Music On Hard Drive, 101
Mute, 50, 60
N
Name of the Live Show, 102
NET TRANSFER, 28
New Cut (Cut Manager), 33
O
OPEN WINDOW, 81
Operations, 43
Optional Breaks, 43
Other (Catagory of TIMED EVENTS), 60
Random ON/OFF (In TIMED EVENTS), 63
Record Audio, 23
Record Screen, 22
Record Temp, 27
RECORD TIME/TEMP, 26
Record Times, 26
Red Bar, 106
red box, 107
Relays, 57
Remote Screen Example:, 94
Remote screen options, 95
Remote Template, 93
Remotes, 93
Remotes from the keyboard, 96
Remotes with a SmartTouch, 96
RENAME CUT, 30
Renaming Networks on the RIDZ 8x2 Switcher, 72
Ridz 8x2, 56
RIDZ 8x2, 52, 57
S
S Key, 20
S Relay, 81
Satellite, 101
Screen Saver, 16
Setting up inputs for the RIDZ Switcher, 74
Shrink-and-Expand, 9, 11, 46
SMART (RIDZ) SWITCHER(in Timed Events), 64
SmartTouch, 22, 93, 95, 96, 97, 98
Sort (Cut Manager), 32
Start (Unattended Record) on a time basis and End on
a relay..., 87
Start (Unattended Record) on a timed basis, end on a
timed basis., 82
Start Break, 102
Operations-104
Start Date, 31
Starting (Unattended Record) on a Relay and Ending
on a Relay, 89
Starting (Unattended Record) on a relay and ending on
a time basis..., 85
Stop (in TIMED EVENTS), 64
Stop Date, 31
STOP's in the Fill Rotation Screen, 100
STOP's in the Function Screen, 49
Stretch and Shrink, 9, 11, 46
Subroutine, 56, 68, 69, 70, 71, 72
Subroutines, 68
Subroutines (in TIMED EVENTS), 69
Support, 8
T
Time and Temp Checks, 26
Time Left on each drive, 24
Timed Events, 52
TIMED STOP, 26
Tones on the air..., 98
TRANSFER LOGS, 35
TTLINPUT.LOG, 112
Types of TIMED EVENTS, 57
U
UD Mode, 112
Unattended Record, 80
Unlatch relay, 67
Unmute, 9
Use Diagnostics Mode, 112
V
Verification Logs, 34
VIEW LOGS, 36
W
Windows, 91, 110
Operations-105