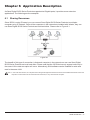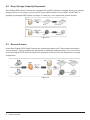
1
EliteRAID
ER104I
& MobileRAID
MR4I
DETAILED USER’S MANUAL
Forewords
About this manual
Thank you for using products from Sans Digital.
This manual will introduce the Sans Digital iSCSI product. Before using Sans Digital iSCSI product,
you are advised to read this manual first. All information contained in this manual has been carefully
confirmed before printing, but the actual product specifications shall be in accordance with those at the
time of delivery; any update to product specifications or relevant information may be found on
www.sansdigital.com, and no separate notification will be made.
If you have any query regarding the products of Sans Digital, or you would like the latest product
information, please contact us at [email protected], and we shall give you a reply as soon as
possible.
Copyright © Sans Digital. All rights reserved.
ER104I Quick Install Guide
1. Package Contents
After you open the outer package, make sure that the following items are in the box:
‧ER104I product body
‧AC Power Cord
‧RS-232 Port Cable
‧CD
‧User Manual
‧Accessory Kit
2. Hardware Installation
Please follow the procedures to complete the hardware installation of ER104I.
Step 1
Open the outer package and take out the product. (Make sure the related accessories
and the product are not damaged or missing. If you have any questions, please
contact the us, www.sansdigital.com or [email protected])
Step 2
Mount the product to the rack. Make sure that the ventilation fan is not obstructed and
appropriate ventilation space is provided around the product. (Do not place the product
to any environment that may cause damage to the product)
Step 3
Take out the tray and install your hard disk in it. Make sure to fasten the hard disk securing
screws to prevent damages caused by unnecessary movement.
Step 4
Once the installation is completed, insert the tray back and fix it firmly in the proper place.
Step 5
Connect the cables to the corresponding ports. Make sure that you have connected the
corresponding cables to two Gigabit ports, LAN or RS-232 port and Extension port (optional).
Then connect the power cord.
Step 6
Hardware installation is completed. You can power on the system to start the related setup
and application through LAN port or RS232 port. (Default account and password:
admin / 1234, IP address: 192.168.0.1)
Complete! You may start the configurations of the system. Please refer to Chapter 4.
MR4I Quick Install Guide
1. Package Contents
After you open the outer package, make sure that the following items are in the box:
‧MR4I product body
‧AC Power Cord
‧RS-232 Port Cable
‧CD
‧User Manual
‧Accessory Kit
2. Hardware Installation
Please follow the procedures to complete the hardware installation of MR4I.
Step 1
Open the outer package and take out the product. (Make sure the related accessories
and the product are not damaged or missing. If you have any questions, please
contact the us, www.sansdigital.com or [email protected])
Step 2
Place the product on a flat and stable surface. Make sure that the ventilation fan is not obstructed
and appropriate ventilation space is provided around the product. (Do not place the product to
any environment that may cause damage to the product)
Step 3
Take out the tray and install your hard disk in it. Make sure to fasten the hard disk securing
screws to prevent damages caused by unnecessary movement.
Step 4
Once the installation is completed, insert the tray back and fix it firmly in the proper place.
Step 5
Connect the cables to the corresponding ports. Make sure that you have connected the
corresponding cables to two Gigabit ports, LAN or RS-232 port and Extension port (optional).
Then connect the power cord.
Step 6
Hardware installation is completed. You can power on the system to start the related setup
and application through LAN port or RS232 port. (Default account and password: admin /
1234, IP address: 192.168.0.1)
Complete! You may start the configurations of the system. Please refer to Chapter 4.
Contents
Chapter 1
1.1
1.2
1.3
Chapter 2
2.1
2.2
2.3
Chapter 3
3.1
3.1.1
3.1.2
3.2
3.2.1
3.2.2
3.2.3
3.3
3.3.1
3.3.2
Chapter 4
4.1
4.2
4.3
4.4
4.4.1
4.4.2
4.4.3
4.4.4
4.4.5
4.4.6
4.4.7
4.4.8
4.4.9
4.4.10
4.5
4.5.1
4.5.2
4.5.3
4.5.4
4.5.5
4.6
4.6.1
4.6.2
RAID Introduction..................................................................
What is RAID?..............................................................................
RAID Functions.............................................................................
RAID Levels and Comparisons..........................................................
iSCSI Introduction and Glossary..........................................
What is iSCSI?..............................................................................
Using iSCSI..................................................................................
Glossary......................................................................................
Installation..............................................................................
Notice Before Installation.................................................................
Sans Digital iSCSI Series Products Features.........................................
Verifying the related equipments........................................................
Management Methods....................................................................
Web GUI (Graphic User Interface).....................................................
RS-232 Connection Port..................................................................
Remote Control - Secure Shell..........................................................
System Control.............................................................................
LCM (SL5650)..............................................................................
System Buzzer..............................................................................
GUI Overview..........................................................................
GUI Architecture............................................................................
Login..........................................................................................
Quick install.................................................................................
System config...............................................................................
System name...............................................................................
IP address...................................................................................
iSCSI..........................................................................................
Login Config.................................................................................
Password....................................................................................
Date...........................................................................................
E-Mail.........................................................................................
Simple Network Management Protocol (SNMP).....................................
System log Server..........................................................................
Event log.....................................................................................
iSCSI config.................................................................................
Entity property...............................................................................
NIC............................................................................................
Node..........................................................................................
Session.......................................................................................
CHAP account..............................................................................
Volume config...............................................................................
Physical disk.................................................................................
Volume group (VG).........................................................................
10
10
10
10
12
12
12
13
14
14
14
14
15
15
18
21
22
22
23
24
24
25
26
27
27
28
28
28
29
29
29
30
30
30
31
31
31
32
32
32
33
33
35
4.6.3
4.6.4
4.6.5
4.6.6
4.7
4.7.1
4.7.2
4.7.3
4.7.4
4.8
4.8.1
4.8.2
4.8.3
4.8.4
4.8.5
4.9
Chapter 5
5.1
5.2
5.3
5.4
5.5
Chapter 6
6.1
6.2
6.3
User data volume (UDV)..................................................................
Cache volume (CV)........................................................................
Logical unit number........................................................................
Example......................................................................................
Enclosure Management..................................................................
SES config...................................................................................
Hardware Monitor..........................................................................
Hard Drive S.M.A.R.T. Function Support..............................................
UPS...........................................................................................
Maintenance................................................................................
Upgrade......................................................................................
Info............................................................................................
Reset to default.............................................................................
Congif import & export....................................................................
Shutdown....................................................................................
Logout........................................................................................
35
36
37
37
45
45
45
46
46
47
47
48
48
48
48
49
Advanced Operation.............................................................. 50
Rebuild........................................................................................ 50
VG Migration and Expansion............................................................ 51
UDV Expansion............................................................................. 52
Disk roaming................................................................................ 52
Support Microsoft MPIO and MC/S..................................................... 52
Application Description......................................................... 53
Sharing Resources......................................................................... 53
Easy Storage Capacity Expansion...................................................... 54
Remote Access............................................................................. 54
Appendix
A.
B.
C.
D.
E.
F.
Certification list..............................................................................
Event notifications..........................................................................
Using notices................................................................................
Microsoft iSCSI Initiator...................................................................
MPIO and MC/S configure instructions................................................
QLogic QLA4010C configure instructions.............................................
55
57
60
61
66
82
Chapter 1
1.1
RAID Introduction
What is RAID?
It is inevitable that a single hard disk, either with SCSI or IDE interface, will suffer the compatibility
problem between the motor rotational speed and the transfer interface. As a result, an Ultra160 SCSI or
ATA100 IDE hard disk can only achieve the transfer rate of up to 30MB/Sec at the bandwidth of
100MHz.
In addition, the life span of a hard disk is limited. Once a hard disk is damaged, it is likely to lead to the
system crash and data loss. Above mentioned are two severe problems in network system architecture.
These factors have encouraged the creation of RAID (Redundant Arrays of Inexpensive / Independent
Disks), a technology that combines multiple inexpensive and independent hard disks into an array of
harddisks so as to increase data transfer performance and storage efficiency.
RAID implements the mechanisms such as Striping or Mirroring plus Parity Checking, to combine two
or more physical hard disks into one virtual/logical disk array that allows On-line, quick access, huge
capacity and fault tolerance. If one of the hard disks in the array is damaged, the system continues to
operate using the remaining working hard disks, resulting in no system crash or data loss. In summary,
RAID technology increases the performance and data security in network system architecture.
1.2
RAID Functions
‧Expanding storage capacity
‧Increasing data transfer speed
‧Saving cost
‧Inherent Fault Tolerance
‧Hot Swap
‧Auto-Rebuild
‧Hot Spare
‧On-line Capacity Expansion
1.3
RAID Levels and Comparisons
With the development of RAID technologies, users now have more options for RAID levels. Some
vendors even have proprietary names for RAID levels. Generally, RAID levels include RAID 0, 1, 3, 5, 6,
0+1, 10, 30, 50, 60 and JBOD (Just a Bunch Of Disks).
The following is a comparison of some commonly used RAID levels.
10
RAID Level
Basic Operation
Method
Hard Disk Available
Capacity
Data Reliability
Data Transfer Speed
Minimum Number
of Hard Disks
0
Striping data across
each drive
Total capacity of all
the hard disks
Low
Highest
2
1
Mirroring
Half of total capacity
of all the hard disks
High
Lower
2
0+1
Mirroring data to
another drive and
stripping across the
drive
Half of total capacity
of all the hard disks
Very High
High
4
RAID Introduction
3
Stores parity
information on
independent disk
Total capacity of all
the hard disks minus
one disk capacity
High
Very High
3
5
Stores parity
information on all the
hard disks
Total capacity of all
the hard disks minus
one disk capacity
High
Very High
3
3+Spare
Stores parity
Total capacity of all
information on
the hard disks minus
independent hard disk
two disks capacity
& spare disk.
Very High
High
4
5+Spare
Stores parity
information on all the
hard disks & spare
disk.
Total capacity of all
the hard disks minus
two disks capacity
Very High
High
4
6
Stores parity
information on all the
hard disks
Total capacity of all
the hard disks minus
two disks capacity
Very High
High
4
For more information of RAID, refer to our website at www.sansdigital.com
RAID Introduction 11
Chapter 2 iSCSI Introduction and Glossary
2.1
What is iSCSI?
SCSI (Small Computer Standard Interface) is an ANSI standard parallel interface used by a computer
to link up with peripheral devices. As it offers faster transfer rates than other standard interfaces, it is
commonly used in workstations and servers as the interface of HDD and other storage devices.
A iSCSI (Internet SCSI) is a protocol that integrates SCSI protocol into TCP/IP packet in order to link
storage device with servers over a network. iSCSI is capable of providing high-efficiency SANs (Storage
Area Networks) over standard IP network such as LAN, WAN or Internet.
Conventional SANs generally refer to the storage area networks under Fiber-Channel. Yet to response
to the effects of iSCSI, currently SANs are divided into FC-SANs and IP-SANs. IP-SAN uses iSCSI
transfer protocol to add storage capacity unlimitedly to a server over the Internet, regarded as a real
storage network system.
The storage capacity of IP-SANs can be expanded using various storage systems from various vendors.
Furthermore, under SANs, any network types (such as Ethernet, High Ethernet or Fast Ethernet) and
various operation systems (such as Microsoft Windows, Linux, Solaris and etc) can be supported. IPSANs also provides the mechanisms for security, data duplication, multi-channel, high-efficiency and etc.
2.2
Using iSCSI
A connection using storage protocol such as iSCSI requires “two ends”, a “Initiator” and a “target”. In the
iSCSI field, they are called “iSCSI initiator” and “iSCSI target”.
iSCSI initiator asks for operation from all SCSI, for example, read and write. iSCSI usually locates in the
Host side or sever side.
On the other hand, iSCSI target refers to the storage equipments or the devices used for managing or
allocating capacity. It is a device for executing SCSI commands. An iSCSI target can be a disk, tape or
disk array.
12
RAID Introduction
Figure 2.2.1
iSCSI initiator is essential to the host side. It is controlling SCSI in an iSCSI implementation. Its role can
be played as either software or hardware (HBA). Please refer to the iSCSI HBA card list in Appendix A to
confirm if your HBA card is supported. Initiator software adopts standard TCP/IP protocol and Ethernet
facilities while iSCSI HBA card uses vendor-proprietary iSCSI and TCP/IP protocols.
iSCSI HBA card vendors will provide proprietary initiator tools. Please refer to your HBA card user
manual for detailed information.
Users can download Microsoft iSCSI initiator software at the following URL:
http://www.microsoft.com/downloads/details.aspx?FamilyID=12cb3c1a-15d6-4585-b385-befd1319f825&
DisplayLang=en
Please refer to Appendix D Microsoft iSCSI initiator for the installation instructions of Microsoft iSCSI initiator.
Linux OS provides iSCSI initiator as well. Refer to the URL below:
Instructions web page : http://linux-iscsi.sourceforge.net/
Download link : http://sourceforge.net/project/showfiles.php?group_id=26396
Instructions document : http://www.cuddletech.com/articles/iscsi/iscsiref.pdf
For Mac operation system, please refer to the URL below:http://www.attotech.com/xtend.html
For software used on other operation system, please refer to the related instructions on the respective
websites.
2.3
Glossary
The following terms will be used throughout this manual:
RAID
Redundant Array of Independent Disks
DS
PD
Physical Disk
GS
Dedicated Spare disks
Global Spare disks
VG
Volume Group
DC
Dedicated Cache
UDV
User Data Volume
GC
Global Cache
CV
Cache Volume
DG
DeGrade mode
LUN
Logical Unit Number
S.M.A.R.T.
Self-Monitoring Analysis and Reporting
Technology.
GUI
Graphic User Interface.
WWN
World Wide Name.
WT
Write-Through
HBA
Host Bus Adapter.
WB
Write-Back
MPIO
Multi-Path Input/Output.
RO
Read-Only
MC/S
Multiple Connections per Session
S.E.S
SCSI Enclosure Services
NIC
Network Interface Card
iSCSI
Internet Small Computer Systems Interface
LACP
Link Aggregation Control Protocol
MTU
Maximum Transmission Unit
CHAP
Challenge Handshake Authentication Protocol
iSNS
Internet Storage Name Service
RAID Introduction 13
Chapter 3 Installation
3.1
Notice Before Installation
3.1.1
Sans Digital iSCSI Series Products Features
Sans Digital iSCSI Series Products are high-performance RAID system with the features as follows:
‧Dual Gigabit channels design
‧eSATA expansion interface
‧Supports RAID 6 level
‧Supports hot-swap
‧N-way mirroring
‧GUI operator interface
‧Online capacity expansion and RAID level conversion
‧Global/dedicated cache configuration by volume
‧Supports S.M.A.R.T
‧Supports SES
‧Disk roaming
‧MPIO ready (initiator driver or HBA card support needed)
‧MC/S ready (initiator driver or HBA card support needed)
‧Supports CHAP authentication
Sans Digital iSCSI Series products can be applied on different RAID level by connecting to a main system
via iSCSI interface. Sans Digital iSCSI Series products provide reliable data security and supports RAID
6 level. RAID 6 level allows two damaged hard disks without affecting current data. Data in the damaged
hard disk can be restored by the data in the working hard disks.
By providing high-performance and protecting your data, Sans Digital iSCSI Series Products are the most
cost-effective and best solution in the network data storage backup field for small and medium business.
3.1.2
Verifying the related equipments
Before you install the related products, please verify the following items first:
‧ When you open the package and take out the hardware components, please check if any accessory is
missing or damaged
‧ Refer to Appendix A Certification List to verify if your hardware devices are supported
‧ A server equips with Ethernet card or iSCSI HBA card
‧ CAT 5e or CAT 6 network cable used in the management and iSCSI port. We suggest you using
CAT 6 network cable for optimal performance
‧ Plan your storage system architecture, such RAID and spare information, in advance
‧ The information on the management port and the iSCSI port. To use a static IP address, please prepare
the information about the static IP address, subnet mask and default gateway
‧ High-speed network switch (recommended) or a high-speed network switch featuring VLAN/LCAP/
Trunking functions
‧ CHAP security information, including the CHAP user name and password (optional)
14
RAID Introduction
‧ Complete all the hardware installation before booting the system. The connection to the controller port,
management port and iSCSI port should be completed first
3.2
Management Methods
You can manage the Sans Digital iSCSI Series Products by one of the following three methods. Each
method is described as follows:
3.2.1
Web GUI (Graphic User Interface)
Sans Digital iSCSI Series Products support Graphic User Interface (GUI) for system management. Before
getting started, make sure the related network port is connected. If you want to use a static IP address,
make sure the IP address is not conflicting with other IP address. You can use the “ping” command to
verify if IP address confliction occurs.
The default IP address of Sans Digital iSCSI Series Products is 192.168.0.1. The following instructions
describe how to start your initial setup by configuring a static IP address in Windows XP system.
Step 1
First, verify if IP address confliction occurs. Click Start→Run→input ping xxx.xxx.xxx.xxx (the IP
address you are going to use). If you get a reply of “Request time out.”, then you can use the IP
address. It is recommended that you may also consult with your MIS personnel directly for the
related IP address information.
RAID Introduction 15
Step 2
Configure the domain. Click Start→Settings→Network Connections. A dialog window for your
current network connection will appear. Select “Network Connections” and then click “Properties”.
Step 3
Select “Internet Protocol (TCP/IP)” and click “Properties”. A dialog window for IP address
settings will appear.
16
RAID Introduction
Step 4
Configure the IP address, subnet mask, gateway and DNS. You can consult with the MIS
personnel in your company for the related IP address.
Step 5
After the configuration, click “OK” to complete the settings. (If you need to change the IP
address in the future, you should make sure that the IP addresses used by Sans Digital iSCSI
Series Products are in the same domain to ensure the proper system operation.)
Step 6
Login the system. The default IP address of Sans Digital iSCSI Series Products is 192.168.0.1.
Open your web browser and input:
RAID Introduction 17
http://192.168.0.1
To use the system for the first time, click any of the functions to pop up the screen requesting for account
and password. The default username and password are as follows:
Login Username: admin ; Default Password: 1234
3.2.2
RS-232 Connection Port
The system can also be managed and configured via the RS-232. In case you have forgotten the IP
address you have configured, you can then use RS-232 port to enter the system for configure. The
following instructions are based on Windows XP environment.
Step 1
Step 2
18
Please make connection by using RS-232 cable provided in the Accessory Kit. Once the
connection is completed, switch the power on.
Click Start→Programs→Accessories→Communications→HyperTerminal. To configure the
terminal settings. The first step is to give a name for this terminal setting.
RAID Introduction
Step 3
Select the connection port.
Step 4
Configure the related settings.
RAID Introduction 19
Bits per second: 115200
Data bits: 8 bite
Parity: None
Stop bits: 1
Flow control: None
Step 5
Select the terminal type. Please click File→Properties→Settings. Specify the terminal type as
vt100. Then click “OK” to complete the connection.
Step 6
After the connection, input the username and password and then login. The following operations
20
RAID Introduction
are similar to the operations via web-based GUI. Please refer to Chapter 4 for instructions.
SANS DIGITAL
Login Username: admin
Default Password: 1234
3.2.3
Remote Control - Secure Shell
SSH (secure shell) allows remote login to Sans Digital iSCSI Series Products
You can download SSH end user software via the following websites:
SSHWinClient WWW : http://www.ssh.com/
Putty WWW : http://www.chiark.greenend.org.uk/
Host name: 192.168.0.1
Login Username: admin
Default Password: 1234
SANS DIGITAL
Remind : Sans Digital iSCSI Series Products support SSH for remote control. To use SSH functions, IP address and password are
required for login.
RAID Introduction 21
3.3
System Control
3.3.1
LCM (SL5650)
Use the four function keys, (Up), (Down), ESC (Escape) and ENT (Enter) to control LCM (LCD
Control Module). After booting up the system, the following screen will be displayed.
xxx.xxx.xxx.xxx
IntelliRAID
After pressing ENT (Enter) key, you can use
(Up) and
(Down) keys to select a LCM function.
If there is any alarm or error message, LCM will show the related information on the screen to provide
users with more information.
Each LCM function is described as follows:
Alarm Mute
To turn off the alarm sound when an error occurs
Reset/Shutdown
To reset or shutdown the controller
Quick Install
To use “Quick Install” to set up a volume by three steps. Please refer to section 4.3 for configure via the webbased GUI
View IP Setting
To view current IP address, subnet mask and gateway
Change IP Config
To set up the IP address, subnet mask and gateway. You can choose to use DHCP server (for IP address
allocation) or manually specify the IP address
Reset to Default
To restore factory defaults:
Default Password: 1234
Default IP address: 192.168.0.1
Default subnet mask: 255.255.255.0
Default gateway: 192.168.0.254
22
RAID Introduction
LCM architecture reference diagram
[Alarm Mute]
[cYes
Nod]
[Reset]
[cYes
Nod]
[Shutdown]
[cYes
Nod]
[Reset/Shutdown]
[Quick Install]
RAID 0
Volume Size
Adjust Volume
(RAID 1/RAID 3/
(xxxxxx MB)
Size
RAID 5/RAID 6)
xxxxxx MB
Apply The Config
[cYes
Nod]
[IP Config]
[Static IP]
Sans Digital
[IP Address]
IntelliRAID
[View IP Setting]
[192.168.000.001]
[IP Subnet Mask]
[255.255.255.0]
[IP Gateway]
[192.168.000.254]
[DHCP]
[Change IP Config]
[cYes
Nod]
[IP Address]
Adjust IP address
[IP Subnet Mask]
Adjust Submask IP
[IP Gateway]
Adjust Gateway IP
[Static IP]
[Apply IP Setting]
[Reset to Default]
[cYes
[cYes
Nod]
Nod]
Note : Before powering off, please execute “Shutdown” to flush the data from the cache
3.3.2 System Buzzer
The system buzzer features are described as follows:
1. The system buzzer alarms to confirm that system boots up successfully
2. The system buzzer alarms continuously when system failure or error occurs. The alarm can be
stopped via the mute option (Alarm Mute)
RAID Introduction 23
Chapter 4 GUI Overview
4.1
GUI Architecture
The following is the GUI architecture:
Æ
Step 1 / Step 2 / Step 3 / Confirm
System name
Æ
System name
IP address
Æ
DHCP / Static / HTTP port / HTTPS port / SSH port
iSCSI
Æ
iSNS / Authentication / Link aggregation or Multi-homed / IP settings / Default gateway / Set MTU
Language
Æ
Auto Detect / English / Simple Chinese
Log config
Æ
Auto Logout / Login Lock
Password
Æ
Old password / Password / Confirm
Date
Æ
Date / Time / Time zone / Daylight saving / NTP / Server
Mail
Æ
Mail-from address / Mail-to address / SMTP relay / Authentication / Send test mail
SNMP
Æ
SNMP trap address / Community
System log server
Æ
Server IP / Hostname / Port / Facility / Event Level
Event log
Æ
Filter / Mute / Clear / Download
Entity Property
Æ
Entity name / iSNS IP
NIC
Æ
Name / DHCP / IP Address Netmask / Gateway / MTU
/ MAC Address / Link / Entity Name
Quick Install
System Config
iSCSI Config
Node
Æ
Name / Auth
Session
Æ
Initiator Name / TPGT / Error Recovery Level / Error Recovery Count
CHAP account
Æ
User
Physical disk
Æ
Free disc / Global spares / Dedicated spares / More information
Volume group
Æ
Create / Delete / More information / Rename / Migrate
Æ
Create / Delete / Attach LUN / More information / Rename / Extend / Set read/write mode / Set
priority
Cache volume
Æ
Create / Delete / More information / Resize
Logical unit
Æ
Attach / Detach
Volume config
User data volume
Enclosure management
SES Config
Æ
Enable / Disable
Hardware Monitor
Æ
Item / Information / Confirm
S.M.A.R.T.
Æ
S.M.A.R.T. for physical disks
UPS
Æ
UPS Type / Shutdown Battery Level / Shutdown Delay / Shutdown UPS
Upgrade
Æ
Browse the firmware to upgrade
Info
Æ
System information
Reset to default
Æ
Reset to factory default
Config Import & Export
Æ
Import / Export / Import File
Shutdown
Æ
Reboot / Shutdown
Maintenance
Logout
24
RAID Introduction
4.2
Login
Sans Digital iSCSI Series Products supports graphic user interface (GUI) to manage the system. Make
sure the network cable is already connected and configured to the same domain as your current related
devices. Please refer to 3.2.1 for related configures. The following descriptions are examples based on
the default IP address: 192.168.0.1. Please open your web browser and input:
http://192.168.0.1
To use the system for the first time, click any of the functions to pop up the dialog window requesting for
account and password. The default account and password are as follows:
Login account: admin
Default Password: 1234
After login, you can choose a function from the list to the left side of the window for related configures.
There are four indicators at the top-right corner of the window. Each indicates:
1.
RAID light : Green indicates RAID is working properly. Red indicates RAID error.
2.
Temperature light: Green indicates normal. Red indicates abnormal system temperature.
3.
Voltage light : Green indicates normal. Red indicates abnormal voltage status. Please refer to
4.6.2 for more details.
4.
UPS : Green indicates normal. Red indicates abnormal UPS status.
RAID Introduction 25
4.3
Quick install
You can use “Quick install” function for quick configure. On RAID levels 0, 1, 3, 5 and 6, the system will
automatically calculate the maximum available capacity, which is subject to the number of your hard
disks and currently available capacity.
Step 1
Select “Quick install”, the system will ask you to configure the RAID level, as shown in
to figure 4.3.1. After configuring the RAID level, click “
” to enter next page
to configure “LUN”.
Figure 4.3.1
Step 2
Please select a Logical Unit Number (LUN). The wildcard “*” indicates that every host is
allowed to access this capacity. You can change the volume size in this page. The maximum
volume size will be automatically shown on this page. Input a value specified a size
less than or equal to the maximum volume size, and click “
”.
Step 3
Confirmation page. The system will display all the related information as shown in
Figure 4.3.2. If the information is correct, click “
”.
Figure 4.3.2
26
RAID Introduction
4.4
System config
“System config” function allows you to configure the basic functions of the system.
Figure 4.4
4.4.1 System name
Select “System name” to change system name. The default System name is in accordance with the
product name and serial number of the system. For example: SANSDIGITAL-000001.
Figure 4.4.1
RAID Introduction 27
4.4.2
IP address
Select “IP address” to change the IP address for remote control page. You can choose DHCP (to obtain
IP address from DHCP server) or static IP to change the HTTP, HTTPS and SSH ports.
Figure 4.4.2
4.4.3
Language
Select “Language” to setup the GUI language.
Figure 4.4.3
4.4.4
Login Config
Select “Login config” to configure the time of single login and auto logout. Single login can prevent
multiple users from simultaneously accessing the management console.
1. Auto logout: The options include (1) Disable (2) 5 min (3) 30 min (4) 1 hour. If a user idles after the
specified time elapsed, the system will automatically logout to allow other users to login.
Figure 4.4.4
2. Login block: Disable / Enable. When login block is enabled, only one user is allowed to login/change
the system settings.
28
RAID Introduction
4.4.5
Password
Click “Password” to change the administrator password. Input the original password first and then input
your new password two twice.
Figure 4.4.5
4.4.6
Date
Click “Date” to configure current date and time.(We recommend you configure it before using the system
to ensure the time consistency across the network.)
Figure 4.4.6
4.4.7
E-Mail
Click “Mail” to input up to 3 E-mail addresses for receiving the event notification. Mail servers will check
“Mail-from address” and block spam mails. Please fill the necessary fields and select “Send test mail” to
verify the E-mail notification function works properly.
Figure 4.4.7
RAID Introduction 29
4.4.8
Simple Network Management Protocol (SNMP)
Select “SNMP” to configure SNMP (Simple Network Management Protocol) trap messages. It allows up
to 3 SNMP trap message addresses. The default community configure is “public”.
Figure 4.4.8
4.4.9
System log Server
The System log server supports remote access to the disk array system’s log. It allows system event log
to be recorded into files and be sent to those operating systems with the “syslogd” applications.
If this functionality is required, the ER104I/MR4I set as the “Target”. Please follow the screen below and
fill out the information necessary with 514 TCP port set as the communication port.
Currently, both Windows & MAC do not support system log server functions, if you require this function,
please contact Windows or MAC support for further details or updates. A third party program support
syslogd may be available.
Figure 4.4.9
4.4.10 Event log
Event log contain system event of the unit. Click “Event log” to view the event messages. Click “Filter”
to select the log type to be displayed. Click “Download” button to save the whole event log as a text file
“log-xxxx.txt”. Click “Clear” button to clear the whole event log. Click “Mute” button to stop system alerts.
Figure 4.4.10.1
30
RAID Introduction
There are three methods to display the event log: “Show events” in the event log page, “Pop up events”
in the pop-up window in the web page, and “Show on LCM” (SL5650). You can select a preferred one.
Figure 4.4.10.2
4.5
iSCSI config
Select the “iSCSI config” allows you to configure the related iSCSI settings.
Figure 4.5
4.5.1
Entity property
Once the Entity name has been displayed, you may input the iSNS IP address. Through the iSNS
function, the iSCSI storage system is able to pass the related management information to the iSNS
server to provide better management of overall iSCSI network.
iqn.2001-08.com.sansdigital:iscsi-000a40189
Figure 4.5.1
4.5.2 NIC
This function allows the two communication ports for two IP addresses. Select
to configure the
usage of the DHCP or the static IP address. Select
to configure the default gateway IP address.
Select
to configure the MTU value. Static IP address is highly recommended.
Figure 4.5.2
RAID Introduction 31
4.5.3
Node
Displays Node name. Select
to enable or disable the CHAP function.
iqn.2001-08.com.sansdigital:iscsi-000a40189:default-target
Figure 4.5.3
4.5.4
Session
Displays the number of users connected to the system. Select
as “Initiator IP”, ”Initiator name” and ”Authentication”.
to see the related information such
Figure 4.5.4.1
Figure 4.5.4.2
4.5.5
CHAP account
Sets up related information of CHAP. Select
to delete an existing user. Select
user.
to add a new CHAP user. Select
to further set up related configuration of each
sansdigital
sansdigital
Figure 4.5.5
32
RAID Introduction
4.6
Volume config
“Volume config” allows you to configure any volume related functionalities of the system.
Figure 4.6
4.6.1
Physical disk
Enter the “Physical disk” option to view the status of hard disks installed in the system.
The following are operation tips:
1. Multiple selections. Select one or more hard disks by clicking the checkboxes. Or click the checkbox
at the top left corner for the system to select all the disks automatically. Ticking again will select none.
2. The list will not appear if there is no Volume Group (VG) or VG under RAID 0 or JBOD mode. This is
because the dedicated disk cannot be configured under these RAID levels.
3. Three functions, “
”, “
” and “
”, are allow
multiple selection.
Figure 4.6.1
RAID Introduction 33
‧Physical disk field description:
The slot number of the hard disk. The blue button next to the number indicates “More Information” function.
Clicking it shows the details of the hard disk.
Slot
WWN
World Wide Name.
Size (MB)
Disk volume
VG Name
Associated Volume Group name.
Disk state:
“GOOD” Æ The hard disk is good.
Status
“DEFECT” Æ The hard disk has errors.
“FAIL” Æ The disk fails to function properly.
“RD” Æ RAID Disk. This hard disk has been configured with a RAID level.
“FR” Æ Free disk. This hard disk is free for use.
“DS” Æ Dedicated Spare. This disk has been configured to be the dedicated spare of the VG.
Status 1
“GS” Æ Global Spare. This disk has been configured to be a global spare of all VGs.
“RS” Æ Reserve. The disk contains the VG information but cannot be used. It is caused by incomplete VG
configure, or hot-plug of the hard disk during system operation. In order to protect the data in the hard disk,
the status is changed to reserve automatically. It can be reused after configuring it to “FR” manually.
“R” Æ Rebuild. The hard disk is under rebuilding
Status 2
“M”Æ Migration. The disk is under data migration
3.0G Æ The hard disk speed can reach the SATA2 level (3.0Gbps)
Speed
1.5G Æ The hard disk speed can reach the SATA1 level (1.5Gbps)
Unknown Æ The hard disk does not support either of above levels
‧Physical disk operations description:
34
FREE DISC
Configure the selected hard disk(s) to be free for use
GLOBAL SPARES
Configure the selected hard disk(s) to be the global spare of all VGs
DEDICATED SPARES
Configure the selected hard disk(s) to be dedicated spare of selected VGs
RAID Introduction
4.6.2
Volume group (VG)
Click “Volume group” to view the status of each volume group.
‧ VG field description:
Figure 4.6..2
No.
Volume group number. The blue button next to the number indicates “More Information” function. Clicking it shows
the details of the volume group.
Name
Volume group name. The blue button next to the name indicates “Rename” function.
Total(MB)
Total capacity of this volume group
Free(MB)
Free capacity of this volume group
#PD
The number of physical disks of the volume group
#UDV
The number of user data volumes of the volume group
The status of volume group
Status
“Online” Æ Volume group is online
“Fail” Æ Volume group fails
Status 1
hard disk have not been replace.
Status 2
“R” Æ Rebuild. This volume group is under rebuilding.
Status 3
“M” Æ Migration. This volume group is under migration.
RAID
•
“DG” Æ Degraded mode. This volume group is not degraded. The reason could be hard disk failure or failured
The RAID level of the volume group. The blue button next to the RAID level indicates “Migrate” function. Clicking
“Migrate” allows adding disk(s) for expansion or changing the RAID level of the volume group.
VG operation description:
4.6.3
CREATE
Create a volume group
DELETE
Delete a volume group
User data volume (UDV)
Enter the “User data volume” function to view the status of each user data volume
Figure 4.6.3
‧UDV field description:
No.
Number of this user data volume. The blue button below the UDV number indicates “More
Information” function. It shows the details of the user data volume.
Name
Name of this user data volume. The blue button below the UDV Name indicates “Rename”
function.
RAID Introduction 35
Size(MB)
Total capacity of this user data volume. The blue button below the size indicates “Extend”
function.
Status
The status of this user data volume:
“Online” Æ User data volume is online.
“Fail” Æ User data volume fails.
Status 1
“WT” Æ Write Through.
“WB” Æ Write Back.
The blue button below the status 1 indicates “Set read/write mode” function
Status 2
“HI” Æ High priority.
“MD” Æ Medium priority.
“LO” Æ Low priority.
The blue button below the status 2 indicates “Set Priority” function
Status 3
“I” Æ User data volume is initializing
“R” Æ User data volume is under rebuilding
“M” Æ User data volume is under migration
R%
% complete of initializing or rebuilding
RAID
The RAID level that user data volume is currently using
#LUN
Number of LUN(s) that data volume is attaching
VG name
The VG name of the user data volume
CV (MB)
The cache volume of the user data volume
‧UDV operation description:
4.6.4
ATTACH LUN
Attach to a LUN
CREATE
Create a user data volume
DELETE
Delete a user data volume
Cache volume (CV)
Enter “Cache volume” function to view the status of cache volume
The global cache volume is a default cache volume, which is automatically created after power on, and
cannot be deleted. The size of global cache is based on the RAM size. It is total memory volume minus
the system usage.
Figure 4.6.4
‧CV field description:
No.
Number of the cache volume. The blue button next to the CV number indicates “More
Information” function. It shows the details of the cache volume.
Size(MB)
Total capacity of the cache volume. The blue button next to the CV size indicates “Resize”
function. The cache volume size can be adjusted through the above function.
UDV Name
Name of UDV
‧CV operations description:
36
CREATE
Create a cache volume
DELETE
Delete a cache volume
RAID Introduction
4.6.5
Logical unit number
Enter “Logical unit” function to view the status of attached logical unit number of each UDV
You can add LUN by clicking the “
”. The configuration screen will show, as in Figure
4.6.5.1 You must input an initiator name in the “Host” field for access control, or fill-in wildcard “*”, which
allow every host can control the volume. Choose LUN and permission, click “
” as
shown in Figure 4.6.5.2.
Figure 4.6.5.1
Figure 4.6.5.2
‧LUN operations description:
ATTACH
Attach a logical unit number to a user data volume
DETACH
Detach a logical unit number from a user data volume
The authorization rules of access control are applied in top-down order. For example: there are two rules
for the same UDV, one is “*” for LUN 0 and the other is “iqn.host1” for LUN 1. A different host “iqn.host2”
is allowed to login to have access control because the rule one allow access for all host.
The access will be denied when there is no matching rule.
4.6.6
Example
The followings are examples for creating a volume. Example 1 is to create two UDVs sharing the same
CV (global cache volume) and configure a global spare disk. Example 2 is to create two UDVs. One
shares global cache volume while the other uses dedicated cache volume. A dedicated spare disk will
be configured.
‧Example 1
Example 1 is to create two UDVs in one VG, each UDV shares global cache volume. Global cache
volume is automatically created after system boots up, therefore no action is needed to configure CV.
Finally, set a global spare disk. The last protion will show how to delete all configurations.
RAID Introduction 37
Step 1
Create VG (Volume Group).
To create the VG, please follow the steps below.
SANS DIGITAL
SANS DIGITAL
Figure 4.6.6.1
1. Select “/Volume config /Volume group”
2. Click “
”
3. Input a VG Name. Choose a RAID level from the list. Click “
” to choose the
the physical disk in the RAID, click “
”. Since we will create a spare disk, do not
select all disk and leave one physical disk for spare disk creation.
4. Confirm the results. Click “
” if all the settings are correct
5. A VG will be created after the confirmation.
sansdigital
Figure 4.6.6.2
Step 2
Create UDV (User Data Volume).
To create a UDV, please follow the steps below.
SANS DIGITAL
SANS DIGITAL
Figure 4.6.6.3
1. Select “/Volume config/User data volume”
2. Click “
”
3. Input a UDV name. Choose a VG Name and input a size for the UDV. Decide the stripe height,
block size, read/write mode and configure the priority, and click “
”. Since we will
create 2 UDV, do not use all sizes avaliable.
4. A UDV will be created after the confirmation.
5. Repeat the steps above to create the second UDV. Create the UDV with rest of the sizes.
SANS DIGITAL
Figure 4.6.6.4
38
RAID Introduction
Step 3
Attach LUN to UDV.
There are two methods to attach LUN to UDV.
1. In “/Volume config/User data volume”, click “
2. In “/Volume config/Logical unit”, click “
”
”.
To attach a LUN to UDV:
Figure 4.6.6.5
1. Select a UDV
2. Input “Host” which is the initiator name for access control of this volume or input the wildcard “*” to
grant access to every host. Configure LUN and permission, then click “
”.
SANS DIGITAL
Figure 4.6.6.6
Note : The authorization rules of access control are applied in top-down order. Please refer to 4.6.5 for details.
Step 4
Configure global spare disk.
To configure global spare disks:
1. Select “/Volume config/Physical disk”
2. Select the free disk(s) by clicking the checkbox. Click “
as global spares
3. There will be a “GS” icon at status 1 field
” to configure them
Example 1, create 2 UDV with spare disk is completed. You can now connect to the iSCSI volume to
iSCSI initialor.
To delete UDVs and VG, please follow the steps below
Step 1: Detach LUN from UDV
Enter “/Volume config/Logical unit”.
SANS DIGITAL
Figure 4.6.6.7
RAID Introduction 39
1. Select LUNs by ticking the checkbox and then click “
pop up.
2. Click “OK”
Step 2
”. A confirmation window will
Delete UDV (User Data Volume)
To delete the UDV:
1.
2.
3.
4.
5.
Select “/Volume config/User data volume”
Select UDVs by ticking the checkbox.
Click “
” and a confirmation window will pop up
Select “OK”
OK. A UDV has been deleted
Remind : When a UDV is deleted, the attached LUN(s) related to this UDV will also be detached automatically.
Step 3
Delete VG (Volume Group)
To delete the VG, please follow the steps below.
1. Select “/Volume config/Volume group”
2. Select a VG by clicking the checkbox. Make sure that there is no UDV on this VG and the UDV(s)
on this VG have been deleted.
3. Click “
” and a confirmation window will pop up.
4. Click “OK” to confirm
Remind : The action of deleting the VG will be complete only when all of the related UDV(s) have been deleted in this VG. Otherwise,
error will occur when deleting VG.
Step 4
Free global spare disk.
To free global spare disks, please follow the steps below.
1. Select “/Volume config/Physical disk”
2. Select the global spare disk by ticking the checkbox, then click “
40
RAID Introduction
” to free the disk(s).
‧Example 2
Example 2 will create two UDVs in one VG. One UDV shares global cache volume while the other
uses dedicated cache volume. First, a dedicated cache volume should be created; it will be useful in
creating UDV. The last protion will show how to delete all configurations.
Each UDV is associated with one specific CV (cache volume) to execute the data transmission. Each
CV could have different cache memory size. If there is no special request in UDVs, it will use global
cache volume. User can create a dedicated cache for individual UDV manually. Using dedicated
cache volume, the performance would not be affected by the data access of other UDVs that using
global CV.
The total cache size depends on the RAM size and all the size will be configured as global spare
cache automatically. To create a dedicated cache volume, the first step is to cut down the global
spare cache size for the dedicated cache volume.
Step 1
Create dedicated cache volume
Figure 4.6.6.8
1. Select “/Volume config/Cache volume”.
2. If there is no enough space for creating a new dedicated cache volume, cut down the global spare
cache size first by clicking the blue button “
” in the size field. After re-allocation of the volume
size, click “
” to return to cache volume page
3. Click “
” to enter the configure page
4. Fill in the size and click “
”
Remind : The minimum size of global cache volume is 40MB. The minimum size of dedicated cache volume is 20MB.
Step 2
Create VG (Volume Group)
To create the VG, please follow the steps below.
1. Select “/Volume config /Volume group”
2. Click “
”
3. Input a VG Name. Choose a RAID level from the list. Click “
” to choose the
the physical disk in the RAID, click “
”. Since we will create a spare disk, do not
select all disk and leave one physical disk for spare disk creation.
4. Confirm the results. Click “
” if all the settings are correct
5. A VG will be created after the confirmation.
RAID Introduction 41
Step 3
Create UDV (User Data Volume)
To create a UDV, please follow the steps below.
1. Select “/Volume config/User data volume”
2. Click “
”
3. Input a UDV name. Choose a VG Name and input a size for the UDV. Decide the stripe height,
block size, read/write mode and configure the priority, and click “
”. Since we will
create 2 UDV, do not use all sizes avaliable.
4. A UDV will be created after the confirmation.
To create a UDV with dedicated cache volume, please follow the steps below.
1. Select “/Volume config/User data volume”
2. Click “
”
3. Input a UDV name. Choose a VG Name, and select the dedicated cache which is created earlier.
Input the size for the UDV, and decide the stripe height, block size, read/write mode and set priority.
Finally, click “
” to confirm the creation.
SANS DIGITAL
SANS DIGITAL
Figure 4.6.6.9
SANS DIGITAL
Figure 4.6.6.10
Step 4
Attach LUN to UDV
There are two methods to attach LUN to UDV.
1. In “/Volume config/User data volume”, click “
2. In “/Volume config/Logical unit”, click “
”
”.
To attach a LUN to UDV:
1. Select a UDV
2. Input “Host” which is the initiator name for access control of this volume or input the wildcard “*” to
”.
grant access to every host. Configure LUN and permission, then click “
42
RAID Introduction
Step 5
Configure dedicated spare disk
To configure dedicated spare disks, please follow the steps below:
1. Select “/Volume config/Physical disk”
2. Select a VG from the list, then select the disk(s) to be freed and click “
them as dedicated spare for the selected VG.
3. There will be a “DS” icon at status 1 field
” to set
SANS DIGITAL
SANS DIGITAL
SANS DIGITAL
SANS DIGITAL
Figure 4.6.6.11
Example 2, create 2 UDV with dedicate spare disk is completed. You can now connect to the iSCSI
volume to iSCSI initialor.
To delete UDVs and VG, please follow the steps below
Step 1: Detach LUN from UDV
Enter “/Volume config/Logical unit”.
SANS DIGITAL
Figure 4.6.6.12
1. Select LUNs by ticking the checkbox and then click “
pop up.
2. Click “OK”
Step 2
”. A confirmation window will
Delete UDV (User Data Volume)
To delete the UDV:
1.
2.
3.
4.
5.
Select “/Volume config/User data volume”
Select UDVs by ticking the checkbox.
Click “
” and a confirmation window will pop up
Select “OK”
OK. A UDV has been deleted
Remind : When a UDV is deleted, the attached LUN(s) related to this UDV will also be detached automatically.
RAID Introduction 43
Step 3
Delete VG (Volume Group)
To delete the VG, please follow the steps below.
1. Select “/Volume config/Volume group”
2. Select a VG by clicking the checkbox. Make sure that there is no UDV on this VG and the UDV(s)
on this VG have been deleted.
” and a confirmation window will pop up.
3. Click “
4. Click “OK” to confirm
Step 4
Free dedicated spare disk
To free dedicated spare disks, please follow the steps below:
1. Select “/Volume config/Physical disk”
2. Select the dedicated spare disk by ticking the checkbox and then click “
the disk
Step 5
Delete dedicated cache volume
To delete the dedicated cache volume, please follow the steps below:
1.
2.
3.
4.
Select “/Volume config/Cache volume”
Select a CV by clicking the checkbox
Click “
” and a confirmation window will pop up
Select “OK”
Note : Global cache volume cannot be deleted
44
RAID Introduction
” to free
4.7
Enclosure Management
“Enclosure management” function allows the administrator to manage or obtain information about the
hardware.
Figure 4.7.1
4.7.1
SES config
SES represents SCSI Enclosure Services. You can enter “SES config” function to enable or disable the
management of SES.
Figure 4.7.1
4.7.2
Hardware Monitor
Enter “Hardware Monitor” function to view the information of current voltage and temperature
Figure 4.7.2
If “Auto shutdown” has been checked, the system will shutdown automatically when voltage or
temperature is out of the normal range. For better data protection, please enable the “Auto Shutdown”
function.
RAID Introduction 45
4.7.3
Hard Drive S.M.A.R.T. Function Support
S.M.A.R.T. (Self-Monitoring Analysis and Reporting Technology) is a diagnostic tool for hard drives to
give advanced warning of hard disks failures. It provides users chances to take actions before possible
hard disks failure.
S.M.A.R.T. measures many attributes of the hard disk realtime and detects if the hard disk is moving
out of threshold tolerance. The advanced notice of possible hard disk failure allows users to back up
hard disk or replace the hard disk in advance. It prevent from hard disk crash when it is writing data or
rebuilding a failed hard disk.
After you enter the “S.M.A.R.T.” function, the S.M.A.R.T. information will be displayed. The number is
the current value and the number in parenthesis is the default threshold value. The threshold values are
different according to hard disk vendors. Please refer to the vendor’s specifications for details.
Figure 4.7.3
4.7.4
UPS
You can enter “UPS” function to configure UPS (Uninterruptible Power Supply).
Figure 4.7.4
Currently, the system only support the smart-UPS (Auto Shutdown) function of APC (American Power
Conversion Corp.). For more information, visit http://www.apc.com/.
To setup the UPS, connect the system to APC UPS via RS-232 for communication. Configure the
shutdown values when power failure. UPS of other vendors do not support auto shutdown.
UPS Type
Select UPS Type. Choose Smart-UPS for APC Smart-UPS or choose “None” for other
vendors.
Shutdown Battery Level (%)
When below the specified level, the system will shut down automatically. Setting the
value to “0” will disable the UPS function.
46
RAID Introduction
Shutdown Delay (s)
If power failure occurs, and the system cannot return back after the specified period of
time, the system will shut down automatically. Setting the value to “0” will disable this
function.
Shutdown UPS
If ON is selected, when power is gone, UPS will shut down automatically after the system
shuts down successfully. After power comes back, UPS will start working and notify the
system to boot up. Selecting “OFF” will disable this function.
Status
The status of UPS.
“Detecting…”
“Running”
“Unable to detect UPS”
“Communication lost”
“UPS reboot in progress”
“UPS shutdown in progress”
“Batteries failed. Please change them NOW!”
Battery Level (%)
Current battery power %.
4.8
Maintenance
”Maintenance” function provides system maintenance information to the system’s administrator.
Figure 4.8
4.8.1
Upgrade
The “Upgrade” function allow you to upgrade firmware and export the configuration file for backup
purposes.
To Export the configuration file, click "Export Config" and save to your desired location.
To Firmware Update:
1. Prepare your new firmware file named “xxxx.bin”. File can be obtain in www.sansdigital.com
2. Click
to select the file.
3, Click
, the system will automatically start and complete the upgrade.
Figure 4.8.1
RAID Introduction 47
During the upgrade, a status window will appear. The system will reboot after the update.
Remind : If currently your system is working properly, upgrading firmware is optional. For the latest version of the firmware, please
contact [email protected].
4.8.2
Info
You can click the “Info” function to view current system information.
Figure 4.8.2
4.8.3
Reset to default
You can click the “Reset to default” function to restore your system to factory defaults.
4.8.4
Configuration import & export
You can click the “Config import & export” function to import/export the configurations.
Figure 4.8.4.
4.8.5
Shutdown
After you enter the “Shutdown” function, it will display the “REBOOT” and “SHUTDOWN” buttons. Before
power off or restart, it is recommended to "REBOOT" or "SHUTDOWN" to flush the data from cache to
physical disks. This will keep the integrity of the data.
Figure 4.8.5
48
RAID Introduction
4.9
Logout
For security reason, “Logout” function will exit the management console. To login to the system, input
user name and password again.
RAID Introduction 49
Chapter 5 Advanced Operation
5.1
Rebuild
When A Volume Group (VG) is protected by RAID level (e.g.: RAID 3, RAID 5, or RAID 6), if one
physical disk has been failed, unplugged or removed, the VG status is changed to rebuild. The system
will search for available space to rebuild the data to ensure data integrity. It will use the dedicated spare
disk as rebuild disk first, then the global spare disk.
Sans Digital iSCSI Series Products support the Auto-Rebuild function. When the RAID level degraded or
fail, Sans Digital iSCSI Series Products start Rebuild automatically.
For example, if a RAID 6 is setup:
1. When there is no global spare disk or dedicated spare disk on the system, Sans Digital iSCSI Series
Products will be in degraded mode and wait until
(A) one hard disk is assigned as spare hard disk,
(B) the failed hard disk is replaced with new clean hard disk.
An Auto-Rebuild process will starts automatically when either of the above occur. The new disk will
be a spare disk to the original VG .
If the new added hard disk is not clean (with unknown VG information), it would be marked as
RS (reserved) and the system will not start the Auto-Rebuild.
If the disk is belonging to existing VG, it would be FR (Free) disk and the system will start
Auto-Rebuild.
2. When there is enough global spare disk(s) or dedicated spare disk(s), Sans Digital iSCSI Series
Products will start Auto-Rebuild immediately. In RAID 6 level, if there is another disk failure during the
rebuilding process, Sans Digital iSCSI Series Products will complete the rebuild regardless. The
Auto-Rebuild feature works at realtime to prevent a conflict with the “Roaming” function.
In degraded mode, the status of VG is “DG”.
When rebuilding, the status of PD/VG/UDV will display “R”, and “R%” in UDV will display rebuild status
in percentage. After rebuilding is complete, “R” and “DG” will disappear. And the VG will back to normal.
Note : If there is no VG or only the VG under RAID 0 or JBOD mode, rebuild is not avaliable.
Sometimes "Rebuild" is also known as "Recover". The following table describes the relationship between
RAID levels and rebuilding.
RAID 0
(striping). No data protection. Data is damaged or inaccessible if any hard disk fails or is unplugged.
RAID 1
(mirroring). Allows one hard disk to fail or being unplugged. One new hard disk is required to insert to the system to complete
the rebuilding.
N-way mirror
Extension of RAID 1 level. It has N copies of the disks and allows N-1 hard disks to fail or being unplugged.
RAID 3
(striping with parity). Allows one hard disk to fail or being unplugged.
50
RAID Introduction
RAID 5
(striping with interspersed parity). Allows one hard disk to fail or being unplugged.
RAID 6
(2-dimensional parity protection). RAID 6 allows two hard disks to fail or being unplugged. If two hard disks need to be rebuilt at
the same time, it will rebuild the first one and then the other one.
RAID 0+1
(mirroring of the member RAID 0). Allows two hard disks to fail or being unplugged, but the hard disks must in the same array.
RAID 10
(striping over the member RAID 1). Allows two hard disks to fail or being unplugged, but the hard disks must in different array.
RAID 30
(striping over the member RAID 3). Allows two hard disks to fail or being unplugged, but the hard disks must in different array.
RAID 50
(striping over the member RAID 5). Allows two hard disks to fail or being unplugged, but the hard disks must in different array.
RAID 60
(striping over the member RAID 6). Allows four hard disks to fail or being unplugged, but no more than two hard disks in same
array.
JBOD
The abbreviation of “Just a Bunch Of Disks”. No data protection. Data is damaged or inaccessible if any hard disk fails or is
unplugged.
5.2
VG Migration and Expansion
VG Migration/Expansion allow you to change from one RAID level to another, or expand current RAID
level to additional Hard drives. To migrate the RAID level, follow the steps below.
1. Click “/Volume config/Volume group”
2. Select the VG to be migrated and click “
” button in the RAID field
3. Change the RAID level by clicking the “
” down list. If the hard disk capacity is not enough
to support the new RAID level, a request to add more PD will pop up. Click “
”
to add hard disks and click “
” to go back to the configure page.
When migrating to lower RAID level, such as the migration from RAID 6 to 0, data will be lost. the
system will evaluate if this operation is safe and display the “Sure to migrate to a lower protection
array?” to warn you.
4. Double check the configuration. If there is no change needed, click “
”.
5. A confirmation page will show detailed RAID data. If there is no change needed, click “
”
to start the migration.
6. In the “status 3” field, you can view the migration status and the letter “M” will be displayed. In “/Volume
config/User data volume”, a “M” and progress percentage “R%” will be displayed in “Status 3”.
SANS DIGITAL
Figure 5.2.1
Remind : To migrate/expand, the total volume of VG must be larger or equal to the original VG. It does not allow the hard
disks with the same RAID level and the same original VG to expand.
When configuring the migration, if the settings are incorrect, the system will pop up a warning window described as below:
"Invalid VG ID": Source VG error
"Degrade VG not allowed": Source VG is degraded
"Initializing/rebuilding operation's going": Source VG is initialing or rebuilding
"Migration operation's going": Source VG is doing migration
"Invalid VG raidcell parameter": Structural error. For example, the size of a new VG is smaller than that of the original VG
Note : VG migration cannot be executed during data rebuilding or UDV expansion.
RAID Introduction 51
5.3
UDV Expansion
To expand UDV size, please follow the steps below.
1. Select “/Volume config/User data volume”
” button next to the number in the Size field.
2. Select the UDV to be expanded and click the “
3. Change the volume size. The volume size must be larger than the original value. Then click
“
” to start expansion
4. Expansion starts. If UDV needs initialization, it will display an “I” in “Status 3” field and the progress
percentage “R%”
Remind : The volume of UDV expansion must be larger than original value
Note : UDV expansion cannot be executed during rebuilding or migration
5.4
Disk roaming
Physical disks can exchange to different slot in the same system or be completely moved from system 1
to system 2. This is called disk roaming. Disk roaming is restricted by the following conditions:
1. Check the firmware version of the two systems. It is recommended that both systems are using
the same firmware.
2. The VG included in whole physical disks should be moved together. The architectures of the VG
and UDV will be kept but LUN architecture will be cleared to avoid conflict with system 2.
5.5
Support Microsoft MPIO and MC/S
MPIO (Multi-Path Input/Output) and MC/S (Multiple Connections per Session) both use multiple physical
paths to create logical paths between the server and the storage device. Under regular use, in case
one or more connections fail, the transmission is supposed to stop. But multi-path users can adopt an
alternate path for I/O to make sure that the data access is still working.
Microsoft iSCSI initiator supports multi-path function, please follow the steps below to use the MPIO function.
1.
2.
3.
4.
A host with dual LAN ports is connected to Sans Digital iSCSI Series Products
Create a VG/UDV and attach this UDV to the host
When install “Microsoft iSCSI initiator”, install MPIO driver at the same time
Login to target separately on each port. When login to target, confirm “Enable multi-path”. Please
refer to step 6 in Appendix D
5. MPIO mode can be selected by Targets Æ Details Æ Devices Æ Advanced
6. Rescan the disk
7. There will be one disk running MPIO
For detailed configure steps, please refer to Appendix E: MPIO and MC/S Configure Instructions. The
configure steps for MC/S are very similar to that for MPIO, please refer to Appendix E.
52
RAID Introduction
Chapter 6 Application Description
As Sans Digital iSCSI Series Products supports dual Gigabit ports, it provides more extensive
applications. The following are the examples:
6.1
Sharing Resources
Since iSCSI is using IP based, you can connect Sans Digital iSCSI Series Products to multipule
computer using IP network. Once all the computers in the network are installed with initiator, they can
use Sans Digital iSCSI Series Products as local hard disks. Please refer to Figure 6.1.
Figure 6.1
The benefit of this type of connection is that each computer in the network now can use Sans Digital
iSCSI Series Products as local hard disks. Please note that the iSCSI device only support write only in
the same LUN or data corruption will occur. Alternatively, SAN software can be installed for write and
read in the same LUN.
Note : In one local area network, the computers that is using Sans Digital iSCSI Series Products must installed with initiator. When two
computers or above write into the same file at the same time, it may cause the file corruption.
RAID Introduction 53
6.2
Easy Storage Capacity Expansion
Sans Digital iSCSI Series Products are equipped with 4 eSATA extension interface. When your existing
storage volume is not enough, you can add a 4 bays JBOD system, such as MS4T and ES104T to
upgrade your storage RAID system to 8 bays. It is easy for you to expand the volume anytime.
Figure 6.2
6.3
Remote Access
As the Sans Digital iSCSI Series Products are implemented based on IP, they support the network
“remote access”. Simply configure the appropriate IP addresses and permissions, you can connect
to the Sans Digital iSCSI Series Products from anywhere of the world for the data access or remote
configuration.
Figure 6.3
54
RAID Introduction
Appendix
A. Certification list
• RAM
RAM Spec: 184pins, DDR333(PC2700), Reg.(register) or UB(unbuffer), ECC or Non-ECC.
Vendor
Model
Unigen
UG732D6688KN-DH, 256MB DDR333 (UB)
Unigen
UG732D7588KZ-DH, 256MB DDR333 (Reg, ECC)
Unigen
UG764D7588KZ-DH, 512MB DDR333 (Reg, ECC)
Unigen
UG7128D7588LZ-DH, 1GB DDR333 (Reg, ECC)
Unigen
UG732D6688KS-DH, 256MB DDR333 (UB)
Unigen
UG764D6688LS-DH, 512MB DDR333 (UB)
Trenscend
256MB DDR333 (Reg ECC)
Trenscend
512MB DDR333 (Reg ECC)
Trenscend
1GB DDR333 (Reg ECC)
• iSCSI HBA card
Vendor
Model
Adaptec
7211C (Gigabit, 1 port, TCP/IP offload, iSCSI offload)
QLogic
QLA4010C (Gigabit, 1 port, TCP/IP offload, iSCSI offload)
For detailed setup steps of Qlogic QLA4010C, please refer to Appendix F: QLogic QLA4010C
setup instructions.
• NIC
Vendor
Intel
Model
PWLA8490MT (Gigabit, 1 port, TCP/IP offload)
Intel
PWLA8492MT (Gigabit, 2 port, TCP/IP offload)
Intel
PWLA8494MT (Gigabit, 4 port, TCP/IP offload)
• SATA hard drive
Vendor
Model
Hitachi
Deskstar 7K250, HDS722580VLSA80, 80GB, 7200RPM, SATA, 8M
Hitachi
Deskstar 7K80, HDS728080PLA380, 80GB, 7200RPM, SATA-II, 8M
Hitachi
Deskstar 7K500, HDS725050KLA360, 500G, 7200RPM, SATA-II, 16M
Hitachi
Deskstar 7K80, HDS728040PLA320, 40G, 7200RPM, SATA-II, 2M
Maxtor
DiamondMax Plus 9, 6Y080M0, 80G, 7200RPM, SATA, 8M
Maxtor
DiamondMax 11, 6H500F0, 500G, 7200RPM, SATA 3.0Gb/s, 16M
Samsung
SpinPoint P80, HDSASP0812C, 80GB, 7200RPM, SATA, 8M
Seagate
Barracuda 7200.7, ST380013AS, 80G, 7200RPM, SATA, 8M
Seagate
Barracuda 7200.7, ST380817AS, 80G, 7200RPM, SATA, 8M, NCQ
Seagate
Barracuda 7200.8, ST3400832AS, 400G, 7200RPM, SATA, 8M, NCQ
Seagate
Barracuda 7200.9, ST3500641AS, 500G, 7200RPM, SATA-II, 16M
RAID Introduction 55
56
Western Digital
Caviar SE, WD800JD, 80GB, 7200RPM, SATA, 8M
Western Digital
Caviar SE, WD1600JD, 160GB, 7200RPM, SATA, 8M
Western Digital
Raptor, WD360GD, 36.7GB, 10000RPM, SATA, 8M
Western Digital
Caviar RE2, WD4000YR, 400GB, 7200RPM, SATA, 16M, NCQ
RAID Introduction
B. Event notifications
• PD/S.M.A.R.T. events
Level
Type
Description
Info
Disk inserted
Info: Disk <slot> is inserted.
Info
Disk removed
Info: Disk <slot> is removed.
Warning
S.M.A.R.T. threshold exceed
condition
Warning: S.M.A.R.T. threshold exceed condition
occurred.
• Physical HW events
Level
Type
Description
Warning
ECC error
Warning: Single-bit ECC error is detected.
Error
ECC error
Error: Multi-bit ECC error is detected.
Info
ECC DIMM Installed
Info: ECC Memory is installed.
Info
Non-ECC installed
Info: Non-ECC Memory is installed.
Error
Host chip failure
Error: Host channel chip failed.
Error
Drive chip failure
Error: Drive channel chip failed.
Warning
Ethernet port failure
Warning: GUI Ethernet port failed.
• HDD IO events
Level
Type
Description
Warning
Disk error
Error: Disk <slot> read block error.
Warning
Disk error
Error: Disk <slot> writes block error.
Warning
HDD failure
Error: Disk <slot> is failed.
Warning
Channel error
Error: Disk <slot> IO incomplete.
• SES events
Level
Type
SES load conf. OK
Info
Description
Info: SES configuration has been loaded.
Warning
SES Load Conf. Failure
Error: Failed to load SES configuration. The SES device is disabled.
Info
SES is disabled
Info: The SES device is disabled.
Info
SES is enabled
Info: The SES device is enabled
• Environmental events
Level
Type
Description
Info
Admin Login OK
Info: Admin login successfully.
Warning
Admin Login Fail
Warning: Admin fails to login.
Info
Admin Logout OK
Info: Admin logout successfully.
Warning
Admin Logout Fail
Warning: Admin fails to logout.
Error
Thermal critical
Error: System Overheated!!! The system will auto shutdown
immediately.
RAID Introduction 57
Warning
Thermal warning
Warning: System temperature is a higher than normal.
Error
Voltage critical
Error: System voltages failed!!! The system will auto shutdown
immediately
Warning
Voltage warning
Warning: System voltage is higher/lower than normal
Info
PSU restore
Info: Power <number> is restored to work.
Error
PSU Fail
Error: Power <number> is out of order.
Info
Fan restore
Info: Fan <number> is restore to work.
Error
Fan Fail
Error: Fan <number> is out of order.
Error
Fan non-exist
Error: System cooling fan is not installed.
Error
AC Loss
Error: AC loss for the system is detected.
Error
UPS power low
Error: UPS Power Low!!! The system will auto shutdown immediately.
Info
Mgmt LAN Port Active
Info: Management LAN Port is active.
Warning
Mgmt LAN Port Failed
Warning: Fail to manage the system via the LAN Port.
Info
RTC Device OK
Info: RTC device is active.
Warning
RTC Access Failed
Warning: Fail to access RTC device
Info
Reset Password
Info: Reset Admin Password to default.
Info
Reset IP
Info: Reset network settings set to default.
• System config events
Level
Type
Description
Info
Sys Config. Defaults Restored
Info: Default system configurations restored.
Info
Sys NVRAM OK
Info: The system NVRAM is active.
Error
Sys NVRAM IO Failed
Error: Can’t access the system NVRAM.
Warning
Sys NVRAM is full
Warning: The system NVRAM is full.
• System maintenance events
Level
Info
Type
Description
Firmware Upgraded
Info: System firmware has been upgraded
Error: System firmware upgrade failed.
Error
Firmware Upgraded Failed
Info
System reboot
Info: System has been rebooted
Info
System shutdown
Info: System has been shutdown.
Info
System Init OK
Info: System has been initialized OK.
Error
System Init Failed
Error: System cannot be initialized in the last boot up.
• LVM events
Level
58
Type
Description
Info
VG Created OK
Warning
VG Created Fail
Warning: Fail to create VG <name>.
Info
VG Deleted
Info: VG <name> has been deleted.
Info
UDV Created OK
Info: UDV <name> has been created.
Warning
UDV Created Fail
Warning: Fail to create UDV <name>.
RAID Introduction
Info: VG <name> has been created.
Info
UDV Deleted
Info
UDV Attached OK
Info: UDV <name> has been deleted.
Info: UDV <name> has been LUN-attached.
Warning
UDV Attached Fail
Warning: Fail to attach LUN to UDV <name>.
Info
UDV Detached OK
Info: UDV <name> has been detached.
Warning
UDV Detached Fail
Info
UDV_OP Rebuild Started
Info: UDV <name> starts rebuilding.
Info
UDV_OP Rebuild Finished
Info: UDV <name> completes rebuilding.
Warning
UDV_OP Rebuild Fail
Warning: Fail to complete UDV <name> rebuilding.
Info
UDV_OP Migrate Started
Info: UDV <name> starts migration.
Info
UDV_OP Migrate Finished
Info: UDV <name> completes migration.
Warning
UDV_OP Migrate Failed
Warning: Fail to complete UDV <name> migration.
Warning
VG Degraded
Warning: VG <name> is under degraded mode.
Warning
UDV Degraded
Warning: UDV <name> is under degraded mode.
Info
UDV Init OK
Info: UDV <name> completes the initialization.
Warning
UDV_OP Stop Initialization
Warning: Fail to complete UDV <name> initialization.
Warning
UDV IO Fault
Warning
VG Failed
Warning
UDV Failed
Error: Fail to access UDV <name>.
Warning
Global CV Adjustment Failed
Error: Fail to adjust the size of the global cache.
Info
Global Cache
Info: The global cache is OK.
Error
Global CV Creation Failed
Error: Fail to create the global cache.
Info
UDV Rename
Info: UDV <name> has been renamed as <name>.
Info
VG Rename
Info: VG <name> has been renamed as <name>.
Info
Set VG Dedicated Spare Disks
Info
Set Global Disks
Info: Assign Disk <slot> to the Global Spare Disks.
Info
UDV Read-Only
Info: UDV <name> is a read-only volume.
Info
WRBK Cache Policy
Info: Use the write-back cache policy for UDV <name>.
Info
WRTHRU Cache Policy
Info: Use the write-through cache policy for UDV <name>.
Info
High priority UDV
Info: UDV <name> is set to high priority.
Info
Mid Priority UDV
Info: UDV <name> is set to mid priority.
Info
Low Priority UDV
Info: UDV <name> is set to low priority.
Warning: Fail to detach LUN from Bus <number> SCSI_ID
<number> LUN <number>.
Error: IO failure for stripe number <number> in UDV
<name>.
Error: Fail to access VG <name>.
Info: Assign Disk <slot> to be VG <name> dedicated spare
disk.
RAID Introduction 59
C. FAQ
1. Microsoft MPIO doesn’t support Windows XP and Windows 2000 Professional.
A : Only Windows Server 2003 or Windows 2000 server support MPIO.
2. You can successfully ping to the administration port but cannot access Web GUI.
A: Connect your network cable to the administration port before booting up the system. Reboot the
system after the connection.
3. What should I do if I forgot the IP address and failed to login?
A : For MR4I, you can look it up via the LCM. For ES104I, refer to 3.3.2 to login to the administration
interface via RS232 to look it up.
4. Do Sans Digital iSCSI Series Products require additional driver upon different operation system?
A : There is no need for additional driver if your network interface card is properly installed. However, in
order to use Sans Digital iSCSI Series Products with the optimal performance, select a
hardware network card compliant to IEEE 802.3 1000 BASE-T technical standards (Gigabit NIC).
5. Are Sans Digital iSCSI Series Products compatible with any hard disks?
A : Please refer to Appendix A for the disk certification list. The hard disks that support SATA standard will
be compatible. If you have found any disk compatible question, please feel free to contact
[email protected]
6. Why is my data transmission performance poor?
A: If you have verified that all the hardware devices are configured properly, you should verify if the
network devices, including network card, network cable, hub and switch, are compatible with IEEE
802.3 1000 BASE-T technical standards. 10/100 networking device will not provide optimal
performance. You can also adjust the options like Stripe Size/Write or read/priority to improve the
overall storage performance.
7. What should I do if I lost or forgot my password?
A : Please email to [email protected] to ask for assistance.
60
RAID Introduction
D. Microsoft iSCSI Initiator
The follow is the step by step to setup Microsoft iSCSI Initiator.
1. Run Microsoft iSCSI Initiator. Please see Figure D.1.
2. Click “Discovery”.
Figure D.1
3. Click “Add”. Input IP address or DNS name of iSCSI storage device. Please see Figure D.2.
Figure D.2
RAID Introduction 61
4. Click “OK”. Please see Figure D.3.
Figure D.3
5. Click “Targets”. Please see Figure D.4.
iqn.2001-08.sansdigital:iscsi-000a40000:d... Connected
Figure D.4
62
RAID Introduction
6. Click “Log On”. Please see Figure D.5. Check “Enable multi-path” if running MPIO.
iqn.2001-08.sansdigital:iscsi-000a40000:default-target
Figure D.5
7. Click “Advance” if CHAP information is needed. Please see Figure D.6.
Figure D.6
RAID Introduction 63
8. Click “OK”. The status would be “Connected”. Please see Figure D.7.
iqn.2001-08.sansdigital:iscsi-000a40000:d... Connected
Figure D.7
64
RAID Introduction
The following procedure is to log off iSCSI device.
A. Click “Details”. Please see Figure D.8.
Figure D.8
B. Check the Identifier, which will be deleted.
C. Click “Log off”.
RAID Introduction 65
E. MPIO and MC/S setup instructions
Here is the step by step to setup MPIO. There are 2 kinds of scenarios for MPIO. Please see Figure E.1.
Sans Digital suggests using scenario 2 for better performance.
• Network diagram of MPIO.
Figure E.1
66
RAID Introduction
The setup instructions are in the following:
• Create a VG with RAID 5, using 3 HDDs.
SANS DIGITAL
Figure E.2
• Create a UDV by using RAID 5 VG.
SANS DIGITAL
Figure E.3
• Run Microsoft iSCSI initiator and check the Initiator Node Name.
RAID Introduction 67
Figure E.4
• Attaching LUN to R5 UDV. Input the Initiator Node Name in Host field.
SANS DIGITAL
Figure E.5
• The volume config setting is done.
SANS DIGITAL
Figure E.6
• Check iSCSI settings. The IP address of iSCSI data port 0 is 192.168.11.229, port 1 is
192.168.12.229 for example.
iqn.2001-08.com.sansdigital:iscsi-000a40189
Figure E.7
68
RAID Introduction
• Add Target Portals on Microsoft iSCSI initiator.
Figure E.8
• Input the IP address of iSCSI data port 0 (192.168.11.229 as mentioned in previous page).
Figure E.9
RAID Introduction 69
• Add second Target Portals on Microsoft iSCSI initiator.
Figure E.10
• Input the IP address of iSCSI data port 1 (192.168.12.229 as mentioned in previous page).
Figure E.11
70
RAID Introduction
• The initiator setting is done.
Figure E.12
• Log on.
iqn.2001-08.sansdigital:iscsi-000a40000:d... Connected
RAID Introduction 71
Figure E.13
• Enable “Enable multi-path” checkbox. Then click “Advanced”.
iqn.2001-08.sansdigital:iscsi-000a40000:default-target
Figure E.14
• Select Target Portal to iSCSI data port 0 (192.168.11.229). Then click “OK”
Figure E.15
72
RAID Introduction
• Log on again.
iqn.2001-08.sansdigital:iscsi-000a40000:d... Connected
Figure E.16
• Enable “Enable multi-path” checkbox. Then click “Advanced”.
iqn.2001-08.sansdigital:iscsi-000a40000:default-target
Figure E.17
RAID Introduction 73
• Select Target Portal to iSCSI data port 1 (192.168.12.229). Then select “OK”
Figure E.18
• iSCSI device is connected. Click “Details”.
iqn.2001-08.sansdigital:iscsi-000a40000:d... Connected
74
RAID Introduction
Figure E.19
• Click “Device” tab, then click “Advanced”.
SANS DIGITAL iSCSI
SANS DIGITAL iSCSI
Figure E.20
• Click “MPIO” tab, select “Load Balance Policy” to “Round Robin”.
RAID Introduction 75
Figure E.21
• Click “Apply”.
Figure E.22
• Run “Device Manage” in Windows. Make sure MPIO device is available. The disk can be tested
performance by IOMETER.
SANS DIGITAL iSCSI
SANS DIGITAL iSCSI
SANS DIGITAL...
76
RAID Introduction
Figure E.23
The MC/S setup instructions are very similar to MPIO, detail steps are in the following. For the target
side setting, the steps are exactly the same as MPIO. Please refer to Figure E.1 to Figure E.9.
• Create a VG with RAID 5, using 3 HDDs.
• Create a UDV by using RAID 5 VG.
• Run Microsoft iSCSI initiator 2.0 and check the Initiator Node Name.
• Attaching LUN to R5 UDV. Input the Initiator Node Name in Host field.
• The volume config setting is done.
• Check iSCSI settings. The IP address of iSCSI data port 0 is 192.168.11.229, port 1 is
192.168.12.229 for example.
• Add Target Portals on Microsoft iSCSI initiator 2.0.
• Input the IP address of iSCSI data port 0 (192.168.11.229 as mentioned in previous pages).
For MC/S, there is only ONE “Target Portals” in the “Discovery” tab.
Figure E.24
RAID Introduction 77
• Log on.
iqn.2001-08.sansdigital:iscsi-000a40000:d... Connected
Figure E.25
• Then click “Advanced”.
iqn.2001-08.sansdigital:iscsi-000a40000:default-target
Figure E.26
78
RAID Introduction
• Select set Local Adapter, Source IP, and Target Portal to iSCSI data port 0 (192.168.11.229).
Then click “OK”
Figure E.27
• After connected, click “Details”, then in the “Session” tab, click “Connections”
iqn.2001-08.sansdigital:iscsi-000a40000:d... Connected
RAID Introduction 79
Figure E.28
• Choose “Round Robin” for Load Balance Policy
Figure E.29
• “Add” Source Portal for the iSCSI data port 1(192.168.12.229)
80
RAID Introduction
Figure E.30
iqn.2001-08.sansdigital:iscsi-000a40000:default-target
Figure E.31
• Select Local adapter, Source IP, and Target Portal to iSCSI data port 1 (192.168.12.229).
Then select “OK”
Figure E.32
• The MC/S setting is complete.
RAID Introduction 81
F. QLogic QLA4010C setup instructions
The following is the step by step setup of Qlogic QLA4010C.
• Log on the iSCSI HBA Manager and the current state shows “No Connection Active”.
Figure F.1
• Click “Target settings”. Then select the target and click “Config Parameters”.
82
RAID Introduction
Figure F.2
• Disable “Immediate Data” and enable “Initial R2T”.
Figure F.3
• Click “OK”.
Figure F.4
RAID Introduction 83
• Click “Save settings” and click “Yes” on next page.
Figure F.5
• Click “Refresh” and find a new target with iSCSI name.
84
RAID Introduction
RAID Introduction 85