1
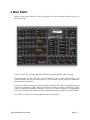
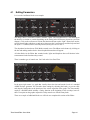
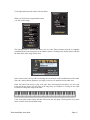
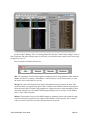
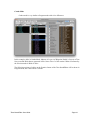
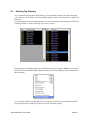
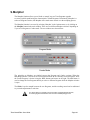
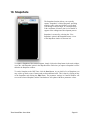
Tetra 4 Voice
SoundEditor
User Guide
Mac/PC Edition
1590 Sylvaner
Avenue
St. Helena, CA
94574
Tetra SoundEditor User Guide
Page 1
Table of Contents
1. 1. Introduction
1.1
Support
5
5
1.2 About this Manual
6
1.3
Installation/Requirements
6
1.4 Before You Begin
7
1.5
Overview
7
2. Starting Up
8
2.1
Getting Connected
8
2.3
Midi Setup 9
3. SoundEditor Menus
10
3.1.1 TetraPro/TeraLE Menu
10
3.1.2 FILE Menu:
11
3.1.3 Edit Menu:
11
3.1.4 MIDI Menu:
12
3.1.5 Global Settings
12
3.1.6 Options Menu:
13
3.1.7 Snap Shots Menu:
13
3.1.8 Help Menu:
14
3.1.9 Program and Combo Menus:
14
4. Main Editor
15
4.1
Editing Parameters
16
4.2
Toolbar
18
4.2
Program Name Display
20
4.3
Assigning Program Catagories
21
5. The Sequencer Window
22
5.1
Sequencer Controls
23
5.2
The Function Button
24
5.3
Tempo and Clock Divide
25
5.4
Sequence Templates
25
Tetra SoundEditor User Guide
Page 2
6. Program and Combo Modes
28
6.1
Program Menu
29
6.2
Combo Menu
31
7. Bank Manager/Librarian
32
7.1
Bank Manager Toolbar
33
7.2
ʻRadioʼ Buttons and Checkboxes
34
7.3
User Bank
35
7.4
The Librarian Panel
36
7.5 Librarian Toolbar
37
7.6
Adding Program to the Library
38
7.7
Moving Programs between Categories
39
7.8
Copying Programs to the User Bank
40
8. Program Genetics 41
8.1
Selecting
45
8.2
Creating New Sounds
45
8.3
Selecting Top Offspring
46
9.4
Program Genetics Menus
47
9. Morpher
10.Snapshots 11.Phantom Program/Combo Banks 48
50
51
21.1 Window Operations
52
12.2 Phantom Program/Combo Banks Menu
53
12.Additional Controls
54
12.1 V-Piano
54
12.2 Playing from the Computer Keyboard
55
13.Appendix A
File Extensions
14.Appendix B
Sequencer Chord Structure
15.Appendix C
Sequencer Step Values
Tetra SoundEditor User Guide
56
56
57
57
58
58
Page 3
16.Appendix D
59
Midi Setup Options
59
Midi In Keyboard Controller
59
Virtual Midi Ports
60
Tetra SoundEditor User Guide
Page 4
1. Introduction
Welcome to SoundEditor, a full-featured Editor and Sound Development tool for the Dave Smith
Instruments (DSI) Tetra synthesizer.
SoundEditor provides the ultimate editing and sound development experience by displaying all
Tetra Program parameters in a single, intuitive graphical interface. The interface allows you to view
the complete details of any Program at a glance and edit any parameter using the mouse or
computer keyboard. It allows you to see how the factory Programs are put together, or to freely
experiment to see what you can create. Programs can be auditioned from SoundEditor at any time
over the full range of notes (C0 - C8) without the need for a separate MIDI controller.
SoundEditor is available in two versions: a Light Edition (free), and a Pro Edition. Both versions
offer the full Program editing capabilities described above, with the Pro Edition offering these
additional features:
• A Librarian that allows you to compile, organize and save Programs in Libraries for
easy storage and retrieval. An unlimited number of Library files can be created.
•
A Program Genetics function, where you can create entire banks of new
sounds from any two source Programs.
•
A Morpher function, allowing you to smoothly transition (morph) between
any two Programs as you audition the sound in real time.
• Phantom Program Banks, which allow you to have up to 16 virtual Program
banks available at any time.
•
A Snapshots function that allows you to configure multiple UNDO points
while editing a Program.
•
Enhanced Sequencer functionality that allows you to create, modify, and
store an unlimited number of Sequencer files that can be applied to any
Tetra Program.
This manual describes the functions and features found in both the Light and Pro
Editions. To get the most from SoundEditor, please read this User Guide carefully.
We hope you enjoy using SoundEditor for your Tetra synthesizer!
1.1 Support
Online support for this product is available at:
http://www.soundtower.com/Tetra
Tetra SoundEditor User Guide
Page 5
1.2 About this Manual
Throughout the manual, screen shots of the SoundEditor application are shown for i l l u s t r a t i v e
purposes. These views are based on SoundEditor for the Macintosh, although similar views will be
observed if you are using SoundEditor on a PC. When any significant variation in the appearance
or operation of SoundEditor occurs between the Mac and PC platforms, the differences will be
described.
Throughout this document you will see icons that provide additional information:
-
This icon indicates an important note concerning the operation of the
SoundEditor program.
- This icon indicates a helpful or productive tip.
1.3 Installation/Requirements
No special software installation is required. SoundEditor is a standalone program designed to run
on Windows XP or Vista, or a Macintosh (OSX 10.3 or higher).
The SoundEditor application requires:
- 20 MB Hard Drive space
- 256 MB RAM (min.)
- 1024 x 768 minimum screen resolution (1400 x 900 recommended)
- a MIDI interface or USB connection
Tetra SoundEditor User Guide
Page 6
1.4 Before You Begin To get the most out of this program you should be familiar with the operation of the DSI Tetra. The
Tetra is complex musical instrument with an amazing array of programmable features. The Tetra
Operation Manual is the essential source for descriptions of the instrument and its operation, and is
recommended reading for all users. Although SoundEditor can be an invaluable resource to aid in
understanding he operation of the Tetra synthesizer, it is not a substitute for reading the Tetra
documentation.
1.5 Overview
This User Guide will take you through the steps to configure SoundEditor to work with your DSI
Tetra. The Starting Up section should be followed first to get the hardware properly connected and
running with the SoundEditor application. From there you can freely explore, audition and edit the
hundreds of Programs that Tetra offers, create new Programs, organize and rearrange Programs to
suit your needs, etc.
Have fun!
Tetra SoundEditor User Guide
Page 7
2. Starting Up
This chapter describes the steps to connect and configure SoundEditor on you computer.
2.1 Getting Connected
Once you have downloaded and installed Tetra LE or Tetra Pro software, open the Tetra folder and
launch the application by double clicking on the program icon.
Upon opening the Pro version for the first time, will be presented with the dialog box as shown
below.
.
The registration screen offers two options: Demo Mode and Register Online.
Selecting Demo Mode will put the program into demo mode (unregistered), limiting file and SysEx
operations, but still allowing you to get an idea of what the Pro Edition offers.
Demo mode gives you unlimited time to explore all of SoundEditor’s features with the
following limitations:
• Real-time editing from the Controls Window (disabled)
• Loading and Saving all files (disabled)
• Writing presets to the Tetra (disabled)
• Some Librarian features, Program Genetics and Morpher auditioning (disabled)
• Snapshots features (disabled)
When you re-run the program, you’ll need to select Demo Mode again. This will continue until the
program has a valid registration. There is no limit to the number of times the program can be run in
demo mode.
If you click on the REGISTER ON LINE button, SoundEditor will attempt to launch your browser
and connect you to the Dave Smith Instruments online store, where you can purchase a registration
code to unlock the software. You will need a working internet connection to complete this
operation. Once purchased, registration codes are issued via email, and you may experience a few
hours delay in receiving it.
Once you have received your registration code, enter the information exactly as it appears, and
click the Enter Code button.
Tetra SoundEditor User Guide
Page 8
2.3 Midi Setup
In order for the Tetra SoundEditor software to communicate with the Tetra hardware, the hardware
must be connected to both the MIDI In and MIDI Out connections of your computer's MIDI
interface or through the USB port. If these connections are not already in place, shut down the
computer (always a good idea before connecting/disconnecting anything!) and connect the
interface, the MIDI In and MIDI Out cables or the USB cable to the hardware.
With the proper connections between the Tetra and the MIDI interface or USB cable in place,
reboot and launch the SoundEditor program. Click on the MIDI menu and select MIDI Setup.
You’ll see the following window (your window may show different port information):
Select the Midi Port Connections tab. Highlight the ports that your Tetra is connected to the
hardware. Select the DSI Tetr4:DSI Tetr4 ports if using the USB connection
Select the Midi In - Keyboard Controller to set the parameters for the Midi In port.
Tetra SoundEditor User Guide
Page 9
3. SoundEditor Menus
Here’s a quick tour of the menus in the Main window: (PC menus are similar)
Please note that some items will not appear on Tetra LE as noted
3.1.1TetraPro/TeraLE Menu
Preferences offers this dialog box that allows you to adjust Scroll
wheel and Knob value adjustments with the dropdown menus.
Selecting About reveals this image,
showing various specifics about the
Tetra SoundEditor Software.
Click OK to close this window
Tetra OS Update will reveal this dialog box.
Occasionally check for Tetra software
updates at
http://www.davesmithinstruments.com
If you have downloaded a new update,
click OS Update From File, navigate to the new OS file and click OK
Tetra SoundEditor User Guide
Page 10
3.1.2FILE Menu:
This menu will contain different items depending on whether the Tetra is in Program or Combo
mode and between Editor or Program/Combo list windows. Depending upon the mode, the File
Menu contains various commands to Load and Save single Program or Combo files to and from the
computer, Load and Save all Tetra data to and from the computer, opening Program and Combo
bank windows, accessing Bank Manager and Librarian functions, Phantom banks and to load
Factory Presets.
Editor-Program Mode Editor- Combo Mode
Program Bank Combo Bank
Tetra Bank Manager/Librarian (TetraPro only) will be discussed in a later chapter.
Phantom Banks (TetraPro only) will be discussed in a later chapter.
3.1.3Edit Menu:
Like the File menu, the Edit menu contains different command depending on the mode that the
SoundEditor is in.
Program List
Program/Combo Edit
Combo List
The three menus shown above will be available when the mode listed below each e x a m p l e i s
active.
Tetra SoundEditor User Guide
Page 11
3.1.4MIDI Menu:
The MIDI menu provides access to the MIDI Setup and Global Settings windows, as well a
s
transfer commands of Tetra data (transmit/receive) and will have different options depending upon
the mode that module is in.
Program Mode Combo Mode
Program/Combo Bank Mode
All three MIDI menus contain Global Settings and Midi Setup.
3.1.5Global Settings
Clicking on Global Settings in the Midi menu will bring up this image. Refer to your Tetra owner’s
manual for details on these functions.
Tetra SoundEditor User Guide
Page 12
3.1.6Options Menu:
The Options menu is available in all modes, however Program Genetics and Morpher are
available in Tetra Pro. These items will be described in a later chapter.
o n l y
Selecting V-Piano brings up the following image:
This keyboard image provides a playing surface if you don’t have a midi keyboard c o n n e c t e d t o
the computer and you wish to work on your Tetra. Clicking on a key will send that note to the Tetra.
The pitch and mod wheels will function as expected by clicking and dragging the wheels up and
down. To the left, you can click on the Chn. box and a drop down box will allow you to select a
midi channel (1-16), and the up and down arrows may be clicked to set a velocity value.
3.1.7Snap Shots Menu:
The Snapshots menu is available in all modes
Snap Shots is a quick way to save out the current Program or Combo to a multi-file clipboard. Just
select Add Snapshots and the current Program or Combo, depending on which mode you are
working in, will be saved to the next available slot. The Programs or Combos saved to the Snap
Shots list will only remain until you quit the Tetra SoundEditor.
Once you restart the program, the Snap Shots list will be cleared.
Tetra SoundEditor User Guide
Page 13
3.1.8Help Menu:
The Help menu is available in all modes
The Help menu allows you to connect to the Soundtower web site to get help, download updates
etc. Of course, your computer will require an active connection to the internet for this feature to
work for you. Just click on Help On Line.
3.1.9Program and Combo Menus:
When either the Program or Combo list windows appear, an additional menu item will appear.
These menu items will be described in later chapters.
Tetra SoundEditor User Guide
Page 14
4. Main Editor
When you start up the TetraPro or Tetra LE program, you will be presented with this overview of
the Tetra controls.
There are only a few concepts required to be able to navigate through this feature rich page.
Please remember to review the Tetra Owner’s Manual to gain a better understanding of the
operation of the synth. We will touch upon a few of the features, but this guide is not intended to
replace the Owner’s Manual.
It can be seen that the editor page is laid out in blocks to address that address the standard functions
found in most subtractive synths. There are also blocks of controls to address modulation routing,
routing of standard performance controllers, Access to the built in sequencer, 4 programmable
LFO’s, Unison modes, and assignment of the 4 assignable front panel controls of the Tetra Module.
Let’s look a few of the ways you can adjust the controls on this page.
Tetra SoundEditor User Guide
Page 15
4.1 Editing Parameters
Let’s use the Oscillators block as an example
This image shows a collection of knobs, clickable “lights” and a dropdown box. Click and drag on
the knobs in a circular or vertical (depending on the setting in the Preferences, shown in a previous
chapter). Click on the red boxes to activate the function and turn on the “light”. Shown here are the
two Keyboard lights (which are on and active) that cause the 2 oscillators to track the keyboard and
the Sync 2->1 switch (which is currently inactive) that syncs Osc 2 to Osc 1.
The dropdown box that shows Glide Mode currently set to Fixed Rate can be chance by clicking on
the box and making another choice from a dropdown menu that will appear.
All other blocks in the Editor that contains knobs, lights and dropdown boxes all function in the
same manner for the functions they control.
There is another type of control area. Let’s look at the Low Pass Filter.
In the upper right corner is a graph that visually shows the time and sustain levels of a standard
ADSR envelope generator. You can make these settings by adjusting the knobs, or you can click
and drag the small points at the junctions of the various segments of the graph. The Tetra actually
employs a DADSR which includes a Delay function at the beginning of the envelope, however
there is not point on the graph to adjust this. Delay must be set with the rotary knob.
There are a couple of additional blocks we will look at to complete this section of the Editor.
Tetra SoundEditor User Guide
Page 16
To the right hand side of the editor is the this block.
When you click on the Assign Params button,
you will see this image:
This block presents a window that allows you to set the Tetra parameters that the 4 assignable
parameter knobs on the front panel of the module controls. Clicking on the Push It! button with flip
the block back to the image shown above.
In the center section, the Layer B switch brings the second layer to allow modification of the sound.
Sync Adj. assures that any parameter you adjust in one layer is duplicated on the other layer.
Stack A/B causes both layers to play at the same time. Selecting Split A/B allows you set a split
point and the two layers will only play in the range they are assigned to. Clicking on the small
keyboard will bring this image to the front:
Click at any point on this image and that will become the split point. Click anywhere else on the
editor screen to close the keyboard image.
Tetra SoundEditor User Guide
Page 17
When in the Combo mode, the center block will appear like this:
You can select one of the 4 voices to show the editor settings by clicking on the buttons bellow the
name screen. Additionally, you may select any combination of the Sync Adj. lights to allow
common adjustment of parameters of those voices who’s lights are lit.
4.2 Toolbar
The Toolbar is provided as a convenient way to access many of the Menu items.
Program - Selects Program mode and brings the directory of Program Banks to the front.
Combo - Selects Combo mode and brings the directory of Combos to the front
FIle Button
Program Mode - Load Single Program
Loads a Single Program previously saved to the computer
Save Single Program
Saves the current Program to the computer
Preferences
Opens the Preferences window
Combo Mode Load Single Combo
Loads a Single Combo previously saved to the computer
Save Single Combo
Saves the current Combo to the computer
Preferences
Opens the Preferences window
Edit Button
Program Mode - Copy Layer
Copies t h e a c t i v e l a y e r o f t h e s e l e c t e d P r o g r a m t o t h e
clipboard
Import Layer
Pastes the Program layer that is on the clipboard to the
active layer of the selected Program
Copy Program
Copies selected Program to the clipboard
Paste Program (Appears when a Program has been copied)
Pastes Program on clipboard to selected Program
Rename Program
Opens a dialog to allow the name of the selected Program
to be changed
Initialize Program
Initializes the current Program
Tetra SoundEditor User Guide
Page 18
Combo Mode -
Copy Combo
Copies current Combo to the clipboard
Copy Voice
Copies currently selected voice of a selected Combo to the
clipboard
Import Voice
Pastes the current voice on the clipboard to the selected
voice of the selected Combo
Paste Combo (Appears when a Combo has been copied)
Pastes Combo on clipboard to selected Combo
Rename Combo
Opens a dialog to allow the name of the selected Combo to
be renamed.
Initialize Combo
Initializes current Combo
Receive Button
The Receive button receives the current program from the Tetra hardware, allowing you to
refresh after making changes. This button resynchronizes SoundEditor with the Tetra if you
have been editing a program offline using the Tetra controls.
Send Button
The Send button sends the current edited SoundEditor program to the Tetra hardware,
allowing you to refresh after making edits. This button resynchronizes the Tetra with
SoundEditor if you have been editing a program offline using SoundEditor.
Write Button
The Write button produces a window (shown below) allowing you to write the current
Program or Combo to the Tetra hardware. In this window you can change the name of the
Program or Combo, assign a category, and select the memory location where the Program
will be written. The Write button duplicates the action of selecting ‘Write Program’ from the
Edit menu
Tetra SoundEditor User Guide
Page 19
Midi Button
The Midi button allows you to select Midi Setup and Global Settings as previously
described.
Genetics Button
The Genetics button opens the Program Genetics window. This button duplicates the
action of selecting ‘Program Genetics’ in the Options menu. Program Genetics is covered in
section 9.
Morpher Button
The Morpher button opens the Morpher window. This button duplicates the action of
selecting ʻMorpherʼ in the Options menu. Morpher functions are covered in section
10.
Piano Button
The Piano button opens the V-Piano
View Button
A simple reminder of two keyboard commands
Snap Button
The Snap button copies the current program to the Snapshots window. This button
duplicates the action of selecting ʻAdd Snapshotʼ from the Snapshots menu.
Snapshots are covered in section 11.
4.2 Program Name Display
The Program Name Display (shown below) shows the name of the currently selected
Program (‘Tom Sawyer’), the location of the Program (bank A, location 0o2), and the
category of the Program is currently not assigned:
To change the Program name, double-click inside the Program Name Display. This will produce a
window where you can enter a new name (up to 16 characters in length), and also select or
change the Program Category, if desired:
Clicking on the OK button will send the new name to SoundEditor and to the Tetra’s edit buffer,
but will not automatically store the name. To store the new name you must write the edited sound to
the Tetra using the WRITE command.
Tetra SoundEditor User Guide
Page 20
4.3 Assigning Program Catagories
There are several ways to assign a category to a Program. This can be done from the Program
Name Display, from the Program Naming window, or by right-clicking in the ‘Category’ column of
the User Bank (part of the Bank Manager/Librarian).
To assign a category from the Program Name Display, click in the Category section of the display
(the upper right part of the Name Display window). This will produce a contextual menu of
categories to select from:
You can also select a category from the Program Naming window by clicking on the blue text in
Program Category field. This will produce the same contextual menu as shown above:
Tetra SoundEditor User Guide
Page 21
5. The Sequencer Window
The Tetra module contains a sequencer that can be programed in the SoundEditor. Basic controls
are found in the upper right block of the editor window.
To initiate the preprogrammed sequencer pattern associated with the Program or Combo you have
selected, click the Sequencer light in the top left hand corner of this block.
If you wish to show greater detail and to program specific sequencer patterns, click the Sequencer
button or by selecting “Sequencer” from the Edit menu. The Sequencer window is shown below.
This image shows the sequencer window in Program mode. Combo mode is similar. To return to
the editor control window, click on the image of the control window in the right hand middle third
of the sequencer, or click the Program button in the upper sequencer block.
Tetra SoundEditor User Guide
Page 22
The Sequencer window allows you to program/adjust the four Tetra sequences, select the
modulation destination of each sequence, and set the overall tempo and clock divide parameters.
Additionally, a Sequence Templates function allows you to copy sequences from other programs
and apply them to any one or all four sequences, and a Sequence Functions drop-down panel allows
you to adjust the length of each sequence, create pitched sequences from preloaded sequence data,
and alter the sequence data in musically useful ways (Sequence Templates and Sequencer Functions
are only available in the Pro Edition).
5.1
Sequencer Controls
This image shows the first block of the sequencer window.The remaining blocks have similar
functions.
The dropdown box on the left determines the parameter that this sequence is going to
control.
Typically it would be one of the Oscillator options to allow a pattern of notes to be played. In this
case the value of the sliders will be shown in midi note numbers. Other selected destinations will
show their value in simple numbers.
Clicking the Reset button will lower all sliders to their lowest position. Clicking reset again will
turn all steps off (to a “rest” condition.
We will discuss the Function button in a moment.
Clicking the Draw Mode button allows you to determine the way the sliders react to the cursor.
The mode set in this box will be common between all sequencer blocks.
In Sliders mode, changing the value of a slider requires to you to click and drag the slider handle
up and down.
In Pen mode, simply click and drag inside the slider area and drag across the window to set the
value of the individual steps.
Clicking on the value below any given slider will cause a window to appear where you can directly
enter a value, or use the arrow button to reveal a dropdown window with a scroll bar to allow entry
of value or note number in this manner.
Above each slider is a button that allows you to reset, rest, or return to the previously set value by
repeated clicks of the mouse.
Tetra SoundEditor User Guide
Page 23
5.2 The Function Button
In the Sequencer Function panel, the Seq buttons that appear on the far left (Seq1 thru Seq4) are
used to select the specific sequence that will be affected by the panel functions. The ‘From Step’
and ‘To Step’ sliders allow you to specify the range of steps that will be affected within the selected
sequence. Clicking the Function button will reveal this window:
In the figure above, for example, Sequence 4 has been selected with a step range of 5 - 10. This
means that any function chosen from either the Chords or Functions lists will only affect steps 5
thru 10 in Sequence 4, and no others. Also, note that the color of the selected step bars is different
from the others - this provides a visual indication of the sequence steps that will be affected by the
chosen functions.
The Chords list allows you to select from preloaded ‘chord’ data for major and minor chords, and
several major and minor sevenths for each sequence. Selecting from the Chords list gives you a
sequence of arpeggiated notes that makes up the chosen chord structure (from as few as two notes
to as many as six). The selected note sequence will be repeated until the end of the sequence or
until the end of the specified range is reached.
The root note of a chorded sequence is based on the first step of the selected sequence. For
example, in the previous figure the first step (step 5) happened to be ‘E’, so a major chord based on
a ‘E’ was generated. To get a chord sequence based on a different root, simply adjust the first
sequence step to the desired note then click one of the Chord buttons.
Appearing on the far right of the panel are additional controls to modify the selected sequence.
These include an executable Functions list, UNDO and DONE buttons, and a Control Adjust arrow
too
Tetra SoundEditor User Guide
Page 24
The Functions list provides commands to copy, paste and modify the selected sequence.
Commands include:
Copy: Copies the selected sequence.
Paste: Pastes to any selected sequence.
Reverse: Reverses the sequence order within the specified step range.
Invert: Inverts all values within the specified step range. Zero values become
Resets and vice versa.
Randomize: Randomizes all values within the specified step range. Repeated
selecting of the Randomize function creates a new series of random sequence
values.
Randomize Q: Works like Randomize, but automatically adjusts step values
up or down to real note values.
Step Up: Creates a sequence of incremental positive values based on the fi rst
value in the range. For example, if the first step value is 0, Step Up will create
a series of values where the second step value will be 1, the third 2, etc. If the
first step value is 45, then the second will be 46, the third 47, etc.
Step Q: Works like Step Up, but increases the step values by 2. If the fi rst step
value is 10, Step Q will create a series of values where the second step value
will be 12, the third 14, etc.
The Control Adjust arrows raise or lower the selected sequence value by ‘1’ for each click
of the control. Holding the control button instead of clicking provides for
r a p i d
adjustment of the sequence values.
The UNDO button offers multiple levels of undo. You can undo any chord or function
selection back to the point at which you started.
The DONE button closes the Function panel.
5.3 Tempo and Clock Divide
At the top right of the Sequencer Window are the Tempo
and Clock Divide function controls. To make
adjustments, simply click and rotate the control for
Tempo, or click on the downward arrow in the Clock
Divider field for a contextual menu of clock divider
selections.
Tempo is continually adjustable from 30 to 250 BPM.
Clock Divide is adjustable in increments from Half Note
through 64th Note Triplets.
The sequencer can be sync’d to an external Midi source
through the Global Panel with the Midi Clock Select
options.
5.4 Sequence Templates
Tetra SoundEditor User Guide
Page 25
Sequence Templates provide a way to copy and paste sequences from other Programs into the
current Program, and load/save sequence files on your computer.
The operation of the Sequence Template function is managed with the three buttons at the top of the
Sequence Template window:
The Add button adds the sequence from the current Program to the list.
The Load From...
button produces a drop-down menu that allows you to load
sequences from banks A, B or C, or from a File saved to your hard drive.. There is
also a selection here to clear the list. Selecting Load From... A File produces a window
that displays all the files on your computer. Only those files having an ‘.m_s’ extension
are valid template files that can be loaded - all other file types will be ignored.
The Save button produces a ‘Save’ window where you can name the Sequence
Template and select the storage volume for the file. To load a Sequence Template to
the current Program, simply select a Sequence from the list and click on the ‘Send‘
arrow on the right. The four sequences that make up the selected Sequence
Template are sent to the Tetra’s Edit Buffer, and they also appear in the Sequence
Window, where they can be edited using the sequence step bars, buttons and
functions.
By default, Sequence Templates are sorted numerically, but they can also be sorted alphabetically
(A–Z) by clicking on the ‘4 x Sequence’ column header. A second click on that header will reverse
the sort order (Z–A). Clicking on the ‘No.’ column header switches the sorting order back to the
numerical listing (1, 2, 3...), and a second click on that header reverses the sorting order (... 3, 2, 1).
Tetra SoundEditor User Guide
Page 26
The sequencer has some additional considerations, depending whether in Program or Combo
mode.
Program Mode
Combo Mode
As can be seen, you have the option in Program mode to flip between Layers when adjusting
sequencer parameters with the ability to Sync the changes you make to both layers.
In Combo mode, you can select which voice you are setting the sequence for and also Sync any
combination of voices to adjust simultaneously.
Tetra SoundEditor User Guide
Page 27
6. Program and Combo Modes
We have made mention of Program and Combo Modes, but have focused primarily on the Program
Mode.
Simply stated, Program Mode plays single sound or a layered sound made up of two sounds that are
Stacked (Played at the same time through the keyboard range) or Split (Layer A plays in one area of
the keyboard, Layer B plays on the remaining keys. This Split point is easily set and is described
above).
Combo mode plays 4 voices at once. These voices can be edited individually.
When you click Program at the top of the Editor screen, you will be presented with this
window:
This window shows the 4 banks of 128 Programs. Clicking on a name will call up the sound on the
Tetra module. This page interacts with the Editor in that clicking Layer A will bring the Editor
screen up and ready to edit Layer A. If you clicked Layer B, it would have set to edit Layer B.
Don’t forget, the Layering feature is only used on Programs that are using Split or Stacked control
of two sounds.
Tetra SoundEditor User Guide
Page 28
6.1
Program Menu
In addition to bringing up this screen, when you are in Program mode, and additional Menu item
called Program also appears in the menu bar. This menu contains the following commands:
Edit Program
This command will just assure that the Editor has the correct program loaded
Write Program
Whatever program is currently selected, stock or edited, can be saved back on top of itself or
to a different location.
This screen will appear where you can select any location of any bank to to store this sound. This is
one way of reordering patches, but perhaps not the most efficient way. More on that later.
Two things: Care must be taken to not overwrite Programs you may need. Also, understand that this
is writing this Program and location to the Tetra memory, not simply to a place in the software.
Receive Bank
The hierarchal menu drops down to give you the choice of Bank, A, B. C. D or all all Banks. This
transfers all the Banks from the Tetra into the software.
Tetra SoundEditor User Guide
Page 29
Transmit Bank
The hierarchal menu drops down to give you the choice of Bank, A, B. C. D or
all all Banks. This transfers all the Banks from the software to the Tetra .
Load Program Bank to
The hierarchal menu drops down to give you the choice of Bank, A, B. C.
or D.
Once you select a bank, you well be presented with a dialog that allows
you to load a previously saved Bank from your computer.
Save Program Bank
The hierarchal menu drops down to give you the choice of Bank, A, B. C.
or D. Once you select a bank, you will be presented with a dialog that
allows you to save the selected bank you your computer.
Load Single Program
A dialog will appear that allow you to allow you to load a single program
you have previously saved to your computer. Loading this Program will
also load the Program into the Tetra edit buffer so you can hear the sound,
but it has not been saved. Select Write Program from the Program menu,
or click the Write button on the editor. You will be presented a dialog box
that allows you to select where the Program will be saved on the Tetra and
also to rename if you desire.
Save Single Program
A dialog will appear that will allow you to save the current program to your
computer.
Initialize
The hierarchal menu drops down to give you the choice of Bank, A, B. C.
or D.
Selecting one of these banks will initialize that bank. Note that this does not
initialize the Tetra, but rather just the bank in the Editor. I you desired to initialize the
bank in the Tetra, you would have to do this using the Transmit Bank described above.
Tetra SoundEditor User Guide
Page 30
6.2 Combo Menu
When you click Combo on the Editor window, you will be presented with this screen:
This window shows a single bank of 128 Combos.
Additionally, a Combo item will appear in the menu bar and the following options w i l l
available:
be
All of these commands function in a similar manner to the Program functions listed
above but for Combo settings.
Very Important!!
When in Program or Combo mode, an additional item, Load Factory Presets, appears in
the File menu. This will completely reset the data in the Editor that will appear at startup.
Be careful using this feature as you could loose any custom Programs, Combos or
Librarian features you have developed.
Save your work often!
Tetra SoundEditor User Guide
Page 31
7. Bank Manager/Librarian
The Bank Manager/Librarian is accessed by selecting the ‘Bank Manager/Librarian’ option in the
File menu. The Bank Manager/Librarian lets you organize and store an unlimited number of Tetra
Programs. You can also have as many Library files on your computer as you wish. The Librarian
provides 24 sound categories to organize your Tetra sounds and have them available for immediate
use. For convenience, these sound categories have already been defined, but all categories can
easily be renamed according to your needs. A view of the Bank Manager/Librarian window is
shown below.
4
1
2
3
5
6
The main components of the Bank Manager/ Librarian include:
1. Toolbar buttons to access frequently-used functions and commands in the Bank Manager.
2. ‘Radio’ buttons and checkboxes to select operational modes in the Bank Manager.
3. User Bank and Bank buttons (Banks A, B, C.D)
4. Toolbar buttons to access frequently-used Librarian functions and commands.
5. List of categorized Library Programs
6. Predefined Library categories (24 total)
Tetra SoundEditor User Guide
Page 32
7.1 Bank Manager Toolbar
The Bank Manager Toolbar (shown below) provides convenient access to frequently- used Bank
Management commands and functions. Descriptions of each Toolbar button follows.
The Load button allows you to load a bank of Programs into the User Bank. Selecting Load
produces a ‘Load Tetra Program Bank’ window that allows you to locate and select Tetra Program
Bank files to load. Only those files having an ‘.m_b’ extension are valid Program files that can be
loaded - all other file types will be ignored.
The Save button allows you to save the current User Program Bank. Selecting Save produces a
‘Save As...’ window where you can name the Program Bank and select the storage volume for the
file.
The Receive button initiates the process to receive a bank of Programs from the Tetra hardware.
Selecting Receive produces a ‘Receive Program Banks’ window. You will need to click on the
Start button to begin the actual transfer process. The bank that is requested from the Tetra
hardware will be the currently selected User Bank (A, B, C or D).
In other words, if the User Bank is displaying Bank A when you initiate the receive command, the
Tetra hardware will transmit the first bank (Bank 1) to SoundEditor regardless of its current bank
setting.
The Transmit button initiates the process to transmit a bank of Programs from the current User
Bank (A, B, C or D) to Tetra hardware. Selecting Transmit produces a ‘Transmit Program Banks’
window. You will need to click on the Start button to begin the actual transfer process. The
transmitted bank (A, B, C or D) will go into the corresponding bank (1, 2, or 3) on the Tetra
hardware. In other words, if the User Bank is displaying Bank B when you initiate the transmit
command, the Tetra hardware will receive that data into Bank 2 regardless of its current bank
setting.
The Load, Save , Receive and Transmit button functions duplicate commands found in the menus.
Lastly, although not related to the controls described above, the Transparency button allows you to
adjust the transparency of the Bank Manager/Librarian window.
Tetra SoundEditor User Guide
Page 33
7.2 ʻRadioʼ Buttons and Checkboxes
‘Radio’ buttons and checkboxes are used to select operational modes in the Bank Manager
window. These controls appear just below the Toolbar in the upper left corner of the Bank Manager
window:
Here’s how the buttons and checkboxes function:
The Use Bank Data checkbox is part of the User Program Bank functions. When Use Bank Data
is unchecked (disabled), selecting a preset from the User Program Bank switches the Tetra to the
corresponding preset. This guarantees synchronization between the hardware and SoundEditor.
When Use Bank Data is checked (enabled), the selected preset data from the User Program Bank is
sent to the Tetra edit buffer for editing and audition. This feature helps to browse through presets
in the User Program Bank without the need for dumping the entire bank to the hardware.
When Use Bank Data is enabled, Tempo and Clock Divide data is not sent with
the program data. If a sequence is playing when you select a new program, you
will hear the new program’s sound, but it will be played at the tempo of the
original program. This can be used to quickly audition new sounds/sequences at
pre determined tempos.
Despite its location in the window, the Auto Dump checkbox is actually part of the Librarian
function. When the Auto Dump checkbox is checked (enabled), a selected preset from the
Librarian Program list is automatically sent to the Tetra edit buffer for editing/audition.
When Auto Dump is unchecked (disabled), no data is sent.
The Multi Select and Drag and Drop radio buttons are used to define the operation of the cursor
in the Bank Manager/Librarian window. Drag and Drop permits conventional cursor operation,
allowing you to freely drag and drop presets between the current User Bank and the Librarian. You
can add the Shift and other modifier keys to make multiple preset selections, which can be groups
of Programs, non-adjacent selections, or a combination of both. Multi Select mode locks the cursor
into ‘Select’ mode, allowing you to select groups of Programs. This mode can be useful for large
amounts of group moves because it restricts the operation of the cursor to just making selections,
preventing accidental dragging of presets out of the User Bank or Librarian. In Multi Select mode,
Programs are moved between the User Bank and Librarian using the large Copy buttons.
Lastly, although not part of the operational mode controls described above, the Edit button takes
you to the Controls window, where you can edit the currently selected Program.
Tetra SoundEditor User Guide
Page 34
7.3 User Bank
The User Bank (and associated Bank
Manager controls) allow you to you load,
save, transmit, receive, and edit banks of
Tetra Programs. Program banks are loaded
into the User Bank either from the Tetra,
from a stored bank, or from one of the
three factory banks built into SoundEditor.
The User Bank has three banks, labeled
A-D, corresponding to the three Program
banks in the DSI Tetra. Programs in the
User Bank be selected individually, as
a group, or randomly (non-adjacent), to
allow for convenient rearrangement and
reorganization.
One thing to keep in mind while working
in the User Bank is that the Bank buttons
interact with the Use Bank Data checkbox,
meaning that SoundEditor will switch
to the Tetra bank/location and acquire
the Program data from the Tetra (when
Use Bank Data is unchecked), or send
the selected Program data to the Tetra’s
current preset (when Use Bank Data is
checked).
The User Bank list offers several options for
sorting Programs. By default, Programs are
sorted numerically as they appear in the
bank, but Programs can also be sorted
alphabetically or by Category. To sort
alphabetically (A-Z), click on the ‘Program’
column header at the top of the listing, as
shown. A second click on the ‘Program’
header will reverse the order (Z-A).
To sort Tetra Programs by Category
(A-Z), click on the ‘Category’ column
header. A second click on the ‘Category’
header will reverse the order (Z-A).
Clicking on the ‘No.’ column header
switches the sorting order back to the
numerical listing.
Tetra SoundEditor User Guide
Page 35
7.4 The Librarian Panel
The Librarian lets you store an unlimited number of Tetra Programs, and allows you organize them
in any fashion. You can also have as many library files on your computer as you wish. The
Librarian provides 24 sound categories to organize your Tetra sounds and have them available for
immediate use. The categories are pre-defined, but any category can be renamed should you need
to. A view of the Librarian panel is shown below. Sound categories are displayed on the left along
with two large Copy buttons. A list of the Tetra Programs appears on the right, and buttons for
library file functions are at the top.
The currently selected (active) sound category is indicated by boldface type and a triangle to the
left of the name. In the figure above, Library (Not Assigned) is the active category, and contains 14
Programs; these Programs are listed in the window on the right.
If the number of Programs exceed the amount that can be displayed within this window (about 22
Programs) SoundEditor will add a scroll bar to the window.
To switch to a different category, simply click on the desired category name:
Navigating a Librarian Category Program list is exactly like navigating any other list, using either
the mouse or the keyboard. Options for changing the sort order of Programs is the same as for any
other list
Tetra SoundEditor User Guide
Page 36
7.5 Librarian Toolbar
The Librarian Toolbar (below) provides convenient access to frequently-used Librarian
commands and functions. Descriptions of each Toolbar button follows.
The Add Current Program button adds the current Program from the User Bank to the active
sound category. Note that new entries are always added to the end of the list, so if you have a lot of
Programs in a particular category, you may have to scroll down to see the new entry.
The New button allows you to create a new Library. After selecting New, you will get a message
dialog box asking if you wish to save the existing library. To save the existing Library, clicking the
OK button in the message box will present you with a ‘Save As...’ window where you can name
and save the current Library file to the specified storage location. After the ‘save’ operation is
complete, you will have an empty (new) Library. If you decline to save the existing Library, the
contents of the existing library (all 32 categories) will be cleared, leaving an empty Library.
The Save button allows you to save the current Library. Selecting Save produces a ‘Save As...’
window where you can name the Library File and select the storage location for the fi le.
The Load button allows you to load a library file into the Librarian. Loading a library file is just
like loading a bank file, but with a difference – library file names have the extension .m_l.
You can load a new library into an existing library to combine the presets of
each.
You can also combine presets from different banks using the ‘Load from User
Bank Data’ command.
The Add Current Program, New, Save and Load buttons duplicate commands found in the
menus.
Finally, although not part of the operational controls described above, the Edit button takes you to
the Controls Window, where you can edit the Library’s currently selected Program.
You can load a new library into an existing library to combine the presets of each. You can also combine presets from
different banks using the ‘Load from User Bank Data’ command.
Tetra SoundEditor User Guide
Page 37
7.6 Adding Program to the Library
While the Add Current Program button is one way to add an entry into the Library, it only adds a
single Program at a time to the currently selected Category. To copy groups of Programs from the
User Bank into the Library, use the right-facing Copy button:
In the screen shot above, Programs A010 through A015 were selected from the User Bank.
Clicking on the right facing Copy button added those six programs to the selected Library category
(“Res Lead”).
Occasionally, you may wish to add single Programs or groups of Programs to multiple Library
categories. In this case, selecting and dragging the Program(s) from the User Bank into the Library
offers a direct and convenient alternative to using the Copy button:
In the screen shot above, Program A009 was selected from the User Bank and is shown being
dragged into the Library’s ‘Res Bass’ Category. When Programs are moved by dragging, only an
outline box is displayed as they are being moved. Note that you can drag a Program (or group of
Programs) into any Category by this method.
Tetra SoundEditor User Guide
Page 38
7.7 Moving Programs between Categories
Tetra Programs can be moved between Categories using several transfer methods. The first method
is to set the red Transfer Arrow (click in the Transfer Arrow column to set the arrow to point to the
desired Category), select the desired Program and then click on the Arrow. The Program will
transfer from the current Category to the new Category.
In the screen shot below, the Program ‘Wagerian’ is being transferred from the ‘Res Lead’
Category into the ‘Soft Lead’ Category:
The second method involves simply dragging the desired Program from the current Library
Category into another Category.
In the screen shot below, the Program ‘Epic Brass’ is being dragged into the Library’s ‘Soft Bass’
Category. As mentioned previously, when Programs are moved by dragging, only an outline box of
the Program is displayed as it is being moved.
Either method can be used to move single Programs or groups of Programs.
Tetra SoundEditor User Guide
Page 39
7.8 Copying Programs to the User Bank
Copying Programs from the Library to the User Bank basically involves the same methods as
copying Programs into the Library from the User Bank: you can either use the large Copy button, or
you can simply drag the Program (or group of Programs) into the User Bank. Note, however, that
either method requires that you first specify a location in the User Bank to copy the Program(s) to.
The screen shots below will illustrate the process. First, in the User Bank, we select location A03 as
the ‘copy to’ location. Next, in the Librarian, we select ‘Dual Bass’ as the Program to be copied:
We then clicked the left facing arrow that brought up this dialog to confirm our actions. The
message box offers three choices: Cancel, NO and OK.
If you are uncertain about proceeding at this point, you should select Cancel and the copy
operation will be stopped. If you select NO, then the Program will be copied to the User Bank but it
will not be sent to the Tetra. Programs in the User Bank but do not wish to affect the Programs in
the Tetra.
Finally, if you select OK, then the full Copy/Write process will execute. The Program will be
copied to the User Bank and written to the Tetra hardware.
Copying groups of Programs works in the same way, but this time the location you select in the
User Bank establishes where the first Program in the group will be copied to. The Programs will fill
the User Bank from that point. A message box will display the range of User Bank locations that
will be affected by the copy operation, and request your confirmation before proceeding.
If the number of Programs to be copied exceeds the available space in a User
Bank, the copy operation will be performed until the end is reached. For example,
if you try to copy five Programs from the Library into the User Bank starting at
location 127, only the first two Programs will be copied. These Programs will
appear in locations 127 and 128; the other three Programs will be ignored.
All Bank Manager and Librarian menu items are shown on page 10.
Tetra SoundEditor User Guide
Page 40
8. Program Genetics
The Program Genetics function allows you to quickly build new sounds from two existing ones in a
similar fashion to breeding. The Genetics function is available in both Program and Combo modes.
Parameters of each of the two sources (“Parents”) are combined using four different functions to
generate a new bank of presets (“Kids”). Sources can be taken from Programs and individual voices
of Combos and applied to either Programs or Combos.
The Program Genetics window is selected from the Options menu of the main page Program
Genetics can also be accessed from the Bank Manager/Librarian Options menu selection as well.
Program Mode
A view of the Preset Genetics window is shown below. The two source banks (called “Mommy”
and “Daddy”) are located in the upper left, along with buttons for the four different Genetics
functions. The generated bank (“Kids”) and the Top Offspring bank are located in the lower left. On
the right are filters to exclude selected parameters from the Genetics function, and three buttons at
the top for editing functions and resetting excluded parameters.
Any pair of Programs can be used for the Genetics functions (that’s one Program each from Mother
and Father). The result of applying the user-selected Genetics functions creates a child bank of 128
new programs, and any ‘keepers’ auditioned from the child bank can then be moved into the Top
Offspring bank.
Shown above is a collection of Kids generated from the A Layer of Wagerian from the Mommy
Bank and the A Layer of Tom Sawyer from the Daddy bank. This has created a set of Programs that
will be created for Layer A (as indicated in Work on Layer). Clicking on any of the names in the
Kids list will send that Program to the A layer of the Tetra to audition.
Tetra SoundEditor User Guide
Page 41
In this example, Mommy Voice 2 of Analog Dance Kit from the Combo banks, Daddy is Layer A
from Tom Sawer and again clicking on the list will allow you to audition these sounds on the Tetra as they
are applied to Layer A.
Here’s what the four button functions do:
Mix: The parameters of each Child program are randomly chosen using parameters from either the
Mother or Father. For example, if the Mother’s cutoff frequency was 10 and the Father’s was 88,
the child’s value would either be 10 or 88.
Morph: The value of each parameter is linearly interpolated from one parent to the other. This
means that the fi rst program in the ‘Kids’ bank is identical to the Mother while the last program is
identical to the Father. All other Child programs are weighted towards a parent depending on their
placement within the list. The middle Child Program (Program #64) is exactly 1⁄2 of the Mother
and 1⁄2 of the Father Programs.
Mutate: The parameter values of each child Program are randomly chosen from within the range
between each parent’s parameter. For example, if the Mother’s cutoff frequency was 10 and the
Father’s was 88, Child values would be anywhere between 10 and 88.
Tetra SoundEditor User Guide
Page 42
Random: A random value from within the min/max parameter range produces the value of each
parameter for the Child. The four Program Genetics functions are selected by using the buttons at
the top of the window.
Experimentation using vastly different parents or similar parents creates the most
interesting results. You can also ‘interbreed’ the child patches too. In addition,
you can set filters to excluded parameters that will not take a part in the
generation of new offspring. Experiment and have fun!
Additional controls appear on the top right side of the Program Genetics window:
The Auto Audition checkbox enables the transfer of selected Programs from the Mother, Father,
Kids or Top Offspring banks to the Tetra’s edit buffer for auditioning. When the
Auto Audition checkbox is unchecked (disabled), no Programs are transmitted. The Edit button
brings up the Editor window, permitting on-screen editing of a selected Program from the Parents,
Kids or Top Offspring banks.
The Write button brings up the Write Program dialog box. The Write function works on the
currently selected program, which can be from the Parents, Kids or Top Offspring banks.
The Reset button resets all checkbox selections made under the ‘Exclude Preset
Parameters’ section. When you click Reset, all checked parameters become unchecked.
The Auto Audition button must be checked for the Editor to correctly display
the selected Program in the Genetics window.
Tetra SoundEditor User Guide
Page 43
Combo Mode
Combo mode is very similar to Program mode with a few differences.
In this example, while in Combo Mode, Mommy is Layer A of Wagerian, Daddy is Layer A of Tom
Sawyer and the Kids that are generated will be sent to Voice 3 of the current Combo as indicated by
the selection made in Work on Voice.
The following sections of relative to the Genetics feature of the Tetra SoundEditor will be shown in
Program mode, but Combo mode is similar.
Tetra SoundEditor User Guide
Page 44
8.1 Selecting
Both Parent banks use Programs from the ‘A’ bank by default, but any bank can be loaded into
either parent by clicking on the list box masthead and selecting Bank A, B, C, D or Combo Bank:
Either Layer A or Layer B of any voice from any Program Bank or Voice 1-4 from any Combo may
be selected for either parent.
8.2 Creating New Sounds
To create a bank of sounds you must first select a pair of ‘seed’ Programs, one each from the
Mommy bank and Daddy bank. Use the scroll bars to scroll through the Parent bank lists and select
the desired Programs. To quickly advance through a bank list, place the cursor onto the list and use
the scroll wheel on the mouse.
With a pair of Programs chosen, selecting any one
of the four Genetics functions (Mix, Morph, Mutate
or Random) will create a bank of 128 programs in
the Kids bank. Selecting function a second time will
replace the previously generated Kids bank with a
new bank of 128 programs.
Program names in the ʻKidsʼ bank become
scrambled or rearranged when you use
the Genetics functions. This is normal.
Tetra SoundEditor User Guide
Page 45
8.3
Selecting Top Offspring
As you audition Programs from the Kids bank, you will probably identify one or more Programs
you wish to save or edit further. The Top Offspring bank provides a convenient place to ‘park’ these
Programs.
To copy Programs to the Top Offspring bank, you can either drag the selected Program into the Top
Offspring window, or click on the large Copy arrow as shown:
Programs in the Top Offspring bank can be edited directly (by selecting the Edit button) or loaded
into the Librarian or Phantom Banks functions using the ‘load Top Offspring’ menu commands in t
those functions:
Also, when the Librarian and Program Genetics windows are both open, you can drag individual
Programs from the Top Offspring list directly into any Librarian category.
Tetra SoundEditor User Guide
Page 46
9.4 Program Genetics Menus
Since most of the control needed for Program Genetics operations are contained within the PG
window, only a few additional menus commands are required. These are shown below.
File:
The File menu allows you to quickly switch to
the Bank Manager/Librarian function or to
Phantom Program Banks. Selecting ‘Close’
closes the Program Genetics window and
returns you to the Controls Window.
Edit:
The Edit menu allow you to clear the
Programs in the Top Offspring bank.
Tetra SoundEditor User Guide
Page 47
9. Morpher
The Morpher function allows you to blend or ‘morph’ any two Tetra Programs together
to create a hybrid sound having the characteristics of both Programs. Functionally, Morpher is a
subset of Program Genetics, but Morpher offers much more control over the morphing process.
The Morpher function is accessed by selecting ‘Morpher’ in the Options menu, or by clicking on
the Morpher button in the main window. There are two different Morpher windows depending on
if you are in Program or Combo mode. The two windows are shown below:
Program Mode
Combo Mode
The principles to Morpher are similar between the Program and Combo versions. When the
Morphing function is accessed, the first Program defaults to the currently selected Program, while
the second Program is chosen using the Bank buttons and menu on the right. The Get button is
used to change the first Program should you select a different Program while the Morpher window
is open.
The Slider is used to morph between the two Programs, and the resulting sound can be auditioned
as you make adjustments in real time.
You should keep your speaker volume low when using the Morpher function,
as some high gain characteristics can result from the Morphing process.
Tetra SoundEditor User Guide
Page 48
When the Live Scroll option is checked, SoundEditor’s Control Window is continuously updated to
show the parameter values as they change. You should also be aware that the Morphing process
affects the Program name, so you’ll see scrambled or rearranged names in the Program Name
display and also on the Tetra hardware. This is normal.
Clicking on the Add to Lib button adds the currently morphed Program to the Librarian
in the active Library Category.
The active Category defaults to ‘Not Assigned’ each time you launch
SoundEditor and remains that way until you change it.
The More button allows you to select additional Morphing options
The checkboxes shown allow you to exclude certain parameters from the Morphing process. The
term ‘base’ refers to the parameters in the fi rst Program:
Preserve Base Sequencer - Checking this box preserves the step settings of all four
Sequencers. Sequence Destinations are not preserved.
Preserve Freq/Tune - Checking this box preserves Oscillator 1 & 2 Pitch and Tuning
settings. Other Oscillator parameters are not preserved.
Preserve Base Oscillators - Checking this box preserves Oscillator 1 & 2 Pitch, Tuning,
Waveform and Glide settings. Oscillator Mix and Sub-oscillator settings are not preserved.
Preserve Base Mod Sources - Checking this box excludes all four Sequencers from the
Morphing process. Sequence Destinations are not preserved, however.
Preserve Base Mod Destination - Checking this box preserves the four Modulation
Destinations.
Preserve Base Controls - Checking this box preserves the destination and amount values of
the five MIDI Control parameters.
There is also the option to specify a MIDI Controller to act as the Morpher slider.
Checking the Use Controller checkbox enables the selected MIDI Controller to control the
Morphing process on the selected MIDI Channel.
Tetra SoundEditor User Guide
Page 49
10. Snapshots
The Snapshots function allows you to quickly
capture “Snapshots” of edited programs, providing
multiple ‘undo’ points and allowing you to check
your editing at various stages. It is a simple utility
with a minimum of features, but it is invaluable in
support of the editing/sound development process.
Snapshots is accessed by selecting the ‘View
Snapshots’ option in the Snapshots menu. A view
of the Snapshots window is shown at left.
To capture a Snapshot of the current Program, simply click on the Snap button in the main window,
or use the ‘Add Snapshot’ option in the Snapshot menu. Each time you capture a Snapshot it will be
added to the Snapshots window.
To send a Snapshot to the DSI Tetra, click the Send button. As you build a list of Snapshots you
may wish to go back to one of interest and perform additional edits. This is done by clicking on one
of the Snapshots and clicking the Edit button. The parameter settings in Controls Window will
reset to the selected Snapshot, and the Tetra hardware will update with those parameters values.
Tetra SoundEditor User Guide
Page 50
11. Phantom Program/Combo Banks
i
The Phantom Program Banks function allows you to add virtual banks of Programs and Combos
(called “Phantoms”) to your Tetra. Phantom Program and Combo Banks allows you to load up to
16 banks of Tetra Programs or Combos into SoundEditor, and have any Program in any bank
mmediately available for auditioning. This means you can have as many as 2048 Programs (16 x
128) at your disposal (or 2432 Programs when you include the three Tetra Program banks).
Banks of Programs can be loaded from SoundEditor’s Program Banks (A, B, C or D), or from the
Top Offspring list in the Program Genetics window, from the equivalent banks of Combo’s when in
Combo mode. or from any previously saved bank files. Banks can also be assembled by pasting or
dragging single programs to this window.
Phantom Program Banks (PPB) is selected from the Editor’s File menu. The PPB window is shown
below. The Phantom Combo Banks window is similar and will show in Combo mode.
Tetra SoundEditor User Guide
Page 51
21.1 Window Operations
Other ‘hidden’ controls in the PPB window allow you to sort Program Banks in various ways.
Program Banks can be sorted numerically, alphabetically or by category by clicking on ‘No.’,
‘Program’ or ‘Category’ headers. Finally, individual Programs can be sent to the Tetra hardware
by selecting a Program and clicking on the Send arrow that appears in the far right column. The
Phantom Program Banks window has relatively few controls compared to other windows in
SoundEditor:
The Add Current Program button adds the current preset from the User Bank to the active
Phantom Bank. Note that new entries are always added to the end of the list, so if you have a lot of
presets in a Phantom Bank, you may have to scroll down to see the new entry. Note also that since a
bank consists of 128 Programs, clicking the Add Current Program button will have no effect if
the bank is already full.
The Edit button takes you to the Controls window, where you can edit the currently selected
Program.
Other ‘hidden’ controls in the PPB window allow you to sort Program Banks in various ways.
Program Banks can be sorted numerically, alphabetically or by category by clicking on ‘No.’,
‘Program’ or ‘Category’ headers.
Finally, individual Programs can be sent to the Tetra hardware by selecting a Program and clicking
on the Send arrow that appears in the far right column.
Remember that the Phantom Combo Banks functions are similar when in Combo Mode.
Tetra SoundEditor User Guide
Page 52
12.2 Phantom Program/Combo Banks Menu
PPB menus allow you to load Tetra Programs from within other SoundEditor functions, elect file
storage options, execute editing commands, and transfer Program banks. A description of the PPB
menus appears below.
The File menu allows you to load Tetra Programs from multiple sources (Library files, User
Bank files and Program Genetics Offspring), and save PPB Bank Library files.
File:
Edit:
The Edit menu allows you to copy, paste, rename, and
initialize individual Programs, as well as for clear the
current Phantom Bank.
MIDI:
The MIDI menu allows you to transmit the current
Phantom Bank to the selected Tetra Bank (A, B, C or
D).
Tetra SoundEditor User Guide
Page 53
12. Additional Controls
SoundEditor offers additional remote controllers functions for the Tetra: a Virtual Piano
(V-Piano), and the ability to play the Tetra from the computer keyboard. These functions allow
you to remotely play the Tetra from within SoundEditor (handy if the Tetra is located more than an
arm’s reach away from the computer).
These functions are located in the Options menu:
12.1 V-Piano
The V-Piano provides a way to play the Tetra remotely using the mouse. When you press a key on
the virtual keyboard, the corresponding MIDI ‘Note On’ message will be sent to the Tetra. The note
information will be displayed in red on the bottom left side of the keyboard, along with the MIDI
channel and velocity information:
The ‘Vel’ Up/Down control on the far right of the V-Piano keyboard adjusts the note velocity
(values from 1 to 127). The Midi channel is changed by clicking on the label just above the
Velocity label and choosing from the popup contextual menu.
The virtual Pitch Bend and Mod Wheels can be used to control Pitch and Modulation
functions as you play.
Tetra SoundEditor User Guide
Page 54
13.2 Playing the Mopho from the Computer Keyboard
can alsofrom
play notes
on the MophoKeyboard
using the computer keyboard. The middle
12.2You
Playing
the Computer
and bottom rows of computer keys act as a single octave of keys mapped like a
You can also play notes on the Tetra using the computer keyboard. The middle and bottom rows
piano
keyboard. You can use these keys to remotely play notes on the Mopho. The
of computer keys act as a single octave of keys mapped like a piano keyboard. You can use these
computer
key assignments
are:Tetra. The computer key assignments are:
keys to remotely
play notes on the
Each keyboard press generates a MIDI Note ON message corresponding to the note as specified.
Each
press generates
a MIDI
Note ON
message corresponding to the note
Whenkeyboard
the key is released,
a MIDI Note
OFF message
is sent.
as specified. When the key is released, a MIDI Note OFF message is sent.
Two computer keys are programmed to adjust octaves (increment/decrement):
“p” – Octave
(oneprogrammed
octave for eachtokey
press)octaves (increment/decrement):
Two
computer
keysupare
adjust
“o”
down
forfor
each
key press)
“p”––Octave
Octave
up (one
(oneoctave
octave
each
key press)
“o” – Octave down (one octave for each key press)
You can switch octaves over a range of –2 to +8 (ten octaves total). When the octave switching
keys are pressed, a pop-up window briefl y appears showing the change.
You can switch octaves over a range of –2 to +8 (ten octaves total). When the octave
switching keys are pressed,
a pop-up
window
briefl
y appears
showing
You can sustain
a note
by pressing
down a
“note” key the
and change.
while it is
depressed, press an “octave” key. A MIDI Note ON command will be
a corresponding
MIDIkey
Noteand
OFF,
causing
sustained, or
You can sustain a notesent
bywithout
pressing
down a “note”
while
it isadepressed,
‘stuck’ note. To release the note, press the Space Bar. The Space Bar
press an “octave” key. A MIDI Note ON command will be sent without a
will send an ‘All Notes Off’ command that shuts off all MIDI notes.
corresponding MIDI Note OFF, causing a sustained, or ‘stuck’ note. To release the
note, press the Space Bar. The Space Bar will send an ‘All Notes Off’ command
Two computer keys are programmed to adjust note velocity (increment/decrement):
that shuts off all MIDI notes.
“i” – Note velocity increases (+5 for each key press)
“u” – Note velocity decrease (-5 for each key press)
Two
computer
keys
arefrom
programmed
to adjust note
velocity
(increment/decrement):
Note velocities can
be set
0 to 125 in increments
of 5. A
note velocity
of 0 is the equivalent of
– Note
velocity
increases
(+5 keys
for each
key press)
no note “i”
played.
When
the velocity
switching
are pressed,
a pop-up window briefly appears
howing
change.
“u” – the
Note
velocity decrease (-5 for each key press)
Changing
the velocity
values using
keyboard isof
the0same
Note velocities can be set from
0 to 125
in increments
ofthe
5. computer
A note velocity
is the
as changing ‘Piano Note Velocity’ in MIDI Setup Window.
equivalent of no note played. When the velocity switching keys are pressed, a pop-up
window briefly appears showing the change.
The ability to play notes using the computer keyboard works in all SoundEditor windows, allowing
Changing
velocity Note,
valueshowever,
using the
is the
you to audition
soundsthe
at anytime.
thatcomputer
the CAPSkeyboard
LOCK key
mustsame
not beasengaged
changing
‘Piano
Note Velocity’
MIDInote
Setup
Window.
(ON), as only
the lower
case letters
will sendinMIDI
data.
You can use the CAPS LOCK key to temporarily turn off remote playing
The ability to play notes usingif desired.
the computer keyboard works in all SoundEditor
windows, allowing you to audition sounds at anytime. Note, however, that the CAPS
LOCK key must not be engaged (ON), as only the lower case letters will send MIDI
note data.
YouUser
canGuide
use the CAPS LOCK key to temporarily turn off remote playing if Page
desired.
Tetra SoundEditor
55
13. Appendix A
File Extensions
SoundEditor uses the following file extensions to specify Tetra data:
“Single Tetra Combo = ".t4_c"
"Tetra Combo Bank" = ".t4cb"
"Single Tetra Program" = ".t4cb"
"Tetra Program Bank" = ".t4b "
"Program Library" = ".t4l"
"Combo Library" = ".t4cl"
"Sequence Templates" = ".t4s"
"Tetra Data"= ".tt4"
Tetra SoundEditor User Guide
Page 56
DSI Mopho SoundEditor - Sequencer Chord Structure
14. Appendix B
Appendix
B
Sequencer Chord Structure
Sequencer
Chord Structure
The Sequencer Function Panel in SoundEditor contains a number of preset ‘chords’ which are
as arpeggiated
of notes.
These
arpeggiated
note‘chords’
patterns
are shown
below,
Theprogrammed
Sequencer Function
Panel in patterns
SoundEditor
contains
a number
of preset
which
are programmed
grouped
to
show
how
the
pattern
repeats
over
the
16
sequence
steps.
All
patterns
are
based
a
as arpeggiated patterns of notes. These arpeggiated note patterns are shown below, grouped to showon
how
starting
note
of
C4,
but
the
actual
starting
note
is
programmable,
allowing
you
to
create
sequences
the pattern repeats over the 16 sequence steps. All patterns are based on a starting note of C4, but the actual
in any
key.
starting
note
is programmable, allowing you to create sequences in any key.
Basic (alternating major third):
1
2
3
4
5
6
7
8
9
10
11
12
13
14
15
16
C4
E4
C4
E4
C4
E4
C4
E4
C4
E4
C4
E4
C4
E4
C4
E4
1
2
3
4
5
6
7
8
9
10
11
12
13
14
15
16
C4
E4
G4
C4
E4
G4
C4
E4
G4
C4
E4
G4
C4
E4
G4
C4
1
2
3
4
5
6
7
8
9
10
11
12
13
14
15
16
C4
Eb4
G4
C4
Eb4
G4
C4
Eb4
G4
C4
Eb4
G4
C4
Eb4
G4
C4
Major:
Minor:
Major (2):
1
2
3
4
5
6
7
8
9
10
11
12
13
14
15
16
C4
G4
C5
E5
G5
C4
G4
C5
E5
G5
C4
G4
C5
E5
G5
C4
Minor (2):
1
2
3
4
5
6
7
8
9
10
11
12
13
14
15
16
C4
G4
C5
Eb5
G5
C4
G4
C5
Eb5
G5
C4
G4
C5
Eb5
G5
C4
Major 7:
1
2
3
4
5
6
7
8
9
10
11
12
13
14
15
16
C4
E4
G4
Bb4
C4
E4
G4
Bb4
C4
E4
G4
Bb4
C4
E4
G4
Bb4
Minor 7:
1
2
3
4
5
6
7
8
9
10
11
12
13
14
15
16
C4
Eb4
G4
Bb4
C4
Eb4
G4
Bb4
C4
Eb4
G4
Bb4
C4
Eb4
G4
Bb4
Major 7 (2):
1
2
3
4
5
6
7
8
9
10
11
12
13
14
15
16
C4
G4
Bb4
C5
E5
G5
C4
G4
Bb4
C5
E5
G5
C4
G4
Bb4
C5
Minor 7 (2):
1
2
3
4
5
6
7
8
9
10
11
12
13
14
15
16
C4
G4
Bb4
C5
Eb5
G5
C4
G4
Bb4
C5
Eb5
G5
C4
G4
Bb4
C5
62
Tetra SoundEditor User Guide
Page 57
DSI Mopho SoundEditor - Sequencer Step Values
Appendix
C C
15. Appendix
Sequencer
Step Values
Sequencer Step Values
The following chart of step values is provided to assist in identifying and adjusting
The following
chart ofpitches
step values
is providedStep
to assist
in are
identifying
andthe
adjusting
sequence
sequence
in SoundEditor.
values
paired with
equivalent
pitches in SoundEditor.
Step
values
are
paired
with
the
equivalent
MIDI
note.
MIDI note.
Step
Value
Note
Step
Value
Note
Step
Value
Note
0
C0
48
C2
96
C4
2
C#0
50
C#2
98
C#4
4
D0
52
D2
100
D4
6
D#0
54
D#2
102
D#4
8
E0
56
E2
104
E4
10
F0
58
F2
106
F4
12
F#0
60
F#2
108
F#4
14
G0
62
G2
110
G4
16
G#0
64
G#2
112
G#4
18
A0
66
A2
114
A4
20
A#0
68
A#2
116
A#4
22
B0
70
B2
118
B4
24
C1
72
C3
120
C5
26
C#1
74
C#3
122
C#5
28
D1
76
D3
124
D5
30
D#1
78
D#3
RST
Reset
32
E1
80
E3
OFF
Rest
34
F1
82
F3
36
F#1
84
F#3
38
G1
86
G3
40
G#1
88
G#3
42
A1
90
A3
44
A#1
92
A#3
46
B1
94
B3
Print this page and keep it handy for working with sequences.
63
Tetra SoundEditor User Guide
Page 58
16. Appendix D
Midi Setup Options
The MIDI Setup menu provides tabs for configuring the MIDI Port Connections and MIDI In
Keyboard Controller options. MIDI Port Configurations are covered in the MIDI Setup section.
This Appendix provides details on configuring and using the MIDI IN Keyboard Controller and
Virtual MIDI Port functions (the Virtual MIDI Ports only appears in the Macintosh version of
SoundEditor).
Midi In Keyboard Controller
4.
The MIDI In Keyboard Controller function allows you to control the Tetra from \another MIDI
controller while SoundEditor is active. When enabled, the MIDI In Keyboard Controller function
acts like a MIDI Merge utility, merging MIDI data from the controller device with editing data
from SoundEditor.
Only a few simple steps are required to configure the MIDI In Keyboard Controller function:
1. Select the MIDI port that the controller is connected to.
2. Make sure that the ‘Activate MIDI Controller Port’ checkbox is checked.
3. Set the MIDI Controller to the same MIDI channel as the Tetra.
Test the setup. If the controller can send MIDI Note On messages, you can test the setup
by playing a few notes. Otherwise, try sending an easily discernible MIDI
message,
such a Program Change command.
Tetra SoundEditor User Guide
Page 59
Virtual Midi Ports
The Macintosh version of SoundEditor includes a Virtual MIDI Interface that allows you to connect
the SoundEditor application between your MIDI Sequencer (Logic, ProTools, Cubase, etc.) and the
DSI Tetra. In the MIDI Setup window, you’ll notice MIDI In Port and MIDI Out Ports labeled
‘Tetra V– Output Port’ and ‘Tetra V– Input Port’ respectively. These ports are established by
SoundEditor to provide a virtual MIDI bridge between it, your MIDI Sequencer and the Tetra:
NOTE: Although they appear in the MIDI Setup list, the Virtual ports
should never be selected. The Virtual ports are always active and are
designed to be used exclusively by the MIDI applications that will be
communicating with SoundEditor. You should select only the external
(physical) ports that will be used for the connection between
Mopho SoundEditor - MIDI Setup Options
SoundEditor and the DSIDSI
Tetra.
The Virtual MIDI Port function allows SoundEditor to interact with the Tetra while
ThetoVirtual
MIDIdata
Porttofunction
allows
SoundEditor to interact with the Mopho while
continuing
pass MIDI
your MIDI
Sequencer.
continuing to pass MIDI data to your MIDI Sequencer.
Tetra
To configure your sequencer for this setup, you need to select “Tetra V – Output Port” as your
sequencer’s
MIDI
Input
port
and “Tetra
– Input
as your
sequencer’s
MIDI
To confi
gure
your
sequencer
for V
this
setup,Port”
you need
to select
“Mopho
V – Output
Output port.
Port”
With thisassetup,
the
sequencer
will
receive
MIDI
data
from
the
Virtual
Output
and
transmit
MIDI
your sequencer’s MIDI Input port and “Mopho V – Input Port” as your sequencer’s
data to the
Virtual
Input.
MIDI Output port. With this setup, the sequencer will receive MIDI data from the Virtual
Output and transmit MIDI data to the Virtual Input.
Tetra SoundEditor User Guide
Page 60