1
4
Accessing the Web-Based Configuration Utility
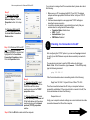
Step 1 Start your Web browser and type http://192.168.1.1 in the URL
field. This is your AP's default private IP address.
Step 2 After connecting to the
device, you will be prompted to
enter the username and password.
Leave the username empty and
enter the default password as
admin.
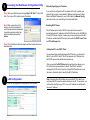
Manually Specifying an IP address
If you want to reconfigure the IP information of the AP to match your
existed LAN, just pick one available IP address and the same Subnet
Mask and Default Gateway for your LAN. Enable the Manual Config
option and enter your new settings in the provided fields.
Enabling DHCP Server
The AP implements a built-in DHCP server which can be used to
dynamically assign IP addresses to the DHCP clients on the LAN/WLAN.
To use DHCP server function, make sure you have properly set the AP’s
IP address, enable the DHCP service, then enter the DHCP Lease Time
and IP Pool Range fields.
Step 3 The Web-Based utility will appear with the System Overview
table selected.
Setting the AP to be DHCP Client
If your network has already deployed a DHCP server, you should set
the AP to be a DHCP client. The AP will request an IP Address from
the DHCP server when rebooted or powered up.
After you enable the DHCP client option and apply the change, your
PC will lose the communication to the AP. Since the IP address
assigned to the AP could come from a large DHCP address pool, you
will need a third-party tool to identify the APs IP address.
5
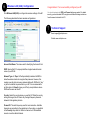
LAN Configuration
Click the LAN page link to configure the LAN interface.
Note: Changing the LAN settings may cause the PC from which you
configure the AP to lose the communication to the AP. To reconnect, you
will need to reconfigure your PC to use an IP address compatible with
the new IP address.