1
side, rear and front sections and discard.
Fit replacement fibre insulation pads in the reverse order.
Note: The fibre pads are fragile so take care they are not
damaged.
Ensure the insulation pad fitted to the combustion chamber
cover has the pilot observation hole correctly aligned.
Reassemble the appliance in the reverse order.
Open the valves, fill and re-pressurise the system as described in
Section 12.2
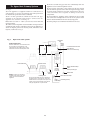
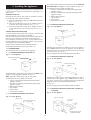
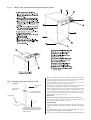
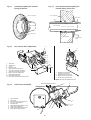
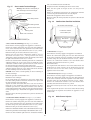
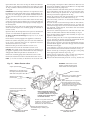
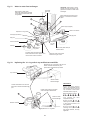
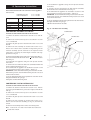
Fig. 37. Gas to water heat exchanger.
Warning: There will be a small quantity of
water remaining in the heat exchanger.
Front union connection
Fibre sealing washer
Gas to water heat
exchanger
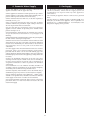
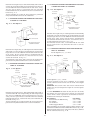
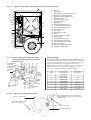
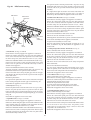
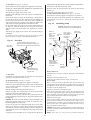
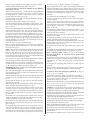
Fig. 38. Combustion chamber insulation.
Fibre sealing washer
Gas to water heat exchanger
Remove access cover
Fixing screw
Combustion chamber
rear insulation pad
Rear union connection
Main burner
Remove left-hand fibre insulation pad
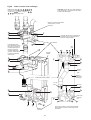
3. Gas to Water Heat Exchanger. See Figs. 17, 36 and 37.
Check that the electricity supply to the appliance is turned off.
Remove the cabinet front panel, place the facia and control box
in the Service Position, lower the expansion vessel and remove
the inner casing cover, as described in Section 14.2 a, b, c and d.
Drain the heating circuit as described in Section 15.2 (a).
Remove the fan, flue hood, combustion chamber cover as
described in Sections 14.2 e, f and g. Remove the Safety
Temperature Limiter thermostat and the CH primary sensor from
the pad as described in Section 15.3.11 and 13.
Remove the left hand fibre insulation pad from the combustion
chamber. Remove the access cover in the left hand side of the
combustion chamber held in position with one screw. Unscrew
the front and rear heat exchanger union connections.
Lift the heat exchanger off the right hand side of the combustion
chamber support and clear of the union connections. Remove
the heat exchanger clear of the inner casing.
CAUTION: There will be a small quantity of water remaining in
the heat exchanger.
Follow the procedure as described in 15.2.
Discard the heat exchanger.
Fit the replacement heat exchanger in the reverse order using
new fibre sealing washers. Ensure the washers are in place and
the heat exchanger correctly aligned.
Tighten the union connections. Refit the access cover to the left
hand side of the combustion chamber and replace the fibre
insulation pad. Refit the combustion chamber cover. Refit the
sensor and thermostat with a layer of heat sink compound. Refer
to wiring diagram Fig. 8. Reassemble the appliance in the reverse
order.
Open the valves, fill and re-pressurise the system as described in
Section 12.2.
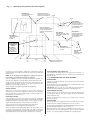
Combustion chamber
side insulation pads
5. Main Burner. See Figs. 36.
Check that the electricity supply to the appliance is turned off.
Remove the cabinet front panel, place the facia and control box
in the Service Position, lower the expansion vessel and remove
the inner casing cover, as described in Section 14.2 a, b, c and d.
Remove the combustion chamber cover and main burner
assembly as described in Sections 14.2 g and h.
Discard the burner.
Fit a replacement main burner in the reverse order. Ensure the
main burner is fitted correctly on the main burner injector
located at the back of the inner casing. Reassemble the
appliance in the reverse order.
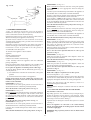
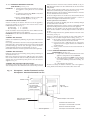
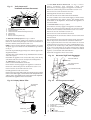
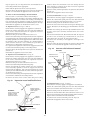
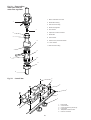
6. Main Burner Injector. See Figs. 36 and 39.
Check that the electricity supply to the appliance is turned off.
Remove the cabinet front panel, place the facia and control box
in the Service Position, lower the expansion vessel and remove
the inner casing cover, as described in Section 14.2 a, b, c and d.
Remove the combustion chamber cover and main burner
assembly as described in Sections 14.2 g and h.
Unscrew the brass injector at the rear of the inner casing and
discard.
Fit the replacement injector in the reverse order. Thread sealing
compound is not required. Reassemble the appliance in the
reverse order.
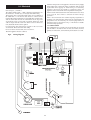
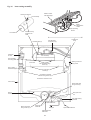
Fig. 39. Main burner injector.
4. Combustion Chamber Insulation. See Figs. 16, 17, 36 and 38.
Check that the electricity supply to the appliance is turned off.
Remove the cabinet front panel, place the facia and control box
in the Service Position, lower the expansion vessel and remove
the inner casing cover, as described in Section 14.2 a, b, c and d.
Drain the heating circuit as described in Section 15.2 (a).
Remove the combustion chamber cover as described in Section 14.2 (g).
Remove the gas to water heat exchanger as described in Section 15.3.3.
Remove the fibre insulation pads from the combustion chamber
Rear of inner
casing
Main burner injector
35