1
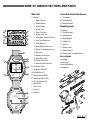
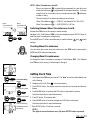
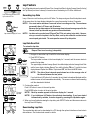
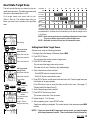
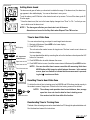
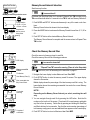
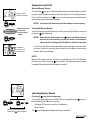
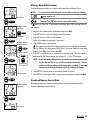
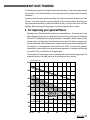
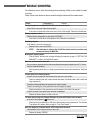
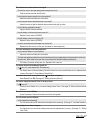
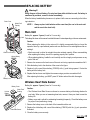
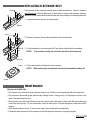
User Manual
Startup manual gives you information of installation, preparation of the main unit and basic
operation.
E
INTRODUCTION
Thank you very much for purchasing the CAT EYE MSC-2Dx. The MSC-2Dx is a multi sports
computer that combines the functions of a wireless heart rate monitor and a wired
Cyclocomputer. Our race proven Cyclocomputer technology and the double pulse heartrate
system enables you to monitor, track and record your training and racing like never before.
The recorded data can be downloaded to a PC by using the optional download unit.
Please read this manual to gain a thorough understanding of the product and how it works.
Please keep this manual in a safe place.
If this manual is damaged or lost, contact our offices, your local dealer or www.cateye.com.
Important
• Always follow the warnings that are marked with
Warning!!!.
• No part of this manual may be reproduced or transmitted without the prior written permission of Cat Eye Co., Ltd.
• The contents and illustrations in this manual are subject to change without notice.
• If there should be any errors or inaccuracies in this manual, please contact Cat Eye at
www.cateye.com.
Copyright© 1999
CAT EYE Co., Ltd.
MSC2DxUE-000703 3
* Windows is a registered trademark of Microsoft Corporation.
MSC-2Dx 1
ABOUT THE MANUALS
The following manuals are included:
Quick Start manual
This manual gives you basic information on installation, set up and use of the main unit.
User manual
This manual explains detailed use of the MSC-2Dx.
Quick chart (Inside Carry Bag)
Reference chart.
The meaning of icons in this manual:
Warning!!!
Sections marked with these icons are critical for the safe use
of the device. Instructions given must be followed.
NOTE !
Helpful tips that cover important items are highlighted this
way.
CAUTION
Important cautionary notes on the use and operation of the
MSC-2Dx.
Registration
Please register your MSC-2Dx to validate
the warranty.
MSC-2Dx 2
CONTENTS
Introduction ------------------------------------------------------------------------------------------ 1
Important ----------------------------------------------------------------------------------- 1
About the Manuals --------------------------------------------------------------------------------- 2
The correct use of the Cat Eye MSC-2Dx ---------------------------------------------------- 4
Name of Various Sections and Parts ---------------------------------------------------------- 5
Button Navigation ---------------------------------------------------------------------------------- 6
Changing the upper display ----------------------------------------------------------- 7
Functions --------------------------------------------------------------------------------------------- 8
Using the Heart Rate Function
Chest Belt Heart Rate Sensor ------------------------------------------------------ 10
Before Wearing Chest Belt Heart Rate Sensor -------------------------------- 10
Wearing The Heart Rate Sensor --------------------------------------------------- 11
Setting the Main Unit
Setting Wheel Circumference ------------------------------------------------------ 12
Setting Clock Time -------------------------------------------------------------------- 13
Features
Auto Time -------------------------------------------------------------------------------- 14
Power Saving --------------------------------------------------------------------------- 14
Speed Pace ----------------------------------------------------------------------------- 14
Lap ---------------------------------------------------------------------------------------- 15
Heart Rate Target Zone -------------------------------------------------------------- 16
Memory Record ------------------------------------------------------------------------ 18
Downloading to a PC ----------------------------------------------------------------- 23
Heart Rate Training ------------------------------------------------------------------------------ 24
Trouble Shooting --------------------------------------------------------------------------------- 26
Replacing Battery -------------------------------------------------------------------------------- 28
Replacing Electrode Belt ----------------------------------------------------------------------- 29
Maintenance --------------------------------------------------------------------------------------- 29
Specifications -------------------------------------------------------------------------------------- 30
Registration ---------------------------------------------------------------------------------------- 31
Accessories ---------------------------------------------------------------------------------------- 32
Index ------------------------------------------------------------------------------------------------- 33
MSC-2Dx 3
THE CORRECT USE OF THE CAT EYE MSC-2Dx
Warning !!!
•
Pace maker users should never use this device.
•
This device should never be used in commercial aircraft.
•
When using the MSC-2Dx, do not give excess attention to the monitor or the data. Pay
attention to the road, traffic and your surroundings!
•
Keep the device away from children. If children use this device, they should have adult supervision.
•
Dispose of used batteries properly. Keep batteries out of the reach of children. In case the
battery is swallowed by accident, consult a doctor immediately.
NOTE !:
•
The following places generate strong electromagnetic wave and interference, which cause
incorrect measurement:
1. Places near TV, PC, radios, motors/engines, or in cars and trains.
2. Railroad crossings and near railway tracks, around television transmitting stations and
radar bases.
•
Do not use the chest belt if it causes a rash or other skin irritations.
•
Avoid dropping or severely jarring the main unit or chest strap.
•
When the chest belt becomes soiled with sweat, clean it with mild soap and water.
•
Do not bend, twist or pull forcibly the electrode area of the chest belt.
•
Try to avoid using the main unit within a 1.5m radius of other transmitters. Do not use other
wireless devices simultaneously. It may result in improper measurements.
•
Avoid exposing the main unit to direct sun light for extended periods of time when not in use.
•
Do not disassemble the main unit. We recommend taking the main unit to a professional
jeweler for battery replacement and proper resealing.
•
Periodically check the positions and mounting condition of the magnet and the speed sensor.
•
Never apply chemicals (thinner or benzene) to the unit.
•
Static electricity could cause a function error, resulting in abnormal display of the data. In
such a case, reset the main unit.
MSC-2Dx 4
NAME OF VARIOUS SECTIONS AND PARTS
4
5
9
L. Transmitter
M. Electrode Belt
2. Middle Display
N. Attachment Belt
3. Lower Display
Mounting parts
4. Speed Icon
6
O. Bracket
5. Clock Time Icon
P. 2Dx Attachment
11
6. Speed Scale Icon
Q. Speed Sensor
7. Heart Rate Target Zone Icon
R. Wheel Magnet
8. Auto Time Mode Icon
S. Rubber Pad
9. Heart Rate Icon
T. Nylon Tie
10.Used Memory Rate Icon
U. Sensor Screw
11.Wheel Circumferences Icon
V. Sensor Band B
12.Alarm Icon
W. Sensor Band A (Large)(Small)
13
12
10
16
Chest Belt Heart Rate Sensor
A. Display
1. Upper Display
7
8
Main Unit
14
15
H
T/A
SE
LT
C
T
13.Memory Record Icon
B
D
G
A
B. Lap Button (LAP)
Accessories
Carry Bag
Quick Chart
Quick Start Manual
User Manual
C. Set Button (SET/AT)
DE
S/S
MO
3
F
E
15.Speed Pace Arrow
16.Selected Functions Icon
1
2
14.Heart Rate Scale
D. Light Button (LT)
N
E. Mode Button (MODE)
M
F. Start/Stop Button (S/S)
L
G. All Clear Button (AC)
H. Wrist Band
T
I. Back Cover
S
J. Contacts
I
K. Serial No.
P
9 3 0 0 0 0
K
R
O
U
J
V
W
Q
MSC-2Dx 5
BUTTON NAVIGATION
Mode Button (MODE)
Under standard operations, this button switches the function of the lower display.
The functions of the lower display are divided into the main functions. Each main function has a
corresponding sub function. To switch the functions of the lower display:
LT
SE
T/A
T
LAP
DE
MO
S/S
• Push MODE button to switch from one main function to the next main function.
• Hold down MODE button for more than 2 seconds to switch from a main function to its sub
function.
• Push MODE button again to return to the main function from the sub function.
• You cannot directly move from one sub function to another.
See the following diagram for the flow of the main and sub functions.
Mode Button (MODE)
NOTE !: This screen display can be switched from Clock Time to Speed on the lower screen.
LP
Lap Count
SUB Function
(S)
Clock Time
(Current Speed)
MXP
TM
Maximum
Heart Rate
Elapsed
Time
MAIN
Function
AVS
MXS
Average
Speed
Maximum
Speed
DST
Trip
Distance
Switching lower display with the MODE button
SUB Function
PUSH
Hold down
for two seconds
Lap Button (LAP)
Lap Button (LAP)
MO
When the unit is measuring time, heart rate, etc., push this button to record data (Elapsed Time,
Distance, Lap's Average Speed and Lap's Average Heart Rate) at any arbitrary point. Up to 50
lap data points can be captured. (See page 15, "Lap Feature")
DE
S/S
SE
LT
T
Total
Distance
Light Button (LT)
LAP
T/A
ODO
Light Button (LT)
This button illuminates the screen for about 3 seconds.
MSC-2Dx 6
Set Button (SET/AT)
Set Button (SET/AT)
MO
DE
S/S
This button is used to enter various
setting screens. See the right diagram for how the screen changes.
When you are setting data into the
unit, this button is used to fix and
complete the setting.
Data on Lower Display
SET/AT
Elapsed Time
Average Speed
Trip Distance
Maximum Speed
Clock Time
Lap Count
Maximum H.R.
Total Distance
Stop state
SE
T/A
LT
T
L A P
Area to Enter, Setting Item
Auto Time Feature On/Off
Confirming Heart Rate Target Zone
Clock Time Setting
Lap Data Readout
Memory Record File Select
Wheel Circumference Setting
Start/Stop Button (S/S)
SE
T/A
LT
T
LAP
This button starts/stops measurement of Elapsed Time, Average Speed and Distance. While
measuring, "bpm" in the middle display flashes. When Auto Time feature ( ) is on, this button
does not function.
Changing the Upper Display
DE
S/S
MO
SET/AT + S/S
is off), push SET/AT button and
• When Auto Time feature is off (
S/S button at the same time and the upper display changes from
Current Speed to Clock.
When Auto is on
• When Auto Time feature is on (
between speed and clock.
Upper Display Select
Start/Stop Button (S/S)
AT
is on), this button switches
S/S
All Clear Button (AC)
LT
SE
T/A
T
LAP
DE
MO
S/S
NOTE! This button is not used for normal daily operations. Push this button after replacing the battery or after a display error occurs.
This button deletes the lap data, record memory data and the clock time setting. The total
distance, wheel circumference, speed scale and heart rate target zone settings will not be deleted.
After pushing AC button, reset the clock time.
AC Button (AC)
MO
DE
S/S
LT
SE
T/A
T
L A P
•
If the AC button is pressed while holding SET/AT button, the MSC-2Dx returns to the default
state and all data is erased. Some users might want to perform this function at the beginning
of a training season to record yearly training mileage in the Odometer. Do not perform this
ALL CLEAR under normal condition.
Reset Operation
If MODE button and S/S button are pressed simultaneously, elapsed time, maximum heart rate,
average speed, maximum speed, and trip distance will be reset to zero and the lap data will be
erased, provided that the lower display is not in Odometer mode.
Reset Operation
MSC-2Dx 7
FUNCTIONS
Upper Display
Either Current Speed or Clock Time can be selected on the upper display. (See page 7)
Current Speed
The speed icon flashes. The data is updated once a second.
Range: 0.0 (3.0) ~ 65.9 mph [0.0 (4.0) ~ 105.9 km/h]
Clock Time
The clock icon flashes. Time is displayed in 24 hour or 12 hour.
Reference:
When the speed scale is "km/h", the clock time is always displayed in a 24-hour clock. When the
"mph", the clock time is always displayed in a 12-hour clock.
Middle Display
Heart Rate
When the chest belt heart rate sensor is attached to the body, the heart rate icon flashes and
the Heart Rate is displayed in real time.
Display Range: 0~299 bpm
Lower Display
Select the desired function with MODE button on the lower display. Refer to page 6, "Mode
Button" for navigation to each function.
Tm
Elapsed Time (Timer)
The time lapse from the start to the present time is shown in hours, minutes and seconds. The
elapsed time data returns to zero with the reset option.
Range: 0.00.00~9.59.59
MxP
Maximum Heart Rate
The maximum heart rate from the start to the present time is displayed. This is the sub function
of Elapsed Time. The Max Heart Rate data returns to zero when the MSC is reset.
Range: 0 ~ 299 bpm
Clock Time
Current time is displayed in 24 hour or 12 hour time. The Clock can be moved to the upper
display. (Current Speed would then appear in the lower display.) (See page 7)
MSC-2Dx 8
S
Current Speed
The present speed is displayed. It is updated once a second.
Range: 0.0(3.0)~65.9 mph [0.0(4.0)~105.9 km/h]
LP
Lap Count
The lap count from the start to the present time is displayed. This is the sub function of Clock
Time (or Current Speed). The Lap data returns to zero when the MSC is reset.
Range: LP-00 ~ LP-50
AvS
Average Speed
The average speed from the start to the present time is displayed. The Average Speed data
returns to zero when the MSC is reset. When the elapsed time exceeds 27:46'39", or the trip
distance exceeds 999.99 mile[km], (.E) will appear on the display and calculation of average
speed ceases indicating an Error.
Range: 0.0~65.9 mph [0.0~105.9 km/h]
MxS
Maximum Speed
The maximum instantaneous speed is displayed. This is the sub function of Average Speed. The
Max Speed data returns to zero when the MSC is reset.
Range: 0.0 (3.0) ~ 65.9 mph [0.0 (4.0) ~ 105.9 km/h]
Dst
Trip Distance
The trip distance from the start to the present time is displayed. The distance data returns to zero
when the MSC is reset.
Range: 0.00~999.99 mile [km]
Odo
Total Distance
The trip distance is accumulated continuously. This is the sub function of Trip Distance. From 0
to 9,999.9, the increment is 0.1; from 10,000 to 99,999, the increment is 1.
Range: 0.0 ~ 9,999.9/10,000 ~ 99,999 mile [km]
PTm
Time in Pulse Zone (Time in Training Zone) Readout Screen
In the readout screen, the time spent within the heart rate target zone is displayed.
The upper and middle displays indicate the upper and the lower limit of the zone respectively,
and the lower display indicates the time spent in that heart rate zone.
MSC-2Dx 9
USING THE HEART RATE FUNCTION
Wireless Heart Rate Sensor
Main Unit
Chest Belt Heart Rate Sensor
The chest belt heart rate sensor is based on the electrocardiograph methodology used in hospitals. The MSC-2Dx uses this technology but in a simplified and miniaturized form. In this methodology, electrodes attached to the body sense the differences of electric potential and thus
heart rate is measured. In the same manner, MSC-2Dx's chest belt sensor uses two built-in
electrodes that come into contact with the body to detect differences in electric potential. The
signal is then transmitted to the main unit and heart rate is displayed.
Reference:
Maximum transmitting distance: about 90 cm.
Before Wearing Chest Belt Heart Rate Sensor
Warning !!!
Pace maker users should never use this device.
NOTE !:
• Wear the chest belt heart rate sensor at the center of your chest and in contact with your skin.
• To increase measurement effectiveness, dampen the electrode area with water or electrocardiograph electrolyte cream.
• People with sensitive skin can wear the chest belt over a thin shirt with the electrode area
damped with water.
• Hair on the chest may interfere with accurate measurements.
• Do not use this unit with other cordless devices (including CATEYE CC-CL200) or some
lamps (including CATEYE Stadium Light). Interference might occur, resulting in incorrect
measurement.
MSC-2Dx 10
Wearing the Heart Rate Sensor
NOTE !:
When wearing the chest belt heart rate sensor, ensure that the top mark on the transmitter comes to the top. If worn upside down, signal’s transmittable distance might become
shorter.
1. Adjust the length of the belt to fit your chest.
2. Hook the attachment belt to the electrode belt. Place the electrode area at the center of your
chest. Be sure that the electrode area is held firmly against your skin.
Reference: When wearing the chest belt heart rate sensor over a shirt it is necessary to
moisten the electrode area for the better results. In the winter season when
skin can be dried, errors may occur even when the electrodes are in direct
contact with your skin. This can be improved by moistening the electrodes.
3. Adjust the belt so that the transmitter is at the center (just above your diaphragm) of your
chest.
Wear the chest belt heart rate sensor in the legible way (the top mark on the transmitter
should come to the top).
Transmitter
TOP
MSC Wireless Heart Rate Sensor
TOP
Top mark
MSC Wireless Heart Rate Sensor
Heart Rate
4. Place the main unit in front of your body. Check if the heart rate icon
display and the heart rate appears.
flashes in the middle
is not flashing, check the position of the chest belt heart rate sensor,
If the heart rate icon
moisten the electrode area, move away from any outside electronic interference, and try
again.
MSC-2Dx 11
SETTING THE MAIN UNIT
Setting Wheel Circumference
You can input two kinds of wheel circumferences into MSC2Dx, so it can be quickly switched between two bikes.
1. Determine the wheel circumference.
L
Refer to the Tire Size Reference Table below to determine
your tire's circumference. For the most accurate setting
you can perform a “wheel roll-out”. To do this pump your
tires up to normal pressure. On a level area place the valve
stem perpendicular to the ground and mark the spot. Get
on the bike and with your weight bearing on the tires roll
one complete wheel length forward. Mark where the valve
stem is perpendicular to the ground again. Measure the
distance between the two. This number in millimeters is
the most accurate calibration number you can put into the
computer.
Reference: The tire size is shown on the side of your tire.
MODE
Switching the
speed scale
2. Push AC button.
The screen will illuminate for one second and then "km/h"
or "mph" will flash. Push MODE button to switch between
"km/h" and "mph".
3. Push SET/AT button.
SET/AT
The wheel
circumference
setting screen
The speed scale is now set. The wheel circumference set
up screen now appears. The wheel circumference icon
and the preset wheel circumference (2096) flash.
MODE
4. Change the value.
Increase the number
LAP
SET/AT
• Push MODE button to increase the number.
• Push LAP button to decrease the number.
Decrease the number
Hold down the button for rapid advancement.
Completes the
wheel circumference
setting
Reference:
You can easily change a value for another wheel circumferat this stage.
ence
Push MODE and LT buttons simultaneously to switch to
and change the value by the same procedure described in 4.
Setting Values Cross
Reference Table
Tire Size
24 x 1
24 x 3/4 Tubular
24 x 1-1/8 Tubular
24 x 1-1/4
24 x 1.75
24 x 2.00
24 x 2.125
26 x 1(559mm)
26 x 1(650C)
26 x 1.25
26 x 1-1/8 Tubular
26 x 1-3/8
26 x 1-1/2
26 x 1.40
26 x 1.50
26 x 1.75
26 x 1.95
26 x 2.00
26 x 2.1
26 x 2.125
26 x 2.35
27 x 1
27 x 1-1/8
27 x 1-1/4
27 x 1-3/8
650 x 35A
650 x 38A
650 x 38B
700 x 18C
700 x 19C
700 x 20C
700 x 23C
700 x 25C
700 x 28C
700 x 30C
700 x 32C
700C Tubular
700 x 35C
700 x 38C
700 x 44C
L(mm)
1753
1785
1795
1905
1890
1925
1965
1913
1952
1953
1970
2068
2100
2005
1985
2023
2050
2055
2068
2070
2083
2145
2155
2161
2169
2090
2125
2105
2070
2090
2086
2096
2105
2136
2170
2155
2130
2168
2180
2224
5. Push SET/AT button.
The wheel circumference setting is completed. Elapsed
Time TM function appears.
MSC-2Dx 12
NOTE !: Wheel Circumference A and B.
Wheel circumference
is specifically programmed for road riding and
is programmed for low speed sensitivity. If you are
wheel circumference
using this unit on a mountain bike, we recommend using the
calibration
number for riding.
The initial setting of the wheel circumference is as follows:
wheel
circumference B
wheel
circumference A
Wheel Circumference
------ 2096 (27 inch Standard Tire: 700 x 23C)
Wheel Circumference
------ 2050 (MTB 26 x 1.95 Tire)
Switching Between Wheel Circumference A and B
Elapsed time TM must not be running to switch settings.
MODE +
Navigate to the Total Distance ODO on the lower display and push SET/AT button to
enter the wheel circumference setting screen.
LT
Push MODE and LT buttons simultaneously to switch between
settings.
and
wheel
Checking Wheel Circumference
ODO
You can check the current wheel circumference in the ODO mode by pressing the
MODE and S/S buttons simultaneously.
Changing Wheel Circumferences
To change the wheel circumference navigate to Total Distance ODO. (The Elapsed
time TM can not be running.) Perform steps 3 through 5.
Setting Clock Time
SET/AT
Clock time setting
screen
1. The Elapsed time TM must be turned off. The "bpm" icon of the middle display can
not be flashing.
2. Navigate to the Clock Time
in the lower display
MODE
Increase the number
LAP
Decrease the number
SET/AT
S/S
Time unit switching
Completes the clock
time setting
3. Push SET/AT button. The display enters the clock time set up screen and the hour
flashes.
4. Press MODE button to increase and LAP button to decrease the number.
Hold down the button for rapid advancement.
5. Push S/S button. The minutes flash.
6. Press MODE button to increase the digits and LAP button to decrease.
Hold down the button for rapid advancement.
7. Push SET/AT button. Clock time is now set.
NOTE !:
The digits for second becomes zero (:00) when SET/AT button is pressed.
MSC-2Dx 13
FEATURES
Auto Time Feature (Auto Start/Stop)
Auto time
feature On
When the Auto Time feature of AT is on, the main unit automatically starts/stops measuring and
icon appears on the middle display. When AT
recording when ever the wheel is rotating.
feature is on, buttons will not start or stop any operations. Therefore the AT feature is only useful
when using the unit for cycling.
When you use this unit on your wrist, turn off the Auto Time (
SET/AT
) feature.
NOTE !: If you turn
feature on while using the unit as a wristwatch/heart rate monitor,
the unit stops measuring. Be careful not to press the SET/AT button during
wristwatch/heart rate use.
Switching Auto Time feature On/Off
Auto time
feature Off
1. The Auto Time feature can be turned on or off when Elapsed Time TM, Average Speed AVS
or Trip Distance DST is in the lower display.
2. Push SET/AT button to turn on or off the Auto Time feature.
Auto Time feature is turned on when the
visible.
icon appears or off when the
icon is not
Power Saving Feature
When the main unit is left without any button operation or without receiving any signal of heart
rate or wheel signal for about 15 minutes continuously, the power supply is shut down and the
unit will go into the Sleep State, displaying only the clock (as in the left figure).
However, even in the Sleep State, the unit continues to count Elapsed Time TM.
When any button other than LT button is pressed, or the current signal is received, the screen
wakes up and returns to normal display.
NOTE !: If the unit is left with the readout screen or the setup screen of target heart rate
zone/Lap/Memory Record, the power saving feature might not work. Always
leave your MSC in a main function for long records of time.
The Pace Arrow
Speed Pace Feature
The Pace arrow on the lower display indicates the current speed level, whether it is higher or
lower than the average speed.
------------------------- The current speed is higher than the average speed.
------------------------ The current speed is lower than the average speed.
------------------------- The current speed is equal to the average speed.
No illumination -------- The current speed and/or average speed is zero.
MSC-2Dx 14
LAP
Lap Feature
LAP
START
0.00.00
Up to 50 lap data points can be captured (Elapsed Time, Average Heart Rate for the lap, [Average Speed for the lap]
and Trip Distance) and stored in memory for manual review or downloading to a PC with an interface unit.
TM
LP-01
LP-02
LP-03
Lap interval longer than 5 sec.
Up to about 27 hrs.
Recording Lap Data
LAP
‘Beep’
Lap number display for 3 sec.
In any of the main or sub functions, push the LAP button. The beep sound goes off and the lap data is saved.
At the same time, the lower display indicates the current lap number for about 3 seconds.
NOTE !: You must wait a minimum 5 seconds before recording next lap. The maximum
measurable time is 27 hours and 46 minutes.
Because the lap data captured is the average heart rate and average speed for the
interval, short lap intervals may produce inconsistent data.
NOTE !: Lap data can be recorded even if Elapsed Time TM is not running (=stop state). However,
once you record the lap data in the Stop State, next lap data cannot be recorded unless
current speed gets started. The reset operation erases all lap data points.
Lap Data Read Out
To review the lap data:
TM
STOP
SET/AT
MODE
Switching TM/DST
LAP
NOTE !: The data of heart rate and speed shown here is the average value of
the interval between the two points.
If you hold down LAP button for 2 seconds, the unit starts to download the data and the
MODE
readout screen is fast-forwarded automatically. The screen continues fast-forwarding
until the download is finished.
3. Continue the readout.
Push LAP button to move to the next lap data.
Push MODE button to return to the prior lap data.
The next
NOTE !: Each lap number appears in the lower display for 1 second.
lap data
NOTE !: If you hold down LAP button, the unit starts downloading. If you have started
to download by mistake, it can be stopped by pressing the Lap button again.
4. When you have finished reviewing the Lap data, push SET/AT button and the screen returns to
the Lap Count LP display.
Lap data readout screen
LAP
SET/AT
Elapsed Time is not running. (=stop state)
1. Navigate to where the Lap Count LP is in the lower display.
2. Push SET/AT button.
The lap number is shown in the lower display for 1 second, and the screen starts to
readout the lap data.
The upper display indicates Average Speed, the middle display indicates Average Heart Rate
and the lower display indicates Elapsed Time with the flashing TM icon. To switch the lower
display between Elapsed time TM and Trip distance DST, hold down the MODE button.
Downloading
Downloading Lap Data
The recorded lap data can be downloaded to a PC through the optional interface unit and e-train
data software. See the download manual for details.
MSC-2Dx 15
Heart Rate Target Zone
The unit records the time you stayed in your targeted heart rate zones. This data can be manually
reviewed or downloaded later to a PC.
Four target heart rate zones can be set.
(Zone.1~Zone.4). The audible alarm tells you
when your heart rate is outside of the specified
zone.
MXS display
H.R. target zones
readout screen
Upper heart rate limit
Lower heart rate limit
Time in heart rate zone
40
Zone.1
40 - 80 bpm
60
80
120
140
160
180
200
Zone.1
Zone.2
70 - 110 bpm
Zone.3
110 - 140 bpm
100
Zone.2
Target training zone
Zone.3 Audible alarm setting
Zone.4
140 - 180 bpm
Zone.4
The chart shows an example of how zone 3 (target heart rate 110-140) is set with
the audible alarm. The alarm will not sound when you are within the target zone of
110-140 bpm.
NOTE !: Heart rate target zones are completely independent of each other.
They can overlap or do not have to touch another zone.
NOTE !: Alarm will not sound till you have first entered the zone.
Set each zone using the following procedure.
1. Navigate the lower display to Maximum Speed MXS.
2. Push SET/AT button.
The unit enters the readout screen of target zone.
3. Push SET/AT button again.
The unit enters the target zone set up screen.
SET/AT
H.R. target zones
setting screen
Upper heart rate limit
Lower heart rate limit
Zone number
MODE
Increase the
number
LAP
Decrease the
number
To upper heart rate
limit setting
Zone 2 ~ Zone 4
setting in same way
SET/AT
20
Setting Heart Rate Target Zones
SET/AT
SET/AT
Heart Rate 0
bpm
The lower limit of zone 1 flashes in the middle display.
4. Set the desired lower heart rate limit.
• Push MODE button to increase the value.
• Push LAP button to decease the value.
5. Push SET/AT button, and the lower heart rate limit is set. Then the upper heart rate
limit flashes in the upper display.
Push S/S button to set (or reset) the alarm sound for this zone. (See page 17,
"Setting Heart Rate Alarm Sound".)
6. Set the desired upper heart rate limit.
7. Push SET/AT button to set zone 1.
The screen enters zone 2 set up screen.
8. Repeat steps 4 - 7 for all zones.
9. After completing zone 4, push SET/AT button.
Target zone setting is completed. The screen returns to the maximum speed MXS
function.
NOTE !: Once you enter the H.R. target zone set up screen, you must navigate
all the way from zone 1-zone 4. There is no short cut out of this set up.
MSC-2Dx 16
Alarm is off.
Setting Alarm Sound
The alarm sound goes off when your heart rate is outside the range. If the alarm is set, the alarm icon
appears in the middle display. You can set the alarm in every zone.
S/S
To set the alarm, push S/S button in the desired zone's set up screen. To turn off the alarm, push S/
S button again.
* Once the alarm is set, the icon in the lower display changes from "Zone." to "AL--" so that you can
see in which zone the alarm is set.
Alarm is set.
NOTE !: The alarm goes off when your heart rate is out of the zone.
Alarm does not sound in the Stop State when Elapsed Time TM is not on.
Time In Heart Rate Zone
You can review how long you stayed in each target heart rate zone.
1. Navigate to Maximum Speed MXS in the lower display.
MXS display
2. Push SET/AT button.
The unit enters the readout screen for target zone. The time in each zone is shown on
the lower display.
SET/AT
You can download the data by mounting the unit on the interface unit and press the LAP
button for 2 seconds.
H.R. target zone
readout screen
Upper heart rate limit 3. Push MODE button to switch between the zones.
4. Push MODE button in zone 4, and the screen returns to Maximum Speed MXS function.
Lower heart rate limit
Time in heart rate zone
MODE
LAP
Zone 2
Downloading
MODE
Zone 4
MODE
Resetting Time In Heart Rate Zone
To delete the data of time in training zone, hold MODE and S/S buttons simulta-neously in
the readout screen of target zone. All data in the four training zones will be deleted.
MODE
Zone 3
NOTE !: You can check the time in zones even while still measuring. Hold down
MODE button a little longer to switch between the zones. In the readout
screen, bpm icon flashes to indicate that the measurement is proceedicon does not flash.
ing, but
MODE + S/S
Saved data reset
NOTE !: The ordinary reset operation done to reset distance, time, average
speed etc. does not clear the data for time in training zones.
You must not set this from within this function.
Downloading Time In Training Zone
The data of time in training zones can be downloaded to a PC through the optional interface unit.
See the download manual for instructions.
MSC-2Dx 17
Memory Record Interval Feature
Memory Record saves elapsed time, heart rate, speed and trip distance at the specified time interval in a
selected file. You can choose from 4 time intervals (5, 15, 30 and 60 seconds) and record them to 5
separate files.
icon appears in the middle display.
• When the Memory Record is on,
• Memory Record data can only be erased from the individual file it was recorded to.
• The data is downloadable to a PC through the optional interface unit.
The total memory capacity is 2560 points. Used memory of each file is shown as a percentage of the total
available.
Timing
5 sec.
0.01
.30
0.01
.00
0.01
0.00
.30
42h. and 40min.
Max.
measurement time
.30
0.01
.15
0.01
.45
.00
0.01
0.00
.15
.30
0.00
0.00
Max.
measurement time
10h. and 40min.
0.00
.0
0.00 0
.0
0.00 5
.1
0.00 0
.1
0.00 5
.2
0.00 0
.2
0.00 5
.3
0.00 0
.3
0.00 5
.4
0.00 0
.4
0.00 5
.5
0.00 0
.5
0.01 5
.0
0.01 0
.0
0.01 5
.1
0.01 0
.1
0.01 5
.2
0.01 0
.2
0.01 5
.3
0.01 0
.3
0.01 5
.40
Timing
15 sec.
Max.
measurement time
21h. and 20min.
.00
30 sec.
0.00
Timing
0.00
.00
(Max. 2560 points)
0.00
Timing
60 sec.
.00
Memory Record capacity and Lap feature's memory capacity are independent.
.00
NOTE !:
Start
Measurement
Max.
measurement time
3h. and 33min.
Memory record data saving file, F-1 to F-5
Memory record timing sec.(interval)
Procedure for Memory Record
Take the following steps to record data to memory.
Select Time Interval
See page 19
Select file to memory record to.
See page 20
Start Memory Record function by
pressing Start/Stop
See page 21
MSC-2Dx 18
Memory Record Interval Selection
Main/Sub Function
Start from any function.
MODE + SET/AT
OFF
icon must be off.
Memory record timing selection screen
MODE
SET/AT
Hold down the Start/Stop Button for 2 seconds if Elapsed Time TM is running or turn
TM on and then hold down for 2 seconds to turn TM off and turn Memory Record off.
Timing selection
→5 sec.→15 sec.
→30 sec.→60 sec.
1. Push MODE and SET/AT buttons simultaneously in any of the main or sub functions.
Complete the
memory record
timing select
setting.
2. Press the MODE button to advance the Memory Record Interval from 5, 15, 30 or
60.
Memory Record Interval is shown in the lower display.
3. Push SET/AT button at the desired Memory Record Interval.
The Memory Record Interval is complete and the screen returns to Elapsed Time
TM function.
Check the Memory Record Files
Check the amount of memory stored in each file.
Check the memory files with the following procedures.
MXP display
OFF
TM
STOP
SET/AT
icon must be turned off.
"Elapsed Time TM" can not be running. (Timer is in the Stop-state)
Memory record file
screen
When
File Number
1. Navigate the lower display to show Maximum Heart Rate MXP.
Used Memory Rate (%)
2. Push SET/AT button to enter the memory record file screen. The upper display
shows the file number.
Max. measurable time
Ex.) 3h and 26min.
LAP
File number
switching
icon is on, turn it off according to the instruction in page 21.
Middle display shows the percentage of the total memory each file is using. The
lower display shows the remaining measurable time under the current Memory
Record Interval.
NOTE !:
Depending on the Memory Record Interval you select, remaining time will
vary.
3. You can navigate through each file by pressing the LAP button. Note the file
number on the top line of the screen. Check each file's used memory and delete
any files to free up memory. Delete files by pressing and holding the Start/Stop
and Mode buttons for two seconds. See that the center number (percentage of
total memory used) goes to zero and additional time appears on the lower display.
SET/AT
Complete of
confirmation
4. Push SET/AT button to return to Maximum Heart Rate MXP.
MSC-2Dx 19
Setting up Memory Record
OFF
"Elapsed Time TM" can not be running. (Timer is in the Stop-state)
TM
0.00.00
"Elapsed Time TM" must be zero. (Reset TM by pressing the Start/
Stop and Mode buttons simultaneously.)
When
MXP display
icon must be turned off.
TM
STOP
icon is on, turn it off according to the instructions in page 21.
1. Navigate the lower screen to show Maximum Heart Rate MXP (a sub function of
Elapsed Time TM).
2. Push SET/AT button to enter the memory record file screen.
SET/AT
3. Push LAP button and select a file from "F-1 to F-5" to record your activity into.
Memory record file
screen
4. To delete the data already stored in the file, push S/S and MODE button simultaneously.
(Data deletion is done individually in each file.)
LAP
NOTE !:
File selection
You cannot add additional data to a file that already has data
recorded in it.
5. Push S/S button.
MODE + S/S
Erase memory data
The file is selected and
File number
NOTE !:
Used Memory Rate (%)
Max. Measurable time
icon appears.
If
icon does not appear, Elapsed time TM may not be zero. Go
back to the top of this page, reset the unit and follow the procedure again.
6. Push SET/AT button.
The lower display returns to the Maximum Heart Rate MXP. Preparation is completed and the unit is ready to start memory record .
S/S
Select auto memory in
file 1
NOTE !:
• Be sure to check the remaining time before starting to record to memory. If
the recordable memory time is not long enough, increase it by deleting
some data stored in other files or selecting a different Memory Record Interval.
•
SET/AT
When the used memory exceeds the capacity, the memory feature automatically turns off.
Memory record
measurement ready
MSC-2Dx 20
Memory Record On/Off
Starting Memory Record
Memory Record
Feature is stand-by
Check that the
icon is on in the middle display (memory record feature is in standby state). Push S/S button and data of heart rate, speed, etc., is recording to memory.
icon is on), the memory record measurement
If the Auto Time feature is on (
automatically starts when the bicycle starts.
NOTE !: You can use lap feature only with the memory record reviewing.
S/S
Memory Record
Measurement
Memorizing of data
measured at
selected interval
(timing)
Turning off Memory Record
To turn off memory record of the activity, holding down the S/S button for more than
icon disappears.
2 seconds.
NOTE !: When the Auto Time feature is on (
icon is on), Memory Record
does not turn off even when your bicycle stops. You must manually turn it off by holding down S/S button for more than 2 seconds.
S/S
Complete of
memory record
measurement
•
You can also turn off the memory record features by resetting the computer. But in
this case, note that the general data is erased but the memory record data is
stored in the file you selected.
NOTE !:
Memory Record does not turn off unless you manually turn it off. See if Memory
icon is visible. Only when the memory exceeds
Record is on or off by noting if the
its capacity Memory Record is automatically turned off.
Canceling Memory Record
(Turning off
S/S
MODE + S/S
icon before timing starts)
To turn off Memory Record when the MSC-2Dx is in a stand-by state (
but the Elapsed Time TM has not started):
icon is on
Hold down S/S button for more than 2 seconds, or
Reset the unit.
Memory Record Measurement is
released and
mark disappears.
The
icon disappears and Memory Record is cancelled.
MSC-2Dx 21
Memory Record Data Review
Use the following procedure to review the data saved during Memory Record.
NOTE !:
MXP display
OFF
TM
STOP
SET/AT
Memory record
file screen
LAP
You cannot review the data while you are still recording to memory.
icon must be off.
"Elapsed Time TM" must not be running (Stop-state)
If
icon is on, turn it off. In any mode or sub-mode press the Start/Stop button for
two seconds.
1. Navigate so the lower display is Maximum Heart Rate MXP.
2. Push SET button to enter the Memory Record file screen.
File selection
3. Push LAP button to select the file to review.
Memory record
readout screen
4. Push MODE button to enter the file.
Switch file numbers by pressing the Lap button.
MODE
MODE
Switching TM/DST
LAP
LAP
Downloading
icon appears and the screen starts replaying the recorded data from memory.
TM icon flashes. By holding down MODE button, the lower display changes from
Elapsed Time TM to Trip Distance Dst DST.
5. Push LAP (or MODE) button to advance to the next data point. This time interval is
determined by the Record Interval you selected (5, 15, 30 or 60 seconds).
NOTE !: If you hold down LAP button for 2 seconds, the unit starts downloading the data and the screen is fast forwarded automatically. The unit
continues fast forwarding until the download is complete. If you have
started downloading by mistake, stop it by pushing LAP button.
6. Push SET/AT button to return to the memory record file screen.
Next point data
SET/AT
7. Push SET/AT button again, and the screen returns to Maximum Heart Rate MXP.
Download Memory Record Data
Memory record
file screen
Ride data of heart rate, speed, time and distance can be downloaded into a PC.
See the download manual for details.
SET/AT
MXP display
MSC-2Dx 22
Downloading to a PC
By using the optional download unit, the data of memory record, lap and heart rate target zone
can be downloaded to PC.
Memory Record
Heart rate, speed, elapsed time and distance at every point is downloaded in CSV (Comma
Separated Value) format, and displayed in the graph format on the screen.
Lap
Heart rate, speed, elapsed time and distance at every lap is downloaded in CSV format.
Heart rate target zone
Zone number, target zone and time in pulse zone is downloaded in CSV format.
How to download
Set the main unit on the interface unit and hold down the LAP button in each function’s readout
screen. The unit starts to download the data and the readout screen is fast-forwarded.
Memory Record
readout screen
MODE
Memory Record
File screen
LP
SET/AT
Lap Data
readout screen
SET/AT
LAP
(S)
MXP
TM
AVS
MXS
DST
SET/AT
ODO
Heartrate Taget Zone
readout screen
MSC-2Dx 23
HEART RATE TRAINING
The following is very general information about heart rate training. There are many good books
on the subject. Visit a local bookseller or visit our web site for more in depth heart rate training
information.
In general, heart rate goes up while exercising. The harder you exercise, the faster your heart
will beat. In this way, heart rate is a good indication of the exercise intensity. By setting your
target heart rate and making an effort to maintain that rate, you will be able to work out more
efficiently. Before starting a training program, consult a medical specialist or trainer.
1. For improving your general fitness
Bicycling is one of the best activities to improve your general fitness. To improve your overall
fitness through bicycling, set your target heart rate zone from the training level of between
30% and 70%, depending on your physical strength. It is desirable to work for twenty to thirty
minutes a time, at a frequency of more than three times a week. To obtain your target zone,
see the table below, which illustrates the correlation between heart rate and training level.
For beginners, it is recommended to start with the level of 30%. From this point, gradually
increase the level according to your fitness level and experience. For a purpose of improving
your health, 70% is considered to be the highest goal.
For the purpose of losing weight, work at a comparatively lower level for a longer period. For
maximum benefit you will want to workout for more than one hour at a time.
200
PULSE RATE (bpm)
MAX
180
IMUM
PULS
E RA
TE (2
04 –
80%
0.69
x AG
E)
160
70%
60%
140
50%
TARGET
ZONE
120 40%
190
180
30%
100
–A
GE
–A
GE
Exercise Level
90
20
AGE
30
40
50
60
70
MSC-2Dx 24
2. For competitors
Measure your resting heart rate just after awakening in the morning and your maximum heart rate
(perhaps during competition). Then set your target zone according to your goal:
A) For longer physical-endurance
Aiming at races which last for many hours
or over consecutive days:
60% - 70% (aerobic exercise)
B) For physical-endurance which lasts about two hours
70% - 80% (aerobic exercise)
C) For pushing power at full force for about a minute
more than 85% (anaerobic exercise)
D) For instantaneous maximum power which lasts for several seconds (sprinting)
more than 95% (anaerobic exercise)
Training level (%) =
(Target heart rate) – (Resting heart rate) x 100
(Maximum heart rate) – (Resting heart rate)
Target heart rate =(Maximum heart rate - Resting heart rate)
x Training level (%) + Resting heart rate
100
Resting heart rate
Measure your resting heart rate when you are awake in bed in the morning.
Maximum heart rate
The following calculations are generally used: (220 – age) or (240 – 0.69 x age).
For more precise figure, consult a training specialist.
MSC-2Dx 25
TROUBLE SHOOTING
If a malfunction occurs, check the following before contacting Cat Eye or your retailer for repair
or service.
Check if there is any electronic device around that might interfere with the measurement.
Trouble
Check Items
Remedy
The liquid crystal screen appears dark or there are some dark spots.
Was it left for a long time under direct sunlight?
It will return to normal after a few hours once it is out of the sunlight. Data will not be effected.
Display response is slow.
Was the ambient temperature too low (below 32°F [0°C])?
It will return to normal when the temperature rises. Data will not be effected.
No display appears.
Is the battery in the main unit worn out?
Replace it with a new one (CR2032).
NOTE !:
After the battery is replaced, the AC (All Clear) button must be pressed to reset
the data and set up the MSC-2Dx.
Meaningless display appears.
Push AC button, and reset the unit again following the instruction in page 12, "SETTING THE
MAIN UNIT", or refer to the Quick Start manual.
Heart rate measurement is abnormal.
Are you near any electronic devices that are emitting electromagnetic signals (such as TV, stereo,
motor or personal computer).
While measuring heart rate, try to keep a greater distance away from these devices. Reset the
data.
Current speed is no working properly.
Check if there is any object on the contacts of the main unit or the bracket.
Clean the contacts. Main unit is often stained with sweat. Periodically wash it with a mild hand
soap and wipe dry.
Check the clearance between the speed sensor and the magnet.
Check if the marking line of the speed sensor and the magnet is aligned.
Adjust the positions of the speed sensor and the magnet. (See Quick Start manual.)
Check if the cable of the speed sensor is broken or damaged.
Replace the bracket sensor set with a new one.
The timer does not stop even though S/S button is pressed (S/S button does not work).
Is the Auto Time feature on (
icon is on)?
When the Auto Time feature is on, S/S button does not start or stop measurement. Turn the Auto
Time feature off if desired. (Refer to page 14, "Auto Time Feature".)
Heart rate display is not stable and the value is lower than the actual.
Has the battery in the heart rate sensor is worn out?
Replace the battery (CR2032).
MSC-2Dx 26
The unit does not receive the heart rate signal.
Check if the unit is in the sleep state (power saving feature is on).
Push any button other than the AC button.
Is the heart rate sensor placed in the correct position?
Adjust the position according to the instruction.
Is the heart rate sensor attached securely to your body?
Attach the sensor so that the electrode area contacts closely with your skin.
Is your skin dry (especially in winter)?
Lightly moisturize the electrode area.
Has the battery in the heart rate sensor worn out?
Replace it with a new one (CR2032).
Has the battery in the main unit worn out?
Replace it with a new one (CR2032).
Have the electrodes belts deteriorated over normal use?
Replace them with new ones. (See your local dealer or www.cateye.com.)
The heart rate display occasionally reads zero.
Is the heart rate sensor in correct position?
Adjust the position according to the instruction.
The heart rate reads zero where there is some interference from an outside signal or the transmitter is too far from
the main unit. Move closer to the main unit or move away from the radio frequency interference.
The battery in the main unit has worn out. Replace it with a new one.
The display does not show Memory Record file.
Is
icon on? Is the elapsed time TM measuring?
The display does not show the Memory Record file when the memory record feature is on or elapsed time is
running. (See page 19, "Check Memory Record Files")
You cannot turn record memory feature on. (
icon does not appear.)
Reset Elapsed Time TM. (See page 20, "Setting up Memory Record")
You cannot change the Interval Timer of memory record.
Is
icon on?
If memory record feature is on, you cannot change Interval Timer. (See page 19, "Memory Record Interval
Selection")
The unit cannot record LAP data.
At least 5 seconds of interval is needed to record the next lap data.
The unit cannot read out LAP data.
Is the elapsed time measuring?
The unit cannot read out LAP data when the elapsed time is measuring. (See page 15, "Lap Data Read Out")
Clock setting screen does not appear.
The display does not show clock setting screen when the elapsed time is running. (See page 13, "Setting
Clock Time")
MSC-2Dx 27
REPLACING BATTERY
Warning !!!
Safely dispose of the old battery. Do not place them within children's reach. If a battery is
swallowed by accident, consult a doctor immediately.
When the factory loaded battery has worn out, replace it with a new one according to the following instruction:
Back Cover
Water Proof
Packing
NOTE !:
Always replace both batteries at the same time (the one in the main unit
and the one in the chest belt).
Main Unit
Battery life: approx. 2 years (if used for 1 hour a day)
Battery Lock
The battery life shown in this manual is not definitive and it varies depending on the use environment.
Water Proof Packing
Lithium Battery
CR2032
1.
2.
3.
4.
Caution:
When replacing the battery in the main unit it is highly recommended that you have this
operation done by a professional jeweler who can test the unit for watertightness after resealing it.
• Back cover seal is critical to maintain the water resistant capacity. When re-assembling
after replacing the battery, check if the packing properly fits in position.
• When replacing battery, handle the unit carefully and do not apply much pressure on any
part of the unit.
Remove four screws on the back cover of the main unit using a precision screwdriver No.0.
Slide the battery lock to the direction of the arrow in the figure.
Replace it with a new lithium battery (CR2032) with (+) pole facing upward. Fasten the
battery with the battery lock.
Replace the back cover and tighten the screws using a precision screwdriver No.0.
After replacing the battery, you MUST press AC button and set the clock time again.
Battery Lock
Wireless Heart Rate Sensor
Battery Cover
Lithium
Battery
Water Proof
Packing
CR2032
Heart Rate Sensor
Battery life: approx. 2 years (if worn for 1 hour a day)
Caution:
• The Wireless Heart Rate Sensor continues to consume battery while being attached to
your body. When you are not measuring heart rate, remove it from your chest to save the
battery life.
• Battery cover seal is critical for maintaining its watertight capacity. Check the battery cover
for proper fit and positioning closing.
1. Remove the battery cover on the back of the transmitter with a coin.
2. Replace the old battery with a new lithium battery (CR2032) with the (+) pole upward as
illustrated.
3. Close the battery cover securely.
MSC-2Dx 28
REPLACING ELECTRODE BELT
Screws
The electrodes on the chest belt naturally wear out after extended use. (See your retailer of
www.cateye.com to obtain a replacement.) When there are cracks on the surface or measurement error occurs, replace the electrode belt with new one according to the following instruction:
1. Loosen the screws at the back of the transmitter.
Spacer
Spacer
2. Remove the spacers. Remove the transmitter from the electrode belt.
Electrode 3. Fix the transmitter to a new electrode belt. Clean the two contacts before assembling.
belt
NOTE !:
If the contacts are dirty, the electrodes may fail to detect heart rate.
Transmitter
Contact
4. Put the spacers back and fasten the screws securely.
NOTE !:
When replacing the electrode belt, also check the transmitter's battery life.
Contact
MAINTENANCE
Daily Care of the MSC-2Dx:
• The contacts on the main unit may be stained by sweat or oils. Wash the contact periodically with mild soapy water.
• If the contacts on the bracket get wet, wipe them dry following the ride. If they get rusty, or if they begin to corrode, it may
result in the speed detection error.
• When the main unit or the chest belt heart rate sensor is soiled, wash it with water or clean it with mild soapy water using
a soft cloth, and wipe it dry. Do not use benzene, alcohol or other solvent. They will damage the surface and void the
warranty.
• Attachment belt absorbs sweat. To keep it clean, wash it occasionally with mild soapy water.
• Periodically check the position of the speed sensor and the magnet to assure they are properly aligned.
MSC-2Dx 29
SPECIFICATIONS
Display functions (Icon)
Upper display
Current speed
Clock time
Speed icon
Clock time icon
Center display
Heart rate
Heart rate icon
Record memory icon
Auto icon
Alarm icon
Used memory icon
Wheel circumference icon
Lower display
Elapsed time
Maximum heart rate
Clock time
Current speed
Lap count
Average speed
Maximum speed
Trip distance
Total distance
Zone remaining time
Pace icon
Additional features Heart rate target zone
Range
Standard accuracy
0.0(3.0) - 65.9mph [0.0(4.0) - 105.9km/h]
±0.5mph (under 31mph)
1:00 - 12:59 [0:00 - 23:59]
±0.003%
Illuminates when Current Speed is selected.
Illuminates when Clock Time is selected.
0 - 299 bpm
±1bpm
Blinks when the heart rate signal is received.
Illuminates when the record memory feature is activated.
Illuminates when the Auto Time (automatic start/stop) feature is activated.
Illuminates when the alarm for heart rate target zone is operated.
Illuminates when using record memory rate (%) is indicated on display.
Displays the wheel circumference currently active.
0:00'00" - 9:59'59"
±0.003%
0 - 299bpm
±1bpm
1:00 - 12:59 [0:00 - 23:59]
±0.003%
0.0(3.0) - 65.9mph [0.0(4.0) - 105.9km/h]
±0.5mph (under 31mph)
LP-00 - LP-50 (Lap Feature)
0.0 - 65.9mph [0.0 - 105.9km/h]
±0.5mph
0.0(3.0) - 65.9mph [0.0(4.0) - 105.9km/h]
±0.5mph (under 31mph)
0.00 - 999.99mile [km]
±0.01mile (under 31mph)
0.0 - 9999.9 / 10000 - 99999mile [km]
±0.1/1mile (under 31mph)
0.00'00" - 9.59'59"
±1"
Displays whether the speed is higher or lower than the average speed. (Pace Feature)
Heart rate range is divided into 4 zones and Time In Pulse Zone is measured and saved
(Alarm may be set in each zone).
Memory Record feature
Saves measurement data for 5 files or maximum 2,560 points (Memory Record Interval
timing may be selected from 5, 15, 30 or 60 sec.).
Lap feature
Saves for a maximum 50 points (Minimum interval: 5 sec.).
Others
Power saving feature (Auto reset upon receipt of speed sensor signal or forced reset by
button operation).
Download saved data to a PC (Optional download kit is required).*1
Control system:
4-bit one-chip microcomputer, crystal oscillator
Display system:
Liquid crystal display (equipped with the LED backlight)
Speed signal detection system:
Noncontact magnetic sensor
Heart rate signal transfer system:
Wireless signal simultaneous transfer (Transmission distance: Approx. 90 cm)
Operating temperature range:
32°F - 104°F [0°C - 40°C] (Can be used below 0° with slower screen response.)
Storage temperature range:
–4°F - 122°F [–20°C - 50°C]
Wheel circumference set range:
10 - 3000mm / A/B switching method, initial value: A-2096, B-2050
Applicable fork diameter:
11Ø - 36Ø
Power supply/battery life:
Pre-installed batteries are for primarily for factory testing purpose. Their life may be shorter than replacement batteries.
Normal battery life as follows:
Main unit:
CR2032 x 1 / approx. 2 years (When using 1 hour/day)
Heart rate sensor:
CR2032 x 1 / approx. 2 years (When attaching to body 1 hour/day)
Dimensions/Weight:
Main unit:
1-13/16" x 2-1/16" x 19/32" [46.0 x 52.5 x 14.4 mm] / 1.52 oz. [43 grams]
Heart rate sensor:
13" x 1-7/16" x 19/32" [330 x 36 x 15 mm] / 2.19 oz [62 grams]
Designs and specifications are subject to change without notice, due to modifications or improvements.
*1) Windows 95/98 or Windows 2000 required; RS232C (serial port) needed
MSC-2Dx 30
REGISTRATION
CAT EYE Web Site (http://www.cateye.com)
For warranty service you must register your product. Please register your MSC-2Dx as soon as
possible. CAT EYE provides you technical support and new product information as much as
possible.
Please register on-line through our web site, or send the registration card below directly to our
Customer Service Department. For registration, please fill in the product's serial number (the 6digits number marked on the back of the main unit).
®
CO.,LTD.
2-8-25 Kuwazu Higashi Sumiyoshi-ku, Osaka 546-0041 Japan
Service & Research Address for United States Consumers:
CAT EYE Service & Research Center
1705 14 th St. 115 Boulder CO 80302
Phone: 303-443-4595
FAX: 303-473-0006
Toll Free: 800-5CAT EYE URL: http://www.cateye.com.
For more information about download software, please see
CAT EYE web site.
U.S. Pat. Nos. 4633216/4642606/5089775/5226340 and Pat. Pending
MSC-2Dx 31
ACCESSORIES
Replacement part
#166-5150
Lithium battery CR2032
#169-9826
Replacement electrode belt
#169-9816
Attachment belt
#249-9980
Wrist band kit
Optional part
#240-1001
PC download kit
Interface unit and download software "e-Train Data™"
Windows 95/98/2000 compatible
English version (English version manual attached)
RS232C connection cable
#169-9806
MSC Dx chest belt heart rate sensor kit
Multi sport strap (Velcro)
#249-9990
Bracket sensor kit
#249-9995
MSC-2Dx (bracket) attachment
#169-6070
Wheel magnet
#169-9760
Magnet for composite wheel
#169-6280
Universal sensor band
#249-9970
Attachment kit
MSC-2Dx 32
Index
A
AC button ------------------------------------- 7
L
Lap --------------------------------------- 9,15
S
SET/AT button ------------------------------- 7
Aerobic exercise --------------------------- 25
Alarm --------------------------------------- 17
Lap data download ------------------ 15
Lap data read out -------------------- 15
Speed pace feature ------------------------ 14
S/S(Start/Stop) button ---------------------- 7
All clear --------------------------------------- 7
Anaerobic exercise ------------------------ 25
Recording lap data ------------------ 15
LAP button ----------------------------------- 6
Sub function ---------------------------------- 6
Switching upper display -------------------- 7
Auto Feature ------------------------------- 14
Average speed -------------------------------- 9
Lap’s average heart rate -------------------- 6
Lap’s average speed ------------------------- 6
C
Clock ------------------------------------------ 8
Setting clock ------------------------- 13
Current speed ------------------------------ 8,9
E
Elapsed time --------------------------------- 8
Electrode area ------------------------------ 11
Lower display -------------------------------- 8
LT(Light) button ----------------------------- 6
Trip distance --------------------------------- 9
Maximum heart rate --------------------- 8,25
Maximum speed ----------------------------- 9
U
Upper display -------------------------------- 8
Middle display ------------------------------- 8
MODE button -------------------------------- 6
W
Wheel circumference --------------------- 12
P
Power saving feature ---------------------- 14
Feature setting ------------------------------- 7
Heart rate ------------------------------------- 8
Heart rate target zone
Confirming zone stay time ------ 16,17
Download ----------------------------- 17
Resetting ------------------------------ 17
Zone stay time ------------------------- 9
Heart rate sensor --------------------------- 10
Heart rate target ------------------------ 24, 25
A & B --------------------------------- 13
Confirming wheel circumference - 13
Switching ----------------------------- 13
Wheel circumference setting screen ---- 12
R
H
Training level ------------------------------ 24
Transmitter --------------------------------- 11
M
Main function -------------------------------- 6
Electrode belt ------------------------------ 11
F
T
Total distance (Odometer) ------------------ 9
Record memory ---------------------------- 18
Checking file ------------------------- 19
Data read out ------------------------- 22
Finishing record memory ---------- 21
Prepare for record memory -------- 20
Record memory download --------- 22
Record memory off ----------------- 21
Record memory stand-by state ---- 20
Record memory timing selection -- 19
Starting record memory ------------ 21
Used memory rate (%) -------------- 19
Resetting -------------------------------------- 7
Resting Heart Rate ------------------------ 25
MSC-2Dx 33