1
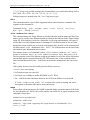
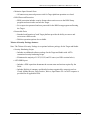
500 A Huntmar Park Drive
ASTi
Telestra 4 Target
Operation and Maintenance Manual
Document: DOC-01-TEL4-TUG-1
Advanced Simulation Technology inc.500A Huntmar Park Drive, Herndon, Virginia, 20170 USA
Revision K (June 2013)
Product Name: Telestra 4 Target
ASTi Telestra 4 Target Operation and Maintenance Manual
© Copyright ASTi 2010-13. ASTi documents are continuously updated see www.asti-usa.com/support/document.
Restricted Rights: Use, duplication, or disclosure by the Government is subject to restrictions as set forth in subparagraph (c)(1)(ii) of the Rights in Technical Data and Computer Software clause at DFARS 252.227-7013.
This material may be reproduced by or for the U.S. Government pursuant to the copyright license under the
clause at DFARS 252.227-7013 (1994).
ASTi
500 A Huntmar Park Drive
Herndon, VA 20170
Table of Contents
Chapter 1: Introduction . . . . . . . . . . . . . . . . . . . . . . . . . . . . . . . . . . . . . . . . .1
1.1. Theory of Operation ............................................................................................... 2
Figure 1: Theory of Operation .............................................................................. 3
Chapter 2: System Description . . . . . . . . . . . . . . . . . . . . . . . . . . . . . . . . . . .4
2.1. Target Hardware Components .............................................................................. 4
2.1.1. Chassis ............................................................................................................ 4
Figure 2: Telestra 4 Target Chassis ..................................................................... 4
2.1.2. Power Supply ................................................................................................... 5
2.1.3. CPU Type ........................................................................................................ 5
2.1.4. Hard Drive ........................................................................................................ 5
2.1.5. Optical Drive .................................................................................................... 5
2.1.6. Keyboard and Monitor ..................................................................................... 5
2.1.7. Network Ports .................................................................................................. 5
2.1.8. ACENet Devices .............................................................................................. 6
2.2. Target Software Packages Overview ................................................................... 7
2.2.1. Operating System Software ............................................................................. 7
2.2.2. Support and Utilities Software ......................................................................... 7
2.2.3. Software Licensing .......................................................................................... 7
Chapter 3: System Installation . . . . . . . . . . . . . . . . . . . . . . . . . . . . . . . . . . .8
3.1. Receiving and Unpacking ..................................................................................... 8
3.2. Parts Inventory ....................................................................................................... 8
3.2.1. System Configuration ...................................................................................... 8
Figure 3: Target Rear Panel ................................................................................. 8
3.3. Software Installation and Configuration .............................................................. 9
3.3.1. Network Ports .................................................................................................. 9
Figure 4: Network Ports ........................................................................................ 9
3.4. Default Network Settings ..................................................................................... 10
i
3.5. Connections ......................................................................................................... 11
3.5.1. Connecting ACENet Devices ......................................................................... 11
3.5.2. Power Connection ......................................................................................... 11
3.5.3. Monitor Connection ........................................................................................ 11
3.5.4. Keyboard Connection .................................................................................... 11
3.5.5. Audio and I/O Equipment Connection ........................................................... 12
3.5.6. Cabling ........................................................................................................... 12
3.5.7. Software Upgrade .......................................................................................... 13
Chapter 4: General Information . . . . . . . . . . . . . . . . . . . . . . . . . . . . . . . . .14
4.1. Safety Precautions ............................................................................................... 14
4.2. Equipment Handling ............................................................................................ 14
4.3. Customer Support ................................................................................................ 15
Chapter 5: HLA Runtime – Joining the Federation . . . . . . . . . . . . . . . . . .16
5.1. HLA User Accounts ............................................................................................. 16
5.2. The HLA Remote Control Interface .................................................................... 17
5.3. Testing the HLA Software ................................................................................... 18
5.3.1. Host Emulation Utility ..................................................................................... 18
5.4. Remote Control Interface Commands and Responses .................................... 19
5.5. RTI EXEC ............................................................................................................... 25
5.5.1. Setting Up the Federation .............................................................................. 26
Chapter 6: Security . . . . . . . . . . . . . . . . . . . . . . . . . . . . . . . . . . . . . . . . . . .27
6.1. Security and Enhancements ............................................................................... 27
6.2. DISA & STIGS ....................................................................................................... 29
6.3. Customer Responsibilities .................................................................................. 30
6.4. Telestra 4 Security and Process Details ............................................................ 31
6.5. Security Package Installation ............................................................................. 32
Chapter 7: Warranty and Repairs . . . . . . . . . . . . . . . . . . . . . . . . . . . . . . . .33
7.1. Warranty Information ........................................................................................... 33
7.2. Repairs and Returns ............................................................................................ 33
7.3. Disclaimer and Warnings .................................................................................... 34
Appendix A: System Specifications . . . . . . . . . . . . . . . . . . . . . . . . . . . . . .35
Temperature and Humidity Requirements ................................................................ 35
Reliability ..................................................................................................................... 35
Appendix B: Software Version Release Notes . . . . . . . . . . . . . . . . . . . . .36
Appendix C: HLA RTIs Compatibility . . . . . . . . . . . . . . . . . . . . . . . . . . . . .37
Appendix D: Useful LinuxTM Commands . . . . . . . . . . . . . . . . . . . . . . . . . .38
ii
ASTi Telestra 4 Target Operations & Maintenance Manual (Ver. 1, Rev. K)
Chapter 1: Introduction
The Target is an embedded, real-time platform, providing high-fidelity radio/communications and
environmental cue modeling. The Target connects to ASTi’s flexible, networked-based ACENet
architecture which provides a wide range of high-fidelity, scalable, digital 48kHz audio and I/O
peripherals. With real-time performance and reliability, the Target uses the latest multi-core
processing technology. The Target supports a variety of additional software services and packages
to meet even the highest of communications simulation requirements.
Copyright © 2013 Advanced Simulation Technology inc.
1
ASTi Telestra 4 Target Operations & Maintenance Manual (Ver. 1, Rev. K)
1.1. Theory of Operation
The Telestra 4 (also called a Target) is an embedded server that processes audio and
communications (Number 1 in Figure 1, below). The Target runs the Red Hat® Enterprise
Linux® operating system as well as a suite of custom software applications written and
maintained by ASTi.
1
Audio is processed in remote units called ACE-RIUs, ACUs, or ACU2s. Headsets, PTTs,
speakers, or microphones are plugged into these devices. The audio is sent digitally over
ACENet (Number 2 in Figure 1, below) to and from the Target. Crown Amplifiers can also be
connected to the ACENet and process audio from the Target. The ACENet runs over ethernet, but
is different from a typical LAN between computers. ACENet should be isolated from any other
network, and each remote unit receives a name instead of an IP address. Reference the ASTi
ACENet Guide for more information.
2
The Target runs a custom Project that processes the audio and simulates radios, intercom
systems, or sounds such as airplane engines or the rotors of a helicopter. The custom
project is a software load that makes the Target customized to a particular application such as a
flight simulator. Often a host computer is responsible for sending commands to the project
(Number 3 in Figure 1, below). In most cases, UDP packets are sent back and forth between the
Target and the host. These commands can control how audio is routed, how radios behave, or how
the sound effects are processed.
3
The primary tool for maintenance and troubleshooting tasks is called Remote
Management Service (RMS) (Number 4 in Figure 1, below). RMS is a web server that
runs on the Target and can be accessed by any computer on the same network as the Target.
Simply point a web browser at the IP address of the Target to access RMS. The health system,
ACENet statistics, and the custom project are all managed and accessed in RMS.
4
2
Copyright © 2013 Advanced Simulation Technology inc.
ASTi Telestra 4 Target Operations & Maintenance Manual (Ver. 1, Rev. K)
DIS
3 Host
1 Target
Host
Network
Eth0
4
Remote
Management
System
Eth1
2
ACENet
Amp (4ch.)
ACU2
ACE-RIU
CHAN A
CHAN B
CHAN C
2 Channel ACU
CHAN D
Advanced Simulation Technology, Inc.
PTT
PTT
VCR or Other
Recording Devices
SINCGARS
Hand-Held
Terminal
Powered
Speaker
Commercial and
Military Headsets
Figure 1: Theory of Operation
Copyright © 2013 Advanced Simulation Technology inc.
3
ASTi Telestra 4 Target Operations & Maintenance Manual (Ver. 1, Rev. K)
Chapter 2: System Description
2.1. Target Hardware Components
The Target consists of a number of hardware components and can be configured in many different
ways depending on the requirements of the particular application. The components are discussed
in more detail in the following sections. Engineering drawings supplied with each Target identify
the overall system configuration.
4
Copyright © 2013 Advanced Simulation Technology inc.
ASTi Telestra 4 Target Operations & Maintenance Manual (Ver. 1, Rev. K)
2.1.1. Chassis
The standard Target is currently a 2U, 19” rackmount system.
Target
Depth
Width
Height
Standard 2U
With Front
Rackmount
22 3/4”
24”
3 1/2”
3 1/2”
With Middle
Rackmount
22 3/4”
17”
19”
(with thumb
screws)
19”
Weight
31 lbs.
(as shipped)
3 1/2”
Table 1: Telestra 4 Target Chassis Dimensions
Figure 2: Telestra 4 Target Chassis
A 1U Target option is also available.
Target
1U Option
Depth
Width
Height
Weight
25 1/2”
19”
1 3/4”
24.5 lbs.
(approx.)
Copyright © 2013 Advanced Simulation Technology inc.
5
ASTi Telestra 4 Target Operations & Maintenance Manual (Ver. 1, Rev. K)
2.1.2. Power Supply
The power supply is a standard 2U 400 watt or greater power supply. It is auto-sensing and
accepts 100-240 Volts with 47 to 63Hz. The input power of the device is 100-240 VAC, 8A-4A,
47-67 Hz.
2.1.3. CPU Type
The CPU type used in the system depends on the time of purchase and whether any CPU upgrades
have been incorporated. The typical CPU is an Intel® multi-core processor.
2.1.4. Hard Drive
The Target hard drive is a Serial ATA removable drive; the size may vary depending on the
system configuration. The platform will include a removable drive docking bay as part of the
chassis. The bay will accommodate a 3.5” removable drive cartridge.
2.1.5. Optical Drive
The Target has a Serial ATA DVD/CD drive. This drive is used for installing system software.
2.1.6. Keyboard and Monitor
The 101-key keyboard is supported via a standard PS/2 connector on the rear of the chassis.
The video connection is via a 15-pin, female, high-density, sub-miniature, “D” style connector
located on the back of the chassis.
2.1.7. Network Ports
Ethernet operation conforms to IEEE 802.3. UDP level protocol with IP addressing supported
along with some multicast capabilities.
The following sections discuss the individual network features in more detail.
Host Simulation: Simulation state and sound model control parameters generated by a
simulation application on another network computer can be transmitted to the Target.
Parameters include state data such as engine RPM, radio frequency, communications panel switch
settings, radio position, exercise number, etc. These parameters are brought into the local audio
models using special input control objects found in the modeling environment.
In addition to reception, model information and equipment health status can also be passed from
the Target back to another computer through the same link.
The Target can receive information from other computers on the network by specifying different
UDP port numbers for data originating from the different machines.
Status and monitor screens are provided in the Remote Management System enabling the user to
monitor network activity and examine data received or transmitted by the Target. Network
configuration parameters such as port numbers, source and destination IP addresses, etc. are set
by the user in RMS.
DIS: When configured for DIS operation the Target connects directly to the DIS network. Signal
and Transmitter PDUs are transmitted and received directly, off-loading the host or other network
device from dealing with these processor-intensive PDUs.
6
Copyright © 2013 Advanced Simulation Technology inc.
ASTi Telestra 4 Target Operations & Maintenance Manual (Ver. 1, Rev. K)
Status and monitor screens are provided in RMS enabling the user to monitor network activity and
DIS radio traffic. DIS options and network parameters are set via RMS.
ASTiNet: The ASTiNet is part of the Telestra 4 family network.
ACENet: The Audio Communications Environment Network (ACENet) is part of the Telestra 4
family and provides low latency, network-based audio and I/O distribution architecture for ASTi’s
communications and sound modeling equipment and software. This flexible architecture provides
highly scalable distribution network of model processing systems and remote audio and I/O
interface devices to address widely distributed and complex multi-user sound and
communications applications. For more information on the ACENet, reference the Telestra 4
ACENet User Guide (DOC-01-TEL4-AN-UG-1).
2.1.8. ACENet Devices
The ACENet devices provide remote interfacing of audio and I/O peripherals to ASTi’s ACENet
architecture. All audio and I/O is digitally distributed between the ACENet devices and Target
modeling platforms for maximum noise rejection and reliability. The audio features 48kHz digital
distribution and balanced pro-audio style interfaces, providing high-fidelity audio. See the
ACENet devices specific technical user guides for more information.
Copyright © 2013 Advanced Simulation Technology inc.
7
ASTi Telestra 4 Target Operations & Maintenance Manual (Ver. 1, Rev. K)
2.2. Target Software Packages Overview
2.2.1. Operating System Software
Software on the Target system includes an ASTi-configured Linux™ OS and ACE software for
the sound and communications model runtime environment. Also included is ASTi's Remote
Management System application software providing remote management, configuration and
debug of ASTi systems over LAN/WAN from any standard computer with a proper web browser.
2.2.2. Support and Utilities Software
Support and operating system software packages may also be included with the Target. All Target
configurations include Linux™ operating system software. Additional support may be installed
depending on the Target configuration.
Installation of third party packages by the user is generally discouraged by ASTi. ASTi can not
guarantee that user-installed software will not affect the performance or operation of the Target.
2.2.3. Software Licensing
The software included with the Target is ASTi proprietary and subject to the terms of the software
license agreement.
8
Copyright © 2013 Advanced Simulation Technology inc.
ASTi Telestra 4 Target Operations & Maintenance Manual (Ver. 1, Rev. K)
Chapter 3: System Installation
See the Telestra 4 Quick Start Guide (DOC-01-TEL4-QSG-1) for initial Target setup and IP
address assignment.
3.1. Receiving and Unpacking
Upon receipt of the Target, check that all packages are received according to the shipping
manifest and that no apparent damage has occurred during shipping. Do not accept packages that
are obviously damaged without first consulting with the carrying authority.
Unpack and carefully remove the Target components from their shipping packaging in accordance
with procedures common to industry standard practices. Be sure to observe all notes, caution or
warning labels that may be present on the outside and inside of the shipping packages.
3.2. Parts Inventory
After all equipment is removed from the packaging, verify equipment received against the
shipping invoice. Notify ASTi immediately of any discrepancies. All Targets are shipped with
engineering drawings that identify the system. Packing lists also provide detailed information
about the shipment and may contain important notes.
3.2.1. System Configuration
The current configuration includes a removable hard drive and CD/DVD drive, three or more
network ports depending on configuration, and four USB interfaces. No DSP cards are installed
or required.
0000
ASTI
PROPERTY OF
Figure 3: Target Rear Panel
Copyright © 2013 Advanced Simulation Technology inc.
9
ASTi Telestra 4 Target Operations & Maintenance Manual (Ver. 1, Rev. K)
3.3. Software Installation and Configuration
Targets are shipped with all necessary software pre-installed. To rebuild the system’s hard disk,
reference the Telestra 4 Target Cold Start Procedure (DOC-02-TEL4-TCS-1). Turn on the Target
via the power switch on the front of the chassis. The system will boot into the Linux operating
system. For further instruction on Target installation, please see the Telestra 4 Quick Start Guide
(DOC-01-TEL4-QSG-1) for initial setup and IP address assignment.
The only user account that exists after system installation or cold start is “admin” (without the
quotes). The default password for this user is also “admin.” All user account logins and passwords
are case-sensitive.
Login: admin
Password: admin
Login: root
Password: abcd1234
3.3.1. Network Ports
Each Target has three or more Ethernet network ports depending on the system configuration. The
physical location and function of each of these connections varies, based on the hardware
installed by ASTi prior to shipment. The connections will vary over time and from system to
system. Please read the ETH labels on your system to verify Ethernet locations.
The multiple network ports provide convenient, independent connection to a DIS or HLA
network, Host simulation network, Diskless, and ACENet. The local or host network is used to
pass required data and state parameters back and forth to the user defined sound and
communications models on the Target and the customer's simulation software.
0000
ASTI
PROPERTY OF
Network Ports
See chassis labels for ethernet assignment
Ethernet labels will be Eth0, Eth1, and Eth2
Figure 4: Network Ports
10
Copyright © 2013 Advanced Simulation Technology inc.
ASTi Telestra 4 Target Operations & Maintenance Manual (Ver. 1, Rev. K)
3.4. Default Network Settings
After initial software installation or system cold start, the Target Ethernet interface eth0 tries to
obtain a network IP address and subnet mask using DHCP. To obtain these network settings, a
DHCP server must exist on the network intended for use by eth0. If the Target cannot contact a
DHCP server using eth0, it will assign a meaningless IP address of 0.0.0.0 to that interface.
The Target’s other two Ethernet interfaces, eth1 and eth2, are assigned default IP addresses and
subnet masks. Refer to the figure under “Network Ports” for the physical locations of the Ethernet
ports.
If you do not wish to use DHCP to configure eth0 (or if the network does not have a DHCP
server), the user must manually configure the network configurations including the IP address,
subnet mask, and gateway IP. Ask your network administrator for valid IP address and subnet
masks for the network(s) where the Target will be integrated.
Note: Manually setting the network configuration requires that a keyboard and monitor be
connected directly to the Target.
To manually set the network configuration, log in to the Target as:
Login: root
Password: abcd1234
Then type the following:
ace-net-config -a xxx.xxx.xxx.xxx -n yyy.yyy.yyy.yyy
where xxx.xxx.xxx.xxx is the IP address and yyy.yyy.yyy.yyy is the netmask.
After manually configuring interface eth0 (if not using DHCP), users must use the RMS web
interface to change settings for the Target’s Ethernet ports. For more information on RMS 4,
reference the Telestra 4 Remote Management System 4 User Guide (DOC-01-TEL4-RMS4-UG4).
Copyright © 2013 Advanced Simulation Technology inc.
11
ASTi Telestra 4 Target Operations & Maintenance Manual (Ver. 1, Rev. K)
3.5. Connections
After unpacking the Target, connect the power, network, keyboard and monitor cords to the
system as described below. Allow two inches of space to the rear of the Target for connections.
Remove all plastic packaging from the Target before proceeding with the system
installation.
Note: As technology evolves, the Telestra 4 Target chassis will continue to change.
Look for these objects on the rear of the chassis, and connect as appropriate.
Power Cord In
To chassis
Main Power Switch
To wall
May not be present on all systems
Not Included
Video Output
Connects to monitor's 15-pin D connector
Keyboard
PS/2 connection, may not be purple in color
Each system will have three (3) labeled jacks
x3
Ethernet Jack
RJ-45 connection
To network
Remember to switch on the main power switch on the rear of the Telestra 4 Target chassis.
3.5.1. Connecting ACENet Devices
The ACENet devices connect to the Target through an Ethernet port connection on the rear panel
of the chassis.
3.5.2. Power Connection
The power cord attachment and the power switch push-button are both located on the rear panel
of the chassis.
3.5.3. Monitor Connection
The monitor can be plugged directly into the Target.
3.5.4. Keyboard Connection
The keyboard connection is a 6-pin mini DIN (PS/2-style) connector on the back of the Target. On
all systems, the Target is configured to boot and operate properly with or without the keyboard
connected.
12
Copyright © 2013 Advanced Simulation Technology inc.
ASTi Telestra 4 Target Operations & Maintenance Manual (Ver. 1, Rev. K)
3.5.5. Audio and I/O Equipment Connection
External audio and I/O equipment such as headsets, microphones, amplifiers, preamplifiers, VCR
audio in/out, tape players, PTT switches, etc. are connected directly to ACENet audio devices.
3.5.6. Cabling
For minimum noise, individually shielded, twisted pair cable should be used for all audio lines.
Shields should be tied at a single point to a good earth ground and in general should not be
connected to audio ground.
The most important use of a shielded twisted pair is for the microphone line. Microphone lines
usually carry a very small signal and typically run next to the headset line which typically has a
much larger, higher current signal. The potential for additional noise and crosstalk is greatly
increased if proper cabling techniques are not used.
3.5.7. Software Upgrade
Users must perform a system cold start to upgrade the software. Please see the Telestra 4 Target
Cold Start Procedure (DOC-02-TEL4-TCS-1).
Warning: Performing a system cold start to upgrade the software will cause complete
erasure of the system hard drive.
Before doing a software upgrade, the user should back up the system. For instructions on backing
up the system see the RMS 4 User Guide (DOC-01-TEL4-RMS4-UG-4) section 4.3.
Configuration System Backup and Restore.
Copyright © 2013 Advanced Simulation Technology inc.
13
ASTi Telestra 4 Target Operations & Maintenance Manual (Ver. 1, Rev. K)
Chapter 4: General Information
This chapter provides general information about the Target.
4.1. Safety Precautions
This section must be read completely and understood before using the Target. The following
safety precautions must be observed when performing any operation and maintenance tasks
associated with the Target. These safety precautions are necessary to prevent injury to personnel
and damage to equipment.
Warning
Potentially fatal voltages are present in the Target. Before removing, handling, or replacing any
Target components, ensure that all electrical supplies have been turned off and electrical power
cords are disconnected from the Target. There are areas with hazardous energy inside the device.
Please, make sure that the device is disconnected from the power source if the cover is removed.
Caution: Risk of explosion if battery is replaced by an incorrect type. Dispose of used batteries
according to the instructions.
The following disclaimer is provided regarding use of the Target. The disclaimer applies to all
parties using the Target in any situation or configuration. This disclaimer should be read and
understood completely before using the Target.
Disclaimer
The Target is a sound production device. The user, by the act of installing and using the Target and
any associated equipment such as external amplifiers, headsets, speakers, etc., warrants and
represents that he/she is aware that excessive audio levels can cause permanent hearing
impairment and that he/she assumes full responsibility for configuring all equipment including
hardware and software to achieve safe operating sound pressure levels under all conditions.
4.2. Equipment Handling
All Target circuits and modules are sensitive to electrostatic discharge (ESD). To avoid damage to
the Target equipment, proper ESD procedures should be followed when handling all Target
equipment. Ensure that all work is performed at a properly grounded ESD work station. In
addition, all personnel handling Target equipment should be properly grounded. When the
transporting or shipping the Target equipment should be properly grounded.
When transporting or shipping individual modules, equipment should be fully-packaged in an
antistatic bag.
ASTi is not responsible for equipment damage due to improper handling.
14
Copyright © 2013 Advanced Simulation Technology inc.
ASTi Telestra 4 Target Operations & Maintenance Manual (Ver. 1, Rev. K)
4.3. Customer Support
Customer support is a major part of the ASTi audio simulation solution. If you have any questions
about our product, how it can be used for your application, or suggestions for future
enhancements, you can contact ASTi in the following ways:
By Email - Send an email at any time to [email protected].
By Web - Contact us through the ASTi web site at www.asti-usa.com.
By Phone - Call the technical support line 9:00 am to 5:00 pm (Eastern) weekdays at (703) 4712104,
By Fax - Include your name, company, fax number, phone number where you can be reached, and
your specific question. The number for ASTi is (703) 471-2108.
Copyright © 2013 Advanced Simulation Technology inc.
15
ASTi Telestra 4 Target Operations & Maintenance Manual (Ver. 1, Rev. K)
Chapter 5: HLA Runtime – Joining the Federation
5.1. HLA User Accounts
All user account logins and passwords are case-sensitive. The default HLA user account (hlauser)
is created for user convenience.
WARNING: ASTi recommends changing the password for the account
immediately after software installation or cold start.
User Account
16
Username
Default
Password
HLA Functionality
Console
Login
System Administrator
root
abcd1234
-Federation File
Management
-Federation
Management
-Remote Control
Interface
-RTI Installation
-RTI Management
No
HLA Runtime User
Account
hlauser
HLA!now!
-Read Configuration
Files
-Remote Control
Interface
Yes
Copyright © 2013 Advanced Simulation Technology inc.
ASTi Telestra 4 Target Operations & Maintenance Manual (Ver. 1, Rev. K)
5.2. The HLA Remote Control Interface
The HLA federate software runs in the background upon system startup and may only be accessed
through the remote control interface. The user accesses the remote control interface through a
TCP/IP connection to the appropriate control port. Each federate has its own control port as
specified in the HLA Configuration section of the ACE Studio Development Workstation
Technical User Guide (DOC-01-TELAS-UG-4). A given control port can only support one TCP
connection at a time. Once the remote control interface is in place, the user can completely control
the system from a remote computer.
Through the remote control interface, a host computer can tell the federate to join or resign from a
federation.
The host can also get the following information from the federate:
• Joined/resign status
• Current federate name, federation name, fed file name, rid file name, and conversion file
name
• RTI network activity information
The host can only get this information if it is controlling the federate. The commands and
responses through this interface are all text based, readable messages. A host emulator program is
supplied with the Target and it can act as a console attached to the federate, either on the local or
on a remote system. The connection is designed to be robust; if the connection is unexpectedly
closed or broken, the socket will automatically re-open and begin listening for a new connection
after a time-out period.
Any changes (i.e. Federation Name at Join or Debug Level) made through the HLA Remote
Control Interface are temporary changes and are only applicable for the duration of the project
install. Upon reinstall of the project/layout any changes will be lost. In the layout, modify the
HLA Domain to make permanent changes.
Copyright © 2013 Advanced Simulation Technology inc.
17
ASTi Telestra 4 Target Operations & Maintenance Manual (Ver. 1, Rev. K)
5.3. Testing the HLA Software
5.3.1. Host Emulation Utility
The host emulation program (hostemu) that is shipped with the HLA software allows the user to
test the remote interface and verify that it is working correctly. To run the host emulator on the
local platform, log in as “hlauser.”
hostemu <port number>
To connect to a port on a remote Target, type the command:
hostemu <port number> <IP address>
where the <IP address> parameter specifies the IP address of the remote Target. This
command allows a local Target to act as a remote host to a second Target.
Once attached, hostemu acts as a console. Typed text is sent to the Target remote control
interface, and the replies are displayed on the screen.
18
Copyright © 2013 Advanced Simulation Technology inc.
ASTi Telestra 4 Target Operations & Maintenance Manual (Ver. 1, Rev. K)
5.4. Remote Control Interface Commands and Responses
The Target federate expects all command lines to be terminated with a newline character (“\n”
for those who are C programmers). If two command lines come at once, they will be executed in
order. A command will not be executed until the final newline (\n) is received.
Commands are not case-sensitive. However, some data for the commands may be case-sensitive
(for example, the fed file name must be in the correct case).
The Target replies are of variable length. This is an indication to the host computer that no
additional data will be sent.
If the interface receives a command that it does not recognize, it will simply ignore the new code.
If it receives a line of white space (followed by a newline character), it will respond with a
newline character.
ACTIVITY
This command returns activity counters from the Target. If accessing the remote control interface through the host emulator utility on the Target, this command may be initiated by simply
pressing the <ENTER> key. See the sample output below:
life count: 0x41
<Attribute Updates>
rx: 0x6 | tx: 0xc | ignored: 0x0
<Interactions>
Audio | rx : 0x0 | tx : 0x0
TDL | rx : 0x0 | tx : 0x0
Attach | rx 0x0
<Objects>
Transmitters | local : 0x2 | rti : 0x1
Entities | local : 0x0 | attached
: 0x0
ENDLIST
The life count increments once a second while the entity is joined to a federation. The
count is a general indicator of federate health.
Attribute Updates report the cumulative number of attribute updates sent and received
by the federate. The ignored is the number of updates received but ignored. This happens
when the federate receives an update for an entity object to which none of its radios are
attached. The attributes, which are defined in the ASTi SOM, include radio object parameters
such as power, world location, and frequency. An attribute update occurs whenever one of
these fields change.
Interactions is the number of interactions sent and received. The interaction counters are
organized by interaction type. The Audio counters increment as the federate sends or
receives audio packets. The TDL counter increments as the federate sends or receives data
messages. The ASTi SOM versions 3.1 and higher define a data message interaction to implement tactical data link simulations in HLA.
Copyright © 2013 Advanced Simulation Technology inc.
19
ASTi Telestra 4 Target Operations & Maintenance Manual (Ver. 1, Rev. K)
Objects lists the number of transmitter and entity objects on the HLA network. For transmitters, the local counter reflects the number of local transmitter objects while the rti
counter reflects the number of remote objects. For entities, the local counter reflects the
number of entities the federate has detected on the HLA network. The attached counter
reflects the number of local radios that are attached to existing entities.
BYE
This command can be entered at any time to gracefully leave the HLA federate application. If
joined, the Target will not resign before exiting.
DEBUG {value}
This command can be entered at any time and is used to display or set the current debug level.
If the command is entered without a value it will display the current debug level. If entered
with a level that debug level will be set.
The debug level parameter determines which combination of debug messages are printed to
the file. The value is derived from a debug mask described in the following table.
Remote Control Debug Levels
Level
Debug Mask Position Description
0
Off
1
General (required to print any debug
messages)
2
RTI Object Activity
4
New Ethernet Object Info
8
Name Information
16
Ethernet Activity
32
RTI Activity
64
Handle
128
Translate
256
Timeouts
512
Convert
1024
Context
For example, to log “Name Info”, you would set the debug level to 9, which is 8 (Name Info)
plus 1 (turn logging on). Setting the debug level to 8 would not work, because it represents 8
(Name Information) plus 0 (logging off).
If you wanted to log “RTI Object Activity”, “New Ethernet Object Info”, “Ethernet Activity”,
and “RTI Activity”, but NOT “Name Info”, you would set the debug level to 55 (32 + 16 + 4
20
Copyright © 2013 Advanced Simulation Technology inc.
ASTi Telestra 4 Target Operations & Maintenance Manual (Ver. 1, Rev. K)
+ 2 + 1). To log every possible message (not recommended), you would set the debug level to
2047 (1024 +512 + 256 + 128 + 64 + 32 + 16 + 8 + 4 + 2 + 1).
Debug messages are printed to the file /var/log/messages.
HELP
This command returns a list of all the supported remote control interface commands. The
response to this command is:
Commands: help, join, resign, name, stats, status, activity,
bye, quit, debug {value}
JOIN <Federation Name>
This command directs the Target federate to join the federation with the name specified. If no
name is given, it will use the federation name specified for that federate in the Target configuration file. If the federate is joined to a federation, it will resign and attempt to join again. It
will do this even if the federation name is unchanged. If a federation name is not set (either
through the remote control port or from the configuration file), then the JOIN command will
fail and respond “JOIN <NONAMEGIVEN> FAIL.” Two federates must use the same federation name to pass information between them.
The response to the JOIN command is either “JOIN FederationName OK”, “JOIN
FederationName FAIL”, or “JOIN FederationName FAIL BAD_FED_FILE”.
The last response occurs if the federate could not get handles for all of the object class names
and attribute names it requested from the RTI. The normal cause of this is that the object
names and attribute names in the .fed file do not match the information in the conversion
file.
If the system does not join successfully, the most likely causes are:
• No rtiexec was running
• No federation name was specified
• No license was available to run the RTI (MÄK or VTC RTIs)
• The .fed file did not contain the names in the ASTi Radio SOM or was not found.
If “JOIN <federation_name> OK” is returned, the system is running and can be
interrogated to determine the federate status and activity.
NAME
When called with no parameters, the NAME command simply returns the names of the federate, the federation, the .fed file, the .rid file, and the conversion file. A typical response to this
command is shown here:
FEDERATION MySuperFed
FEDERATE Federate1
FEDFILE /tmp/aced-repoKwg3FX/repo/domains/FEDERATE1/hla/
asti3_2.fed
Copyright © 2013 Advanced Simulation Technology inc.
21
ASTi Telestra 4 Target Operations & Maintenance Manual (Ver. 1, Rev. K)
RIDFILE /tmp/aced-repoKwg3FX/repo/domains/FEDERATE1/hla/standalone.rid
CONVERT /tmp/aced-repoKwg3FX/repo/domains/FEDERATE1/hla/
convert3_2.conv
These variables receive their initial values from the Project domain configuration on project/
layout install. After installation these parameters can be modified by passing parameters to
the NAME command as shown below:
NAME FEDERATION <NewFederationName>
NAME FEDERATE <NewFederateName>
NAME FEDFILE <NewFedFileName>
NAME RIDFILE <NewRidFileName>
NAME CONVERT <NewConvertFileName>
Note: The file name parameters must specify the file name only and the file must exist in the
hla sub-directory of the currently installed T4 project domain. It is not necessary to enter the
full path.
QUIT
This command can be entered at any time to terminate the HLA federate application. If
joined, the Target federate will resign before exiting.
RESIGN
This command can be entered at any time in order to leave the current federation. To join a
different federation, it is not necessary to resign. Issuing a new JOIN command will cause the
Target federate to resign from its current federation before attempting to join the new one. If
the Target federate is instructed to join a federation it is already joined to, it will resign and rejoin that federation. The response is “RESIGN OK” or “RESIGN FAIL”. If the federate is
not joined to a federation, no action is taken and the federate will respond “RESIGN OK”.
STATS
This command prints performance statistics. A sample output is shown here:
ScanListTime : n = 94 Min = 0.000013 Max = 0.000122 Avg = 0.000051
TickTime : n = 6058 Min = 0.000008 Max = 0.001606 Avg = 0.000014
The ScanListTime statistics reflect the number of times the federate software scans the
current list of transmitters and receivers, the minimum list scan time, the maximum list scan
time, and the average list scan time.
The TickTime statistics reflect the number of times the RTI tick() function is called, and
the minimum, maximum, and average durations of time that are spent within a tick() call.
STATUS
This command returns either “JOINED”, “RESIGNED”, or “READY.”
22
Copyright © 2013 Advanced Simulation Technology inc.
ASTi Telestra 4 Target Operations & Maintenance Manual (Ver. 1, Rev. K)
5.5. RTI EXEC
The HLA software that runs on the Target is an HLA federate. This federate software, when
combined with the ACE Studio model processing, implements a full radio simulation
environment, based upon the data structures defined in the ASTi Radio SOM.
From power on, an HLA-enabled Target will start the federate application as a background
process. A particular federate may be accessed through the remote control interface.
The RTI Software: The DMSO RTI requires that the “rtiexec” application is running
somewhere on the HLA network. In the normal mode of use, the rtiexec will be running on
another computer system resident on the HLA network. However, to perform local-only testing or
stand-alone tests, it is possible to run the rtiexec on the Target. The rtiexec will service
every system on the network. Prior to starting the rtiexec, the DMSO RTI must be installed,
and the proper RTI library path must be specified in the RMS HLA configuration section. Once
the Target is configured to use the DMSO RTI, log in to the system as “hlauser”, go to the
DMSO RTI directory (in /opt/rti) and enter the following commands to start rtiexec:
cd config
. rtienv.sh
cd ../bin
./rtiexec
Although this is not necessary, the MÄK RTI may also use an rtiexec application. To run the
rtiexec application for the MÄK RTI, go the MÄK RTI directory (in /opt/rti) and type the
following commands:
cd bin
./rtiexec
To stop the RTI, type CTRL+C.
Please refer to the MÄK RTI Reference Manual for more information on the rtiexec
application. The MÄK RTI requires a license server to run.
Copyright © 2013 Advanced Simulation Technology inc.
23
ASTi Telestra 4 Target Operations & Maintenance Manual (Ver. 1, Rev. K)
5.5.1. Setting Up the Federation
This section assumes that the RTI and federate software are properly installed on two Targets.
This example will use the DMSO RTI (1.3NGv4) and, for the purposes of this scenario, the
rtiexec process will run on one of the two Targets. Only one rtiexec process should exist
on the network. For performance reasons, ASTi recommends running this process on a separate
machine during an actual exercise and NOT on one of the Targets.
1. Start the RTI as described above.
2. On each machine, run the host emulator utility from any console.
3. Then enter the command “join.”
Wait for the federate software to return “JOIN OK” to indicate a successful join
operation. If the software returns “JOIN FAIL”, double check the network configuration
on each machine.
4. The rtiexec should then indicate successful federate initialization.
At this point, there is an “ASTi” federation with two joined federates. Note that the federate name
for each Target was generated based on the hostname and IP address of the individual machine. To
properly destroy the federation:
• Resign each federate by typing “resign” at the Telestra > prompt on both Targets.
• Stop the rtiexec process using CTRL+C.
24
Copyright © 2013 Advanced Simulation Technology inc.
ASTi Telestra 4 Target Operations & Maintenance Manual (Ver. 1, Rev. K)
Chapter 6: Security
6.1. Security and Enhancements
The Telestra 4 product suite is built around Red Hat® Enterprise Linux®, providing a
communications solution that runs on a fully National Information Assurance Partnership (NIAP)
validated operating system. NIAP is a U.S. Government initiative created to meet the security
testing needs of both information technology (IT) consumers and producers.
To the end user this means that the entire Telestra 4 product suite including the Target and Studio,
runs on an NIAP approved operating system. Couple this with ASTi's Telestra 4 Security Package
and you have an NIAP-approved OS that eliminates all CAT I and II issues while locking down
the platform in a known working configuration and adhering to the most current security
requirements.
Standard Studio and Target security features:
• Red Hat® Enterprise Linux® version 5.x
• NIAP Approved OS
• Minimal OS Footprint
• Only essential OS elements are included. For example, the Target platform does not
include a desktop environment since it is unnecessary. This aids in eliminating functions
or features that increase security risk.
• User ID and Password Authentication
• This includes the ability to assign unique user ID and passwords to individual accounts.
• Secure Remote Access
• Access is restricted to essential configuration and management elements required for
operation.
• All remote access is provided through secure means and the plain text remote access
capabilities were removed.
• Due to embedded nature of the Target platform, remote access cannot be completely
removed.
• SELinux
• Security Enhanced Linux (SELinux) provides support for MLS (Multi-Level Security)
policies.
• Auditing
• Tracks activities and modifications of the entire system, including file system
operations, process system calls, user actions such as password changes, account
additions/deletions/modification, use of authentication services, and configuration
changes (such as time changes).
Copyright © 2013 Advanced Simulation Technology inc.
25
ASTi Telestra 4 Target Operations & Maintenance Manual (Ver. 1, Rev. K)
• Minimize Open Network Ports
• All unnecessary network ports not vital for Target platform operation are closed.
• BIOS Password Protection
• BIOS protection includes security features that restrict access to the BIOS Setup
program and restrict who can boot the Target.
• Set a supervisor password and user password for the BIOS setup program and booting
the Target.
• Removable Drive
• Standard configuration of each Target platform provides the ability to remove and
secure non-volatile media.
• Diskless operation options also available.
Telestra 4 Security Package features:
Note: The Telestra 4 Security Package is an optional software package for the Target and Studio.
• Security Hardening Scripts
• Includes an additional software package for the Target and Studio with ASTi's
customized security hardening scripts.
• Eliminates the majority of CAT I, II, III, and IV issues (see DISA section below).
• ASTi SRR Report
• Includes a PDF report that documents the current status and actions required by the
DAA.
• Includes High-level summary and detailed sections organized by categories such as
Closed, Manual Review, False Positive, Waiver, Open/Future Fix. An ASTi response is
provided for all applicable PDIs.
26
Copyright © 2013 Advanced Simulation Technology inc.
ASTi Telestra 4 Target Operations & Maintenance Manual (Ver. 1, Rev. K)
6.2. DISA & STIGS
The Defense Information Systems Agency (DISA) develops and provides security configuration
guidance for IA and IA-enabled IT products. The guidelines are outlined in DISA's Security
Technical Implementation Guides (STIGS), which identify existing and potential vulnerabilities
on a system. STIGS exist for a variety of operating systems and applications. Additionally, there
are Security Readiness Review (SRR) scripts that automate the process of validating a system
configuration against the STIG requirements. Every security software version release for the
Target and Studio is tested against the latest versions of the UNIX STIG with UNIX SRR scripts.
Within each STIG there are four vulnerability code definitions from category I (high
vulnerability) to category IV (low vulnerability).
• Category I - Vulnerabilities that allow an attacker immediate access into a machine, allow
super user access, or bypass a firewall.
• Category II - Vulnerabilities that provide information that have a high potential of giving
access to an intruder.
• Category III - Vulnerabilities that provide information that potentially could lead to compromise.
• Category IV - Vulnerabilities that provide information that will lead to the possibility of
degraded security.
ASTi's goal for the Target and Studio is to eliminate all CAT I's and CAT II's and to minimize
CAT III and IV vulnerabilities. ASTi has also incorporated the UNIX SRR scripts into the
production testing process so that the software is constantly updated with the most valid security
enhancements1.
1
As the DISA STIG CAT I and II vulnerabilities change in future STIG releases it is impossible to predict future
issues. While ASTi will make every reasonable attempt to remove all CAT I and II issues we cannot guarantee
removal of all these issues. The CAT I and II issues are constantly changing over time. If removal of an issue is not
feasible we will work with the customer to obtain a waiver as required. This will be documented in the accompanying
ASTi SRR Report.
Copyright © 2013 Advanced Simulation Technology inc.
27
ASTi Telestra 4 Target Operations & Maintenance Manual (Ver. 1, Rev. K)
6.3. Customer Responsibilities
The vulnerabilities are given unique labels called Potential Discrepancy Items (PDIs). Each PDI
is categorized with a short description of the vulnerability it represents. Out of the hundreds of
PDIs, ASTi can eliminate the majority of them; however, the customer is responsible for
eliminating several PDIs.
For example, certain elements of the STIGS require that the customer:
• Set non-guessable passwords
• Review audit logs
• Maintain specific physical security requirements
As the STIGS and SRR scripts are updated, the PDI list will change. The specific PDI list is
provided for each software release tested against the latest STIG/SRR versions.
28
Copyright © 2013 Advanced Simulation Technology inc.
ASTi Telestra 4 Target Operations & Maintenance Manual (Ver. 1, Rev. K)
6.4. Telestra 4 Security and Process Details
Certain security features such as secure remote access, SELinux and user accounts are available
on both ACE Studio and the Target platform by default. The additional security package is
available for installation on the Target and Studio.
The Telestra 4 security software for the Target and Studio is a one-time delivery and when the
software is purchased you receive the following:
• Telestra 4 Software Installation DVD(s)
• Telestra 4 Security Software Installation DVD
• ASTi SRR Report(s)
• Updated Options File CD (also called the program software license)
The Telestra 4 security software version for the Target and Studio is based on a STIG version. For
example, if you order a security software update in the first quarter of 2008 you will receive the
security software version that was run against the November 15th, 2007 DISA UNIX and Web
Server SRRs.
Future Telestra 4 security software packages/upgrades that are required to match the latest STIG
requirements would require the purchase of a new security package. Future upgrades will be
available as required based on customer demand. Additionally, ASTi will provide updates when a
STIG update is available. Based on recent history, this means that if required we would release
approximately four versions per year. However, this is subject to change based on customer
demand and the DISA STIG release schedule.
ASTi highly recommends that customers have an active support contract. Given that no two
customers are alike, neither are their security requirements. The various components of this
process are documented; however, there are always customers with specific questions in this area
requiring some level of support. Support needs will vary from the area of installation or simply
understanding why certain PDIs show the responses that they do in the SRR report.
Copyright © 2013 Advanced Simulation Technology inc.
29
ASTi Telestra 4 Target Operations & Maintenance Manual (Ver. 1, Rev. K)
6.5. Security Package Installation
For the Target Security Package installation, reference the ACE Target Cold Start Procedure
(DOC-02-TEL4-TCS-1) section 6.0 “Installing Telestra 4 Security Software Package” for stepby-step instructions.
For the Studio Security Package installation, reference the ACE Studio Cold Start Procedure
(DOC-02-TEL4-ASCS-1) section 5.0 “Installing Telestra 4 Security Software Package” for stepby-step instructions.
In addition to installing the rpm package(s) during the ASTi Telestra 4 Security software
installation, the DVD contains one folder labeled:
• ASTi_SRR_Report
The “ASTi_SRR_Report” directory contains a PDF that is provided to assist in the IA
accreditation process. The PDF is generated from the non-ASTi generated DISA SRR results.
ASTi transforms the raw results generated from the DISA SRRs into a user-friendly format. The
first page shows a description of the Target platform under testing and includes information on the
OS version, ACE Target software version, STIG/SRR version and Security Package version. In
other words, it shows the configuration of the main aspects associated with generating an SRR
Report. Additionally, there is a summary of any Open, Closed, Manual Review, False Positive and
Waiver PDIs by vulnerability code. CAT I is the highest vulnerability code and CAT IV is the
lowest. Pages 2 - N show the details of individual PDIs and are sorted by current status such as
Open, Closed, etc.
Note: The RMS Status page does not display the OS software version when the optional security
package is installed.
30
Copyright © 2013 Advanced Simulation Technology inc.
ASTi Telestra 4 Target Operations & Maintenance Manual (Ver. 1, Rev. K)
Chapter 7: Warranty and Repairs
7.1. Warranty Information
The equipment is under warranty for a period of one (1) year following purchase. In the case of
equipment upgrades, warranty applies to original date of shipment of individual components.
Other commercial equipment purchased or provided such as monitors, amplifiers, speakers, fiber
optic links, etc. are also covered under the one year warranty unless otherwise stated.
The warranty does not cover improper equipment handling or improperly packaged returns.
Extended warranties are available - contact ASTi for details (703) 471-2104.
7.2. Repairs and Returns
If it becomes necessary to return equipment to ASTi, please observe the following instructions:
1. Request an RMA number through the form on the ASTi web site: www://www.astiusa.com/support/
The receiving department at ASTi will not receive a repair without an RMA number.
2. When packaging the equipment in question, make sure it is well protected. ALWAYS
DOUBLE BOX the equipment. The inner container should employ some semi-rigid,
contour-fitting foam, while the exterior container should use a more pliant, shockabsorbing material such as styrofoam peanuts. The device should be properly enclosed in
an antistatic bag to prevent possible ESD damage. Failure to properly package the
equipment during shipping could void the warranty.
3. Do not send accessory pieces such as rack mount kits, power supplies or software. Only
include items that do not work.
4. The shipping label must include the RMA number.
5. Include a description of the problem including the serial number for the unit in question.
Include point of contact information including name, telephone number, and equipment
return address. Failure to include this information could extensively delay the return of the
equipment.
6. Evaluation of equipment is performed free of charge. No work will be done without prior
customer approval.
7. Customer is responsible for shipping charges to ASTi for warranty and non-warranty
repairs.
8. Note that if equipment is not under warranty, a purchase order will be required to cover
any repairs. ASTi will provide a quote for all non-warranty items, including return
shipping. Customer is responsible for return shipping charges on non-warranty equipment.
9. Equipment still under warranty will be shipped back via Federal Express, unless otherwise
directed. ASTi is responsible for return shipping charges on domestic items under
warranty.
Copyright © 2013 Advanced Simulation Technology inc.
31
ASTi Telestra 4 Target Operations & Maintenance Manual (Ver. 1, Rev. K)
10. If equipment is not received by ASTi within thirty (30) days of the RMA number issuing
date, the request data and number issued will be closed and designated as unused.
11. Any items received from customers without RMA numbers or appropriate contact
information included with shipment will not be tested. After sixty (60) days, ASTi
reserves the right to scrap all hardware received in this condition.
12. International customers must include the correct product value on all shipping
documents. Contact ASTi for proper harmonized tariff codes. The customer is responsible
for duties, taxes and fees incurred in shipment of the equipment.
7.3. Disclaimer and Warnings
There are NO user-serviceable components in this device. Opening the Telestra 4 Target chassis
will void the warranty. ASTi does not support board-level repair, therefore fuses in the device are
not user-replaceable.
32
Copyright © 2013 Advanced Simulation Technology inc.
ASTi Telestra 4 Target Operations & Maintenance Manual (Ver. 1, Rev. K)
Appendix A: System Specifications
Temperature and Humidity Requirements
Degrees
Fahrenheit
Degrees Celsius
Humidity
Altitude
Operation
Environment
50 – 90 F
10 – 32.2 C
20% – 95%
Storage
Environment
32 – 135 F
-10 – 55 C
10% – 95%
0 – 8,000 ft.
(2,438
meters)
0 – 8,000 ft.
(2,438
meters)
Target
Reliability
The ASTi sound system has been designed to use the minimal complexity of electronic hardware
and the highest quality components. Special attention has been paid to the selection of
traditionally less reliable elements such as the hard drive. To this end the Target contains a hard
disk with a MTBF of 250,000 hours. Typical system MTBF will be greater than 50,000 hours (to
be confirmed by field data). These numbers are based on predicted values with actual field data
being superior.
Copyright © 2013 Advanced Simulation Technology inc.
33
ASTi Telestra 4 Target Operations & Maintenance Manual (Ver. 1, Rev. K)
Appendix B: Software Version Release Notes
See Telestra 4 FAQs on the ASTi Web site (www.asti-usa.com/support/faq/telestra4.html).
34
Copyright © 2013 Advanced Simulation Technology inc.
ASTi Telestra 4 Target Operations & Maintenance Manual (Ver. 1, Rev. K)
Appendix C: HLA RTIs Compatibility
ASTi is involved with an ever growing number of HLA-based communications simulations for a
variety of programs throughout the US and internationally.
Important: From experience, each HLA program has its own set of unique issues and problems
dependent on the equipment, software and simulation deployed. Therefore, ASTi cannot
guarantee zero risk of any issues arising with the currently supported set of RTIs. Note that no set
of tests are able to verify all aspects of operation. RTI operation, RID file settings, network
operation and conditions, simulation software, and use of HLA in a network environment form a
set of complex variables which must be tested together in their target environment under
operational conditions.
ASTi’s Telestra 4 HLA software supports the RTIs listed below. ASTi’s Telestra 4 platform was
tested with and supports several versions of the MÄK & VTC RTIs. The current HLA
functionality is based on HLA 1.3 testing. Contact ASTi for IEEE 1516 support availability.
The user should choose the proper RTI based on the requirements (and GCC 3.4 compatibilities)
of their operating system(s) or other HLA-related software. If there is an RTI that does not appear
on this list but there is interest in it, contact ASTi to discuss the possibility of expanding the HLA
software.
• VTC NG Pro 4.2.4 RHEL 4.0 OS, gcc 3.4.3 compiler
• VTC NG Pro 4.0.4 RHEL 4.0 OS, gcc 3.4.3 compiler
• VTC NG Pro 3.0.4 RHEL 4.0 OS, gcc 3.4.3 compiler
• VTC NG Pro 2.04 Linux FC3, gcc 3.4.2 compiler
• MÄK 3.2 Enterprise 4, gcc 3.4.3
• MÄK 3.1 Enterprise 4, gcc 3.4.2
• MÄK 3.0/3.0.1 Enterprise 4, gcc 3.4.4
• MÄK 2.4.2 Enterprise 4, gcc 3.4.3
• MÄK 2.4 Enterprise 4, gcc 3.4.3
Copyright © 2013 Advanced Simulation Technology inc.
35
ASTi Telestra 4 Target Operations & Maintenance Manual (Ver. 1, Rev. K)
Appendix D: Useful LinuxTM Commands
The following commands are useful when navigating the Target via the command line.
ls
Typing ‘ls’ at the command line displays the files that are in a particular directory. It is similar to
the ‘dir’ command in DOS. Common variations include ‘ls -l,’ which displays more
information about the files and ‘ls -a,’ which will display all files and directories including
“hidden directories.”
pwd
This command returns the full path that you are currently in. It is useful for seeing where you are
in the directory tree.
cd_newdirectory
The Change Directory command allows the user to navigate through the file system. It is similar
to ‘cd’ in DOS but there are a few differences. For example, Linux is case sensitive. As a result
the command:
cd Folder1
is not the same as
cd folder1
There is a shortcut to go up one folder which is the ‘..’ expression. Similarly, they can be
combined to go up multiple folders in a single line. See example below:
36
Copyright © 2013 Advanced Simulation Technology inc.
ASTi Telestra 4 Target Operations & Maintenance Manual (Ver. 1, Rev. K)
cp oldfile newfile
The copy command allows users to create and rename copies of any file in the file system. You
must always specify both the file being copied and the new file name.See below for some
examples.
mv oldfile newfile
The Move command works exactly like the ‘cp’ command, except that the original file is moved
instead of copied and will no longer exist in the original location. This can also be used to rename
files.
Copyright © 2013 Advanced Simulation Technology inc.
37