1
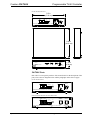
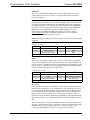
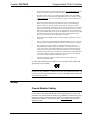
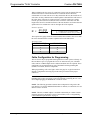
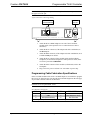
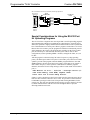
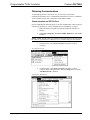
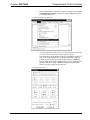
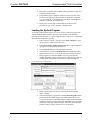
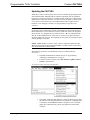
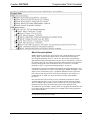
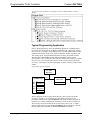
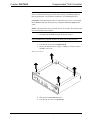
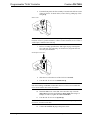
This document was prepared and written by the Technical Documentation department at:
Crestron Electronics, Inc.
15 Volvo Drive
Rockleigh, NJ 07647
1-888-CRESTRON
Crestron CN-TVAV
Programmable TV/AV Controller
Contents
Programmable TV/AV Controller: CN-TVAV
1
Description
Functional Description
Physical Description
Leading Specifications
Setup
Cresnet Modular Cabling
Cable Configuration for Programming
Programming Cable Fabrication Specifications
Special Considerations for Using the RS-232 Port for Uploading Programs
Cable Configuration for Normal Operation
Identity Code
Loading Crestron Control Software
Installing Crestron Development Tools
Initial Setup
File Types
Obtaining Communications
Troubleshooting Communications
Loading the System Program
Updating the CN-TVAV
Programming with SIMPL™ Windows® or SIMPL+
Programming Modes
Typical Programming Application
Example Programs
Problem Solving
Troubleshooting
Internal Fuse Replacement
Further Inquiries
Future Updates
Return and Warranty Policies
Merchandise Returns / Repair Service
CRESTRON Limited Warranty
Operations Guide - DOC. 5722B
1
1
2
6
7
7
8
9
10
11
12
13
13
14
15
18
20
21
22
24
25
28
29
30
30
30
33
33
34
34
34
Contents • i
Crestron CN-TVAV
Programmable TV/AV Controller
Programmable TV/AV Controller:
CN-TVAV
Description
Functional Description
The CN-TVAV is a multi-purpose television/audio-visual (TV/AV) device controller
that is compatible with SIMPL™ Windows® and can be used as a standard Crestron
remote control system (herein referred to as the Cresnet system) peripheral or as a
“smart” peripheral. As a standard Cresnet system peripheral, the CN-TVAV can be
added as a Cresnet network device to a host Crestron control system with all logic,
infrared (IR) drivers, and serial strings stored in the control system programming
logic. In the “smart” peripheral mode, the CN-TVAV may be programmed to store
and execute SIMPL and SIMPL+ programs.
The CN-TVAV controls the ON/OFF and many or most functions of an attached TV
or AV device. The unit provides operating power to the device and controls the
device through a Crestron SmarTouch infrared probe (STIRP). The CN-TVAV also
provides four Versiports ports (each capable of digital inputs/or digital outputs or
analog inputs) for controlling or monitoring external equipment.
The CN-TVAV may also be enabled and operated with optional Crestron handheld
IR transmitters. To prevent interference from most standard IR frequencies and/or
fluorescent lighting, the CN-TVAV and optional transmitters operate at 455 kilohertz
(kHz). Contact Crestron customer service for further information.
The CN-TVAV may be utilized as a “smart” peripheral, a standard Cresnet system
peripheral, or a “mixed mode” peripheral. For descriptions of the three ways to
perform different functions, refer to the following paragraphs.
In Local Processing Mode, the CN-TVAV functions as a “smart” peripheral. The
built-in CN-TVAV devices (IR Port, Versiport, Com Port, Power Sensor, and IR
Gateway) are accessed and controlled by the SIMPL Windows program loaded into
the CN-TVAV.
NOTE: The CN-TVAV in the Local Processing Mode does not function as a “full
scale” control system and support a local Cresnet system (ie. touchpanels, etc. The
CEN-TVAV may be used as a device controller while supporting a local Cresnet
system.
Operations Guide - DOC. 5722B
Programmable TV/AV Controller: CN-TVAV • 1
Programmable TV/AV Controller
Crestron CN-TVAV
The CN-TVAV does not support dynamic preset storage that may be required by
certain modules, such as dynamic camera presets, etc. Having a simulated clock and
simulated NVRAM, if power is lost, the clock and symbols utilizing NVRAM do not
maintain previous settings. Therefore, the CN-TVAV may not be suitable for certain
types of local processing applications. For further information, please contact
Crestron customer service.
In Remote Processing Mode, a CN-TVAV may be used as a peripheral within a
host control system program. When this is done, all the functionality of the
CN-TVAV (such as the IR Port, Versiport, Com Port, Power Sensor, and IR
Gateway) is accessed via the host control system program with no programming
within the CN-TVAV. For example, IR can be generated by the CN-TVAV by
programming the host control system only.
The Mixed Processing Mode is a combination of the Local Processing and Remote
Processing Modes. For example, the Versiports can be programmed to control other
equipment from the program in the CN-TVAV and the IR Port can be generated via
the host control system (no IR driver loaded in the CN-TVAV). It is not
recommended to communicate to a port of the CN-TVAV (such as the IR Port)
through a program in the CN-TVAV itself and via a host control system at the same
time.
Physical Description
Shown below is the STIRP and 5-pin connector plug that are supplied with the
CN-TVAV. When connected to the IR port of the CN-TVAV and positioned near an
attached TV or AV device, the STIRP (or other IR device) emits IR signals that
control the attached device. The provided 5-pin connector plug shown may be
connected to the I/O port of the CN-TVAV and used for digital inputs, digital
outputs, and analog inputs to control and monitor up to four external devices.
CN-TVAV Accessories
STIRP
(10 ft /
25.40 cm)
5-PIN
CONNECTOR
PLUG
The CN-TVAV, shown on the next page, is housed in a black enclosure with silkscreened labels on the front and rear panels. On the front panel are 11 light-emitting
diodes (LEDs) for indicating the status of the unit and of the attached device(s). All
connections are made through the rear panel. There are four rubber feet on the base
of the unit for stability and to prevent slippage.
The CN-TVAV is also available as an international version. All of the features are
identical with the exception of the international AC power requirements, power-in
cord and power out receptacle, and unit nomenclature of CNI-TVAV. Throughout
this operations guide, all references to CN-TVAV apply to both versions except
where noted.
2 • Programmable TV/AV Controller: CN-TVAV
Operations Guide - DOC. 5722B
Crestron CN-TVAV
Programmable TV/AV Controller
CN-TVAV Physical Views
7.07 in
(17.95 cm)
CRESNET
POWER OUT 6A MAX
RS-232
POWER IN
I/O
IR
1 2 3 4 G
115 VAC
50-60HZ
6.6A MAX
CRESTRON ELECTRONICS INC. ROCKLEIGH, N.J. 07647 USA
6.32 in
(16.06 cm)
TVAV CONTROL
PWR
INPUT-OUTPUT
NET
1
2
3
4
TV/AV
PWR
RS-232
IR
RXD
TXD
1.70 in
(4.32 cm)
IR IN
CRESTRON
CN-TVAV
CN-TVAV Ports
Each CN-TVAV rear panel port has a silk-screened label. For the descriptions of the
ports, refer to the two diagrams below and the paragraphs on the next two pages.
CN-TVAV Rear Panel
CRESNET
POWER OUT 6A MAX
RS-232
I/O
1 2 3 4 G
POWER IN
IR
CRESTRON ELECTRONICS INC. ROCKLEIGH, N.J. 07647 USA
115 VAC
50-60HZ
6.6A MAX
CNI-TVAV (International Version) Rear Panel
CRESNET
POWER OUT
5A MAX
RS-232
I/O
1 2 3 4 G
CRESTRON ELECTRONICS INC. ROCKLEIGH, N.J. 07647 USA
Operations Guide - DOC. 5722B
POWER IN
IR
230 VAC
50-60HZ, 5.5A MAX
Programmable TV/AV Controller: CN-TVAV • 3
Programmable TV/AV Controller
Crestron CN-TVAV
CRESNET
This 6-pin, 6-position RJ11 modular jack is used to connect the CN-TVAV to a
control system so it may be accessed as a Cresnet peripheral. Refer to the table
below for the pinouts.
CAUTION: If making connections to RJ11 ports, use the Crestron 6-conductor
modular cable provided, do not use 6-conductor telephone cables. Telephone cables
are wired in a crisscross fashion and are not compatible with Crestron equipment.
For further information, refer to the latest revision of Modular Cable Requirements
(Doc. 5682). This document can be obtained from the Products page (PRODUCT
MANUALS section, manuals for software and wiring diagrams section) or
Downloads page (CABLES and MANUAL Libraries) of Crestron’s website
(www.crestron.com). Search for MODULAR.PDF. New users are required to
register in order to obtain access to the FTP site.
NOTE: This port does not provide 24 direct current volts (VDC) for powering other
equipment.
CRESNET Port Pinouts
PIN
DESCRIPTION
PIN
DESCRIPTION
1*
2
3
Not Connected
Not Connected
Net+ (Cresnet Y data)
4
5
6
Net- (Cresnet Z data)
GND
GND
* While facing the rear panel of the unit, pin 1 is located at the upper-left of the port.
RS-232
This 6-pin, 6-position RJ11 modular jack is used for control of RS-232 peripheral
devices and to communicate with a personal computer (PC) when programming the
CN-TVAV. Prior to switching between the programming mode and the RS-232 port,
refer to “Special Considerations for Using the RS-232 Port for Uploading Programs”
on page 10. Refer to the table below for the pinouts.
RS-232 (PC) Port Pinouts
PIN
DESCRIPTION
PIN
DESCRIPTION
1*
2
3
CTS (Clear to Send)
GND
RxD (Received Data)
4
5
6
TxD (Transmitted Data)
RTS (Request to Send)
Not Connected
* While facing the rear panel of the unit, pin 1 is located at the upper-left of the port.
I/O (1-4, G)
Pins 1-4 of this Versiport may individually be used as programmable digital inputs,
digital outputs, analog inputs, or any combination of each. Digital inputs are rated
0 - 24VDC, 20K ohms input impedance, logic threshold 1.25VDC. Digital outputs
offer 250 milliamp sink from maximum 24VDC; catch diodes provide transient
protection for use with “real world” loads. Analog inputs are rated 0 - 10VDC,
protected to 24VDC maximum, 20K ohms input impedance; pin-programmable 2K
ohms pullup resistor to +5V. The pin labeled G is the common ground for pins 1-4.
IR
This 3.5mm mini-jack is used by the STIRP (provided) to control an attached TV or
AV device. The jack accepts mono (2-conductor) or stereo (3-conductor) mini-plugs.
Multiple IR drivers may be loaded into the CN-TVAV and, with the use of a
Crestron ST-SPL IR Splitter, up to five AV devices may be controlled.
4 • Programmable TV/AV Controller: CN-TVAV
Operations Guide - DOC. 5722B
Crestron CN-TVAV
Programmable TV/AV Controller
POWER OUT
WARNING: When the POWER IN cord is plugged into an energized outlet,
POWER OUT becomes energized. Crestron recommends connecting the TV or AV
device before plugging the POWER IN cord into an outlet.
NOTE: The maximum continuous current from the POWER OUT under any
external load shall not exceed a current limit that is suitable for the minimum wire
gauge and maximum length used for the interconnecting cable(s).
NOTE: The maximum load applied to the POWER OUT shall not exceed the rated
voltage and current as specified on the unit.
This receptacle provides AC power (refer to the rear panel label for details) for a TV
or AV device. The receptacle is hard-wired to the POWER IN cord and is not
protected with a fuse. When programmed to sense whether the attached device is
OFF or ON, a large current is used to indicate that the attached device is ON and the
absence of (or very low) current indicates the device is OFF. If the CN-TVAV (or
control system) detects that the device is ON, the program can be coded to not allow
the CN-TVAV to attempt to turn it ON, which would inadvertently turn it OFF. This
is true if the IR driver does not have discrete ON and OFF functions, but only a
POWER function.
POWER IN
This attached power cord supplies operating AC power (refer to the rear panel label
and/or “Leading Specifications” section on page 6 for details) to the CN-TVAV and
the POWER OUT port. An internal fuse electrically protects the CN-TVAV circuitry
from excessive power input.
CN-TVAV Indicators
There are 11 LED indicators located on the front panel of the CN-TVAV. For the
descriptions of the front panel indicators, refer to the diagram below and the
following paragraphs.
CN-TVAV Front Panel
TVAV CONTROL
PWR
NET
CRESTRON
INPUT-OUTPUT
1
2
3
4
TV/AV
PWR
IR
RS-232
RXD
TXD
IR IN
CN-TVAV
PWR
This LED (green) is illuminated while the CN-TVAV power-in cord is plugged into
an energized VAC outlet. There is no ON/OFF switch for the CN-TVAV.
NET
This LED (yellow) illuminates when communication with Cresnet peripherals is
occurring or while processing commands from the PC (i.e., uploading,
programming). The connections to these devices are made through the rear panel
CRESNET port.
Operations Guide - DOC. 5722B
Programmable TV/AV Controller: CN-TVAV • 5
Programmable TV/AV Controller
Crestron CN-TVAV
INPUT-OUTPUT
These four LEDs (red) labeled 1-4 illuminate while the corresponding input or
output device that is connected to the rear panel I/O is active.
TV/AV
The PWR (green) LED is illuminated while the current sensor is detecting that the
TV or AV device connected to the power-out receptacle is ON. The IR (red) LED
illuminates when IR signals are being sent out the IR port.
RS-232
The RXD (red) LED illuminates when the CN-TVAV is receiving serial data from
the RS-232 port. The TXD (red) LED illuminates when the CN-TVAV is sending
data to the port.
NOTE: The IR receiver, for use with an optional Crestron handheld IR transmitter,
is located behind the red lens between the RS-232 and IR IN indicators.
IR IN
This LED (red) illuminates when the CN-TVAV receives a valid IR code from an
optional Crestron handheld transmitter.
Leading Specifications
The table below provides a summary of leading specifications for the CN-TVAV.
Dimensions and weight are rounded to the nearest hundredth unit.
Leading Specifications of the CN-TVAV
SPECIFICATION
Power Input Requirements:
Power Output:
US
International
US
International
DETAILS
115VAC, 50-60 Hz, 6.6A maximum
230VAC, 50-60 Hz, 5.5A maximum
115VAC, 50-60 Hz, 6A maximum
230VAC, 50-60 Hz, 5A maximum
Internal Fuse
IR Reception Frequency
IR Reception Angle
SIMPL Windows
CEN/CN-TVAV Update File
CNMSX-AV/Pro Update File
CNRACKX/-DP Update File
MaxAnalogSignals
MaxDigitalSignals
MaxNVRAM
MaxProgramSize:
Maximum CN-TVAVs per CNMSX
control system
1A, 250V, Fast/Quick Acting 1
455kHz
Approximately 30o centered on IR receiver
Version 1.61.13 or later 2
Version 51205V.UPZ or later 3
Version 51226X.UPZ or later 3
Version 51226W.UPZ or later 3
2048 4
16373 4
NA 5
256K
25 if touchpanels are used, 30 if no
touchpanels are used 6
Dimensions & Weight
Height: 1.70 in (4.32 cm)
Width: 7.07 in (17.95 cm)
Depth: 6.32 in (16.06 cm)
Weight: 3.54 lb (1.61 kg) 7
6 • Programmable TV/AV Controller: CN-TVAV
Operations Guide - DOC. 5722B
Crestron CN-TVAV
Programmable TV/AV Controller
1
The listed internal fuse is available from Wickmann (www.wickmannusa.com, part
number 3701100041) and larger commercial retailers.
2
The latest software version can be obtained from the What’s New page (SIMPL
Windows section) or Downloads page (SIMPLWIN Library) of Crestron’s website
(www.crestron.com). New users are required to register in order to obtain access to
the FTP site.
3
Filenames for update files have a UPZ extension and can be obtained from the
What’s New page (Control Systems Update Files section) or Downloads page
(OPSYS Library) of Crestron’s website. Update files are designed for specific
devices. If an update file is loaded into a device other than for which it was intended,
it may lockup the device that would then have to be returned to Crestron. Update
files with a “S” designator for the ST-CP, “V” designator are for CEN/CN-TVAV,
“W” for CNRACKX/-DP, and “X” for the CNMSX-AV/Pro. These devices are able
to recognize and reject incorrect update files. However, when updating, do not
ignore any Crestron Viewport warning prompts or messages.
4
Maximum number of SIMPL Windows analog and digital signals that CN-TVAV
can process.
5
The CN-TVAV has a simulated clock and simulated NVRAM. If power is lost, the
clock and symbols utilizing simulated NVRAM do not maintain previous settings.
6
Due to program size in the CNMSX, the recommended limit of CN-TVAVs
programmed into a CNMSX using the CNXENET+ card is 25 if each room (CNTVAV) also contains a touchpanel. With this configuration, (depending upon the
wiring, it may be advisable to add a CNXHUB), 20 sources may be programmed
with the 25 rooms. If there are no touchpanels are utilized, the recommended limit of
CN-TVAVs is 30. If a Cresnet system has more rooms, either connect additional
CN-TVAVs to another CNMSX or utilize CEN-TVAVs.
7
The weight listed is the combined weight of the CN-TVAV, STIRP, 5-pin
connector, and modular cable.
As of the date of manufacture, this unit has been tested and found to comply with
specifications for CE marking.
NOTE: This device complies with part 15 of the FCC rules. Operation is subject to
the following two conditions: (1) this device may not cause harmful interference, and
(2) this device must accept any interference received, including interference that may
cause undesired operation.
Setup
Cresnet Modular Cabling
NOTE: If making network connections to the Cresnet peripherals, refer to the latest
revision of the Crestron Network Modular Cable Requirements (Doc. 5682). This
document can be obtained from the Products page (PRODUCT MANUALS section,
manuals for software and wiring diagrams section) or Downloads page (CABLES
and MANUAL Libraries) of Crestron’s website (www.crestron.com). Search for
MODULAR.PDF.
Operations Guide - DOC. 5722B
Programmable TV/AV Controller: CN-TVAV • 7
Programmable TV/AV Controller
Crestron CN-TVAV
When calculating the wire gauge for a particular Cresnet run, the length of the run
and the load factor of each network unit to be connected must be taken into
consideration. If Cresnet units are to be daisy-chained on the run, the load factor of
each unit to be daisy-chained must be added together to determine the load factor of
the entire chain. If the unit is a home-run from a Crestron system power supply
network port, the load factor of that unit is the load factor of the entire run. The
length of the run in feet and the load factor of the run should be used in the resistance
equation below to calculate the value on the right side of the equation.
Resistance Equation
R <
40,000
L x LF
Where: R = Resistance (refer to next table).
L = Length of run (or chain) in feet.
LF = Load factor of entire run (or chain).
The required wire gauge should be chosen such that the resistance value is less than
the value calculated in the resistance equation. Refer to the table below.
Wire Gauge Values
RESISTANCE (R)
WIRE GAUGE
4
16
6
18
10
20
15
22
Cable Configuration for Programming
The CN-TVAV may be programmed through the host control system or directly via
the local RS-232 port. To program the CN-TVAV at the RS-232 port, a modular
cable, an RJ11 to DB9F adapter and 6-conductor modular cable are required. These
components are not supplied but are part of the SmarTouch Programming Kit
(ST-PK). If available, use these components.
When programming, refer to the figure on the next page for a typical connection
diagram. Complete the following steps in the order provided to ensure proper
connection.
WARNING: When the POWER IN cord is plugged into an energized outlet,
POWER OUT becomes energized. Crestron recommends connecting the TV or AV
device before plugging the POWER IN cord into an outlet.
NOTE: The following procedure assumes that a touchpanel is being used as the
user interface. If a wireless hand-held transmitter is utilized, no connections to a user
interface need to be made.
NOTE: The RJ11 to DB9F adapter is available commercially or contact Crestron
customer support for part number 15556. If not available, refer to “Programming
Cable Fabrication Specifications” on page 9.
8 • Programmable TV/AV Controller: CN-TVAV
Operations Guide - DOC. 5722B
Crestron CN-TVAV
Programmable TV/AV Controller
NOTE: While facing the rear panel of the unit, pin 1 of the RS-232 port is located at
the upper-left of the port.
Typical Connections when Programming
TO PC DURING
PROGRAMMING
CRESNET
TO VAC
OUTLET
POWER OUT 6A MAX
RS-232
I/O
1 2 3 4 G
POWER IN
IR
CRESTRON ELECTRONICS INC. ROCKLEIGH, N.J. 07647 USA
115 VAC
50-60HZ
6.6A MAX
1.
Attach the RJ11 to DB9F adapter to one end of the 6-conductor
modular cable. (Not required if a PC to Control Processor cable is
fabricated.)
2.
Attach the RJ11 connector (of the adapter and cable combination) to
the RS-232 port.
3.
Attach the DB9 connector (of the adapter and cable combination) to an
available COM port on the PC.
4.
Attach the RJ11 connector of the modular cable supplied with the
touchpanel (or fabricated touchpanel to control processor cable) to the
CN-TVAV port labeled CRESNET.
5.
Attach the other connector of the modular (or fabricated) cable to the
touchpanel.
6.
Plug CN-TVAV power cord into VAC wall outlet or power strip.
Programming Cable Fabrication Specifications
In the event that modular cables or RJ11 to DB9F adapter is not available to program
the CN-TVAV at the RS-232 port, the table below and the diagram on the next page
are provided so that the cable can be fabricated.
NOTE: The RJ11 to DB9F adapter is available commercially or contact Crestron
customer service for part number 15556.
RJ11 Modular Cable Pinouts
PIN
DESCRIPTION
PIN
DESCRIPTION
1*
2
3
CTS (Clear to Send)
GND
RxD (Received Data)
4
5
6
TxD (Transmitted Data)
RTS (Request to Send)
Not Connected
* While facing the rear panel of the unit, pin 1 is located at the upper-left of the port.
Operations Guide - DOC. 5722B
Programmable TV/AV Controller: CN-TVAV • 9
Programmable TV/AV Controller
Crestron CN-TVAV
PC to Control Processor (CN-TVAV) Cable Specification
TO PC
COM PORT
REAR VIEW OF
CONNECTOR
6
7
8
9
1
2
2
3
5
3
4
5
7
8
TO RS-232
PORT
1
2
3
4
5
6
CTS
GND
RxD
TxD
RTS
n/c
PART #
AWC10152-A
1
PART #
641337
(9-PIN FEMALE)
PART #
748047-1
Special Considerations for Using the RS-232 Port
for Uploading Programs
The CN-TVAV has a single RS-232 console port that is used for uploading programs
and communicating with RS-232 equipment for control purposes. Since the port is
shared, the operation is slightly different from standard Crestron control systems that
have a dedicated RS-232 console ports. When a program is loaded into a CN-TVAV
that uses the TVAVCOM-1 port, the program will initialize but the shared port will
still be attached to the console. The program runs normally, but the TVAVCOM-1
port will effectively be “disconnected” from the system. This is done so other
configurations (such as uploading SIMPL+ modules, setting the IP Table, etc.) can
be done.
After the program is rebooted (using F10 in the Viewport or cycling operating
power), the shared port is taken over by the TVAVCOM-1 port (if the TVAVCOM-1
symbol is present in the program) when the SIMPL program initializes. Note that
SIMPL Windows will not convert the TVAVCOM-1 port if there are no signals or
data coded in the port, or if the symbol is commented out. When the program
initializes, the normal TVAV bootup messages will be issued out the TVAVCOM-1
port, i.e.:
TVAV Monitor v5.10.13 - 03/07/00 - interrupt serial i/o
512k flash memory, 512k SRAM, segment =F900
Press <esc> now to enter debug monitor
If there is a device hooked up to the TVAVCOM-1 port, the bootup message may be
treated as false characters and cause device errors. It is possible to set the baud rate
to DISABLE (pressing F8 while in the Viewport and selecting DISABLE) for the
console port. This will cause the initial bootup message to not be displayed. In order
to obtain communications with the CN-TVAV through the RS-232 port, the
following methods can be used:
10 • Programmable TV/AV Controller: CN-TVAV
Operations Guide - DOC. 5722B
Crestron CN-TVAV
Programmable TV/AV Controller
Set Baud Rate to Obtain Communication
BAUD RATE
STEPS TO PERFORM
If the baud rate was 1. Set the Viewport to 38400 N81 baud via Setup |
Communications Setting.
set to 'disable' for
2. Disconnect the AC power from the CN-TVAV.
the console.
If the baud rate was 3. Reconnect AC power to the CN-TVAV.
4. Within the first 5-seconds, press the BREAK character
set to a rate other
ALT-K) in the Viewport and observe the standard CN-TVAV
than 'disable' for the
bootup message.
console but the rate
5. When the following message is displayed, press the spaceis unknown.
bar to abort running the program. Otherwise, the CN-TVAV
will boot, the TVAVCOM-1 symbol will take over, and the
console will be set to the DISABLE rate.
Booting from Flash Prom
6E00
Press <space> for cold start
6. To set the console baud rate, press F8 and select a new
baud rate. This will force the console to show the bootup
messages at bootup time.
If the baud rate was 1. Set the Viewport to the baud rate the console is operating at
or use Establish Communications (Alt-B) from the
set to a rate other
Diagnostics Menu.
than 'disable' and
2. Press BREAK (ALT-K) three times in succession and
the rate is known.
observe the following reply:
TVAV Console Enabled
The console port is always accessible, regardless of whether or not the program
contains a TVAVCOM-1 port, if the console connection is established via “Establish
Remote Console Connection” on page 20. To prevent the console switchover during
program development, the TVAVCOM-1 port may be commented out. If the
TVAVCOM-1 port is not programmed in SIMPL Windows (if the definition is
present but the Port contains no data), then the console port will never be taken over
and is always accessible.
Cable Configuration for Normal Operation
When operating the CN-TVAV under normal conditions, refer to the figure on the
next page for a typical connection diagram.
WARNING: When the POWER IN cord is plugged into an energized outlet,
POWER OUT becomes energized. Crestron recommends connecting the TV or AV
device before plugging the POWER IN cord into an outlet.
CAUTION: If making connections to the CRESNET modular port, do not use
6-conductor telephone cables. Telephone cables are wired in a crisscross fashion and
are not compatible with Crestron equipment. Use the modular cable provided.
CAUTION: If making connections to the Cresnet peripherals from the CRESNET
port, refer to “Cresnet Modular Cabling” on page 7.
NOTE: If making connections to Cresnet peripherals from the CRESNET port,
refer to “CRESNET” on page 4 for the port description and pinouts.
Operations Guide - DOC. 5722B
Programmable TV/AV Controller: CN-TVAV • 11
Programmable TV/AV Controller
Crestron CN-TVAV
NOTE: Refer to the latest revision of the STIRP Installation Instructions (Doc.
5674) for details to attach the STIRP near the IR sensor window of the TV or AV
device. This document can be obtained from the Products page (PRODUCT
MANUALS section, hardware section) or Downloads page (MANUAL Library) of
Crestron’s website (www.crestron.com). Search for STIRP.PDF. New users are
required to register in order to obtain access to the FTP site.
NOTE: The power plug is used to connect or disconnect power from the unit. Other
than making the power connection last, complete the connections in any order.
NOTE: An optional Crestron handheld IR transmitter must have an unobstructed
line-of-sight to the IR receiver of the CN-TVAV. Make sure nothing is between the
transmitter and the CN-TVAV that would prevent maximum signal reception.
Typical Connections for Normal Operation
TO CRESNET PERIPHERALS
(DURING MIXED MODE) OR
HOST CONTROL SYSTEM
(REMOTE OR MIXED MODE)
CRESNET
TO STIRP OR
OTHER IR DEVICE
TO VAC
OUTLET
POWER OUT 6A MAX
RS-232
I/O
1 2 3 4 G
POWER IN
IR
CRESTRON ELECTRONICS INC. ROCKLEIGH, N.J. 07647 USA
TO RS-232
PERIPHERALS
TO OTHER
PERIPHERALS
115 VAC
50-60HZ
6.6A MAX
TO TV OR
AV DEVICE
Identity Code
Every equipment and user interface within the Cresnet network requires a unique
identity code (NET ID). These codes are recognized by a two-digit hexadecimal
number from 03 to FE.
When used in the Remote Processing Mode or Mixed Processing Mode, each
CN-TVAV in the Cresnet system needs a NET ID that matches an ID code specified
in the SIMPL Windows program. The NET ID of the CN-TVAV is factory set to 50.
The NET IDs of multiple units must all be unique and changed from a PC via
SIMPL Windows or VisionTools™ Pro-e (VT Pro-e).
NOTE: VT Pro-e is a Windows compatible software package for creating Crestron
touchpanel screen designs.
The method for changing the unit’s NET ID is identical regardless of the software
chosen. Complete the following steps to change the NET ID.
1.
Attach one of the CN-TVAVs to the control system (verify that the
software is running).
12 • Programmable TV/AV Controller: CN-TVAV
Operations Guide - DOC. 5722B
Crestron CN-TVAV
Programmable TV/AV Controller
2.
From the SIMPL Windows or VT Pro-e menu, select Tools | Viewport
to open the Crestron Viewport.
3.
From the Viewport menu, select Functions | Set Network ID. The
software checks the baud rate and then opens the “Set Network ID”
dialog box.
4.
In the “Set Network ID” dialog box, select the CN-TVAV from the
Current Network Devices text window.
5.
From the Choose the new network ID for the selected device (Hex): text
box, select the new Net ID for the CN-TVAV.
6.
Click Set ID to initiate the change. This will display the “ID command
has been sent” dialog box.
7.
In the “Command Complete” dialog box, click OK.
8.
In the Current Network Devices text window, verify the new NET ID
code.
9.
In the “Set Network ID” dialog box, click Close.
NOTE: The new NET ID code may also be verified by selecting Diagnostic |
Report Network Devices in the Viewport.
10. Repeat this procedure for each CN-TVAV to be added to the Cresnet
system.
Loading Crestron Control Software
Crestron control software is available in an electronic form; CD-ROM, email, or
from Crestron’s website. Regardless of how and from where the software is
obtained, this section provides the necessary installation steps. Before performing the
procedures in this section, refer to “Cable Configuration for Programming” on
page 8 for cabling instructions.
Installing Crestron Development Tools
Crestron provides software tools for programming the CN-TVAV. Even if only the
control software is being loaded into the hardware and there are no plans to do any
programming, some Crestron development software must be installed on the PC.
Currently, Crestron programming is accomplished with the use of the following
development tools listed in the table shown on the next page.
NOTE: If the intent is to load software developed elsewhere, install SIMPL
Windows only. To program the CN-TVAV, install all three applications.
NOTE: The latest versions of these applications are available from Crestron’s
website (www.crestron.com). Crestron ControlCD also contains a version (which
may not be as current as the website version). To obtain a free copy of the CD-ROM,
contact Crestron at 1-888-CRESTRON [1-888-273-7876]. Alternatively, complete a
literature request from the Crestron website to obtain one.
Operations Guide - DOC. 5722B
Programmable TV/AV Controller: CN-TVAV • 13
Programmable TV/AV Controller
Crestron CN-TVAV
Crestron Development Tools
DEVELOPMENT TOOL
SIMPL Windows
VT Pro-e
DEAL for Windows
DESCRIPTION
Used to program the CN-TVAV.
Used to design touchpanel layouts and to program
SmarTouch Systems.
Used for learning (using the optional CNXLIR) and
maintaining IR driver files.
Before installing any development tools, confirm that all other applications such as
Microsoft® Office, etc. are closed. The website and CD provide instructions for
installing the various tools. When initiating a custom install from the CD, the user is
presented with a list of the software programs, documentation, and other resources.
For each item, set or clear a checkbox to the left of the item to direct the installation
program whether to install that component onto the hard drive. The size of the each
item installed determines how much disk space is required. Each development tool
contains a help file that can be opened from the Help pull-down menu. Refer to these
files for additional information.
Initial Setup
To avoid any procedural errors,
follow the steps in the order
provided.
After installing the desired development tool, various job files may be obtained from
Crestron or other sources. Using Windows Explorer™, complete the following steps.
These steps ensure that all job files reside on the hard drive (C:) in the Directory
\CRESTRON\PROJECTS\MYJOB.
1.
Navigate to the SIMPL directory on the hard drive. Assume that the
default install directory is C:\CRESTRON.
2.
Create a new folder for the project files. Although the folder where the
files are placed is not critical, it is easier to manage projects if a logical
structure is created. For example, create a new folder, called
PROJECTS, underneath the CRESTRON directory. Create another
folder, called MYJOB, under PROJECTS for the current job. The
resulting pathname is C:\CRESTRON\PROJECTS\ MYJOB.
3.
Copy the supplied files into the folder created in the last step. The
source of the file determines the procedure.
From a floppy disk: Most floppy disks sent from Crestron contain a
common directory structure designed to make it easier to organize files.
Copy the entire contents of the disk(s) including the directory structure.
From an EXE file: If a job is downloaded from the Crestron website
or is received via email, all files may have been compressed into a
single, self-extracting archive. This archive has an EXE extension.
First, copy the EXE file into the directory stated in step 1, then doubleclick on the file name to begin decompressing the file. The program
asks for a location for the extracted files. In this case, browse for the
same directory where the archive was copied. (Once files are extracted,
retain the original EXE file in case files need to be restored.)
From a ZIP file: If the downloaded job is from Crestron’s website or
e-mail, all files may have been compressed into an archive file with a
ZIP extension. For this ZIP file to be used, in SIMPL Windows, select
File | Import Archived Program. This will open a dialog box similar
to the one shown on the next page.
14 • Programmable TV/AV Controller: CN-TVAV
Operations Guide - DOC. 5722B
Crestron CN-TVAV
Programmable TV/AV Controller
Import an Archived (ZIP File) Program Dialog Box
The job may be copied to any folder or directory, and the User IR, User
Module, and SIMPL+ files will be copied to the proper directories. If a
version of SIMPL Windows lower than 1.30.01 is being used, copy the
ZIP file into the job directory stated in step 1, then extract the files with
a program called WinZip. Obtain a copy of this program from their
website (www.winzip.com) on the Internet. Extract the files into the
same directory where the archive was copied. Once files are extracted,
retain the original ZIP file in case the files need to be restored at any
point. The User IR, User Module, and SIMPL+ files will need to be
copied to their proper directories manually.
File Types
There are quite a few file types involved with Crestron control software. This section
explains the different types that might be encountered in each directory. In many
cases, the supplied software is grouped into a number of subdirectories. The intent is
to keep files organized. For example, after copying the files to the hard disk, the
directory structure may appear as shown below.
Possible Directory Structure
Operations Guide - DOC. 5722B
Programmable TV/AV Controller: CN-TVAV • 15
Programmable TV/AV Controller
Crestron CN-TVAV
NOTE: In this example, the Vt3501 and Vt3502directories represent two
touchpanels that are part of the entire remote control system. Consult the connection
sheets or other supplied information to determine which directory corresponds to a
given touchpanel.
Ops Subdirectory - The files (described in the table below) in this subdirectory
contains the CN-TVAV operating system with which the program was tested. Ensure
that the operating system version currently loaded is equal to or newer than the
version included here, so that the program runs properly. For help with uploading an
operating system, refer to “Updating the CN-TVAV” on page 22.
File Types in Ops Subdirectory
FILE TYPE
.upz
DESCRIPTION
This is a control system file. For more information regarding these
files, refer to "Updating the CV-TVAV".
Programs Subdirectory - The files (described in the table below) in this
subdirectory contain the system program. This is the main program that loads into
the CN-TVAV and determines the exact functionality.
File Types in Programs Subdirectory
FILE TYPE
DESCRIPTION
.asv
.bin
SIMPL Windows auto-save file.
This is the executable code for the CN-TVAV.
This is the default IP Table that contains the IP addresses of all of the
ethernet devices in the system. It is generated when the program is
compiled.
This file contains information required by Test Manager (see SIMPL
Windows help for more information) for debugging programs in realtime. It is generated each time the program is compiled.
This is the SIMPL-C file that is generated from the SMW file when a
program is compiled. In SIMPL Windows version 1.18 or lower, this
file is what actually gets compiled into the BIN file. In versions after
1.18, this file may or may not be generated and but is not required.
This is the SIMPL Windows program file. It contains the source code
for the main system program.
SIMPL Windows program backup file.
.dip
.sig
.smp
.smw
.sm2
Userdb Subdirectory - The files (described in the table below) in this subdirectory
is a user database IR driver that is needed to interface with certain IR-controlled
devices. This driver differs from Crestron database IR drivers in that the former are
included as part of a Crestron Database.
File Types in Userdb Subdirectory
FILE TYPE
DESCRIPTION
.ir
This is a user IR driver file. It is needed during the convert/compile
process in order to properly compile the program. If recompilation of
the program is necessary, use the Import Program option or copy any
IR files received into the default user database directory (see SIMPL
Windows help for more information). Alternatively, set the SIMPL
Windows userdb directory to the directory where the macros exist. (In
SIMPL Windows, this is accomplished from the Directories tab by
selecting Edit | Preferences.)
16 • Programmable TV/AV Controller: CN-TVAV
Operations Guide - DOC. 5722B
Crestron CN-TVAV
Programmable TV/AV Controller
Usrmodule Subdirectory - The files (described in the table below) in this
subdirectory are user modules, or special sub-programs that are integral parts of the
main program. These differ from Crestron modules in that the former are supplied as
part of the development software.
File Types in Usrmodule Subdirectory
FILE TYPE
.umc
.um2
DESCRIPTION
This is a user module file. It is needed during the convert/compile
process in order to properly compile the program. To recompile the
program, use the Import Program option or copy any UMC files
received into the default user module directory (see SIMPL Windows
help for more information). Alternatively, set the SIMPL Windows
usermodule directory to the directory where the modules exist. (In
SIMPL Windows, this is accomplished from the Directories tab by
selecting Edit | Preferences.)
This is the user module backup file.
UsrSPlus Subdirectory - The files (described in the table below) in this
subdirectory contain the User SIMPL+ modules used in this system. To recompile
the program, use the Import Program option or copy the USH and USP files received
into the default user SIMPL+ directory. Alternatively, set the SIMPL Windows user
SIMPL+ directory to the directory where the modules exist.
File Types in UsrSPlus Subdirectory
FILE TYPE
.csz
.uf
.ush
.usp
DESCRIPTION
Crestron SIMPL+ archive. This archive contains all of the SIMPL+
executable code (from both user modules and Crestron modules) that
the Transfer Program dialog will send to the CN-TVAV.
User SIMPL+ compiled file. This contains the executable SIMPL+
code for the CN-TVAV.
User SIMPL+ header file. This file details how SIMPL Windows should
model the gate as a symbol (i.e. how many inputs, outputs, etc.).
User SIMPL+ source code module. This file gets compiled by the
SIMPL+ environment and also is editable by the user.
Touchpanel Directory - The files (described in the table below) in this subdirectory
contain touchpanel projects (for example, Vt3501 and Vt3502 in the previous
diagram titled Possible Subdirectory Structure). Each project describes the exact
graphical display of the touchpanel.
File Types in Touchpanel Subdirectory
FILE TYPE
DESCRIPTION
.bmp, .pcx, These are graphic files that are needed by VisionTools for Windows
or .dib
(VTW) for recompiling touchpanel projects.
This is the compiled touchpanel project file. This file is uploaded to the
.hex
panel.
Logic files for existing SmarTouch products (such as ST-1500/ 1500C)
.lgc
that use VTW.
Logic files for existing SmarTouch products (such as ST-1500/ 1500C
.vti and .vtl
or ST-1550/1550C) that use VTPro-e.
This is the only VT Pro-e file required for a given project. It replaces
.vtp
the PRJ, PGF, and graphic (BMP, PCX, etc.) files that were part of
VTW projects.
Operations Guide - DOC. 5722B
Programmable TV/AV Controller: CN-TVAV • 17
Programmable TV/AV Controller
Crestron CN-TVAV
Obtaining Communications
To upload program files to the CN-TVAV, it is necessary to first obtain
communication with the device. Communication with the CN-TVAV is established
via the local RS-232 port and is required to set IP address initially.
Communication via RS-232 Port
Prior to completing the following steps, be sure the communication cable is properly
connected as described in “Cable Configuration for Programming” on page 8.
1.
Make sure that no programs accessing the COM port of the PC are
running.
2.
Select Start | Programs | Crestron | SIMPL Windows to start SIMPL
Windows.
NOTE: SIMPL Windows may open with an opening splash screen and may display
the “What do you want to do?” dialog box. If so, close the dialog box and continue.
3.
As shown below, select Tools | Viewport to open the Crestron
Viewport.
Accessing the Viewport
4.
As shown below, select Tools | Viewport to open the Crestron
Viewport. Refer to diagram below. From the Setup menu, verify that
Auto Baud Search is checked.
Verifying Auto Baud Search
18 • Programmable TV/AV Controller: CN-TVAV
Operations Guide - DOC. 5722B
Crestron CN-TVAV
Programmable TV/AV Controller
5.
Refer to diagram below. While the Viewport is displayed, select Setup
| Communications settings (alternatively, depress Alt+D) to open the
Port Settings dialog box.
Accessing the Port Settings Dialog Box
6.
Select the appropriate connection type. (If using the RS-232 port of the
CN-TVAV for the connection to the PC, refer to “Special
Considerations for Using the RS-232 Port for Uploading Programs” on
page 10 for further information.) Verify that an available COM port
(COM 1 is shown below) is selected. Set the baud rate to 38400, the
parity to None, the data bits to Eight, and the stop bits to One. Refer to
the dialog box shown for the remaining settings and click the OK
button to save the settings and close the box.
Port Settings Dialog Box
Operations Guide - DOC. 5722B
Programmable TV/AV Controller: CN-TVAV • 19
Programmable TV/AV Controller
7.
Crestron CN-TVAV
Select Diagnostics | Check Operating System Version (alternatively,
depress F5) from the Viewport. The Viewport may display a window
as it scans various baud rates. Eventually, a message should appear in
the Incoming section showing a version number. Such a response
indicates that communications have been established.
If a “No Communications with Rack” error message opens, proceed to
“Troubleshooting Communications” on page 20. If the baud rate of the
CN-TVAV was something other than 38400, the software
automatically adjusts the baud rate to 38400.
Establish Remote Console Connection
Instead of communicating by plugging into each CN-TVAV in a large installation
via RS-232 in order to upload programs/firmware/etc., the CN-TVAV console can be
accessed from the control system to which it is a peripheral. Complete the following
steps to establish communication with the CN-TVAV.
1.
If using the Stand-alone Viewport, open the Viewport and proceed to
step 4. To access the Viewport via SIMPL Windows, select Start |
Programs | Crestron | SIMPL Windows to start SIMPL Windows.
NOTE: SIMPL Windows may open with an opening splash screen and may display
the “What do you want to do?” dialog box. If so, close the dialog box and continue.
2.
Select Tools | Viewport to open the Crestron Viewport.
3.
Refer to the documentation supplied with the host control system and
verify communication with the host control system.
4.
From the Viewport menu, select Remote | Remote Console | Connect
as shown below.
Viewport Remote Console Connect Function
5.
Observe the Viewport connect to the CN-TVAV.
Troubleshooting Communications
If communications with the CN-TVAV has not been established, follow the steps in
this section to help remedy the problem.
1.
If a program is already loaded into CN-TVAV, refer to “Special
Considerations for Using the RS-232 Port for Uploading Programs” on
page 9 for further information.
2.
Verify that the cable being used is correct. (If cable is not available,
refer to “Programming Cable Fabrication Specifications” on page 9.)
20 • Programmable TV/AV Controller: CN-TVAV
Operations Guide - DOC. 5722B
Crestron CN-TVAV
Programmable TV/AV Controller
3.
Repeat the “Communication via RS-232 Port” procedure on page 18 to
establish communications.
4.
Verify that the proper COM port on the PC has been selected. Some
PCs have more than one COM port, some of which may be internal
(e.g., for a modem). If verification can not be made, consult the user’s
manual or contact the PC manufacturer.
5.
Repeat steps 5 and 6 of the “Communication via RS-232 Port”
procedure on page 18 to re-initialize communications.
Loading the System Program
To load the system program into the CN-TVAV, use the Crestron Viewport or the
Transfer Program option in SIMPL Windows. For consistency, the following
procedure uses the Viewport. To upload a BIN file into the CN-TVAV, complete the
following steps in the order provided.
1.
If the Crestron Viewport is not open, select Tools | Viewport to open
the Viewport to connect to the CN-TVAV.
2.
Select File Transfer | Send Program (alternatively, depress Alt+P) to
open the Cresnet Simpl Program dialog box.
3.
Use the Browse button to locate the supplied BIN file.
4.
As shown below, click the Send Program button to initiate program
upload to the CN-TVAV. A “Transfer in Progress” dialog box opens,
but no response is required. If SIMPL+ files are present and the
SIMPL+ Program(s) option is checked in the “What to Send” field, the
associated files will be transferred after the program is transferred.
Cresnet Simpl Program Dialog Box
Operations Guide - DOC. 5722B
5.
When a Query dialog box opens to create the permanent memory
image, click No.
6.
After transferring the program file, click the Check Program button to
ensure that the file loaded properly. The information in the Current
Program field of the Cresnet Simpl Program dialog box should update
and display the file currently loaded. If the information does not update,
repeat steps 3 through 5 of this procedure. If this does not remedy the
problem, contact Crestron customer service for assistance.
Programmable TV/AV Controller: CN-TVAV • 21
Programmable TV/AV Controller
Crestron CN-TVAV
Updating the CN-TVAV
Much like a Crestron control system, the CN-TVAV contains an Operating System
and a Monitor ROM. Although both are separate components, they are packaged
together in a single file referred to as a Control System Update File. Control system
update files have the UPZ extension. It is often necessary to update a control system
or CN-TVAV if new features have been implemented (such as support for new
hardware or new language constructs) or if programming "bugs" have been
corrected.
CAUTION: Update files are designed for specific devices. If an update file is
loaded into a device other than for which it was intended, it may lockup the device
that would then have to be returned to Crestron. Update files with a “S” designator
for the ST-CP, “V” designator are for CEN/CN-TVAV, “W” for CNRACKX/-DP,
and “X” for the CNMSX-AV/Pro. These devices are able to recognize and reject
incorrect update files. However when updating, do not ignore any Crestron Viewport
warning prompts or messages.
NOTE: SIMPL Windows version 1.40.07 or later is required to update the UPZ.
When the UPZ is loaded, the program and SIMPL+ modules will be erased so they
must be reloaded after a UPZ is loaded.
The following procedure is recommended to load a new UPZ file into the
CN-TVAV.
1.
Establish communications with the CN-TVAV by performing
“Obtaining Communications” on page 18.
2.
From the Crestron Viewport, select File Transfer | Update Control
System as shown below.
Accessing the Update Control System Dialog Box
3.
The Update Control System dialog box, shown on the next page, offers
the option to enter the path name of a new update file. If the path name
is not known, use the Browse button to navigate to a list of available
update files. When browsing, choose only update files with a UPZ
extension.
22 • Programmable TV/AV Controller: CN-TVAV
Operations Guide - DOC. 5722B
Crestron CN-TVAV
Programmable TV/AV Controller
Update Control System Dialog Box
NOTE: After a file is selected, the “Update Control System” dialog box, as shown
below, will query the CN-TVAV to determine what versions of the Operating
System and Monitor ROM are currently running.
4.
To start the transfer, click the Send button as shown below. The
transfer dialog will display the progress in updating the selected
components.
Example Update Control System Dialog Box
Operations Guide - DOC. 5722B
Programmable TV/AV Controller: CN-TVAV • 23
Programmable TV/AV Controller
Crestron CN-TVAV
5.
As a result of the update, a dialog box (similar to as shown below) may
open and the SIMPL program (and possibly SIMPL+ modules) must be
cleared. As shown, click the Yes button.
6.
Upload the SIMPL program and SIMPL+ modules after the transfer is
complete.
Continue with transfer? Selection Box
Programming with SIMPL™ Windows® or SIMPL+
SIMPL (Symbol Intensive Master Programming Language) is an easy-to-use
programming language that is completely integrated and compatible with all
Crestron system hardware. The objects that are used in SIMPL Windows are called
symbols. SIMPL Windows offers drag and drop functionality in a familiar Windows
environment.
SIMPL Windows is Crestron Electronics' software for programming Crestron control
systems. It provides a well-designed graphical environment with a number of
workspaces (i.e., windows) in which a programmer can select, configure, program,
test, and monitor a Crestron control system and/or CN-TVAV.
The next three sections describe a CN-TVAV within SIMPL Windows. The first
section details the programming modes of the CN-TVAV, the second section
describes a typical programming application, and the third section provides the
location of example programs.
NOTE: The following descriptions assume that the reader has knowledge of SIMPL
Windows. If not, refer to the extensive help information provided with the software.
NOTE: If programmed with SIMPL Windows, the CN-TVAV may be loaded with
a BIN file of 250K or less, and for SIMPL+, the unit is limited to 256K. Descriptions
and examples are provided in the following sections.
24 • Programmable TV/AV Controller: CN-TVAV
Operations Guide - DOC. 5722B
Crestron CN-TVAV
Programmable TV/AV Controller
Programming Modes
The CN-TVAV may be utilized three ways to perform different functions; Local,
Remote, and Mixed Processing Modes. Similar to as shown below, the CN-TVAV
and its supporting devices have been added to SIMPL Windows.
New SIMPL Windows’ Devices for Programming the CN-TVAV
NOTE: The CN-TVAV contains no NVRAM. It has “simulated” NVRAM,
meaning that conventional (volatile) memory is mapped into the NVRAM space.
When power is disconnected, the contents of memory are lost. Rather than restrict
the usage of NVRAM symbols (such as RAM, SMEM, etc.), the mapping allows
some SIMPL programs to use NVRAM for runtime calculations. Runtime
calculations are not essential if power is lost and are reset at startup (i.e. such as
putting names into an SMEM when using the QUE symbol).
NOTE: The CN-TVAV also does not have a hardware clock. The clock must be
reset at startup.
NOTE: The compiler will detect usage of NVRAM symbols or DEVICE SYSTEM
(real time clock driver) and flag it in the error log as warnings when programming.
Operations Guide - DOC. 5722B
Programmable TV/AV Controller: CN-TVAV • 25
Programmable TV/AV Controller
Crestron CN-TVAV
Local Processing Mode
NOTE: The CN-TVAV in the Local Processing Mode does not function as a “full
scale” control system and support a local Cresnet system (ie. touchpanels, etc. The
CEN-TVAV may be used as a device controller while supporting a local Cresnet
system.
In the Local Processing Mode, the CN-TVAV is programmed to access and control
the local hardware ports. Use the Configuration Manager workspace (Project |
Configure System) in SIMPL Windows to select and configure all the devices that
need to be included into the system. From the Control Systems folder in the Device
Library, select “CN-TVAV Local Processing”. Drag and drop the CN-TVAV into
Network System View and the symbol appears as shown below.
Network System View of the Local Processing Mode CN-TVAV in SIMPL Windows’ Configuration Manager
NOTE: SIMPL Windows contains Intersystem Communication (ISC) devices that
provide a simple method to cross link analog, digital, and serial data signals between
a control system and a Mixed Processing Mode network device (ie. CN-TVAV). The
CN-ISC is automatically added but when in a Local Processing Mode or Remote
Processing Mode, it is not used and may be commented out. For further information,
refer to “Typical Programming Example” on page 28.
Remote Processing Mode
In the Remote Processing Mode, the CN-TVAV does not contain a program. The
slots and Cresnet devices are accessed solely from the host control system that
generates all the proper network packets to control the hardware. To utilize a
CN-TVAV as a peripheral, drag and drop the "CN-TVAV Remote Processing" from
the "Network Control Modules" onto the Net-Device slot in the control system (or
Cresnet Units in Network System View). In the Program Manager workspace
(Project | Program System), the CN-TVAV appears in the program view as shown
on the next page.
NOTE: SIMPL Windows contains ISC devices that provide a simple method to
cross link analog, digital, and serial data signals between a control system and a
Mixed Processing Mode network device (ie. CN-TVAV). The CN-ISC is
automatically added but when in a Local Processing Mode or Remote Processing
Mode, it is not used and may be commented out. For further information, refer to
“Typical Programming Example” on page 28.
26 • Programmable TV/AV Controller: CN-TVAV
Operations Guide - DOC. 5722B
Crestron CN-TVAV
Programmable TV/AV Controller
Program View of the Remote Processing Mode CN-TVAV in SIMPL Windows’ Program Manager
Mixed Processing Mode
SIMPL Windows contains ISC devices that provide a simple method to cross link
analog, digital, and serial data signals between a control system and a Mixed
Processing Mode network device (ie. CN-TVAV). The CN-ISC is automatically
added and the primary advantage when using ISC devices is the memory savings for
the control system. The size of the program in the control system decreases because a
portion of the program resides in the network device (CN-TVAV). For further
information, refer to “Typical Programming Example” on page 28.
Combinations of Local Processing Mode and Remote Processing Mode can be used.
A program residing in the CN-TVAV can perform logic (SIMPL and SIMPL+ code)
and access the local hardware ports. A peripheral definition can also reside in the
host control system and access the CN-TVAV local hardware. For example, it is
possible that the TVAVIR-1 be driven from the host control system and the
CN-TVAV.
Only the TVAVIR-1 and TVAVIO-5 can be controlled by both the host control
system and the CN-TVAV, logic can exist in both the remote and local programs.
The TVAVIRGW and TVACOM-1 can be controlled by only one program, either
remote or local, the ISC(s) are used to share logic between programs. If the
TVAVIRGW or TVAVCOM-1 is defined in the local program, this information will
not be shared with the remote program even if defined in the remote program and
ISC(s) must be utilized.
NOTE: In the diagram on the next page, only the first port/channel of the
CN-ISC(R) device is shown for clarity.
Operations Guide - DOC. 5722B
Programmable TV/AV Controller: CN-TVAV • 27
Programmable TV/AV Controller
Crestron CN-TVAV
Program View of the Mixed Processing Mode CN-TVAV in SIMPL Windows’ Program
Manager
Typical Programming Application
Refer to the diagram below. In this programming application, a CNMSX-PRO is
used as the host control system. An RS-232 controlled VCR is physically wired to
the CN-TVAV. A module is created that has PLAY, STOP, FFWD, REW, PAUSE
and RX$ on the inputs and PLAY-F, STOP-F, FFWD-F, REW-F, PAUSE-F, and
TX$ on the outputs. If programmed without the CN-ISCs, the module would be
added into the CNMSX-PRO program and TX$ and RX$ connected to the
TVAVCOM-1 port to control the VCR. With the CN-ISCs, the module is put inside
the CN-TVAV, and TX$ and RX$ connected to the TVAVCOM-1 locally in the
CN-TVAV. The transport controls and feedback would be connected to the CN-ISC
symbol.
Programming Application Wiring
CT-1000
NET IDyy
CNMSX-PRO
NET
IDyy
CT-1000
DEFINITION
NET
IDxx
CN-TVAV
DEFINITION
CRESNET
CN-TVAV
NET IDxx
RS-232
VCR
CN-ISC(L)
CN-ISC(R)
The two diagrams on the next page show the host control system side and the
CN-TVAV side ISC's. As an example of a signal path, a button press on a
touchpanel would activate signal VCR-PLAY. The signal would be packaged for
transport over Cresnet (containing the destination Cresnet ID, Slot 5, and Port 1).
The receiving CN-TVAV would decode it, and send it to Slot 5, ISC 1, Signal 1,
which would activate the signal TVAV-VCR-PLAY that would put the VCR into
the Play Mode. The return path for TVAV-VCR-PLAY-F is similar.
28 • Programmable TV/AV Controller: CN-TVAV
Operations Guide - DOC. 5722B
Crestron CN-TVAV
Programmable TV/AV Controller
Detail View of the Remote Side (CNMSX-PRO) ISC(R) Symbol in SIMPL Windows’
Programming Manager
Detail View of the Local CN-TVAV Side ISC(L) Symbol in SIMPL Windows’ Programming
Manager
Example Programs
Example programs for the CN-TVAV are available from the Downloads page
(EXAMPLES Library) of Crestron’s website (www.crestron.com). Search for
CN-TVAV.ZIP that contains two example programs, associated files and a
README.TXT file that describes the programs. New users are required to register
in order to obtain access to the FTP site.
Operations Guide - DOC. 5722B
Programmable TV/AV Controller: CN-TVAV • 29
Programmable TV/AV Controller
Crestron CN-TVAV
Problem Solving
Troubleshooting
The table below provides corrective action for possible trouble situations. If further
assistance is required, please contact a Crestron customer service representative.
CN-TVAV Troubleshooting
POSSIBLE
CAUSE(S)
TROUBLE
POWER
indicator LED
does not
illuminate.
TV or AV
device not
receiving
power.
TV or AV
device does
not respond.
*
VAC at wall outlet or
power strip is not
available.
CN-TVAV internal fuse
bad.
VAC at wall outlet or
power strip is not
available.
Device faulty.
STIRP not positioned
properly.
Wrong manufacturer or
model number for IR
driver.
Incorrect panel screens
loaded into touchpanel.
CORRECTIVE ACTION
Verify VAC at wall outlet or power strip is
available.
Perform the "Internal Fuse Replacement"
procedure following this table.
Verify VAC at wall outlet or power strip is
available.
Refer to manufacturer's documentation.
Verify placement of STIRP. *
Verify device definition.
Use the software to open the project and verify
that each button that is suppose to control the
device has a join number and the command
associated with it lists "SEND<device name>
<function name>" (e.g., SEND LIV_RM_VCR
PLAY).
Download the touchpanel screens again.
Refer to the latest revision of the STIRP Installation Instructions (Doc. 5674) for details
to attach the STIRP near the IR sensor window of the TV or AV device. This document
can be obtained from the Products page (PRODUCT MANUALS section, Hardware
section) or Downloads page (MANUAL Library) of Crestron’s website
(www.crestron.com). Search for STIRP.PDF.
Internal Fuse Replacement
The circuitry of the CN-TVAV is electrically protected by an internal fuse. If the
fuse blows (opens), no power is provided to the circuitry (the POWER OUT
receptacle remains energized). To replace the fuse, perform this procedure. The only
tools required are a grounding strap (or grounded work station) and a #1 Phillips tip
screwdriver.
WARNING: Use extra caution when working with 100-125VAC or 220-250VAC.
These voltages present an extreme hazard if inadvertent contact is made. Make sure
that the POWER IN line plug is disconnected from the power source before
performing this procedure.
30 • Programmable TV/AV Controller: CN-TVAV
Operations Guide - DOC. 5722B
Crestron CN-TVAV
Programmable TV/AV Controller
CAUTION: The CN-TVAV contains electro-static discharge (ESD) sensitive
devices. Perform the following procedure while wearing a grounding strap that is
properly grounded or on a grounded work station to avoid damaging the unit.
CAUTION: If disconnecting the CN-TVAV from the power source, DO NOT pull
the POWER IN cord. Disconnect power by pulling the POWER IN plug from the
source.
NOTE: The internal fuse only protects the CN-TVAV circuitry. This fuse does not
protect the POWER OUT receptacle.
1.
Disconnect the POWER IN plug from the power source.
NOTE: Although not required, it is recommended to label and disconnect each
cable (POWER IN line excluded) from the rear panel ports of the CN-TVAV.
2.
Turn the CN-TVAV over to bottom-side up.
3.
Refer to the diagram below. Using a #1 Phillips screwdriver, remove
the four cover screws.
Remove Cover Screws
Operations Guide - DOC. 5722B
4.
Slide the cover rearward and remove.
5.
Turn the CN-TVAV over to top-side up.
Programmable TV/AV Controller: CN-TVAV • 31
Programmable TV/AV Controller
6.
Crestron CN-TVAV
From the front panel, the fuse assembly is located at the left-rear corner
of the CN-TVAV. As shown below, remove fuse by pulling top of fuse
straight up.
Remove Fuse
NOTE: If a resistance checker is available, verify that fuse is open/maximum
resistance. If fuse is good/no resistance, contact Crestron customer service. If fuse is
verified open, continue to the next step.
7.
Refer to “Leading Specifications” that begins on page 6 and replace
fuse with same type and rating. As shown below, align the fuse and
fuse base pins and install.
Install Replacement Fuse
8.
Slide the cover from the rear of the CN-TVAV forward.
9.
Turn the CN-TVAV over to bottom-side up.
NOTE: The inner-most screw holes of the cover and CN-TVAV are machined for
unit rack mounting and do not accommodate the cover screws. Do not install the
cover screws into the inner-most screw holes.
10. Install the four cover screws that were removed in step 3 into the
outer-most screw holes and tighten to finger-tight, then using a #1
Phillips screwdriver, tighten an additional 1/8-turn.
11. Turn the CN-TVAV over to top-side up.
NOTE: If the cables were labeled and disconnected from the rear panel ports of the
CN-TVAV, reconnect each cable.
12. Connect the POWER IN plug to the power source.
32 • Programmable TV/AV Controller: CN-TVAV
Operations Guide - DOC. 5722B
Crestron CN-TVAV
Programmable TV/AV Controller
Further Inquiries
If after reviewing this Operations Guide, you cannot locate specific information or
have questions, please take advantage of Crestron's award winning customer service
team by calling:
•
In the US and Canada, call Crestron’s corporate headquarters at
1-888-CRESTRON [1-888-273-7876] or 1-201-767-3400.
•
In Europe, call Crestron International at +32-15-50-99-50.
•
In Asia, call Crestron Asia at +852-2341-2016.
•
In Latin America, call Crestron Latin America at +525-260-4336.
For local support from exclusive Crestron factory-trained personnel call:
•
In Australia, call Soundcorp at +613-9488-1555.
•
In New Zealand, call Amber Technologies at +649-410-8382.
Future Updates
As Crestron improves functions, adds new features, and extends the capabilities of
the CN-TVAV, additional information and programming examples may be made
available as manual updates. These updates are solely electronic and serve as
intermediary supplements prior to the release of a complete technical documentation
revision.
The Downloads page of the Crestron website (www.crestron.com) directs the reader
to the location and description of each update. Check the site periodically for update
availability and its subjective value.
Operations Guide - DOC. 5722B
Programmable TV/AV Controller: CN-TVAV • 33
Programmable TV/AV Controller
Crestron CN-TVAV
Return and Warranty Policies
Merchandise Returns / Repair Service
1.
No merchandise may be returned for credit, exchange, or service without prior
authorization from CRESTRON. To obtain warranty service for CRESTRON
products, contact the factory and request an RMA (Return Merchandise
Authorization) number. Enclose a note specifying the nature of the problem, name
and phone number of contact person, RMA number, and return address.
2.
Products may be returned for credit, exchange, or service with a CRESTRON Return
Merchandise Authorization (RMA) number. Authorized returns must be shipped
freight prepaid to CRESTRON, Cresskill, N.J., or its authorized subsidiaries, with
RMA number clearly marked on the outside of all cartons. Shipments arriving freight
collect or without an RMA number shall be subject to refusal. CRESTRON reserves
the right in its sole and absolute discretion to charge a 15% restocking fee, plus
shipping costs, on any products returned with an RMA.
3.
Return freight charges following repair of items under warranty shall be paid by
CRESTRON, shipping by standard ground carrier. In the event repairs are found to
be non-warranty, return freight costs shall be paid by the purchaser.
CRESTRON Limited Warranty
CRESTRON ELECTRONICS, Inc. warrants its products to be free from manufacturing defects in
materials and workmanship under normal use for a period of three (3) years from the date of
purchase from CRESTRON, with the following exceptions: disk drives and any other moving or
rotating mechanical parts, pan/tilt heads and power supplies are covered for a period of one (1)
year; touchscreen display and overlay components are covered for 90 days; batteries and
incandescent lamps are not covered.
This warranty extends to products purchased directly from CRESTRON or an authorized
CRESTRON dealer. Purchasers should inquire of the dealer regarding the nature and extent of the
dealer's warranty, if any.
CRESTRON shall not be liable to honor the terms of this warranty if the product has been used in
any application other than that for which it was intended, or if it has been subjected to misuse,
accidental damage, modification, or improper installation procedures. Furthermore, this warranty
does not cover any product that has had the serial number altered, defaced, or removed.
This warranty shall be the sole and exclusive remedy to the original purchaser. In no event shall
CRESTRON be liable for incidental or consequential damages of any kind (property or economic
damages inclusive) arising from the sale or use of this equipment. CRESTRON is not liable for
any claim made by a third party or made by the purchaser for a third party.
CRESTRON shall, at its option, repair or replace any product found defective, without charge for
parts or labor. Repaired or replaced equipment and parts supplied under this warranty shall be
covered only by the unexpired portion of the warranty.
Except as expressly set forth in this warranty, CRESTRON makes no other warranties, expressed
or implied, nor authorizes any other party to offer any other party to offer any warranty, including
any implied warranties of merchantability or fitness for a particular purpose. Any implied
warranties that may be imposed by law are limited to the terms of this limited warranty. This
warranty statement supercedes all previous warranties.
Trademark Information
All brand names, product names, and trademarks are the sole property of their respective owners. Windows is a registered
trademark of Microsoft Corporation. Windows95/98/Me and WindowsNT/2000 are trademarks of Microsoft Corporation.
34 • Programmable TV/AV Controller: CN-TVAV
Operations Guide - DOC. 5722B
Crestron CN-TVAV
Programmable TV/AV Controller
This page intentionally left blank.
Operations Guide - DOC. 5722B
Programmable TV/AV Controller: CN-TVAV • 35
Crestron Electronics, Inc.
15 Volvo Drive Rockleigh, NJ 07647
Tel: 888.CRESTRON
Fax: 201.767.7576
www.crestron.com
Operations Guide - DOC. 5722B
09.01
Specifications subject to
change without notice.