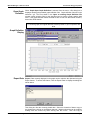
1
MDLMDL-DataManager™
Version 5.0 Reference Guide
For use with the MicroDataLogger® data acquisition system.
Updated June 2002
www.archenergy.com
FCC Notice
WARNING
This equipment has been certified to comply with the limits for Class B computing devices, pursuant to Subpart J
of Part 15 of FCC Rules. Only peripherals (Computer input/output devices, terminals, printers, etc.) certified to
comply with the Class B limits may be attached to this computer. Operation with non-certified peripherals is likely
to result in interference to radio and TV reception. (44 FR 59543. Oct. 16, 1979, as amended at 45 FR 24166.
Apr. 9, 1980)
© 2002 by Architectural Energy Corporation.
License Agreement
Please read this license agreement.
If you do not agree to these terms, return the full product to
Architectural Energy Corporation within thirty (30) days of delivery.
This is a legal agreement between you, the end user, and Architectural Energy
Corporation. The MDL-DataManager™ software program (the software) is licensed
by Architectural Energy Corporation to the original customer and any subsequent
transferee of the product for use only on the terms set forth here.
Grant of License
Architectural Energy Corporation grants you, the user, the right to use the software on
any computer(s) as is necessary, for you, the user, to communicate with the
MicroDataLogger® portable data acquisition system equipment that you are using.
The use of the software other than with the MicroDataLogger portable data acquisition
system is prohibited.
Copyright
The software is owned by Architectural Energy Corporation and is protected by United
States copyright laws and international treaty provisions. You may make an archival
copy of the software. You may not duplicate or copy in full or in part the user’s manual
or other written materials without the express written authorization of Architectural
Energy Corporation. (PDF materials downloaded from our web site may be
duplicated for customer use.)
Other Restrictions
The software license is provided to you, the user, without charge with the rental or
purchase of the MicroDataLogger portable data acquisition system. You may not
rent, lease or sell the software. If the MicroDataLogger portable data acquisition
system is rented or sold, the software license shall be transferred to the subsequent
MicroDataLogger system user without charge. You may not reverse engineer,
decompile, disassemble, or create derivative works from the software.
General
This Agreement is governed by the laws of the State of Colorado.
Due to Architectural Energy Corporation’s policy of continuous product
improvement, software and hardware specifications are subject to
change without notice.
MicroDataLogger® Portable Data Acquisition System
Standard
Product
Warranty
Architectural Energy Corporation (AEC) warrants the MicroDataLogger portable data
acquisition system and accessories to be free from defects in material and workmanship for a
period of one year. This warranty is limited to repairing or replacing, at AEC’s option, any
defective component, only when it is returned with an AEC Return Material Authorization
number to AEC or to an AEC-designated repair facility. In all cases, shipping charges to and
from AEC or the AEC-designated repair facility are at the Customer’s expense.
Certain sensors, transducers, accessories or peripherals included with the product but not
manufactured by AEC, including but not limited to batteries, are warranted for 90 days or the
extent of the manufacturer’s warranty, whichever is longer.
This limited warranty does not cover any losses or damages resulting from shipment to or
from Customer, or from improper installation, environment or abuse, or from any
modifications, adjustments or repair by other than AEC-authorized personnel, nor does this
warranty cover a product subjected to misuse or accidental damage. AEC shall be held
harmless for any injury or property damage whatsoever resulting from the misuse,
misapplication, or illegal use of the MicroDataLogger portable data acquisition system.
Except as set forth and except as to title, there are no warranties, expressed or implied, or
any affirmations of fact or promises by AEC with reference to the products or their
merchantability or fitness for any particular purpose. In no event shall AEC be liable for lost
data, lost profits, goodwill, or any other special or consequential damages.
Architectural Energy Corporation
2540 Frontier Avenue, Suite 201
Boulder, Colorado 80301 USA
Phone: 303-444-4149
Toll Free: 800-450-4454
FAX: 303-444-4304
Email: [email protected]
Web Site: http://www.archenergy.com
MicroDataLogger®, MDL-DataManager™ and MDL-DataRetriever™ are trademarks of Architectural Energy
Corporation.
Other brand and product names if mentioned in this guide are trademarks of their respective holders.
MDL-DataManager™ Software
and
MicroDataLogger® data acquisition system
Reference Guide
Table of Contents
Section
Topic
1.0 Overview
1
2.0 Quick Start Guide
Attaching Modules to the MicroDataLogger Unit
LCD and Push Button
Button Start/Stop
Software Installation
Connecting the MicroDataLogger to a Computer
Configuring the MicroDataLogger
Battery Capacity and Charging
Estimated Battery Run Time
Sensors with High Power Requirements
Battery Run Time Test
2
2
2
3
3
3
3
4
5
6
6
3.0 MDL-DataManager™ Software
3.1 File Menu Commands
Use Existing Config
Delete
Export (to ASCII File)
Edit Log File
Print Configuration File
Recent File
Exit
Table of Contents
Page
8
8
8
8
8
10
10
10
10
3.2
Logger Menu Commands
Configure MDL
Configuration Parameters Window
Run-Time Parameters
Button Start/Stop
Overwrite Data When Memory is Full
Battery Voltage
Memory Capacity
Scale Buttons
Slope and Offset Wizard
Command Buttons
Real-Time Readings
Retrieve Data
10
10
11
11
13
13
13
13
14
15
15
16
17
3.3
Graph Menu Commands
New Graph Definition
Open Graph Definition
Export Data
Edit Graph Definition
Close Graph Definition
Save Graph Definition
Print Graph
18
18
20
20
21
21
21
21
Section
Topic
3.3
Table of Contents
Page
Graph Menu Commands (continued)
Copy Graph to Clipboard
The Mouse
21
21
3.4
Graph Analysis Features
Integration and Statistical Analysis
22
22
3.5
View Menu Commands
23
3.6
Preferences Menu Commands
Options
Edit Modules List
23
24
24
3.7
Help Menu Commands
24
4.0 MDL-Remote™ Application
MDL-Remote Operation
MDL-DataManager Options Window – Comm Port/Modem
Edit Phone Numbers
Command Buttons
Phone Number Information
MDL-DataRetriever™ Software
25
25
27
27
27
27
28
5.0 Trouble Shooting
Hardware Problems
PC Communication Problems
29
29
30
Appendix A – Module Wiring Connections
General Signal Measurement Modules
Screw Designations for Wiring
Module Wiring Diagrams
32
32
32
33
Appendix B – Calculating Scale Factors
Conversion Formula
Determining Slope
Determining Offset
34
34
34
34
Appendix C – MicroDataLogger Specifications
35
MDL-DataManager™ Reference Guide
Architectural Energy Corporation
1.0 Overview of the MicroDataLogger® System
Architectural Energy Corporation (AEC) has created the MicroDataLogger® data
acquisition system that is a portable, four-channel, battery-powered logger with
associated sensors and accessories. The MicroDataLogger unit (MDL) is a generalpurpose microcomputer-based data logger with the following unique features.
!
!
!
!
FLASH memory
12-bit resolution
Modular interchangeable sensors
Provided excitation power to sensors
!
!
!
!
Automatic sensor identification
Individual logger serial number
Onboard LCD display
Accepts analog and digital signals
The MicroDataLogger unit can be used as a stand-alone portable data acquisition
system to meet any variety of user-defined data collection needs, or as part of an
integrated system of application software, such as the ENFORMA series, with
embedded engineering algorithms to solve specific performance evaluation problems.
AEC has recently enhanced the MicroDataLogger system by adding remote access
capabilities. The new MDL-Remote® system utilizes the MicroDataLogger acquisition
system with a specially equipped modem and associated hardware to easily retrieve
data via phone line from a customer's location. The new remote system integrates
MicroDataLogger®—DataManager™ software (MDL-DataManager) with a
companion package called MicroDataLogger®—DataRetriever™ software (MDLDataRetriever).
A diverse set of customers benefit from AEC’s MicroDataLogger data acquisition
system that includes utilities, energy service companies, HVAC contractors,
compressed air service companies, and energy consultants.
The MicroDataLogger unit is a small, battery-powered data logger capable of recording
time-series information from a wide variety of sensors and electrical transducers. A
personal computer is used to configure the MDL for a particular application and later to
retrieve and analyze the recorded data.
The MicroDataLogger unit has four plug-in slots for signal conditioning modules
(sensors). When a module is installed in the logger, an Auto-ID feature can identify
the module's function and will automatically program the correct excitation power and
sensor warm-up time.
The MDL's non-volatile FLASH memory can store
approximately 64,000 readings total or 16,000 readings for each of four channels.
The frequency of MDL measurements is user-defined and can vary from one
measurement every three seconds to one every hour. To conserve the MDL's
memory, a number of individual measurements can be averaged together and stored
as one reading. At a typical measurement frequency of once every minute using
typical low-power requirement sensors, the MDL can record data for more than 30
days.
Other features include a Liquid Crystal Display (LCD) display, real-time clock, 12-bit
resolution, precision voltage reference, serial port, and easy-to-use Windows-based
logger control software, MDL-DataManager software.
Section 1.0: Overview of the MicroDataLogger® System
Page 1
MDL-DataManager™ Reference Guide
Architectural Energy Corporation
2.0 Quick Start Guide
Attaching
Modules to the
MicroDataLogger
Unit
The MicroDataLogger unit (MDL) has four plug-in slots for sensor and signal
conditioning modules. Facing the front of the MDL unit with the Liquid Crystal Display
(LCD) at the top, these channels are numbered 1 to 4 from left to right. Modules are
easily installed on the logger by sliding the module’s rear mounting clip onto the edge
of the MDL module mounting deck, while making sure the module’s connector is
correctly aligned with the pins on the MDL mating connector. When the pins are
aligned, push the module completely into the MDL mating connector. This will lock the
module securely into place and will protect it from being accidentally disconnected. To
remove the module, pull it straight out of the logger.
Warning:
It is very important to properly align the module connector with the pins on the
MDL mating connector. Improper alignment will bend the pins, making the MDL
unable to accept modules and can result in a wide variety of problems.
LCD Display and The MDL’s alphanumeric LCD can be activated by the push button switch located on
Push Button the right side of the logger.
Press once for a sequential display of the user-programmed logger name, the current
time, and other information about the current state of the logger.
Press twice for the current (real time) readings from all four channels. The display will
briefly show the units of measure and then display the channel readings for the next
five minutes.
Press three times for a sequential display of the logger’s user-programmed channel
configuration information, logger serial number and firmware revision level.
Press four times for a continuous (5 minute) display of the battery voltage. The
logger will emit a warning beep at the end of the 5-minute interval. You must have
firmware version 1.07 or higher to support this feature.
Section 2.0: Quick Start Guide
Page 2
MDL-DataManager™ Reference Guide
Architectural Energy Corporation
Note:
If your MDL does not have firmware version 1.07 or higher, please call to order a
firmware upgrade for your MDL. Firmware version 1.08 is standard on Model
202 MicroDataLogger units.
Once a display mode is activated, it will continue through its display sequence and
then go back to sleep. To cancel and exit a display mode, press the button once.
Button Start/Stop The pushbutton can also be used to override the programmed Start Time. Data
logging can then start immediately or logging can be terminated early. This feature can
only be used if the MDL was configured with the Button Start/Stop option. If Button
Start/Stop is enabled, press and hold down the push button for five seconds to start
data logging before the Start Time. Logging will continue until the configured Stop
Time is reached, the memory is full, or the push button is held in again for 5 seconds.
You must have firmware version 1.07 and MDL-DataManager version 2.0 or higher to
support the pushbutton stop feature.
Software The MDL-DataManager software is included on CD with the purchase or rental of a
Installation MicoDataLogger unit. Installation of the software is simple and straightforward when
following the CD package instructions or the web site download directions.
The latest version of the MDL-DataManager software is made available for download
on the Architectural Energy Corporation (AEC) web site (www.archenergy.com) at no
charge. AEC requests that visitors downloading the software online provide contact
information so that we can identify which customers are using which version of
software in case technical bulletins or application notes need to be sent to software
users.
The MDL-DataManager software has these system requirements for operation:
! Windows®-based system of Windows 95 or greater
! NT 4.0 or greater (NT 4.0 Requires Service Pack 4 or above)
! Requires Common Controls 32 (MDL-DataManager will install if not present)
! A Comm Port in range 1, 2, 3, 4
System Administrators are needed when installing MDL-DataManager on to
Windows® NT (or Windows® 2000 or XP ) Operating Systems.
Connecting the
MicroDataLogger
to a Computer
First, connect the end of the serial communication cable with the rectangular 9-pin
female connector to the computer’s serial port, and then insert the other end into the
round DIN connector on the right side of the MDL. When the cable is plugged into a
sleeping logger, the MDL will wake up and the LCD display will show ON for a brief
moment (less than a second).
Note:
Before attempting to communicate with the MDL for the first time, be sure to use
the command Preferences-Options, Comm Port/Modem to select the correct
communications port (COMM 1, COMM 2, COMM 3, or COMM 4).
AEC recently enhanced the MDL system by adding remote access capabilities. The
new remote system integrates MDL-DataManager software with a companion
package, the MDL-DataRetriever software. For configuration instructions, see the
MDL-DataRetriever™ Software section.
Section 2.0: Quick Start Guide
Page 3
MDL-DataManager™ Reference Guide
Architectural Energy Corporation
Configuring the The MicroDataLogger unit must be programmed for a particular data collection
MicroDataLogger application before it can be used. This process is called configuration.
To configure the logger, use the following procedure:
1. First, plug in the appropriate modules if you would like the software to
automatically configure the channels with the proper modules. (This is not
required to configure the MDL; however, it is good practice to ensure that the
proper modules are placed into the proper channels and so that the MDLDataManager software’s Auto-ID feature also can be used.)
2. Connect the MDL to the personal computer running the MDL-DataManager
software.
3. Select Logger-Configure MDL from the Main Menu. See Configure MDL for
more information about configuration issues. Enter Start Date and Start Time,
Duration (a data collection/recording period) and the Sample Interval (a
measurement frequency).
4. Complete the configuration process by sending the configuration to the logger by
clicking on the Send Config button.
The correct operation of the MDL now can be confirmed by using the Menu Command
Logger–Real Time Readings to display the configuration information stored in the
logger’s memory and see the current readings of each channel. Real Time Readings
also may be viewed when using the real-time display on the logger by using the twobutton press mode. After confirming proper operation, the MDL can be disconnected
from the computer and deployed in the field.
When logging is completed, reconnect the MDL to the computer. Use the Menu
Command Logger–Retrieve Data. All the measurements stored in the logger’s
memory are now transferred to a disk file in the computer. The MDL-DataManager
software’s graphing features now can be used to view the data on screen and to send
data to a printer. Refer to the MDL-DataManager™ Software section for further
details.
Battery Capacity The MicroDataLogger unit is powered by an internal, rechargeable 6 volt, 1.3 ampand Charging hour battery. The logger typically spends most of its time in a low-power sleep mode.
Whenever it is time to take a measurement, the MDL real-time clock wakes up the
microprocessor to begin a sampling cycle.
Digital modules are an exception. The pulse, status, and occupancy modules can
wake up the MDL at any time. Each time the microprocessor wakes up, it checks the
battery voltage and, if the voltage is too low, it will stop logging and display a Low
Battery Stopped alarm message. This protects the battery from being damaged by
excessive discharge. Data in Flash memory up until the Low Battery Stopped event
occurs will remain safely stored without power.
If the battery voltage is 6.2 volts or less, a Low Battery Warning message will be
displayed upon entering the Configuration, Real Time Readings or Retrieve Data
menus. This warning indicates that the battery may not be fully charged. A fully
charged battery will read 6.4 volts or higher. The MDL will operate until the battery
voltage drops to 5.6 volts, and then will enter the Low Battery Stop state. Connecting
the logger to the charger and waiting until the voltage comes back up to 6.2 volts or
higher will allow the logger to operate normally again. This can take several hours if
the battery is fully discharged.
Battery Charging: Plug the charger into a standard 120 VAC wall outlet and insert the
charger cable plug into the external power jack on the right side of the MDL.
Section 2.0: Quick Start Guide
Page 4
MDL-DataManager™ Reference Guide
Architectural Energy Corporation
Recharging time varies depending on the condition of the battery, but 8 to12 hours
(overnight) is the maximum time required. The charger is designed to function at room
temperature (65-75 degrees F) and will not charge properly in cold or hot
environments. The red LED indicator on the charger will light brightly when first
connected to a discharged battery. When the battery is charged, the LED will
occasionally flash indicating that the charger is in Float mode. The charger can be left
connected to the MDL unit continuously without damage to the battery.
Battery Voltage can be read from the MDL unit’s Display Mode 4 (four presses of the
push button) or from the MDL-DataManager software. To obtain an accurate battery
voltage reading, disconnect the logger from the charger. After disconnecting the
charger, the battery will typically read 6.5 to 7.5 volts, but this is not a reliable
indication of the battery’s charge. A fully charged battery typically will read about 6.4
volts (after sitting for 24 hours) on the LCD display. To read the battery voltage under
load, perform a four-button press and read the battery voltage at the end of the 5minute interval. (The alarm will sound and the last voltage reading will be displayed.)
Battery voltage indications in the MDL-DataManager software will be lower than the
Display Mode 4 indications because of the additional power required to operate the
serial communication interface. Therefore, the most accurate indication of battery
voltage is shown on the logger’s LCD display in Display Mode 4.
Warning:
In order to preserve battery capacity and prevent permanent damage, the
battery should be recharged after every deployment.
Loggers being stored for an extended period should have their batteries
recharged every two months.
The maximum operating time of the MDL unit’s battery depends on the power
requirements of the modules and sensors used. Sensor Warm-Up Time, Sample
Interval and the Ambient Temperature also influence the Estimated Battery Run
Time. Under typical conditions, using low power sensors, a fully charged battery will
power the MDL for more than 70,000 logged readings. More than anything else, the
sample interval you choose has the largest influence on the amount of time you will be
able to collect data.
Think of the battery as a large bucket of water and each time you sample your sensor
you remove a thimble of water. The slower you sample the longer the bucket will
contain water. Every time you sample the MDL’s channels, you remove some of the
charge from the battery. The faster you sample the sooner the battery’s charge is
depleted.
Estimated Battery The following table shows an estimate of the maximum time that an MDL-202 with a
Run Time new, full-capacity battery will run for various sample intervals with low-power sensors
such as temperature sensors. Increasing the sample time, warm-up time, or using
sensors with high-power requirements will decrease the run time of the MDL unit.
Sample Interval
3 seconds
15 seconds
1 minute
5 minutes
15 minutes
Estimated Battery Life
2 days
10 days
30 days
90 days
180 days
The MDL-202 battery has a capacity of 1.3 amp-hours. Capacity will decrease with
age, the number of charge/discharge cycles, the length of time the battery sits in a
discharged state, and the depth of discharge. The voltage at full charge of an older
Section 2.0: Quick Start Guide
Page 5
MDL-DataManager™ Reference Guide
Architectural Energy Corporation
battery will appear to be about the same as a new one, but its capacity and run time
will be less. The MDL’s battery is designed to maintain 80% of its new capacity after
200 charge/discharge cycles. Low ambient temperatures (0°F) will decrease capacity
about 30%. In addition, the self-discharge rate of the battery at room temperature is
about 5% per month. All of these effects should be considered when determining the
sample interval for the desired logging duration.
A Battery Runtime Test should be performed if the condition of the battery is suspect.
Sensors with
High Power
Requirements
Some sensors supplied with the MDL or available from other manufacturers use
significant power, and may be operated for only a short time before depleting the
battery. The 12 volt sensor excitation power supply can provide up to 100 mA, but at
that rate battery life is limited.
It is recommended that sensors with high power requirements be operated with the
MDL connected to its external AC line powered battery charger or only operated for a
short period of time using the internal battery. For extended operation, an external 6
volt battery of the required Amp-Hour rating should be used.
Note:
Power-hungry sensors that use significant power include hot wire
anemometers, tachometers, aspirated radiation shields and many types of gas
sensors (CO2, CO, etc.). For related information, see Battery Runtime Test.
Battery Runtime In order to assure the reliability of the MDL’s battery, it should be tested every three to
Test six months and after any deployment in which the MDL fails to log for the configured
duration or crashes. It’s a good procedure to keep a log of test dates and runtimes for
each MDL.
1. Disconnect all modules from the MDL and charge the battery for at least 8 hours.
2. Disconnect the charger from the MDL and check the battery voltage (four-button
press) – it should read about 6.5 to 7.2 volts shortly after being disconnected from
the
charger.
3.
Connect the MDL to a computer and configure the logger using the special battery
test configuration file supplied with MDL-DataManager version 3.0 or higher
software. To load this configuration, go to File-Use Existing Config and select
BATTEST2.CFG.
4. Send the configuration to the MDL and then disconnect the serial cable and
battery charger. Observe the LCD after logging begins. You should see
SAMPLING flash on the screen every 6 seconds. If the MDL does not start on
time, reconnect to the host computer and check the configuration.
5. Allow the MDL to continue running until it stops flashing SAMPLING. With new
batteries, this may take 15 to 20 hours depending on the model year of the MDL.
Logging will automatically stop when the battery voltage drops to 5.6 volts or less.
6. When logging has ended, reconnect the MDL to its charger and activate the LCD
by pressing the button once. Look for the LOW BATTERY STOPPED warning
message and note the Stop Date and Stop Time displayed. Pressing the button
three times displays the configuration including the Start Date and Start Time.
Subtract the Start Date and Start Time from the Stop Date and Stop Time to
determine the number of hours of operation. If the MDL ran for less than ten hours
or the battery is older than 5 years, the battery should be replaced.
Section 2.0: Quick Start Guide
Page 6
MDL-DataManager™ Reference Guide
Architectural Energy Corporation
After the test, remember to recharge the battery for eight or more hours before using
or storing the MDL.
Section 2.0: Quick Start Guide
Page 7
MDL-DataManager™ Reference Guide
Architectural Energy Corporation
3.0 MDL-DataManager™ Software
MDL-DataManager software operates in the Windows operating system. Software
installation instructions can be found in Section 2. When MDL-DataManager software
is accessed, a title screen is shown, followed by a blank screen with the following
menu commands shown across the top tool bar:
File
Logger
Graph
View
Preferences
Help
Each of the six main menu commands are discussed in detail.
AEC has recently enhanced the MicroDataLogger system (MDL) by adding remote
access capabilities. The new MDL-Remote system utilizes the MDL unit with a
specially equipped modem and associated hardware equipment and software to easily
retrieve the data via phone line from a customer's location.
The new remote system integrates MDL-DataManager software with a companion
package, called MDL-DataRetriever software. For configuration instructions, see MDL
Remote Software topic.
3.1 File Menu Commands
The File Menu Commands control all communications with the MicroDataLogger unit.
The commands available are:
Configure MDL, Real Time Readings, Retrieve Data.
Use Existing You can use a previously saved configuration file to configure the MicroDataLogger
Config unit. When File–Use Existing Config is chosen, a file dialog box will open and show
previously saved configuration files. Select a configuration file and click on OK. This
will open the Configuration Window and fill in the appropriate fields with information
from the configuration file. For related information, see Configuration Window.
Delete This menu item (File–Delete) opens the dialog box Delete an Existing File. Select
Configuration (.cfg), Data (.log). or Graph (.grf) setup files to be deleted. Click OK to
delete the file.
Warning:
Any files deleted are no longer available; this function should be used with care.
Export (to ASCII The command File–Export (to ASCII File) creates an ASCII text file from a
File) MicroDataLogger binary data file. The ASCII file can be loaded into other programs
such as spreadsheets or text editors. This menu item opens a file dialog box that can
be used to select the MicroDataLogger file to be exported to ASCII format. View the
topic example ASCII file to see the format of a tab delimited ASCII file.
Note:
Select desired format (Preferences–Options, Export File Format) BEFORE
choosing File–Export (to ASCII File). Default is set for Tab-Delimited.
The default export format is Tab Delimited, which imports into Excel very easily. There
are two formats for the ASCII export file:
(1) Tab Delimited
(2) Comma Separated Values.
Section 3.0 MDL-DataManager™ Software
Page 8
MDL-DataManager™ Reference Guide
Architectural Energy Corporation
Edit Log File
At times, it is necessary to edit an MDL log file while still maintaining the MDL *.log
format.
MDL log files can be edited by selecting Edit Log File under the File menu. When this
menu option is selected, a standard file dialog is displayed to allow the selection of the
file to be edited. When the file is selected, a new file name is suggested, usually by
adding “_1” to the original file name. To protect original data, the software does not
allow overwriting an existing file.
MDL Name
The logger name can be changed if desired to better reflect where it was located.
Logger start and stop dates and times
The start and stop of the log file can be changed to remove data from the beginning or
the end of the file. This is useful particularly if the sensors were not properly installed
before the start of the logging period, or if the logger sensors were removed before the
end of the logging period.
Channel Name
The channel name can be changed if desired to better reflect the location of the
measurement.
Slope, Offset, and Units
For data channels that used a user-configurable module that requires a slope and
offset, these can be edited to correct errors made during installation. For example, if a
slope for a 100 amp CT was used and a 200 amp CT was actually installed, the scale
factor can be changed to correct the data. Similarly, if the wrong units were selected
during the initial configuration, this also can be corrected.
To correct the Slope and Offset, type in the correct values. The software will perform
the corrections when writing the new file.
If you wish to return all fields to their original contents, click the Reset button.
Section 3.0 MDL-DataManager™ Software
Page 9
MDL-DataManager™ Reference Guide
Print
Configuration
File
Architectural Energy Corporation
Configuration files are saved while in the Configure MDL screen. The command File–
Print Configuration File sends a MDL logger configuration file to the printer. First, the
file dialog box Print a Configuration File is displayed. Select the MicroDataLogger
configuration file to print. Click OK to print. This option is useful for documenting your
monitoring setups.
Recent File The File-Recent File command is not a functioning command within the MDLDataManager software at this time.
Exit File–Exit closes MDL-DataManager software.
3.2
Logger Menu Commands
The Logger Menu Commands control all communications with the MicroDataLogger
unit. The commands available are:
Configure MDL, Retrieve Data, Real Time Readings.
Configure MDL The Logger–Configure MDL command opens the Configure MDL window. This
window is used to set up the logger prior to deployment and includes the module type
for each channel, logging Start Time, Sample Interval, Duration and other configuration
information which must be sent to the MDL before logging can begin. The following
topics discuss each field in the Configure MDL window.
Operation of Auto-ID Feature
When Logger–Configure MDL or Read Channels is selected, the software uses the
Auto-ID feature to determine the types of modules plugged into the logger and selects
the proper modules from the module drop down lists.
When using Logger–Configure MDL, if there are no modules plugged into the logger,
the module configuration information used in the previous configuration will be used.
MicroDataLogger Name
Enter a Name for the MicroDataLogger unit in the MDL Name field, such as its
location, use, project, etc. Up to two 16-character lines of identification information can
be entered. This Name appears in both the configuration and the data files, and in the
Logger LCD display mode 1. Like the Serial Number, the MDL Name will serve to
identify resultant data files collected.
Values for the Channel Setup Group fields will be automatically configured based on
the following rules:
1. A channel-by-channel comparison is made between the configuration information
stored in the MDL and the modules currently plugged into the MDL. If the modules are
the same type as defined in the configuration data stored in the MDL’s memory, the
stored configuration information is used.
2. If a module slot is empty (Not In Use), the configuration information stored in the
MDL is used.
3. If the module slot contains a module type different from the type defined in the
MDL’s configuration, the default values for the module type installed are used.
Section 3.0 MDL-DataManager™ Software
Page 10
MDL-DataManager™ Reference Guide
Architectural Energy Corporation
Note:
If File–Use Existing Config from the File menu is chosen, the software will fill in
all fields using the information stored in the existing file. However, if there are
modules plugged into the logger and there is a difference between the physical
module and the module type in the configuration file, a warning dialog will be
displayed to ask if you want the contents of the file to override the actual
configuration.
All of the fields also can be manually configured.
contained in the following topics.
Descriptions of each field are
Channel Name Field. Enter up to a 14-character alphanumeric label for each channel
to easily identify the channel of data when plotting or exporting the data.
Module Description. The Module Description field identifies the type of module that
the MDL will be configured for use. This field will be filled in automatically as
described in Operation of Auto-ID. To manually select a different module type, use the
drop-down list. Entering the first letter of the module type will automatically scroll the
list to that entry.
Manual module description is used if the MDL being configured currently does not
have any modules installed.
Edit Module List. This menu choice opens a window that displays all the current
supported module types and allows the user to select whether the module type will be
displayed in the drop down list on the MDL configuration screen. This makes it easier
to find a module when the list only contains frequently used modules. If a module is
Auto-ID’d by the software, and that module was not already selected, it will be selected
and the module will appear in the list.
To select modules to be displayed in the list, click on the desired module.
Configuration
Parameters
Window
Run-Time When Logger–Configure MDL is initially chosen from the Logger menu, the Start
Parameters Date and Start Time, Duration, Sample Interval, and Samples to Average fields are
filled in based on the configuration information stored in the MicroDataLogger unit
Section 3.0 MDL-DataManager™ Software
Page 11
MDL-DataManager™ Reference Guide
Architectural Energy Corporation
filled in based on the configuration information stored in the MicroDataLogger unit
(MDL) from the last time it was configured.
If the File–Use Existing Config is initially selected, the Start Date and Start Time,
Duration, Sample Interval and Samples To Average fields are filled in based on the
information previously saved in a configuration file.
Start Date and Start Time. Fill in the desired Start Date and Start Time using
“AM/PM” or military time, depending on how you have the clock set on your PC. The
Increase and Decrease arrow buttons next to each field can be used to increase and
decrease the values in whole days or hours, respectively. Values can also be entered
from the keyboard.
Set to Now. This button automatically sets the start date and time to the current date
and time.
Every time the MDL is configured, the logger synchronizes its internal clock to the
clock of the PC being used to configure it.
Duration. The Duration is the length of time that the MDL will be deployed collecting
data. Select the desired time units: days, hours, or minutes. Fill in the Duration field.
The Increase and Decrease arrow buttons next to the Duration field can be used to
increase and decrease the duration in whole days, hours, or minutes depending on the
duration units selected.
Tip:
If you wish to collect data for the maximum period available at the selected
storage interval, set the duration to a very large value (999 days) and MDLDataManager will automatically change the duration to the maximum value
possible.
Stop Date and Stop Time. The Stop Date and Stop Time are calculated fields and
will be filled in automatically, based on the Start Date and Start Time and the Duration
entered.
Sample Interval. The sample interval is the length of time the MDL will sleep before
waking up to take the next sample (read the sensor values of all channels). Select the
sample interval from the drop-down list.
Note:
Short sample intervals will decrease the amount of time that the logger can
operate with only the built-in battery. For information on the period of time that
the logger can operate for various sample intervals, see Estimated Battery Life.
Samples to Average. The Samples to Average is the number (1 to 255) of samples
to be averaged and stored as one reading in the data file. For example, if the Sample
Interval is set at 15 seconds and the desired Storage Interval is 1 minute, set the
Samples to Average to 4.
Tip:
Use the Samples to Average feature when short of memory and you need a long
duration time; however, averaging samples does not extend battery life.
Storage Interval. The Storage Interval is the time between stored values and is a
calculated field. It will automatically be filled in based on the sample interval and the
Samples to Average values.
Section 3.0 MDL-DataManager™ Software
Page 12
MDL-DataManager™ Reference Guide
Architectural Energy Corporation
Button Start/Stop The MicroDataLogger unit has the capability of being started or stopped in the field
manually by holding the push button in for five seconds. This feature is only available if
the logger was configured with the Button Start/Stop Enable option selected. If a
manual start in the field is desired, the Button Start/Stop Enable check box needs to
be clicked on in the Run Time Parameters Group box.
To stop logging hold the push button in for five seconds. Logging will also end when
the configured stop time is reached. The default is to have Button Start/Stop Enable
disabled.
The Start/Stop feature does not permit users to repeatedly start and stop the
MDL unit. The feature allows the MDL to be started with the push button command
and also stopped with the push button command when the feature is enabled. Once
the MDL is stopped with the push button command, it must be reconfigured to start
logging data again.
Note:
This feature requires firmware version 1.07 or higher. If your MDL does not have
firmware version 1.07 or higher, please call to order a firmware upgrade for your
logger. All Model 202 loggers have firmware version 1.08.
Overwrite Data
When Memory is
Full
When Memory Overwrite Enable is checked, the MDL has the capability of
overwriting the oldest data in memory to enable continuous monitoring. For example, if
a piece of equipment is being monitored to detect a failure mode, but the user is
uncertain when the failure will occur, the MDL can be configured to run for an indefinite
period of time. When the memory is filled, the oldest data will be overwritten with the
newest data. Flash memory is erased in 16 K blocks or about 11,000 readings.
To enable this option, click the check box Memory Overwrite Enable. If this option is
chosen, a message box will confirm that you want this option to be selected:
Warnings:
With Memory Overwrite Enable selected, new data will overwrite the
oldest data when memory is full. Verify or cancel this option.
When memory overwrite is enabled, deployment duration can be so long that
the battery will become discharged (Low Battery Stop). To prevent this, use the
Battery Charger for continuous operation from AC power.
Battery Voltage The Battery Voltage display is the last item in the Run Time Parameters Group. The
Battery Voltage display gives an approximate indication of the battery’s state of
charge. A better indication of battery voltage is obtained by pushing the MDL
pushbutton 4 times and reading the voltage on the display.
Refer to Battery Capacity and Charging for more information.
Memory Capacity MDL-DataManager software will automatically calculate the MDL’s memory capacity,
based on the user-selected Sample and Storage Intervals chosen. If a duration
period is selected which exceeds the MDL’s memory capacity, a dialog box (error
message) will pop-up. Click the OK button. The duration period is automatically
reduced to the maximum duration period allowed by the MDL’s memory capacity.
Note:
The battery capacity may be the limiting factor in determining the maximum
logging period. If fast sampling and averaging are used, then the battery could
be depleted before the memory is filled.
Section 3.0 MDL-DataManager™ Software
Page 13
MDL-DataManager™ Reference Guide
Architectural Energy Corporation
Scale Buttons There are four Scale buttons, one for each channel. These are enabled only if a User
Configurable type of module is installed, such as a 0-5 VDC input module or a pulse
input module, for example. When a user configurable module is installed, click the
Scale button to open the module Configuration Parameters window.
Configuration Parameters.
User configurable modules can be configured with the following parameters.
Slope and Offset. The Scale Factors of Slope and Offset are used to convert raw data
into engineering units suitable for display. These Scale Factors are very important for
user-supplied sensors that do not Auto-ID in the MDL-DataManager software. For
guidance on how to calculate scale factors, reference the MDL-DataManager Help
topics and select Calculating Scale Factors.
Units of Measure. Selecting this menu option opens a window that provides a choice
of either English or SI (metric) units of measure for the non-user configurable
modules, such as temperature. After selecting the desired units, click OK to save this
information.
Warm-Up Time. The MDL can supply 12-volt DC power for sensors and modules.
Only User Configurable Modules (5 volt, 10 volt, 20 mA, etc.) can have their warm-up
times adjusted, but not below the minimum value that automatically appears. These
modules are typically used to input signals from sensors and transducers supplied by
other manufacturers.
Some types of modules require power to be turned on prior to sampling a channel.
This is called Warm-Up Time: the length of time excitation power is turned on before
taking a sample. When an external sensor is powered by the MDL, the 12-volt sensor
power needs to be turned on before taking a reading to allow the output signal to
stabilize. The default warm-up time for most modules is five tenths of a second (500
mS). Depending on the characteristics of the sensor, the default warm-up time may
need to be increased. Check the sensor manufacturer's specifications for how long it
takes the output signal to become stable after the power is turned on.
If a longer warm-up time is needed, enter a new time such as 10, for a one second
Warm-Up time (ie: 10 tenths of a second). All modules default to a minimum warm-up
time and cannot be adjusted below that minimum.
Note:
Warm-Up times longer than two seconds automatically limit the Sample Interval
to 6 seconds or longer. The Sample Interval must be longer than the longest
warm-up time selected. If the Sample Interval needs to be adjusted to
accommodate a long warm-up time, a dialog box will inform the user.
Decimal Digits. The Decimal Digits controls the number of decimal places to the right
of the decimal point that will be displayed. Two decimal digits are the recommended
number to have for any data collection efforts. A selection of three or more decimal
digits will cause asterisks (****) to appear in the MicroDataLogger unit’s display.
Slope and Offset Wizard. MDL-DataManager version 5.0 introduced a Wizard for
performing the calculations required for Slope and Offset based on the information
entered by the user. TO access the Wizard feature, click on the Slope and Offset
Wizard button.
Note:
The MicroDataLogger unit’s LCD displays a maximum of 5 digits plus a decimal
point and the sign (-) of the number. If asterisks (****) appear in the display,
reduce the number of decimal places. Logged data is always recorded at full
accuracy and is not affected by the display’s decimal digits setting.
Section 3.0 MDL-DataManager™ Software
Page 14
MDL-DataManager™ Reference Guide
Architectural Energy Corporation
Scale and Offset A Wizard is provided that is accessed by clicking the Slope and Offset Wizard button.
Wizard Different screens are displayed depending on the type of user-configurable module
attached to the logger. An example window that requests user-defined parameters for
Slope and Offset calculations is shown below. The Wizard that appears is based on
the module selected.
Simply follow the step-by-step instructions on the window that appears, and be certain
to click on the Calculate button at Step 3, and OK to return to the Configuration
Parameters window where the Wizard automatically transfers the Slope, Offset and
Output Units into their respective fields. The Wizard also provides a Help option to
address user questions.
Command There are various command buttons on the right-hand side of the Configure screen,
Buttons described below:
Read Channels. The Read Channels command uses the Auto-ID feature to compare
on a channel by channel basis the module configuration information stored in the MDL
with the actual module types that may be currently installed in any of the four channel
slots.
If the stored configuration module type is the same as the actual module type, the
stored configuration information (module type, slope, offset, etc.) is used. If the module
slot is empty, the configuration is changed to Not In Use.
Note:
If the stored configuration module type is not the same as the actual module
type installed in the channel slot, the actual module type is used. Default
values are used for the required channel configuration information. It is good
practice to visually verify that the module type displayed matches the module
type used on a channel-by-channel basis.
Section 3.0 MDL-DataManager™ Software
Page 15
MDL-DataManager™ Reference Guide
Architectural Energy Corporation
Read Config. When the Read Config button is clicked, the software updates all the
fields on the Configure MDL window with the configuration information stored in the
MDL. The action is identical to that which occurs when you first enter the Configure
MDL window. This option can be used to read a new MDL’s configuration without
having to exit the Configure MDL window. This allows multiple loggers to be
configured more quickly.
Send Config. Clicking the Send Config button will send the configuration information,
shown in the Configure MDL window, to the MDL. This must be done before the MDL
can be used to collect data.
Save Config. The current configuration can be saved in a file on the host computer.
Clicking the Save Config button will open a file dialog box that will allow the user to
input a file name for the configuration file. The extension for the configuration file is
*.CFG.
Saving a configuration is useful if a particular configuration will be used frequently.
Use the Save Config Button Command to store all of the configuration information
used for that deployment. The configuration file can be reused by selecting Use
Existing Config from the File menu.
Print Configuration. The current logger configuration information can be printed by
clicking the Print Config button to provide a hard copy record of the current MDL
configuration.
Configuration files are saved while in the Configure MDL screen. The command File–
Print Configuration File sends a MicroDataLogger configuration file to the printer.
First, the file dialog box Print a Configuration File is displayed. Select the
MicroDataLogger configuration file to print. Click OK to print. This option is useful for
documenting your monitoring setups. View the MDL-DataManager Help topic
Example Configuration File to see the contents of a configuration file report.
Close. Closes the configuration screen.
Real-Time
Readings
Section 3.0 MDL-DataManager™ Software
Page 16
MDL-DataManager™ Reference Guide
Architectural Energy Corporation
The Logger–Real Time Reading Command displays the current channel readings
and the status of the MicroDataLogger unit. The readings are updated approximately
every two seconds. To close this screen, click the Close button.
Another way to read real-time readings is to push the MDL pushbutton two times and
read the real time readings on the logger display.
Retrieve Data
Note:
If you're having problems with this feature, verify that you are using MDLDataManager software version 4.0 or higher. If you're using an earlier version of
the software, upgrade to the latest available version. This can be done by
visiting the Architectural Energy Corporation web site and downloading the
software for free at www.archenergy.com.
When Logger–Retrieve Data is selected, a window is displayed with logger
information and two buttons as follows:
Retrieve Data. To initiate the data retrieval process, click on the Retrieve Data
button. A file dialog box will open, permitting the user to retrieve data into a new or
existing file. Type in a file name. The file extension “.log” will be added automatically by
the program.
Data are typically retrieved after the data collection period has ended. Data can also
be retrieved at any time before the MDL has completed data collection. Data retrieval
will not interrupt ongoing data collection.
Section 3.0 MDL-DataManager™ Software
Page 17
MDL-DataManager™ Reference Guide
Architectural Energy Corporation
The MicroDataLogger unit will sound a tone when it begins transferring data. As the
data is retrieved, a Percent Complete display will indicate progress. At about 90%
complete, the MDL will sound a tone, which indicates that the data file has been
successfully transferred to the host computer. The program then will run for a few
moments more to convert the data and store it in the file. When the conversion is
complete, a Transfer Complete message will be displayed (on older computers with
slower microprocessors this delay may take 5-10 seconds).
Cancel. The Cancel button on the screen allows the user to close the screen without
retrieving data. If data are being retrieved, the Cancel button can be clicked to stop the
retrieval.
Tip:
If the battery voltage is low, connect the battery charger to the MicroDataLogger
unit before retrieving data to prevent a Low Battery Stopped alarm shut-down.
Even if the battery fails, the logged data is safely stored in FLASH memory which
does not require battery backup.
3.3
Graph Menu Commands
The Graph menu functions provide many useful features. They provide quick viewing
of MicroDataLogger data files. The graphing function permits the creation of up to four
time-synchronized data plots from one to four data files collected by up to 4
MicroDataLogger units. Time and value scaling can be changed using mouse
zooming. The data plots can be saved, imported into other programs using the
clipboard, and printed.
New Graph The graphing function permits the creation of up to four data plots from one to four
Definition data files collected by up to 4 MicroDataLoggers in the multi-plot mode. In the “One-
Plot” mode, up to 25 data streams can be added from any combination of data files.
Time and value scaling can be changed using mouse zooming. The data plots can be
Section 3.0 MDL-DataManager™ Software
Page 18
MDL-DataManager™ Reference Guide
Architectural Energy Corporation
saved, imported into other programs using the clipboard, and printed. Follow these
steps when Graph—–New Graph Definition is selected to create or edit a graph
definition.
1. Select the desired MicroDataLogger data file in the file list box. When you select
the file by clicking once on it, the data channels in the selected file will be listed in
the "Channels" list box.
2. To add channels to the plot list, either select them individually by clicking once on
each channel and add the selected channels to the plot list by clicking "Add", or all
of the channels to the plot list by clicking "Add All".
You can add unlimited additional data channels from other data files to the plot list
using this technique, although only four data channels can be displayed at once.
The data channels will be added to the drop-down channel lists in the Graph view.
3. To change the order of the data channels in the plot list, select individual channels
and use the Up and Down buttons to change the order.
4. To remove data channels from the plot list, select individual channels and click the
Remove button, or to remove all data channels from the list, use the Remove All
button.
5. When the Plot List is finalized, click OK to close the window and display the Graph
Window.
Section 3.0 MDL-DataManager™ Software
Page 19
MDL-DataManager™ Reference Guide
Architectural Energy Corporation
Open Graph When Graph–Open Graph Definition is selected from the menu, a file dialog box is
Definition displayed showing the available graph definition files. Graph definition files end in the
extension *.grf. The Files shown in the Open an existing Graph Definition File
window contain pointers (links) to the data files used to create a graph, not the data
itself. If the graph definition and/or the data file are moved from their saved locations,
these links will be broken.
Note:
To create a graph, the original data files must be present on your computer’s disk
drive.
Graph Definition
Display
Export Data Export. Data currently displayed in the graph can be copied to the clipboard using the
Export feature. To access this feature, click the Export button to display the dialog box
shown below.
This dialog box lists the currently plotted data. Select the channels of data to copy to
the clipboard by clicking on the desired channels. Multiple selections can be made by
holding down the control key while clicking with the mouse. Click the Copy to
Section 3.0 MDL-DataManager™ Software
Page 20
MDL-DataManager™ Reference Guide
Architectural Energy Corporation
Clipboard button to complete the operation. The data can now be pasted into another
application such as Microsoft® Word or Excel.
One Plot. When data are plotted on a single plot, up to 25 data streams from any
combination of data files can be viewed. To facilitate viewing data with different units
or vastly different values, data can be assigned to either the left (Y1) or right (Y2) axis.
All of the data that was selected for plotting in the New Graph Definition dialog is
listed in the Y1 and Y2 list boxes. Select data for each Y axis by clicking on it. To
switch data from the Y1 to the Y2 axis, select the data in the Y2 list box. It will
automatically be de-selected from the Y1 list box. Data can be switched to the Y1 list
box using the same process. Data can be removed from the plot by clicking on the
highlighted item in the list box.
Multi Plot. When originally created, graphs appear in the multi plot format. Only four
data streams can be displayed in this mode and they appear stacked one on top of the
other.
Edit Graph By selecting Graph-Edit Graph Definition when viewing a new or existing graph, you
Definition may add to or remove from the graph data streams by following the steps listed under
New Graph Definition.
Close Graph Select Graph–Close Graph Definition to close the currently displayed graph.
Definition
Save Graph Graph–Save Graph Definition As and Graph–Save Graph Definition save the
Definition current Graph definition. If the current Graph definition has not previously been saved,
a dialog box opens allowing the current Graph definition to be saved under a new or
existing name.
All graph properties such as titles, colors and scaling are saved in additional graph
properties files that have the same name but different extensions as the graph
definition file.
Print Graph Graph–Print Graph prints the current graph, first displaying the graph with the Print
Previewer, using the current printer definition specified in the Window’s Print
Manager.
Copy Graph to The current graph can be copied to the clipboard and pasted into another document,
Clipboard such as Microsoft Word, using Graph–Copy Graph to Clipboard.
The Mouse The mouse has several functions when the Graph window is open that can be very
useful.
Left Mouse Button
Zoom Mode: If the Zoom Mode radio button is selected, the mouse is in zoom mode.
When the left mouse button is held down and the mouse pointer is dragged across the
screen, the zoom feature will become activated. In multi-plot mode, a box is displayed
on the screen showing the minimum and maximum time that will be used to draw the
new re-scaled graph. Drag the mouse to include the portion of the time scale to be
expanded. When the left button is released, the graph will be redrawn with the new
time scale. This operation can be undone by clicking the left arrow button (<<) on the
graph view, or redone by clicking the right arrow button (>>). To view the entire data
set, click the Reset button.
When only one plot is shown, the zoom will scale both in the X and Y directions.
Section 3.0 MDL-DataManager™ Software
Page 21
MDL-DataManager™ Reference Guide
Architectural Energy Corporation
When the mouse pointer is dragged across the screen when the left mouse button is
held down, a rectangle will be displayed that shows the area that will be included in the
new graph.
Clicking on the Unzoom button returns the graphs to their original scale and
appearance.
Analysis Mode: If the Analysis Mode radio button is selected, the mouse is in analysis
mode. In Analysis Mode, the mouse is used to select a time region for analysis. The
area is selected in the same way that zooming is performed. Once the area has been
selected, a window will appear with Analysis Results.
Right Mouse Button.
Clicking the right mouse button displays the property dialog box for the selected graph.
To select a graph, click on it with the left mouse button. You can change labels,
scaling, colors, and many other features of the graphs using the property dialog. For
more information about the properties dialog box, click the help button on the dialog
box.
3.4
Graph Analysis Features
Integration and
Statistical
Analysis
To perform an analysis of a region of the logger data, first click on the Analysis Mode
radio button on the graph screen. Hold down the left-mouse button, and drag the
mouse over the range of the graph to be analyzed. The points closest to the beginning
and the end of the selected region will be used to define the range of the points in the
analysis.
Tip:
Percent “On Time” data collected using the STATUS-81-3 module is not suited
for Integration and Statistical Analysis mode. Export this kind of data to a
spreadsheet for analysis.
The following information is appears in the analysis window for each plot.
Plot # Logger Channel Name. The plot number from 1 to 4, and the MicroDataLogger
Channel Name assigned to the logger during the configuration process.
Start/Stop Date Time. The analysis period selected with the mouse. This may vary
from one plot to another if the data was not collected from the same logger and the
data streams do not start or end at the same time.
Section 3.0 MDL-DataManager™ Software
Page 22
MDL-DataManager™ Reference Guide
Architectural Energy Corporation
Number of Samples. The number of samples included in the selected region.
Area. The area is derived by integrating under the curve, using the 0 on the Y-axis as
the lower bound. The integration algorithm used is Simpson’s Method. If only a single
data point is selected, the area is undefined.
Min. The minimum Y value for the selected region.
Max. The maximum Y value for the selected region.
Avg. The average Y value for the selected region.
Slope. The slope calculated between the first and the last samples in the region.
Unless the data are very linear, this is relatively meaningless
Std. Dev. The standard deviation of all the samples in the region.
Four buttons are available at the bottom of this screen:
Close. This closes the analysis window. When the analysis window is closed, another
region can be selected and analyzed until the Analyze Graph Data mode is turned off.
This is done by selecting the Analyze Graph Data option in the Analysis menu. When
this option is not checked (off), normal zooming of the graph is enabled once again.
Print. This option allows both the analysis information and the graph to be printed to a
printer.
Copy to Clipboard. This option allows just the text in the analysis window to be
copied to the Clipboard. It can then be pasted to another application.
Help. Displays the help text for this screen.
3.5
View Menu Commands
The View menu contains two viewing preferences. One preference is for the Toolbar
that automatically appears at the top of the MDL-DataManager window. By selecting
View-Toolbar, you can remove or replace the checkmark to include or remove the
toolbar from the window. The same actions can be taken to remove or replace the
Status Bar at the bottom of the window. The Status Bar displays the current time and
date as set on the host computer.
3.6
Preferences Menu Commands
The following preferences can be set from this menu: Options and Edit Module List.
The Options menu includes settings for the following: Comm Port/Modem, Export File
Format, and Units of Measure. These preferences are stored in the file PREF.MDL
and can be changed using this menu. The new preferences will be written to
PREF.MDL and will be used for the current and all future MDL-DataManager
sessions.
AEC recently enhanced the MicroDataLogger data acquisition system and MDLDataManager software by adding remote access capabilities. Use the Comm
Port/Modem tab listed under the Options menu to integrate MDL-DataManager with
the MDL-DataRetriever software.
Section 3.0 MDL-DataManager™ Software
Page 23
MDL-DataManager™ Reference Guide
Architectural Energy Corporation
Options This Preferences menu option displays a window with the following tabs for setting
various options within the software:
Comm Port/Modem Configuration. Selecting Preferences–Options, Comm
Port/Modem opens a window that provides a choice of communications port
connection for a serial interface with a MicroDataLogger unit as well as phone and
modem settings for MDL-DataManager software to store.
The MDL-DataRetriever software creates and uses scheduling information to
automate retrieval of data from MDL units installed in the field. Please read the MDLRemote for information regarding modem connections in the Preferences—–Options
window.
Export File Format. Selecting Preferences—–Options, Export File Format opens a
window that provides a choice of either Tab Delimited fields or Comma Separated
fields for the format to use when creating an ASCII text data file. After selecting the
desired format, click OK to save this preference.
This function allows for data to be exported as an ASCII text file for input into standard
software applications (spreadsheet, database, word processor or statistical
applications). The export function file name extension defaults to .txt.
Units of Measure. Select the engineering units which you would prefer your data be
stored in: English or SI (Standard International/Metric).
Edit Modules List This menu choice opens a window that displays all supported module types and allows
the user to select whether the module type will be displayed in the drop down list on
the MDL configuration screen. This makes it easier to find a module when the list only
contains frequently used modules. If a module is Auto-ID’d by the software, and that
module was not already selected, it will be selected and the module will appear in the
list.
To select or remove modules to be displayed in the module list, click on the desired
module.
3.7
Help Menu Commands
Help for MDL-DataManager software is provided in two forms. The Help bar at the
bottom of the screen displays a short context sensitive help message. A
comprehensive online reference guide can be accessed at any time by pressing the
<F1> key or by selecting the Help–Help Topics menu item. All topics in Help are
listed alphabetically.
Also provided under the Help menu is an About selection that redisplays the MDLDataManager opening screen information: version of the software, phone numbers for
MicroDataLogger sales & technical support, and Architectural Energy Corporation
mailing information.
Section 3.0 MDL-DataManager™ Software
Page 24
MDL-DataManager™ Reference Guide
Architectural Energy Corporation
4.0 MDL-Remote™ Application
AEC enhanced the MicroDataLogger data acquisition system (MDL) by adding
remote access capabilities. Remote access allows MDL users to automatically
retrieve data from loggers using a phone line and download data to a computer while
the equipment is still installed in the field. The ability to easily and quickly access data
from a remote site is the main benefit of this enhancement.
Designed to integrate seamlessly with MDL units, sensors & accessories, and MDLDataManager software, the new remote system includes the following components.
!
!
!
!
MDL-Modem uniquely equipped for the MDL system to transfer data via phone
line.
MDL-Smart Port that allows connection of up to 5 loggers per modem.
MDL-Remote extended length cable for connectivity from the MDL to the Smart
Port or Modem.
MDL-DataRetriever software automates data retrieval and splices collected data
into one “.log” file. (MDL-DataManager software does not provide automated
data retrieval or data splice features.)
MDL-Remote MDL-DataManager and MDL-DataRetriever software can be used to remotely
Operation configure and download data from MicroDataLogger units through the use of a
modem, and can also be used with a modem and Smart Port to enable remote
communication with up to five MDL units with a single modem. Once the software is
configured, remote communication with MDLs is nearly identical to local
communication over a local serial cable.
If a Smart Port is used, you can communicate with up to five MDL units, although you
cannot communicate with all of them at once. You must individually select which
MDL you wish to communicate with by selecting the desired Port ID in the MDL
Options dialog, discussed below.
To use the MDL-DataManager software to communicate with a remotely installed
MicroDataLogger unit, follow these steps.
While you're at the remote data collection site:
1.
Install the MDL and sensors in the remote location.
Install the MDL and sensors. If you intend to leave the MDL in place for an extended
period of time, be sure to plug the MDL into a battery charger (CHARGE-02). This
will ensure that you can repeatedly download the logger without encountering a
battery failure. It also allows you to store data at high frequencies with no concern
about discharging the battery.
2.
Configure the MDL for your application using MDL-DataManager software
version 4.0 or higher. (optional)
While you are at the remote site, it is good practice to configure the MDL to ensure
that all sensors are connected properly and that the readings are reasonable. You
can also perform this initial configuration remotely over a modem, but if there are any
problems with the physical setup of the loggers, you won't be able to fix it until you
take a trip out to the site. So to avoid disappointment, configure your loggers before
you leave the site!
Section 4.0 MDL-Remote™ Application
Page 25
MDL-DataManager™ Reference Guide
Architectural Energy Corporation
Since you may want to automatically download the MDL for the duration of the data
collection, use the following suggested run time parameters:
Memory Write Enable
If you wish to be able to collect data indefinitely, check
this box. (Recommended only if you're going to be
using MDL-DataRetriever.)
Duration
As long as you wish to collect data, or longer
Button Start/Stop
If you wish to be able to start the loggers by pushing
the button before you leave the site, check this box.
(Disadvantage: If you check this box and start the
loggers with a button press, the time stamp for
different loggers may be slightly different.)
3.
Install Smart Port (MDL-SMPORT) if more than one MDL is being used.
If you are using more than one MDL, you can use a Smart Port to connect up to five
MDL units to a modem. Connect the MDLs to the Smart Port using the standard MDL
serial cable (CABLE-SERIAL). If the MDL needs to be placed farther than six feet
from the Smart Port, then you can use a RS-232 extension cable (CABLE-EX-050 or
200) between the standard serial cable and the Smart Port. Extended distance RS232 cables are stocked by AEC, and are available in standard 50 foot and 200 foot
lengths. As many as four of the 50 foot cables may be connected together to create a
combined length of 200 feet, but it is recommended that total extended lengths not
exceed 200 feet due to possible signal degradation. If your extension needs are less
than 25 feet, then a standard, readily available RS-232 extension cable may be used.
The Smart Port requires external power through the supplied power supply.
4.
Connect modem (MDL-MODEM) to Smart Port (MDL-SMPORT), or to MDL
if a single MDL is being used.
The modem connects to the Smart Port using the modem adapter cable (CABLEMODEM). Although any modem that is capable of auto-answer can be used, we
recommend that you use an AEC-provided modem (MDL-MODEM), which has been
pre-configured and tested, and includes the required modem adapter cable. If
necessary, an extension cable may be used between the modem and Smart Port,
although in practice it may be easier to keep them close to one another since they
both require power.
5.
Connect the modem to the phone line using standard phone cable.
Configuring MDL-DataManager to remotely communicate with MDLs:
After physically setting up the MDLs, Smart Port, and modem and you've returned to
the host computer, you can set up MDL-DataManager 4.0 or higher to communicate
directly with the remote MDLs. To set all this up, start the MDL-DataManager
software and follow these steps:
!
Select Options under the Preferences menu.
!
Select the Comm Port/Modem tab in the Options dialog and set up the
phone number.
!
If a Smart Port is installed, check the Smart Port checkbox.
!
If a Smart Port is installed, select the Port ID for the desired MDL unit.
Section 4.0 MDL-Remote™ Application
Page 26
MDL-DataManager™ Reference Guide
Architectural Energy Corporation
!
Check the "Use Modem for all Logger Actions" check box to enable the
software to use the modem.
!
Set the number of "Dial Retries" to the maximum number of times you
wish the software to try to reconnect with the remote modem.
!
Click OK to close this dialog.
!
To communicate with the remote MDL, select either Configure MDL,
Retrieve Data, or Real Time Reading under the Logger menu
!
To switch between loggers connected to a Smart Port, return to the
Options dialog under the Preferences menu.
!
To hang up the modem after finishing MDL communications, select
"Hang Up Modem" under the Logger menu.
MDLDataManager
Options Window
Edit Phone The Comm Port/Modem tab in the MDL-DM Options dialog allows you to create new
Numbers phone numbers, edit existing phone numbers, or delete phone numbers that are no
longer required. Leaving a phone number in the list that is no longer required will not
cause problems, and if it is expected that the phone number may be required in the
future, then leave it in the list.
To edit or add phone numbers to the Phone Number line, click on the Edit button.
This brings up the Edit Phone Numbers dialog in which you can add, delete, or edit
phone numbers for data retrieval.
Command New
Buttons
Creates a new line in the phone number list.
Delete
Deletes the selected phone number.
OK
Closes the "Edit Phone Numbers" dialog
Help
Displays this help.
Phone Number A space for configuration information associated with each phone number is also
Information provided. This can be useful when deploying the MDL-Remote equipment in multiple
locations or when redeploying equipment at a previous logging site.
Section 4.0 MDL-Remote™ Application
Page 27
MDL-DataManager™ Reference Guide
MDLDataRetriever
Software
Architectural Energy Corporation
Item
Number
Description
Telephone number for connecting with the remote
modem. The phone number may include dashes and
parentheses, commas for pauses and any other
codes that may be required for your phone system.
Description
An optional description associated with the selected
number. This description is useful for identifying the
site
MDL-DataRetriever software is used to automatically dial up MicroDataLogger units
and download their data on a regular schedule. The software allows automated
retrieval to be scheduled at specific times. Every time a retrieval is performed the
completion status and time of execution is saved. If a busy signal is detected, the
program will redial the number for the specified number of retry times. The MDLDataRetriever software also splices separate data retrievals together for one
continuous “log” file.
A separate user guide is provided for the MDL-DataRetriever software.
Section 4.0 MDL-Remote™ Application
Page 28
MDL-DataManager™ Reference Guide
Architectural Energy Corporation
5.0 Trouble Shooting
If you experience problems with your MicroDataLogger unit (MDL), MDLDataManager software, or MDL-DataRetriever software, there are several potential
sources of the problem.
The following is a table of potential MDL problems, and the appropriate action to take
to correct the problem.
Hardware
Problems
Symptoms
Action to be taken
“Low Battery Stop” occurs
After retrieving any data taken, fully
charge MDL and perform a battery life
test as described in the Battery Life Test
help topic. If the run-time is less than 50
hrs, return to AEC for testing and/or
battery replacement.
If run-time is
greater than 50 hrs, the “Low Battery
Stop” most likely occurred due to short
Sample Intervals and/or high-powered
sensors.
No readings on a channel
Check to be sure that none of the
channel’s pins have been bent.
Otherwise return to AEC for repair. Call
first to obtain an RMA number.
MicroDataLogger unit crashes
(Black Boxes Appear in LCD)
Use a small screwdriver or similar metal
rod and gently touch the two conductors
of the external power jack on the right
side of the logger. This “re-boots” the
logger.
Note: A logger crash can be identified
by many black boxes appearing in the
LCD of the unit.
**** Appears in LCD
The MicroDataLogger unit’s LCD will
display a maximum of 5 digits plus a
decimal point and the sign (-) of the
number. If asterisks (****) appear in the
display, reduce the number of decimal
places in the Configuration Parameters
window for the channel(s) showing the
asterisks.
Note: Logged data is always recorded at
full accuracy and is not affected by the
display’s decimal digits setting. Two
decimal digits are the recommended
number to have for any data collection
efforts. A selection of three or more
Section 5.0 Trouble Shooting
Page 29
MDL-DataManager™ Reference Guide
Architectural Energy Corporation
decimal digits will cause asterisks (****)
to appear in the MicroDataLogger unit’s
display.
Battery voltage runs down
The battery will slowly self-discharge
while a logger is sitting unused over time.
While being stored, the battery should be
recharged every two months. If the
battery voltage runs down over a very
short period of time, the battery may
need to be replaced. The batter in the
MDL units carries a 90-day warranty from
the date of purchase.
Logger fails to correctly ID a plugged in
module.
The module’s ID feature may have been
damaged due to electrostatic discharge.
The module’s other features should still
work fine. Simply select the module type
from the drop down menu on the Config
Parameters screen.
Note: This remedy may result in the
“Module
ID
Mismatch”
message
appearing on the logger’s LCD. This is
normal because the logger can not
properly ID the module due to user
override of the module ID. The module
will still work properly unless it has
suffered more extensive damage.
Retrieve Data fails
If the MDL fails to “wake up” when
Retrieve Data is attempted, perform a
two-button press and then try to Retrieve
Data.
PC If your PC is having difficulty communicating with your MicroDataLogger unit (MDL):
Communication
1. First go to Preferences—Options in the MDL-DataManager menu, select Comm
Problems
Port/Modem option.
2. Select the proper comm port (COMM 1, 2, 3, or 4) to which your serial cable
connects.
3. Try again to communicate with your MDL.
4. If you still cannot communicate with your MDL, check the MDL’s battery voltage by
pressing the button 4 times. If the battery voltage reads 6.2 volts or less, or the
MDL’s LCD does not respond, recharge you MDL for 6-10 hours and try to
communicate again.
5. If you still are unable to communicate with your MDL, another software application
may have taken precedence over the com port needed to use the MDL. Such
applications include, but are not limited to: Palm Pilot® software, faxing software,
automated dial up applications. Even if these applications have not been opened
by you for use, they may be running in the background of your computer as part of
your computer’s Startup Menu. By disabling these applications when using MDLDataManager, you should be able to regain communication with your
MicroDataLogger unit to configure it for use or to download data from it.
Section 5.0 Trouble Shooting
Page 30
MDL-DataManager™ Reference Guide
Architectural Energy Corporation
6. With MDL-DataManager versions prior to 4.0, some virus scan applications
caused com port communication problems. Although no current virus scan
applications are known to cause PC/MDL communication problems, it is not
possible to state that these problems could not recur due to ongoing virus scan
update releases.
Windows 95 operating system or higher: One or more of the programs loaded in your
Startup Menu may be conflicting with the serial communications functions of MDLDataManager. Remove these programs from your Start Menu. Use the ctrl, alt, and
delete keys simultaneously on your keyboard to display a list of the programs running
in your startup. After closing the various tasks you should now be able to communicate
with the MDL. One by one, replace the programs (that you use) back into your Start
Menu and attempt to communicate with the MDL. When you can again no longer
communicate with the MDL, you will have located the program or programs that
conflict with the MDL communications. Permanently remove the conflicting program(s)
from your Start Menu.
Section 5.0 Trouble Shooting
Page 31
MDL-DataManager™ Reference Guide
Architectural Energy Corporation
Appendix A – Module Wiring Connections
Architectural Energy Corporation (AEC) stocks signal conditioning modules for use
with a wide array of AEC-supplied or third-party sensors. These different signal
conditioning modules allow the MicroDataLogger unit (MDL) to connect to nearly any
sensor or meter on the market based on the sensor or meter output signal. Each
separate sensor or meter to be used with the MicroDataLogger data acquisition
system will require a module to connect to the MDL to the sensor. It is important to
note that AEC carries a number of sensors that are pre-wired to modules for your use:
temperature, humidity, occupancy, and lite level.
General Signal A variety of plug-in modules are available for interfacing the MDL to a range of sensor
Measurement and transducer output signals. Most third-party sensors and transducers – including
those carried by AEC – can be used with the MDL.
Modules
The MDL-DataManager software enables the user to scale the signal being read and
assign an appropriate engineering unit of measure. Sensor or field wiring is connected
to the modules via a 4-circuit, plug-in, screw type terminal block. Current can be
measured directly using the 20 mA DC module. Signal conditioning modules for fullscale ranges above 5 volts use a precision resistor divider to attenuate the input
signal.
Note:
The 20 mA DC signal conditioning module, model ADC-33-3, can be
damaged by transient voltages if it is connected to the current loop circuit
while the circuit is energized.
Screw Part/Module Number
Designations for ADC-33-3 (4-20mA)
Wiring VDC-19-3 (5V)
Pin
1
2
3
4
– Signal Input
+ Signal Input
– 12 Vdc Return
+ 12 Vdc Power Out
Pin
1
2
3
4
n/c
mV Input Low
mV Input Hi
n/c
Part/Module Number
COUNT-80-3 (pulse)
Pin
1
2
3
4
Switch (–)
Switch (+)
n/c
n/c
Part/Module Number
STATUS-81-3 (AC/DC)
Pin
1
2
3
4
n/c
n/c
Voltage Low
Voltage Hi
VDC-29-3 (10V)
Part/Module Number
VAC-17-3 (333mV)
Appendix A – Module Wiring Connections
module
label
1 2 3 4
terminal block numbered left to right
32
MDL-DataManager™ Reference Guide
Architectural Energy Corporation
Module Wiring
Diagrams
MicroDataLogger
®
Wiring Diagrams for 5 volt, 10 volt & 20 mA Modules
VDC-19-3, VDC-29-3, ADC-33-3
Revised: 6/25/2000
Note: 10 volt module wired the same as 5 volt
–
+
1
5 volts DC
VDC-19-3
2
5 volts DC
VDC-19-3
power
supply
+ power
TRANSDUCER
– power
+ signal 2-wire externally powered
– signal
+ power
TRANSDUCER
3-wire MDL powered
+ signal
– signal
3
5 volts DC
VDC-19-3
4
20 mA DC
ADC-33-3
and power
+ power
– power
+ signal
– signal
TRANSDUCER
4-wire MDL powered
–
terminal
–
+
+
TRANSDUCER
20 mA externally powered
terminal
5
20 mA DC
ADC-33-3
power
supply
+
terminal
–
TRANSDUCER
20 mA MDL powered
terminal
Module wiring information also appears in the MDL-DataManager software’s Help.
Appendix A – Module Wiring Connections
33
MDL-DataManager™ Reference Guide
Architectural Energy Corporation
Appendix B – Calculating Scale Factors
Architectural Energy Corporation (AEC) stocks signal conditioning modules for use
with a wide array of AEC-supplied or third-party sensors. These different signal
conditioning modules allow the MicroDataLogger unit (MDL) to connect to nearly any
sensor or meter on the market based on the sensor or meter output signal. Each
separate sensor or meter to be used with the MicroDataLogger data acquisition
system will require a module to connect to the MDL to the sensor. It is important to
note that AEC carries a number of sensors that are pre-wired to modules for your use:
temperature, humidity, occupancy, and lite level.
Conversion Sensors and transducers converta physical input (pressure, amperage, etc.) into an
Formula electrical signal (volts, milliamps, pulses, etc.) that can be measured by the
MicroDataLogger unit (MDL). For the MDL to accurately read the signal connected to
it and record a corresponding electrical signal, a Slope and Offset need to be
calculated and entered into the configuration of the MDL.
The conversion formula for this is shown below:
Reading in Engineering Units = (Sensor or Transducer Output ) x ((Slope) + Offset)
Or, Reading in Engineering Units is (y = mx + b).
Determining Examining the equation of the line (y = mx + b) created by comparing the
Slope Sensor/Transducer Input (y) against the Sensor/Transducer Output (x), we can
determine the Slope (m). The Slope, then, is determined by the following formula:
Slope =
Full Scale Range or Transducer in Engineering Units
Full Scale Output Signal Range of Sensor or Transducer (voltage, current)
Example: You are using a 150 psig pressure transducer that has a 1-5 volt output
signal.
150 psig Maximum Range less 0 psig Minimum Range = 150 psig
5 volt Max. Output Range less 1 volt Min. Range = 4 volts
Therefore, Slope
=
150
4
=
37.5
Determining To determine the Offset (b), we examine the line when the input is at a minimum.
Offset Thus, when y = y min, we have y min = mx + b. Solving for b yields b = y min - mx.
Consequently we have:
Offset = (Minimum Sensor/Transducer Input Value in Eng. Units) – ((Slope) x
(Sensor/Transducer Output* at Minimum Input Value))
*Voltage, etc.
Example: You are using the same 150 psig pressure transducer that has a 1-5 volt
output signal.
Therefore, Offset = 0 – ( 37.5 x 1 volt)
Appendix B – Calculating Scale Factors
= 0 – (37.5) = -37.5
34
MDL-DataManager™ Reference Guide
Architectural Energy Corporation
Appendix C – MicroDataLogger® Specifications
Channel Capacity
Four universal input/output channels
accept both analog and digital signal
conditioning modules.
User Interface
16 characters by two line alphanumeric display, push-button switch
and audible signal tone.
Module Auto ID
Automatic logger programming of
module/sensor signal type and range
information.
User Interface
16 characters by two line alphanumeric display, push-button switch
and audible signal tone.
Analog Resolution
1.2 mV or 4,096 parts (12 bit A/D
conversion).
Computer Interface
RS-232 serial interface; baud rate:
default 19,200 bps; data format:
eight data bits, no parity, one stop
bit; cable 72 in. (183 cm) with ninepin female “D” type connector.
Analog Accuracy
±0.1% of full scale reading based
on a precision voltage reference (3
ppm/°C typical temperature
coefficient).
Real-Time Clock
±1 minute/month over full operating
temperature range.
Sample Interval
User-programmable sample
intervals: 3, 6, 15, and 30 seconds
and 1, 2, 3, 5, 10, 15, 20, 30, and 60
minutes.
Enclosure
Injection molded, gray ABS plastic,
standard: environmentally sealed;
NEMA-12, or 4X optional.
Mounting
Two through-holes each for #6-32
flat-head screws standard; magnetic,
Velcro and other types of mounting
optional.
Size and Weight
14.7 x 12.6 x 5.7 mm (6 x 5 x 2.25
inches) and 500 g (17.6 oz.)
including internal battery and with no
modules installed.
Memory Capacity
64,000 measurements total (i.e.
16,000 per channel).
Memory Retention
Data retention greater than 20 years
without power, using non-volatile 128
kbytes Flash memory chip.
Internal Power
Six volt, one Ahr., rechargeable
sealed lead-acid battery pack.
Typical recharge time is 8 to 12
hours.
Environmental
Operating: +32 to +122 °F (0 to
+50°C), 90% RH non-condensing.
Storage: -4 to +140 °F (-20 to
+60°C), 5% to 95% RH noncondensing.
Battery Life
When taking readings once per
minute using low-power sensors,
battery is 30 days or more. Less
frequent sampling results in
longer battery life. A fullycharged battery will power a
typically configured logger for a
minimum of 70,000 logged
readings.
Signal Conditioning Modules
DC Voltage Ranges: 5 to 500 V
333 mV RMS
20 mA DC
Occupancy
Pulse Counting
Relative Humidity
Status AC/DC Voltage
Temperature, thermistor
Sensors & Transducers
AC current, voltage
AC watts, kWh, P.F.
Light—Level and Status
Occupancy
Pressure–Barometric
Pressure–Differential
Pressure–Gage
Relative Humidity
Temperature
Flow
(View a catalog or the AEC web
site for individual sensor
specifications.)
FCC Compliance
Class B, sub-part J, paragraph 15,
and European standard CISPR 22
Appendix C – MicroDataLogger® Specifications
35