1
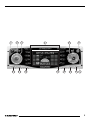
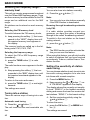
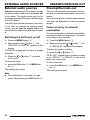
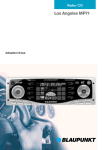
Radio / CD
Los Angeles MP71
Operating instructions
Bitte aufklappen
Open here
Ouvrir s.v.p.
Aprite la pagina
Hier openslaan a.u.b.
Öppna
Por favor, abrir
Favor abrir
Åbn her
2
13
12
NEDERLANDS
5
11
10
9
8
SVENSKA
4
ESPAÑOL
14
3
PORTUGUÊS
2
DANSK
1
ITALIANO
6
7
3
FRANÇAIS
ENGLISH
DEUTSCH
CONTROLS
1
2
3
4
5
6
7
8
9
:
;
<
=
>
32
button, to open the control panel
Button, to switch the unit on/off and
operate the volume mute feature
Volume control
Softkeys, the function of the softkeys
depends on the display content.
OK button, to confirm menu entries
and close the menu
DEQ button, to open the equalizer
menu
Multifunction rocker switch
MENU button, to open the main settings menu
AUD button, to adjust the bass, treble,
balance, fader and loudness
DIS button, to change the display content
Display
CD button, to start playing a CD
CDC button, to start playing a CD in
the CD changer (only if connected)
or
to start playing an external audio
source (only if connected)
TUNE button, to activate radio mode
and open the radio functions menu
(only possible in radio mode)
Adjusting the display ................... 40
Radio mode ................................... 41
Switching to radio mode ........................ 41
Convenient RDS functions (AF, REG) ... 41
Selecting the frequency range /
memory level ......................................... 42
Tuning into a station .............................. 42
Setting the sensitivity of station seek
tuning .................................................... 42
Storing station presets .......................... 43
Storing stations automatically
(Travelstore) .......................................... 43
Listening to station presets ................... 43
Scanning stations .................................. 43
Setting the scantime .............................. 44
Programme type (PTY) ......................... 44
Optimising radio reception .................... 45
Switching between stereo and mono .... 46
Changing the display ............................ 46
Traffic information ........................ 46
CD mode ....................................... 47
Switching to CD mode and inserting
a CD ...................................................... 47
Ejecting a CD ........................................ 48
Selecting tracks ..................................... 48
ENGLISH
FRANÇAIS
ITALIANO
Preparing the MP3 CD .......................... 49
Switching to MP3 mode ........................ 50
Selecting a directory .............................. 50
Selecting tracks ..................................... 51
Fast searching (audible) ........................ 51
Random track play (MIX) ...................... 51
Scanning tracks (SCAN) ....................... 51
Repeating individual tracks or whole
directories (REPEAT) ............................ 51
Setting the display ................................. 52
Setting scrolling text .............................. 52
CD changer mode (optional) ....... 53
Switching to CD changer mode ............. 53
Selecting CDs ....................................... 53
Selecting tracks ..................................... 53
Fast searching (audible) ........................ 53
Changing the display ............................ 53
Repeating individual tracks or whole
CDs (REPEAT) ...................................... 53
Random track play (MIX) ...................... 53
Scanning all tracks on all CDs (SCAN) . 54
Clock - Time .................................. 54
Equalizer ....................................... 55
Notes on adjusting the settings ............. 55
Switching the equalizer on/off ............... 55
Setting the equalizer ............................. 56
Setting the quality factor for the filter .... 56
Selecting sound presets ........................ 56
Setting the spectrometer ....................... 56
Help adjusting the equalizer .................. 56
External audio sources ................ 58
Preamplifier/sub-out .................... 58
Specifications (excerpts) ............. 59
Guarantee ..................................... 59
Installation instructions ............. 257
33
NEDERLANDS
39
Adjusting the bass ................................. 39
Adjusting the treble ............................... 39
Loudness ............................................... 39
Adjusting the right/left volume
distribution (balance) ............................. 39
Adjusting the front/back volume
distribution (fader) ................................. 39
TA-SOUND ............................................ 39
MP3 mode ..................................... 49
SVENSKA
35
37
38
ESPAÑOL
Theft protection KeyCard ............
Switching on/off ...........................
Adjusting the volume ...................
Sound and volume distribution
settings .........................................
Fast searching (audible) ........................ 48
Random track play (MIX) ...................... 48
Scanning tracks (SCAN) ....................... 48
Repeating tracks (REPEAT) .................. 48
Changing the display ............................ 49
Traffic announcements in CD mode ...... 49
PORTUGUÊS
Road safety ........................................... 34
Installation ............................................. 34
Accessories ........................................... 34
DANSK
Notes and accessories ................ 34
DEUTSCH
CONTENTS
NOTES AND ACCESSORIES
Notes
Accessories
Thank you for deciding to use a Blaupunkt
product. We hope you enjoy using this new
piece of equipment.
Before using the device for the first time,
please read these operating instructions. The
Blaupunkt editors are constantly working on
making the operating instructions clearer and
easier to understand. However, if you still
have any questions on how to operate the
unit please contact your dealer or the telephone hotline for your country. You will find
the hotline telephone numbers printed at the
back of this booklet.
Only use accessories approved by Blaupunkt.
Road safety
Road safety has absolute priority. Only
operate the unit if the road and traffic conditions allow you to do so. Familiarise yourself with the unit before setting off on your
journey.
When inside your vehicle, you should always be able hear police, fire fighter and
ambulance sirens in time. For this reason,
set the volume of whatever you are listening to to a reasonable level.
Installation
If you want to install your car radio yourself,
please read the installation and connection
instructions that follow these operating instructions.
34
Remote control
The optional RC 08, RC 10 or RC 10H remote controls allow you to safely and conveniently access the main functions of your
car radio.
Amplifier
All Blaupunkt and Velocity amplifiers can be
used.
CD changer
You can connect the following Blaupunkt CD
changers:
CDC A 06, CDC A 08, CDC A 072 and IDC
A 09.
You can also connect the CDC A 05 and CDC
A 071 CD changers by using an adapter cable (Blaupunkt no.: 7 607 889 093).
Microdrive™ player
As an alternative to a CD changer, you can
also connect a Compact Drive MP3 player in
order to access additional MP3 tracks. In the
case of the Compact Drive MP3, you first use
a computer to store the MP3 tracks on the
Microdrive™ hard disk of the Compact Drive
MP3, and then, when the Compact Drive MP3
is connected to the car radio, you can play
the tracks like normal CD tracks.
button 1.
➮ Insert the KeyCard as shown in the pic-
2
ture (arrow 1) with the contact surfaces
facing downwards.
1
KeyCard that the unit is familiar with.
Removing the KeyCard
➮ press the
ENGLISH
ITALIANO
To unlock the control panel,
FRANÇAIS
➮ Remove the incorrect card and insert a
button 1.
The control panel opens.
KeyCard slide towards the right until
they reach their end position.
➮ Remove the KeyCard from the control
panel.
➮ Close the control panel.
Note:
As a precautionary measure against
theft, remove the KeyCard when leaving
the vehicle and leave the control panel
open.
For safety reasons, the control panel
must always be closed whilst the vehicle
is moving.
NEDERLANDS
➮ Push the KeyCard together with the
●
The control panel opens.
3
Note:
If you insert a card which the unit does
not recognize, e.g. a cash card,
“WRONG KC” appears in the display.
●
PORTUGUÊS
➮ Press the
➮ Close the control panel (arrow 3).
SVENSKA
Inserting a KeyCard
with the KeyCard slide in the direction of
the arrow (2) until they reach their end
position.
ESPAÑOL
The unit is supplied with a KeyCard.
The car radio can also be operated using a
second KeyCard.
If a KeyCard is lost or damaged, you can
purchase a replacement KeyCard from a
Blaupunkt dealer.
If you use two KeyCards, the second KeyCard adopts the settings of the first KeyCard.
However, you have the option of storing the
settings for the following functions separately:
Station button presets, bass, treble, balance,
fader, loudness, traffic announcement volume, beep volume and equalizer settings.
Furthermore, the values that were set last for
the frequency range, tuned station, traffic information announcement, RDS, REG, scantime, seek tuning sensitivity, power-on volume
and SHARX are all stored.
This means that after inserting your KeyCard,
you will always be provided with your personalized set of basic settings.
➮ Carefully push the KeyCard together
Preparing a second KeyCard
(“Learning”)
A second KeyCard can be prepared as an
additional KeyCard if the unit is being operated using the first KeyCard.
If you want to prepare a second KeyCard (a
process known as “Learning”),
➮ insert the first KeyCard and switch the
unit on.
35
DANSK
Theft protection KeyCard
DEUTSCH
THEFT PROTECTION
THEFT PROTECTION
➮ Press the MENU button 8.
➮ Keep pressing the or button 7 until “LEARN KC” appears in the display.
➮ Press the
button 7.
“CHANGE” appears in the display.
➮ Remove the first KeyCard.
➮ Insert the new KeyCard.
“LEARN OK” appears in the display.
To close the menu,
Preparing a new KeyCard / entering the
master code
If you no longer have a valid KeyCard for your
unit and you want to prepare a new KeyCard:
➮ Insert a new KeyCard that the unit is not
yet familiar with.
➮ Close the control panel.
➮ Switch the unit off, if it is not already off.
➮ Simultaneously press and hold the
TUNE > and ST1 4 buttons.
➮ press the MENU button 8.
➮ Switch the unit on using button 2.
The car radio can now be operated using the
second KeyCard.
“0000” appears in the display.
Enter the four-digit master code that is printed on the car radio passport as follows:
Note:
A maximum of two KeyCards can be
used for each device.
If you already have two KeyCards for the unit
and then prepare a third, the KeyCard that
was not inserted whilst the third KeyCard was
being prepared can no longer be used to operate the unit.
●
Lost or damaged KeyCard
If all the unit’s KeyCards are damaged or lost,
you can prepare a new KeyCard.
You can acquire a new KeyCard from your
dealer.
Before you can use the new KeyCard, you
will need the device’s master code, which you
can find printed on the car radio passport. To
prepare a new KeyCard, please read the section entitled “Preparing a new KeyCard”.
Keep the car radio passport in a safe
place but never in the vehicle.
➮ Enter the each of the master code’s
numbers using the / buttons 7. To
do so, repeatedly press the buttons until
the required number appears in the display.
➮ Move the input cursor using the
buttons 7.
➮ If the master code is displayed correctly,
press the OK button 5.
The new KeyCard is accepted as soon as
the unit switches to playback mode.
Visual theft protection (LED)
When the unit is switched off and the KeyCard removed, the power-on button and drive
compartment illumination can be set to flash.
This requires the “LED” setting in the menu
to be set to “ON”.
➮ Press the MENU button 8.
➮ Keep pressing the or button 7 until “LED ON” or “LED OFF” appears in
the display.
or button 7 to switch
between the ON and OFF settings.
➮ Press the
36
til “READ KC” appears in the display.
➮ Press the
button 7.
The radio passport data are displayed as
scrolling text in the display.
To close the menu,
➮ press the OK button 5 or MENU button 8.
The settings are saved.
Looking after the KeyCard
Keeping the contacts free from dirt and other
particles will ensure that the KeyCard functions properly. Avoid making direct skin contact with the contacts.
If necessary, clean the KeyCard contacts with
a lint-free cloth and some alcohol.
DEUTSCH
ENGLISH
➮ To switch the unit off, press button 2
for longer than two seconds.
The unit switches off.
FRANÇAIS
➮ Press the MENU button 8.
➮ Keep pressing the or button 7 un-
➮ To switch the unit on, press button 2.
The unit switches on.
Switching on/off using the
vehicle ignition
If the unit is correctly connected to the vehicle’s ignition and the unit was not switched
off using button 2, it will switch on/off simultaneously with the ignition.
You can switch the unit on even if the ignition
is off.
➮ To do so, press button 2.
Note:
●
To protect the vehicle battery, the unit
will switch off automatically after one
hour if the ignition is off.
ITALIANO
You can use the supplied KeyCard to display
the radio passport data like model name, type
number (7 6...) and serial number.
Switching on/off using button 2
NEDERLANDS
Displaying the radio passport
data
There are various ways of switching the unit
on/off.
SVENSKA
ton 8.
The settings are saved.
Switching on/off
Switching on/off using the
KeyCard
You can switch the unit on/off by inserting and
removing the KeyCard if the unit was not previously switched off using button 2. For instructions on inserting/removing the KeyCard,
please read the chapter entitled “Theft protection KeyCard”.
ESPAÑOL
➮ press the OK button 5 or MENU but-
PORTUGUÊS
To close the menu,
SWITCHING ON/OFF
DANSK
THEFT PROTECTION
37
VOLUME
Adjusting the volume
Activating mute
The volume can be adjusted in steps from 0
(off) to 66 (maximum).
This feature allows you to instantaneously
reduce the volume (mute).
➮ To increase the volume, turn the volume
➮ Briefly press button 2.
control to the right.
➮ To decrease the volume, turn the volume control to the left.
“MUTE” appears in the display.
Cancelling mute
➮ Briefly press button 2.
Setting the power-on volume
or
You can set the unit’s default power-on volume.
➮ turn the volume control 3.
➮ Press the MENU button 8.
➮ Keep pressing the button 7 until
“ON VOL” appears in the display.
➮ Set the power-on volume using the
and buttons 7 or the volume control.
If you set the volume to a value less than “1”,
“LAST VOL” appears in the display. This
means that the volume that was set before
the unit was switched off will be reactivated
when the unit is switched on.
Risk of serious injury! If the power-on
volume is set to maximum, the volume level can be very high when the unit is
switched on.
If the volume was set to maximum
before the unit was switched off and the
power-on volume is set to “LAST VOL”,
the volume level can be very high when
the unit is switched on again.
Severe damage to your hearing can be
caused in both cases!
To close the menu,
➮ press the OK button 5 or MENU button 8.
The settings are saved.
Mute while telephoning
If your car radio is connected to a mobile telephone, the car radio’s volume will be muted
as soon as you “pick up” the telephone. This
requires that the mobile telephone be connected to the car radio as described in the
installation instructions.
If a traffic announcement is received during a
telephone call and traffic information priority
has been activated, the traffic announcement
will be played. For further details, please read
the chapter entitled “Traffic information”.
Setting the volume of the
confirmation beep
For some functions you will hear a confirmation beep if you keep a button pressed for
longer than two seconds, e.g. when storing a
radio station to a station preset button. You
can adjust the volume of this beep.
➮ Press the MENU button 8.
➮ Keep pressing the button 7 until
“BEEP” appears in the display.
➮ Set the volume using the
and buttons 7 or the volume control. “0”
means beep off; “9” means maximum
beep volume.
To close the menu,
➮ press the OK button 5 or MENU button 8.
The settings are saved.
38
Loudness
TA-SOUND
The loudness feature can be used to aurally
compensate (boost) the bass at low volume
levels.
➮ Press the AUD button 9.
“BASS” appears in the display.
➮ Keep pressing the or button 7 until “LOUD” appears in the display.
To adjust the loudness,
➮ press the or button 7.
“LOUD OFF” means loudness is deactivated; “LOUD 6” means maximum loudness
boost.
When you have finished making your changes,
➮ press the AUD button 9.
You can separately adjust the sound and volume distribution settings for traffic information announcements.
➮ Press and hold the softkey 4 that corresponds to the “TA” display item for
longer than two seconds.
“TA-SOUND” appears in the display.
➮ Keep pressing the or button 7 until the required parameter appears in the
display.
➮ Make your adjustments using the or
button 7.
When you have finished making your changes,
➮ press the AUD button 9.
➮ Press the AUD button 9.
39
ENGLISH
FRANÇAIS
ITALIANO
“BASS” appears in the display.
➮ Keep pressing the or button 7 until “TREBLE” appears in the display.
To adjust the treble,
➮ press the or button 7.
When you have finished making your changes,
➮ press the AUD button 9.
To adjust the fader,
➮ press the AUD button 9.
“BASS” appears in the display.
➮ Keep pressing the or button 7 until “FADER” appears in the display.
To adjust the front/back volume distribution,
➮ press the or button 7.
When you have finished making your changes,
➮ press the AUD button 9.
Adjusting the treble
NEDERLANDS
Adjusting the front/back volume
distribution (fader)
SVENSKA
➮ Press the AUD button 9.
“BASS” appears in the display.
➮ Press the or button 7 to adjust the
bass.
When you have finished making your changes,
➮ press the AUD button 9.
ESPAÑOL
Adjusting the bass
To adjust the balance,
➮ press the AUD button 9.
“BASS” appears in the display.
➮ Keep pressing the or button 7 until “BAL” appears in the display.
To adjust the right/left volume distribution,
➮ press the or button 7.
When you have finished making your changes,
➮ press the AUD button 9.
PORTUGUÊS
Note:
●
You can adjust the bass, treble and
loudness individually for each audio
source.
Adjusting the right/left volume
distribution (balance)
DANSK
Sound and volume
distribution settings
DEUTSCH
SOUND AND VOLUME DISTRIBUTION SETTINGS
DISPLAY
Night-time display brightness
Adjusting the display
You can adjust the display to suit the installation position in your vehicle and your own preferences.
Adjusting the viewing angle
➮ Press the MENU button 8.
➮ Keep pressing the or button 7 until “ANGLE” appears in the display.
➮ Adjust the viewing angle using the
and buttons 7.
To close the menu,
➮ press the OK button 5 or MENU button 8.
The settings are saved.
Adjusting the display brightness
If your car radio has been fitted as described
in the installation instructions, the display
brightness will switch over when the headlights are turned on/off. The display brightness can be adjusted separately for night and
day in steps ranging from 1-9.
Daytime display brightness
➮ Press the MENU button 8.
➮ Keep pressing the or button 7 until “DIM DAY” appears in the display.
➮ Set the brightness using the
and
buttons 7.
To close the menu,
➮ press the OK button 5 or MENU button 8.
The settings are saved.
40
➮ Press the MENU button 8.
➮ Keep pressing the or button 7 until “DIM NGHT” appears in the display.
➮ Set the brightness using the
and
buttons 7.
To close the menu,
➮ press the OK button 5 or MENU button 8.
The settings are saved.
RADIO MODE
➮ press the TUNE button >.
seconds.
The settings are saved.
Convenient RDS functions (AF,
REG)
Switching REG on/off
To use the REG RDS function,
The convenient RDS functions AF (Alternative Frequency) and REG (Regional) extend
your radio’s range of functions (only in FM
radio mode).
●
AF: If this RDS function is activated, the
unit automatically carries out a background search for the best receivable
frequency for the station that is currently
set.
●
REG: At certain times, some radio stations divide their programme into regional programmes providing different
content. You can use the REG function
to prevent the car radio from switching
to alternative frequencies that are providing different regional programme
content.
➮ press the TUNE button > in radio
mode.
The radio functions menu appears in the display.
➮ Press the softkey 4 that corresponds
to the “REG” display item.
When the REG function is switched on/off,
“REG ON” or “REG OFF” appears briefly in
the display.
To return to the main radio menu,
➮ press the TUNE button > or wait eight
seconds.
The settings are saved.
ENGLISH
DEUTSCH
➮ press the TUNE button > or wait eight
FRANÇAIS
to the “RDS” display item.
The RDS functions are active when “RDS” is
displayed inversed. When the RDS functions
are switched on/off, “REG ON” or “REG OFF”
appears briefly in the display.
To return to the main radio menu,
ITALIANO
➮ Press the softkey 4 that corresponds
NEDERLANDS
If the unit is currently in one of its other operating modes,
mode.
The radio functions menu appears in the display.
SVENSKA
Switching to radio mode
➮ press the TUNE button > in radio
ESPAÑOL
This unit is equipped with an RDS radio receiver. Many of the receivable FM stations
transmit a signal that not only carries the programme but also additional information such
as the station name and programme type
(PTY).
The station name appears in the display as
soon as it is received. You can optionally display the programme type. For further details,
please read the section entitled “Programme
type (PTY)”.
Switching the RDS function on/off
To use the RDS functions (AF and REG),
PORTUGUÊS
Radio mode
DANSK
Note:
REG must be separately activated/deactivated in the radio functions menu.
●
41
RADIO MODE
Selecting the frequency range /
memory level
Tuning into stations manually
You can also tune into stations manually.
This unit can receive programmes broadcast
over the FM and MW frequency ranges. There
are three memory levels available for the FM
range and an additional one for the MW
range.
Six stations can be stored on each memory
level.
➮ Press the
Selecting the FM memory level
To switch between the FM memory levels,
➮ keep pressing the softkey 4 that corresponds to the “NEXT” display item until
the required memory level appears in
the display.
The memory levels are called up in the following order: FM I, FM II, FMT.
Selecting the frequency range
To select the FM or MW frequency range
(waveband),
➮ press the TUNE button > in radio
mode.
The radio functions menu appears in the display.
➮ Keep pressing the softkey 4 that corresponds to the “BND” display item until
the required waveband appears in the
display.
To return to the main radio menu,
➮ press the TUNE button > or wait eight
seconds.
The settings are saved.
Tuning into a station
There are various ways of tuning into a station.
Automatic seek tuning
➮ Press the
or
button 7.
The unit tunes into the next receivable station.
42
or
button 7.
Note:
●
You can only tune into stations manually
if the RDS function is deactivated.
Browsing through broadcasting networks
(only FM)
If a radio station provides several programmes, you have the option of browsing
through its so-called “broadcasting network”.
To switch to the next station on the broadcasting network,
➮ press the
or
button 7.
Note:
●
The RDS function must be activated before you can use this feature.
When using this feature, you will only be able
to switch to stations that you have received
once already. To do so, use the Scan or Travelstore function.
Setting the sensitivity of station
seek tuning
You can choose whether to only tune into stations with a strong reception or to also tune
into those with a weak reception.
➮ Press the MENU button 8.
➮ Keep pressing the or button 7 until “FM-SENS” appears in the display.
The display shows the currently set sensitivity level. “SENS 6” is the highest sensitivity
setting and means the tuner can receive distant stations. “SENS 1” is the lowest setting.
➮ Set the required sensitivity using the
and buttons 7.
To close the menu,
➮ press the OK button 5 or MENU button 8.
The settings are saved.
➮ To store the station to a particular
softkey, press (for longer than two seconds) one of the softkeys 4 that corresponds to a display item “ST1” – “ST6”.
Storing stations automatically
(Travelstore)
You can automatically store the six stations
with the strongest reception in the region (only
FM). The stations are stored in the FMT memory.
Note:
●
Any stations that were previously stored
on this memory level are deleted in the
process.
To use the Travelstore function,
➮ press the TUNE button > in radio
Starting Radio-SCAN
To start Radio-SCAN,
➮ press the TUNE button > in radio
mode.
The radio functions menu appears in the display.
➮ Press the softkey 4 that corresponds
to the “SCA” display item.
Scanning begins. “SCAN” appears briefly in
the display followed by a flashing display of
the current station name or frequency.
Scanning stored stations (Preset-SCAN)
You can briefly play all the stations stored in
memory that can currently be received. You
can set the scanning time (scantime) to between 5 and 30 seconds in the menu.
mode.
The radio functions menu appears in the display.
Starting Preset-SCAN
To start Preset-SCAN,
➮ Press the softkey 4 that corresponds
mode.
The radio functions menu appears in the display.
to the “TS” display item.
The station storing procedure begins. “TSTORE” appears in the display. After the process is completed, the station stored in FMT
memory location 1 will be played.
Listening to station presets
➮ Select the memory level or frequency
range (waveband).
➮ Press the softkey 4 that corresponds
➮ press the TUNE button > in radio
➮ Press and hold (for longer than one second) the softkey 4 that corresponds to
the “SCA” display item.
Scanning begins. “SCAN” appears briefly in
the display. The memory levels are scanned
one after another, and the currently scanned
memory location “ST1” – “ST6” is displayed
inversed.
to the display item “ST1” – “ST6” of the
station that you want to listen to.
43
ENGLISH
FRANÇAIS
scribed in the section entitled “Tuning
into a station”.
ITALIANO
FM II, FMT or the MW frequency range.
➮ Tune into the required station as de-
NEDERLANDS
➮ Select the required memory level FM I,
SVENSKA
Scanning receivable stations
(Radio-SCAN)
You can briefly play (scan) all the receivable
stations. You can set the scanning time (scantime) to between 5 and 30 seconds in the
menu.
ESPAÑOL
Storing stations manually
PORTUGUÊS
Scanning stations
DANSK
Storing station presets
DEUTSCH
RADIO MODE
RADIO MODE
Stopping SCAN and continuing listening
to a station
➮ Press the softkey 4 that corresponds
to the “SCA” display item again.
Scanning is stopped and the station that was
scanned last remains active.
Setting the scantime
➮ Press the MENU button 8.
➮ Keep pressing the or button 7 until “SCANTIME” appears in the display.
➮ Set the required scantime using the
and buttons 7.
To close the menu,
➮ press the OK button 5 or MENU button 8.
The settings are saved.
Note:
●
The set scantime also applies to scanning carried out in CD, cassette, MiniDisc and CD changer mode (depending on the car radio’s equipment).
Programme type (PTY)
Besides transmitting the station name, some
FM stations also provide information on the
type of programme that they are broadcasting. Your radio can receive and display this
information.
For example, the programme types can be:
CULTURE
TRAVEL
JAZZ
SPORT
NEWS
POP
ROCK
MUSIC
Using the PTY function, you can directly select stations of a particular programme type.
PTY-EON
If you specify the programme type and start
seek tuning, the unit will switch from the current station to a station of the selected programme type.
44
Note:
If no station is found that corresponds to
the selected programme type, you will
hear a beep sound and “NO PTY” appears briefly in the display. The radio
will then retune to the station that was
received last.
●
If the tuned radio station or another station on the broadcasting network broadcasts the required programme type at a
later point in time, the radio automatically switches from the currently tuned station or from CD mode / CD changer
mode to the station whose programme
type matches the one you selected.
●
Switching PTY on/off
To use the PTY function,
➮ press the TUNE button > in radio
mode.
The radio functions menu appears in the display.
➮ Press the softkey 4 that corresponds
to the “PTY” display item.
When PTY is activated, the display briefly
shows the programme type that was selected last. PTY appears in the display.
To return to the main radio menu,
➮ press the TUNE button > or wait eight
seconds.
The settings are saved.
Selecting a programme type and starting
seek tuning
➮ Press the
or
button 7.
The current programme type appears in the
display.
If you want to select another programme type,
➮ keep pressing one of the
buttons
7 until the required programme type is
displayed.
Or
➮ Select a programme type using the
til “HICUT” appears in the display.
or
button 7.
To store a programme type,
➮ press and hold (for longer than one second) one of the softkeys 4 corresponding to the “ST1” – “ST6” display items.
The programme type is now stored in the
selected location.
Setting the PTY language
You can set the language in which the programme types are displayed.
➮ Press the MENU button 8.
➮ Keep pressing the or button 7 until “PTY LANG” appears in the display.
To switch between the languages “DEUTSCH”, “ENGLISH” or “FRANCAIS”,
➮ press the
or
➮ Press the MENU button 8.
➮ Keep pressing the or button 7 un-
button 7.
or button 7 to set HICUT.
“NO HICUT” means no reduction will be
made; “HICUT 3” means a maximum automatic reduction of the treble and interference
level will be carried out.
To close the menu,
➮ Press the
➮ press the OK button 5 or MENU button 8.
The settings are saved.
Switching bandwidth during interference
(SHARX)
The SHARX function allows you to largely
avoid interference caused by neighbouring
radio stations. Switch on the SHARX function if you experience a high radio station
density.
Switching SHARX on/off
➮ press the OK button 5 or MENU but-
➮ Press the MENU button 8.
➮ Keep pressing the or button 7 un-
ton 8.
The settings are saved.
til “SHARX” appears in the display.
To switch SHARX on/off,
To close the menu,
FRANÇAIS
Storing a programme type on a station
button
Setting HICUT
ITALIANO
The next receivable station corresponding to
your selected programme type will then be
tuned into.
NEDERLANDS
button 7.
SVENSKA
or
ESPAÑOL
➮ press the
Treble reduction feature during
interference (HICUT)
The HICUT function improves the sound during poor radio reception. If interference occurs, the treble is automatically reduced thus
reducing the interference level.
➮ press the
or
PORTUGUÊS
sponding to the “ST1” – “ST6” display
items.
The selected programme type is displayed
briefly. To start seek tuning,
button 7.
“NO SHARX” means automatic bandwidth
switching is deactivated; “SHARX ON” means
automatic bandwidth switching is activated.
45
DANSK
➮ press one of the softkeys 4 corre-
ENGLISH
Optimising radio reception
To select a stored programme type,
DEUTSCH
RADIO MODE
RADIO MODE
TRAFFIC INFORMATION
To close the menu,
➮ press the OK button 5 or MENU button 8.
The settings are saved.
Switching between stereo and
mono
If reception is poor, you can make the radio
play in mono. The switch from stereo to mono
is smooth. When the car radio is switched on
it will play in stereo. The stereo/mono setting
is changed in the menu.
➮ Press the MENU button 8.
➮ Keep pressing the or button 7 until “STEREO” or “MONO” appears in the
display.
To switch between stereo and mono,
➮ press the
or
button 7.
To close the menu,
➮ press the OK button 5 or MENU button 8.
The settings are saved.
Changing the display
You can select what appears in the display.
In the top display line, you can choose to display the station name, frequency or programme type. In the lower display line (DOT
matrix), you can choose to display the clock
time or the memory level.
Changing the top display line
➮ Keep pressing the DIS button : until
the required information (station name,
frequency or programme type) is displayed in the top display line.
Changing the DOT matrix display
➮ Press the DIS button : for longer than
one second.
The display switches between clock time and
memory level.
46
Traffic information
Your unit is equipped with an RDS-EON receiver.
EON (Enhanced Other Network) is a feature
that involves the broadcasting of radio station information within a broadcasting network.
If a traffic announcement (TA) is transmitted,
the unit automatically switches from a station
that does not provide traffic information to a
station within the same broadcasting network
that does.
Once the traffic announcement has been
heard, the radio switches back to the programme that you were listening to before.
Switching traffic information
priority on/off
➮ Press the softkey 4 that corresponds
to the “TA” display item.
Traffic announcement priority is active when
“TA” appears inversed in the display.
Note:
You will hear a warning sound:
●
if you leave the reception area of a traffic information station that you are currently listening to.
●
if, while listening to a CD, cassette or
MiniDisc (depending on the car radio’s
equipment), you leave the reception
area of a traffic information station that
you are tuned into and the subsequent
automatic search cannot find a new traffic information station.
●
if you retune the radio from a traffic information station to a station that does
not broadcast traffic information.
If you hear the warning sound, you can either
switch off traffic information priority or tune
into a station that broadcasts traffic information.
ton 8.
The settings are saved.
Risk of severe damage to the CD
drive!
CD singles with a diameter of 8 cm and
non-circular contoured CDs (shape CDs)
must not be used.
We accept no liability for any damage to
the CD drive that may occur as a result of
the use of unsuitable CDs.
Switching to CD mode and
inserting a CD
●
DEUTSCH
ENGLISH
FRANÇAIS
➮ press the OK button 5 or MENU but-
ITALIANO
buttons
7 or the volume control.
To close the menu,
NEDERLANDS
➮ Set the volume using the
ESPAÑOL
til “TA VOLUME” appears in the display.
You can use this unit to play standard CDs
with a diameter of 12 cm. Besides being able
to play CDs containing audio data on the Los
Angeles MP71, you can also play CDs containing MP3 files. For further details, please
read the chapter entitled “MP3 mode” that
follows this chapter.
CD-Rs (CDs that you have “burned” yourself)
can generally also be played. Due to the varying quality of CDs, Blaupunkt cannot guarantee that this will work properly. If problems
occur with your own burned CDs, you should
try another brand of CD blank or choose another blank colour. Best results are achieved
with CD blanks that provide 74 minutes of
playing time.
Rewritable CDs (CD-RW) generally cannot
be played!
If there is no CD inserted in the drive,
➮ press the
button 1.
PORTUGUÊS
➮ Press the MENU button 8.
➮ Keep pressing the or button 7 un-
CD mode
The control panel opens.
➮ Gently insert the CD with the printed
side uppermost into the drive until you
feel some resistance.
The CD is drawn into the drive automatically.
You must not hinder or assist the drive as it
draws in the CD.
47
DANSK
Setting the volume for traffic
announcements
CD MODE
SVENSKA
TRAFFIC INFORMATION
CD MODE
➮ Gently close the control panel whilst ex-
Random track play (MIX)
erting a little pressure until you feel it
click into place.
The CD menu appears and CD playback
begins.
●
If a CD is already inserted in the drive,
➮ Press the softkey 4 that corresponds
to the “MIX” display item.
“MIX CD” appears briefly in the display. The
next track to be played will be picked at random.
➮ Press the CD button <.
Stopping MIX
The CD menu appears and playback begins
from the point at which it was last interrupted.
Ejecting a CD
➮ Press the
button 1.
The control panel opens out towards you.
➮ Press the
button on the opened con-
trol panel.
The CD is ejected.
➮ Carefully remove the CD.
Note:
●
If you do not remove the CD within 30
seconds, it will be drawn back into the
drive.
Selecting tracks
➮ Keep pressing one of the arrow buttons
➮ Press the softkey 4 that corresponds
to the “MIX” display item again.
“MIX OFF” appears briefly in the display.
Scanning tracks (SCAN)
You can briefly play all the tracks on the CD.
➮ Press the softkey 4 that corresponds
to the “SCA” display item.
“SCAN” appears in the display. The tracks on
the CD are briefly played in ascending order.
Note:
You can set the scanning time. For further details, please read the section entitled “Setting the scantime” in the “Radio mode” chapter.
●
Stopping SCAN and continuing playback
➮ Press the softkey 4 that corresponds
7 until the number of the required
track appears in the display.
If you press the or button 7 once, the
current track will be played again from the
beginning.
to the “SCA” display item again.
The currently scanned track will then continue to be played normally.
Fast searching (audible)
To fast search backwards or forwards,
to the “RPT” display item.
The track is repeated until you deactivate RPT.
➮ keep one of the
Cancelling REPEAT
or / buttons
7 pressed until fast searching backwards / forwards begins.
48
Repeating tracks (REPEAT)
➮ Press the softkey 4 that corresponds
➮ Press the softkey 4 that corresponds
to the “RPT” display item again.
Normal playback is then resumed.
If you wish to receive traffic announcements
in CD mode,
➮ press the softkey 4 that corresponds
to the “TA” display item.
Traffic announcement priority is active when
“TA” appears inversed in the display. For further details, please read the chapter entitled
“Traffic information”.
Preparing the MP3 CD
The various combinations of CD burners, CD
burning software and CD blanks may lead to
problems arising with the ability to play certain CDs. If problems occur with your own
burned CDs, you should try another brand of
CD blank or choose another blank colour.
Best results are achieved with CD blanks that
provide 74 minutes of playing time.
The format of the CD must be ISO 9660 Level 1 or Level 2. Other formats cannot be
played reliably.
Avoid multi-sessions. If you write more than
one session to the CD, only the first session
will be detected.
In order to avoid overly long access times,
you should not create more than 20 directories on any MP3-CD that you want to play on
the Los Angeles MP71 (though a maximum
of 127 directories are technically possible).
These directories can be individually selected on the Los Angeles MP71.
Each directory can contain up to 254 tracks
and subdirectories, which can also be selected. A maximum of 8 levels of directories are
allowed.
ENGLISH
FRANÇAIS
Traffic announcements in CD
mode
ITALIANO
the required information appears in the
display.
DANSK
➮ keep pressing the DIS button : until
NEDERLANDS
On the Los Angeles MP71 you can also play
CD-Rs containing MP3 music files.
MP3 is a process developed by the Fraunhofer Institute for compressing CD audio data.
Compression allows data to be reduced to
around 10% of their original size without a
noticeable loss in quality (at a bit rate of 128
Kbit/s). If a lower bit rate is used to convert
CD audio data to MP3, you can create smaller files but there will be a loss of quality.
SVENSKA
MP3 mode
You can switch between various display
modes in CD mode:
●
Track number and clock display.
●
Track number and playing time display.
To switch between the display modes,
ESPAÑOL
Changing the display
DEUTSCH
MP3 MODE
PORTUGUÊS
CD MODE
49
MP3 MODE
Fig. 1
Fig. 2
D01
D01
D02
D03
T001
T002
T003
T004
T005
D05
T001
T002
T003
T004
T005
T006
T007
D04
T001
T002
T003
T004
T005
T006
T007
T008
T009
T010
T011
T001
T002
T003
T004
T005
T006
T007
T008
T009
T010
T011
Since using some burner software can lead
to inconsistencies in the way items are numbered, you should ensure that the root directory D01 either contains only subdirectories
containing tracks (Fig. 1) or only tracks
(Fig. 2).
Each track can be named using the PC. The
directory name can be displayed in the Los
Angeles MP71’s display. Name the directories and tracks using your CD burner software. The software’s operating instructions
will provide details on how to do this.
Note:
●
When naming directories and tracks
you should avoid using special characters.
If you like your files to be in the correct order,
you should use burner software that places
files in alphanumerical order. If your software
does not provide this feature, you can also
sort the files manually. To do so, you should
50
place a number (e.g. “001”, “002”, etc.) before each file name – the leading zeros must
also be included.
Each track can be given a name (ID tag). The
track’s name can also be shown in the display.
When creating (encoding) MP3 files from the
audio files, you should use bit rates up to a
maximum of 256 kB/sec.
Only MP3 files with the “.MP3” file extension
can be played on the Los Angeles MP71.
Note:
To ensure uninterrupted playback,
●
do not change the file extension to
“.MP3” of any files other than MP3 files
and then attempt to play them!
●
Do not use “mixed” CDs containing nonMP3 data and MP3 tracks.
●
Do not use mix mode CDs containing
audio tracks and MP3 tracks.
Switching to MP3 mode
MP3 mode is activated in the same way as
normal CD mode. For further details, please
read the section entitled “Switching to CD
mode and inserting a CD” in the “CD mode”
chapter.
Selecting a directory
To avoid overly long access times, you should
use a maximum of 20 directories.
To move up or down to another directory,
or button 7 until the number of the required directory
appears in the display after “D”.
➮ keep pressing the
Note:
●
Any directories that do not contain MP3
files will be skipped automatically. If, for
instance, you are listening to tracks in
directory D01 and you select the next
directory by pressing the button 7,
buttons 7
pressed until fast-reverse / fast-forward
track selection begins.
➮ keep one of the
Fast searching (audible)
To fast search backwards or forwards,
/ buttons 7
pressed until fast searching backwards /
forwards begins.
➮ keep one of the
Random track play (MIX)
➮ Press the softkey 4 that corresponds
to the “MIX” display item.
“MIX CD” appears briefly in the display. The
next track to be played will be picked at random.
Stopping SCAN and continuing playback
ENGLISH
FRANÇAIS
Note:
●
You can set the scanning time. For further details, please read the section entitled “Setting the scantime” in the “Radio mode” chapter.
➮ Press the softkey 4 that corresponds
to the “SCA” display item again.
The currently scanned track will then continue to be played normally.
Repeating individual tracks or
whole directories (REPEAT)
➮ Press the softkey 4 that corresponds
to the “RPT” display item.
“RPT TRCK” appears briefly in the display.
To repeat the whole directory,
➮ press the softkey 4 that corresponds
to the “RPT” display item again.
“RPT DIR” appears briefly in the display.
Cancelling REPEAT
To stop the current track or current directory
from being repeated,
➮ keep pressing the softkey 4 that corresponds to the “RPT” display item until
“RPT OFF” appears briefly in the display.
ITALIANO
Fast track selection
Fast track selection allows you to quickly select tracks in large directories. Fast track selection selects tracks in steps of ten.
To quickly select tracks backwards or forwards,
to the “SCA” display item.
“SCAN” appears in the display. The tracks on
the CD are briefly played in ascending order.
NEDERLANDS
or button 7 until the number of the required track appears in the display.
If the button 7 is pressed once, the current track will be played again from the beginning.
➮ keep pressing the
➮ Press the softkey 4 that corresponds
SVENSKA
To move up or down to another track in the
current directory,
You can briefly play all the tracks on the CD.
ESPAÑOL
Selecting tracks
Scanning tracks (SCAN)
PORTUGUÊS
directory D02 will be skipped and D03
will be played. The display will then automatically switch from “D02” to “D03”.
DEUTSCH
MP3 MODE
Stopping MIX
DANSK
➮ Press the softkey 4 that corresponds
to the “MIX” display item again.
“MIX OFF” appears briefly in the display and
the unit plays track 1 in the current directory.
51
MP3 MODE
Setting the display
To close the menu,
There are various options available for displaying the name of the artist, track, directory
and file.
➮ press the OK button 5 or MENU but-
Displaying the directory name and IDTAG (artist and track name)
To display the name of the directory, artist and
track, select “TAG ON” in the menu.
Displaying the directory name and file
name
To display the directory name and file name,
select “TAG OFF” in the menu.
Setting TAG
➮ Press the MENU button 8.
➮ Keep pressing the or button 7 until “TAG ON” or “TAG OFF” appears in
the display.
buttons 7 to switch between the settings.
To close the menu,
➮ Use the
➮ press the OK button 5 or MENU button 8.
The settings are saved.
Setting scrolling text
You can choose whether you want the display that you set under “TAG ON/OFF” to
appear as scrolling text (“SCRL ON”) or appear non-recurrently (“SCRL OFF”).
Setting SCROLL
➮ Press the MENU button 8.
➮ Keep pressing the or button 7 until “SCRL ON” or “SCRL OFF” appears
in the display.
buttons 7 to switch between the settings.
➮ Use the
52
ton 8.
The settings are saved.
Note:
If you selected “SCRL OFF”, you can display
the scrolling text non-recurrently:
➮ To do so, briefly press the DIS button
:.
If you selected “SCRL ON”, you can briefly
display the directory and track number:
➮ To do so, briefly press the DIS button
:.
Selecting CDs
To move up or down to another CD,
➮ keep pressing the or button 7 until the number of the required CD appears in the display.
Selecting tracks
To move up or down to another track on the
current CD,
➮ keep pressing the or button 7 until the number of the required track appears in the display.
If the button 7 is pressed once, the current track will be played again from the beginning.
Fast searching (audible)
To fast search backwards or forwards,
➮ keep one of the / buttons 7
pressed until fast searching backwards /
forwards begins.
➮ Press the softkey 4 that corresponds
to the “RPT” display item.
“RPT TRCK” appears briefly in the display.
To repeat the whole CD,
➮ press the softkey 4 that corresponds
to the “RPT” display item again.
“RPT DISC” appears briefly in the display.
ENGLISH
FRANÇAIS
ITALIANO
The CD changer menu appears and playback
resumes from the point at which it was last
interrupted. If the magazine was removed
from the CD changer and then replaced, playback will begin from the first track on the first
CD that the CD changer detects.
NEDERLANDS
➮ Press the CDC button =.
Repeating individual tracks or
whole CDs (REPEAT)
Cancelling REPEAT
To stop the current track or current CD from
being repeated,
➮ keep pressing the softkey 4 that corresponds to the “RPT” display item until
“RPT OFF” appears briefly in the display.
Random track play (MIX)
To play the tracks on the current CD in random order,
➮ press the softkey 4 that corresponds
to the “MIX” display item.
“MIX CD” appears briefly in the display.
To play the tracks on all inserted CDs in random order,
➮ press the softkey 4 that corresponds
to the “MIX” display item again.
“MIX MAG” appears briefly in the display.
53
SVENSKA
Switching to CD changer mode
ESPAÑOL
Note:
●
Information on handling CDs, inserting
CDs and operating the CD changer can
be found in the operating instructions
supplied with your CD changer.
You can switch between various display
modes in CD changer mode:
●
CD number, track number and clock
display.
●
CD number, track number and playing
time display.
To switch between the display modes,
➮ keep pressing the DIS button : until
the required information appears in the
display.
PORTUGUÊS
To find out which CD changers can be used
with this unit, please refer to page 34 of these
instructions or contact your Blaupunkt dealer.
Changing the display
DANSK
CD changer mode
(optional)
DEUTSCH
CD CHANGER MODE
CD CHANGER MODE
Note:
●
In the case of the CDC A 08 and the
IDC A 09, all the CDs and all the tracks
in the changer are picked randomly. In
the case of any other changer, all the
tracks on one CD are played randomly
first before the next CD in the changer
is played.
Stopping MIX
➮ keep pressing the softkey 4 that corresponds to the “MIX” display item until
“MIX OFF” appears briefly.
Scanning all tracks on all CDs
(SCAN)
To briefly play all the tracks on all the inserted CDs in ascending order,
➮ press the softkey 4 that corresponds
to the “SCA” display item.
“SCAN” appears in the display.
Stopping SCAN
To stop scanning,
➮ press the softkey 4 that corresponds
to the “SCA” display item again.
The currently scanned track will then continue to be played normally.
●
You can set the scanning time. For further details, please read the section entitled “Setting the scantime” in the “Radio mode” chapter.
CLOCK
Clock - Time
Setting the clock
The clock can be set automatically using the
RDS signal. However, if you cannot receive
any RDS stations or the RDS stations that
you listen to do not support this feature, you
can also set the clock manually.
Setting the clock automatically
To set the clock automatically,
➮ press the MENU button 8.
➮ Keep pressing the or button 7 until “CLK MAN” (manual) appears in the
display.
If “CLK AUTO” is displayed, automatic clock
adjustment is already activated.
button 7 until
“CLK AUTO” appears in the display.
To close the menu,
➮ Keep pressing the
➮ press the OK button 5 or MENU button 8.
The settings are saved.
If “CLK AUTO” is selected and the radio receives a station that supports the RDS clock
time function (RDS-CT), the clock will be set
automatically.
Setting the clock manually
To adjust the clock,
➮ press the MENU button 8.
➮ Keep pressing the or button 7 until “CLOCKSET” appears in the display.
➮ Press the
or
button 7.
The time appears in the display. The hours
flash and can be adjusted.
➮ Adjust the hours using the
/
buttons
7.
➮ Once you have adjusted the hours,
press the button 7.
The minutes flash.
54
➮ Press the MENU button 8.
➮ Keep pressing the or button 7 until “24 H MODE” or “12 H MODE” appears in the display.
or button 7 to switch
between the modes.
To close the menu,
➮ Press the
➮ press the OK button 5 or MENU button 8.
The settings are saved.
Continuous clock display when
the unit is switched off
To display the clock when the unit is off and
the ignition is on,
➮ press the MENU button 8.
➮ Keep pressing the or button 7 until “CLK OFF” or “CLK ON” appears in
the display.
or button 7 to switch
between the ON/OFF settings.
To close the menu,
➮ Press the
Notes on adjusting the settings
We recommend you use a CD that you are
familiar with for making changes to the settings.
Before adjusting the equalizer, set the sound
and volume distribution settings to zero and
deactivate loudness. For further details, refer
to the chapter entitled “Sound and volume
distribution settings”.
➮ Listen to a CD, cassette or MiniDisc
(depending on the car radio’s equipment).
➮ Analyse the sound impression.
➮ Now read the “Sound impression” column in the table entitled “Help adjusting
the equalizer”.
➮ press the OK button 5 or MENU but-
➮ Set the equalizer values as described in
ton 8.
The settings are saved.
Switching the equalizer on/off
the “Measures” column.
DEUTSCH
ENGLISH
Selecting 12/24-hour clock mode
FRANÇAIS
ton 8.
The settings are saved.
This unit is equipped with a parametric digital
equalizer. In this case, parametric means that
a frequency range can be increased or decreased (GAIN +8 to -8) for each of the three
filters.
The following filters are available:
● LOW EQ
32 - 200 Hz
● MID EQ
250 - 1,600 Hz
● HIGH EQ
2,000 - 12,500 Hz
These filters can be set without the need for
measuring equipment. They will allow you to
significantly influence the sound characteristics in your vehicle.
ITALIANO
➮ press the OK button 5 or MENU but-
Equalizer
NEDERLANDS
but-
SVENSKA
/
tons 7.
To close the menu,
ESPAÑOL
➮ Adjust the minutes using the
EQUALIZER
PORTUGUÊS
CLOCK
➮ To switch the equalizer on, press the
DANSK
DEQ button 6.
“LOW EQ” appears in the display.
➮ To switch the equalizer off, press and
hold the DEQ button 6 until “DEQ
OFF” appears briefly.
55
EQUALIZER
Setting the equalizer
●
➮ Press the DEQ button 6.
➮ Using the or button 7, select the
●
CLASSIC
VOCAL
The settings for these music styles have already been programmed.
filter “LOW EQ”, “MID EQ” or “HIGH
EQ”.
To select the frequency,
➮ Press the DEQ button 6.
➮ Select “PRESET” using the
➮ press the or button 7.
➮ Adjust the level using the or
ton 7.
To select a sound preset,
button
or
but-
7.
To select the next filter,
➮ press the or button 7.
➮ Press OK button 5.
➮ first press the OK button 5 and then
When you have finished making all your adjustments,
the or button 7.
When you have finished making all your adjustments,
➮ press the DEQ button 6.
Setting the quality factor for the
filter
➮ Press the DEQ button 6.
➮ Using the or button 7, select the
settings for the quality factor of the individual filters “LO-Q-FAC”, “MI-Q-FAC” or
“HI-Q-FAC”.
To adjust the filter quality,
➮ press the
or
button 7.
To select the next filter,
➮ first press the OK button 5 and then
➮ press the DEQ button 6.
Setting the spectrometer
The spectrometer (level display) briefly provides a symbolic display of the volume, the
sound control settings and the equalizer settings whilst you are making your changes.
When you are not changing any settings, the
spectrometer can display the car radio’s output level.
Switching the spectrometer on/off
➮ Press the MENU button 8.
“MENU” appears in the display.
or button 7 until “PEAK ON” or “PEAK OFF” appears
in the display.
To switch the spectrometer on/off,
➮ Keep pressing the
the or button 7.
When you have finished making all your adjustments,
➮ press the
➮ press the DEQ button 6.
To close the menu,
Selecting sound presets
You can select sound presets for the following music types.
●
ROCK
●
DISCO
●
JAZZ
56
or
button 7.
➮ press the OK button 5 or MENU button 8.
The settings are saved.
EQUALIZER
Dull sound
Little clarity
No brilliance to the instruments
Increase treble level with
Filter: “HIGH EQ”
Frequency: approx. 12,500 Hz
Level: +2 to +4 dB
ENGLISH
Reduce the mid level with
Filter: “MID EQ”, “HIGH EQ”
Frequency: 1,000 to 2,500 Hz
Level: -4 to -6 dB
FRANÇAIS
Sound very much in the foreground,
aggressive, no stereo effect.
ITALIANO
Reduce the lower mid level with
Filter: “LOW EQ”, “MID EQ”
Frequency: 125 to 400 Hz
Level: approx. -4 dB
NEDERLANDS
Dirty bass
Booming sound
Unpleasant pressure
SVENSKA
Increase bass with
Filter: “LOW EQ”
Frequency: 50 to 100 Hz
Level: +4 to +6 dB
ESPAÑOL
Bass sound is too weak
PORTUGUÊS
Measures
DANSK
Sound Impression / problem
DEUTSCH
Help adjusting the equalizer
57
EXTERNAL AUDIO SOURCES
PREAMPLIFIER/SUB-OUT
External audio sources
Preamplifier/sub-out
Instead of connecting a CD changer, you can
connect another audio source equipped with
a line output. The audio source can, for example, be a portable CD player, MiniDisc player or MP3 player.
The AUX input must be activated in the menu.
If you want to connect an external audio
source, you will need an adapter cable. You
can obtain this cable from a Blaupunkt dealer.
The car radio provides connections for connecting an external preamplifier and a subwoofer.
We recommend you use well-matched products from the Blaupunkt or Velocity product
ranges.
Power-on delay for external
preamplifier
Switching the AUX input on/off
You can set a power-on delay for an amplifier
connected to the pre-amp output. The maximum delay is four seconds.
➮ Press the MENU button 8.
➮ Keep pressing the button 7 until
➮ Press the MENU button 8.
➮ Keep pressing the or button 7 un-
“AUX OFF” or “AUX ON” appears in the
display.
If “AUX ON” is displayed, the input is already
activated.
til “AMP DLAY” appears in the display.
To adjust the power-on delay,
or button 7 to switch
AUX on/off.
To close the menu,
“DLAY OFF” means that no power-on delay
is set; “DELAY 1” to “DELAY 4” refer to the
delay time in seconds.
To close the menu,
➮ Press the
➮ press the OK button 5 or MENU button 8.
The settings are saved.
Note:
●
If the AUX input is activated, you can
select it by pressing the CDC button =.
58
➮ press the
or
button 7.
➮ press the OK button 5 or MENU button 8.
The settings are saved.
4 x 25 watts sine in
accordance with
DIN 45 324 at 14.4 V
4 x 47 watts max. power
Tuner
Frequency ranges:
FM :
87.5 – 108 MHz
MW :
531 – 1,602 kHz
FM frequency response:
30 - 15,000 Hz
CD
Frequency response:
20 - 20,000 Hz
4 channels:
DEUTSCH
SVENSKA
Pre-amp out
ENGLISH
Output power:
The scope of the guarantee depends on the
regulations in force within the country in which
the unit was purchased.
If your unit develops a fault, please contact
your dealer and present the purchase receipt.
If the statutory guarantee period in your country is less than 12 months, Blaupunkt will grant
a 12-month manufacturer’s guarantee. This
guarantee does not cover damage due to
wear, incorrect usage or commercial use.
If you wish to enforce a claim under the manufacturer’s guarantee that is provided by Blaupunkt, please send the faulty equipment together with the purchase receipt to the Blaupunkt customer service centre in your country. You can find out which address is closest
to you by contacting the telephone hotline listed on the back page of this booklet. Blaupunkt retains the right to rectify defects or
supply a replacement.
FRANÇAIS
Amplifier
Guarantee
ITALIANO
Specifications (excerpts)
GUARANTEE
NEDERLANDS
SPECIFICATIONS
4V
AUX input
ESPAÑOL
1.2 V / 10 kOhm
DANSK
PORTUGUÊS
Input sensitivity:
Subject to changes!
59
Service-Nummern / Service numbers / Numéros du service aprèsvente / Numeri del servizio di assistenza / Servicenummers /
Telefonnummer för service / Números de servicio / Números de
serviço / Servicenumre
Country:
Phone:
Fax:
WWW:
http://www.blaupunkt.com
Germany
(D)
0180-5000225
05121-49 4002
Austria
Belgium
Denmark
Finland
France
Great Britain
Greece
Ireland
Italy
Luxembourg
Netherland
Norway
Portugal
Spain
Sweden
Switzerland
(A)
(B)
(DK)
(FIN)
(F)
(GB)
(GR)
(IRL)
(I)
(L)
(NL)
(N)
(P)
(E)
(S)
(CH)
01-610 390
02-525 5454
44 898 360
09-435 991
01-4010 7007
01-89583 8880
0800-550 6550
01-4149400
02-369 6331
40 4078
023-565 6348
66-817 000
01-2185 00144
902-120234
08-7501500
01-8471644
01-610 393 91
02-525 5263
44-898 644
09-435 99236
01-4010 7320
01-89583 8394
01-576 9473
01-4598830
02-369 6464
40 2085
023-565 6331
66-817 157
01-2185 11111
916-467952
08-7501810
01-8471650
Czech. Rep.
Hungary
Poland
(CZ)
(H)
(PL)
02-6130 0441
01-333 9575
0800-118922
02-6130 0514
01-324 8756
022-8771260
Turkey
(TR)
0212-3350677
0212-3460040
USA
(USA) 800-2662528
Brasil
(Mercosur)
(BR)
708-6817188
+55-19 3745 2769 +55-19 3745 2773
Malaysia
(Asia Pacific) (MAL) +604-6382 474
+604-6413 640
Blaupunkt GmbH
12/01 TRO
CM/PSS 8 622 403 067