1
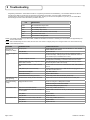
8 Troubleshooting (continued)
PROBLEM
PROBABLE CAUSE
CORRECTIVE ACTION
Error codes E5 & E7
Door did not make it fully opened
Check and change Fh at DP-Hub if needed to make the door reach full
open or adjust door so that it opens at least 80 degrees
Bad learn
Perform a new DP-Hub learn
Home Switch is breaking too late, or is wired
incorrectly, or is faulty
Check Home Switch (Section 5-8)
Faulty EDPS
Replace EDPS
Faulty DP-Hub
Replace DP-Hub
Door opened too far
Adjust door so that it opens less than 110 degrees
Bad learn
Perform a new DP-Hub learn
Faulty EDPS
Replace EDPS
Faulty DP-Hub
Replace DP-Hub
Door Mounted Sensor going into detection too
soon
Check the Door Mounted Positions using the Operating Parameter and
if the degree is greater than 0 but less than 65, adjust the sensor by
angling it in closer to the door or raise the detection threshold from the
floor
Door Mounted Sensor wiring is incorrect
Check the Door Mounted Positions using the Operating Parameter and if
the degree is 0, check wiring of Door Mounted Sensors
Error codes E6 & E8
Error codes E9 & EA
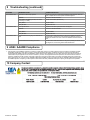
9 ANSI / AAADM Compliance
1. Upon finishing of the installation perform at a minimum a daily safety check in accordance with the minimum inspection guidelines provided
by AAADM, provide each owner with an owner’s manual that includes a daily safety checklist and contains at a minimum the information
recommended by AAADM, and offer a familiarization session with the owner explaining how to do daily inspections and calling out location of
cutoff switches to put equipment out of service if a deficiency is noted. The equipment should be inspected in accordance with the minimum
inspection guidelines annually. A safety check that includes at a minimum the items listed on the safety information label must be performed
during each service call. If you are not an AAADM certified inspector BEA strongly recommends to have an AAADM certified inspector perform
an AAADM inspection and placing a valid inspection sticker below the safety information label prior to placing the equipment into operation.
10 Company Contact
75.5652.03 20130617
Page 13 of 16