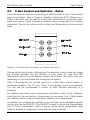
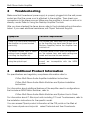
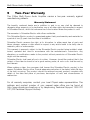
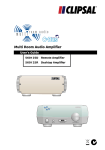
1
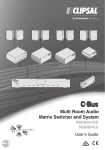
AL
S
LIP
C
L
SA
IP
CL
E>
CE
UR
TE
R
WE
PO
>
UM
OL
<V
O
<S
MU
Multi Room Audio Amplifier
560125D/2
560125R/2
560110R
User’s Guide
Multi Room Audio Amplifier
User's Guide
Contents
1
2
Introduction
1.1
Safety Information
3
4
1.2
Operating Do's and Don'ts
5
1.3
Features and Capabilities
6
Operating Instructions
2.1
Powering On and Off
8
8
2.2
Connecting a Stereo Source
9
2.3
C-Bus Controls and Switches-Notes
10
2.4
Using the Desktop Amplifier Controls
11
2.5
Using Headphones
13
3
Troubleshooting
14
4
Additional Product Information
14
5
Two-Year Warranty
15
Copyright by Schneider Electric. All rights reserved.
C-Bus and Clipsal are registered trademarks of Schneider Electric.
Multi Room Audio, Neo and Saturn are trademarks of Schneider Electric.
All other trademarks are the property of their respective owners.
November 2009
2
Multi Room Audio Amplifier
1
User's Guide
Introduction
This User's Guide is written for the homeowner whose amplifiers and speakers
were installed and tested by a professional C-Bus installer. This User's Guide
assumes that all of the installation and setup work was completed using the
C-Bus Multi Room Audio Amplifier Installation Instructions.
A Multi Room Audio (MRA) Amplifier is part of a C-Bus enabled audio distribution
system. C-Bus input units control the amplifier. Examples of C-Bus input units
that control MRA amplifiers include Saturn and Neo wall switches, DLT switches,
and the C-Touch Colour Touchscreen.
This User's Guide tells you how to use one or more MRA amplifiers in a
standalone layout without an MRA Matrix Switcher. For system level features,
refer to the C-Bus Multi Room Audio Matrix Switcher and System User's Guide.
Amplifier Product Range
The three types of MRA amplifiers are shown in Figure 1. Your MRA layout might
contain any combination of these amplifiers. A single amplifier is a valid
configuration and you can have several amplifiers linked together as needed to
suit you needs.
Figure 1. Types of MRA amplifiers
All types of MRA amplifiers have connections for line level stereo inputs, speakers
and C-Bus. When several amplifiers are connected together, a digital audio cable
distributes the audio program from amplifier to amplifier. For more details, refer to
the C-Bus Multi Room Audio Amplifier Installation Instructions.
3
Multi Room Audio Amplifier
1.1
User's Guide
Safety Information
Read and understand the following safety information before using the amplifier.
WARNINGS–Electrical Shock Hazards
Failure to comply with the following precautions could cause death or severe
injury from electrical shock.
•
Do not open the outer cover. There are no user serviceable parts inside the
amplifier. Always refer repairs to qualified personnel.
•
Connect the power supply only to a wall power outlet that has a properly
connected earth connection. Do not use an extension cable. Never tamper
with or remove the grounding blade on the power supply cord.
•
To avoid electric arcing and sparks, check that the power supply cable is
securely connected to the amplifier before plugging the power supply into the
wall power outlet. Likewise, always disconnect the power supply cord from
the wall power outlet before disconnecting the power supply cable from the
MRA amplifier.
•
Do not allow liquids to drip or splash on the amplifier. Never immerse the
amplifier in water or allow it to fall into a bathtub or sink. Do not touch the
amplifier if your hands are wet or if you are standing in water. If the amplifier
becomes wet, disconnect the power supply from the wall power outlet and
notify your C-Bus installer immediately.
•
Use the power supply provided for use with the MRA amplifier. Do not
substitute any other type. Using the wrong power supply could create an
electrical shock and/or a fire hazard.
•
If any cord or cable is damaged, unplug the equipment immediately and call
your C-Bus installer for a replacement unit or cable.
WARNINGS–Hearing Loss Hazards
The amplifiers can produce sounds loud enough to cause permanent hearing
loss. Prevent hearing loss by doing the following:
•
Mute the speakers before connecting an audio source.
•
Turn down the volume setting before connecting headphones. Connect the
headphones to the amplifier BEFORE placing them on your head.
•
Instruct children in the proper use the Multi Room Audio equipment and
provide adequate supervision.
4
Multi Room Audio Amplifier
1.2
User's Guide
Operating Do's and Dont's
To get the best performance and extend the useful life of the MRA amplifier,
follow these guidelines:
Do
•
Use the power supply designed for the amplifier. Using any other power
supply can damage the unit, and void the warranty.
•
Operate the amplifier in an indoor location free from direct sunlight or other
sources of heat. Provide adequate ventilation.
Don't
•
Don't connect high level sources from a source to the MRA amplifier's stereo
input connections. These high power signals will overdrive the amplifier's
input and cause poor sound quality. Use line level sources only. Refer to
Connecting a Stereo Source.
•
Cover the amplifier or place it in an enclosed space. Operating the equipment
at high temperatures for extended periods will reduce reliability and product
life.
•
Plug or unplug cables or speaker wires when power is applied. Disconnect
the power supply from the wall power outlet before changing connections.
•
Insert C-Bus RJ45 plugs into LAN or Digital Audio sockets. Damage to the
equipment can occur. If you are not sure, call your C-Bus installer.
Care Instructions
Maintain the appearance of the equipment by following these guidelines:
•
Use a soft lint free cloth for cleaning.
•
Do not use chemicals or spray cleaners.
•
Do not use hard, sharp objects to select the controls.
•
Do not allow dust to accumulate on the equipment.
5
Multi Room Audio Amplifier
1.3
User's Guide
Features and Capabilities
MRA amplifiers can be used in a standalone configuration without an MRA Matrix
Switcher. The standalone MRA amplifier lets you:
•
Plug in a stereo input source from a CD player, PC sound card, MP3 player,
or other line-level source. Your C-Bus installer can provide a convenient wall
plate connection for your stereo source input, if desired.
•
Individually control each amplifier in the installation using C-Bus. You can
control the volume, tone and mute the speakers.
•
Use several methods to operate the 560125D/2 desktop amplifier. You can
use C-Bus input switches, a hand held remote control and the manual front
panel controls. The desktop model also has a power standby mode. Refer to
Section 2.3 and Section 2.4.
•
Add additional amplifiers in other rooms and distribute the program source
from the first amplifier to other rooms. Contact your C-Bus installer for details.
•
Include Multi Room Audio in scenes and use timers and schedules. Consult
with your C-Bus installer for more details.
•
Plan for future expansion including multiple audio zones and multiple source
selection using the MRA Matrix Switcher. Refer to the C-Bus Multi Room
Audio Matrix Switcher and System User's Guide.
During installation, your C-Bus installer connected the MRA amplifier in a manner
similar to the diagram below. Some connectors on the amplifier's rear panel are
not used. Refer to the system-level documents for more information.
Figure 2. MRA single amplifier standalone setup
6
Multi Room Audio Amplifier
User's Guide
If you have more than one amplifier in your standalone configuration, the digital
audio feature of the amps is implemented. See the figure below for a typical
installation. For other configurations refer to the Multi Room Audio Matrix Switcher
and System Installation Instructions and the system level User's Guide.
Caution
Do not disconnect the C-Bus network cables or Digital Audio cables. Connecting
these cables to the wrong locations could damage your amplifier. Allow your
C-Bus installer to handle all cabling changes.
Figure 3. MRA multiple amplifier standalone setup
It is important to remember that all of the amplifiers in a standalone layout share a
common stereo input that is connected to the first amplifier. Also, C-Bus input
devices individually control each amplifier.
7
Multi Room Audio Amplifier
2
User's Guide
Operating Instructions
Your C-Bus installer connected the amplifier power supply to a wall power outlet.
The amplifier uses very little power, so you do not need to disconnect the power
supply from the outlet when the amplifier is not in use.
2.1
Powering On and Off
The following steps are recommended when powering on the amplifier. The
remote amplifiers do not have a local power switch because they are often
installed in hard to reach locations in your house.
Connecting the Power Supply
1. Make sure that the C-Bus, speaker and stereo input connections to the
amplifier are in place and that connections are tight.
2. Inspect the power supply and its cables for any problems or loose
connections. Do not use a power supply that is damaged.
3. Connect the output cable to the EXTERNAL POWER connector on the
amplifier's back panel.
4. Plug the power supply into a wall power outlet. Remote amplifiers are now
powered on and ready for use.
Powering On the Desktop Amplifier
The 560125D/2 Desktop Amplifier is equipped with a power/standby front panel
switch. The switch operates as described below:
A quick press switches the desktop amplifier ON or to STANDBY.
A long press (400 milliseconds, about one half second) turns the amplifier power
off.
When in STANDBY mode, the amplifier can be switched on via C-Bus or a
remote control.
When powered OFF, the desktop amplifier does not respond to C-Bus or a
remote control.
Powering Off the Amplifiers
When changing speaker wire connections, you must power off the amplifier. Be
sure to remove the power supply from the wall power outlet.
Unplugging the power supply causes the amplifier to return to its default values
for volume and tone settings or to the settings programmed using Toolkit.
8
Multi Room Audio Amplifier
2.2
User's Guide
Connecting a Stereo Source
For best audio quality, always use high quality audio cables and keep the cable
lengths as short as possible. The MRA amplifiers use line level signals. Examples
of audio equipment you can connect include, CD and DVD players, PC sound
cards (line output, not speaker outputs), and MP3 players that have a line output.
Normally, the volume of the input source is not adjustable and the MRA amplifier
controls the volume. Use C-Bus and the MRA amplifier to adjust tone settings as
well.
You can have more than one MRA amplifier in a standalone configuration, but you
can have only one stereo input source for all of the connected amplifiers. If you
connect multiple sources, the sound quality will suffer.
There are two possible connector types for audio cable attachment to the
amplifier. Refer to Table 1.
Amplifier type
LOCAL IN connector
560125D/2 Desktop and
560125R/2 Remote
Left (L) RCA phono jack
Right (R) RCA phono jack
560125R Low Power Remote
3.5 mm stereo jack
Table 1. LOCAL IN connector details
Connect the stereo audio cable from the source equipment to the location shown
in the figure below.
Figure 4. LOCAL IN connection points
9
Multi Room Audio Amplifier
2.3
User's Guide
C-Bus Control and Switches – Notes
The most common method of controlling an MRA amplifier is via a C-Bus switch
such as the Saturn, Neo or Dynamic Labelling Technology (DLT). Buttons on a
C-Bus wall switch can be used to control the volume/on/off (combined), bass,
treble and muting. Figure 5 shows a possible control configuration for a Saturn
wall switch. The top two buttons control a light and the remaining buttons control
audio.
Figure 5. Possible button assignments on a Saturn wall switch
Volume buttons are typically multipurpose. For example, a quick-press can toggle
the amplifier between On and Standby. A long press (of more than 400
milliseconds, about one half second) adjusts the volume. This action may vary
depending on how the installer has configured the system.
Other C-Bus devices can provide control for a Multi Room Audio system or
standalone amplifier. The C-Touch Colour Touch Screen is one such example.
You can use the touchscreen to control an MRA amplifier according to a
schedule.
For detailed information and programming instructions, refer to the installation
instructions for the wall switch or touchscreen you are using. Your C-Bus installer
can create a custom control configuration based on your requirements.
An installer can configure an amplifier to be controlled via an alternative remote
control, such as the 5035TX2. The 5035TX2 is used to control the Scene Master
and C-Touch Touchscreen. Figure 6 shows typical button assignments used
when an amplifier is configured to work with this type of remote.
10
Multi Room Audio Amplifier
User's Guide
Figure 6. C-Bus Remote Control
2.4
Using the Desktop Amplifier Controls
The Desktop Amplifier (shown in Figure 7) can be controlled from the front panel.
Figure 6 shows the indicators and buttons; Table 2 describes each of these
features. The remote amplifier is controlled entirely from C-Bus, and has no
controls on its front panel.
Figure 7. 560125D/2 Desktop Amplifier front panel
11
Multi Room Audio Amplifier
Button or
Indicator
Description
Power
Quick press: Switches the amplifier On or to Standby.
User's Guide
Long press: Pressing the button for more than 400 ms switches
the Amplifier off. When in standby, the Amplifier can be switched
on via C-Bus or a remote control. When off, the unit will not
respond to C-Bus or remote control.
Power indicator
On: Amplifier switched on. Off: Amplifier off.
Off with 5 second flash: Amplifier in standby.
On with flash: IR remote control code received.
Note: The installer can use C-Bus Toolkit software to disable the
5-second standby flash.
Volume
Increases and decreases the volume. Cancels the Mute status if
both speakers and headphones are muted.
Mute
pushbutton
Quick press: Sets the audio output (speakers and headphones)
to a preset (typically low) level configured by the installer. A
subsequent press returns to the previous volume setting. If the
power button is used to switch between Standby and On, the
Mute status is reset.
Long press: Pressing the button for more than 400 ms (about
one half second) causes the speakers (but not headphones) to
mute. A subsequent long press reverses this state.
Source
selection
A standalone amplifier is connected to only one analogue source
input. If you have an optical input connected, the Source buttons
let you switch between the analogue source and the optical
source.
Note that you cannot use the optical input and the digital audio
input at the same time.
IR Window
The infrared (IR) receiver that is used with the remote control
shown in Figure 8.
Table 2. Desktop amplifier front panel controls and indicators
12
Multi Room Audio Amplifier
User's Guide
Figure 8. The Desktop Amplifier Remote Control
2.5
Using Headphones
The MRA Desktop Amplifier has a 3.5 mm stereo headphone socket on its rear
panel. This allows you to listen to audio through headphones.
Set the volume to a low level before connecting headphones. Once you have
plugged headphones into the amplifier (either via a wall plate socket or directly
into the amplifier), press the Mute button for more than 400 ms (about one half
second) to silence the speakers.
13
Multi Room Audio Amplifier
3
User's Guide
Troubleshooting
Make sure that the external power supply is properly plugged into the wall power
socket and that the power cord is attached to the amplifier. Then check your
connections to the stereo source. Make sure the amplifier is turned on and not in
standby mode. Refer to Using the Desktop Amplifier Controls.
After you have checked the items above, refer to the troubleshooting information
below. If you need additional assistance, call Clipsal Technical Support.
Symptom
Possible Explanation
There is no sound after switching
the Amplifier on (sound worked
previously).
The volume may have been set to minimum,
or the Amplifier may have been Muted (on a
Desktop Amplifier) before the Amplifier was
switched off.
The default volume, bass or treble
settings have changed (when
switching the Amplifier on).
If a power failure occurs when the Amplifier is
on, the volume, bass and treble settings are
saved and become the new defaults.
Cannot hear any sound when
using the optical input
Some digital audio formats (such as surround
sound) are incompatible with the MRA
system.
4
Additional Product Information
For specifications and regulatory compliance information refer to:
C-Bus Multi Room Audio Amplifier Installation Instructions
C-Bus Multi Room Audio Matrix Switcher and System Installation
Instructions
For information about additional features of the amplifier used in configurations
that include an MRA Matrix Switcher, refer to:
C-Bus Multi Room Audio Matrix Switcher and System User's Guide
For information about C-Bus input units including C-Touch Touchscreens, refer to
the installation instructions for the specific model.
You can access Clipsal product information at the CIS portal on the Web at
http://www.clipsal.com/cis/portal select Technical and then Downloads.
14
Multi Room Audio Amplifier
5
User's Guide
Two-Year Warranty
The C-Bus Multi Room Audio Amplifier carries a two-year warranty against
manufacturing defects.
Warranty Statement
The benefits conferred herein are in addition to, and in no way shall be deemed to
derogate; either expressly or by implication, any or all other rights and remedies in respect
to Schneider Electric, which the consumer has in the location where the product is sold.
The warrantor is Schneider Electric with offices worldwide.
This Schneider Electric product is guaranteed against faulty workmanship and materials for
a period of two (2) years from the date of installation.
Schneider Electric reserves the right, at its discretion, to either repair free of parts and
labour charges, replace or offer refund in respect to any article found to be faulty due to
materials, parts or workmanship.
This warranty is expressly subject to the Schneider Electric product being installed, wired,
tested, operated and used in accordance with the manufacturer's instructions. Any
alterations or modifications made to the product without permission of Schneider Electric
might void the warranty.
Schneider Electric shall meet all costs of a claim. However, should the product that is the
subject of the claim be found to be in good working order, all such costs shall be met by
the claimant.
When making a claim, the consumer shall forward the Schneider Electric product to the
nearest Schneider Electric office. Provide adequate particulars of the defect within 28 days
of the fault occurring. The product should be returned securely packed, complete with
details of the date and place of purchase, description of load, and circumstances of
malfunction.
For all warranty enquiries, contact your local Clipsal sales representative. The
address and contact number of your nearest sales office can be found at
http://www.clipsal.com/locations or by telephoning Technical Support 1300 722
247 (CIS Technical Support Hotline).
15
Technical Support
For further assistance in using this product, consult your nearest Clipsal
Integrated Systems (CIS) Sales Representative or Technical Support Officer.
Technical Support Contact Numbers
Australia
1300 722 247 (CIS Technical Support Hotline)
New Zealand
0800 888 219 (CIS Technical Support Hotline)
Northern Asia
+852 2484 4157 (Clipsal Hong Kong)
South Africa
011 314 5200 (C-Bus Technical Support)
Southern Asia
+603 7665 3555 Ext. 236 or 242 (CIS Malaysia)
United Kingdom
0870 608 8 608 (Schneider Electric Support)
Technical Support email:
[email protected]
Clipsal Australia Pty Ltd
A member of Schneider Electric
Contact us clipsal.com/feedback
National Customer Care Enquiries:
Tel 1 300 202 525
Fax 1 300 202 556
F1913/02
clipsal.com
Schneider Electric reserves the right to change
specifications, modify designs and discontinue items without
incurring obligation and whilst every effort is made to ensure
that descriptions, specifications and other information in this
catalogue are correct, no warranty is given in respect thereof
and the company shall not be liable for any error therein.
Copyright by Schneider Electric. All rights reserved.
10319762