1
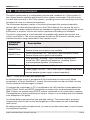
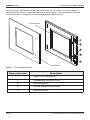
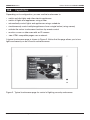
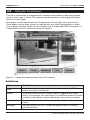
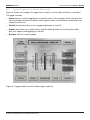
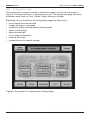
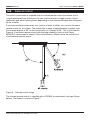
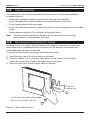
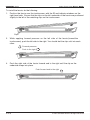
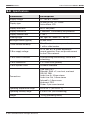
Colour Touchscreen
5000CTC3 Series
User’s Guide
Contents
1.0
2.0
3.0
4.0
5.0
6.0
7.0
8.0
9.0
10.0
11.0
Product Description
Capabilities
Using the Touchscreen
3.1 Typical Page for Controlling Appliances
3.2 Configuration Page
Remote Control
Scenes
Schedules
Care Instructions
Removing and Installing the Fascia
Specifications
Two-Year Warranty
Installer Details
3
5
6
7
8
9
10
10
11
11
13
14
15
Copyright 2011. Schneider Electric Australia Pty Ltd. All rights reserved.
The information in this document is provided in good faith. Schneider Electric Australia Pty Ltd has
endeavoured to ensure the relevance and accuracy of the information, but assumes no responsibility
for any loss incurred as a result of its use. Schneider Electric does not warrant that the information is
fit for any particular purpose, nor does it endorse its use in applications that are critical to the health
or life of any human being. Schneider Electric reserves the right to update the information at any time
without notice.
C-Bus, Clipsal, C-Touch and HomeGate are trademarks of Schneider Electric Industries SAS. All
other trademarks are the property of their respective owners.
November 2011
5000CTC3 Series
1.0
Colour Touchscreen User’s Guide
Product Description
The colour touchscreen is a configurable controller and scheduler for C-Bus systems. It
has infrared remote capability and a backlit colour display touchscreen. The unit mounts
in a wall and connnects to the C-Bus network, providing control and scheduling of services
throughout a home or commercial installation.
The touchscreen displays a series of touch-sensitive pages that are associated with
various lights or other electrical devices on the C-Bus network. You can use the unit to
trigger ‘scenes’ where multiple devices are switched on together, setting a particular mood
at the press of a button. You can also control appliances according to a schedule.
The colour touchscreen is a wall-mounted unit available with several fascia styles and
colours (see Table 1). The colour touchscreen includes an IR window for remote control
interface functions using a hand held C-Bus remote control.
Catalogue
Number
Description
5080CTC3-xx
Colour touchscreen, 6.4”, wall mount, beveled glass surround.
Several fascia colour options are available.
5050CTC3-xx
Colour touchscreen, 6.4”, wall mount, Neo style plastic fascia.
Several fascia colour options are available.
Parts package, including: stylus, microfibre cleaning cloth,
ferrite filter, WiFi antenna and extension, mounting screws
and a programming cable. (included parts)
5035TX2
C-Bus infrared remote control, 5-button
Power supply, 24V d.c., 1.25A, 30W, with AC adapters and screw
terminal adapter (power supply ordered separately)
Table 1. Colour touchscreen and accessories
An infrared remote control is provided with the touchscreen for local control. When
connected to a Clipsal StarServe™ system, the touchscreen can be controlled from any
location where an infrared target is located.
To program the touchscreen, a PC is connected to the LAN interface located behind the
fascia. Clipsal Toolkit and PICED configuration software tools are downloaded from the
Web. Projects are created using PICED and are transferred to the touchscreen’s memory.
The appearance of every touchscreen’s setup is unique, so your display may look different
from examples in this guide.
An internal battery maintains the time and date settings. The touchscreen’s processor
automatically controls the contrast and brightness of the screeen as well as backlight
level control.
By setting access levels and passwords, you can set up the touchscreen to restrict access
to touchscreen functions.
© 2011 Schneider Electric. All rights reserved.
3 of 16
5000CTC3 Series
Colour Touchscreen User’s Guide
Figure 1 shows the features of the front side of the unit. Normally, you do not need to
remove the front fascia. It must be removed to gain access to the reset button. See the
instructions later in this guide for removing and installing the fascia.
Touchscreen
Front fascia
Figure 1. Front panel features
Figure reference
4 of 16
Description
1
Power on/off indicator LED
2
Programming connector (RJ45)
3
Reset pushbutton
4
Infrared remote control window
5
Light level sensor
© 2011 Schneider Electric. All Rights Reserved.
5000CTC3 Series
2.0
Colour Touchscreen User’s Guide
Capabilities
Depending on its configuration, you can use the touchscreen to:
• switch and dim lights and other electric appliances
• switch off lights and appliances using a timer
• automatically control lights and appliances using a schedule
• simultaneously control multiple appliances from a single button (using scenes)
• activate the colour touchscreen functions by remote control
• monitor a room or other area with an IP camera
• view HTML-compatible pages over a network
A typical touchscreen page is shown in Figure 2. Notice that the page allows you to turn
lights and security on an off and to activate scenes.
Figure 2. Typical touchscreen page for control of lighting, security and scenes
© 2011 Schneider Electric. All Rights Reserved.
5 of 16
5000CTC3 Series
3.0
Colour Touchscreen User’s Guide
Using the Touchscreen
The colour touchscreen is configured with software customised for a particular location
(such as your home or office). The software typically presents a main page with buttons
that link to other pages.
Most pages contain buttons that control appliances such as lights, fans, and curtains.
Some pages contain slider controls or radio buttons that adjust lighting levels or select
from a range of options. Pages can also display local or networked HTML documents, or
a video feed from an IP camera as shown in Figure 3.
Figure 3. A page that displays video from an IP camera
Definitions
Term
Definition
load
An electrical device (such as a light) connected to a C-Bus
output unit (such as a dimmer).
A series of actions across multiple outputs, triggered by a single
button. For example, on arrival home, you could use a scene to switch
on lights in the hallway, kitchen and lounge, and switch on a heater.
scene
schedule
backlight
6 of 16
A sequence of events set to occur at particular times in the
future.
The light behind the LCD screen providing visibility in varying
lighting conditions.
© 2011 Schneider Electric. All Rights Reserved.
5000CTC3 Series
3.1
Colour Touchscreen User’s Guide
Typical Page for Controlling Appliances
Figure 4 shows an example of a page that is used to control lights and fans in a kitchen.
The page includes:
•
Scene buttons that set appliances to specific levels. For example, the Cooking button
sets the kitchen and bench lights to their highest levels and switches the exhaust and
range hood fans on.
•
Switch buttons that allow you to toggle appliances on and off.
•
Sliders that allow you to adjust (dim) specific lighting levels, by touching the slider
with your finger and dragging up or down.
•
Buttons that link to other pages.
Figure 4. A page used to control kitchen lights and fans
© 2011 Schneider Electric. All Rights Reserved.
7 of 16
5000CTC3 Series
3.2
Colour Touchscreen User’s Guide
Configuration Page
The touchscreen’s software includes a configuration page, such as the one shown in
Figure 5. This page allows you to customise your unit. The configuration page may have
a different name, such as Tools, Utilities, Setup, Settings or System.
Depending on your installation, the configuration page may allow you to:
•
•
•
•
•
•
•
•
set or change the time and date
change the region or language
temporarily ignore screen presses (cleaning mode)
adjust sound settings
adjust the backlight
set or change a password
calibrate the screen
configure the unit’s network settings
Figure 5. An example of a configuration (settings) page
8 of 16
© 2011 Schneider Electric. All Rights Reserved.
5000CTC3 Series
4.0
Colour Touchscreen User’s Guide
Remote Control
The colour touchscreen is supplied with an infrared remote control that allows you to
control appliances from a distance. You can use the remote to trigger scenes, switch
appliances and adjust lighting levels, depending on how the touchscreen was configured
by the installer.
If you have multiple touchscreen units (colour or black & white), you can use the same
remote control for all of them. The remote has a range of approximately 8 metres from
the infrared receiver at 90° to the touchscreen, or 4 metres at 60°. This is illustrated in
Figure 6. A universal remote control with learning capability (such as the Clipsal
5030URC) can be used to control C-Bus touchscreens. Please follow the instructions
of the learning remote control.
Figure 6. Remote control range
The infrared remote control is supplied with a CR2025 (or equivalent) coin type lithium
battery. The battery is shown in Figure 7.
© 2011 Schneider Electric. All Rights Reserved.
9 of 16
5000CTC3 Series
Colour Touchscreen User’s Guide
Battery compartment
Figure 7. Battery compartment in the 5035TX2 remote control
5.0
Scenes
One of the benefits of an automation system is the combining of events to create a special
effect or mood. An example of this is when a movie starts at a cinema. The house lights
dim, the curtains open and the movie begins to play. You can reproduce this effect by
creating a scene triggered by your touchscreen unit.
Almost anything on your C-Bus system can be included in a scene. Ask your installer for
information on how scenes can be used to set special moods.
6.0
Schedules
A schedule is used to make something happen at a particular time. Since this feature is
included in the touchscreen, you can ask your installer to include schedules that perform
household chores on a regular basis. An example would be to turn the lights on and off
when you are away from home to make the house look lived in. You can create the
impression that someone is home and moving from room to room a various times.
Another example is something often forgotten, such as watering the garden on a regular
basis.
Note: Your installer creates schedules using special software tools.
10 of 16
© 2011 Schneider Electric. All Rights Reserved.
5000CTC3 Series
7.0
Colour Touchscreen User’s Guide
Care Instructions
The touchscreen unit contains electrical and electronic parts. Follow these guidelines
to maintain the unit:
• Clean the touchscreen regularly using the soft cleaning cloth provided.
• Do not use chemicals or spray cleaners on the touchscreen or the fascia.
• Do not operate the unit with wet hands.
• Do not use hard, sharp objects to select the controls. Use your fingertip or the provided
stylus.
•
Allow adequate ventilation. Do not block the ventilation holes.
Note:
8.0
The warm airflow coming from the vents on the top of the unit may cause
discolouration of some surfaces over time.
Removing and Installing the Fascia
Normally, you do not need to remove the fascia. You might be instructed to access the
reset button that is located behind the front fascia. Do not leave the touchscreen unit
unattended when the fascia is removed.
To remove the fascia refer to the figure and follow these steps:
1) Grasp the right side of the fascia with your left hand.
2) Push the release lock in with your right thumb. At the same time lift the right
side of the fascia plate off and to the right with your left hand.
3) Swing the fascia off towards the left. Refer to Figure 8.
Push the
release lock
Lift off and to the right to disengage
the clip, then swing to the left
Figure 8. Removing the fascia
© 2011 Schneider Electric. All Rights Reserved.
11 of 16
5000CTC3 Series
Colour Touchscreen User’s Guide
To install the fascia, do the following:
1.
Position the fascia over the touchscreen, with the IR and indicator windows on the
right hand side. Ensure that the clips on the left underside of the fascia are positioned
slightly to the left of the matching clips on the touchscreen.
Clips
2.
While applying forward pressure on the left side of the fascia (toward the
touchscreen), push the left side to the right. You should feel the clips slot into each
other.
Forward pressure
Push to the right
3.
Push the right side of the fascia forward and to the right until the clip on the
underside snaps into place.
Push forward and to the right
12 of 16
© 2011 Schneider Electric. All Rights Reserved.
5000CTC3 Series
Colour Touchscreen User’s Guide
9.0 Specifications
Parameter
Description
Supply voltage
12 - 36V d.c., class 2
Display type
16.3cm (6.4 in) TFT Colour
Active Matrix LCD
Display resolution
640 × 480 pixels
Display luminance
> 300cd/m² Controlled by the processor
Display contrast ratio
> 100:1
Viewing angle
left, right: 60°; down: 55°; up: 40°
Backlight lifetime (typical)
50,000 hours
Touch surface durability
35 million touches in any one location,
1 million slide touches
C-Bus supply voltage
15 to 36V d.c. @ 20mA required for
normal operation. Does not provide current
for the C-Bus network.
C-Bus control functions
Load switching and dimming, control and
scheduling
C-Bus connection
2 × C-Bus RJ45 (parallel)
C-Bus System Clock
Software selectable
Connections
USB type A x 2
Ethernet, RJ45 x 2, one front, one back
RS-232, DB9
Audio Line In, 3.5mm stereo
Audio Line Out, 3.5mm stereo
Infrared In, 3.5mm mono
Keyboard, PS/2
Power, 2 pin screw terminal
Operating temperature range
XX to XX°C (XX to XX °F)
Operating humidity range
5 to 90% RH (non-condensing)
Weight
1375 g (excluding fascia)
© 2011 Schneider Electric. All Rights Reserved.
13 of 16
5000CTC3 Series
Colour Touchscreen User’s Guide
10.0 Two-Year Warranty
The 5000CTC3 Series Colour Touchscreen carries a two-year warranty against
manufacturing defects.
Warranty Statement
The benefits conferred herein are in addition to, and in no way shall be deemed to
derogate, either expressly or by implication, any or all other rights and remedies in respect
to the Clipsal by Schneider Electric product, that the consumer has in the loacation where
the product is sold.
The warrantor is Schneider Electric (Australia) Pty Ltd, a member of Schneider Electric
Industries SAS, with offices worldwide.
This Clipsal by Schneider Electric product is guaranteed against faulty workmanship and
materials for a period of two(2) years from the date of purchase.
Schneider Electric (Australia) Pty Ltd reserves the right, at its discretion, to either repair
free of parts and labour charges, replace or offer refund in respect to any article found to
be faulty due to materials, parts or workmanship.
This warranty is expressly subject to the Clipsal by Schneider Electric product being
installed, wired, tested, operated and used in accordance with the manufacturer’s
instructions. Any alterations or modifications made to the product without permission of
Schneider Electric (Australia) Pty LTD might void the warranty.
Schneider Electric (Australia) Pty Ltd shall meet all costs of a claim. However, should the
product that is the subject of the claim be found to be in good working order, all such costs
shall be met by the claimant.
When making a claim, the consumer shall forward the Clipsal by Schneider Electric product
to the nearest Clipsal by Schneider Electric office. Provide adequate particulars of the
defect within 28 days of the fault occurring. The product should be returned securely
packed, complete with details of the date and place of purchase, description of the load
and circumstances of the malfunction.
For all warranty enquiries, contact your local Clipsal by Schneider Electric sales office.
The address and contact number can be found at the website
http:/www.clipsal.com/locations
or by telephoning 1 300 722 247, the CIS Technical Support Hotline (Australia only).
14 of 16
© 2011 Schneider Electric. All Rights Reserved.
5000CTC3 Series
11.0
Colour Touchscreen User’s Guide
Installer Details
Parameter
Description
Name
Company
Address
City / Suburb
State
Postcode / Zipcode
Country
Voice Phone
Mobile Phone
Facsimile
Email
Web
© 2011 Schneider Electric. All Rights Reserved.
15 of 16
Technical Support and Troubleshooting
For further assistance in using this product, consult your nearest Clipsal by Schneider
Electric Sales or Technical Support Office.
Australia Technical Support Hotline 1300 722 247
New Zealand Technical Support Hotline 0800 888 219
United States Customer Information Center 1 888 778 2733
[email protected]
CIS Technical Support email:
[email protected]
Schneider Electric (Australia) Pty Ltd
Contact us:
clipsal.com
clipsal.com/feedback
National Customer Service Enquiries
Tel 1300 2025 25
Fax 1300 2025 56
Schneider Electric (Australia) Pty Ltd reserves the right to change
specifications, modify designs and discontinue items without
incurring obligation and while every effort is made to ensure that
descriptions, specifications and other information in this
instruction manual is correct, no warranty is given in respect
thereof and the company shall not be liable for any error therein.
© 2011 Schneider Electric. All rights reserved.
Trademarks are owned by Schneider Electric Industries SAS or
its affiliated companies.
F2336/01
November 2011