1
ADOBE FLEX 3
BUILDING AND DEPLOYING
ADOBE FLEX 3 APPLICATIONS
®
®
© 2008 Adobe Systems Incorporated. All rights reserved.
Building and Deploying Adobe Flex® 3 Applications
If this guide is distributed with software that includes an end-user agreement, this guide, as well as the software described in it, is furnished under license
and may be used or copied only in accordance with the terms of such license. Except as permitted by any such license, no part of this guide may be
reproduced, stored in a retrieval system, or transmitted, in any form or by any means, electronic, mechanical, recording, or otherwise, without the prior
written permission of Adobe Systems Incorporated. Please note that the content in this guide is protected under copyright law even if it is not distributed
with software that includes an end-user license agreement.
This pre-release version of the Software may not contain trademark and copyright notices that will appear in the commercially available version of the
Software.
The content of this guide is furnished for informational use only, is subject to change without notice, and should not be construed as a commitment by
Adobe Systems Incorporated. Adobe Systems Incorporated assumes no responsibility or liability for any errors or inaccuracies that may appear in the
informational content contained in this guide.
Please remember that existing artwork or images that you may want to include in your project may be protected under copyright law. The unauthorized
incorporation of such material into your new work could be a violation of the rights of the copyright owner. Please be sure to obtain any permission
required from the copyright owner.
Any references to company names in sample templates are for demonstration purposes only and are not intended to refer to any actual organization.
Adobe, the Adobe logo, Flash, Flex, Flex Builder and LiveCycle are either registered trademarks or trademarks of Adobe Systems Incorporated in the
United States and/or other countries. ActiveX and Windows are either registered trademarks or trademarks of Microsoft Corporation in the United
States and/or other countries.
Apple and Macintosh are trademarks of Apple Inc., registered in the United States and other countries. Linux is a registered trademark of Linus
Torvalds. Microsoft and Windows are either registered trademarks or trademarks of Microsoft Corporation in the United States and/or other countries.
Solaris is a registered trademark or trademark of Sun Microsystems, Inc. in the United States and other countries. All other trademarks are the property
of their respective owners.
This product includes software developed by the Apache Software Foundation (http://www.apache.org/).
This product contains either BISAFE and/or TIPEM software by RSA Data Security, Inc.
The Flex Builder 3 software contains code provided by the Eclipse Foundation (“Eclipse Code”). The source code for the Eclipse Code as contained in
Flex Builder 3 software (“Eclipse Source Code”) is made available under the terms of the Eclipse Public License v1.0 which is provided herein, and is
also available at http://www.eclipse.org/legal/epl-v10.html.
Adobe Systems Incorporated, 345 Park Avenue, San Jose, CA 95110-2704, USA.
Notice to U.S. government end users. The software and documentation are “Commercial Items,” as that term is defined at 48 C.F.R. §2.101, consisting
of “Commercial Computer Software” and “Commercial Computer Software Documentation,” as such terms are used in 48 C.F.R. §12.212 or 48 C.F.R.
§227.7202, as applicable. Consistent with 48 C.F.R. §12.212 or 48 C.F.R. §§227.7202-1 through 227.7202-4, as applicable, the Commercial Computer
Software and Commercial Computer Software Documentation are being licensed to U.S. Government end users (a) only as Commercial items and (b)
with only those rights as are granted to all other end users pursuant to the terms and conditions herein. Unpublished-rights reserved under the
copyright laws of the United States. For U.S. Government End Users, Adobe agrees to comply with all applicable equal opportunity laws including, if
appropriate, the provisions of Executive Order 11246, as amended, Section 402 of the Vietnam Era Veterans Readjustment Assistance Act of 1974 (38
USC 4212), and Section 503 of the Rehabilitation Act of 1973, as amended, and the regulations at 41 CFR Parts 60-1 through 60-60, 60-250 ,and 60741. The affirmative action clause and regulations contained in the preceding sentence shall be incorporated by reference.
Part Number: 90085059 (01/08)
iii
Contents
Part 1: Application Design
Chapter 1: Application Development Phases
Design phase . . . . . . . . . . . . . . . . . . . . . . . . . . . . . . . . . . . . . . . . . . . . . . . . . . . . . . . . . . . . . . . . . . . . . . . . . . . . . 3
Configure phase
Build phase
.......................................................................... 5
............................................................................... 6
Deploy phase
............................................................................. 8
Secure phase
. . . . . . . . . . . . . . . . . . . . . . . . . . . . . . . . . . . . . . . . . . . . . . . . . . . . . . . . . . . . . . . . . . . . . . . . . . . . 10
Application Development in Flex SDK
. . . . . . . . . . . . . . . . . . . . . . . . . . . . . . . . . . . . . . . . . . . . . . . . . . . . 11
Chapter 2: Flex Application Structure
Installation directory structure . . . . . . . . . . . . . . . . . . . . . . . . . . . . . . . . . . . . . . . . . . . . . . . . . . . . . . . . . . . 15
Development directory structure
Compiling an application
. . . . . . . . . . . . . . . . . . . . . . . . . . . . . . . . . . . . . . . . . . . . . . . . . . . . . . . . . 17
. . . . . . . . . . . . . . . . . . . . . . . . . . . . . . . . . . . . . . . . . . . . . . . . . . . . . . . . . . . . . . . . . 24
Deployment directory structure
. . . . . . . . . . . . . . . . . . . . . . . . . . . . . . . . . . . . . . . . . . . . . . . . . . . . . . . . . . 26
Chapter 3: Applying Flex Security
Introduction
. . . . . . . . . . . . . . . . . . . . . . . . . . . . . . . . . . . . . . . . . . . . . . . . . . . . . . . . . . . . . . . . . . . . . . . . . . . . . 29
Loading assets
. . . . . . . . . . . . . . . . . . . . . . . . . . . . . . . . . . . . . . . . . . . . . . . . . . . . . . . . . . . . . . . . . . . . . . . . . . . 39
Using J2EE authentication
Using RPC services
Making other connections
Using SSL
. . . . . . . . . . . . . . . . . . . . . . . . . . . . . . . . . . . . . . . . . . . . . . . . . . . . . . . . . . . . . . . . 41
. . . . . . . . . . . . . . . . . . . . . . . . . . . . . . . . . . . . . . . . . . . . . . . . . . . . . . . . . . . . . . . . . . . . . . . 44
. . . . . . . . . . . . . . . . . . . . . . . . . . . . . . . . . . . . . . . . . . . . . . . . . . . . . . . . . . . . . . . 45
. . . . . . . . . . . . . . . . . . . . . . . . . . . . . . . . . . . . . . . . . . . . . . . . . . . . . . . . . . . . . . . . . . . . . . . . . . . . . . . . 47
Writing secure Flex applications
. . . . . . . . . . . . . . . . . . . . . . . . . . . . . . . . . . . . . . . . . . . . . . . . . . . . . . . . . . 48
Configuring client security settings
Other resources
. . . . . . . . . . . . . . . . . . . . . . . . . . . . . . . . . . . . . . . . . . . . . . . . . . . . . . . 53
. . . . . . . . . . . . . . . . . . . . . . . . . . . . . . . . . . . . . . . . . . . . . . . . . . . . . . . . . . . . . . . . . . . . . . . . . . 56
Chapter 4: Optimizing Flex Applications
Improving client-side performance . . . . . . . . . . . . . . . . . . . . . . . . . . . . . . . . . . . . . . . . . . . . . . . . . . . . . . . 57
Improving charting component performance
. . . . . . . . . . . . . . . . . . . . . . . . . . . . . . . . . . . . . . . . . . . . . 88
Chapter 5: Improving Startup Performance
About startup performance . . . . . . . . . . . . . . . . . . . . . . . . . . . . . . . . . . . . . . . . . . . . . . . . . . . . . . . . . . . . . . 91
About startup order
. . . . . . . . . . . . . . . . . . . . . . . . . . . . . . . . . . . . . . . . . . . . . . . . . . . . . . . . . . . . . . . . . . . . . . 92
iv CONTENTS
Using deferred creation
. . . . . . . . . . . . . . . . . . . . . . . . . . . . . . . . . . . . . . . . . . . . . . . . . . . . . . . . . . . . . . . . . . 94
Creating deferred components
Using ordered creation
. . . . . . . . . . . . . . . . . . . . . . . . . . . . . . . . . . . . . . . . . . . . . . . . . . . . . . . . . . . 98
. . . . . . . . . . . . . . . . . . . . . . . . . . . . . . . . . . . . . . . . . . . . . . . . . . . . . . . . . . . . . . . . . . 101
Using the callLater() method
. . . . . . . . . . . . . . . . . . . . . . . . . . . . . . . . . . . . . . . . . . . . . . . . . . . . . . . . . . . . 107
Chapter 6: Building Overview
About the Flex development tools
About application files
. . . . . . . . . . . . . . . . . . . . . . . . . . . . . . . . . . . . . . . . . . . . . . . . . . . . . . . 111
. . . . . . . . . . . . . . . . . . . . . . . . . . . . . . . . . . . . . . . . . . . . . . . . . . . . . . . . . . . . . . . . . . 113
Part 2: Application Development
Chapter 7: Flex SDK Configuration
About configuration files
Flex SDK configuration
. . . . . . . . . . . . . . . . . . . . . . . . . . . . . . . . . . . . . . . . . . . . . . . . . . . . . . . . . . . . . . . . 119
. . . . . . . . . . . . . . . . . . . . . . . . . . . . . . . . . . . . . . . . . . . . . . . . . . . . . . . . . . . . . . . . . . 121
Flash Player configuration
. . . . . . . . . . . . . . . . . . . . . . . . . . . . . . . . . . . . . . . . . . . . . . . . . . . . . . . . . . . . . . . 123
Chapter 8: Using the Flex Compilers
About the Flex compilers . . . . . . . . . . . . . . . . . . . . . . . . . . . . . . . . . . . . . . . . . . . . . . . . . . . . . . . . . . . . . . . . 125
About the command-line compilers
. . . . . . . . . . . . . . . . . . . . . . . . . . . . . . . . . . . . . . . . . . . . . . . . . . . . . 131
About configuration files
. . . . . . . . . . . . . . . . . . . . . . . . . . . . . . . . . . . . . . . . . . . . . . . . . . . . . . . . . . . . . . . . 134
About option precedence
. . . . . . . . . . . . . . . . . . . . . . . . . . . . . . . . . . . . . . . . . . . . . . . . . . . . . . . . . . . . . . . 138
Using mxmlc, the application compiler
. . . . . . . . . . . . . . . . . . . . . . . . . . . . . . . . . . . . . . . . . . . . . . . . . . 139
Using compc, the component compiler
. . . . . . . . . . . . . . . . . . . . . . . . . . . . . . . . . . . . . . . . . . . . . . . . . . 161
Viewing errors and warnings
About SWC files
. . . . . . . . . . . . . . . . . . . . . . . . . . . . . . . . . . . . . . . . . . . . . . . . . . . . . . . . . . . . 172
. . . . . . . . . . . . . . . . . . . . . . . . . . . . . . . . . . . . . . . . . . . . . . . . . . . . . . . . . . . . . . . . . . . . . . . . . 174
About manifest files
. . . . . . . . . . . . . . . . . . . . . . . . . . . . . . . . . . . . . . . . . . . . . . . . . . . . . . . . . . . . . . . . . . . . . 175
Using fcsh, the Flex compiler shell
. . . . . . . . . . . . . . . . . . . . . . . . . . . . . . . . . . . . . . . . . . . . . . . . . . . . . . . 176
Chapter 9: Using Flex Ant Tasks
Installation . . . . . . . . . . . . . . . . . . . . . . . . . . . . . . . . . . . . . . . . . . . . . . . . . . . . . . . . . . . . . . . . . . . . . . . . . . . . . 181
Using Flex Ant tasks
. . . . . . . . . . . . . . . . . . . . . . . . . . . . . . . . . . . . . . . . . . . . . . . . . . . . . . . . . . . . . . . . . . . . . 182
Working with compiler options
. . . . . . . . . . . . . . . . . . . . . . . . . . . . . . . . . . . . . . . . . . . . . . . . . . . . . . . . . . 184
Using the mxmlc task
. . . . . . . . . . . . . . . . . . . . . . . . . . . . . . . . . . . . . . . . . . . . . . . . . . . . . . . . . . . . . . . . . . . 187
Using the compc task
. . . . . . . . . . . . . . . . . . . . . . . . . . . . . . . . . . . . . . . . . . . . . . . . . . . . . . . . . . . . . . . . . . . 189
Using the html-wrapper task
. . . . . . . . . . . . . . . . . . . . . . . . . . . . . . . . . . . . . . . . . . . . . . . . . . . . . . . . . . . . 190
Chapter 10: Using Runtime Shared Libraries
Introduction to RSLs . . . . . . . . . . . . . . . . . . . . . . . . . . . . . . . . . . . . . . . . . . . . . . . . . . . . . . . . . . . . . . . . . . . . 195
v
Creating libraries
. . . . . . . . . . . . . . . . . . . . . . . . . . . . . . . . . . . . . . . . . . . . . . . . . . . . . . . . . . . . . . . . . . . . . . . . 200
Using standard and cross-domain RSLs
Using the framework RSLs
Troubleshooting RSLs
. . . . . . . . . . . . . . . . . . . . . . . . . . . . . . . . . . . . . . . . . . . . . . . . . . 202
. . . . . . . . . . . . . . . . . . . . . . . . . . . . . . . . . . . . . . . . . . . . . . . . . . . . . . . . . . . . . . . 216
. . . . . . . . . . . . . . . . . . . . . . . . . . . . . . . . . . . . . . . . . . . . . . . . . . . . . . . . . . . . . . . . . . . 225
Chapter 11: Logging
About logging . . . . . . . . . . . . . . . . . . . . . . . . . . . . . . . . . . . . . . . . . . . . . . . . . . . . . . . . . . . . . . . . . . . . . . . . . . 227
Using the debugger version of Flash Player
Client-side logging and debugging
Compiler logging
. . . . . . . . . . . . . . . . . . . . . . . . . . . . . . . . . . . . . . . . . . . . . . 228
. . . . . . . . . . . . . . . . . . . . . . . . . . . . . . . . . . . . . . . . . . . . . . . . . . . . . . 232
. . . . . . . . . . . . . . . . . . . . . . . . . . . . . . . . . . . . . . . . . . . . . . . . . . . . . . . . . . . . . . . . . . . . . . . 243
Chapter 12: Using the Command-Line Debugger
About debugging . . . . . . . . . . . . . . . . . . . . . . . . . . . . . . . . . . . . . . . . . . . . . . . . . . . . . . . . . . . . . . . . . . . . . . . 245
Starting a debugging session
. . . . . . . . . . . . . . . . . . . . . . . . . . . . . . . . . . . . . . . . . . . . . . . . . . . . . . . . . . . . 248
Configuring the command-line debugger
. . . . . . . . . . . . . . . . . . . . . . . . . . . . . . . . . . . . . . . . . . . . . . . 250
Using the command-line debugger commands
. . . . . . . . . . . . . . . . . . . . . . . . . . . . . . . . . . . . . . . . . . 251
Chapter 13: Using ASDoc
About the ASDoc tool
. . . . . . . . . . . . . . . . . . . . . . . . . . . . . . . . . . . . . . . . . . . . . . . . . . . . . . . . . . . . . . . . . . . 263
Creating ASDoc comments
. . . . . . . . . . . . . . . . . . . . . . . . . . . . . . . . . . . . . . . . . . . . . . . . . . . . . . . . . . . . . . 264
Documenting ActionScript elements
Documenting MXML files
ASDoc tags
. . . . . . . . . . . . . . . . . . . . . . . . . . . . . . . . . . . . . . . . . . . . . . . . . . . . 269
. . . . . . . . . . . . . . . . . . . . . . . . . . . . . . . . . . . . . . . . . . . . . . . . . . . . . . . . . . . . . . . 274
. . . . . . . . . . . . . . . . . . . . . . . . . . . . . . . . . . . . . . . . . . . . . . . . . . . . . . . . . . . . . . . . . . . . . . . . . . . . . 275
Running the ASDoc tool
. . . . . . . . . . . . . . . . . . . . . . . . . . . . . . . . . . . . . . . . . . . . . . . . . . . . . . . . . . . . . . . . . 280
Chapter 14: Versioning
Overview . . . . . . . . . . . . . . . . . . . . . . . . . . . . . . . . . . . . . . . . . . . . . . . . . . . . . . . . . . . . . . . . . . . . . . . . . . . . . . . 285
Using multiple SDKs
. . . . . . . . . . . . . . . . . . . . . . . . . . . . . . . . . . . . . . . . . . . . . . . . . . . . . . . . . . . . . . . . . . . . 286
Backward compatibility
. . . . . . . . . . . . . . . . . . . . . . . . . . . . . . . . . . . . . . . . . . . . . . . . . . . . . . . . . . . . . . . . . 286
Targeting Flash Player versions
. . . . . . . . . . . . . . . . . . . . . . . . . . . . . . . . . . . . . . . . . . . . . . . . . . . . . . . . . . 295
Part 3: Application Deployment
Chapter 15: Deploying Flex Applications
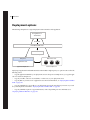
About deploying an application . . . . . . . . . . . . . . . . . . . . . . . . . . . . . . . . . . . . . . . . . . . . . . . . . . . . . . . . . 299
Deployment options
. . . . . . . . . . . . . . . . . . . . . . . . . . . . . . . . . . . . . . . . . . . . . . . . . . . . . . . . . . . . . . . . . . . . 300
Compiling for deployment
Deployment checklist
. . . . . . . . . . . . . . . . . . . . . . . . . . . . . . . . . . . . . . . . . . . . . . . . . . . . . . . . . . . . . . 302
. . . . . . . . . . . . . . . . . . . . . . . . . . . . . . . . . . . . . . . . . . . . . . . . . . . . . . . . . . . . . . . . . . . 304
vi CONTENTS
Chapter 16: Creating a Wrapper
About the wrapper . . . . . . . . . . . . . . . . . . . . . . . . . . . . . . . . . . . . . . . . . . . . . . . . . . . . . . . . . . . . . . . . . . . . . . 311
Creating a simple wrapper
. . . . . . . . . . . . . . . . . . . . . . . . . . . . . . . . . . . . . . . . . . . . . . . . . . . . . . . . . . . . . . 315
Adding features to the wrapper
. . . . . . . . . . . . . . . . . . . . . . . . . . . . . . . . . . . . . . . . . . . . . . . . . . . . . . . . . 319
About the object and embed tags
. . . . . . . . . . . . . . . . . . . . . . . . . . . . . . . . . . . . . . . . . . . . . . . . . . . . . . . 321
Requesting an MXML file without the wrapper
. . . . . . . . . . . . . . . . . . . . . . . . . . . . . . . . . . . . . . . . . . . 332
Chapter 17: Using Express Install
About Express Install
. . . . . . . . . . . . . . . . . . . . . . . . . . . . . . . . . . . . . . . . . . . . . . . . . . . . . . . . . . . . . . . . . . . . 333
Editing your wrapper for Express Install
Alternatives to Express Install
. . . . . . . . . . . . . . . . . . . . . . . . . . . . . . . . . . . . . . . . . . . . . . . . . . 334
. . . . . . . . . . . . . . . . . . . . . . . . . . . . . . . . . . . . . . . . . . . . . . . . . . . . . . . . . . . . 338
Chapter 18: Using the Flex Module for Apache and IIS
Introduction . . . . . . . . . . . . . . . . . . . . . . . . . . . . . . . . . . . . . . . . . . . . . . . . . . . . . . . . . . . . . . . . . . . . . . . . . . . . 341
Getting started
. . . . . . . . . . . . . . . . . . . . . . . . . . . . . . . . . . . . . . . . . . . . . . . . . . . . . . . . . . . . . . . . . . . . . . . . . 342
Configuring the web-tier compiler
Customizing the template
. . . . . . . . . . . . . . . . . . . . . . . . . . . . . . . . . . . . . . . . . . . . . . . . . . . . . . . 345
. . . . . . . . . . . . . . . . . . . . . . . . . . . . . . . . . . . . . . . . . . . . . . . . . . . . . . . . . . . . . . . 348
Debugging with the web-tier compiler
. . . . . . . . . . . . . . . . . . . . . . . . . . . . . . . . . . . . . . . . . . . . . . . . . . 350
1
Part 1: Application Design
Topics
Application Development Phases . . . . . . . . . . . . . . . . . . . . . . . . . . . . . . . . . . . . . . . . . . . . . . . . . . . . . . . . . . . . . . . . . . . . 3
Flex Application Structure. . . . . . . . . . . . . . . . . . . . . . . . . . . . . . . . . . . . . . . . . . . . . . . . . . . . . . . . . . . . . . . . . . . . . . . . . 15
Applying Flex Security . . . . . . . . . . . . . . . . . . . . . . . . . . . . . . . . . . . . . . . . . . . . . . . . . . . . . . . . . . . . . . . . . . . . . . . . . . . . 29
Optimizing Flex Applications . . . . . . . . . . . . . . . . . . . . . . . . . . . . . . . . . . . . . . . . . . . . . . . . . . . . . . . . . . . . . . . . . . . . . . 57
Improving Startup Performance . . . . . . . . . . . . . . . . . . . . . . . . . . . . . . . . . . . . . . . . . . . . . . . . . . . . . . . . . . . . . . . . . . . . 91
2 PART 1
3
Chapter 1: Application Development
Phases
It is difficult to define the exact process that all Adobe® Flex™ developers use to build and deploy applications.
However, the process typically involves five distinct phases: design, configure, build, deploy, and secure.
Topics
Design phase . . . . . . . . . . . . . . . . . . . . . . . . . . . . . . . . . . . . . . . . . . . . . . . . . . . . . . . . . . . . . . . . . . . . . . . . . . . . . . . . . . . . . 3
Configure phase . . . . . . . . . . . . . . . . . . . . . . . . . . . . . . . . . . . . . . . . . . . . . . . . . . . . . . . . . . . . . . . . . . . . . . . . . . . . . . . . . . 5
Build phase . . . . . . . . . . . . . . . . . . . . . . . . . . . . . . . . . . . . . . . . . . . . . . . . . . . . . . . . . . . . . . . . . . . . . . . . . . . . . . . . . . . . . . 6
Deploy phase . . . . . . . . . . . . . . . . . . . . . . . . . . . . . . . . . . . . . . . . . . . . . . . . . . . . . . . . . . . . . . . . . . . . . . . . . . . . . . . . . . . . . 8
Secure phase . . . . . . . . . . . . . . . . . . . . . . . . . . . . . . . . . . . . . . . . . . . . . . . . . . . . . . . . . . . . . . . . . . . . . . . . . . . . . . . . . . . . 10
Application Development in Flex SDK . . . . . . . . . . . . . . . . . . . . . . . . . . . . . . . . . . . . . . . . . . . . . . . . . . . . . . . . . . . . . . 11
Design phase
In the design phase, you make basic decisions about how to write code for reusability, how your application
interacts with its environment, how your application accesses application resources, and many other decisions. In
the design phase, also define your development and deployment environments, including the directory structure
of your application.
Although these design decisions specify how your application interacts with its environment, you also have architectural issues to decide. For example, you might choose to develop your application based on a particular design
pattern, such as Model-View-Controller (MVC).
About design patterns
One common starting point of the design phase is to identify one or more design patterns relevant for your application. A design pattern describes a solution to a common programming problem or scenario. Although the
design pattern might give you insight into how to approach an application design, it does not necessarily define
how to write code for that solution.
4 CHAPTER 1
Many types of design patterns have been catalogued and documented. For example, the Functional design pattern
specifies that each module of your application performs a single action, with little or no side effects for the other
modules in your application. The design pattern does not specify what a module is, commonly though it corresponds to a class or method.
About MVC
The goal of the Model-View-Controller (MVC) architecture is that by creating components with a well-defined
and limited scope in your application, you increase the reusability of the components and improve the maintainability of the overall system. Using the MVC architecture, you can partition your system into three categories of
components:
Model components Encapsulates data and behaviors related to the data processed by the application. The model
might represent an address, the contents of a shopping cart, or the description of a product.
View components Defines your application’s user interface, and the user’s view of application data. The view
might contain a form for entering an address, a DataGrid control for showing the contents of a shopping cart, or
an image of a product.
Controller components Handles data interconnectivity in your application. The Controller provides application
management and the business logic of the application. The Controller does not necessarily have any knowledge
of the View or the Model.
For example, with the MVC design, you could implement a data-entry form that has three distinct pieces:
•
•
The model consists of XML data files or the remote data service calls to hold the form data.
•
The controller contains logic that manipulates the model and sends the model to the view.
The view is the presentation of any data and display of all user interface elements.
The promise of the MVC architecture is that by creating components with a well-defined and limited scope, you
increase the reusability of these components and improve the maintainability of the overall system. In addition,
you can modify components without affecting the entire system.
Although you can consider a Flex application as part of the View in a distributed MVC architecture, you can use
Flex to implement the entire MVC architecture on the client. A Flex application has its own view components that
define the user interface, model components that represent data, and controller components that communicate
with back-end systems.
About Struts
Struts is an open-source framework that facilitates the development of web applications based on Java servlets and
other related technologies. Because it provides a solution to many of the common problems that developers face
when building these applications, Struts has been widely adopted in a large variety of development efforts, from
small projects to large-scale enterprise applications.
ADOBE FLEX 3 5
Building and Deploying Adobe Flex 3 Applications
Struts is based on a Model-View-Controller (MVC) architecture, with a focus on the controller part of the MVC
architecture. In addition, it provides JSP tag libraries to help you create the view in a traditional JSP/HTML
environment.
Configure phase
Before you write your first line of application code, or before you deploy an application, you must ensure that you
configure your environment correctly. Configuration is a broad term and encompasses several different tasks.
For example, you must configure your development and deployment environments to ensure that your application can access the required resources and data services. If your application requires access to a web service,
ensure that your application has the correct access rights to the web service. If you application runs outside a
firewall, ensure that it can access resources inside the firewall.
The following sections contain an overview of configuration tasks.
About run-time configuration
Most run-time configuration has to do with configuring access to remote data services, such as web services. For
example, during application development, you run your application behind a firewall, where the application has
access to all necessary resources and data services. However, when you deploy the application, you must ensure
that an executing application can still access the necessary resources when the application runs outside of the
firewall.
One configuration issue for Flex SDK applications is the placement of a crossdomain.xml file. For security, by
default Flash Player does not allow an application to access a remote data service from a domain other than the
domain from which the application was served. Therefore, a server that hosts a data service must be in the same
domain as the server hosting your application, or the remote server must define a crossdomain.xml file. A crossdomain.xml file is an XML file that provides a way for a server to indicate that its data and documents are available
to SWF files served from specific domains, or from all domains. By default, place the crossdomain.xml at the root
directory of the server that is serving the data.
Flex SDK does not include a server-side proxy for handling data service requests. Therefore, you must ensure that
you configure data services for direct access by your application, or make data service requests through your own
proxy server.
6 CHAPTER 1
Build phase
Building your application is an iterative process that includes three main tasks:
1
Compile
2
Debug
3
Test
About compiling
Compiling your application converts your application files and assets into a single SWF file. During compilation,
you set compiler options to enable accessibility, enable debug information in the output, set library paths, and set
other options. You can configure the compiler as part of configuring your project in Flex Builder, by using
command-line arguments to the compiler, or by setting options in a configuration file.
ADOBE FLEX 3 7
Building and Deploying Adobe Flex 3 Applications
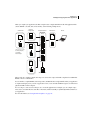
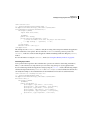
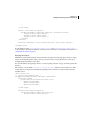
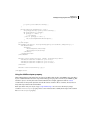
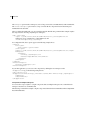
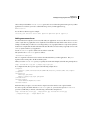
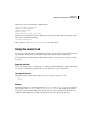
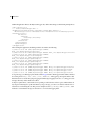
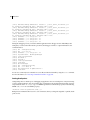
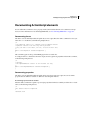
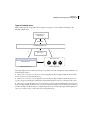
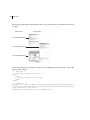
When you compile your application, the Flex compiler creates a single SWF file from all of the application files
(Adobe® MXML™, AS, RSL, SWC, and asset files), as the following example shows:
main.mxml
Custom
components
Client
*.AS
*.SWF
*.MXML
RSL files
*.AS
Use <mx;Script>
to write, import,
or include
ActionScript
Web Server
ActionScript
Classes
<mx:Application>
<..>
Compiler/Linker
*.AS
*.AS
<..>
*.MXML
*.AS
SWC and RSL files
Flex provides two compilers: mxmlc and compc. You can use the compc and mxmlc compilers from within Flex
Builder or from a command line.
You use mxmlc to compile MXML, ActionScript, SWC, and RSL files into a single SWF file. After your application
is compiled and deployed on your web or application server, a user can make an HTTP request to download and
play the SWF file on their computer.
You use compc to create resources that you use to create the application. For example, you can compile components, classes, and other files into SWC files or into RSLs, and then statically or dynamically link these libraries to
your application.
For more information, see “Using the Flex Compilers” on page 125.
8 CHAPTER 1
About debugging an application
Flex provides several tools that you use to debug your application, including the following:
AIR Debug Launcher (ADL) A command line version of the Adobe® AIR™ debugger that you can use outside of
Adobe® Flex™ Builder™.
Flash Player You can run Flex applications in two different versions of Adobe® Flash® Player: the standard version,
which the general public uses, and the debugger version, which application developers use to debug their applications during the development process.
Flex Builder visual debugger The Flex Builder debugger allows you to run and debug applications. You can use
the debugger to set and manage breakpoints; control application execution by suspending, resuming, and terminating the application; step into and over the code; watch variables; evaluate expressions; and so on.
Flex Command-line debugger A command line version of the debugger that you can use outside of Flex Builder.
For more information, see “Using the Command-Line Debugger” on page 245.
About testing an application
Due to the size, complexity, and large amounts of data handled by applications, maintaining the quality of a large
software application can be difficult. To help with this task, you can use automated testing tools that test and
validate application behavior without human intervention.
The Flex Automation Package provides developers with the ability to create Flex applications that use the
Automation API. You can use this API to create automation agents or to ensure that your applications are ready
for testing. In addition, the Flex Automation Package includes support for Mercury QuickTest Professional (QTP)
automation tool. for more information, see “Creating Applications for Testing” on page 356.
Deploy phase
When you deploy your application, you make it available to customers. Typically, you deploy the application as a
SWF file on a web server so that users can access it by using an HTTP request to the SWF file.
When you deploy the application’s SWF file, you must also deploy all of the assets required by the application. For
example, if the application requires access to video or image files, or to XML data files, you must make sure to
deploy those assets as well. If the application uses an RSL, you must also deploy the RSL.
Deploying assets may not necessarily be as simple as copying the assets to a location on your web server. Flash
Player has built-in security features that controls the access of application assets at run time.
This section contains an overview of the deployment phase. For more information, see “Deploying Flex Applications” on page 299.
ADOBE FLEX 3 9
Building and Deploying Adobe Flex 3 Applications
What happens during a request to a SWF file
When a customer requests the SWF file, the web server or application server returns the SWF file to the client
computer. The SWF file then runs locally on the client.
In some cases, a request to a Flex SWF file can cause multiple requests to multiple SWF files. For example, if your
application uses Runtime Shared Libraries (RSLs), the web server or application server returns an RSL as a SWC
file to the client along with the application SWF file.
Server-side caching
Your web server or application server typically caches the SWF file on the first request, and then serves the cached
file on subsequent requests. You configure server-side caching by using the options available in your web server
or application server.
Client-side caching
The SWF file returned to the client is typically cached by the customer’s browser on first request. Depending on
the browser configuration, the SWF file typically remains in the cache until the browser closes. When the browser
reopens, the next request to the SWF file must reload it from the server.
Integrating Flex applications with your web application
To incorporate a Flex application into a website, you typically embed the SWF file in an HTML, JSP, Adobe®
ColdFusion®, or other type of web page. The page that embeds the SWF file is known as the wrapper.
A wrapper consists of an <object> tag and an <embed> tag that format the SWF file on the page, define data
object locations, and pass run-time variables to the SWF file. In addition, the wrapper can include support for
deep linking and Flash Player version detection and deployment.
When you compile an application with Flex Builder, it automatically creates a wrapper file for you in the bin
directory associated with the Flex Builder project. You can copy the contents of the wrapper file into your HTML
pages to reference the SWF file.
You can edit the wrapper to manipulate how Flex appears in the browser. You can also add JavaScript or other logic
in the page to communicate with Flex or generate customized pages.
When using the mxmlc command-line compiler, you must write the wrapper yourself. For more information, see
“Creating a Wrapper” on page 311.
10 CHAPTER 1
Secure phase
Security is not necessarily a phase of the application development process, but is an issue that you should take into
consideration during the entire development process. That is, you do not configure, build, test, and deploy an
application, and then define the security issues. Rather, you take security into consideration during all phases.
Building security into your application often takes the following main efforts:
•
•
Using the security features built into Flash Player
Building security into your application
Flash Player has several security features built into it, including sandbox security, that you can take advantage of
because you are building applications for Flash Player.
But, Flash Player security is not enough for many application requirements. For example, your application may
require the user to log in, or perform authentication in some other way, before accessing data services. When you
must handle security issues beyond those built into Flash Player, design them into your application from the initial
design phase, test them during the compile phase, and verify them during the deploy phase.
For more information on security, see “Applying Flex Security” on page 29.
About the security model
The Flex security model protects both the client and the server. Consider the following general aspects of security
when you deploy Flex applications:
•
Flash Player operating in a sandbox on the client
•
Authorizing and authenticating users who access a server’s resources
Flash Player runs inside a security sandbox that prevents the client from being hijacked by malicious application
code. This sandbox prevents a user from running a Flex application that can access system files and perform other
tasks.
Flash Player security
Flash Player has an extensive list of features that ensure Flash content is secure, including the following:
• Uses the encryption capabilities of SSL in the browser to encrypt all communications between a Flash application and the server
• Includes an extensive sandbox security system that limits transfer of information that might pose a risk to
security or privacy
• Does not allow applications to read data from the local drive, except for SharedObjects that were created by
that domain
•
Does not allow writing any data to the disk except for data that is encapsulated in SharedObjects
ADOBE FLEX 3 11
Building and Deploying Adobe Flex 3 Applications
• Does not allow web content to read any data from a server that is not from the same domain, unless that server
explicitly allows access
•
•
Enables the user to disable the storage of information for any domain
Does not allow data to be sent from a camera or microphone unless the user gives permission
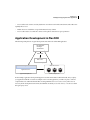
Application Development in Flex SDK
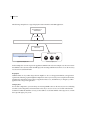
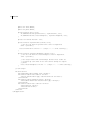
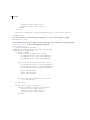
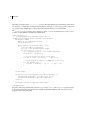
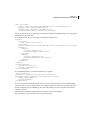
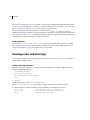
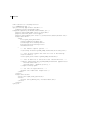
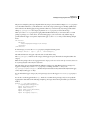
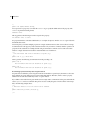
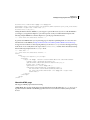
The following example shows a typical development environment for a Flex SDK application:
Flex application
running on
client machine
HTTP/SOAP
Web server
webserver.example.com
Proxy server
Web services server
Application server
appserver.example.com
finance.example.com
In this example, application development happens in an environment that is behind a firewall, and you deploy
your application SWF file on webserver.example.com. To run the application, you make a request to it from a
computer that is also within the firewall. The executing SWF file can access resources on any other server as
necessary. In the development environment, the SWF file can directly access web services, or it can access them
through a proxy server.
12 CHAPTER 1
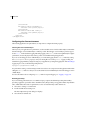
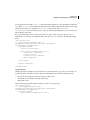
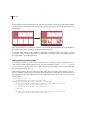
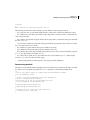
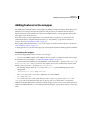
The following example shows a typical deployment environment for a Flex SDK application:
Flex applications on
client machine
HTTP/SOAP
Firewall/Router/DNS server
Web server
webserver.example.com
Proxy server
Web services server
Application server
appserver.example.com
finance.example.com
In this example, the customer requests the application SWF file from webserver.example.com, the server returns
the SWF file to the customer, and the SWF file plays. The executing SWF file must be able to access the necessary
resources from outside the firewall.
Design phase
With Flex SDK, one of your first design decisions might be to choose a design pattern that fits your application
requirements. That design pattern might have implications on how you structure your development environment,
determine the external data services that your application must access, and define how you integrate your Flex
application into a larger web application.
Configure phase
For run-time configuration, you ensure that your executing SWF file can access the necessary resources including
asset files (such as image files) and external data services. If you access a resource on a domain other than the
domain from which the SWF file is served, you must define a crossdomain.xml file on the target server, or make
the request through a proxy server.
ADOBE FLEX 3 13
Building and Deploying Adobe Flex 3 Applications
Build phase
To build an application for Flex SDK, you define a directory structure on your development system for application
files, and define the location of application assets. You then compile, debug, and test your application.
The compile-time configuration for a Flex SDK application is primarily a process of setting compiler options to
define the location of SWC and RSLs, to create a SWF file with debug information, or to set additional compiler
options. When compiling applications, you compile your application into a single SWF file, and then deploy the
SWF file to a web server or application server for testing.
Deploy phase
With Flex SDK, you deploy your application SWF file on your web server or application server. Users then access
the deployed SWF file by making an HTTP request in the form:
http://hostname/path/filename.swf
If you embed your SWF file in an HTML or other type of web page using a wrapper, users request the wrapper
page. The request to the wrapper page causes the web server or application server to return the SWF file along
with the wrapper page.
Secure phase
Security issues for Flex SDK applications often have to do with how the application accesses external resources.
For example, you might require a user to log in to access resources, or you might want the application to be able
to access external data services that implement some other form of access control.
14 CHAPTER 1
15
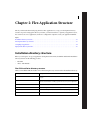
Chapter 2: Flex Application Structure
One of your first tasks when developing an Adobe® Flex™ application is to set up your development directory
structure. As part of setting up this directory structure, you must decide how to organize your application assets,
how to share assets across applications, and how to configure the compiler to create your application SWF file.
Topics
Installation directory structure . . . . . . . . . . . . . . . . . . . . . . . . . . . . . . . . . . . . . . . . . . . . . . . . . . . . . . . . . . . . . . . . . . . . . 15
Development directory structure . . . . . . . . . . . . . . . . . . . . . . . . . . . . . . . . . . . . . . . . . . . . . . . . . . . . . . . . . . . . . . . . . . . 17
Compiling an application . . . . . . . . . . . . . . . . . . . . . . . . . . . . . . . . . . . . . . . . . . . . . . . . . . . . . . . . . . . . . . . . . . . . . . . . . 24
Deployment directory structure . . . . . . . . . . . . . . . . . . . . . . . . . . . . . . . . . . . . . . . . . . . . . . . . . . . . . . . . . . . . . . . . . . . . 26
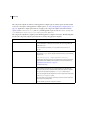
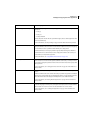
Installation directory structure
Before you can begin to set up your application development environment, be familiar with the Flex installation
directory structure for the following products:
•
Flex SDK
•
Adobe ® Flex® Builder™
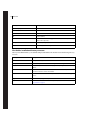
Flex SDK installation directory structure
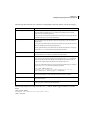
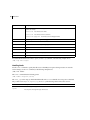
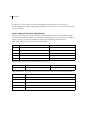
When you install Flex SDK, the installer creates the following directory structure under the installation directory:
Directory
Description
/ant
Contains the Flex Ant tasks, which provide a convenient way to build your Flex
projects.
/asdoc
Contains ASDoc, a command-line tool that you can use to create API language
reference documentation as HTML pages from the classes in your Flex application.
/bin
Contains the executable files, such as the mxmlc and compc compilers.
/frameworks
Contains configuration files, such as flex-config.xml and default.css.
/frameworks/libs
Contains the library SWC files. You use the files to compile your application.
/frameworks/locale
Contains the localization resource files.
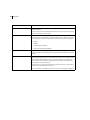
16 CHAPTER 2
Directory
Description
/frameworks/projects
Contains the Flex framework source code.
/frameworks/rsls
Contains the RSL for the Flex framework.
/frameworks/themes
Contains the theme files that define the basic look and feel of all Flex components.
/lib
Contains JAR files.
/runtimes
Contains the standard and debugger versions of Adobe ® Flash® Player and the
Adobe® AIR™ components.
/samples
Contains sample applications.
/templates
Contains template HTML wrapper files.
Flex Builder installation directory structure
When you install Flex Builder, you install Flex SDK plus Flex Builder. The installer creates the following directory
structure:
Directory
Description
Flex Builder 3
The top-level directory for Flex Builder.
/configuration
A standard Eclipse folder that contains the config.ini file and error logs.
/features
A standard Eclipse folder that contains the plug-ins corresponding to features of Flex
Builder.
/jre
Contains the Java Runtime Environment installed with Flex Builder used by default when
you run the stand-alone version of Flex Builder.
/Player
Contains the different versions of Flash Player—the standard version and the debugger
version.
/plugins
Contains the Eclipse plugins used by Flex Builder.
/sdks
Contains the different Flex SDKs. For a directory description, see “Flex SDK installation directory structure” on page 15.
ADOBE FLEX 3 17
Building and Deploying Adobe Flex 3 Applications
Development directory structure
As part of the process of setting up the directory structure of your development environment, you define the
directory location for application-specific assets, assets shared across applications, and the location of other application files and assets.
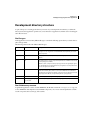
Flex file types
A Flex application consists of many different file types. Consider the following options when you decide where to
place each type of file.
The following table describes the different Flex file types:
File format
Extension
Description
MXML
.mxml
Your application typically has one main application MXML file that contains the
<mx:Application> tag, and one or more MXML files that implement your custom
MXML components.
ActionScript
.as
A utility class, Flex custom component class, or other logic implemented as an ActionScript file.
SWC
.swc
A custom library file, or a custom component implemented as an MXML or ActionScript
file, then packaged as a SWC file.
A SWC file contains components that you package and reuse among multiple applications. The SWC file is then statically linked into your application at compile time when
you create the application’s SWF file.
RSL
.swc
A custom library implemented as an MXML or ActionScript file, and then deployed as a
Runtime Shared Library (RSL). An RSL is a stand-alone SWC file that is downloaded
separately from your application’s SWF file, cached on the client computer for use with
multiple application SWF files, and dynamically linked to your application.
CSS file
.css
A text file template for creating a Cascading Style Sheets file.
Assets
.flv, .mp3, .jpg, .gif, .swf, .png, The assets required by your application, including image, skin, sound, and video files.
.svg, .xml, other
Flex SDK directory structure
A typical Flex application consists of a main MXML file (the file that contains the <mx:Application> tag), one
or more MXML files that implement custom MXML components, one or more ActionScript files that contains
custom components and custom logic, and asset files.
18 CHAPTER 2
The following example shows an example of the directory structure of a simple Flex application:
appRoot
mainApp.mxml
myValidators
PriceValidator.mxml
AddressValidator.as
myFormatters
PriceFormatter.mxml
StringFormatter.as
assets
logo.gif
splashScreen.gif
.settings (Flex Builder only)
bin (Flex Builder only)
html-template (Flex Builder only)
This application consists of a root application directory and directories for different types of files. Everything
required to compile and run the application is contained in the directory structure of the application.
Flex Builder adds additional directories to the application that are not present for Flex SDK applications:
.settings Contains the preference settings for your Flex Builder project
bin-debug Contains the debug SWF and debug wrapper files
bin-release Contains the generated SWF file and wrapper file, created by Flex Builder when you select File >
Export > Release Version
html-template Contains additional files used by specific Flex features, such as deep linking or Player detection.
Flex Builder uses these files to generate an HTML wrapper for your SWF file.
ADOBE FLEX 3 19
Building and Deploying Adobe Flex 3 Applications
There are no inherent restrictions in Flex for the location of the root directory of your application, so you can put
it almost anywhere in the file system of your computer. If you are using Flex Builder, the default location of the
application root directory in Microsoft Windows is My Documents\Flex Builder 3\project_name (for example,
C:\Documents and Settings\userName\My Documents\Flex Builder 3\myFlexApp).
Sharing assets among applications
Typically, you do not develop a single application in isolation from all other applications. Your application shares
files and assets with other applications.
The following example shows two Flex applications, appRoot1 and appRoot2. Each application has a directory for
local assets, and can access shared assets from a directory outside of the application’s directory structure:
myApps
appRoot1
localAssets
appRoot2
localAssets
sharedAssets
The location of the shared assets does not have to be at the same level as the root directories of the Flex applications. It only needs to be somewhere accessible by the applications at compile time.
In the following example, you use the Image control in an MXML file in the appRoot1 directory to access an asset
from the shared assets directory:
<?xml version="1.0"?>
<!-- apparch/EmbedExample.mxml -->
<mx:Application xmlns:mx="http://www.adobe.com/2006/mxml">
<mx:Image id="loader1" source="@Embed(source='../assets/butterfly.gif')"/>
</mx:Application>
Consideration for accessing application assets
One of the decisions that you must make when you create a Flex application is whether to load your assets at run
time, or to embed the assets within the application’s SWF file.
20 CHAPTER 2
When you embed an asset, you compile it into your application’s SWF file. The advantage to embedding an asset
is that it is included in the SWF file, and can be accessed faster than having to load it from a remote location at
run time. The disadvantage of embedding is that your SWF file is larger than if you load the asset at run time.
If you decide to access an asset at run time, you can load it from the local file system of the computer on which
the SWF file runs, or you can access a remote asset, typically though an HTTP request over a network.
A SWF file can access one type of external asset: local or over a network; the SWF file cannot access both types.
You determine the type of access allowed by the SWF file by using the use-network flag when you compile your
application. When you set the use-network flag to false, you can access assets in the local file system, but not
over the network. The default value is true, which lets you access assets over the network, but not in the local file
system.
For more information on the use-network flag, see “Using the Flex Compilers” on page 125. For more information on embedding application assets, see “Embedding Assets” on page 965 in the Adobe Flex 3 Developer
Guide.
Sharing MXML and ActionScript files among applications
You can build an entire Flex application in a single MXML file that contains both your MXML code and any
supporting ActionScript code. As your application gets larger, your single file also grows in size and complexity.
This type of application would soon become difficult to understand and debug, and very difficult for multiple
developers to work on simultaneously.
Flex supports a component-based development model. You use the predefined components included with Flex to
build your applications, and create components for your specific application requirements. You can create custom
components using MXML or ActionScript.
Defining your own components has several benefits. One advantage is that components let you divide your applications into modules that you can develop and maintain separately. By implementing commonly used logic within
custom components, you can also build a suite of reusable components that you can share among multiple Flex
applications.
ADOBE FLEX 3 21
Building and Deploying Adobe Flex 3 Applications
The following example shows two Flex applications, appRoot1 and appRoot2. Each application has a subdirectory
for local MXML and ActionScript components, and can also reference a library of shared components:
my Apps
appRoot1
myValidators
PriceValidator.mxml
AddressValidator.as
myFormatters
PriceFormatter.mxml
StringFormatter.as
appRoot2
myValidators
myFormatters
sharedLibrary
sharedValidators
SharedVal1.mxml
SharedVal2.as
sharedFormatters
SharedFormatter1.mxml
SharedFormatter2.as
The Flex compiler uses the source path to determine the directories where it searches for MXML and ActionScript
files. By default, the root directory of the application is included in the source path; therefore, a Flex application
can access any MXML and ActionScript files in its main directory, or in a subdirectory.
22 CHAPTER 2
For shared MXML and ActionScript files that are outside of the application’s directory structure, you modify the
source path to include the directories that the compiler searches for MXML and ActionScript files. The
component search order in the source path is based on the order of the directories listed in the source path.
You can set the source path as part of configuring your project in Flex Builder, in the flex-config.xml file, or set it
when you open the command-line compiler. In this example, you set the source path to:
C:\myApps\sharedLibrary
To access a component in an MXML file, you specify a namespace definition that defines the directory location
of the component relative to the source path. In the following example, an MXML file in the appRoot1 directory
accesses an MXML component in the local directory structure, and in the directory containing the shared library
of components:
<?xml version="1.0"?>
<!-- apparch/ComponentNamespaces.mxml -->
<mx:Application
xmlns:mx="http://www.adobe.com/2006/mxml"
xmlns:MyLocalComps="myFormatters.*"
xmlns:MySharedComps="sharedFormatters.*"
>
<MyLocalComps:PriceFormatter/>
<MySharedComps:SharedFormatter2/>
</mx:Application>
The MXML tag name for a custom component is composed of two parts: the namespace prefix, in this example
MyLocalComps and MySharedComps, and the tag name. The namespace prefix tells Flex the directory in the
source path that contains the file that implements the custom component. The tag name corresponds to the
filename of the component, in this example PriceFormatter.mxml and SharedFormatter2.mxml.
Using a SWC file in a Flex SDK application
A SWC file is a Flex library file that contains one or more components implemented in MXML or ActionScript.
All Flex library files are shipped as SWC files in the frameworks/libs directory. This includes the following SWC
files:
•
framework.swc
•
•
playerglobal.swc
rpc.swc
ADOBE FLEX 3 23
Building and Deploying Adobe Flex 3 Applications
You can also create SWC files that you package and reuse among multiple applications. You typically use static
linking with SWC files, which means the compiler includes all components, classes, and their dependencies in the
application SWF file when you compile the application. For more information on static linking, see “About
linking” on page 196.
By default, the Flex compiler includes all SWC files in the frameworks/libs directory when it compiles your application. For your custom SWC files, you use the library-path option of the mxmlc compiler, or set the library
path in Flex Builder, to specify the location of the SWC file.
Using an RSL in a Flex SDK application
One way to reduce the size of your application’s SWF file is by externalizing shared assets into stand-alone files
that can be separately downloaded and cached on the client. These shared assets are loaded by any number of
applications at run time, but must be transferred to the client only once. These shared files are known as Runtime
Shared Libraries or RSLs.
An RSL is a stand-alone file that the client downloads separately from your application’s SWF file, and caches on
the client computer for use with multiple application SWF files. Using an RSL reduces the resulting file size for
your applications. The benefits increase as the number of applications that use the RSL increases. If you only have
one application, putting components into RSLs does not reduce the aggregate download size, and might increase
it.
You create an RSL as a SWC file that you package and reuse among multiple applications. To reference an RSL,
you use the runtime-shared-libraries option for the command-line compiler, or Flex Builder. You typically
use dynamic linking with RSLs, which means that the classes in the RSL are left in an external file that is loaded
at run time.
Every Flex application uses some aspects of the Flex framework, which is a relatively large set of ActionScript
classes that define the infrastructure of a Flex application. If a client loads two different Flex applications, the
application will likely load overlapping class definitions. To further reduce the SWF file size, you can use
framework RSLs. Framework RSLs let you externalize the framework libraries and can be used with any Flex application.
For more information on RSLs, framework RSLs, and dynamic linking, see “Using Runtime Shared Libraries” on
page 195.
Using modules in a Flex SDK application
Modules are SWF files that can be loaded and unloaded by an application. They cannot be run independently of
an application, but any number of applications can share the modules.
24 CHAPTER 2
Modules let you split your application into several separate SWF files. The main application, or shell, can dynamically load other SWF files that it requires, when it needs them. It does not have to load all modules when it starts,
nor does it have to load any modules if the user does not interact with them. When the application no longer needs
a module, it can unload the module to free up memory and resources.
For more information, see “Creating Modular Applications” on page 981.
Compiling an application
Compiling your application converts your application files and assets into a single SWF file. During compilation,
you set compiler options to enable accessibility, enable debug information in the output, set library paths, and set
other options. You can configure the compiler as part of configuring your project in Flex Builder, by using
command-line arguments to the compiler, or by setting options in a configuration file.
For more information on compiling applications, see “Using the Flex Compilers” on page 125.
About case sensitivity during a compile
The Flex compilers use a case-sensitive file lookup on all file systems. On case-insensitive file systems, such as the
Macintosh and Windows file systems, the Flex compiler generates a case-mismatch error when you use a
component with the incorrect case. On case-sensitive file systems, such as the UNIX file system, the Flex compiler
generates a component-not-found error when you use a component with the incorrect case.
Compiling a Flex SDK application
Flex SDK includes two compilers, mxmlc and compc. You use mxmlc to compile MXML files, ActionScript files,
SWC files, and RSLs into a single SWF file. After your application is compiled and deployed on your web or application server, a user can make an HTTP request to download and play the SWF file on their computer. You use
the compc compiler to compile components, classes, and other files into SWC files or RSLs.
To compile an application with Flex SDK, you use the mxmlc compiler in the bin directory of your Flex SDK
directory. The most basic mxmlc example is one in which the MXML file for your application has no external
dependencies (such as components in a SWC file or ActionScript classes). In this case, you open mxmlc from the
command line and point it to your MXML file, as the following example shows:
$ mxmlc c:/myFiles/app.mxml
ADOBE FLEX 3 25
Building and Deploying Adobe Flex 3 Applications
The mxmlc compiler has many options that you can specify on the command line, or that you can set in the flexconfig.xml file. For example, to disable warning messages, you set the warnings options to false, as the following
example shows:
$ mxmlc -warnings=false c:/myFiles/app.mxml
You only specify the main application file, the file that contains the <mx:Application> tag, to the compiler. The
compiler searches the default source path for any MXML and ActionScript files that your application references.
If your application references MXML and ActionScript files in directories that are not included in the default
source path, you can use the source-path option to add a directory to the source path, as the following example
shows:
$ mxmlc -source-path path1 path2 path3 c:/myFiles/app.mxml
In this example, you specify a list of directories, separated by spaces, and terminate that list with --.
Compiling an application that uses SWC files
Often, you use SWC files when compiling MXML files. You specify the SWC files in the compiler by using the
library-path option.
The following example adds two SWC files to the library-path when it compiles your application:
$ mxmlc -library-path+=/myLibraries/MyRotateEffect.swc;/myLibraries/MyButtonSwc.swc
c:/myFiles/app.mxml
Compiling an application that uses RSLs
To use an RSL in your application, use the runtime-shared-library-path compiler option. The following
example compiles an application with an RSL at the command line:
$ mxmlc -runtime-shared-library-path=../lib/mylib.swc,../bin/library.swf Main.mxml
Compiling an application that uses modules
The way you compile modules is similar to the way you compile Flex applications. On the command line, you use
the mxmlc command-line compiler. The result is a SWF file that you load into your application as a module.
You cannot run the module-based SWF file as a stand-alone application or load it into a browser window. It must
be programmatically loaded by an application as a module.
For more information on compiling modules on the command line, see “Creating Modular Applications” on
page 981
26 CHAPTER 2
Compiling a Flex Builder application
When you compile a project with Flex Builder, you open the Flex compilers from within Flex Builder itself, not
from the command line. You can build your projects manually or let Flex Builder automatically compile them for
you. In either case, the Flex Builder compiler creates the SWF application files, generates a wrapper, places the
output files in the proper location, and alerts you to any errors encountered during compilation. You then run and
debug your applications as needed.
If you must modify the default build settings, you have several options for controlling how your projects are built
into applications. For example, you can set build preferences on individual projects or on all the projects in your
workspace, modify the build output path, change the build order, and so on. You can also create custom build
instructions using third-party tools, such as Apache Ant.
When your projects are built, automatically or manually, Flex Builder places the SWF file in the project output
folder along with the wrapper. By default, this is the debug version of your application. It contains debugging
information and, therefore, is used when you debug your application. A wrapper file embeds the application SWF
file and is used to run or debug your application in a web browser. The standard version of your application SWF
files, which you generate through Export Release Version, does not include the additional debugging information
and is smaller.
Compiling an application that uses modules
In Flex Builder, you create modules as applications and compile them by either building the project or running
the application. The result is a SWF file that you load into your application as a module.
You cannot run the module-based SWF file as a stand-alone Flex application or load it into a browser window. It
must be loaded by an application as a module. When you run it in Flex Builder to compile it, you should close the
Player or browser Window and ignore any errors. Modules should not be requested by the Player or through a
browser directly.
For information on compiling modules in Flex Builder, see “Creating Modular Applications” on page 981
Deployment directory structure
When you deploy an application, ensure that the directory structure of the deployed application is correct.
When you deploy your application, must be aware of how your application accesses its assets. If you embedded all
of your application assets into the SWF file, you can deploy the application as a stand-alone SWF file.
ADOBE FLEX 3 27
Building and Deploying Adobe Flex 3 Applications
However, if your application accesses assets at run time, the application requests assets during execution. You
must ensure that you deploy all of the necessary assets, in the correct location, so that you can run the application
correctly.
Assets that you deploy at run time include:
•
•
HTML wrapper
•
•
•
Express Install files
•
•
Compiled CSS SWF files
•
•
Images, sound files, and other binary assets that are not embedded
Deep linking files
RSLs
Modules
Resource modules (for localization)
Data files
In some cases, the deployed locations of these files must match the locations of the files during development. For
example, if you load modules from the same directory as your main application, then you must deploy these
modules to that directory, unless you programmatically handle alternative locations to load the modules from.
In other cases, the deployed locations of these files is specified. For example, the deep linking files history.css,
historyFrame.html, and history.js must all reside in a /history subdirectory that is located relative to the application’s SWF file.
And in other cases, you specify the eventual deployed location of these assets when you compile your application.
For example, if you compiled your application using an RSL, you must ensure that the RSL is also deployed to your
web server, along with your application’s SWF file. The directory location of the RSL must match the directory
location that you specified at compile time using the runtime-shared-libraries or runtime-sharedlibrary-path options for the compiler.
For more information about what assets to deploy with your application, see “Deployment checklist” on page 304.
28 CHAPTER 2
29
Chapter 3: Applying Flex Security
Developers (including programmers and other authors) who design and publish Flex applications can control the
security aspects of the applications they develop by using Flex.
Topics
Introduction . . . . . . . . . . . . . . . . . . . . . . . . . . . . . . . . . . . . . . . . . . . . . . . . . . . . . . . . . . . . . . . . . . . . . . . . . . . . . . . . . . . . 29
Loading assets . . . . . . . . . . . . . . . . . . . . . . . . . . . . . . . . . . . . . . . . . . . . . . . . . . . . . . . . . . . . . . . . . . . . . . . . . . . . . . . . . . . 39
Using J2EE authentication. . . . . . . . . . . . . . . . . . . . . . . . . . . . . . . . . . . . . . . . . . . . . . . . . . . . . . . . . . . . . . . . . . . . . . . . . 41
Using RPC services. . . . . . . . . . . . . . . . . . . . . . . . . . . . . . . . . . . . . . . . . . . . . . . . . . . . . . . . . . . . . . . . . . . . . . . . . . . . . . . 44
Making other connections. . . . . . . . . . . . . . . . . . . . . . . . . . . . . . . . . . . . . . . . . . . . . . . . . . . . . . . . . . . . . . . . . . . . . . . . . 45
Making other connections. . . . . . . . . . . . . . . . . . . . . . . . . . . . . . . . . . . . . . . . . . . . . . . . . . . . . . . . . . . . . . . . . . . . . . . . . 45
Using SSL . . . . . . . . . . . . . . . . . . . . . . . . . . . . . . . . . . . . . . . . . . . . . . . . . . . . . . . . . . . . . . . . . . . . . . . . . . . . . . . . . . . . . . . 47
Writing secure Flex applications. . . . . . . . . . . . . . . . . . . . . . . . . . . . . . . . . . . . . . . . . . . . . . . . . . . . . . . . . . . . . . . . . . . . 48
Configuring client security settings . . . . . . . . . . . . . . . . . . . . . . . . . . . . . . . . . . . . . . . . . . . . . . . . . . . . . . . . . . . . . . . . . 53
Other resources . . . . . . . . . . . . . . . . . . . . . . . . . . . . . . . . . . . . . . . . . . . . . . . . . . . . . . . . . . . . . . . . . . . . . . . . . . . . . . . . . . 56
Introduction
Adobe® Flash® Player runs applications built with Flash. (These applications are also referred to as SWF files).
Content is delivered as a series of instructions in binary format to Flash Player over web protocols in the precisely
described SWF (.swf) file format. The SWF files themselves are typically hosted on a server and then downloaded
to, and displayed on, the client computer when requested. Most of the content consists of binary ActionScript
instructions. ActionScript is the ECMA standards-based scripting language that Flash uses that features APIs
designed to allow the creation and manipulation of client-side user interface elements and for working with data.
The Flex security model protects both client and the server. Consider the following two general aspects to
security:
•
•
Authorization and authentication of users accessing a server’s resources
Flash Player operating in a sandbox on the client
30 CHAPTER 3
Flex supports working with the web application security of any J2EE application server. In addition, precompiled
Flex applications can integrate with the authentication and authorization scheme of any underlying server
technology to prevent users from accessing your applications. The Flex framework also includes several built-in
security mechanisms that let you control access to web services, HTTP services, and server-based resources such
as EJBs.
Flash Player runs inside a security sandbox that prevents the client from being hijacked by malicious application
code.
Note: SWF content running in the Adobe® AIR™ follows different security rules than content running in the browser.
For details, see the "AIR Security" section in Developing AIR Applications with Adobe Flex 3.
Declarative compared to programmatic security
The two common approaches to security are declarative and programmatic. Often, declarative security is server
based. Using the server’s configuration, you provide protection to a resource or set of resources. You use the
container’s authentication and authorization schemes to protect that resource from unauthorized access.
The declarative approach to security casts a wide net. Declarative security is implemented as a separate layer from
the web components that it works with. You set up a security system, such as a set of file permissions or users,
groups, and roles, and then you plug your application's authentication mechanism into that layer.
With declarative security, either a user gains access to the resource or they do not. Usually the content cannot be
customized based on roles. In an HTML-based application, the result is that users are denied access to certain
pages. However, in a Flex environment, the typical result of declarative security is that the user is denied access to
the entire application, since the application is seen as a single resource to the container.
Declarative security lets programmers who write web applications ignore the environment in which they write.
Declarative security is typically set up and maintained by the deployer and not the developer of the application.
Also, updates to the web application do not generally require a refactoring of the security model.
Programmatic security gives the developer of the application more control over access to the application and its
resources. Programmatic security can be much more detailed than declarative security. For example, a developer
using programmatic security can allow or deny a user access to a particular component inside the application.
Although programmatic security is typically configured by the developer of the application, it usually interacts
with the same systems as declarative security, so the relationship between developer and deployer of the application must be cooperative when implementing programmatic security.
ADOBE FLEX 3 31
Building and Deploying Adobe Flex 3 Applications
Declarative security is recommended over programmatic security for most applications because the design
promotes code reuse, making it more maintainable. Furthermore, declarative security puts the responsibility of
security into the hands of the people who specialize in its implementation; application programmers can concentrate on writing applications and people who deploy the applications in a specific environment can concentrate
on enforcing security policies and take advantage of that context.
Client security overview
When considering security issues, you cannot think of Flex applications as traditional web applications. Flex
applications often consist of a single monolithic SWF file that is loaded by the client once, or a series of SWF files
loaded as modules or RSLs. Web applications, on the other hand, usually consist of many individual pages that are
loaded one at a time.
Most web applications access resources such as web services that are outside of the client. When a Flex application
accesses an external resource, two factors apply:
• Is the user authorized to access this resource?
• Can the client load the resource, or is it prevented from loading the resource, because of its sandbox limitations?
The following basic security rules always apply by default:
•
•
Resources in the same security sandbox can always access each other.
SWF files in a remote sandbox can never access local files and data.
You should consider the following security issues related to the client architecture that affect Flex applications.
Flash Player security features
Much of Flash Player security is based on the domain of origin for loaded SWF files, media, and other assets. A
SWF file from a specific Internet domain, such as www.example.com, can always access all data from that domain.
These assets are put in the same security grouping, known as a security sandbox. For example, a SWF file can load
SWF files, bitmaps, audio, text files, and any other asset from its own domain. Also, cross-scripting between two
SWF files from the same domain is permitted, as long as both files are written using ActionScript 3.0. Crossscripting is the ability of one SWF file to use ActionScript to access the properties, methods, and objects in another
SWF file. Cross-scripting is not supported between SWF files written using ActionScript 3.0 and files using
previous versions of ActionScript; however, these files can communicate by using the LocalConnection class.
Memory usage and disk storage protections
Flash Player includes security protections for disk data and memory usage on the client computer.
32 CHAPTER 3
The only type of persistent storage is through the SharedObject class, which is embodied as a file in a directory
whose name is related to that of the owning SWF file. A Flex application cannot typically write, modify, or delete
any files on the client computer other than SharedObject data files, and it can only access SharedObject data files
under the established settings per domain.
Flash Player helps limit potential denial-of-service attacks involving disk space (and system memory) through its
monitoring of the usage of SharedObject classes. Disk space is conserved through limits automatically set by Flash
Player (the default is 100K of disk space for each domain). The author can set the application to prompt the user
for more disk space, or Flash Player automatically prompts the user if an attempt is made to store data that exceeds
the limit. In either case, the disk space limit is enforced by Flash Player until the user gives explicit permission for
an increased allotment for that domain.
Flash Player contains memory and processor safeguards that help prevent applications from taking control of
excess system resources for an indefinite period of time. For example, Flash Player can detect an application that
is in an infinite loop and select it for termination by prompting the user. The resources that the application uses
are immediately released when the application closes.
Flash Player uses a garbage collector engine. The processing of new allocation requests always first ensures that
memory is cleared so that the new usage always obtains only clean memory and cannot view any previous data.
Privacy
Privacy is an important aspect of overall security. Adobe products, including Flash Player, provide very little information that would reveal anything about a user (or their computer). Flash Player does not provide personal information about users (such as names, e-mail addresses, and phone numbers), or provide access to other sensitive
information (such as credit card numbers or account information).
What Flash Player does provide is basically standardized hardware and software configuration information that
authors might use to enhance the user experiences in the environment encountered. The same information is
often available already from the operating system or web browser.
Information about the client environment that is available to the Flex application includes:
•
User agent string, which typically identifies the embedding browser type and operating system of the client
•
•
System capabilities such as the language or the presence of an MP3 decoder (see the Capabilities class)
•
Keyboard and mouse input
Presence of a camera and microphone
ActionScript also includes the ability to replace the contents of the client’s Clipboard by using the
setClipboard() method of the System class. This method does not have a corresponding getClipboard()
method, so protected data that might be stored in the Clipboard already is not accessible to Flash Player.
ADOBE FLEX 3 33
Building and Deploying Adobe Flex 3 Applications
About sandboxes
The sandbox type indicates the type of security zone in which the SWF file is operating. In Flash Player, all SWF
files (and HTML files, for the purposes of SWF-to-HTML scripting) are placed into one of four types of sandbox:
remote All files from non-local URLs are placed in a remote sandbox. There are many such sandboxes, one for
each Internet (or intranet) domain from which files are loaded.
local-with-filesystem The default sandbox for local files. SWF files in this sandbox may not contact the Internet
(or any servers) in any way—they may not access network endpoints with addresses such as HTTP URLs.
local-with-networking SWF file in this sandbox may communicate over the network but may not read from local
file systems.
local-trusted This sandbox is not restricted. Any local file can be placed in this sandbox if given authorization by
the end user. This authorization can come in two forms: interactively through the Settings Manager or noninteractively through an executable installer that creates Flash Player configuration files on the user’s computer.
You can determine the current sandbox type by using the sandboxType property of the Security class, as the
following example shows:
<?xml version="1.0" encoding="utf-8"?>
<!-- security/DetectCurrentSandbox.mxml -->
<mx:Application xmlns:mx="http://www.adobe.com/2006/mxml" creationComplete="initApp()">
<mx:Script><![CDATA[
[Bindable]
private var l_sandboxType:String;
private function initApp():void {
l_sandboxType = String(Security.sandboxType);
}
]]></mx:Script>
<mx:Form>
<mx:FormItem id="fi1" label="Security.sandboxType">
<mx:Label id="l1" text="{l_sandboxType}"/>
</mx:FormItem>
</mx:Form>
</mx:Application>
When you compile a Flex application, you have some control over which sandbox the application is in. This determination is a combination of the value of the use-network compiler option (the default is true) and whether the
SWF file was loaded by the client over a network connection or as a local file.
34 CHAPTER 3
The following table shows how the sandbox type is determined:
use-network
Loaded
Sandbox type
false
locally
local-with-filesystem
true
locally
local-with-network
true
network
remote
false
network
n/a (causes an error)
Browser security
Flash Player clients can be one of the following four types:
•
Embedded Flash Player
•
•
Debugger version of embedded Flash Player
•
Debugger version of stand-alone Flash Player
Stand-alone Flash Player
The stand-alone Flash Player runs on the desktop. It is typically used by people who are running applications that
are installed and maintained by an IT department that has access to the desktop on which the application runs.
The embedded Flash Player is run within a browser. Anyone with Internet access can run applications from
anywhere with this player. For Internet Explorer, the embedded player is loaded as an ActiveX control inside the
browser. For Netscape-based browsers (including Firefox), it is loaded as a plug-in inside the browser. Using an
embedded player lets the developer use browser-based technologies such as FORM and BASIC authentication as
well as SSL.
Browser APIs
Applications hosting the Flash Player ActiveX control or Flash Player plug-in can use the EnforceLocalSecurity
and DisableLocalSecurity API calls to control security settings. If DisableLocalSecurity is opened, the application
does not benefit from the local-with-networking and local-with-file-system sandboxes. All files loaded from the
local file system are placed into the local-trusted sandbox. The default behavior for an ActiveX control hosted in
a client application is DisableLocalSecurity.
If EnforceLocalSecurity is opened, the application can use all three local sandboxes. The default behavior for the
browser plug-in is EnforceLocalSecurity.
Cross-scripting
Cross-scripting is when a SWF file communicates directly with another SWF file. This communication includes
calling methods and setting properties of the other SWF file.
ADOBE FLEX 3 35
Building and Deploying Adobe Flex 3 Applications
SWF file loading and cross-scripting are always permitted between SWF files that reside in the same sandbox. For
example, any local-with-filesystem SWF file can load and cross-script any other local-with-filesystem SWF file;
any local-with-networking SWF file can load and cross-script any other local-with-networking SWF file; and so
on. The restrictions appear when two SWF files from different sandboxes or two remote SWF files with different
domains attempt to cooperate.
For SWF files in the remote sandbox, if two SWF files were loaded from the same domain, they can cross-script
without any restrictions. If both SWF files were loaded from a network, but from different domains, you must
provide permissions to allow them to cross-script.
To enable cross-scripting between SWF files, use the Security class’s allowDomain() and
allowInsecureDomain() methods.
You call these methods from the called SWF file and specify the calling SWF file’s domain. For example, if SWF1
in domainA.com calls a method in SWF2 in domainB, SWF2 must call the allowDomain() method and specifically allow SWF files from domainA.com to cross-script the method, as the following example shows:
import flash.system.Security;
Security.allowDomain("domainA.com");
If the SWF files are in different sandboxes (for example, if one SWF file was loaded from the local file system and
the other from a network) they must adhere to the following set of rules:
•
Remote SWF files (those served over HTTP and other non-local protocols) can never load local SWF files.
•
•
Local-with-networking SWF files can never load local-with-filesystem SWF files, or vice versa.
•
Local-trusted SWF files can load SWF files from any sandbox.
Local-with-filesystem SWF files can never load remote SWF files.
To facilitate SWF-to-SWF communication, you can also use the LocalConnection class. For more information,
see “Using the LocalConnection class” on page 46.
ExternalInterface
You use the ExternalInterface API to let your Flex application call scripts in the wrapper and to allow the wrapper
to call functions in your Flex application. The ExternalInterface API consists primarily of the call() and
addCallback() methods in the flash.net package.
This communication relies on the domain-based security restrictions that the allowScriptAccess and
allowNetworking properties define. You set the values of the allowScriptAccess and allowNetworking
properties in the SWF file’s wrapper. For more information, see “About the object and embed tags” on page 321.
By default, the Flex application and the HTML page it is calling must be in the same domain for the call()
method to succeed. For more information, see “Communicating with the Wrapper” on page 1035 in the Adobe
Flex 3 Developer Guide.
36 CHAPTER 3
The navigateToURL() method
The navigateToURL() method opens or replaces a window in the Flash Player’s container application. You
typically use it to launch a new browser window, although you can also embed script in the method’s call to
perform other actions.
This usage of the navigateToURL() method relies on the domain-based security restrictions that the
allowScriptAccess and allowNetworking parameters define. You set the values of the allowScriptAccess
and allowNetworking parameters in the SWF file’s wrapper. For more information, see “About the object and
embed tags” on page 321.
Caching
Flex applications reside entirely on the client. If the browser loads the application, the application SWF file, plus
externally loaded images and other media files, are stored locally on the client in the browser’s cache. These files
reside in the cache until cleared.
Storing a SWF file in the browser’s cache can potentially expose the file to people who would not otherwise be able
to see it. The following table shows some example locations of the browser’s cache files:
Broswer or operating system
Cache location
Internet Explorer on Windows XP
C:\Documents and Settings\username\Local Settings\Temporary Internet Files
Firefox on Windows XP
C:\Documents and Settings\username\Application Data\Mozilla\Firefox\Profiles\username.default\Cache
UNIX
$HOME/.mozilla/firefox/username.default/Cache/
These files can remain in the cache even after the browser is closed.
To prevent client browsers from caching the SWF file, try setting the following HTTP headers in the wrapper that
returns the Flex application’s SWF file:
Cache-control: no-cache, no-store, must-revalidate, max-age=-1
Pragma: no-cache, no-store
Expires: -1
Trusted sites and directories
The browser security model includes levels of trust applied to specific websites. Flash Player interacts with this
model by assigning a sandbox based on whether the browser declared the site of the SWF file’s origin trusted.
If Flash Player loads a SWF file from a trusted website, the SWF file is put in the local-trusted sandbox. The SWF
file can read from local data sources and communicate with the Internet.
ADOBE FLEX 3 37
Building and Deploying Adobe Flex 3 Applications
You can also assign a SWF file to be in the local-trusted sandbox when you load it from the local file system. To
do this, you configure a directory as trusted by Flash Player (which results in the SWF file being put in the localtrusted sandbox) by adding a FlashPlayerTrust configuration file that specifies the directory to trust. This requires
administrator access privileges to the client system, so it is typically used in controlled environments. Users can
also define a directory as trusted by using the Flash Player User Settings Manager. For more information, see Flash
Player documentation.
Deploying secure applications
When you deploy an application, you make the application accessible to your users. The process of deploying an
application is dependent on your application, your application requirements, and your deployment environment.
You can employ some of the following strategies to ensure that the application you deploy is secure.
Deploying local SWF files versus network SWF files
Client computers can obtain individual SWF files from a number of sources, such as from an external website or
a local file system. When SWF files are loaded into Flash Player, they are individually assigned to security
sandboxes based on their origin.
Flash Player classifies SWF files downloaded from the network (such as from external websites) in separate
sandboxes that correspond to their website origin domains. By default, these files are authorized to access
additional network resources that come from the specific (exact domain name match) site. Network SWF files can
be allowed to access additional data from other domains by explicit website and author permissions.
A local SWF file describes any file referenced by using the “file:\\” protocol or a UNC path, which does not include
an IP address or a qualifying domain. For example, “\\test\test.swf ” and “file:\\test.swf ” are considered local files,
while “\\test.com\test.swf ” and “\\192.168.0.1\test.swf ” are not considered local files.
Local SWF files from local origins, such as local file systems or UNC network paths, are placed into one of three
sandboxes: local-with-networking, local-with-filesystem, and local-trusted.
When you compile the Flex application, if you set the use-network compiler option to false, local SWF files are
placed in the local-with-filesystem sandbox. If you set the use-network compiler option to true, local SWF files
are placed in the local-with-networking sandbox.
Local SWF files that are registered as trusted (by users or by installer programs) are placed in the local-trusted
sandbox. Users can also reassign (move) a local SWF file to or from the local-trusted sandbox based on their
security considerations.
38 CHAPTER 3
Deploy checklist
Before you deploy your application, ensure that your proxy servers, firewalls, and assets are configured properly.
Adobe provides a deployment checklist that you can follow. For more information, see “Deployment checklist” on
page 304.
Remove wildcards
If your application relies on assets loaded from another domain, and that domain has a crossdomain.xml file on
it, remove wildcards from that file if possible. For example, change the following:
<cross-domain-policy>
<allow-access-from domain="*" to-ports="*"/>
</cross-domain-policy>
to this:
<cross-domain-policy>
<allow-access-from domain="*.myserver.com" to-ports="80,443,8100,8080" />
</cross-domain-policy>
Also, set the value of the to-ports attribute of the allow-access-from tag to ensure that you are only allowing
necessary ports access to the resources.
Check your application for calls to the allowDomain() and allowInsecureDomain() methods. During development, you might pass these methods a wildcard character (*), but now restrict those methods to allowing
requests only from the necessary domains.
Deploy assets to WEB-INF
In some deployments, you want to make assets such as data files accessible to the application, but not accessible
to anyone requesting the file. If you are using a J2EE-based server, you can deploy those files to a subdirectory
within the WEB-INF directory. Based on J2EE security constraints, no J2EE server can return a resource from the
WEB-INF directory to any client request. The only way to access files in this directory is with server-side code.
Precompiling source code
If you are using the Flex module for Apache and IIS, precompile MXML files, JSP files, and class files. After you
precompile your MXML and JSP files, remove the source files from the public-facing server. You should not be
using the Flex module for Apache and IIS to compile MXML file in a production environment.
To precompile MXML files, use the mxmlc compiler utility in the bin directory. For more information on using
the utility, see “About the command-line compilers” on page 131.
To precompile JSP files on JRun, for example, you use the jspc precompiler utility located in the JRun bin
directory. For information on precompiling JSP files on your application server, see your application server
documentation.
ADOBE FLEX 3 39
Building and Deploying Adobe Flex 3 Applications
Loading assets
The most common task that developers perform that requires an understanding of security is loading external
assets.
Data compared to content
The Flash Player security model makes a distinction between loading content and accessing or loading data.
Content is defined as media: visual media that Flash Player can display, such as audio, video, or a SWF file that
includes displayed media. Data is defined as something that you can manipulate only with ActionScript code.
You can load data in one of two ways: by extracting data from loaded media content, or by directly loading data
from an external file (such as an XML file) or socket connection. You can extract data from loaded media by using
the BitmapData.draw() method, the Sound.id3 property, or the SoundMixer.computeSpectrum() method.
You can load data by using classes such as the SWFLoader, URLStream, URLLoader, Socket, and XMLSocket
classes.
The Flash Player security model defines different rules for loading content and accessing data. Loading content
has fewer restrictions than accessing data. In general, content such as SWF files, bitmaps, MP3 files, and videos
can be loaded from anywhere, but if the content is from a domain other than that of the loading SWF file, it will
be partitioned in a separate security sandbox.
Loading remote assets
Loading remote or network assets relies on three factors:
• Type of asset. If the target asset is a content asset, such as an image file, you do not need any specific permissions from the target domain to load its assets into your Flex application. If the target asset is a data asset, such as
an XML file, you must have the target domain’s permission to access this asset. For more information on the types
of assets, see “Data compared to content” on page 39.
• Target domain. If you are loading data assets from a different domain, the target domain must provide a crossdomain.xml policy file. This file contains a list of URLs and URL patterns that it allows access from. The calling
domain must match one of the URLs or URL patterns in that list. For more information about the crossdomain.xml file, see “Using cross-domain policy files” on page 40. If the target asset is a SWF file, you can also
provide permissions by calling the loadPolicyFile() method and loading an alternative policy file inside that
target SWF file. For more information, see “Using cross-domain policy files” on page 40.
40 CHAPTER 3
• Loading SWF file’s sandbox. To load an asset from a network address, you must ensure that your SWF file is
in either the remote or local-with-networking sandbox. To ensure that a SWF file can load assets over the network,
you must set the use-network compiler option to true when you compile the Flex application. This is the default.
If the application was loaded from the local file system with use-network set to false, the application is put in
the local-with-filesystem sandbox and it cannot load remote SWF files.
Loading assets from a remote location that you do not control can potentially expose your users to risks. For
example, the remote website B contains a SWF file that is loaded by your website A. This SWF file normally
displays an advertisement. However, if website B is compromised and its SWF file is replaced with one that asks
for a username and password, some users might disclose their login information. To prevent data submission, the
loader has a property called allowNetworking with a default value of never.
Using cross-domain policy files
To make data available to SWF files in different domains, use a cross-domain policy file. A cross-domain policy file
is an XML file that provides a way for the server to indicate that its data and documents are available to SWF files
served from other domains. Any SWF file that is served from a domain that the server’s policy file specifies is
permitted to access data or assets from that server.
When a Flash document attempts to access data from another domain, Flash Player attempts to load a policy file
from that domain. If the domain of the Flash document that is attempting to access the data is included in the
policy file, the data is automatically accessible.
The default policy file is named crossdomain.xml and resides at the root directory of the server that is serving the
data. The following example policy file permits access to Flash documents that originate from foo.com, friendOfFoo.com, *.foo.com, and 105.216.0.40:
<?xml version="1.0"?>
<!-- http://www.foo.com/crossdomain.xml -->
<cross-domain-policy>
<allow-access-from domain="www.friendOfFoo.com"/>
<allow-access-from domain="*.foo.com"/>
<allow-access-from domain="105.216.0.40"/>
</cross-domain-policy>
You can also configure ports in the crossdomain.xml file. For more information about crossdomain.xml policy
files, see Programming ActionScript 3.0.
You can use the loadPolicyFile() method to access a nondefault policy file.
ADOBE FLEX 3 41
Building and Deploying Adobe Flex 3 Applications
Loading local assets
In some cases, your SWF file might load assets that reside on the client’s local file system. This typically happens
when the Flex application is embedded on the client device and loaded from a network. If the application is
allowed to access local assets, it cannot access network assets.
To ensure that a Flex application can access assets in the local sandbox, the application must be in the local-withfilesystem or local-trusted sandbox. To ensure this, you set the use-network compiler option to false when you
compile the application. The default value of this option is true.
When you load another SWF file that is in the local file system into your application with a class such as
SWFLoader, and you want to call methods or access properties of that SWF file, you do not need to explicitly
enable cross-scripting.
If the SWF files are in different sandboxes (for example, you loaded the main SWF file into the local-with-network
sandbox, but loaded the asset SWF file from the network), you cannot cross-script because they are in different
sandboxes. Remote SWF files cannot load local SWF files, and vice versa.
Using J2EE authentication
Flex applications integrates well with any server environment, including J2EE. To effectively implement secure
web applications in a J2EE environment, you should understand the following concepts:
Authentication The process of gathering user credentials (user name and password) and validating them in the
system. This requires checking the credentials against a user repository such as a database, flat file, or LDAP
implementation, and authenticating that the user is who they say they are.
Authorization The process of making sure that the authenticated user is allowed to view or access a given
resource. If a user is not authorized to view a resource, the container does not allow access.
Using container-based authentication
J2EE uses the Java Authentication and Authorization Service (JAAS), Java security manager, and policy files to
enforce access controls on users and ties this enforcement to web server roles. The authenticating mechanism is
role based. That is, all users who access a web application are assigned to one or more roles. Example roles are
manager, developer, and customer.
Application developers can assign usage roles to a web application, or to individual resources that make up the
application. Before a user is granted access to a web application resource, the container ensures that the user is
identified (logged in) and that the user is assigned to a role that has access to the resource. Any unauthorized
access of a web application results in an HTTP 401 (Unauthorized) status code.
42 CHAPTER 3
Authentication requires a website to store information about users. This information includes the role or roles
assigned to each user. In addition, websites that authenticate user access typically implement a login mechanism
that forces verification of each user’s identity by using a password. After the website validates the user, the website
can then determine the user’s roles.
This logic is typically implemented in one of the following forms:
•
•
JDBC Login Module
•
•
Windows Login Module
LDAP Login Module
Custom JAAS Login Module
Authentication occurs on a per-request basis. The container typically checks every request to a web application
and authenticates it.
Authentication requires that the roles that the application developer defines for a web application be enforced by
the server that hosts the application.
As part of developing and deploying an application, you must configure the following application authentication
settings:
•
•
Access roles to applications
•
Application server validation method
Resource protection
The web application’s deployment descriptor, web.xml, contains the settings for controlling application authentication. This file is stored in the web application’s WEB-INF directory.
Using authentication to control access to Flex applications
To use authentication to prevent unauthorized access to your Flex application, you typically use the container to
set up constraints on resources. You then challenge the user who then submits credentials. These credentials
determine the success or failure of the user’s login attempt, as the container’s authentication logic determines.
For example, you can protect the page that the Flex application is returned with, or protect the SWF file itself. You
do this in the web.xml file by defining specific URL patterns, as the following example shows:
<web-app>
<security-constraint>
<web-resource-collection>
<web-resource-name>Payroll Application</web-resource-name>
<url-pattern>/payroll/*</url-pattern>
<http-method>GET</http-method>
<http-method>POST</http-method>
</web-resource-collection>
ADOBE FLEX 3 43
Building and Deploying Adobe Flex 3 Applications
<auth-constraint>
<role-name>manager</role-name>
</auth-constraint>
</security-constraint>
</web-app>
When the browser tries to load a resource that is secured by constraints in the web.xml file, the browser either
challenges the user (if you are using BASIC authentication) or forwards the user to a login page (with FORM
authentication).
With BASIC authentication, the user enters a username and password in a popup box that the browser creates. To
specify that an application uses BASIC authentication, you use the login-config element and its auth-method
subelement in the web application’s web.xml file, as the following example shows:
<web-app>
<login-config>
<auth-method>BASIC</auth-method>
<realm-name>Managers</realm-name>
</login-config>
...
</web-app>
With FORM authentication, you must code the page that accepts the username and password, and submit them
as FORM variables named j_username and j_password. This form can be implemented in HTML or as a Flex
application or anything that can submit a form.
When you configure FORM authentication, you can specify both a login form and an error form in the web.xml
file, as the following example shows:
<web-app>
<login-config>
<auth-method>FORM</auth-method>
<form-login-config>
<form-login-page>/login.htm</form-login-page>
<form-error-page>/loginerror.htm</form-error-page>
</form-login-config>
</login-config>
</web-app>
You submit the results of the form validation to the j_security_check action. The server executing the application recognizes this action and processes the form.
A simple HTML-based form might appears as follows:
<form method="POST" action="j_security_check">
<table>
<tr><td>User</td><td><input type=text name="j_username"></tr>
<tr><td>Password</td><td><input type=password name="j_password"></tr>
44 CHAPTER 3
</table>
<input type=submit>
</form>
The results are submitted to the container’s JAAS system with base-64 encoding, which means they can be read
by anyone that can view the TCP/IP traffic. Use encryption to prevent these so-called “man-in-the-middle”
attacks. In both BASIC and FORM authentication, if the user accessed the resource through SSL, the username
and password submission are encrypted, as is all traffic during that exchange.
After it is complete, the container populates the browser’s security context and provides or denies access to the
resource. Flash Player inherits the security context of the underlying browser. As a result, when you make a data
service call, the established credentials are used.
When a user fails an authentication attempt with invalid credentials, be sure not to return information about
which item was incorrect. Instead, use a generic message such as “Your login information was invalid.”
Using RPC services
You can use the RPC services classes—RemoteObject, HTTPService, and WebService—not only to control access
to the data that goes into an MXML page, but also to control the data and actions that flow out of it. You can also
use service authentication to allow only certain users to perform certain actions. For example, if you have an application that allows employee data to be modified through a RemoteObject call, use RemoteObject authentication
to make sure that only managers can change the employee data.
A service-based architecture makes it easy to implement several different security models for your Flex application. You can use programmatic security to limit access to services, or you can apply declarative security
constraints to entire services.
When accessing RPC services with Flex tags such as the <mx:WebService> and <mx:HTTPService> tags, your
Flex application’s SWF file must connect to the service directly, which means that it can encounter security-based
limitations.
Destinations must be configured entirely in the Flex application; the component must communicate directly with
the RPC service.
In addition, you must set the use-proxy compiler option to false when you compile the application.
When use-proxy is false, one of the following must be true:
• The RPC is in the same domain as the Flex application that calls it.
• The RPC’s host system has a crossdomain.xml file that explicitly allows access from the Flex application’s
domain.
ADOBE FLEX 3 45
Building and Deploying Adobe Flex 3 Applications
Using secured services
Secured services are services that are protected by resource constraints. The service itself behaves as a resource
that needs authentication and the container defines its URL pattern as requiring authorization.
You might have a protected Flex application that calls a protected resource. In this case, with BASIC authentication
and a proxied destination, the user’s credentials are passed through to the service. The user only has to log on once
when they first start the Flex application, and not when the application attempts to access the service.
Without a proxy, the user is challenged to enter their credentials a second time when the application attempts to
access the service.
When you use secured services, keep the following in mind:
• If possible, use HTTPS for your services when you use authentication. In BASIC and custom authentication,
user names and passwords are sent in a base-64 encoding. Using base-64 encoding hides the data only from plain
view; HTTPS actually encrypts the data. You can use HTTPS in these cases by making sure HTTPS is set up on
your server and by adding a protocol attribute with the value https on the service, and by adding a crossdomain.xml file.
• To ensure that the WebService and HTTPService endpoints are secure, use a browser window to access the
URL you are trying to secure. This should always bring up a BASIC authentication prompt.
• If the BASIC or custom login box appears but you can’t log in, make sure that the users and roles were added
correctly to your application server. This is often an error-prone task that is overlooked as the source of the
problem.
Making other connections
Flash Player can connect to servers, services, and load data from sources other than RPC services. Some of these
sources have security issues that you should consider.
Using RTMP
Flash Player uses the Real-Time Messaging Protocol (RTMP) for client-server communication. This is a TCP/IP
protocol designed for high-performance transmission of audio, video, and data messages. RTMP sends
unencrypted data, including authentication information (such as a name and a password).
Although RTMP in and of itself does not offer security features, Flash communications applications can perform
secure transactions and secure authentication through an SSL-enabled web server.
46 CHAPTER 3
Flash Player also provides support for versions of RTMP that are tunneled through HTTP and HTTPS. RTMP
refers to RTMP transmitted within an HTTP wrapper, and RTMPS is RTMP transmitted within an HTTPS
wrapper.
Using sockets
Sockets let you read and write raw binary or XML data with a connected server. Sockets transmit over TCP.
Because of this, Flash Player cannot take advantage of the built-in encryption capabilities of the browser. However,
you can use encryption algorithms written in ActionScript to protect the data that is being communicated.
Cross-domain access to socket and XML socket connections is disabled by default. Access to socket connections
in the same domain of the SWF file on ports lower than 1024 is also disabled by default. You can permit access to
these connections by serving a cross-domain policy file from any of the following locations:
•
•
The same port as the main socket connection
•
The HTTP server on port 80 in the same domain as the socket server
A different port
For more information, see the Socket and XMLSocket classes in Flash ActionScript Language Reference.
Using the LocalConnection class
The LocalConnection class lets you develop SWF files that can send instructions to each other. LocalConnection
objects can communicate only among SWF files that are running on the same client computer, but they can be
running in different applications—for example, a SWF file running in a browser and a SWF file running in a
projector. (A projector is a SWF file saved in a format that can run as a stand-alone application—that is, the
projector doesn’t require Flash Player to be installed since it is embedded inside the executable file.)
For every LocalConnection communication, there is a sender SWF file and a listener SWF file. The simplest way
to use a LocalConnection object is to allow communication only between LocalConnection objects located in the
same domain because you won’t have security issues.
Applications served from different domains that need to be able to make LocalConnection calls to each other
must be granted cross-domain LocalConnection permissions. To do this, the listener must allow the sender
permission by using the LocalConnection.allowDomain() or LocalConnection.allowInsecureDomain()
methods.
Adobe does not recommend using the LocalConnection.allowInsecureDomain() method because allowing
non-HTTPS documents to access HTTPS documents compromises the security offered by HTTPS. It is best that
all Flash SWF files that make LocalConnection calls to HTTPS SWF files are served over HTTPS.
ADOBE FLEX 3 47
Building and Deploying Adobe Flex 3 Applications
For more information about using the LocalConnection class, see Programming ActionScript 3.0.
To facilitate SWF-to-SWF communication, you can also use cross-scripting. For more information, see “Crossscripting” on page 34.
Using SSL
A SWF file playing in a browser has many of the same security concerns as an HTML page being displayed in a
browser. This includes the security of the SWF file while it is being loaded into the browser, as well as the security
of communication between Flash and the server after the SWF file has loaded and is playing in the browser. In
particular, data communication between the browser and the server is susceptible to being intercepted by third
parties. The solution to this issue in HTML is to encrypt the communication between the client and server to
make any data captured by third parties undecipherable and thus unusable. This encryption is done by using an
SSL-enabled browser and server.
Because a SWF file running within a browser uses the browser for almost all of its communication with the server,
it can take advantage of the browser’s built-in SSL support. This lets communication between the SWF file and the
server be encrypted. Furthermore, the actual bytes of the SWF file are encrypted while they are being loaded into
the browser. Thus, by playing a SWF file within an SSL-enabled browser through an HTTPS connection with the
server, you can ensure that the communication between Flash Player and the server is encrypted and secure.
The one exception to this security is the way Flash Player uses persistent sockets (through the ActionScript
XMLSocket object), which does not use the browser to communicate with the server. Because of this, SWF files
that use sockets cannot take advantage of the built-in encryption capabilities of the browser. However, you can use
one-way encryption algorithms written in ActionScript to encrypt the data being communicated.
MD5 is a one-way encryption algorithm described in RFC 1321. This algorithm has been ported to ActionScript,
which enables developers to secure one-way data by using the MD5 algorithm before it is sent from the SWF file
to the server. For more information about RFC 1321, see www.faqs.org/rfcs/rfc1321.html or www.rsasecurity.com/rsalabs/faq/3-6-6.html.
Using secure endpoints
To access HTTP services or web services through HTTPS, you can specify the protocols using “https” in the wsdl
or url properties; for example:
<mx:WebService url="https://myservice.com" .../>
<mx:HTTPService wsdl="https://myservice.com" .../>
48 CHAPTER 3
By default, a SWF file served over an unsecure protocol, such as HTTP, cannot access other documents served
over the secure HTTPS protocol, even when those documents come from the same domain. As a result, if you
loaded the SWF file over HTTP but want to connect to the service through HTTPS, you must add
secure="false" in the crossdomain.xml file on the services’s server, as the following example shows:
<cross-domain-policy>
<allow-access-from domain="*.mydomain.com" secure="false"/>
</cross-domain-policy>
If you loaded the SWF file over HTTPS, you do not have to make any changes.
Writing secure Flex applications
When you code a Flex application, keep the following topics in mind to ensure that the application you write is as
secure as possible.
MXML tags with security restrictions
Some MXML tags trigger operations that require security settings. Operations that trigger security checks
include:
•
Referencing a URL that is outside the exact domain of the application that makes a request.
•
•
Referencing an HTTPS URL when the application that makes the request is not served over HTTPS.
Referencing a resource that is in a different sandbox.
In these cases, access rights must be granted through one of the permission-granting mechanisms such as the
allowDomain() method or a crossdomain.xml file.
MXML tags that can trigger security checks include:
•
Any class that extends the Channel class.
•
RPC-related tags that use channels such as <mx:WebService>, <mx:RemoteObject>, and
<mx:HTTPService>.
•
Messaging tags such as <mx:Producer> and <mx:Consumer>.
•
•
The <mx:DataService> tag.
Tags that load SWF files such as <mx:SWFLoader> .
In addition to these tags and their underlying classes, many Flash classes trigger security checks including ExternalInterface, Loader, NetStream, SoundMixer, URLLoader, and URLRequest.
ADOBE FLEX 3 49
Building and Deploying Adobe Flex 3 Applications
Disabling viewSourceURL
If you enabled the view source feature by setting the value of the viewSourceURL property on the
<mx:Application> tag, you must be sure to remove it before you put your application into production.
This functionality applies only to Flex Builder users.
Remove sensitive information from SWF files
Applications built with Flash share many of the same concerns and issues as web pages when it comes to
protecting the security of data. Because the SWF file format is an open format, you can extract data and algorithms
contained within a SWF file. This is similar to how HTML and JavaScript code can be easily viewed by users.
However, SWF files make viewing the code more difficult. A SWF file is compiled and is not human-readable like
HTML or JavaScript.
But security is not obtained through obscurity. A number of third-party tools can extract data from compiled
SWF files. As a result, do not consider that any data, variables, or ActionScript code compiled into an application
are secure. You can use a number of techniques to secure sensitive information and still make it available for use
in your SWF files.
To help ensure a secure environment, use the following general guidelines:
•
•
Do not include sensitive information, such as user names, passwords, or SQL statements in SWF files.
Do not use client-side username and password checks for authentication.
• Remove debug code, unused code, and comments from code before compiling to minimize the amount of
information about your application that is available to someone with a decompiler or a debugger version of Flash
Player.
• If your SWF file needs access to sensitive information, load the information into the SWF file from the server
at run time. The data will not be part of the compiled SWF file and thus cannot be extracted by decompiling the
SWF file. Use a secure transfer mechanism, such as SSL, when you load the data.
•
Implement sensitive algorithms on the server instead of in ActionScript.
• Use SSL whenever possible.
• Only deploy your web applications from a trusted server. Otherwise, the server-side aspect of your application
could be compromised.
50 CHAPTER 3
Input validation
Input validation means ensuring that input is what it says it is or is what it is supposed to be. If your application is
expecting name and address information, but it gets SQL commands, have a validation mechanism in your application that checks for and filters out SQL-specific characters and strings before passing the data to the execute
method.
In many cases, you want users to provide input in TextInput, TextArea, and other controls that accept user input.
If you use the input from these controls in operations inside the application, make sure that the input is free of
possible malicious characters or code.
One approach to enforcing input validation is to use the Flex validator classes by using the <mx:Validator> tag
or the tag for the appropriate validator type. Validators ensure that the input conforms to a predetermined pattern.
For example, the NumberValidator class ensures that a string represents a valid number. This validator can ensure
that the input falls within a given range (specified by the minValue and maxValue properties), is an integer
(specified by the domain property), is non-negative (specified by the allowNegative property), and does not
exceed the specified precision.
In typical client-server environments, data validation occurs on the server after data is submitted to it from the
client. One advantage of using Flex validators is that they execute on the client, which lets you validate input data
before transmitting it to the server. By using Flex validators, you eliminate the need to transmit data to and receive
error messages back from the server, which improves the overall responsiveness of your application.
You can also write your own ActionScript filters that remove potentially harmful code from input. Common
approaches include stripping out dollar sign ($), quotation mark ("), semi-colon (;) and apostrophe (') characters
because they have special meaning in most programming languages. Because Flex also renders HTML in some
controls, also filter out characters that can be used to inject script into HTML, such as the left and right angle
brackets (“<” and “>”), by converting these characters to their HTML entities “<” and “>”. Also filter out the
left and right parentheses (“(”and “)”) by translating them to “(” and “)”, and the pound sign (“#”) and
ampersand (“&”) by translating them to “#” (#) and “&” (&).
Another approach to enforcing input validation is to use strongly-typed, parameterized queries in your SQL code.
This way, if someone tries to inject malicious SQL code into text that is used in a query, the SQL server will reject
the query.
For more information on potentially harmful characters and conversion processes, see
http://www.cert.org/tech_tips/malicious_code_mitigation.html.
For more information about validators, see “Validating Data” on page 1263 in the Adobe Flex 3 Developer Guide.
ActionScript
Use some of the following techniques to try to make your use of ActionScript more secure.
ADOBE FLEX 3 51
Building and Deploying Adobe Flex 3 Applications
Handling errors
The SecurityError exception is thrown when some type of security violation takes place. Security errors include:
•
An unauthorized property access or method call was made across a security sandbox boundary.
• An attempt was made to access a URL not permitted by the security sandbox.
• A socket connection was attempted to an unauthorized port number, for example, a port below 1024, without
a policy file present.
• An attempt was made to access the user’s camera or microphone, and the request to access the device was
denied by the user.
Flash Player dispatches SecurityErrorEvent objects to report the occurrence of a security error. Security error
events are the final events dispatched for any target object. This means that any other events, including generic
error events, are not dispatched for a target object that experiences a security error.
Your event listener can access the SecurityErrorEvent object’s text property to determine what operation was
attempted and any URLs that were involved, as the following example shows:
<?xml version="1.0"?>
<!-- security/SecurityErrorExample.mxml -->
<mx:Application xmlns:mx="http://www.adobe.com/2006/mxml" creationComplete="initApp()">
<mx:Script><![CDATA[
import flash.net.URLLoader;
import flash.net.URLRequest;
import flash.events.SecurityErrorEvent;
import mx.controls.Alert;
private var loader:URLLoader = new URLLoader();
private function initApp():void {
loader.addEventListener(SecurityErrorEvent.SECURITY_ERROR,
securityErrorHandler);
}
private function triggerSecurityError():void {
// This URL is purposefully broken so that it will trigger a
// security error.
var request:URLRequest = new URLRequest("http://www.[yourDomain].com");
// Triggers a security error.
loader.load(request);
}
private function securityErrorHandler(event:SecurityErrorEvent):void {
Alert.show("A security error occurred! Check trace logs for details.");
trace("securityErrorHandler: " + event.text);
52 CHAPTER 3
}
]]></mx:Script>
<mx:Button id="b1" label="Click Me To Trigger Security Error"
click="triggerSecurityError()"/>
</mx:Application>
If no event listeners are present, the debugger version of Flash Player automatically displays an error message that
contains the contents of the text property.
In general, try to wrap methods that might trigger a security error in a try/catch block. This prevents users from
seeing information about destinations or other properties that you might not want to be visible.
Suppressing debug output
Flash Player writes debug output from a trace() method or the Logging API to a log file on the client. Any client
can be running the debugger version of Flash Player. As a result, remove calls to the trace() method and Logging
API calls that produce debugging output so that clients cannot view your logged information.
If you use the Logging API in your custom components and classes, set the value of the LogEventLevel to NONE
before compilation, as the following example shows:
myTraceTarget.level = LogEventLevel.NONE;
For more information about the Logging API, see “Using the logging API” on page 233.
Using host-based authentication
IP addresses and HTTP headers are sometimes used to perform host-based authentication. For example, you
might check the Referer header or the client IP address to ensure that a request comes from a trusted source.
However, request headers such as Referer can be spoofed easily. This means that clients can pretend to be
something they are not by settings headers or faking IP addresses. The solution to the problem of client spoofing
is to not use HTTP header data as an authentication mechanism.
Using passwords
Using passwords in your Flex application is a common way to protect resources from unauthorized access. Test
the validity of the password on the server rather than the client, because the client has access to all the logic in the
local SWF file.
Never store passwords locally. For example, do not store username and password combinations in local SharedObjects. These are stored in plain-text and unencrypted, just as cookie files are. Anyone with access to the user’s
computer can access the information inside a SharedObject.
ADOBE FLEX 3 53
Building and Deploying Adobe Flex 3 Applications
To ensure that passwords are transmitted from the client to the server safely, enforce the use of SSL or some other
secure transport-level protocol.
When you ask for a password in a TextArea or TextInput control, set the displayAsPassword property to true.
This displays the password as asterisks as it is typed.
Storing persistent data with the SharedObject class
Flash Player supports persistent shared objects through the SharedObject class. The SharedObject class stores data
on users’ computers. This data is usually local, meaning that it was obtained with the SharedObject.getLocal()
method. You can also create persistent remote data with the SharedObject class; this requires Flash Media Server
(formerly Flash Communication Server).
Each remote sandbox has an associated store of persistent SharedObject directory on the client. For example,
when any SWF from domain1.com reads or writes data with the SharedObject class, Flash Player reads or writes
that object in the domain1.com object store. Likewise for a SWF from domain2.com, Flash Player uses the
domain2.com store. To avoid name collisions, the directory path defaults to the full path in the URL of the creating
SWF file. This process can be shortened by using the localPath parameter of the SharedObject.getLocal()
method, which allows other SWF files from the same domain to access a shared object after it is created.
Every domain has a maximum amount of data that a SharedObject class can save in the object store. This is an
allocation of the user’s disk space in which applications from that domain can store persistent data. Users can
change the quota for a domain at any time by choosing Settings from the Flash Player context menu. When an
application tries to store data with a SharedObject class that causes Flash Player to exceed its domain’s quota, a
dialog box appears, asking the user whether to increase the domain quota.
Configuring client security settings
Some security control features in Flash Player target user choices, and some target the modern corporate and
enterprise environments, such as when the IT department would like to install Flash Player across the enterprise
but has concerns about IT security and privacy. To help address these types of requirements, Flash Player provides
various installation-time configuration choices. For example, some corporations do not want Flash Player to have
access to the computer’s audio and video hardware; other environments do not want Flash Player to have any read
or write access to the local file system.
Three groups can make security choices: the application author (using developer controls), the administrative
user (using administrator controls), and the local user (with user controls).
54 CHAPTER 3
About the mm.cfg file
You configure the debugger version of Flash Player by using the settings in the mm.cfg text file. You must create
this file when you first configure the debugger version of Flash Player.
The settings in this file let you enable or disable trace() logging, set the location of the trace() file’s output, and
configure client-side error and warning logging.
For more information, see “Configuring the debugger version of Flash Player” on page 229.
About the mms.cfg file
The primary purpose for the Macromedia® Security Configuration file (mms.cfg) is to support the corporate and
enterprise environments where the IT department wants to install Flash Player across the enterprise, while
enforcing some common global security and privacy settings (supported with installation-time configuration
choices).
On operating systems that support the concept of user security levels, the file is flagged as requiring system
administrator (or root) permissions to modify or delete it. The following table shows the location of the mms.cfg,
depending on the operating system:
Operating System
Location of mms.cfg file
Macintosh OS X
/Library/Application Support/Macromedia
Windows XP/Vista
C:\WINDOWS\system32\Macromed\Flash
Windows 2000
C:\WINNT\System32\Macromed\Flash
Windows 95/98/ME
C:\WINDOWS\System\Macromed\Flash
Linux
/etc/adobe
You can use this file to configure security settings that deal with data loading, privacy, and local file access. The
settings include:
•
•
FileDownloadDisable
FileUploadDisable
• LocalStorageLimit
• AVHardwareDisable
For a complete list of options and their descriptions, see http://www.adobe.com/devnet/flashplayer/articles/flash_player_8_security.pdf.
ADOBE FLEX 3 55
Building and Deploying Adobe Flex 3 Applications
About FlashPlayerTrust files
Flash Player provides a way for administrative users to register certain local files so that they are always loaded
into the local-trusted sandbox. Often an installer for a native application or an application that includes many
SWF files will do this. Depending on whether Flash Player will be embedded in a nonbrowser application, one of
two strategies can be appropriate: register SWF files and HTML files to be trusted, or register applications to be
trusted. Only applications that embed the browser plug-ins can be trusted—the stand-alone players and standard
browsers do not check to see if they were trusted.
The installer creates files in a directory called FlashPlayerTrust. These files list paths of trusted files. This directory,
known as the Global Flash Player Trust directory, is alongside the mms.cfg file, in the following location, which
requires administrator access:
• Windows: system\Macromed\Flash\FlashPlayerTrust (for example,
C:\winnt\system32\Macromed\Flash\FlashPlayerTrust)
• OS X: app support/Macromedia/FlashPlayerTrust (for example, /Library/Application Support/Macromedia/FlashPlayerTrust)
These settings affect all users of the computer. If an installer is installing an application for all users, the installer
can register its SWF files as trusted for all users.
For more information about FlashPlayerTrust files, see http://www.adobe.com/devnet/flashplayer/articles/flash_player_8_security.pdf.
About the Settings Manager
The Settings Manager allows the individual user to specify various security, privacy, and resource usage settings
for applications executing on their client computer. For example, the user can control application access to select
facilities (such as their camera and microphone), or control the amount of disk space allotted to a SWF file’s
domain. The settings it manages are persistent and controlled by the user.
The user can indicate their personal choices for their Flash Player settings in a number of areas, either globally
(for Flash Player itself and all applications built with Flash) or specifically (applying to specific domains only). To
designate choices, the user can select from the six tab categories along the top of the Settings Manager dialog box:
•
Global Privacy Settings
•
•
Global Storage Settings
•
•
•
Flash Player Update Settings
Global Security Settings
Privacy Settings for Individual Websites
Storage Settings for Individual Websites
56 CHAPTER 3
Access the Settings Manager for your Flash Player
1
Open an application in Flash Player.
2
Right-click and select Settings.
The Adobe Flash Player Settings dialog box appears.
3
Select the Privacy tab (on the far left).
4
Click the Advanced button.
Flash Player launches a new browser window and loads the Settings Manager help page.
Other resources
The following table lists resources that are useful in understanding the Flash Player security model and implementing security in your Flex applications:
Resource name
Location
Security Topic Center
http://www.adobe.com/devnet/security
Security Bulletins and Advisories
http://www.adobe.com/support/security
Flash Player Security & Privacy
http://www.adobe.com/products/flashplayer/security
Security Resource Center
http://www.adobe.com/resources/security
Flash Player 9 Security white paper
http://www.adobe.com/go/fp9_0_security
“Flash Player Security” in Programming
http://www.adobe.com/go/progAS3_security
ActionScript 3.0
“Networking and Communications” in Programming http://www.adobe.com/go/AS3_networking_and_communications
ActionScript 3.0.
Security Changes in Flash Player 8
http://www.adobe.com/devnet/flash/articles/fplayer8_security.html
Security Changes in Flash Player 7
http://www.adobe.com/devnet/flash/articles/fplayer_security.html
Understanding Service Authentication
http://www.adobe.com/devnet/flex/articles/security_framework_print.html
Settings Manager
http://www.adobe.com/support/flashplayer/help/settings/
57
Chapter 4: Optimizing Flex Applications
After you have a working application, you can explore ways to make that application download faster and perform
better.
Topics
Improving client-side performance . . . . . . . . . . . . . . . . . . . . . . . . . . . . . . . . . . . . . . . . . . . . . . . . . . . . . . . . . . . . . . . . . 57
Improving client-side performance
Tuning software to achieve maximum performance is not an easy task. You must commit to producing efficient
implementations and monitor software performance continuously during the software development process.
Employ the following general guidelines when you test applications for performance, such as using the
getTimer() method and checking initialization time.
Before you begin actual testing, you should understand some of the influences that client settings can have on
performance testing. For more information, see “Configuring the client environment” on page 62.
In addition to these techniques, you should also consider using the Adobe® Flex® profiler in Adobe® Flex® Builder™.
For more information, see “Profiling Flex applications” on page 155 in Using Adobe Flex Builder 3.
General guidelines
You can use the following general guidelines when you improve your application and the environment in which
it runs:
• Set performance targets early in the software design stage. If possible, try to estimate an acceptable performance target early in the application development cycle. Certain usage scenarios dictate the performance requirements. It would be disappointing to fully implement a product feature and then find out that it is too slow to be
useful.
• Understand performance characteristics of the application framework, and employ the strategies that
maximize the efficiency of components and operations.
• Understand performance characteristics of the application code. In medium-sized or large-sized projects, it is
common for a product feature to use codes or components written by other developers or by third-party vendors.
Knowing what is slow and what is fast in dependent components and code is essential in getting the design right.
58 CHAPTER 4
• Do not attempt to test a large application’s performance all at once. Rather, test small pieces of the application
so that you can focus on the relevant results instead of being overwhelmed by data.
• Test the performance of your application early and often. It is always best to identify problem areas early and
resolve them in an iterative manner, rather then trying to shove performance enhancements into existing, poorly
performing code at the end of your application development cycle.
• Avoid optimizing code too early. Even though early testing can highlight performance hot spots, refrain from
fixing them while you are still developing those areas of the application; doing so might unexpectedly delay the
implementation schedule. Instead, document the issues and prioritize all the performance issues as soon as your
team finishes the feature implementation.
Testing applications for performance
You can use various techniques to test start-up and run-time performance of your Flex applications, such as
monitoring memory consumption, timing application initialization, and timing events. The Flex profiler provides
this type of information without requiring you to write any additional code. If you are using Flex Builder, you
should use the profiler for testing your application’s performance. For more information, see “Profiling Flex applications” on page 155 in Using Adobe Flex Builder 3.
Calculating application initialization time
One approach to performance profiling is to use code to gauge the start-up time of your application. This can help
identify bottlenecks in the initialization process, and reveal deficiencies in your application design, such as too
many components or too much reliance on nested containers.
The getTimer() method in flash.utils returns the number of milliseconds that have elapsed since Adobe® Flash®
Player or Adobe AIR™ was initialized. This indicates the amount of time since the application began playing. The
Timer class provides a set of methods and properties that you can use to determine how long it takes to execute
an operation.
Before each update of the screen, Flash Player calls the set of functions that are scheduled for the update.
Sometimes, a function should be called in the next update to allow the rest of the code scheduled for the current
update to execute. You can instruct Flash Player or AIR to call a function in the next update by using the
callLater() method. This method accepts a function pointer as an argument. The method then puts the
function pointer on a queue, so that the function is called the next time the player dispatches either a render event
or an enterFrame event.
The following example records the time it takes the Application object to create, measure, lay out, and draw all of
its children. This example does not include the time to download the SWF file to the client, or to perform any of
the server-side processing, such as checking the Flash Player version, checking the SWF file cache, and so on.
ADOBE FLEX 3 59
Building and Deploying Adobe Flex 3 Applications
<?xml version="1.0"?>
<!-- optimize/ShowInitializationTime.mxml -->
<mx:Application xmlns:mx="http://www.adobe.com/2006/mxml"
creationComplete="callLater(showInitTime)">
<mx:Script><![CDATA[
import flash.utils.Timer;
[Bindable]
public var t:String;
private function showInitTime():void {
// Record the number of ms since the player was initialized.
t = "App startup: " + getTimer() + " ms";
}
]]></mx:Script>
<mx:Label id="l1" text="{t}"/>
</mx:Application>
This example uses the callLater() method to delay the recording of the startup time until after the application
finishes and the first screen updates. The reason that the showInitTime function pointer is passed to the
callLater() method is to make sure that the application finishes initializing itself before calling the getTimer()
method.
For more information on using the callLater() method, see “Using the callLater() method” on page 107.
Calculating elapsed time
Some operations take longer than others. Whether these operations are related to data loading, instantiation,
effects, or some other factor, it’s important for you to know how long each aspect of your application takes.
You can calculate elapsed time from application startup by using the getTimer() method. The following example
calculates the elapsed times for the preinitialize and creationComplete events for all the form elements. You
can modify this example to show individual times for the initialization and creation of each form element.
<?xml version="1.0" encoding="iso-8859-1"?>
<!-- optimize/ShowElapsedTime.mxml -->
<mx:Application xmlns:mx="http://www.adobe.com/2006/mxml"
initialize="init()">
<mx:Script><![CDATA[
[Bindable]
public var dp:Array = [
{food:"apple", type:"fruit", color:"red"},
{food:"potato", type:"vegetable", color:"brown"},
{food:"pear", type:"fruit", color:"green"},
{food:"orange", type:"fruit", color:"orange"},
{food:"spinach", type:"vegetable", color:"green"},
{food:"beet", type:"vegetable", color:"red"}
];
60 CHAPTER 4
public var sTime:Number;
public var eTime:Number;
public var pTime:Number;
private function init():void {
f1.addEventListener("preinitialize", logPreInitTime, true);
f1.addEventListener("creationComplete", logCreationCompTime, true);
}
private var isFirst:Boolean = true;
private function logPreInitTime(e:Event):void {
// Get the time when the preinitialize event is dispatched.
sTime = getTimer();
trace("Preinitialize time for " + e.target + ": " + sTime.toString());
}
private function logCreationCompTime(e:Event):void {
// Get the time when the creationComplete event is dispatched.
eTime = getTimer();
// Use target rather than currentTarget because these events are
// triggered by each child of the Form control during the capture
// phase.
trace("CreationComplete time for " + e.target + ": " + eTime.toString());
}
]]></mx:Script>
<mx:Form id="f1">
<mx:FormHeading label="Sample Form" id="fh1"/>
<mx:FormItem label="List Control" id="fi1">
<mx:List dataProvider="{dp}" labelField="food" id="list1"/>
</mx:FormItem>
<mx:FormItem label="DataGrid control" id="fi2">
<mx:DataGrid width="200" dataProvider="{dp}" id="dg1"/>
</mx:FormItem>
<mx:FormItem label="Date controls" id="fi3">
<mx:DateChooser id="dc"/>
<mx:DateField id="df"/>
</mx:FormItem>
</mx:Form>
</mx:Application>
ADOBE FLEX 3 61
Building and Deploying Adobe Flex 3 Applications
Calculating memory usage
You use the totalMemory property in the System class to find out how much memory has been allocated to Flash
Player or AIR on the client. The totalMemory property represents all the memory allocated to Flash Player or
AIR, not necessarily the memory being used by objects. Depending on the operating system, Flash Player or AIR
will be allocated more or less resources and will allocate memory with what is provided.
You can record the value of totalMemory over time by using a Timer class to set up a recurring interval for the
timer event, and then listening for that event.
The following example displays the total amount of memory allocated (totmem) to Flash Player at 1-second
intervals. This value will increase and decrease. In addition, this example shows the maximum amount of memory
that had been allocated (maxmem) since the application started. This value will only increase.
<?xml version="1.0"?>
<!-- optimize/ShowTotalMemory.mxml -->
<mx:Application xmlns:mx="http://www.adobe.com/2006/mxml" initialize="initTimer()">
<mx:Script><![CDATA[
import flash.utils.Timer;
import flash.events.TimerEvent;
[Bindable]
public var time:Number = 0;
[Bindable]
public var totmem:Number = 0;
[Bindable]
public var maxmem:Number = 0;
public function initTimer():void {
// The first parameter is the interval (in milliseconds). The
// second parameter is number of times to run (0 means infinity).
var myTimer:Timer = new Timer(1000, 0);
myTimer.addEventListener("timer", timerHandler);
myTimer.start();
}
public function timerHandler(event:TimerEvent):void {
time = getTimer()
totmem = flash.system.System.totalMemory;
maxmem = Math.max(maxmem, totmem);
}
]]></mx:Script>
<mx:Form>
<mx:FormItem label="Time:">
<mx:Label text="{time} ms"/>
62 CHAPTER 4
</mx:FormItem>
<mx:FormItem label="totalMemory:">
<mx:Label text="{totmem} bytes"/>
</mx:FormItem>
<mx:FormItem label="Max. Memory:">
<mx:Label text="{maxmem} bytes"/>
</mx:FormItem>
</mx:Form>
</mx:Application>
Configuring the client environment
When testing applications for performance, it is important to configure the client properly.
Choosing the version of Flash Player
When you test your applications for performance, use the standard version of Adobe® Flash® Player or AIR rather
than the debugger version of Flash Player or ADL, if possible. The debugger version of Player provides support
for the trace() method and the Logging API. Using logging or the trace() method can significantly slow player
performance, because the player must write log entries to disk while running the application.
If you do use the debugger version of Flash Player, you can disable logging and the trace() method by setting
the TraceOutputFileEnable property to 0 in your mm.cfg file. You can keep trace() logging working, but
disable the Logging API that you might be using in your application, by setting the logging level of the TraceTarget
logging target to NONE, as the following example shows:
myLogger.log(LogEventLevel.NONE, s);
For performance testing, consider writing run-time test results to text components in the application rather than
calling the trace() method so that you can use the standard version of Flash Player and not the debugger version
of Flash Player.
For more information about configuring trace() method output and logging, see “Logging” on page 227.
Disabling SpeedStep
If you are running performance tests on a Windows laptop computer, disable Intel SpeedStep functionality.
SpeedStep toggles the speed of the CPU to maximize battery life. SpeedStep can toggle the CPU at unpredictable
times, which makes the results of a performance test less accurate than they would otherwise be.
1
Select Start > Settings > Control Panel.
2
Double-click the Power Settings icon.
The Power Options Properties dialog box displays.
3
Select the Power Schemes tab.
ADOBE FLEX 3 63
Building and Deploying Adobe Flex 3 Applications
4
Select High System Performance from the Power Schemes drop-down box.
5
Click OK.
Changing timeout length
When you test your application, be aware of the scriptTimeLimit property. If an application takes too long to
initialize, Flash Player warns users that a script is causing Flash Player to run slowly and prompts the user to abort
the application. If this is the situation, you can set the scriptTimeLimit property of the <mx:Application> tag
to a longer time so that the Flex application has enough time to initialize.
However, the default value of the scriptTimeLimit property is 60 seconds, which is also the maximum, so you
can only increase the value if you have previously set it to a lower value. You rarely need to change this value.
The following example sets the scriptTimeLimit property to 30:
<?xml version="1.0"?>
<!-- optimize/ChangeScriptTimeLimit.mxml -->
<mx:Application xmlns:mx="http://www.adobe.com/2006/mxml" scriptTimeLimit="30">
<!-- Empty application -->
</mx:Application>
Preventing client-side caching
When you test performance, ensure that you are not serving files from the local cache to Flash Player. Otherwise,
this can give false results about download times. Also, during development and testing, you might want to change
aspects of the application such as embedded images, but the browser continues to use the old images from your
cache.
If the date and time in the If-Modified-Since request header matches the date and time in the Last-Modified
response header, the browser loads the SWF file from its cache. Then the server returns the 304 Not Modified
message. If the Last-Modified header is more recent, the server returns the SWF file.
You can use the following techniques to disable client-side caching:
• Delete the Flex files from the browser’s cache after each interaction with your application. Browsers typically
store the SWF file and other remote assets in their cache. On Microsoft Internet Explorer in Windows XP, for
example, you can delete all the files in c:\Documents and Settings\username\Local Settings\Temporary Internet
Files to force a refresh of the files on the next request. For more information, see “Caching” on page 36.
• Set the HTTP headers for the SWF file request in the HTML wrapper to prevent caching of the SWF file on
the client. The following example shows how to set headers that prevent caching in JSP:
// Set Cache-Control to no-cache.
response.setHeader("Cache-Control", "no-cache");
// Prevent proxy caching.
response.setHeader("Pragma", "no-cache");
64 CHAPTER 4
// Set expiration date to a date in the past.
response.setDateHeader("Expires", 946080000000L); //Approx Jan 1, 2000
// Force always modified.
response.header("Last-Modified", new Date());
Reducing SWF file sizes
You can improve initial user experience by reducing the time it takes to start an application. Part of this time is
determined by the download process, where the SWF file is returned from the server to the client. The smaller the
SWF file, the shorter the download wait. In addition, reducing the size of the SWF file also results in a shorter
application initialization time. Larger SWF files take longer to unpack in Flash Player.
The mxmlc compiler includes several options that can help reduce SWF file size.
Using the bytecode optimizer
The bytecode optimizer can reduce the size of the Flex application’s SWF file by using bytecode merging and
peephole optimization. Peephole optimization removes redundant instructions from the bytecode.
If you are using Flex Builder or the mxmlc command-line compiler, you can set the optimize compiler option to
true, as the following example shows:
mxmlc -optimize=true MyApp.mxml
The default value of the optimize option is true.
Disabling debugging
Disabling debugging can make your SWF files smaller. When debugging is enabled, the Flex compilers include
line numbers and other navigational information in the SWF file that are only used in a debugging environment.
Disabling debugging reduces functionality of the fdb command-line debugger and the debugger built into Flex
Builder.
To disable debugging, set the debug compiler option to false. The default value for the mxmlc compiler is false.
The default value for the compc compiler is true.
For more information about debugging, see “Using the Command-Line Debugger” on page 245.
Using strict mode
When you set the strict compiler option to true, the compiler verifies that definitions and package names in
import statements are used in the application. If the imported classes are not used, the compiler reports an error.
The following example shows some examples of when strict mode throws a compiler error:
package {
import flash.utils.Timer; // Error. This class is not used.
ADOBE FLEX 3 65
Building and Deploying Adobe Flex 3 Applications
import flash.printing.* // Error. This class is not used.
import mx.controls.Button; // Error. This class is not used.
import mx.core.Application; // No error. This class is used.
public class Foo extends Application {
}
}
The strict option also performs compile-time type checking, which provides a small optimization increase in
the application at run time.
The default value of the strict compiler option is true.
Examining linker dependencies
To find ways to reduce SWF file sizes, you can look at the list of ActionScript classes that are linked into your SWF
file.
You can generate a report of linker dependencies by setting the link-report compiler option to true. The output
of this compiler option is a report that shows linker dependencies in an XML format.
The following example shows the dependencies for the ProgrammaticSkin script as it appears in the linker report:
<script name="C:\flex3sdk\frameworks\libs\framework.swc(mx/skins/ProgrammaticSkin)"
mod="1141055632000" size="5807">
<def id="mx.skins:ProgrammaticSkin"/>
<pre id="mx.core:IFlexDisplayObject"/>
<pre id="mx.styles:IStyleable"/>
<pre id="mx.managers:ILayoutClient"/>
<pre id="flash.display:Shape"/>
<dep id="String"/>
<dep id="flash.geom:Matrix"/>
<dep id="mx.core:mx_internal"/>
<dep id="uint"/>
<dep id="mx.core:UIComponent"/>
<dep id="int"/>
<dep id="Math"/>
<dep id="Object"/>
<dep id="Array"/>
<dep id="mx.core:IStyleClient"/>
<dep id="Boolean"/>
<dep id="Number"/>
<dep id="flash.display:Graphics"/>
</script>
66 CHAPTER 4
The following table describes the tags used in this file:
Tag
Description
<script>
Indicates the name of a compilation unit used in the creation of the application SWF file. Compilation units must contain
at least one public definition, such as a class, function, or namespace.
The name attribute shows the origin of the script, either from a source file or from a SWC file (for example, frameworks.swc).
If you set keep-generated=true on the command line, all classes in the generated folder are listed as scripts in this
file.
The size attribute shows the class' size, in bytes.
The mod attribute shows the time stamp when the script was created.
<def>
Indicates the name of a definition. A definition, like a script, can be a class, function, or namespace.
<pre>
Indicates a definition that must be linked in to the SWF file before the current definition is linked in. This tag means
prerequisite.
For class definitions, this tag shows the direct parent class (for example, flash.events:Event), plus all implemented interfaces (for example, mx.core:IFlexDisplayObject and mx.managers:ILayoutClient) of the class.
<dep>
Indicates other definitions that this definition depends on (for example, String, _ScrollBarStyle, and mx.core:IChildList).
This is a reference to a definition that the current script requires.
Some script definitions have no dependencies, so the <script> tag might have no <dep> child tags.
<ext>
Indicates a dependency to an asset that was not linked in. These dependencies show up in the linker report when you
use the external-library-path, externs, or load-externs compiler options to add assets to the SWF file.
You can examine the list of prerequisites and dependencies for your application definition. You do this by
searching for your application’s root MXML file by its name; for example, MyApp.mxml. You might discover that
you are linking in some classes inadvertently. When writing code, it is common to make a reference to a class but
not actually require that class in your application. That reference causes the referenced class to be linked in, and
it also links in all the classes on which the referenced class depends.
If you look through the linker report, you might find that you are linking in a class that is not needed. If you do
find an unneeded class, try to identify the linker dependency that is causing the class to be linked in, and try to
find a way to rewrite the code to eliminate that dependency.
Avoiding initializing unused classes
Some common ways to avoid unnecessary references include avoiding initializing classes you do not use and
performing type-checking with the getQualifiedClassName() method.
The following example checks if the class is a Button control. This example forces the compiler to include a Button
in the SWF file, even if the child is not a Button control and the entire application has no Button controls.
ADOBE FLEX 3 67
Building and Deploying Adobe Flex 3 Applications
<?xml version="1.0"?>
<!-- optimize/UnusedClasses.mxml -->
<mx:Application xmlns:mx="http://www.adobe.com/2006/mxml"
creationComplete="checkChildType()">
<mx:Script><![CDATA[
import mx.controls.Button;
public function checkChildType():void {
var child:DisplayObject = getChildAt(0);
var childIsButton:Boolean = child is mx.controls.Button;
trace("child is mx.controls.Button: " + childIsButton); // False.
}
]]></mx:Script>
<!-- This control is here so that the getChildAt() method succeeds. -->
<mx:DataGrid/>
</mx:Application>
You can use the getQualifiedClassName() method to accomplish the same task as the previous example. This
method returns a String that you can compare to the name of a class without causing that class to be linked into
the SWF.
The following example does not create a linker dependency on the Button control:
<?xml version="1.0"?>
<!-- optimize/GetQualifiedClassNameExample.mxml -->
<mx:Application xmlns:mx="http://www.adobe.com/2006/mxml"
creationComplete="checkChildType()">
<mx:Script><![CDATA[
public function checkChildType():void {
var child:DisplayObject = getChildAt(0);
var childClassName:String = getQualifiedClassName(child);
var childIsButton:Boolean = childClassName == "mx.controls::Button"
trace("child class name = Button " + childIsButton);
}
]]></mx:Script>
<!-- This control is here so that the getChildAt() method succeeds. -->
<mx:DataGrid/>
</mx:Application>
Externalizing assets
There are various methods of externalizing assets used by your Flex applications; these include:
•
Using modules
68 CHAPTER 4
•
Using run-time stylesheets
•
•
Using Runtime Shared Libraries (RSLs)
Loading assets at run time rather than embedding them
This section describes loading assets at run time. For information about modules and run-time stylesheets, see
the Adobe Flex 3 Developer Guide. For information about RSLs, see “Using RSLs to reduce SWF file size” on
page 70.
One method of reducing the SWF file size is to externalize assets; that is, to load the assets at run time rather than
embed them at compile time. You can do this with assets such as images, SWF files, and sound files.
Embedded assets load immediately, because they are already part of the Flex SWF file. However, they add to the
size of your application and slow down the application initialization process. Embedded assets also require you to
recompile your applications whenever your asset changes.
The following example embeds the shapes.swf file into the Flex application at compile time:
<?xml version="1.0"?>
<!-- optimize/EmbedAtCompileTime.mxml -->
<mx:Application xmlns:mx="http://www.adobe.com/2006/mxml">
<mx:Image source="@Embed(source='../assets/butterfly.gif')"/>
</mx:Application>
The following example loads the shapes.swf file into the Flex application at run time:
<?xml version="1.0"?>
<!-- optimize/EmbedAtRunTime.mxml -->
<mx:Application xmlns:mx="http://www.adobe.com/2006/mxml">
<mx:Image source="../assets/butterfly.gif"/>
</mx:Application>
The only supported image type that you cannot load at run time is SVG. Flash Player and AIR require that the
compiler transcodes that file type at compile time. The player and AIR runtime cannot transcode that file type at
run time.
When you load SWF files from domains that are not the same as the loading SWF file, you must use a crossdomain.xml file or other mechanism to enable the proper permissions. For more information on using the crossdomain.xml file, see “Using cross-domain policy files” on page 40.
An alternative to reducing SWF file sizes by externalizing assets is to increase the SWF file size by embedding
assets. By embedding assets such as images, sounds, and SWF files, you can reduce the network bandwidth and
connections. The SWF file size increases, but the application requires fewer network connections to the server.
For information on loading assets, see “Embedding Assets” on page 965 in the Adobe Flex 3 Developer Guide.
ADOBE FLEX 3 69
Building and Deploying Adobe Flex 3 Applications
Using character ranges for embedded fonts
By specifying a range of symbols that compose the face of an embedded font, you reduce the size of an embedded
font. Each character in a font must be described; if you remove some of these characters, it reduces the overall size
of the description information that Flex must include for each embedded font.
You can set the range of glyphs in the flex-config.xml file or in the font-face declaration in each MXML file. You
specify individual characters or ranges of characters using the Unicode values for the characters, and you can set
multiple ranges for each font declaration.
In CSS, you can set the Unicode range with the unicodeRange property, as the following example shows:
@font-face {
src:url("../assets/MyriadWebPro.ttf");
fontFamily: myFontFamily;
unicodeRange:
U+0041-U+005A, /* Upper-Case [A..Z] */
U+0061-U+007A, /* Lower-Case a-z */
U+0030-U+0039, /* Numbers [0..9] */
U+002E-U+002E; /* Period [.] */
}
In the flex-config.xml file, you can set the Unicode range with the <language-range> block, as the following
example shows:
<language-range>
<lang>Latin I</lang>
<range>U+0020,U+00A1-U+00FF,U+2000-U+206F,U+20A0-U+20CF,U+2100-U+2183</range>
</language-range>
For more information, see “Using Fonts” on page 653 in the Adobe Flex 3 Developer Guide.
Using multiple SWF files
One way to reduce the size of an application’s file is to break the application up into logical parts that can be sent
to the client and loaded over a series of requests rather than all at once. By breaking a monolithic application into
smaller applications, users can interact with your application more quickly, but possibly experience some delays
while the application is running.
One approach is to use the SWFLoader control. This technique can work with SWF files that add graphics or
animations to an application, or SWF files that act as stand-alone applications inside the main application. If you
import SWF files that require a large amount of user interaction, however, consider building them as custom
components. SWF files produced with earlier versions of Flex or ActionScript may not work properly when
loaded with the SWFLoader control.
70 CHAPTER 4
Rather than loading SWF files into the main application with the SWFLoader control, consider having the SWF
files communicate with each other as separate applications. You can do this with local SharedObjects, LocalConnection objects, or with the ExternalInterface API.
Another approach to loading multiple small SWF files rather than one large one is to use the HTML wrapper to
provide a framework for loading the SWF files.
Comparing dynamic and static linking
Most large applications use libraries of ActionScript classes and components. You must decide whether to use
static or dynamic linking when using these libraries in your Flex applications.
When you use static linking, the compiler includes all components, classes, and their dependencies in the application SWF file when you compile the application. The result is a larger SWF file that takes longer to download
but loads and runs quickly because all the code is in the SWF file. To compile your application that uses libraries
and to statically link those definitions into your application, you use the library-path and include-libraries
options to specify the locations of SWC files.
Dynamic linking is when some classes used by an application are left in an external file that is loaded at run time.
The result is a smaller SWF file size for the main application, but the application relies on external files that are
loaded during run time.
To dynamically link classes and components, you compile a library. You then instruct the compiler to exclude that
library’s contents from the application SWF file. You must still provide link-checking at compile time even though
the classes are not going to be included in the final SWF file.
You use dynamic linking by creating component libraries and compiling them with your application by using the
external-library-path, externs, or load-externs compiler options. These options instruct the compiler to
exclude resources defined by their arguments from inclusion in the application, but to check links against them
and prepare to load them at run time. The external-library-path option specifies SWC files or directories for
dynamic linking. The externs option specifies individual classes or symbols for dynamic linking. The loadexterns option specifies an XML file that describes which classes to use for dynamic linking. This XML file has
the same syntax as the file produced by the link-report compiler option.
For more information about linking, see “About linking” on page 196. For more information about compiler
options, see “Using the Flex Compilers” on page 125.
Using RSLs to reduce SWF file size
One way to reduce the size of your application’s SWF file is by externalizing shared assets into stand-alone files
that can be separately downloaded and cached on the client. These shared assets are loaded by any number of
applications at run time, but must be transferred only once to the client. These shared files are known as Runtime
Shared Libraries (RSLs).
ADOBE FLEX 3 71
Building and Deploying Adobe Flex 3 Applications
If you have multiple applications but those applications share a core set of components or classes, your users will
be required to download those assets only once as an RSL. The applications that share the assets in the RSL use
the same cached RSL as the source for the libraries as long as they are in the same domain. The resulting file size
for your applications can be reduced. The benefits increase as the number of applications that use the RSL
increases.
When you create an RSL, be sure to optimize it prior to deployment. This removes debugging information as well
as unnecessary metadata from the RSL, which can dramatically reduce its size.
For more information, see “Using Runtime Shared Libraries” on page 195.
Application coding
The MXML language provides a rich set of controls and classes that you can use to create interactive applications.
This richness sometimes can reduce performance. However, there are some techniques that a Flex developer can
use to improve the run-time performance of the Flex application.
To measure the effects of the following techniques, you should use the Flex profiler. For more information, see
“Profiling Flex applications” on page 155 in Using Adobe Flex Builder 3.
Object creation and destruction
Object creation is the task of instantiating all the objects in your application. These objects include controls,
components, and objects that contain data and other dynamic information. Optimizing the process of object
creation and destruction can result in significant performance gains. Object destruction is the act of reallocating
memory for objects after all references to those objects have been removed. This task is carried out by the garbage
collector at regular intervals. You can improve the frequency that Flash Player and AIR destroy objects by
removing references to objects.
No single task during application initialization takes up the most time. The best way to improve performance is
to create fewer objects. You can do this by deferring the instantiation of objects, or changing the order in which
they are created to improve perceived performance.
Using ordered creation
You can improve perceived startup time of your Flex application by ordering the creation of containers in the initial
view. The default behavior of Flex is to create all containers and their children in the initial view, and then display
everything at once. The user cannot interact with the application or see meaningful data until all the containers
and their children are created.
In some cases, you can improve the user’s initial experience by displaying the components in one container before
creating the components in the next container. This process is called ordered creation.
72 CHAPTER 4
To use ordered creation, you set the creationPolicy property of a container to queued, as the following example
shows:
<?xml version="1.0"?>
<!-- optimize/QueuedPanels.mxml -->
<mx:Application xmlns:mx="http://www.adobe.com/2006/mxml">
<mx:Panel id="panel1" creationPolicy="queued" width="100%" height="33%">
<mx:Button id="button1a"/>
<mx:Button id="button1b"/>
</mx:Panel>
<mx:Panel id="panel2" creationPolicy="queued" width="100%" height="33%">
<mx:Button id="button2a"/>
<mx:Button id="button2b"/>
</mx:Panel>
<mx:Panel id="panel3" creationPolicy="queued" width="100%" height="33%">
<mx:Button id="button3a"/>
<mx:Button id="button3b"/>
</mx:Panel>
</mx:Application>
This adds the container’s children to a queue. Flash Player instantiates and displays all of the children within the
first container in the queue before instantiating the children in the next container in the queue.
For more information on ordered creation, see “Using ordered creation” on page 101.
Using deferred creation
To improve the start-up time of your application, minimize the number of objects that are created when the application is first loaded. If a user-interface component is not initially visible at start up, create that component only
when you need it. This is called deferred creation. Containers that have multiple views, such as an Accordion,
provide built-in support for this behavior. You can use ActionScript to customize the creation order of multipleview containers or defer the creation of other containers and controls.
To use deferred creation, you set the value of a component’s creationPolicy property to all, auto, or none. If
you set it to none, Flex does not instantiate a control’s children immediately, but waits until you instruct Flex to
do so. In the following example, the children of the VBox container are not be instantiated when the application
is first loaded, but only after the user clicks the button:
<?xml version="1.0"?>
<!-- optimize/CreationPolicyNone.mxml -->
<mx:Application xmlns:mx="http://www.adobe.com/2006/mxml">
<mx:Script><![CDATA[
private function createButtons(e:Event):void {
myVBox.createComponentsFromDescriptors();
ADOBE FLEX 3 73
Building and Deploying Adobe Flex 3 Applications
}
]]></mx:Script>
<mx:Panel title="VBox with Repeater">
<mx:VBox id="myVBox" height="100" width="125" creationPolicy="none">
<mx:Button id="b1" label="Hurley"/>
<mx:Button id="b2" label="Jack"/>
<mx:Button id="b3" label="Sawyer"/>
</mx:VBox>
</mx:Panel>
<mx:Button id="myButton" click="createButtons(event)" label="Create Buttons"/>
</mx:Application>
You call methods such as createComponentFromDescriptor() and createComponentsFromDescriptor()
on the container to instantiate its children at run time. For more information on using deferred instantiation, see
“Using deferred creation” on page 94.
Destroying unused objects
Flash Player provides built-in garbage collection that frees up memory by destroying objects that are no longer
used. To ensure that the garbage collector destroys your unused objects, remove all references to that object,
including the parent’s reference to the child.
For more information about garbage collection, see “About garbage collection” on page 178 in Using Adobe Flex
Builder 3.
On containers, you can call the removeChild() or removeChildAt() method to remove references to child
controls that are no longer needed. The following example removes references to button instances from the
myVBox control:
<?xml version="1.0"?>
<!-- optimize/DestroyObjects.mxml -->
<mx:Application xmlns:mx="http://www.adobe.com/2006/mxml">
<mx:Script><![CDATA[
private function destroyButtons(e:Event):void {
myVBox.removeChild(b1);
myVBox.removeChild(b2);
myVBox.removeChild(b3);
}
]]></mx:Script>
<mx:Panel title="VBox with Repeater">
<mx:VBox id="myVBox" height="100" width="125">
<mx:Button id="b1" label="Hurley"/>
74 CHAPTER 4
<mx:Button id="b2" label="Jack"/>
<mx:Button id="b3" label="Sawyer"/>
</mx:VBox>
</mx:Panel>
<mx:Button id="myButton2" click="destroyButtons(event)" label="Destroy Buttons"/>
</mx:Application>
You can clear references to unused variables by setting them to null in your ActionScript; for example:
myDataProvider = null
To ensure that destroyed objects are garbage collected, you must also remove event listeners on them by using the
removeEventListener() method, as the following example shows:
<?xml version="1.0"?>
<!-- optimize/RemoveListeners.mxml -->
<mx:Application xmlns:mx="http://www.adobe.com/2006/mxml"
creationComplete="initApp(event)">
<mx:Script><![CDATA[
private function initApp(e:Event):void {
b1.addEventListener("click",myClickHandler);
b2.addEventListener("click",myClickHandler);
b3.addEventListener("click",myClickHandler);
}
private function destroyButtons(e:Event):void {
b1.removeEventListener("click",myClickHandler);
b2.removeEventListener("click",myClickHandler);
b3.removeEventListener("click",myClickHandler);
myVBox.removeChild(b1);
myVBox.removeChild(b2);
myVBox.removeChild(b3);
}
private function myClickHandler(e:Event):void {
// Do something here.
}
]]></mx:Script>
<mx:Panel title="VBox with Repeater">
<mx:VBox id="myVBox" height="100" width="125">
<mx:Button id="b1" label="Hurley"/>
<mx:Button id="b2" label="Jack"/>
<mx:Button id="b3" label="Sawyer"/>
</mx:VBox>
ADOBE FLEX 3 75
Building and Deploying Adobe Flex 3 Applications
</mx:Panel>
<mx:Button id="myButton" click="destroyButtons(event)" label="Destroy Buttons"/>
</mx:Application>
You cannot call the removeEventListener() method on an event handler that you added inline. In the following
example, you cannot call removeEventListener() on b1’s click event handler, but you can call it on b2’s and
b3’s event handlers:
<?xml version="1.0"?>
<!-- optimize/RemoveSomeListeners.mxml -->
<mx:Application xmlns:mx="http://www.adobe.com/2006/mxml"
creationComplete="initApp(event)">
<mx:Script><![CDATA[
private function initApp(e:Event):void {
b2.addEventListener("click",myClickHandler);
b3.addEventListener("click",myClickHandler);
}
private function destroyButtons(e:Event):void {
b2.removeEventListener("click",myClickHandler);
b3.removeEventListener("click",myClickHandler);
myVBox.removeChild(b1);
myVBox.removeChild(b2);
myVBox.removeChild(b3);
}
private function myClickHandler(e:Event):void {
// Do something here.
}
]]></mx:Script>
<mx:Panel title="VBox with Repeater">
<mx:VBox id="myVBox" height="100" width="125">
<mx:Button id="b1" label="Hurley" click="myClickHandler(event)"/>
<mx:Button id="b2" label="Jack"/>
<mx:Button id="b3" label="Sawyer"/>
</mx:VBox>
</mx:Panel>
<mx:Button id="myButton" click="destroyButtons(event)" label="Destroy Buttons"/>
</mx:Application>
76 CHAPTER 4
The weakRef parameter to the addEventListener() method provides you with some control over memory
resources for listeners. A strong reference (when weakRef is false) prevents the listener from being garbage
collected. A weak reference (when weakRef is true) does not. The default is false.
For more information about the removeEventListener() method, see “Using Events” on page 61 in the Adobe
Flex 3 Developer Guide.
Using styles
You use styles to define the look and feel of your Flex applications. You can use them to change the appearance of
a single component, or apply them globally. Be aware that some methods of applying styles are more expensive
than others. You can increase your application’s performance by changing the way you apply styles.
For more information about using styles, see “Using Styles and Themes” on page 589 in the Adobe Flex 3
Developer Guide.
Loading stylesheets at run time
You can load stylesheets at run time by using the StyleManager. These style sheets take the form of SWF files that
are dynamically loaded while your Flex application runs.
By loading style sheets at run time, you can load images (for graphical skins), fonts, type and class selectors, and
programmatic skins into your Flex application without embedding them at compile time. This lets skins and fonts
be partitioned into separate SWF files, away from the main application. As a result, the application’s SWF file size
is smaller, which reduces the initial download time. However, the first time a run-time style sheet is used, it takes
longer for the styles and skins to be applied because Flex must download the necessary CSS-based SWF file.
For more information, see the Adobe Flex 3 Developer Guide.
Reducing calls to the setStyle() method
Run-time cascading styles are very powerful, but use them sparingly and in the correct context. Calling the
setStyle() method can be an expensive operation because the call requires notifying all the children of the
newly-styled object. The resulting tree of children that must be notified can be quite large.
A common mistake that impacts performance is overusing or unnecessarily using the setStyle() method. In
general, you only use the setStyle() method when you change styles on existing objects. Do not use it when you
set up styles for an object for the first time. Instead, set styles in an <mx:Style> block, as style properties on the
MXML tag, through an external CSS style sheet, or as global styles.
ADOBE FLEX 3 77
Building and Deploying Adobe Flex 3 Applications
Some applications must call the setStyle() method during the application or object instantiation. If this is the
case, call the setStyle() method early in the instantiation phase. Early in the instantiation phase means setting
styles from the component or application’s preinitialize event, instead of the initialize or
creationComplete event. By setting the styles as early as possible during initialization, you avoid unnecessary
style notification and lookup.
If you programmatically create a component and want to set styles on that component, call the setStyle()
method before you attach it to the display list with a call to the addChild() method, as the following example
shows:
<?xml version="1.0"?>
<!-- optimize/CreateStyledButton.mxml -->
<mx:Application xmlns:mx="http://www.adobe.com/2006/mxml"
creationComplete="initApp(event)">
<mx:Script><![CDATA[
import mx.controls.Button;
public function initApp(e:Event):void {
var b:Button = new Button();
b.label="Click Me";
b.setStyle("color", 0x00CCFF);
panel1.addChild(b);
}
]]></mx:Script>
<mx:Panel id="panel1"/>
</mx:Application>
Setting global styles
Changing global styles (changing a CSS ruleset that is associated with a class or type selector) at run time is an
expensive operation. Any time you change a global style, Flash Player must perform the following actions:
•
•
Traverse the entire application looking for instances of that control.
•
Redraw that control.
Check all the control’s children if the style is inheriting.
The following example globally changes the Button control’s color style property:
<?xml version="1.0"?>
<!-- optimize/ApplyGlobalStyles.mxml -->
<mx:Application xmlns:mx="http://www.adobe.com/2006/mxml"
creationComplete="initApp(event)">
<mx:Script><![CDATA[
public function initApp(e:Event):void {
78 CHAPTER 4
StyleManager.getStyleDeclaration("Button").setStyle("color", 0x00CCFF);
}
]]></mx:Script>
<mx:Panel id="panel1">
<mx:Button id="b1" label="Click Me"/>
<mx:Button id="b2" label="Click Me"/>
<mx:Button id="b3" label="Click Me"/>
</mx:Panel>
</mx:Application>
If possible, set global styles at authoring time by using CSS. If you must set them at run time, try to set styles by
using the techniques described in “Reducing calls to the setStyle() method” on page 76.
Calling the setStyleDeclaration() and loadStyleDeclarations() methods
The setStyleDeclaration() method is computationally expensive. You can prevent Flash Player from applying
or clearing the new styles immediately by setting the update parameter to false.
The following example sets new class selectors on different targets, but does not trigger the update until the last
style declaration is applied:
<?xml version="1.0"?>
<!-- styles/SetStyleDeclarationExample.mxml -->
<mx:Application xmlns:mx="http://www.adobe.com/2006/mxml" creationComplete="initApp()">
<mx:Script><![CDATA[
import mx.styles.StyleManager;
private var myButtonStyle:CSSStyleDeclaration = new
CSSStyleDeclaration('myButtonStyle');
private var myLabelStyle:CSSStyleDeclaration = new
CSSStyleDeclaration('myLabelStyle');
private var myTextAreaStyle:CSSStyleDeclaration = new
CSSStyleDeclaration('myTextAreaStyle');
private function initApp():void {
myButtonStyle.setStyle('color', 'blue');
myLabelStyle.setStyle('color', 'blue');
myTextAreaStyle.setStyle('color', 'blue');
}
private function applyStyles():void {
StyleManager.setStyleDeclaration("Button", myButtonStyle, false);
StyleManager.setStyleDeclaration("Label", myLabelStyle, false);
StyleManager.setStyleDeclaration("TextArea", myTextAreaStyle, true);
}
ADOBE FLEX 3 79
Building and Deploying Adobe Flex 3 Applications
]]></mx:Script>
<mx:Button id="myButton" label="Click Me" click="applyStyles()"/>
<mx:Label id="myLabel" text="This is a label"/>
<mx:TextArea id="myTextArea" text="This is a TextArea"/>
</mx:Application>
When you pass false for the update parameter, Flash Player stores the selector but does not apply the style.
When you pass true for the update parameter, Flash Player recomputes the styles for every visual component in
the application.
The loadStyleDeclarations() method is similarly computationally expensive. When you load a new style
sheet, this method triggers an update to the display list by default. You can prevent Flash Player from applying or
clearing the new style sheets immediately by setting the update parameter to false. When you chain calls to
loadStyleDeclarations() methods, set the update parameter to false for all calls except the last one.
Working with containers
Containers provide a hierarchical structure that lets you control the layout characteristics of container children.
You can use containers to control child sizing and positioning, or to control navigation among multiple child
containers.
When you develop your Flex application, try to minimize the number of containers that you use. This is because
most containers provide relative sizing and positioning, which can be resource-intensive operations, especially
when an application first starts.
One common mistake is to create a container that contains a single child. Sometimes having a single child in a
container is necessary, such as when you use the container’s padding to position the child. But try to identify and
remove containers such as these that provide no real functionality. Also keep in mind that the root of an MXML
component does not need to be a container.
Another sign of possibly too many containers is when you have a container nested inside another container, where
both the parent and child containers have the same type (for example, HBoxes).
Minimizing container nesting
It is good practice to avoid deeply nested layouts when possible. For simple applications, if you have nested
containers more than three levels deep, you can probably produce the same layout with fewer levels of containers.
Deep nesting can lead to performance problems. For larger applications, deeper nesting might be unavoidable.
80 CHAPTER 4
When you nest containers, each container instance runs measuring and sizing algorithms on its children (some
of which are containers themselves, so this measuring procedure can be recursive). When the layout algorithms
have processed, and the relative layout values have been calculated, Flash Player draws the complex collection of
objects comprising the view. By eliminating unnecessary work at object creation time, you can improve the performance of your application.
Using Grid containers
A Grid container is useful for aligning multiple objects. When you use Grid containers, however, you introduce
additional levels of containers with the GridItem and GridRow controls. In many cases, you can achieve the same
results by using the VBox and HBox containers, and these containers use fewer levels of nesting.
Using layout containers
You can sometimes improve application start-up time by using Canvas containers, which perform absolute
positioning, instead of relative layout containers, such as the Form, HBox, VBox, Grid, and Tile containers.
Canvas containers are the only containers that let you specify the location of their child controls by default. All
other containers are relative containers by default, which means that they lay everything out relative to other
components in the container. You can make Application and Panel containers do absolute positioning.
Canvas containers eliminate the layout logic that other containers use to perform automatic positioning of their
children at startup, and replace it with explicit pixel-based positioning. When you use a Canvas container, you
must remember to set the x and y positions of all of its children. If you do not set the x and y positions, the Canvas
container’s children lay out on top of each other at the default x, y coordinates (0,0).
The canvas container is not always more efficient than other containers, however, because it must measure itself
to make sure that it is large enough to contain its children. Applications that use canvases typically contain a much
flatter containment hierarchy. As a result, using canvas containers can lead to less nesting and fewer overall
containers, which improves performance.
Canvas containers support constraints, which means that if the container changes size, the children inside the
container move with it.
Using absolute sizing
Writing object widths and heights into the code can save time because the Flex layout containers do not have to
calculate the size of the object at run time. By specifying container or control widths or heights, you lighten the
relative layout container’s processing load and subsequently decrease the creation time for the container or
control. This technique works with any container or control.
ADOBE FLEX 3 81
Building and Deploying Adobe Flex 3 Applications
Improving effect performance
Effects let you add animation and motion to your application in response to user or programmatic action. For
example, you can use effects to cause a dialog box to bounce slightly when it receives focus, or to slowly fade in
when it becomes visible.
Effects can be one of the most processor-intensive tasks performed by a Flex application. Use the techniques
described in this section to improve the performance of effects. For more information, see “Using Behaviors” on
page 545 in the Adobe Flex 3 Developer Guide.
Increasing effect duration
Increase the duration of your effect with the duration property. Doing this spreads the distinct, choppy stages
over a longer period of time, which lets the human eye fill in the difference for a smoother effect.
Hiding parts of the target view
Make parts of the target view invisible when the effect starts, play the effect, and then make those parts visible
when the effect has completed. To do this, you add logic in the effectStart and effectEnd event handlers that
controls what is visible before and after the effect.
When you apply a Resize effect to a Panel container, for example, the measurement and layout algorithm for the
effect executes repeatedly over the duration of the effect. When a Panel container has many children, the
animation can be jerky because Flex cannot update the screen quickly enough. Also, resizing one Panel container
often causes other Panel containers in the same view to resize.
To solve this problem, you can use the Resize effect’s hideChildrenTargets property to hide the children of
Panel containers while the Resize effect is playing. The value of the hideChildrenTargets property is an Array
of Panel containers that should include the Panel containers that resize during the animation. When the
hideChildrenTargets property is true, and before the Resize effect plays, Flex iterates through the Array and
hides the children of each of the specified Panel containers.
Avoiding bitmap-based backgrounds
Designers often give their views background images that are solid colors with gradients, slight patterns, and so
forth. To ease what Flash Player redraws during an effect, try using a solid background color for your background
image. Or, if you want a slight gradient instead of a solid color, use a background image that is a SWF or SVG file.
These are easier for Flash Player to redraw than standard JPG or PNG files.
82 CHAPTER 4
Suspending background processing
To improve the performance of effects, you can disable background processing in your application for the
duration of the effect by setting the suspendBackgroundProcessing property of the Effect to true. The
background processing that is blocked includes component measurement and layout, and responses to data
services for the duration of the effect.
Using the cachePolicy property
An effect can use bitmap caching in Flash Player to speed up animations. An effect typically uses bitmap caching
when the target component’s drawing does not change while the effect is playing.
The cachePolicy property of UIComponents controls the caching operation of a component during an effect.
The cachePolicy property can have the following values:
CachePolicy.ON Specifies that the effect target is always cached.
CachePolicy.OFF Specifies that the effect target is never cached.
CachePolicy.AUTO Specifies that Flex determines whether the effect target should be cached. This is the default
value.
The cachePolicy property is useful when an object is included in a redraw region but the object does not change.
For more information about redraw regions, see “Understanding redraw regions” on page 83.
The cachePolicy property provides a wrapper for the cacheAsBitmap property. For more information, see
“Using the cacheAsBitmap property” on page 83.
Improving rendering speed
The actual rendering of objects on the screen can take a significant amount of time. Improving the rendering times
can dramatically improve your application’s performance. Use the techniques in this section to help improve
rendering speed. In addition, use the techniques described in the previous section, “Improving effect performance” on page 81, to improve effect rendering speed.
Setting movie quality
You can use the quality property of the wrapper’s <object> and <embed> tags to change the rendering of your
Flex application in Flash Player. Valid values for the quality property are low, medium, high, autolow,
autohigh, and best. The default value is best.
ADOBE FLEX 3 83
Building and Deploying Adobe Flex 3 Applications
The low setting favors playback speed over appearance and never uses anti-aliasing. The autolow setting emphasizes speed at first but improves appearance whenever possible. The autohigh setting emphasizes playback speed
and appearance equally at first, but sacrifices appearance for playback speed if necessary. The medium setting
applies some anti-aliasing and does not smooth bitmaps. The high setting favors appearance over playback speed
and always applies anti-aliasing. The best setting provides the best display quality and does not consider playback
speed. All output is anti-aliased and all bitmaps are smoothed.
For information on these settings, see “About the object and embed tags” on page 321.
Understanding redraw regions
A redraw region is the region around an object that must be redrawn when that object changes. Everything in a
redraw region is redrawn during the next rendering phase after an object changes. The area that Flash Player
redraws includes the object, and any objects that overlap with the redraw region, such as the background or the
object’s container.
You can see redraw regions at run time in the debugger version of Flash Player by selecting View > Show Redraw
Regions in the player’s menu. When you select this option, the debugger version of Flash Player draws red
rectangles around each redraw region while the application runs.
By looking at the redraw regions, you can get a sense of what is changing and how much rendering is occurring
while your application runs. Flash Player sometimes combines the redraw regions of several objects into a single
region that it redraws. As a result, if your objects are spaced close enough together, they might be redrawn as part
of one region, which is better than if they are redrawn separately. If the number of regions is too large, Flash Player
might redraw the entire screen.
Using the cacheAsBitmap property
To improve rendering speeds, make careful use of the cacheAsBitmap property. You can set this property on any
UIComponent.
When you set the cacheAsBitmap property to true, Flash Player stores a copy of the initial bitmap image of an
object in memory. If you later need that object, and the object’s properties have not changed, Flash Player uses the
cached version to redraw the object. This can be faster than using the vectors that make up the object.
Setting the cacheAsBitmap property to true can be especially useful if you use animations or other effects that
move objects on the screen. Instead of redrawing the object in each frame during the animation, Flash Player can
use the cached bitmap.
The downside is that changing the properties of objects that are cached as bitmaps is more computationally
expensive. Each time you change a property that affects the cached object’s appearance, Flash Player must remove
the old bitmap and store a new bitmap in the cache. As a result, only set the cacheAsBitmap property to true for
objects that do not change much.
84 CHAPTER 4
Enable bitmap caching only when you need it, such as during the duration of an animation, and only on a few
objects at a time because it can be a memory-intensive operation. The best approach might be to change this
property at various times during the object’s life cycle, rather than setting it once.
Using filters
To improve rendering speeds, do not overuse filters such as DropShadowFilter. The expense of the filter is proportional to the number of pixels in the object that you are applying the filter to. As a result, it is best to use filters on
smaller objects.
Using device text
Mixing device text and vector graphics can slow rendering speeds. For example, a DataGrid control that contains
both text and graphics inside a cell will be much slower to redraw than a DataGrid that contains just text.
Using clip masks
Using the scrollRect and mask properties of an object are expensive operations. Try to minimize the number of
times you use these properties.
Using large data sets
You can minimize overhead when working with large data sets.
Paging
When you use a DataService class to get your remote data, you might have a collection that does not initially load
all of its data on the client. You can prevent large amounts of data from traveling over the network and slowing
down your application while that data is processed using paging. The data that you get incrementally is referred
to as paged data, and the data that has not yet been received is pending data.
Paging data using the DataService class provides the following benefits:
•
•
Maximum message size on the destination can be configured.
•
•
Client reassembles separate messages.
•
User interface elements can display portions of the collection without waiting for the entire collection to load.
If size exceeds the maximum value, multiple message batches are used.
Asynchronous data paging across the network.
For more information, see “Using Data Providers and Collections” on page 137 in the Adobe Flex 3 Developer
Guide.
ADOBE FLEX 3 85
Building and Deploying Adobe Flex 3 Applications
Disabling live scrolling
Using a DataGrid control with large data sets might make it slow to scroll when using the scrollbar. When the
DataGrid displays newly visible data, it calls the getItemAt() method on the data provider.
The default behavior of a DataGrid is to continuously update data when the user is scrolling through it. As a result,
performance can degrade if you just simply scroll through the data on a DataGrid because the DataGrid is continuously calling the getItemAt() method. This can be a computationally expensive method to call.
You can disable this live scrolling so that the view is only updated when the scrolling stops by setting the
liveScrolling property to false.
The default value of the liveScrolling property is true. All subclasses of ScrollControlBase, including TextArea,
HorizontalList, TileList, and DataGrid, have this property.
Dynamically repeating components
There are relative benefits of using List-based controls (rather than the Repeater control) to dynamically repeat
components. If you must use the Repeater, however, there are techniques for improving the performance of that
control.
Comparing List-based controls to the Repeater control
To dynamically repeat components, you can choose between the Repeater or List-based controls, such as HorizontalList, TileList, or List. To achieve better performance, you can often replace layouts you created with a Repeater
with the combination of a HorizontalList or TileList and an item renderer.
The Repeater object is useful for repeating a small set of simple user interface components, such as RadioButton
controls and other controls typically used in Form containers. You can use the HorizontalList, TileList, or List
control when you display more than a few repeated objects.
The HorizontalList control displays data horizontally, similar to the HBox container. The HorizontalList control
always displays items from left to right. The TileList control displays data in a tile layout, similar to the Tile
container. The TileList control provides a direction property that determines if the next item is down or to the
right. The List control displays data in a single vertical column.
Unlike the Repeater object, which instantiates all objects that are repeated, the HorizontalList, TileList, and List
controls only instantiate what is visible in the list. The Repeater control takes a data provider (typically an Array)
that creates a new copy of its children for each entry in the Array. If you put the Repeater control’s children inside
a container that does not use deferred instantiation, your Repeater control might create many objects that are not
initially visible.
For example, a VBox container creates all objects within itself when it is first created. In the following example,
the Repeater control creates all the objects whether or not they are initially visible:
<?xml version="1.0"?>
86 CHAPTER 4
<!-- optimize/VBoxRepeater.mxml -->
<mx:Application xmlns:mx="http://www.adobe.com/2006/mxml">
<mx:Script><![CDATA[
import mx.collections.ArrayCollection;
[Bindable]
public var imgList:ArrayCollection = new ArrayCollection([
{img:"../assets/butterfly.gif"},
{img:"../assets/butterfly-gray.gif"},
{img:"../assets/butterfly-silly.gif"}
]);
]]></mx:Script>
<mx:Panel title="VBox with Repeater">
<mx:VBox height="150" width="250">
<mx:Repeater id="r" dataProvider="{imgList}">
<mx:Image source="../assets/{r.currentItem.img}"/>
</mx:Repeater>
</mx:VBox>
</mx:Panel>
</mx:Application>
If you use a List-based control, however, Flex only creates those controls in the list that are initially visible. The
following example uses the List control to create only the image needed for rendering:
<?xml version="1.0"?>
<!-- optimize/ListItems.mxml -->
<mx:Application xmlns:mx="http://www.adobe.com/2006/mxml">
<mx:Script><![CDATA[
import mx.collections.ArrayCollection;
private static var birdList:Array =
["../assets/butterfly.gif","../assets/butterfly-gray.gif","../assets/butterflysilly.gif"];
[Bindable]
private var birdListAC:ArrayCollection = new ArrayCollection(birdList);
private function initCatalog():void {
birdlist.dataProvider = birdListAC;
}
]]></mx:Script>
<mx:Panel title="List">
ADOBE FLEX 3 87
Building and Deploying Adobe Flex 3 Applications
<mx:List id="birdlist" rowHeight="150" width="250" rowCount="1"
itemRenderer="mx.controls.Image" creationComplete="initCatalog()">
</mx:List>
</mx:Panel>
</mx:Application>
Using the Repeater control
When using a Repeater control, keep the following techniques in mind:
•
Avoid repeating objects that have clip masks because using clip masks is a resource- intensive process.
• Ensure that the containers used as the children of the Repeater control do not have unnecessary container
nesting and are as small as possible. If a single instance of the repeated view takes a noticeable amount of time to
instantiate, repeating makes it worse. For example, multiple Grid containers in a Repeater object do not perform
well because Grid containers themselves are resource-intensive containers to instantiate.
• Set the recycleChildren property to true. The recycleChildren property is a Boolean value that, when
set to true, binds new data items into existing Repeater children, incrementally creates children if there are more
data items, and destroys extra children that are no longer required.
The default value of the recycleChildren property is false to ensure that you do not leave stale state information in a repeated instance. For example, suppose you use a Repeater object to display photo images and
each Image control has an associated NumericStepper control for how many prints you want to order. Some
of the state information, such as the image, comes from the dataProvider property. Other state information,
such as the print count, is set by user interaction. If you set the recycleChildren property to true and page
through the photos by incrementing the Repeater object's startingIndex value, the Image controls bind to
the new images, but the NumericStepper control maintains the old information. Use
recycleChildren="false" only if it is too cumbersome to reset the state information manually, or if you
are confident that modifying your dataProvider property should not trigger a recreation of the Repeater
object’s children.
Keep in mind that the recycleChildren property has no effect on a Repeater object’s speed when the
Repeater object loads the first time. The recycleChildren property improves performance only for subsequent changes to the Repeater control’s data provider. If you know that your Repeater object creates children
only once, you do not have to use the recycleChildren property or worry about the stale state situation.
88 CHAPTER 4
Improving charting component performance
You can use various techniques to improve the performance of charting controls.
Avoiding filtering series data
When possible, set the filterData property to false. In the transformation from data to screen coordinates, the
various series types filter the incoming data to remove any missing values that are outside the range of the chart;
missing values would render incorrectly if drawn to the screen. For example, a chart that represents vacation time
for each week in 2003 might not have a value for the July fourth weekend because the company was closed. If you
know your data model will not have any missing values at run time, or values that fall outside the chart’s data
range, you can instruct a series to explicitly skip the filtering step by setting its filterData property to false.
Coding the LinearAxis object
If possible, do not let a LinearAxis object autocalculate its range. A LinearAxis control calculating its numeric
range can be a resource-intensive calculation. If you know reasonable minimum and maximum values for the
range of your LinearAxis, specify them to help your charts render more quickly.
In addition to specifying the range for a LinearAxis, specify an interval (the numeric distance between label values
along the axis) value. Otherwise, the chart control must calculate this value.
Coding the CategoryAxis object
Modifying a CategoryAxis object’s data provider is more resource intensive than modifying a Series object’s data
provider. If the data bound to your chart is going to change, but the categories in your chart will stay static, have
the CategoryAxis’ data provider and Series’ data provider refer to different objects. This prevents the CategoryAxis from reevaluating its data provider, which is a resource-intensive computation.
Styling AxisRenderer objects
Improve the rendering time of your AxisRenderers objects by setting particular styles. The AxisRenderers
perform many calculations to ensure that they render correctly in all situations. The more help you can give them
in restricting their options, the faster they render. Setting the labelRotation and canStagger styles on the
AxisRenderer improve performance. You can set these styles within the tag or in CSS.
ADOBE FLEX 3 89
Building and Deploying Adobe Flex 3 Applications
Specifying gutter styles
Specify gutter styles when possible. The gutter area of a Cartesian chart is the area between the margins and the
actual axis lines. With default values, the chart adjusts the gutter values to accommodate axis decorations. Calculating these gutter values can be resource intensive. By explicitly setting the values of the gutterLeft,
gutterRight, gutterTop, and gutterBottom style properties, your charts draw quicker and more efficiently.
Using drop shadows
To improve performance, do not use drop-shadows on your series items unless they are necessary. You can selectively add shadows to individual chart series by using renderers such as the ShadowBoxItemRenderer and
ShadowLineRenderer classes.
Shadows are implemented as filters in charting controls. As a result, you must remove these shadows by setting
the chart control’s seriesFilters property to an empty Array. The following example removes the shadows
from all series, but then changes the renderer for the third series to be a shadow renderer:
<?xml version="1.0"?>
<!-- optimize/RemoveShadowsColumnChart.mxml -->
<mx:Application xmlns:mx="http://www.adobe.com/2006/mxml">
<mx:Script><![CDATA[
import mx.collections.ArrayCollection;
[Bindable]
public var expenses:ArrayCollection = new ArrayCollection([
{Month: "Jan", Income: 2000, Expenses: 1500, Profit: 500},
{Month: "Feb", Income: 1000, Expenses: 200, Profit: 800},
{Month: "Mar", Income: 1500, Expenses: 500, Profit: 1000}
]);
]]></mx:Script>
<mx:Panel title="Column Chart">
<mx:ColumnChart id="myChart" dataProvider="{expenses}">
<mx:seriesFilters>
<mx:Array/>
</mx:seriesFilters>
<mx:horizontalAxis>
<mx:CategoryAxis dataProvider="{expenses}" categoryField="Month"/>
</mx:horizontalAxis>
<mx:series>
<mx:ColumnSeries xField="Month" yField="Income" displayName="Income"/>
<mx:ColumnSeries xField="Month" yField="Expenses" displayName="Expenses"/>
<mx:ColumnSeries xField="Month" yField="Profit" displayName="Profit"
itemRenderer="mx.charts.renderers.ShadowBoxItemRenderer"/>
</mx:series>
</mx:ColumnChart>
<mx:Legend dataProvider="{myChart}"/>
90 CHAPTER 4
</mx:Panel>
</mx:Application>
91
Chapter 5: Improving Startup
Performance
Adobe® Flex® helps you improve the actual and perceived startup times of your Flex applications. You can do this
by deferring the creation of certain controls until a later time, or customize the order in which containers are
created and displayed in your applications.
Topics
About startup performance . . . . . . . . . . . . . . . . . . . . . . . . . . . . . . . . . . . . . . . . . . . . . . . . . . . . . . . . . . . . . . . . . . . . . . . . 91
About startup order . . . . . . . . . . . . . . . . . . . . . . . . . . . . . . . . . . . . . . . . . . . . . . . . . . . . . . . . . . . . . . . . . . . . . . . . . . . . . . 92
Using deferred creation . . . . . . . . . . . . . . . . . . . . . . . . . . . . . . . . . . . . . . . . . . . . . . . . . . . . . . . . . . . . . . . . . . . . . . . . . . . 94
Creating deferred components . . . . . . . . . . . . . . . . . . . . . . . . . . . . . . . . . . . . . . . . . . . . . . . . . . . . . . . . . . . . . . . . . . . . . 98
Using ordered creation. . . . . . . . . . . . . . . . . . . . . . . . . . . . . . . . . . . . . . . . . . . . . . . . . . . . . . . . . . . . . . . . . . . . . . . . . . . 101
Using the callLater() method . . . . . . . . . . . . . . . . . . . . . . . . . . . . . . . . . . . . . . . . . . . . . . . . . . . . . . . . . . . . . . . . . . . . . 107
About startup performance
You could increase the startup time and decrease performance of your applications if you create too many objects
or put too many objects into a single view. To improve startup time, minimize the number of objects that are
created when the application is first loaded. If a user-interface component is not initially visible at startup, avoid
creating that component until you need it. This is called deferred creation. Containers that have multiple views,
such as an Accordion container, provide built-in support for this behavior. You can use ActionScript to customize
the creation order of multiple-view containers or defer the creation of other containers and controls.
After you improve the actual startup time of your application as much as possible, you can improve perceived
startup time by ordering the creation of containers in the initial view. The default behavior of Flex is to create all
containers and their children in the initial view, and then display everything at one time. The user will not be able
to interact with the application or see meaningful data until all the containers and their children are created. In
some cases, you can improve the user’s initial experience by displaying the components in one container before
creating the components in the next container. This process is called ordered creation.
92 CHAPTER 5
The remaining sections of this topic describe how to use deferred creation to reduce overall application startup
time and ordered creation to make the initial startup time appear as short as possible to the user. But before you
can fully understand ordered creation and deferred creation, you must also understand the differences between
single-view and multiple-view containers, the order of events in a component’s startup life cycle, and how to
manually instantiate controls from their child descriptors.
About startup order
All Flex components trigger a number of events during their startup procedure. These events indicate when the
component is first created, plotted internally, and drawn on the screen. The events also indicate when the
component is finished being created and, in the case of containers, when its children are created.
Components are instantiated, added or linked to a parent, and then sized and laid out inside their container. The
component creation order is as follows:
The following example shows the major events that are dispatched during a component’s creation life cycle:
preinitialize
initialize
creationComplete
updateComplete
The creation order is different for containers and components because containers can be the parent of other
components or containers. Components within the containers must also go through the creation order. If a
container is the parent of another container, the inner container’s children must also go through the creation
order.
ADOBE FLEX 3 93
Building and Deploying Adobe Flex 3 Applications
The following example shows the major events that are dispatched during a container’s creation life cycle:
Container
Component
preinitialize
preinitialize
initialize
childAdd
initialize
creationComplete
updateComplete
creationComplete
updateComplete
After all components are created and drawn, the Application object dispatches an applicationComplete event.
This is the last event dispatched during an application startup.
The creation order of multiview containers (navigators) is different from standard containers. By default, all toplevel views of the navigator are instantiated. However, Flex creates only the children of the initially visible view.
When the user navigates to the other views of the navigator, Flex creates those views’ children. For more information on the deferred creation of children of multiview containers, see “Using deferred creation” on page 94.
For a detailed description of the component creation life cycle, see “About creating advanced components” on
page 129 in Creating and Extending Adobe Flex 3 Components.
94 CHAPTER 5
Using deferred creation
By default, containers create only the controls that initially appear to the user. Flex creates the container’s other
descendants if the user navigates to them. Containers with a single view, such as Box, Form, and Grid containers,
create all of their descendants during the container’s instantiation because these containers display all of their
descendants immediately.
Containers with multiple views, called navigator containers, only create and display the descendants that are
visible at any given time. These containers are the ViewStack, Accordion, and TabNavigator containers.
When navigator containers are created, they do not immediately create all of their descendants, but only those
descendants that are initially visible. Flex defers the creation of descendants that are not initially visible until the
user navigates to a view that contains them.
The result of this deferred creation is that an MXML application with navigator containers loads more quickly, but
the user experiences brief pauses when he or she moves from one view to another when interacting with the application.
You can instruct each container to create their children or defer the creation of their children at application startup
by using the container’s creationPolicy property. This can improve the user experience after the application
loads. For more information, see “About the creationPolicy property” on page 94.
You can also create individual components whose instantiation is deferred by using the
createComponentsFromDescriptors() method. For more information, see “Creating deferred components”
on page 98.
About the creationPolicy property
To defer the creation of any component, container, or child of a container, you use the creationPolicy property.
Every container has a creationPolicy property that determines how the container decides whether to create its
descendants when the container is created. You can change the policy of a container using MXML or ActionScript.
The valid values for the creationPolicy property are auto, all, none, and queued. The meaning of these
settings depends on whether the container is a navigator container (multiple-view container) or a single-view
container. For information on the meaning of these values see “Single-view containers” on page 95 and “Multipleview containers” on page 95.
The creationPolicy property is not inheritable. This means that if you set the value of the creationPolicy
property to none on an outer container, all containers within that container have the default value of the
creationPolicy property, unless otherwise set. They do not inherit the value of none for their creationPolicy.
Also, if you have two containers at the same level (of the same type) and you set the creationPolicy of one of
them, the other container has the default value of the creationPolicy property unless you explicitly set it.
ADOBE FLEX 3 95
Building and Deploying Adobe Flex 3 Applications
Single-view containers
Single-view containers by default create all their children when the application first starts. You can use the
creationPolicy property to change this behavior. The following table describes the values of the
creationPolicy property when you use it with single-view containers:
Value
Description
all, auto
Creates all controls inside the single-view container. The default value is auto, but all results in the same behavior.
none
Instructs Flex to not instantiate any component within the container until you manually instantiate the controls.
When the value of the creationPolicy property is none, explicitly set a width and height for that container.
Normally, Flex scales the container to fit the children that are inside it, but because no children are created, proper
scaling is not possible. If you do not explicitly resize the container, it grows to accommodate the children when they
are created.
To manually instantiate controls, you use the createComponentsFromDescriptors() method. For more
information, see “Creating deferred components” on page 98.
queued
Has no effect on deferred creation. For more information on using the queued value of the creationPolicy property, see “Using ordered creation” on page 101.
The following example sets the value of a VBox container’s creationPolicy property to auto, the default value:
<?xml version="1.0"?>
<!-- layoutperformance/AutoCreationPolicy.mxml -->
<mx:Application xmlns:mx="http://www.adobe.com/2006/mxml">
<mx:VBox id="myVBox" creationPolicy="auto">
<mx:Button id="b1" label="Get Weather"/>
</mx:VBox>
</mx:Application>
The default behavior of all single-view containers is that they and their children are entirely instantiated when the
application starts. If you set the creationPolicy property to none, however, you can selectively instantiate
controls within the containers by using the techniques described in “Creating deferred components” on page 98.
Multiple-view containers
Containers with multiple views, such as the ViewStack and Accordion, do not immediately create all of their
descendants, but only those descendants that are visible in the initial view. Flex defers the instantiation of descendants that are not initially visible until the user navigates to a view that contains them. The following containers
have multiple views and, so, are defined as navigator containers:
•
•
ViewStack
•
Accordion
TabNavigator
96 CHAPTER 5
When you instantiate a navigator container, Flex creates all of the top-level children. For example, creating an
Accordion container triggers the creation of each of its views, but not the controls within those views. The
creationPolicy property determines the creation of the child controls inside each view.
When you set the creationPolicy property to auto (the default value), navigator containers instantiate only the
controls and their children that appear in the initial view. The first view of the Accordion container is the initial
pane, as the following example shows:
ADOBE FLEX 3 97
Building and Deploying Adobe Flex 3 Applications
When the user navigates to another panel in the Accordion container, the navigator container creates the next set
of controls, and recursively creates the new view’s controls and their descendants. You can use the Accordion
container’s creationPolicy property to modify this behavior. The following table describes the values of the
creationPolicy property when you use it with navigator containers:
Value
Description
all
Creates all controls in all views of the navigator container. This setting causes a delay in application startup time, but
results in quicker response time for user navigation.
auto
Creates all controls only in the initial view of the navigator container. This setting causes a faster startup time for the
application, but results in slower response time for user navigation.
This setting is the default for multiple-view containers.
none
Instructs Flex to not instantiate any component within the navigator container or any of the navigator container’s panels
until you manually instantiate the controls.
To manually instantiate controls, you use the createComponentsFromDescriptors() method. For more
information, see “Creating deferred components” on page 98.
queued
This property has no effect on deferred creation. For more information on using the queued value of the
creationPolicy property, see “Using ordered creation” on page 101.
The following example sets the creationPolicy property of an Accordion container to all, which instructs the
container to instantiate all controls for every panel in the navigator container when the application starts:
<?xml version="1.0"?>
<!-- layoutperformance/AllCreationPolicy.mxml -->
<mx:Application xmlns:mx="http://www.adobe.com/2006/mxml">
<mx:Panel title="Accordion">
<mx:Accordion id="myAccordion" creationPolicy="all">
<mx:VBox label="Accordion Button for Panel 1">
<mx:Label text="Accordion container panel 1"/>
<mx:Button label="Click Me"/>
</mx:VBox>
<mx:VBox label="Accordion Button for Panel 2">
<mx:Label text="Accordion container panel 2"/>
<mx:Button label="Click Me"/>
</mx:VBox>
<mx:VBox label="Accordion Button for Panel 3">
<mx:Label text="Accordion container panel 3"/>
<mx:Button label="Click Me"/>
</mx:VBox>
</mx:Accordion>
</mx:Panel>
</mx:Application>
98 CHAPTER 5
Creating deferred components
When you set a container’s creationPolicy property to none, components declared as MXML tags inside that
container are not created. Instead, objects that describe those components are added to an Array. These objects
are called descriptors. You can use the createComponentsFromDescriptors() method to manually instantiate
those components. This method is defined on the Container base class.
Using the createComponentsFromDescriptors() method
You use the createComponentsFromDescriptors() method of a container to create all the children of a
container at one time.
The createComponentsFromDescriptors() method has the following signature:
container.createComponentsFromDescriptors(recurse:Boolean):Boolean
The recurse argument determines whether Flex should recursively instantiate children of the components. Set
the parameter to true to instantiate children of the components, or false to not instantiate the children. The
default value is false.
On a single-view container, calling the createComponentsFromDescriptors() method instantiates all controls
in that container, regardless of the value of the creationPolicy property.
In navigator containers, if you set the creationPolicy property to all, you do not have to call the
createComponentsFromDescriptors() method, because the container creates all controls in all views of the
container. If you set the creationPolicy property to none or auto, calling the
createComponentsFromDescriptors() method creates only the current view’s controls and their descendents.
Another common usage is to set the navigator container’s creationPolicy property to auto. You can then call
navigator.getChildAt(n).createComponentsFromDescriptors() to explicitly create the children of the nth view.
The following example does not instantiate any of the buttons in the HBox container when the application starts
up, but does when the user changes the value of the creationPolicy property. The user initiates this change by
selecting all from the drop-down list.
<?xml version="1.0"?>
<!-- layoutPerformance/ChangePolicy.mxml -->
<mx:Application xmlns:mx="http://www.adobe.com/2006/mxml" creationComplete="appInit()">
<mx:Script><![CDATA[
[Bindable]
public var p:String;
private function appInit():void {
ADOBE FLEX 3 99
Building and Deploying Adobe Flex 3 Applications
p = policy.selectedItem.toString();
}
private function changePolicy():void {
var polType:String = policy.value.toString();
hb.creationPolicy = polType;
if (polType == "none") {
// do nothing
} else if (polType == "all") {
hb.createComponentsFromDescriptors();
}
}
]]></mx:Script>
<mx:ComboBox id="policy" close="p=String(policy.selectedItem);changePolicy();">
<mx:dataProvider>
<mx:Array>
<mx:String>none</mx:String>
<mx:String>all</mx:String>
</mx:Array>
</mx:dataProvider>
</mx:ComboBox>
<mx:Panel title="Creation
<mx:Button label="B1"
<mx:Button label="B2"
<mx:Button label="B3"
</mx:Panel>
Policy" id="hb" creationPolicy="none">
width="50" y="0" x="0"/>
width="50" y="0" x="75"/>
width="50" y="0" x="150"/>
<mx:Label text="CreationPolicy: {p}"/>
</mx:Application>
Using the childDescriptors property
When a Flex application starts, Flex creates an object of type Object that describes each MXML component. These
objects contain information about the component’s name, type, and properties set in the object’s MXML tag. Flex
adds these objects to an Array that each container maintains. For example, applications with two Canvas
containers have an Array with objects that describe the Canvas containers. Those containers, in turn, have an
Array with objects that describe their children.
Each object in the Array is an object of type ComponentDescriptor. You can access this Array by using a
container’s childDescriptors property, and use a zero-indexed value to identify the descriptor. All containers
have a childDescriptors property.
100 CHAPTER 5
Depending on the value of the creationPolicy property, Flex immediately begins instantiating controls inside
the containers or it defers their instantiation. If instantiation is deferred, you can use the properties of this Array
to access the ComponentDescriptor of each component and create that object at a specified time.
The childDescriptors property points to an Array of objects, so you can use Array functions, such as length,
to iterate over the children, as the following example shows:
<?xml version="1.0"?>
<!-- layoutperformance/AccessChildDescriptors.mxml -->
<mx:Application xmlns:mx="http://www.adobe.com/2006/mxml">
<mx:Script><![CDATA[
import mx.core.ComponentDescriptor;
import flash.utils.*;
public function iterateOverChildren():void {
// Get the number of descriptors.
var n:int = tile.childDescriptors.length;
for (var i:int = 0; i < n; i++) {
var c:ComponentDescriptor = tile.childDescriptors[i];
var d:Object = c.properties;
// Log ids and types of objects in the Array.
ta1.text += c.id + " is of type " + c.type + "\n";
// Log the properties added in the MXML tag of the object.
for (var p:String in d) {
ta1.text += "Property: " + p + " : " + d[p] + "\n";
}
}
}
]]></mx:Script>
<mx:Tile id="tile" creationComplete="iterateOverChildren();">
<mx:TextInput id="myInput" text="Enter text here"/>
<mx:Button id="myButton" label="OK" width="150"/>
</mx:Tile>
<mx:TextArea id="ta1" height="150" width="250"/>
</mx:Application>
Properties of the ComponentDescriptor include id, type, and properties. The properties property points to
an object that contains the properties that were explicitly added in the MXML tag. This object does not store
properties such as styles and events.
ADOBE FLEX 3 101
Building and Deploying Adobe Flex 3 Applications
Destroying components
After you create a component, it continues to exist until the user quits the application or you detach it from its
parent and the garbage collector destroys it.
To detach a component from its parent container, you can use the removeChild() or removeChildAt()
methods. You can also use the removeAllChildren() method to remove all child controls from a container.
Calling these methods does not immediately delete the objects from memory. If you do not have any other references to the child, Adobe® Flash® Player garbage collects it at some future point. But if you have stored a reference
to that child on some other object, the child is not removed from memory.
For more information on using these methods, see the View class in the Adobe Flex Language Reference.
Using ordered creation
By default, Flex displays the Loading progress bar while it initializes an application. Only after all of the components in the application are initialized and laid out does Flex display any portion of the application. Using ordered
creation, you can customize this experience and change the user’s perception of how quickly the application starts.
During initialization, Flex first creates all the containers, and then fills in each container with its children and data.
Finally, Flex displays the application in its entirety. This causes the user to wait for the entire application to load
before beginning to interact with it.
However, you can instruct Flex to display the children of each container as its children are created rather than
waiting for the entire application to finish loading. You do this using a technique called ordered creation.
The following example shows a complex application that contains a single container at the top, and four containers
across the bottom. This application implements ordered creation so that the contents of each container become
visible before the entire application is finished loading.
102 CHAPTER 5
In this example, the image on the left shows the application after the first container is populated with its children
and data, but before the remaining four containers are populated. The image on the right shows the final state of
the application.
If this application did not use ordered creation, Flex would not display anything until all components in all five of
the containers were created, resulting in a longer perceived start-up time.
To gradually display children of each container, you add them to an instantiation queue. The “Adding containers
to the queue” on page 102 section describes how to add containers to the queue so that you can improve perceived
layout performance of your Flex applications.
Adding containers to the queue
You can add any number of containers to the instantiation queue so that their contents are displayed in queue
order. To add a container to the instantiation queue, you set the value of the container’s creationPolicy property
to queued. Unless you specify a queue order, containers are instantiated and displayed in the order in which they
appear in the application source code.
In the following example, the Panel containers and their child controls are added to the instantiation queue. To
the user, each Panel container appears one at a time during the application startup. The perceived startup time of
the application is greatly reduced. The panels are created in the order that they appear in the source code (panel1,
panel2, panel3):
<?xml version="1.0"?>
<!-- layoutperformance/QueuedCreationPolicy.mxml -->
<mx:Application xmlns:mx="http://www.adobe.com/2006/mxml">
<mx:Panel id="panel1" creationPolicy="queued" width="100%" height="33%">
<mx:Button id="button1a" label="Button 1A"/>
<mx:Button id="button1b" label="Button 1B"/>
</mx:Panel>
<mx:Panel id="panel2" creationPolicy="queued" width="100%" height="33%">
<mx:Button id="button2a" label="Button 2A"/>
ADOBE FLEX 3 103
Building and Deploying Adobe Flex 3 Applications
<mx:Button id="button2b" label="Button 2B"/>
</mx:Panel>
<mx:Panel id="panel3" creationPolicy="queued" width="100%" height="33%">
<mx:Button id="button3a" label="Button 3A"/>
<mx:Button id="button3b" label="Button 3B"/>
</mx:Panel>
</mx:Application>
Flex first creates all the panels. Flex then instantiates and displays all the children in the first panel in the queue
before moving on to instantiate the children in the next panel in the queue.
To specify an order for the containers in the instantiation queue, you use the creationIndex property. For more
information on using the creationIndex property, see “Setting queue order” on page 103.
Setting queue order
When you use ordered creation, the order in which containers appear in the instantiation queue determines in
what order Flex displays the container and its children on the screen.
You can set the order in which containers are queued by using the container’s creationIndex property, in
conjunction with setting the creationPolicy property to queued. Flex creates the containers in their
creationIndex order until all containers in the initial view are created. Flex then revisits each container and
creates its children in the same order. After creating all the children in a container that is in the queue, Flex
displays that container before starting to create the children in the next container.
All containers support a creationIndex property.
If you set a creationIndex property on a container, but do not set the creationPolicy property to queued, Flex
ignores the creationIndex property and uses auto, the default value, for the creationPolicy property.
The following example sets the creationIndex property so that the contents of the panel3 container are shown
first, then the contents of panel2, and finally the contents of panel1:
<?xml version="1.0"?>
<!-- layoutperformance/QueueOrder.mxml -->
<mx:Application xmlns:mx="http://www.adobe.com/2006/mxml">
<mx:Script><![CDATA[
private function logCreationOrder(e:Event):void {
ta1.text += e.currentTarget.id + " created\n";
}
]]></mx:Script>
<mx:Fade id="SlowFade" duration="4000"/>
<mx:HBox>
104 CHAPTER 5
<mx:Panel id="panel1" title="Panel 1 (index:2)" creationPolicy="queued"
creationIndex="2" creationComplete="logCreationOrder(event)"
creationCompleteEffect="{SlowFade}">
<mx:Button id="button1a" label="Button 1A"
creationComplete="logCreationOrder(event)"/>
<mx:Button id="button1b" label="Button 1B"
creationComplete="logCreationOrder(event)"/>
</mx:Panel>
<mx:Panel id="panel2" title="Panel 2 (index:1)" creationPolicy="queued"
creationIndex="1" creationComplete="logCreationOrder(event)"
creationCompleteEffect="{SlowFade}">
<mx:Button id="button2a" label="Button 2A"
creationComplete="logCreationOrder(event)"/>
<mx:Button id="button2b" label="Button 2B"
creationComplete="logCreationOrder(event)"/>
</mx:Panel>
<mx:Panel id="panel3" title="Panel 3 (index:0)" creationPolicy="queued"
creationIndex="0" creationComplete="logCreationOrder(event)"
creationCompleteEffect="{SlowFade}">
<mx:Button id="button3a" label="Button 3A"
creationComplete="logCreationOrder(event)"/>
<mx:Button id="button3b" label="Button 3B"
creationComplete="logCreationOrder(event)"/>
</mx:Panel>
</mx:HBox>
<mx:TextArea id="ta1" height="200" width="350"/>
</mx:Application>
This example uses the inherited creationCompleteEffect effect to play an effect just as the container finishes
creation. The result is that the panels fade in slow enough that you can see the order of creation. After a container
is initialized and displayed, Flex waits for all effects to finish playing before initializing the next container.
If you set the same value of the creationIndex property for two queued containers, Flex creates and displays
their contents in the order in which they are defined in the application’s source code. The value of the
creationIndex property can be any valid Number, including 0 and negative values.
Dynamically adding containers to the queue
You can dynamically add containers to the instantiation queue by using the Application class’s addToCreationQueue() method. The addToCreationQueue() method has the following signature:
ADOBE FLEX 3 105
Building and Deploying Adobe Flex 3 Applications
addToCreationQueue(id:Object, preferredIndex:int, callbackFunction:Function,
parent:IFlexDisplayObject):void
The following table describes the addToCreationQueue() method’s arguments:
Argument
Description
id
Specifies the name of the container that you want to add to the queue.
preferredIndex
(Optional) Specifies the container’s position in the queue. By default, Flex places the container at the end
of the queue, but this value lets you explicitly choose the queue order for the container.p
callbackFunction
This parameter is currently ignored.
parent
This parameter is currently ignored.
Only use the addToCreationQueue() method to add containers to the queue whose creationPolicy property
is set to none. Containers whose creationPolicy property is set to auto or all will probably created their
children during the application initialization. Containers whose creationPolicy property is set to queued are
already in the queue.
After it is added to the queue, the container that is to be created with the addToCreationQueue() method then
competes with containers whose creationPolicy is set to queued, depending on their position in the queue.
Flex creates containers whose preferredIndex property is lowest.
The following example uses the addToCreationQueue() method to create the children of the HBox containers
when the user clicks the Create Later button. The calls to the addToCreationQueue() method specify a
preferredIndex for each box, which causes the boxes and their children to be created in a different order from
the order in which they are defined in the application’s source code (in this example, box1, box3, box2, and then
box4).
<?xml version="1.0"?>
<!-- layoutPerformance/AddToCreationQueueExample.mxml -->
<mx:Application xmlns:mx="http://www.adobe.com/2006/mxml">
<mx:Script><![CDATA[
public function doCreate():void {
addToCreationQueue('box1', 0);
addToCreationQueue('box2', 2);
addToCreationQueue('box3', 1);
addToCreationQueue('box4', 3);
}
]]></mx:Script>
<mx:HBox backgroundColor="#CCCCFF" horizontalAlign="center">
<mx:Label text="addToCreationQueue()" fontWeight="bold"/>
</mx:HBox>
106 CHAPTER 5
<mx:Form>
<mx:FormItem label="first:">
<mx:HBox id="box1" creationPolicy="none" width="200" height="50"
borderStyle="solid" backgroundColor="#CCCCFF">
<mx:Button label="Button 1"/>
<mx:Button label="Button 2"/>
</mx:HBox>
</mx:FormItem>
<mx:FormItem label="fourth:">
<mx:HBox id="box2" creationPolicy="none" width="200" height="50"
borderStyle="solid" backgroundColor="#CCCCFF">
<mx:Button label="Button 3"/>
<mx:Button label="Button 4"/>
</mx:HBox>
</mx:FormItem>
<mx:FormItem label="second:">
<mx:HBox id="box3" creationPolicy="none" width="200" height="50"
borderStyle="solid" backgroundColor="#CCCCFF">
<mx:Button label="Button 5"/>
<mx:Button label="Button 6"/>
</mx:HBox>
</mx:FormItem>
<mx:FormItem label="third:">
<mx:HBox id="box4" creationPolicy="none" width="200" height="50"
borderStyle="solid" backgroundColor="#CCCCFF">
<mx:Button label="Button 7"/>
<mx:Button label="Button 8"/>
</mx:HBox>
</mx:FormItem>
</mx:Form>
<mx:Button label="Create Later" click="doCreate();"/>
</mx:Application>
In some cases, the addToCreationQueue() method does not act as you might expect. The reason is that if the
instantiation queue is empty, the first container to be put in that queue triggers the creation process of its children.
Other containers might subsequently be added to the queue, but the instantiation of the first container added has
already been triggered, regardless of the value of its preferredIndex property. The result is that an item might
not have the lowest preferredIndex value, but because no other containers are in the queue, Flex begins creating
that container. Flex cannot stop instantiating the first container once it starts.
In the following example, although the redBox container has the highest preferredIndex, Flex creates its
children first because the queue was empty when Flex encountered this line in the code. By the time redBox is
complete, the other containers will be in the queue, and Flex proceeds with the next lowest item in the queue; in
this case, the whiteBox container, followed by blueBox and, finally, greenBox.
function doCreate():void {
ADOBE FLEX 3 107
Building and Deploying Adobe Flex 3 Applications
addToCreationQueue('redBox', 4);
addToCreationQueue('blueBox', 2);
addToCreationQueue('whiteBox', 1);
addToCreationQueue('greenBox', 3);
}
Combining containers with different creationPolicy settings
You can mix containers with different creationPolicy settings and change the order in which they are created
and their children are displayed. Flex creates outer containers before inner containers, regardless of their
creationIndex. This is because Flex does not create the children of a queued container until all containers at that
level are created.
Setting a container’s creationPolicy property does not override the policies of the containers within that
container. For example, if you queue an outer container, but set the inner container’s creationPolicy to none,
Flex creates the inner container, but not any child controls of that inner container.
In the following example, the button1 control is never created because its container specifies a creationPolicy
of none, even though the outer container sets the creationPolicy property to all:
<?xml version="1.0"?>
<!-- layoutperformance/TwoCreationPolicies.mxml -->
<mx:Application xmlns:mx="http://www.adobe.com/2006/mxml">
<mx:HBox label="HBox1" creationPolicy="all" creationIndex="0">
<mx:HBox label="HBox1" creationPolicy="none">
<mx:Button id="button1" label="Click Me"/>
</mx:HBox>
</mx:HBox>
</mx:Application>
Using the callLater() method
The callLater() method queues an operation to be performed for the next screen refresh, rather than in the
current update. Without the callLater() method, you might try to access a property of a component that is not
yet available. The callLater() method is most commonly used with the creationComplete event to ensure
that a component has finished being created before Flex proceeds with a specified method call on that component.
All objects that inherit from the UIComponent class can open the callLater() method. It has the following
signature:
callLater(method:Function, args:Array):void
108 CHAPTER 5
The method argument is the function to call on the object. The args argument is an optional Array of arguments
that you can pass to that function.
The following example defers the invocation of the doSomething() method, but when it is opened, Flex passes
the Event object and the “Product Description” String in an Array to that function:
callLater(doSomething, [event, "Product Description"]);
...
function doSomething(event:Event, title:String):void {
...
}
The following example uses a call to the callLater() method to ensure that new data is added to a DataGrid
before Flex tries to put focus on the new row. Without the callLater() method, Flex might try to focus on a cell
that does not exist and throw an error:
<?xml version="1.0"?>
<!-- layoutperformance/CallLaterAddItem.mxml -->
<mx:Application xmlns:mx="http://www.adobe.com/2006/mxml" initialize="initData()">
<mx:Script><![CDATA[
import mx.collections.*;
private var DGArray:Array = [
{Artist:'Pavement', Album:'Slanted and Enchanted', Price:11.99},
{Artist:'Pavement', Album:'Brighten the Corners', Price:11.99}];
[Bindable]
public var initDG:ArrayCollection;
//Initialize initDG ArrayCollection variable from the Array.
public function initData():void {
initDG=new ArrayCollection(DGArray);
}
public function addNewItem():void {
var o:Object;
o = {Artist:'Pavement', Album:'Nipped and Tucked', Price:11.99};
initDG.addItem(o);
callLater(focusNewRow);
}
public function focusNewRow():void {
myGrid.editedItemPosition = {
columnIndex:0,rowIndex:myGrid.dataProvider.length-1
};
}
]]></mx:Script>
ADOBE FLEX 3 109
Building and Deploying Adobe Flex 3 Applications
<mx:DataGrid id="myGrid" width="350" height="200" dataProvider="{initDG}"
editable="true">
<mx:columns>
<mx:Array>
<mx:DataGridColumn dataField="Album" />
<mx:DataGridColumn dataField="Price" />
</mx:Array>
</mx:columns>
</mx:DataGrid>
<mx:Button id="b1" label="Add New Item" click="addNewItem()"/>
</mx:Application>
Another use of the callLater() method is to create a recursive method. Because the function is called only after
the next screen refresh (or frame), the callLater() method can be used to create animations or scroll text with
methods that reference themselves.
The following example scrolls ticker symbols across the screen and lets users adjust the speed with an HSlider
control:
<?xml version="1.0"?>
<!-- layoutperformance/CallLaterTicker.mxml -->
<mx:Application xmlns:mx="http://www.adobe.com/2006/mxml">
<mx:Script><![CDATA[
[Bindable]
public var text:String = "SLAR:95.5....TIBA:42....RTF:34.15....AST:23.42";
[Bindable]
public var speed:Number = 5;
public function initTicker():void {
theText.move( this.width+10, 0 ); // Start the text on the right side.
callLater(moveText);
}
public function moveText():void {
var xpos:Number = theText.x;
if( xpos-speed+theText.width < 0 ) {
xpos = this.width+10; // Start the text on the right side.
}
xpos -= speed;
theText.move(xpos,0);
callLater(moveText);
}
public function changeSpeed():void {
speed = speedSelector.value;
110 CHAPTER 5
}
]]></mx:Script>
<mx:Panel title="Ticker Sample" width="400" height="200">
<mx:Canvas creationComplete="initTicker()"
horizontalScrollPolicy="off" backgroundColor="red" color="white"
width="100%">
<mx:Label id="theText" text="{text}" y="0"/>
</mx:Canvas>
<mx:HBox>
<mx:Label text="Speed:"/>
<mx:HSlider minimum="1" maximum="10" value="{speed}"
id="speedSelector" snapInterval="1" tickInterval="1"
change="changeSpeed()"/>
</mx:HBox>
</mx:Panel>
</mx:Application>
111
Chapter 6: Building Overview
Typical Adobe® Flex™ development environment include similar tools and asset types that you work with to create
Flex applications.
Topics
About the Flex development tools . . . . . . . . . . . . . . . . . . . . . . . . . . . . . . . . . . . . . . . . . . . . . . . . . . . . . . . . . . . . . . . . . 111
About application files . . . . . . . . . . . . . . . . . . . . . . . . . . . . . . . . . . . . . . . . . . . . . . . . . . . . . . . . . . . . . . . . . . . . . . . . . . . 113
About the Flex development tools
Configuration files
Be familiar with the ways to configure your development environment. Adobe Flex Software Development Kit
(SDK) primarily provide XML files that you use to configure the settings. The flex-config.xml file defines the
default compiler options for the compilers.
In addition to server and compiler configuration settings, you can also modify the messaging and data
management settings, the JVM heap size, Adobe® Flash® Player settings, and logging and caching settings.
For more information about configuring your Flex SDK environment, see “Flex SDK Configuration” on page 119.
Compilers
Flex includes application compilers and component compilers. You use the application compilers to compile SWF
files from MXML and other source files. You use the component compilers to compile SWC files from component
files. You can then use SWC files as dynamic or static libraries with your Flex applications.
The application compilers take the following forms:
• Adobe® Flex™ Builder™ project compiler. The Flex Builder application compiler is opened by Flex Builder for
Flex Projects and ActionScript Projects.
• mxmlc command-line compiler. You open the mxlmc compiler from the command line to create a SWF file
that you then deploy to a website.
112 CHAPTER 6
• Web-tier compiler. The Flex module for Apache and IIS compiler provides web-tier compilation of MXML
files on Apache and IIS web servers. This lets you rapidly compile, test, and deploy an application: instead of
compiling your MXML file into a SWF file and then deploying it and its wrapper files on a web server, you can
just refresh the MXML file in your browser. For more information, see “Using the Flex Module for Apache and
IIS” on page 341.
The component compilers take the following forms:
• Flex Builder library project compiler. The Flex Builder component compiler is opened by Flex Builder for Flex
library projects.
• compc command-line compiler. You open the compc compiler from the command line to create SWC files.
You can use these SWC files as static component libraries, themes, or runtime shared libraries (RSLs).
For information on using the compilers, see “Using the Flex Compilers” on page 125.
Debugger
To test your applications, you run the application SWF files in a web browser or the stand-alone Flash Player. If
you encounter errors in your applications, you can use the debugging tools to set and manage breakpoints in your
code; control application execution by suspending, resuming, and terminating the application; step into and over
the code statements; select critical variables to watch; evaluate watch expressions while the application is running;
and so on.
Flex provides the following debugging tools:
Flex Builder debugger
he Flex Builder Debugging perspective provides all of the debugging tools you expect
from a robust, full-featured development tool. You can set and manage breakpoints; control application execution
by suspending, resuming, and terminating the application; step into and over the code; watch variables; evaluate
expressions; and so on. For more information, see Using Adobe Flex Builder 3.
The fdb command-line debugger The fdb command-line debugger provides a command-line interface to the
debugging experience. With fdb, you can step into code, add breakpoints, check variables, and perform many of
the same tasks you can with the Flex Builder visual debugger. For more information, see “Using the CommandLine Debugger” on page 245.
AIR Debug Launcher (ADL) ADL is a command line debugger for Adobe® AIR™ applications that you can use
outside of Flex Builder. For details, see "Using the AIR development tools" of Developing AIR Applications with
Adobe Flex 3.
ADOBE FLEX 3 113
Building and Deploying Adobe Flex 3 Applications
Loggers
You can log messages at several different points in a Flex application’s life cycle. You can log messages when you
compile the application, when you deploy it to a web application server, or when a client runs it. You can log
messages on the server or on the client. These messages are useful for informational, diagnostic, and debugging
activities.
Flex includes the following logging mechanisms that you use when working with Flex applications.
Client-side logging When you use the debugger version of Flash Player or start your AIR application using AIR
Debug Launcher, you can use the trace() global method to write out messages or configure a TraceTarget to
customize log levels of applications for data services-based applications. For more information, see “Client-side
logging and debugging” on page 232.
Compiler logging When compiling your Flex applications from the command line and in Flex Builder, you can
view deprecation and warning messages, and sources of fatal errors. For more information, see “Compiler
logging” on page 243.
About application files
Flex applications can use many types of application files such as classes, component libraries, theme files, and
Runtime Shared Libraries (RSLs).
Component classes
You can use any number of component classes in your Flex applications. These classes can be MXML or ActionScript files. You can use classes to extend existing components or define new ones.
Component classes can take the form of MXML, ActionScript files, or as SWC files. In MXML or ActionScript
files, the components are not compiled but reside in a directory structure that is part of your compiler’s source
path. SWC files are described in “SWC files” on page 114.
Component libraries are not dynamically linked unless they are used in a Runtime Shared Library (RSL).
Component classes are statically linked at compile time, which means that they must be in the compiler’s source
path. For information about creating and using custom component classes, see Creating and Extending Adobe
Flex 3 Components.
114 CHAPTER 6
SWC files
A SWC file is an archive file for Flex components and other assets. SWC files contain a SWF file and a catalog.xml
file. The SWF file inside the SWC file implements the compiled component or group of components and includes
embedded resources as symbols. Flex applications extract the SWF file from a SWC file, and use the SWF file’s
contents when the application refers to resources in that SWC file. The catalog.xml file lists of the contents of the
component package and its individual components.
You compile SWC files by using the component compilers. These include the compc command-line compiler and
the Flex Builder Library Project compiler. SWC files can be component libraries, RSLs, theme files, and resource
bundles.
To include a SWC file in your application at compile time, it must be located in the library path. For more information about SWC files, see “About SWC files” on page 174.
Component libraries
A component library is a SWC file that contains classes and other assets that your Flex application uses. The
component library’s file structure defines the package system that the components are in.
Typically, component libraries are statically linked into your application, which means that the compiler compiles
it into the SWF file before the user downloads that file.
To build a component library SWC file, you use the include-classes, include-namespaces, and includesources component compiler options. For more information on building component libraries, see “Using
compc, the component compiler” on page 161.
Runtime Shared Libraries
You can use shared assets that can be separately downloaded and cached on the client in Flex. These shared assets
are loaded by multiple applications at run time, but must be transferred only once to the client. These shared files
are known as Runtime Shared Libraries or RSLs.
RSLs are the only kind of application asset that is dynamically linked into your Flex application. When you
compile your application, the RSL source files must be available to the compiler so that it can perform proper link
checking. The assets themselves are not included in the application SWF file, but are only referenced at run time.
ADOBE FLEX 3 115
Building and Deploying Adobe Flex 3 Applications
To create an RSL SWC file, you add files to a library by using the include-classes and include-namespaces
component compiler options. To use RSLs when compiling your application, you use the external-librarypath, externs, load-externs, and runtime-shared-libraries application compiler options. The
external-library-path, externs, and load-externs options provide the compile-time location of the
libraries. The runtime-shared-libraries option provides the run-time location of the shared library. The
compiler requires this for dynamic linking.
For more information, see “Using Runtime Shared Libraries” on page 195.
Themes
A theme defines the look and feel of a Flex application. A theme can define something as simple as the color
scheme or common font for an application, or it can be a complete reskinning of all the components used by the
application.
Themes usually take the form of a SWC file. However, themes can also be composed of a CSS file and embedded
graphical resources, such as symbols from a SWF file.
Theme files must be available to the compiler at compile-time. You build a theme file by using the include-file
and include-classes component compiler options to add skin files and style sheets to a SWC file. You then
reference the theme SWC file when you compile the main Flex application by using the theme application
compiler option.
For more information about themes, see “Using Styles and Themes” on page 589 in the Adobe Flex 3 Developer
Guide.
Resource bundles
You can package libraries of localized properties files and ActionScript classes into a SWC file. The application
compiler can then statically use this SWC file as a resource bundle. For more information about creating and using
resource bundles, see “Localizing Flex Applications” on page 1101 in the Adobe Flex 3 Developer Guide.
Other assets
Other application assets include images, fonts, movies, and sound files. You can embed these assets at compile
time or access them at run time.
When you embed an asset, you compile it into your application’s SWF file. The advantage of embedding an asset
is that it is included in the SWF file, and can be accessed faster than when the application has to load it from a
remote location at run time. The disadvantage of embedding an asset is that your SWF file is larger than if you
load the resource at run time.
116 CHAPTER 6
The alternative to embedding an asset is to load the asset at run time. You can load an asset from the local file
system in which the SWF file runs, or you can access a remote asset, typically though an HTTP request over a
network.
Embedded assets load immediately, because they are already part of the Flex SWF file. However, they add to the
size of your application and slow down the application initialization process. Embedded assets also require you to
recompile your applications whenever your asset files change.
For more information, see “Embedding Assets” on page 965 in the Adobe Flex 3 Developer Guide.
117
Part 2: Application Development
Topics
Building Overview . . . . . . . . . . . . . . . . . . . . . . . . . . . . . . . . . . . . . . . . . . . . . . . . . . . . . . . . . . . . . . . . . . . . . . . . . . . . . . 111
Flex SDK Configuration . . . . . . . . . . . . . . . . . . . . . . . . . . . . . . . . . . . . . . . . . . . . . . . . . . . . . . . . . . . . . . . . . . . . . . . . . 119
Using the Flex Compilers. . . . . . . . . . . . . . . . . . . . . . . . . . . . . . . . . . . . . . . . . . . . . . . . . . . . . . . . . . . . . . . . . . . . . . . . . 125
Using Runtime Shared Libraries. . . . . . . . . . . . . . . . . . . . . . . . . . . . . . . . . . . . . . . . . . . . . . . . . . . . . . . . . . . . . . . . . . . 195
Logging. . . . . . . . . . . . . . . . . . . . . . . . . . . . . . . . . . . . . . . . . . . . . . . . . . . . . . . . . . . . . . . . . . . . . . . . . . . . . . . . . . . . . . . . 227
Using the Command-Line Debugger. . . . . . . . . . . . . . . . . . . . . . . . . . . . . . . . . . . . . . . . . . . . . . . . . . . . . . . . . . . . . . . 245
Using ASDoc . . . . . . . . . . . . . . . . . . . . . . . . . . . . . . . . . . . . . . . . . . . . . . . . . . . . . . . . . . . . . . . . . . . . . . . . . . . . . . . . . . . 263
118 PART 2
119
Chapter 7: Flex SDK Configuration
Use the configuration files included with Adobe® Flex® SDK to configure the compilers and other aspects of Flex.
For information about how to configure Adobe® Flex® Builder™, see Using Adobe Flex Builder 3.
Topics
About configuration files . . . . . . . . . . . . . . . . . . . . . . . . . . . . . . . . . . . . . . . . . . . . . . . . . . . . . . . . . . . . . . . . . . . . . . . . . 119
Flex SDK configuration . . . . . . . . . . . . . . . . . . . . . . . . . . . . . . . . . . . . . . . . . . . . . . . . . . . . . . . . . . . . . . . . . . . . . . . . . . 121
Flash Player configuration. . . . . . . . . . . . . . . . . . . . . . . . . . . . . . . . . . . . . . . . . . . . . . . . . . . . . . . . . . . . . . . . . . . . . . . . 123
About configuration files
The various compilers and servers use the configuration files differently.
Applying license keys
You typically add a license key if you want to unlock the source code for the data visualization packages, or if you
want to remove the watermark from your applications that use the charting and AdvancedDataGrid components.
There are several methods to set the license key for your Flex compiler. You can set your license key in the
following ways:
•
•
Use the license manager in Flex Builder
•
•
•
Edit the flex-config.xml file
Edit the license.properties file
Use the license command line compiler option
Use the Configuration.setLicense() method (compiler API only)
Use the license manager in Flex Builder
To enter your license key in Flex Builder, select Help > Manage Flex Licenses.
Edit the license.properties file
You can manually add your license key to the license.properties file. You add the license key to the value of the
flexbuilder3 key, as the following example shows:
flexbuilder3=00000000000000000000
120 CHAPTER 7
The location of the license.properties file is operating system-dependent. It is located in the following directories:
Operating System
Location
Windows XP
C:\Documents and Settings\All Users\Application Data\Adobe\Flex\license.properties
Windows Vista
C:\ProgramData\Adobe\Flex\license.properties
Mac OSX
/Library/Application Support/Adobe/Flex/license.properties
Linux
~/.adobe/Flex/license.properties
Edit the flex-config.xml file
You can edit your config.xml file to add a license key. You add it to the <licenses> child tag of the <flexconfig> tag, as the following example shows:
<flex-config>
<licenses>
<license>
<product>flexbuilder3</product>
<serial-number>0000-0000-0000-0000-0000-0000</serial-number>
</license>
</licenses>
...
</flex-config>
Use the license command-line compiler option
You can pass your license key as an option to the mxmlc and compc command-line compilers. To do this, you use
the license option, and pass it a product name and the key. The product name must be "flexbuilder3". The
following example shows how to do this:
mxmlc -license=flexbuilder3,00000000000000000000 MyApp.mxml
In Flex Builder, you can pass the license key with the license compiler option by adding it to the Additional
Compiler Arguments field in the Flex Compiler properties panel.
Use the Configuration.setLicense() method
If you are using the Flex compiler API to build your Flex applications, you can call the Configuration class’s
setLicense() method. For more information, see the documentation included with the compiler API.
Root variables
For Flex SDK, the flex_install_dir variable is the top-level directory where you installed the SDK. Under this
directory are the bin, frameworks, lib, and samples directories. The flex_app_root directory is the top level
location for many files.
ADOBE FLEX 3 121
Building and Deploying Adobe Flex 3 Applications
Configuration files layout
The layout of the configuration files for Flex SDK is simple. It includes a jvm.config file, fdb command-line
debugger shell script, and the mxmlc and compc command-line compiler shell scripts for configuring the JVM
that the compiler uses. It also includes the flex-config.xml file that sets the compiler options, as well as executable
files for fdb, mxmlc, and compc.
The layout of the configuration files for Flex SDK is as follows:
sdk_install_dir/
bin/jvm.config
bin/mxmlc
bin/mxmlc.exe
bin/compc
bin/compc.exe
bin/fdb
bin/fdb.exe
frameworks/flex-config.xml
Flex SDK configuration
Flex SDK includes the mxmlc and compc command-line compilers. You use mxmlc to compile Flex applications
from MXML, ActionScript, and other source files. You use the compc compiler to compile component libraries,
Runtime Shared Libraries (RSLs), and theme files.
The compilers are located in the sdk_install_dir/bin directory. You configure the compiler options with the flexconfig.xml file. The compilers use the Java JRE. As a result, you can also configure settings such as memory
allocation and source path with the JVM arguments.
Command-line compiler configuration
The flex-config.xml file defines the default compiler options for the compc and mxmlc command-line compilers.
You can use this file to set options such as debugging, SWF file metadata, and themes to apply to your application.
For a complete list of compiler options, see “Using mxmlc, the application compiler” on page 139 and “Using
compc, the component compiler” on page 161.
The flex-config.xml file is located in the sdk_install_dir/frameworks directory. If you change the location of this
file relative to the location of the command-line compilers, you can use the load-config compiler option to point
to its new location.
122 CHAPTER 7
You can also use a local configuration file that overrides the compiler options of the flex-config.xml file. You give
this local configuration file the same name as the MXML file, plus -config.xml” and store it in the same directory.
When you compile your MXML file, the compiler looks for a local configuration file first, then the flex-config.xml
file.
For more information on compiler configuration files, see “About configuration files” on page 134.
JVM configuration
The Flex compilers use the Java JRE. Configuring the JVM can result in faster and more efficient compilations.
Without a JVM, you cannot use the mxmlc and compc command-line compilers. You can configure JVM settings
such as the Java source path, Java library path, and memory settings.
On Windows, you use the compc.exe and mxmlc.exe executable files in the bin directory to compile Flex applications and component libraries. You use the fdb.exe executable file in the bin directory to debug applications. The
executable files use the jvm.config file to set JVM arguments. The jvm.config file is in the same directory as the
executable files. If you move it or the executable files to another directory, they use their default settings and not
the settings defined in the jvm.config file.
The fdb, compc, and mxmlc shell scripts (for UNIX, Linux, or Windows systems running a UNIX-shell emulator
such as Cygwin) do not take a configuration file. You set the JVM arguments inside the shell script file.
Locating the jvm.config file
The location of the jvm.config file depends on which Flex product you use. The following table shows the location
and use of the product-specific jvm.config files:
Product
Location of jvm.config
Description
Flex SDK
sdk_install_dir/bin
Used by the Java process opened by the mxmlc and compc command-line
executable files.
Changing the JVM heap size
The most common JVM configuration is to set the size of the Java heap. The Java heap is the amount of memory
reserved for the JVM. The actual size of the heap during run time varies as classes are loaded and unloaded. If the
heap requires more memory than the maximum amount allocated, performance will suffer as the JVM performs
garbage collection to maintain enough free memory for the applications to run.
You can set the initial heap size (or minimum) and the maximum heap size on most JVMs. By providing a larger
heap size, you give the JVM more memory with which to defer garbage collection. However, you must not assign
all of the system’s memory to the Java heap so that other processes can run optimally.
ADOBE FLEX 3 123
Building and Deploying Adobe Flex 3 Applications
To set the initial heap size on the Sun HotSpot JVM, change the value of the Xms property. To change the maximum
heap size, change the value of the Xmx property. The following example sets the initial heap size to 256M and the
maximum heap size to 512M:
java.args=-Xms256m -Xmx512m -Dsun.io.useCanonCaches=false
In addition to increasing your JVM’s heap size, you can tune the JVM in other ways. Some JVMs provide more
granular control over garbage collecting, threading, and logging. For more information, consult your JVM
documentation or view the options on the command line. If you are using the Sun HotSpot JVM, for example, you
can enter java -X or java -D on the command line to see a list of configuration options.
In many cases, you can also use a different JVM. Benchmark your Flex application and the application server on
several different JVMs. Choose the JVM that provides you with the best performance.
Setting the useCanonCaches argument to false is required to support Windows file names.
<?xml version="1.0"?>
<!-- config/ContextRootTest.mxml -->
<mx:Application xmlns:mx="http://www.adobe.com/2006/mxml"
creationComplete="l1.text='url='+s1.url">
<mx:HTTPService id="s1" url="@ContextRoot()/service.jsp"/>
<mx:Label id="l1"/>
</mx:Application>
Flash Player configuration
You can use the standard version or the debugger version of Adobe® Flash® Player as clients for your Flex applications. The debugger version of Flash Player can log output from the trace() global method as well as data
services messages and custom log events.
You enable and disable logging and configure the location of the output file in the mm.cfg file. For more information on locating and editing the mm.cfg file, see “Configuring the debugger version of Flash Player” on
page 229.
You can configure the standard version and the debugger version of Flash Player auto-update and other settings
by using the mms.cfg file. This file is in the same directory as the mm.cfg file. For more information on autoupdate, see the Flash Player documentation.
124 CHAPTER 7
125
Chapter 8: Using the Flex Compilers
Adobe® Flex® application and component compilers can be opened on the command line, in Adobe® Flex®
Builder™, and at run time in the Flex web application. Use the Flex compilers to compile applications, component
libraries, themes, and run-time shared libraries (RSLs).
Topics
About the Flex compilers. . . . . . . . . . . . . . . . . . . . . . . . . . . . . . . . . . . . . . . . . . . . . . . . . . . . . . . . . . . . . . . . . . . . . . . . . 125
About the command-line compilers . . . . . . . . . . . . . . . . . . . . . . . . . . . . . . . . . . . . . . . . . . . . . . . . . . . . . . . . . . . . . . . 131
About configuration files . . . . . . . . . . . . . . . . . . . . . . . . . . . . . . . . . . . . . . . . . . . . . . . . . . . . . . . . . . . . . . . . . . . . . . . . . 134
About option precedence. . . . . . . . . . . . . . . . . . . . . . . . . . . . . . . . . . . . . . . . . . . . . . . . . . . . . . . . . . . . . . . . . . . . . . . . . 138
Using mxmlc, the application compiler. . . . . . . . . . . . . . . . . . . . . . . . . . . . . . . . . . . . . . . . . . . . . . . . . . . . . . . . . . . . . 139
Using compc, the component compiler. . . . . . . . . . . . . . . . . . . . . . . . . . . . . . . . . . . . . . . . . . . . . . . . . . . . . . . . . . . . . 161
Viewing errors and warnings . . . . . . . . . . . . . . . . . . . . . . . . . . . . . . . . . . . . . . . . . . . . . . . . . . . . . . . . . . . . . . . . . . . . . 172
About SWC files . . . . . . . . . . . . . . . . . . . . . . . . . . . . . . . . . . . . . . . . . . . . . . . . . . . . . . . . . . . . . . . . . . . . . . . . . . . . . . . . 174
About manifest files . . . . . . . . . . . . . . . . . . . . . . . . . . . . . . . . . . . . . . . . . . . . . . . . . . . . . . . . . . . . . . . . . . . . . . . . . . . . . 175
Using fcsh, the Flex compiler shell . . . . . . . . . . . . . . . . . . . . . . . . . . . . . . . . . . . . . . . . . . . . . . . . . . . . . . . . . . . . . . . . . 176
About the Flex compilers
Flex includes the following application and component compilers:
• Application compilers. The application compilers create SWF files from MXML, ActionScript, and other
assets such as images, SWF files, and SWC files.
• Component compilers. The component compilers create SWC files from the same kinds of files. The application compilers then use the SWC files as component libraries, themes, or RSLs.
126 CHAPTER 8
The following example shows the input and output of the Flex compilers:
Component compilers
*.as
Flex Builder
*.swc
compc
*.swc
*.mxml
*.as
*.mxml
Application compilers
*.as
mxmlc
*.swf
*.mxml
*.as
Flex Builder
*.swf
*.mxml
*.html
*.mxml
Web tier
You open the application compiler with the mxmlc command-line tool, the Flex Builder Build Project option, or
with the run-time web-tier compiler. You open the component compiler with the Flex Builder Build Project
option for a Library Project or with the compc command-line tool.
About the application compilers
The application compilers create SWF files that are run in an Adobe™ Flash® Player client or in an Adobe AIR™
application. The client can be a stand-alone Flash Player or a Flash Player in a browser, which takes the form of
an ActiveX control for Microsoft Internet Explorer or a plug-in for Netscape-based browsers.
ADOBE FLEX 3 127
Building and Deploying Adobe Flex 3 Applications
Flex Builder project compiler. The Flex Builder application compiler is opened by Flex Builder for Flex Projects
and ActionScript Projects. (The component compiler is used for Library Projects.) It is similar in functionality to
the mxmlc command-line compiler, although the way you set options is different. You use this compiler to
compile Flex Builder projects that you will later deploy. For more information, see “Using the Flex Builder application compiler” on page 127.
The mxmlc command-line compiler. You open the mxlmc compiler from the command line to create a SWF file
that you then deploy to a website. Typically, you pass the name of the application’s root MXML file to the compiler.
The output is a SWF file. For more information, see “Using the mxmlc application compiler” on page 128.
The Flex module for Apache and IIS compiler provides web-tier compilation of MXML files
on Apache and IIS web servers. This lets you rapidly compile, test, and deploy an application: instead of compiling
your MXML file into a SWF file and then deploying it and its wrapper files on a web server, you can just refresh
the MXML file in your browser. For more information, see “Using the Flex Module for Apache and IIS” on
page 341.
Web-tier compiler.
The Flex Builder compiler and mxmlc compiler have similar sets of options. These are described in “About the
application compiler options” on page 139.
You can compile applications that are written entirely in ActionScript and contain no MXML. You can compile
these “ActionScript-only” applications with the Flex Builder and mxmlc compilers. You cannot compile ActionScript-only applications with the web-tier compiler. This compiler requires that there be at least a root application
MXML file.
Using the Flex Builder application compiler
You use the Flex Builder application compiler to create SWF files from MXML, ActionScript, and other source
files. You use this compiler to precompile SWF files that you deploy later, or you can deploy them immediately to
a server running the Flex web application.
To open the Flex Builder application compiler, you select Project > Build. The Flex Builder application compiler
is opened by Flex Builder for Flex Projects and ActionScript Projects. (You use the component compiler for
Library Projects.)
To edit the compiler settings, use the settings on the Project > Properties > Flex Compiler dialog box. For information on the compiler options, see “About the application compiler options” on page 139.
The Flex Builder compiler has the same options as the mxmlc compiler. Some options are implemented with GUI
controls in the Flex Compiler dialog box. To set the source path and library options, select Project > Properties >
Flex Build Path and use the Flex Build Path dialog box.
You can set the values of most options in the Additional Compiler Arguments field by using the same syntax as
on the command line. For information about the syntax for setting options in the Flex Compiler dialog box, see
“About the command-line compilers” on page 131.
128 CHAPTER 8
By default, Flex Builder exposes the compilation options through the project properties. If you want to use a
configuration file, you can create your own and pass it to the compiler by using the load-config option. For more
information on setting compiler options with configuration files, see “About configuration files” on page 134.
In addition to generating SWF files, the Flex Builder compiler also generates an HTML wrapper that you can use
when you deploy the new Flex application. The HTML wrapper includes the <object> and <embed> tags that
reference the new SWF file, as well as scripts that support history management and player version detection. For
more information about the HTML wrapper, see “Creating a Wrapper” on page 311.
The Flex Builder application compiler uses incremental compilation by default. For more information on incremental compilation, see “About incremental compilation” on page 157.
Using the mxmlc application compiler
You use the mxmlc command-line compiler to create SWF files from MXML, AS, and other source files. You can
open it as a shell script and executable file for use on Windows and UNIX systems. You use this compiler to
precompile Flex applications that you deploy later.
The command-line compiler is installed with Flex SDK. It is in the flex_install_dir/bin directory in Flex SDK. The
compiler is also included in the default Flex Builder installation, in the
flex_builder_install_dir/sdks/sdk_version/bin directory.
To use the mxmlc utility, you should understand its syntax and how to use configuration files. For more information, see “About the command-line compilers” on page 131.
The basic syntax of the mxmlc utility is as follows:
mxmlc [options] target_file
The default option is the target file to compile into a SWF file, and it is required to have a value. If you use a spaceseparated list as part of the options, you can terminate the list with a double hyphen before adding the target file;
for example:
mxmlc -option arg1 arg2 arg3 -- target_file.mxml
To see a list of options for mxmlc, you can use the help list option, as the following example shows:
mxmlc -help list
To see a list of all options available for mxmlc, including advanced options, you use the following command:
mxmlc -help list advanced
The default output of mxmlc is filename.swf, where filename is the name of the root application file. The default
output location is in the same directory as the target, unless you specify an output file and location with the
output option.
ADOBE FLEX 3 129
Building and Deploying Adobe Flex 3 Applications
The mxmlc command-line compiler does not generate an HTML wrapper. You must create your own wrapper to
deploy a SWF file that the mxmlc compiler produced. The wrapper is used to embed the SWF object in the HTML
tag. It includes the <object> and <embed> tags, as well as scripts that support Flash Player version detection and
history management. For information about creating an HTML wrapper, see “Creating a Wrapper” on page 311.
The mxmlc utility uses the default compiler settings in the flex-config.xml file. This file is in the
flex_sdk_dir/frameworks/ directory. You can change the settings in this file or use another custom configuration
file. For more information on using configuration files, see “About configuration files” on page 134.
The mxmlc compiler is highly customizable with a large set of options. For information on the compiler options,
see “About the application compiler options” on page 139.
You can also open the mxmlc compiler with the java command on the command line. For more information, see
“Invoking the command-line compilers with Java” on page 133.
About the component compiler
You use the component compiler to generate a SWC file from component source files and other asset files such as
images and style sheets. A SWC file is an archive of Flex components and other assets. For more information about
SWC files, see “About SWC files” on page 174.
In some ways, the component compiler is similar to the application compiler. The application compiler produces
a SWF file from one or more MXML and ActionScript files; the component compiler produces a SWC file from
its input files. SWC files are compressed files that contain a SWF file (library.swf), asset files, and a catalog.xml file.
You use the component compiler to create the following kinds of assets:
Component libraries. Component libraries are SWC files that contain one or more components that are used by
applications. SWC files also contain the namespace information that describe the contents of the SWC file. For
more information about component libraries, see “About SWC files” on page 174.
Run-time shared libraries (RSLs). RSLs are external shared assets that can be separately downloaded and cached
on the client. These shared assets are loaded by any number of applications at run time. For more information on
RSLs, see “Using Runtime Shared Libraries” on page 195.
Themes. Themes are a combination of graphical and programmatic skins, and Cascading Style Sheets (CSS). You
use themes to define the look and feel of a Flex application. For more information on themes, see “Using Styles
and Themes” on page 589 in Adobe Flex 3 Developer Guide.
You open the component compiler in the following ways:
Flex Builder Library Project compiler. Flex Builder uses the component compiler when you create a Library
Project. (The application compiler is used for Flex Projects and ActionScript Projects). For more information, see
“Using the Flex Builder component compiler” on page 130.
130 CHAPTER 8
The compc command-line compiler. You open the compc compiler from the command line to create a SWC file.
For more information, see “Using the compc component compiler” on page 130.
The component compiler has many of the same options as the application compilers, as described in “About the
application compiler options” on page 139. The component compiler has additional options as described in
“About the component compiler options” on page 161.
Like the application compiler, you can use the load-config option to point the component compiler to a configuration file, rather than specify command-line options or set the options in the Flex Library Compiler dialog box.
When you compile a SWC file, store the new file in a location that is not the same as the source files. If both sets
of files are accessible by Flex when you compile your application, unexpected behavior can occur.
The SWC files that are produced by the component compilers do not require an HTML wrapper because they are
used as themes, RSLs, or component libraries that are input to other compilers to create Flex applications. You
never deploy a SWC file that users can request directly.
Using the Flex Builder component compiler
You use the component compiler in Flex Builder to create SWC files. You do this by setting up a Flex Library
Project using the New Library Project command. You add MXML and ActionScript components, style sheets,
SWF files, and other assets to the project.
To open the Flex Builder component compiler, select Project > Build Project for your Flex Library Project.
You edit the compiler settings by using the settings on the Project > Properties > Flex Library Compiler dialog
box. Using the Additional Compiler Arguments field in this dialog box, you can set compiler options as if you were
using the command-line compiler. For information about the syntax for setting options in the Flex Library
Compiler dialog box, see “About the command-line compilers” on page 131.
You can set the value of some options using the GUI controls. To set the resource options in the Flex Library Build
Path dialog box, select Project > Properties > Flex Library Build Path.
Flex Builder does not expose a default configuration file to set compiler options but you can create your own and
pass it to the compiler with the load-config option. For more information on setting compiler options with
configuration files, see “About configuration files” on page 134.
Using the compc component compiler
You use the compc command-line compiler to compile SWC files from MXML, ActionScript, and other source
files such as style sheets, images, and SWF files.
You can open the compc compiler as a shell script and executable file for use on Windows and UNIX systems. It
is in the flex_install_dir/bin directory in Flex SDK.
ADOBE FLEX 3 131
Building and Deploying Adobe Flex 3 Applications
To use the compc compiler, you should understand how to pass options and use configuration files. For more
information, see “About the command-line compilers” on page 131.
The syntax of the compc compiler is as follows:
compc [options] -include-classes class [...]
The default option for compc is include-classes. At least one of the “include-” options is required.
To see a list of supported options for compc, you can use the help list option, as the following example shows:
compc -help list
The compc compiler uses the default compiler settings in the flex-config.xml file. Like the application compiler,
you can change these settings or use another custom configuration file. Unlike the application compiler, however,
the component compiler does not support the use of default configuration files.
You cannot use the compc compiler to create a SWC file from a FLA file or other file created in the Adobe® Flash®
authoring environment.
You can also open the compc compiler with the java command on the command line. For more information, see
“Invoking the command-line compilers with Java” on page 133.
About the command-line compilers
You use the mxmlc and compc command-line compilers to compile your MXML and AS files into SWF and SWC
files. You can use the utilities to precompile Flex applications that you want to deploy on another server or to
automate compilation in a testing environment.
To use the command-line compilers, you must have a Java run-time environment in your system path.
For Flex SDK, the command-line compilers are located in the flex_install_dir/bin directory. For Flex Builder, the
compilers are located in the flex_builder_install_dir/sdks/sdk_version/bin directory.
When using mxmlc and compc on the command line, you can also use a configuration file to store your options
rather than list them on the command line. You can store command-line options as XML blocks in a configuration
file. For more information, see “About configuration files” on page 134.
Command-line syntax
The mxmlc and compc compilers take many options. The options are listed in the help which you can view with
the help option, as the following example shows:
mxmlc -help
132 CHAPTER 8
This displays a menu of choices for getting help. The most common choice is to list the basic configuration
options:
mxmlc -help list
To see advanced options, use the list advanced option, as the following example shows:
mxmlc -help list advanced
To see a list of entries whose names or descriptions include a particular String, use the following syntax:
mxmlc -help pattern
The following example returns descriptions for the external-library-path, library-path, and runtimeshared-libraries options:
mxmlc -help list library
For a complete description of mxmlc options, see “About the application compiler options” on page 139. For a
complete description of compc options, see “About the component compiler options” on page 161.
Many command-line options, such as show-actionscript-warnings and accessible, have true and false
values. You specify these values by using the following syntax:
mxmlc -accessible=true -show-actionscript-warnings=true
Some options, such as source-path, take a list of one or more options. You can see which options take a list by
examining the help output. Square brackets ([ ]) that surround options indicate that the option can take a list of
one or more parameters.
You can separate each entry in a list with a space or a comma. The syntax is as follows:
-var val1 val2
or
-var=val1, val2
If you do not use commas to separate entries, you terminate a list by using a double hyphen, as the following
example shows:
-var val1 val2 -- -next_option
If you use commas to separate entries, you terminate a list by not using a comma after the last entry, as the
following example shows:
-var=val1, val2 -next_option
You can append values to an option using the += operator. This adds the new entry to the end of the list of existing
entries rather than replacing the existing entries. The following example adds the c:/myfiles directory to the
library-path option:
mxmlc -library-path+=c:/myfiles
ADOBE FLEX 3 133
Building and Deploying Adobe Flex 3 Applications
Using abbreviated option names
In some cases, the command-line help shows an option with dot-notation syntax; for example, source-path is
shown as compiler.source-path. This notation indicates how you would set this option in a configuration file.
On the command line, you can specify the option with only the final node, source-path, as long as that node is
unique, as the following example shows:
mxmlc -source-path . c:/myclasses/ -- foo.mxml
For more information about using configuration files to store command-line options, see “About configuration
files” on page 134.
Some compiler options have aliases. Aliases provide shortened variations of the option name to make command
lines more readable and less verbose. For example, the alias for the output option is o. You can view a list of
options by their aliases by using the following command:
mxmlc -help list aliases
or
mxmlc -help list advanced aliases
You can also see the aliases in the verbose help output by using the following command:
mxmlc -help list details
Invoking the command-line compilers with Java
Flex provides a simple interface to the command-line compilers. For UNIX users, there is a shell script. For
Windows users, there is an executable file. These files are located in the bin directory. You can also invoke the
compilers using Java. This lets you integrate the compilers into Java-based projects (such as Ant) or other utilities.
The shell scripts and executable files for the command-line compilers wrap calls to the mxmlc.jar and compc.jar
JAR files. To invoke the compilers from Java, you call the JAR files directly. For Flex SDK, the JAR files are located
in the flex_install_dir/lib directory. For Flex Builder, they are located in the
flex_builder_install_dir/sdks/sdk_version/lib.
To invoke a command in a JAR file, use the java command from the command line and specify the JAR file you
want to execute with the jar option. You must also specify the value of the +flexlib option. This advanced
option lets you set the root directory that is used by the compiler to locate the flex-config.xml file, among other
files. You typically point it to your frameworks directory. From there, the compiler can detect the location of other
configuration files.
The following example compiles MyApp.mxml into a SWF file using the JAR file to invoke the mxmlc compiler:
java -jar ../lib/mxmlc.jar +flexlib c:/flex_3_sdk/frameworks c:/flex3/MyApp.mxml
134 CHAPTER 8
You pass all other options as you would when you open the command-line compilers. The following example sets
the locale and source path when compiling MyApp:
java -jar ../lib/mxmlc.jar +flexlib c:/flex_3_sdk/frameworks -locale en_US -source-path
locale/{locale} c:/flex3/MyApp.mxml
About configuration files
Configuration files can be used by the command-line utilities and Flex Builder compilers.
Flex includes a default configuration file named flex-config.xml. This configuration file contains most of the
default compiler settings for the application and component compilers. You can customize this file or create your
own custom configuration file.
Flex SDK includes the flex-config.xml file in the flex_install_dir/frameworks directory.
The Flex Builder compilers do not use a flex-config.xml file by default. The default settings are stored internally.
You can, however, create a custom configuration file and pass it to the Flex Builder compilers by using the loadconfig option. Flex Builder includes a copy of the flex-config.xml file that you can use as a template for your
custom configuration file. This file located in the flex_builder_install_dir/sdks/sdk_version/frameworks directory.
You can generate a configuration file with the current settings by using the dump-config option, as the following
example shows:
mxmlc -dump-config myapp-config.xml
Locating configuration files
You can specify the location of a configuration file by using the load-config option. The target configuration
file can be the default flex-config.xml file, or it can be a custom configuration file. The following example loads a
custom configuration file:
compc -load-config=myconfig.xml
If you specify the filename with the += operator, your loaded configuration file is used in addition to and not
instead of the flex-config.xml file:
compc -load-config+=myconfig.xml
With the mxmlc compiler, you can also use a local configuration file. A local configuration file does not require
you to point to it on the command line. Rather, Flex examines the same directory as the target MXML file for a
configuration file with the same name (one that matches the filename-config.xml filename). If it finds a file, it uses
it in conjunction with the flex-config.xml file. You can also specify a configuration file by using the load-config
option with the += operator.
ADOBE FLEX 3 135
Building and Deploying Adobe Flex 3 Applications
For example, if your application’s top-level file is called MyApp.mxml, the compiler first checks for a MyAppconfig.xml file for configuration settings. With this feature, you can easily compile multiple applications using
different configuration options without changing your command-line options or your flex-config.xml file.
Options in the local configuration file take precedence over options set in the flex-config.xml file. Options set in
a configuration file that the load-config option specify take precedence over the local configuration file.
Command-line settings take precedence over all configuration file settings. For more information on the precedence of compiler options, see “About option precedence” on page 138.
Configuration file syntax
You store values in a configuration file in XML blocks, which follow a specific syntax. In general, the tags you use
match the command-line options.
About the root tag
The root tag of the default configuration file, flex-config.xml, is <flex-config>. If you write a custom configuration file, it must also have this root tag. Compiler configuration files must also have an XML declaration tag, as
the following example shows:
<?xml version="1.0"?>
<flex-config xmlns="http://www.adobe.com/2006/flex-config">
You must close the <flex-config> tag as you would any other XML tag. All compiler configuration files must
be closed with the following tag:
</flex-config>
In general, the second tag in a configuration file is the <compiler> tag. This tag wraps most compiler options.
However, not all compiler options are set in the <compiler> block of the configuration file.
Tags that you must wrap in the compiler block are prefixed by compiler in the help output (for example,
compiler.services). If the option uses no dot-notation in the help output (for example, include-file), it is a
tag at the root level of the configuration file, and the entry appears as follows:
<compiler>
...
</compiler>
<include-file>
<name>logo.gif</name>
<path>c:/images/logo/logo1.gif</path>
</include-file>
136 CHAPTER 8
In some cases, options have multiple parent tags, as with the fonts options, such as compiler.fonts.managers
and compiler.fonts.languages.language. Other options that require parent tags when added to a configuration file include the frames.frame option and the metadata options. The following sections describe methods
for determining the syntax.
Getting the configuration file tags
Use the help list option of the command-line compilers to get the configuration file syntax of the compiler
options; for example:
mxmlc -help list advanced
The following is the entry for the source-path option:
-compiler.source-path [path-element][...]
This indicates that in the configuration file, you can have one or more <path-element> child tags of the
<source-path> tag, and that <source-path> is a child of the <compiler> tag. The following example shows
how this should appear in the configuration file:
<compiler>
<source-path>
<path-element>.</path-element>
<path-element>c:/myclasses/</path-element>
</source-path>
</compiler>
Understanding leaf nodes
The help output uses dot-notation to separate child tags from parent tags, with the right-most entry being known
as the leaf node. For example, -tag1.tag2 indicates that <tag2> should be a child tag of <tag1>.
Angle brackets (< >) or square brackets ([ ]) that surround an option indicate that the option is a leaf node.
Square brackets indicate that there can be a list of one or more parameters for that option.
If the leaf node of a tag in the angle bracket is unique, you do not have to specify the parent tags in the configuration file. For example, the help usage shows the following:
compiler.fonts.managers [manager-class][...]
You can specify the value of this option in the configuration file, as the following example shows:
<compiler>
<fonts>
<managers>
<manager-class>flash.fonts.JREFontManager</manager-class>
</managers>
</fonts>
ADOBE FLEX 3 137
Building and Deploying Adobe Flex 3 Applications
</compiler>
However, the <manager-class> leaf node is unique, so you can set the value without specifying the <fonts> and
<managers> parent tags, as the following example shows:
<compiler>
<manager-class>flash.fonts.JREFontManager</manager-class>
</compiler>
If the help output shows multiple options listed in angle brackets, you set the values of these options at the same
level inside the configuration file and do not make them child tags of each other. For example, the usage for
default-size (default-size <width> <height>) indicates that the default size of the application is set in a
configuration file, as the following example shows:
<default-size>
<height>height_value</height>
<width>width_value</width>
</default-size>
Using tokens
You can pass custom token values to the compiler using the following syntax:
+token_name=value
In the configuration file, you reference that value using the following syntax:
${token_name}
You can use the @Context token in your configuration files to represent the context root of the application. You
can also use the ${flexlib} token to represent the frameworks directory. This is useful if you set up your own
configuration and are not using the default library-path settings.
The default value of the ${flexlib} token is application_home\frameworks.
Appending values
In a configuration file, you can specify the append attribute of any tag that takes a list of arguments. Set this
attribute to true to indicate that the values should be appended to the option rather than replace it. The default
value is false.
Setting the append attribute to true lets you compound the values of options with multiple configuration files.
The following example appends two entries to the library-path option:
<library-path append="true">
<path-element>/mylibs</path-element>
<path-element>/myotherlibs</path-element>
</library-path>
138 CHAPTER 8
About option precedence
You can set the same options in multiple places and the Flex compilers use the value from the source that has the
highest precedence.
If you do not specify an option on the command line, the compilers check for a load-config option and get the
value from that file.
When using the mxmlc compiler, Flex checks to see if there is an app_name-config.xml file in the same directory
as the target MXML file. This is known as the local configuration file and is described in “Locating configuration
files” on page 134. The syntax and structure of local configuration files are the same as with the flex-config.xml
file.
If no load-config option is specified, the compilers check for the flex-config.xml file. The compilers look for the
flex-config.xml file in the /frameworks directory. The following location is the default:
{flex_root}/frameworks
Most options have a default value that the compilers use if the option is not set in any of the other ways.
The following table shows the possible sources of options for each compiler. The table also shows the order of
precedence for each option. The options set using the method described in a lower row take precedence over the
options set using the methods described in a higher row.
Compiler options
Flex Builder
mxmlc
compc
Default settings
Yes
No
No
flex-config.xml
No
Yes
Yes
Local configuration file
No
Yes
No
Configuration file specified by load-config option
Yes
Yes
Yes
Command-line option
No
Yes
Yes
Options panel
Yes
No
No
The web-tier compiler uses its own set of configuration files.
You can mix and match the source of the compiler options. For example, you can specify a custom configuration
file with the load-config option, and also set additional options on the command line.
You can also use multiple configuration files. You can chain them by using the += operator with the load-config
option. If you specify a configuration file with this option, the compilers also look for the flex-config.xml and local
(appname-config.xml) configuration files.
ADOBE FLEX 3 139
Building and Deploying Adobe Flex 3 Applications
Using mxmlc, the application compiler
You use the application compiler to compile SWF files from your ActionScript and MXML source files.
The application compiler’s options let you define settings such as the library path and whether to include debug
information in the resulting SWF file. Also, you can set application-specific settings such as the frame rate at
which the SWF file should play and its height and width.
To invoke the application compiler with Flex SDK, you use the mxmlc command-line utility. In Flex Builder, you
use the application compiler by building a new Flex Project. Some of the Flex SDK command-line options have
equivalents in the Flex Builder environment. For example, you can use the tabs in the Flex Build Path dialog box
to add classes and libraries to your project.
The following set of examples use the application compiler.
About the application compiler options
The following table describes the application compiler options. You invoke the application compiler with the
mxmlc command-line utility or when building a project in Flex Builder.
Option
Description
accessible=true|false
Enables accessibility features when compiling the Flex application or SWC file.
The default value is false.
For more information on using the Flex accessibility features, see “Creating
Accessible Applications” on page 1139 in Adobe Flex 3 Developer Guide.
actionscript-file-encoding string
Sets the file encoding for ActionScript files.
For more information, see “Setting the file encoding” on page 156.
advanced
Lists advanced help options when used with the help option, as the following
example shows:
mxmlc -help advanced
This is an advanced option.
allow-source-path-overlap=true|false
Checks if a source-path entry is a subdirectory of another source-path
entry. It helps make the package names of MXML components unambiguous.
This is an advanced option.
140 CHAPTER 8
Option
Description
as3=true|false
Use the ActionScript 3.0 class-based object model for greater performance
and better error reporting. In the class-based object model, most built-in functions are implemented as fixed methods of classes.
The default value is true. If you set this value to false, you must set the es
option to true.
This is an advanced option.
benchmark=true|false
Prints detailed compile times to the standard output. The default value is
true.
context-root context-path
Sets the value of the {context.root} token, which is often used in channel
definitions in the flex-services.xml file and other settings in the flex-config.xml
file. The default value is null.
contributor name
Sets metadata in the resulting SWF file. For more information, see “Adding
metadata to SWF files” on page 155.
creator name
Sets metadata in the resulting SWF file. For more information, see “Adding
metadata to SWF files” on page 155.
date text
Sets metadata in the resulting SWF file. For more information, see “Adding
metadata to SWF files” on page 155.
debug=true|false
Generates a debug SWF file. This file includes line numbers and filenames of
all the source files. When a run-time error occurs, the stacktrace shows these
line numbers and filenames. This information is used by the command-line
debugger and the Flex Builder debugger. Enabling the debug option generates larger SWF files.
For the mxmlc compiler, the default value is false. For the compc compiler,
the default value is true.
For Flex Builder, the default value is true. If you export an application by using
the Export Release Build feature, the Flex Builder compiler excludes the
debugging information, which is the equivalent of setting the value of this
option to false.
When generating SWC files, if debug is set to true, then the library.swf file
inside the SWC file contains debug information. If you are generating a SWC
file for distribution, set this value to false.
For information about the command-line debugger, see “Using the
Command-Line Debugger” on page 245.
If you set this option to true, Flex also sets the verbose-stacktraces
option to true
debug-password string
Lets you engage in remote debugging sessions with the Flash IDE.
This is an advanced option.
ADOBE FLEX 3 141
Building and Deploying Adobe Flex 3 Applications
Option
Description
default-background-color int
Sets the application’s background color. You use the 0x notation to set the
color, as the following example shows:
-default-background-color=0xCCCCFF
The default value is null. The default background of a Flex application is an
image of a gray gradient. You must override this image for the value of the
default-background-color option to be visible. For more information,
see “Editing application settings” on page 156.
This is an advanced option.
default-frame-rate int
Sets the application’s frame rate. The default value is 24.
This is an advanced option.
default-script-limits
max-recursion-depth
max-execution-time
Defines the application’s script execution limits.
The max-recursion-depth value specifies the maximum depth of Adobe
Flash Player call stack before Flash Player stops. This is essentially the stack
overflow limit. The default value is 1000.
The max-execution-time value specifies the maximum duration, in
seconds, that an ActionScript event handler can execute before Flash Player
assumes that it is hung, and aborts it. The default value is 60 seconds. You
cannot set this value above 60 seconds.
You can override these settings in the application.
This is an advanced option.
default-size width height
Defines the default application size, in pixels.
This is an advanced option.
defaults-css-files filename [, ...]
Inserts CSS files into the output the same way that a per-SWC defaults.css file
works, but without having to re-archive the SWC file to test each change.
CSS files included in the output with this option have a higher precedence
than default CSS files in existing SWCs. For example, a CSS file included with
this option overrides definitions in framework.swc’s defaults.css file, but it has
the same overall precedence as other included CSS files inside the SWC file.
This option does not actually insert the CSS file into the SWC file; it simulates
it. When you finish developing the CSS file, you should rebuild the SWC file
with the new integrated CSS file.
This option takes one or more files. The precedence for multiple CSS files
included with this option is from first to last.
This is an advanced option.
142 CHAPTER 8
Option
Description
defaults-css-url string
Defines the location of the default style sheet. Setting this option overrides
the implicit use of the defaults.css style sheet in the framework.swc file.
For more information on the defaults.css file, see “Using Styles and Themes” on
page 589 in Adobe Flex 3 Developer Guide.
This is an advanced option.
define=NAMESPACE::variable,value
Defines a global constant. The value is evaluated at compile time and exists as
a constant within the application. A common use of inline constants is to set
values that are used to include or exclude blocks of code, such as debugging
or instrumentation code. This is known as conditional compilation.
The following example defines the constant debugging in the CONFIG
namespace:
-define=CONFIG::debugging,true
In ActionScript, you can use this value to conditionalize statements; for
example:
CONFIG::debugging {
// Execute debugging code here.
}
To set multiple conditionals on the command-line, use the define option
more than once.
For more information, see “Using conditional compilation” on page 158.
description text
Sets metadata in the resulting SWF file. For more information, see “Adding
metadata to SWF files” on page 155.
dump-config filename
Outputs the compiler options in the flex-config.xml file to the target path; for
example:
mxmlc -dump-config myapp-config.xml
This is an advanced option.
ADOBE FLEX 3 143
Building and Deploying Adobe Flex 3 Applications
Option
Description
es=true|false
Instructs the compiler to use the ECMAScript edition 3 prototype-based
object model to allow dynamic overriding of prototype properties. In the
prototype-based object model, built-in functions are implemented as
dynamic properties of prototype objects.
The default value is false.
Using the ECMAScript edition 3 prototype-based object model lets you use
untyped properties and functions in your application code. As a result, if you
set the value of the es compiler option to true, you must set the strict
compiler option to false. Otherwise, the compiler will throw errors.
If you set this option to true, you must also set the value of the as3 compiler
option to false.
This is an advanced option.
externs class_name [...]
Sets a list of classes to exclude from linking when compiling a SWF file.
This option provides compile-time link checking for external references that
are dynamically linked.
For more information about dynamic linking, see “About linking” on page 196.
This is an advanced option.
external-library-path path-element [...]
Specifies a list of SWC files or directories to exclude from linking when
compiling a SWF file. This option provides compile-time link checking for
external components that are dynamically linked.
By default, the libs/player/playerglobal.swc file is linked as an external library.
This library is built into Flash Player.
For more information about dynamic linking, see “About linking” on page 196.
You can use the += operator to append the new SWC file to the list of external
libraries.
fonts.advanced-anti-aliasing=true|false
Sets the default value that determines whether embedded fonts use
advanced anti-aliasing information when rendering the font.
Setting the value of the advanced-anti-aliasing property in a style sheet
overrides this value.
The default value is false.
For more information about using advanced anti-aliasing, see “Using Fonts”
on page 653 in Adobe Flex 3 Developer Guide.
144 CHAPTER 8
Option
Description
fonts.languages.language-range lang range
Specifies the range of Unicode settings for that language. For more information, see “Using Styles and Themes” on page 589 in Adobe Flex 3 Developer Guide.
This is an advanced option.
fonts.local-fonts-snapshot path_to_file
Sets the location of the local font snapshot file. The file contains system font
data.
This is an advanced option.
fonts.managers manager-class [...]
Defines the font manager. The default is flash.fonts.JREFontManager. You can
also use the flash.fonts.BatikFontManager. For more information, see “Using
Styles and Themes” on page 589 in Adobe Flex 3 Developer Guide.
This is an advanced option.
fonts.max-cached-fonts string
Sets the maximum number of fonts to keep in the server cache.
fonts.max-glyphs-per-face string
Sets the maximum number of character glyph-outlines to keep in the server
cache for each font face. This is an advanced option.
frames.frame label class_name [...]
Specifies a SWF file frame label with a sequence of class names that are linked
onto the frame.
This option lets you add asset factories that stream in after the application that
then publish their interfaces with the ModuleManager class. The advantage to
doing this is that the application starts faster than it would have if the assets
had been included in the code, but does not require moving the assets to an
external SWF file.
This is an advanced option.
generate-frame-loader=true|false
Toggles the generation of an IFlexBootstrap-derived loader class.
This is an advanced option.
headless-server=true|false
Enables the headless implementation of the Flex compiler. This sets the
following:
System.setProperty("java.awt.headless", "true")
The headless setting (java.awt.headless=true) is required to use fonts and SVG
on UNIX systems without X Windows.
This is an advanced option.
help [-list [advanced]]
Prints usage information to the standard output. For more information, see
“Command-line syntax” on page 131.
ADOBE FLEX 3 145
Building and Deploying Adobe Flex 3 Applications
Option
Description
include-libraries library [...]
Links all classes inside a SWC file to the resulting application SWF file, regardless of whether or not they are used.
Contrast this option with the library-path option that includes only those
classes that are referenced at compile time.
To link one or more classes whether or not they are used and not an entire SWC
file, use the includes option.
This option is commonly used to specify resource bundles.
include-resource-bundles bundle [...]
Specifies the resource bundles to link into a resource module. All resource
bundles specified with this option must be in the compiler’s source path. You
specify this using the source-path compiler option.
For more information on using resource bundles, see “Localizing Flex Applications” on page 1101 in Adobe Flex 3 Developer Guide.
includes class [...]
Links one or more classes to the resulting application SWF file, whether or not
those classes are required at compile time.
To link an entire SWC file rather than individual classes, use the includelibraries option.
incremental=true|false
Enables incremental compilation. For more information, see “About incremental compilation” on page 157.
This option is true by default for the Flex Builder application compiler. For the
command-line compiler, the default is false. The web-tier compiler uses
incremental compilation by default.
keep-as3-metadata=class_name [...]
Specifies custom metadata that you want to keep. By default, the compiler
keeps the following metadata:
•
Bindable
•
Managed
•
ChangeEvent
•
NonCommittingChangeEvent
•
Transient
If you want to preserve the default metadata, you should use the += operator
to append your custom metadata, rather than the = operator which replaces
the default metadata.
This is an advanced option. For more information, see “About metadata tags”
on page 33 in Creating and Extending Adobe Flex 3 Components.
146 CHAPTER 8
Option
Description
keep-all-type-selectors=true|false
Instructs the compiler to keep a style sheet’s type selector in a SWF file, even if
that type (the class) is not used in the application. This is useful when you have
a modular application that loads other applications. For example, the loading
SWF file might define a type selector for a type used in the loaded (or, target)
SWF file. If you set this option to true when compiling the loading SWF file,
then the target SWF file will have access to that type selector when it is loaded.
If you set this option to false, the compiler will not include that type selector
in the loading SWF file at compile time. As a result, the styles will not be available to the target SWF file.
This is an advanced option.
keep-generated-actionscript=true|false
Determines whether to keep the generated ActionScript class files.
The generated class files include stubs and classes that are generated by the
compiler and used to build the SWF file.
When using the application compiler, the default location of the files is the
/generated subdirectory, which is directly below the target MXML file. If the
/generated directory does not exist, the compiler creates one. When using the
compc component compiler, the default location of the /generated directory
is relative to the output of the SWC file. When using Flex Builder, the default
location of the generated files is the /bin/generated directory.
The default names of the primary generated class files are filename-generated.as and filename-interface.as.
The default value is false.
This is an advanced option.
language code
Sets metadata in the resulting SWF file. For more information, see “Adding
metadata to SWF files” on page 155.
ADOBE FLEX 3 147
Building and Deploying Adobe Flex 3 Applications
Option
Description
library-path path-element [...]
Links SWC files to the resulting application SWF file. The compiler only links in
those classes for the SWC file that are required. You can specify a directory or
individual SWC files.
The default value of the library-path option includes all SWC files in the
libs and libs/player directories, plus the current locale directory. These are
required.
To point to individual classes or packages rather than entire SWC files, use the
source-path option.
If you set the value of the library-path as an option of the command-line
compiler, you must also explicitly add the framework.swc and locale SWC files.
Your new entry is not appended to the library-path but replaces it, unless
you use the += operator.
On the command line, you use the += operator to append the new argument
to the list of existing SWC files.
In a configuration file, you can set the append attribute of the library-path
tag to true to indicate that the values should be appended to the library path
rather than replace existing default entries.
license product_name license_key
Defines the license key to use when compiling. Valid values for
product_name include flexbuilder3.
link-report filename
Prints linking information to the specified output file. This file is an XML file
that contains <def>, <pre>, and <ext> symbols showing linker dependencies in the final SWF file.
The file format output by this command can be used to write a file for input to
the load-externs option.
For more information on the report, see “Examining linker dependencies” on
page 65.
This is an advanced option.
load-config filename
Specifies the location of the configuration file that defines compiler options.
If you specify a configuration file, you can override individual options by
setting them on the command line.
All relative paths in the configuration file are relative to the location of the
configuration file itself.
Use the += operator to chain this configuration file to other configuration files.
For more information on using configuration files to provide options to the
command-line compilers, see “About configuration files” on page 134.
148 CHAPTER 8
Option
Description
load-externs filename [...]
Specifies the location of an XML file that contains <def>, <pre>, and <ext>
symbols to omit from linking when compiling a SWF file. The XML file uses the
same syntax as the one produced by the link-report option. For more
information on the report, see “Examining linker dependencies” on page 65.
This option provides compile-time link checking for external components that
are dynamically linked.
For more information about dynamic linking, see “About linking” on page 196.
This is an advanced option.
locale string
Specifies one or more locales to be compiled into the SWF file. If you do not
specify a locale, then the compiler uses the default locale from the flexconfig.xml file. The default value is en_US. You can append additional locales
to the default locale by using the += operator.
If you remove the default locale from the flex-config.xml file, and do not
specify one on the command line, then the compiler will use the machine’s
locale.
For more information, see “Localizing Flex Applications” on page 1101in
Adobe Flex 3 Developer Guide.
localized-description text lang
Sets metadata in the resulting SWF file. For more information, see “Adding
metadata to SWF files” on page 155.
localized-title text lang
Sets metadata in the resulting SWF file. For more information, see “Adding
metadata to SWF files” on page 155.
mxml.compatibility-version=version
Specifies the version of the Flex compiler that the output should be compatible with. This option affects some behavior such as the layout rules, padding
and gaps, skins, and other style settings. In addition, it affects the rules for
parsing properties files.
The currently-supported values are 3 and 2.0.1. The default value is 3.
The following example instructs the application to compile with the 2.0.1 rules
for these behaviors:
-compatibility-version=2.0.1
For more information on using the option, see “Backward compatibility” on
page 286.
namespaces.namespace uri manifest
Specifies a namespace for the MXML file. You must include a URI and the location of the manifest file that defines the contents of this namespace. This path
is relative to the MXML file.
For more information about manifest files, see “About manifest files” on
page 175.
ADOBE FLEX 3 149
Building and Deploying Adobe Flex 3 Applications
Option
Description
optimize=true|false
Enables the ActionScript optimizer. This optimizer reduces file size and
increases performance by optimizing the SWF file’s bytecode.
The default value is true.
output filename
Specifies the output path and filename for the resulting file. If you omit this
option, the compiler saves the SWF file to the directory where the target file is
located.
The default SWF filename matches the target filename, but with a SWF file
extension.
If you use a relative path to define the filename, it is always relative to the
current working directory, not the target MXML application root.
The compiler creates extra directories based on the specified filename if those
directories are not present.
When using this option with the component compiler, the output is a SWC file
rather than a SWF file, unless you set the directory option to true. In that
case, the output is a directory with the contents of the SWC file. The name of
the directory is that value of the ouput option.
publisher name
Sets metadata in the resulting SWF file. For more information, see “Adding
metadata to SWF files” on page 155.
raw-metadata XML_string
Defines the metadata for the resulting SWF file. The value of this option overrides any metadata.* compiler options (such as contributor, creator,
date, and description).
This is an advanced option.
resource-bundle-list filename
Prints a list of resource bundles that are used by the current application to a
file named with the filename argument. You then use this list as input that
you specify with the include-resource-bundles option to create a
resource module.
For more information, see “Localizing Flex Applications” on page 1101 in
Adobe Flex 3 Developer Guide.
runtime-shared-libraries rsl-url [...]
Specifies a list of runtime shared libraries (RSLs) to use for this application. RSLs
are dynamically-linked at run time. The compiler externalizes the contents of
the application that you are compiling that overlap with the RSL.
You specify the location of the SWF file relative to the deployment location of
the application. For example, if you store a file named library.swf file in the
web_root/libraries directory on the web server, and the application in the web
root, you specify libraries/library.swf.
For more information about RSLs, see “Using Runtime Shared Libraries” on
page 195.
150 CHAPTER 8
Option
Description
runtime-shared-library-path=pathelement,rsl-url[,policy-fileurl,failover-url,...]
Specifies the location of a runtime shared library (RSL). The compiler externalizes the contents of the application that you are compiling that overlap with
the RSL.
The path-element argument is the location of the SWC file or open directory
to compile against. For example, c:\flexsdk\frameworks\libs\framework.swc.
This is the equivalent of the using the external-library-path option
when compiling against an RSL using the runtime-shared-libraries
option.
The rsl-url argument is the URL of the RSL that will be used to load the RSL
at runtime. The compiler does not verify the existence of the SWF file at this
location at compile time. It does store this string in the application, however,
and uses it at run time. As a result, the SWF file must be available at run time
but necessarily not at compile time.
The policy-file-url is the location of the crossdomain.xml file that gives
permission to read the RSL from the server. This might be necessary because
the RSL can be on a separate server as the application. For example,
http://www.mydomain.com/rsls/crossdomain.xml.
The failover-url and second policy-file-url arguments specify the
location of the secondary RSL and crossdomain.xml file if the first RSL cannot
be loaded. This most commonly happens when the client Player version does
not support cross-domain RSLs. You can add any number of failover RSLs, but
must include a policy file URL for each one.
Do not include spaces between the comma-separated values. The following
example shows how to use this option:
mxmlc -o=../lib/app.swf -runtime-shared-librarypath=../lib/mylib.swc,../bin/myrsl.swf Main.mxml
You can specify more than one library file to be used as an RSL. You do this by
adding additional runtime-shared-library-path options.
You can also use the runtime-shared-libraries command to use RSLs
with your Flex applications. However, the runtime-shared-librarypath option lets you also specify the location of the policy file and failover
RSL.
For more information about RSLs, see “Using Runtime Shared Libraries” on
page 195.
services filename
Specifies the location of the services-config.xml file. This file is used by LiveCycle Data Services ES.
ADOBE FLEX 3 151
Building and Deploying Adobe Flex 3 Applications
Option
Description
show-actionscript-warnings=true|false
Shows warnings for ActionScript classes.
The default value is true.
For more information about viewing warnings and errors, see “Viewing warnings and errors” on page 172.
show-binding-warnings=true|false
Shows a warning when Flash Player cannot detect changes to a bound property.
The default value is true.
For more information about viewing warnings and errors, see “Viewing warnings and errors” on page 172.
show-shadowed-device-fontwarnings=true|false
Shows warnings when you try to embed a font with a family name that is the
same as the operating system font name. The compiler normally warns you
that you are shadowing a system font. Set this option to false to disable the
warnings.
The default value is true.
For more information about viewing warnings and errors, see “Viewing warnings and errors” on page 172.
show-unused-type-selectorwarnings=true|false
Shows warnings when a type selector in a style sheet or <mx:Style> block is
not used by any components in the application.
The default value is true.
For more information about viewing warnings and errors, see “Viewing warnings and errors” on page 172.
152 CHAPTER 8
Option
Description
source-path path-element [...]
Adds directories or files to the source path. The Flex compiler searches directories in the source path for MXML, AS, or CSS source files that are used in your
Flex applications and includes those that are required at compile time.
You can use wildcards to include all files and subdirectories of a directory.
To link an entire library SWC file and not individual classes or directories, use
the library-path option.
The source path is also used as the search path for the component compiler’s
include-classes and include-resource-bundles options.
You can also use the += operator to append the new argument to the list of
existing source path entries.
This option has the following default behavior:
•
If source-path is empty, the target file’s directory will be added to
source-path.
•
If source-path is not empty and if the target file’s directory is a subdirectory of one of the directories in source-path, source-path remains
unchanged.
•
If source-path is not empty and if the target file’s directory is not a
subdirectory of any one of the directories in source-path, the target file’s
directory is prepended to source-path.
static-link-runtime-sharedlibraries=true|false
Determines whether to compile against libraries statically or use RSLs. Set this
option to true to ignore the RSLs specified by the runtime-sharedlibrary-path option. Set this option to false to use the RSLs.
The default value is true.
This option is useful so that you can quickly switch between a statically and
dynamically linked application without having to change the runtimeshared-library-path option, which can be verbose, or edit the configuration files.
For more information about RSLs, see “Using Runtime Shared Libraries” on
page 195.
strict=true|false
Prints undefined property and function calls; also performs compile-time type
checking on assignments and options supplied to method calls.
The default value is true.
For more information about viewing warnings and errors, see “Viewing warnings and errors” on page 172.
ADOBE FLEX 3 153
Building and Deploying Adobe Flex 3 Applications
Option
Description
target-player=player_version
Specifies the version of Flash Player that you want to target with the application. Features requiring a later version of Flash Player are not compiled into the
application.
The player_version parameter has the following format:
major_version.minor_version.revision
The major_version is required while minor_version and revision are
optional. The minimum value is 9.0.0. If you do not specify the
minor_version or revision, then the compiler uses zero.
If you do not explicitly set the value of this option, the compiler uses the
default from the flex-config.xml file. The value in flex-config.xml is the version
of Flash Player that shipped with the SDK.
This option is useful if your application’s audience has a specific player and
cannot upgrade. You can use this to “downgrade” your application for that
audience.
This option is commonly used in conjunction with framework RSLs. For more
information, see “Targeting Flash Player versions” on page 295.
theme filename [...]
Specifies a list of theme files to use with this application. Theme files can be
SWC files with CSS files inside them or CSS files.
For information on compiling a SWC theme file, see “Using Styles and Themes”
on page 589 in Adobe Flex 3 Developer Guide.
title text
Sets metadata in the resulting SWF file. For more information, see “Adding
metadata to SWF files” on page 155.
use-network=true|false
Specifies that the current application uses network services.
The default value is true.
When the use-network property is set to false, the application can access
the local filesystem (for example, use the XML.load() method with file: URLs)
but not network services. In most circumstances, the value of this property
should be true.
For more information about the use-network property, see “Applying Flex
Security” on page 29.
use-resource-bundle-metadata=true|false
Enables resource bundles. Set to true to instruct the compiler to process the
contents of the [ResourceBundle] metadata tag.
The default value is true.
For more information, see “Localizing Flex Applications” on page 1101 in
Adobe Flex 3 Developer Guide.
This is an advanced option.
154 CHAPTER 8
Option
Description
verbose-stacktraces=true|false
Generates source code that includes line numbers. When a run-time error
occurs, the stacktrace shows these line numbers.
Enabling this option generates larger SWF files.
Enabling this option does not generate a debug SWF file. To do that, you must
set the debug option to true.
The default value is false.
verify-digests=true|false
Instructs the application to check the digest of the RSL SWF file against the
digest that was compiled into the application at compile time. This is a security
measure that lets you load RSLs from remote domains or different subdomains. It also lets you enforce versioning of your RSLs by forcing an application’s digest to match the RSL’s digest. If the digests are out of sync, you must
recompile your application or load a different RSL SWF file.
For more information about RSLs, see “Using Runtime Shared Libraries” on
page 195.
version
Returns the version number of the MXML compiler. If you are using a trial or
Beta version of Flex, the version option also returns the number of days
remaining in the trial period and the expiration date.
warn-warning_type=true|false
Enables specified warnings. For more information, see “Viewing warnings and
errors” on page 172.
warnings=true|false
Enables all warnings. Set to false to disable all warnings. This option overrides the warn-warning_type options.
The default value is true.
The following sections provide examples of using the mxmlc application compiler options on the command line.
You can also use these techniques with the application compilers in the Flex Builder and web-tier environments.
Basic example of using mxmlc
The most basic example is one in which the MXML file has no external dependencies (such as components in a
SWC file or ActionScript classes) and no special options. In this case, you invoke the mxmlc compiler and point
it to your MXML file as the following example shows:
mxmlc c:/myfiles/app.mxml
The default option is the target file to compile into a SWF file, and it is required to have a value. If you use a spaceseparated list as part of the options, you can terminate the list with a double hyphen before adding the target file;
for example:
mxmlc -option arg1 arg2 arg3 -- target_file.mxml
ADOBE FLEX 3 155
Building and Deploying Adobe Flex 3 Applications
Adding metadata to SWF files
The application compilers support adding metadata to SWF files. This metadata can be used by search engines
and other utilities to gather information about the SWF file. This metadata represents a subset of the Dublin Core
schema.
You can set the following values:
•
contributor
•
•
creator
•
•
description
•
•
localized-description
•
•
publisher
date
language
localized-title
title
For the mxmlc command-line compiler, the default metadata settings in the flex-config.xml file are as follows:
<metadata>
<title>Adobe Flex 2 Application</title>
<description>http://www.adobe.com/flex</description>
<publisher>unknown</publisher>
<creator>unknown</creator>
<language>EN</language>
</metadata>
You can also set the metadata values as command-line options. The following example sets some of the metadata
values:
mxmlc -language+=klingon -title "checkintest!" -localized-description "it r0x0rs" en-us localized-description "c'est magnifique!" fr-fr -creator "Flexy Frank" -publisher "Franks
Beans" flexstore.mxml
In this example, the following values are compiled into the resulting SWF file:
<rdf:RDF xmlns:rdf='http://www.w3.org/1999/02/22-rdf-syntax-ns#'>
<rdf:Description rdf:about='' xmlns:dc='http://purl.org/dc/elements/1.1'>
<dc:format>application/x-shockwave-flash</dc:format>
<dc:title>checkintest!</dc:title>
<dc:description>
<rdf:Alt>
<rdf:li xml:lang='fr-fr'>c'est magnifique!</rdf:li>
<rdf:li xml:lang='x-default'>http://www.adobe.com/flex<
156 CHAPTER 8
/rdf:li>
<rdf:li xml:lang='en-us'>it r0x0rs</rdf:li>
</rdf:Alt>
</dc:description>
<dc:publisher>Franks Beans</dc:publisher>
<dc:creator>Flexy Frank</dc:creator>
<dc:language>EN</dc:language>
<dc:language>klingon</dc:language>
<dc:date>Dec 16, 2005</dc:date>
</rdf:Description>
</rdf:RDF>
For information on the SWF file format, see the Flash File Format Specification, which is available through the
Player Licensing program.
Setting the file encoding
You use the actionscript-file-encoding option to set the file encoding so that the application compiler
correctly interprets ActionScript files. This tag does not affect MXML files because they are XML files that contain
an encoding specification in the xml tag.
You use the actionscript-file-encoding option when your ActionScript files do not contain a Byte Order
Mark (BOM), and the files use an encoding that is different from the default encoding of your computer. If your
ActionScript files contain a BOM, the compiler uses the information in the BOM to determine the file encoding.
For example, if your ActionScript files use Shift_JIS encoding, have no BOM, and your computer uses ISO-88591 as the default encoding, you use the actionscript-file-encoding option, as the following example shows:
actionscript-file-encoding=Shift_JIS
Editing application settings
The mxmlc compiler includes options to set the application’s frame rate, size, script limits, and background color.
By setting them when you compile your application, you do not need to edit the HTML wrapper or the application’s MXML file. You can override these settings by using properties of the <mx:Application> tag or
properties of the <object> and <embed> tags in the HTML wrapper.
The following command-line example sets default application properties:
mxmlc -default-size 240 240 -default-frame-rate=24 -default-background-color=0xCCCCFF default-script-limits 5000 10 -- c:/myfiles/flex2/misc/MainApp.mxml
To successfully apply the value of the default-background-color option to your Flex application, you must set
the default background image to an empty string. Otherwise, this image of a gray gradient covers the background
color. For more information, see “Application Container” on page 451 in Adobe Flex 3 Developer Guide.
ADOBE FLEX 3 157
Building and Deploying Adobe Flex 3 Applications
For more information about the HTML wrapper, see “Creating a Wrapper” on page 311.
Using SWC files
Often, you use SWC files when compiling MXML files. SWC files can provide themes, components, or other
helper files. You typically specify SWC files used by the application by using the library-path option.
The following example compiles the RotationApplication.mxml file into the RotationApplication.swf file:
mxmlc -library-path+=c:/mylibraries/MyButtonSwc.swc
c:/myfiles/comptest/testRotation.mxml
In a configuration file, this appears as the following example shows:
<compiler>
<library-path>
<path-element>c:/flexdeploy/frameworks/libs/framework.swc</path-element>
<path-element>c:/flexdeploy/frameworks/locale/{locale}/framework_rb.swc</pathelement>
<path-element>c:/mylibraries/MyButtonSwc.swc</path-element>
</library-path>
</compiler>
About incremental compilation
You can use incremental compilation to decrease the time it takes to compile an application or component library
with the Flex application compilers. When incremental compilation is enabled, the compiler inspects changes to
the bytecode between revisions and only recompiles the section of bytecode that has changed. These sections of
bytecode are also referred to as compilation units.
You enable incremental compilation by setting the incremental option to true, as the following example shows:
mxmlc -incremental=true MyApp.mxml
Incremental compilation means that the compiler inspects your code, determines which parts of the application
are affected by your changes, and only recompiles the newer classes and assets. The Flex compilers generate many
compilation units that do not change between compilation cycles. It is possible that when you change one part of
your application, the change might not have any effect on the bytecode of another.
As part of the incremental compilation process, the compiler generates a cache file that lists the compilation units
of your application and information on your application’s structure. This file is located in the same directory as
the file that you are compiling. For example, if my application is called MyApp.mxml, the cache file is called
MyApp_n.cache, where n represents a checksum generated by the compiler based on compiler configuration. This
file helps the compiler determine which parts of your application must be recompiled. One way to force a
complete recompile is to delete the cache file from the directory.
158 CHAPTER 8
Incremental compilation can help reduce compile time on small applications, but you achieve the biggest gains on
larger applications.
The default value of the incremental compiler option is true for the Flex Builder application compiler. For the
mxmlc command-line compiler, the default is false.
Using conditional compilation
To include or exclude blocks of code for certain builds, you can use conditional compilation. The mxmlc compiler
lets you pass the values of constants to the application at compile time. Commonly, you pass a Boolean that is used
to include or exclude a block of code such as debugging or instrumentation code. The following example conditionalizes a block of code by using an inline constant Boolean:
ADOBE FLEX 3 159
Building and Deploying Adobe Flex 3 Applications
CONFIG::debugging {
// Execute debugging code here.
}
To pass constants, you use the compiler.define compiler option. The constant can be a Boolean, String, or
Number, or an expression that can be evaluated in ActionScript at compile time. This constant is then accessible
within the application source code as a global constant.
To use the define option, you define a configuration namespace for the constant, a variable name, and a value
using the following syntax:
-define=namespace::variable_name,value
The configuration namespace can be anything you want. The following example defines the constant debugging
with a value of true in the CONFIG namespace:
-define=CONFIG::debugging,true
To set the values of multiple constants on the command-line, use the define option more than once; for example:
mxmlc -define=CONFIG::debugging,true -define=CONFIG::release,false MyApp.mxml
To set the value of these constants in the flex-config.xml file, rather than on the command line, you write this as
the following example shows:
<compiler>
<define>
<name>CONFIG::debugging</name>
<value>true</value>
</define>
<define>
<name>CONFIG::release</name>
<value>false</value>
</define>
</compiler>
In a Flex Ant task, you can set constants with a define element, as the following example shows:
<mxmlc ... >
<define name="CONFIG::debugging" value="true"/>
<define name="CONFIG::release" value="false"/>
</mxmlc>
Using inline constants
You can use inline constants in ActionScript. Boolean values can be used to conditionalize top-level definitions of
functions, classes, and variables, in much the same way you would use an #IFDEF preprocessor command in C or
C++. You cannot use constant Boolean values to conditionalize metadata or import statements.
160 CHAPTER 8
The following example conditionalizes which class definition the compiler uses when compiling the application:
// compilers/MyButton.as
package {
import mx.controls.Button;
CONFIG::debugging
public class MyButton extends Button {
public function MyButton() {
super();
// Set the label text to blue.
setStyle("color", 0x0000FF);
}
}
CONFIG::release
public class MyButton extends Button {
public function MyButton() {
super();
// Set the label text to red.
setStyle("color", 0xFF0000);
}
}
}
You can also pass Strings and Numbers to the application and use them as inline constants, in the same way you
might use a #define directive in C or C++. For example, if you pass a value named NAMES::Company, you replace
it with a constant in your application by using an ActionScript statement like the following example shows:
private static const companyName:String = NAMES::Company;
Passing expressions
You can pass expressions that can be evaluated at compile time as the value of the constant. The following example
evaluates to false:
-define+=CONFIG::myConst,"1 > 2"
The following example evaluates to 3:
-define+=CONFIG::myConst,"4 - 1"
Expressions can contain constants and other configuration values; for example:
-define+=CONFIG::bool2,false -define+=CONFIG::and1,"CONFIG::bool2 && false"
In general, you should wrap all constants with double quotes, so that the mxmlc compiler correctly parses them
as a single argument.
ADOBE FLEX 3 161
Building and Deploying Adobe Flex 3 Applications
Passing Strings
When passing Strings, you must add extra quotes to ensure that the compiler parses them correctly.
To define Strings on the command-line, you must surround them with double-quotes, and either escape-quote
them ("\"Adobe Systems\"" or "\’Adobe Systems\’") or single-quote them ("'Adobe Systems'" ).
The following example shows both methods of including Strings on the command line:
-define+=NAMES::Company,"’Adobe Systems’" -define+=NAMES::Ticker,"\"ADBE\""
To define Strings in configuration files, you must surround them with single or double quotes; for example:
<define>
<name>NAMES::Company</name>
<value>'Adobe Systems'</value>
</define>
<define>
<name>NAMES::Ticker</name>
<value>"ADBE"</value>
</define>
To pass empty Strings on the command line, use single quotes surrounded by double quotes, as the following
example shows:
-define+=CONFIG::debugging,"’’"
To pass empty Strings in configuration files, use double quotes ("") or single quotes (’’).
Using compc, the component compiler
You use the component compiler to generate a SWC file from component source files and other asset files such as
images and style sheets.
To use the component compiler with Flex SDK, you use the compc command-line utility. In Flex Builder, you use
the compc component compiler by building a new Flex Library Project. Some of the Flex SDK command-line
options have equivalents in the Flex Builder environment. You use the tabs in the Flex Library Build Path dialog
box to add classes, libraries, and other resources to the SWC file.
The following examples show component compiler usage.
About the component compiler options
The component compiler options let you define settings such as the classes, resources, and namespaces to include
in the resulting SWC file.
162 CHAPTER 8
The component compiler can take most of the application compiler options, and the options described in this
section. For a description of the application compiler options, see “About the application compiler options” on
page 139. Application compiler options that do not apply to the component compiler include the metadata
options (such as contributor, title, and date), default application options (such as default-backgroundcolor and default-frame-rate), locale, debug-password, and theme.
The component compiler has compiler options that the application compilers do not have. The following table
describes the component compiler options that are not used by the application compilers:
Option
Description
compute-digest=true|false
Writes a digest to the catalog.xml of a library. Use this when the library will be used
as a cross-domain RSL or when you want to enforce the versioning of RSLs. The
default value is true.
For more information about RSLs, see “Using Runtime Shared Libraries” on
page 195.
directory=false|true
Outputs the SWC file in an open directory format rather than a SWC file. You use this
option with the output option to specify a destination directory, as the following
example shows:
compc -directory=true -output=destination_directory
You typically use this option when you create RSLs because you must extract the
library.swf file from the SWC file before deployment. For more information, see
“Using Runtime Shared Libraries” on page 195.
The default value is false.
include-classes class [...]
Specifies classes to include in the SWC file. You provide the class name (for example,
MyClass) rather than the file name (for example, MyClass.as) to the file for this
option. As a result, all classes specified with this option must be in the compiler’s
source path. You specify this by using the source-path compiler option.
You can use packaged and unpackaged classes. To use components in namespaces,
use the include-namespaces option.
If the components are in packages, ensure that you use dot-notation rather than
slashes to separate package levels.
This is the default option for the component compiler.
ADOBE FLEX 3 163
Building and Deploying Adobe Flex 3 Applications
Option
Description
include-file name path [...]
Adds the file to the SWC file. This option does not embed files inside the library.swf
file. This is useful for adding graphics files, where you want to add non-compiled
files that can be referenced in a style sheet or embedded as assets in MXML files.
If you add a stylesheet that references compiled resources such as programmatic
skins, use the include-stylesheet option.
If you use the [Embed] syntax to add a resource to your application, you are not
required to use this option to also link it into the SWC file.
For more information, see “Adding nonsource classes” on page 171.
include-lookup-only=false|true
If true, only manifest entries with lookupOnly=true are included in the SWC
catalog. The default value is false.
This is an advanced option.
include-namespaces uri [...]
Specifies namespace-style components in the SWC file. You specify a list of URIs to
include in the SWC file. The uri argument must already be defined with the
namespace option.
To use components in packages, use the include-classes option.
include-sources path-element
Specifies classes or directories to add to the SWC file. When specifying classes, you
specify the path to the class file (for example, MyClass.as) rather than the class name
itself (for example, MyClass). This lets you add classes to the SWC file that are not in
the source path. In general, though, use the include-classes option, which lets
you add classes that are in the source path.
If you specify a directory, this option includes all files with an MXML or AS extension,
and ignores all other files.
include-stylesheet name path [...]
Specifies stylesheets to add to the SWC file. This option compiles classes that are
referenced by the stylesheet before including the stylesheet in the SWC file.
You do not need to use this option for all stylesheets; only stylesheets that reference
assets that need to be compiled such as programmatic skins or other class files. If
your stylesheet does not reference compiled assets, you can use the includefile option.
This option does not compile the stylesheet into a SWF file before including it in the
SWC file. You compile a CSS file into a SWF file when you want to load it at run time.
On the command line, you cannot point the compc utility to a single directory and have it compile all components
and source files in that directory. You must specify each source file to compile.
If you have a large set of components in a namespace to include in a SWC file, you can use a manifest file to avoid
having to type an unwieldy compc command. For information on creating manifest files, see “About manifest
files” on page 175.
164 CHAPTER 8
The following sections describe common scenarios where you could use the compc command-line compiler. You
can apply the techniques described here to compiling SWC files in Flex Builder with the Flex Library Compiler.
Compiling stand-alone components and classes
In many cases, you have one or more components that you use in your Flex applications, but you do not have them
in a package structure. You want to be able to use them in the generic namespace (“*”) inside your Flex applications. In these cases, you use the include-classes option to add the components to your SWC file.
The following command-line example compiles two MXML components, Rotation.as and RotationInstance.as,
into a single SWC file:
compc -source-path .
-output c:/jrun4/servers/flex2/flex/WEB-INF/flex/user_classes/RotationClasses.swc
-include-classes rotationClasses.Rotation rotationClasses.RotationInstance
The rotationClasses directory is a subdirectory of the current directory, which is in the source path. The SWC file
is output to the user_classes directory, so the new components require no additional configuration to be used in
a server environment.
You use the include-classes option to add components to the SWC file. You use just the class name of the
component and not the full filename (for example, MyComponent rather than MyComponent.as). Use dotnotation to specify the location of the component in the package structure.
You also set the source-path to the current directory or a directory from which the component directory can be
determined.
You can also add the framework.swc and framework_rb.swc files to the library-path option. This addition is
not always required if the compiler can determine the location of these SWC files on its own. However, if you move
the compiler utility out of the default location relative to the frameworks files, you must add it to the library path.
The previous command-line example appears in a configuration file as follows:
<compiler>
<source-path>
<path-element>.</path-element>
</source-path>
<output>
c:/jrun4/servers/flex2/flex/WEB-INF/flex/user_classes/RotationClasses.swc
</output>
</compiler>
<include-classes>
<class>rotationClasses.Rotation</class>
<class>rotationClasses.RotationInstance</class>
</include-classes>
ADOBE FLEX 3 165
Building and Deploying Adobe Flex 3 Applications
To use components that are not in a package in a Flex application, you must declare a namespace that includes the
directory structure of the components. The following example declares a namespace for the components compiled
in the previous example:
<?xml version="1.0"?>
<mx:Application xmlns:mx="http://www.adobe.com/2006/mxml"
xmln:local="rotationclasses.*">
...
<local:Rotation id="Rotate75" angleFrom="0" angleTo="75" duration="100"/>
...
</mx:Application>
To use the generic namespace of “*” rather than a namespace that includes a component’s directory structure, you
can include the directory in the source-path as the following command-line example shows:
compc -source-path . c:/flexdeploy/comps/rotationClasses
-output c:/jrun4/servers/flex2/flex/WEB-INF/flex/user_classes/RotationComps.swc
-include-classes Rotation RotationInstance
Then, you can specify the namespace in your application as:
<mx:Application xmlns:mx="http://www.adobe.com/2006/mxml" xmln:local="*">
You are not required to use the directory name in the include-classes option if you add the directory to the
source path.
These options appear in a configuration file, as the following example shows:
<compiler>
<source-path>
<path-element>.</path-element>
<path-element>c:/flexdeploy/comps/rotationClasses</path-element>
</source-path>
<output>c:/jrun4/servers/flex2/flex/WEB-INF/flex/user_classes/
RotationComps.swc</output>
</compiler>
<include-classes>
<class>Rotation</class>
<class>RotationInstance</class>
<include-classes>
This example assumes that the components are not in a named package. For information about compiling
packaged components, see “Compiling components in packages” on page 166.
166 CHAPTER 8
Compiling components in packages
Some components are created inside packages or directory structures so that they can be logically grouped and
separated from application code. As a result, packaged components can have a namespace declaration that
includes the package name or a unique namespace identifier that references their location within a package.
You compile packaged components similarly to how you compile components that are not in packages. The only
difference is that you must use the package name in the namespace declaration, regardless of how you compiled
the SWC file, and that package name uses dot-notation instead of slashes. You must be sure to specify the location
of the classes in the source-path.
In the following command-line example, the MyButton component is in the mypackage package:
compc -source-path . c:/flexdeploy/comps/mypackage/
-output c:/jrun4/servers/flex2/flex/WEB-INF/flex/user_classes/MyButtonComp.swc
-include-classes mypackage.MyButton
These options appear in a configuration file, as the following example shows:
<compiler>
<source-path>
<path-element>.</path-element>
<path-element>c:/flexdeploy/comps/mypackage/</path-element>
</source-path>
<output>
c:/jrun4/servers/flex2/flex/WEB-INF/flex/user_classes/MyButtonComp.swc
</output>
</compiler>
<include-classes>
<class>mypackage.MyButton</class>
<include-classes>
To access the MyButton class in your application, you must declare a namespace that includes its package; for
example:
<mx:Application xmlns:mx="http://www.adobe.com/2006/mxml" xmlns:mine="mypackage.*">
You can use the compc compiler to compile components from multiple packages into a single SWC file. In the
following command-line example, the MyButton control is in the mypackage package, and the CustomComboBox control is in the acme package:
compc -source-path .
-output c:/jrun4/servers/flex2/flex/WEB-INF/flex/user_classes/CustomComps.swc
-include-classes mypackage.MyButton
acme.CustomComboBox
You then define each package as a separate namespace in your MXML application:
<?xml version="1.0"?>
ADOBE FLEX 3 167
Building and Deploying Adobe Flex 3 Applications
<mx:Application xmlns:mx="http://www.adobe.com/2006/mxml" xmlns:mine="mypackage.*"
xmlns:acme="acme.*">
<mine:MyButton/>
<acme:CustomComboBox/>
</mx:Application>
Compiling components using namespaces
When you have many components in one or more packages that you want to add to a SWC file and want to
reference from an MXML file through a custom namespace, you can list them in a manifest file, then reference
that manifest file on the command line. Also, you can specify a namespace for that component or define multiple
manifest files and, therefore, specify multiple namespaces to compile into a single SWC file.
When you use manifest files to define the components in your SWC file, you specify the namespace that the
components use in your Flex applications. You can compile all the components from one or more packages into a
single SWC file. If you have more than one package, you can set it up so that all packages use a single namespace
or so that each package has an individual namespace.
Components in a single namespace
In the manifest file, you define which components are in a namespace. The following sample manifest file defines
two components to be included in the namespace:
<?xml version="1.0"?>
<!-- SimpleManifest.xml -->
<componentPackage>
<component id="MyButton" class="MyButton"/>
<component id="MyOtherButton" class="MyOtherButton"/>
</componentPackage>
The manifest file can contain references to any number of components in a namespace. The class option is the
full class name (including package) of the class. The id property is optional, but you can use it to define the
MXML tag interface that you use in your Flex applications. If the compiler cannot find one or more files listed in
the manifest, it throws an error. For more information on using manifest files, see “About manifest files” on
page 175.
On the command line, you define the namespace with the namespace option; for example:
-namespace http://mynamespace SimpleManifest.xml
Next, you target the defined namespace for inclusion in the SWC file with the include-namespaces option; for
example:
-include-namespaces http://mynamespace
168 CHAPTER 8
The namespace option matches a namespace (such as “http://www.adobe.com/2006/mxml”) with a manifest file.
The include-namespaces option instructs compc to include all the components listed in that namespace’s
manifest file in the SWC file.
After you define the manifest file, you can compile the SWC file. The following command-line example compiles
the components into the “http://mynamespace” namespace:
compc -source-path .
-output c:/jrun4/servers/flex2/flex/WEB-INF/flex/user_classes/MyButtons.swc
-namespace http://mynamespace SimpleManifest.xml
-include-namespaces http://mynamespace
In a configuration file, these options appear as the following example shows:
<compiler>
<source-path>
<path-element>.</path-element>
</source-path>
<output>c:/jrun4/servers/flex2/flex/WEB-INF/flex/user_classes/MyButtons.swc</output>
<namespaces>
<namespace>
<uri>http://mynamespace</uri>
<manifest>SimpleManifest.xml</manifest>
</namespace>
</namespaces>
</compiler>
<include-namespaces>
<uri>http://mynamespace</uri>
<include-namespaces>
In your Flex application, you can access the components by defining the new namespace in the
<mx:Application> tag, as the following example shows:
<?xml version="1.0"?>
<mx:Application xmlns:mx="http://www.adobe.com/2006/mxml" xmlns:a="http://mynamespace">
<a:MyButton/>
<a:MyOtherButton/>
</mx:Application>
Components in multiple namespaces
You can use the compc compiler to compile components that use multiple namespaces into a SWC file. Each
namespace must have its own manifest file.
The following command-line example compiles components defined in the AcmeManifest.xml and SimpleManifest.xml manifest files:
ADOBE FLEX 3 169
Building and Deploying Adobe Flex 3 Applications
compc -source-path .
-output c:/jrun4/servers/flex2/flex/WEB-INF/flex/user_classes/MyButtons.swc
-namespace http://acme2006AcmeManifest.xml
-namespace http://mynamespace SimpleManifest.xml
-include-namespaces http://acme2006 http://mynamespace
In this case, all components in both the http://mynamespace and http://acme2006 namespaces are targeted and
included in the output SWC file.
In a configuration file, these options appear as the following example shows:
<compiler>
<source-path>
<path-element>.</path-element>
</source-path>
<output>c:/jrun4/servers/flex2/flex/WEB-INF/flex/user_classes/MyButtons.swc</output>
<namespaces>
<namespace>
<uri>http://acme2006</uri>
<manifest>AcmeManifest.xml</manifest>
</namespace>
<namespace>
<uri>http://mynamespace</uri>
<manifest>SimpleManifest.xml</manifest>
</namespace>
</namespaces>
</compiler>
<include-namespaces>
<uri>http://acme2006</uri>
<uri>http://mynamespace</uri>
<include-namespaces>
In your MXML application, you define both namespaces separately:
<?xml version="1.0"?>
<mx:Application xmlns:mx="http://www.adobe.com/2006/mxml"
xmlns:simple="http://mynamespace" xmlns:acme="http://acme2006">
<simple:SimpleComponent/>
<acme:AcmeComponent/>
</mx:Application>
You are not required to include all namespaces that you define as target namespaces. You can define multiple
namespaces, but use only one target namespace. You might do this if some components use other components
that are not directly exposed as MXML tags. You cannot then directly access the components in the unused
namespace, however.
The following command line example defines two namespaces, http://acme2006 and
http://mynamespace, but only includes one as a namespace target:
170 CHAPTER 8
compc -source-path .
-output c:/jrun4/servers/flex2/flex/WEB-INF/flex/user_classes/MyButtons.swc
-namespace http://acme2006AcmeManifest.xml
-namespace http://mynamespace SimpleManifest.xml
-include-namespaces http://mynamespace
Adding utility classes
You can add any classes that you want to use in your Flex applications to a SWC file. These classes do not have to
be components, but are often files that components use. They are classes that might be used at run time and,
therefore, are not checked by the compiler. For example, your components might use a library of classes that
perform mathematical functions, or use a custom logging utility. This documentation refers to these classes as
utility classes. Utility classes are not exposed as MXML tags.
To add utility classes to a SWC file, you use the include-sources option. This option lets you specify a path to
a class file rather than the class name, or specify an entire directory of classes.
The following command-line example adds the FV_calc.as and FV_format.as utility classes to the SWC file:
compc -source-path .
-output c:/jrun4/servers/flex2/flex/WEB-INF/flex/user_classes/MySwc.swc
-include-sources FV_classes/FV_format.as FV_classes/FV_calc.as
-include-classes asbutton.MyButton
In a configuration file, these options appear as the following example shows:
<compiler>
<source-path>
<path-element>.</path-element>
</source-path>
<output>c:/jrun4/servers/flex2/flex/WEB-INF/flex/user_classes/MySwc.swc</output>
</compiler>
<include-classes>
<class>asbutton.MyButton</class>
</include-classes>
<include-sources>
<path-element>FV_classes/FV_format.as</path-element>
<path-element>FV_classes/FV_calc.as</path-element>
<include-sources>
When specifying files with the include-sources option, you must give the full filename (for example,
FV_calc.as instead of FV_calc) because the file is not a component.
You can also provide a directory name to the include-sources option. In this case, the compiler includes all files
with an MXML or AS extension, and ignores all other files.
ADOBE FLEX 3 171
Building and Deploying Adobe Flex 3 Applications
Classes that you add with the include-sources option can be accessed from the generic namespace in your Flex
applications. To use them, you need to add the following code in your Flex application tag:
xmlns:local="*"
You can then use them as tags; for example:
<local:FV_calc id="calc" rate=".0125" nper="12" pmt="100" pv="0" type="1"/>
Adding nonsource classes
You often include noncompiled (or nonsource) files with your applications. A nonsource file is a class or resource
(such as a style sheet or graphic) that is not compiled but is included in the SWC file for other classes to use. For
example, a font file that you embed or a set of images that you use as graphical skins in a component’s style sheet
should not be compiled but should be included in the SWC file. These are classes that you typically do not use the
[Embed] syntax to link in to your application.
Use the include-file option to define nonsource files in a SWC file.
The syntax for the include-file option is as follows:
-include-file name path
The name argument is the name used to reference the embedded file in your Flex applications. The path
argument is the current path to the file in the file system.
When you use the include-file option, you specify both a name and a filepath, as the following example shows:
compc -include-file logo.gif c:/images/logo/logo1.gif ...
In a configuration file, these options appear as the following example shows:
<compiler>
<output>c:/jrun4/servers/flex2/flex/WEB-INF/flex/user_classes/Combo.swc</output>
</compiler>
<include-file>
<name>logo.gif</name>
<path>c:/images/logo/logo1.gif</path>
</include-file>
<include-classes>
<class>asbutton.MyButton</class>
<include-classes>
Each name that you assign to a resource must be unique because the name becomes a global variable.
You cannot specify a list of files with the include-file option. So, you must add a separate include-file
option for each file that you include, as the following command-line example shows:
compc -include-file file1.jpg ../images/file1.jpg -include-file file2.jpg
../images/file2.jpg -- -output MyFile.swc
172 CHAPTER 8
If you want to add many resources to the SWC file, consider using a configuration file rather than listing all the
resources on the command line. For an example of a configuration file that includes multiple resources in a SWC
file, see “Using Styles and Themes” on page 589 in Adobe Flex 3 Developer Guide.
In general, specify a file extension for files that you include with the include-file option. In some cases,
omitting the file extension can lead to a loss of functionality. For example, if you include a CSS file in a theme SWC
file, you must set the name to be *.css. When Flex examines the SWC file, it applies all CSS files in that SWC file
to the application. CSS files without the CSS extension are ignored.
Creating themes
You can use the include-file and include-classes options to add skin files and style sheets to a SWC file.
The SWC file can then be used as a theme. For more information about using themes in Flex applications, see
“Using Styles and Themes” on page 589 in Adobe Flex 3 Developer Guide.
Viewing errors and warnings
You can use the compiler options to specify what level of warnings and errors to view. Also, you can set levels of
logging with the compiler options.
Viewing warnings and errors
There are several options that let you customize the level of warnings and errors that are displayed by the Flex
compilers, including the following:
•
•
•
•
•
show-binding-warnings
show-actionscript-warnings
show-shadowed-device-font-warnings
strict
warnings
To disable all warnings, set the warnings option to false.
The show-actionscript-warnings option displays compiler warnings for the following situations:
1
Situations that are probably not what the developer intended, but are still legal; for example:
if (a = 10)
if (b == NaN)
var b;
// Did you really want '==' instead of '='?
// Any comparison with NaN is always false.
// Missing type declaration.
ADOBE FLEX 3 173
Building and Deploying Adobe Flex 3 Applications
•
Usage of deprecated or removed ActionScript 2.0 APIs.
•
Situations where APIs behave differently in ActionScript 2.0 than in ActionScript 3.0.
You can customize the types of warnings displayed by using options that begin with warn (for example, warnconstructor-return-values and warn-bad-type-cast). A complete list of warnings are available in the
advanced command-line help or in the flex-config.xml file.
The strict option enforces typing and reports run-time verifier errors at compile time. This option assumes that
definitions are not dynamically redefined at run time, so these checks can be made at compile time. It displays
errors for conditions such as undefined references, const and private violations, argument mismatches, and type
checking.
The show-binding-warnings option displays warnings when Flash Player cannot detect changes to bound
properties.
About deprecation
The command-line compilers express deprecation warnings by default. In some cases, Flex functionality has been
deprecated. Deprecated features and properties have the following characteristics:
•
Generate compilation warnings that Flex displays in the HTML wrapper for the application.
•
•
Continue to work in Flex 2 and 2.0.1.
Will be removed from the product in a future major release.
You can suppress deprecation warnings by setting the show-deprecated-warnings option to false.
There is a [Deprecated] metadata tag that you can use to deprecate your own classes and class elements. For
more information, see “Deprecated metadata tag” on page 41 in Creating and Extending Adobe Flex 3 Components.
About logging
Errors and warnings are reported differently, depending on which compiler you are using.
The mxmlc and compc command-line compilers send error and warning messages to the standard output. You
can redirect this output by using the redirector (>).
Flex Builder displays error and warning messages in the Problems tab.
The web-tier compiler displays error and warning messages in the requesting browser by default. The web-tier
compiler also stores error and warning messages in a log file. For more information on configuring logging for
the web-tier compiler, see “Using the web-tier compiler log files” on page 351.
174 CHAPTER 8
About SWC files
A SWC file is an archive file, sometimes also referred to as a class library, for Flex components and other assets.
SWC files contain a SWF file and a catalog.xml file, in addition to properties files and other uncompiled assets
such as CSS files. The SWF file implements the compiled component or group of components and includes
embedded resources as symbols. Flex applications extract the SWF file from a SWC file and use the SWF file’s
contents when the application refers to resources in that SWC file. The catalog.xml file lists of the contents of the
component package and its individual components.
In most cases, the symbols defined in the SWF file that are referenced by the application are embedded in the Flex
application at compile-time. This is known as static linking. The application compiler only includes those classes
that are used by your application, and dependent classes, in the final SWF file.
You can also dynamically link the contents of SWC files. Dynamic linking is when the entire SWF file is loaded at
run time. To achieve dynamic linking of the SWF file, you must use the SWC file as a Runtime Shared Library, or
RSL. For more information, see “Using Runtime Shared Libraries” on page 195.
SWC files make it easy to exchange components and other assets among Flex developers. You need only exchange
a single file, rather than the MXML or ActionScript files and images and other resource files. The SWF file in a
SWC file is compiled, which means that the code is loaded efficiently and it is hidden from casual view. Also,
compiling a component as a SWC file can make namespace allocation an easier process.
You can package and expand SWC files with tools that support the PKZip archive format, such as WinZip or jar.
However, do not manually change the contents of a SWC file, and do not try to run the SWF file that is in a SWC
file in Flash Player.
You typically create SWC files by using compc, the command-line component compiler. You can also save SWC
files as open directories rather than archived files. This give you easier access to the contents of the SWC file. You
create an open directory SWC by setting the directory option to true. This is typically only used when you
create an RSL because RSLs require that you deploy the SWF file with your application.
The properties files inside SWC files are uncompiled text files in UTF-8 format. They are used as resource bundles
for localization of Flex applications. Within the SWC file, they are stored in the /locale/locale_string directory,
where locale_string is something like en_US or fr_FR. For more information, see “Localizing Flex Applications” on page 1101 in Adobe Flex 3 Developer Guide.
ADOBE FLEX 3 175
Building and Deploying Adobe Flex 3 Applications
Distributing SWC files
After you generate a SWC file, you can use it in your Flex applications.
You can also copy SWC files to a directory specified by the library-path compiler option. You must store SWC
files at the top level of the user_classes directory or the directory specified by the library-path. You cannot store
SWC files in subdirectories.
To use a SWC file when compiling components or applications from the command line or from within Flex
Builder, you specify the location of the SWC file with the library-path compiler option.
Note: Do not store custom components or classes in the flex_root/WEB-INF/flex/libs directory. This directory is for
Adobe classes and components.
Using components in SWC files
If a component in a SWC file does not have a namespace, you can add a generic namespace identifier in your
<mx:Application> tag to use the component, as the following example shows:
<mx:Application xmlns:mx="http://www.adobe.com/2006/mxml" xmlns:a="*">
If the component has a package name as part of its namespace, you must do one of the following:
1
Add the package name to the namespace declaration in the <mx:Application> tag; for example:
<mx:Application xmlns:mx="http://www.adobe.com/2006/mxml" xmlns:but="mycomponents.*">
2 Create a manifest file and recompile the SWC file. You pass the manifest file to the compc compiler by using
the namespace option. In the <mx:Application> tag, you specify only the unique namespace URI that you used
with compc. For more information on specifying a namespace for the component, see “Compiling components
using namespaces” on page 167.
About manifest files
Manifest files map a component namespace to class names. They define the package names that the components
used before being compiled into a SWC file. They are not required when compiling SWC files, but they can help
keep your source files organized.
Manifest files use the following syntax:
<?xml version="1.0"?>
<componentPackage>
<component id="component_name" class="component_class"/>
[...]
</componentPackage>
176 CHAPTER 8
For example:
<?xml version="1.0"?>
<componentPackage>
<component id="MyButton" class="package1.MyButton"/>
<component id="MyOtherButton" class="package2.MyOtherButton"/>
</componentPackage>
In a manifest file, the id property of each <component> tag must be unique. It is the name you use for the tag in
your Flex applications. For example, you define the id as MyButton in the manifest file:
<component id="MyButton" class="asbutton.MyButton"/>
In your Flex application, you use MyButton as the tag name:
<local:MyButton label="Click Me"/>
The id property in the manifest file entry is optional. If you omit it, you can use the class name as the tag. This is
useful if you have two classes with the same name in different packages. In this case, you use the manifest to define
the tags, as the following example shows:
<?xml version="1.0"?>
<componentPackage>
<component id="BoringButton" class="boring.MyButton"/>
<component id="GreatButton" class="great.MyButton"/>
</componentPackage>
Some SWC files consist of multiple components from different packages, so compc includes a manifest file with
your SWC file in those cases to prevent compiler errors.
When compiling the SWC file, you specify the manifest file by using the namespace and the includenamespaces options. You define the namespace and its contents with the namespace option:
-namespace http://mynamespace mymanifest.xml
Then you identify that namespace’s contents for inclusion in the SWC file:
-include-namespaces http://mynamespace
Using fcsh, the Flex compiler shell
The fcsh (Flex Compiler Shell) utility provides a shell environment that you use to compile Flex applications,
modules, and component libraries. It works very similarly to the mxmlc and compc command line compilers, but
it compiles faster than the mxmlc and compc command-line compilers. One reason is that by keeping everything
in memory, fcsh eliminates the overhead of launching the JVM and loading the compiler classes. Another reason
is that compilation results (for example, type information) can be kept in memory for subsequent compilations.
ADOBE FLEX 3 177
Building and Deploying Adobe Flex 3 Applications
This utility is intended to improve the experience of users of the command-line compilers. If you are using Flex
Builder, you do not need to use fcsh. The Flex Builder tool already uses the optimizations provided by fcsh.
For simple applications, fcsh might not be necessary. But for more complex applications that you compile
frequently, you should experience a significant performance improvement over using the mxmlc and compc
command-line compilers.
When you first compile an application with fcsh, you will not typically notice any difference in speed between the
fcsh and the command-line compilers. This is because fcsh must load the application model and custom libraries
into memory, just as the command-line compilers would. After that, however, each subsequent compilation uses
the libraries in memory to compile. This reduces the amount of disk access that the compilers need to perform
and should result in shorter compile times.
The fcsh tool is in the bin directory. For Unix and Mac OS, it is a shell script called fcsh. For Windows, it is fcsh.exe.
You invoke it only from the command line. The Java settings are managed by the jvm.config file in the bin
directory.
Using fcsh
You invoke fcsh from the command line. You can launch the utility either as an executable (Windows) or shell
command (Unix/Linux/Mac).
1
Open a command prompt.
2
Navigate to the {SDK_root}/bin directory.
Enter fcsh at the command line. Your commands will now be executed within the fcsh environment. You will
know this if the (fcsh).
3
Typically, you compile a simple application when you first launch fcsh; for example:
(fcsh) mxmlc c:/myfiles/MyApp.mxml
The fcsh utility returns a target id:
fcsh: Assigned 1 as the compile target id.
You then refer to the target ids when using subsequent commands inside the fcsh utility. For example, to compile
the application with incremental compilation:
(fcsh) compile 1
You can enter help in the fcsh shell to see a list of available options; for example:
(fcsh) help
You can enter quit in the fcsh shell to exit fcsh and return to the command prompt; for example:
(fcsh) quit
178 CHAPTER 8
The following example shows that fcsh dramatically reduces compilation time when compiling the same application multiple times:
(fcsh) mxmlc -benchmark=true
Total time: 8885ms
Peak memory usage: 84 MB
(fcsh) mxmlc -benchmark=true
Total time: 5140ms
Peak memory usage: 84 MB
flexstore.mxml
(Heap: 58, Non-Heap: 26)
flexstore.mxml
(Heap: 57, Non-Heap: 27)
Then, the second full compilation of the same application is much faster:
> touch flexstore.mxml
(fcsh) compile 1
Files changed: 1 Files affected: 0
Total time: 933ms
Peak memory usage: 88 MB (Heap: 62, Non-Heap: 26)
flexstore.swf (522456 bytes)
Total time: 1102ms
Peak memory usage: 77 MB (Heap: 51, Non-Heap: 26)
(fcsh)
About fcsh options
The following table describes the available fcsh options:
Option
Description
clear [id]
Removes the target id(s) from memory but saves the target's *.cache file. If you enter this command without
specifying an id argument, fcsh clears all target ids. For information about cache files, see “About incremental compilation” on page 157.
compile id
Uses incremental compilation (without linking) to compile the specified id. If you try to compile a target that
has not changed, fcsh skips that target.
compc arg1 [...]
Compiles SWC files from the specified sources. This command returns a target id that you can then pass to
other fcsh options. The target ids are incremented by 1 for each new compilation. If you quit fcsh and then
relaunch it, all targets are cleared and the ids start at 1 again.
info [id]
Displays compiler target information such as the source files and cache file name. If you do not specify a
target id, fcsh prints information for all targets in reverse id order.
ADOBE FLEX 3 179
Building and Deploying Adobe Flex 3 Applications
Option
Description
mxmlc arg1 [...]
Compiles and optimizes the target Flex application or module using the mxmlc command-line compiler.
This command returns a target id that you can then pass to other fcsh options. The target ids are incremented by 1 for each new compilation. If you quit fcsh and then relaunch it, all targets are cleared and the
ids start at 1 again.
quit
Exits the fcsh utility. All data stored in memory is destroyed. When you relaunch fcsh, you cannot access any
targets that you created in a previous session.
180 CHAPTER 8
181
Chapter 9: Using Flex Ant Tasks
The Adobe® Flex® Ant tasks provide a convenient way to build your Flex projects using an industry-standard build
management tool. If you are already using Ant projects to build Flex applications, you can use the Flex Ant tasks
to replace your exec or java commands that invoke the mxmlc and compc compilers. If you are not yet using Ant
to build your Flex applications, you can take advantage of these custom tasks to quickly and easily set up complex
build processes for your Flex applications.
The Flex Ant tasks feature includes two compiler tasks, mxmlc and compc. You can use these to compile Flex applications, modules, and component libraries. In addition, the Flex Ant tasks include the html-wrapper task that
lets you generate custom HTML wrappers and the supporting files for those wrappers.
The mxmlc and compc Flex Ant tasks extend the java Ant task. As a result, you can use all the available attributes
of the java Ant task in those Flex Ant tasks. This includes fork, maxmemory, and classpath.
For more information on using Ant, see the Ant project web site at http://ant.apache.org.
Topics
Installation . . . . . . . . . . . . . . . . . . . . . . . . . . . . . . . . . . . . . . . . . . . . . . . . . . . . . . . . . . . . . . . . . . . . . . . . . . . . . . . . . . . . . 181
Using Flex Ant tasks . . . . . . . . . . . . . . . . . . . . . . . . . . . . . . . . . . . . . . . . . . . . . . . . . . . . . . . . . . . . . . . . . . . . . . . . . . . . . 182
Working with compiler options . . . . . . . . . . . . . . . . . . . . . . . . . . . . . . . . . . . . . . . . . . . . . . . . . . . . . . . . . . . . . . . . . . . 184
Using the mxmlc task . . . . . . . . . . . . . . . . . . . . . . . . . . . . . . . . . . . . . . . . . . . . . . . . . . . . . . . . . . . . . . . . . . . . . . . . . . . . 187
Using the compc task . . . . . . . . . . . . . . . . . . . . . . . . . . . . . . . . . . . . . . . . . . . . . . . . . . . . . . . . . . . . . . . . . . . . . . . . . . . . 189
Using the html-wrapper task. . . . . . . . . . . . . . . . . . . . . . . . . . . . . . . . . . . . . . . . . . . . . . . . . . . . . . . . . . . . . . . . . . . . . . 190
Installation
Installing the Flex Ant tasks is a simple process. You copy a single JAR file from the Flex SDK ant directory to a
target directory. For Adobe® Flex® Builder™, the Flex Ant directory is located at flex_builder_install/sdks/3.0.0/ant.
For the SDK, the ant directory is located at sdk_install/ant.
Copy the flex_ant/lib/flexTasks.jar file to Ant's lib directory ({ant_root}/lib). If you do not copy this file to the lib
directory, you must specify it by using Ant's -lib option on the command line when you make a project.
The Flex Ant directory also includes the source code for the Flex Ant tasks.
182 CHAPTER 9
Using Flex Ant tasks
You can use the Flex Ant tasks in your existing projects or create new Ant projects that use them. There are three
tasks that you can use in your Ant projects:
• mxmlc — Invokes the application compiler. You use this compiler to compile Flex applications, modules,
resource modules, and CSS SWF files.
• compc — Invokes the component compiler. You use this compiler to compile SWC files and Runtime Shared
Libraries (RSLs).
• html-wrapper — Generates the HTML wrapper and supporting files for your Flex application. By using this
task, you can select the type of wrapper (with and without deep linking support, with and without express install,
and with and without player detection), as well as specify application settings such as the height, width, and
background color.
To use the custom Flex Ant tasks in your Ant projects, you must add the flexTasks.jar file to your project's lib
directory, and then point to that JAR file in the taskdef task. A taskdef task adds a new set of task definitions
to your current project. You use it to add task definitions that are not part of the default Ant installation. In this
case, you use the taskdef task to add the mxmlc, compc, and html-wrapper task definitions to your Ant installation. In addition, for most projects you set the value of the FLEX_HOME variable so that Ant can find your flexconfig.xml file and so that you can add the frameworks directory to your source path.
Use the Flex tasks in Ant:
Add a new taskdef task to your project. In this task, specify the flexTasks.tasks file as the resource, and point
to the flexTasks.jar file for the classpath. For example:
1
<taskdef resource="flexTasks.tasks"
classpath="${basedir}/flexTasks/lib/flexTasks.jar" />
Define the FLEX_HOME and APP_ROOT properties. Use these properties to point to your Flex SDK’s root
directory and application's root directory. Although not required, creating properties for these directories is a
common practice because you will probably use them several times in your Ant tasks, for example:
2
<property name="FLEX_HOME" value="C:/flex/sdk"/>
<property name="APP_ROOT" value="myApps"/>
3 Write a target that uses the Flex Ant tasks. The following example defines the main target that uses the mxmlc
task to compile the Main.mxml file:
<target name="main">
<mxmlc file="${APP_ROOT}/Main.mxml" keep-generated-actionscript="true">
<load-config filename="${FLEX_HOME}/frameworks/flex-config.xml"/>
ADOBE FLEX 3 183
Building and Deploying Adobe Flex 3 Applications
<source-path path-element="${FLEX_HOME}/frameworks"/>
</mxmlc>
</target>
The following shows the complete example:
<?xml version="1.0" encoding="utf-8"?>
<!-- mySimpleBuild.xml -->
<project name="My App Builder" basedir=".">
<taskdef resource="flexTasks.tasks"
classpath="${basedir}/flexTasks/lib/flexTasks.jar"/>
<property name="FLEX_HOME" value="C:/flex/sdk"/>
<property name="APP_ROOT" value="myApp"/>
<target name="main">
<mxmlc file="${APP_ROOT}/Main.mxml" keep-generated-actionscript="true">
<load-config filename="${FLEX_HOME}/frameworks/flex-config.xml"/>
<source-path path-element="${FLEX_HOME}/frameworks"/>
</mxmlc>
</target>
</project>
This example shows how to use different types of options for the mxmlc task. You can specify the value of the
keep-generated-actionscript option as an attribute of the mxmlc task's tag because it does not take any
child tags. To specify the values of the load-config and source-path options, you create child tags of the
mxmlc task's tag. For more information on using options, see “Working with compiler options” on page 184.
4
Execute the Ant project, as shown in the following example:
> ant -buildfile mySimpleBuild.xml main
If you did not copy the flexTasks.jar file to Ant's lib directory as described in “Installation” on page 181, you
must include the JAR file by using Ant's -lib option. For example:
> ant -lib c:/ant/lib/flexTasks.jar -buildfile mySimpleBuild.xml main
The output of these commands should be similar to the following:
Buildfile: mySimpleBuild.xml
main:
[mxmlc] Loading configuration file C:\flex\sdk\frameworks\flex-config.xml
[mxmlc] C:\myfiles\flex2\ant_tests\apps\Main.swf (150035 bytes)
BUILD SUCCESSFUL
Total time: 10 seconds
>
184 CHAPTER 9
Working with compiler options
The compc and mxmlc compilers share a very similar set of options. As a result, the behavior of the mxmlc and
compc Ant tasks are similar as well. T
You can specify options for the mxmlc and compc Flex tasks in a number of ways:
•
•
•
Task attributes
•
•
Nested elements
Single argument options
Multiple argument options
Implicit FileSets
Task attributes
The simplest method of specifying options for the Flex Ant tasks is to specify the name and value of commandline options as a task attribute. In the following example, the file and keep-generated-actionscript options
are specified as attributes of the mxmlc task:
<mxmlc file="${APP_ROOT}/Main.mxml" keep-generated-actionscript="true">
Many mxmlc and compc options have aliases (alternative shorter names). The Flex Ant tasks support all
documented aliases for these options.
Single argument options
Many compiler options specify the value of a single parameter. For example, the load-config option takes a
parameter named filename. You set these types of options by including an attribute in the task element whose
name is the option name and whose value is the value of the option.
The following example sets the values of the load-config and source-path options:
<mxmlc ... >
<load-config filename="${FLEX_HOME}/frameworks/flex-config.xml"/>
<source-path path-element="${FLEX_HOME}/frameworks"/>
</mxmlc>
The source-path option can take more than one path-element parameter. For more information, see
“Repeatable options” on page 185.
ADOBE FLEX 3 185
Building and Deploying Adobe Flex 3 Applications
Multiple argument options
Some compiler options, such as the default-size option, take more than one argument. The default-size
option takes a height and a width argument. You set the values of options that take multiple arguments by using
a nested element of the same name, with the attributes of the element corresponding to the arguments of the
option as shown in the command-line compiler’s online help.
For example, the online help for mxmlc shows the following syntax for the default-size option:
-default-size <width> <height>
To pass the option -default-size 800 600 to the mxmlc task, use the following syntax:
<mxmlc ...>
<default-size width="800" height="600"/>
</mxmlc>
Repeatable options
Some compiler options are repeatable. The online help shows their arguments in square brackets, followed by a
bracketed ellipses, like this:
-compiler.source-path [path-element] [...]
You set the value of repeatable options by using multiple nested elements of the same name as the option, along
with attributes of the same name as they appear in the online help.
The following example sets two values for the compiler.source-path option:
<mxmlc ...>
<compiler.source-path path-element="src"/>
<compiler.source-path path-element="../bar/src"/>
</mxmlc>
Nested elements
In some situations, options that are closely related are grouped together in a nested element of the main task
element. For example, the command-line compiler options with the compiler.fonts and metadata prefixes can
be grouped into nested elements. The compiler.fonts options use the element name fonts and the metadata
options use the element name metadata.
186 CHAPTER 9
The following example shows how to use the metadata nested element:
<mxmlc ...>
<metadata description="foo app">
<contributor name="Joe" />
<contributor name="Nick" />
</metadata>
</mxmlc>
In this example, you drop the metadata prefix when setting the description and contributor options as a
nested element.
This is a uniformly applied rule with one exception: the compiler.fonts.languages.language-range option
is set using a nested element with the name language-range, rather than languages.language-range.
Implicit FileSets
There are many examples in the Apache Ant project where tasks behave as implicit FileSets. For example, the
delete task, while supporting additional attributes, supports all of the attributes (such as dir and includes ) and
nested elements (such as include and exclude ) of a FileSet to specific the files to be deleted.
Some Flex Ant tasks allow nested attributes that are implicit FileSets. These nested attributes support all the
attributes and nested elements of an Ant FileSet while adding additional functionality. These elements are usually
used to specify repeatable arguments that take a filename as an argument.
The following example uses the implicit FileSet syntax with the include-sources nested element:
<include-sources dir="player/avmplus/core" includes="builtin.as, Date.as, Error.as,
Math.as, RegExp.as, XML.as"/>
When a nested element in a Flex Ant task is an implicit FileSet, it supports one additional attribute: append. The
reason for this is that some repeatable options for the Flex compilers have default values. When setting these
options in a command line, you can append new values to the default value of the option, or replace the default
value with the specified values. Setting the append value to true adds the new option to the list of existing options.
Setting the append value to false replaces the existing options with the new option. By default, the value of the
append attribute is false in implicit FileSets.
The following example sets the value of the append attribute to true and uses the Ant include element of an
implicit FileSet to add multiple SWC files to the include-libraries option:
<compiler.include-libraries dir="${swf.output}" append="true">
<include name="MyComponents.swc" />
<include name="AcmeComponents.swc" />
<include name="DharmaComponents.swc" />
</compiler.include-libraries>
ADOBE FLEX 3 187
Building and Deploying Adobe Flex 3 Applications
The following options are implemented as implicit FileSets:
compiler.external-library-path
compiler.include-libraries
compiler.library-path
compiler.theme
compiler.include-sources (compc only)
The Flex Ant task's implicit FileSets are also different from the Ant project's implicit FileSets in that they support
being empty, as in the following example:
<external-library-path/>
This is equivalent to using external-library-path= on the command line.
Using the mxmlc task
You use the mxmlc Flex Ant task to compile applications, modules, resource modules, and Cascading Style Sheets
(CSS) SWF files. This task supports most mxmlc command-line compiler options, including aliases.
For more information on using the mxmlc command-line compiler, see “Using mxmlc, the application compiler”
on page 139.
Required attributes
The mxmlc task requires the file attribute. The file attribute specifies the MXML file to compile. This attribute
does not have a command-line equivalent because it is the default option on the command line.
Unsupported options
The following mxmlc command-line compiler options are not supported by the mxmlc task:
•
help
•
version
Example
The following example mxmlc task explicitly defines the source-path and library-path options, in addition to
other properties such as incremental and keep-generated-actionscript. This example also specifies an
output location for the resulting SWF file. This example defines two targets: main and clean. The main target
compiles the Main.mxml file into a SWF file. The clean target deletes the output of the main target.
188 CHAPTER 9
<?xml version="1.0" encoding="utf-8"?>
<!-- myMXMLCBuild.xml -->
<project name="My App Builder" basedir=".">
<taskdef resource="flexTasks.tasks"
classpath="${basedir}/flexTasks/lib/flexTasks.jar" />
<property name="FLEX_HOME" value="C:/flex/sdk"/>
<property name="APP_ROOT" value="apps"/>
<property name="DEPLOY_DIR" value="c:/jrun4/servers/default/default-war"/>
<target name="main">
<mxmlc
file="${APP_ROOT}/Main.mxml"
output="${DEPLOY_DIR}/Main.swf"
actionscript-file-encoding="UTF-8"
keep-generated-actionscript="true"
incremental="true"
>
<!-- Get default compiler options. -->
<load-config filename="${FLEX_HOME}/frameworks/flex-config.xml"/>
<!-- List of path elements that form the roots of ActionScript
class hierarchies. -->
<source-path path-element="${FLEX_HOME}/frameworks"/>
<!-- List of SWC files or directories that contain SWC files. -->
<compiler.library-path dir="${FLEX_HOME}/frameworks" append="true">
<include name="libs" />
<include name="../bundles/{locale}" />
</compiler.library-path>
<!-- Set size of output SWF file. -->
<default-size width="500" height="600" />
</mxmlc>
</target>
<target name="clean">
<delete dir="${APP_ROOT}/generated"/>
<delete>
<fileset dir="${DEPLOY_DIR}" includes="Main.swf"/>
</delete>
</target>
</project>
ADOBE FLEX 3 189
Building and Deploying Adobe Flex 3 Applications
Using the compc task
You use the compc Flex Ant task to compile component SWC files. This task supports most compc command-line
compiler options, including aliases. For more information on using the compc command-line compiler, see
“Using compc, the component compiler” on page 161.
Required attributes
The only required attribute for the compc task is the output attribute, which specifies the name of the SWC file
that the compc task creates.
Special attributes
The include-classes attribute takes a space-delimited list of class names. For example:
<compc include-classes="custom.MyPanel custom.MyButton" ... >
...
</compc>
When using the include-resource-bundles attribute, you should not specify them as a comma or spacedelimited list in a single entry. Instead, add a separate nested tag for each resource bundle that you want to include,
as the following example shows:
<compc output="${swf.output}/compc_rb.swc" locale="en_US">
<include-resource-bundles bundle="ErrorLog"/>
<include-resource-bundles bundle="LabelResource"/>
<sp path-element="locale/{locale}" />
</compc>
Unsupported options
The following compc command-line compiler options are not supported by the compc task:
•
help
•
version
190 CHAPTER 9
Example
The following example compc task builds a new SWC file that contains two custom components and other assets.
The components are added to the SWC file by using the include-classes attribute. The source files for the
components are in a subdirectory called components. The other assets, including four images and a CSS file, are
added to the SWC file by using the include-file element. This example defines two targets: main and clean.
The main target compiles the MyComps.swc file. The clean target deletes the output of the main target.
<?xml version="1.0" encoding="utf-8"?>
<project name="My Component Builder" basedir=".">
<taskdef resource="flexTasks.tasks"
classpath="${basedir}/flexTasks/lib/flexTasks.jar" />
<property name="FLEX_HOME" value="C:/flex/sdk"/>
<property name="DEPLOY_DIR" value="c:/jrun4/servers/default/default-war"/>
<property name="COMPONENT_ROOT" value="components"/>
<target name="main">
<compc
output="${DEPLOY_DIR}/MyComps.swc"
include-classes="custom.MyButton custom.MyLabel">
<source-path path-element="${basedir}/components"/>
<include-file name="f1-1.jpg" path="assets/images/f1-1.jpg"/>
<include-file name="f1-2.jpg" path="assets/images/f1-2.jpg"/>
<include-file name="f1-3.jpg" path="assets/images/f1-3.jpg"/>
<include-file name="f1-4.jpg" path="assets/images/f1-4.jpg"/>
<include-file name="main.css" path="assets/css/main.css"/>
</compc>
</target>
<target name="clean">
<delete>
<fileset dir="${DEPLOY_DIR}" includes="MyComps.swc"/>
</delete>
</target>
</project>
Using the html-wrapper task
The html-wrapper Flex Ant task generates files that you deploy with your Flex applications. In its simplest form,
an HTML wrapper consists of an <object> and an <embed> tag that embed the SWF file in an HTML page.
ADOBE FLEX 3 191
Building and Deploying Adobe Flex 3 Applications
The html-wrapper task outputs the index.html and AC_OETags.js files for your Flex application. If you enable
deep linking support, the html-wrapper task also outputs the deep linking files such as historyFrame.html,
history.css, and history.js. If you enable express installation, the html-wrapper task also outputs the playerProductInstall.swf file.
You typically deploy these files, along with your application's SWF file, to a web server. Users request the HTML
wrapper, which embeds the SWF file. You can customize the output of the wrapper and its supporting files after
it is generated by Ant.
For more information on the HTML wrapper, see “Creating a Wrapper” on page 311.
About the templates
There are six types of HTML wrapper templates that you can generate with the html-wrapper Flex Ant task:
• Client-side detection only — Provides scripts that detect the version of the client's player and return alternative content if the client's player does not meet the minimum required version.
• Client-side detection with history — Provides the same scripts as those in the client-side-detection template,
but adds deep linking support.
•
Express installation — Provides scripts that support Express Install.
•
•
Express installation with history — Provides scripts that support Express Install and deep linking support.
•
No player detection with history — Provides a basic wrapper with deep linking support.
No player detection — Provides a basic wrapper.
You determine which template is used by using a combination of the history and template attributes of the htmlwrapper task.
Supported attributes
The attributes of the html-wrapper task correspond to some of the attributes and parameters of the <object>
and <embed> tags in the HTML wrapper. The task also supports some attributes that specify the output location
and the type of wrapper to generate. For a complete list of the attributes and parameters of the <object> and
<embed> tags in the HTML wrapper, see “About the object and embed tags” on page 321.
192 CHAPTER 9
The following table describes the supported attributes of the html-wrapper task:
Attribute
Description
application
The name of the SWF object in the HTML wrapper. You use this name to refer to the SWF object in JavaScript
or when using the ExternalInterface API. This value should not contain any spaces or special characters. This
attribute sets the value of the <embed> tag's name attribute and the <object> tag's id attribute.
bgcolor
Specifies the background color of the application. Use this property to override the background color
setting specified in the SWF file. This property does not affect the background color of the HTML page. This
attribute sets the value of the <embed> tag's bgcolor attribute and the <object> tag's bgcolor parameter. The default value is white.
file
Sets the file name of the HTML output file. The default value is "index.html".
height
Defines the height, in pixels, of the SWF file. Adobe® Flash® Player makes a best guess to determine the
height of the application if none is provided. This attribute sets the value of the <embed> tag's height
attribute and the <object> tag's height attribute. The default value is 400.
history
Set to true to include deep linking support (also referred to as history management) in the HTML wrapper.
Set to false to exclude deep linking from the wrapper. Use this attribute in combination with the
template attribute to determine which template is used. The default value is false. For more information
on deep linking, see “Deep Linking” on page 1065 in Adobe Flex 3 Developer Guide.
output
Sets the directory that Ant writes the generated files to.
swf
Sets the name of the SWF file that the HTML wrapper embeds (for example, Main). Do not include the *.swf
extension; the extension is appended to the name for you. This attribute sets the value of the <embed> tag's
src attribute and the <object> tag's movie parameter. This SWF file does not have to exist when you
generate the HTML wrapper. It is used by the <object> and <embed> tags to point to the location of the
SWF file at deployment time.
template
The type of template to output. The value of this attribute must be one of the following:
•
•
•
client-side-detection
express-installation
no-player-detection
Use this attribute in combination with the history attribute to determine which template is used. The
default value is express-installation.
title
Sets the value of the <title> tag in the head of the HTML page. The default value is Flex Application.
version-major
Sets the value of the requiredMajorVersion global JavaScript variable in the HTML wrapper. The default
value is 9. The value of this attribute only matters if you include version detection in your wrapper by setting
the template attribute to express-installation or client-side-detection.
version-minor
Sets the value of the requiredMinorVersion global JavaScript variable in the HTML wrapper. The default
value is 0. The value of this attribute only matters if you include version detection in your wrapper by setting
the template attribute to express-installation or client-side-detection.
ADOBE FLEX 3 193
Building and Deploying Adobe Flex 3 Applications
Attribute
Description
version-revision
Sets the value of the requiredRevision global JavaScript variable in the HTML wrapper. The default
value is 0. The value of this attribute only matters if you include version detection in your wrapper by setting
the template attribute to express-installation or client-side-detection.
width
Defines the width, in pixels, of the SWF file. Flash Player makes a best guess to determine the width of the
application if none is provided. This attribute sets the value of the <embed> tag's width attribute and the
<object> tag's width attribute. The default value is 400.
Required attributes
The html-wrapper task requires the swf attribute. In addition, if you specify only the swf attribute, the default
wrapper will have the following default settings:
height="400"
width="400"
template="express-installation"
bgcolor="white"
history="false"
title="Flex Application"
Be sure to use only the filename and not the filename and extension when specifying the value of the swf attribute.
The html-wrapper task appends .swf to the end of its value.
For example, do this:
swf="Main"
Do not do this:
swf="Main.swf"
Unsupported options
You cannot set all the available <object> and <embed> tag parameters using the html-wrapper task. Parameters
you cannot set include quality, allowScriptAccess, classid, pluginspage, and type.
Example
The following example project includes a wrapper target that uses the html-wrapper task to generate a wrapper
with deep linking and player detection logic. This target also sets the height and width of the SWF file. The project
also includes a clean target that deletes all the files generated by the wrapper target.
<?xml version="1.0" encoding="utf-8"?>
<!-- myWrapperBuild.xml -->
<project name="My Wrapper Builder" basedir=".">
194 CHAPTER 9
<taskdef resource="flexTasks.tasks" classpath="${basedir}/lib/flexTasks.jar"/>
<property name="FLEX_HOME" value="C:/flex3/sdk"/>
<property name="APP_ROOT" value="apps"/>
<target name="wrapper">
<html-wrapper
title="Welcome to My Flex App"
file="index.html"
height="300"
width="400"
bgcolor="red"
application="app"
swf="Main"
version-major="9"
version-minor="0"
version-revision="0"
history="true"
template="express-installation"
output="${APP_ROOT}"/>
</target>
<target name="clean">
<delete>
<!-- Deletes playerProductInstall.swf -->
<fileset dir="${APP_ROOT}"
includes="playerProductInstall.swf"
defaultexcludes="false"/>
<!-- Deletes index.html and historyFrame.html -->
<fileset dir="${APP_ROOT}" includes="*.html" defaultexcludes="false"/>
<!-- Deletes history.css -->
<fileset dir="${APP_ROOT}" includes="*.css" defaultexcludes="false"/>
<!-- Deletes history.js and AC_OETags.js -->
<fileset dir="${APP_ROOT}" includes="*.js" defaultexcludes="false"/>
</delete>
</target>
</project>
195
Chapter 10: Using Runtime Shared
Libraries
Adobe® Flex® supports Runtime Shared Libraries (RSLs), which you can configure.
Topics
Introduction to RSLs . . . . . . . . . . . . . . . . . . . . . . . . . . . . . . . . . . . . . . . . . . . . . . . . . . . . . . . . . . . . . . . . . . . . . . . . . . . . 195
Creating libraries. . . . . . . . . . . . . . . . . . . . . . . . . . . . . . . . . . . . . . . . . . . . . . . . . . . . . . . . . . . . . . . . . . . . . . . . . . . . . . . . 200
Using standard and cross-domain RSLs . . . . . . . . . . . . . . . . . . . . . . . . . . . . . . . . . . . . . . . . . . . . . . . . . . . . . . . . . . . . 202
Using the framework RSLs . . . . . . . . . . . . . . . . . . . . . . . . . . . . . . . . . . . . . . . . . . . . . . . . . . . . . . . . . . . . . . . . . . . . . . . 216
Troubleshooting RSLs . . . . . . . . . . . . . . . . . . . . . . . . . . . . . . . . . . . . . . . . . . . . . . . . . . . . . . . . . . . . . . . . . . . . . . . . . . . 225
Introduction to RSLs
One way to reduce the size of your applications’ SWF files is by externalizing shared assets into stand-alone files
that can be separately downloaded and cached on the client. These shared assets can be loaded and used by any
number of applications at run time, but must be transferred only once to the client. These shared files are known
as Runtime Shared Libraries or RSLs.
If you have multiple applications but those applications share a core set of components or classes, clients can
download those assets only once as an RSL rather than once for each application. The RSLs are persisted on the
client disk so that they do not need to be transferred across the network a second time. The resulting file size for
the applications can be reduced. The benefits increase as the number of applications that use the RSL increases.
Flex applications support the following types of RSLs:
• Standard RSLs — A library of custom classes created by you to use across applications that are in the same
domain. Standard RSLs are stored in the browser’s cache. For more information, see “About standard RSLs” on
page 203.
• Cross-domain RSLs — A library of custom classes, like standard RSLs, with the difference being that they can
be loaded by applications in different domains and sub-domains. Cross-domain RSLs are stored in the browser’s
cache. For more information, see “About cross-domain RSLs” on page 204.
• Framework RSLs — Precompiled libraries of Flex components and framework classes that all applications can
share. Framework RSLs are precompiled for you. For more information, see “Using the framework RSLs” on
page 216.
196 CHAPTER 10
You can create your own RSLs from custom libraries. You do this by using either the Adobe® Flex® Builder’s™ Build
Project option for your Flex Library Project or the compc command-line compiler.
About linking
Understanding linking can help you understand how RSLs work and how you can most benefit from their use.
The Flex compilers support static linking and dynamic linking. Static linking is the most common type of linking
when compiling a Flex application. However, dynamic linking lets you take advantage of RSLs to achieve a
reduction of the final SWF file size and, therefore, a reduction in the application download time.
When you use static linking, the compiler includes all referenced classes and their dependencies in the application
SWF file. The end result is a larger file that takes longer to download than a dynamically-linked application, but
loads and runs quickly because all the code is in the SWF file.
To statically link a library’s definitions into your application, you use the library-path and includelibraries compiler options to specify locations of SWC files.
When you use the library-path option, the compiler includes only those classes required at compile time in the
SWF file, so the entire contents of a library are not necessarily compiled into the SWF file. The includelibraries option includes the entire contents of the library, regardless of which classes are required. You can also
use the source-path and includes options to embed individual classes in your SWF file.
In Flex Builder, you use the Project > Properties > Flex Builder Path > Library Path dialog to add libraries to your
project. To statically link a library at compile time, you select Merged Into Code for the library’s Link Type. This
includes only those classes that are used in the application, so it is the equivalent of the library-path compiler
option.
If you statically link any part of a library into your application, you cannot use that library as an RSL.
Dynamic linking is when some classes used by an application are left in an external file that is loaded at run time.
The result is a smaller SWF file size for the main application, but the application relies on external files that are
loaded at run time. Dynamic linking is used by modules, runtime stylesheets, and RSLs.
When you want to use a dynamically-linked library, you instruct the compiler to exclude that library’s contents
from the application SWF file when you compile the application. You must provide link-checking at compile time
even though the classes are not going to be included in the final SWF file. At run time, the application loads the
entire library into the application SWF file, which can result in slower startup times and greater memory usage.
You can use the runtime-shared-library-path and runtime-shared-libraries options to specify the
location of dynamically-linked libraries.
ADOBE FLEX 3 197
Building and Deploying Adobe Flex 3 Applications
You can also use the external-library-path, externs, or load-externs compiler options to specify the files
to dynamically link into an application. These options instruct the compiler to exclude classes and libraries from
the application, but to check links against them and prepare to load them at run time. The external-librarypath option specifies SWC files or directories for dynamic linking. The externs option specifies individual
classes or symbols for dynamic linking. The load-externs option specifies an XML file that describes what
classes to use for dynamic linking. These options are most often used when externalizing assets from modules so
that the module and the application do not contain overlapping class definitions. The runtime-sharedlibrary-path option provides all the arguments to use external libraries as RSLs.
In Flex Builder, to use dynamically-linked libraries, you specify either RSL or External as the Link Type in the
Library Path dialog for the library.
You can view the linking information for your application by using the link-report compiler option. This
generates a report that has the same syntax as the file that you load with the load-externs option, so you can use
it as an argument to that option without changing it. For more information about this report, see “Examining
linker dependencies” on page 65.
For more general information about the command-line compiler options, see “Using the Flex Compilers” on
page 125.
RSL benefits
The following example shows the possible benefit of separating shared components into an RSL. In this example,
the library’s size is 150 KB (kilobytes) and the compiled application’s size is 100 KB. Without RSLs, you merge the
library into both applications for an aggregate download size of 500 KB. If you add a third or fourth application,
the aggregate download size increases by 250 KB for each additional application.
198 CHAPTER 10
With RSLs, the RSL needs to be downloaded once only. For two applications that use the same RSL, the result is
an aggregate download size of 350 KB, or a 30% reduction. If you add a third or fourth application, the aggregate
download size increases by 100 KB instead of 250KB for each additional application. In this example, the benefits
of using an RSL increase with each new application.
Without RSLs
(Using statically-linked
component libraries)
App1 + lib
With RSLs
App2 + lib
250 KB
RSL
App1
App2
150 KB
100 KB
100 KB
250 KB
Flash Player
500 KB
350 KB
In this example, the applications with statically-linked libraries run only after Adobe® Flash® Player loads the 250
KB for each application. With dynamically linked RSLs, however, only the first application must load the entire
250 KB (the combined size of the application and the RSL). The second application runs when just 100 KB loads
because the RSL is cached.
The illustrated scenario shows one possible outcome. If your applications do not use all of the components in the
RSL, the size difference (and, as a result, the savings in download time) might not be as great. Suppose that each
application only uses half of the components in the RSL. If you statically link the library, only those classes that
are used are included; the output, as a result, is 100 KB + 75 KB for the first application and the library and 100
KB + 75 KB for the second application and the library, or an aggregate download size of 350 KB. When you use a
library as an RSL, its entire SWF file must be transferred across the network and loaded by the application at run
time, regardless of how much of that library is actually used. In this second case, the combined download size
when using RSLs and when not using RSLs is the same.
In general, the more Flex applications that use a common RSL, the greater the benefit.
ADOBE FLEX 3 199
Building and Deploying Adobe Flex 3 Applications
RSL considerations
RSLs are not necessarily beneficial for all applications. You should try to test both the download time and startup
time of your application with and without RSLs.
Standard RSLs can not be shared across domains. If a client runs an application in domain1.com and uses an RSL,
and then launches an application in domain2.com that uses the same RSL, the client downloads the RSL twice
even though the RSL is the same. You can overcome this limitation of standard RSLs by using cross-domain RSLs.
Cross-domain RSLs can be loaded by any application, even if that application is not in the same domain. They do,
however, require that you create and check a digest when the RSL is loaded. This can increase startup time of the
application by a small amount.
Framework RSLs can also be loaded by any application. To take advantage of the fact that framework RSLs can be
cached in the Player cache, the client must be running a recent version of Flash Player. Not all clients necessarily
have the latest Player, so loading a framework RSL might fail. In these cases, you can specify a failover RSL.
An RSL usually increases the startup time of an application. This is because the entire library is loaded into a Flex
application regardless of how much of the RSL is actually used. For this reason, make your RSLs as small as
possible. This contrasts with how statically-linked libraries are used. When you compile a Flex application, the
compiler extracts just the components it needs from those component libraries.
If you have several applications that share several libraries, it might be tempting to merge the libraries into a single
library that you use as an RSL. However, if the individual applications generally do not use more than one or two
libraries each, the penalty for having to load a single, large RSL might be higher than it would be to have the applications load multiple smaller RSLs.
In this case, test your application with both a single large RSL and multiple smaller RSLs, because the gains are
largely application specific. It might be better to build one RSL that has some extra classes than to build two RSLs,
if most users will load both of them anyway.
If you have overlapping classes in multiple RSLs, be sure to synchronize the versions so that the wrong class is
never loaded.
You cannot use RSLs in ActionScript-only projects if the base class is Sprite or MovieClip. RSLs require that the
application’s base class, such as Application or SimpleApplication, understand RSL loading.
About caching
RSLs are cached when they are first used. When they are needed by another application, they can be loaded from
the cache rather than across the network. Caching is one of the benefits of RSLs, because disk access is much faster
than network access.
200 CHAPTER 10
The type of caching used by an RSL is based on the type of RSL. Standard or cross-domain RSLs are stored in the
browser’s cache. If the user clears their cache, the RSLs are removed and must be downloaded again the next time
they are needed. Unsigned framework RSLs are also stored in the browser’s cache.
Signed framework RSLs are stored in the Player cache. This is a special cache that is maintained by Flash Player.
To clear this cache, clients must invoke the Settings Manager. RSLs stored in this cache are signed and therefore
can be used by any Flex application without the need for a cross-domain policy file.
For more information about the framework cache, see “About the Player cache” on page 218.
Creating libraries
To use standard or cross-domain RSLs, you must first create the library that will be used as an RSL. If you want to
use framework RSLs, the libraries are already created for you. In that case, all you need to do is compile against
them and then deploy the SWZ or SWF file with your Flex application.
A standard or cross-domain RSL is a library of custom components, classes, and other assets that you create. You
can create a library using either Flex Builder or the compc command-line compiler. A library is a SWC file or open
directory that contains a library.swf file and a catalog.xml file, as well as properties files and other embedded
assets. You can use any library as an RSL, but libraries do not need to be used as RSLs.
Creating libraries in Flex Builder
In Flex Builder, you create a new library by selecting File > New > Flex Library Project. You add resources to a
library by using the Flex Library Build Path dialog box. When you select Build Library or Build All, Flex Builder
creates a SWC file. This SWC file contains the library.swf file.
Creating libraries on the command line
On the command line, you create a library by using the compc compiler. You add files to a library by using the
include-classes and include-namespaces options when you compile the SWC file.
The following command-line example creates a library called CustomCellRenderer.swc with the compc compiler:
compc -source-path ../mycomponents/components/local
-include-classes CustomCellRendererComponent
-directory=true
-debug=false
-output ../libraries/CustomCellRenderer
ADOBE FLEX 3 201
Building and Deploying Adobe Flex 3 Applications
The options on the command line can also be represented by settings in the flex-config.xml file, as the following
example shows:
<?xml version="1.0">
<flex-config>
<compiler>
<source-path>
<path-element>../mycomponents/components/local</path-element>
</source-path>
</compiler>
<output>../libraries/CustomCellRenderer</output>
<directory>true</directory>
<debug>false</false>
<include-classes>
<class>CustomCellRendererComponent</class>
</include-classes>
</flex-config>
All classes and components must be statically linked into the resulting library. When you use the compc compiler
to create the library, do not use the include-file option to add files to the library, because this option does not
statically link files into the library.
Optimizing libraries
Optimizing libraries means to remove debugging and other code from the library prior to deployment. For
normal libraries that you are not using as RSLs, you do not need to optimize. This is because you will likely want
to debug against the library during development, so you will need the debug code inside the library. And, when
you compile the release version of your Flex application, the compiler will exclude debug information as it links
the classes from the library.
When you compile a library for production use as an RSL, however, you can set the debug compiler option to
false. The default value is true for compc, which means that the compiler, by default, includes extra information
in the SWC file to make it debuggable. You should avoid creating a debuggable library that you intend to use in
production so that the RSL’s files are as small as possible. If you set the value of the debug option to false,
however, you will not be able to debug against the RSL for testing.
If you do include debugging information, you can still optimize the RSL after compiling it, which removes the
debugging information as well as unnecessary metadata. For more information, see “Optimizing RSL SWF files”
on page 212.
Before you deploy an RSL, you extract the SWF file that is inside the library SWC file and optimize it. The default
name of this SWF file is library.swf. After you extract it from the SWC file, you can rename it to anything you want.
When you deploy the RSL, you deploy the SWF file so that the application can load it at run time.
202 CHAPTER 10
On the command line, you typically specify that the output of compiling a library be an open directory rather than
a SWC file by using the directory option and the output option. The output is an open directory that contains
the following files:
•
•
catalog.xml
library.swf
In addition, the library contains properties files and any images or other embedded assets that are used by the
library.
If you do not specify that the output be an open directory, you must manually extract the library.swf file from the
SWC file with a compression utility, such as PKZip.
In Flex Builder, you can instruct the compiler to automatically extract the SWF file for you when you add the RSL
SWC file to the project. Doing this does not optimize the SWF file, so the library will be bigger than if you extract
it yourself and optimize it.
To manually extract an RSL SWF file from its SWC file in Flex Builder, add the output and directory options
to the Additional Compiler Arguments field in the Flex Compiler dialog box. In both cases, you specify the
deployment location of the SWF file when you add the SWC file to your project as an RSL.
When creating a library, you need to know if you will be using the library as a standard RSL or as a cross-domain
RSL. If you are using it as a cross-domain RSL, you must include the digest information in the library. For more
information, see “About cross-domain RSLs” on page 204.
After you create the library, you then compile your application against the SWC file and specify the library’s SWF
file’s location for use at run time. For more information, see “Compiling applications with standard and crossdomain RSLs” on page 206.
For more information on using the compc compiler options, see “Using the Flex Compilers” on page 125.
Using standard and cross-domain RSLs
Standard and cross-domain RSLs are RSLs that you create from your custom component libraries. These RSLs are
different from signed framework RSLs in that they are unsigned and can only be stored in the browser’s cache.
They are never stored in the Player cache.
To use standard or cross-domain RSLs, you perform the following tasks:
• Create a library An RSL is created from a library of custom classes and other assets. You can create a
library with either the Flex Builder Library Project or the compc command-line compiler. You can output the
library as a SWC file or an open directory. The library includes a library.swf file and a catalog.xml file; the
library.swf file is deployed as the RSL. For more information, see “Creating libraries” on page 200.
ADOBE FLEX 3 203
Building and Deploying Adobe Flex 3 Applications
• Compile your application against the library When you compile your Flex application, you externalize
assets from your application that are defined in the RSL. They can then be linked at run time rather than at
compile time. You do this when you compile the application by passing the compile-time location of the library
SWC file as well as the run-time location of the library’s SWF file. For more information, see “Compiling applications with standard and cross-domain RSLs” on page 206.
• Optimize the RSL After you generate a library and compile your application against it, you should run the
optimizer against the library’s SWF file. The optimizer reduces the SWF file by removing debugging code and
unneeded metadata from it. While this step is optional, it is best practice to optimize a library SWF file before
deploying it. For more information, see “Optimizing RSL SWF files” on page 212.
• Deploy the RSL After you have compiled and optionally optimized your RSL, you deploy the library.swf
file with your application so that it is accessible at run time. If the RSL is a cross-domain RSL, then you might also
be required to deploy a crossdomain.xml file.
About standard RSLs
Standard RSLs can only be used by applications that are in the same domain as the RSL. You can benefit from using
standard RSLs if you meet all of the following conditions:
•
You host multiple applications in the same domain.
•
•
You have custom component libraries.
More than one application uses those custom component libraries.
Not all applications can benefit from standard RSLs. Applications that are in different domains or that do not use
component libraries will not benefit from standard RSLs.
Standard RSLs can benefit from digests. While they do not require digests, you can use them to ensure that your
application loads the latest RSL. For more information, see “About RSL digests” on page 204.
The following is a list of typical applications that can benefit from standard RSLs:
• Large applications that load multiple smaller applications that use a common component library. The toplevel application and all the subordinate applications can share components that are stored in a common RSL.
• A family of applications on a server built with a common component library. When the user accesses the first
application, they download an application SWF file and the RSL. When they access the second application, they
download only the application SWF file (the client has already downloaded the RSL, and the components in the
RSL are used by the two applications).
• A single monolithic application that changes frequently, but has a large set of components that rarely change.
In this case, the components are downloaded once, while the application itself might be downloaded many times.
This might be the case with charting components, where you might have an application that uses you change
frequently, but the charting components themselves remain fairly static.
204 CHAPTER 10
About cross-domain RSLs
Cross-domain RSLs can be used by applications in any domain or sub-domain. The benefits of cross-domain RSLs
are the same as standard RSLs, but they are not restricted to being in the same domain as the application that loads
them. This lets you use the same RSL in multiple applications that are in different domains.
To use a cross-domain RSL that is located on a remote server, the remote server must have a crossdomain.xml file
that allows access from the application’s domain. The easiest way to do this is to add a crossdomain.xml file to the
server’s root. To ensure that applications from any domain can access the RSL SWF file, you can use an open crossdomain.xml file such as the following:
<cross-domain-policy>
<allow-access-from domain="*" to-ports="*"/>
</cross-domain-policy>
This is not a best practice, however, because it allows requests from any domain to load the RSL, and other assets,
from your server. You should instead restrict requests to only those domains that you trust by narrowing the
entries in the domain attribute. For more information, see “Using cross-domain policy files” on page 40.
You can store the crossdomain.xml file anywhere on the target server. When you compile a cross-domain RSL,
you can specify the location of the crossdomain.xml file, and the application will look to that location to get
permission to load the RSL. If you do not specify the location of the crossdomain.xml file when you compile your
application, the application looks in the server’s root directory by default.
Cross-domain RSLs can fail to load into a Flex application under the following conditions:
•
•
The server on which the RSL is located fails
The network fails, so remote files cannot be loaded
• The digest of the RSL when the application was compiled does not match the digest of the RSL when it is
loaded
• The crossdomain.xml file is absent from the RSL’s server
Cross-domain RSLs support a backup mechanism where a failover RSL can be loaded in the case of a server
failure. If the server on which the main RSL fails, Flash Player will try to load a failover RSL whose location you
specify when you compile the application.
About RSL digests
To ensure that the cross-domain RSL is coming from the trusted party, Flash Player reads the bytes of the
incoming RSL and computes a one-way hash, or digest. The digest must match the digest that was stored in the
application at compile time when the application was linked to the cross-domain RSL. If the RSL’s digest matches
the known digest, then Flash Player loads the cross-domain RSL. If the digests do not match, Flash Player displays
an error message and does not load the RSL.
ADOBE FLEX 3 205
Building and Deploying Adobe Flex 3 Applications
You can also use digests for standard RSLs. This is useful if you update your RSLs frequently, and want to ensure
that the application loads the latest RSL.
To create a digest while compiling a library, you set the compute-digest compiler option to true. You can set
this value in the flex-config.xml file, as the following example shows:
<compute-digest>true</compute-digest>
The default value of the compute-digest option is true.
In Flex Builder, to disable digests, you must add the following to the Additional Compiler Arguments field in the
Flex Library Compiler dialog box:
-compute-digest=false
The compiler writes the digest inside the swc/library/libraries/digests element of the RSL’s catalog.xml
file. The following example shows the structure of digest elements, which are optional children of the digests
element in the catalog.xml file:
<digests>
<digest type="SHA-256" signed="true"
value="d604d909d8d6d358097cf2f4ebf4707faf330469ed6b41dcdc5aaf6f4dd3bea9"
<digest type="SHA-256" signed="false"
value="d604d909d8d6d358097cf2f4ebf4707faf330469ed6b41dcdc5aaf6f4dd3bea9"
</digests>
/>
/>
The following table describes the tag and its attributes:
Option
Description
digest
Optional child of digests element.
signed
Whether the library is signed or not. This value is true if the digest is of a signed library and false otherwise. Only
Adobe can create signed libraries. This attribute is required.
type
The kind of hash used to create the digest. The only currently-supported value is "SHA-256". This attribute is required.
value
The hash of the specified type. This is the digest of the RSL associated with the catalog.xml. This attribute is required.
When you compile your production application with an RSL that uses a digest for verification, set the verifydigests compiler option to true to indicate that the application must check the digest before using the RSL. The
default value of this option is true.
If you have multiple RSLs, such as a main RSL plus a failover RSL, the compiler stores multiple digests inside the
application.
The Flex compiler uses the SHA-256 digest algorithm from the java.security libraries to generate the digest.
206 CHAPTER 10
About failover
The failover feature is used for two reasons:
• If the Flash Player is not at least version 9.0.115 and it tries to load a signed RSL, it will attempt to load the
failover RSL
• If a network or server failure occurs while loading the main RSL, Flash Player will attempt to load the failover
RSL
For framework RSLs, you typically specify a signed RSL as the main RSL, and an unsigned RSL as the failover RSL.
When loading an application that uses signed framework RSLs, older versions of Flash Player skip the signed RSL
and attempt to load the failover RSL, which is typically an unsigned RSL.
For all RSLs, the failover RSL provides a mechanism to load an RSL if the primary server is unavailable.
You can specify the location of the RSL and a failover RSL in your flex-config.xml file or on the command line as
parameters to the runtime-shared-library-path option. The default failover RSL is
framework_3.0.${build.number}.swf. In Flex Builder, you can add failover RSLs by adding them to the
Deployment Paths in the Library Path Item Options dialog box.
Compiling applications with standard and cross-domain RSLs
Compiling your application with standard or cross-domain RSLs is easier to do in Flex Builder than it is on the
command line. Flex Builder can automatically extract the RSL SWF file for you during the compilation process,
and use that SWF to compile your application against. If you use the command-line compiler, then you must
extract this file from the SWC file yourself prior to deployment. In either case, when you deploy the RSL SWF file,
you should optimize it as described in “Optimizing RSL SWF files” on page 212.
Compile with standard or cross-domain RSLs in Flex Builder
1
Open your Flex application’s project.
2
Select Project > Properties.
3
Select Flex Build Path in the option list. The Flex Build Path settings appear.
ADOBE FLEX 3 207
Building and Deploying Adobe Flex 3 Applications
4
Select the Library Path tab:
5
Click the Add SWC button. The Add SWC dialog box appears.
6
Enter the path to the SWC file or click the Browse button to find the SWC file.
208 CHAPTER 10
Click OK to add the SWC file to your project’s library path. Flex Builder adds the new SWC file to the list of
SWC files in the Library Path tree.
7
Expand the SWC file in the Build Path Libraries tree by clicking the + next to it. The following example shows
an expanded SWC named MySWC:
8
Change the Link Type to “Runtime shared library (RSL)”. You do this by selecting the Link Type and clicking
the Edit button. When you change the Link Type to an RSL, Flex Builder displays additional options in the Library
Path Item Options dialog box.
9
ADOBE FLEX 3 209
Building and Deploying Adobe Flex 3 Applications
10 For Verification, select Digests if you are using a cross-domain RSL or if you are using a standard RSL that you
want to verify at run time with a digest.
Click the Add button to add the deployment path of the RSL SWF file. The Edit RSL Deployment Path dialog
box appears.
In the Deployment Path/URL field, enter the location that you will deploy the RSL’s SWF file to. This path is
relative to the main application’s SWF file. The default is to deploy the RSL in the same directory as the main
application.
(Cross-domain RSLs only) Add a policy file URL if the application and the RSL will be on separate domains,
and the crossdomain.xml file is not at the root of the RSL’s server.
You can have Flex Builder extract the RSL’s SWF file from the SWC file automatically or you can do it
manually. Deselect the Auto Extract swf to Deployment Path option if you want to extract the RSL’s SWF file
from the SWC file manually. Otherwise, Flex Builder will extract the SWF file for you. In general, you should
manually extract the SWF file and optimize it before deploying it. Otherwise, the library.swf file will be larger
than necessary. For more information on optimizing the RSL, see “Optimizing RSL SWF files” on page 212.
Click OK to save your changes.
11 Select None for Verification if you are using a standard RSL that does not use a digest. In this case, the RSL is
assumed to not be cross-domain, and you therefore cannot specify a policy file URL. This is because standard
RSLs must be deployed in the same domain as the main application, so policy files are not necessary. The
deployment path of the RSL can also only be a local path that is relative to the location of the main application’s
SWF file.
12 Click OK to save your Library Path Item Options.
13 If the RSL is a cross-domain RSL, ensure that the Verify RSL Digests option is selected in the Library Path tab.
If the RSL is standard and you do not want to use a digest, deselect this option. This option is overridden by the
Verification setting in the Library Path Item Options dialog box.
14 Click OK to save your changes to the Flex Build Path settings.
210 CHAPTER 10
Compile with standard or cross-domain RSLs on the command line
To use standard or cross-domain RSLs in your application on the command line, you use the runtime-sharedlibrary-path application compiler option. This option has the following syntax:
-runtime-shared-library-path=path-element,rsl-url[,policy-file-url,failover-url,...]
The following table describes the runtime-shared-library-path arguments:
Argument
Description
path-element
Specifies the location of the SWC file or open directory to compile against. For example, c:\flexsdk\frameworks\libs\framework.swc. The compiler provides compile-time link checking by using the library specified
by this option.
This argument is required.
rsl-url
Specifies the location of the RSL SWF file that will be loaded by the application at run time. The compiler
does not verify the existence of the SWF file at this location at compile time. It does store this string in the
application, however, and uses it at run time. As a result, the SWF file must be available at run time but not
necessarily at compile time. You specify the location of the SWF file relative to the deployment location of
the application. For example, if you store the library.swf file in the web_root/libraries directory on the web
server, and the application in the web root, you specify libraries/library.swf for the RSL SWF file.
This argument is required.
You must know the deployment location of the RSL SWF file relative to the application when you compile
it. You do not have to know the deployment structure when you create the library SWC file, though, because
components and classes are compiled into a SWC file and can be used by any application at compile time.
The value of the rsl-url argument can be a relative URL, such as “../libraries/library.swf”, or an absolute
URL, such as “http://www.mydomain.com/libraries/library.swf”. If it is on a different server, it must be a crossdomain or framework RSL. Standard RSLs can only be loaded from the same domain as the application.
The default name of the RSL SWF file is library.swf, but you can change it to any name you want after you
extract it from the SWC file. If you change it, then you must change the name you specify in the rsl-url
option.
ADOBE FLEX 3 211
Building and Deploying Adobe Flex 3 Applications
Argument
Description
policy-file-url
Specifies the location of the policy file (crossdomain.xml) that gives permission to load the RSL from the
server. For example, http://www.mydomain.com/rsls/crossdomain.xml. This is only necessary if the RSL and
the application that uses it are on different domains. If you are serving the application and the RSL SWF file
from the same domain, then you do not need to specify a policy file URL.
This argument is optional.
If you do not provide a value, then Flash Player looks at the root of the target web server for the crossdomain.xml file. For more information on using RSLs in different domains, see “About cross-domain RSLs” on
page 204.
failover-url
Specifies the location of a secondary RSL if the first RSL cannot be loaded. This is most commonly used to
ensure that an unsigned framework RSL will be used if the signed framework RSL fails to load. If the version
of Flash Player is earlier than 9.0.115, it cannot load signed RSLs, so it must load an unsigned RSL. While this
argument is used primarily to ensure that the framework RSL is loaded, it can also be used by cross-domain
RSLs to ensure that a secondary RSL is available in case of network or server failure.
This argument is optional.
If you specify a second policy-file-url, then Flash Player will look to that location for the crossdomain.xml file for the failover RSL.
The following example shows how to use the runtime-shared-library-path option when compiling your
application on the command line:
mxmlc -runtime-shared-library-path=../lib/mylib.swc,../bin/library.swf Main.mxml
Do not include spaces between the comma-separated arguments of the runtime-shared-library-path option
on the command line.
Your Flex application can use any number of RSLs. In Flex Builder, you add a list of RSLs on the Library Path tab.
When using the command line, you add additional runtime-shared-library-path options. In both cases, the
order of the RSLs is significant because base classes must be loaded before the classes that use them.
You can also use a configuration file to use RSLs, as the following example shows:
<runtime-shared-library-path>
<path-element>../lib/mylib.swc</path-element>
<rsl-url>../bin/library.swf</rsl-url>
</runtime-shared-library-path>
In the previous example, the file structure at compile time looks like this:
c:/Main.mxml
c:/lib/CustomDataGrid.swc
The deployed files are structured like this:
web_root/Main.swf
web_root/bin/library.swf
212 CHAPTER 10
If you are using a cross-domain RSL, you can also specify the location of the crossdomain.xml file, and the location
of one or more RSLs to be used as a failover RSL. The following example specifies a full URL for the location of
the RSL, and the locations of a crossdomain.xml file and failover RSL on the command line:
mxmlc -runtime-shared-library-path=
../lib/mylib.swc,
http://www.my-domain.com/rsls/library.swf,
http://www.my-domain.com/rsls/crossdomain.xml,
http://www.my-other-domain.com/rsls/library.swf,
http://www.my-other-domain.com/rsls/crossdomain.xml
Main.mxml
In the configuration file, this would be represented as follows:
<runtime-shared-library-path>
<path-element>../lib/mylib.swc</path-element>
<rsl-url>http://www.my-domain.com/rsls/library.swf</rsl-url>
<policy-file-url>http://www.my-domain.com/rsls/crossdomain.xml</rsl-url>
<rsl-url>http://www.my-other-domain.com/rsls/library.swf</rsl-url>
<policy-file-url>http://www.my-other-domain.com/rsls/crossdomain.xml</rsl-url>
</runtime-shared-library-path>
Toggling RSLs on the command line
When compiling an application that uses RSLs, the command-line compiler options can be unwieldy and difficult
to read. It is generally easier to define RSLs in your configuration files. However, when you do that, it is not very
easy to enable or disable them as you develop your application because you have to edit the configuration file any
time you want to change the way the RSLs are compiled.
To disable the use of RSLs without editing the configuration file, set the value of static-link-runtimeshared-libraries to false. By doing this, you can toggle the use of RSLs from the command line without
having to edit the configuration file or enter long sets of command-line options. The default value of this option
is true.
While you typically set the value of the static-link-runtime-shared-libraries option on the command
line, you can also set it in the configuration file. If you set any RSL values on the command line, then the value of
the static-link-runtime-shared-libraries option in the configuration file is ignored.
Optimizing RSL SWF files
The default SWF file in your SWC files includes debugging code and metadata that increase the file size. The
debugging code is necessary for the compiler to run, but is not necessary at run time unless you want to debug the
RSL. You can remove the debug code and unnecessary metadata by using the optimizer tool.
ADOBE FLEX 3 213
Building and Deploying Adobe Flex 3 Applications
If you use the optimizer tool, you must keep track of two separate library files: one for compiling (the larger, preoptimized one) and one for deploying (the smaller one, optimized one). You compile your main application
against the non-optimized library but then deploy the optimized library so that it can be loaded at run time.
The optimizer tool is in the bin directory. For Unix and Mac OS, it is a shell script called optimizer. For Windows,
it is optimizer.exe. You invoke it only from the command line. The Java settings are managed by the jvm.config
file in the bin directory.
The syntax for the optimizer tool is as follows:
optimizer -keep-as3-metadata="Bindable,Managed,ChangeEvent,
NonCommittingChangeEvent,Transient" -input input_swf -output output_swf
You must specify the keep-as3-metadata option and pass it the required metadata. At a minimum, you should
specify the Bindable, Managed, ChangeEvent, NonCommittingChangeEvent, and Transient metadata names. You
can also specify custom metadata that you want to remain in the optimized SWF file.
You can specify the configuration file that the optimizer tool uses by using the load-config option.
To get help while using the optimizer tool, enter the -help option:
c:\flex\bin> optimizer -help
By default, the optimizer tool saves an optimized version of the SWF file in the current directory, with the name
output.swf. This file should be smaller than the library.swf because it does not contain the debugging code.
Use optimized RSLs
1 Create an RSL by compiling a library project in Flex Builder or building a SWC file with the compc command
line tool.
2
Compile your main application and reference the RSL.
3
Extract the library.swf file from your RSL’s SWC file, if you haven’t done so already.
4
Run the optimizer against the library.swf file, for example:
c:\bin> optimimzer -keep-as3-metadata="Bindable,Managed,ChangeEvent,
NonCommittingChangeEvent,Transient" -input c:\rsls\library.swf -output
c:\rsls\output\output.swf
5 Deploy the optimized library (in this case, output.swf) with the application so that the application uses it at
run time.
214 CHAPTER 10
Example of creating and using a standard and cross-domain RSL
This example walks you through the process of creating a library and then using that library as a standard and a
cross-domain RSL with an application. It uses the command-line compilers, but you can apply the same process
to create and use RSLs with a Flex Builder project. This example first shows you how to use a standard RSL, and
then how to use that same RSL as a cross-domain RSL.
Keep in mind that a SWC file is a library that contains a SWF file that contains run-time definitions and additional
metadata that is used by the compiler for dependency tracking, among other things. You can open SWC files with
any archive tool, such as WinZip, and examine the contents.
Before you use an RSL, first learn how to statically link a SWC file. To do this, you build a SWC file and then set
up your application to use that SWC file.
In this example you have an application named app.mxml that uses the ProductConfigurator.as and
ProductView.as classes. The structure of this example includes the following files and directories:
project/src/app.mxml
project/libsrc/ProductConfigurator.as
project/libsrc/ProductView.as
project/lib/
project/bin/
To compile this application without using libraries, you can link the classes in the /libsrc directory using the
source-path option, as the following example shows:
cd project/src
mxmlc -o=../bin/app.swf -source-path+=../libsrc app.mxml
This command adds the ProductConfigurator and ProductView classes to the SWF file.
To use a library rather than standalone classes, you first create a library from the classes. You use the compc
compiler to create a SWC file that contains the ProductConfigurator and ProductView classes, as the following
command shows:
cd project
compc -source-path+=libsrc -debug=false -o=lib/mylib.swc ProductConfigurator ProductView
This compiles the mylib.swc file in the lib directory. This SWC file contains the implementations of the ProductConfigurator and ProductView classes.
To recompile your application with the new library, you add the library with the library-path option, as the
following example shows:
cd project/src
mxmlc -o=../bin/app.swf -library-path+=../lib/mylib.swc app.mxml
ADOBE FLEX 3 215
Building and Deploying Adobe Flex 3 Applications
This links the library at compile time, which does not result in any benefits of externalization. The library is not
yet being used as an RSL. If you use the new library as an RSL, the resulting SWF file will be smaller, and the library
can be shared across multiple applications.
Now you can recompile the application to use the library as an external RSL rather than as a library linked at
compile time.
The first step is to compile your application with the runtime-shared-library-path option. This option
instructs the compiler to specifically exclude the classes in your library from being compiled into your application,
and provides a run time location of the RSL SWF file.
cd project/src
mxmlc -o=../bin/app.swf -runtime-shared-library-path=../lib/mylib.swc,myrsl.swf app.mxml
The next step is to prepare the RSL so that it can be found at run time. To do this, you extract the library.swf file
from the SWC file with any archive tool, such as WinZip or jar.
The following example extracts the SWF file by using the unzip utility on the command line:
cd project/lib
unzip mylib.swc library.swf
mv library.swf ../bin/myrsl.swf
This example renames the library.swf file to myrsl.swf and moves it to the same directory as the application SWF
file.
The next step is to optimize the library.swf file so that it does not contain any debug code or unnecessary metadata.
The following example optimizes the SWF file by using the optimizer tool:
optimimzer -keep-as3-metadata="Bindable,Managed,ChangeEvent,NonCommittingChangeEvent,
Transient" -input bin/myrsl.swf -output bin/myrsl.swf
You now deploy the main application and the RSL. In this example, they must be in the same directory. If you want
to deploy the myrsl.swf file to a different directory, you specify a different path in the runtime-sharedlibrary-path option.
You can optionally run the optimizer tool on the myrsl.swf file to make it smaller before deploying it. For more
information, see “Optimizing RSL SWF files” on page 212.
To use the RSL as a cross-domain RSL, you add a crossdomain.xml file, a failover RSL, and its crossdomain.xml
file to the option, as the following example shows:
cd project/src
mxmlc -o=../bin/app.swf -runtime-shared-library-path=../lib/mylib.swc,
http://www.my-remote-domain.com/rsls/myrsl.swf,
http://www.my-remote-domain.com/rsls/crossdomain.xml,
http://www.my-other-remote-domain.com/rsls/myrsl.swf,
http://www.my-other-remote-domain.com/rsls/crossdomain.xml,
Main.mxml
216 CHAPTER 10
Next, you create a crossdomain.xml file. If the domain that are you running the Flex application on is my-localdomain.com, then you can create a crossdomain.xml file that looks like the following:
<cross-domain-policy>
<allow-access-from domain="*.my-local-domain.com" to-ports="*"/>
</cross-domain-policy>
You now deploy the main application and the RSL. This time, however, the RSL is deployed on a remote server in
the /rsls directory. You must also ensure that the crossdomain.xml file is in that directory. Finally, you must ensure
that the failover RSL and its crossdomain.xm l file are deployed to the other remote domain.
Using the framework RSLs
Every Flex application uses some aspects of the Flex framework, which is a relatively large set of ActionScript
classes that define the infrastructure of a Flex application. If a client loads two different Flex applications, the
application will likely load overlapping class definitions. This can be a problem for users who are on dialup or slow
network connections. It also leads to the perception that Flex applications load more slowly than HTML-based
applications.
To overcome these limitations, you can use framework RSLs with your Flex applications. These libraries are
comprised of the Flex class libraries and can be used with any Flex application. Framework RSLs come in two
versions: signed and unsigned. Signed framework RSLs are cached in a special Player cache rather than the browser
cache. They can be accessed by any application regardless of that application’s originating domain. They only need
to be downloaded to the client once, and they are not cleared from the client’s disk when the browser’s cache is
cleared. Unsigned framework RSLs are cached in the browser cache and can only be used by applications that have
access to the RSL’s domain.
Flash Player 9.0.115 and later support loading signed framework RSLs. These RSLs can be loaded by applications
in different domains. The framework RSLs are signed and have the extension SWZ. Only Adobe can create signed
RSLs, and only signed RSLs can be stored in the Player cache. If you create an RSL that contains a custom library,
it will be unsigned. You cannot sign it. If a Player with a version earlier than 9.0.115 attempts to load a framework
RSL, then Flash Player skips it and loads a failover RSL, if one was specified when the application was compiled.
Only applications compiled with the Flex 3 compilers can use signed framework RSLs. Applications compiled
earlier versions of the compilers cannot use signed framework RSLs.
ADOBE FLEX 3 217
Building and Deploying Adobe Flex 3 Applications
Included framework RSLs
The framework RSLs are located in the flex_sdk_dir/frameworks/rsls directory. For Flex Builder, the framework
RSLs are located in the flex_builder_dir/sdks/3.0.0/frameworks/rsls directory. The naming convention includes
the version number of Flex, plus the build number of the compiler that you currently use. The following
framework RSLs are included with the Flex products:
•
framework_3.0.build_number.swz (signed framework RSL)
•
•
framework_3.0.build_number.swf (unsigned framework RSL)
•
•
rpc_3.0.build_number.swf (unsigned data services RSL)
•
(Flex Builder only) datavisualization_3.0.build_number.swf (unsigned data visualization RSL)
rpc_3.0.build_number.swz (signed data services RSL)
(Flex Builder only) datavisualization_3.0.build_number.swz (signed data visualization RSL)
The signed and unsigned framework RSLs are optimized, as described in “Optimizing RSL SWF files” on
page 212.
Flex also includes a number of SWC files that you can use as standard or cross-domain RSLs. These libraries are
unsigned and not optimized. These SWC files are located in the frameworks/libs directory. They include
automation.swc (for automation classes) and qtp.swc (for Mercury QuickTest Pro agent classes).
Framework RSL digests
After the framework RSLs are transferred across the network, Flash Player generates a digest of the framework
RSL and compares that digest to the digest that was stored in the Flex application when it was compiled. If the
digests match, then the RSL is loaded. If not, then Flash Player throws an error and attempts to load a failover RSL.
Using a framework RSL
To use the framework RSL in your Flex applications, you compile against the framework.swc file in your /frameworks/libs directory with the runtime-shared-library-path option on the command line. You can optionally
add a policy file URL if necessary, plus one or more failover RSLs and their policy file URLs.
The following example compiles SimpleApp with the framework RSL:
mxmlc -runtime-shared-library-path=libs/framework.swc,
framework_3.0.183453.swz,,framework_3.0.183453.swf
SimpleApp.mxml
This example sets the signed framework RSL (*.swz) as the primary RSL, and then the unsigned framework RSL
(*.swf) as the secondary RSL. This example does not specify a location for the policy file, so it is assumed that
either the RSLs and the application are in the same domain or the policy file is at the root of the target server.
218 CHAPTER 10
The following example shows the configuration file that loads a framework RSL:
<runtime-shared-library-path>
<path-element>libs/framework.swc</path-element>
<rsl-url>framework_3.0.${build.number}.swz</rsl-url>
<policy-file-url></policy-file-url>
<rsl-url>framework_3.0.${build.number}.swf</rsl-url>
</runtime-shared-library-path>
The configuration file uses a {build.number} token in the name of the RSLs. The compiler replaces this with a
build number during compilation. The name of the framework RSL depends on the build number of Flex that you
are using.
You can specify a signed SWZ file as the framework RSL and not specify an unsigned SWF file as a failover RSL.
In this case, the application will not work in any Flash Player of version earlier than 9.0.115. The compiler will
throw a warning, though, unless you set the target-player compiler option to 9.0.115 or later. This instructs
the compiler to ignore the fact that there is no failover that will work with older Players. You can detect and
upgrade users to the newest Player in the HTML wrapper by using the Express Install feature. For more information, see “Using Express Install” on page 333.
When you deploy your application, you must be sure to deploy the SWZ file to the location you specified on the
command line. You must also be sure that the crossdomain.xml file is in place at the RSL’s domain. To ensure that
your Flex application can support older versions of Flash Player, you should also deploy the unsigned framework
RSL SWF file (in addition to the signed SWZ file), and specify that file as a failover RSL.
About the Player cache
The Player cache stores signed RSLs, such as the framework RSLs. You can manage the settings of the Player cache
with the Settings Manager. The use of the RSLs in the Player cache is secure; no third party can inject code that
will be executed. Only Adobe can sign RSLs; therefore, only Adobe RSLs can be stored in the Player cache.
The default size of the framework cache is 20MB. When the aggregate size of the cached RSLs in this directory
meets or exceeds 20MB, Flash Player purges the cache. Files are purged on a least-recently-used basis. Less-used
files are purged before files that have been used more recently. Purging continues until the cache size is below 60%
of the maximum size. By default, this is 12MB.
The Global Storage Settings panel in the Settings Manager lets the user turn off the caching feature and increase
or decrease its size. The Settings Manager is a special control panel that runs on your local computer but is
displayed within and accessed from the Adobe website. If the user disables the Player cache, then Flash Player will
not load SWZ files. Flash Player will load failover RSLs instead.
ADOBE FLEX 3 219
Building and Deploying Adobe Flex 3 Applications
The following table shows the locations of the Player cache on various platforms:
Platform
Location
Windows 95/98/ME/2000/XP
C:\Documents and Settings\user_name\Application Data\Adobe\Flash Player\AssetCache\
Windows Vista
C:\Users\user_name\AppData\Roaming\Adobe\Flash Player\AssetCache\
Linux
/home/user_name/.adobe/Flash_Player/AssetCache/
Mac OSX
/Users/user_name/Library/Cache/Adobe/Flash Player/AssetCache/
Using the framework RSLs in Flex Builder
You can use Flex Builder to organize your RSLs and decide which SWC files to use as RSLs and which to use as
statically-linked libraries. You can also use Flex Builder to configure the deployment locations, digests, and other
properties of RSLs. The signed and unsigned framework RSLs have already been created for you and optimized.
All you have to do is compile your application against the RSLs and deploy them to the location that you specified
at compile time.
You can set each SWC file that your project uses to use one of the following linkage types:
• Merged Into Code —Indicates that classes and their dependencies from this library are added to the SWF file
at compile time. They are not loaded at run time. The result is a larger SWF file, but no external dependencies.
This is the default selection for the framework.
• RSL — Indicates that this library will be used as an RSL. When you compile your application, the classes and
their dependencies in this library are externalized, but you compile against them. You must then make them
available as an RSL at run time.
• External — Indicates that this library will be externalized from the application, but it will not be used as an
RSL. This excludes all the definitions in a library from an application but provides compile time link checking.
Typically, only playerglobal.swc has this setting in an application project, but you might also use it to externalize
assets that are used as modules or dynamically-loaded SWF files.
By default, all SWC files in the library path use the same linkage as the framework.
Use the framework.swc file as an RSL in Flex Builder
1
Open your Flex project in Flex Builder.
2
Select the project in the Navigator and select Project > Properties.
3
Select the Flex Build Path option in the resource list at the left. The Flex Build Path dialog box appears.
220 CHAPTER 10
4
Select the Library Path tab:
Select Runtime Shared Library (RSL) from the Framework Linkage drop-down list. This instructs the application compiler to use the framework.swc file as an RSL. Flex Builder assumes that you will deploy the framework
RSLs to the same directory as the main application’s SWF file.
5
6
Click OK to save your changes.
When you export the release build of your project, the main application’s SWF file should be smaller. In addition,
in the release output directory, Flex Builder includes the framework’s SWF and SWZ files for you to deploy.
ADOBE FLEX 3 221
Building and Deploying Adobe Flex 3 Applications
You can view the settings of the SWC files that are included with Flex but whose classes are not included in the
framework RSLs by expanding the list of libraries used by Flex in the Library Path tab. This list includes the
automation.swc and qtp.swc files. You might want to compile your application against these SWC files as RSLs if
your application will benefit from doing so. These SWC files are not optimized, so before you use them as RSLs,
you should optimize them as described in “Optimizing RSL SWF files” on page 212.
Use other Adobe SWC files as RSLs in Flex Builder
1
On the Library Path tab, click the + to expand the list of SWC files.
Select the SWC file that you want to use as an RSL and click the + to show its properties. For example, click
the + next to the automation.swc file.
2
3 Click the Link Type property and click the Edit button. The default link type is “Merged into code”, which
means that the library is statically linked to your application by default.
4 If you are already using the framework.swc file as an RSL, you can select the Use Same Linkage As Framework
option. This option lets you toggle the RSL’s status on and off by changing only the framework.swc file’s linkage
status. Otherwise, select Runtime Shared Library (RSL) from the Link Type drop-down list.
The RSL Options field is enabled.
Select the Verification type and the deployment locations of the RSL as described in “Compiling applications
with standard and cross-domain RSLs” on page 206.
5
6
Click OK to save your changes.
In some cases, you might not want to deploy the framework RSLs in the same directory as your main application.
You might have a central server where these RSLs are stored, and need to share them across multiple applications.
222 CHAPTER 10
Customize the deployment location of the framework RSLs
1
Edit the framework.swc file’s settings in the Library Path Item Options dialog box.
2
Select the Digests radio button, if it is not already selected.
Notice the two default entries in the Deployment paths field: an SWZ file and an SWF file. The SWZ file is the
signed RSL that can be stored in the framework cache. The SWF file is an unsigned SWF file that is a failover
if the SWZ file cannot be loaded.
By default, the framework RSLs are deployed to the same directory as your main application.
To change the deployment location of the framework RSLs, click the SWZ file and then click the Edit button.
The Edit RSL Deployment Path dialog box appears:
3
ADOBE FLEX 3 223
Building and Deploying Adobe Flex 3 Applications
In the Deployment Path/URL field, enter the location of the SWZ file. For example, “http://www.remoteserver.com/rsls/framework_3.0.183453.swc”. The application tries to load the RSL from this location at run
time. The location can be relative to the application’s SWF file, or a full URL to a remote server. If the RSL is
on a remote server, you might also be required to point to the policy file. In the Policy file URL field, enter the
location of the crossdomain.xml file, if there is no crossdomain.xml file at the target server’s root. You do not
need to enter anything in this field if the application’s SWF file and the RSLs are served from the same domain,
or if the crossdomain.xml file is at the target server’s root.
4
Click OK to save your changes in the Edit RSL Deployment Path dialog box.
5 Repeat the previous two steps for the SWF file, if you are also deploying the unsigned framework RSL with
your application. If you do not deploy the failover SWF file, then users with Flash Player versions earlier than
9.0.115 will not be able to use your application.
6
Click OK to save your changes to the Library Path Item Options dialog box.
7
Ensure that the Verify RSL Digests option on the Library Path tab is selected.
8
Click OK to save your changes to the Flex Build Path settings.
When you deploy your application, you must manually copy the framework RSLs to the path that you specified
on the remote server.
Using the framework RSLs on the command line
The following example application shows how to use the framework RSLs on the command line.
You first create an application that uses at least one visual Flex component. For example, the following application
uses a Button control:
<?xml version="1.0"?>
<!-- rsls/SimpleRSLApp.mxml -->
<mx:Application xmlns:mx="http://www.adobe.com/2006/mxml">
<mx:Button label="Submit"/>
</mx:Application>
Save this file as SimpleApp.mxml and store it in the project/src directory.
After you create the application, determine the size of the application’s compiled SWF file before you use the
framework RSL. This will give you an idea of how much memory you are saving by using the framework RSL.
Compile this application as you normally would, with one exception. Add the static-link-runtime-sharedlibraries=true option; this ensures that you are not using the framework RSL when compiling the application,
regardless of the settings in your configuration files. Instead, you are compiling the framework classes into your
SWF file.
224 CHAPTER 10
With the mxmlc command-line compiler, use the following command to compile the application:
cd project
mxmlc -static-link-runtime-shared-libraries=true bin/SimpleApp.mxml
Examine the output size of the SWF file. Even though the application contains only a Button control, the size of
the SWF file should be around 140KB. That is because it not only includes component and application framework
classes, but it also includes all classes that those classes inherit from plus other framework dependencies. For
visual controls such as a Button, the list of dependencies can be lengthy. If you added several more controls to the
application, you will notice that the application does not get much larger. That is because there is a great deal of
overlap among all the visual controls.
Run the application in a browser either from the file system or from a server. You can also run the application in
the standalone player.
Next, compile the application again, but this time add the signed framework RSL as an RSL and the unsigned
framework RSL as a failover RSL. For example:
mxmlc -runtime-shared-library-path=c:/p4/flex/flex/sdk/frameworks/libs/framework.swc,
framework_3.0.183453.swz,,framework_3.0.183453.swf rsls/SimpleApp.mxml
The result is a SWF file that should be significantly smaller than the previous SWF file.
This command includes a blank entry for the policy file URL. In this example, the crossdomain.xml file is not
needed because you will deploy the RSLs and the application to the same domain, into the same directory.
In addition, the runtime-shared-library-path option includes an unsigned failover RSL as its final parameter.
This is a standard framework RSL SWF file that is provided to support older versions of Flash Player that do not
support signed RSLs. It is not cross domain, and if used by the client, it is stored in the browser’s cache, not the
framework cache.
You must now deploy the application and the framework RSLs to a server. You cannot request the SimpleApp.swf
file from the file system because it loads network resources (the framework RSLs) and this will cause a security
sandbox violation unless it is loaded from a server. You deploy the SimpleApp.swf, framework_3.0.183453.swz,
and framework_3.0.183453.swf files to the same directory on your web server.
Request the application in the browser or create a wrapper for the application and request that file.
To verify that the signed framework RSL was loaded by your Flex application, you can look for an SWZ file in your
framework cache. For more information, see “About the Player cache” on page 218.
After the client downloads the signed framework RSL, they will not have to download that RSL again for any Flex
application that uses signed framework RSLs, unless a new version of the framework is released or the RSL’s SWZ
file is purged from the Player cache.
ADOBE FLEX 3 225
Building and Deploying Adobe Flex 3 Applications
Troubleshooting RSLs
RSLs can be complicated to create, use, and deploy. The following table describes common errors and techniques
to resolve them:
Error
Resolution
#1001
This error indicates that the digest of a library does not match the RSL SWF file. When you compile an application that uses an RSL, you specify the library SWC file that the application uses for link checking at compile
time and an RSL SWF file that the application loads at run time. The digest in the library’s catalog.xml file
must match the digest of the RSL SWF file or you will get this error. If this error persists, recompile the application against the library SWC file again and redeploy the application’s SWF file.
If you are using framework RSLs, then the SWZ file is a different version than what the application was
compiled against. Check whether this is the case by adding a failover RSL SWF file and recompiling. If the
error does not recur, then the SWZ file is out of sync.
#2032
This error indicates that the SWZ or SWF file is not being found.
For example, if you specified only “mylib.swf” as the value of the rsl-url parameter to the runtimeshared-library-path option, but the SWF file is actually in a sub-directory such as /rsls, then you must
either recompile your application and update the value of the rsl-url parameter to “rsls/mylib.swf”, or
move mylib.swf to the same directory as the application’s SWF file.
#2046
This error indicates that the loaded RSL was not signed properly. In the case of framework RSLs, the framework’s SWZ file that the application attempted to load at run time was not a properly signed SWZ file. You
must ensure that you deploy an Adobe-signed RSL.
#2048
The cause of this error is that you do not have a crossdomain.xml file on the server that is returning the RSL.
You should add a file to that server. For more information, see “Using cross-domain policy files” on page 40.
If you put the crossdomain.xml file at the server’s root, you do not have to recompile your Flex application.
This is because the application will look for that file at the server’s root by default, so there is no need to
explicitly define its location.
If you cannot store a crossdomain.xml file at the remote server’s root, but can put it in another location on
that server, you must specify the file’s location when you compile the application. On the command line, you
do this by setting the value of the policy-file-url argument of the runtime-shared-library-path
option.
In the following example, the RSL SWF file is located in the /rsls directory on www.domain.com. The crossdomain.xml file is located in the same directory, which is not the server’s root, so it must therefore be explicitly specified:
mxmlc -runtime-shared-library-path=
../lib/mylib.swc,
http://www.mydomain.com/rsls/myrsl.swf,
http://www.mydomain.com/rsls/crossdomain.xml
Main.mxml
226 CHAPTER 10
Error
Resolution
#2148
This error occurs when you try to open an application that uses RSLs in the standalone player or in the
browser by using the file system and not a server. It means that you are violating the security sandbox of
Flash Player by trying to load file resources.
You must deploy your application and RSLs to a network location, and request the application with a
network request so that Flash Player will load the RSL.
If you are testing the application locally, you can add the directory to your Player trust file to avoid this error.
Requested resource
not found
You might find this error in your web server logs. If you deploy the RSL SWF file to a location other than that
specified when you compiled the application, then you will get an error similar to this when the application
tries to run.
The solution is to either recompile your Flex application and correct the deployment location of the RSL SWF
file or to move the RSL SWF file to the location that the application expects.
227
Chapter 11: Logging
You can log messages at several different points in an Adobe® Flex® application’s life cycle. You can log messages
when you compile the application, when you deploy it to a web application server, or when a client runs it. You
can log messages on the server or on the client. These messages are useful for informational, diagnostic, and
debugging activities.
Topics
About logging . . . . . . . . . . . . . . . . . . . . . . . . . . . . . . . . . . . . . . . . . . . . . . . . . . . . . . . . . . . . . . . . . . . . . . . . . . . . . . . . . . 227
Using the debugger version of Flash Player . . . . . . . . . . . . . . . . . . . . . . . . . . . . . . . . . . . . . . . . . . . . . . . . . . . . . . . . . 228
Client-side logging and debugging. . . . . . . . . . . . . . . . . . . . . . . . . . . . . . . . . . . . . . . . . . . . . . . . . . . . . . . . . . . . . . . . . 232
Compiler logging . . . . . . . . . . . . . . . . . . . . . . . . . . . . . . . . . . . . . . . . . . . . . . . . . . . . . . . . . . . . . . . . . . . . . . . . . . . . . . . 243
About logging
When you encounter a problem with your application, whether during compilation or at run time, the first step
is to gather diagnostic information to locate the cause of the problem. The source of a problem typically is in one
of two places: the server web application, or the client application.
Note: For detailed information on debugging Adobe® AIR™ applications, see "Using the AIR development tools" in
Developing AIR Applications with Adobe Flex 3.
Flex includes several different logging and error reporting mechanisms that you can use to track down failures:
Client-side logging and debugging With the debugger version of Adobe® Flash® Player, or with an AIR appli-
cation that you debug using ADL, you can use the global trace() method to write out messages or configure a
TraceTarget to customize log levels of applications for data services-based applications. For more information, see
“Client-side logging and debugging” on page 232.
Compiler logging When compiling your Flex applications from the command line and in Adobe® Flex® Builder®,
you can view deprecation and warning messages, and sources of fatal errors. For more information, see “Compiler
logging” on page 243.
Web-tier logging The Flex module for Apache and IIS compiler has its own logging facilities. For more information, see “Using the web-tier compiler log files” on page 351.
228 CHAPTER 11
The following example shows the types of logging you can do in the appropriate environment:
Client
(Debugger version of Flash Player
or AIR Debug Launcher)
The trace() method
Logging API
● Client-side data services
Development
environment
Web application server
Web-tier compiler
Server-side data services
● Web application server
●
●
●
●
●
●
Command-line compiler
Flex Builder compiler
To use client-side debugging utilities such as the trace() global method and client-side data services logging, you
must install and configure the debugger version of Flash Player. This is described in “Using the debugger version
of Flash Player” on page 228. The debugger version of Flash Player is not required to log compiler messages or
web-tier compiler messages.
Using the debugger version of Flash Player
The debugger version of Flash Player is a tool for development and testing. Like the standard version of Adobe
Flash Player 9, it runs SWF files in a browser or on the desktop in a stand-alone player. Unlike Flash Player, the
debugger version of Flash Player enables you to do the following:
•
Output statements and application errors to the debugger version of the Flash Player local log file by using the
trace() method.
•
Write data services log messages to the local log file of the debugger version of Flash Player.
•
•
View run-time errors (RTEs).
•
•
Use the Flex Builder debugging tool.
Use the fdb command-line debugger.
Use the Flex Builder profiling tool.
Note: Any client running the debugger version of Flash Player can view your application’s trace() statements and
other log messages unless you disable them. For more information, see “Suppressing debug output” on page 52.
ADOBE FLEX 3 229
Building and Deploying Adobe Flex 3 Applications
The debugger version of Flash Player lets you take advantage of the client-side logging utilities such as the
trace() method and the logging API. You are not required to run the debugger version of Flash Player to log
compiler and web-tier messages because these logging mechanisms do not require a player.
Note: ADL logs trace() output from AIR applications, based on the setting in mm.cfg (the same setting used by the
debug version of Flash Player).”
In nearly all respects, the debugger version of Flash Player appears to be the same as the standard version of Flash
Player. To determine whether or not you are running the debugger version of Flash Player, use the instructions in
“Determining Flash Player version in Flex” on page 231.
The debugger version of Flash Player comes in ActiveX, Plug-in, and stand-alone versions for Microsoft Internet
Explorer, Netscape-based browsers, and desktop applications, respectively. You can find the debugger version of
Flash Player installers in the following locations:
•
Flex Builder: install_dir/Player/os_version
•
Flex SDK: install_dir/runtimes/player/os_version/
Uninstall your current Flash Player before you install the debugger version of Flash Player. For information on
installing the debugger version of Flash Player, see the Flex installation instructions.
You can enable or disable trace logging and perform other configuration tasks for the debugger version of Flash
Player. For more information, see “Configuring the debugger version of Flash Player” on page 229.
Configuring the debugger version of Flash Player
You use the settings in the mm.cfg text file to configure the debugger version of Flash Player. These settings also
affect logging of trace() output in AIR applications running in the ADL debugger. If this file does not exist, you
can create it when you first configure the debugger version of Flash Player. The location of this file depends on
your operating system.
The following table shows where to create the mm.cfg file for several operating systems:
Operating system
Create file in …
Macintosh OS X
/Library/Application Support/Macromedia
Windows 95/98/ME
%HOMEDRIVE%\%HOMEPATH%
Windows 2000/XP
C:\Documents and Settings\username
Windows Vista
C:\Users\username
Linux
/home/username
230 CHAPTER 11
On Microsoft Windows XP, the default location was \Documents and Settings\user_name. On Microsoft
Windows 2000, the default location was \. For earlier versions of Flash Player on Windows XP and 2000, the
location of the mm.cfg file was determined by the HOMEDRIVE and HOMEPATH environment variables.
The following table lists the properties that you can set in the mm.cfg file:
Property
Description
ErrorReportingEnable
Enables the logging of error messages.
Set the ErrorReportingEnable property to 1 to enable the debugger version of Flash Player to
write error messages to the log file. To disable logging of error messages, set the
ErrorReportingEnable property to 0.
The default value is 0.
MaxWarnings
Sets the number of warnings to log before stopping.
The default value of the MaxWarnings property is 100. After 100 messages, the debugger version of
Flash Player writes a message to the file stating that further error messages will be suppressed.
Set the MaxWarnings property to override the default message limit. For example, you can set it to
500 to capture 500 error messages.
Set the MaxWarnings property to 0 to remove the limit so that all error messages are recorded.
TraceOutputFileEnable
Enables trace logging.
Set TraceOutputFileEnable to 1 to enable the debugger version of Flash Player to write trace
messages to the log file. Disable trace logging by setting the TraceOutputFileEnable property to
0.
The default value is 0.
TraceOutputFileName
Note: Beginning with the Flash Player 9 Update, Flash Player ignores the TraceOutputFileName
property and stores the flashlog.txt file in a hard-coded location based on operating system. For more
information, see “Log file location” on page 231.
Sets the location of the log file. By default, the debugger version of Flash Player writes error messages
to a file named flashlog.txt, located in the same directory in which the mm.cfg file is located.
Set TraceOutputFileName to override the default name and location of the log file by specifying a
new location and name in the following form: On Macintosh OS X, you should use colons to separate
directories in the TraceOutputFileName path rather than slashes.
TraceOutputFileName=<fully qualified path/filename>
The following sample mm.cfg file enables error reporting and trace logging:
ErrorReportingEnable=1
TraceOutputFileEnable=1
ADOBE FLEX 3 231
Building and Deploying Adobe Flex 3 Applications
Log file location
The default log file location changed between the initial Flash Player 9 release and the Flash Player 9 Update. In
the initial Flash Player 9 release, the default location was the same directory as the mm.cfg file and you could
update the log file location and name through the TraceOutputFileName property.
Beginning with the Flash Player 9 Update, you cannot modify the log file location or name. The filename is
flashlog.txt, and its location is hard-coded, depending on your operating system. The following table shows the
flashlog.txt file location:
Operating System
Log file location
Windows 95/98/ME/2000/XP
C:\Documents and Settings\username\Application Data\Macromedia\Flash
Player\Logs
Windows Vista
C:\Users\username\AppData\Roaming\Macromedia\Flash Player\Logs
Macintosh OS X
/Users/username/Library/Preferences/Macromedia/Flash Player/Logs/
Linux
/home/username/.macromedia/Flash_Player/Logs/
Determining Flash Player version in Flex
To determine which version of Flash Player you are currently using—the standard version or the debugger
version—you can use the Capabilities class. This class contains information about Flash Player and the system that
it is currently operating on. To determine if you are using the debugger version of Flash Player, you can use the
isDebugger property of that class. This property returns a Boolean value: the value is true if the current player
is the debugger version of Flash Player and false if it is not.
The following example uses the playerType, version, and isDebugger properties of the Capabilities class to
display information about the Player:
<?xml version="1.0"?>
<!-- logging/CheckDebugger.mxml -->
<mx:Application xmlns:mx="http://www.adobe.com/2006/mxml">
<mx:Script><![CDATA[
import flash.system.Capabilities;
private function reportVersion():String {
if (Capabilities.isDebugger) {
return "Debugger version of Flash Player";
} else {
return "Flash Player";
}
}
private function reportType():String {
return Capabilities.playerType + " (" + Capabilities.version + ")";
232 CHAPTER 11
}
]]></mx:Script>
<mx:Label text="{reportVersion()}"/>
<mx:Label text="{reportType()}"/>
</mx:Application>
Other properties of the Capabilities class include hasPrinting, os, and language.
Client-side logging and debugging
Often, you use the trace() method when you debug applications to write a checkpoint message on the client,
which signals that your application reached a specific line of code, or to output the value of a variable.
The debugger version of Flash Player has two primary methods of writing messages that use trace():
• The global trace() method. The global trace() method prints Strings to a specified output log file. For
more information, see “Using the global trace() method” on page 232.
• Logging API. The logging API provides a layer of functionality on top of the trace() method that you can
use with your custom classes or with the data service APIs. For more information, see “Using the logging API” on
page 233.
Configuring the debugger version of Flash Player to record trace() output
To record messages on the client, you must use the debugger version of Flash Player. You must also set
TraceOutputFileEnable to 1 in your mm.cfg file. For more information on editing the mm.cfg file, see “Configuring the debugger version of Flash Player” on page 229.
The debugger version of Flash Player sends output from the trace() method to the flashlog.txt file. The location
of this file is determined by the operating system. For more information, see “Log file location” on page 231.
Using the global trace() method
You can use the debugger version of Flash Player to capture output from the global trace() method and write
that output to the client log file. You can use trace() statements in any ActionScript or MXML file in your application. Because it is a global function, you are not required to import any ActionScript classes packages to use the
trace() method.
The following example defines a function that logs the various stages of the Button control’s startup life cycle:
<?xml version="1.0"?>
<!-- logging/ButtonLifeCycle.mxml -->
<mx:Application xmlns:mx="http://www.adobe.com/2006/mxml">
ADOBE FLEX 3 233
Building and Deploying Adobe Flex 3 Applications
<mx:Script><![CDATA[
private function traceEvent(event:Event):void {
trace(event.currentTarget + ":" + event.type);
}
]]></mx:Script>
<mx:Button id="b1" label="Click Me"
preinitialize="traceEvent(event)"
initialize="traceEvent(event)"
creationComplete="traceEvent(event)"
updateComplete="traceEvent(event)"
/>
</mx:Application>
The following example shows the output of this simple application:
TraceLifecycle_3.b1:Button:preinitialize
TraceLifecycle_3.b1:Button:initialize
TraceLifecycle_3.b1:Button:creationComplete
TraceLifecycle_3.b1:Button:updateComplete
TraceLifecycle_3.b1:Button:updateComplete
TraceLifecycle_3.b1:Button:updateComplete
Messages that you log by using the trace() method should be Strings. If the output is not a String, use the
String(...) String conversion function, or use the object’s toString() method, if one is available, before you
call the trace() method.
To enable tracing, you must configure the debugger version of Flash Player as described in “Configuring the
debugger version of Flash Player to record trace() output” on page 232.
Using the logging API
The logging API lets an application capture and write messages to a target’s configured output. Typically the
output is equivalent to the global trace() method, but it can be anything that an active target supports.
234 CHAPTER 11
The logging API consists of the following parts:
Logger The logger provides an interface for sending a message to an active target. Loggers implement the ILogger
interface and call methods on the Log class. The two classes of information used to filter a message are category
and level. Each logger operates under a category. A category is a string used to filter all messages sent from that
logger. For example, a logger can be acquired with the category “orange”. Any message sent using the “orange”
logger only reaches those targets that are listening for the “orange” category. In contrast to the category that is
applied to all messages sent with a logger, the level provides additional filtering on a per-message basis. For
example, to indicate that an error occurred within the “orange” subsystem, you can use the error level when
logging the message. The supported levels are defined by the LogEventLevel class. The Flex framework classes that
use the logging API set the category to the fully qualified class name as a convention.
Log target The log target defines where log messages are written. Flex predefines a single log target: TraceTarget,
which is the most commonly used log target. This log target connects the logging API to the trace system so that
log messages are sent to the same location as the output of the trace() method. For more information on the
trace() method, see “Using the global trace() method” on page 232.
You can also write your own custom log target. For more information, see “Implementing a custom logger with
the logging API” on page 238.
Destination The destination is where the log message is written. Typically, this is a file, but it can also be a console
or something else, such as an in-memory object. The default destination for TraceTarget is the flashlog.txt file. You
configure this destination on the client.
The following example shows a sample relationship between a logger, a log target, and a destination:
Logger
Log target
Destination
ILogger
TraceTarget
flashlog.txt
You can also use the logging API to send messages from custom code you write. You can do this when you create
a set of custom APIs or components or when you extend the Flex framework classes and you want users to be able
to customize their logging. For more information, see “Implementing a custom logger with the logging API” on
page 238.
The following packages within the Flex framework are the only ones that use the logging API:
•
mx.rpc.*
•
•
mx.messaging.*
mx.data.*
To configure client-side logging in MXML or ActionScript, create a TraceTarget object to log messages. The TraceTarget object logs messages to the same location as the output of the trace() statements. You can also use the
TraceTarget to specify which classes to log messages for, and what level of messages to log.
ADOBE FLEX 3 235
Building and Deploying Adobe Flex 3 Applications
The levels of logging messages are defined as constants of the LogEventLevel class. The following table lists the
log level constants and their numeric equivalents, and describes each message level:
Logging level
constant (int)
Description
ALL (0)
Designates that messages of all logging levels should be logged.
DEBUG (2)
Logs internal Flex activities. This is most useful when debugging an application.
Select the DEBUG logging level to include DEBUG, INFO, WARN, ERROR, and FATAL messages in your log files.
INFO (4)
Logs general information.
Select the INFO logging level to include INFO, WARN, ERROR, and FATAL messages in your log files.
WARN (6)
Logs a message when the application encounters a problem. These problems do not cause the application to
stop running, but could lead to further errors.
Select the WARN logging level to include WARN, ERROR, and FATAL messages in your log files.
ERROR (8)
Logs a message when a critical service is not available or a situation has occurred that restricts the use of the
application.
Select the ERROR logging level to include ERROR and FATAL messages in your log files.
FATAL (1000)
Logs a message when an event occurs that results in the failure of the application.
Select the FATAL logging level to include only FATAL messages in your log files.
The log level lets you restrict the amount of messages sent to any running targets. Whatever log level you specify,
all “lower” levels of messages are written to the log. For example, if you set the log level to DEBUG, all log levels are
included. If you set the log level to WARNING, only WARNING, ERROR , and FATAL messages are logged. If you set the
log level to the lowest level of message, FATAL, only FATAL messages are logged.
Using the logging API with data services
The data services classes are designed to use the logging API to log client-side and server-side messages.
Enable the logging API with data services
1 Create a TraceTarget logging target and set the value of one or more filter properties to include the classes
whose messages you want to log. You can filter the log messages to a specific class or package. You can use
wildcards (*) when defining a filter.
2 Set the log level by using the level property of the log target. You can also add detail to the log file output,
such as the date and time that the event occurred, by using properties of the log target.
236 CHAPTER 11
When you create a target within ActionScript, call the Log class’s addTarget() method to add the new target
to the logging system. Calling the addTarget() method is not required when you create a target in MXML. As
long as the client is using the debugger version of Flash Player and meets the requirements described in “Configuring the debugger version of Flash Player to record trace() output” on page 232, the messages are logged.
3
The following example configures a TraceTarget logging target in ActionScript:
<?xml version="1.0"?>
<!-- charts/ActionScriptTraceTarget.mxml -->
<mx:Application xmlns:mx="http://www.adobe.com/2006/mxml"
creationComplete="initLogging();">
<mx:Script><![CDATA[
import mx.collections.ArrayCollection;
import mx.logging.targets.*;
import mx.logging.*;
[Bindable]
public var myData:ArrayCollection;
private function initLogging():void {
// Create a target.
var logTarget:TraceTarget = new TraceTarget();
// Log only messages for the classes in the mx.rpc.* and
// mx.messaging packages.
logTarget.filters=["mx.rpc.*","mx.messaging.*"];
// Log all log levels.
logTarget.level = LogEventLevel.ALL;
// Add date, time, category, and log level to the output.
logTarget.includeDate = true;
logTarget.includeTime = true;
logTarget.includeCategory = true;
logTarget.includeLevel = true;
// Begin logging.
Log.addTarget(logTarget);
}
]]></mx:Script>
<!-- HTTPService is in the mx.rpc.http.* package -->
<mx:HTTPService
id="srv"
url="../assets/trace_example_data.xml"
ADOBE FLEX 3 237
Building and Deploying Adobe Flex 3 Applications
useProxy="false"
result="myData=ArrayCollection(srv.lastResult.data.result)"
/>
<mx:LineChart id="chart" dataProvider="{myData}" showDataTips="true">
<mx:horizontalAxis>
<mx:CategoryAxis categoryField="month"/>
</mx:horizontalAxis>
<mx:series>
<mx:LineSeries yField="apple" name="Apple"/>
<mx:LineSeries yField="orange" name="Orange"/>
<mx:LineSeries yField="banana" name="Banana"/>
</mx:series>
</mx:LineChart>
<mx:Button id="b1" click="srv.send();" label="Load Data"/>
</mx:Application>
In the preceding example, the filters property is set to log messages for all classes in the mx.rpc and
mx.messaging packages. In this case, it logs messages for the HTTPService class, which is in the mx.rpc.http.*
package.
You can also configure a log target in MXML. When you do this, though, you must be sure to use an appropriate
number (such as 2) rather than a constant (such as DEBUG). The following example sets the values of the filters for
a TraceTarget logging target by using MXML syntax:
<?xml version="1.0"?>
<!-- charts/MXMLTraceTarget.mxml -->
<mx:Application xmlns:mx="http://www.adobe.com/2006/mxml" creationComplete="initApp();">
<mx:Script><![CDATA[
import mx.collections.ArrayCollection;
import mx.logging.Log;
[Bindable]
public var myData:ArrayCollection;
private function initApp():void {
Log.addTarget(logTarget);
}
]]></mx:Script>
<mx:TraceTarget id="logTarget"
includeDate="true"
includeTime="true"
238 CHAPTER 11
includeCategory="true"
includeLevel="true"
>
<mx:filters>
<mx:Array>
<mx:String>mx.rpc.*</mx:String>
<mx:String>mx.messaging.*</mx:String>
</mx:Array>
</mx:filters>
<!-- 0 is represents the LogEventLevel.ALL constant. -->
<mx:level>0</mx:level>
</mx:TraceTarget>
<!-- HTTPService is in the mx.rpc.http.* package -->
<mx:HTTPService
id="srv"
url="../assets/trace_example_data.xml"
useProxy="false"
result="myData=ArrayCollection(srv.lastResult.data.result)"
/>
<mx:LineChart id="chart" dataProvider="{myData}" showDataTips="true">
<mx:horizontalAxis>
<mx:CategoryAxis categoryField="month"/>
</mx:horizontalAxis>
<mx:series>
<mx:LineSeries yField="apple" name="Apple"/>
<mx:LineSeries yField="orange" name="Orange"/>
<mx:LineSeries yField="banana" name="Banana"/>
</mx:series>
</mx:LineChart>
<mx:Button id="b1" click="srv.send();" label="Load Data"/>
</mx:Application>
Implementing a custom logger with the logging API
If you write custom components or an ActionScript API, you can use the logging API to access the trace system
in the debugger version of Flash Player. You do this by defining your log target as a TraceTarget, and then calling
methods on your logger when you log messages.
The following example extends a Button control. It writes log messages for the startup life cycle events, such as
initialize and creationComplete, and the common UI events, such as click and mouseOver.
ADOBE FLEX 3 239
Building and Deploying Adobe Flex 3 Applications
package { // The empty package.
import mx.controls.Button;
import flash.events.*;
import mx.logging.*;
import mx.logging.targets.*;
public class MyCustomLogger extends Button {
private var myLogger:ILogger;
public function MyCustomLogger() {
super();
initListeners();
initLogger();
}
private function initListeners():void {
// Add event listeners life cycle events.
addEventListener("preinitialize", logLifeCycleEvent);
addEventListener("initialize", logLifeCycleEvent);
addEventListener("creationComplete", logLifeCycleEvent);
addEventListener("updateComplete", logLifeCycleEvent);
// Add event listeners for other common events.
addEventListener("click", logUIEvent);
addEventListener("mouseUp", logUIEvent);
addEventListener("mouseDown", logUIEvent);
addEventListener("mouseOver", logUIEvent);
addEventListener("mouseOut", logUIEvent);
}
private function initLogger():void {
myLogger = Log.getLogger("MyCustomClass");
}
private function logLifeCycleEvent(e:Event):void {
if (Log.isInfo()) {
myLogger.info(" STARTUP: " + e.target + ":" + e.type);
}
}
private function logUIEvent(e:MouseEvent):void {
if (Log.isDebug()) {
myLogger.debug(" EVENT:
" + e.target + ":" + e.type);
}
}
}
}
240 CHAPTER 11
Within the application that uses the MyCustomLogger class, define a TraceTarget, as the following example shows:
<?xml version="1.0"?>
<!-- charts/LoadCustomLogger.mxml -->
<mx:Application xmlns:mx="http://www.adobe.com/2006/mxml" xmlns="*" >
<mx:TraceTarget level="0" includeDate="true" includeTime="true" includeCategory="true"
includeLevel="true">
<mx:filters>
<mx:Array>
<mx:String>*</mx:String>
</mx:Array>
</mx:filters>
</mx:TraceTarget>
<MyCustomLogger/>
</mx:Application>
After running this application, the flashlog.txt file looks similar to the following:
3/9/2006 18:58:05.042 [INFO] MyCustomLogger STARTUP:
Main_3.mcc:MyCustomLogger:preinitialize
3/9/2006 18:58:05.487 [INFO] MyCustomLogger STARTUP: Main_3.mcc:MyCustomLogger:initialize
3/9/2006 18:58:05.557 [INFO] MyCustomLogger STARTUP:
Main_3.mcc:MyCustomLogger:creationComplete
3/9/2006 18:58:05.567 [INFO] MyCustomLogger STARTUP:
Main_3.mcc:MyCustomLogger:updateComplete
3/9/2006 18:58:05.577 [INFO] MyCustomLogger STARTUP:
Main_3.mcc:MyCustomLogger:updateComplete
3/9/2006 18:58:05.577 [INFO] MyCustomLogger STARTUP:
Main_3.mcc:MyCustomLogger:updateComplete
3/9/2006 18:58:06.849 [DEBUG] MyCustomLogger EVENT: Main_3.mcc:MyCustomLogger:mouseOver
3/9/2006 18:58:07.109 [DEBUG] MyCustomLogger EVENT: Main_3.mcc:MyCustomLogger:mouseDown
3/9/2006 18:58:07.340 [DEBUG] MyCustomLogger EVENT: Main_3.mcc:MyCustomLogger:mouseUp
3/9/2006 18:58:07.360 [DEBUG] MyCustomLogger EVENT: Main_3.mcc:MyCustomLogger:click
3/9/2006 18:58:07.610 [DEBUG] MyCustomLogger EVENT: Main_3.mcc:MyCustomLogger:mouseOut
To log a message, you call the appropriate method of the ILogger interface. The ILogger interface defines a method
for each log level: debug(), info(), warn(), error(), and fatal(). The logger logs messages from these calls
if their levels are at or under the log target’s logging level. If the target’s logging level is set to all, the logger records
messages when any of these methods are called.
To improve performance, a static method corresponding to each level exists on the Log class, which indicates if
any targets are listening for a specific level. Before you log a message, you can use one of these methods in an if
statement to avoid running the code. The previous example uses the Log.isDebug() and Log.isInfo() static
methods to ensure that the messages are of level INFO or DEBUG before logging them.
ADOBE FLEX 3 241
Building and Deploying Adobe Flex 3 Applications
The previous example logs messages dispatched from any category because the TraceTarget’s filters property is
set to the wildcard character (*). The framework code sets the category of the logger to the fully qualified class
name of the class in which logging is being performed. This is by convention only; any String specified when
calling Log.getLogger(x) is the category required in a filters property to receive the message.
When you set the filters property for logging within the Flex framework, you can restrict this to a certain
package or packages, or to other classes. To restrict the logging to your custom class only, add the category
specified when the logger was acquired (“MyCustomLogger”) to the filters Array, as the following example
shows:
<mx:filters>
<mx:Array>
<mx:String>MyCustomLogger</mx:String>
</mx:Array>
</mx:filters>
In ActionScript, you can set the filters property by using the following syntax:
traceTarget.filters = ["p1.*", "p2.*", "otherPackage*"];
The wildcard character can appear only at the end of a value in the Array.
The Log.getLogger() method sets the category of the logger. You pass this method a String that defines the
category.
Note: The Flex packages that use the logging API set the category to the current class name by convention, but it can
be any String that falls within the filters definitions.
The value of the category must fall within the definition of at least one of the filters for the log message to be
logged. For example, if you set the filters property to something other than “*” and you use
Log.getLogger("MyCustomLogger"), the filter Array must include an entry that matches MyCustomLogger,
such as “MyCustomLogger” or “My*”.
You can include the logger’s category in your log message, if you set the logger’s includeCategory property to
true.
You can also use the ILogger interface’s log() method to customize the log message, and you can specify the
logging level in that method. The following example logs messages that use the log level that is passed into the
method:
package { // The empty package.
// logging/MyCustomLogger2.as
import mx.controls.Button;
import flash.events.*;
import flash.events.MouseEvent;
import mx.logging.*;
import mx.logging.targets.*;
242 CHAPTER 11
public class MyCustomLogger2 extends Button {
private var myLogger:ILogger;
public function MyCustomLogger2() {
super();
initListeners();
initLogger();
}
private function initListeners():void {
// Add event listeners life cycle events.
addEventListener("preinitialize", logLifeCycleEvent);
addEventListener("initialize", logLifeCycleEvent);
addEventListener("creationComplete", logLifeCycleEvent);
addEventListener("updateComplete", logLifeCycleEvent);
// Add event listeners for other common events.
addEventListener("click", logUIEvent);
addEventListener("mouseUp", logUIEvent);
addEventListener("mouseDown", logUIEvent);
addEventListener("mouseOver", logUIEvent);
addEventListener("mouseOut", logUIEvent);
}
private function initLogger():void {
myLogger = Log.getLogger("MyCustomClass");
}
private function logLifeCycleEvent(e:Event):void {
if (Log.isInfo()) {
dynamicLogger(LogEventLevel.INFO, e, "STARTUP");
}
}
private function logUIEvent(e:MouseEvent):void {
if (Log.isDebug()) {
dynamicLogger(LogEventLevel.DEBUG, e, "EVENT");
}
}
private function dynamicLogger(
level:int,
e:Event, prefix:String):void {
var s:String = "__" + prefix + "__" + e.currentTarget +
":" + e.type;
myLogger.log(level, s);
ADOBE FLEX 3 243
Building and Deploying Adobe Flex 3 Applications
}
}
}
Compiler logging
Flex provides you with control over the output of warning and debug messages for the application and component
compilers. When you compile, you can enable the message output to help you to locate and fix problems in your
application.
For the command-line compiler, the settings that you use to control messages are defined in the flex-config.xml
file or as command-line compiler options.
You have a high level of control over what compiler messages are displayed. For example, you can enable or disable
messages such as binding-related warnings in the flex-config.xml file by using the show-binding-warnings
option. The following example disables these messages in the flex-config.xml file:
<show-binding-warnings>false</show-binding-warnings>
You can also set this option on the command line.
For Flex Builder, you set error and warning options in the Compiler Properties dialog box. To open the Compiler
Properties dialog box, select Project > Properties > Flex Compiler. You can enable or disable warnings in this
dialog box. In addition, you can enter more specific options such as show-binding-warnings in the Additional
Compiler Arguments field.
If you enable compiler messages, they are written to the console window (or System.out) by default.
Also in Flex Builder is a separate Eclipse Error Log file. This file stores messages from the Eclipse environment.
The default location of this log file on Windows XP is c:\Documents and
Settings\user_name\workspace\.metadata\.log. For MacOS and Linux, the default location is also in the
workspace directory, but files and directories that begin with a dot are hidden by default. As a result, you must
make those files visible before you can view the log file.
For more information on the compiler logging settings, see “Viewing warnings and errors” on page 172.
244 CHAPTER 11
245
Chapter 12: Using the Command-Line
Debugger
If you encounter errors in your applications, you can use the debugging tools to set and manage breakpoints in
your code; control application execution by suspending, resuming, and terminating the application; step into and
over the code statements; select critical variables to watch; evaluate watch expressions while the application is
running, and so on.
Topics
About debugging. . . . . . . . . . . . . . . . . . . . . . . . . . . . . . . . . . . . . . . . . . . . . . . . . . . . . . . . . . . . . . . . . . . . . . . . . . . . . . . . 245
Starting a debugging session . . . . . . . . . . . . . . . . . . . . . . . . . . . . . . . . . . . . . . . . . . . . . . . . . . . . . . . . . . . . . . . . . . . . . . 248
Configuring the command-line debugger . . . . . . . . . . . . . . . . . . . . . . . . . . . . . . . . . . . . . . . . . . . . . . . . . . . . . . . . . . 250
Using the command-line debugger commands . . . . . . . . . . . . . . . . . . . . . . . . . . . . . . . . . . . . . . . . . . . . . . . . . . . . . . 251
About debugging
Debugging Adobe® Flex® applications can be as simple as enabling trace() statements or as complex as stepping
into an application’s source files and running the code, one line at a time. The Adobe® Flex® Builder™ debugger and
the command-line debugger, fdb, let you step through and debug the files used by your Flex applications.
Note: For information on debugging Adobe® AIR™ applications, see "Using the AIR development tools" in Developing
AIR Applications with Adobe Flex 3.
To debug a Flex application, you must generate a debug SWF file. This is a SWF file with debug information in it.
You then connect fdb to the debugger version of Adobe® Flash® Player that is running the debug SWF file.
The debugger is an agent that communicates with the application that is running in Flash Player. It connects to
your application with a local socket connection. As a result, you might have to disable anti-virus software to use
it if your anti-virus software prevents socket communication. The debugger uses this connection to transfer information from the SWF file to the command line so that you can add breakpoints, inspect variables, and do other
common debugging tasks. The port through which the debugger connects to your application is 7935. You cannot
change this port.
246 CHAPTER 12
This topic describes how to use the fdb command-line debugger. To use the Flex Builder debugger, see “Running
and Debugging Applications” on page 136 in Using Adobe Flex Builder 3.To use either debugger, you must install
and configure the debugger version of Flash Player. To determine if you are running the debugger version or the
standard version of Flash Player, open any Flex application in the player and right-click the mouse button. If you
see the Show Redraw Regions option, you are running the debugger version of Flash Player. For more information
about the debugger version of Flash Player, and how to detect which player you are running, see “Using the
debugger version of Flash Player” on page 228.
Using the command-line debugger
The fdb command-line debugger is located in the flex_install_dir/bin directory. To start fdb, open a command
prompt, change to that directory, and enter fdb.
For a description of available commands, use the following command:
(fdb) help
For an overview of the fdb debugger, use the following command:
(fdb) tutorial
Generating debug SWF files
To debug a Flex application, you first generate a debug SWF file. Debug SWF files are similar to other application
SWF files except that they contain debugging-specific information that the debugger and the debugger version of
Flash Player use during debugging sessions. Debug SWF files are larger than non-debug SWF files, so generate
them only when you are going to debug with them.
To generate the debug SWF file using the mxmlc command-line compiler, you set the debug option to true, either
on the command line or in the flex-config.xml file. The following example sets the debug option to true on the
command line:
mxmlc -debug=true myApp.mxml
Flex Builder generates debug SWF files by default in the project’s /bin-debug directory. To generate a non-debug
SWF file in Flex Builder, you use the Export Release Build feature. This generates a non-debug SWF file in the
project’s /bin-release directory. You can also manually set the debug compiler option to false in the Additional
Compiler Arguments field of the project’s properties.
To generate the debug SWF file using the web-tier compiler with the Flex module for Apache and IIS, you can
either set the debug compiler option to true or append debug=true on the query string:
http://www.yourdomain.com/MyApp.mxml?debug=true
For more information, see “Invoking the debugger compiler” on page 350.
ADOBE FLEX 3 247
Building and Deploying Adobe Flex 3 Applications
Command-line debugger limitations
The command-line debugger supports debugging only at the ActionScript level and does not support the Flash
timeline concept. The debugger also does not support adding breakpoints inside script snippets in MXML tags.
You can set breakpoints on event handlers defined for MXML tags.
Flash Player may interact with a server. The debugger does not assist in debugging the server-side portion of the
application, nor does it offer support for inspecting any of the IP transactions that take place from Flash Player to
the server, and vice versa.
Command-line debugger shortcuts
You can open commands within the fdb debugger by using the fewest number of nonambiguous keystrokes. For
example, to use the print command, you can type p, because no other command begins with that letter.
Using the default browser
When you debug an application in a web browser, fdb opens the player in the default browser. The default browser
is the browser that opens when you open a web-specific file without specifying an application. You must also have
the debugger version of Flash Player installed with this browser. If you do not have the debugger version of Flash
Player, Flash displays an error indicating that your Flash Player does not support all fdb commands.
Your default browser might not be the first browser that you installed on your computer. For example, if you
installed another web browser after installing Microsoft Internet Explorer, Internet Explorer might not be your
default browser.
Determine your default browser
1
From the Windows toolbar, select Start.
2
Select Run and enter a URL in the Run dialog box. For example:
http://www.adobe.com
3
Click OK.
Windows opens the default browser or displays an error message indicating that there is no application
configured to handle your request.
Set Internet Explorer 6.x as your default browser
1
Open the Internet Explorer application.
2
Select Tools > Internet Options.
3
Select the Programs tab.
248 CHAPTER 12
4
Select the “Internet Explorer should check to see whether it is the default browser” option, and click OK.
The next time you start Internet Explorer, Internet Explorer prompts you to make it the default browser. If you
are not prompted, Internet Explorer is already your default browser.
Set Firefox as your default browser
1
Open the Firefox application.
2
Select Tools > Options.
3
Select the General icon to view general settings.
4
Select the “Firefox should check to see if it is the default browser when starting” option, and click OK.
The next time you start FireFox, FireFox prompts you to make it the default browser. If you are not prompted,
FireFox is already your default browser.
About the source files
Each application can have any number of ActionScript files. Some of the files that fdb steps into are external class
files, and some are generated by the Flex compilers.
In general, Flex generates a single file that contains ActionScript statements used in <mx:Script> blocks in the
root MXML file, and an additional file for each ActionScript class that the application uses. Flex generates many
source files so that you can navigate the application from within the debugger.
To view a list of files that are used by the application you are debugging, use the info files command. For more
information, see “Getting status” on page 259.
The generated ActionScript class files are sometimes referred to as compilation units. For more information about
compilation units, see “About incremental compilation” on page 157.
Starting a debugging session
You start a debugging session by using the fdb command-line debugger. After you start a session, you typically
type continue once before you set break points and perform other debugging tasks. This is because the first frame
that suspends debugging occurs before the application has finished initialization.
For more information about which commands are available after you start a debugging session, see “Using the
command-line debugger commands” on page 251.
ADOBE FLEX 3 249
Building and Deploying Adobe Flex 3 Applications
Starting a session with the stand-alone Flash Player
You can start a debugging session with the stand-alone debugger version of Flash Player. You do this by compiling
the application into a SWF file, and then invoking the SWF file with the fdb command-line debugger. The fdb
debugger opens the debugger version of the stand-alone Flash Player.
The debugger version of the stand-alone Flash Player runs as an independent application. It does not run within
a web browser or other shell. The debugger version of the stand-alone Flash Player does not support any server
requests, such as web services and dynamic SWF loading, so not all applications can be properly debugged inside
the debugger version of the stand-alone Flash Player.
Debug with the stand-alone Flash Player
1
Compile the Flex application’s debug SWF file and set the debug option to true.
The following example compiles an application with the mxmlc command-line compiler:
mxmlc -debug=true myApp.mxml
You can also compile an application SWF file by using the web-tier compiler or the Flex Builder compiler. For
more information on Flex compilers, see “About the Flex compilers” on page 125.
2
Find the flex_install_dir/bin directory. You installed the Flex application files to this directory.
3
Type fdb from the command line. The fdb prompt appears.
You can also open fdb with the JAR file, as the following example shows:
java -jar ../lib/fdb.jar
4
Type run at the fdb prompt, followed by the path to the SWF file, as shown in the following example:
(fdb) run c:/myfiles/fonts/EmbedMyFont.swf
The fdb debugger starts the Flex application in the debugger version of the stand-alone Flash Player, and the
(fdb) command prompt appears. You can also start a session by typing fdb filename.swf at the command
prompt, rather than by using the run command.
Starting a session in a browser
You can start a debugging session in a browser. This requires that you pre-compile the SWF file and are able to
request it from a web server.
Debug in a browser
Compile the Flex application’s debug SWF file and set the debug option to true. The following example
compiles an application with the mxmlc command-line compiler:
1
mxmlc -debug=true myApp.mxml
250 CHAPTER 12
You can also compile an application SWF file by using the web-tier compiler or the Flex Builder compiler. For
more information on Flex compilers, see “About the Flex compilers” on page 125.
Create an HTML wrapper that embeds this SWF file, if you have not already done so. For more information
on creating a wrapper, see “Creating a Wrapper” on page 311.
2
3
Copy the SWF file and its wrapper files to your web server.
4
Find the flex_install_dir/bin directory. You installed the Flex application files to this directory.
5
Type fdb in the command line. The fdb prompt appears.
You can also open fdb with the JAR file, as the following example shows:
java -jar ../lib/fdb.jar
6
Type run at the fdb prompt:
(fdb) run
This instructs fdb to wait for a player to connect to it.
In your browser, request a wrapper that embeds the debug SWF file. Do not request the SWF file directly in a
browser because some browsers do not allow you to run a SWF file directly.
7
Alternatively, you can type run filename.html at the command line, and fdb launches the browser for you.
The filename should include the entire URL; for example:
(fdb) run http://localhost:8100/flexapps/index.html
Configuring the command-line debugger
You can configure the current session of the fdb command-line debugger using variables that exist entirely within
fdb; they are not part of your application. The configuration variables are prefixed with $.
The following table describes the most common configuration variables used by fdb:
Variable
Description
$invokegetters
Set to 0 to prevent fdb from firing getter functions. The default value is 1 (enabled).
$listsize
Sets the number of lines to display with the list command. The default value is 10.
To set the value of a configuration variable, you use the set command, as the following example shows:
(fdb) set $invokegetters = 0
For more information on using the set command, see “Changing data values” on page 256.
ADOBE FLEX 3 251
Building and Deploying Adobe Flex 3 Applications
Using the command-line debugger commands
The fdb command-line debugger includes commands that you use to debug and navigate your Flex application.
Running the debugger
The fdb debugger provides several commands for stepping through the debugged application’s files. The following
table summarizes those commands:
Command
Description
continue
Continues running the application.
file [file]
Specifies an application to be debugged, without starting it. This command does not cause the application to
start; use the run command without an argument to start debugging the application.
finish
Continues until the function exits.
next [N]
Continues to the next source line in the application. The optional argument N means do this N times or until the
program stops for some other reason.
quit
Exits from the debug session.
run [file]
Starts a debugging session by running the specified file. To run the application that the file command previously
specified, execute the run command without any options.
The run command starts the application in a browser or stand-alone Flash Player.
step [N]
Steps into the application. The optional argument N means do this N times or until the program stops for some
other reason.
These commands are nonblocking, which means that when they return, the client has at least begun the operation, but it has not necessarily finished it.
When you start a session, fdb stops execution before Flex renders the application on the screen. Use the continue
command to get to the application’s starting screen.
The following example shows a sample application after it starts:
(fdb) continue
[trace] ComboBase:
[trace] ComboBase:
[trace] ComboBase:
[trace] ComboBase:
[trace] ComboBase:
[trace] ComboBase:
[trace] ComboBase:
y
y
y
y
y
y
y
=
=
=
=
=
=
=
undefined
undefined
undefined
undefined
undefined
undefined
undefined
text_mc.bl
text_mc.bl
text_mc.bl
text_mc.bl
text_mc.bl
text_mc.bl
text_mc.bl
=
=
=
=
=
=
=
undefined
undefined
undefined
undefined
undefined
undefined
undefined
252 CHAPTER 12
[trace] RadioButtonGroup.addInstance: instance = _level0._VBox0._Accordion0._For
m2._FormItem3._RadioButton1 data = undefined label = 2005
[trace] RadioButtonGroup.addInstance: instance = _level0._VBox0._Accordion0._For
m2._FormItem3._RadioButton2 data = undefined label = 2004
[trace] RadioButtonGroup.addInstance: instance = _level0._VBox0._Accordion0._For
m2._FormItem3._RadioButton3 data = undefined label = 2005
[trace] RadioButtonGroup.addInstance: instance = _level0._VBox0._Accordion0._For
m2._FormItem3._RadioButton4 data = undefined label = 2006
[trace] ComboBase: y = 0 text_mc.bl = 12
[trace] ComboBase: y = 0 text_mc.bl = 12
[trace] ComboBase: y = 0 text_mc.bl = 12
[trace] ComboBase: y = 0 text_mc.bl = 14
During the debugging session, you interact with the application in the debugger version of Flash Player. For
example, if you select an item from the drop-down list, the debugger continues to output information to the
command window:
[trace]
[trace]
[trace]
[trace]
[trace]
[trace]
[trace]
[trace]
[trace]
[trace]
[trace]
[trace]
[trace]
[trace]
SSL : ConfigureScrolling
SSP : 5 51 true 47
ComboBase: y = 0 text_mc.bl = 14
layoutChildren : bRowHeightChanged
>>SSL:layoutChildren
deltaRows 5
rowCount 5
<<SSL:layoutChildren
>>SSL:draw
bScrollChanged
SSL : ConfigureScrolling
SSP : 5 51 false 46
SSL Drawing Rows in UpdateControl 5
<<SSL:draw
You can store commonly used commands in a source file, and then load that file by using the source command.
For more information, see “Accessing commands from a file” on page 254.
Setting breakpoints
Setting breakpoints is a critical aspect of debugging any application. You can set breakpoints on any ActionScript
code in your Flex application. You can set breakpoints on statements in any external ActionScript file, on ActionScript statements in an <mx:Script> tag, or on MXML tags that have event handler properties. In the following
MXML code, click is an event handler property:
<mx:Button click="ws.getWeather.send();"/>
Breakpoints are maintained from session to session. However, when you change the target file or quit fdb, breakpoints are lost.
ADOBE FLEX 3 253
Building and Deploying Adobe Flex 3 Applications
The following table summarizes the commands for manipulating breakpoints with the ActionScript debugger:
Command
Description
break [args]
Sets a breakpoint at the specified line or function. The argument can be a line number or function name. With no arguments, the break command sets a breakpoint at the currently
stopped line (not the currently listed line).
If you specify a line number, fdb breaks at the start of code for that line. If you specify a function
name, fdb breaks at the start of code for that function.
clear [args]
Clears a breakpoint at the specified line or function. The argument can be a line number or
function name.
If you specify a line number, fdb clears a breakpoint in that line. If you specify a function name,
fdb clears a breakpoint at the beginning of that function.
With no argument, fdb clears a breakpoint in the line that the selected frame is executing in.
Compare the delete command, which clears breakpoints by number.
commands [breakpoint]
Sets commands to execute when the specified breakpoint is encountered. If you do not
specify a breakpoint, the commands are applied to the last breakpoint.
condition bnum [expression]
Specifies a condition that must be met to stop at the given breakpoint. The fdb debugger evaluates expression when the bnum breakpoint is reached. If the value is true or nonzero, fdb
stops at the breakpoint. Otherwise, fdb ignores the breakpoint and continues execution.
To remove the condition from the breakpoint, do not specify an expression.
You can use conditional breakpoints to stop on all events of a particular type. For example, to
stop on every initialize event, use the following commands:
(fdb) break UIEvent:dispatch
Breakpoint 18 at 0x16cb3: file UIEventDispatcher.as, line 190
(fdb) condition 18 (eventObj.type == 'initialize')
delete [args]
Deletes breakpoints. Specify one or more comma- or space-separated breakpoint numbers to
delete those breakpoints. To delete all breakpoints, do not provide an argument.
disable breakpoints [bp_num]
Disables breakpoints. Specify one or more space-separated numbers as options to disable
only those breakpoints.
enable breakpoints [bp_num]
Enables breakpoints that were previously disabled. Specify one or more space-separated
numbers as options to enable only those breakpoints.
The following example sets a breakpoint on the myFunc() method, which is triggered when the user clicks a
button:
(fdb) break myFunc
Breakpoint 1 at 0x401ef: file file1.mxml, line 5
(fdb) continue
254 CHAPTER 12
Breakpoint 1, myFunc() at file1.mxml:5
5ta1.text = "Clicked";
(fdb)
To see all breakpoints and their numbers, use the info breakpoints command. This will also tell you if a breakpoint is unresolved.
You can use the commands command to periodically print out values of objects and variables whenever fdb
encounters a particular breakpoint. The following example prints out the value of ta1.text (referred to as $1),
executes the where command, and then continues when it encounters the button’s click handler breakpoint:
(fdb) commands 1
Type commands for when breakpoint 1 is hit, one per line.
End with a line saying just 'end'.
>print ta1.text
>where
>continue
>end
(fdb) cont
Breakpoint 1, myFunc() at file1.mxml:5
5ta1.text = "Clicked";
$1 = ""
#0 [MovieClip 1].myFunc(event=undefined) at file1.mxml:5
#1 [MovieClip 1].handler(event=[Object 18127]) at file1.mxml:15
Breakpoints are not specific to a single SWF file. If you set a breakpoint in a file that is common to multiple SWF
files, fdb applies the breakpoint to all SWF files.
For example, suppose you have four SWF files loaded and each of those SWF files contains the same version of an
ActionScript file, view.as. To set a breakpoint in the init() function of the view.as file, you need to set only a
single breakpoint in one of the view.as files. When fdb encounters any of the init() functions, it triggers the
break.
Accessing commands from a file
You can use the source command to read fdb commands from a file and execute them. This lets you write
commands such as breakpoints once and use them repeatedly when debugging the same application in different
sessions or across different applications.
The source command has the following syntax:
(fdb) source file
The value of file can be a filename for a file in the current working directory or an absolute path to a remote file.
To determine the current working directory, use the pwd command.
The following examples read in the mycommands.txt file from different locations:
ADOBE FLEX 3 255
Building and Deploying Adobe Flex 3 Applications
(fdb) source mycommands.txt
(fdb) source mydir\mycommands.txt
(fdb) source c:\mydir\mycommands.txt
Examining data values
The print command displays values of members such as variables, objects, and properties. This command
excludes functions, static variables, constants, and inaccessible member variables (such as the members of an
Array).
The print command uses the following syntax:
print [variable_name | object_name[.] | property]
The print command prints the value of the specified variable, object, or property. You can specify the name or
name.property to narrow the results. If fdb can determine the type of the entity, fdb displays the type.
If you specify the print command on an object, fdb displays a numeric identifier for the object.
To list all the properties of an object, use trailing dot-notation syntax. The following example prints all the
properties of the object myButton:
(fdb) print myButton
To print the value of a single variable, use dot-notation syntax, as the following example shows:
(fdb) print myButton.label
Use the what command to view the context of a variable. The what command has the following syntax:
(fdb) what variable
Use the display command to add an expression to the autodisplay list. Every time debugging stops, fdb prints
the list of expressions in the autodisplay list. The display command has the following syntax:
(fdb) display [expression]
The expression is the same as the arguments for the print command, as the following example shows:
(fdb) display myButton.color
To view all expressions on the autodisplay list, use the info display command.
To remove an expression from the autodisplay list, use the undisplay command. The undisplay command has
the following syntax:
(fdb) undisplay [list_num]
Use the undisplay command without an argument to remove all entries on the autodisplay list. Specify one or
more list_num options separated by spaces to remove numbered entries from the autodisplay list.
256 CHAPTER 12
You can temporarily disable autodisplay expressions by using the disable display command. The disable
display command has the following syntax:
(fdb) disable display [display_num]
Specify one or more space-separated numbers as options to disable only those entries in the autodisplay list.
To re-enable the display list, use the enable display command, which has the same syntax as the disable
display command.
Changing data values
You can use the set command to assign the value of a variable or a configuration variable. The set command has
the following syntax:
set [expression]
Depending on the variable type, you use different syntax for the expression. The following example sets the
variable i to the number 3:
(fdb) set i = 3
The following example sets the variable employee.name to the string Reiner :
(fdb) set employee.name = "Reiner"
The following example sets the convenience variable $myVar to the number 20:
(fdb) set $myVar = 20
You use the set command to set the values of fdb configuration variables. For more information, see “Configuring
the command-line debugger” on page 250.
Viewing file contents
You use the list command to view lines of code in the ActionScript files. The list command uses the following
syntax:
list [- | line_num[,line_num] | [file_name:]line_num | file_name[:line_num] |
[file_name:]function_name]
You use the list command to print the lines around the specified function or line of the current file. If you do
not specify an argument, list prints 10 lines after or around the previous listing. If you specify a filename, but
not a line number, list assumes line 1.
If you specify a single numeric argument, the list command lists 10 lines around that line. If you specify more
than one comma-separated numeric argument, the list command displays lines between and including those
line numbers.
ADOBE FLEX 3 257
Building and Deploying Adobe Flex 3 Applications
To set the list location to where the execution is currently stopped, use the home command.
The following example lists code from line 10 to line 15:
(fdb) list 10, 15
If you specify a hyphen (-) in the previous example, the list command displays the 10 lines before a previous 10line listing.
Specify a line number to list the lines around that line in the current file, as in the following example:
(fdb) list 10
Specify a filename followed by a line number to list the lines around that line in that file, as in the following
example:
(fdb) list effects.mxml:10
Specify a function name to list the lines around the beginning of that function, as in the following example:
(fdb) list myFunction
Specify a filename followed by a function name to list the lines around the beginning of that function. This lets
you distinguish among like-named static functions, as follows:
(fdb) list effects.mxml:myFunction
You can resolve ambiguous matches by extending the value of the function name or filename, as the following
examples show:
Filenames:
(fdb) list UIOb
Ambiguous matching file names:
UIComponent.as#66
UIComponentDescriptor.as#67
UIComponentExtensions.as#68
(fdb) list UIComponent.
Function names:
(fdb) list init
Ambiguous matching function names:
init
initFromClipParameters
(fdb) list init(
258 CHAPTER 12
Viewing and changing the current file
The list command acts on the current file by default. To change to a different file, use the cf command. The cf
command has the following syntax:
(fdb) cf [file_name|file_number]
For example, to change the file to MyApp.mxml, use the following command:
(fdb) cf MyApp.mxml
If you do not specify a filename, the cf command lists the name and file number of the current file.
To view a list of all files used by the current application, use the info files command. For more information, see
“Getting status” on page 259.
Viewing the current working directory
Use the pwd command to view the file system’s current working directory, as the following example shows. This is
the directory from which fdb was run.
(fdb) pwd
c:/Flex2SDK/bin/
Locating source files
Usually, fdb can find the source files for your application to display them with the list command. In some situations, however, you need to add a directory to the search path so that fdb can find the source files. This can be
necessary, for example, when the application was compiled on a different computer than you are using to debug
the application.
You use the directory command to add a directory to the search path. This command adds the specified
directory or directories to the beginning of the list of directories that fdb searches for source files. The syntax for
the directory command is as follows:
(fdb) directory path
For example:
(fdb) directory C:\MySource;C:\MyOtherSource
On Windows, use the semicolon character as a separator. On Macintosh and UNIX, use the colon character as a
separator.
To see the current list of directories in the search path, use the show directories command.
Using truncated file and function names
The fdb debugger supports truncated file and function names. You can specify file_name and function_name
arguments with partial names, as long as the names are unambiguous.
ADOBE FLEX 3 259
Building and Deploying Adobe Flex 3 Applications
If you use truncated file and function names, fdb tries to map the argument to an unambiguous function name
first, and then a filename. For example, list foo first tries to find a function unambiguously starting with foo in
the current file. If this fails, it tries to find a file unambiguously starting with foo.
Printing stack traces
Use the bt command to display a back trace of all stack frames. The bt command has the following syntax:
(fdb) bt
Getting status
Use the info command to get general information about the application. The info command has the following
syntax:
info [options] [args]
The info command displays general information about the application being debugged. The following table
describes the options of the info command:
Option
Description
arguments
Displays the argument variables of the current stack frame.
breakpoints
Displays the status of user-settable breakpoints.
display
Displays the list of autodisplay expressions.
files [arg]
Displays the names of all files used by the target application. This includes authored files and system files, plus
generated files. Also indicates the file number for each file.
You can use wildcards and literals to select and sort the output. The info files command supports the
following:
info files character Alphabetically lists files with names that start with the specified character. The
following example lists all files starting with the letter V:
info files V
Alphabetically lists all files with the given extension. The following example
lists all files with the as extension:
info files *.extension
info files *.as
info files *string*
Alphabetically lists all files with names that include string.
260 CHAPTER 12
Option
Description
functions [arg]
Displays all function names used in this application. The info functions command optionally takes an
argument; for example:
info functions
Lists all functions in all files.
info functions
Lists all functions in the current file.
info functions MyApp.mxml
Lists all functions in the MyApp.mxml file.
handle
Displays settings for fault handling in the debugger.
locals
Displays the local variables of the current stack frame.
sources
Displays authored source files used by the target application.
stack
Displays the backtrace of the stack.
swfs
Displays all current SWF files.
targets
Displays the HTTP or file URL of the target application.
variables
Displays all global and static variable names.
For additional information about these options, use the help command, as the following example shows:
(fdb) help info targets
Handling faults
Use the handle command to specify how fdb reacts to Flash Player exceptions during execution. To view the
current settings, use the info command, as the following example shows:
(fdb) info handle
The handle command has the following syntax:
(fdb) handle exception [action]
The fault_type is the category of fault that fdb handles. The action is what fdb does in response to that fault.
The possible actions are print, noprint, stop, and nostop. The following table describes these actions:
Action
Description
print
Prints a message if this type of fault occurs.
noprint
Does not print a message if this type of fault occurs.
ADOBE FLEX 3 261
Building and Deploying Adobe Flex 3 Applications
Action
Description
stop
Stops execution of the debugger if this type of fault occurs.
nostop
Does not stop execution of the debugger if this type of fault occurs.
Getting help
Use the help command to get information on particular topics. The help command has the following syntax:
help [topic]
The help command provides a relatively terse description of each command and its usage. The following example
opens the help command:
(fdb) help
Type help followed by the command name to get the full help information, as the following example shows:
(fdb) help delete
Terminating the session
You use the kill and exit commands to end the current debugging session and exit from the fdb application.
The kill and exit commands do not take any arguments. If fdb opened the default browser, you can also
terminate the fdb session by closing the browser window.
To stop the current session, use the kill command, as the following example shows:
(fdb) kill
Using the kill command does not quit the fdb application. You can immediately start another session. To exit
from fdb, use the exit command, as follows:
(fdb) exit
262 CHAPTER 12
263
Chapter 13: Using ASDoc
ASDoc is a command-line tool that you can use to create API language reference documentation as HTML pages
from the classes in your Adobe® Flex™ application. The Adobe Flex team uses the ASDoc tool to generate the
Adobe Flex Language Reference.
Topics
About the ASDoc tool . . . . . . . . . . . . . . . . . . . . . . . . . . . . . . . . . . . . . . . . . . . . . . . . . . . . . . . . . . . . . . . . . . . . . . . . . . . 263
Creating ASDoc comments . . . . . . . . . . . . . . . . . . . . . . . . . . . . . . . . . . . . . . . . . . . . . . . . . . . . . . . . . . . . . . . . . . . . . . . 264
Documenting ActionScript elements. . . . . . . . . . . . . . . . . . . . . . . . . . . . . . . . . . . . . . . . . . . . . . . . . . . . . . . . . . . . . . . 269
Documenting MXML files . . . . . . . . . . . . . . . . . . . . . . . . . . . . . . . . . . . . . . . . . . . . . . . . . . . . . . . . . . . . . . . . . . . . . . . 274
ASDoc tags. . . . . . . . . . . . . . . . . . . . . . . . . . . . . . . . . . . . . . . . . . . . . . . . . . . . . . . . . . . . . . . . . . . . . . . . . . . . . . . . . . . . . 275
Running the ASDoc tool . . . . . . . . . . . . . . . . . . . . . . . . . . . . . . . . . . . . . . . . . . . . . . . . . . . . . . . . . . . . . . . . . . . . . . . . . 280
About the ASDoc tool
The ASDoc tool parses one or more ActionScript class definitions and MXML files, and generates API language
reference documentation for all public and protected methods and properties, and for all [Bindable],
[DefaultProperty], [Event], [Style], and [Effect] metadata tags.
You can specify a single class, multiple classes, an entire namespace, or a combination of these inputs as inputs to
the ASDoc tool.
ASDoc generates its output as a directory structure of HTML files that matches the package structure of the input
class files. Also, ASDoc generates an index of all public and protected methods and properties. To view the ASDoc
output, you open the index.html file in the top-level directory of the output.
Invoking the ASDoc tool
To invoke ASDoc, invoke the asdoc utility from the bin directory of your Flex installation. For example, from the
bin directory, enter the following command to create output for the Flex Button class:
asdoc -source-path C:\flex\frameworks\source
-doc-classes mx.controls.Button
-main-title "Flex API Documentation"
-window-title "Flex API Documentation"
-output flex-framework-asdoc
264 CHAPTER 13
In this example, the source code for the Button class is in the directory C:\flex\frameworks\source\mx\controls.
The output is written to C:\flex\bin\flex-framework-asdoc directory.
To view the output, open the file C:\flex\bin\flex-framework-asdoc\index.html. For more information on running
the asdoc command, see “Running the ASDoc tool” on page 280.
Creating ASDoc comments
A standard programing practice is to include comments in source code. The ASDoc tool recognizes a specific type
of comment in your source code and copies that comment to the generated output. The ASDoc tool recognizes
the following formatting and parsing rules for comments.
Writing an ASDoc comment
An ASDoc comment consists of the text between the characters /** that mark the beginning of the ASDoc
comment, and the characters */ that mark the end of it. The text in a comment can continue onto multiple lines.
Use the following format for an ASDoc comment:
/**
* Main comment text.
*
* @tag Tag text.
*/
As a best practice, prefix each line of an ASDoc comment with an asterisk (*) character, followed by a single white
space to make the comment more readable in the ActionScript or MXML file, and to ensure correct parsing of
comments. When the ASDoc tool parses a comment, the leading asterisk and white space characters on each line
are discarded; blanks and tabs preceding the initial asterisk are also discarded.
The ASDoc comment in the previous example creates a single-paragraph description in the output. To add
additional comment paragraphs, enclose each subsequent paragraph in HTML paragraph tags, <p></p>. You
must close the <p> tag, in accordance with XHTML standards, as the following example shows:
/**
* First paragraph of a multiparagraph description.
*
* <p>Second paragraph of the description.</p>
*/
All of the classes that ship with Flex contain the ASDoc comments that appear in the Adobe Flex Language
Reference. For example, view the mx.controls.Button class for examples of ASDoc comments.
ADOBE FLEX 3 265
Building and Deploying Adobe Flex 3 Applications
Placing ASDoc comments
Place an ASDoc comment immediately before the declaration for a class, interface, constructor, method, property,
or metadata tag that you want to document, as the following example shows for the myMethod() method:
/**
* This is the typical format of a simple
* multiline (single paragraph) main description
* for the myMethod() method, which is declared in
* the ActionScript code below.
* Notice the leading asterisks and single white space
* following each asterisk.
*/
public function myMethod(param1:String, param2:Number):Boolean {}
The ASDoc tool ignores comments placed in the body of a method and recognizes only one comment per ActionScript statement.
A common mistake is to put an import statement between the ASDoc comment for a class and the class declaration. Because an ASDoc comment is associated with the next ActionScript statement in the file after the
comment, this example associates the comment with the import statement, not the class declaration:
/**
* This is the class comment for the class MyClass.
*/
import flash.display.*; // MISTAKE - Do not to put import statement here.
class MyClass {
}
Formatting ASDoc comments
The main body of an ASDoc comment begins immediately after the starting characters, /**, and continues until
the tag section, as the following example shows:
/**
* Main comment text continues until the first @ tag.
*
* @tag Tag text.
*/
The first sentence of the main description of the ASDoc comment should contain a concise but complete
description of the declared entity. The first sentence ends at the first period that is followed by a space, tab, or line
terminator.
ASDoc uses the first sentence to populate the summary table at the top of the HTML page for the class. Each type
of class element (method, property, event, effect, and style) has a separate summary table in the ASDoc output.
266 CHAPTER 13
The tag section begins with the first ASDoc tag in the comment, which is defined by the first @ character that
begins a line, ignoring leading asterisks, white space, and the leading separator characters, /**. The main
description cannot continue after the tag section begins.
The text following an ASDoc tag can span multiple lines. You can have any number of tags, where some tags can
be repeated, such as the @param and @see tags, while others cannot.
The following example shows an ASDoc comment that includes a main description and a tag section. Notice the
use of white space and leading asterisks to make the comment more readable:
/**
* Typical format of a simple multiline comment.
* This text describes the myMethod() method, which is declared below.
*
* @param param1 Describe param1 here.
* @param param2 Describe param2 here.
*
* @return Describe return value here.
*
* @see someOtherMethod
*/
public function myMethod(param1:String, param2:Number):Boolean {}
For a complete list of the ASDoc tags, see “ASDoc tags” on page 275.
Using the @private tag
By default, the ASDoc tool generates output for all public and protected elements in an ActionScript class, even if
you omit the ASDoc comment. To make ASDoc ignore an element, insert an ASDoc comment that contains the
@private tag anywhere in the comment. The ASDoc comment can contain additional text along with the
@private tag, which is also excluded from the output.
ASDoc also generates output for all public classes in the list of input classes. You can specify to ignore an entire
class by inserting an ASDoc comment that contains the @private tag before the class definition. The ASDoc
comment can contain additional text along with the @private tag, which is also excluded from the output.
Excluding an inherited element
By default, the ASDoc tool copies information and a link for all ActionScript elements inherited by a subclass from
a superclass. In some cases, a subclass may not support an inherited element. You can use the [Exclude] metadata
tag to cause ASDoc to omit the inherited element from the list of inherited elements.
The [Exclude] metadata tag has the following syntax:
[Exclude(name="elementName", kind="property|method|event|style|effect")]
ADOBE FLEX 3 267
Building and Deploying Adobe Flex 3 Applications
For example, to exclude documentation on the click event in the MyButton subclass of the Button class, insert
the following [Exclude] metadata tag in the MyButton.as file:
[Exclude(name="click", kind="event")]
Using HTML tags
You must write the text of an ASDoc comment in XHTML-compliant HTML. You can use selected HTML entities
and HTML tags to define paragraphs, format text, create lists, and add anchors. For a list of the supported HTML
tags, see “Summary of commonly used HTML elements” on page 279.
The following example comment contains HTML tags to format the output:
/**
* This is the typical format of a simple multiline comment
* for the myMethod() method.
*
* <p>This is the second paragraph of the main description
* of the <code>myMethod</code> method.
* Notice that you do not use the paragraph tag in the
* first paragraph of the description.</p>
*
* @param param1 Describe param1 here.
* @param param2 Describe param2 here.
*
* @return A value of <code>true</code> means this;
* <code>false</code> means that.
*
* @see someOtherMethod
*/
public function myMethod(param1:String, param2:Number):Boolean {}
Using special characters
The ASDoc tool might fail if your source files contain non-UTF-8 characters such as curly quotes. If it does fail,
the error messages it displays should refer to a line number in the interim XML file that was created for that class.
That can help you track down the location of the special character.
ASDoc passes all HTML tags and tag entities in a comment to the output. Therefore, if you want to use special
characters in a comment, you must enter them using HTML code equivalents. For example, to use a less-than (<)
or greater-than (>) symbols in a comment, use < and >. To use the at-sign (@) in a comment, use &64;.
Otherwise, these characters will be interpreted as literal HTML characters in the output.
For a list of common HTML tags and their entity equivalents, see “Summary of commonly used HTML elements”
on page 279.
268 CHAPTER 13
Because asterisks (*) are used to delimit comments, ASDoc does not support asterisks within a comment. To use
an asterisk in an ASDoc comment, you must use the double tilde (~~).
Hiding text in ASDoc comments
The ASDoc style sheet contains a class called hide, which you use to hide text in an ASDoc comment by setting
the class attribute to hide. Hidden text does not appear in the ASDoc HTML output, but does appear in the
generated HTML file so you should not use it for confidential information. The following example uses the hide
class:
/**
*Dispatched when the user presses the Button control.
*If the <code>autoRepeat</code> property is <code>true</code>,
*this event is dispatched repeatedly as long as the button stays down.
*
*<span class="hide">This text is hidden.</span>
*@eventType mx.events.FlexEvent.BUTTON_DOWN
*/
Rules for parsing ASDoc comments
The following rules summarize how ASDoc processes an ActionScript file:
• If an ASDoc comment precedes an ActionScript element, ASDoc copies the comment and code element to
the output file.
• If an ActionScript element is not preceded by an ASDoc comment, ASDoc copies the code element to the
output file with an empty description.
• If an ASDoc comment contains the @private ASDoc tag, the associated ActionScript element and the ASDoc
comment are ignored.
• The comment text should always precede any @ tags, otherwise the comment text is interpreted as an
argument to an @ tag. The only exception is the @private tag, which can appear anywhere in an ASDoc
comment.
• HTML tags, such as <p></p>, and <ul></ul>, in ASDoc comments are passed through to the output.
• HTML tags must use XML style conventions, which means there must be a beginning and ending tag. For
example, an <li> tag must always be closed by a </li> tag.
ADOBE FLEX 3 269
Building and Deploying Adobe Flex 3 Applications
Documenting ActionScript elements
You can add ASDoc comments to class, property, method, and metadata elements to document ActionScript
classes. For more information on documenting MXML files, see “Documenting MXML files” on page 274.
Documenting classes
The ASDoc tool automatically includes all public classes in its output. Place the ASDoc comment for a class just
before the class declaration, as the following example shows:
/**
* The MyButton control is a commonly used
* MyButton controls look like they can be
* They can have a text label, an icon, or
*/
public class MyButton extends UIComponent
}
rectangular button.
pressed.
both on their face.
{
This comment appears at the top of the HTML page for the associated class.
To configure ASDoc to omit the class from the output, insert an @private tag anywhere in the ASDoc comment,
as the following example shows:
/**
* @private
* The MyHiddenButton control is for internal use only.
*/
public class MyHiddenButton extends UIComponent {
}
Documenting properties
The ASDoc tool automatically includes all public and protected properties in its output. You can document
properties that are defined as variables or defined as setter and getter methods.
Documenting properties defined as variables
Place the ASDoc comment for a public or protected property that is defined as a variable just before the var declaration, as the following example shows:
/**
*The default label for MyButton.
*
*@default null
270 CHAPTER 13
*/
public var myButtonLabel:String;
A best practice for a property is to include the @default tag to specify the default value of the property. The
@default tag has the following format:
@default value
This tag generates the following text in the output for the property:
The default value is value.
For properties that have a calculated default value, or a complex description, omit the @default tag and describe
the default value in text.
ActionScript lets you declare multiple properties in a single statement. However, this does not allow for unique
documentation for each property. Such a statement can have only one ASDoc comment, which is copied for all
properties in the statement. For example, the following documentation comment does not make sense when
written as a single declaration and would be better handled as two declarations:
/**
* The horizontal and vertical distances of point (x,y)
*/
public var x, y;// Avoid this
ASDoc generates the following documentation from the preceding code:
public var x
The horizontal and vertical distances of point (x,y)
public var y
The horizontal and vertical distances of point (x,y)
Documenting properties defined by setter and getter methods
Properties that are defined by setter and getter methods are handled in a special way by the ASDoc tool because
these elements are used as if they were properties rather than methods. Therefore, ASDoc creates a property
definition for an item that is defined by a setter or a getter method.
If you define a setter method and a getter method, insert a single ASDoc comment before the getter, and mark the
setter as @private. Adobe recommends this practice because usually the getter comes first in the ActionScript
file, as the following example shows:
/**
* Indicates whether or not the text field is enabled.
*/
public function get html():Boolean {};
/**
ADOBE FLEX 3 271
Building and Deploying Adobe Flex 3 Applications
* @private
*/
public function set html(value:Boolean):void {};
The following rules define how ASDoc handles properties defined by setter and getter methods:
• If you precede a setter or getter method with an ASDoc comment, the comment is included in the output.
• If you define both a setter and a getter method, only a single ASDoc comment is needed – either before the
setter or before the getter.
• If you define a setter method and a getter method, insert a single ASDoc comment before the getter, and mark
the setter as @private.
• You do not have to define the setter method and getter method in any particular order, and they do not have
to be consecutive in the source-code file.
•
•
If you define just a getter method, the property is marked as read-only.
•
If you define both a public setter and public getter method in a class, and you want to hide them by using the
If you define just a setter method, the property is marked as write-only.
@private tag, they both must be marked @private.
• If you have only one public setter or getter method in a class, and it is marked @private, ASDoc applies
normal @private rules and omits it from the output.
•
A subclass always inherits its visible superclass setter and getter method definitions.
Documenting methods
The ASDoc tool automatically includes all public and protected methods in its output. Place the ASDoc comment
for a public or protected method just before the function declaration, as the following example shows:
/**
* This is the typical format of a simple multiline documentation comment
* for the myMethod() method.
*
* <p>This is the second paragraph of the main description
* of the <code>myMethod</code> method.
* Notice that you do not use the paragraph tag in the
* first paragraph of the description.</p>
*
* @param param1 Describe param1 here.
* @param param2 Describe param2 here.
*
* @return A value of <code>true</code> means this;
* <code>false</code> means that.
*
272 CHAPTER 13
* @see someOtherMethod
*/
public function myMethod(param1:String, param2:Number):Boolean {}
If the method takes an argument, include an @param tag for each argument to describe the argument. The order
of the @param tags in the ASDoc comment should match the order of the arguments to the method. The @param
tag has the following syntax:
@param paramName description
Where paramName is the name of the argument and description is a description of the argument.
If the method returns a value, use the @return tag to describe the return value. The @return tag has the following
syntax:
@return description
Where description describes the return value.
Documenting metadata
Flex uses metadata tags to define elements of a component. ASDoc recognizes these metadata tags and treats them
as if there were properties or method definitions. The metadata tags recognized by ASDoc include:
•
[Bindable]
•
•
•
[DefaultProperty]
•
[Style]
[Effect]
[Event]
For more information on these metadata tags, see “Metadata Tags in Custom Components” on page 33 in Creating
and Extending Adobe Flex 3 Components.
Documenting bindable properties
A bindable property is any property that can be used as the source of a data binding expression. To mark a
property as bindable, you insert the [Bindable] metadata tag before the property definition, or before the class
definition to make all properties defined within the class bindable.
When a property is defined as bindable, ASDoc automatically adds the following line to the output for the
property:
This property can be used as the source for data binding.
For more information on the [Bindable] metadata tag, see “Metadata Tags in Custom Components” on page 33
in Creating and Extending Adobe Flex 3 Components.
ADOBE FLEX 3 273
Building and Deploying Adobe Flex 3 Applications
Documenting default properties
The [DefaultProperty] metadata tag defines the name of the default property of the component when you use
the component in an MXML file.
When ASDoc encounters the [DefaultProperty] metadata tag, it automatically adds a line to the class
description that specifies the default property. For example, see the List control in Adobe Flex Language Reference.
For more information on the [DefaultProperty] metadata tag, see “Metadata Tags in Custom Components” on
page 33 in Creating and Extending Adobe Flex 3 Components.
Documenting effects, events, and styles
You use metadata tags to add information about effects, events, and styles in a class definition. The [Effect] ,
[Event], and [Style] metadata tags typically appear at the top of the class definition file. To document the
metadata tags, insert an ASDoc comment before the metadata tag, as the following example shows:
/**
* Defines the name style.
*/
[Style "name"]
For events and effects, the metadata tag includes the name of the event class associated with the event or effect.
The following example shows an event definition from the Flex mx.controls.Button class:
/**
* Dispatched when the user presses the Button control.
* If the <code>autoRepeat</code> property is <code>true</code>,
* this event is dispatched repeatedly as long as the button stays down.
*
* @eventType mx.events.FlexEvent.BUTTON_DOWN
*/
[Event(name="buttonDown", type="mx.events.FlexEvent")]
In the ASDoc comment for the mx.events.FlexEvent.BUTTON_DOWN constant, you insert a table that defines
the values of the bubbles, cancelable, target, and currentTarget properties of the Event class, and any
additional properties added by a subclass of Event. At the end of the ASDoc comment, you insert the @eventType
tag so that ASDoc can find the comment, as the following example shows:
/**
* The FlexEvent.BUTTON_DOWN constant defines the value of the
* <code>type</code> property of the event object
* for a <code>buttonDown</code> event.
*
* <p>The properties of the event object have the following values:</p>
* <table class=innertable>
* <tr><th>Property</th><th>Value</th></tr>
* ...
274 CHAPTER 13
* </table>
*
* @eventType buttonDown
*/
public static const BUTTON_DOWN:String = "buttonDown"
The ASDoc tool does several things for this event:
•
In the output for the mx.controls.Button class, ASDoc creates a link to the event class that is specified by the
type argument of the [Event] metadata tag.
•
ASDoc copies the description of the mx.events.FlexEvent.BUTTON_DOWN constant to the description of the
buttonDown event in the Button class.
For a complete example, see the mx.controls.Button and mx.events.FlexEvent classes.
For more information on the [Effect], [Event], and [Style] metadata tags, see “Metadata Tags in Custom
Components” on page 33 in Creating and Extending Adobe Flex 3 Components.
Documenting MXML files
You can use the ASDoc tool with MXML files as well as ActionScript files. All ActionScript entities defined in an
<mx:Script> block, such as properties and methods, appear in the output. Items defined in MXML tags do not
appear in the ASDoc output.
Because the format of an ASDoc comment uses ActionScript syntax, you can only insert an ASDoc comment in
an <mx:Script> block of an MXML file.
MXML files correspond to ActionScript classes where the superclass corresponds to the first tag in the MXML
file. For an application file, that tag is the <mx:Application> tag and therefore an MXML application file appears
in the ASDoc output as a subclass of the Application class.
ADOBE FLEX 3 275
Building and Deploying Adobe Flex 3 Applications
ASDoc tags
The following table lists the ASDoc tags:
ASDoc tag
Description
Example
@copy reference
@copy #stop
Copies an ASDoc comment from the referenced location. The main description, @param, @copy MovieClip#stop
and @return content is copied; other tags are
not copied.
You typically use the @copy tag to copy information from a source class or interface not in
the inheritance list of the destination class. If
the source class or interface is in the inheritance list, use the @inheritDoc tag instead.
You can add content to the ASDoc comment
before the @copy tag.
Specify the location by using the same syntax
as you do for the @see tag. For more information, see “Using the @see tag” on page 277.
@default value
Specifies the default value for a property, style, @default 0xCCCCCC
or effect. The ASDoc tool automatically creates
a sentence in the following form when it
encounters an @default tag:
The default value is value.
@eventType package.class.CONSTANT Use the first form in a comment for an
@eventType String
[Event] metadata tag. It specifies the
constant that defines the value of the
Event.type property of the event object
associated with the event. The ASDoc tool
copies the description of the event constant to
the referencing class.
Use the second form in the comment for the
constant definition. It specifies the name of the
event associated with the constant. If the tag is
omitted, ASDoc cannot copy the constant's
comment to a referencing class.
See “Documenting effects, events, and
styles” on page 273
276 CHAPTER 13
ASDoc tag
Description
Example
@example exampleText
Applies style properties, generates a heading,
and puts the code example in the correct location. Enclose the code in <listing
version="3.0"></listing> tags.
@example The following code
sets the volume level for your
sound:
<listing version="3.0">
var mySound:Sound = new
Sound();
mySound.setVolume(VOL_HIGH);
</listing>
Whitespace formatting is preserved and the
code is displayed in a gray, horizontally
scrolling box.
@exampleText string
Use this tag in an ASDoc comment in an
external example file that is referenced by the
@example tag. The ASDoc comment must
precede the first line of the example, or follow
the last line of the example.
/**
* This text does not appear
* in the output.
* @exampleText But this does.
*/
External example files support one comment
before and one comment after example code.
@inheritDoc
Use this tag in the comment of an overridden
method or property. It copies the comment
from the superclass into the subclass, or from
an interface implemented by the subclass.
The main ASDoc comment, @param, and
@return content are copied; other tags are
not. You can add content to the comment
before the @inheritDoc tag.
When you include this tag, ASdoc uses the
following search order:
1. Interfaces implemented by the current class
(in no particular order) and all of their baseinterfaces.
2. Immediate superclass of current class.
3. Interfaces of immediate superclass and all of
their base-interfaces.
4. Repeat steps 2 and 3 until the Object class is
reached.
You can also use the @copy tag, but the @copy
tag is for copying information from a source
class or interface that is not in the inheritance
chain of the subclass.
@inheritDoc
ADOBE FLEX 3 277
Building and Deploying Adobe Flex 3 Applications
ASDoc tag
Description
Example
@internal text
Hides the text attached to the tag in the gener- @internal Please do not
ated output. The hidden text can be used for publicize the undocumented use
of the third parameter in this
internal comments.
method.
@param paramName description
Adds a descriptive comment to a method
parameter. The paramName argument must
match a parameter definition in the method
signature.
@param fileName The name of
the file to load.
@private
Exclude the element from the generated
output.
@private
To omit an entire class, put the @private tag
in the ASDoc comment for the class; to omit a
single class element, put the @private tag in
the ASDoc comment for the element.
@return description
Adds a Returns section to a method description with the specified text. ASDoc automatically determines the data type of the return
value.
@return The translated
message.
@see reference [displayText]
Adds a See Also heading with a link to a class
element. For more information, see “Using the
@see tag” on page 277.
@see flash.display.MovieClip
Do not include HTML formatting characters in
the arguments to the @see tag.
@throws package.class.className
description
Documents an error that a method can throw.
@throws SecurityError Local
untrusted SWFs may not
communicate with the Internet.
Using the @see tag
The @see tag lets you create cross-references to elements within a class; to elements in other classes in the same
package; and to other packages. You can also cross-reference URLs outside of ASDoc. The @see tag has the
following syntax:
@see reference [displayText]
where reference specifies the destination of the link, and displayText optionally specifies the link text. The location
of the destination of the @see tag is determined by the prefix to the reference attribute:
•
•
#
ASDoc looks in the same class for the link destination.
ClassName
ASDoc looks in a class in the same package for the link destination.
278 CHAPTER 13
•
PackageName
•
•
global
style
ASDoc looks in a different package for the link destination.
ASDoc looks in the Top Level package for the link destination.
ASDoc looks for a style property for the link destination.
Note: You cannot insert HTML tags in reference. However, you can add an HTML link without using the @see tag
by inserting the HTML code in the ASDoc comment.
The following table shows several examples of the @see tag:
Example
Result
@see "Just a label"
Text string
@see http://www.cnn.com
External website
@see package-detail.html
Local HTML file
@see Array
Top-level class
@see AccessibilityProperties
Class in same package
@see flash.display.TextField
Class in different package
@see Array#length
Property in top level class
@see flash.ui.ContextMenu#customItems
Property in class in different package
@see mx.containers.DividedBox#style:dividerAffordance
Style property in class in different package
@see #updateProperties()
Method in same class as @see tag
@see Array#pop()
Method in top-level class
@see flash.ui.ContextMenu#clone()
Method in class in different package
@see global#Boolean()
Package method in Top Level (global)
@see flash.util.#clearInterval()
Package method in flash.util
ADOBE FLEX 3 279
Building and Deploying Adobe Flex 3 Applications
Summary of commonly used HTML elements
The following table lists commonly used HTML tags and character codes within ASDoc comments:
Tag or Code
Description
<p>
Starts a new paragraph. You must close <p> tags.
Do not use <p> for the first paragraph of a doc comment (the paragraph after the opening /**) or the first paragraph associated with a tag. Use the <p> tag for subsequent; for example:
/**
* The first sentence of a main description.
*
* <p>This line starts a new paragraph.</p> *
* <p>This line starts a third paragraph.</p>
*/
ASDoc ignores white space in comments; to add white space for readability in the AS file, do not use the <p> tag
but just add blank lines.
class="hide"
Hides text. Use this tag if you want to add documentation to the source file but do not want it to appear in the
output.
<listing>
Indicates a program listing (sample code).
Use this tag to enclose code snippets that you format as separate paragraphs, in monospace font, and in a gray
background to distinguish the code from surrounding text. You must close <listing> tags.
<pre>
Formats text in monospace font, such as a description of an algorithm or a formula. Do not use <br/> tags at end
of line.
Use <listing> tag for code snippets.
<br>
Adds a line break. You must close this tag.
Comments for most tags are automatically formatted; you do not generally have to add line breaks. To create
additional white space, add a new paragraph instead.
This tag may not be supported in the future, so use it only if necessary.
<ul>, <li>
Creates a list. You must close these tags.
<table>
<th>
<tr>
<td>
Creates a table. For basic tables that conform to ASDoc style, set the class attribute to innertable. Avoid setting
any special attributes. Avoid nesting structural items, such as lists, within tables.
ASDoc uses a standard CSS stylesheet that has definitions for the <table>, <th>, <tr> and <td> tags. You must
close these tags.
Use <th> for header cells instead of <td>, so the headers get formatted correctly.
280 CHAPTER 13
Tag or Code
Description
<img>
Inserts an image. To create the correct amount of space around an image, enclose the image reference in
<p></p> tags. Captions are optional; if you use a caption, make it boldface. You must close the <img> tag by
ending it with />, as the following example shows:
<img src = "../../images/matrix.jpg" />
<code>
Applies monospace formatting. You must close this tag.
<strong>
Applies bold text formatting. You must close this tag.
<em>
Applies italic formatting. You must close this tag.
<
Less-than operator (<) . Ensure that you include the final semicolon (;).
>
Greater-than operator (>). Ensure that you include the final semicolon (;).
&
Ampersand (&). Ensure that you include the final semicolon (;).
—
Em dash.
™
Trademark symbol (™) that is not registered. This character is superscript by default, so do not enclose it in <sup>
tags.
 
Nonbreaking space.
®
Registered trademark symbol (®). Enclose this character in <sup> tags to make it superscript.
°
Degree symbol.
@
Do not use an @ sign in an ASDoc comment; instead, insert the HTML character code: @.
Running the ASDoc tool
You use the following options to specify the list of classes processed by the asdoc command: doc-classes, docsources, doc-namespaces. The doc-classes and doc-namespaces options require you to specify the
source-path option to specify the root directory of your files.
The most basic example is to specify a class or list of classes using the doc-classes option, as the following
example shows:
asdoc -source-path . -doc-classes comps.GraphingWidget comps.GraphingWidgetTwo
ADOBE FLEX 3 281
Building and Deploying Adobe Flex 3 Applications
In this example, the classes must be located at comps\GraphingWidget.as and comps\GraphingWidgetTwo.as,
where comps is a subdirectory of the directory from which you run the asdoc command. The arguments of the
doc-classes option use dot notation that corresponds to the package name of the class.
If the classes are not in the current directory, use the source-path option to specify that directory. For example,
if the two input classes are in the directory C:\flex\class_dir\comps, then use the following command-line to
invoke asdoc:
asdoc -source-path C:\flex\class_dir -doc-classes comps.GraphingWidget
comps.GraphingWidgetTwo
Your application might require library files, represented as SWC files, to compile. In the next example, you use the
-library-path option to specify the directory containing the SWC files:
asdoc -source-path . -doc-classes myComponents.BlueButton
-library-path C:\myLibs
You can also specify the source classes by using the doc-sources option. This option causes asdoc to recursively
search directories. The following command line generates output for all classes in the current directory and its
subdirectories:
asdoc -source-path . -doc-sources .
You can specify a namespace as the input by using the doc-namespaces option. The following command line
documents all the classes in the core framework:
asdoc -source-path frameworks
-namespace http://framework frameworks/core-framework-manifest.xml
-doc-namespaces http://framework
Excluding classes
All of the classes specified by the doc-classes, doc-sources, and doc-namespaces options are documented,
with the following exceptions:
•
•
If you specified the class by using the exclude-classes option, the class is not documented.
•
If the class is found in a SWC, the class is not documented.
If the ASDoc comment for the class contains the @private tag, the class is not documented.
In the following example, you generate output for all classes in the current directory and its subdirectories, except
for the two classes comps\PageWidget and comps\ScreenWidget.as:
asdoc -source-path . -doc-sources . -exclude-classes comps.PageWidget comps.ScreenWidget
Note that the excluded classes are still compiled along with all of the other input classes; only their content in the
output is suppressed.
282 CHAPTER 13
If you set the exclude-dependencies option to true, dependent classes found when compiling classes are not
documented. The default value is false, which means any classes that would normally be compiled along with
the specified classes are documented.
For example, you specify class A by using the doc-classes option. If class A imports class B, both class A and
class B are documented.
Options to the asdoc command
The options to the asdoc command work the same way that mxmlc and compc options work. For more information on mxmlc and comp, see “Using the Flex Compilers” on page 125.
The following table lists the options to the asdoc command:
Option
Description
-doc-classes path-element [...]
A list of classes to document. These classes must be in the source path. This is the default
option.
This option works the same way as does the -include-classes option for the compc
component compiler. For more information, see “Using compc, the component compiler”
on page 161.
-doc-namespaces uri manifest
A list of URIs whose classes should be documented. The classes must be in the source path.
You must include a URI and the location of the manifest file that defines the contents of this
namespace.
This option works the same way as does the -include-namespaces option for the
compc component compiler. For more information, see “Using compc, the component
compiler” on page 161.
-doc-sources path-element [...]
A list of files that should be documented. If a directory name is in the list, it is recursively
searched.
This option works the same way as does the -include-sources option for the compc
component compiler. For more information, see “Using compc, the component compiler”
on page 161.
-exclude-classes string
A list of classes that should not be documented. You must specify individual class names.
Alternatively, if the ASDoc comment for the class contains the @private tag, is not documented.
-exclude-dependencies true|false
Whether all dependencies found by the compiler are documented. If true, the dependencies of the input classes are not documented.
The default value is false.
-footer string
The text that appears at the bottom of the HTML pages in the output documentation.
ADOBE FLEX 3 283
Building and Deploying Adobe Flex 3 Applications
Option
Description
-left-frameset-width int
An integer that changes the width of the left frameset of the documentation. You can
change this size to accommodate the length of your package names.
The default value is 210 pixels.
-main-title "string"
The text that appears at the top of the HTML pages in the output documentation.
The default value is "API Documentation".
-output string
The output directory for the generated documentation. The default value is "asdocoutput".
-package name "description"
The descriptions to use when describing a package in the documentation. You can specify
more than one package option.
The following example adds two package descriptions to the output:
asdoc -doc-sources my_dir
-output myDoc
-package com.my.business "Contains business classes and
interfaces"
-package com.my.commands "Contains command base classes and
interfaces"
-templates-path string
The path to the ASDoc template directory. The default is the asdoc/templates directory in
the ASDoc installation directory. This directory contains all the HTML, CSS, XSL, and image
files used for generating the output.
-window-title "string"
The text that appears in the browser window in the output documentation.
The default value is "API Documentation".
The asdoc command also recognizes the following options from the compc component compiler:
•
•
-source-path
•
•
-namespace
•
•
•
-actionscript-file-encoding
•
•
-benchmark
•
-warnings
-library-path
-load-config
-help
-advanced
-strict
284 CHAPTER 13
For more information, see “Using mxmlc, the application compiler” on page 139. All other application compiler
options are accepted but ignored so that you can use the same command-lines and configuration files for the
ASDoc tool that you can use for mxmlc and compc.
285
Chapter 14: Versioning
You might encounter some versioning issues when working on Adobe® Flex® applications. When compiling, you
can choose the version of the SDK to use and you can target specific versions of Adobe® Flash® Player. You can
replicate behavior of previous SDK versions. Also, you can design applications that can load modules and other
SWF files that were compiled with different SDKs.
Topics
Overview . . . . . . . . . . . . . . . . . . . . . . . . . . . . . . . . . . . . . . . . . . . . . . . . . . . . . . . . . . . . . . . . . . . . . . . . . . . . . . . . . . . . . . 285
Using multiple SDKs . . . . . . . . . . . . . . . . . . . . . . . . . . . . . . . . . . . . . . . . . . . . . . . . . . . . . . . . . . . . . . . . . . . . . . . . . . . . 286
Backward compatibility . . . . . . . . . . . . . . . . . . . . . . . . . . . . . . . . . . . . . . . . . . . . . . . . . . . . . . . . . . . . . . . . . . . . . . . . . . 286
Targeting Flash Player versions. . . . . . . . . . . . . . . . . . . . . . . . . . . . . . . . . . . . . . . . . . . . . . . . . . . . . . . . . . . . . . . . . . . . 295
Overview
When a new version of Flex is released, it usually includes changes to the APIs, compiler, and the user interface
for Adobe® Flex® Builder™. As a result, if you were working on a project but then upgraded your version of the
SDK, you might have to refactor some part of your code to be compatible with the new version. In addition, if the
audience for your application is restricted in what Flash Player it can use, you might have to make certain concessions to ensure that your application runs without errors.
Flex Builder 3 lets you choose different SDKs, based on your needs. This lets you maintain projects in Flex Builder
3 that have not been updated to be compatible with the latest version of the SDK, or lets you use Flex Builder 3
features without having to refactor your Flex 2.0.1 projects. For more information, see “Using multiple SDKs” on
page 286.
The differences between Flex 2.0.1 and Flex 3 go beyond new features. The layout schemes and the styles of many
components have changed. If you want to use Flex 3 features but have your application look and feel the same as
Flex 2.0.1, you can specify the version whose styles you want to use with the compatibility-version compiler
option. For more information, see “Backward compatibility” on page 286.
With current Flex tools, you can target your application toward a specific version of Flash Player. To do this, you
use the target-player compiler option. For more information, see “Targeting Flash Player versions” on
page 295.
286 CHAPTER 14
Using multiple SDKs
Flex Builder lets you change the version of the SDK that you use to compile your projects. You can select the SDK
when you first create a project, or at any time you are working on a project. You can change the SDK for any type
of Flex project, including library projects and ActionScript-only projects.
When you change the SDK, Flex Builder rebuilds your application and flags any code that is no longer compatible
with the selected SDK.
Flex Builder includes the Flex 3 and Flex 2.0.1 SDKs. You can also add any SDK you want.
For more information about selecting different SDKs in Flex Builder, see “Using multiple SDKs in Flex Builder”
on page 131 in Using Adobe Flex Builder 3.
Backward compatibility
To specify the version of the Flex compiler and framework that the output should be compatible with, use the
compatibility-version compiler option. This option affects some behavior such as the layout rules, padding
and gaps, skins, and other style settings. In addition, it affects the rules for parsing properties files. Setting the
compatibility version does not enforce all differences that exist between the versions. For a list of differences that
are enforced, see “Differences between SDK 2.0.1 and SDK 3” on page 287.
The currently supported values for the compatibility-version compiler option are 2.0.0 and 2.0.1. If you do
not explicitly set the value of this option, the compiler defaults to the current SDK’s version. You can determine
the current SDK’s version by using the -version option on the command line. For example:
mxmlc -version
In Flex Builder, you add the compatibility-version compiler option to the Additional Compiler Arguments
field on the Flex Compiler properties panel. The following example sets the compatibility version to 2.0.1:
-compatibility-version=2.0.1
For the command-line compilers, you can either pass the compatibility-version compiler option on the
command line or set the value in the configuration file. The following example sets the compatibility version to
2.0.1 in the flex-config.xml file:
<compiler>
<mxml>
<compatibility-version>2.0.1</compatibility-version>
<mxml>
<compiler>
ADOBE FLEX 3 287
Building and Deploying Adobe Flex 3 Applications
When you set the compatibility-version option, you must be sure that the configuration files that you use are
compatible with the version you select. For example, the way that locales and metadata elements are set up in the
flex-config.xml file is different between Flex 2.0.1 and Flex 3. For a complete list of differences, see “Differences
between SDK 2.0.1 and SDK 3” on page 287.
You can programmatically access the version of the Flex application that you are running by using the
mx.core.FlexVersion class. To get the current compatibility version in your application, use the
compatibilityVersionString property of that class. This lets you conditionalize the logic in your application
based on the compatibility version.
Using themes
When you set the compatibility version, you should also be sure to use the appropriate theme file that matches
that version. For Flex 2.0.0 and 2.0.1, you should use the HaloClassic.swc theme file. Themes are located in the
frameworks/themes directory. For Flex 3, you do not have to specify a theme file. The default theme file is
designed for Flex 3 compatibility. For more information on using themes, see “About themes” on page 645 in the
Adobe Flex 3 Developer Guide.
The default style sheets for several versions of Flex are available in the framework.swc file. This SWC file contains
the current default style sheet (defaults.css), the Flex 2.0.1 default style sheet (defaults-2.0.1.css), and the Flex 2
default style sheet (defaults-2.0.0.css). The compiler uses the style sheet that is appropriate for the compatibility
version you set. For example, if you set the compatibility-version option to 2.0.1, then the compiler uses the
Flex 2.0.1 default style sheet.
Differences between SDK 2.0.1 and SDK 3
The differences between SDK 2.0.1 and SDK 3 that result from setting the compatibility-version option are
mostly style properties and the styles applied to subcomponents.
Subcomponents are components within other components that inherited the styles of their parent in SDK 2.0.1
but do not in SDK 3. For example, the DateField control has a DateChooser subcomponent. In Flex 2.0.1, if you
set noninheritable style properties such as borderColor or cornerRadius on the DateField control, the styles
are also applied to the DateChooser subcomponent. This resulted in unexpected styling of the subcomponent and
it was difficult to override this behavior. In Flex 3, these styles are not passed through from the DateField control
to the DateChooser subcomponent, but you can choose to pass them through.
The following application shows the difference between how a DateField control appeared in SDK 2.0.1 and how
it appears in SDK 3:
<?xml version="1.0" encoding="utf-8"?>
<!-- versioning/DateFieldSubComponentStyles.mxml -->
<!-- Compile this sample twice: once with the compatibility-version
288 CHAPTER 14
compiler option set to 2.0.1 and once without setting it. -->
<mx:Application xmlns:mx="http://www.adobe.com/2006/mxml">
<mx:DateField
id="dateField1"
yearNavigationEnabled="true"
borderColor="red"
/>
</mx:Application>
To see the difference in how styles are passed (or not passed) to subcomponents, compile this application twice.
The first time you compile this example, do not set the compatibility-version compiler option. The second
time you compile this example, set the compatibility-version option to 2.0.1, as the following example shows:
mxmlc -compatibility-version=2.0.1 DateFieldSubComponentStyles.mxml
When you run this application without setting the compatibility-version, the borderColor style is applied
to the DateField control, but not to any part of the DateChooser calendar. When you run the 2.0.1 version of this
application, the borderColor style is applied to the DateField control as well as the buttons and header lines of
the DateChooser calendar.
You can add style properties to a filter list so that they are passed from the control to its subcomponent. For more
information, see “Subcomponent styles” on page 610 in the Adobe Flex 3 Developer Guide.
The following table lists the framework differences between Flex SDK 2.0.1 and Flex SDK 3 that are enforced when
you use the compatibility-version compiler option:
Difference
Behavior in SDK 2.0.1
Behavior in SDK 3
Button control padding prop- The values of the paddingLeft,
paddingRight, paddingTop, and
erties
paddingBottom styles are ignored by Button
controls.
The values of the paddingLeft, paddingRight,
paddingTop, and paddingBottom styles are
honored. To make your icon Buttons look like the SDK
2.0.1 buttons, set the paddingLeft and
paddingRight style properties to 0.
RadioButton control height
RadioButton controls take padding properties into
account when determining their height.
RadioButton controls do not use the padding
properties when determining their height.
The default height of a RadioButton control is 18 The default height of a RadioButton control is 22
pixels.
pixels.
DateChooser year navigator
skins
The measuredHeight property was larger
because of the changes in Button sizing.
The measuredHeight property was smaller.
DataGrid header skins
To customize the DataGrid header background,
you subclass DataGrid and override the
drawHeaderBackground() method.
The logic from the drawHeaderBackground()
method is in the DataGridHeaderBackgroundSkin
class. Also, you use the headerBackgroundSkin
style to style DataGrid header background skins.
ADOBE FLEX 3 289
Building and Deploying Adobe Flex 3 Applications
Difference
Behavior in SDK 2.0.1
Menu control’s
The default value of the horizontalGap prop- The default value of the horizontalGap property is
erty for Menu controls is 0. If a Menu has a
6. Additional space is added for a RadioButton or
RadioButton control and an icon, the two
CheckBox, but not for icons in a MenuItem control.
overlap.
horizontalGap property
Behavior in SDK 3
ScrollBar layout
The width of a ScrollBar was determined by the
up arrow skin’s width.
The width of a ScrollBar component is the largest
width among the up arrow, down arrow, track, and
thumb skins.
Disabled ScrollBars
There is no separate skin for the buttons on a
disabled ScrollBar.
ScrollArrowSkin has a disabled state. The scroll track
was changed from a DisplayObject to a Button. The
ScrollTrackSkin now supports Button states.
ScrollBar subcomponent
alignment
The up arrow, down arrow, track, and thumb are The up arrow, down arrow, track, and thumb are
left-aligned.
center-aligned.
ScrollBar thumb width
The thumb width is the width of the ScrollBar.
The thumb width is the same as the thumb’s
measuredWidth property.
Padding styles with the Canvas Padding styles have no effect on the Canvas
container
container.
Canvas respects padding styles.
Constraint-based layout rules
for content-sized containers
Width and height are honored for components with
constraints set in content-sized containers. In the
previous example, the Button control’s width is 100
pixels.
Width is ignored when left and right styles are set
for components in containers where no width is
set. In these cases, the preferredWidth property of a component is used. Height is ignored
when top and bottom styles are set for components in containers where no height is set. In
these cases, the preferredHeight property of
a component is used.
In the following example, the Button control is 40
pixels wide:
<mx:Canvas id="mycanvas">
<mx:Button left="50" right="50"
width="100" id="b"/>
</mx:Canvas>
FormItem padding
FormItem controls add unnecessary extra
padding underneath the controls when there is
more than one control.
No extra padding is allocated underneath a FormItem
control.
Scale-9 for Panel containers
The Panel container’s skin uses the HaloBorder
class.
The Panel container’s skin uses the PanelSkin class.
Some measurement logic was removed from the
Panel class and put into the PanelSkin class.
290 CHAPTER 14
Difference
Behavior in SDK 2.0.1
Behavior in SDK 3
Border style for Panel
containers
You can set the borderStyle property to "solid" Panel does not support any value for the
and set a borderColor and
borderStyle property other than "default".
borderThickness property on the Panel
You can use a combination of explicit heights and
container.
widths and absolute positioning to replicate most of
the SDK 2.0.1 behavior for alternative borderStyle
properties.
The PanelSkin class's implementation of alternative
borderStyle properties does not lay out the header
and control bar in the correct locations; the Panel is
not large enough.
TitleWindow title alignment
The TitleWindow control’s textHeight property The TitleWindow control’s textHeight property
adjusts to the scale factor.
ignores the scale factor.
Accordion header padding
The paddingTop and paddingBottom proper- The height of the Accordion container’s header is
ties of the Accordion headers is set to -1.
different by one to two pixels.
Accordion subcomponent
styles
The styles of the Accordion headers are inherited The Accordion header does not inherit its styles from
from the Accordion container.
the Accordion control. Instead, the header uses the
headerStyleName style, if one is specified.
The following Accordion styles are deprecated:
fillAlphas, fillColors,
focusRoundedCorners, horizontalGap,
selectedFillColors, and verticalGap.
ColorPicker subcomponent
styles
The ColorPicker’s swatch panel subcomponent
inherits its styles from the ColorPicker control.
Styles that affect the swatch panel do not apply if
they are set on the ColorPicker. Instead, the swatch
panel uses the swatchPanelStyleName style, if
one is specified.
The following ColorPicker styles are deprecated:
backgroundColor, columnCount,
horizontalGap, verticalGap, previewHeight,
previewWidth, swatchGridBackgroundColor,
swatchGridBorderSize, swatchHeight,
swatchHighlightColor,
swatchHighlightSize, swatchWidth,
textFieldWidth, and textFieldStyleName.
ComboBox subcomponent
styles
The List drop-down in a ComboBox control
inherits its styles from the ComboBox control.
The List subcomponent does not inherit its styles
from the ComboBox control. Instead, the List
subcomponent uses the dropdownStyleName style,
if one is specified.
ADOBE FLEX 3 291
Building and Deploying Adobe Flex 3 Applications
Difference
Behavior in SDK 2.0.1
Behavior in SDK 3
DateChooser subcomponent
styles
The cornerRadius and fillColors styles are Setting the cornerRadius and fillColors style
applied to the next and previous month button properties affects only the DateChooser itself, but not
subcomponents of a DateChooser control.
the subcomponent buttons. To style the buttons, you
must edit their skin classes or override the style filters
list.
The fillColors and fillAlphas styles of the
DateChooser control are deprecated.
DateField subcomponent
styles
The DateChooser that pops up from clicking on a The DateChooser subcomponent of a DateField
DateField inherits its styles from the DateField
control does not inherit its styles from the DateField
control.
control. Instead, the DateChooser subcomponent
uses the dateChooserStyleName style, if one is
specified.
The following DateField styles are deprecated:
cornerRadius, fillAlphas, fillColors,
headerColors, headerStyleName,
highlightAlphas, todayStyleName, and
weekDayStyleName.
LinkBar subcomponent styles The LinkButton subcomponents in a LinkBar
control inherit their styles from the LinkBar
control.
MenuBar subcomponent
styles
The LinkButton subcomponents of a LinkBar do not
inherit their styles from the LinkBar control. Instead,
the LinkButton subcomponents use the
linkButtonStyleName style, if one is specified.
The submenus of a MenuBar control inherit their The submenus of a MenuBar control do not inherit
styles from the MenuBar control.
their styles from the MenuBar control. Instead, they
use the menuStyleName style, if one is specified.
The backgroundAlpha and backgroundColor
MenuBar styles are deprecated.
NumericStepper subcomponent styles
The up and down buttons in a NumericStepper
control inherit their border styles from the
NumericStepper control.
The up and down buttons of a NumericStepper
control do not inherit their border styles from the
NumericStepper control.
To change the border styles for a NumericStepper
control’s button subcomponents, you must subclass
the NumericStepper class and override the getters for
the downArrowStyleFilters and
upArrowStyleFilters properties. For more information, see “Subcomponent styles” on page 610 in
the Adobe Flex 3 Developer Guide.
TabBar subcomponent styles
The firstButtonStyleName and
The firstTabStyleName and
lastButtonStyleName are inherited from the lastTabStyleName styles apply to tab styles.
ButtonBar control on a TabBar control.
292 CHAPTER 14
Difference
Behavior in SDK 2.0.1
Behavior in SDK 3
PopUpManager subcomponent styles
PopUp controls inherit their styles from the
PopUp controls inherit styles from their owners.
Application if they were not explicitly set on the
PopUp control.
ColorPicker alpha
The ColorPicker control’s alpha property is
lower, resulting in a lighter control.
Form and FormItem layout
FormItem layout percentage height is not calcu- FormItem layout code uses BoxLayout. Percentage
lated correctly.
heights and widths are calculated correctly.
The ColorPicker control’s alpha property is higher,
resulting in a darker control.
Also, Form and FormItem now support the
includeInLayout property.
Percent width rounding rule
If two the width of a container is 275 pixels and
two children have the width set to 50%, each
component is 137 pixels. The extra pixel is
ignored.
If the width of a container is 275 pixels and two children have a width set to 50%, the components widths
are 137 pixels and 138 pixels. The extra pixel is applied
to one of the components.
Run-time localization
The _CompiledResourceBundleInfo class is not
autogenerated for SWC and SWF files.
The _CompiledResourceBundleInfo class is autogenerated for SWC and SWF files.
Parsing rules for .properties
files
Parsing .properties files requires removing
Parsing .properties files use the same rules as Java.
certain sequences of characters. To use a double
For more information about how properties files are
quote, you use \\". To use a new-line character,
parsed in SDK 3, see “Properties file syntax” on
you use \\n. To use a backslash, you use \\\\.
page 1106 in the Adobe Flex 3 Developer Guide.
Metadata
The keep-as3-metadata compiler option is set
in flex-config.xml. The default metadata
preserved by the Flex framework includes Bindable, Managed, ChangeEvent, NonCommittingChangeEvent, and Transient.
SWC libraries define what metadata the linker
preserves when linking in code from that library.
When you compile a library, the keep-as3metadata option instructs the compc compiler what
metadata to declare. The option adds the metadata
If you use a third-party library with custom meta- names to preserve in the SWC file’s catalog.xml file.
data in your projects, you must add that metaIf you use that library, you do not need to specify the
data to the keep-as3-metadata option.
metadata when compiling your application.
Profiler
Applications are not compatible with the profiler. Applications are compatible with the profiler.
ADOBE FLEX 3 293
Building and Deploying Adobe Flex 3 Applications
Difference
Behavior in SDK 2.0.1
Behavior in SDK 3
Signed framework Runtime
Shared Libraries (RSLs)
Applications are not compatible with signed
framework RSLs.
Applications are compatible with signed framework
RSLs.
Icons for disabled components When the disabledIcon property is set to
The icon for a disabled component does not disapnull, the icon is invisible when the component is pear when the disabledIcon property is set to
null. To mimic the Flex 2.0.1 behavior, you can create
disabled.
a style that specifies null for the classes in the appropriate icon properties. For example:
RadioButton {
icon:ClassReference(null);
disabledIcon:ClassReference(null);
selectedDisabledIcon:
ClassReference(null);
}
You can set remaining icon properties, such as
downIcon and overIcon, to the appropriate skin
class; for example, mx.skins.halo.RadioButton.
The configuration file syntax is also different between SDK 2.0.1 and SDK 3. If you use a customized flexconfig.xml file, you must ensure that you match its syntax to the syntax of the SDK that you compile with. If you
change SDKs, you might need to change the configuration file.
The following table lists the differences between the configuration files:
SDK 2.0.1
SDK 3
<flash-type>
true
</flash-type>
<advanced-anti-aliasing>
true
</advanced-anti-aliasing>
<!-- <locale>en_US</locale> -->
<locale>
<locale-element>en_US</locale-element>
</locale>
<!-<source-path>
<path-element>locale/{locale}</path-element>
<path-element>string</path-element>
</source-path>
-->
<!-<source-path>
<path-element>string</path-element>
</source-path>
-->
<external-library-path>
<path-element>
libs/playerglobal.swc
</path-element>
</external-library-path>
<external-library-path>
<path-element>
libs/player
</path-element>
</external-library-path>
294 CHAPTER 14
SDK 2.0.1
SDK 3
<fonts>
<managers>
<manager-class>
flash.fonts.JREFontManager
</manager-class>
<manager-class>
flash.fonts.BatikFontManager
</manager-class>
</managers>
</fonts>
<fonts>
<managers>
<manager-class>
flash.fonts.JREFontManager
</manager-class>
<manager-class>
flash.fonts.AFEFontManager
</manager-class>
<manager-class>
flash.fonts.BatikFontManager
</manager-class>
</managers>
</fonts>
<warn-class-is-sealed>
false
</warn-class-is-sealed>
<warn-class-is-sealed>
true
</warn-class-is-sealed>
<warn-deprecated-event-handler-error>
false
</warn-deprecated-event-handler-error>
<warn-deprecated-event-handler-error>
true
</warn-deprecated-event-handler-error>
<warn-deprecated-function-error>
false
</warn-deprecated-function-error>
<warn-deprecated-function-error>
true
</warn-deprecated-function-error>
<warn-deprecated-property-error>
false
</warn-deprecated-property-error>
<warn-deprecated-property-error>
true
</warn-deprecated-property-error>
<warn-level-not-supported>
false
</warn-level-not-supported>
<warn-level-not-supported>
true
</warn-level-not-supported>
n/a
<show-unused-type-selector-warnings>
true
</show-unused-type-selector-warnings>
n/a
<!-<target-player>version</target-player>
-->
n/a
<runtime-shared-library-path>
<path-element>libs/framework.swc</pathelement>
<rsl-url>framework_3.0.183453.swz</rsl-url>
<policy-file-url></policy-file-url>
<rsl-url>framework_3.0.183453.swf</rsl-url>
<policy-file-url></policy-file-url>
</runtime-shared-library-path>
n/a
<static-link-runtime-shared-libraries>
true
</static-link-runtime-shared-libraries>
ADOBE FLEX 3 295
Building and Deploying Adobe Flex 3 Applications
SDK 2.0.1
SDK 3
n/a
<!-<compute-digest>boolean</compute-digest>
-->
<metadata>
<title>Adobe Flex 2 Application</title>
</metadata>
<metadata>
<title>Adobe Flex 3Application</title>
</metadata>
<show-deprecation-warnings>
true
</show-deprecation-warnings>
n/a
Targeting Flash Player versions
You can use the target-player compiler option to specify the version of Flash Player that you want to target
with the application. Features requiring a later version of Flash Player are not compiled into the application.
Currently, this feature applies only to RSLs.
The command has the following syntax:
-target-player=player_version
The player_version parameter has the following format:
major_version.minor_version.revision
The major_version is required while minor_version and revision are optional. The minimum value is 9.0.0.
If you do not specify the minor_version or revision, the compiler uses zero.
If you do not explicitly set the value of this option, the compiler uses the default from the flex-config.xml file. This
option is commented out in the default flex-config.xml configuration file.
This option is used with framework RSLs. It helps ensure that an application is compiled correctly. For example,
if you specify that your application should use a signed RSL but you do not specify a failover RSL, users of older
versions of Flash Player will not load a signed framework RSL and will therefore experience errors when they try
to run your application. If you don’t set the target-player option or set it to some value less than 9.0.115, the
compiler throws a warning. You must be sure that your users request your application only with a recent version
of Flash Player. One way to do this is to include logic in your HTML wrapper that specifies a minimum required
version of Flash Player. For more information, see “Adding the Express Install script to the wrapper” on page 334.
If you do not specify a failover RSL, but set the target-player option to some value greater than or equal to
9.0.115, the compiler will not throw a warning because players later than that version will load a signed framework
RSL and therefore do not generally need a failover RSL.
296 CHAPTER 14
297
Part 3: Application Deployment
Topics
Deploying Flex Applications . . . . . . . . . . . . . . . . . . . . . . . . . . . . . . . . . . . . . . . . . . . . . . . . . . . . . . . . . . . . . . . . . . . . . . 299
Creating a Wrapper . . . . . . . . . . . . . . . . . . . . . . . . . . . . . . . . . . . . . . . . . . . . . . . . . . . . . . . . . . . . . . . . . . . . . . . . . . . . . 311
Using Express Install . . . . . . . . . . . . . . . . . . . . . . . . . . . . . . . . . . . . . . . . . . . . . . . . . . . . . . . . . . . . . . . . . . . . . . . . . . . . 333
Using the Flex Module for Apache and IIS . . . . . . . . . . . . . . . . . . . . . . . . . . . . . . . . . . . . . . . . . . . . . . . . . . . . . . . . . . 341
298 PART 3
299
Chapter 15: Deploying Flex Applications
When you deploy an Adobe® Flex® application, you make the application accessible to your users. The process of
deploying an application is dependent on your application, your application requirements, and your deployment
environment. For example, the process of deploying an application on an internal website that is only accessible
by company employees might be different from the process for deploying the same application on a public website
accessible by anyone.
Use the overview of the deployment process and the general checklist as a guide when you deploy your application.
Topics
About deploying an application . . . . . . . . . . . . . . . . . . . . . . . . . . . . . . . . . . . . . . . . . . . . . . . . . . . . . . . . . . . . . . . . . . . 299
Deployment options . . . . . . . . . . . . . . . . . . . . . . . . . . . . . . . . . . . . . . . . . . . . . . . . . . . . . . . . . . . . . . . . . . . . . . . . . . . . . 300
Compiling for deployment . . . . . . . . . . . . . . . . . . . . . . . . . . . . . . . . . . . . . . . . . . . . . . . . . . . . . . . . . . . . . . . . . . . . . . . 302
Deployment checklist . . . . . . . . . . . . . . . . . . . . . . . . . . . . . . . . . . . . . . . . . . . . . . . . . . . . . . . . . . . . . . . . . . . . . . . . . . . . 304
About deploying an application
When you deploy an application, you move the application from your development environment to your
deployment environment. After you deploy it, customers have full access to the application.
The deployment process that your organization uses might only require you to copy a Flex application’s SWF file
from your development server to your deployment server. In many organizations however, the deployment
process is more complicated, and involves people from groups outside the development organization. For
example, you might have an IT department that maintains your corporate website. The IT department might be
responsible for staging, testing, and then deploying your application.
Your application architecture might also require you to deploy more than just a single SWF file. For example, your
application might access Runtime Shared Libraries (RSLs) or other assets at run time. You must make sure to copy
all required files to your deployment environment.
Deployment might also require you to perform operations other than just copying application files to a
deployment server. Your application might access data services on your server, or on another server. You must
ensure that your data services are accessible by a deployed Flex application that executes on a client’s computer.
300 CHAPTER 15
Deployment options
The following example shows a typical deployment environment for a Flex application:
Flex applications on
client machine
HTTP/SOAP
Firewall/Router/DNS server
Web server
webserver.example.com
Proxy server
Web services server
Application server
appserver.example.com
finance.example.com
Deploying an application for Flex SDK and Adobe® Flex® Builder® might require you to perform some or all of the
following actions:
• Copy the application SWF file to your deployment server. As the previous example shows, you copy the application to webserver.example.com.
• Copy any asset files, such as icons, media files, or other assets, to your deployment server.
• Copy any RSLs to your web server or application server. For more information, see “Deploying RSLs with Flex
SDK” on page 301.
• Copy any SWF files for your module to your deployment server in the same directory structure as you used
for your development environment. “Deploying modules with Flex SDK” on page 301.
• Copy any SWF files required to support Flex features, such as deep linking. For more information, see
“Deploying additional Flex files” on page 301.
ADOBE FLEX 3 301
Building and Deploying Adobe Flex 3 Applications
•
Write a wrapper for the SWF file if you access it from an HTML, JSP, ASP, or another type of page.
A deployed SWF file can encompass your entire web application, however it is often used as a part of the application. Therefore, users do not typically request the SWF file directly, but request a web page that references
the SWF file. Flex Builder can generate the wrapper for you, or, you can write the wrapper. For more information, see “Creating a Wrapper” on page 311.
• Create a crossdomain.xml file on the server for data service, if you directly access any data services outside of
the domain that serves the SWF file. For more information, see “Accessing data services from a deployed application” on page 302
Deploying RSLs with Flex SDK
When your application uses an RSL, you must make sure to deploy the RSL on your deployment server, in the
same domain, unless you are using cross-domain RSLs. You use the runtime-shared-libraries option of the
Flex compiler to specify the directory location of the RSL at compile time. Ensure that you copy the RSL to the
same directory that you specified with runtime-shared-libraries. For more information, see “Using Runtime
Shared Libraries” on page 195.
Deploying modules with Flex SDK
Modules are SWF files that can be loaded and unloaded by an application. They cannot be run independently of
an application, but any number of applications can share the modules. When your application uses a module, you
must make sure to deploy the module’s SWF file on your deployment server in the same directory structure as you
used for your development environment. For more information, see “Creating Modular Applications” on
page 981 in the Adobe Flex 3 Developer Guide.
Deploying additional Flex files
The implementation of some Flex features requires that you deploy additional files along with your application’s
SWF file. For example, if you use deep linking functionality in your application, you must deploy the historyFrame.html, history.css, and history.js files along with your application’s SWF file. If you use express install version
detection feature, you also must deploy the playerProductInstall.swf file with your SWF file. You typically deploy
these files in the same directory as your application’s SWF file.
For a complete list of additional Flex files that you might deploy with your application, see “Deployment checklist”
on page 304.
302 CHAPTER 15
Accessing data services from a deployed application
In a typical Flex development environment, you build and test your application behind a corporate firewall, where
security restrictions are much less strict than when a customer runs the application on their own computer.
However, when you deploy the application, it runs on a customers computer outside your firewall. That simple
change of location might cause the application to fail if you do not correctly configure your data services to allow
external access.
Most run-time accesses to application resources fall into one of the following categories:
•
Direct access to asset files on a web server, such as image files.
• Direct access to resources on your J2EE application server.
• Data services requests through a proxy. A proxy redirects that request to the server that handles the data
service request.
•
Direct access to a data service.
As part of deploying your application, ensure that all run-time data access requests work correctly from the application that is executing outside of your firewall.
Compiling for deployment
When you create a deployable SWF file, ensure that you compile the application correctly. Typically, you disable
certain compiler features, such as the generation of debug output, and enable other options, such as the generation
of accessible content.
This section contains an overview of some common compiler options that you might use when you create a
deployable SWF file. For a complete list of compiler options, see “Using the Flex Compilers” on page 125.
Creating a release build of your application in Flex Builder
When you create and run an application in Flex Builder, the Flex compiler includes debug information in that
application so that you can set breakpoints and view variables and perform other debugging tasks. However, the
SWF file that Flex Builder generates by default includes debugging information that makes it larger than the
release build of the SWF file.
To create a release build of your application in Flex Builder, select Project > Export Release Build. This compiles
a version of your application’s SWF file that does not contain any debug information in it. This SWF file is smaller
than the SWF files you compile normally. This also compiles any modules that are in the application’s project
without debug information.
ADOBE FLEX 3 303
Building and Deploying Adobe Flex 3 Applications
In general, all compiled SWF files that are stored in the project’s /bin-debug directory contain debug information.
When you export the application, you choose a new output directory. The default is the /bin-release directory.
To compile a release build on the command line, set the debug compiler option to false. This prevents debug
information from being included in the final SWF file.
Enabling accessibility
The Flex accessibility option lets you create applications that are accessible to users with disabilities. By default,
accessibility is disabled. You enable the accessibility features of Flex components at compile time by using options
to a Flex Builder project, setting the accessible option to true for the command-line compiler, or setting the
<accessible> tag in the flex-config.xml file to true.
For more information on creating accessible applications, see “Creating Accessible Applications” on page 1139 in
the Adobe Flex 3 Developer Guide.
Preventing users from viewing your source code
Flex lets you publish your source code with your deployed application. You might want to enable this option
during the development process, but disable it for deployment. Or, you might want to include your source code
along with your deployed application.
In Flex Builder, the Export Release Build wizard lets you specify whether to publish your source code. You can
also use the viewSourceURL property of the Application class to set the URL of your source code.
Disabling incremental compilation
You can use incremental compilation to decrease the time it takes to compile an application or component library
with the Flex application compilers. When incremental compilation is enabled, the compiler inspects changes to
the bytecode between revisions and only recompiles the section of bytecode that has changed.
For more information, see “Using the Flex Compilers” on page 125.
Using a headless server
A headless server is one that is running UNIX or Linux and often does not have a monitor, keyboard, mouse, or
even a graphics card. Headless servers are most commonly encountered in ISPs and ISVs, where available space
is at a premium and servers are often mounted in racks. Enabling the headless mode reduces the graphics requirements of the underlying system and can allow for a more efficient use of memory.
If you deploy a Flex application on a headless server, you must set the headless-server option of the compiler
to true. Setting this option to true is required to support fonts and SVG images in a nongraphical environment.
304 CHAPTER 15
Deployment checklist
The deployment checklist contains some common system configuration issues that customers have found when
deploying Flex applications for production. It also contains troubleshooting tips to diagnose common deployment
problems.
Application assets
When deploying a Flex application, you must make sure you also deploy all the assets that the application uses at
run time. These include files that are used by the wrapper to support deep linking or history management, as well
as files that are loaded by the application such as resource bundles or RSLs.
In the case of wrapper code, you will probably be cutting and pasting it from the HTML templates included with
the SDK into your JSP or ASP or PHP pages.
Check that the following assets are deployed with your application if you use those assets in your Flex applications:
Feature
Assets to Deploy
Wrapper files
If you use a wrapper, be sure to include it in the deployment process. The wrapper can be any
file that returns HTML, such as PHP, ASP, JSP, or ColdFusion. At a minimum, this file must include
an <object> or <embed> tag to embed the Flex application.
In addition, if you use dynamic pages to query databases or perform other server-side actions
for your Flex application, be sure to deploy those as well. This is especially important if you use
the data wizard in Flex Builder to generate these pages.
Version detection
To support version detection in your HTML wrapper, you must add the code based on the Flex
wrapper templates to your wrapper, as well as deploy the AC_OETags.js file. This file defines
several methods used for version detection.
For more information, see “Creating a Wrapper” on page 311.
Express Install
To support Express Install, you must include the following files:
•
AC_OETags.js
•
playerProductInstall.swf
For more information, see “Using Express Install” on page 333.
ADOBE FLEX 3 305
Building and Deploying Adobe Flex 3 Applications
Feature
Assets to Deploy
History management and deep linking To support history management and deep linking, you must include the following files in your
deployment:
•
history.js
•
history.css
•
historyFrame.html
You must import the first two files into your HTML wrapper, and store all through of these files
in a /history subdirectory.
For more information, see “Deep Linking” on page 1065 in the Adobe Flex 3 Developer Guide.
Runtime shared libraries (RSLs)
For standard RSLs, deploy the RSL SWF files with your Flex application. You must be sure to
deploy the SWF files to the same relative location that the compiler used. If you are deploying
an a custom RSL, be sure to optimize the RSL’s SWF file prior to deployment.
For framework RSLs, be sure to deploy both the signed (*.SWZ) and unsigned (*.SWF) RSLs.
For framework and cross-domain RSLs, be sure to deploy failover RSLs to the locations you
specified when you compiled the application.
For more information, see “Using Runtime Shared Libraries” on page 195.
Runtime stylesheets
If you use runtime stylesheets in your application, you must deploy the SWF files so that they
can be loaded. You can load run-time stylesheet SWF files either locally or remotely. However,
if you load them locally, the stylesheets must be in the same relative location that you specified
in the application.
For more information, see “Loading style sheets at run time” on page 633 in the Adobe Flex 3
Developer Guide.
Modules
If your application uses modules, you must deploy the module SWF files so that they can be
loaded.
Modules are SWF files that can be loaded and used by any number of applications. If multiple
applications use your modules, then you should deploy them to a location that all applications
can load them from rather than deploy them multiple times across different domains.
For more information, see “Creating Modular Applications” on page 981 in the Adobe Flex 3
Developer Guide.
Runtime localization
If your application uses run-time localization (if it, for example, lets the user switch from English
to Japanese language at run time), then you might need to deploy resource module SWF files.
These modules can contain one or more resources bundles for one or more locales.
For more information, see “Localizing Flex Applications” on page 1101 in the Adobe Flex 3
Developer Guide.
306 CHAPTER 15
Feature
Assets to Deploy
Security files
If you use container-based security, then be sure to update your security constraints to include
your Flex application.
In addition, if you load assets from multiple domains, be sure to deploy any crossdomain.xml
files that are required by your applications.
Miscellaneous runtime assets
Not all assets are embedded at compile time. For example, FLV and image files are usually
loaded at run time to keep the SWF file as small as possible. Be sure to check that you deploy
the following types of assets that are typically loaded at run time with your Flex application:
•
FLV files
•
SWF files
•
Sound files (such as MP3 files)
•
Images (such as GIF, JPG, and PNG files)
Data files
It is not uncommon for flat data files to be used as a data provider in Flex applications. Be sure
to deploy any text files, which might appear in various formats such as XML, that are loaded at
run time.
View source
If you use the view source functionality in Flex Builder, be sure to include the supporting files
when you deploy your application. These files include the selected source code files, the source
viewer’s SWF file, HTML and CSS files for the source viewe, an XML file, and a ZIP file of the
source code that users can download. You must maintain the directory structure that Flex
Builder generates in the output directory.
To enable view source and generate the ZIP file in Flex Builder, select Project > Export Release
Build. Then select the Enable View Source option.
For more information, see “Publishing source code” on page 134 in Using Adobe Flex Builder 3.
ADOBE FLEX 3 307
Building and Deploying Adobe Flex 3 Applications
Types of network access
Deployed Flex applications typically make several types of requests to services within your firewall, as the
following example shows:
Flex applications on
client machine
HTTP/SOAP
Firewall/Router/DNS server
1.
2.
Web server
4.
webserver.example.com
Web services server
Proxy server
Application server
appserver.example.com
3.
finance.example.com
Most of the deployment issues that customers report are related to network security and routing, and fall into one
of the following scenarios:
1 Direct access to resources on a web server, such as image files. In the preceding example, the client directly
accesses resources on webserver.example.com.
Direct access to resources on your application server. In the preceding example, the client directly accesses
resources on appserver.example.com. Ensure that deployed Flex applications can access the appropriate servers.
2
3 Web services requests through a proxy. A proxy redirects a request to the server that handles the web service.
In the preceding example, the client accesses a resource on appserver.example.com, but that request is redirected
to finance.example.com. Ensure that you configure the proxy server correctly so that deployed Flex applications
can access your web services, or other data services, through the proxy.
308 CHAPTER 15
Direct access of a web service. In the preceding example, the client directly accesses a service on
finance.example.com. If a deployed Flex application directly accesses web services, or other data services, ensure
that access is allowed.
4
Step 1. Create a list of server-side resources
Before you start testing your network configuration, make a list of the IP addresses and DNS names of all the
servers that a Flex application might access. A Flex application might directly access these servers, for example by
using a web service, or another server might access them as part of handling a redirected request.
Enter the information about your servers in the following table:
Name
DNS name
IP address
Enter information about the server hosting the web service proxy:
Name
DNS Name
IP Address
Enter information about your web services or any other services accessible from a deployed Flex application:
Name
Location (URL)
ADOBE FLEX 3 309
Building and Deploying Adobe Flex 3 Applications
Step 2. Verify access from server to server within your firewall
In some cases, an external request to one server can be redirected to another server behind your firewall. A
redirected request can occur for a request to a web service or to any file, depending on the system configuration.
Where it is necessary, ensure that your servers can communicate with each other so that a redirected request can
be properly handled.
To determine if one server, called Server A in this example, can communicate with another server, called Server
B, create a temporary file called temp.htm on Server A in its web root directory. Then, log in to Server B and
ensure that it can access temp.htm on Server A. Try to access the file by using Server A’s DNS name and also its IP
address.
Servers can have multiple NIC cards or multiple IP addresses. Ensure that each server can communicate with all
of the IP addresses on your other servers.
Also, log in to the server that hosts your web service proxy to make sure that it can access all web services on all
other servers. You can test the web service proxy by making an HTTP request to the WSDL file for each web
service. In the previous example, log in to appserver.example.com and ensure that it can access the WSDL files on
finance.example.com.
If any server cannot access the other servers in your system, an external request from a Flex application might also
fail. For more information, contact your system administrator.
Step 3. Verify access to your servers from outside the firewall
Some servers might have to be accessed from outside the firewall to handle HTTP, SOAP, or AMF requests from
clients. You can use the following methods to determine if a deployed Flex application can access your servers
from outside the firewall:
1 On each server that can be accessed from outside the firewall, create a temporary file, such as temp.htm, on
the server in its web root directory. From a computer outside the firewall, use a browser to make an HTTP request
to the temporary file to ensure that an external computer can access it.
For example, for a file named temp.htm, try accessing it by using the following URL:
http://webserver.example.com/server1/temp.htm
2 From a computer outside the firewall, use a browser to make an HTTP request to the WSDL file for each web
service that can be accessed from outside the firewall to ensure that the WSDL file can be accessed.
For example, try accessing the WSDL file for a web service by using the following URL:
http://finance.example.com/server1/myWS.wsdl
You should be able to access the temp.htm file or the WSDL file on all of your servers from outside the firewall. If
these requests fail, contact your IT department to determine why the files cannot be accessed.
310 CHAPTER 15
Step 4. Configure the proxy server
In “Step 3. Verify access to your servers from outside the firewall” on page 309, you ensure that you can directly
access your servers and server resources from outside the firewall.
After you configure your proxy server, ensure that the deployed Flex application can access web services and other
server-side resources as necessary.
Step 5. Create a crossdomain policy file
Your system might be configured to allow a Flex application to directly access server-side resources on different
domains or different computers without going through a proxy. These operations fail under the following conditions:
• When the Flex application’s SWF file references a URL, and that URL is outside the exact domain of the SWF
file that makes the request
• When the Flex application’s SWF file references an HTTPS URL, and the SWF file that makes the request is
not served over HTTPS
To make a data service or asset available to SWF files in different domains or on different computers, use a crossdomain policy file on the server that hosts the data service or asset. A crossdomain policy file is an XML file that
provides a way for the server to indicate that its data services and assets are available to SWF files served from
certain domains, or from all domains. Any SWF file that is served from a domain specified by the server’s policy
file is permitted to access a data service or asset from that server. By default, place the crossdomain.xml at the root
directory of the server that is serving the data.
For more information on using a cross-domain policy file, see “Using cross-domain policy files” on page 40.
311
Chapter 16: Creating a Wrapper
Adobe® Flex™ applications can take the form of a SWF file that you embed in an HTML page by using the
<object> and <embed> tags. The HTML page can also reference an external JavaScript file to embed the Flex
application. Collectively, the HTML page and JavaScript file are known as the wrapper.
Topics
About the wrapper . . . . . . . . . . . . . . . . . . . . . . . . . . . . . . . . . . . . . . . . . . . . . . . . . . . . . . . . . . . . . . . . . . . . . . . . . . . . . . 311
Creating a simple wrapper. . . . . . . . . . . . . . . . . . . . . . . . . . . . . . . . . . . . . . . . . . . . . . . . . . . . . . . . . . . . . . . . . . . . . . . . 315
Adding features to the wrapper . . . . . . . . . . . . . . . . . . . . . . . . . . . . . . . . . . . . . . . . . . . . . . . . . . . . . . . . . . . . . . . . . . . 319
About the object and embed tags . . . . . . . . . . . . . . . . . . . . . . . . . . . . . . . . . . . . . . . . . . . . . . . . . . . . . . . . . . . . . . . . . . 321
Requesting an MXML file without the wrapper. . . . . . . . . . . . . . . . . . . . . . . . . . . . . . . . . . . . . . . . . . . . . . . . . . . . . . 332
About the wrapper
The wrapper is responsible for embedding the Flex application’s SWF file in a web page, such as an HTML, ASP,
JSP, or Adobe ColdFusion page. In addition, you use the logic in the wrapper to enable deep linking and Express
Install, and to ensure that users both with and without JavaScript enabled in their browsers can access your Flex
applications. You can also use the wrapper to pass flashVars variables into your Flex applications and to use the
ExternalInterface API. These topics are described in “Communicating with the Wrapper” on page 1035 in Adobe
Flex 3 Developer Guide.
There are several ways to create a wrapper:
•
Write a custom wrapper using the instructions in “Creating a simple wrapper” on page 315.
• Export and customize an HTML wrapper from Flex Builder. For more information, see “About the Flex
Builder wrapper” on page 312.
• Use the templates provided in the /templates directory. For more information, see “About the HTML
templates” on page 312.
• Use the html-wrapper Flex Ant task. For more information, see “Using the html-wrapper task” on page 190.
• Generate the HTML wrapper with the Flex module for Apache and IIS. For more information, see “Customizing the template” on page 348.
312 CHAPTER 16
Adobe® Flex® Builder™and the Flex module for Apache and IIS generate a wrapper that embeds your Flex application. The Flex Builder wrapper include support for Express Install and deep linking by default, although you
can disable these features or configure them to your specifications. Deep linking lets users navigate the history of
their interactions within the Flex application using the browser’s Forward and Back buttons, and it lets users read
and write to the browser’s address bar. Express Install ensures that your users have a good upgrade experience if
their Players require an update. The wrapper created by the Flex module for Apache and IIS does not support
Express Install or deep linking.
The mxmlc command-line compiler does not generate a wrapper. You must write it manually using the instructions in “Creating a simple wrapper” on page 315. You can start out with a simple wrapper that just embeds your
Flex application. You can then add deep linking and Express Install support to your wrapper.
About the Flex Builder wrapper
To view the wrapper generated by Flex Builder, run the current project. Flex Builder generates an HTML page in
the same directory as the project’s root MXML file. This directory also includes the supporting files such as the
history.css, history.js, historyFrame.html, and AC_OETags.js files.
You can configure the wrapper by using the Flex Compiler properties dialog box in Flex Builder. Configuration
settings include:
•
•
Enable or disable wrapper generation
•
•
Use Express Install
Set the minimum required version of Flash Player
Enable deep linking and history management support
For more information, see the Flex Builder documentation.
About the HTML templates
Flex SDK includes a set of HTML templates in the flex_install_dir/templates directory. For Flex Builder, these files
are located in the install_dir/sdks/3.0.0/templates directory. These templates provide a basic wrapper, as well as
wrappers that implement various features. The following table describes the templates:
Directory
Description
client-side-detection
Provides scripts that detect the version of the client’s player and return alternate content if
the client’s player does not meet the minimum required version.
client-side-detection-with-history
Provides the same scripts as those in the client-side-detection directory, but adds deep
linking support.
express-installation
Provides scripts that support Express Install, which includes client-side version detection.
ADOBE FLEX 3 313
Building and Deploying Adobe Flex 3 Applications
Directory
Description
express-installation-with-history
Provides scripts that support Express Install and deep linking.
no-player-detection
Provides a basic wrapper that embeds the SWF file by using an external JavaScript file.
no-player-detection-with-history
Provides a basic wrapper with deep linking support.
You typically use the index.template.html file found in each of these directories as the main HTML file that
embeds your Flex application. For deployment, you should rename this file to index.html or whatever filename
fits your web site’s design. If you already have the HTML set up for your web site and are incorporating Flex into
that site, then you can copy and paste the code from these templates to your existing web site’s files. The template
HTML also works with dynamic scripting code such as PHP, ASP, or JSP.
Each template contains a set of tokens, such as ${height} and ${title}. These tokens are used by Flex Builder
to generate the wrapper code. Flex Builder replaces them with the appropriate values when it compiles a project.
If you are editing the wrapper manually and deploying an application built with the SDK, then you must replace
these tokens with the appropriate values.
In many cases, the tokens set the values of properties and attributes of the <object> and <embed> tags, or values
of parameters that you pass to the AC_FL_RunContent() JavaScript method. For details on these properties, see
the property’s description in “About the object and embed tags” on page 321.
The following table describes the template tokens:
Token
Description
${application}
Identifies the SWF file to the host environment (a web browser, typically) so that it can be referenced
by using a scripting language.
This token is the value of the id and name properties that is described in “About the object and
embed tags” on page 321.
${bgcolor}
The background color of the application.
This token is the value of the bgcolor property that is described in “About the object and embed
tags” on page 321.
${height}
The height of the application, in pixels.
This token is the value of the height property that is described in “About the object and embed
tags” on page 321.
${swf}
Specifies the location of the SWF file.
This token is the value of the src and movie properties that is described in “About the object and
embed tags” on page 321.
${title}
The title of the HTML page. This value appears in the browser’s title bar when the user requests the
HTML page. The default value supplied by Flex Builder is the name of the Flex application.
314 CHAPTER 16
Token
Description
${version_major}
The required major version number of Flash Player. For example, 9.
This token only appears in the wrappers with Flash Player version detection code. For more information, see “Using Express Install” on page 333.
${version_minor}
The required minor version number of Flash Player. For example, 0.
This token only appears in the wrappers with Flash Player version detection code. For more information, see “Using Express Install” on page 333.
${version_revision}
The required revision version number of Flash Player. For example, 162.
This token only appears in the wrappers with Flash Player version detection code. For more information, see “Using Express Install” on page 333.
${width}
The width of the application, in pixels.
This token is the value of the height property that is described in “About the object and embed
tags” on page 321.
For more information about Express Install, see “Adding Express Install to your wrapper” on page 320. For more
information about deep linking, see “Adding deep linking to your wrapper” on page 321.
About the AC_OETags.js file
The AC_OETags.js file provides the HTML templates with version-checking and embedding functionality. All of
the HTML templates included with Flex SDK embed the AC_OETags.js file using a line like the following:
<script src="AC_OETags.js" language="javascript"></script>
The logic in the AC_OETags.js file writes the <object> and <embed> tags out so that the browser embeds the
SWF file. To accomplish this, most of the HTML templates call the AC_FL_RunContent() JavaScript method.
This method uses a subset of the properties of the <object> and <embed> tags to embed the Flex application. The
properties of these tags are similar to the parameters of this method. For example, the src parameter of the
AC_FL_RunContent() method is equivalent to the src attribute of the <embed> tag. For more information, see
“About the object and embed tags” on page 321.
The AC_OETags.js file also defines methods, such as GetSwfVer() and DetectFlashVer(), which are used by
the version detection functionality. For more information on these methods, see “Editing your wrapper for
Express Install” on page 334.
ADOBE FLEX 3 315
Building and Deploying Adobe Flex 3 Applications
Creating a simple wrapper
You can write your own wrapper for your SWF files rather than use the wrappers generated by Flex Builder or the
Flex module for Apache and IIS. Your own wrapper can be simple HTML, or it can be a JavaServer Page (JSP), a
PHP page, an Active Server Page (ASP), or anything that can return HTML that is rendered in your client’s
browser. Typically, you integrate wrapper logic into your website’s own HTML templates.
This section describes how to write the simplest wrapper possible to get your Flex application running on a web
server. It does not include features such as deep linking and Express Install. These features improve the user
experience and should be omitted only after careful consideration. Instructions for adding these features, which
can make creating a wrapper more complex, are described in later sections.
A basic wrapper consists of the following files:
• HTML page This is the file that the client browser requests. It typically defines two possible experiences
(one for users with JavaScript enabled and one for users without JavaScript enabled). This page also references a
separate JavaScript file. In the provided HTML templates, a basic version of this page is included at /templates/noplayer-detection/index.template.html.
•
JavaScript file The JavaScript file referenced by the <script> tag in the HTML page includes the
following:
•
<object> tag
•
<embed> tag
This tag embeds the SWF file for Internet Explorer.
This tag embeds the SWF file for Netscape-based browsers.
In the provided HTML templates, the JavaScript file is named AC_OETags.js. This JavaScript file contains
a great deal of logic that is unnecessary for a basic wrapper, so you will probably want to write your own
when developing a basic wrapper.
The client first requests the HTML page. If the user’s browser has JavaScript enabled, the HTML page then references the JavaScript file. The JavaScript file embeds the Flex application’s SWF file.
To make your Flex application respond immediately without user interaction, use a <script> tag to load the
JavaScript file that contains the <object> and <embed> tags. Do not write the <object> and <embed> tags
directly in the HTML file. Controls that are directly loaded by the embedding page require activation before they
will run in Microsoft Internet Explorer 6 or later. If you load the controls directly in the HTML page, users will be
required to activate those controls before they can use them by clicking on the control or giving it focus. This is
undesirable because you want your Flex application to run immediately when the page loads, not after the user
interacts with the control.
If the client disabled JavaScript in their browser, you typically embed the Flex application directly in the
<noscript> tag. You can add warnings that they should enable JavaScript or else they will have a less than ideal
experience.
316 CHAPTER 16
The following example illustrates the minimum number of requests that the client browser makes when JavaScript
is enabled:
Client Browser
Requested File
Step 1: GET /flex/index.html
Step 2: GET /flex/mysource.js
Step 3: GET /flex/MyApp.swf
The following example shows the minimum requirements of the HTML page and JavaScript file to embed a Flex
application named MyApp:
<!-- index.html -->
<!-- saved from url=(0014)about:internet -->
<html>
<body>
<script src="mysource.js"></script>
</body>
</html>
<!-- mysource.js -->
document.write("<object id='MyApp' classid='clsid:D27CDB6E-AE6D-11cf-96B8-444553540000'
codebase='http://download.macromedia.com/pub/shockwave/cabs/flash/swflash.cab#version=9,
0,0,0' height='100%' width='100%'>");
document.write("<param name='movie' value='MyApp.swf'/>");
ADOBE FLEX 3 317
Building and Deploying Adobe Flex 3 Applications
document.write("<embed name='MyApp' src='MyApp.swf'
pluginspage='http://www.macromedia.com/shockwave/download/index.cgi?P1_Prod_Version=Shoc
kwaveFlash' height='100%' width='100%'/>");
document.write("</object>");
Adding the Mark of the Web (MOTW) to your wrapper is optional. However, if you do not add the MOTW to
your wrapper, your application might not open in the expected security zone within Internet Explorer. The
following example MOTW forces Internet Explorer to open the page in the Internet zone:
<!-- saved from url=(0014)about:internet -->
In general, add a MOTW when you are previewing pages locally before publishing them on a server. For more
information about the MOTW, see http://msdn.microsoft.com/workshop/author/dhtml/overview/motw.asp.
To support browsers that do not have scripting enabled, you can add a <noscript> block to the wrapper. The tags
in this block of code usually mirrors the output of the document.write() methods in the embedded JavaScript
file. The following example adds the <noscript> block:
<!-- index.html -->
<!-- saved from url=(0014)about:internet -->
<html>
<body>
<script src="mysource.js"></script>
<noscript>
<object id='MyApp' classid='clsid:D27CDB6E-AE6D-11cf-96B8-444553540000'
codebase='http://download.macromedia.com
/pub/shockwave/cabs/flash/swflash.cab#version=9,0,0,0'
height='100%' width='100%'>
<param name='src' value='MyApp.swf'/>
<embed name='MultipleButtons' pluginspage='http://
www.macromedia.com/shockwave/download/index.cgi
?P1_Prod_Version=ShockwaveFlash' src='MyApp.swf' height='100%'
width='100%'/>
</object>
</noscript>
</body>
</html>
About the HTML page
The wrapper’s HTML page includes the following:
<script> block The script block embeds the JavaScript file. This JavaScript file defines the <object> and <embed>
tags that embed the SWF file in the HTML page. This block is for users who have enabled JavaScript in their
browser.
318 CHAPTER 16
<noscript> block The code in the <noscript> block uses <object> and <embed> tags to embed the SWF file in
the HTML page for users who have disabled JavaScript in their browser. The <noscript> block is useful if your
application requires JavaScript (for example, if you use the ExternalInterface API in your application). You can use
this block to warn users that they will have limited functionality, or redirect them to another site. For a simple
application, however, your <noscript> block typically contains identical tags as they are defined in the JavaScript
file. For more complex wrappers that include support for Express Install, the <script> block can include a
considerable amount of JavaScript code.
About the JavaScript file
The JavaScript file consists of a set of document.write() methods that write the <object> and <embed> tags
that embed your application. In this example, these tags are identical to the <object> and <embed> tags used in
the HTML page’s <noscript> block. In more complex configurations, you can add Express Install or deep linking
support to the JavaScript file that is not supported in the HTML page’s <noscript> block. Remember that the
code in the HTML page is for browsers that do not support JavaScript.
The <object> tag’s codebase and the <embed> tag’s pluginspage properties add support for basic player version
detection and installation. The codebase tag defines the minimum version required at the end of the URL (for
example, #version=9,0,0,0). If a client requests this page with a player version older than the version specified,
they are prompted to upgrade their player.
The upgrade experience is considerably better with Express Install. If the user’s player does not meet the minimum
requirements, the new player is automatically installed for them. You add Express Install by editing your wrapper.
For more information, see “Using Express Install” on page 333.
With a generic wrapper, a user who clicks the Back and Forward buttons in their browser navigates the HTML
pages in the browser’s history and not the history of their interactions within the Flex application. Deep linking
lets users navigate their interactions with the Flex application by using the Back and Forward buttons in their
browser. You can add deep linking by editing your wrapper. For more information, see “Deep Linking” on
page 1065 in Adobe Flex 3 Developer Guide.
In addition to adding deep linking and Adobe® Flash® Player detection support to your wrapper, you can use other
properties of the <object> and <embed> tags to add functionality. For more information, see “About the object
and embed tags” on page 321.
ADOBE FLEX 3 319
Building and Deploying Adobe Flex 3 Applications
Adding features to the wrapper
The default wrapper that Flex Builder creates includes deep linking and support for Express Install. The BrowserManager lets users navigate through a Flex application using the web browser’s Back and Forward buttons.
Express Install detects if the client has the required version of Flash Player to run the application and installs a
newer player on the client if necessary.
Each of these features requires additional files to be deployed with your application, as described here. For
additional information on implementing these features, see “Deep Linking” on page 1065 in Adobe Flex 3
Developer Guide and “Using Express Install” on page 333.
Before adding additional functionality to your custom wrapper, you should understand the issues described in
“Customizing the wrapper” on page 319.
A simple application uses only the main wrapper plus a JavaScript file that embeds the Flex application’s SWF file.
Customizing the wrapper
Use the following guidelines when you create a custom wrapper.
• You can use the HTML templates in the /templates directory as guides to adding new features to the wrapper.
For information about the templates, see “About the HTML templates” on page 312.
• You must embed the SWF file and not the MXML file. Set the value of the src property of the <object> tag
to mxml_filename.mxml.swf if you use the web-tier compiler. If you use the command-line compiler or Flex
Builder, set the value of the src property to mxml_filename.swf.
The following example defines the src property of the <object> tag for an MXML application called
MyApp.mxml:
<param name='src' value='MyApp.mxml.swf'>
The <embed> tag uses the src property to define the source of the SWF file:
src='MyApp.mxml.swf'
•
Do not include periods or other special characters in the id and name properties of the <object> and
<embed> tags. These tags identify the SWF object on the page, and you use them when you use the ExternalInterface API. This API lets Flex communicate with the wrapper, and vice versa. For more information about
using the ExternalInterface API, see “Communicating with the Wrapper” on page 1035 in Adobe Flex 3 Developer
Guide.
320 CHAPTER 16
• Do not put the contents of the JavaScript file directly in the HTML page. This causes Internet Explorer to
prompt the user before enabling Flash Player. If the client has “Disable Script Debugging (Internet Explorer)”
unchecked in Internet Explorer’s advanced settings, the browser still prompts the user to load the ActiveX plugin before running it.
• If you use both the <object> and the <embed> tags in your custom wrapper, use identical values for each
attribute to ensure consistent playback across browsers. For more information about the <object> and the
<embed> tags, see “About the object and embed tags” on page 321.
• To add basic player detection logic without deep linking or Express Install support, use the templates in the
/templates/client-side-detection directory. For more information, see “Editing your wrapper for Express Install”
on page 334.
• To add support for deep linking, follow the instructions in “Deep Linking” on page 1065 in Adobe Flex 3
Developer Guide.
• To add support for Flash Player detection, follow the instructions in “About Express Install” on page 333.
• When using Flex Builder, the default wrapper includes deep linking and Express Install support. You can
disable one or both of these features by using the Compiler Properties dialog box. You can also use this dialog box
to set the minimum required version of the Flash Player.
Adding Express Install to your wrapper
Express Install is included by default in the wrappers generated by Flex Builder.
Disable Express Install in Flex Builder
1
Open your project in Flex Builder.
2
Select Project > Properties.
3
Select Flex Compiler from the tree at the left.
4
Deselect the Use Express Install option.
5
Click OK to save your changes.
If you write your own wrapper, however, you must add it manually or use the HTML templates in the /templates
directory as a base.
Adding Express Install support involves adding JavaScript and VBScript to your main wrapper file, as well as
deploying the AC_OETags.js file. In addition, you must deploy another SWF with your application.
The following files are required by a wrapper with Express Install support:
•
•
index.template.html (with additional version detection logic)
AC_OETags.js
ADOBE FLEX 3 321
Building and Deploying Adobe Flex 3 Applications
•
playerProductInstall.swf
•
YourApp.swf
The AC_OETags.js file defines functions that the wrapper calls to embed the Flex application’s SWF file. It also
provides version checking methods. For more information about the AC_OETags.js file, see “About the
AC_OETags.js file” on page 314.
In addition to using the AC_OETags.js file, you must also deploy the playerProductInstall.swf file in a location
that is accessible by the main application SWF file.
The files required by Express Install are located in the /templates/express-installation and /templates/expressinstallation-with-history directories.
For more information about adding support for Express Install to your wrapper, see “Using Express Install” on
page 333.
Adding deep linking to your wrapper
Support for deep linking, also known as history management, is included by default in the wrappers generated by
Flex Builder. If you write your own wrapper, however, you must add it manually or use the HTML files in the
/templates directory as a base.
To add deep linking support, you reference the history.js file in a <script> tag in your wrapper. The history.js file
records actions for deep linking. You must also deploy the following files with your wrapper:
•
•
history.js
•
history.css
historyFrame.html
If you do not add deep linking support to your wrapper, you cannot use the BrowserManager in your Flex application.
For more information about adding deep linking support to your wrapper, see “Deep Linking” on page 1065 in
the Adobe Flex 3 Developer Guide.
About the object and embed tags
The HTML templates included with Flex Builder and Flex SDK use the <object> and <embed> tags embed your
Flex application. In the case of Flex Builder, when you compile a project, Flex Builder sets the values for these tags
for you. For the SDK, you must manually edit the templates and set the values of these tags.
322 CHAPTER 16
The <object> and <embed> tags support a set of properties that add additional functionality to the wrapper.
These properties let you change the appearance of the SWF file on the page or change some of its properties such
as the title or language. If you want to customize your wrapper, you can add these properties to the wrapper.
The <object> tag is used by Internet Explorer 3.0 or later on Windows platforms or any browser that supports
the use of the Flash ActiveX control. The <embed> tag is used by Netscape Navigator 2.0 or later, or browsers that
support the use of the Netscape-compatible plug-in version of Flash Player.
When an ActiveX-enabled browser loads the HTML page, it reads the values set on the <object> and ignores the
<embed> tag. When browsers using the Flash plug-in load the HTML page, they read the values set on the
<embed> tag and ignore the <object> tag. Make sure that the properties for each tag are identical, unless you want
different results depending on the user’s browser.
You must set the values of four required properties as attributes in the <object> tag. The required properties are:
•
height
•
•
width
•
codebase
classid
All other properties are optional and you set their values in separate, named <param> tags.
Although the movie property is technically an optional tag, without it, there is no reference to the application you
want the client to load. Therefore, your wrapper should always set the movie parameter in the <object> tag.
The following example shows the required properties as attributes of the <object> tag, and four optional
properties, movie, play, loop, and quality, as <param> child tags:
<object classid="clsid:d27cdb6e-ae6d-11cf-96b8-444553540000" width="100" height="100"
codebase="http://active.macromedia.com/flash7/cabs/ swflash.cab#version=9,0,0,0">
<param name="movie" value="moviename.swf">
<param name="play" value="true">
<param name="loop" value="true">
<param name="quality" value="high">
</object>
For the <embed> tag, all settings are attributes that appear between the angle brackets of the opening <embed> tag.
The <embed> tag requires the height and width attributes, and the pluginspage attribute, which is the equivalent of the <object> tag’s codebase property. The <embed> tag does not require a classid attribute. As with
the movie parameter of the <object> tag, the src attribute of the <embed> tag provides the reference to the Flex
application. Without it, there would be no SWF file, so you should consider it a required attribute.
Although the codebase and pluginspage properties are required, they are not necessarily used if you use Flash
Player Detection Kit to detect and install the required version of Flash Player. For more information, see “Using
Express Install” on page 333.
ADOBE FLEX 3 323
Building and Deploying Adobe Flex 3 Applications
The following example shows a simple <embed> tag with the optional quality attribute:
<embed src="moviename.swf" width="100" height="100" quality="high"
pluginspage="http://www.macromedia.com/shockwave/download/index.cgi?P1_Prod_Version=Shoc
kwaveFlash">
</embed>
To use both tags together, position the <embed> tag just before the closing </object> tag, as the following
example shows:
<object classid="clsid:d27cdb6e-ae6d-11cf-96b8-444553540000" width="100" height="100"
codebase="http://active.macromedia.com/flash7/cabs/ swflash.cab#version=9,0,0,0">
<param name="movie" value="moviename.swf">
<param name="play" value="true">
<param name="loop" value="true">
<param name="quality" value="high">
<embed src="moviename.swf" width="100" height="100" play="true” loop="true"
quality="high"
pluginspage="http://www.macromedia.com/shockwave/download/index.cgi?P1_Prod_Version=Shoc
kwaveFlash">
</embed>
</object>
When you define parameters for the <object> tag, also add them as tag properties to the <embed> tag so that the
SWF file appears the same on the page regardless of the client’s browser.
If you are editing the HTML wrapper templates for the SDK, you will need to replace the tokens such as
${height} and ${width} in the <object> and <embed> tags with absolute values before deploying the wrapper.
For more information, see “About the HTML templates” on page 312.
Not all properties are supported by both the <object> and the <embed> tags. For example, the id property is used
only by the <object> tag, just as the name property is used only by the <embed> tag.
In some cases, the <object> and <embed> tag properties duplicate properties that you can set on the
<mx:Application> tag in the Flex application source code. For example, you can set the height and width
properties of the SWF file on the <object> and <embed> tags or you can set them on the <mx:Application> tag.
324 CHAPTER 16
The following table describes the supported <object> and <embed> tag properties:
Property
Type
Description
align
String
Specifies the position of the SWF file.
The align property supports the following values:
• bottom: Vertically aligns the bottom of the SWF file with the current baseline. This is typically
the default value.
allowNetworking
String
•
middle: Vertically aligns the middle of the SWF file with the current baseline.
•
top: Vertically aligns the top of the SWF file with the top of the current text line.
•
left: Horizontally aligns the SWF file to the left margin.
•
right: Horizontally aligns the SWF file to the right margin.
Restricts browser communication. This property affects more APIs than the allowScriptAccess
property.
The allowNetworking property supports the following values:
•
all: No networking restrictions. Flash Player behaves normally. This is typically the default.
•
internal: SWF files cannot call browser navigation or browser interaction APIs (such as the
ExternalInterface.call(), fscommand(), and navigateToURL() methods), but can
call other networking APIs.
•
none: SWF files cannot call networking or SWF-to-SWF file communication APIs. In addition to
the APIs restricted by the internal value, these include other methods such as
URLLoader.load(), Security.loadPolicyFile(), and SharedObject.getLocal().
For more information, see Programming ActionScript 3.0.
ADOBE FLEX 3 325
Building and Deploying Adobe Flex 3 Applications
Property
Type
Description
allowScriptAccess
String
Controls the ability to perform outbound scripting from within the SWF file.
The allowScriptAccess property can prevent a SWF file hosted from one domain from
accessing a script in an HTML page that comes from another domain. Setting
allowScriptAccess to never for all SWF files hosted from another domain can ensure security
of scripts located in an HTML page.
Valid values are as follows:
•
always: Outbound scripting always succeeds.
•
never: Outbound scripting always fails.
• samedomain: Outbound scripting succeds only if the application is from the same domain
as the HTML page.
The default value for the web-tier compiler is sameDomain.
This property affects the following operations:
•
•
•
ExternalInterface.call()
•
navigateToURL(), when used with window name of _self, _parent, or _top.
fscommand()
navigateToURL(), when used with javascript or another scripting scheme
For more information, see Programming ActionScript 3.0.
archive
String
Specifies a space-separated list of URIs for archives containing resources used by the application,
which may include the resources specified by the classid and data properties.
Preloading archives can result in reduced load times for applications. Archives specified as relative
URIs are interpreted relative to the codebase property.
base
String
Specifies the base directory or URL used to resolve relative path statements in ActionScript.
326 CHAPTER 16
Property
Type
Description
bgcolor
String
Specifies the background color of the application. Use this property to override the background
color setting specified in the SWF file. This property does not affect the background color of the
HTML page.
Valid formats for bgcolor are any #RRGGBB, hexadecimal, or RGB value.
The Application container’s style uses an image as the default background image. This image
obscures any background color settings that you might make in the wrapper. So, to make the value
of the bgcolor property display properly, you must clear the Application container’s
backgroundImage style property. To do this, you can set it to the value of a space character, as the
following example shows:
<mx:Style>
Application {
backgroundImage: " ";
}
</mx:Style>
border
int
Specifies the width of the SWF file’s border, in pixels. The default value for this property depends
on the user agent.
classid
String
Defines the classid of Flash Player. This identifies the ActiveX control for the browser. Internet
Explorer 3.0 or later on Windows 9x, Windows 2000, Windows NT, Windows ME, and Windows XP
prompt the user with a dialog box asking if they would like to auto-install Flash Player if it's not
already installed. This process can occur without the user having to restart the browser.
This property is used for the <object> tag only.
For the <object> tag, you set the value of this property as an attribute of the <object> tag and
not as a <param> tag.
codebase
String
Identifies the location of Flash Player ActiveX control so that the browser can download it if it is not
already installed.
This property is used for the <object> tag only.
You can modify this property by using the settings in Flex Builder.
For the <object> tag, you set the value of this property as an attribute of the tag and not as a child
<param> tag.
Like the pluginspage property, the codebase property is required. However, they are not necessarily used if you use Flash Player Detection Kit to detect and install the required version of Flash
Player. For more information, see “Using Express Install” on page 333.
ADOBE FLEX 3 327
Building and Deploying Adobe Flex 3 Applications
Property
Type
Description
codetype
String
Defines the content type of data expected when downloading the application specified by the
classid property
The codetype property is optional but recommended when the classid property is specified; it
lets the browser avoid loading unsupported content types.
The default value of the codetype property is the value of the type property.
data
String
Specifies the location of the application’s data; for example, instance image data for objects that
define images.
If the data property is a relative URI, it is relative to the codebase property.
declare
Boolean
Makes the current SWF file’s definition a declaration only. The SWF file must be instantiated by a
subsequent object definition referring to this declaration.
devicefont
Boolean
Specifies whether static text objects for which the deviceFont option is not selected are drawn
using a device font anyway, if the needed fonts are available from the operating system.
dir
String
Specifies the base direction of text in an element’s content and attribute values. It also specifies the
directionality of tables. Valid values are LTR (left-to-right text or table) and RTL (right-to-left text or
table).
flashVars
String
Sends variables to the application. The format is a set of name-value pairs, each separated by an
ampersand (&).
Browsers support string sizes of up to 64 KB (65535 bytes) in length.
The default value of this property is typically an empty string.
For more information on using flashVars to pass variables to Flex applications, see “Communicating with the Wrapper” on page 1035 in Adobe Flex 3 Developer Guide.
height
int
Defines the height, in pixels, of the SWF file. Flash Player makes a best guess to determine the
height of the application if none is provided.
The browser scales an object or image to match the height and width specified by the author.
You can set this value to a fixed number or a percentage value; for example, length=’100’ or
length=’50%’.
Lengths expressed as percentages are based on the horizontal or vertical space currently available,
not on the default size of the SWF file. FireFox browsers do not support percentage-based values.
You can also set the height of a Flex application by setting the height property of the
<mx:Application> tag in an MXML file.
For the <object> tag, you set the value of this property as an attribute of the <object> tag and
not as a <param> child tag.
328 CHAPTER 16
Property
Type
Description
hspace
int
Specifies the amount of white space inserted to the left and right of the SWF file. The default value
is typically not specified, but is generally a small, nonzero length.
id
String
Identifies the SWF file to the host environment (a web browser, for example) so that it can be referenced by using a scripting language such as VBScript or JavaScript.
The id property is only used with the <object> tag. It is equivalent to the name property used
with the <embed> tag.
lang
String
Specifies the base language of an element’s property values and text content.
The default value is typically unknown. The browser can use language information specified using
the lang property to control rendering in a variety of ways.
menu
Boolean
Changes the appearance of the menu that appears when users right-click over a Flex application
in Flash Player. Set to true to display the entire menu. Set to false to display only the About and
Settings options on the menu.
The default value is typically true.
movie
String
Specifies the location of the SWF file.
The movie property is only used with the <embed> tag. It is equivalent to the src property used
with the <object> tag.
name
String
Identifies the SWF file to the host environment (a web browser, typically) so that it can be referenced by using a scripting language.
The name property is only used with the <embed> tag. It is equivalent to the id property used with
the <object> tag.
pluginspage
String
Identifies the location of Flash Player plug-in so that the user can download it if it is not already
installed.
This property is used for the <embed> tag only.
You can modify this property by using the settings in Flex Builder.
Like the codebase property, the pluginspage property is required. However, these properties
are not necessarily used if you use Flash Player Detection Kit to detect and install the required
version of Flash Player. For more information, see “Using Express Install” on page 333.
ADOBE FLEX 3 329
Building and Deploying Adobe Flex 3 Applications
Property
Type
Description
quality
String
Defines the quality of playback in Flash Player. Valid values of quality are low, medium, high,
autolow, autohigh, and best. The default value is typically best.
The low setting favors playback speed over appearance and never uses anti-aliasing.
The autolow setting emphasizes speed at first but improves appearance whenever possible. Playback begins with anti-aliasing turned off. If Flash Player detects that the processor can handle it,
anti-aliasing is turned on.
The autohigh setting emphasizes playback speed and appearance equally at first, but sacrifices
appearance for playback speed if necessary. Playback begins with anti-aliasing turned on. If the
actual frame rate drops below the specified frame rate, anti-aliasing is turned off to improve playback speed. Use this setting to emulate the View > Antialias setting in Flash.
The medium setting applies some anti-aliasing and does not smooth bitmaps.
The high setting favors appearance over playback speed and always applies anti-aliasing.
The best setting provides the best display quality and does not consider playback speed. All
output is anti-aliased and all bitmaps are smoothed.
salign
String
Positions the SWF file within the browser. Valid values are L, T, R, B, TL, TR, BL, and BR.
L, R, T, and B align the SWF file along the left, right, top, or bottom edge, respectively, of the
browser window and crop the remaining three sides as needed.
TL and TR align the SWF file to the top-left and top-right corner, respectively, of the browser
window and crop the bottom and remaining right or left side as needed.
BL and BR align the SWF file to the bottom-left and bottom-right corner, respectively, of the
browser window and crop the top and remaining right or left side as needed.
scale
String
Defines how the browser fills the screen with the SWF file. The default value is typically showall.
Valid values of the scale property are showall, noborder, and exactfit.
Set to showall to make the entire SWF file visible in the specified area without distortion, while
maintaining the original aspect ratio of the SWF file. Borders may appear on two sides of the SWF
file.
Set to noborder to scale the SWF file to fill the specified area, without distortion but possibly with
some cropping, while maintaining the original aspect ratio of the SWF file.
Set to exactfit to make the entire SWF file visible in the specified area without trying to preserve
the original aspect ratio. Distortion may occur.
src
String
Specifies the location of the SWF file.
The src property is only used with the <object> tag. It is equivalent to the movie property used
with the <embed> tag.
standby
String
Defines a message that the browser displays while loading the object’s implementation and data.
330 CHAPTER 16
Property
Type
Description
style
String
Specifies style information for the SWF file.
The syntax of the value of the style property is determined by the default style sheet language.
In CSS, property declarations have the form "name:value" and are separated by a semicolon.
Styles set with this property do not affect components or the Application container in the Flex
application. Rather, they apply to the SWF file as it appears on the HTML page.
supportembed
Boolean
Determines whether the Netscape-specific <embed> tag is supported. The supportembed property is optional, and the default value is typically true.
Set to false to prevent the <embed> tag from being read by the browser.
tabindex
int
Specifies the position of the SWF file in the tabbing order for the current document. This value must
be a number between 0 and 32767. User agents should ignore leading zeros.
title
String
Displays information about the SWF file.
Values of the title property can be rendered by browsers or other user agents in different ways.
For example, some browsers display the title as a ToolTip. Audio user agents might speak the title
information in a similar context.
type
String
Specifies the content type for the data specified by the data property.
The type property is optional but recommended when data is specified; it prevents the browser
from loading unsupported content types.
If the value of this property differs from the HTTP Content-Type returned by the server, the HTTP
Content-Type takes precedence.
usemap
String
Associates an image map with the SWF file. The image map is defined by a map element. The value
of usemap must match the value of the name attribute of the associated map element.
vspace
int
Specifies the amount of white space inserted above and below the SWF file. The default value is
typically not specified, but is generally a small, nonzero length.
ADOBE FLEX 3 331
Building and Deploying Adobe Flex 3 Applications
Property
Type
Description
width
int
Defines the width, in pixels, of the SWF file. Flash Player makes a best guess to determine the width
of the application if none is provided.
Browsers scale an object or image to match the height and width specified by the author.
You can set this value to a fixed number or a percentage value. For example, “width=100” or
“width=”50%”.
Lengths expressed as percentages are based on the horizontal or vertical space currently available,
not on the natural size of the SWF file.
You can also set the width of a Flex application by setting the width property of the
<mx:Application> tag in an MXML file.
For the <object> tag, you set the value of this property as an attribute of the <object> tag and
not as a <param> tag.
wmode
String
Sets the Window Mode property of the SWF file for transparency, layering, and positioning in the
browser. Valid values of wmode are window, opaque, and transparent.
Set to window to play the SWF in its own rectangular window on a web page.
Set to opaque to hide everything on the page behind it.
Set to transparent so that the background of the HTML page shows through all transparent
portions of the SWF file. This can slow animation performance.
To make sections of your SWF file transparent, you must set the alpha property to 0. To make your
application’s background transparent, set the backgroundAlpha property on the
<mx:Application> tag to 0.
The wmode property is not supported in all browsers and platforms.
The <object> and <embed> tags can also take additional properties that are not supported by Flex applications.
These unsupported properties are listed in “Unsupported properties” on page 331.
Unsupported properties
Some optional Flash Player properties do not apply to Flex applications. These are properties that involve movie
frames and looping. The following properties have no effect when used with Flex:
•
loop
•
•
play
swliveconnect
332 CHAPTER 16
Requesting an MXML file without the wrapper
If you are using the web-tier compiler, also known as the Flex module for Apache and IIS, you can request an
MXML file that has not yet been compiled into a SWF and have it return only the SWF file (without the wrapper).
You do this by appending *.swf to the end of the request string that specifies *.mxml.
For example, the following request returns only a SWF file and no wrapper:
http://www.mysite.com/flex/MyApp.mxml.swf
For more information, see “Using the Flex Module for Apache and IIS” on page 341.
333
Chapter 17: Using Express Install
After developing an application, you want to ensure that all users can run it and that they have a current version
of the Adobe® Flash® Player. In most cases, the player is an ActiveX control running inside Microsoft Internet
Explorer or a plug-in for Netscape-based browsers. You edit the wrapper to include version detection logic, and
logic that installs a newer player on the client if necessary. This is known as Express Install. It is sometimes also
known as Player Product Install.
Express Install requires that the client have Flash Player 6.0.65 or later installed on MacOS or Microsoft Windows,
and that the browser has JavaScript enabled.
Topics
About Express Install . . . . . . . . . . . . . . . . . . . . . . . . . . . . . . . . . . . . . . . . . . . . . . . . . . . . . . . . . . . . . . . . . . . . . . . . . . . . 333
Editing your wrapper for Express Install. . . . . . . . . . . . . . . . . . . . . . . . . . . . . . . . . . . . . . . . . . . . . . . . . . . . . . . . . . . . 334
Alternatives to Express Install . . . . . . . . . . . . . . . . . . . . . . . . . . . . . . . . . . . . . . . . . . . . . . . . . . . . . . . . . . . . . . . . . . . . . 338
About Express Install
Adobe® Flex® includes code and applications that make the updating process for the player simple for you and
nearly transparent for the client. These files are located in the sdk_install_dir/templates directory for Flex SDK and
the install_dir/sdks/3.0.0/templates directory for Adobe® Flex® Builder™.
The recommended method of ensuring that Flash Player can run the Flex application on the client is to use
Express Install. With Express Install, you can detect when users do not have the latest version of Flash Player, and
you can initiate an update process that installs the latest version of the player from the Adobe website. When the
installation is complete, users are directed back your website, where they can run your Flex application.
Express Install runs a SWF file in the existing Flash Player to upgrade users to the latest version of the player. As
a result, Express Install requires that Flash Player already be installed on the client, and that it be version 6.0.65 or
later. The Express Install feature also relies on JavaScript detection logic in the browser to ensure that the player
required to start the process exists. As a result, the browser must have JavaScript enabled for Express Install to
work.
If the player on the client is not new enough to support Express Install, you can display alternate content, redirect
the user to the Flash Player download page, or initiate another type of Flash Player upgrade experience. For information on using alternative Player upgrade techniques, see “Alternatives to Express Install” on page 338.
334 CHAPTER 17
Editing your wrapper for Express Install
After you compile your application into a SWF file, you write a wrapper that embeds that SWF file. Clients request
this wrapper directly. You can use Adobe Flex Builder to automatically generate a wrapper, or you can write one
yourself. Express Install is included by default in the wrappers generated by Flex Builder.
Disable Express Install in Flex Builder
1
Open your project in Flex Builder.
2
Select Project > Properties.
3
Select Flex Compiler from the tree at the left.
4
Deselect the Use Express Install option.
5
Click OK to save your changes.
The wrapper generated by the Flex module for Apache and IIS does not support Express Install.
If you write your own wrapper, however, you must add Express Install manually. Sample wrapper templates are
available in the sdk_install_dir/templates directory for Flex SDK and the install_dir/sdks/3.0.0/templates directory
for Flex Builder. For more information, see “About the HTML templates” on page 312.
Refer to the following steps if you write your own wrapper and add Express Install support to it, and customize a
generated wrapper or template. For more information about creating a wrapper, see “Creating a Wrapper” on
page 311.
Adding the Express Install script to the wrapper
After you write your own wrapper, follow these steps to add support for Express Install. These steps require the
following files, which are located in the /templates/express-installation directory:
• index.template.html Wrapper file that detects the Flash Player version and initiates Express Install if
necessary. You can integrate this code with your website.
• AC_OETags.js Script file that provides methods for Flash Player version detection and embedding your
Flex application. You call methods in this file from your wrapper.
•
cation.
playerProductInstall.swf Application that initiates Express Install. You deploy this file with your appli-
ADOBE FLEX 3 335
Building and Deploying Adobe Flex 3 Applications
Add Express Install support to your wrapper
1
Open your wrapper in a text editor.
2 Add or include the script in the index.template.html file to your wrapper. This file is included in the
/templates/express-installation directory. For a detailed description of this script, see “Understanding the Express
Install script” on page 337.
3 In the Globals section of the script, set the minimum version of Flash Player that your users must be running.
For example:
// Globals
// Major version of Flash required
var requiredMajorVersion = 9;
// Minor version of Flash required
var requiredMinorVersion = 0;
// Minor version of Flash required
var requiredRevision = 0;
If you are using Flex Builder to generate the wrapper, you can set this value in the Detect Flash Version text
box in the Compiler Properties dialog box.
This is useful, too, to ensure that your users have a version of Flash Player that supports certain features. For
example, if you want your users’ Flash Player to support signed framework RSLs, set the minimum version to
9.0.115.
4 Deploy the AC_OETags.js file to a location that is accessible to your wrapper. This file is included in the
/templates/express-installation directory. This file is also generated by Flex Builder. The default location is the
same directory as the wrapper. If you change it, you must also edit the following line in the wrapper:
<script src="AC_OETags.js" language="javascript"></script>
5 Edit the calls to the AC_FL_RunContent() method. This method passes information about the SWF file to be
run to the AC_OETags.js external script file. The functions defined in the AC_OETags.js file write the <object>
and <embed> tags for the SWF file.
There are multiple calls to this method in script blocks that meet different conditions. In the first script block,
change the id and name parameters to match your SWF file’s name:
if (hasProductInstall && !hasRequestedVersion) {
AC_FL_RunContent(
"src", "playerProductInstall",
"FlashVars", "MMredirectURL="+MMredirectURL+'&MMplayerType='+
MMPlayerType+'&MMdoctitle='+MMdoctitle+"",
"width", "100%",
"height", "100%",
"align", "middle",
"id", "MyFirstProject",
"quality", "high",
336 CHAPTER 17
"bgcolor", "#869ca7",
"name", "MyFirstProject",
"allowScriptAccess","sameDomain",
"type", "application/x-shockwave-flash",
"pluginspage", "http://www.macromedia.com/go/getflashplayer"
);
}
In the second script block, change the src, id, and name parameters to match your SWF file’s name:
} else if (hasRequestedVersion) {
AC_FL_RunContent(
"src", "MyFirstProject",
"width", "100%",
"height", "100%",
"align", "middle",
"id", "MyFirstProject",
"quality", "high",
"bgcolor", "#869ca7",
"name", "MyFirstProject",
"allowScriptAccess","sameDomain",
"type", "application/x-shockwave-flash",
"pluginspage", "http://www.macromedia.com/go/getflashplayer"
);
}
When you edit these methods, you can also add flashVars variables, change the height and width of the SWF
file, and set other properties of the SWF file, if necessary. For more information about available properties, see
“About the object and embed tags” on page 321. For more information about adding deep linking support, see
“Deep Linking” on page 1065 in the Adobe Flex 3 Developer Guide.
Replace the value of the alternateContent variable with your own custom content. In this step and the next,
you can implement alternate methods of upgrading Flash Player for users who do not meet the requirements for
Express Install. For more information, see “Alternatives to Express Install” on page 338.
6
Replace the HTML code found within the <noscript> tag with your own custom content. For more information, see “Alternatives to Express Install” on page 338.
7
Deploy the playerProductInstall.swf file included in the /templates/express-installation directory to your web
server.
8
By default, you should deploy this file to the same directory as your Flex application. If you deploy it to another
location, you must update the wrapper to point to this new location. This file is also included in your Flex
application’s bin directory in Flex Builder.
ADOBE FLEX 3 337
Building and Deploying Adobe Flex 3 Applications
Understanding the Express Install script
The scripts that implement Express Install in your wrapper are contained in the AC_OETags.js and
index.template.html files from the /templates/express-installation directory.
The following steps show the order of execution within the Express Install scripts.
For browsers with scripting
1
Sets global variables that define the required minimum version of the player.
2
Detects browser type (set the values of the isIE , isWin, and isOpera Boolean properties).
3
Sets the value of the hasProductInstall property by calling the DetectFlashVer() method.
This method returns true if the current player supports Flash Product Install. This method returns false if
the current player does not support Flash Product Install. Flash Players later than version 6.0.65 meet this
requirement.
4
5
Sets the value of the hasRequestedVersion property by calling the DetectFlashVer() method.
This method returns true if the current player is new enough to display the Flex application. This method
returns false if the current player must be upgraded to display the Flex application.
6
7 Sets the value of the MMredirectURL property to specify the location where the browser is redirected after
running Express Install.
Sets the value of the document.title and MMdoctitle properties so the unused browser windows can be
closed after running Express Install.
8
9
Examines the values of the hasProductInstall and hasRequestedVersion properties:
• If the current player is version 6.0.65 or later (hasProductInstall=true) but it cannot play the current
Flex application (hasRequestedVersion=false), run the playerProductInstall.swf file. This upgrades the
player with Express Install.
• If the current version of the player meets the requirements for playback (hasRequestedVersion=true),
run the Flex application.
• If the current player is earlier than version 6.0.65 (hasProductInstall=false) and the version is not
new enough (hasRequestedVersion=false), show alternate content or upgrade without Express Install.
For browsers without scripting
1
Shows the link to the Flash Player download page.
2
Shows alternate content or prompts the user to upgrade without using Express Install.
338 CHAPTER 17
Alternatives to Express Install
When you add the Express Install script to your wrapper, one of the following results occur when a client requests
that wrapper:
•
•
Client runs the application.
•
•
Client upgrades Flash Player by using alternative method and then runs the application.
Client upgrades Flash Player by using Express Install and then runs the application.
Client does not upgrade Flash Player and runs alternate content.
Users who do not update the Flash Player version by using Express Install generally fall into the following
categories:
•
Browser with disabled scripting If the browser disables JavaScript, the browser executes content in the
<noscript> tag of the wrapper. The version detection logic from the index.template.html and AC_OETags.js files
is not interpreted when your wrapper is loaded into a browser, nor is Express Install usable.
• Browser with no Flash Player installed If the browser has no Flash Player installed but JavaScript is
enabled, the browser executes the alternate content area in the <script> tag of the wrapper.
• Browser with Flash Player version earlier than 6.0.65 If Flash Player is not new enough to run the Express
Install SWF file (playerProductInstall.swf), but JavaScript is enabled, the browser executes the alternate content
area in the <script> tag of the wrapper.
• User refuses Flash Player installation or upgrade If the user declines to install Flash Player or to upgrade
their version of Flash Player, the browser executes the alternate content area in the <script> tag of the wrapper.
It is up to you to determine whether to provide content in HTML format or some other format that the browser
can render without using Flash Player.
In situations where the browser executes alternate content, you can use the <object> and <embed> tags to embed
your Flex application and provide an upgrade and installation path for players that are old or missing.
The <object> tag’s codebase property is used to enforce the player versioning for a Microsoft Internet Explorer
browser. The tag adds support for basic player version detection and installation. The codebase property defines
the minimum version specified at the end of the CAB file’s location (for example, #version=9,0,0). If the
browser requests this page with a player version older than that, the user is prompted to upgrade their player. This
installation can occur without the user having to restart the browser.
The <embed> tag’s pluginspage property is used for Firefox, Netscape 8, and Mozilla-based browsers. If there is
no plug-in installed, the browser displays a plug-in icon and the text “Click here to get the plug-in.” When a user
clicks the icon, they are directed to an appropriate location, depending on the type of browser being used, where
they can download and install the latest version of Flash Player. The pluginspage property does not enforce a
required version of the plug-in.
ADOBE FLEX 3 339
Building and Deploying Adobe Flex 3 Applications
Flash Player is available from the Firefox Plug-in Finder Service. This means that if the Firefox browser does not
have the player installed when it encounters an <embed> tag, it guides the user through the process of
downloading and installing Flash Player through the Finder Service.
Consider adding a note to users of Firefox, Netscape 8, and Mozilla-based browsers that if they have scripting
disabled, they should upgrade their Flash Players to version 9 before continuing. You can put this in the
<noscript> block to ensure that only users with scripting disabled get this message.
These upgrade processes result in a different upgrade experience than the experience of the user who upgrades
by using Express Install. Express Install provides a clean installation and returns the user to the original page.
These alternative paths require more steps and in some cases do not provide users with a return path to the
original application.
You can do basic version detection without using Express Install. For an example of this, see the files in the
/templates/client-side-detection and /templates/client-side-detection-with-history directories.
Other techniques for upgrading Flash Player without Express Install are described in the Flash Player Detection
Kit. These include using server-side logic and writing a custom SWF file to perform version detection and installation. For more information, see the Detection Kit documentation at www.adobe.com/go/fp_detectionkit.
Note: Netscape users who do not initially have any version of Flash Plug-in installed may be redirected to a Netscape
download page rather than the Flash Player upgrade page. To avoid this, instruct your users to select Edit > Preferences > Navigator > Helper Applications and deselect the Always Use the Netscape Plug-in Finder Service to Get Plugins setting. If this setting is selected, Netscape ignores download location specified by the <embed> tag in the HTML
wrapper.
340 CHAPTER 17
341
Chapter 18: Using the Flex Module for
Apache and IIS
Topics
Introduction . . . . . . . . . . . . . . . . . . . . . . . . . . . . . . . . . . . . . . . . . . . . . . . . . . . . . . . . . . . . . . . . . . . . . . . . . . . . . . . . . . . 341
Getting started. . . . . . . . . . . . . . . . . . . . . . . . . . . . . . . . . . . . . . . . . . . . . . . . . . . . . . . . . . . . . . . . . . . . . . . . . . . . . . . . . . 342
Configuring the web-tier compiler . . . . . . . . . . . . . . . . . . . . . . . . . . . . . . . . . . . . . . . . . . . . . . . . . . . . . . . . . . . . . . . . 345
Customizing the template . . . . . . . . . . . . . . . . . . . . . . . . . . . . . . . . . . . . . . . . . . . . . . . . . . . . . . . . . . . . . . . . . . . . . . . . 348
Debugging with the web-tier compiler . . . . . . . . . . . . . . . . . . . . . . . . . . . . . . . . . . . . . . . . . . . . . . . . . . . . . . . . . . . . . 350
Introduction
The Adobe® Flex® module for Apache and IIS compiler provides web-tier compilation of MXML files on Apache
and IIS web servers. This lets you rapidly compile, test, and deploy an application: Instead of compiling your
MXML file into a SWF file and then deploying it and its wrapper files on a web server, you can just refresh the
MXML file in your browser.
You do not need a Java 2 Enterprise Edition (J2EE) server to use the web-tier compiler. The Flex module for
Apache and IIS works with just the web server and a Java Runtime Environment (JRE).
This document refers to the Flex module for Apache and IIS as the web-tier compiler or the compiler module.
For web tier compilation, you can also use the Adobe Flex compiler module for J2EE application servers. The Flex
compiler module for J2EE application servers is a ZIP file that you can deploy to most J2EE application servers
that support servlets. The Flex compiler module for J2EE application servers also provides a JSP tag library that
lets you write Flex applications in JSPs. It is available as a download on the Adobe web site.
How the web-tier compiler works
This process contains the following steps:
1
The client requests a file with an *.mxml file extension.
2
The web server forwards the request to the compiler module.
The compiler module compiles the MXML file into a SWF file. The compiler module uses incremental compilation, so most compilations after the first one take less time to complete.
3
342 CHAPTER 18
4
The compiler module returns an HTML file to the web server, which returns it to the client.
If the SWF file was compiled successfully, the HTML page embeds the SWF file. If the HTML file is an error
page, the SWF file is not embedded in the HTML page and no further requests are made.
5
The client then requests the SWF file based on the contents of the wrapper’s <object> and <embed> tags, if a
current version of the SWF file is not in its local file cache.
6
When the web server receives a request for a file with the extension *.mxm.swf instead of *.mxml, the compiler
module returns a SWF file only, and not the wrapper around it. In general, you should not request a SWF file
directly, because it may run differently than if it were embedded in a wrapper.
The web-tier compiler has the following advantages over using the command-line compiler:
• Provides incremental compilation (recompiles only the bits that have changed, not necessarily the entire
application).
•
•
Saves you from having to deploy the SWF file and wrapper files after compiling.
•
•
Lets you debug by adding a query string parameter (?debug=true).
•
Displays error and warning messages in the browser.
Lets you customize the HTML wrapper or template.
Helps you share updates to your application across working groups by sending a link to the web server.
The web-tier compiler has the following disadvantages compared to using the command-line compiler:
•
•
Not for production use.
No built-in support for Express Install, deep linking, or version detection.
• Caching relies on the web server.
• On Linux systems, when you compile certain applications you may get an error message about not having a
graphical display. This is due to the Java compiler being run by the Apache user, which does not have access to the
desktop. To overcome this, add the following line to the flex-config.xml file used by the compiler:
<headless-server>true</headless-server>
Getting started
You can download the compiler module from the following location:
http://www.adobe.com/go/flex3_download
ADOBE FLEX 3 343
Building and Deploying Adobe Flex 3 Applications
Versions and requirements
The compiler module comes in the following versions:
•
•
Flex 3 compiler ISAPI filter for Windows (EXE)
•
•
Flex 3 compiler module for Apache for Macintosh (ZIP)
Flex 3 compiler module for Apache for Windows (EXE)
Flex 3 compiler module for Apache for Linux and other platforms (ZIP)
The Windows and Macintosh installers include the Flex SDK and the required JRE. The Linux installer requires
that you install the following separately:
•
Flex SDK 2.0.1 or later
•
JRE 1.4.2 or later
All of these versions require one of the following web servers:
•
•
Apache 1.x/2.x (Windows, MacOS, or Linux)
IIS version 5.1, 6, or 7 (Windows)
Installing the web-tier compiler
To install the compiler module, run the appropriate installer. The installer prompts you for the locations of various
assets, including:
• Where to install the compiler module and SDK — The installer installs the Flex SDK and the compiler
module. This document refers to this location as module_install_dir. On Windows, the default location is
c:\Program Files\flex_sdk. On MacOS, the default location is /Applications/flex_sdk.
• (Apache) Configuration files — The location of your Apache configuration files. This is not the document
root of the web server, but rather the location of the web server’s configuration files. For Apache on Windows XP,
the default location is C:\Program Files\Apache Software Foundation\Apache2.2\conf.
• Web server root — The location of your web server root. This is the document root of the web server. For IIS
on Windows XP, the default location is C:\Inetpub\wwwroot. For Apache on Window XP, the default location is
C:\Program Files\Apache Software Foundation\Apache2.2\htdocs.
Linux users must use manual installation. The manual installation download does not include the SDK or JRE.
For more information, see the readme file that is included in the download.
The compiler module installation sets the JAVA_HOME environment variable, if it is not already set. If it is set, then
the compiler module verifies that the JRE version to which that variable points is supported by the module.
Verifying the installation
To verify that the web-tier compiler installation was successful, see “Using the web-tier compiler” on page 344.
344 CHAPTER 18
The installer modifies your web server’s configuration. On Apache, the installer adds the following to the end of
your httpd.conf file:
LoadModule flex_module modules/mod_flex.dll
AddHandler flex .mxml
Do not modify the Flex settings in this file. For more information about the httpd.conf file, see the Apache
documentation.
View the filter on IIS
1
From the Administrative Tools section of the control panel, open the Internet Information Services manager.
2
Right-click the Default Web Site and select Properties. The Default Web Site Properties dialog box appears.
3
Select the ISAPI Filters tab. The tab should list the Flex module.
You can use ISAPI Filters tab to disable the Flex filter without uninstalling it.
On IIS, the installer installs an ISAPI filter on the Default Web Site. You can add the filter to any web site running
on IIS.
Install the ISAPI filter on web sites other than the Default Web Site
1
From the Administrative Tools section of the control panel, open the Internet Information Services manager.
2
Right-click the web site and select Properties. The Web Site Properties dialog box appears.
3
Select the ISAPI Filters tab.
4
Click the Add button. The Filter Properties dialog box appears.
5
In the Filter Name text box, enter a name for the filter.
6
In the Executable text box, browse to the location of the DLL that was installed on the Default Web Site.
7
Click OK and then click OK again to add the new filter to your web site.
Uninstalling the web-tier compiler
❖ Run the uninstall executable in the module_install_dir/uninstall directory.
On Apache, the uninstaller utility attempts to restore the httpd.conf file by using a backup. If any changes were
made to the httpd.conf file between the time of the compiler module installation and the time of the uninstallation, answering Yes to the prompt erases those changes.
Using the web-tier compiler
After installing the web-tier compiler and restarting your web server, you can request an MXML file from your
web server and receive a compiled SWF file in return.
ADOBE FLEX 3 345
Building and Deploying Adobe Flex 3 Applications
Use the web-tier compiler
1
(Windows) Reboot your computer.
2
Start or restart the web server.
3 Copy your MXML file to the web server’s document root. For Apache, the default document root is
Apache_install_dir/htdocs. For IIS, it is IIS_install_dir/wwwroot.
4
Request the MXML file in your web browser. For example:
http://localhost/Main.mxml
The module returns a generated wrapper that embeds the SWF file.
Map the project’s workspace to a virtual path in your web server
1
In Apache, set the Alias directive in the httpd.conf file:
Alias /flex "C:/Documents and Settings/knizia/workspace/MyBasicProject"
Alternatively, you can define your Adobe® Flex® Builder™ project directly under the web root.
2
In Flex Builder, select Run > Run to change the URL to launch in your project. The Run dialog box appears.
3
Under URL or Path to Launch, deselect the Use Defaults option.
4
Enter your request URL in the Debug and Run text boxes. For example:
http://localhost/flex/MyBasicProject.mxml
http://localhost/flex/MyBasicProject.mxml
Flex Builder appends ?debug=true to the URL when it launches the browser. This query string parameter
triggers a compilation with the debug compiler options enabled.
Configuring the web-tier compiler
You configure the web-tier compiler primarily with the following configuration files:
1 compiler.conf — Defines web-tier compiler-specific settings such as the location of the HTML template and
the location of the flex-config.xml file. The compiler.conf file is located in the module_install_dir directory.
This file uses the following syntax:
option_name=value
For example:
template=default.html
346 CHAPTER 18
You can add a comment to this file by using the pound (#) sign at the beginning of the line that you want to
comment out.
If you make changes to this file, you must restart your web server for the changes to take effect. For more information on editing the default web-tier compiler’s wrapper, see “Customizing the template” on page 348.
flex-config.xml — This file defines the default settings for the Flex compiler. The module finds this file by
using the value of the flex_config property in the compiler.conf file. If you installed the Flex framework with
the web-tier compiler, then the compiler.conf file points to the flex-config.xml file in the
module_install_dir/frameworks directory. If you are currently using the SDK and have a custom flex-config.xml
file, you might want to replace the default flex-config.xml file with your custom file or change the location by
editing the compiler.conf file.
2
For more information about the flex-config.xml file, see “Using the Flex Compilers” on page 125.
If a configuration file exists in the same folder as the MXML file, with a name that matches the app_nameconfig.xml format, the web-tier compiler uses that configuration file. This configuration file has the same precedence as a local configuration file, as described in “About configuration files” on page 134.
You cannot instruct the web-tier compiler to compile files that have extensions other than *.mxml or *.mxml.swf.
Therefore, although you can change the file extension that triggers the compiler (for example, by adding an
additional AddHandler entry in your Apache httpd.conf file), anything that is passed to the web-tier compiler
other than a *.mxml or *.mxml.swf file generates a compiler error.
About the compiler.conf options
The following table describes the options that you can set in the compiler.conf file:
Option
Description
flex_config
The location of the flex-config.xml file that is used by the web-tier compiler. This file contains all available
compiler settings, and the compiler relies on it for default settings.
If you installed the web-tier compiler with the Flex framework, the default value on Windows is C:\Program
Files\FlexModule\frameworks\flex-config.xml. On MacOS, it is /Applications/FlexModule/frameworks. On
Linux, it is /user_home/FlexModule/frameworks.
Otherwise, the default value is the location of your framework’s flex-config.xml file.
For more information on the flex-config.xml file, see “Using the Flex Compilers” on page 125
cache_folder
The location of a cache file used by the MXML compiler. This is used for incremental compilation.
On Windows XP, the default value is C:\Documents and Settings\username\Local Settings\Temp\. On Windows
Vista, it is /Users/user_name/Local Settings/temp. On Linux and MacOS, it is /tmp.
ADOBE FLEX 3 347
Building and Deploying Adobe Flex 3 Applications
Option
Description
flex_lib
The location of the frameworks directory that contains SWC files used by the compiler.
If you installed the web-tier compiler with the Flex framework, the default value on Windows XP is C:\Program
Files\FlexModule\frameworks.
height
The height of the application. The value can be either a number (the number of pixels) or a percentage value.
The default value is 100%, which the browser interprets as 100% of the available space.
If the height property is explicitly set on the <mx:Application> tag in the source MXML file, then the value
in the compiler.conf file is ignored. If this value is not set in the MXML file or in the compiler.conf file, Adobe®
Flash® Player makes a best guess to determine the height of the application.
width
The width of the application. The value can be either a number (the number of pixels) or a percentage value.
The default value is 100%, which the browser interprets as 100% of the available space.
If the width property is explicitly set on the <mx:Application> tag in the source MXML file, then the value
in the compiler.conf file is ignored. If this value is not set in the MXML file or in the compiler.conf file, Adobe Flash
Player makes a best guess to determine the width of the application.
template
The name of the HTML template that is used to embed the compiled SWF file. This file is returned by the web
server when the web-tier compiler is invoked. The Flex module replaces tokens (indicated by the ${token}
syntax) before the web server can return the file. At a minimum, this file must contain the ${swf} token.
The default value is default.html. The file must be in the module_install_dir/templates directory.
You can view a generated template by requesting an MXML file from the web-tier compiler. Then, in your
browser, select View Source. The source for the page is the generated HTML wrapper.
If you make changes to this file, you do not have to restart the server or recompile your Flex application for the
changes to take effect.
For more information on customizing the HTML template, see “Customizing the template” on page 348.
lines_in_context
The number of lines above and below the source of an error or warning that are shown in the browser when the
compiler returns an error warning. For example, if you set the value of this property to 10, when you request an
MXML file with an error in it, the browser displays the 10 lines of code in the MXML file before and the 10 lines
after the source line of the error.
You set this value when you run the Flex module installer. The default value is 1.
Example compiler.conf file
The following is an example of a compiler.conf file:
flex_config=C:\Program Files\FlexModule\frameworks\flex-config.xml
flex_lib=C:\Program Files\FlexModule\frameworks
cache_folder=C:\Documents and Settings\knizia\Local Settings\Temp\
width=100%
height=100%
template=default.html
348 CHAPTER 18
# increase number of lines to 10:
lines_in_context=10
Customizing the template
When the web-tier compiler compiles an MXML file into a SWF file, it also generates an HTML wrapper that
embeds that SWF file. The browser first loads the wrapper, which embeds the SWF file. This wrapper is generated
from a template that is included in the web-tier compiler installation.
The template file is in the module_install_dir/templates folder. The default template is default.html.
You specify the location of the template in the compiler.conf configuration file by using the template property;
for example:
template=default.html
For more information on editing the compiler.conf file, see “Configuring the web-tier compiler” on page 345.
The template uses several tokens as placeholders that the compiler replaces when it generates the final output. For
example, the token ${swf} is replaced with the MXML file name (minus the MXML file extension).
You can customize the template, but you must adhere to several rules. The new template:
•
•
Must be a *.html file.
•
Must include at least the ${swf} token. You use this token to define the value of the movie parameter in the
Must be in the module_install_dir/templates directory.
<object> tag and the value of the src attribute in the <embed> tag.
• Must not use any external script or CSS files. For example, you cannot use code similar to the following in the
template:
<script src="mysource.js"></script>
Limitations of the template
The web-tier compiler is not meant to be used in a production environment. The wrapper does not support the
following features:
•
•
History management or deep linking
•
Express Install
Player detection and deployment
ADOBE FLEX 3 349
Building and Deploying Adobe Flex 3 Applications
In addition, the template does not convert query string parameters to flashVars variables in the wrapper’s
<object> and <embed> tags. If you want to pass run-time data as a flashVars variable, you should hard-code it
in the wrapper, or use some other method of inserting the values into the wrapper’s <object> and <embed> tags.
Finally, you cannot include other script files or external CSS files in the template. The template must be a single
flat file that embeds the Flex application. It can contain JavaScript or other client-side code.
In Internet Explorer version 6 and later, you must click somewhere in the browser’s window before you can use
the Flex application. You may be prompted to press the Spacebar or the Enter key to activate the control. This is
because the wrapper returned by the web-tier compiler does not use an external JavaScript file to embed the SWF
file. HTML wrappers that use external script files to embed SWF files do not exhibit this behavior. You cannot
change this behavior because you cannot use external scripts in your template wrapper with the web-tier compiler.
For more information on HTML wrappers, see “Creating a Wrapper” on page 311.
About the template’s tokens
The following table describes the tokens that you can use in the web-tier compiler’s template:
Token
Description
${application}
Identifies the SWF file to the host environment (a web browser, for example) so that it can be referenced by
using a scripting language such as VBScript or JavaScript in the wrapper.
This token is used by the id property of the <object> tag and the name property of the <embed> tag.
${bgcolor}
Specifies the background color of the application. Use this property to override the background color
setting specified in the source MXML file. This property does not affect the background color of the HTML
page.
Valid format for bgcolor is any #RRGGBB, hexadecimal, or RGB value.
The Application container’s style uses an image as the default background. This image obscures any background color settings that you might make. Therefore, to make the value of the {$bgcolor} token be
displayed properly, you must clear the Application container’s backgroundImage style property. To do
this, you can set it to the value of a space character in the MXML source file, as the following example shows:
<mx:Style>
Application {
backgroundImage: " ";
}
</mx:Style>
$(height)
Defines the height of the application. The default value is 100%. You set the default value in the
compiler.conf file. If this value is set in the MXML file, then the web-tier compiler uses that value.
This token is used by the height properties of the <object> and <embed> tags.
350 CHAPTER 18
Token
Description
$(swf)
Defines the name of the MXML file, minus the extension. For example, if the MXML file is named Main.mxml,
the web-tier compiler inserts Main where this token occurs.
This token is used by the movie parameter of the <object> tag and the src property of the <embed> tag.
$(width)
Defines the width of the application. The default value is 100%. You set the default value in the
compiler.conf file. If this value is set in the MXML file, then the web-tier compiler uses that value.
This token is used by the width properties of the <object> tag and <embed> tags.
Debugging with the web-tier compiler
The web-tier compiler has the following debugging-related features:
•
•
Detects a query string parameter that you use to invoke the debugger compiler
•
Logs access and error messages
Controls the number of lines in the output that occur before and after an error or warning
Invoking the debugger compiler
You can compile a debug version of your Flex application when you are using the web-tier compiler. You do this
by appending ?debug=true to the end of the query string; for example:
http://www.myhost.com/myApps/Main.mxml?debug=true
You cannot disable this behavior of the web-tier compiler.
Adding ?debug=true to your query string instructs the compiler to include debugging information in the final
SWF file output. As a result, you can set breakpoints and use other features of the fdb command-line debugger or
the Flex Builder visual debugger.
To debug the application, you launch the fdb command line debugger and then launch your application in the
browser with ?debug=true on the query string. The application connects to the running debugger.
You must have a debugger version of Flash Player to compile the application with debug information in it.
For more information on using fdb, see “Using the Command-Line Debugger” on page 245.
ADOBE FLEX 3 351
Building and Deploying Adobe Flex 3 Applications
Customizing error output
You can select the number of lines of code to show in the browser before and after an error or warning. You do
this in the Configuration screen of the installer.
The default value is 1. The value can be any nonnegative integer. If you set the value to 10, the compiler displays
10 lines of code before and after the location of a syntax error when the error is displayed in the browser.
If you want to change the number of lines after you have installed the web-tier compiler, you set the value of the
lines_in_context property in the compiler.conf file. The following example sets the value to 10:
lines_in_context=10
You can disable warnings by setting ?warnings=false in the request string.
For more information on editing the compiler.conf file, see “Configuring the web-tier compiler” on page 345.
Using the web-tier compiler log files
The web-tier compiler generates its own set of access and error log files. The compiler writes to these log files in
the /logs subdirectory of the module installation directory:
•
•
module_install_dir/logs/access.log
module_install_dir/logs/error.log
The access log records the date, time, and path for each MXML file that the web-tier compiler compiles. The
following is an example of the access log file after the file MyBasicProject.mxml was compiled repeatedly:
[2007/03/02 16:13:08]C:/Documents and
Settings/knizia/workspace/MyBasicProject/MyBasicProject.mxml
[2007/03/02 16:13:24]C:/Documents and
Settings/knizia/workspace/MyBasicProject/MyBasicProject.mxml
[2007/03/02 16:13:47]C:/Documents and
Settings/knizia/workspace/MyBasicProject/MyBasicProject.mxml
[2007/03/02 16:13:57]C:/Documents and
Settings/knizia/workspace/MyBasicProject/MyBasicProject.mxml
[2007/03/02 16:15:32]C:/Documents and
Settings/knizia/workspace/MyBasicProject/MyBasicProject.mxml
The error log records the date and time of any errors, plus the line of code that triggered the error, and the line
number. The following is an example entry in the error log file:
[2007/03/02 16:15:34] [/MyBasicProject] error: Attribute name "s" must be followed by the
' = ' character. @ 11
The error log records only the line of code that triggered the error and not any lines of code above or below it,
regardless of the value of the lines_in_context property.
352 CHAPTER 18