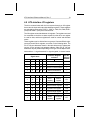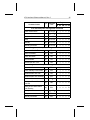
1
.....................................
ATA Interface
.....................................
Reference Manual
.....................................
.....................................
.....................................
.....................................
ATA Interface
Reference Manual
36111-001, Rev. C
21 May 1993
© 1993 Seagate Technology, Inc. All rights reserved
Publication Number: 36111-001, Rev. C
Seagate®, Seagate Technology®, and the Seagate logo are registered
trademarks of Seagate Technology, Inc. Other product names are registered trademarks or trademarks of their owners.
Seagate reserves the right to change, without notice, product offerings
or specifications. No part of this publication may be reproduced in any
form without written permission from Seagate Technology, Inc.
ATA Interface Reference Manual, Rev. C
iii
Contents
1.0 Introduction . . . . . . . . . . . . . . . . . . . . . . . . . .
1
1.1 Advantages of the ATA interface . . . . . . . . . . . . . .
1
1.2 Origins and implementation history . . . . . . . . . . . . .
2
1.3 Nomenclature and conventions . . . . . . . . . . . . . . .
2
2.0 ATA cables and connectors . . . . . . . . . . . . . . . . .
3
2.1 Connector used on 5.25- and 3.5-inch drives . . . . . . . .
3
2.2 Connector used on 2.5-inch drives . . . . . . . . . . . . .
5
2.3 System configurations . . . . . . . . . . . . . . . . . . . .
7
3.0 ATA interface signals . . . . . . . . . . . . . . . . . . . . .
9
3.1 Signal / Pin descriptions . . . . . . . . . . . . . . . . . . . 10
3.2 Interface handshaking . . . . . . . . . . . . . . . . . . . . 12
4.0 ATA interface I/O registers . . . . . . . . . . . . . . . . . . 13
4.1 Alternate Status register . . . . . . . . . . . . . . . . . . . 14
4.2 Command register . . . . . . . . . . . . . . . . . . . . . . 15
4.3 Cylinder High register . . . . . . . . . . . . . . . . . . . . 15
4.4 Cylinder Low register . . . . . . . . . . . . . . . . . . . . 16
4.5 Data register . . . . . . . . . . . . . . . . . . . . . . . . . 16
4.6 Device Control register . . . . . . . . . . . . . . . . . . . 16
4.7 Drive Address register . . . . . . . . . . . . . . . . . . . . 17
4.8 Drive/Head register . . . . . . . . . . . . . . . . . . . . . 18
4.9 Error register . . . . . . . . . . . . . . . . . . . . . . . . 19
4.10 Features register . . . . . . . . . . . . . . . . . . . . . . 20
4.11 Sector Count register . . . . . . . . . . . . . . . . . . . 20
4.12 Sector Number register . . . . . . . . . . . . . . . . . . 20
4.13 Status register . . . . . . . . . . . . . . . . . . . . . . . 21
4.14 Reset response . . . . . . . . . . . . . . . . . . . . . . 23
5.0 ATA interface commands
. . . . . . . . . . . . . . . . . . 25
iv
ATA Interface Reference Manual, Rev. C
5.1 Logical block addressing . . . . . . . . . . . . . . . . . .
25
5.2 ATA Command Types and Protocols . . . . . . . . . . .
26
5.2.1 PIO read commands . . . . . . . . . . . . . . . . .
27
5.2.2 PIO write commands . . . . . . . . . . . . . . . . .
28
5.2.3 DMA data transfer commands . . . . . . . . . . . .
30
5.2.4 Nondata commands . . . . . . . . . . . . . . . . . .
31
5.3 ATA interface command summaries . . . . . . . . . . . .
32
5.3.1 Command registers . . . . . . . . . . . . . . . . . .
33
5.3.2 Commands and error messages . . . . . . . . . . .
36
5.4 ATA standard commands . . . . . . . . . . . . . . . . .
38
5.4.1 Execute Drive Diagnostic command . . . . . . . . .
38
5.4.2 Format Track command . . . . . . . . . . . . . . . .
39
5.4.3 Identify Drive command . . . . . . . . . . . . . . . .
40
5.4.4 Initialize Drive Parameters command . . . . . . . . .
46
5.4.5 NOP command . . . . . . . . . . . . . . . . . . . .
46
5.4.6 Read Buffer command . . . . . . . . . . . . . . . .
47
5.4.7 Read DMA command . . . . . . . . . . . . . . . . .
47
5.4.8 Read Long command . . . . . . . . . . . . . . . . .
47
5.4.9 Read Multiple command . . . . . . . . . . . . . . .
48
5.4.10 Read Sectors command . . . . . . . . . . . . . . .
49
5.4.11 Read Verify Sectors command . . . . . . . . . . .
49
5.4.12 Recalibrate command . . . . . . . . . . . . . . . .
50
5.4.13 Seek command . . . . . . . . . . . . . . . . . . .
50
5.4.14 Set Features command . . . . . . . . . . . . . . .
50
5.4.15 Set Multiple Mode command . . . . . . . . . . . .
52
5.4.16 Write Buffer command . . . . . . . . . . . . . . . .
52
5.4.17 Write DMA command . . . . . . . . . . . . . . . .
52
5.4.18 Write Long command . . . . . . . . . . . . . . . .
53
5.4.19 Write Multiple command . . . . . . . . . . . . . . .
53
5.4.20 Write Same command . . . . . . . . . . . . . . . .
54
ATA Interface Reference Manual, Rev. C
5.4.21 Write Sectors command
v
. . . . . . . . . . . . . . . 54
5.4.22 Write Verify . . . . . . . . . . . . . . . . . . . . . . 55
5.5 ATA standard power management commands . . . . . . . 55
5.5.1 Check Power Mode command . . . . . . . . . . . . . 56
5.5.2 Idle command . . . . . . . . . . . . . . . . . . . . . 56
5.5.3 Idle Immediate command
. . . . . . . . . . . . . . . 58
5.5.4 Sleep command . . . . . . . . . . . . . . . . . . . . 58
5.5.5 Standby . . . . . . . . . . . . . . . . . . . . . . . . . 58
5.5.6 Standby Immediate . . . . . . . . . . . . . . . . . . . 58
5.6 Seagate standard power management commands . . . . . 59
5.6.1 Active and Set Idle Timer command . . . . . . . . . . 59
5.6.2 Active Immediate command . . . . . . . . . . . . . . 59
5.6.3 Check Idle Mode command . . . . . . . . . . . . . . 59
5.6.4 Idle Immediate command
. . . . . . . . . . . . . . . 60
5.6.5 Idle and Set Idle Timer command . . . . . . . . . . . 60
5.7 Seagate alternative power management commands . . . . 60
5.7.1 Check Idle Mode command . . . . . . . . . . . . . . 62
5.7.2 Check Standby Power Mode command . . . . . . . . 62
5.7.3 Enable/Disable Auto Idle command . . . . . . . . . . 62
5.7.4 Enable/Disable Auto Standby command . . . . . . . . 63
5.7.5 Idle Immediate command
. . . . . . . . . . . . . . . 63
5.7.6 Ready and Enable/Disable Auto Idle command . . . . 63
5.7.7 Ready and Enable/Disable Auto Standby command . . 63
5.7.8 Ready Immediate command . . . . . . . . . . . . . . 64
5.7.9 Sleep command . . . . . . . . . . . . . . . . . . . . 64
5.7.10 Standby Immediate command . . . . . . . . . . . . 64
6.0 ATA Interface timing diagrams . . . . . . . . . . . . . . . . 65
vi
ATA Interface Reference Manual, Rev. C
Figures
Figure 1. Pin assignments for the 40-pin male ATA interface connector used on 5.25- and 3.5-inch drives . . . . . . . . . . . 3
Figure 2. 40-pin male ATA interface connector for 5.25- and 3.5-inch
drives . . . . . . . . . . . . . . . . . . . . . . . . . . . 4
Figure 3. 40-pin female ATA interface connector for cables attached
to 5.25- and 3.5-inch drives . . . . . . . . . . . . . . . . 4
Figure 4. Pin assignments for the 50-pin male ATA interface connector used on 2.5- and 1.8-inch drives . . . . . . . . . . . . 5
Figure 5. 50-pin male ATA interface connector for 2.5-inch drives . 6
Figure 6. Master and slave drives attached to ATA connector embedded in system board . . . . . . . . . . . . . . . . . . . . 7
Figure 7. Master and slave drives attached to ATA host adapter . . 7
Figure 8. ATA Interface signals and signal pins (power pins not
shown) . . . . . . . . . . . . . . . . . . . . . . . . . . . 9
Figure 9. Power mode transition diagram . . . . . . . . . . . . .
57
Figure 10. Alternate power mode transition diagram . . . . . . .
61
Figure 11. Timing diagram signal conventions . . . . . . . . . .
65
Figure 12. PIO data transfer timing (to and from drive) . . . . . .
66
Figure 13. I/O Ready (IORDY) timing . . . . . . . . . . . . . . .
67
Figure 14. Single-word DMA transfer timing . . . . . . . . . . . .
68
Figure 15. Multiword DMA transfer timing . . . . . . . . . . . . .
69
Figure 16. System power-on and reset timing . . . . . . . . . . .
70
ATA Interface Reference Manual, Rev. C
1
1.0 Introduction
This manual describes Seagate Technology’s implementation of the AT
Attachment (ATA) interface, an intelligent hard disc drive interface for
use in personal computer systems. This manual includes supported ATA
interface commands, command execution, translation methodology,
caching, power management, signal conventions, line specifications,
and interpretations of error conditions. These interface descriptions are
based on the draft proposed American National Standard (dpANS) ATA
Interface Revision 4.0. For information on a particular Seagate ATA
interface drive (including any drive-unique features not listed in this
document), refer to the product manual for the specific drive.
1.1 Advantages of the ATA interface
The ATA interface is a natural extension of the ISA system bus. Most of
the signals and circuitry necessary for the interface are already present
in the host system. The interface is easily implemented into the design
of an ISA or EISA system with little or no extension required in the system
software. It is for this reason that the ATA interface standard has gained
such wide acceptance in the personal computer industry.
The ATA interface is designated as a logic-level interface, and responds
to high-level commands from the host. The drive itself is an intelligent
device with an embedded controller that interprets and executes the
commands sent from the host. After command execution, the drive
reports information on successful command completion, any error conditions and all parameters appropriate to drive status queries.
Features incorporated in some or all of Seagate’s ATA interface drives
include:
• Translation capabilities for emulating head, cylinder, and sector geometries that do not match the native geometry of the drive
• Defect management, which provides automatic reallocation of bad
sectors
• Drive caching that significantly improves drive performance, especially in DOS environments
• Multisegmented adaptive caching, allowing the drive to adapt the
caching algorithm based on the profile of read/write requests
• Power management capabilities, which are necessary for use in
portable computers and energy-efficient desktop systems. Power
management features can be set through the system software, allow-
2
ATA Interface Reference Manual, Rev. C
ing specific configuration of the drive’s features for specialized applications.
1.2 Origins and implementation history
The ATA interface has evolved rapidly since its initial design by Compaq
Corporation. After refining the basic ATA interface concepts and circuitry,
Compaq Corporation worked with Imprimis (now a part of Seagate) to
build the first ATA interface drive. At this stage, the interface was far from
being an accepted standard. However, it was a natural extension of the
ATA I/O bus, and gained industry-wide acceptance because most of the
necessary framework needed for the implementation was already present in the host machine.
Initially, there were no industry-wide standards for implementing the ATA
interface, leaving manufacturers free to extend and improve upon it. In
the latter part of 1988, a Common Access Method (CAM) committee was
established to develop such standards. Their results were adopted by
the American National Standards Institute (ANSI) with the intent of
creating a common ATA command specification.
The ANSI standard for the ATA interface now provides specifications for
mandatory commands, signal conventions, register descriptions and
other information necessary for basic compatibility across manufacturers
and platforms. The current ANSI specification includes provisions for
extended features such as caching and power management, while also
providing options for vendor-specific enhancements.
1.3 Nomenclature and conventions
Throughout this manual, the term master refers to Drive 0 in a two-drive
system; the term slave refers to Drive 1, if present (for more information
see Section 2.3).
Signal names are shown in all capital letters. Signals may be asserted
or negated. A signal that is asserted as a higher positive voltage is
referred to as active high. A signal that is asserted as a lower (positive)
voltage is referred to as active low, and is indicated by a minus sign (–)
following the signal name. Bit names are in all capitals except where a
lower case “n” precedes the name, as the case of nIEN. The “n” indicates
that when the bit is cleared (= 0), the action is true and when the bit is
set (= 1), the action is false. For example, BIT =1 and nBIT = 0 would be
true; BIT = 0 and nBIT = 1 would be false.
ATA Interface Reference Manual, Rev. C
3
2.0 ATA cables and connectors
The standard ATA interface cable is a 40-conductor nonshielded cable. The
cable should be no more than 18 inches (457 mm) long, with connectors
that provide strain relief and are keyed at pin 20. Two types of connectors
are used on Seagate’s ATA-capable drives: a 40-pin connector for 5.25and 3.5-inch drives, and a 50-pin connector for 2.5- and 1.8-inch drives.
2.1 Connector used on 5.25- and 3.5-inch drives
The standard connector used on 5.25- and 3.5-inch drives has 40 pin
positions in 2 rows of 20 pins each, on 100 mil (0.1 inch) centers (see
Figures 1, 2 and 3). Pin 20 is removed for keying. The mating cable
connector is a keyed, 40-pin-position nonshielded female connector with
2 rows of 20 contacts on 100 mil centers. For 5.25- and 3.5-inch drives,
power is supplied to the drive through a separate 4-conductor cable.
Seagate recommends using 40-pin connectors such as AMP part number 1-499496-0, Du Pont part number 66900-040, or equivalent.
Signal
Pin
Pin
Signal
RESET–
1
2
Ground
DD7
3
4
DD8
DD6
5
6
DD9
DD5
7
8
DD10
DD4
9
10
DD11
DD3
11
12
DD12
DD2
13
14
DD13
DD1
15
16
DD14
DD0
17
18
DD15
Ground
19
20
key (no pin)
DMARQ
21
22
Ground
DIOW–
23
24
Ground
DIOR–
25
26
Ground
IORDY
27
28
SPSYNC:CSEL
DMACK–
29
30
Ground
INTRQ
31
32
IOCS16–
DA1
33
34
PDIAG–
DA0
35
36
DA2
CS1FX–
37
38
CS3FX–
DASP–
39
40
Ground
Figure 1. Pin assignments for the 40-pin male ATA interface connector
used on 5.25- and 3.5-inch drives
4
ATA Interface Reference Manual, Rev. C
Dimensions are in inches
0.100 ± 0.010
0.70 ± 0.010
0.235 ± 0.025
0.025
± 0.002
0.230 ± 0.003
0.025 ± 0.002
0.100 typ
0.160
0.070 ± 0.010
1.90
2.00
Figure 2. 40-pin male ATA interface connector for 5.25- and 3.5-inch
drives
Dimensions are in inches (mm)
2.00 (50.80)
Strain relief
1.90 (48.26)
Triangle indicates
position of pin 1
0.140 (3.556)
0.230 ± 0.003
(5.84 ± 0.076)
2.00 (50.80)
0.060 (1.524)
0.025 ± 0.002
(0.635 ± 0.051)
Polarizing key
0.100 (2.54)
0.235 ± 0.025
(5.97 ± 0.635)
0.100 ± 0.010
(2.54 ± 0.254)
Figure 3. 40-pin female ATA interface connector for cables attached to
5.25- and 3.5-inch drives
ATA Interface Reference Manual, Rev. C
5
2.2 Connector used on 2.5-inch drives
The ATA connector on 2.5-inch drives has 50 pin positions. In addition
to the key pin, one pair of pins is removed, and the four end pins are used
as jumpers for master/slave configurations, as shown in Figure 4. This
leaves 44 pins to supply power and conduct signals to and from the drive.
The signal pins (1 through 40) are assigned the same signals as in the
40-pin connector used for 5.25- and 3.5-inch drives. Power is supplied
through pins 41, 42 and 43. The mating cable connector is a 44-conductor
nonshielded connector with 2 rows of 22 female contacts on 0.079-inch
(2 mm) centers, as shown in Figure 5 on page 6.
Signal / use
Pin
Pin
Signal / use
master/slave jumper
A
B
master/slave jumper
master/slave jumper
C
D
master/slave jumper
RESET–
1
2
Ground
DD7
3
4
DD8
DD6
5
6
DD9
DD5
7
8
DD10
DD4
9
10
DD11
DD3
11
12
DD12
DD2
13
14
DD13
DD1
15
16
DD14
DD0
17
18
DD15
no pin
no pin
Ground
19
20
key (no pin)
DMARQ
21
22
Ground
DIOW–
23
24
Ground
DIOR–
25
26
Ground
IORDY
27
28
SPSYNC:CSEL
DMACK–
29
30
Ground
INTRQ
31
32
IOCS16–
DA1
33
34
PDIAG–
DA0
35
36
DA2
CS1FX–
37
38
CS3FX–
DASP–
39
40
Ground
+5V (logic)
41
42
+5V (motor)
+Ground
43
44
Type
Figure 4. Pin assignments for the 50-pin male ATA interface connector
used on 2.5- and 1.8-inch drives
6
ATA Interface Reference Manual, Rev. C
Dimensions are in inches (mm)
0.079 ± 0.003 (2.00 ± 0.08)
0.039 ± 0.003 (0.99 ± 0.08)
0.152 ± 0.005
(3.86 ± 0.13)
0.157 (4.00)
0.079 ± 0.003 (2.00 ± 0.08)
0.020 ± 0.002
(0.51 ± 0.05)
0.020 ± 0.002
(0.51 ± 0.05)
0.039 ± 0.003
(0.99 ± 0.08)
Master/slave jumpers
0.161 (4.09) ref
0.158 ± 0.003 (4.00 ± 0.08)
1.654 (42.01)
2.212 (56.18)
Figure 5. 50-pin male ATA interface connector for 2.5-inch drives
We recommend using a connector such as Molex part number 872594413 or equivalent for 2.5-inch drives attached to flexible cables or
printed circuit cables. Some Seagate 2.5-inch drives are designed to
support the industry-standard MCC direct-mounting specifications (see
drive product manual for details). MCC-compatible connectors (such as
Molex part number 87368-442x or equivalent) and mounting hardware
must be used with these drives in fixed-mounting applications.
ATA Interface Reference Manual, Rev. C
7
2.3 System configurations
Seagate recommends using the ATA interface in one of the following
configurations:
• If the system motherboard has its own ATA connector, then you can
connect the drive interface cable directly to the system motherboard,
as shown in Figure 6.
• If the system does not have a built-in ATA connector, then attach the
interface cable to a Seagate ST07A or ST08A host adapter installed
in a system expansion slot. This configuration is shown in Figure 7.
System
Board
Drive 0
Drive 1
Figure 6. Master and slave drives attached to ATA connector embedded
in system board
pter
da
st A
Ho
System
Board
Drive 0
Drive 1
Figure 7. Master and slave drives attached to ATA host adapter
ATA Interface Reference Manual, Rev. C
9
3.0 ATA interface signals
Figure 8 summarizes the signals used by the I/O bus. Arrows indicate
signal directions. The PDIAG– and DASP– signals are used in some
systems for communication between the master and slave drive. Each
signal is described in greater detail in section 3.1.
Drive pin #
Signal name
Host pin # and signal description
1
2
3
4
5
6
7
8
9
10
11
12
13
14
15
16
17
18
19
20
21
22
23
24
25
26
27
*28
Reset–
Ground
DD7
DD8
DD6
DD9
DD5
DD10
DD4
DD11
DD3
DD12
DD2
DD13
DD1
DD14
DD0
DD15
Ground
(removed)
DMARQ
Ground
DIOW–
Ground
DIOR–
Ground
IORDY
SPSYNC:CSEL
1
2
3
4
5
6
7
8
9
10
11
12
13
14
15
16
17
18
19
20
21
22
23
24
25
26
27
28
29
30
31
32
33
*34
35
36
37
38
*39
DMACK–
Ground
INTRQ
IOCS16–
DA1
PDIAG–
DA0
DA2
CS1FX–
CS3FX–
DASP–
29
30
31
32
33
34
35
36
37
38
39
40
Ground
40
Host Reset
Ground
Host Data Bus Bit 7
Host Data Bus Bit 8
Host Data Bus Bit 6
Host Data Bus Bit 9
Host Data Bus Bit 5
Host Data Bus Bit 10
Host Data Bus Bit 4
Host Data Bus Bit 11
Host Data Bus Bit 3
Host Data Bus Bit 12
Host Data Bus Bit 2
Host Data Bus Bit 13
Host Data Bus Bit 1
Host Data Bus Bit 14
Host Data Bus Bit 0
Host Data Bus Bit 15
Ground
(No Pin)
DMA Request
Ground
Host I/O Write
Ground
Host I/O Read
Ground
I/O Channel Ready
Spindle sync
or Cable Select
DMA Acknowledge
Ground
Host Interrupt Request
Host 16 Bit I/O
Host Address Bus Bit 1
Passed Diagnostics
Host Address Bus Bit 0
Host Address Bus Bit 2
Host Chip Select 0
Host Chip Select 1
Drive Active or
Slave Present
Ground
*Indicates master-slave signals (details shown below).
Drive 1
(slave)
28
34
39
Drive 0
(master)
28
34
39
Host
SPSYNC:CSEL
PDIAG–
DASP–
28
34
39
Figure 8. ATA Interface signals and signal pins (power pins not shown)
10
ATA Interface Reference Manual, Rev. C
3.1 Signal / Pin descriptions
Note. Not all Seagate drives support the full complement of ATA signals
listed below. To determine the complete set of signals that are
supported by a particular Seagate drive, see the product manual
for that drive.
Pin #
Signal name Description
01
RESET–
Reset signal from the host.
02
Ground
Grounding pin
03–18 Host Data 0 Data lines to and from host. These comprise
through
the 16-bit tristate, bidirectional data bus
Host Data 15 between host and drive. The lower 8-bits of
host data (0–7) are used for register and ECC
access. All 16 bits are used for data transfers.
19
Ground
Grounding pin
20
Key
An unused pin, which is clipped off at the
drive to allow keyed cable attachment.
21
DMARQ
DMA Request (optional)
22
Ground
Grounding pin
23
DIOW–
Drive I/O write strobe. Rising edge clocks
data from the host data bus to a drive register
or data port.
24
Ground
Grounding pin
25
DIOR–
Drive I/O read strobe. Falling edge enables data
from a drive register or data port to host data bus.
26
Ground
Grounding pin
27
IORDY
I/O Channel Ready (optional); a tristate signal.
28
SPSYNC
or
CSEL
(optional) SPSYNC is an interdrive clock
signal sent from the master drive to the slave
drive to allow the slave to synchronize its
spindle motor to the master drive’s spindle
motor. CSEL is used to differentiate master
from slave in a two-drive system.
29
DMACK–
DMA Acknowledge (optional)
30
Ground
Grounding pin
ATA Interface Reference Manual, Rev. C
11
Pin #
Signal name Description
31
INTRQ
A tristate signal used to interrupt the host
system. Asserted only when the drive has a
pending interrupt, the drive is selected, and
the host has cleared nIEN in the Device
Control register. If nIEN=1, or the drive is not
selected, this output is in a high-impedance
state, regardless of the presence or absence
of a pending interrupt.
32
IOCS16–
A tristate signal that, when active, indicates to
the host system that the 16-bit data port has
been addressed and that the drive is
prepared to send or receive a 16-bit data
word.
33
DA1
Drive I/O address line 1: a 3-bit binary coded
address asserted by the host to access a
register or data port in the drive.
34
PDIAG–
Passed diagnostics. Used by slave to signal
to master drive that slave has passed its
internal diagnostics.
35
DA0
Drive I/O address line 0 (see DA1 above).
36
DA2
Drive I/O address line 2 (see DA1 above).
37
CS1FX–
Drive I/O chip select decoded from host
address lines. When active, one of the registers
in the Command Block is selected.
38
CS3FX–
Drive I/O chip select decoded from host
address lines. When active, one of the registers
in the Control Block is selected.
39
DASP–
Dual purpose pin: 1)When drive is slave
(SLV), this pin is used during power up to
signal to the master that a slave is present.
2) At all other times, the signal is active when
the drive is executing a command, and can
be used by the host I/O adapter to send an
activity signal to an LED.
40
Ground
Grounding pin
12
ATA Interface Reference Manual, Rev. C
3.2 Interface handshaking
The main handshaking signals between the drive and the host are the
busy bit (BSY) and the data request bit (DRQ) (in the status register) and
the interrupt (INTRQ) signal. They can be set in one of the following ways:
• Any reset will cause BSY to be set.
• Writing a command to the command register will also set BSY.
The BSY bit is used to indicate that the controller is busy and should not
be accessed.
The DRQ bit is used to control the data transfer to and from the controller.
The host can read/write the data register only when the DRQ bit is set to 1.
The INTRQ signal is generated by the drive to interrupt the host.
For example, during a Read Sector command, the drive generates an
INTRQ to the host whenever a sector is ready for the host to read. No
INTRQ is generated immediately after completion of a Read command.
The number of interrupts equals the number of sectors read.
During a Write Sector command, the drive generates an INTRQ whenever the drive requests data from the host (except for the first sector).
The drive also generates an interrupt immediately after completion of a
Write command. The number of interrupts equals the number of sectors
written.
All commands that do not include read- or write-data transfers generate
a single interrupt when the command completes. Resets do not generate
an interrupt.
INTRQ is cleared when the host reads the status register. The host can
read the Alternate Status register without clearing the INTRQ.
ATA Interface Reference Manual, Rev. C
13
4.0 ATA interface I/O registers
The drive communicates with the host system through an I/O register
that routes the input and output data between registers. These registers
are selected by codes on the CS1FX–, CS3FX–, DA2, DA1, DA0, DIOR–
(read) and DIOW– (write) lines from the host.
The I/O register routes data between 14 registers. Ten registers are used
for commands to the drive or status reports from the drive, one register
is used for data, and three registers are used for control and alternate
status.
These registers can be divided into two groups: Command Block registers and Control Block registers, as shown in the following table. The
PC-AT I/O port addresses shown in the table below and in subsequent
text are for the primary host adapter address. Other PC-AT I/O port
addresses may be possible depending on the type of host adapter used.
Abbreviations: 1 = signal asserted; 0 = signal negated; X = doesn’t matter
Function / Register
selected
Signal name
CS1FX– CS3FX– DA2 DA1 DA0
DIOR–
DIOW–
PC-AT
I/O port
address
0
0
X
X
X
No operation
—
1
1
X
X
X
Invalid addressing
—
0
1
X
X
X
Selects Command Block
—
1
0
X
X
X
Select Control Block
—
Command Block registers
1
0
0
0
0
Data register
1
0
0
0
1
Error
register
Feature
register
1F1
1
0
0
1
0
Sector Count register
1F2
1
0
0
1
1
Sector Number register
1F3
1
0
1
0
0
Cylinder Low register
1F4
1
0
1
0
1
Cylinder High register
1F5
1
0
1
1
0
Drive/Head register
1F6
1
0
1
1
1
Status
register
Command
register
1F0
1F7
14
ATA Interface Reference Manual, Rev. C
Function / Register
selected
Signal name
CS1FX– CS3FX– DA2 DA1 DA0
DIOR–
DIOW–
PC-AT
I/O port
address
Control Block registers
0
1
0
X
X
Data bus
high
impedance
Not used
3F0–3F3
0
1
1
0
X
Data bus
high
impedance
Not used
3F4–3F5
0
1
1
1
0
Alternate
Status
register
Device
Control
register
3F6
0
1
1
1
1
Drive
Address
register
Not used
3F7
4.1 Alternate Status register
CS1FX– = 0
DA2 = 1
CS3FX– = 1
DA1 = 1
DA0 = 0
Mode = Read Only
PC-AT I/O port address: 3F6H
This register contains the same information as the Status register in the
command block. The only difference is that reading this register does not
imply interrupt acknowledge or reset a pending interrupt. This register
can be read at any time.
Bit
7
Name
BSY
6
5
DRDY DWF
4
DSC
3
2
DRQ CORR
1
0
IDX
ERR
ATA Interface Reference Manual, Rev. C
15
4.2 Command register
CS1FX– = 1
DA2 = 1
CS3FX– = 0
DA1 = 1
DA0 = 1
Mode = Write Only
PC-AT I/O port address: 1F7H
This eight-bit register contains the host command. When this register is
written, the drive immediately begins executing the command. The host
must ensure that the BSY bit in the Status register is set to 0. All other
setup registers must be written to (with appropriate values) before the
command register can be written. Refer to Section 5.3.1 for an explanation of the command register’s contents following the execution of various
commands.
4.3 Cylinder High register
CS1FX– = 1
DA2 = 1
CS3FX– = 0
DA1 = 0
DA0 = 1
Mode = Read/Write
PC-AT I/O port address: 1F5H
This register contains the most significant bits of the starting cylinder
address for any disc access. At the completion of a command, this
register is updated to reflect the current cylinder address.
With logical block addressing, this register contains bits 23 through 16
of the LBA.
16
ATA Interface Reference Manual, Rev. C
4.4 Cylinder Low register
CS1FX– = 1
DA2 = 1
CS3FX– = 0
DA1 = 0
DA0 = 0
Mode = Read/Write
PC-AT I/O port address: 1F4H
This register contains the eight least significant bits of the starting cylinder
address for any disc access. At the completion of a command, this
register is updated to reflect the current cylinder address.
With logical block addressing, this register contains bits 15 through 8 of
the LBA.
4.5 Data register
CS1FX– = 1
DA2 = 0
CS3FX– = 0
DA1 = 0
DA0 = 1
Mode = Read/Write
PC-AT I/O port address: 1F0H
This is the register through which:
• All data is passed during Read and Write commands.
• The sector table is transferred during format commands.
The host can only access this register when the DRQ bit in the status
register is set to 1. All transfers use 16-bit words, except the ECC bytes
transferred during Read Long and Write Long commands, which use 8
bit bytes.
4.6 Device Control register
CS1FX– = 0
DA2 = 1
CS3FX– = 1
DA1 = 1
DA0 = 0
Mode = Write Only
PC-AT I/O port address: 3F6H
ATA Interface Reference Manual, Rev. C
17
The Device Control register contains the two control bits shown below
(X indicates bits that are not used):
Bit
7
6
5
4
3
2
1
0
Name
X
X
X
X
1
SRST
nIEN
0
nIEN
is the enable bit for the drive interrupt to the host.
When this bit is set to 0 and the drive is selected, the host
interrupt, INTRQ, is enabled, through a tristate buffer, to the host.
When nIEN is set to 1, or the drive is not selected, the INTRQ
pin is in a high-impedance state, regardless of the presence or
absence of a pending interrupt.
SRST is the host software reset bit. When it is set to 1, the drive is reset.
When it is set to 0, the drive is enabled. If two drives are
daisy-chained on the interface, this bit resets and enables both
drives simultaneously.
4.7 Drive Address register
CS1FX– = 0
DA2 = 1
CS3FX– = 1
DA1 = 1
DA0 = 1
Mode = Read Only
PC-AT I/O port address: 3F7H
This register contains the drive select and head select signals of the
currently selected drive. The bits in this register are as follows:
Bit
7
Name
HiZ
HiZ
6
5
4
3
2
1
0
nWTG nHS3 nHS2 nHS1 nHS0 nDS1 nDS0
is reserved and is not driven by the drive. When the host reads
the Drive Address register, the HiZ bit must be in a high-impedance state.
nWTG is the write gate bit, which is set to 1 during a Write command.
nHS3 through nHS0
are the one’s complement of the binary-coded address of the
currently selected head. nHS3– is the most significant bit. For
18
ATA Interface Reference Manual, Rev. C
example, if nHS3– through nHS0– are 1 1 0 0, respectively,
Head 3 is selected.
nDS1
is the drive select bit for drive 1 (the slave drive), and should be
active low when drive 1 is selected.
nDS0
is the drive select bit for drive 0 (the master drive), and should
be active low when drive 0 is selected.
4.8 Drive/Head register
The host selects between the master and slave drives based on the DRV
bit in the drive/head register. When the DRV bit is not set, the master
drive is selected, and when the DRV bit is set to 1, the slave drive is
selected. Seagate drives are designated as master and slave by setting
the appropriate jumpers.
CS1FX– = 1
DA2 = 1
CS3FX– = 0
DA1 = 1
DA0 = 0
Mode = Read/Write
PC-AT I/O port address: 1F6H
The Drive/Head register contains the drive address and the head address. At the end of a command, this register is updated to reflect the
currently selected head. This register is reset during a host reset or when
the Execute Drive Diagnostic command is issued. With logical block
addressing, this register contains bits 27 through 24 of the LBA.
The map of the Drive/Head register is shown below:
Bit
7
6
5
4
Name
1
LBA
1
DRV
DRV
3
2
1
0
HEAD
is the bit used to select the drive. Master is 0. Slave is 1.
HEAD is the 4-bit address used to select the head. When the drive is
executing the Initialize Drive Parameters command, HEAD
specifies the maximum head address.
LBA
signifies the addressing scheme currently being used. If this bit
is set to 1, the drive is using the logical block addressing scheme.
If the bit is set to 0, the CHS scheme is used. Refer to Section
5.1 for an explanation of these two addressing schemes.
ATA Interface Reference Manual, Rev. C
19
4.9 Error register
CS1FX– = 1
DA2 = 0
CS3FX– = 0
DA1 = 0
DA0 = 1
Mode = Read Only
PC-AT I/O port address: 1F1H
This register contains the status from the last command executed by the
drive, or it may contain a diagnostic code. At the completion of any
command except Execute Drive Diagnostic, the contents of this register
are valid when ERR=1 in the Status register. Following a power on, reset,
or completion of an Execute Drive Diagnostic command, this register
contains a diagnostic code, as described in Section 5.4.1.
The error bits in the Error register are defined below:
Bit
7
6
5
4
Name
BBK
UNC
MC
IDNF
3
2
1
0
MCR ABRT TK0NF AMNF
BBK
indicates a bad block mark was detected in the ID field of the
requested sector.
UNC
indicates an uncorrectable data error has been encountered.
IDNF
indicates the requested sector’s ID field could not be found.
ABRT indicates the requested command has been aborted due to a
drive status error (such as not ready or write fault) or because
the command is invalid.
TK0NF indicates track 0 has not been found during the command.
AMNF indicates the data address mark has not been found after finding
the correct ID field.
MC /
MCR
These bits are reserved for removable-media drives.
20
ATA Interface Reference Manual, Rev. C
4.10 Features register
CS1FX– = 1
DA2 = 0
CS3FX– = 0
DA1 = 0
DA0 = 1
Mode = Write Only
PC-AT I/O port address: 1F1H
This register is used by the Set Features command to enable and disable
special options, as defined in Section 5.4.14 (The Set Features command).
4.11 Sector Count register
CS1FX– = 1
DA2 = 0
CS3FX– = 0
DA1 = 1
DA0 = 0
Mode = Read/Write
PC-AT I/O port address: 1F2H
This register specifies the number of sectors of data to be transferred
during read/write sector commands. The value contained in the register
is decremented every time a sector is transferred. A value of zero
specifies 256 sectors. When executing the Initialize Drive Parameters or
Format commands, this register defines the number of sectors per track.
This register is used by the power mode commands to set timers.
4.12 Sector Number register
CS1FX– = 1
DA2 = 0
CS3FX– = 0
DA1 = 1
DA0 = 1
Mode = Read/Write
PC-AT I/O port address: 1F3H
This register contains the starting sector number for any disc access. At
the completion of a command, this register is updated to reflect the last
sector transferred correctly, or the sector on which an error occurred. The
sectors are numbered sequentially, starting with 1. With logical block
addressing, this register contains bits 7 through 0 of the logical block
address (LBA).
ATA Interface Reference Manual, Rev. C
21
4.13 Status register
CS1FX– = 1
DA2 = 1
CS3FX– = 0
DA1 = 1
Mode = Read Only
DA0 = 1
PC-AT I/O port address: 1F7H
This register contains either the drive status or the controller status. It is
updated at the completion of each command. If the host reads this
register while an interrupt is pending, it clears the interrupt.
The bits in the Status register are defined below:
Bit
7
Name
BSY
BSY
6
5
DRDY DWF
4
DSC
3
2
DRQ CORR
1
0
IDX
ERR
is the busy bit. It is set to 1 whenever the drive has access to the
command block. When it is set to 1:
• No other bits are valid.
• The host is locked out of reading shared registers; the Status
register is read instead.
The BSY bit is set to 1 under the following circumstances:
• At the assertion of the RESET– signal on the interface
• At the assertion of the SRST bit in the Device Control register
• Immediately upon host write to the Command register
DRDY is the drive ready indicator bit. This bit is set to 0 at power up and
remains set at 0 until the drive is ready to accept a command.
DWF
is the drive write fault bit. When there is a write fault error, this
bit is set to 1 and is not changed until the Status register is read
by the host, at which time the bit again indicates the current write
fault status.
DSC
is the drive seek complete bit. It is set to 1 when the disc drive
is not seeking.
22
DRQ
ATA Interface Reference Manual, Rev. C
is the data request bit. It is set to 1 when the drive is ready to
transfer a word or byte of data between the host and the data
port. The drive is busy whenever DRQ or BSY bits are set to 1.
When the DRQ bit is set to 1, the host may read or write any of
the registers including the Command register.
CORR is the corrected data bit. It is set to 1 when a correctable data
error has been encountered and the data has been corrected.
This condition does not end a multisector read operation. This
bit is set to 0 when a new command is serviced.
IDX
is the index bit. This bit usually contains a 0, except once per
disc revolution when it is toggled from 0 to 1 and back to 0.
ERR
is the error bit. It is set to 1 when the previous command ended
in some type of error. The other bits in the Status register, and
the bits in the Error register, have more information as to the
cause of the error. This bit is set to 0 when a new command is
serviced.
ATA Interface Reference Manual, Rev. C
23
4.14 Reset response
When the drive is reset, either by the host reset interface pin (RESET)
or by the host software reset bit (SRST) in the Device Control register,
the drive asserts BSY immediately. Once the reset has been removed
and the drive has been re-enabled, with BSY still asserted, the drive:
1. Initializes the hardware
2. Clears programmed drive parameters and reverts to the defaults
3. Loads the command block registers with their initial values
4. Negates DASP–
No interrupt is generated when initialization is complete. The initial values
for the command block registers are:
Register name
Initial values
Error
01H
Sector Count
01H
Sector Number
01H
Cylinder Low
00H
Cylinder High
00H
Drive Head
00H
ATA Interface Reference Manual, Rev. C
25
5.0 ATA interface commands
All ATA commands are decoded from the command register in the
command block. The host sets up all necessary parameters and enables
INTRQ (if used by the host) through other registers of the command block
before the command code is written to the command register. The drive
begins to execute a command immediately after the command register
is written. Upon completion of the command, the drive returns valid status
information through the Status register. If the error bit in the Status
register is set to 1, the Error register provides additional error information.
When two drives are daisy-chained on a single interface, commands are
sent to both drives. In most cases, only the selected drive executes the
command. The desired drive is selected through the drive bit in the
Drive/Head register.
The host can program the drive to perform commands and report its
status to the host after the completion of each command. In the case of
a diagnostic command, both drives execute the command. The slave
reports to the master that it has completed the diagnostic command using
the PDIAG– signal. For all other commands, only the selected drive
executes the command.
Note. Some ATA commands are optional and may not be supported by
all drives. See the appropriate Seagate product manual, which
will identify any of the following commands that may not be
supported by a particular drive model.
5.1 Logical block addressing
Some Seagate drives can operate in either standard cylinder-head-sector (CHS) or logical block addressing (LBA) mode, on a command-bycommand basis. A drive that supports LBA indicates this through word
49, bit 9 of the Identify Drive information. If the host selects LBA (by
setting bit 6 of the Drive/Head register), then the sectors on the drive are
assumed to be linearly mapped, with an LBA 0 of cylinder 0 / head 0 /
sector 1.
Seagate drives that support logical block addressing have the following
characteristics:
• The data returned from the Identify Drive command changes as
described below:
– Bit 9 in Word 49 is set to 1, and
26
ATA Interface Reference Manual, Rev. C
– Words 60 and 61 contain the total number of sectors available on
the drive. This number remains constant for the life of the drive, and
is unaffected by the current translation mode. This value may be
greater than the number of sectors implied by Words 1, 3, and 6.
There are no translation modes that allow Cylinder/Head/Sector
(CHS) access to more sectors than specified by words 60 and 61.
• In the Drive/Head register, bit 6 (LBA) is set to 0 for CHS addressing
and set to 1 for logical block addressing.
• The logical address is a 28-bit unsigned binary number, which is
placed into the command block as follows:
– bits 27–24 into the Drive/Head register bits 3–0
– bits 23–16 into the Cylinder High register
– bits 15–8 into the Cylinder Low register
– bits 7–0 into the Sector Number register
• In all valid translation modes, the following formula describes an
equivalent logical block address (LBA) for any CHS address:
LBA = C × SpC + H × SpT + S – 1
where C, H, and S are the cylinder, head, and sector numbers,
respectively, SpC is the number of sectors per logical cylinder for the
current translation mode, and SpT is the number of sectors per logical
track for the current translation mode. For all translation modes, C=0,
H=0, S=1 is equivalent to LBA=0. It is not possible to compute an
equivalent CHS for all logical block addresses in all translation modes
because this formula only works in one direction. This is because CHS
addressing can’t access 1/256th of all of the possible sectors that
logical block addressing can access, since there is no sector 0 in CHS.
• The maximum allowed value for the LBA is one less than the number
returned in the Identify Drive data words 60 and 61.
5.2 ATA Command Types and Protocols
The ATA commands can be grouped into four different types, depending
on the protocols followed during command execution. These four types
are: PIO read commands, PIO write commands, DMA data transfer
commands and nondata-transfer commands. The following pages summarize the execution of each of these command types.
ATA Interface Reference Manual, Rev. C
27
5.2.1 PIO read commands
The PIO read command group includes the Identify Drive, Read Buffer,
Read Long, Read Multiple and Read Sectors commands. The Identify
Drive and Read Buffer commands each transfer a single block of 512
bytes. The Read Long command transfers a single block of 512 bytes
plus 4 or more ECC bytes. The Read Multiple command transfers one
or more blocks of data where the size of each block is a multiple of 512
bytes. The Read Sectors command transfers one or more blocks of 512
bytes each.
To execute a PIO read command, the host and drive follow these steps:
1. The host writes any required parameters to the Features, Sector
Count, Sector Number, Cylinder and Drive/Head registers.
2. The host writes the command code to the Command register.
3. The drive sets BSY and prepares for data transfer.
4. When a block of data is available, the drive sets DRQ and clears BSY
prior to asserting INTRQ.
5. After detecting INTRQ, the host reads the Status register. In response
to the Status register being read, the drive negates INTRQ.
6. The host reads one block of data from the Data register.
7. The drive clears DRQ. If transfer of another block is required, the drive
also sets BSY and the above sequence is repeated from step 4).
The following table shows a PIO read command that transfers two blocks
without an error (in this and subsequent tables, read downward to follow
the sequence of steps executed).
Step
Event
Process
BSY
DRQ
INTRQ
1
—
Setup
BSY=0
—
—
2
—
Issue command
BSY=0
—
—
3
—
—
BSY=1
—
—
4
—
BSY=0
DRQ=1 Assert
5
BSY=0
DRQ=1 Negate
6
Transfer Read status
first
block Transfer data
BSY=0
DRQ=1 —
7
—
BSY=1
—
continued
—
28
ATA Interface Reference Manual, Rev. C
continued from previous page
Step
Event
Process
BSY
DRQ
INTRQ
4
—
BSY=0
DRQ=1 Assert
5
BSY=0
DRQ=1 Negate
6
Transfer Read status
first
block Transfer data
BSY=0
DRQ=1 —
7
—
BSY=1
—
—
If Error Status is presented, the drive is prepared to transfer data, and it
is at the host’s discretion that the data is transferred. The following
example shows a PIO read command with an error indicated on the first
block. In this example, although DRQ=1 at step 5, there is no valid data
to transfer. Because of the error status, the command is aborted after
step 5.
Step
Process
BSY
DRQ
INTRQ
1
Setup
BSY=0
—
—
2
Issue command
—
—
—
3
—
BSY=1
—
—
4
—
BSY=0
DRQ=1
Assert
5
Read status
BSY=0
DRQ=0
Negate
5.2.2 PIO write commands
PIO write commands include the Format Track, Write Buffer, Write Long,
Write Multiple, Write Same, Write Sectors and Write Verify commands.
The Format Track, Write Buffer and Write Same commands transfer a
single block of 512 bytes. The Write Long command transfers a single
block of 512 bytes plus 4 or more ECC bytes. The Write Multiple
command transfers one or more blocks of data where the size of each
block is a multiple of 512 bytes. The Write Sectors and Write Verify
commands transfer one or more blocks of 512 bytes each.
During a PIO write command, the host and drive follow these steps:
1. The host writes any required parameters to the Features, Sector
Count, Sector Number, Cylinder and Drive/Head registers.
2. The host writes the command code to the Command register.
ATA Interface Reference Manual, Rev. C
29
3. The drive sets BSY and prepares for data transfer.
4. When the drive is ready to accept a block of data, it sets DRQ and
clears BSY. When the host detects DRQ is set to 1, the host writes
one block of data from the Data register.
5. The drive clears DRQ and sets BSY.
6. When the drive has completed processing of the block, it clears BSY
and asserts INTRQ. If transfer of another block is required, the drive
also sets DRQ.
7. After detecting INTRQ, the host reads the Status register. In response
to the Status register being read, the drive negates INTRQ. If transfer
of another block is required, DRQ is set to 1 and the sequence
continues to step 8).
8. The host writes one block of data to the Data register. The sequence
continues at step 5).
The table below shows a PIO write command that transfers two blocks
of data without an error.
Step
Event
Process
BSY
DRQ
INTRQ
1
—
Setup
BSY=0
—
—
2
—
Issue command
BSY=0
—
—
3
—
—
BSY=1
—
—
Transfer data
BSY=0
DRQ=1 —
BSY=1
—
BSY=0
DRQ=1 Assert
4
5
6
Transfer —
first
block —
—
7
Read status
BSY=0
DRQ=1 Negate
8
Transfer data
BSY=0
DRQ=1 —
BSY=1
—
BSY=0
DRQ=1 Assert
BSY=0
DRQ=0 Negate
5
6
7
Transfer —
second
block —
Read status
—
30
ATA Interface Reference Manual, Rev. C
In contrast, the table below illustrates a PIO write command with an error
indicated on the first block.
Step
Event
Process
BSY
DRQ
INTRQ
1
—
Setup
BSY=0
—
—
2
—
Issue command
BSY=0
—
—
3
—
—
BSY=1
—
—
Transfer data
BSY=0
DRQ=1 —
BSY=1
—
BSY=0
DRQ=1 Assert
BSY=0
DRQ=1 Negate
4
5
6
7
Transfer —
first
block —
Read status
—
5.2.3 DMA data transfer commands
The DMA data transfer commands are Read DMA and Write DMA. Data
transfers using DMA commands differ from PIO transfers in two ways:
1) data transfers are performed using the slave-DMA channel; and 2) a
single interrupt is generated by the drive at the completion of the
command.
Initiation of the DMA transfer commands is identical to the Read Sectors
or Write Sectors commands except that the host initializes the slave-DMA
channel prior to issuing the command.
The host interrupt handler for DMA transfers is different from PIO
transfers in that: 1) no intermediate sector interrupts are issued on
multisector commands; and 2) the host resets the DMA channel prior to
reading status from the drive.
The host and drive follow these steps to execute the DMA Read or DMA
Write commands:
1. The host initializes the slave-DMA channel.
2. The host writes any required parameters to the Features, Sector
Count, Sector Number, Cylinder and Drive/Head registers.
3. The host writes the command code to the Command register.
4. The drive sets BSY.
5. The host and the drive transfer the data through the slave-DMA channel. A DMA transfer command with an error may transfer none, some,
ATA Interface Reference Manual, Rev. C
31
or all of the data during this step. During this step, the status of DRQ
is not specified (indicated by x in the diagram).
6. When the data transfer has completed, the drive clears BSY and
asserts INTRQ.
7. After detecting INTRQ, the host resets the slave-DMA channel.
8. The host reads the Status register. In response to the Status register
being read, the drive negates INTRQ.
The following table shows a DMA Data Transfer command with no error.
Step
Process
BSY
DRQ
INTRQ
1
Initialize DMA
—
—
—
2
Setup
BSY=0
—
—
3
Issue command
BSY=0
—
—
4
—
BSY=0
—
—
5
DMA transfer
BSY=1
DRQ=x
—
6
—
BSY=0
—
Assert
7
Reset DMA
BSY=0
—
Assert
8
Read status
BSY=0
—
Negate
5.2.4 Nondata commands
A number of ATA commands do not involve data transfer. These commands include Execute Drive Diagnostics, Initialize Drive Parameters,
NOP, Recalibrate, Seek, Set Features, Set Multiple Mode and all of the
Power Management commands.
To execute nondata commands, the host and drive follow these steps:
1. The host writes any required parameters to the Features, Sector
Count, Sector Number, Cylinder and Drive/Head registers.
2. The host writes the command code to the Command register.
3. The drive sets BSY.
4. When the drive has completed processing, it clears BSY and asserts
INTRQ.
5. After detecting INTRQ, the host reads the Status register. In response
to the Status register being read, the drive negates INTRQ.
32
ATA Interface Reference Manual, Rev. C
The following table illustrates a typical nondata command:
Step
Process
BSY
DRQ
INTRQ
1
Setup
BSY=0
—
—
2
Issue command
BSY=0
—
—
3
—
BSY=1
—
—
4
—
BSY=0
—
Assert
5
Read status
BSY=0
—
Negate
An important subset of the nondata commands are the power management commands, all of which are optional within the ATA command
specification. These commands are treated in separate sections in the
text and tables that follow.
5.3 ATA interface command summaries
The following tables and text summarize the various ATA interface commands. Most of these are identical to those described in dpANS ATA
Interface Revision 4.0. A few additional power management commands are
Seagate-specific. These can be divided into two groups: standard Seagate
power management commands and alternative Seagate power management commands (the latter are used in some early Seagate drives).
All commands are issued to the drive in the following sequence:
1. The appropriate registers are loaded into the command block with the
necessary parameters.
2. The command code is written to the Command register.
3. The drive begins execution of the command.
ATA Interface Reference Manual, Rev. C
33
5.3.1 Command registers
The following table summarizes the contents of the Command registers
following implementation of the various ATA interface commands. The
following abbreviations are used in this table:
Command type abbreviations:
PIOR PIO read command
DMA DMA data transfer commands
PIOW PIO write command
ND
Nondata commands
Register abbreviations:
FR
Features register
SC
Sector Count register
SN
Sector Number register
CY
Cylinder register
DH
Drive/Head register
Parameter abbreviations:
n
The register does not contain a valid parameter for this command.
y
This register contains a valid parameter used by this command.
In the the Drive/Head register, y means that both drive and head
parameters are valid.
D
In the Drive/Head register, only the drive parameter is valid. (*the
Execute Drive Diagnostics command is addressed to drive 0 but
executed by both drives.)
Command name
Type
Register
Command
code
FR SC SN CY DH
ATA standard commands
Execute Drive Diagnostics
ND
90H
n
n
n
n
D*
Format Track
PIOW
50H
n
y
n
y
y
Identify Drive
PIOR
ECH
n
n
n
n
D
Initialize Drive Parameters
ND
91H
n
y
n
n
y
NOP
ND
00H
n
n
n
n
y
PIOR
E4H
n
n
n
n
D
Read Buffer
continued
34
ATA Interface Reference Manual, Rev. C
continued from previous page
Command name
Type
Register
Command
code
FR SC SN CY DH
ATA standard commands
Read DMA (w/retry)
DMA
C8H
n
y
y
y
y
Read DMA (no retry)
DMA
C9H
n
y
y
y
y
Read Long (w/retry)
DMA
22H
n
y
y
y
y
Read Long (no retry)
DMA
23H
n
y
y
y
y
Read Multiple
PIOR
C4H
n
y
y
y
y
Read Sectors (w/retry)
PIOR
20H
n
y
y
y
y
Read Sectors (no retry)
PIOR
21H
n
y
y
y
y
Read Verify Sectors (w/retry)
PIOR
40H
n
y
y
y
y
Read Verify Sectors (no retry)
PIOR
41H
n
y
y
y
y
Recalibrate
ND
1xH
n
n
n
n
D
Seek
ND
7xH
n
n
y
y
y
Set Features
ND
EFH
y
n
n
n
D
Set Multiple Mode
ND
C6H
n
y
n
n
D
Write Buffer
PIOW
E8H
n
n
n
n
D
Write DMA (w/retry)
DMA
CAH
n
y
y
y
y
Write DMA (no retry)
DMA
CBH
n
y
y
y
y
Write Long (w/retry)
PIOW
32H
n
y
y
y
y
Write Long (no retry)
PIOW
33H
n
y
y
y
y
Write Multiple
PIOW
C5H
n
y
y
y
y
Write Same
PIOW
E9H
y
y
y
y
y
Write Sectors (w/retry)
PIOW
30H
n
y
y
y
y
Write Sectors (no retry)
PIOW
31H
n
y
y
y
y
Write Verify
PIOW
3CH
n
y
y
y
y
ATA Interface Reference Manual, Rev. C
Command name
Type
35
Register
Command
code
FR SC SN CY DH
ATA standard power management commands
Check Power Mode
ND
98H or E5H
n
y
n
n
D
Idle
ND
97H or E3H
n
y
n
n
D
Idle Immediate
ND
95H or E1H
n
n
n
n
D
Sleep
ND
99H or E6H
n
n
n
n
D
Standby
ND
96H or E2H
n
n
n
n
D
Standby Immediate
ND
94H or E0H
n
n
n
n
D
Seagate standard power management commands
Active and Set Idle Timer
ND
FBH
n
y
n
n
D
Active Immediate
ND
F9H
n
n
n
n
D
Check Idle Mode
ND
FDH
n
y
n
n
D
Idle Immediate
ND
F8H
n
n
n
n
D
Idle and Set Idle Timer
ND
FAH
n
y
n
n
D
Seagate alternative power management commands
Check Idle Mode
ND
FDH
n
y
n
n
D
Check Standby Power Mode
ND
E5H
n
y
n
n
D
Enable/Disable Auto Idle
ND
FAH
n
y
n
n
D
Enable/Disable Auto Standby
ND
E2H
n
y
n
n
D
Idle Immediate
ND
F8H
n
n
n
n
D
Ready and Enable/Disable
Auto Idle
ND
FBH
n
n
n
n
D
Ready and Enable/Disable
Auto Standby
ND
E3H
n
n
n
n
D
Ready Immediate
ND
E1H or F9H n
n
n
n
D
Sleep
ND
E6H
n
n
n
n
D
Standby Immediate
ND
E0H
n
n
n
n
D
36
ATA Interface Reference Manual, Rev. C
5.3.2 Commands and error messages
The following table summarizes the contents of the Error and Status
registers after execution of the various ATA interface commands. Bullets
indicate valid bits. The abbreviations used in this table are shown below:
Error register
Status register
Bit
Description
Bit
BBK
Bad block detected
DRDY Drive ready detected
UNC
Uncorrectable error
DWF
Drive write fault detected
IDNF
Requested ID not found
DSC
Drive seek complete
Description
ABRT Aborted command error
CORR Corrected data error
TK0NF Track 0 not found error
ERR
Error bit in status register
AMNF Data address mark not
found error
Error register
Command
BBK
UNC
Status register
IDNF ABRT TK0NF AMNF DRDY DWF
DSC CORR ERR
ATA standard commands
Execute Drive
Diagnostics
•
See Section 5.4.1
•
Format Track
Identify Drive
•
•
•
•
•
•
•
•
•
•
•
•
•
Initialize Drive
Parameters
NOP
•
Read Buffer
•
Read DMA
•
Read Long
•
Read Multiple
•
Read Sectors
Read Verify
Sectors
Recalibrate
•
•
•
•
•
•
•
•
•
•
•
•
•
•
•
•
•
•
•
•
•
•
•
•
•
•
•
•
•
•
•
•
•
•
•
•
•
•
•
•
•
•
•
•
•
•
•
•
•
•
•
•
•
•
•
•
ATA Interface Reference Manual, Rev. C
37
Error register
Command
BBK
UNC
Status register
IDNF ABRT TK0NF AMNF DRDY DWF
•
DSC CORR ERR
•
•
•
•
•
Set Features
•
•
•
•
•
Set Multiple
Mode
•
•
•
•
•
Write Buffer
•
•
•
•
•
Seek
Write DMA
•
•
•
•
•
•
•
Write Long
•
•
•
•
•
•
•
Write Multiple
•
•
•
•
•
•
•
Write Same
•
•
•
•
•
•
•
Write Sectors
•
•
•
•
•
•
•
Write Verify
•
•
•
•
•
•
•
•
•
Invalid
Command Code
•
•
•
•
•
•
ATA standard power management commands
Check Power
Mode
•
•
•
•
•
Idle
•
•
•
•
•
Idle Immediate
•
•
•
•
•
Sleep
•
•
•
•
•
Standby
•
•
•
•
•
Standby
Immediate
•
•
•
•
•
Seagate standard power management commands
Active
Immediate
•
•
•
•
•
Active and Set
Idle Timer
•
•
•
•
•
Check Idle
Mode
•
•
•
•
•
Idle Immediate
•
•
•
•
•
Idle and Set
Idle Timer
•
•
•
•
•
38
ATA Interface Reference Manual, Rev. C
Error register
Command
BBK
UNC
Status register
IDNF ABRT TK0NF AMNF DRDY DWF
DSC CORR ERR
Seagate alternative power management commands
Check Idle
Mode
•
•
•
•
•
Check Standby
Power Mode
•
•
•
•
•
Enable/Disable
Auto Idle
•
•
•
•
•
Enable/Disable
Auto Standby
•
•
•
•
•
Idle Immediate
•
•
•
•
•
Ready and
Enable/Disable
Auto Idle
•
•
•
•
•
Ready and
Enable/Disable
Auto Standby
•
•
•
•
•
Ready
Immediate
•
•
•
•
•
Sleep
•
•
•
•
•
Standby
Immediate
•
•
•
•
•
5.4 ATA standard commands
5.4.1 Execute Drive Diagnostic command
The Execute Drive Diagnostic command (command code 90H) performs
the internal diagnostic tests implemented by the drive. The DRV bit is
ignored. Both drives, if present, execute this command at the same time.
If there is no slave present:
• The single drive posts only its own diagnostic results.
• The drive clears BSY, and generates an interrupt.
If a slave drive is present:
• The slave drive asserts PDIAG– within 5 seconds.
• The master drive waits up to 6 seconds for the slave to assert PDIAG–.
ATA Interface Reference Manual, Rev. C
39
• If the slave has not asserted PDIAG–, indicating a failure, the master
will append 80H to its own diagnostic status.
• Both drives will execute diagnostics.
• If slave diagnostic failure is detected when master drive status is read,
slave status is obtained by setting the DRV bit, and reading status.
If the slave fails diagnostics, the master compares (ORs) 80H with the
current status of the master and loads the appropriate code into the Error
register. If the slave passes diagnostics or there is no slave connected,
the master drive ORs 00H with its own status and loads the appropriate
code into the Error register. The Diagnostic Code written to the Error
register is a unique 8-bit code as shown below.
Code
Significance
01H
No error detected
02H
Formatter device error
03H
Sector buffer error
04H
ECC circuitry error
05H
Controlling microprocessor error
8xH
Slave drive test failed
5.4.2 Format Track command
The implementation of the Format Track command (command code 50H)
is drive specific. The actions may be a physical reformatting of a track or
simply writing some value in the data fields.
The track address is specified in the Cylinder High and Cylinder Low
registers, and the number of sectors is specified in the Sector Count
register. When the command is accepted, the drive sets the DRQ bit and
waits for the host to transfer one 512-byte block of data. After the data
block is transferred, the drive clears DRQ, sets BSY and performs the
track formatting. The contents of the sector buffer are not written to the
media.
40
ATA Interface Reference Manual, Rev. C
If the drive supports reformatting of headers as well as data fields, the
data block is interpreted as shown in the following table:
DD15———-DD0
First sector
descriptor
DD15———-DD0
sector
: : : : Last
descriptor
Remainder of buffer
filled with zeros
One 16-bit word represents each sector, the words being contiguous
from the start of a sector. Any words remaining in the buffer after the
representation of the last sector are filled with zeros. Words DD15–8
contain the sector number. If an interleave is specified, the words appear
in the same sequence as they appear on the track. Words DD7–0 contain
a descriptor value defined as follows:
00H
Format sector as good
20H
Unassign the alternate location for this sector
40H
Assign this sector to an alternate location
80H
Format sector as bad
5.4.3 Identify Drive command
The Identify Drive command (command code ECH) transfers information
about the drive to the host. When the command is issued, the drive sets
BSY, prepares to transfer a single 512-byte block of data, sets DRQ, and
generates an interrupt. The host then reads the data from the drive. The
data is organized as shown in the table below. All reserved bits or words
are zero.
Words 53 to 59 and 62 to 63 change depending on the current operating
mode of the drive. All other words are constant for a particular drive.
An asterisk (*) indicates words for which a value of 0000H indicates
parameter not specified.
Identify Drive Command
Word
Bit
Description
0
15
0 = reserved for nonmagnetic drives
0
14
1 = format speed tolerance gap required
0
13
1 = track offset option available
0
12
1 = data strobe offset option available
ATA Interface Reference Manual, Rev. C
41
Identify Drive Command
Word
Bit
Description
0
11
1 = rotational speed tolerance is > 0.5%
0
10
1 = disc transfer rate > 10 Mbit/sec
0
9
1 = disc transfer rate ≤ 10 Mbit/sec but > 5 Mbit/sec
0
8
1 = disc transfer rate ≤ 5 Mbit/sec
0
7
1 = removable cartridge drive
0
6
1 = fixed drive
0
5
1 = spindle motor control option implemented
0
4
1 = head switch time > 15 usec
0
3
1 = not MFM encoded
0
2
1 = soft sectored
0
1
1 = hard sectored
0
0
0 = ATA reserved (should be zero)
1
—
Number of cylinders
(the number of user-addressable cylinders in
the default translation mode)
2
—
ATA reserved (should be zero)
3
—
Number of heads
(the number of user-addressable heads in the
default translation mode)
4
—
Number of unformatted bytes per track
5
—
Number of unformatted bytes per sector
6
—
Number of sectors per track
(the number of user-addressable sectors per
track in the default translation mode)
7–9
—
ATA reserved (should be zero)
10–19
—
Serial number*
(20 ASCII characters, right justified and padded
with spaces [20H])
continued
42
ATA Interface Reference Manual, Rev. C
continued from previous page
Identify Drive Command
Word
Bit
Description
20
—
Buffer type*
(0000H = not specified
0001H = a single-ported single-sector buffer
which is not capable of simultaneous data
transfers to or from the host and the disc;
0002H = a dual ported multisector buffer
capable of simultaneous data transfers to or
from the host and the disc;
0003H = a dual ported multisector buffer
capable of simultaneous transfers with a read
caching capability;
0004H through FFFFH are reserved:
These codes are typically not used by the
operating system but are useful for diagnostic
programs that perform initialization routines, in
which a different interleave value may be
desirable for 0001H, 0002H or 0003H above.)
21
—
Buffer size in 512-byte increments*
22
—
Number of ECC bytes available on read/write long
commands*
(If the contents of this field are set to a value
other than 4, the Set Features command (bit
44H) must be used to specify the appropriate
number of ECC bytes to be transferred during
read/write long commands)
23–26
—
Firmware revision*
(8 ASCII characters, left justified and padded
with spaces [20H])
27–46
—
Model number*
(40 ASCII characters, left justified and padded
with spaces [20H])
47
15–8
Seagate reserved
47
7–0
00H = Read/write multiple commands not implemented; xxH = Maximum number of sectors that
can be transferred per interrupt on read and
write multiple commands.
ATA Interface Reference Manual, Rev. C
43
Identify Drive Command
Word
Bit
Description
48
—
0000H = cannot perform double-word I/O;
0001H = can perform double-word I/O
(Included for backwards-compatible use)
49
15–10
0 = ATA reserved (should be zero)
49
9
1 = LBA supported
49
8
1 = DMA supported
49
7–0
Seagate reserved
50
ATA reserved (should be zero)
51
15–8
PIO data transfer cycle timing mode
(The PIO transfer timing for each ATA device
falls into categories which have unique
parametric timing specifications. To determine
the proper device timing category, compare the
cycle time specified in Section 6 with the
contents of this field. The value returned in bits
15 through 8 should fall into one of the
categories specified in Section 6, and if it does
not, then mode 0 is used as the default timing.)
51
7–0
Seagate reserved
52
15–8
DMA data transfer cycle timing mode
(The DMA transfer timing for each ATA device
falls into categories which have unique
parametric timing specifications. To determine
the proper device timing category, compare the
cycle time specified in Section 6 with the
contents of this field. The value returned in bits
15 through 8 should fall into one of the
categories specified in Section 6. If it does not,
then mode 0 is used as the default timing. The
contents of this word are ignored if words 62 or
63 are supported).
52
7–0
Seagate reserved
53
15–1
ATA reserved (should be zero)
continued
44
ATA Interface Reference Manual, Rev. C
continued from previous page
Identify Drive Command
Word
Bit
Description
53
0
1 = the fields reported in words 54–58 are valid;
0 = the fields reported in words 54–58 are not valid
54
—
Number of current cylinders
(the number of user-addressable cylinders in
the current translation mode; not valid unless bit
0 of word 53 is set to 1)
55
—
Number of current heads
(the number of user-addressable heads in the
current translation mode; not valid unless bit 0
of word 53 is set to 1)
56
—
Number of current sectors per track
(the number of user-addressable sectors per
track in the current translation mode; not valid
unless bit 0 of word 53 is set to 1)
57–58
—
Current capacity in sectors
(the current capacity in sectors excludes all
sectors used for device-specific purposes. The
number of sectors of available capacity is
calculated as: (Number of current cylinders) ×
(Number of current heads) × (Number of current
sectors per track); not valid unless bit 0 of word
53 is set to 1)
59
15–9
ATA reserved (should be zero)
59
8
1 = Multiple sector setting is valid
59
7–0
Number of sectors transfered during Read/Write
Multiple commands (xxH = Current setting for
number of sectors that can be transferred per
interrupt on Read Multiple and Write Multiple
commands; only applies if the valid bit [bit 8] is
set to 1)
ATA Interface Reference Manual, Rev. C
45
Identify Drive Command
Word
Bit
Description
60–61
—
Total number of user-addressable sectors
(LBA mode only; if the drive supports LBA
mode, these words reflect the total number of
user-addressable sectors. This value does not
depend on the current drive geometry. If the
drive does not support LBA mode, these words
are set to 0)
62
15–8
Single word DMA transfer mode active
(This high-order byte contains a single bit set to
indicate which mode is active—see Set
Features command)
62
7–0
Single word DMA transfer modes supported
(This low-order byte identifies by bit all of the
modes that are supported. For example, if mode
0 is supported, bit 0 is set to 1)
63
15–8
Multiword DMA transfer mode active
(This high-order byte contains a single bit set to
indicate which mode is active—see Set
Features command)
63
7–0
Multiword DMA transfer modes supported
(This low-order byte identifies by bit all of the
modes which are supported. For example, if
mode 0 is supported, bit 0 is set to 1.)
64–127
—
ATA reserved (should be zero)
128–159 —
Seagate reserved
160–255 —
ATA reserved (should be zero)
46
ATA Interface Reference Manual, Rev. C
5.4.4 Initialize Drive Parameters command
This command (command code 91H) sets the number of sectors per track
and the number of heads, minus 1, per cylinder for the translation mode
the host would like to use. Upon receipt of the command, the drive sets
BSY, saves the parameters, clears BSY, and generates an interrupt.
The only two register values used by this command are the Sector Count
register which specifies the number of sectors per track, and the
Drive/Head register which specifies the number of heads minus 1.
The sector count and head values are not checked for validity by this
command. If they are invalid, no error is posted until the host attempts a
data access command. All data access commands are rejected with an
error until a valid translation mode is established.
5.4.5 NOP command
This command (command code 00H) enables a host that can only
perform 16-bit register accesses to check drive status. The drive will
respond as it does to an unrecognized command by setting Abort in the
Error register, setting Error in the Status register, clearing Busy in the
Status register, and asserting INTRQ.
When a 16-bit host writes to the Drive Head register, one byte contains
the Command register, so the drive sees a new command when the
intended purpose is only to select a drive. Both drives may be busy but
not necessarily ready (for example, the master drive may be ready, but
the slave may not). To check this possibility, an 8-bit host uses the
following procedure:
1. Read the Status register (wait until Busy False)
2. Select the drive (write to the Drive Head register)
3. Read the Status register (wait until Busy False and Ready True)
4. Send the command (write to the Command register).
Since a 16-bit host executes steps 2 and 4 simultaneously, a problem
occurs if the drive being selected is not ready at the time the command
is issued.
ATA Interface Reference Manual, Rev. C
47
5.4.6 Read Buffer command
The Read Buffer command (command code E4H) enables the host to
read the current contents of the drive’s sector buffer.
The Read Buffer and Write Buffer commands must be synchronized so
that sequential Write Buffer and Read Buffer commands access the
same 512 bytes within the buffer.
A Read Buffer command that is not immediately preceded by a Write
Buffer command gives unpredictable data.
5.4.7 Read DMA command
This command (command codes C8H and C9H) executes in a similar
manner to the Read Sectors command except for the following:
• The host initializes a slave-DMA channel prior to issuing the command.
• Data transfers are qualified by DMARQ and are performed by the
slave-DMA channel.
• The drive issues only one interrupt per command to indicate that data
transfer has terminated and status is available.
Any unrecoverable error encountered during execution of a Read DMA
command results in the termination of data transfer at the sector where
the error was detected. The sector in error is not transferred. The drive
generates an interrupt to indicate that data transfer has terminated and
status is available.
The error posting is the same as that of the Read Sectors command. If
the no-retry command code (C9H) is issued, some or all of the error
recovery procedures normally used with this command may be skipped.
5.4.8 Read Long command
The Read Long command (command codes 22H and 23H) performs
similarly to the Read Sectors command except that it returns the data
and the ECC bytes contained in the data field of the desired sector. After
transferring a single block of 512 bytes, the drive transfers the ECC bytes
one byte at a time.
During a Read Long command, the drive does not check the ECC bytes
to determine if there has been a data error. If the no-retry command code
(23H) is issued, some or all of the error recovery procedures normally
used with this command may be skipped. Only single-sector read-long
48
ATA Interface Reference Manual, Rev. C
operations are supported. See also the Identify Drive and Set Features
commands.
5.4.9 Read Multiple command
This command (command code C4H) is similar to the Read Sectors
command. Interrupts are not generated on every sector, but on the
transfer of a block which contains the number of sectors defined by a Set
Multiple Mode command.
The number of sectors per block to be transferred without intervening
interrupts is programmed by the Set Multiple Mode command, which
must be executed prior to the Read Multiple command. Interrupts are
generated when DRQ is set to 1 at the beginning of each block or partial
block.
When the Read Multiple command is issued, the Sector Count register
contains the number of sectors (not the number of blocks or the block
count) requested.
If the number of requested sectors is not evenly divisible by the block
count, as many full blocks as possible are transferred, followed by a final,
partial block transfer. The partial block transfer is for n sectors, where
n = Remainder (sector count / block count)
If the Read Multiple command is attempted before the Set Multiple Mode
command has been executed or when Read Multiple commands are
disabled, the Read Multiple operation is rejected with an Aborted Command error.
Disc errors encountered during Read Multiple commands are posted at
the beginning of the block or partial block transfer, but DRQ is still set
and the data transfer takes place as it normally would, including transfer
of corrupted data, if any.
The contents of the Command Block registers following the transfer of a
data block which had a sector in error are undefined. The host should
retry the transfer as individual requests to obtain valid error information.
Subsequent blocks or partial blocks are transferred only if the error was
a correctable data error. All other errors cause the command to stop after
transfer of the block which contained the error.
ATA Interface Reference Manual, Rev. C
49
5.4.10 Read Sectors command
This command (command codes 20H and 21H) reads from 1 to 256
sectors as specified in the Sector Count register (a sector count of 0
requests 256 sectors), beginning at the specified sector.
If the drive is not already on the desired track, an implied seek is
performed. Once on the desired track, the drive searches for the requested sector. If the requested sector cannot be found, an ID Not Found
or Address Mark Not Found error is posted.
DRQ is always set prior to data transfer regardless of the presence or
absence of an error condition. At command completion, the Command
Block registers contain the cylinder, head and sector number of the last
sector read.
If a data error occurs, the read terminates at the sector where the error
occurred. For example, if a READ command of twenty sectors encounters an uncorrectable data error in sector eight, then after reading sector
eight, the flawed data would be stored in the sector buffer and the
command would terminate. The Command Block registers would contain
the cylinder, head and sector number of the sector where the error
occurred. If the no-retry command code (21H) is issued, some or all of
the error recovery procedures normally used with this command may be
skipped.
5.4.11 Read Verify Sectors command
This command (command codes 40H and 41H) is identical to the Read
Sectors command, except that DRQ is never set, and no data is transferred to the host.
When the requested sectors have been verified, the drive clears BSY
and generates an interrupt. Upon command completion, the Command
Block registers contain the cylinder, head, and sector number of the last
sector verified.
If an error occurs, the verify ends at the sector where the error occurs.
The Command Block registers contain the cylinder, head and sector
number of the sector where the error occurred. The Sector Count register
contains the number of sectors not yet verified. If the no-retry command
code (41H) is issued, some or all of the error recovery procedures
normally used with this command may be skipped.
50
ATA Interface Reference Manual, Rev. C
5.4.12 Recalibrate command
This command (command code 1xH, where x can by any value from 0H
to FH) moves the read/write heads from anywhere on the disc to cylinder
0. Upon receipt of the command, the drive sets BSY and issues a seek
to cylinder zero. The drive then waits for the seek to complete before
updating status, clearing BSY and generating an interrupt.
If the drive cannot reach cylinder 0, a Track Not Found error is posted.
Drives with Power Management facilities that are in a low power state
when this command is received may signal completion of this command
without leaving the low power state.
5.4.13 Seek command
This command (command code 7xH, where x can by any value from 0H
to FH) initiates a seek to the track and selects the head specified in the
command block. The drive will not set DSC=1 until the action of seeking
has completed. The drive may return the interrupt before the seek is
completed. If another command is issued to the drive while a seek is
being executed, the drive sets BSY=1, waits for the seek to complete,
and then begins execution of the command.
Drives with Power Management facilities that are in a low power state
when this command is received may signal completion of this command
without leaving the low power state.
5.4.14 Set Features command
This command (command code EFH) is used by the host to establish the
following parameters which affect the execution of certain drive features,
which may or may not be supported by a particular Seagate drive (see
your drive product manual to determine which Set Features codes are
supported by a particular drive). If the value in the Features register is
not supported or is invalid, the drive posts an Aborted Command error.
Byte Description
01H
Enable 8-bit data transfers
02H
Enable write cache (see product manual for default settings)
03H
Set DMA transfer mode based on value in Sector Count register
33H
Disable retry
ATA Interface Reference Manual, Rev. C
51
Byte Description
44H
Use maximum length of ECC (> 4 bytes) on read long/write long
commands (the maximum ECC length varies among drives).
54H
Set cache segments to Sector Count register value
55H
Disable read look-ahead feature
66H
Use current settings as default (until hard reset or power off)
77H
Disable ECC
81H
Disable 8-bit data transfers (factory default)
82H
Disable write cache (see product manual for default settings)
88H
Enable ECC (factory default)
99H
Enable retries (factory default)
AAH Enable read look-ahead feature (factory default)
ABH Set maximum prefetch using value in Sector Count register
(see product manual for default settings)
BBH 4 bytes of ECC apply on read long/write long commands
(factory default)
CCH Enable reverting to power-on defaults (see product manual for
default settings)
At power-on, or after a hard reset, the feature selections are restored to
the factory default values. If 66H has been set, a software reset will not
change the feature selections (this can be canceled by setting CCH). If
66H has not been set, a soft reset will return the settings to the factory
defaults.
A host can choose the DMA transfer mechanism using Set DMA Transfer
mode and by specifying a value in the Sector Count register. The upper
5 bits define the type of DMA transfer and the low order 3 bits encode
the mode value.
Transfer mechanism
Upper 5 bits
Lower 3 bits
Block transfer (default)
00000
000
Single word DMA mode x
(only valid if DMA supported)
00010
0xx
Multiword DMA mode 0
(only valid if DMA supported)
00100
000
52
ATA Interface Reference Manual, Rev. C
5.4.15 Set Multiple Mode command
This command (command code C6H) enables the drive to perform Read
and Write Multiple operations and establishes the block count for these
commands.
The Sector Count register is loaded with the number of sectors per block.
Drives normally support block sizes of 2, 4, 8, and 16 sectors. However,
other block size values may also be supported, depending on the size of
the drive’s buffer. Upon receipt of the Set Multiple Mode command, the
drive sets BSY=1 and checks the Sector Count register.
If the Sector Count register contains a valid value and the block count is
supported, the value is loaded for all subsequent Read Multiple and Write
Multiple commands and execution of those commands is enabled. If a
block count is not supported, an Aborted Command error is posted, and
Read Multiple and Write Multiple commands are disabled.
If the Sector Count register contains 0 when the command is issued,
Read and Write Multiple commands are disabled.
This command is not required prior to every Read Multiple or Write
Multiple command.
At power on, or after a hardware reset, the default mode is Read and
Write Multiple disabled. If Disable Default has been set in the Features
register, then the mode remains the same as that last established prior
to a software reset, otherwise it reverts to the default of disabled.
5.4.16 Write Buffer command
This command (command code E8H) allows the host to overwrite the
contents of the drive’s sector buffer with any data pattern desired.
The Read Buffer and Write Buffer commands are synchronized within
the drive such that sequential Write Buffer and Read Buffer commands
access the same 512 bytes within the buffer.
5.4.17 Write DMA command
This command (command codes CAH and CBH) executes in a similar
manner to Write Sectors except for the following:
• The host initializes a slave-DMA channel prior to issuing the command.
• Data transfers are qualified by DMARQ and are performed by the
slave-DMA channel.
ATA Interface Reference Manual, Rev. C
53
• The drive issues only one interrupt per command to indicate that data
transfer has ended and drive status is available.
Any error encountered during Write DMA execution results in the termination of data transfer. The drive issues an interrupt to indicate that data
transfer has terminated and status is available in the Error register. The
error posting is the same as that of the Write Sectors command. If the
no-retry command code (CBH) is issued, some or all of the error recovery
procedures normally used with this command may be skipped.
5.4.18 Write Long command
This command (command codes 32H and 33H) is similar to the Write
Sectors command except that it writes the data and the ECC bytes
directly from the sector buffer; the drive does not generate the ECC bytes
itself. Only single sector Write Long operations are supported.
After transferring a single block of 512-bytes, the drive transfers the ECC
bytes one byte at a time. If the no-retry command code (33H) is issued,
some or all of the error recovery procedures normally used with this
command may be skipped.
Also see the Identify Drive and Set Features commands.
5.4.19 Write Multiple command
This command (command code C5H) is similar to the Write Sectors
command. Interrupts are not presented on each sector but on the transfer
of a block which contains the number of sectors defined by Set Multiple
Mode command.
The number of sectors per block to be transferred without intervening
interrupts is programmed by the Set Multiple Mode command, which
must be executed prior to the Write Multiple command.
When the Write Multiple command is issued, the Sector Count register
contains the number of sectors (not the number of blocks or the block
count) requested.
If the number of requested sectors is not evenly divisible by the block
count, as many full blocks as possible are transferred, followed by a final,
partial block transfer. The partial block transfer is for n sectors, where
n = remainder (sector count / block count)
If the Write Multiple command is attempted before the Set Multiple Mode
command has been executed or when Write Multiple commands are
54
ATA Interface Reference Manual, Rev. C
disabled, the Write Multiple operation is rejected with an aborted command error.
Disc errors encountered during Write Multiple commands are posted
after the attempted disc write of the block or partial block transferred. The
Write command ends with the sector in error, even if it was in the middle
of a block. Subsequent blocks are not transferred in the event of an error.
Interrupts are generated when DRQ is set to 1 at the beginning of each
block or partial block.
The contents of the Command Block registers following the transfer of a
data block which had a sector in error are undefined. The host should
retry the transfer as individual requests to obtain valid error information.
5.4.20 Write Same command
This command (command code E9H) executes in a similar manner to
Write Sectors except that only one sector of data is transferred. The
contents of the sector are written to the drive one or more times.
If the Features register is 22H, the drive writes that part of the sectors
specified by the sector count, sector number, cylinder and drive/head
registers. If the Features register contains DDH, the drive writes all the
user-accessible sectors. If the register contains a value other than 22H
or DDH, the command is rejected with an aborted command error.
The drive issues an interrupt to indicate that the command is complete.
Any error encountered during execution results in the termination of the
write operation. Status is available in the Error register if an error occurs.
The error posting is the same as that of the Write Sectors command.
5.4.21 Write Sectors command
This command (command codes 30H and 31H) writes from 1 to 256
sectors as specified in the Sector Count register (a sector count of 0
requests 256 sectors), beginning at the specified sector.
If the drive is not already on the desired track, an implied seek is
performed. Once on the desired track, the drive searches for the appropriate ID field.
If the requested sector cannot be found, an ID Not Found or Address Not
Found error is posted.
If the sector is found without error, the data loaded in the buffer is written
to the data field of the sector.
ATA Interface Reference Manual, Rev. C
55
Upon command completion, the Command Block registers contain the
cylinder, head, and sector number of the last sector written.
If an error occurs during a write of more than one sector, writing
terminates at the sector where the error occurs. The Command Block
registers contain the cylinder, head, and sector number of the sector
where the error occurred. If the no-retry command code (31H) is issued,
some or all of the error recovery procedures normally used with this
command may be skipped.
5.4.22 Write Verify
This command (command code 3CH) is similar to the Write Sectors
command, except that each sector is verified immediately after being
written. The verify operation is a read without transfer and a check for
data errors. Any errors encountered during the verify operation are
posted. Multiple sector Write Verify commands write all the requested
sectors and then verify all the requested sectors before generating the
final interrupt.
5.5 ATA standard power management commands
The ATA standard command set includes five commands that allow
power management for low-power systems. Power management has
been used primarily in 2.5-inch and smaller drives. However, selected
Seagate 3.5-inch drives support some or all of the power management
commands listed here. These commands switch the drive between four
primary modes of operation, Active mode, Idle mode, Standby mode, and
Sleep mode, as shown in Figure 9.
Active mode. The drive is in Active mode during the read/write and seek
operations.
Idle mode. At power-on, the drive sets the idle timer to enter Idle mode
after five seconds of inactivity. In some cases, the idle timer delay can
be set using the system setup utility. In Idle mode, the spindle remains
up to speed. The heads are parked over the landing zone, away from the
data, for maximum data safety. The buffer remains enabled, and the drive
accepts all commands and returns to Active mode any time disc access
is necessary.
Standby mode. The drive enters Standby mode when a Standby Immediate command has been received from the host. The drive can also enter
Standby mode after a specifiable length of time has elapsed with the
drive in Idle mode. The standby timer delay is system dependent, and is
usually established by the user with a system utility such as Setup. In
56
ATA Interface Reference Manual, Rev. C
Standby mode, the buffer remains enabled, the heads are parked and
the spindle is at rest. The drive accepts all commands, and returns to
Active mode any time disc access is necessary.
Sleep mode. The drive enters Sleep mode when a Sleep Immediate
command has been received from the host. The heads are parked and
the spindle is at rest. The drive leaves Sleep mode when a Hard Reset
or Soft Reset command is sent from the host. After a soft reset has been
received, the drive exits Sleep mode with all current emulation and
translation parameters intact.
Default time delays for both the idle timer and the standby timer are set
by the drive at power-on. In some systems, these delays can be set
manually using the system setup utility. Each time the drive performs an
Active function (read, write or seek), the idle timer is reinitialized, and
begins the countdown from the specified delay time to zero. If the idle
timer reaches zero before any drive activity is required, the drive makes
a transition to Idle mode. After making the transition to Idle mode, the
drive begins the standby timer countdown. If the standby timer reaches
zero before any drive activity is required, the drive makes a transition to
Standby mode. In both Idle and Standby mode, the drive accepts all
commands, and returns to Active mode when disc access is necessary.
In general, after the host issues a command, the drive shifts to the power
management mode that uses the minimum amount of power required to
complete that command (for example, the drive does not start up the
spindle when reading from the cache).
For maximum compatibility, there are multiple command codes for some
power management commands. In such instances, both command
codes perform in an equivalent manner and are treated identically by the
drive.
5.5.1 Check Power Mode command
This command (command codes 98H and E5H) checks the power mode.
If the drive is in, going to, or recovering from the Standby mode, the drive
sets BSY to 1, sets the Sector Count register to 00H, clears BSY, and
then generates an interrupt. If the drive is in the Idle mode, it sets BSY
to 1, sets the Sector Count register to FFH, clears BSY, and generates
an interrupt.
5.5.2 Idle command
This command (command codes 97H and E3H) causes the drive to set
BSY, enter the Idle mode, clear BSY, and generate an interrupt. The
ATA Interface Reference Manual, Rev. C
57
Set Standby
Timer Value
Set Idle
Timer Value
Start Idle and
Standby Timers
97H /E3H
Soft Reset
Sect Cnt = FF
Set Idle
Timer Value
96H /E2H
Set Standby
Timer Value
FAH
STANDBY
Mode
96H /E2H
FDH
98H /E5H
95H /E1H /F8H
94H /E0H or Standby Timer Expired
99H /E6H
Sect Cnt = 00
SLEEP
Mode
Sect Cnt = FF
Figure 9. Power mode transition diagram
FDH
FAH
Soft Reset
94H /E0H or Standby Timer Expired
Disc Access Command or Hard Reset
F9H
FBH
97H /E3H
Hard Reset
96H /E2H
Disc Access Command
Restart
Standby Timer
and Idle Timer
IDLE
Mode
98H /E5H
98H /E5H /FDH
FAH
99H /E6H
Hard Reset or Disc Access Command
F9H
95H /E1H /F8H or Idle Timer Expired
Soft Reset
FBH
97H /E3H
ACTIVE
Mode
99H /E6H
Soft Reset
Sect Cnt = 00
Sect Cnt = FF
58
ATA Interface Reference Manual, Rev. C
interrupt is generated even though the drive may not have completed its
transition to Idle mode.
If the Sector Count register is not zero, then the automatic power-down
sequence is enabled and the timer begins counting down immediately.
The duration of the standby timer depends on the value in the Sector
Count register, which is in units of 5 seconds (for example, 1 = 5 seconds
and 2 = 10 seconds). If the Sector Count register is zero, then the
automatic power-down sequence is disabled.
5.5.3 Idle Immediate command
This command (command codes 95H and E1H) causes the drive to set
BSY to 1, enter the Idle mode, clear BSY, and generate an interrupt. The
interrupt is generated even though the drive may not have completed the
transition to Idle mode.
5.5.4 Sleep command
This command (command codes 99H and E6H) is the only way to cause
the drive to enter Sleep mode. When entering sleep mode, the drive spins
down. After the spindle has stopped, the drive clears BSY, generates an
interrupt, and deactivates the interface. The only way to recover from
Sleep mode is by issuing a software reset or hardware reset.
A drive will not power-on in Sleep mode nor remain in Sleep mode
following a reset sequence.
5.5.5 Standby
This command (command codes 96H and E2H) causes the drive to enter
the Standby mode. The drive may return the interrupt before completing
the transition to Standby mode.
If the Sector Count register is not zero, then the automatic power-down
sequence is enabled and the timer begins counting down when the drive
returns to Idle mode. If the Sector Count register is zero, then the
automatic power-down sequence is disabled.
5.5.6 Standby Immediate
This command (command codes 94H and E0H) causes the drive to enter
the Standby mode. The drive may return the interrupt before completing
the transition to Standby mode.
ATA Interface Reference Manual, Rev. C
59
5.6 Seagate standard power management commands
Many Seagate drives designed for portable or laptop computers implement power management using both ATA-standard and Seagate-specific commands. These commands switch the drive between the four
primary modes of operation as shown in Figure 9.
Note. An alternative set of power management commands were implemented on some earlier Seagate drives, including the ST9051A,
ST9077A, ST351A/X and some versions of the ST3096A and
ST3120A. These are described in Section 5.7.
5.6.1 Active and Set Idle Timer command
This command (command code FBH) causes the drive to enter Active
mode. The time limit for automatic entry to Idle mode is also set by this
command. When the drive receives this command, it asserts Busy in the
Host Status register, initiates entry into Active mode, negates Busy, and
generates an interrupt.
If the drive was in Standby mode, it spins up to enter Active mode. The
drive does not wait for the spinup to be complete before generating the
interrupt. The Sector Count register is interpreted by this command as a
time interval in 100-msec increments to be used for automatic entry into
Idle mode.
The time interval set by this command is the maximum time that the drive
remains in Active mode between future commands received from the
host. A value of zero in the Sector Count register disables the timer used
for automatic entry to Idle mode.
5.6.2 Active Immediate command
When the drive receives this command (command code F9H), BSY is set
to 1 and the drive enters Active mode. If the drive is in Standby mode,
the spinup routine is executed. (If the drive is in either Active mode or
Idle mode, the spindle is already up to speed, and the spinup routine is
skipped.) Then, the drive clears BSY and generates an interrupt. This
interrupt is generated even if the drive is not fully in Active mode.
5.6.3 Check Idle Mode command
This command (command code FDH) checks the current power mode of
the drive. When the drive receives this command, it asserts Busy in the
Host Status register, indicates the current power mode in the Sector
Count register, negates Busy and generates an interrupt.
60
ATA Interface Reference Manual, Rev. C
A value of 0 in the Sector Count register means the drive is currently in,
or entering, Idle mode. A value of FFH in the Sector Count register
indicates that the drive is currently in, or entering, either Active mode or
Standby mode.
5.6.4 Idle Immediate command
This command (command code F8H) operates identically to the
ATA-standard Idle Immediate command, but has a different command
code.
5.6.5 Idle and Set Idle Timer command
This command (command code FAH) causes the drive to enter Idle mode
and sets the time limit for automatic entry to Idle mode. When the drive
receives this command, it asserts Busy in the Host Status register,
initiates entry into Idle mode, negates Busy, and generates an interrupt.
If the drive was already in Standby mode, the drive spins up to enter Idle
mode. The drive does not wait for the spinup to be complete before
generating the interrupt.
The Sector Count register is interpreted by this command as a time
interval in 100-msec increments to be used for automatic entry into Idle
mode. The time interval set by this command is the maximum time that
the drive remains in Active mode between future commands received
from the host. A value of zero in the Sector Count register disables the
timer used for automatic entry to Idle mode.
5.7 Seagate alternative power management commands
An alternative set of power management commands were implemented
on some earlier Seagate drives. These commands are described below
and their operation is summarized in Figure 10. These alternative power
management commands are specific to the following Seagate drives:
Drive model
Part number
ST9051A, ST9077A
All
ST351A/X
All
ST3120A
911003-0xx
ST3096A
911008-0xx
ATA Interface Reference Manual, Rev. C
61
Set Standby
Timer Value
Set Power Save
Timer Value
Start Power Save
and
Standby Timers
E3H
FBH
F8H
Restart
Standby Timer
and
Power Save Timer
Hard Reset
Disc Access Command
E1H /F9H
FBH
E3H
Hard Reset
E2H
E0H or Standby Timer Expired
Disc Access command
E5H /FDH
FAH
E6H
Hard Reset
Disc Access Command
FBH
E3H
E1H /F9H
F8 or Power Save Timer Expired
ACTIVE
Mode
Sect Cnt = FF
IDLE
(Power-save)
Mode
FAH
Set Power Save
Timer Value
E2H
Set Standby
Timer Value
E2H
Set Power Save
Timer Value
FAH
STANDBY
Mode
E6H
Sect Cnt = 00
FDH
E5H
FDH
E5H
E0H or Standby Timer Expired
E6H
Soft Reset
SLEEP
Mode
Sect Cnt = FF
Figure 10. Alternate power mode transition diagram
Sect Cnt = 00
Sect Cnt = FF
62
ATA Interface Reference Manual, Rev. C
Note. Power management commands for all other Seagate ATA-interface drives that support power management are described in
Section 5.6.
Power-save mode and the power-save timer are used in regard to the
alternative Seagate power commands. These are functionally equivalent
to Idle Mode and the idle timer, respectively.
5.7.1 Check Idle Mode command
This command (command code FDH) reports whether the drive is currently in or making a transition to Idle mode. When the drive receives this
command, it sets BSY, loads the appropriate information into the Sector
Count register, clears BSY and generates an interrupt. Depending on
what state the drive is in or making a transition to, one of the following
values is sent:
00H = The drive is in, or entering, Idle mode.
FFH = The drive is in, or entering, Active mode or Standby mode.
5.7.2 Check Standby Power Mode command
This command (command code E5H) returns a code for the power mode
the drive is currently in or making a transition to. When the drive receives
this command, it sets BSY, returns a value through the Sector Count
register representing the current mode, clears BSY and generates an
interrupt. The return values are as follows:
00H = The drive is in, or entering, Standby mode.
FFH = The drive is in, or entering, Active mode or Power-Save mode.
5.7.3 Enable/Disable Auto Idle command
This command (command code FAH) enables and disables the Automatic Idle feature of the drive. When the drive receives this command, it sets
BSY, switches to Idle mode and enables or disables the power-save timer
according to the value placed in the Sector Count register. The drive then
clears BSY and generates an interrupt.
If the value in the sector count is zero, the idle timer is disabled. If the
value is nonzero, the drive switches to Idle mode after the specified delay
time has elapsed. The delay time is specified in the Sector Count register
in 100-msec increments. The delay is reset to its initial value whenever
any command requiring a read, write or seek is received.
ATA Interface Reference Manual, Rev. C
63
5.7.4 Enable/Disable Auto Standby command
This command (command code E2H) enables and disables the automatic
standby feature of the drive. When the drive receives this command, it
sets BSY and makes a transition to Standby mode. Depending on the
value placed in the Sector Count register, the drive either enables or
disables the standby timer. The drive then clears BSY and generates an
interrupt.
Placing a zero value in the Sector Count register disables automatic
Standby. Placing a nonzero value in the Sector Count register enables
the standby timer to count down in 5-second increments. For example,
a value of 12 sets the standby timer to sixty seconds (after which time,
the Standby routine is initiated). A value of 13 sets the timer for 65
seconds. The delay timer is reset by the drive whenever a read, write or
seek command is issued. The default power-on condition is that automatic standby is disabled.
5.7.5 Idle Immediate command
This command (command code F8H) causes the drive to enter Idle mode
immediately. When the drive receives this command, it sets BSY, makes
a transition to Idle mode, clears BSY and generates an interrupt. The
drive generates this interrupt when it completes its transition to Idle mode.
If the drive is already in Idle mode, it ignores this command.
5.7.6 Ready and Enable/Disable Auto Idle command
This command (command code FBH) is the functional equivalent of the
Enable/Disable Auto Idle command (command code FAH). However, this
command always forces the drive into the Active state. It then enables
or disables the idle timer based on the value in the Sector Count register.
5.7.7 Ready and Enable/Disable Auto Standby
command
This command (command code E3H) is a functional combination of the
Ready Immediate and the Enable/Disable Auto Standby commands.
Refer to the individual commands for a detailed description.
When the drive receives this command, it sets BSY, enters Active mode,
sets the standby timer if necessary, clears BSY and generates an
interrupt. If the spindle is already up to speed when the command is
received, the spinup sequence is not executed.
64
ATA Interface Reference Manual, Rev. C
5.7.8 Ready Immediate command
When the drive receives this command (command codes E1H and F9H),
it sets BSY and enters Active mode. If the drive is in Standby mode, the
spinup routine is executed. (If the drive is in either Active mode or Idle
mode, the spindle is already up to speed, and the spinup routine is
skipped.) Then, the drive clears BSY and generates an interrupt. This
interrupt is generated even if the drive is not fully in Active mode.
5.7.9 Sleep command
This command (command code E6H) tells the drive to enter Sleep mode
immediately. When the drive receives this command, it sets BSY, enters
Sleep mode, clears BSY and generates an interrupt. After the final
interrupt is generated, all successive interrupts are ignored. When a soft
reset is sent from the host, the drive leaves Sleep mode and makes a
transition to Standby mode. If a hard reset is sent from the host, the drive
returns to Active mode. After a soft reset is received, the drive exits Sleep
mode with all emulation and translation parameters intact.
5.7.10 Standby Immediate command
This command (command code E0H) causes the drive to enter Standby
mode. When the drive receives this command, it asserts Busy in the host
Status register, initiates entry into Standby mode, negates Busy, and
generates an interrupt.
If the drive is in Active mode or Idle mode, it spins down to enter Standby
mode. The drive does not wait to complete the spindown before generating the interrupt.
ATA Interface Reference Manual, Rev. C
65
6.0 ATA Interface timing diagrams
The following symbols are used in the timing specifications for the ATA
interface. The host is responsible for providing cable deskewing for all
signals originating from the controller. The drive provides cable deskewing
for all signals originating from the host.
Within these diagrams, all timing specifications are in nanoseconds
(nsec), unless otherwise specified. Timing parameters designated with
an asterisk (*) represent maximum allowable times. All other parameters
represent minimum times.
or
— signal transition (asserted or negated) *
or
— data transition (asserted or negated)
— the alternate condition if a signal is shown with no change
— a degree of uncertainty as to when a signal is asserted
— a degree of uncertainty as to when a signal is negated
Tx
— Nominal clock period
*Both active high and active low signals are shown with the asserted
condition toward the top of the page and the negated condition toward
the bottom of the page (see diagrams below):
TEST
(Active High)
Bit setting = 1- - - Bit setting = 0- - - -
TEST–
(Active Low)
Bit setting = 0- - - Bit setting = 1- - - -
Assert
Negate
Assert
Negate
Figure 11. Timing diagram signal conventions
66
ATA Interface Reference Manual, Rev. C
Address
Valid *1
DIOR– /DIOW–
Write Data
Valid *2
Read Data
Valid *2
IOCS16–
T5
T7
T3
T1
T6
T4
T9
T2
T8
T0
*1 Drive Address consists of signals CS1FX–, CS3FX–, and DA2–DA0
*2 Data consists of DD0–DD15 (16-bit) or DD0–DD7 (8-bit)
Figure 12. PIO data transfer timing (to and from drive)
Key to PIO timing data (all times in nsec)
Label Parameter
Mode 0 Mode 1 Mode 2
T0
Cycle Time
600
T1
383
240
DIOR–/DIOW– setup address valid 70
50
30
T2
DIOR–/DIOW– pulse width:
125
290
100
290
T3
DIOW– data setup
60
45
30
T4
DIOW– data hold
30
20
15
T5
DIOR– data setup
50
35
20
T6
DIOR– data hold
5
5
5
T7
Addr. valid to IOCS16– assertion
90*
50*
40*
T8
Addr. valid to IOCS16– negation
60*
45*
30*
T9
DOIR–/DIOW– address valid hold
20
15
10
16-bit 165
8-bit 290
Note. All timings indicate minimum times except for those marked with
an asterisk (*), which show maximum allowable times.
ATA Interface Reference Manual, Rev. C
67
DIOR– /DIOW–
IORDY
TA
TB
Figure 13. I/O Ready (IORDY) timing
Key to I/O Ready timing data (all times in nsec)
Label
Parameter
Mode 0
Mode 1
TA
IORDY setup time
—
35
TB
IORDY pulse width
—
1,250
68
ATA Interface Reference Manual, Rev. C
DMARQ
DMACK–
DIOR–/DIOW–
Read
DD0 –DD15
Write
DD0 –DD15
TE
TC
TF
TG
TI
TH
TD
TJ
TO
Figure 14. Single-word DMA transfer timing
Key to single-word DMA timing data (all times in nsec)
Label Parameter
Mode 0 Mode 1 Mode 2
T0
Cycle Time
960
480
240
TC
DMACK to DMREQ delay
200*
100*
80*
TD
DIOR–/DIOW– 16-bit pulse
480
240
120
TE
DIOR– data access
250*
150*
60*
TF
DIOR– data hold
5
5
5
TG
DIOW– data setup
250
100
35
TH
DIOW– data hold
50
30
20
TI
DMACK to DIOR–/DIOW– setup
0
0
0
TJ
DIOR–/DIOW– to DMACK hold
0
0
0
TS
DIOR– setup
TD-TE
TD-TE TD-TE
Note. All timings indicate minimum times except for those marked with
an asterisk (*), which show maximum allowable times.
ATA Interface Reference Manual, Rev. C
69
DMARQ
DMACK–
DIOR–
DIOW–
Read
DD0 –DD15
Write
DD0 –DD15
TG
TH
TJ
TL
TF
TE
TD
TK
TI
TO
Figure 15. Multiword DMA transfer timing
Key to multiword DMA timing data (all times in nsec)
Mode 0
Label Parameter
Min.
Max.
T0
Cycle time
480
—
TC
DMACK to DMREQ delay
—
—
TD
DIOR–/DIOW– 16-bit pulse width
215
—
TE
DIOR– data access
—
150
TF
DIOR– data hold
5
20
TG
DIOW– data setup
100
—
TH
DIOR– data hold
20
—
TI
DMACK to DIOR–/DIOW– setup
0
—
TJ
DIOR–/DIOW– to DMACK hold
20
—
TKr
DIOR– negated pulse width
50
—
TKw
DIOW– negated pulse width
215
—
TLr
DIOR– to DMREQ delay
—
120
TLw
DIOW– to DMREQ delay
—
40
70
ATA Interface Reference Manual, Rev. C
RESET–
Drive 0
BSY
(1)
DASP–
(2)
(3)
Control
Registers
Drive 1
BSY
PDIAG–
(3)
DASP–
Control
Registers
TN
TP
TM
TQ
TR
TS
Notes:
1. Drive 0 can set BSY= 0 if Drive 1 is not present
2. Drive 0 can use DASP– to indicate it is active if Drive 1 is not present
3. DASP– can be asserted to indicate that the drive is active
Figure 16. System power-on and reset timing
Key to power-on and reset timing data
Label
Time
TM
25 µsec
TN
400 nsec*
TP
1 msec*
TQ
30 seconds*
TR
450 msec for master drive*
TR
400 msec for slave drive*
TS
30.5 seconds*
Note. All timings indicate minimum times except for those marked with
an asterisk (*), which show maximum allowable times.
Seagate Technology, Inc.
920 Disc Drive, Scotts Valley, California 95066, USA
Publication Number: 36111-001, Rev. C, Printed in USA