1
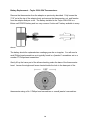
Digital Thermometer & Adaptor for E-61 Groupheads
September 13, 2014
Introduction:
The purpose of this adaptor and digital thermometer is to facilitate the measurement of
brew water temperature about 1.25" (3.2 cm) away from the puck during a brew cycle.
In addition, and EQUALLY IMPORTANT, it measures the temperature of the grouphead
at the indicated location under idle conditions. It requires no drilling, tapping, soldering,
brazing, cutting, teflon tape, or epoxy but is ONLY capable of fitment to E61 groupheads that are fully exposed. The difference between the temperature that you will be
measuring using this adaptor and the measured temperature of water reaching the
puck is approximately 3-5 degrees F but may vary with different machines and different
brew conditions and certainly varies over the course of the typical 23-27 second shot.
Indicated temperatures will be higher than those presented to the puck when using the
flush-n-wait technique whereas indicated temperatures will be lower than those
presented to the puck when using the flush-n-go technique - http://www.homebarista.com/forums/need-hints-on-using-e61-thermocouple-adapter-t5125.html .
There have been several successful adventures in measuring brew water temperature
in espresso machines. The best example would be the Scace Thermofilter. It is a wellengineered device, designed to measure brew temperature during an accurately
simulated double-shot (45-60 ml) brewing process. Instructions for the use of this
device and a professional review of it can be found here:
http://www.home-barista.com/forums/viewtopic.php?t=453
1
Background:
This adaptor is identical to the original thermocouple adaptor except that the “boredthrough” size of the fitting is 1/8” (0.125”) vice the original adaptor which had a boredthrough size of 1/16” (0.0625”) and the overall length is increased by about 3/16”. In
addition, the width of the 7/16” (~11 mm) hex on the main body is shortened to enable
installation in all machines without adding any additional copper washers as spacers.
The advantage to this device is that it is a complete solution to the task of measuring
temperature whereas the original thermocouple adaptor requires a thermocouple and
appropriate meter.
The disadvantage of this device when compared to the use of a thermocouple in the
original thermocouple adaptor is in accuracy, response time, and temperature readout
resolution (depending on the meter used with the original thermocouple adaptor). My
preference, of course, is the original thermocouple adaptor but sometimes the SO’s in
our lives do not necessarily want the kitchen turned into an espresso laboratory and,
sometimes, we do not want it either. As I write, Anita has a thermometer installed.
Kit Contents:
a. Stainless steel adaptor (Swagelok P/N SS-200-1-0221BT or equal) fitted with
replaceable nylon ferrules and a modified Taylor Model 9840N (°F / °C user
switchable) digital thermometer with soft-touch buttons and auto-shutoff.
b. Two 6 mm copper sealing washers (one for installation, one as spare)
c. Adaptor closure plug (should you want to or need to temporarily remove the
thermometer ONLY)
d. One set of spare nylon ferrules (front and back) for adaptor
e. Original 5” long probe housing with pointed tip which is good for use with the WDT
(only shipped with thermometers sold direct)
2
The digital thermometer kit currently ships with a Taylor Model 9840N thermometer that
is user switchable from degrees F to degrees C. The Taylor 524 thermometer, which
was also user switchable, was temporarily discontinued by the manufacturer.
Installing the Digital Thermometer and Adaptor: (the quick install procedure)
Machine should be at room temperature (or maybe 15 minutes into a warm-up), turned
off, and unplugged. Remove the M6 hex head screw with a 5 mm hex key wrench.
Hex key wrenches come in both long handle and short handle models. Removal is
easier using the long handle model. If this is a Rocket or a recent Fiorenzato machine,
the screw may be a little tight because the supplier(s) of the grouphead to these
manufacturers have chosen to use a little thread sealer/thread locker on the threads of
the hex head screw.
Note the originally fitted copper washer as this needs to be removed. On some
machines, the screw is sealed with a teflon washer which should also be removed.
3
Clean the sealing surface with a Q-tip or equivalent.
Now separate the thermometer and adaptor exactly as shown below.
4
Screw the main body of the adaptor into the “hole” finger tight using a new copper
washer. Make sure that the adaptor is fully seated. Now tighten the adaptor 1/8 of a
turn using the box end of a 7/16” (11mm also works) combination wrench or a small
adjustable wrench.
Insert the thermometer with 7/16” nut and ferrules into the adaptor as a unit.
The thermometer probe is designed to stop at the proper insertion depth. Finger
tighten the 7/16” nut, applying just a little downwards pressure to the thermometer as
you tighten with your fingers.
Now, while keeping the thermometer in the correct orientation, tighten the 7/16” nut with
a wrench 3/4 of a turn and mark the position of the nut with respect to the adaptor body.
You are done. Should there be any questions before or after installation, I am available
at 301-587-5033 or [email protected] up until midnight EST. Phone is always the
preferred communication from my standpoint.
5
Installing the Digital Thermometer and Adaptor: (the long installation process)
When the digital thermometer adaptor is used in a Quickmill machine (Alexia, Andreja,
Anita, or Vetrano) or any other machine that utilizes the “standard” E-61 grouphead
( Isomac, Izzo, Rocket, Vibiemme, etc.), the probe will come already adjusted
(approximately) at the proper depth and the nut will be a heavy finger-tight.
3516, 9841, & 9840N Thermometers
The recommended depth of the probe for these machines is achieved by having the
probe protrude 3/8” (~9.5 mm) beyond the end of the M6 threading on the adaptor.
This depth should be very satisfactory for the majority of all machines equipped with an
E-61 or similar grouphead. As of August 2012, a newly designed probe is fitted to the
thermometers which fixes the protrusion at ~ 3/8”. Depth measurement and/or
adjustment is no longer necessary.
508, 524 Thermometers
The above illustrations show the approximate dimensions for the various thermometers
offered during the past 4 years. It is best to install the adaptor and thermometer in the
machine at room temperature as you will be working in the grouphead area where it is
very easy to get burned.
6
The picture on the left above shows how the thermometer & adaptor should look upon
receipt. Unscrew the 7/16” nut and remove the thermometer, nut, & ferrules as a unit
as shown on the right picture above. Set the thermometer, nut & ferrules aside for the
time being but be careful that the ferrules do not fall off and disappear “forever”.
Remove the existing M6 x 8 mm allen-head capscrew using a 5 mm long-handle allen
wrench. The existing copper or Teflon sealing washer will likely come off semi-attached
to the capscrew. If not, remove it from the machined recess in the grouphead and set
aside as an emergency spare. Clean the recess and the seating surface for the new
copper washer with a water-moistened Q-tip as necessary. A few swipes should do it.
Remove (unscrew) the protective plastic cap from the adaptor’s M6 threads and screw
the adaptor with copper sealing washer into the machine FINGER-TIGHT. It is NOT
NECESSARY and most definitely NOT RECOMMENDED that you use any type of
thread sealant or Teflon tape on the threads of the adaptor. The soft copper washer
will deform and thus conform to any surface irregularities and perform all of the
necessary sealing.
NOTE
THE ADAPTOR SHOULD SCREW IN AS EASILY AS
THE M6 ALLEN HEAD PLUG SCREWED OUT – THE
THREADING IS IDENTICAL. NO PART OF THE 7/16
HEX SHOULD BE TOUCHING ANY PART OF THE
GROUP-HEAD. IF THIS IS NOT THE CASE, STOP ALL
WORK AND GIVE ME A CALL AT 301-587-5033 OR
SEND AN EMAIL TO ME ([email protected]) AS SOON
AS IS PRACTICABLE.
Using a short 7/16" combination wrench (preferable) or 6” Crescent wrench, tighten the
adaptor fitting an additional 1/8 turn or 45 degrees. An 11 mm wrench also works well.
Do not overtighten.
7
Now, install the thermometer, 7/16” nut, and ferrules (all as a unit) into the adaptor and
tighten the 7/16” thermometer nut loosely FINGER-TIGHT. Orient the thermometer
properly and adjust the thermometer’s height depending upon the particular
thermometer being installed. Current production kits require no height adjustment.
Now turn the 7/16” nut 3/4 of a turn (270 degrees) past finger tight, maintaining the
proper orientation of the thermometer itself. Turn the machine on and let it come to
normal brewing temperature. Pull a shot through an empty basket and look for any
leakage in the area of the adaptor fitting. Now put a blind basket in the portafilter and
backflush the machine by cycling the pump on for 10 seconds and off for 10 seconds.
There should be no leakage from the adaptor fitting. If necessary, tighten the 7/16” nut
connection only enough to correct any leakage.
Removing the Digital Thermometer – Adaptor Remains in Machine:
Loosen the 7/16” thermometer nut completely and remove the thermometer, nut, and
ferrules as a unit. In order to operate the machine, it will be necessary to install the
closure plug supplied with the kit.
Install the adaptor closure plug onto the adaptor fitting finger-tight. Note that the
adaptor closure plug seals without the use of any separate ferrules because ferrules
are “built-in” within this closure plug. Using a short 7/16” combination wrench, tighten
the plug only 1/8 turn (45 degrees) past finger tight while applying a counter-hold on the
7/16” hex on the adaptor body. Plug the machine in, turn it on, and let it reach normal
brewing temperature. Pull a shot through an empty basket and look for any leakage in
the area of the adaptor fitting. Now put a blind basket in the portafilter and backflush
the machine by cycling the pump on for 10 seconds and off for 10 seconds. There
should be no leakage from the area where the plug attaches to the adaptor fitting. If
necessary, tighten the plug just enough to stop any leaks while applying a counter-hold
to the adaptor body hex.
8
Reinstallation of the Digital Thermometer:
While is it certainly best to use new ferrules when reinstalling the thermometer, old
ferrules can be reused but the 7/16” thermometer nut is simply snugged up past fingertight and NOT tightened as per the instructions for new ferrules. The nut goes on first,
then the back ferrule (NOTE THE ORIENTATION as shown in the first illustration of this
document), and finally the front ferrule. Install the thermometer such that the distance
between the top of the 7/16” nut and the bottom of the plastic thermometer housing is
approximately 1/4” – use a ¼” drill bit or a ¼” wide piece of cardboard to attain this
dimension. Turn the nut finger tight and then 3/4 of a turn (new ferrules only).
Operation of the Espresso Machine with the Digital Thermometer:
An E-61 espresso machine having a heat exchanger (hx) can be operated in numerous
ways. I will attempt to explain two methods that certainly achieve the same results but
differ by 180 degrees (NOT temperature degrees) in their methodology. The first
method I have termed “flush-n-wait”, the second method is termed “flush-n-go”. In the
flush-n-wait method, you are flushing a sufficient quantity of water through the
grouphead to cool it down a few degrees BELOW desired brew temperature. Using the
flush-n-go method, you are flushing a sufficient quantity of water through the heat
exchanger to cool its volume of water well BELOW desired brew temperature but the
grouphead will remain ABOVE desired brew temperature. The “wait” method requires
an additional 2 to 3 ounces of flushing water than the “go” method but the actual
quantities and the approximate differential will depend greatly on the pressurestat
(pstat) setting and the design characteristics of your particular machine.
220
215
E-61 Temperature Behavior Tests
Pstat Set @ 1.25 Bar
Idle GH = 214.6 F
Temperature, Degrees F
210
Shot Start - 198 F
Grouphead Temp
205
200
195
190
Grouphead
Thermofilter
185
AdaptorFlush01.xls
180
-5
5
15
25
35
45
55
65
75
85
95
Time, Seconds
9
105
115
125
135
145
155
165
175
Everybody has a different pressurestat (pstat) setting – sometimes whether you like it or
not. It is not unusual for gages to be off by around 8% and just the variation in altitude
between two users can result in a boiler absolute pressure difference of 0.2 bar.
I currently have my pressurestat set to a maximum reading of 1.20 bar (light probably
goes out at ~1.15 bar) as this appears to provide a reasonable balance between the
amount of flushing, the machine recovery after a shot, and steaming power.
a. Ensure that the machine has been idle for at least 30 minutes or if starting from a
cold machine, 60 minutes.
b. Flush the machine until the thermometer reads 185 F +/- 1 degree.
Note that the modified Taylor 524 thermometer is equipped with a small green LED that
will light up at ~ 205 F (96.1 C). This has no significance. The chart on the previous
page is from an Anita that has a vibratory pump and the temperatures are being
measured with a thermocouple. If your machine is equipped with a rotary pump, the
time to attain 185 F on your display will surely be less as your flushing flow rate is
slightly more than that of the vibratory pump and your source water temperature is
lower. As you are pumping away here, the digital thermometer in the adaptor is reading
the temperature of the water flowing past. Very soon after you stop pumping (flushing),
the thermometer starts reading A TEMPERATURE that is fairly representative of
grouphead temperature. As seen in the chart on Page 6, it, very rapidly, bounces up to
about 197 F.
197.5
Magnified Thermosyphon Action
Pstat @ 1.25 Bar
Showing Thermosyphon Reversal
Temperature, Degrees F
197.0
196.5
196.0
Grouphead Temperature, Degrees F
195.5
60
70
80
90
100
110
120
Time, Seconds
However, since the water in the heat exchanger is now about 50 degrees or so below
where it was when you started the flush, a REVERSE THERMOSYPHON ACTION is
10
started and heat is being drawn OUT of the grouphead. The grouphead temperature
starts to head DOWN. Above I have a graph that is a magnified version of the 70 to
110 second interval – the scale is changed to magnify the dip. At about the 83-second
225
Shot Sequence "Magnified" from Flush &
Wait Chart
220
215
Temperature, Degrees F
210
205
200
195
190
Grouphead
185
Thermofilter-1st Shot
180
175
145
Thermofilter-2nd Shot
150
155
160
165
170
Time, Seconds
point, thermosyphon action reverts to NORMAL and the grouphead temperature starts
to climb upwards. If you did NOTHING for the next 20 minutes or so, the grouphead
temperature would be right back wherever you started – in my case 214.6 F. Now,
there is an awful lot more to a “perfect shot” than just “good” temperature management
but I am simply illustrating how the digital thermometer adaptor (or thermocouple
adaptor) can help.
d. Nothing in the foregoing should necessarily cause you to make changes to your
machine as each machine is different although certainly the temperature RESPONSE
TIMES of the Quickmill Anita, Andreja, and Vetrano would be very similar. However, all
three would be different than, say, a Fiorenzato Bricoletta or Vibiemme Domobar.
e. If you perform this little test a couple of times each day for a couple of days, you can
get a pretty good idea of how your machine operates, i.e., how long it takes for the
grouphead to recover from what seems like over flushing.
f. A good idea would be to flush into the cup you plan on using for the coffee – most
definitely this will heat the cup up. Be sure to wipe it dry prior to pulling the shot into it.
g. When the group hits 197 F +/- 1 (on the way up), start the shot and you SHOULD
average very close to 200 F +/- 1 brew temperature with a 1.0 degree variance during
the typical 23-27 second shot.
11
175
Operation of Espresso Machines which require little or no flushing:
There are two (at least for now) double-boiler E-61 machines and three heat exchanger
(hx) machines which require very little flushing. The double boiler machines are the
Alex Duetto and the Vibiemme Double Domobar; the hx machines are the Vibiemme
Domobar Super, and the entire line of Rocket Espresso machines. These two hx
machines are fitted with thermosyphon restrictors (2.80 to 3.00 mm) in the upper tubing
leading from the hx outlet to the group. These restrictors serve two purposes: one is to
slow the thermosyphon flow during normal machine idle conditions and the other is to
redistribute the portions of high temperature water admitted to the E-61 group during a
brew cycle.
The graph below shows temperature recorded when pulling a “shot” at a grouphead
temperature of 198 F as the machine was warming up. The pstat range was 0.72-0.98.
The next graph shows temperature recorded when pulling a “shot” after following the
owners flush procedure. Every effort was made to duplicate it, step-by-step, to ensure
an accurate simulation. As strange as it may sound, this is actually a difficult process
because one needs to make sure you are treating the temperature recording sensor
exactly as a real portafilter. Again, the pstat setting was unchanged at 0.72 bar
minimum to 0.98 bar maximum.
The last graph shows a flush procedure developed for this machine at this particular
pstat setting. It essentially duplicates the results of the first graph with the same pstat
settings.
12
Digital Thermometer Maintenance:
The battery installed in the Taylor 3516 (and spare) is a model number G10-A or G13-A
and is an alkaline battery. The EXACT “Energizer” replacement for the G10-A has
model number 189. Radio Shack, Energizer, Duracell, and others have a model
389/390 that is a BETTER equivalent battery in that the cell composition is silver oxide
vice alkaline.
All digital thermometers sold after around July 1, 2008 most likely have a G-13A battery
13
and the EXACT “Energizer” replacement for the G13-A has model number A76. The
battery installed in the Taylor 9840N and 9841 is model number G13-A and is an
alkaline battery. Radio Shack, Energizer, Duracell, and others also have a MODEL 357
that is a BETTER equivalent battery in that it too is silver oxide vice alkaline.
The battery in the digital thermometer is designed to operate continuously for one year
and I typically leave mine on for days at a time. However, if I knew I was not going to
be using the espresso machine for a few days (travel, sickness, etc., etc.), it would be a
reasonable practice to turn the thermometer off. Nominal battery voltage is 1.50 to 1.55
volts. A more inclusive battery replacement chart is shown just prior to the Enhanced
Kits section at the top of page 14.
The latest thermometer, the Taylor 9840N is equipped with soft-touch buttons for the
on/off function and degrees C/F switching. It also incorporates an auto shut-off feature.
Inside the Taylor 3516 (9840N, 9841 very similar)
Battery Replacement – Taylor 3516, 9840N, 9841:
Remove the thermometer, nut, and ferrules (as a unit) from the
adaptor as previously described. The case can be opened with a small coin or
flat washer – I use my thumbnail. In older thermometers, the battery is kept “captive” by
two small housing tabs but only one housing tab needs to be bent upwards for battery
removal. Carefully straighten this tab while exerting light thumb pressure on the battery
housing center. Push the battery from its slot with a small screwdriver or equivalent.
Note that the positive terminal (+) of the small button cell battery faces upwards.
14
With newer thermometers, the battery is held in place by frictional contact with an upper
tab – no bending is necessary.
The contact tab near the center of the housing should be at about a 20 degree angle
before the replacement battery is installed. This will ensure good contact on both
terminal faces.
The above illustration details the parts of the battery housing. The following illustration
details the approximate routing of the thermistor wiring necessary before the
thermometer halves can be snapped together.
Thermometer Disassembly:
When you open the case as if you were going to replace the battery, you will see two or
three VERY SMALL screws that fix the circuit board to the upper case. Although these
screws have a small philips head, it is best to remove them with a small flat blade
jeweler’s screwdriver, preferably magnetized. After removal of these screws, the circuit
board will lift out exposing the backside of the display and the switch assembly.
The switch contacts and circuit board contact area can be cleaned with one or two
swipes of a clean pencil eraser or contact cleaner.
15
Battery Replacement – Taylor 508 & 524 Thermometers:
Remove the thermometer from the adaptor as previously described. Fully loosen the
7/16” nut at the top of the adaptor body and remove the thermometer, nut, and ferrules
from the adaptor body as a unit. The battery installed in the Taylor 508 & 524 is a
lithium cell CR2032 battery and is a very common “button-cell” battery available in many
stores.
The battery should be replaced when readings grow dim or irregular. You will need a
small Philips head screwdriver as is typically found in a “jeweler’s” screwdriver set or a
number “0” Philips head screwdriver.
Gently lift up the lower part of the silicone backing under the base of the thermometer
head. Loosen the single small screw located inside the hole in the base part of the
thermometer using a No. 0 Philips head screwdriver or a small jeweler’s screwdriver.
16
Battery Replacement – Taylor 9840N shipped during 2011 & later:
Remove the thermometer, nut, and ferrules (as a unit) from the
adaptor as previously described.
These batteries are held captive simply by the spring tension of the center tab and an
additional tab pressing on the battery top near the outer edge. It is NOT NECESSARY
to bend any tabs; simply use a small screwdriver to push the battery out towards the
inside of the case.
The recommended battery replacement is an Energizer Model 357.
17
Enhanced Kits:
The primary purpose of the adaptor is to allow the use of the modified digital
thermometer to assist in making your espresso better and more consistent. However,
once the adaptor is installed, there are very inexpensive options available that would
greatly enhance the utility of the adaptor. These enhanced kits are priced separately as
shown in the Pricing_Inventory_Ordering pdf document, which is available here:
http://users.rcn.com/erics/
The pressure gage adaptor can be used with ANY pressure gage having a 1/4”-18 male
NPT connection but it would be highly advisable that the gage be “liquid filled” so as to
dampen gage needle vibrations. It will indicate the pressure presented to the coffee
during an actual brew cycle or the preinfusion pressure when the machine is equipped
with a rotary pump that is directly connected to the supply main. A recommended gage
would be this one: http://www.gaugestore.com/prodinfo.asp?number=38305 or this
one: http://www.gaugestore.com/prodinfo.asp?number=38673 . Either of these is
inherently much more accurate than the gage installed in our espresso machines.
18
Installation of the Enhanced Pressure Measuring Kit:
Note the approximate distance between the bottom of the thermometer and the top of
the 7/16” nut on the adaptor. This should be 3/16” to 1/4” for the 3516, 9840, and 9841
thermometers and approximately 7/16” for the 508 and 524 thermometers. Remove the
thermometer, nut, and ferrules as a unit as previously described.
The pressure gage will already be installed into the tube adaptor which has had
stainless steel ferrules permanently pre-swaged on its 1/8” shaft. The picture below
shows the gage assembly along with a spare adaptor. Your adaptor will remain in the
machine. Simply insert the gage assembly into the thermometer adaptor, tighten the
7/16” nut with your fingers and then snug it up with a 7/16” wrench – maybe 1/8 of a
turn max.
Test the pressure tightness of all connections by inserting a blind basket and “brew
away”. Compare the reading on your newly installed gage with the brew pressure gage
installed in your machine. The gages should read the same but invariably they will not
due to inaccuracies with the machine’s gage. Assuming we are leak-free, brew your
normal shot of espresso and observe the pressure on the gage. Adjust the OPV such
that brew pressure is approximately 9.0 bar or a little less, i.e. 8.75 bar.
19
Checking the Accuracy of the Thermometer:
This is something you would NOT NORMALLY do, but it does prescribe the procedure I
utilize. The digital thermometer included in each kit is not capable of being calibrated
but it is easy to check its accuracy and speed of response by suspending the tip into
the steam portion of a covered pot of boiling water or a thermos jug/jug cap filled with a
distilled water / ice slurpy mixture.
Note your current altitude, e.g., Silver Spring, Maryland is about 300 feet above sea
level; Denver, Colorado is slightly more. Note your current barometric pressure e.g.
29.92” Hg, 28.96” Hg, 29.54” Hg, etc. You can use this website to determine water’s
boiling point: http://www.csgnetwork.com/h2oboilcalc.html
For example, the current barometric pressure in Silver Spring, MD is 29.99” Hg,
referenced to sea level. If I were at sea level, the boiling point of water would be
212.12 degrees F. However, because Silver Spring, Maryland averages about 300 feet
above sea level, the boiling point of water at the current barometric pressure is 211.60
degrees F. Suspend the probe end of the digital thermometer into a pot of vigorously
boiling water and observe the meter reading with the probe suspended in the steam.
Punch a 1/8” hole into a 2” x 2” piece of cardboard to avoid steaming up the underside
of the thermometer. A simple tea kettle would also be fine for this purpose. Make both
a mental and physical note of the reading. Recheck, as you feel necessary.
20
Another method of “checking” YOUR digital thermometer kit is to immerse the
thermometer tip in a covered short thermos jug filled with a mixture of crushed, distilled
water ice and distilled water – think of a flavorless coarse slurpy. This method is nice
because it is independent of altitude and barometric pressure but needs about 15
minutes or so to stabilize around the established freezing point of water (32.0 F).
Each digital thermometer sold direct ships with a tag attached to the probe stem. The
small writing at the bottom shows the temperature of boiling water/condensing steam
here in Silver Spring, Maryland (MD) for the particular test day conditions, the date of
the test, and my initials. The large number shows what the thermometer read while in
the “test pot.”
Kits shipped with the Taylor 9841, 9840N, 508, or 524 thermometers outside the US
have one side in degrees Fahrenheit and the other in degrees Celsius. Celsius
thermometers are independently tested reading both temperature scales, i.e. the
numbers MAY NOT equate mathematically in accordance with established conversion
formulas from F to C or C to F.
21
Spare Parts:
Nylon ferrule set
6 mm copper washer
7/16” Nut
Plug
Batteries
Swagelok P/N NY-200-SET
Copper sealing washer, 6.2 x 9.9 mm
Swagelok P/N SS-202-1
Swagelok P/N SS-200-P
G10 – A (Taylor 3516 up to approximately 6/1/08)
G13 – A or LR44 (later Taylor 3516, 9840N, & 9841)
Energizer 357 (later Taylor 3516, 9840N, & 9841)
CR2032 (Taylor 524)
From my brief study of batteries and their availability, the Energizer 357 from Office
Depot is the better battery and the best value deal (pack of three for ~ $5).
Digital Scales:
There are a multitude of digital scales out there as there are digital thermometers. The
“best” digital scales accept commonly available batteries (AAA or AA), have nonilluminated displays, and are within the anticipated weight range you desire. At times, I
carry a small stock of nice scales 0-500 grams, they take two AAA batteries (included)
and have performed well for me for over the years. Any scales accuracy/repeatability
can be checked with a NEW US penny – it weighs 2.500 grams according to the US
Mint website.
Pricing and Stock Status:
Complete ordering information and stock status can be found in the document entitled
Pricing_Inventory_Ordering available for download on my crude FTP site:
http://users.rcn.com/erics/ . Comments on these instructions or questions of a general
nature that could be included in the FAQ section of the install manual would be
GREATLY appreciated. The latest updates to this document, in addition to other
goodies of information, are always available at http://users.rcn.com/erics/ . This
document is currently DigThermAdptr6.pdf.
You should always check for this prior to your installation !!!
Eric Svendson
Phone 301-587-5033
1223 Woodside Pkwy
[email protected]
22
Silver Spring, MD 20910-1666
Warranty:
For the first 30 days – full refund of monies exclusive of postage will be made upon
your request AND upon receipt of product.
The thermometer, attached probe, and any purchased accessories are guaranteed to
be fully functional for 1 year from the date of purchase. The stainless steel and brass
adaptors, excluding the ferrules and copper washers, are warranted to the original
purchaser for life. Replacements during this time period will be made for the cost of
postage, shipping supplies, and a small “handling” fee - $10.00 AND upon receipt of old
unit. Replacement units will ship with one set of new ferrules, nut, and a little orange
doughnut on the probe to keep the parts together. This little orange doughnut MUST
BE REMOVED prior to installation. You are obligated to return the old parts (nut and
ferrules and thermometer). If the thermometer was purchased directly from me, no
receipt is required – I retain ALL e-mails. If the thermometer was purchased from Chris’
Coffee, an order number or some other validated document is required.
23
Frequently Asked Questions
(in a very random sequence)
1. How “custom” is this adaptor? Can I get spare parts readily?
The particular adaptor currently has a 4 to 6 week lead-time – is this custom enough for
you? All of the parts, which make up the adaptor with the exception of the body, are
“off the shelf” parts, typically stocked by Swagelok distributors. Even if the part(s) is not
stocked, it would be available in a couple of days – they are all standard catalog items.
I always have all the spare parts available that you could ever want.
1a. New probes introduced – August 2012
Original probe below:
Current probe below:
The new probe has the same exact length as the old probe but the length of the 0.151
diameter expanded section has been increased a little over an 1/8” to eliminate any
protrusion measurement. When the thermometer is FULLY inserted into the adaptor,
the protrusion is fixed at approximately 3/8” – the design objective.
24
2. Is it OK to take the adaptor apart when I get it?
You certainly can but be sure to take it apart on a soft, dark surface with a “mandrel” of
sorts slid inside. This is to minimize the chances of dropping small, almost translucent,
parts (which you would be hard pressed to find) all over the floor. The ideal mandrel is
any smooth 1/8” diameter “rod”, e.g., a 1/8” drill bit, 1/8” tubing, possibly a smooth 1/8”
wooden dowel, or the thermometer w/ attached probe itself.
3. What temperatures should I shoot for?
For sure that depends on the beans you are using but I have found that a measured
average temperature of 203 F at the passageway intersection (with Silvia) corresponds
to 198 F water hitting the “puck”.
4. Should I use the plug that came with the kit?
The plug allows you to remove the thermometer for in or out of warranty service/repair
and operate your machine in a normal manner. Install the adaptor and plug as per the
instructions and become intimate with your machine. Practice making consistent shots
(not necessarily great shots) in the SAME identical manner to which you have become
accustomed.
5. Why can I still turn the 7/16 nut after I have tightened it the prescribed 3/4 of a turn
from finger tight?
Nylon has a little more “give” than metal. Turning the nut over 3/4 turn will distort the
nylon ferrules such that their reusability is questionable. Tightening the nut as
described in the instructions should be sufficient.
6. I have removed my M6 allen head screw like you said and there is NO copper
washer present.
Hmm. Hmm. Every penny counts in manufacturing and sometimes these people go
too far. The screw was probably sealed with sealant on the threads. OBVIOUSLY, it
worked with your espresso machine and IT WORKS in many other applications
because the sealant is applied in very controlled conditions but, IMO, it is not the best
way; certainly not for a retrofit. Use a new copper washer on the thermocouple adaptor,
follow the instructions EXACTLY as written and you will be happy with a leak-proof
connection.
25
7. Are there any special instructions for E61 heat exchanger machines?
Yes, please read the document entitled “thermocouple adaptor tidbits” available from
my FTP website: http://users.rcn.com/erics/ . In addition, there exists an abundant
supply of well-written and informative articles on hx machine operation, particularly on
this website - http://www.home-barista.com/ . However, someone who makes strictly
espresso with a heat exchanger (hx) machine has an advantage over one who is using
the same type of machine but also making cappy’s and latte’s. The rational being that
the pstat setting can be slightly lowered which will inherently lower boiler water
temperature and thus hx temperature. In turn, this will reduce the cooling flush
requirements.
8. Can I re-use any of those copper washers you supply?
Well, you can, but it is not the best practice. The copper sealing washers actually
compress during installation and thus conform to any irregularities on the surfaces.
When tightening the adaptor with a used copper washer, simply “snug it up” as it would
require too much torque to deform it as in an original install. Spare washers are best
obtained from the parts department of a German car dealership.
9. How about updates to this installation manual?
The latest updates are always available at http://users.rcn.com/erics/ . You should
always check for this prior to your installation. Click on the “Digital Thermometer
Adaptor” folder and then open/save the appropriate pdf file contained therein.
10. How do I go about ordering and paying for one of these devices?
Please see the document Pricing_Inventory_Ordering.doc available here:
http://users.rcn.com/erics/ for more detailed pricing information.
I do accept Paypal (my Paypal email is same as normal email) .
11. Does this gizmo have any “problem areas” that I should know about?
Well, ahem, I’m glad you asked. The switch or switches (in the case of the 3516, 9840
& 9841) are simply miniature sliding contacts that CAN BE tough to operate. While it is
rare, sometimes they don’t make the best contact – in this case press down on the
button and/or turn the device on/off a few times. Operation of the switch will improve
26
with use. HOWEVER, thermometers with the soft touch buttons and automatic shutoff
have been shipping for a couple of years now with no reported problems.
12. What can you say about the quality of the thermometer and/or thermistor?
Well, ahem, ahem, I’m glad you asked this also. We have all seen the dozens of digital
thermometers available in stores and on the internet. Heck, just do a “google search”
on [digital thermometer] and sit back a while. As received by me, these thermometers
are put together in a manner commensurate with their cost. HOWEVER, taking them
apart, cleaning out the globs of excess hot melt glue, applying the heat shrink tubing to
the thermistor leads, and dabbing the thermistor in heat transfer grease makes them
very nice indeed. The thermometers utilize a 50K ohm NTC (negative temperature
coefficient) thermistor of surprisingly high quality and that has an industry standard
temperature-resistance curve. In short, I take an “OK” product and make it very good.
13. Would you answer any questions over the phone that I might have?
Sure – call anytime up until midnight (EST) 7 days a week – 301-587-5033.
14. Do I need any special tools to install this device?
The ONLY tools you need are a 5 mm allen head wrench to remove the existing screw
in the grouphead and a 7/16” wrench or small crescent wrench to install the adaptor.
You might also want to use a small 6” ruler to measure/check the probe protrusion – no
longer required – see 1a..
15. What does it mean when the temperature readout is a little dimmer on Tuesday
than it was on Monday?
Time for battery replacement – please see text – important.
16. What does it mean when the temperature readout is LL.L ?
Oh no. One of the leads to the temperature sensor (thermistor) has broken or has
disconnected. Hospital time.
27
17. Are there any other uses for this device that you can think of?
When your espresso production is over for the day and your machine has been on but
idle for at least one hour, do the following and record the results, along with the date.
Record the maximum pstat reading (boiler pressure) and grouphead temperature.
Start the “timer” and flush till the thermometer reads temperature “A”. Let the machine
recover to temperature “B” (rising to, not falling to). When the digital thermometer hits
temperature “B”, stop the timer. Suggested vales for temperature “A” – 175 to 185
Corresponding values for temperature “B” – 190 to 200
Do this test every month and you will have a good idea as to when your machine might
need some descaling (or not). As long as the pstat setting is not changed, increased
recovery time is a direct indicator of scale build-up on the heat exchange surfaces.
End of FAQ – Please suggest more
Outline - Digital Thermometer & Adaptor for E-61 Groupheads
Introduction
Background
Kit Contents
Installing the Digital Thermometer and Adaptor (a quick pictorial)
Installing the Digital Thermometer and Adaptor (the long install procedure)
Removing the Digital Thermometer – Adaptor Remains in Machine
Reinstallation of the Digital Thermometer
Operation of the Espresso Machine with Digital Thermometer
Digital Thermometer Maintenance
Battery Replacement – Taylor 3516, 9840N, 9841
Thermometer Disassembly
Battery Replacement – Taylor 508 & 524 Thermometers
Enhanced Kits
Installation of the Enhanced Kit (pressure)
Checking the Accuracy of the Thermometer
Spare Parts
Digital Scales
Pricing & Stock Status
Warranty
FAQ
28