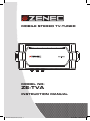
1
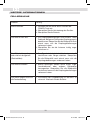
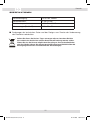
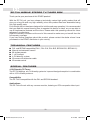
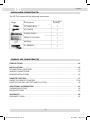
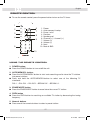
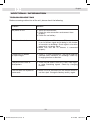
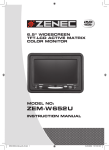
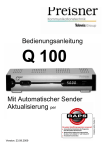
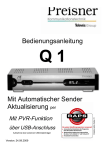
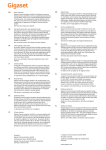
MOBILE STEREO TV-TUNER
MODEL NO:
ZE-TVA
INSTRUCTION MANUAL
ZE-TVA Manual D+E neu.indd 1
02.12.2005 19:09:35 Uhr
ZE-TVA MOBILER STEREO TV-TUNER
Vielen Dank für den Kauf dieses ZENEC-Produktes!
Mit dem Kauf des ZE-TVA haben Sie sich für ein technisch ausgereiftes Produkt entschieden,
das Ihnen durch die Verwendung von hochwertigen Materialien und Bauteilen eine lange
Lebensdauer garantiert.
Obwohl bei der Entwicklung dieses Gerätes auf einfachste und logische Bedienung geachtet
wurde, empfehlen wir die Bedienungsanleitung vor der Installation gut durchzulesen.
Bewahren Sie die Bedienungsanleitung außerdem an einem sicheren Ort auf, damit Sie
darin nachschlagen können wenn später Fragen auftauchen sollten. Zusätzlich soll sie dazu
beitragen, dass Sie das ganze Potential dieses Produktes nutzen können. Lesen Sie vor
allem die Garantiebestimmungen genau durch, um im Falle eines Defektes den optimalen
Service und Kundendienst nutzen zu können. Sollten Sie dennoch Fragen haben, wenden
Sie sich bitte an einen ZENEC-Händler oder den jeweiligen Landesvertrieb.
GERÄTE–FEATURES
■ Kompatibel mit den Farbfernsehnormen PAL und SECAM (PAL-I, PAL-D/K, PAL-B/G,
SECAM D/K, SECAML/L)
■ Automatischer und manueller Sendersuchlauf
■ 99 Programmspeicherplätze
■ 1 x A/V-Ausgang
■ Anschluss für 4-fach Diversity Antenne (nicht im Lieferumfang enthalten)
■ IR-Sensor mit Verlängerungskabel
■ IR-Fernbedienung
BESONDERHEITEN
4-Fach Diversity Antennensystem:
Der ZE-TVA verfügt über ein 4-fach Diversity Empfangssystem, das in Kombination mit
einer 4-fach Diversity Antenne eine bessere Empfangsqualität ermöglicht, als wenn nur eine
einzelne Antenne bzw. ein einzelnes Antennesystem benutzt wird.
Kompatibilität:
Dieser TV-Tuner ist mit den beiden Farbfernsehnormen PAL und SECAM kompatibel.
Verwendung:
Der ZE-TVA kann mit allen Monitoren kombiniert, werden welche über einen CompositeVideoeingang (Cinch) verfügen und mit der jeweiligen Farbfernsehnorm kompatibel sind.
2
ZE-TVA Manual D+E neu.indd 2
02.12.2005 19:09:35 Uhr
Deutsch
LIEFERUMFANG
Abbildung
Menge
Element
ZE-TVA
A/V - Kabel
Power - Kabel
Fernbedienung
Bedienungsanleitung
IR-Sensor mit Verlängerungskabel
INHALTSVERZEICHNIS
SICHERHEITSHINWEISE . . . . . . . . . . . . . . . . . . . . . . . . . . . . . . . . . . . . . . . . . . . . . . . . . 4
INSTALLATION DES GERÄTES . . . . . . . . . . . . . . . . . . . . . . . . . . . . . . . . . . . . . . . . . . . . 5
ANSCHLÜSSE . . . . . . . . . . . . . . . . . . . . . . . . . . . . . . . . . . . . . . . . . . . . . . . . . . . . . . . . . . . 5
ANSCHLUSS DES GERÄTES . . . . . . . . . . . . . . . . . . . . . . . . . . . . . . . . . . . . . . . . . . . . . . . 5
VORSICHTSMASSNAHMEN . . . . . . . . . . . . . . . . . . . . . . . . . . . . . . . . . . . . . . . . . . . . . . . . 6
DIE FERNBEDIENUNG . . . . . . . . . . . . . . . . . . . . . . . . . . . . . . . . . . . . . . . . . . . . . . . . . . . . 7
DIE EINZELNEN TASTEN. . . . . . . . . . . . . . . . . . . . . . . . . . . . . . . . . . . . . . . . . . . . . . . . . 7-8
BENUTZEN DER FERNBEDIENUNG . . . . . . . . . . . . . . . . . . . . . . . . . . . . . . . . . . . . . . . . . . 8
DIE BATTERIE . . . . . . . . . . . . . . . . . . . . . . . . . . . . . . . . . . . . . . . . . . . . . . . . . . . . . . . . . . . 9
BITTE BEACHTEN . . . . . . . . . . . . . . . . . . . . . . . . . . . . . . . . . . . . . . . . . . . . . . . . . . . . . . . . 9
WEITERE INFORMATIONEN . . . . . . . . . . . . . . . . . . . . . . . . . . . . . . . . . . . . . . . . . . . . . . 10
FEHLERSUCHE . . . . . . . . . . . . . . . . . . . . . . . . . . . . . . . . . . . . . . . . . . . . . . . . . . . . . . . . . 10
SPEZIFIKATIONEN . . . . . . . . . . . . . . . . . . . . . . . . . . . . . . . . . . . . . . . . . . . . . . . . . . . . . . 11
GARANTIE . . . . . . . . . . . . . . . . . . . . . . . . . . . . . . . . . . . . . . . . . . . . . . . . . . . . . . . . . . . . 22
GARANTIEKARTE . . . . . . . . . . . . . . . . . . . . . . . . . . . . . . . . . . . . . . . . . . . . . . . . . . . . . . . 23
3
ZE-TVA Manual D+E neu.indd 3
02.12.2005 19:09:36 Uhr
SICHERHEITSHINWEISE
1. Dieses Gerät ist für den Betrieb an einem Bordnetz mit +12V (DC) und Minus gegen
Masse geeignet und darf auch nur so betrieben werden.
2. Bedienen Sie das Gerät nur so, wie es in dieser Bedienungsanleitung beschrieben wird.
Alles andere kann zum Erlöschen Ihres Garantieanspruches führen.
3. Zerlegen oder modifizieren Sie das Gerät nicht. Dies kann zu einer Beschädigung des
Gerätes führen und Ihr Garantieanspruch erlischt dadurch.
4. Benutzen Sie nur das Originalzubehör um das Gerät zu installieren und zu betreiben, da
ansonsten eine Beschädigung des Gerätes riskiert wird.
5. Achten Sie darauf dass bei ausgeschaltetem Motor die Batterie des Fahrzeuges nicht
entladen wird. Da es sich bei dem Gerät um einen Verbraucher handelt und die Batterie
nur bei laufendem Motor aufgeladen wird, kann es passieren dass die Batterie entladen
wird und das Fahrzeug sich nicht mehr starten lässt.
6. Informieren Sie sich vor der Installation des Gerätes über die in Ihrem Land geltenden
Gesetze und Verkehrsvorschriften, die den Gebrauch dieses Gerätes betreffen.
7. Bevor Sie eine defekte Sicherung austauschen, sollten Sie erst einmal überprüfen was
der Grund für den Kurzschluss war. Achten Sie dabei besonders auf die Kabel der
Stromversorgung! Wenn der Kurzschluss nicht durch einen Fehler in der Stromversorgung
resultiert, müssen Sie die defekte Sicherung gegen ein neues Exemplar mit identischen
Werten austauschen. Sollte der Kurzschluss immer noch vorhanden sein, wenden Sie
sich bitte an einen ZENEC-Händler.
8. Achten Sie bei der Installation des Gerätes darauf, dass es nicht dem direktem
Sonnenlicht ausgesetzt ist und auch nicht in der Nähe von Wärmequellen wie z.B. den
Öffnungen der Heizung montiert wird. Die Umgebungstemperatur sollte daher zwischen
0° und 50° liegen. Sollte die Temperatur im Inneren des Fahrzeuges extrem hoch sein,
ist es empfehlenswert den Innenraum vor der Inbetriebnahme des Gerätes erst einmal
etwas abkühlen zu lassen.
9. Wenn Sie Fragen oder Probleme bei der Installation oder der Bedienung des Gerätes
haben, wenden Sie sich bitte an einen ZENEC-Händler oder an den jeweiligen
Landesvertrieb.
4
ZE-TVA Manual D+E neu.indd 4
02.12.2005 19:09:36 Uhr
Deutsch
INSTALLATION
DES GERÄTES
CONNECTOR LOCATIONS
ANSCHLÜSSE
ttx005 manual.qxd
1.
2.
3.
4.
5.
8/11/2005
3:17 PM
Page 5
Stromversorgung
Vorverstärkerausgänge (AUDIO)
Videoausgang
(VIDEO)
1. Power Inputs
Anschlussbuchse für den externen IR-Empfänger
2. Audio Outputs
Antenneneingänge
3. Video Output
4. IR Remote Eye Input
WIRING
CONNECTIONS
5. TV Antenna
Inputs
ANSCHLUSS
DES
GERÄTES
WIRING PRECAUTIONS
Read all wiring precautions. If you are not sure of the connections,
contact your authorized Clarion Dealer.
1. Disconnect the negative(-) lead of the battery before making any
power connections.
2. When creating passage holes for the power wires, use grommets to
eliminate any sharp edges created during drilling. This will protect
the wire from being nicked and causing a short circuit.
3. When connecting the ground lead, fasten the ground lead (black)
securely to a clean metal plate on the vehicle.
ANTENNENSYSTEM
IR-EMPFÄNGER
MONITOR
VERSTÄRKER
ROT: +12V
ACC
3
GELB: +12V
BATTERIE
SCHWARZ: MASSE
5
ZE-TVA Manual D+E neu.indd 5
02.12.2005 19:09:38 Uhr
VORSICHTSMASSNAHMEN
■ Lesen Sie sich vor der Installation noch einmal die Bedienungsanleitung durch.
■ Um während der Installation des Gerätes einen Kurzschluss zu vermeiden, sollten Sie
die Batterie für die Dauer der Montage abhängen.
■ Schließen Sie die Anschlusskabel für die Stromversorgung in folgender Reihenfolge an:
Masse ➝ +12V (Batterie) ➝ +12V (ACC)
■ Verbinden Sie das +12V Anschlusskabel nicht direkt mit dem Pluspol der Batterie.
Achten Sie darauf, das Sie das +ACC Anschlusskabel mit der Zündung des Fahrzeuges
verbinden. Ansonsten erhöht sich bei einer Fehlbedienung das Risiko einer entladenden
Batterie.
■ Wenn eine Sicherung durchgebrannt ist, sollten Sie erst die Anschlusskabel überprüfen.
Es wäre denkbar dass ein defektes Kabel den Kurzschluss verursacht hat bzw. ein
Kabel durch den Kurzschluss beschädigt wurde.
Bitte defekte Sicherungen nur durch solche mit gleichem Wert ersetzen!
■ Achten Sie darauf, dass die Kabel welche nicht angeschlossen sind, keinen Kontakt zur
Fahrzeugmasse oder Stromführenden Anschlüssen haben. Isolieren Sie die Anschlüsse
wenn nötig mit Klebeband oder ähnlichem Isolationsmaterial.
■ Überprüfen Sie nach der Installation des Gerätes alle elektrischen Funktionen wie z.B.
Bremslichter, Blinker, Beleuchtung usw.
6
ZE-TVA Manual D+E neu.indd 6
02.12.2005 19:09:39 Uhr
Deutsch
���������������
� �����������������������������������������������������������������
DIE
FERNBEDIENUNG
�� ������
�
�
����
�
�
���
������
�
�����
����
�
����
��
�
�����
����
�
�
1.
��2.
��3.
��4.
��5.
��6.
��7.
��8.
��9.
10.
��
���
POWER
�����
AUTO MEMORY & SETUP
ERASE/WRITE
�����������
PREV
�����������
Numerische Tasten
��������
Channel (5) / Channel (6)
����������
Volume (+)
�����������������������������
Volume (–)
����������
NEXT
����������
MUTE & SND
����
����
��
������������������������
DIE
EINZELNEN TASTEN
������������������������������������������������������������������
1. POWER-Taste
��������������������
■ Drücken Sie die POWER-Taste um das Gerät ein- bzw. auszuschalten.
� ������������������
�����������������������
2. AUTO/MEMORY-Taste
� ���������������
■ Drücken
Sie die AUTO/MEMORY-Taste um den automatischen Suchlauf zu starten. Alle
empfangbaren
Sender werden automatisch nacheinander gespeichert.
�������������������������������������
■ Halten Sie die AUTO/MEMORY-Taste gedrückt um eine der folgenden Fernsehnormen
� ������������
auszuwählen:
�������������������������������������������������������������������
PAL-I
➝ PAL-D/K ➝ PAL-B/G ➝ SECAM D/K ➝ SECAM L/L
�������������������������
3. ERASE/WRITE-Taste
����������������������������������������������������������������
■ Drücken
Sie die ERASE/WRITE-Taste um einen Sender auf dem jeweiligen Speicherplatz
��������������������������������������������������
zu speichern oder zu löschen.
�
4. PREV-Taste
■ Drücken Sie die PREV-Taste um den automatischen Suchlauf zu starten. Sobald das
Gerät einen Sender mit der nächst niedrigerer Frequenz empfängt, wird der Suchlauf
beendet und der Sender wird wiedergegeben.
5. Numerische Tasten
■ Drücken Sie eine numerische Taste um direkt einen gespeicherten Sender bzw.
den jeweiligen Speicherplatz auszuwählen. Drücken Sie die (10+)-Taste um einen
zweistelligen Speicherplatz auszuwählen.
7
ZE-TVA Manual D+E neu.indd 7
02.12.2005 19:09:40 Uhr
6. [5] / [6]-Tasten
■ Drücken Sie die [5]-Taste um den nächsten gespeicherten Sender auszuwählen.
■ Drücken Sie die [6]-Taste um den vorherigen gespeicherten Sender auszuwählen.
7. (VOL+)-Taste
■ Drücken Sie die (VOL+)-Taste um die Lautstärke zu erhöhen.
8. (VOL-)-Taste
Drücken Sie die (VOL-)-Taste um die Lautstärke zu verringern.
■
9. NEXT-Taste
Drücken Sie die NEXT-Taste um den automatischen Suchlauf zu starten. Sobald das
Gerät einen Sender mit der nächst höherer Frequenz empfängt, wird der Suchlauf
beendet und der Sender wird wiedergegeben.
■
10. MUTE/SND-Taste
Drücken Sie die
stummzuschalten.
■
MUTE/SND-Taste
um
die
Tonwiedergabe
des
Gerätes
BENUTZEN DER FERNBEDIENUNG
■ Richten Sie die Fernbedienung direkt auf den externen IR-Sensor des Gerätes.
■ Achten Sie darauf, dass der Abstand zwischen der Fernbedienung und dem IR-Sensor
nicht größer als 3 Meter ist.
■ Direktes Sonnenlicht oder sehr helles Licht verringern die Empfindlichkeit des
IR-Signals.
■ Vermeiden Sie dass sich zwischen der Fernbedienung und dem IR-Sensors ein Hindernis
befindet, da ansonsten der Empfang des IR-Sensors gestört wird.
8
ZE-TVA Manual D+E neu.indd 8
02.12.2005 19:09:40 Uhr
mber button (0-9) to select available channels
Use this button to Search The Next Viewed Channel
Allows
the user
to selectively
) button to select
double
numeric
channels.add or remove Television channels
to and from the unit's memory.
ections.
REMOTE CONTROL BATTERY INSTALLATION
Deutsch
Previous.
up button to• select
next available channel.
If the remote
control Viewed
does notChannel
function correctly or the oper
Use
this the
button
to Search
The Previous
down button
to
select
previous
channel.
DIE
BATTERIE
range is reduced, replace the battery with a new lithium CR
battery. Make sure to observe the proper polarity placemen
• Next.
1. Öffnen Sie den Batteriefachdeckel, indem Sie die Halterung 1 nach rechts drücken und
Useadd
thisorbutton
to anschließend
Search
The
Next
Viewed Channel
ser to selectively
remove
Television
channels
den Batteriefachdeckel
nach
vorne ziehen (siehe Skizze).
he unit's memory.
REMOTE CONTROL BATTERY INSTALLATION
B
AT
T.
If the
control
doesChannel
not function correctly or the operating
on to Search
Theremote
Previous
Viewed
range is reduced, replace the battery with
2 a new lithium CR2025 type
1
battery. Make sure to observe the proper polarity placement.
on to Search
The Next
Viewed
Channel
2. Nehmen
Sie die
neue Batterie
und legen
in das
Batteriefach,
das battery
der + Pol nach
1. Push
tabsie
to so
the
right.
2. Place
oben zeigt (siehe Skizze).
Pull out the battery
into the tray.
tray.
TROL BATTERY INSTALLATION
B
AT
B
T.
AT
T.
ontrol does not function correctly or the operating
d, replace the battery with a 2new lithium CR2025 type
1
ure to observe the proper polarity
placement.
3. Retu
remo
3
3.1.Schieben
Sie den
Batteriefachdeckel
wiederbattery
zurück in das Gehäuse
der Fernbedienung
Push tab
to the
right. 2. Place
3. Return
tray to
(siehe Skizze).
into the tray.
remote control.
6
B
AT
T.
Pull out the battery
tray.
2
1
3
the right.
battery
2. Place battery
into the tray.
BITTE BEACHTEN
3. Return tray to
remote control.
■ Wenn die Fernbedienung nicht oder sehr langsam reagiert, müssen Sie wahrscheinlich
die Batterie wechseln.
6
■ Entfernen Sie die Batterie wenn sie leer ist oder die Fernbedienung längere Zeit nicht
gebraucht wird.
■ Sollte es trotzdem einmal passieren dass die Batterie ausläuft, müssen Sie mit einem
Tuch die Flüssigkeit im Batteriefach entfernen und anschließend eine neue Batterie
einlegen.
■ Bewahren Sie die Batterie außer der Reichweite von kleinen Kindern auf. Sollte die
Batterie von einer Person verschluckt werden, bitte sofort einen Arzt aufsuchen.
9
ZE-TVA Manual D+E neu.indd 9
02.12.2005 19:09:42 Uhr
WEITERE INFORMATIONEN
FEHLERSUCHE
Problem:
Lösung:
Keine Funktion.
1. Schalten Sie das Gerät durch Drücken der
POWER-Taste ein.
2. Überprüfen Sie die Verkabelung des Gerätes.
3. Überprüfen Sie die Batterie.
Das Bild ist nicht klar.
1. Die Empfangsbedingungen sind schlecht. Hohe
Gebäude, Berge usw. können den Empfang negativ
beeinflussen. Überprüfen Sie die Bildqualität noch
einmal wenn sich die Empfangsbedienungen
verbessert haben.
2. Überprüfen Sie ob die Antenne richtig angeschlossen ist.
Das Bild wird doppelt
oder dreifach dargestellt
(Geisterbilder).
1. Das Signal wird durch hohe Hindernisse wie z.B
Das Bild hat Streifen.
1. Solche Störungen werden durch Autos, Züge,
Hochhäuser oder Berge reflektiert. Überprüfen
Sie die Bildqualität noch einmal wenn sich die
Empfangsbedienungen verbessert haben.
Leuchtreklamen oder anderen Störquellen
hervorgerufen. Überprüfen Sie die Bildqualität
noch einmal wenn sich die Empfangsbedienungen
verbessert haben.
Das Gerät reagiert nicht auf
die Fernbedienung.
1. Die Batterie der Fernbedienung ist leer bzw. zu
schwach. Wechseln Sie die Batterie.
10
ZE-TVA Manual D+E neu.indd 10
02.12.2005 19:09:43 Uhr
Deutsch
SPEZIFIKATIONEN
Stromversorgung:
DC 9–16V, 200mA
Stromverbrauch:
2.4W ± 0.5W
Betriebstemperatur:
Abmessungen (B x H x T):
-30° C bis 80° C
115 x 32 x 70 mm
■ Änderungen der technischen Daten und des Designs zum Zwecke der Verbesserung
des Produktes vorbehalten.
Sollten Sie dieses Gerät eines Tages entsorgen müssen, beachten Sie bitte
dass elektrische Gerät nicht mit dem Haushaltsmüll entsorgt werden sollten.
Führen Sie das Gerät wenn möglich dem Recycling zu. Ihre lokalen Behörden
oder Ihr Händler können Sie dementsprechend informieren (Richtlinie über die
Entsorgung elektrischer und elektronischer Ausstattungen).
11
ZE-TVA Manual D+E neu.indd 11
02.12.2005 19:09:43 Uhr
ZE-TVA MOBILE STEREO TV-TUNER BOX
Thank you for your purchase of this ZENEC product!
With the ZE-TVA unit, you have chosen a technically mature high quality product that will
give you a long life and very high reliability, since this product has been assembled using
only high quality parts.
Even though this unit has been designed for intuitive and easy operation, it is recommended
that you read this manual learning how to operate this device in detail, so you are able to
use all implemented features and functions. Please retain this operating manual for future
reference in a safe place.
Read the warranty conditions at the end of this manual to make sure you benefit from the
full warranty coverage.
If you have further questions about this product, please contact the dealer where it was
purchased or the ZENEC distributor in your country.
TECHNICAL FEATURES
■
■
■
■
■
■
■
PAL and SECAM compatible (PAL-I, PAL-D/K, PAL-B/G, SECAM D/K, SECAM L/L)
Manual and automatic search
99 station presets
1 x A/V-output
4-CH diversity system
IR-sensor with extension cable
IR-remote control
SPECIAL FEATURES
4-CH Diversity TV-Tuner:
The ZE-TVA deploys a 4-CH diversity system to improve the signal reception in combination
with a 4-CH diversity antenna.
Compatibility:
The ZE-TVA is compatible with the PAL and SECAM standard.
Applications:
The ZE-TVA will work with any common monitor, featuring an RCA composite video input.
12
ZE-TVA Manual D+E neu.indd 12
02.12.2005 19:09:44 Uhr
English
PACKAGE CONTENTS
The ZE-TVA comes with the following accessories:
Image
Accessories
Quantity
TV-TUNER BOX
A/V CABLE
POWER CABLE
REMOTE CONTROL
MANUAL
IR -SENSOR
TABLE OF CONTENTS
PRECAUTIONS . . . . . . . . . . . . . . . . . . . . . . . . . . . . . . . . . . . . . . . . . . . . . . . . . . . . . . . . . 14
INSTALLATION . . . . . . . . . . . . . . . . . . . . . . . . . . . . . . . . . . . . . . . . . . . . . . . . . . . . . . . . . 15
CONNECTION LOCATIONS. . . . . . . . . . . . . . . . . . . . . . . . . . . . . . . . . . . . . . . . . . . . . . . . 15
WIRING CONNECTIONS . . . . . . . . . . . . . . . . . . . . . . . . . . . . . . . . . . . . . . . . . . . . . . . . . . 15
WIRING PRECAUTIONS . . . . . . . . . . . . . . . . . . . . . . . . . . . . . . . . . . . . . . . . . . . . . . . . . . 16
REMOTE CONTROL . . . . . . . . . . . . . . . . . . . . . . . . . . . . . . . . . . . . . . . . . . . . . . . . . . . . . 17
USING THE REMOTE CONTROL . . . . . . . . . . . . . . . . . . . . . . . . . . . . . . . . . . . . . . . . 17-18
REMOTE CONTROL BATTERY INSTALLATION . . . . . . . . . . . . . . . . . . . . . . . . . . . . . . . . 18
ADDITIONAL INFORMATION. . . . . . . . . . . . . . . . . . . . . . . . . . . . . . . . . . . . . . . . . . . . . . 19
TROUBLESHOOTING . . . . . . . . . . . . . . . . . . . . . . . . . . . . . . . . . . . . . . . . . . . . . . . . . . . . 19
SPECIFICATIONS. . . . . . . . . . . . . . . . . . . . . . . . . . . . . . . . . . . . . . . . . . . . . . . . . . . . . . . . 20
WARRANTY. . . . . . . . . . . . . . . . . . . . . . . . . . . . . . . . . . . . . . . . . . . . . . . . . . . . . . . . . . . . 22
WARRANTY CARD. . . . . . . . . . . . . . . . . . . . . . . . . . . . . . . . . . . . . . . . . . . . . . . . . . . . . . . 23
13
ZE-TVA Manual D+E neu.indd 13
02.12.2005 19:09:44 Uhr
PRECAUTIONS
1. Only connect the unit to a +12V (DC) power supply with negative grounding.
2. Operate this unit correctly as stated in the manual to prevent unnecessary problems.
The guarantee won’t be valid if the problem is caused by inappropriate operation.
3. Never use the video display function in front when driving to prevent the violation of laws
& regulations and also to reduce the risk of traffic accidents.
4. Be careful not to run down the car battery while using the unit. Using this unit without
the engine running may drain the battery and prevent you from being able to start the
engine later on.
5. Never disassemble or adjust the unit without professional advice.
6. Never expose this unit to moisture or water to prevent electric sparks or fires.
7. Car parking under direct sunlight dramatically increases the temperature inside the car.
Cool down the in-car temperature by air-conditioning before you turn on the unit.
14
ZE-TVA Manual D+E neu.indd 14
02.12.2005 19:09:44 Uhr
English
INSTALLATION
CONNECTOR LOCATIONS
CONNECTION LOCATIONS
ttx005 manual.qxd
1.
2.
3.
4.
5.
8/11/2005
3:17 PM
Page 5
Power inputs
Audio outputs
Video output
1. Power Inputs
IR-Sensor
Audioinputs
Outputs
TV 2.
antenna
3.
Video Output
WIRING
CONNECTIONS
WIRING
4. IR CONNECTIONS
Remote Eye Input
5. TV Antenna Inputs
WIRING PRECAUTIONS
Read all wiring precautions. If you are not sure of the connections,
contact your authorized Clarion Dealer.
1. Disconnect the negative(-) lead of the battery before making any
power connections.
2. When creating passage holes for the power wires, use grommets to
eliminate any sharp edges created during drilling. This will protect
the wire from being nicked and causing a short circuit.
3. When connecting the ground lead, fasten the ground lead (black)
securely to a clean metal plate on the vehicle.
3
15
ZE-TVA Manual D+E neu.indd 15
02.12.2005 19:09:45 Uhr
WIRING PRECAUTIONS
Read all wiring precautions. If you are not sure about the connections, contact your
authorized ZENEC dealer.
1. Disconnect the negative (-) lead of the battery before making any power connections.
2. When you drill holes for the power wires, use grommets to eliminate any sharp edges
created during drilling. This will protect the wire from being cut or damaged and causing
a short circuit.
3. When connecting the ground lead, fasten the ground lead (black) securely to a clean
metal plate on the vehicle.
16
ZE-TVA Manual D+E neu.indd 16
02.12.2005 19:09:46 Uhr
English
REMOTE
CONTROL
���������������
■ �To�����������������������������������������������������������������
use the remote control, press the power button to turn on the TV-tuner.
�� ������
�
�
����
�
�
���
������
�
�����
����
�
����
��
�
�����
����
�
�
��1. �����
Power
��2. �����������
Auto memory & setup
��3. �����������
Erase / write
��4. ��������
Previous
��5. ����������
Number pad
Channel (5) / channel (6)
��6. �����������������������������
Volume (+)
��7. ����������
Volume (–)
��8. ����������
Next
��9. ����
10.
Mute & SND
��� ����
��
������������������������
USING THE REMOTE CONTROL
1.
■
2.
■
■
3.
■
4.
■
������������������������������������������������������������������
��������������������
POWER-button:
�Press
������������������
the POWER-button to turn on/off the unit.
�����������������������
AUTO/MEMORY- button:
� ���������������
Press the AUTO/MEMORY-button to start auto searching and to store the TV stations
�������������������������������������
into preset stations.
Press and hold the AUTO/MEMORY-button to select one of the following TV
� ������������
standards:
�������������������������������������������������������������������
PAL-I
➝ PAL-D/K ➝ PAL-B/G ➝ SECAM D/K ➝ SECAM L/L
�������������������������
����������������������������������������������������������������
ERASE/WRITE-button
��������������������������������������������������
Press the ERASE/WRITE-button to erase/store the current TV station.
�
PREV-button
Press the PREV-button to searching an available TV station by decreasing the tuning
frequency.
5. Numeric buttons
■ Press one of the numeric buttons to select a preset station.
17
ZE-TVA Manual D+E neu.indd 17
02.12.2005 19:09:47 Uhr
Press
Press
thethe
Mute
Mute
button.
button.
• Number
• Number
Pad.
Pad.
Use
Use
thethe
Number
Number
button
button
(0-9)
(0-9)
to to
select
select
available
available
channels
channels
Use
Use
thethe
(10+)
(10+)
button
button
to to
select
select
double
double
numeric
numeric
channels.
channels.
•
6. [5] / [6]-buttons
■ Press the [5]-button to select the next preset stations.
Channel
• Channel
Selections.
Selections.
■ Press the [6]-button to select the previous preset station.
Use
Use
thethe
CHCH
upup
button
button
to to
select
select
next
next
available
available
channel.
channel.
7.Use
(VOL+)-button
Use
thethe
CHCH
down
down
button
button
to to
select
select
thethe
previous
previous
channel.
channel.
■ Press the (VOL+)-button to increase the loudness.
• 8.Erase/Write.
• (VOL-)-button
Erase/Write.
Allows
the(VOL-)-button
the
user
user
to selectively
totoselectively
or or
remove
remove
Television
Television
channels
channels
■Allows
Press
the
decrease add
theadd
loudness.
to and
to and
from
from
thethe
unit's
unit's
memory.
memory.
•
9. NEXT-button
■ Press the NEXT-button to search an available TV station by increasing the tuning
Previous.
• frequency.
Previous.
Use
Use
thisthis
button
button
to Search
to Search
The
The
Previous
Previous
Viewed
Viewed
Channel
Channel
10. MUTE/SND-button
■ Press the MUTE/SND-button to switch on/off the audio output.
• Next.
• Next.
Use
Use
thisthis
button
button
to Search
to Search
The
The
Next
Next
Viewed
Viewed
Channel
Channel
REMOTE
REMOTE
CONTROL
CONTROL
BATTERY
BATTERY
INSTALLATION
INSTALLATION
CONTROL BATTERY INSTALLATION
If REMOTE
the
If the
remote
remote
control
control
does
does
notnot
function
function
correctly
correctly
or or
thethe
operating
operating
range
range
is
reduced,
is
reduced,
replace
replace
the
the
battery
battery
with
with
a
new
a
new
lithium
lithium
CR2025
CR2025
type
type
If the remote control does not function correctly or the operating range is reduced,
replace
the
battery
withsure
a new
CR2025
type
battery.
Make sure
to observe the proper
battery.
battery.
Make
Make
sure
tolithium
to
observe
observe
thethe
proper
proper
polarity
polarity
placement.
placement.
AT
T.
AT
B
B
T.
AT
B
B
AT
T.
T.
polarity placement.
2
1
2
1
3
Push
tab
theto
right.
2. Place
Placebattery
battery
1.1.1.
Push
Push
tabto
tab
to
the
the
right.
right. 2. 2.
Place
battery
Pull out the battery tray.
into the tray.
Pull
Pull
outout
thethe
battery
battery
intointo
thethe
tray.
tray.
tray.
tray.
3
3.
tray tray
to tray
3.Return
3.
Return
Return
to
remote control.
to
remote
remote
control.
control.
6 6
18
ZE-TVA Manual D+E neu.indd 18
02.12.2005 19:09:48 Uhr
English
ADDITIONAL INFORMATION
TROUBLESHOOTING
Before assuming malfunction of the unit, please check the following:
Problem:
Solution:
No power to unit.
1. Push the Power button.
2. Check the wire connections and connect them
properly.
3. Check the car battery.
The picture is not clear.
1. The reception condition is poor. This may be due
to an insufficient signal due to being in the shadow
of mountains or buildings. Check again in a location
exposed to a stronger signal.
2. Make sure that the TV antenna is connected
properly.
The picture has double
or triple images.
1. There is a signal interference. The signal might be
reflected from mountains or buildings. Check by
changing location or direction.
The picture has static or
lined pattern.
1. There may be effects from cars, trains, neon signs,
or other interfering signals. Check by changing
location.
The unit does not respond to
commands.
1. Make sure that the battery on the remote control is
not the culprit. Change the battery and try again.
19
ZE-TVA Manual D+E neu.indd 19
02.12.2005 19:09:49 Uhr
SPECIFICATIONS
Power source:
DC 9–16V, 200mA
Power consumption:
2.4W ± 0.5W
Operating temperature:
-30°C to 113°C
Dimensions (W x H x D):
115 x 32 x 70 mm
If at any time in the future you should need to dispose this product
please note that waste electrical products should not be disposed of
with household waste. Please recycle where facilities exist. Check with
your Local Authority or retailer for recycling advice. (Waste Electrical
and Electronic Equipment Directive)
20
ZE-TVA Manual D+E neu.indd 20
02.12.2005 19:09:50 Uhr
English
21
ZE-TVA Manual D+E neu.indd 21
02.12.2005 19:09:50 Uhr
WARRANTY / GARANTIE
2 YEARS LIMITED WARRANTY
Dear customer
Thank you for purchasing this ZENEC product. It is advisable to keep the original packing material
for any future transporting of the product.
Should your ZENEC product require warranty service, please return it to the retailer from whom
it was purchased or the distributor in your country.
This ZENEC product is warranted against defective materials or workmanship for a period of
TWO years from date of purchase at retail.
Warranty Limitations
This warranty does not cover any damage due to:
1. Improper installation, incorrect audio or mains connection(s).
2. Exposure to excessive humidity, fluids, heat sun rays or excessive dirt or dust.
3. Accidents or abuse, unauthorized repair attempts and modifications not explicitly
authorized by the manufacturer.
This warranty is limited to the repair or the replacement of the defective product at the
manufacturer’s option and does not include any other form of damage, whether incidental,
consequential or otherwise. The warranty does not cover any transport costs or damages
caused by transport or shipment of the product. Warranty work will not be carried out unless
this warranty certificate is presented fully completed with model, serial number, purchaser’s
address, purchasing date and dealer stamp together with the original sales slip!
2 JAHRE GARANTIE
Sehr geehrter Kunde,
Vielen Dank, dass Sie sich zum Kauf dieses Produktes von ZENEC entschlossen haben. Wir
bitten Sie, die Originalverpackung aufzuheben, z.B. für den Transport bei einem Garantiefall.
Wenn Sie Garantie-Leistungen für dieses ZENEC Produkt beanspruchen, wenden Sie sich bitte
direkt an den Händler, bei dem das Gerät gekauft wurde.
Dieses ZENEC Produkt ist durch eine Werksgarantie von 2 Jahren ab Kaufdatum im Fachhandel
gegen Material- oder Herstellungsfehler geschützt.
Garantie-Einschränkungen
Nicht unter Garantie fallen Schäden infolge von:
1. unsachgemässem Einbau oder inkorrektem Audio- oder Stromanschluss.
2. Einwirkung von übermässiger Feuchtigkeit, Flüssigkeit, Hitze, Sonneneinstrahlung
oder starker Verschmutzung.
3. mechanischer Beschädigung durch Unfall, Fall oder Stoss; Schäden durch nicht autorisierte Reparaturversuche und/oder Modifikationen.
Die Garantie dieses Produkts bleibt in jedem Fall auf die Reparatur bzw. den Ersatz
(Entscheidung beim Hersteller) des ZENEC Produktes beschränkt. Transportschäden und
die Kosten des Rücktransportes sind durch diese Garantie nicht abgedeckt. Jeder über
diese Garantie-Erklärung hinausgehende Anspruch und Haftung für direkte / indirekte
Folgeschäden werden ausdrücklich abgelehnt. Garantie-Ansprüche können nur mit einer
korrekt und vollständig ausgefüllten Garantie-Karte und dem Original-Kaufbeleg geltend
gemacht werden.
22
ZE-TVA Manual D+E neu.indd 22
02.12.2005 19:09:50 Uhr
WARRANTY / GARANTIE
ZENEC MODEL: ZE-TVA
Serial Number:..............................................................................................................................
Date of Purchase: .........................................................................................................................
Your name: ...................................................................................................................................
Your address: ...............................................................................................................................
City: ..............................................................................................................................................
State: ................................... ZIP or Postal Code.........................................................................
Country: ........................................................................................................................................
Dealer’s address & stamp
23
ZE-TVA Manual D+E neu.indd 23
02.12.2005 19:09:50 Uhr
ZE-TVA Manual D+E neu.indd 24
02.12.2005 19:09:51 Uhr