1
BMP91UG.book Page -1 Friday, October 14, 2011 7:56 PM
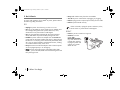
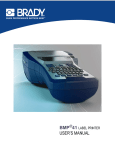
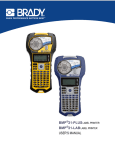
BMP® 91 Tubing & Label Printer
User Guide
BMP91UG.book Page 0 Friday, October 14, 2011 7:56 PM
BMP91UG.book Page i Friday, October 14, 2011 7:56 PM
Copyright & Trademarks
This manual is copyrighted with all rights reserved. No portion of
this manual may be copied or reproduced by any means without
the prior written consent of Brady Worldwide, Inc.
BMP®91 Printer is a trademark of Brady Worldwide, Inc.
assumes no liability arising out of the application or use of any
product or system described, herein; nor any liability for
incidental or consequential damages arising from the use of this
document.
Brady disclaims all warranties or merchantability of fitness for a
particular purpose.
Microsoft and Windows are registered trademarks of Microsoft
Corporation.
Brady Warranty
Brady reserves the right to make changes without further notice to
any product or system described herein to improve reliability,
function, or design.
Our products are sold with the understanding that the buyer will
test them in actual use and determine for him or herself their
adaptability to his/her intended uses. Brady warrants to the buyer
that its products are free from defects in material and
workmanship, but limits its obligation under this warranty to
replacement of the product shown to Brady’s satisfaction to have
been defective at the time Brady sold it. This warranty does not
extend to any persons obtaining the product from the buyer.
© 2011 Brady Worldwide, Inc. All Rights Reserved
Brady Worldwide Inc.
6555 West Good Hope Road
Milwaukee, WI 53223 U.S.A.
Telephone: 414-358-6600 USA Domestic
Facsimile: 414-438-6958
Disclaimer
While every precaution has been taken in the preparation of this
document, Brady assumes no liability to any party for any loss or
damage caused by errors or omissions or by statements resulting
from negligence, accident, or any other cause. Brady further
THIS WARRANTY IS IN LIEU OF ANY OTHER WARRANTY,
EPXRESSED OR IMPLIED INCLUDING, BUT NOT LIMITED TO
ANY IMPLIED WARRANTY OF MERCHANTABILITY OR FITNESS
FOR A PARTICULAR PURPOSE, AND OF ANY OTHER
OBLIGATIONS OR LIABILITY ON BRADY’S PART. UNDER NO
CIRCUMSTANCES WILL BRADY BE LIABLE FOR ANY LOSS,
DAMAGE, EXPENSE OR CONSEQUENTIAL DAMAGES OF ANY
KIND ARISING IN CONNECTION WITH THE USE, OR
INABILITY TO USE, BRADY’S PRODUCTS.
Regulatory Information
i
BMP91UG.book Page ii Friday, October 14, 2011 7:56 PM
Technical Support
Technical Support Numbers/Online Help
For repair or technical assistance, find your regional Brady Tech
Support office by going to:
• In the Americas: www.bradyid.com
• In Europe: www.bradyeurope.com
• In Asia: www.bradyid.com/ap
Repair and Replacement Parts
Brady Corporation offers repair and replacement services.
Contact Brady Technical Support or your local authorised
distributor for repair and replacement information.
English
ii Regulatory Information
BMP91UG.book Page iii Friday, October 14, 2011 7:56 PM
iii
BMP91UG.book Page iv Friday, October 14, 2011 7:56 PM
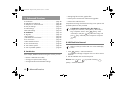
Contents
Copyright & Trademarks . . . . . . . . . . . . . . . . . . . . . . . . . i
Disclaimer . . . . . . . . . . . . . . . . . . . . . . . . . . . . . . . . . . . i
Brady Warranty . . . . . . . . . . . . . . . . . . . . . . . . . . . . . . . i
Technical Support . . . . . . . . . . . . . . . . . . . . . . . . . . . . .ii
1. Before You Begin . . . . . . . . . . . . . . . . . . . . . . . . . 1
A. Introduction . . . . . . . . . . . . . . . . . . . . . . . . . . . . . . . 1
B. Icon & Text Conventions . . . . . . . . . . . . . . . . . . . . . . 1
C. Do’s & Don’ts . . . . . . . . . . . . . . . . . . . . . . . . . . . . . 2
D. In This Package . . . . . . . . . . . . . . . . . . . . . . . . . . . . 6
E. Travelling with your BMP®91 printer . . . . . . . . . . . . . 7
F. BMP®91 Specifications . . . . . . . . . . . . . . . . . . . . . . 7
G. External components of the printer . . . . . . . . . . . . . . . 8
H. Internal components of the printer . . . . . . . . . . . . . . 15
2. Setting Up Your Printer . . . . . . . . . . . . . . . . . . . . 17
A. Introduction . . . . . . . . . . . . . . . . . . . . .
B. Loading a Ribbon Cartridge . . . . . . . . .
C. Powering the printer with an AC Supply .
D. Powering the printer with a Battery . . . .
E. Using the printer with a Computer . . . . .
...
...
...
...
...
....
....
....
....
....
..
..
..
..
..
17
17
18
19
22
3. Printing on Selected Media . . . . . . . . . . . . . . . . . 23
A. Introduction . . . . . . . . . . . . . . . . . . . . . . . . . . . . . . 23
B. Printing with a Tube Roll . . . . . . . . . . . . . . . . . . . . . 23
English
iv Contents
C. Printing with a Heat-Shrink Roll . . . . . . . . . . .
D. Printing with a Heat-shrink Cartridge . . . . . . .
E. Printing with a Label Cartridge . . . . . . . . . . .
F. Changing the Media Type and Its Application .
G. Previewing before printing . . . . . . . . . . . . . .
H. Canceling Printing . . . . . . . . . . . . . . . . . . . .
. . . . . .26
. . . . . .28
. . . . . .30
. . . . . .32
. . . . . .34
. . . . . .35
4. Entering and Editing Text/Symbols . . . . . . . . . . . 36
A. Introduction . . . . . . . . . . . . . . . . . . . . . . . . . . . . . .36
B. What is a Tag? . . . . . . . . . . . . . . . . . . . . . . . . . . . .36
C. General Navigation Tips . . . . . . . . . . . . . . . . . . . . .38
D. Browsing, Creating or Deleting Tags . . . . . . . . . . . . .38
E. Changing the Menu/Input Language . . . . . . . . . . . . .40
F. Entering Text in a Tag . . . . . . . . . . . . . . . . . . . . . . . .40
G. Formatting the Font in a Tag . . . . . . . . . . . . . . . . . . .41
H. Adding Serialization to a Tag . . . . . . . . . . . . . . . . . .42
I. Adding a Barcode to a Tag . . . . . . . . . . . . . . . . . . . .43
J. Adding Other Symbols to a Tag . . . . . . . . . . . . . . . . .44
K. Deleting Text/Symbols . . . . . . . . . . . . . . . . . . . . . . .44
L. Changing the Properties of Tags . . . . . . . . . . . . . . . . .45
5. Advanced Functions . . . . . . . . . . . . . . . . . . . . . . 48
A. Introduction . . . . . . . . . . . . .
B. USB Flash Drive Removal . . . .
C. Multiprint vs. Continuous Print .
D. Print Job Settings . . . . . . . . . .
E. Cutter Settings . . . . . . . . . . . .
F. Barcode Settings . . . . . . . . . .
G. Serialization . . . . . . . . . . . . .
....
....
....
....
....
....
....
....
....
....
....
....
....
....
...
...
...
...
...
...
...
....
....
....
....
....
....
....
. .48
. .48
. .49
. .50
. .52
. .53
. .54
BMP91UG.book Page v Friday, October 14, 2011 7:56 PM
H. Tag Files . . . . . . . . . . . . . . . . . . . . . . . . . . . . . . . . 54
I. User Graphics . . . . . . . . . . . . . . . . . . . . . . . . . . . . . 55
J. USB Flash Drive Connection . . . . . . . . . . . . . . . . . . . 56
K. PC Connection . . . . . . . . . . . . . . . . . . . . . . . . . . . . 56
L. Other Userful Functions . . . . . . . . . . . . . . . . . . . . . . 57
M. Lists of Shortcut Keys . . . . . . . . . . . . . . . . . . . . . . . 59
N. Lists of Menu options . . . . . . . . . . . . . . . . . . . . . . . 60
O. Lists of printable Symbols . . . . . . . . . . . . . . . . . . . . 69
J. If you see this message… . . . . . . . . . . . . . . . . . . . . . 91
6. Maintaining Your Printer . . . . . . . . . . . . . . . . . . . 77
A. Introduction . . . . . . . . . . . . . . . . . . . . . . . . . . . . . . 77
B. Cleaning the Printer . . . . . . . . . . . . . . . . . . . . . . . . . 77
C. Cleaning the Rollers . . . . . . . . . . . . . . . . . . . . . . . . 78
D. Cleaning Adhesive Build-up . . . . . . . . . . . . . . . . . . . 78
E. Replacing the Platen & Wrap rollers . . . . . . . . . . . . . 79
F. Replacing the Cutter . . . . . . . . . . . . . . . . . . . . . . . . 81
G. Replacing the Ribbon Cartridge . . . . . . . . . . . . . . . . 82
H. Replacing the Heat-shrink or Label Cartridge . . . . . . . 83
7. Troubleshooting . . . . . . . . . . . . . . . . . . . . . . . . . . 84
A. Introduction . . . . . . . . . . . . . . . . . . . . . . . . . . . . . . 84
B. If the externally fed tube is not autoloaded… . . . . . . . 84
C. If the loaded tube/label cannot be removed... . . . . . . 85
D. If the tube/label is jammed... . . . . . . . . . . . . . . . . . . 86
E. If the printer ribbon is jammed… . . . . . . . . . . . . . . . . 88
F. If the half-cuts are not deep enough... . . . . . . . . . . . . 89
G. If the display remains blank when power is on… . . . 89
H. If the input display does not appear… . . . . . . . . . . . . 89
I. If the printer does not print (properly or not at all)... . . . 90
Contents
v
BMP91UG.book Page vi Friday, October 14, 2011 7:56 PM
English
vi
BMP91UG.book Page 1 Friday, October 14, 2011 7:56 PM
1. Before You Begin
A. Introduction . . . . . . . . . . . . . . . . . . . . . . . . . . . . .page 1
B. Icon & Text Conventions . . . . . . . . . . . . . . . . . . . . .page 1
C. Do’s & Don’ts . . . . . . . . . . . . . . . . . . . . . . . . . . . .page 2
D. In This Package. . . . . . . . . . . . . . . . . . . . . . . . . . .page 6
E. Travelling with your BMP®91 printer . . . . . . . . . . . .page 7
F. BMP®91 Specifications. . . . . . . . . . . . . . . . . . . . . .page 7
G. External components of the printer . . . . . . . . . . . . .page 8
H. Internal components of the printer . . . . . . . . . . . . . page 15
• Automatic font sizing (so that more characters can be entered)
• Background printing while you continue editting
• Printing on high-quality Brady labels
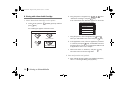
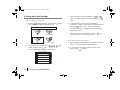
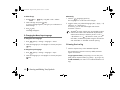
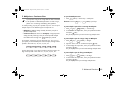
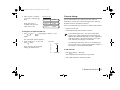
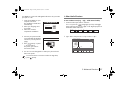
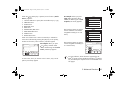
B. Icon & Text Conventions
For easier reference, this guide follows these conventions:
Table 1-1. Icon Conventions:
Icon
Note: Information highlighted by this gives you tips or
additional instructions that are useful.
A. Introduction
Caution or warning: Information highlighted by this
tells you how to avoid actions or situations that may
damage your device or endanger you.
Before you start using the printer, please read this chapter,
especially the safety precautions in the Do’s & Don’ts
section.
The BMP®91 printer can print text, serial numbers, barcodes and
other symbols on tubes (up to 7.0 mm in internal diameter) and
labels (up to 12.0 mm wide). Other special features supported
include:
• Fast printing speed (up to 25 mm/s)
• Long lasting battery (up to 2 hours)
• Large capacity ribbon cartridge (up to 200 m)
• 3.5” 320x240 pixel resolution, 256k colors TFT LCD display
Function
Table 1-2. Text Conventions:
Text Style
Function
italics
Name of a graphic, figure and/or table.
UPPERCASE
Name of a menu or submenu; or an acronym.
“xyz”
Name of an item (e.g. “xyz”) on the LCD screen.
[xyz]
Name of a key (e.g. “xyz”) on the keyboard.
1. Before You Begin
1
BMP91UG.book Page 2 Friday, October 14, 2011 7:56 PM
C. Do’s & Don’ts
• Keep small children away from the consumables.
• Turn off the power switch before unplugging or plugging.
To ensure safe operation of your
the following safety precautions.
BMP®91
printer, please observe
DO
• Unplug the printer when cleaning or when not in use.
• Use only a 100-240V AC power supply, the AC adapter and
the cartridges designed for this printer. Otherwise, a fire,
electrical shock or printer failure could happen.
• Use only the USB cable supplied with the printer package.
Other USB cables may fail to enable printing from a PC.
• Handle the printer and the AC adapter with care.Protect the
printer and AC plug from humidity and dust. E.g. Place placing
the devices in a cool, dry place. Clean them periodically. Dust,
dirt, soot, etc that accumulate could absorb moisture, creating
an insulation fault that may cause a fire.
• Keep the area around the AC adapter clear so that the printer
can be unpluged quickly in an emergency.
• Keep the area around the printer’s tube/label outlet clutter
free, i.e., prevent the tube/labels from accumulating there and
thus jamming the exit.
English
2 1. Before You Begin
• Hold the plug (not the cord) and push it firmly into the outlet.
• Hold the printer handle securely.
If there is thunder, unplug the printer. Otherwise, a fire,
electric shock or printer failure could happen.
DON’T
• Leave the printer unused for a long time.
• Continue to use the
printer if an
abnormality develops,
e.g. when smoke or an
unusual odor appears.
Unplug the printer and
contact your nearest
dealer at once.
BMP91UG.book Page 3 Friday, October 14, 2011 7:56 PM
DON’T
• Handle the power cord or the
plug with wet hands. This
could result in an electric
shock.
• Clean the printer with paint thinner or use inflammable sprays
near the printer. The thinner or spray could come into contact
with the internal components of the printer and cause a fire or
electric shock.
• Place the printer near water, heat sources (such as sparks or
flames) or inflammable materials (such as paint thinner and
alcohol). This could cause a fire, electric shock or printer
damage.
• Place the printer on a rug or a carpet. Fibers and dust could
get inside the printer and cause a fire.
• Use any AC adapter or cord other than the one provided in
your package. This could result in fire, electric shock or printer
failure.
• Pull the AC cord. This could damage the cord.
• Connect the printer to a
multi-outlet adapter or
extension cord. This could
result in fire or electric
shock.
• Place heavy or metal objects on the printer. This could damage
the printer.
• Place the printer on an unstable surface. The printer could fall
or tip over, be damaged and/or cause injury.
• Insert your finger or other
foreign objects into the
sides of the printer. You
could injure your finger
and/or damage the
printer.
• Feed wires into the printer. This could damage the printer.
1. Before You Begin
3
BMP91UG.book Page 4 Friday, October 14, 2011 7:56 PM
DON’T
• Touch the print head
while it is printing or
immediately after
printing. This could cause
a burn.
• Touch the ink ribbon. This
could stain your hands or
result in poor printing.
• Re-use ribbons or label tape. This could damage the printer.
• Touch the cutter. You
could injure your finger.
To handle the cutter
correctly, please refer to
“6. Maintaining Your
Printer”.
English
4 1. Before You Begin
• Touch the connection
terminal (metal part) of
the cartridge. This could
cause an incorrect
recognition of the
cartridge.
BMP91UG.book Page 5 Friday, October 14, 2011 7:56 PM
DON’T
• Attempt to pull a stuck tube out. This could result in poor
printing quality or other malfunctions. You can remove the tube
easily by pressing the [Remove] quick key on the printer.
8
Frame
Maintain
Char Space
Symbol
Remove
Font Size
*
9
(
0
)
Backspace
• Disassemble or modify the printer. This could damage the
printer or cause a fire.
1. Before You Begin
5
BMP91UG.book Page 6 Friday, October 14, 2011 7:56 PM
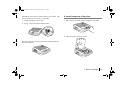
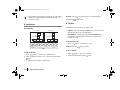
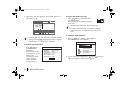
D. In This Package
• Unpack your package and verify that you have the following items in the box:
1 USB cable
1 CD
1 black ribbon cartridge
1 Quickstart Guide &
1 User’s Guide
1 BMP®91 printer
1 AC adapter
• Register online at bradycorp.com/register and receive free product support and updates.
• Save the packaging surrounding your BMP®91 printer in the event that you need to ship the printer and its accessories while travelling
or when returning them back to the supplier.
* The connectors in power plugs and wall sockets could differ in shape, size and type in different countries. Therefore, a power
cord might not be included in this package for certain regions.
** The BMP®91 printer can also be powered by a Lithium-Ion 12V battery pack. However, since this is optional, a battery is not
included in this package. You can buy one from a Brady dealer.
6 1. Before You Begin
BMP91UG.book Page 7 Friday, October 14, 2011 7:56 PM
E. Travelling with your BMP®91 printer
F. BMP®91 Specifications
When traveling with a BMP®91 printer, follow these tips:
System Specifications:
• Turn off the device by pressing
[Power] and then OK [OK].
The printer will return the all mechanic parts to home position.
• Disconnect the USB cable and power adapter from the device.
To prevent damage, wait till all lights are completely
off before removing the battery or power cord.
• Remove the battery from the device if you will not be using the
printer for more than a month.
• When traveling to another country/region, bring the necessary
plug adapter with you.
• Use only the power adapter supplied with the device. Do not
use any other voltage transformer or converter. You can use AC
sources of 100–240 volts, 50/60 Hz.
• Place the printer and all its accessories in the original
packaging material. You can also put them in a Brady hardsided carrying case (optional) which has compartments for
ribbon/label/heat-shrink cartridges, power adapter, CD-ROM,
USB cable and Quick Start Guide/User Guide. (For more
information, contact your local Brady dealer.)
If you are bringing extra or partially used media
cartridges (whether ribbon, label, or heat-shrink tube), do
not leave them inside the printer. Otherwise, whilst
travelling, the medium in a cartridge may unwind. Load a
cartridge only after reaching your destination.
• Dimensions (L x W x H): 275 x 275 x 109 mm
• Weight: 2.58 kg (with battery, no consumables)
2.37 kg (without battery, no consumables)
• Output rate of up to 35 pcs/min (Note: segment length is
20 mm.)
• Thermal Transfer Print Head Resolution: 300 dpi
• Elastomeric Keypad
• 3.5” 320x240 pixel resolution, 256k colors TFT LCD display
• Maximum print width: 7 mm internal diameter (tubes), 12 mm
(labels)
• Maximum print length (segment length): 300 mm
• Number of prints per battery charge: Up to 4000
20 mm segments
• Time taken to deplete battery with continuous printing =
Appox. 2 hours
Future upgrades to the BMP®91 firmware can be
downloaded from Brady’s website. Access
www.bradyid.com/BMP®91 or www.bradyid.com/ap
BMP®91, click Support > Downloads, then select
“BMP®91” from the list of products.
1. Before You Begin
7
BMP91UG.book Page 8 Friday, October 14, 2011 7:56 PM
G. External components of the printer
Environmental Specifications:
Operating Environment
Storage Environment
Temperature: 15–35°C -30–60°C (-22–140°F)
(59–95°F)
Relative Humidity (RH): Up to 90% non-condensing
20–85% non-condensing at 60°C (140°F)
Printer
AC
Adapter
Battery
Pack
Temperature: 0–25°C
(32–77°F)
Relative Humidity (RH):
-20–85°C (-4–185°F)
Battery charging:
0– 45°C (32–113°F)
Battery discharging or
during use: 0–49°C
(32–120°F)
A cool, dry place where the
temperature does not
exceed 49°C (120 °F). E.g.,
NOT in direct sunlight, a
vehicle or a metal building
during summer.
5–90%
Be mindful, when using the AC adapter with the printer,
that the adapter can withstand only a maximum
temperature of 25°C (77°F).
Do not expose the battery pack to water or rain, or allow it to get
wet.
English
8 1. Before You Begin
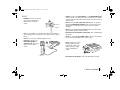
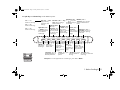
The external components of the BMP®91 printer include:
• a sturdy handle (see below) for secure handling of the device;
Media
outlet
Media
inlets
Handle
• two Media Inlets and one Media Outlet (details on page 16);
• a QWERTY keyboard (details on page 10);
• many types of keys (details on pages 9-11) for fast and easy
access to important and commonly used functions. E.g. Special
[Power] and
[Menu]; Quick keys such
keys such as
Menu
as
Media
[Media] and
[File]; and Function keys such as
File
“Application” (
Fn
(
[File]); and
Fn
[Fn]+
File
[Fn]+
Media
[Media]) and “Tag”
• Lots of useful information on the LCD screen, such as the status
of the medium used, the power supply, and the tag editor
settings (details on pages 12-14).
BMP91UG.book Page 9 Friday, October 14, 2011 7:56 PM
The special keys on the BMP®91 printer.
<Menu> key:
Access all the
printer functions
via a multi-level
menu.
<Clear All> key: Clear all
the text and settings for
the current editing job.
Multiprint (<Fn> + <PRINT> keys):
Display the Advanced Print menu
where you can select a range of tags
and multiple copies for the current
editing job.
<Power> key: Power on or off the
printer.
Navigation pad:
Move up [^],
down [v], left [<]
or right [>].
<PRINT> key:
Print the
current editing
job according
to the current
settings.
Menu
Clear All
OK
Multiprint
PRINT
Preview
Cancel
Print
Preview All
Clear All
Menu
OK
Multiprint
PRINT
Cancel
Print
Preview
Preview All
Tag
Media
Fn
Caps
Shift
Conti Print
!
@
2
~
3
€
Q
W
A
`
S
®
Z
Set Cutter
Language
File
1
4
£
C
F
º
%
T
[
6
{
G
‰
V
Alignment
Serial
5
¥
D
©
$
R
Ф
X
Adjustment
Seg Leng
#
E
±
^
Y
]
7
J
<
N
*
8
0
;
,
P
L
/
Font Size
)
Backspace
=
O
K
>
M
(
+
I
ʼ
Char Space
Remove
9
–
U
”
Maintain
Symbol
&
–
}
H
Ω
B
Frame
A/
A
Application
Esc
:
.
\
|
Enter
?
<OK> key:
Confirm a selected
item/action in a
menu or a
message window.
Preview or Preview All
(<Fn> + <Preview> keys):
View the printed tag with
all formatted effects on
the LCD.
<Cancel Print> key:
Immediately stop a
current printing job.
<Menu Return> key:
Go back to a previous
level menu.
<Close> key:
Directly return to
the Editor,
regardless of the
number of menu
levels entered.
Shift
1. Before You Begin
9
BMP91UG.book Page 10 Friday, October 14, 2011 7:56 PM
The QWERTY keyboard on the BMP®91 printer.
<Esc> key: Cancel the current changes and
return to last Menu (same as <Return>); or
Close the Message Windows (same as
<Cancel>).
<Fn> key: Access additional
functions (e.g. enter
common symbols) when
pressed with another key
(with golden yellow text on
it).
Esc
Fn
Caps
Shift
1
!
@
2
~
3
€
Q
W
A
`
S
®
Z
#
E
±
4
£
¥
D
X
5
R
Ф
©
$
C
F
º
%
T
[
6
{
G
‰
V
<Backspace> key: Delete the
character on the left to the cursor in
the Editor.
^
Y
]
7
B
J
<
N
9
–
U
”
*
8
–
}
H
Ω
&
M
)
;
,
P
L
/
Backspace
=
O
K
>
0
+
I
ʼ
(
:
.
\
Enter
?
Shift
<Shift> key: Access additional functions (e.g. enter common
symbols) when pressed with another key (with white text on it).
Clear All
Menu
OK
Multiprint
PRINT
Cancel
Print
Preview
Preview All
Tag
Media
Fn
Caps
Shift
Conti Print
!
@
2
~
3
€
Q
W
A
`
S
®
Z
Set Cutter
Language
File
1
4
£
©
$
C
F
º
%
T
[
‰
6
{
G
V
Alignment
Serial
5
¥
R
Ф
D
X
Adjustment
Seg Leng
#
E
±
^
Y
]
7
Ω
&
J
<
N
Maintain
>
0
;
,
P
L
/
Font Size
)
Backspace
=
O
K
M
(
+
I
ʼ
Char Space
Remove
9
–
U
”
*
8
–
}
H
B
Frame
Symbol
A/
A
Application
Esc
:
.
\
|
Enter
?
Shift
10 1. Before You Begin
|
Example 1:
To enter a symbol such as “+”, press the [Fn] key and the key that
has a yellow “+” on it at the same time, in other words, press [Fn] +
[O].
To enter a symbol such as “$”, press the [Shift] key and the key that
has a white “$” on it at the same, in other words, press [Shift] + [4].
<Enter> key:
Confirm a selected
item on the LCD
screen.
BMP91UG.book Page 11 Friday, October 14, 2011 7:56 PM
The quick keys and function keys on the BMP®91 printer.
<Fn> + <3>:
Create a 3-line tag.
A
Application
Tag
Conti Print
Set Cutter
Adjustment
Alignment
Frame
Maintain
Char Space
Media
File
Language
Seg Leng
Serial
A/
Symbol
Remove
Font Size
<Seg Leng> key:
Set segment
length to Auto or
Fixed. First
choose current or
all tag(s).
<Language> key: Set
<Serial> key:
language (English or
serialization
Chinese) of the text.
options.
<Media> key: <File> key:
Choose the
Save, open or
media type. delete a file.
Clear All
Menu
OK
Multiprint
PRINT
A
<Fn> + <2>:
Create a 2-line tag.
Alignment (<Fn> Maintain (<Fn> +
Tag (<Fn> + <File> Set Cutter (<Fn> + <Seg + A/ keys): Set <Remove> keys): Set the
keys): Edit tag
Leng> keys): Change
the alignment type printer to Maintenance
properties and
half-cut settings.
mode.
for the text.
settings.
Continuous Print
Adjustment (<Fn>
(<Fn> key +
Application (<Fn> <Language> key): + <Serial> keys): Frame (<Fn> +
Char Space (<Fn> +
<Symbol>
+ <Media> keys): Set the number of Adjust Lead
Set the application tags to be printed. Distance, Vertical keys): Apply a <Font Size> keys): Set
frame to select the character spacing
for a selected
First choose all or Position, and
Segment Length.
of the text.
tag(s).
media type.
current tag(s).
key:
Change the
orientation of
the text on the
tag(s).
A/
A
<Fn> + <1>:
Create a 1-line tag.
<Remove> key:
Remove the
medium from the
printer and home
the printhead.
Open <Symbol> key: Enter <Font Size> key:
special symbols on Set font size of the text
on the tag.
the tag.
Cancel
Print
Preview
Preview All
Tag
Media
Fn
Caps
Shift
Conti Print
File
1
!
3
€
W
A
`
S
®
Z
Set Cutter
Language
@
2
~
Q
4
£
©
$
C
F
º
%
T
[
‰
6
{
G
V
Alignment
Serial
5
¥
R
Ф
D
X
Adjustment
Seg Leng
#
E
±
^
Y
]
7
Ω
J
<
N
*
8
>
0
;
,
P
L
/
Font Size
)
Backspace
=
O
K
M
(
+
I
ʼ
Char Space
Remove
9
–
U
”
Maintain
Symbol
&
–
}
H
B
Frame
A/
A/<
A
Application
Esc
:
.
\
|
Enter
?
Example 2: To set the application for a media type, press <Fn>+<Media>.
Shift
1. Before You Begin
11
BMP91UG.book Page 12 Friday, October 14, 2011 7:56 PM
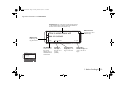
System and Media information on the LCD screen.
AC Power icon: Printer is on AC power
only.
Battery level: Indicates how much power
left (also shown when printer is on both AC
power and battery).
USB icon: USB device is
connected to the printer.
Time & Date
SYSTEM INFORMATION BAR
2:30 pm 10/07/2010
6
1
TAG EDITOR
TAG SCROLL BAR
TAG PROPERTY BAR
2
This is what users will
see on screen
CAPS EN
B
I
A
2
X
A:12 Text
U ABC
HSF Ф4.0
Ribbon icon: Indicates
the ribbon installed (if
any). In this case, the
the icon indicates that a
ribbon has been
loaded.
12 1. Before You Begin
1 / 13
CP 1 SL 30mm
HSFФ4.0
Ribbon remaining
length icon: In this
case, the icon
indicates that the
ribbon is full or
almost full.
A 150%
Background printing
job status icons: In this
case, the tag printing
job is around 70
percent done.
100%
70%
Media Type icon:
Indicates the media
cartridge installed
(if any), its width
and remaining
length.
MEDIA INFORMATION BAR
Media remaining
length icon: In this
case, the medium is
running “very low”.
BMP91UG.book Page 13 Friday, October 14, 2011 7:56 PM
Tag Editor information on the LCD screen.
Actual tag text: This is the only text that will be printed
on the medium (tube or label). All the other details on
the LCD screen are for information only.
6
1
2
Multi-line tag
icons: E.g. this
tag has 2 lines.
2:30 pm 10/07/2010
6
1
2
This is what users will
see on screen
This is what users will
see on screen
HSFФ4.0
CP 1 SL 30mm
Job Media: The
medium used in
the current
editing job is a
Heat-Shrink Flat
4.0mm tube.
Continuous
Print (CP): In
this tag, CP is
set to 1
(default).
Half/Full-cut icon:
E.g. this tag is set to
“Half-cut” (6).
1 / 13
Current Segment
Length (SL): In this
tag, SL is 30 mm.
Tag number /
Number of Tags: This
is tag 1 out of 13
tags.
3
B
1 / 13
CP 1 SL 30mm
HSFФ4.0
CAPS EN
I
A
X2
HSF Ф4.0
A:12 Text
U ABC
A 150%
100%
70%
1. Before You Begin
13
BMP91UG.book Page 14 Friday, October 14, 2011 7:56 PM
Tag Property information on the LCD screen.
CAPS:
Caps-lock
is on here.
Auto-sized tag icon:
Segment length will be
set automatically.
Font Size: Either
fixed text (here)
or auto-text.
Language:
English text is
being entered.
CAPS EN
B
Bold text
effect
(Inactive)
Italic text
effect
(Inactive)
I
Text spacing: Spacing
between characters.
A
X2
Character scaling: The
characters in this tag will
be widened by 50%.
A:12 Text
U ABC
Superscript Underline
text effect text effect
(Inactive) (Inactive)
Preview Zoom Ratio:
100 percent in this tag.
A 150%
Frame icon:
Rectangular
frame
(Inactive)
100%
Horizontal text
alignment:
Center-Top
aligned.
2:30 pm 10/07/2010
6
1
2
This is what users will
see on screen
B
1 / 13
CP 1 SL 30mm
HSFФ4.0
CAPS EN
I
A
X2
HSF Ф4.0
A:12 Text
U ABC
A 150%
100%
70%
English
14 1. Before You Begin
Text orientation: In this
tag, set to “Horizontal”.
Vertical text alignment: Left-Bottom aligned.
BMP91UG.book Page 15 Friday, October 14, 2011 7:56 PM
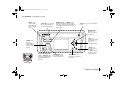
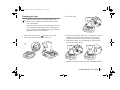
The BMP®91 printer has two media inlets for you to feed a tube
into the printer from the outside (i.e. externally):
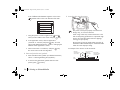
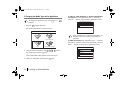
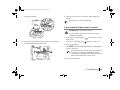
a. a large rectangular hole for tubes
H. Internal components of the printer
1. Below the printer handle, locate and pull the cover latch.
b. a long, narrow slot for flat heat-shrink tubes
a
b
2. Open the printer cover from the top.
The printer also has a media outlet for the printed tube/label to
get out of the device.
YY Y
Y
YYYY
Y YY Y
YY YY
1. Before You Begin
15
BMP91UG.book Page 16 Friday, October 14, 2011 7:56 PM
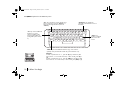
The latches, rollers, cutter, printhead, and cartridge holding areas inside the printer.
Cover latch: Pull this to
open the printer cover.
Wrap Roller latch: Pull
this to move the Wrap
roller away from the
Platen roller.
Platen roller: This roller
provides the backing
against which the
printhead can strike.
Wrap roller: This roller
holds the tube/label in
place against the Platen
roller.
Media Outlet: This is
where the medium (fed
externally or internally)
finally emerges after
printing.
Cutter: This cuts the
medium (tube or label)
into preset segments.
Printhead: This presses the
ribbon against the medium
and prints the text and
symbols of predefined
tag(s).
16 1. Before You Begin
Feed roller: This roller
helps to move the
tube/label forward or
backwards,
depending on the
function triggered in
the printer.
Media cartridge holding
area.
Pinch roller: This roller
holds the tube/label in
place against the Feed
roller.
Media Inlets: Tubes are
fed into the printer from
outside (externally)
through these two inlets
— round tubes through
the large hole and flat
tubes through the slit.
Media Channel latch: If
and when an externally
fed tube cannot get
through to the rollers,
flip open the flap of this
latch.
Ribbon cartridge
holding area.
BMP91UG.book Page 17 Friday, October 14, 2011 7:56 PM
2. Setting Up Your Printer
A. Introduction . . . . . . . . . . . . . . . . . . . . . . . . . . . . page 17
B. Loading a Ribbon Cartridge . . . . . . . . . . . . . . . . . page 17
C. Powering the printer with an AC Supply . . . . . . . . . page 18
D. Powering the printer with a Battery . . . . . . . . . . . . page 19
E. Using the printer with a Computer . . . . . . . . . . . . . page 22
A. Introduction
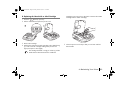
B. Loading a Ribbon Cartridge
The BMP®91 printer uses only Brady ribbon cartridges.
You can load/unload the cartridge with the power on or
off.
1. Pull the cover latch and open the printer cover.
a
b
Your BMP®91 printer comes pre-installed with almost all the
necessary components.
To start using the printer, you only need to install a ribbon
cartridge and then power up the printer with the AC power
adapter included in the package.
You can also power up the printer with a Lithium Ion 12V battery
pack (optional, not included in the package). If and when you
choose to do so, before you start, please read the warnings and
cautions in the “D. To power the printer with a Battery” section.
The BMP®91 printer is designed to be used primarily as a
standalone printer. You can also use the supplied USB cable to
connect the printer to a personal computer (PC), for example, to
perform system upgrades to the printer, or to print from the PC
using the Print Application software.
Within the printer, near the bottom right hand corner, you
should be able to find an empty cartridge holding area.
2. Setting Up Your Printer
17
BMP91UG.book Page 18 Friday, October 14, 2011 7:56 PM
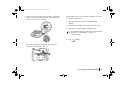
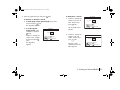
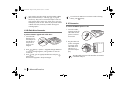
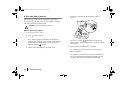
2. Grasping the finger tabs of cartridge, insert the ribbon
cartridge with its label facing up, as shown in the diagram
below.
a
b
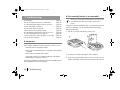
C. Powering the printer with an AC Supply
USE ONLY: a) 100-240V AC power supply, b) the AC
adapter supplied in your package.
KEEP: a) the AC plug clean, b) the area around the AC
adapter clear of any clutter.
1. Firmly insert the thin
round end of the
adapter cable into the
plug-in port on the
back of the printer.
2. Firmly plug the other end of the cord into an
3. Ensure that the printer ribbon is right over the printhead and
push the cartridge slightly to snap into place.
electrical outlet. (Your outlet may look
different from what is shown here.)
4. Close the cover firmly so that you can hear and feel that it
latches.
To clear the printhead area of used ribbon, turn the top
spool of the ribbon counterclockwise.
3. Press the
[Power] key.
The printer starts up. The Brady logo appears and the last tag
editing job gets loaded on the LCD screen.
To turn off the printer, press the
the
English
18 2. Setting Up Your Printer
OK
[OK] key.
[Power] key and then
BMP91UG.book Page 19 Friday, October 14, 2011 7:56 PM
D. Powering the printer with a Battery
Your BMP®91 package does not include a battery since
battery power is optional.
• Use only Brady Lithium-Ion 12V battery packs.
CAUTION: Risk of Explosion if the battery is replaced
by an incorrect type. Dispose of used batteries
according to the instructions.
• Store the battery pack in a cool, dry place.
• Charge the battery pack for 4 hours before using it for the first
time.
You may charge/recharge the battery pack inside the printer
using the AC power adapter in your package OR outside the
printer using the charger adaptor specifically designed for this
purpose.
abnormal chemical reaction may occur, possibly leading to
acid leakage, overheating, smoke emission, bursting and/or
ignition of the battery pack.
• When recharging the battery, observe the recharging
conditions specified by the battery manufacturer.
A recharging operation under non-conforming conditions
(beyond the limits of temperature and larger voltage/current
than specified) can cause the battery pack to be overcharged,
or charged with extremely high current, abnormal chemical
reaction can occur in it, possibly leading to overheating,
smoke emission, bursting and/or ignition.
• Do not disassemble, open, or modify the battery. If it is
damaged, replace the battery.
Incorrect reassembly may result in the risk of electric shock, fire
or exposure to battery chemicals.
• Do not use a battery pack that has been damaged in any way
(e.g., pierced with a nail, hit with a hammer, run over, stepped
on, received a sharp blow, dropped).
• Do not drop the battery. Do not crush the battery by putting
objects on top of it.
WARNINGS
• When loading the battery into a battery pack charger or the
printer’s battery compartment, ensure that the plus (+) and
minus (-) terminal marks on the battery pack and on the battery
charger/compartment are correctly oriented.
Reversing the terminals will result in reverse-charging and
Doing any of these may damage the battery.
• Do not transport or store the battery pack together with metal
objects such as necklaces, hair pins, etc.
A battery will short circuit if a metal object makes a connection
between the positive and negative contacts on the battery. A
short circuited battery may cause fire and personal injury.
2. Setting Up Your Printer
19
BMP91UG.book Page 20 Friday, October 14, 2011 7:56 PM
The charger will charge the battery when the battery’s
internal temperature is between 0°C (32 °F) and
45 °C (113 °F). When the battery pack temperature
range is outside that range, charging will not occur.
• Do not expose cells or batteries to heat, fire, water or rain.
Avoid storage in direct sunlight. Do not allow it to get wet.
Batteries exposed to heat or fire may explode, causing
personal injury or damage. Toxic fumes and materials are
created when batteries are burned.
Water may cause the protective features in the battery pack to
be damaged. The pack can exhibit extremely high current
and/or voltage; abnormal chemical reactions may occur in the
pack, possibly leading to overheating, smoke emission,
bursting and/or ignition.
• Do not use the battery pack for a purpose other than those
specified.
Misuse of battery pack may damage the battery pack, shorten
battery pack life, result in risk of fire, electric shock or personal
injury.
• Dispose of Brady Lithium Ion batteries according to federal,
state and local regulations. Contact a recycling agency in your
area for recycle locations.
Improper battery disposal may harm you and the environment.
CAUTIONS
• Do not store battery where temperatures may exceed 49 °C
(120 °F), such as in direct sunlight, a vehicle or a metal
building during summer.
English
20 2. Setting Up Your Printer
• Do not expose the battery pack or printer to water or rain, or
allow them to get wet. This may damage the battery pack
and/or the printer.
• Do not use oil or solvents to clean or lubricate the battery. The
plastic casing will become brittle and crack, causing a risk of
injury.
• Do not allow any metal or other conductive materials to touch
the battery terminals.
To load the battery in the printer:
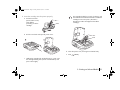
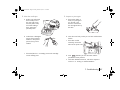
1. Holding the printer securely by the handle, turn the printer
over.
2. Open the bottom
casing as shown here.
BMP91UG.book Page 21 Friday, October 14, 2011 7:56 PM
3. Holding the battery
5. Close the casing.
4. Ensure that the battery pack fits snugly in the battery
6. Press the
(with its label facing
upwards and its
metallic terminals away
from you), insert it into
the printer’s battery
compartment as shown
in the diagram here.
compartment.
If you cannot easily connect the battery pack terminals
to the printer’s battery compartment terminals, doublecheck that the plus (+) and minus (-) terminal marks on
the two are correctly oriented.
[Power] key.
The printer starts up. The
Brady logo appears and
the last tag editing job
gets loaded on the LCD
screen.
To turn off the printer, press the
the
OK
[Power] key and then
[OK] key.
2. Setting Up Your Printer
21
BMP91UG.book Page 22 Friday, October 14, 2011 7:56 PM
E. Using the printer with a Computer
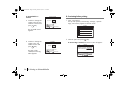
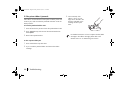
1. Insert the smaller,
squarish end of the
USB cable into the
printer’s socket as
shown here.
2. Plug the other end
(with a rectangular
connector) of the
USB cable into a
USB port on a
personal computer
(PC).
3. Enter
[Menu] > System > “PC Connection”.
For more detailed instructions, see the “PC Connection”
section in “5. Advanced Functions”.
Menu
To use the printer with a USB flash drive, see the “Flash
Drive Connection” section in “5. Advanced Functions”.
English
22 2. Setting Up Your Printer
BMP91UG.book Page 23 Friday, October 14, 2011 7:56 PM
3. Printing on Selected Media
A. Introduction . . . . . . . . . . . . . . . . . . . . . . . . . . . . page 23
B. Printing with a Tube Roll . . . . . . . . . . . . . . . . . . . . page 23
C. Printing with a Heat-Shrink Roll . . . . . . . . . . . . . . . page 26
D. Printing with a Heat-shrink Cartridge . . . . . . . . . . . page 28
E. Printing with a Label Cartridge . . . . . . . . . . . . . . . page 30
F. Changing the Media Type and Its Application . . . . . page 32
G. Previewing before printing . . . . . . . . . . . . . . . . . . page 34
H. Canceling Printing . . . . . . . . . . . . . . . . . . . . . . . page 35
For a new printer, the default media type is “Tube”.
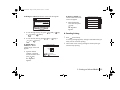
B. Printing with a Tube Roll
1. Select “Tube” on the printer.
a. On the printer, press the
Media
[Media] quick key.
Four media types appear on the LCD screen.
Choose Media Type
A. Introduction
CB
CB
-D
-D
W
W
T3
T3
BMP®91
The
printer supports printing on four main types of
media: tube rolls, heat-shrink tube rolls, heat-shrink tube
cartridges and label cartridges. The tubes in rolls are fed into the
printer from the outside (externally) while the tubes/labels in
cartridges are loaded from within the printer (internally).
When powered up for the first time, a brand new BMP®91 printer
will prompt you to select: 1) Media Type, and 2) Application.
After this, the default settings of new editing jobs will be based
on these settings. On subsequent power-ons, however, the settings
of new editing jobs will be based on the last settings before
power-off.
Tube
CB
Heat - Shrink Roll
CB
-D
W
T3
Label
-D
W
T3
Heat - Shrink Cartridge
b. Ensure that “Tube” is selected (see previous screenshot)
and press
OK
[OK].
3. Printing on Selected Media
23
BMP91UG.book Page 24 Friday, October 14, 2011 7:56 PM
A list of different tube diameters appears on the screen.
Diameter refers to the inner diameter of the tube
3. Insert the tube into the printer.
Please Select Tube
1
0.75mm2/Tɸ2.5mm
2
01.0mm2/Tɸ2.8mm
3
1.5mm2/Tɸ3.2mm
4
2.5mm2/Tɸ3.6mm
5
4.0mm2/Tɸ4.2mm
c. Using the printer’s vertical navigation keys
The printer will not print properly on a tube that is
bumpy, dirty, or of uneven thickness.
and
OK
select your tube width on the screen and press
OK
OK
,
[OK].
d. In the Application screen, select an application
(“General” or “Vertical”) and press OK [OK]. For more
options and detailed instructions, see the “F. Changing the
Medium and Its Application” section.
e. Select “Auto-sized” or “Fixed-size”, and press
The screen returns to the main tag editor.
OK
[OK].
2. Enter and print the text/symbols.
a. Enter and edit the text/symbols. (For detailed instructions,
refer to “4. Entering & Editing Text/Symbols.”)
b. To see how the entered text/symbols look like when
printed, press
Preview
[Preview].
English
24 3. Printing on Selected Media
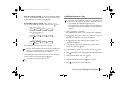
When using a tube reel, minimise the tension in the
tube so that printing performance is optimized. High
tension will cause tube stretch and even slippage,
causing poor print quality.
During printing, keep the media outlet area clear of
obstruction and accumulated prints. A blocked media
outlet will cause improper cutting.
An example of how tension can be minimised:
Tube Roll
mounted above
work surface
Work
surface
Tube enters printer
Keep media
parallel to
outlet area clear
work surface
of obstruction
BMP91
10 cm
15 cm
15 cm
BMP91UG.book Page 25 Friday, October 14, 2011 7:56 PM
a. From the printer’s right side, insert the tube into the larger
media inlet (see the next figure). Keep pushing the tube in
until you cannot push it any further.
If auto-loading fails, an error message will appear on screen.
To load the tube manually:
i) Open the printer and remove any installed media
cartridge.
ii) Push the tube manually until it reaches the platen roller.
iii) Close the cover and let the printer load the tube.
IFor detailed instructions, refer to the “If the externally
fed tube is not autoloaded…” section in “7.
Troubleshooting”.
b. Press
PRINT
[PRINT].
The printer should autoload the tube, moving it up to
somewhere near the platen roller.
3. Printing on Selected Media
25
BMP91UG.book Page 26 Friday, October 14, 2011 7:56 PM
C. Printing with a Heat-Shrink Roll
A list of heat-shrink tube diameters appears on the screen.
1. Select “Heat-shrink Roll” on the printer.
a. On the printer, press the
Media
Please Select Heat Shrink Roll
[Media] quick key and then
press OK [OK].
Four media types appear on the LCD screen.
Choose Media Type
1
HS ɸ3.0mm
2
HS ɸ4.0mm
3
HS ɸ5.0mm
4
HS ɸ6.0mm
5
HS ɸ6.5mm
CB
CB
-D
-D
W
W
c. Using the printer’s vertical navigation keys
T3
T3
Tube
select your tube width on the screen and press
Heat - Shrink Roll
CB
-D
W
Label
T3
Heat - Shrink Cartridge
b. Using the printer’s navigation keys
“Heat Shrink Roll” and press
OK
OK
,
[OK].
(“General” or “Vertical”) and press OK [OK]. For more
options and detailed instructions, see the “F. Changing the
Medium and Its Application” section.
W
T3
OK
d. In the Application screen, select an application
CB
-D
and
OK
OK
,
[OK].
OK
,
OK
,
OK
, select
e. Select “Auto-sized” or “Fixed-size”, and press
The screen returns to the main tag editor.
OK
[OK].
2. Enter and print the text/symbols.
a. Enter and edit the text/symbols. (For detailed instructions,
refer to “4. Entering & Editing Text/Symbols.”)
b. To see how the entered text/symbols look like when
printed, press
English
26 3. Printing on Selected Media
Preview
[Preview].
BMP91UG.book Page 27 Friday, October 14, 2011 7:56 PM
3. Insert the heat-shrink tube into the printer.
The printer will not print properly on a heat-shrink
tube that is bumpy, dirty, or of uneven thickness.
a. From the right side, insert the Heat Shrink Tube into the
narrow media inlet (b), (see below). Keep pushing the
tube in until you cannot push it any further.
The BMP®91 printer is optimised for Brady heatshrink tubes. If third-party heat shrink tubes are
used, the printer might not print properly.
When using a heat-shrink tube roll, minimise the
tension in the tube so that printing performance is
optimized. High tension will cause tube stretch and
even slippage, causing poor print quality.
During printing, keep the media outlet area clear of
obstruction and accumulated prints. A blocked media
outlet will cause the improper cutting.
a
b
An example of how tension can be minimised:
Tube Roll
mounted above
work surface
Work
surface
Tube enters printer
parallel to
work surface
The printer should autoload the tube, moving it up to
somewhere near the platen roller.
Keep media
outlet area clear
of obstruction
If the tube was not autoloaded and ready for
printing, you can load it manually. For detailed
instructions, refer to the “If the externally fed tube
is not autoloaded…” section in “7.
Troubleshooting”.
BMP91
10 cm
15 cm
15 cm
b. Press
PRINT
[PRINT].
3. Printing on Selected Media
27
BMP91UG.book Page 28 Friday, October 14, 2011 7:56 PM
D. Printing with a Heat-shrink Cartridge
1. Select “Heat-shrink Cartridge” on the printer.
a. On the printer, press the
press
OK
Media
[Media] quick key and then
[OK].
Four media types appear on the LCD screen.
Choose Media Type
b. Using the printer’s navigation keys
OK
,
OK
,
OK
,
OK
, select
“Heat-shrink Cartridge” and press OK [OK].
A list of heat-shrink tube diameters appears on the screen.
Please Select Heat Shrink Cartridge
1
HS ɸ3.0mm WT
2
HS ɸ4.0mm WT
3
HS ɸ5.0mm WT
4
HS ɸ6.5mm WT
5
HS ɸ3.0mm YL
CB
CB
-D
-D
W
W
T3
T3
Tube
CB
Heat - Shrink Roll
W
T3
Label
and
OK
select your tube width on the screen and press
OK
OK
,
[OK].
d. In the Application screen, select an application (“General”
CB
-D
c. Using the printer’s vertical navigation keys
-D
W
T3
Heat - Shrink Cartridge
or “Vertical”) and press OK [OK]. For detailed instructions
and more options, see the “F. To Change the Medium and
Its Application” section in this chapter.
e. Select “Auto-sized” or “Fixed-size”, and press
The screen returns to the main tag editor.
OK
[OK].
2. Enter and print the text/symbols.
a. Enter and edit the text/symbols. (For detailed instructions,
refer to “4. Entering & Editing Text/Symbols.”)
English
28 3. Printing on Selected Media
BMP91UG.book Page 29 Friday, October 14, 2011 7:56 PM
b. To see how the entered text/symbols look like when
printed, press
Preview
[Preview].
c. Holding the cartridge with its label facing up, insert it into
the cartridge holding area (see the next illustration) and
press it down lightly.
3. Insert the cartridge into the printer.
The cartridge should fit in snugly. If it doesn’t, pull
the media channel latch downwards to enable the
cartridge to move into place. (The latch is
between the media cartridge and the ribbon
cartridge.)
a. Ensure that a small
portion (about 3 mm)
of the tube is
protruding out of the
cartridge.
b. Pull the cover latch and
open the printer cover.
a
b
d. Close the printer cover, ensuring that it latches firmly.
e. Press
PRINT
[PRINT].
3. Printing on Selected Media
29
BMP91UG.book Page 30 Friday, October 14, 2011 7:56 PM
E. Printing with a Label Cartridge
c. Using the printer’s vertical navigation keys
a. Press the
[Media] quick key and then press
Four media types appear on the LCD screen.
Media
OK
[OK].
,
OK
OK
d. In the Application screen, select an application
(“General”, “Vertical”, “Patch Panel” or “Terminal Block”)
and press OK [OK]. For more options and detailed
instructions, see the “F. Changing the Medium and Its
Application” section.
Choose Media Type
CB
-D
-D
and
select your label width on the screen and then press
[OK].
1. Select “Label” on the printer.
CB
OK
W
W
T3
T3
Tube
e. Select “Auto-sized” or “Fixed-size”, and press
The screen returns to the main tag editor.
Heat - Shrink Roll
CB
OK
[OK].
CB
-D
-D
W
W
T3
T3
Label
2. Enter and print the text/symbols.
Heat - Shrink Cartridge
b. Using the printer’s navigation keys
OK
,
OK
,
OK
,
“Label” and then press OK [OK].
A list of label diameters appears on the screen.
Please Select Label
1
Label 6.0mm WT
2
Label 9.0mm WT
3
Label 12.0mm WT
4
Label 6.0mm YL
5
Label 9.0mm YL
English
30 3. Printing on Selected Media
OK
, select
a. Enter and edit the text/symbols. (For detailed instructions,
refer to “4. Entering & Editing Text/Symbols.”)
b. To see how the entered text/symbols look like when
printed, press
Preview
[Preview].
BMP91UG.book Page 31 Friday, October 14, 2011 7:56 PM
3. Insert the cartridge into the printer properly.
The cartridge should fit in snugly. If it doesn’t, pull
the media channel latch downwards to enable the
cartridge to move into place. (The latch is
between the media cartridge and the ribbon
cartridge.)
a. Ensure that a small
portion (about 3 mm)
of the label is
protruding out of the
cartridge.
b. Pull the cover latch and open the printer cover.
a
b
d. Close the printer cover, ensuring that it latches firmly.
e. Press
PRINT
[PRINT].
c. Holding the cartridge with its label facing up, insert it into
the cartridge holding area (see the next illustration) and
press it down lightly.
3. Printing on Selected Media
31
BMP91UG.book Page 32 Friday, October 14, 2011 7:56 PM
F. Changing the Media Type and Its Application
To change the Application only, press
[Fn] +
Fn
If “Tube” (or “Heat-shrink Roll” or “Heat-shrink Cartridge”)
was entered, only two application types — “General”,
“Vertical” — appear on the medium’s Application screen.
Media
[Media].
1. Press the
Media
Please Select Tube Application
[Media] quick key.
1
General
2
Vertical
Four media types appear on the LCD screen.
Choose Media Type
When a medium has a “General” application, the
orientation of the text printed on the medium is
horizontal.
CB
CB
-D
-D
W
W
T3
T3
Tube
Heat - Shrink Roll
CB
If “Label” was entered, four application types — “General”
(horizontal), “Vertical”, “Patch Panel” (horizontal), “Terminal
Block” — appear on the medium’s Application screen.
CB
-D
-D
W
W
T3
T3
Label
Heat - Shrink Cartridge
Please Select Label Application
2. Using the printer’s navigation keys
new media type and press
OK
OK
,
OK
,
OK
,
OK
, select a
[OK].
A list of tube/label widths appears on the LCD screen.
3. Select your tube/label width and press
English
32 3. Printing on Selected Media
OK
[OK].
1
General
2
Vertical
3
Patch Panel
4
Terminal Block
BMP91UG.book Page 33 Friday, October 14, 2011 7:56 PM
4. Select an application type and press
OK
If “Patch Panel” is entered:
[OK].
If “General” or “Vertical” is entered:
a. To let the printer set the segment length, select “Autosized” and press OK [OK].
The Tag Editor appears.
press
OK
[OK].
No. of Ports 30
Return Menu
The Set Width screen
appears.
Set Length
Length 30
Return Menu
/
Backspace
OK
Confirm
Move Cursor
Delete
OK
Confirm
Move Cursor
Backspace
Delete
Return Editor
mm
OK
text box and press
[OK].
The Tag Editor
appears.
OK
No. of Ports
/
b. To set the segment
length yourself, select
“Fixed-size” and press
[OK].
Confirm or change the
number in the “Length”
a. Confirm or change the
number in the “No. of
Ports” text box and
Return Editor
b. Confirm or change the
number in the “Set
Width” text box and
press
OK
Set Width
Set Width 30
[OK].
The tags will be
created, then the Tag
Editor appears.
Return Menu
/
Backspace
OK
mm
Confirm
Move Cursor
Delete
Return Editor
3. Printing on Selected Media
33
BMP91UG.book Page 34 Friday, October 14, 2011 7:56 PM
If “Terminal Block” is
entered:
a. Confirm or change the
number in the the “No.
of Blocks” text box and
press
OK
[OK].
Set No. of Blocks
1. Press
No. of Blocks 30
Return Menu
/
Backspace
G. Previewing before printing
Confirm
OK
[Preview].
Four preview options (“Current Tag”, “All Tags”, “Specific
Tags”, and “Zoom”) appear on the LCD screen.
Preview
Move Cursor
Delete
Preview
Return Editor
The Set Width screen
appears.
1
Current Tag
2
All Tag
3
Specific Tags
4
Zoom
100%
2. Select an option and press
b. Confirm or change the
number in the “Set
Width” text box and
press
OK
100%
Set Width 30
The tags will be
created, then the Tag
Editor appears.
Return Menu
/
Backspace
English
34 3. Printing on Selected Media
OK
[OK].
If “Current Tag” is entered, the Preview screen will appear.
Set Width
[OK].
OK
mm
Confirm
Preview
2/7
Line 1 characters 1234567890
Line 2 characters 1234567890
Move Cursor
Delete
Return Editor
Return Editor
Navigating
+
Go to
Page Up/Down Fn +
/
/
First/Last Page Shift +
Zoom Out/In
/
Shift
BMP91UG.book Page 35 Friday, October 14, 2011 7:56 PM
If “All Tags” is entered, the Preview screen will also appear.
Preview
50%
2/7
a. Select the desired
zoom level and press
Line 1 characters 1234567890
Line 2 characters 1234567890
[OK].
The Tag Editor
appears.
OK
Return Editor
Navigating
+
Go to
Shift
Page Up/Down Fn +
/
/
First/Last Page Shift +
Zoom Out/In
/
a. To view the tags one by one, press
or
Shift
[Shift] +
OK
Fn
[Fn] +
OK
Shift
[Shift] +
OK
[Up]
[Down].
b. To view the first/last tag, press
Fn
[Fn] +
OK
[Up] or
[Down] .
Please Select Zoom Level
1
50%
2
100%
3
125%
4
150%
5
175%
H. Canceling Printing
1. Press
[Cancel Print].
A warning message appears, asking for confirmation that you
really want to cancel the printing.
Cancel
Print
2. Choose OK on the warning message to resume printing or
If “Specific Tags” is
entered, the “Please
specify range” screen will
appear.
a. Type the relevant
numbers in the From
and To text boxes and
If “Zoom” is entered, the
“Please select Zoom Level”
screen will appear.
Please specify range
Cancel to stop printing.
From 1
To 2
OK
Move among fields
/
Confirm
Cancel and Return
press OK [OK].
The Tag Editor
appears.
3. Printing on Selected Media
35
BMP91UG.book Page 36 Friday, October 14, 2011 7:56 PM
4. Entering and Editing Text/Symbols
A. Introduction . . . . . . . . . . . . . . . . . . . . . . . . . . . .
B. What is a Tag? . . . . . . . . . . . . . . . . . . . . . . . . .
C. General Navigation Tips. . . . . . . . . . . . . . . . . . .
D. Browsing, Creating or Deleting Tags . . . . . . . . . . .
E. Changing the Menu/Input Language. . . . . . . . . . .
F. Entering Text in a Tag . . . . . . . . . . . . . . . . . . . . .
G. Formatting the Font in a Tag . . . . . . . . . . . . . . . .
H. Adding Serialization to a Tag . . . . . . . . . . . . . . .
I. Adding a Barcode to a Tag . . . . . . . . . . . . . . . . .
J. Adding Other Symbols to a Tag . . . . . . . . . . . . . .
K. Deleting Text/Symbols . . . . . . . . . . . . . . . . . . . .
L. Changing the Properties of Tags . . . . . . . . . . . . . .
page 36
page 36
page 38
page 38
page 40
page 40
page 41
page 42
page 43
page 44
page 44
page 45
Therefore, the instructions in this chapter are written with the
assumption that the Media Type and its Application have already
been chosen/confirmed. If you want to change the media/
application and need detailed instructions, please see the “F. To
Change the Media Type and Its Application” section in “Chapter
3. Printing on Selected Medium”.
Shorthand used in this chapter: E.g. This instruction,
“Enter
Menu
[Menu] > Quick Keys > Tag > Properties”
means “Press
press
OK
Menu
[Menu]; then select Quick Keys and
[OK]; next select Tag and press
finally select Properties and press
OK
OK
[OK]; and
[OK]”.
B. What is a Tag?
A. Introduction
BMP®91
When powered up for the first time, your brand new
printer will prompt you to select a) Media Type and b)
Application. After this, each new editing job will be based on
these default settings.
Upon subsequent power-on however, the printer will autoload the
last editing job (with its media settings) that was in the Tag Editor
before the last power-off. This will happen even when the current
English
36 4. Entering and Editing Text/Symbols
medium may be different from the last medium and even if the last
job was a blank one (with a blank tag), the printer will still load it.
Before you can print anything on a tube/label with the BMP®91
printer, you must use the Tag Editor on the LCD screen to enter the
characters (and serial numbers, barcodes or other symbols, if any)
to something known as a “tag”.
Just what is a “tag”? On this printer, a “tag” is basically a
printable space with default and changeable properties. When
printed, each tag usually corresponds to one segment on the
tube/label. If multiple copies of the same “tag” are printed, a
“tag” will then correspond to multiple segments on the tube/label.
BMP91UG.book Page 37 Friday, October 14, 2011 7:56 PM
You can create as many tags as you want. You can also import
and insert your own graphics into a tag. You can format the text
or change the properties of a tag too.
Example 5: Turn a tag (usually single-line) into a multi-line one.
5
Line 1 characters 1234567890
Line 2 characters 1234567890
1
2
Example 1: Make some part of the text bold, italics or underlined,
superscript, or subscript.
5
1
2
bold italics underline
super 6 & 9 sub 6 & 9
Example 6: Align the text in a tag left, right or center.
5
1
3
L12.OWT CP 1 SL 90mm
6/6
L12.OWT CP 1 SL 90mm
6/6
aligned right
aligned center
2
3
Example 2: Underline the digits “6” and “9” by default for easier
recognition.
5
1
Example 7: Orient the text vertically, horizontally or “horizontally
rotated”.
6 and 9 underlined
2
3
123
456
AB1
CD2
Hor Rotated
Hor Rotated
1
2
3
A
B
1
5
2
scale 150%
normal scale & spacing
Vertical
Vertical
Vertical
3
L12.OWT CP 1 SL 90mm
6/6
Example 4: Expand the spacing of Line 1 text to “Exp. 2”.
5
1
2
spacing Exp. 2
normal scale & spacing
Example 8: Add a frame to the tag.
5
1
2
3
3
L12.OWT CP 1 SL 90mm
AB1
Horizontal
Hor Rotated
Example 3: Increase the scale of the Line 1 text to 150%.
1
123
Horizontal
ABC
DEF
6/6
ABC
Horizontal
A
B
C
L12.OWT CP 1 SL 90mm
6/6
L12.OWT CP 1 SL 90mm
6/6
bold italics underline
super 6 & 9 sub 6 & 9
aligned center
L12.OWT CP 1 SL 90mm
6/6
4. Entering and Editing Text/Symbols
37
BMP91UG.book Page 38 Friday, October 14, 2011 7:56 PM
C. General Navigation Tips
To return directly to the Tag Editor:
To move the cursor on the LCD screen horizontally (e.g. across the
characters in a tag or the items in a context menu):
• Press
[Left] or
[Right] on the printer.
To move the cursor on the LCD screen vertically (e.g. up or down
the lines in a tag or the items in a list menu):
• Press
[Up] or
[Down] on the printer.
• Press
[Close].
To view how the tag (when printed) will look like:
• Press Preview [Preview].
For more detailed instructions, please refer to the “H. To
Preview the Tags” section in “3. Printing with Specific Media”.
D. Browsing, Creating or Deleting Tags
To confirm your selection of an item on the screen:
To open the Tag menu:
• Press
• Enter
OK
[OK] or
Enter
[Enter].
A tick (
) appears on the right to that item to indicate that
this item has been selected.
To select a set of characters in a tag for editing:
1. Move the cursor to the first character.
Menu
[Menu] > Quick Keys > “Tag”.
Shortcut: Press the
Fn
[Fn] +
[File] quick keys.
File
To browse the tags one at a time:
• Press
[Shift] +
[Up] (or
move backward (or forward).
Shift
2. Press
[Shift] +
[Left] (or
[Shift] +
[Right]) to
select the characters to the left (or right) of the cursor.
Shift
Shift
To return to a parent menu (i.e. move up one level):
• Press
[Menu Return] or
Esc
[Esc].
English
38 4. Entering and Editing Text/Symbols
Shift
[Shift] +
[Down]) to
To jump to the first (or the last) tag:
• Press
Fn
[Fn] +
[Up] (or
Fn
[Fn] +
[Down]).
BMP91UG.book Page 39 Friday, October 14, 2011 7:56 PM
To go to a specific tag (if you know the tag number):
1. Enter
Fn
[Fn] +
File
[File] > Tag Edit > “Go To”.
2. In the “Tag Number” box, enter the number of the tag that you
want to edit and press
The tag appears.
OK
[OK].
Enter
[Enter].
1 In the Tag Editor, navigate to the tag to be copied.
File
[File] > Tag Edit > Edit > “Copy”.
3 In the Tag Editor, navigate to the tag before (or after) which to
paste the copied tag.
4 Enter
Fn
[Fn] +
File
[File] > Tag Edit > Edit > “Insert”.
To delete a tag:
Fn
[Fn] +
File
[File] > Tag Edit > Edit > “Delete”.
3 Select “Current Tag” and press
To copy and paste a tag:
[Fn] +
[Fn] +
An empty tag is inserted after the current tag.
2 Enter
• At the end of the last (or only) tag, press
A new empty tag appears.
Fn
Fn
1 In the Tag Editor, navigate to the tag to be deleted.
To create a tag:
2 Enter
2. Enter
File
[File] > Tag Edit > Edit > “Paste”.
5 Select “Before Current Tag” (or “After Current Tag”) and press
OK [OK].
The copied tag appears.
OK [OK].
A warning message appears, asking for your confirmation to
delete the tag.
4 Press
[OK].
The tag disappears.
OK
To delete selected tags:
1 Enter
Fn
[Fn] +
File
[File] > Tag Edit > Edit > Delete >
“Range”.
2. Type in the “from” and “to” numbers, and press
OK [OK].
A warning message appears, asking for your confirmation to
delete the tags.
3. Press
OK [OK].
The selected tags disappear.
To insert a tag:
1 In the Tag Editor, navigate to the tag after which to insert a
new tag.
4. Entering and Editing Text/Symbols
39
BMP91UG.book Page 40 Friday, October 14, 2011 7:56 PM
To delete all tags:
1. Enter
Fn
[Fn] +
Alternatively:
File
[File] > Tag Edit > Edit > “Delete”.
2. Select “All Tags” and press
OK [OK].
A warning message appears, asking for your confirmation to
delete the tags.
3. Press
OK [OK].
All the tags disappear.
E. Changing the Menu/Input Language
To change the menu language:
1. Enter
Menu
[Menu] > Settings > Language > “Menu”.
2. Select the language you want (English or Chinese) and press
OK
[OK].
1. Press the
[Language] quick key.
The Language icon on the LCD screen changes.
Language
2. Toggle to select your preferred language (“EN”, “ 中文 ”, “ 中
half-moon” or “ 中 full-moon”).
If necessary, you can enter both English and Chinese
characters in the text.
The BMP®91 printer supports two input methods: English
and Chinese similar to the standard PC keyboard (US)
and the Microsoft Pinyin. When the printer is in the
中
“ 中 half-moon” or 中 “ 中 full-moon” mode, you can
enter letters, numbers and symbols using the Chinese font
with “half-width” or “full-width” character spacing.
F. Entering Text in a Tag
1. Press the respective keys on the QWERTY keyboard.
To change the input language:
1. Enter
Menu
[Menu] > Settings > Language > “Input”.
2. Select the language you want (English or Chinese) and press
OK
[OK].
The text appears on the LCD screen. By default, the letters
appear in lowercase.
To type uppercase letters, press [Caps]. You can also press
[Shift] with the respective letter (e.g. [Shift] + [A] to type “A”).
To add serialization, see section “H. To Add Serialization to a
Tag”.
English
40 4. Entering and Editing Text/Symbols
BMP91UG.book Page 41 Friday, October 14, 2011 7:56 PM
To add a barcode, see section “I. To Add a Barcode to a Tag”.
or 28pts) and press
To add other symbols, see section “J. To Add Other Symbols
to a Tag”.
3. Press
To delete text/symbols, see section “K. To Delect Text/
Symbols”.
To change the font style:
To add user graphics: see section “G. User Graphics” in “5.
Advanced Functions”.
To insert a date and/or time icon: see section “J. Other Useful
Functions” in “5. Advanced Functions”.
G. Formatting the Font in a Tag
To open the Font menu:
• Enter
Menu
[Menu] > “Font”.
Changes in Font Size, Scale and Spacing are applied to
a line in the tag. Changes in Effects and Style, on the
other hand, are applied to selected characters only in the
tag.
1. Enter
OK
[OK].
[Close] to return to the Tag Editor.
Menu
[Menu] > Font > “Style”.
2. In the Style list, select the desired style (“Bold”, “Italics”, or
“Underline”) and press
3. Press
[OK].
OK
[Close] to return to the Tag Editor.
To add a font effect:
1. Using
[Shift] +
[Left] or
[Shift] +
[Right],
select the set of characters to apply the text effects.
2. Enter
Shift
Menu
Shift
[Menu] > Font > “Effects”.
3. Select the desired effect (“None”, “Superscript”, or
“Subscript”) and press
4. Press
OK
[OK].
[Close] to return to the Tag Editor.
To change the font size:
1. Press
Font Size
[Font Size].
2. In the Size list box, select the desired size (e.g. 4pts, 5pts....
To change the character scale:
1. Move the cursor the line where you want to apply the scaling.
4. Entering and Editing Text/Symbols
41
BMP91UG.book Page 42 Friday, October 14, 2011 7:56 PM
2. Enter
Menu
H. Adding Serialization to a Tag
[Menu] > Font > “Scale”.
3. In the Scale list, select the desired zoom factor (e.g. 50%,
75%, 125% or 150%) and press
4. Press
OK
[OK].
[Close] to return to the Tag Editor.
To set the text/character spacing:
1. Move the cursor the line where you want to apply the spacing.
2. Enter
Menu
[Menu] > Font > “Spacing”.
3. In the Spacing list, select an option (“Normal”, “Expanded 1”,
“Expanded 2”, “Expanded 3”, “Expanded 4” or “Expanded
5”) and press OK [OK].
4. Press
[Close] to return to the Tag Editor.
To open the Serialization menu:
1. Enter
Menu
[Menu] > “Quick Keys” > “Serialization”.
Shortcut: Press the
Serial
[Serial] quick key.
To add serialization to a Tag:
1. Press the
[Serial] quick key.
The Serialization menu appears.
Serial
2. In the Serialization menu, select “0–999”, “a–z” or “A–Z”.
If the “0–999” option is entered, set the “Start” number
(default is 0), the “End” number (default is 1) and the
“Increment By” number (default is 1) and then press OK [OK].
To add (or remove) an underline for the digits “6” and “9”:
1. Enter
Menu
Start
End 1
[Menu] > Settings > “6 and 9”.
2. Select “On” (or “Off”) and and press
OK
Increment By 1
[OK].
0-999
3. Press
0
0-999
a-z
A-Z
[Close] to return to the Tag Editor.
If the “a–z” option is entered, set the “Start” alphabet (default
is a), the “End” alphabet (default is b) and the “Increment By”
number (default is 1) and then press OK [OK].
English
42 4. Entering and Editing Text/Symbols
BMP91UG.book Page 43 Friday, October 14, 2011 7:56 PM
If the “A–Z” option is entered, set the “Start” alphabet (default
is A), the “End” alphabet (default is B) and the “Increment By”
number (default is 1) and then press OK [OK].
If the Paddings option is entered, select “Space”, “0” or
“None” to set “Padding character” and then press OK [OK].
When “Padding character” is off
Port 1
Port 2
Port 3
Port 4
I. Adding a Barcode to a Tag
Barcodes can be added to 9 mm and 12 mm labels only
(and not on any tubes) on the printer. Depending on the
type selected, the valid data range may vary.
The segment has to be auto-sized or >25 mm if fixed size.
Only upper-case characters and digits 0-9 are allowed for
code 39.
1. Enter
[Menu] > “Barcode”.
The Barcode menu appears, with “Set Barcode” highlighted.
When “Padding character” is on
Menu
• When inserting zeroes
Port 01
Port 02
Port 03
Port 04
Port 3
Port 4
Insert “0”
Port 2
OK [OK]. The options (“Type” and “HR Text”) in the Set
Barcode menu appears, with “Type” highlighted.
3. Press
• When inserting spaces
Port 1
2. Press
OK [OK]. The Type submenu options appear, with
“Code39” highlighted.
Insert space
The Serialization Continuous Print menu appears.
The only valid characters that can be used in padding are
zero (“0”) or a blank space (“ ”). before the line “The
Serialization Continuous Print menu appears.”
3. In the Serialization Continuous Print menu, set the number of
copies (1-999) to be printed and press
OK
[OK].
The increment step must always be >= 1.
4. In the Type list, select your preferred type (“Code 128” or
“Code 39”) and press
OK
[OK].
5. In the HR Text list, select “On” (or “Off”) and press
6. Press
[OK].
[Menu Return] twice. The Set Barcode options disappear.
7. Select “Barcode Data” and press
8. Enter the desired text and press
9. Press
OK
OK
OK
[OK].
[OK] to confirm.
[Close] to return to the Tag Editor.
4. Entering and Editing Text/Symbols
43
BMP91UG.book Page 44 Friday, October 14, 2011 7:56 PM
J. Adding Other Symbols to a Tag
1. Press the
[Symbol] quick key.
The Symbol menu appears.
To add a commonly used symbol:
• Press
Fn
To add a special symbol:
[Fn] and the respective key on the QWERTY
keyboard. For example:
To get
Press
To get
Press
~
[Fn] + [Q]
[
[Fn] + [F]
€
[Fn] + [W]
]
[Fn] + [G]
£
[Fn] + [E]
“
[Fn] + [H]
¥
[Fn] + [R]
‘
[Fn] + [J]
{
[Fn] + [T]
;
[Fn] + [K]
}
[Fn] + [Y]
:
[Fn] + [L]
_
[Fn] + [U]
®
[Fn] + [Z]
–
[Fn] + [I]
©
[Fn] + [X]
+
[Fn] + [O]
°
[Fn] + [C]
=
[Fn] + [P]
‰
[Fn] + [V]
`
[Fn] + [A]
±
[Fn] + [S]
<
[Fn] + [N]
[Fn] + [D]
>
[Fn] + [M]
[Fn] + [B]
Symbol
2. In the Symbol menu, press the horizontal navigation keys to
select a symbol category (e.g. “Latin 1”, “Latin 2”, “Greek”,
“Cyrillic”, “General”, “Number”, “Blocks”, “Japanese”,
“Currency”, “BPMF”, “Units”, or “Special”) and press OK [OK].
The respective symbol list appears.
3. In the Symbol list, select your preferred symbol and press
K. Deleting Text/Symbols
To delete a character (or a serial number, a barcode or other
symbols) on the left of the cursor in a line and to move the cursor
leftwards:
• Press
Backspace
[Backspace].
To quickly delete all the characters and then set the cursor at the
beginning of the line:
• Press
Fn
[Fn] +
Backspace
[Backspace].
To delete all the characters on the left of cursor:
• Press
English
44 4. Entering and Editing Text/Symbols
OK
[OK].
Shift
[Shift] +
Backspace
[Backspace].
BMP91UG.book Page 45 Friday, October 14, 2011 7:56 PM
1. Enter
Fn
[Fn] +
Shortcut: Press the
To open the Properties menu:
2. Press
Menu
[Menu] > Quick Keys > Tag > “Properties”.
Shortcut: Enter
Fn
[Fn] +
File
[File] > “Properties”.
All changes in the Properties submenu are applied to the
current tag only. To apply properties to multiple tags, use
the “Apply Current Properties” option in the Tag menu.
To change a single-line tag to a multiline tag:
1. Enter
[Fn] +
Fn
File
[File] > Properties > Set Multiline >
“Multiline”.
2. In the Multiline list, select an option (“2 lines” or “3 lines”)
and press
3. Press
OK
[OK].
[Close] to return to the Tag Editor.
Shortcut: Press
Fn
[Fn] + [1] (or [2] or [3]) to quickly create a
one- (or two- or three-) line tag.
Fn
[Fn] +
A/
[
A/
A
L. Changing the Properties of Tags
1. Enter
[File] > Properties > “Alignment”.
File
The Alignment menu appears, with the Horiz. submenu
highlighted in blue by default.
A
Backspace
] quick keys.
OK [OK].
The options in the Horiz. submenu appear, with Center
highlighted by default.
3. Select an option (“Left”, “Center” or “Right”) and press
OK [OK].
The Horiz. submenu is still highlighted in blue by default.
4. Select “Vertical” and press
[OK].
The options in the Vertical submenu appear, with “Middle”
highlighted by default.
OK
5. Select an option (“Top”, “Middle” or “Bottom”) and press
OK
[OK].
6. Press
[Close] to return to the Tag Editor.
To change the text orientation in a tag:
1. Enter
Fn
[Fn] +
Shortcut: Press the
[File] > Properties > “Rotation”.
File
A/
[
A/
A
pressing
[Backspace] will quickly delete this tag (if it
is not the only tag left)!
To change the content alignment of a tag:
A
WHEN there are no more characters to delete in a tag
AND the cursor is on the top left position in the first line,
] quick key.
4. Entering and Editing Text/Symbols
45
BMP91UG.book Page 46 Friday, October 14, 2011 7:56 PM
2. Select an option (“Vertical”, “Horizontal” or “Hor Rotated”)
and press
3. Press
OK
[OK].
1. Enter
[Close] to return to the Tag Editor.
To add a frame in a tag:
1. Enter
[Fn] +
Fn
File
[File] > Properties > “Frame”.
2. Select a frame and press
Fn
2. Press
[Fn] +
Fn
[Fn] +
File
Symbol
[Symbol] quick keys.
[File] > Properties > Frame > “None”.
[Close] to return to the Tag Editor.
Shortcut: Press the
Fn
File
[File] > Properties > “Continuous Print”.
2. Enter the number of copies preferred and press
OK
[OK].
[Close] to return to the Tag Editor.
Shortcut: Press the
Fn
[Fn] +
Language
[Language] quick keys and
[OK].
To remove a frame in a tag:
1. Enter
[Fn] +
select “Continuous Print”.
OK
[Close] to return to the Tag Editor.
Shortcut: Press the
Fn
3. Press
A list of frames appears.
3. Press
To change the number of printed copies of a tag:
[Fn] +
Symbol
[Symbol] quick keys and
select “None”.
English
46 4. Entering and Editing Text/Symbols
To change the segment length for a tag:
1. Enter
Fn
[Fn] +
File
[File] > Properties > “Segment Length”.
2. Select an option (“Auto-sized” or “Fixed-size”) and press
OK
[OK].
If you have chosen “Auto-sized”, the screen will return to the
parent menu (i.e. the Properties submenu).
3. If you have chosen “Fixed-size”, enter your preferred segment
length and press
4. Press
OK
[OK].
[Close] to return to the Tag Editor.
Shortcut: Press the
Seg Leng
[Seg Leng] quick key.
BMP91UG.book Page 47 Friday, October 14, 2011 7:56 PM
To apply the properties of the current tag to ALL or multiple tags:
1. Enter
Fn
[Fn] +
File
[File] > “Apply Current Tag Settings”.
The Apply Current Tag Settings submenu appears.
2. Select “All Tags” or “Set Range” (and enter the range of
selected tags) AND press OK [OK].
If data loss may occur, a warning message will appear,
asking for your confirmation to continue.
3. Press
[OK].
Once the change is completed, the screen returns to the Tag
Editor.
OK
To save the current properties as the default for subsequent tag
editing:
1. Enter
Fn
[Fn] +
File
[File] > “Default Settings”.
The Default Settings submenu appears.
2. Select “Save Current Tag as Default” and press
[OK].
A warning message appears, asking for your confirmation to
save the current tag properties as the default tag settings.
3. Press
OK
[OK].
The screen returns to the Tag Editor.
OK
4. Entering and Editing Text/Symbols
47
BMP91UG.book Page 48 Friday, October 14, 2011 7:56 PM
• Manage tag files and user graphics files
5. Advanced Functions
A. Introduction . . . . . . . . . . . . . . . . . . . . . . . . . . . .
B. USB Flash Drive Removal . . . . . . . . . . . . . . . . . . .
C. Multiprint vs. Continuous Print . . . . . . . . . . . . . . .
D. Print Job Settings . . . . . . . . . . . . . . . . . . . . . . . .
E. Cutter Settings . . . . . . . . . . . . . . . . . . . . . . . . . .
F. Barcode Settings . . . . . . . . . . . . . . . . . . . . . . . . .
G. Serialization . . . . . . . . . . . . . . . . . . . . . . . . . . .
H. Tag Files . . . . . . . . . . . . . . . . . . . . . . . . . . . . . .
I. User Graphics . . . . . . . . . . . . . . . . . . . . . . . . . . .
J. USB Flash Drive Connection . . . . . . . . . . . . . . . . .
K. PC Connection . . . . . . . . . . . . . . . . . . . . . . . . . .
L. Other Userful Functions . . . . . . . . . . . . . . . . . . . .
M. Lists of Shortcut Keys . . . . . . . . . . . . . . . . . . . . .
N. Lists of Menu options . . . . . . . . . . . . . . . . . . . . .
O. Lists of printable Symbols . . . . . . . . . . . . . . . . . .
• Perform printer maintenance and firmware upgrades
page 48
page 48
page 49
page 50
page 52
page 53
page 54
page 54
page 55
page 56
page 56
page 57
page 59
page 60
page 69
A. Introduction
• Perform other useful functions
Comprehensive listings of all the shortcut keys, menu options and
printable symbols are also provided.
A shorthand is extensively used in this chapter. For
example, this instruction, “Enter [Menu] > Quick Keys >
Tag > Properties” means “Press
“Quick Keys” and press
press
OK
OK
OK
Menu
[Menu]; select
[OK]; next select “Tag” and
[OK]; and finally select ”Properties” and press
[OK]”.
B. USB Flash Drive Removal
Make sure that you see the USB icon on the LCD display
screen.
1 Enter
• Remove a USB flash drive safely
[Menu] > “Remove USB drive”.
A confirmation message will appear when it is safe to remove
the drive.
2 Pull the USB flash drive out from the printer.
• Change print job and cutter settings
Shortcut: Press
• Change barcode and serialization settings
[Menu] > “Remove USB drive”.
In this chapter, detailed instructions are given on how you can:
English
48 5. Advanced Functions
Menu
Fn
[Fn]+
9
(
[9] instead of entering
Menu
BMP91UG.book Page 49 Friday, October 14, 2011 7:56 PM
C. Multiprint vs. Continuous Print
To open the Multiprint menu:
A print job is a tag or set of tags that has been submitted
to be printed. For detailed explanation on what a tag is,
please see “4. Entering and Editing Text/Symbols”.
In normal printing, a print job is printed only once. You can print
multiple copies in two different types of sequences via:
• Multiprint: A [PRINT] setting whereby the entire print job is
printed multiple times.
• Continuous Print (also known as Contiprint): A Tag Properties
setting whereby each tag in the job will be printed multiple
times before the next tag once
[PRINT] is pressed.
PRINT
For example, supposing you have three tags (A1, A2, A3) in a
print job. If you choose Multiprint and two copies, the tags will be
printed in this order: A1, A2, A3, A1, A2, A3.
A1
A2
A3
A1
A2
A3
1 Enter
Menu
[Menu] > Quick Keys > “Multiprint”.
Shortcut: Press the
Fn
[Fn] +
PRINT
[PRINT] quick keys.
To print multiple copies of the current tag via Multiprint:
1 Enter
Fn
[Fn] +
PRINT
[PRINT] > “Current Tag”.
2 In the Number of Copies box, enter your preferred number
and press
[OK].
The printer prepares to print the current tag multiple times.
OK
To print multiple copies of a range of tags via Multiprint:
1 Enter
Fn
[Fn] +
PRINT
[PRINT] > “Range”.
2 Type the “from” and “to” numbers and press
[OK].
3 In the Number of Copies box, enter your preferred number
OK
and press
[OK].
The printer prepares to print the selected tags multiple times.
OK
On the other hand, if you choose Contiprint and two copies, the
tags will be printed in this order: A1, A1, A2, A2, A3, A3.
A1
A1
A2
A2
A3
A3
To print multiple copies of all tags via Multiprint:
1 Enter
Fn
[Fn] +
PRINT
[PRINT] > “All Tags”.
2 In the Number of Copies box, enter your preferred number
and press
[OK].
The printer prepares to print all tags multiple times.
OK
5. Advanced Functions
49
BMP91UG.book Page 50 Friday, October 14, 2011 7:56 PM
To print multiple copies of the current tag via Continuous Print
(Contiprint):
2 In the Number of Copies box, enter your preferred number
1 Enter
3 Press
[Menu] > Quick Keys > Tag> Properties >
Continuous Print.
2 In the Number of Copies box, enter your preferred number
Menu
and press
3 Press
OK
[OK].
[Close] and then
PRINT
[Fn] +
Fn
Language
[Language] quick keys.
To print multiple copies of a range of tags via Continuous Print
(Contiprint):
1 Enter
[Fn] +
Fn
Language
OK
[OK].
[Close] and then
PRINT
[PRINT].
The printer prepares to print all tags multiple times.
D. Print Job Settings
[PRINT].
The printer prepares to print the current tags multiple times.
Shortcut: Press the
and press
[Language] > “Range”.
2 Type the “from” and “to” numbers and press
[OK].
3 In the Number of Copies box, enter your preferred number
In normal printing, the printout should be in the nominal position
on the tube/label medium. In other words, the printed text (in one
or two lines) should be neatly centered on each segment with a
clear lead (the space on the left of the text) and equidistant
vertical spacings (the spaces above and below the text).
vertical spacing
Port 1
OK
and press
4 Press
OK
[OK].
[Close] and then
PRINT
[PRINT].
The printer prepares to print the selected tags multiple times.
To print multiple copies of all the tags via Continuous Print
(Contiprint):
1 Enter
Fn
[Fn] +
Language
[Language] > “All Tags”.
English
50 5. Advanced Functions
lead
segment length
BMP91UG.book Page 51 Friday, October 14, 2011 7:56 PM
If the printout is offset from the nominal position, you can adjust
the lead (for insufficient leading space on the left) or the vertical
spacing (for uneven vertical spacing) through the Tag menu.
2 Using the
[Up] or
spacing and press
OK
[Down] keys, adjust the vertical
[OK].
vertical spacing
To adjust segment length for the current tag:
Port 1
1 Enter
Fn
[Fn] +
File
[File] > Properties > Printing
Adjustments > “Length Adjust”.
lead
segment length
2 Using the
[Up] or
length and press
To open the Tag menu:
OK
[Down] keys, adjust the segment
[OK].
If the printed text is too light
(e.g. a) or too dark (e.g. b),
you can change the printing
density to “just right” (e.g. c).
a
Port 1
ab
Port 1
To adjust the lead for the current tag:
To adjust the printing density
for all tags:
c
Port 1
1 Enter
1 Enter
1 Enter
Menu
[Menu] > Quick Keys > “Tag”.
Shortcut: Press the
Fn
[Fn] +
Fn
[Fn] +
File
File
[File] quick keys.
[File] > Properties > Printing
Adjustments > “Lead Adjust”.
2 Using the
press
OK
[Up] or
[Down] keys, adjust the lead and
[OK].
[Menu] >
Settings > “Printing density”.
Menu
2 Select the density you want and press
OK
[OK].
The density ranges from “1” (lightest) to “6” (darkest).
To adjust the vertical spacing for the current tag:
1 Enter
Fn
[Fn] +
File
[File] > Properties > Printing
Adjustments > “Vertical Adjust”.
5. Advanced Functions
51
BMP91UG.book Page 52 Friday, October 14, 2011 7:56 PM
To improve readability, you
can add a horiztonal line in
the center of a tag.
Line 1
Line 2
Fn
[Fn] +
File
[File] > Properties > Set Multiline >
“Centerline”.
2 Select “On” and press
[OK].
A horizontal line appears in the center of the current tag when
it is printed.
OK
To start printing, press
PRINT
[PRINT].
To return to the Tag Editor, press
[Close].
E. Cutter Settings
By default, the BMP®91 printer automatically makes (i) a half cut
(with a cut depth that ranges from “1” to “8”) after the printing of
every segment and (ii) a full cut at the end of every print job.
You can turn off the half cut (per segment) and then turn on the
printing of a cut line (per segment), for example, for manual
cutting later. You can also change the cut depth of the half cuts.
Nevertheless, there will always be a full cut at the end of a print
job. In other words, the last segment will always have a full cut.
English
52 5. Advanced Functions
• Enter
Menu
[Menu] > Settings > “Cutter”.
Shortcut: Press the
To add a centerline for the current tag:
1 Enter
To open the Cutter menu:
Fn
[Fn] +
Seg Leng
[Seg Length] quick keys.
To turn off (or on) half cut per segment:
1 Enter
Fn
[Fn] +
Seg Leng
[Seg Length] > Half Cut > “Action”.
The “Action” options appears.
2 Select “Off” (or “On”) and press
OK
[OK].
What is a segment? For example, if the print job has only
one tag which is printed once, there will be only one
segment. If the only tag is printed 10 times, there will be
10 segments. If the print job has a set of five tags which
are printed 10 times, there will be 50 segments.
To turn on (or off) the printing of a cut line per segment:
1 Enter
Fn
[Fn] +
Seg Leng
[Seg Length] > Half Cut > “Cut Line”
The “Cut Line” options appears.
BMP91UG.book Page 53 Friday, October 14, 2011 7:56 PM
F. Barcode Settings
2 Select “Solid” or ”Dotted”
segment length
(or “None”) and press
[OK].
Port 1
Port 2
Port 1
Port 2
You can add numbers, text, symbols, barcodes and even
serialization on a tag. You can also change the size, spacing,
alignment and even orientation of the text.
Port 1
Port 2
You can print barcodes only when these conditions are satisfied:
OK
Note: This option is
available only when the
cutter action is off.
• Labels are used, and
• General (horizontal) text orientation is chosen.
To change the cut depth of the half cuts:
1 Enter
Fn
[Fn] +
Seg Leng
[Seg Length] > Half Cut > “Cut
Depth”.
The “Cut Depth” options appears.
2 Select a setting (“1” to ”8”) and
press
OK
[OK].
Note: The lower the Cut Depth
setting, the deeper the cut.
Cut Depth
1
2
3
4
5
6
7
8
Deeper
9 mm labels support only 1 line while 12 mm labels
support up to 2 lines. Depending on the barcode type
selected, the valid data range may vary. The segment has
to be auto-sized or >25 mm (if fixed size). Only uppercase characters and digits 0-9 are allowed.
For step-by-step instructions, refer to “G. Formatting the
Font in a Tag” and “L. Changing the Properties of Tags” in
the chapter, “4. Entering Text & Symbols”.
To add a barcode:
Less Deep
• Enter
Menu
[Menu] > “Barcode”.
• Select “Set Barcode” and select the “type option”.
• Select “Barcode Data” and enter the data.
5. Advanced Functions
53
BMP91UG.book Page 54 Friday, October 14, 2011 7:56 PM
If barcodes on two-line tags are required, the “HR” option
must be off. If HR barcodes are required, the tags can
only have one line.
through the
Menu
Serial
[Serial] quick key instead of going
[Menu] key.
H. Tag Files
G. Serialization
The BMP®91 printer supports two types of files:
2D serialization
LCD Screen
Start
0-999
Shortcut: Press the
0
Start
End B
Increment By 1
Increment By 1
a-z
A-Z
0-999
0-999
Serialisation 1
0A
0B
contents and settings of a tag editing job.
A
End 3
0-999
• “Tag files”, managed through the File menu, which contain the
LCD Screen
• “User graphics”, managed through the User Graphics menu,
which are the external graphics that can be imported and
inserted into a tag.
a-z
A-Z
To open the File menu:
Serialisation 2
1A
1B
2A
2B
3A
3B
segments
Serial 2
2
2
2
1 Enter
Menu
[Menu] > Quick Keys > “File”.
Shortcut: Press the
File
[File] quick key.
Serial 1
To add serialization:
1 Enter
[Menu] > Quick Keys > [Serialization].
2 Select a sequence (0-999 or a-z), enter the steps and press
Menu
OK
[OK].
3 To add a second sequence, repeat step1.
English
54 5. Advanced Functions
To save a tag file:
1 Enter
File
[File] > “Save” (or “Save as”).
2 Type in the filename and press
OK
[OK].
BMP91UG.book Page 55 Friday, October 14, 2011 7:56 PM
To name a file, you must use valid characters and at most
10 characters in length. These include numeric digits (e.g.
“0”, “1”, “2”, “3”), lower or uppercase letters (e.g. “a”,
“b”, “c”, “A”, “B”, “C”), underscore (“_”) and hyphen (“-”).
File
OK
[OK].
File
[File] > “Delete”.
2 Select the file from a list (if any) and press
1 Import the CSV file. (see earlier instructions on how to import
File
[File] > “Open”.
3 Select the file from a list (if any) and press
OK
[OK].
I. User Graphics
To delete a tag file:
1 Enter
[OK].
To open a CSV file:
2 Enter
[File] > “Open”.
2 Select the file from a list (if any) and press
OK
a tag file)
To open a tag file:
1 Enter
4 Select the file from a list (if any) and press
To import a user graphics file (or to upload a user file):
OK
[OK].
1 Plug a USB flash drive into the printer’s USB port.
2 Enter
[Menu] > User Graphics > “Import”.
3 Browse to the relevant filename and press
[OK].
Menu
To import a tag file:
OK
1 Plug a Flash drive into the printer’s USB port.
2 Enter
File
[File] > “Import”.
3 Select the file type.
4 Select the file from a list (if any) and press
To insert a user data file (or to load an editing job):
1 Enter
[Menu] > User Graphics > “Insert”.
2 Select the file from a list (if any) and press
[OK].
Menu
OK
[OK].
OK
To export a tag file:
To delete a user data file:
1 Plug a Flash drive into the printer’s USB port.
1 Enter
2 Enter
File
[File] > “Export”.
Menu
[Menu] > User Graphics > Delete.
2 Select the file from a list (if any) and press
OK
[OK].
3 Select the file type.
5. Advanced Functions
55
BMP91UG.book Page 56 Friday, October 14, 2011 7:56 PM
User graphics must be in black and white AND in BMP,
JPEG, or PNG format (i.e. with bmp, jpg, or png file
extensions). They must not exceed 10 Kbytes in file size
and 110x110 dots in picture size. If they are in color, the
LCD display will be in color. However, the printouts will be
in black and white, and may not match the original
colored graphics.
1 Insert the USB
flash drive into
the USB port on
the left side of
the printer as
shown in the
diagram.
Menu
OK
English
56 5. Advanced Functions
K. PC Connection
To connect the BMP®91 printer to a PC:
2. Plug the other end
[Menu] > System > “Upgrade through USB drive”.
A warning message appears, asking whether to save the
current job.
[OK], give an appropriate filename and press
[OK] to save.
The firmware upgrade in the printer begins.
[Close].
squarish end of the
USB cable into the
printer’s socket as
shown here.
To perform firmware upgrade with a flash drive:
3 Press
editor, press
1. Insert the smaller,
J. USB Flash Drive Connection
2 Enter
To exit from the USB Drive connection mode to the Tag
OK
(with a rectangular
connector) of the
USB cable into a
USB port on a
personal computer
(PC).
The USB cable on the PC side should be connected to
a standard USB port.
BMP91UG.book Page 57 Friday, October 14, 2011 7:56 PM
Your BMP® 91 comes with TubingMark software to let you create
print jobs on a PC.
L. Other Userful Functions
1 Insert the CD-ROM into your
To enter a Chinese word (e.g.“ 标签 ”which means “label”):
computer’s CD drive.
The installation wizard starts
automatically.
2 Select your language and
click Install.
3 Follow the wizard to
complete the installation.
TubingMark
5 Enter
If it is not, press the
[Language] quick key and toggle
(keep pressing) until you see “中文” in the Tag Property bar at
the bottom of the LCD screen.
Language
Install
Select Installation Language
English
Documentation
Exit
ᒦᆪ
4 Connect your printer and PC
via a USB cable (for detailed
instructions, see the previous
page).
1. Ensure that the input mode is “Chinese”.
A
A:16 Text
A 100%
50%
2 Type “biao” and press the “2” key to select “2. 标 ”.
PC Connection
[Menu] > System
> “PC Connection”.
The printer goes into PC
Connection mode.
2:30 pm 10/07/2010
6
1
⪠
Menu
6 You can now use TubingMark to create print jobs and send
HSFФ4.0
CAPS ᒦᆪ
biao
2/2
CP 1 SL 30ඳ
A
A:16 Text
A 100%
50%
1 彛 2 ⪠ 3 ᵺ 4 呟 5 Ꮮ
them to the printer.
To exit from the PC connection mode to the Tag editor,
press
[Close].
5. Advanced Functions
57
BMP91UG.book Page 58 Friday, October 14, 2011 7:56 PM
3 Type “qian”, press the right arrow key and then press the “1”
key to select “1. 签 ”.
1 Enter
2:30 pm 10/07/2010
6
1
⪠䧞
HSFФ4.0
To insert a date and time into a tag:
[Menu] > Insert Date/Time >
“Insert Date/Time”.
The Date & Time icon appears where the
cursor was.
Menu
The date/time refers to the start of the print job.
2/2
CP 1 SL 30ඳ
A 100%
CAPS ᒦᆪ
A
qian
1 䧞 2 ⾖ 3 瑐 4 ᦒ
A:16 Text
50%
To enter English text, with half-width or full-width character
spacing, press the
[Language] quick key to toggle to
“ 中 half-moon” or “ 中 full-moon” respectively.
Language
To insert a date only, enter “Insert Date” instead of
“Insert Date/Time”. To insert time only, enter “Insert
Time”.
To change the display brightness:
1 Enter
[Menu] > Settings > LCD Brightness.
The LCD Brightness screen appears.
Menu
LCD Brightness
To check the system information:
1 Enter
[Menu] >
System > “System
Information”.
The System Information
screen appears, giving
details on the
manufacturer, printer
model, firmware
version, available
storage, and so on.
Menu
System Information
Return to last menu
Manufacturer:
Printer Model:
Firmware Version:
ME Table Version:
Media File Version:
Available Storage:
English
58 5. Advanced Functions
Brady Corporation
BMP91
Ver Alpha 3.02
Ver1.0
Ver 1.0
151MB
OK
/
OK
Return to Editor
Adjust the Brightness Level
Confirm Change
2 Use the horizontal navigation keys (
adjust the brightness and then press
[Up] or
OK
[OK].
[Down]) to
BMP91UG.book Page 59 Friday, October 14, 2011 7:56 PM
The printer emits different types of sounds for different types of
problems/issues. If necessary, you can turn off (or on) the sound.
To restore the printer to initial (factory) settings:
1 Enter
[Menu] > Settings > Factory Settings.
A warning message appears, “Current settings will be
cleared.”
To turn off (or on) the sound:
1 Enter
[Menu] > Settings > Sound.
2 Select “Off” (or “On”) and thenpress
[OK].
Menu
2 Press
Menu
OK
[OK].
OK
When the tube or label is stuck, you can use the Feed menu
options to eject the medium or move it forward, backward, and
even cut it.
M. Lists of Shortcut Keys
Special Keys (in the same order as the printer’s key display):
Key(s)
To confirm ejecting a medium:
1 Enter
Menu
[Menu] > Feed > “Eject Media”.
To confirm moving a medium forward:
1 Enter
Menu
[Menu] > Feed > “Forward”.
To confirm moving a medium backward:
1 Enter
Menu
[Menu] > Feed > “Reverse”.
1
2
3
4
Menu
Clear All
PRINT
Fn
Function (Menu access)
[Menu]
To access a menu-based
function.
[Clear All]
To clear all the text and settings
for the current tag editing job.
[PRINT]
To start printing.
[Fn] +
PRINT
[PRINT] (Multiprint)
5
Preview
[Preview]
To confirm moving a medium forward and cut it:
1 Enter
Menu
[Menu] > Feed > “Forward & Cut”.
6
If and when necessary, you can restore the printer to factory
settings.
Fn
[Fn] +
Preview
To print multiple copies.
(Menu > Quick Keys)
To preview the current tag, a
selected range of tags or all the
tags.
(Menu > Quick Keys)
To preview all the tags.
[Preview] (Preview All)
7
Cancel
Print
[Cancel Print]
To cancel the current printing job.
5. Advanced Functions
59
BMP91UG.book Page 60 Friday, October 14, 2011 7:56 PM
8
[OK]
To confirm a selected item/
action.
15
[Remove]
Media removal
9
[Menu Return]
To return to previous menu/
screen
16
[Fn] + [Remove]
Maintenance (Menu > Quick Keys)
17
[Font Size]
Font Size (Menu > Font)
10
[Close]
To close and return to the Tag
Editor
18
[Fn] + [Font Size]
Character Spacing (Menu > Font)
OK
Quick Keys (in the same order as the printer’s key display):
Key(s)
Function (Menu access)
1
[Media]
Media Type (Menu > Quick Keys)
2
[Fn] + [Media]
Applications (Menu > Quick Keys)
3
[File]
File menu (Menu > Quick Keys)
4
[Fn] + [File]
Tag menu (Menu > Quick Keys)
5
[Language]
Language (Menu > Settings)
6
[Fn] + [Language]
Continuous Print (Tag > Properties)
7
[Seg Leng]
Segment Length (Tag > Properties)
8
[Fn] + [Seg Leng]
Set Cutter (Menu > Settings)
9
[Serial]
Serialization (Menu > Quick Keys)
10
[Fn] + [Serial]
Printing Adjustments (Tag > Properties)
11
[Rotation]
Text Rotation (Tag > Properties)
12
[Fn] + [Rotation]
Text Alignment (Tag > Properties)
13
[Symbol]
Symbols (Menu > Quick Keys)
14
[Fn] + [Symbol]
Frame (Tag > Properties)
English
60 5. Advanced Functions
To see a layout of the keys on the printer, refer to the
“External components of the printer section” in Chapter 1.
To access a commonly used function directly, press a
shortcut key. For example, to open the File menu directly,
press the [File] quick key instead of going through the
longer path of pressing [Menu], then selecting “Quick
Keys” followed by “File”.)
To access ALL the functions supported on the printer, press
Menu
[Menu] (see the next section).
N. Lists of Menu options
In this listing, (a) the names of menus and submenus are
in UPPERCASE, (b) the names of menu options are in
quotes, and (c) Notes are in normal text case.
All the functions supported by the BMP®91 printer are listed and
accessible through a multi-level series of menus, submenus and
options on the LCD screen.
BMP91UG.book Page 61 Friday, October 14, 2011 7:56 PM
When the
[Menu] key is pressed, a set of menus (“Level 1
menus”) appears:
Menu
1
2
3
4
5
6
7
8
9
“Remove USB Drive” option (also accessible via [Fn] + [9])
SETTINGS menu
FONTS menu
BARCODE menu
FEED menu
INSERT DATE/TIME menu
USER GRAPHICS menu
SYSTEM menu
QUICK KEYS menu
When one of these Level 1 menus is entered (i.e. selected onscreen and confirmed by pressing the [OK] key on the printer),
another set of menus (“Level 2 menus”) will often appear.
For example: When you press
2:30 pm 10/07/2010
6
1
2
This is what users will
see on screen
3
HSFФ4.0
CAPS EN
Font
1 / 13
CP 1 SL 30mm
A
Size
A:12 Text
Style
A 150%
Effects
[Menu] and then select
“Font”, the following set of Level 2
menus (submenus) appears.
Menu
100%
For example: When you press
Feed
[Menu] and then select
“Feed”, the following set of Level
2 options (not menus) appears.
Menu
The lower-level menus or options
in these submenus can also be
navigated vertically (as in a list
menu).
The lower-level menus or options
can be navigated horizontally (as
in a context menu).
1
Forward
2
Reverse
3
Forward & Cut
4
Eject Media
Settings
1
LCD Brightness
2
Print Density
3
Units
4
Sound
On
4
6 and 9
Off
02
1
mm
2:30 pm 10/07/2010
6
1
2
This is what users will
see on screen
3
HSFФ4.0
4 pt
5 pt
30mm
6 CP
pt 1 SL
Auto
CAPS EN
Size
A
Size
1 / 13
A:12 Text
Style
A 150%
Effects
100%
Scale
Scale
For easy reference, all the functions supported by the
In some cases, when you choose a Level 1 menu, only a set of
options (not menus) appear.
BMP®91 printer and accessible through the
[Menu]
key are listed by the respective Level 1 menus in the next
few pages.
Menu
5. Advanced Functions
61
BMP91UG.book Page 62 Friday, October 14, 2011 7:56 PM
1. Settings menu
MENUS (Level 2)
MENUS (Level 3) / “Options”
MENUS (Level 4) / “Options” / Notes
Menu
Remove USB drive
Settings
LCD BRIGHTNESS
“0” – “5” (Dark to Bright)
–
Font
PRINT DENSITY
“1” – “6“
Level of darkness.
Feed
UNITS
“mm”/”inch”
Default is mm.
Insert Date/Time
SOUND
“On”/”Off”
Different sounds for different types of messages.
System
6 and 9
“On”/”Off”
Useful when the digits are read upside down.
DATE
DATE FORMAT
SET DATE
SHOW ON LCD
“dd/mm/yyyy”, “mm/dd/yyyy”, “yyyy/mm/dd”
Change the digits in each text box.
“Yes” / ”No”
TIME
TIME FORMAT
SET TIME
SHOW ON LCD
“12-hour” / “24-hour”
Change the digits in each text box.
“Yes” / ”No”
SLEEP MODE
“Off”/”3min”/”5min”/”10min” –
AUTO POWER OFF
“On”/”Off” (Default: “Off”)
–
LANGUAGE
MENU
INPUT
“English”/ ” 简体中文 "
“English”/ ” 中文拼音 "
CUTTER
HALF CUT
–
ACTION (“On”/”Off”), CUT LINE (“None”/
”Solid”/”Dotted”), CUT DEPTH (“1” – ”8”)
FACTORY SETTINGS
“OK”/”Cancel”
–
62 5. Advanced Functions
Barcode
User Data
Quick Keys
BMP91UG.book Page 63 Friday, October 14, 2011 7:56 PM
2. Font menu
MENUS (Level 2)
MENUS (Level 3) / “Options”
“Options”
Menu
Remove USB drive
Settings
SIZE
“Auto-sized” or Fixed-size (from “4 pts” – “28pts”) –
STYLE
BOLD
ITALIC
UNDERLINE
“On”/”Off”
“On”/”Off”
“On”/”Off”
Barcode
EFFECTS
“None”, “Superscript” or “Subscript”
–
System
SCALE
“50 %” – “150 %”
–
SPACING
“Normal”, or “Expanded 1”/”2”/”3”/”4”
–
Font
Feed
Insert Date/Time
User Data
Quick Keys
3. Barcode menu
MENUS (Level 2)
SET BARCODE
BARCODE DATA
MENUS (Level 3) / “Options”
TYPE submenu
HR (Human Readable) TEXT
“Options” / Notes
Menu
“Code 128” / “Code 39”
“On”/”Off”
Text box for entering barcode data To confirm inserting data, press
(maximum 30 characters)
Remove USB drive
Settings
Font
Barcode
OK
[OK].
Feed
Insert Date/Time
User Data
System
Quick Keys
5. Advanced Functions
63
BMP91UG.book Page 64 Friday, October 14, 2011 7:56 PM
4. Feed menu
“Options”
Menu
Notes
“Forward”
To confirm moving a medium forward, press
“Reverse”
To confirm moving a medium backward, press
“Forward & Cut”
To confirm moving a medium forward and cut it, press
“Eject Media”
To confirm ejecting a medium, press
OK
Remove USB drive
Settings
OK
[OK].
OK
Font
Barcode
[OK].
OK
Feed
[OK].
Insert Date/Time
User Data
[OK].
System
Quick Keys
5. Insert Date/Time menu
“Options”
Notes
Menu
Settings
“Insert Date”
To confirm inserting a Date icon [graphic] into the current tag, press
OK
[OK].
“Insert Time”
To confirm inserting a Time icon [graphic] into the current tag, press
OK
[OK].
“Insert Date & Time” To confirm inserting a Date & Time icon [graphic] into the current tag, press
[OK].
“Insert Time & Date” To confirm inserting a Time & Date icon [graphic] into the current tag, press
[OK].
64 5. Advanced Functions
Remove USB drive
OK
Font
Barcode
Feed
Insert Date/Time
User Data
System
OK
Quick Keys
BMP91UG.book Page 65 Friday, October 14, 2011 7:56 PM
6. User Graphics menu
“Options”
“Import”
“Insert”
“Delete”
Menu
Notes
Select from: File List
To confirm importing the selected file, press
Remove USB drive
Settings
Font
OK
[OK].
Barcode
Feed
Select from the Graphics List
To confirm inserting the selected graphic at the current cursor position, press [OK].
Select from the Graphics List
To confirm deleting the selected graphic, press
Insert Date/Time
User Data
System
OK
Quick Keys
[OK].
7. System menu
“Options”
Notes
“Upgrade through
USB drive”
1. Check the USB Flash Drive.
2. In the root directory, look for the Brady.tar.gz file.
“PC connection”
Check the USB connection to PC and go into FW upgrading mode. Wait for file
transfer from ByTES PC Tubing Editing software.
“System Information” 1. Manufacturer; 2. Printer Model; 3. Firmware Version;
4. ME Table Version; 5. Media File Version; 6. Available Storage Space
Menu
Remove USB drive
Settings
Font
Barcode
Feed
Insert Date/Time
User Data
System
Quick Keys
5. Advanced Functions
65
BMP91UG.book Page 66 Friday, October 14, 2011 7:56 PM
8. Quick Keys menu
MENUS (Level 2)
MULTI PRINT
MENUS (Level 3) /“Options”
“Current Tag”
“All Tags”
SPECIFIC TAGS submenu
“Options” / Notes
Remove USB drive
Settings
—
—
Enter numbers into the text boxes for “Start Tag”
(default “1”), “End Tag” and “Increment By” (“1”).
Font
System
APPLICATIONS
GENERAL submenu
VERTICAL submenu
PATCH PANEL submenu
TERMINAL BLOCK submenu
“Fixed-size” / “Auto-Sized”
“Fixed-size” / “Auto-Sized”
“No. of Ports”, “Set Width” (for labels only)
“No. of Blocks”, “Set Width” (for labels only)
FILE
“Open”
“Save”
“Save as”
“Delete”
“Import”
“Export”
—
MAINTENANCE
—
Once this option is entered, the printer will move all its
mechanical parts to their home positions.
MEDIA TYPE
TUBE
HEAT-SHRINK ROLL
HEAT-SHRINK CARTRIDGE
LABEL
Select
Select
Select
Select
66 5. Advanced Functions
Menu
tube width and press OK
tube width and press OK
tube width and press OK
label width and press OK
[OK].
[OK].
[OK].
[OK].
Barcode
Feed
Insert Date/Time
User Data
Quick Keys
BMP91UG.book Page 67 Friday, October 14, 2011 7:56 PM
MENUS (Level 2)
PREVIEW
MENUS (Level 3) /“Options”
“Options” / Notes
“Current Tag”
“All Tags”
SPECIFIC TAGS submenu
ZOOM submenu
Start Tag (default “0”), End Tag, Increment By (“1”)
“50%” – “200%”
SERIALIZATION
0-999 submenu
a-z submenu
A-Z submenu
Paddings submenu
Start (default “0”), End (“0”), Increment by (“1”)
Start (default “a”), End (“z”), Increment by (“1”)
Start (default “A”), End (“Z”), Increment by (“1”)
Can be applied only to numeric serialization.
SYMBOL
LATIN 1 & 2 submenus
GREEK submenu
CYRILLIC submenu
GENERAL submenu
NUMBER submenu
BLOCKS submenu
JAPANESE submenu
CURRENCY submenu
BOPOMOFO submenu
UNITS submenu
SPECIAL submenu
ELECTRIC submenu
To confirm inserting a selected symbol at the current
cursor position, press OK [OK].
For more details on the symbols supported by the
BMP®91 printer, please refer to the next section
“Listing of all symbols supported”.
5. Advanced Functions
67
BMP91UG.book Page 68 Friday, October 14, 2011 7:56 PM
MENUS (Level 2)
TAG
MENUS (Level 3) /“Options”
MENUS (Level 4) / “Options” / Notes
EDIT submenu
“Go To” (enter Tag number in text box)
“Copy”
“Cut”
“Paste” (before or after current tag)
“Insert”
DELETE (“Current Tag”, “All Tags”, or SET RANGE)
PROPERTIES submenu
• SET MULTI-LINE: “1”/”2”/”3 lines”; Center Line
(“On”/”Off”)
Note: All changes in
Properties are applied to the
current Tag”. To apply to all
tags, use Apply Current Tag
Settings submenu
• ALIGNMENT: Horizontal (“Left”/”Center”/”Right”),
Vertical (“Top”/”Middle”/”Bottom”)
• FRAME: Select “None” or a frame
• ROTATION: “Horizontal”, “Hor Rotated”, “Vertical”
• CONTINUOUS PRINT: Number (default is “1”)
• SEGMENT LENGTH: “Auto-sized”/“Fixed-size”
• PRINTING ADJUSTMENTS: “Lead Adjust”, “Vertical
Adjust”, “Length Adjust” (in mm)
APPLY CURRENT TAG
SETTINGS submenu
* “All Tags”
* SET RANGE
DEFAULT SETTINGS
submenu
“Save Current Tag as default”
“Reset for Current Media”
“Reset for All Media”
68 5. Advanced Functions
BMP91UG.book Page 69 Friday, October 14, 2011 7:56 PM
O. Lists of printable Symbols
The types of symbols supported by the BMP®91 printer include:
1
2
3
4
5
6
7
Latin 1 symbols
Latin 2 symbols
Greek symbols
Cyrillic symbols
General symbols
Number symbols
Blocks symbols
8
9
10
11
12
13
Japanesesymbols
Currencysymbols
BPMF symbols
Unitssymbols
Specialsymbols
Electric symbols
If the symbol you want is not in these lists, you can import and insert your own symbols using the “User Graphics” menu. However, please
note that all “User Graphics” symbols must:
• be in black and white
• be in BMP, JPEG, or PNG formats and have bmp, jpg, or png file extensions
• NOT exceed 10 Kbytes in file size
• NOT exceed 110 x 110 dots in picture size
If your graphics are in color, the LCD screen will display them in color. However, the printouts will be in black and white, and may
not match the original colored graphics.
5. Advanced Functions
69
BMP91UG.book Page 70 Friday, October 14, 2011 7:56 PM
1. Latin 1 symbols
B
0002
'
'
0027
/
/
002F
7
7
0037
?
Shift + /
003F
G
Shift + G
0047
O
Shift + O
004F
W
Shift + W
0057
_
Shift + 005F
g
G
0067
o
O
006F
w
W
0077
!
"
#
$
\
001C
]
001D
Shift + 6
001E
W
0017
!
"
#
$
%
&
Space
0020
Shift + 1
0021
Shift + '
0022
Shift + 3
0023
Shift + 4
0024
Shift + 5
0025
Shift + 7
0026
%
Shift + 001F
(
Shift + 9
0028
0
0
0030
8
8
0038
@
Shift + 2
0040
H
Shift + H
0048
P
Shift + P
0050
X
Shift + X
0058
`
`
0060
h
H
0068
p
P
0070
x
X
0078
)
Shift + 0
0029
1
1
0031
9
9
0039
A
Shift + A
0041
I
Shift + I
0049
Q
Shift + Q
0051
Y
Shift + Y
0059
a
A
0061
i
I
0069
q
Q
0071
y
Y
0079
Z
001A
Esc
001B
Scroll Lock
0003
*
Shift + 8
002A
2
2
0032
:
Shift + ;
003A
B
Shift + B
0042
J
Shift + J
004A
R
Shift + R
0052
Z
Shift + Z
005A
b
B
0062
j
J
006A
r
R
0072
z
Z
007A
+
Shift + =
002B
3
3
0033
;
;
003B
C
Shift + C
0043
K
Shift + K
004B
S
Shift + S
0053
[
[
005B
c
C
0063
k
K
006B
s
S
0073
{
Shift + [
007B
70 5. Advanced Functions
,
,
002C
4
4
0034
<
Shift + ,
003C
D
Shift + D
0044
L
Shift + L
004C
T
Shift + T
0054
\
\
005C
d
D
0064
l
L
006C
t
T
0074
|
Shift + \
007C
-
002D
5
5
0035
=
=
003D
E
Shift + E
0045
M
Shift + M
004D
U
Shift + U
0055
]
]
005D
e
E
0065
m
M
006D
u
U
0075
}
Shift + ]
007D
.
.
002E
6
6
0036
>
Shift + .
003E
F
Shift + F
0046
N
Shift + N
004E
V
Shift + V
0056
^
Shift + 6
005E
f
F
0066
n
N
006E
v
V
0076
~
Shift + `
007E
BMP91UG.book Page 71 Friday, October 14, 2011 7:56 PM
2. Latin 2 symbols
3. Greek symbols
¤
§
¨
¤
§
¨
°
±
Α
Β
Γ
Δ
Ε
Ζ
Η
Θ
009E
00A1
00A2
00A4
00A7
00A8
00AA
00AB
0391
0392
0393
0394
0395
0396
0397
0398
×
×
à
á
Ι
Κ
Λ
Μ
Ν
Ξ
Ο
Π
00C4
00D1
00D7
00DA
00DB
0399
039A
039B
039C
039D
039E
039F
03A0
°
±
·
00B0
00B1
00B7
à
á
è
é
ê
ì
í
è
Ρ
Σ
Τ
Υ
Φ
Χ
Ψ
Ω
00E0
00E1
00E2
00E3
00E4
00E6
00E7
00E8
03A1
03A3
03A4
03A5
03A6
03A7
03A8
03A9
é
ê
ì
í
÷
ò
ó
ú
α
β
γ
δ
ε
ζ
η
θ
00E9
00EA
00EC
00ED
00F1
00F2
00F3
00F4
03B1
03B2
03B3
03B4
03B5
03B6
03B7
03B8
ü
÷
ē
ù
ú
#
ü
Ы
ι
κ
λ
μ
ν
ξ
ο
π
00F6
00F7
00F8
00F9
00FA
00FB
00FC
00FD
03B9
03BA
03BB
03BC
03BD
03BE
03BF
03C0
ā
ē
ě
ī
ń
ň
ō
ū
ρ
σ
τ
υ
φ
χ
ψ
ω
0101
0113
011B
012B
0144
0148
014D
016B
03C1
03C3
03C4
03C5
03C6
03C7
03C8
03C9
ǎ
ǐ
ǒ
ǔ
ǖ
ǘ
ǚ
ǜ
01CE
01D0
01D2
01D4
01D6
01D5
01DA
01DC
ǹ
a
g
ˇ
¯
´
`
˙
01F9
0251
0261
02C7
02C9
02CA
02CB
02D9
5. Advanced Functions
71
BMP91UG.book Page 72 Friday, October 14, 2011 7:56 PM
4. Cyrillic symbols
5. General symbols
Ё
А
Б
В
Г
Д
Е
Ж
‐
0401
0410
0411
0412
0413
0414
0415
0416
2010
З
И
Й
К
Л
М
Н
О
–
—
―
‖
‘
’
“
”
0417
0418
0419
041A
041B
041C
041D
041E
2013
2014
2015
2016
2018
2019
201C
201D
П
Р
С
Т
У
Ф
Х
Ц
‥
…
‰
′
″
‵
※
€
041F
0420
0421
0422
0423
0424
0425
0426
2025
2026
2030
2032
2033
2035
203B
20AC
Ч
Ш
Щ
Ъ
Ы
Ь
Э
Ю
℃
℅
℉
№
℡
Ⅰ
Ⅱ
Ⅲ
0427
0428
0429
042A
042B
042C
042D
042E
2103
2105
2109
2116
2121
2160
2161
2162
Я
а
б
в
г
д
е
ж
Ⅳ
Ⅴ
Ⅵ
Ⅶ
Ⅷ
Ⅸ
Ⅹ
Ⅺ
042F
0430
0431
0432
0433
0434
0435
0436
2163
2164
2165
2166
2167
2168
2169
216A
з
и
й
к
л
м
н
о
Ⅻ
ⅰ
ⅱ
ⅲ
ⅳ
ⅴ
ⅵ
ⅶ
0437
0438
0439
043A
043B
043C
043D
043E
216B
2170
2171
2172
2173
2174
2175
2176
п
р
с
т
у
ф
х
ц
ⅷ
ⅸ
ⅹ
←
↑
→
↓
↖
043F
0440
0441
0442
0443
0444
0445
0446
2177
2178
2179
2190
2191
2192
2193
2196
ч
ш
щ
ъ
ы
ь
э
ю
↗
↘
↙
∈
∏
∑
∕
√
0447
0448
0449
044A
044B
044C
044D
044E
2197
2198
2199
2208
220F
2211
2215
221A
я
ё
∝
∞
∟
∠
∣
∥
∧
∨
044F
0451
221D
221E
221F
2220
2223
2225
2227
2228
∩
∪
∫
∮
∴
∵
∶
∷
2229
222A
222B
222E
2234
2235
2236
2237
∽
≈
≌
≒
≠
≡
≤
≥
223D
2248
224C
2252
2260
2261
2264
2265
≦
≧
≮
≯
㱾
⊙
⊥
⊿
2266
2267
226E
226F
2295
2299
22A5
22BF
⌒
2312
English
72 5. Advanced Functions
BMP91UG.book Page 73 Friday, October 14, 2011 7:56 PM
6. Number symbols
7. Blocks symbols
쁚
쁛
쁜
쁝
쁞
쁟
쁠
╱
╲
╳
▁
▂
▃
▄
▅
2460
2461
2462
2463
2464
2465
2466
2571
2572
2573
2581
2582
2583
2584
2585
쁡
쁢
쁣
쁆
쁇
쁈
쁉
쁊
▆
▇
█
▉
▊
▋
▌
▍
2467
2468
2469
2474
2475
2476
2477
2478
2586
2587
2588
2589
258A
258B
258C
258D
쁋
쁌
쁍
쁎
쁏
쁐
쁑
쁒
▎
▏
▓
▔
▕
■
□
▲
2479
247A
247B
247C
247D
247E
247F
2480
258E
258F
2593
2594
2595
25A0
25A1
25B2
쁓
쁔
쁕
쁖
쁗
쁘
쁙
쀲
△
▼
▽
◆
◇
○
◎
●
2481
2482
2483
2484
2485
2486
2487
2488
25B3
25BC
25BD
25C6
25C7
25CB
25CE
25CF
쀳
쀴
쀵
쀶
쀷
쀸
쀹
쀺
◢
◣
◤
◥
★
☆
☉
♀
2489
248A
248B
248C
248D
248E
248F
2490
25E2
25E3
25E4
25E5
2605
2606
2609
2640
쀻
쀼
쀽
쀾
쀿
쁀
쁁
쁂
♂
、
。
〃
2491
2492
2493
2494
2495
2496
2497
2498
2642
3001
3002
3003
쁃
쁄
쁅
〇
〈
〉
《
》
「
」
2499
249A
249B
3007
3008
3009
300A
300B
300C
300D
『
』
【
】
〒
〓
〔
〕
300E
300F
3010
3011
3012
3013
3014
3015
〖
〗
〝
〞
3016
3017
301D
301E
5. Advanced Functions
73
BMP91UG.book Page 74 Friday, October 14, 2011 7:56 PM
8. Japanese symbols
English
74 5. Advanced Functions
BMP91UG.book Page 75 Friday, October 14, 2011 7:56 PM
9. Currency symbols
$
Shift + 4
0024
12. Special symbols
€
¢
£
¥
20AC
FFE0
FFE1
FFE5
ㄅ
ㄆ
3106
ㄇ
ㄈ
ㄉ
ㄊ
ㄋ
ㄌ
ㄍ
ㄎ
3107
3108
3109
310A
310B
310C
310D
310E
ㄏ
ㄐ
ㄑ
ㄒ
ㄓ
ㄔ
ㄕ
ㄖ
310F
3110
3111
3112
3113
3114
3115
3116
ㄗ
ㄘ
ㄙ
ㄚ
ㄛ
ㄜ
ㄝ
ㄞ
3117
3118
3119
311A
311B
311C
311D
311E
ㄟ
ㄠ
ㄡ
ㄢ
ㄣ
ㄤ
ㄥ
ㄦ
311F
3120
3121
3122
3123
3124
3125
3126
ㄧ
ㄨ
ㄩ
3127
3128
3129
11. Units symbols
㈠
㈡
㈢
㈣
㈤
3220
3221
3222
3223
3224
㈥
㈦
㈧
㈨
㈩
㈱
㊣
㎎
3225
3226
3227
3228
3229
3231
32A3
33BE
㎏
㎜
㎝
㎞
㎡
㏄
㏎
㏑
338F
339C
339D
339E
33A1
33C4
33CE
33D1
㏒
㏕
33D2
33D5
G
0007
W
0017
Z
001A
Esc
001B
\
001C
|
001D
Shift + 6
001E
Space
0020
Shift + 1
0021
Shift + ‘
0022
Shift + 3
0023
Shift + 5
0025
Shift + 7
0026
’
0027
Shift + 9
0028
Shift + 0
0029
Shift + B
002A
Shift + =
002B
,
002C
.
002D
,
002E
/
002F
0
0030
1
0031
2
0032
3
0033
4
0034
5
0035
6
0036
7
0037
8
0038
9
0039
Shift + ;
003A
;
003B
Shift + ,
003C
=
003D
Shift + .
003E
Shift + /
003F
Shift + 2
0040
Shift + A
0041
Shift + B
0042
Shift + C
0043
Shift + D
0044
Shift + E
0045
Shift + F
0046
Shift + G
0047
Shift + H
0048
Shift + I
0049
Shift + J
004A
Shift + K
004B
Shift + L
004C
Shift + M
004D
Shift + N
004E
Shift + O
004F
Shift + P
0050
Shift + Q
0051
Shift + R
0052
Shift + S
0053
Shift + T
0054
Shift + U
0055
Shift +
0056
Shift + W
0057
Shift + X
0058
Shift + Y
0059
Shift + ;
005A
3105
Scroll Lock
0003
10. BPMF (BoPoMoFo) symbols
B
0002
F107
F101
F102
F103
F104
F105
F106
F108
F109
F10A
F10B
F10C
F10D
F10E
F116
F117
F10F
F110
F111
F112
F114
F115
F118
F119
F11A
F11B
F11C
F11D
F11E
F11F
F120
F121
F127
F129
F128
F122
F123
F124
F125
F126
5. Advanced Functions
75
BMP91UG.book Page 76 Friday, October 14, 2011 7:56 PM
13. Electric symbols
F12B
F130
F138
F140
F148
F131
F139
F141
F149
F132
F13A
F142
F14A
F133
F13B
F143
F14B
F12C
F134
F13C
F144
F14C
F12D
F135
F13D
F145
F14D
F12E
F136
F13E
F146
F12F
F137
F13F
F147
F14E
F14F
F157
F150
F151
F152
F153
F154
F155
F156
F158
F159
F15A
F15B
F15C
F15D
F15E
F1B1
F1B2
F1B3
F1B4
F1B5
F1B6
F1B7
F1B8
F1B9
F1BA
F1BB
F1BC
F1BD
F1BE
F1BF
F1C0
F1C1
F1C2
F1C3
F1C4
F1C5
F1C6
F1C7
F1C8
F1C9
F1CA
F1CB
F1CC
F1CD
F1CE
F1CF
F1D0
F1D1
F1D2
F1D3
F1D4
F1D55
F1D6
F1D7
F1D8
F1D9
F1DA
F1DB
F1DC
F1DD
F1DE
F1DF
F1E0
F1E1
F1E2
F1E3
F1E4
F1E5
F1E6
F1E7
F1E8
F1E9
F1EA
F1EB
F1EC
F1ED
F1EE
F1EF
F1F0
F1F1
F1F2
F1F3
F1F4
F1F5
F1F6
F1F7
F1F8
F1F9
F1FA
F1FB
F1FC
F1FD
F1FE
F1FF
F200
English
76 5. Advanced Functions
BMP91UG.book Page 77 Friday, October 14, 2011 7:56 PM
6. Maintaining Your Printer
A. Introduction . . . . . . . . . . . . . . . . . . . . . . . . . . . . page 77
B. Cleaning the Printer . . . . . . . . . . . . . . . . . . . . . . . page 77
C. Cleaning the Rollers . . . . . . . . . . . . . . . . . . . . . . page 78
D. Cleaning Adhesive Build-up . . . . . . . . . . . . . . . . . page 78
E. Replacing the Platen & Wrap rollers . . . . . . . . . . . . page 79
F. Replacing the Cutter . . . . . . . . . . . . . . . . . . . . . . . page 81
G. Replacing the Ribbon Cartridge . . . . . . . . . . . . . . page 82
H. Replacing the Heat-shrink or Label Cartridge . . . . . page 83
B. Cleaning the Printer
1
2
3
4
If the printer is still on, press
[Power] to switch it off.
Dampen a cloth with water and wring out throughly.
Wipe the body with the cloth.
Dry the body with another clean dry cloth.
To clean the printhead:
1 Use a cotton swab to
clean dirt from the print
head.
A. Introduction
To keep your printer in tip-top condition, it is good practice to
clean your printer (including the transport rollers inside) regularly.
You may also need to replace the platen roller or the cutter if and
when they wear out. The ribbon cartridge and the tube/label
cartridge also needs replacement once the medium runs out.
It is also good practice to press [Maintain] before you switch off
the printer so that the printer will move all its mechanical parts to
the home positions.
Never use benzene or strong solvents when cleaning the
printer body or its internal parts. This could damage the
printer and not just the finish.
Be very careful not to scratch the printhead.
If the printhead is extremely dirty, add a few drops of at
least 95% Isopropyl alcohol (>= 95% IPA) to the cotton
swab, and then wipe the dirt away.
Let the printhead dry before resuming operation.
6. Maintaining Your Printer
77
BMP91UG.book Page 78 Friday, October 14, 2011 7:56 PM
C. Cleaning the Rollers
1 If the printer is still on, press
[Power] to switch it off.
2 Pull the cover latch and open the printer cover.
resuming operation.
In particular, the platen roller should be removed for more
thorough cleaning. For detailed instructions, refer to “E.
Replacing the Platen & Wrap rollers”.
4 Close the cover firmly so that you can hear and feel that it
a
b
latches.
D. Cleaning Adhesive Build-up
After printing around 50 m of labels, you should check for
adhesive build-up, that is, adhesive that accumulate in the printer
over time, especially in the cutter area, the media output area and
the media path.
3 Use gauze to wipe away
any dirt on the four
rollers.
If the roller is extremely
dirty, add a few drops of
at least 95% Isopropyl
alcohol (>= 95% IPA) to
the gauze, then wipe the
dirt away.
Let the rollers dry before
English
78 6. Maintaining Your Printer
BMP91UG.book Page 79 Friday, October 14, 2011 7:56 PM
To clean the adhesive build-up in the printer:
1 If the printer is still on, press
[Power] to switch it off.
2 Pull the cover latch and open the printer cover.
a
b
E. Replacing the Platen & Wrap rollers
Your platen roller will wear out faster if you use the printer
to print on tubes. So you may want to keep one set of
platen and wrap rollers for tube printing and another set
for label printing.
As time passes, the print quality may deteriorate visibly because
the bottom part of the platen roller has worn out significantly
You should then replace the rollers:
3 Use a cotton swab with a few drops of at least 95% Isopropyl
alcohol (>= 95% IPA) and wipe away the adhesive.
4 Close the cover firmly so that you can hear and feel that it
latches.
1 If the printer is still on, press
2 With one hand, press
and hold the wrap roller
latch.
[Power] to switch it off.
a
6. Maintaining Your Printer
79
BMP91UG.book Page 80 Friday, October 14, 2011 7:56 PM
3 With the other hand,
b
4 Pull the platen roller up
c
press and hold onto the
snap of the old platen
roller.
and remove it.
5 Insert the new platen
roller, pushing it down the
spindle until you can hear
and feel it snap into
place.
6 Repeat steps 1-4 above to remove the old wrap roller and to
English
80 6. Maintaining Your Printer
insert the new wrap roller.
BMP91UG.book Page 81 Friday, October 14, 2011 7:56 PM
F. Replacing the Cutter
3 Pull out the cutter.
When the cutter is blunt, you need to replace it. For
details on how to obtain a replacement cutter, contact
your nearest dealer.
Follow the instructions here closely and dispose of the old
cutter immediately. Although the cutter is designed such
that you cannot touch the blade directly, you (or someone)
might still be hurt if you mishandle it.
1 If the printer is still on, press
[Power] to switch it off.
2 Pull the cover latch and open the printer cover.
a
4 Dispose of the old cutter right away, in compliance with local
regulations on the disposal of such items. Do not touch it
anywhere other than the cutter’s handle (see figure above).
5 Install the new cutter. It is inserted properly when the arrow
and line are inline as shown.
b
6 Close the cover firmly so that you can hear and feel that it latches.
6. Maintaining Your Printer
81
BMP91UG.book Page 82 Friday, October 14, 2011 7:56 PM
G. Replacing the Ribbon Cartridge
3 Grasping the finger tab of the old ribbon cartridge, pull the
cartridge up, as shown in the diagram below.
1 Pull the cover latch and open the printer cover.
a
a
b
b
4 Grasping the finger tab of the new ribbon cartridge, insert the
Within the printer, near the bottom right hand corner, you
should be able to find the ribbon cartridge.
2 Check that the printer ribbon is not trapped between the
printhead and the platen roller.
If it is and the printer is on, press the [Maintain] quick key to
to home the printhead.
If the printer is off, switch it on and the printhead should home
automatically.
English
82 6. Maintaining Your Printer
cartridge with its label facing up, as shown in the diagram
above.
5 Ensure that the printer ribbon is right over the printhead and
push the cartridge slightly to snap into place.
6 Close the cover firmly so that you can hear and feel that it
latches.
To clear the printhead area of used ribbon, turn the top
spool of the ribbon counterclockwise.
BMP91UG.book Page 83 Friday, October 14, 2011 7:56 PM
H. Replacing the Heat-shrink or Label Cartridge
cartridge to move into place. (The latch is between the media
cartridge and the ribbon cartridge.)
1 Press the
[Remove] quick key.
2 Pull the cover latch and open the printer cover.
Remove
a
b
8
Frame
Maintain
Char Space
Symbol
Remove
Font Size
*
9
(
0
)
Backspace
3 Remove the cartridge.
4 Holding the replacement media cartridge with its label facing
up, insert it into the cartridge holding area (see the next
figure) and press it down lightly.
5 Close the printer cover firmly so that you can hear and feel
that it latches.
The cartridge should fit in snugly. If it doesn’t, pull the
media channel latch downwards to enable the
6. Maintaining Your Printer
83
BMP91UG.book Page 84 Friday, October 14, 2011 7:56 PM
B. If the externally fed tube is not autoloaded…
7. Troubleshooting
A. Introduction . . . . . . . . . . . . . . . . . . . . . . . . . . . .
B. If the externally fed tube is not autoloaded… . . . . .
C. If the loaded tube/label cannot be removed... . . . .
D. If the tube/label is jammed.... . . . . . . . . . . . . . . .
E. If the printer ribbon is jammed… . . . . . . . . . . . . .
F. If the half-cuts are not deep enough... . . . . . . . . . .
G. If the display remains blank when power is on… . .
H. If the input display does not appear… . . . . . . . . .
I. If the printer does not print (properly or not at all)... .
J. If you see this message… . . . . . . . . . . . . . . . . . . .
page 84
page 84
page 85
page 86
page 88
page 89
page 89
page 89
page 90
page 91
You do not need to power off the printer. But if the printer
was off before the tube was inserted, switch on the
printer.
If the printer did not autoload the tube or the heat-shrink tube that
was fed in externally, you can load the medium manually by
following these steps:
1. Pull the cover latch and open the printer cover.
a
b
A. Introduction
In this chapter, detailed instructions are given on how you can:
• Manually load an externally fed tube
• Easily remove a tube/label that is not ejected, not fed properly
or jammed
• Easily remove a jammed printer ribbon
• Solve other problems, for example insufficient cutter depths,
blank display, no printing, and so on.
A listing of probable error messages and recommended actions is
also provided at the end of this chapter.
English
84 7. Troubleshooting
2. Ensure that no media cartridge has been installed.
3. If you are using small tubes (which may be too soft), you may
need to lift the flap of the media channel latch so the tube can
BMP91UG.book Page 85 Friday, October 14, 2011 7:56 PM
go through smoothly.
5. Close the cover and you can continue with the editing or
printing.
Be careful not to scratch the printhead.
C. If the loaded tube/label cannot be removed...
Do NOT pull the tube/label to remove it.
If a jam happens, refer to the next section “D. If the
tube/label is jammed...”
1. If the printer is operating, press
4. Continue inserting the tube into the printer, ensuring that the
inserted tube reaches the platen roller.
the print job.
If printer is not powered, press
2. Press
Cancel
Print
[Cancel Print] to cancel
[Power] to switch it on.
[Remove].
Alternatively, feed forward the tube/label by entering [Menu]
> Feed > “Forward”.
Remove
Use the Forward function only when the tube/label is
not ejected or fed properly. Feeding the medium
continuously can damage the tube/label or wind the
ribbon around other parts, causing a jam.
3. Remove the tube/label.
7. Troubleshooting
85
BMP91UG.book Page 86 Friday, October 14, 2011 7:56 PM
D. If the tube/label is jammed...
c. Check if the cutter and the printhead are in Home
positions.
During printing, if and when the tube/label is jammed, the
printing will stop. The LCD screen will also display a message
indicating where the jam has occured.
Do NOT pull the tube/label to remove it.
When the jam message appears:
1. Perform preliminary checks.
a. Press
OK
[OK] to continue.
If you happen to have turned off the printer after the
message was displayed and as a result cannot clear the
jam according to the messages, switch on the printer
again by pressing
[Power].
b. Pull the cover latch and open the printer cover.
If they are not, press
Maintain
[Maintain] to force them to
Home positions. If they still do not home, contact the Brady
Tech Support.
d. Check whether the printer ribbon is jammed.
If it is jammed, go to the next section “E. If the printer
ribbon is jammed...”
If the ribbon is not jammed but cannot be removed easily
(e.g. it winds itself around some parts inside the printer),
proceed to the next step without pulling the ribbon.
English
86 7. Troubleshooting
BMP91UG.book Page 87 Friday, October 14, 2011 7:56 PM
2. Clear the media jam.
3. Prepare to print again.
a. Pull the wrap roller latch
downwards (to move
the wrap roller away
from the platen roller)
and while holding it
there, remove the
jammed portion.
a. If the printer ribbon is
slack, use your finger to
turn the reel in the
direction indicated on
the cartridge to take up
the slack.
b. Cut the bent or damaged
portion of the jammed
medium or the printed
portion (if any) of the
medium.
b. Close the cover firmly so that you can hear and feel that it
latches.
c. If the tube/label is in a cartridge, reinsert the cartridge
into the holding area.
c. If the tube was fed
externally, reinsert the
tube into the printer inlet.
d. Press
Maintain
[Maintain] to move the cutter and the
printhead to Home positions.
e. For further detailed instructions, refer to the respective
sections in “3. Printing on Selected Medium”.
7. Troubleshooting
87
BMP91UG.book Page 88 Friday, October 14, 2011 7:56 PM
E. If the printer ribbon is jammed…
If the ribbon winds itself around some parts inside the printer and
causes a jam, make sure that the printhead and cutter are at the
Home positions.
To home the printhead and the cutter:
3. Once removed, if the
ribbon is slack, use your
finger to turn the reel in the
direction indicated on the
cartridge to take up the
slack.
1 Power off and on the printer to home the printhead and cutter.
2. Press
[Remove] and wait until the external media has
been ejected.
Remove
3. Remove the ejected medium.
To clear a printer ribbon jam:
1. Press and hold the wrap roller lever.
2. Try to unwind the jammed ribbon and remove the ribbon
cartridge.
English
88 7. Troubleshooting
For detailed instructions on how to replace the tube/label
cartridge or the ribbon cartridge, please refer to the
relevant section in “6. Maintaining Your Printer”.
BMP91UG.book Page 89 Friday, October 14, 2011 7:56 PM
F. If the half-cuts are not deep enough...
If the cutter does not half-cut the tube or label properly, you can
do the following:
For detailed instructions on how to replace the cutter,
refer to the “To replace a cutter” section in “6.
Maintaining Your Printer”.
G. If the display remains blank when power is on…
1. Change the cut depth.
Enter [Menu] > Setting > Cutter > Half Cut > “Depth”.
2. Select a cut depth setting that is lower than the current. (The
lower the setting, the deeper the cut depth.)
Cut Depth
1
2
3
4
5
6
7
8
Deeper
1. Turn off the printer and make sure that the AC adapter is
securely plugged into the power outlet and is connected to the
main unit. Then turn the power back on.
Alternatively, check if you are using an AC adapter that is
made for use with the printer. Using another AC adapter
could result in circuit damage or overheating.
H. If the input display does not appear…
Less Deep
3. If the current cut depth is already lowest at level “1”, this
means that the cutter is worn out. Replace the cutter with a
new blade.
For detailed instructions on how to replace the cutter, please
refer to the “E. To replace the cutter” section in the chapter,
“6. Maintaining Your Printer”.
4. If the cutter still does not cut properly with a new blade at the
lowest cut depth, contact Brady Technical Support.
This can happen when bad input data has been received.
Restore the printer to initial (factory) settings:
1 Enter
[Menu] > Settings > Factory Settings.
A message appears, asking for confirmation.
2. Press
Menu
OK
[OK].
3. If the input display still does not appear, contact Brady
Technical Support.
7. Troubleshooting
89
BMP91UG.book Page 90 Friday, October 14, 2011 7:56 PM
I. If the printer does not print (properly or not at all)...
1. Make sure character data has been input. (If no character
data has been input, printing cannot start.)
2. Confirm the size of the tube/label loaded in the printer and
then select the same size on-screen.
3. Check if the ribbon cartridge has been installed properly.
Reinstall the ribbon cartridge if necessary.
4. If the tube/label is crushed, twisted or somehow out of shape,
cut off the misshaped portion and then install the medium
again.
Do NOT use misshapened printing media.
5. If the printhead is dirty, clean the printhead. For detailed
instructions, refer to “B. To clean the Printer” in “6.
Maintaining Your Printer”.
English
90 7. Troubleshooting
BMP91UG.book Page 91 Friday, October 14, 2011 7:56 PM
J. If you see this message…
The messages in this section are displayed in alphabetical order.
Message
1
Description
Barcode is not supported by The medium may not be suitable for barcode
current tag settings.
printing.
Barcode only supported for 9
and 12 mm labels using
‘General’ application.
Action
Use only:
• Labels, and
• General (horizontal) text orientation.
Note: 9mm labels support only 1 line of text
(including barcodes) while 12mm labels support up
to 2 lines. Depending on the type selected, the valid
data range may vary. The segment has to be autosized or >25 mm if fixed size. Only upper-case
characters and digits 0-9 are allowed.
2
Insufficient power. Switch to
AC or a new battery to
continue printing.
The power in the battery is running low and
may not be sufficient to provide the required
power to continue with printer operations.
To carry on with printer operations, please plug in
AC adapter. If not, power off printer.
3
Data cannot fit inside tag.
The input data exceeds the border of the tag.
The tag only allows a maximum number of
characters/symbols to be input. To add more data,
change the settings accordingly.
4
Error occurred in importing or An attempt to import/export a file from the
exporting file. Re-try the
printer to a USB flash drive is unsuccessful.
operation.
5
Error opening file.
Check if USB flash drive is functioning properly.
Confirm file destination folder and import/export the
file again.
An attempt to open a file even though no files Confirm the file folder and reopen the file.
has been selected in that folder.
7. Troubleshooting
91
BMP91UG.book Page 92 Friday, October 14, 2011 7:56 PM
Message
Description
Action
6
External media loading failed. External media was not autoloaded.
Remove media and try again.
7
File name cannot be blank.
An attempt to name a file with invalid
characters.
Use only valid characters, such as numeric digits
(e.g. “0”, “1”, “2”, “3”) , lower or uppercase letters
(e.g. “a”, “b”, “c”, “A”, “B”, “C”), underscore (“_”)
and period (“.”).
8
Insufficient media.
The remaining media may not be sufficient to
complete the current print job.
If you choose to proceed with current print job, you
may have to replace the medium once it is finished.
Alternatively, you can start the print job with another
media roll/cartridge with sufficient length.
9
Insufficient ribbon.
The remaining ribbon in the cartridge may not If you choose to proceed with the current print job,
be sufficient to complete the current print job. you may have to replace the ribbon cartridge when it
becomes empty. Alternatively, you can start the print
job with another cartridge with sufficient length.
10
Invalid value entered. Enter
correct value and try again.
Non standard data entry or format input.
11
An attempt to load an external medium into the Open the printer cover and remove the media
Media cartridge installed.
cartridge inside before trying to load an external
Remove media inside printer printer even though a media cartridge is
medium into the printer.
and try again.
installed in the printer.
12
Media jammed at pinch/feed Tube or label or heat shrink tube is jammed at Open cover and remove media.
the pinch/feed roller.
roller. Open cover and
remove media.
92 7. Troubleshooting
Manually load the tube/label. For instructions, refer
to the ”If the externally fed tube is not autoloaded...”
section in “7. Troubleshooting”.
Make sure that the data entry follow the standard
convention.
BMP91UG.book Page 93 Friday, October 14, 2011 7:56 PM
Message
Description
Action
13
Media jammed at platen/
wrap roller. Open cover and
remove media.
14
No external media. Load
The end of media (external only) is detected
media or press Cancel Print to during printing.
stop printing.
15
No file to delete.
An attempt to delete a file even though no files Confirm the file folder and delete the file again.
has been selected in that folder.
16
No file to export.
An attempt to export a file even though no files Confirm the file folder and export the file again.
has been selected in that folder.
17
No file to import.
An attempt to import a file even though no files Confirm the file folder and import the file again.
has been selected in that folder.
18
No more media. Load media The end of media (external or cartridge) is
and press OK to resume
detected during printing.
printing.
To return to the Tag editor, select [Cancel] and press
[OK].
To print again, reload the medium and press
[PRINT].
19
No media to remove.
An attempt to eject the media even though
there is no media in the printer.
Continue with printer operations. If message appears
again, contact Brady Technical Support.
20 No more ribbon. Change
cartridge and press OK to
resume printing.
The end of the ribbon is detected while
printing.
Replace the empty ribbon cartridge with a new one.
21
You are trying to read from a USB flash drive. Ensure that the USB flash drive is connected properly.
However, the printer cannot detect its presence. Re-insert if necessary.
Error mounting USB drive.
Remove your drive and try
again.
Tube or label or heat shrink tube is jammed at Open cover and remove the medium.
the platen/wrap roller.
Please load a new medium and press [OK] to
continue printing
7. Troubleshooting
93
BMP91UG.book Page 94 Friday, October 14, 2011 7:56 PM
Message
Description
22
Overwrite existing file?
23
Padding cannot be added for Invalid characters are used in padding.
alphabets.
24
[MEF001] Power off printer.
Contact Brady for Tech
Support.
Error MEF001 is detected.
25
Printer cover is open.
An operation was attempted while the cover is Close cover and try again.
opened.
26
Serialisation values do not
This message will appear when the end value
correspond. Check the values of the serialization cannot be reached based
and try again.
on the input. For example, if the increment is
“2”, the end value “9” cannot be reached.
27
Power off printer?
If the power button is pressed, this message will To power off, Press [OK].
appear to confirm whether you want to swtich To continue with printer operations, press [CLOSE].
off the printer.
28
This may cause data to be
truncated. Continue?
This message will appear when converting
properties of tag or converting job media.
29
Unable to connect to PC.
Check your cable and try
again.
An attempt to cancel the PC connection mode Go to PC connection mode. Check that the USB
without a USB cable connection.
cable is firmly connected or not damaged.
94 7. Troubleshooting
An attempt to save a new file which has the
same name as an existing file in the same
folder.
Action
To overwrite, press [OK].
To abort operation, press [CLOSE].
Note: The only valid characters that can be used in
padding are zero (“0”) or a blank space (“ ”). For
more details, refer to the “H. To Add Serialization to
a Tag” section in “5. Advanced Functions”.
Contact Brady Technical Support.
Double-check the start, increment and end values.
For example, if the increment is “2”, change the end
value to an even number such as “8” or “10”.
Alternatively, change the increment value to an odd
number such that the end value “9” can be reached.
To continue, press [OK].
To abort operation, press [CLOSE].
BMP91UG.book Page 95 Friday, October 14, 2011 7:56 PM
Message
Description
Action
30 Unknown Error. [MEF100]
Power off and on and try
again.
Some type of error occurred while printing was Restart the printer. If the same message appears
in progress.
again, contact Brady Technical Support.
31
Required upgrade file not
found on USB drive.
An attempt to locate the upgrading file is
unsuccessful.
32
Wrong Media. Please load the The user selected medium is different from the If the error lies in the user selection, please reselect
correct media.
actual medium detected via the SMART cell in the correct medium. If a wrong medium is loaded,
the printer.
please replace it with the correct medium.
Confirm file folder. For instructions on how to
upgrade the printer, refer to the “J. USB Flash Drive
Connection” section in “5. Advanced Functions”.
7. Troubleshooting
95
BMP91UG.book Page 96 Friday, October 14, 2011 7:56 PM
BMP91UG.book Page -1 Friday, October 14, 2011 7:56 PM
BMP91UG.book Page 0 Friday, October 14, 2011 7:56 PM
Y 1 4 4 5 3 3 6